1
AVAYA
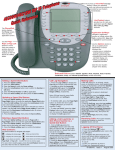
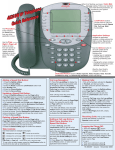
4610, 4620, 4621
IP Terminal Instructions
Call-Handling Features
Answer a Call ***
When a call arrives at your telephone, you hear a ringing tone and a blinking bell icon appears on the
associated call appearance. In addition, call identification information is displayed.
• If not active on another call, answer the call using your handset, headset, or speakerphone.
• If active on a call already, place the active call on hold and then answer the incoming call.
note: The caller indentation remains on each associated call appearance on incoming calls.
Make a Call ***
To make a call manually:
• Go off hook using the handset, headset, or speaker.
• When you hear dial tone, enter the extension or telephone number using the dial pad.
To have the telephone make a call automatically, do one of the following:
• Press Redial and initiate a call to a specific entry.
• Access the Call Log and initiate a call to a specific entry.
• Access the Speed Dial List and initiate a call to a specific entry.
Hold
•
•
***
To put call on hold, press red Hold button. Call stays on hold until you can return to it. The symbol
on the HOLD button appears at the Call Appearance.
Press the call appearance button of the held call to return to held call.
Call Park (to place call on hold at your extension for retrieval from any telephone)
. To park a call using a call park button (The caller can hear conversation, until you hang up.)
• Press Call Park
• Hang up. Your call park button will button will become shaded.
To park a call without a call park button: ***
• Press Transfer
• Dial *79 (call park code) Hear 3 beep Confirmation Tone. Hang up.
Retrieving a Parked Call From any Telephone: ***
• Press the button next to Retv Call Park or Dial *34 (answer back code)
• Dial the extension number where the call was parked. You hear Confirmation Tone (3 short
beeps) Announce call. You are connected to the caller.
Transfer ***
• Press the Transfer button
• Dial the number to which you want to transfer the call.
• Do one of the following:
1. Hang- up without announcing, parties are connected.
2. To announce the call before transferring, wait for the called party to answer, announce the
call, then hang-up.
note: to return to the original party If line is busy, no answer or misdialed, press the button of
held party.
Conference *** (conference feature allows you to conference up to six parties (including yourself) on a call)
1. Press Conference button to add the third party to the call.
2. Dial the number of the person you want to add to the call and wait for an answer
3. Press the Conference button again to add the new party to the call.
4. Repeat steps 1-3 for each party you want to add to the conference call.
To add a held call to an active call: ***
1. Press Conference button to hold first party and to add the holding party
2. When you hear dial tone, press the call appearance button corresponding to the held call.
3. Press Conference again.
note: to return to the original call if line is busy, no answer or misdialed, press the button of
held party.
To remove the last party added to a conference call:
• Press the Drop button. The last person added to the conference call is dropped from the call.
Selected Voice Features
Directory, Next, Make Call
Press Directory. Using the keypad, spell out the last name of the person you wish to find.
EXAMPLE: Spell the last name Smith. Observe the display for the desired name to appear. Press the 7
key once to enter S). Press the 6 key once to enter the letter M, regardless of displaying name. Press the 4
key once to enter the letter I. Press the 8 key to enter T. Press the 4 key once to enter H. When the first
entry for Smith appears in the display, choose from the following:
• Press the Next button to scroll through the Smith’s.
• Use the * key to indicate that you wish to spell the first name.
• Press Make Call (if administered) to dial extension displayed or press Exit to exit directory.
Send All Calls *** (routes incomings calls immediately to voice mail or a predetermined extension).
1. Press the Send Call button (Arrow symbol appears at the button as indicator you have the
feature activated. You may hear an abbreviated ring as incoming call is re-routed.
To Cancel Send Call
Press the Send Call button again to cancel.
Forward All Calls
*** (directs all incoming calls to another extension number. If forward to number doesn’t
answer within 3 rings, the call will go into the mailbox of the original called party)
• Press Call Forward button (if administered) or dial the
Call Forward code *02 and dial the extension number you want to re-direct your calls to.
2
To cancel Call Forwarding:
• Press the Call Forward button or dial the Call Forward cancel code *03. You will hear a 3-beep
confirmation tone.
Call Pickup (to answer a ringing telephone within your predetermined programmed Pickup Group).
To pickup a call:
• Dial the Call Pickup code *11. If you encounter a busy tone, the call has been answered or the
caller hung up.
Directed Call Pickup (allows you to answer any ringing telephone if administered)
: Dial the Directed Call Pickup code *10 and the extension of the ringing telephone.
Personal Settings/ Options
To access the personal Options application:
• (Press the Options softkey from the Home screen.
• To select an option, press the Feature button for the desired option
• To return to the Home screen, press the Exit button.
Contrast Option (increase or decrease the contrast of screen)
• Press the Contrast button
• Use the arrow keys to adjust the level of contrast.
• Press the Done softkey to return to the Options screen.
Personal Ring Option
There are 8 different ringing pattern options
• Press Personal Ringing button.
• To hear a ring pattern, Press the button to the left or right of any numbered pattern. Continue
through the pattern choices until the desired pattern is heard.
• Save the chosen pattern by pressing the Save softkey, or to restore the previous setting without
changing, press the Cancel softkey
Visual Ring Option (activates the red lamp above the display area to flash when your telephone rings).
• Press the Visual feature button.
• Press the yes/no softkey to indicate whether you want Visual Ring enabled.
• Press the Save softkey.
Feature Button Labeling (To label/re-label feature buttons on your telephone)
• Press Options
• Press the Right Page button > and press the line/feature button next to “Feature Button Labeling”
• Press the Line/Feature button next to “re-label Feature Buttons”
• Press the button you wish to label
• Enter the label using the keypad i.e. the 2 key contains A, B, C, and 2. Press 2 once for the A,
twice for the B, three times displays the C and pressing it a fourth time displays the 2. Use the
Symbol softkey to add a space, comma, apostrophe, dash, etc.
• Press Save to save your entry
• Press Phone/Exit to exit labeling.
3
Post Messages (select a message to display on your telephone and the internal callers telephone)
To Activate
Press Post Msg button until you locate preferred message and press the # sign
To Deactivate
Press Post Msg button
note1: You may use the numbers (01-15) also to activate/deactivate Post Msg..
note2: When Post Msg is activated, the telephone will ring once (caller continues to hear ring) on incoming calls to
alert you, then silence The incoming call remains on your telephone for two three rings, then drops off telephone and
covers to voice mail or the predetermined extension.
note3: When going off hook, a reminder tone is active until the feature is deactivated.
Abbreviated Dial *** (to store internal or an external numbers for quick and easy dialing)
Programming/reprogramming an AD button
Lift the handset or press the Speaker button.
.
Press *00 the program code or press the Program button.
Press the AD button to be programmed.
Dial “9” (for outside number) and the number you want to store.
Press the # key to save
Repeat steps 3-5 to program additional AD buttons.
Hang-up to end programming
Placing a Call Using Abbreviated Dial
Press the selected AD button. The call is automatically dialed.
Speed Dial (up to 48 Speed Dial entries on 4610’s and 108 entries on 4620/4621 telephones ***
To Add Entries
1. From the Home screen, Press the SpDial softkey.
2. Press the Add softkey. The Speed Dial Entry screen displays with a cursor in the Name field.
Editing commands display below the Number field next to line/feature buttons. Some of them
appear only when action is necessary, such as case. The commands and their actions are:
a. Clear – Remove all characters from the field in which the cursor resides.
b. Case– Change the character to the left of the cursor from lower case to upper case. Note
that when entering a name, the first character is initially displayed in upper case, with
subsequent characters in lower case letters.
c. Backspace – Delete the character to the immediate left of the cursor.
d. Apostrophe – Insert an apostrophe at the cursor position.
e. Comma – Insert a comma at the cursor position. In a number field, a comma creates a
short pause when the telephone automatically dials that number.
f. Hyphen – Insert a hyphen at the cursor position
g. Space – Insert a space at the cursor position
3. Use the keypad to enter the name up to 10 characters.
4. Pressing the 2 on your keypad displays the letter “A”. Pressing the 2 key again replaces the A
with a “B”. Pressing the 2 again replaces the B with a “C” and pressing it again replaces the C
with a “2”. Pressing it again replaces the C with an “A” and so on. Pressing a different key
moves the cursor one position to the right and displays the first letter associated with that key.
5. Use the left and right soft keys at the bottom of the display to move the cursor.
6. After completing the Name field, press the button to the left of Number.
7. Use the dial pad to enter the telephone number of the person you are adding. Enter the
number as if you were dialing, including the 9 + all the digits.
4
8. When the Name and Number are correct, press the Save softkey. The new entry is added to
the Speed Dial list in alphabetical order.
9. To add another entry, go back to step 2.
10. To exit the Speed Dial feature, press the Phone/Exit button
Making Calls from Speed Dial: ***
1. From the Home screen. Press the SpDial softkey.
2. Press the feature button for the entry you want to call. ( Use the Page Left/Right arrow buttons
to cycle to other pages)
Editing Speed Dial Entries
1. From the Home screen, press the SpDial softkey.
2. Press the Edit softkey.
3. Press the feature button corresponding to the entry you want to edit.
Note: To move to the end of any text displayed on the Name line, press the button to the right
of the line. To move to the beginning of any text, press the button to the left of the line. Press
the feature button to the right of Insert Mode so that you can backspace without erasing
characters during text entry.
4. Using dial pad, edit the Name.
5. When finished, press feature button to the left of the Number field.
6. Using dial pad, edit the number.
7. When done with changes, press Save softkey.
Deleting Speed Dial Entries
1. From Home screen, press the SpDial softkey
2. Press Delete softkey.
3. Press feature button corresponding to entry to be deleted.
4. the “Delete this entry? “prompt is displayed. Press Delete.
Call Log ***
Call Log Setup
Your 4610 IP telephone maintains a log of up to 45 outgoing, incoming answered, and incoming
unanswered calls to/from your phone (up to 15 calls in each log. Your 4620/4621 IP telephone maintains a
log of up to 90 calls (up to 30 in each log). Call Log entries in the Outgoing log can be dialed directly from
the Call Log
Viewing the Call Log
• From the Home screen, press the Log softkey.
• Use left/right arrow buttons to scroll through the Call Log Summary pages.
• To view information about a specific entry, press the button corresponding to the entry.
Making Calls from the Call Log
• From the Home screen, press the Log softkey
• Press the Outgo softkey.
• Use left/right arrow buttons to scroll through the Call Log Summary pages.
• When you locate an entry you want to call, press the button corresponding to the entry.
• Press the Call softkey to make the call.
Saving a Call Log Entry to Your Speed Dial List
• From the Home screen, press the Log softkey.
• Use left/right arrow buttons to scroll through the Call Log pages.
5
•
•
•
When you locate entry to be saved, press the button corresponding to the entry.
Press the Save softkey. To edit the Speed Dial entry, make your changes.
Press the Save softkey when done making changes.
6