1
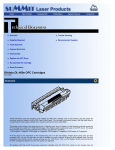
Home
New Arrivals!
Company Info
Publications
Special Features
Contact Us
Overview
Required Tools
Required Supplies
Prepare Work Area
Disassembly Instructions
Cleaning the Waste Chamber
Cleaning the Supply Chamber
Re-Assemble the Cartridge
Printer Maintenance and Troubleshooting
Cartridge Printing Theory
Recommended Supplies
Fuji-Xerox XP-5/10 Toner Cartridges
DOC-0231
OVERVIEW
These instructions cover the disassembly of the Fuji-Xerox XP-5/10 toner cartridges. The purpose of this disassembly is to
vacuum out toner that will have spilled inside the cartridge during shipping and/or rough handling, to clean the debris cavity and
to fill the toner supply housing with new toner. The disassembly can also be used to examine the internal parts of the cartridge
for possible damage should the printing of the cartridge be poor and not correctable by other means.
The Fuji-Xerox XP-5/10 engine is a 5-10 ppm, 300 or 600 dpi (depending on the machine) laser engine. This engine is most
commonly used in the Apple LaserWriter Select 300,310,360, and the Star Micronics LS-5 series. The toner cartridge is similar
in appearance to the Canon LBP-LX Cartridge, but the toner and other supplies are completely different.
The Apple part # for the 300, 310 (300 dpi machines), is M2029G/A. The Apple part # for the 360 (600 dpi machine), is
M1960G/A.
It is also important to note that there is no user accessible intensity adjustment for this engine. There is also no software
intensity control supplied with the printer. The only way to be able to adjust the intensity is through a third party software
program called "Toner Tuner" by Working Software.
With the exception of the Star micronics LS-5 printers, there is also no way to generate a test print from these printers. There is
no self test, or engine test built into these machines. The only way to obtain test prints is through a computer, or a smart box.
The Star LS-5 has a normal keypad that enables you to run self test prints. The Apple LaserWriter Select 310, and 360 are
both Apple, and Windows (IBM) compatible. The Apple LaserWriter Select 300 is Apple only. The Smart box will print to all of
them.
This procedure should be read in it's entirety before proceeding.
REQUIRED TOOLS
The tools needed to successfully and safely recharge toner cartridges are as follows:
Toner approved vacuum. The Atrix HCTV Canister style vac, or the Atrix AAA/Omega-S portable vacuums.
Some type of approved toner vacuuming system is important because toner consists of very fine particles that will pass
right through a normal vacuum filter, and blow out the exhaust.
A small screw driver (Common Style)
A Phillips head screwdriver
Small Jewelers screwdriver
Small Hammer
Razor Blade Knife (Optional)
Hot Glue Gun (Optional)
REQUIRED SUPPLIES
Black toner
Long life replacement drum (Optional)
Wiper Blade (Optional)
Recovery Blade
6" wooden handled cotton swabs (CT-100)
Toner Magnet cloths
Lint-free synthetic cotton 4"x 4" pads
99% pure Isopropyl Alcohol (FR-8)
can of clean compressed air
Drum padding powder (Kynar) (DPP-K)
Nu-Finish Car Polish
New replacement pins with mushroom type heads PIN-LX (optional)
New replacement Magnetic Roller Sleeve (MRS-510)
PREPARE WORK AREA
1. Before proceeding with the following procedure you should have a work area available with approximately 4' x 3' clear
space. It should be covered with some disposable paper since toner will spill on this area. It is recommended that
brown craft paper be used and taped to the work area. This will hold the paper in place when trying to vacuum toner
from the paper.
2. A garbage can with a strong plastic liner should be adjacent to the work area to empty used toner. It should be at least
2' deep to prevent toner from clouding up and over the top of the bag during disposal.
3. Have a few rags available and some disposable paper towels. TM-1 Toner magnet cloths are ideal for this.
4. The work area should be capable of being ventilated, if by accident toner becomes dispersed into the air. An exhaust
fan in one window is recommended for ventilation.
NOTE If the circulation of air in the work area room is combined with other rooms in the building, toner dust may be
carried into the other rooms. A separate and isolated HVAC system is recommended for the work area room.
DISASSEMBLY INSTRUCTIONS
1. Vacuum the exterior of the cartridge.
2. Place the cartridge upside down with the pull-tab towards you.
3. On each side of the of the cartridge there is a small metal pin that has a 1/16" Diameter and protrudes from the side of
the cartridge approximately. 1/16". These pins serve as hinges for the Toner supply chamber.
4. The best way to remove the pins is to push them into the cartridge with the small Jewelers screwdriver. To do this,
place the cartridge so that the OPC Drum is higher than the pin being pushed in. This will avoid any damage caused by
the pin falling onto the OPC drum. If the pins are too tight to push in, tap the screwdriver with the small hammer.
5. Separate the two halves of the cartridge. Remove the two pins from the inside of the cartridge.
SEPARATE DEBRIS CAVITY, AND DRUM
1. Remove the Two Phillips Head screws, and the plastic Drum Axle Pin with the metal contact in the center.
2. Remove the Photo conductive Drum being extremely careful not to scratch it. Vacuum any toner and debris from drum
being careful not to let the vacuum hose come in contact with the drum surface. Do not polish or wipe the drum with a
dry cloth since this may scratch the drum.
3. Blow off any remaining dust from the Drum using compressed clean air. If there is any matter on the drum that must be
cleaned off, use 99% pure Isopropyl alcohol (FR-8 Film Remover) and a soft lint free cotton pad (PW-96) to lightly wipe
the drum surface, then blow off the Drum using compressed clean air.
CAUTION: Be very careful not to tilt or shake the can while spraying, as the propellant may spray out and possibly
ruin the drum. Always handle the Photo conductive Drum with the utmost caution, since if damaged it is costly to
replace.
4. Place the Photo conductive Drum in a soft lint free cloth and then into a dark colored bag or cover from bright light by
some other suitable means. Again, do not rub or wipe the Photo conductive Drum with a dry cloth as this may scratch
its surface.
CLEANING THE DEBRIS CAVITY
1. Carefully remove the Primary Charge Roller (PCR) located next to the Wiper Blade. This is a small rubber roller with metal
contacts on both ends.
NOTE: There are two different PCR's available in these cartridges. The Apple 600 Dpi cartridge has a PCR that has
a very brittle surface. Be very careful in handling this roller. It can still be cleaned with Nu-Finish, but great care
should be taken in handling it. It is very easily damaged. There is also a difference in the PCR assembly itself. The
300 dpi cartridge has a foam strip along the length of the PCR. The 600 DPI cartridge does not have this strip,
instead it has a "Clip" in the middle of the PCR.
WARNING: Do not clean this roller with alcohol, as this will remove the conductive coating on the roller. This roller
takes the place of the corona wire assembly and it is recommended that it be cleaned with Nu-Finish car polish.
2. To clean the roller with the Nu-Finish car polish, apply a small amount, and buff with a clean lint free cloth until the roller is clean
and shines. After the roller has been cleaned, clean the metal ends with alcohol. be careful not to get any of the alcohol on the
rubber surface. For best results, we recommend that the roller be allowed to dry overnight before using. Place the PCR in a
holder to dry. (A piece of wood with a hole drilled in it works fine).
3. Gently shake the toner out of the debris cavity through the opening at the Wiping blade. When most of the used toner has been
removed, vacuum the rest out. To Make this process easier, the Recovery Blade can be removed. Make sure that when installing
the new Recovery Blade that it is perfectly straight, or the cartridge will leak.
WARNING: Be very careful not to bend or otherwise damage the small thin Recovery Blade located next to the
Wiper Blade. If this blade is bent down lower than the height of the wiper blade, toner will accumulate on top of the
blade and spill into the printer. If the blade does get bent, it may be possible to carefully bend the blade up equal to or
slightly higher than the Wiper Blade. Make sure that the edge of this blade is even across it's entire length. If the
blade cannot be repaired, replace it with part # RB-510.
4. Clean the rubber Wiping blade using a lint free cloth (PW-96). This blade removes excess toner from the drum and
must be free of any foreign matter. Be careful not to damage this blade. Lightly coat this blade with Kynar Drum
Padding Powder model DPP-K. Do not use plain DPP as this will stick to the charge roller and cause print defects, (
Small white voids in printed areas
NOTE: New Wiper blades are available, but at this time there is no reliable way to replace it without destroying the
Waste Chamber.
CLEANING THE TONER SUPPLY HOUSING
The toner supply housing consists of the toner supply, magnetic roller and doctor blade which mounts directly next to
the magnetic roller. Note that the magnetic roller is polished steel, not silver, or dark gray, as in other types of
cartridges.
NOTE: The OEM Magnetic Roller Sleeve should NOT be reused. This sleevewill cause backgrounding that looks
like "tire tracks" on the page. This roller hasa very thin clear coating that is all but worn off after it's original cycle.The
best way to remove the Magnetic Roller Sleeve is to carefully pry up the end of the magnet that has a Phillips head
slot cut in it. Pull the black plastic wallout and pry the magnet up. Do not try to turn the magnet with a screwdriver,
itwill break and make the assembly useless.
Remove the fill plug on the end of the Toner Supply Housing. This housing contains the magnetic metal roller and the
toner supply area. Dump the toner out of this housing and save or discard as desired. Vacuum the outside of the
housing and the magnetic roller. Turn the metal roller a few times to vacuum all sides of the roller. Inserting the
vacuum end up to the fill hole while turning the magnetic roller aids in complete toner removal.
Fill the supply with new toner (510) and replace the fill cap. At this point no seals are available, so the cartridge
should be hand delivered.
PRINTER MAINTENANCE, AND TROUBLESHOOTING
1. Before taking any test prints, there are a few items in the printer that should be maintained to ensure optimum print
quality. If these items are not maintained, they could cause print defects that may be incorrectly blamed on the
cartridge.
Transfer Charge Roller; Located in the base of the front lid, is the Transfer Charge Roller. This is a foam roller that
must be kept clean. Be very careful not to touch this roller with any part of your skin. The oils naturally present in your
skin, paper dust, and/or toner dust, can contaminate the roller, causing light print and/or small white voids in the text.
This roller should have no cuts, or areas of missing foam, and should be a medium gray color. If the roller appears
dirty, it should be vacuumed clean. If the roller is damaged it should be replaced.
2. Anti-Static Teeth; Located next to the transfer charge roller are the anti static teeth. These teeth dissipate the static
charge applied by the transfer corona wire to the paper. This helps prevent the paper from sticking to the OPC drum
and causing a paper jam. If these teeth are dirty, they should be vacuumed clean, or carefully blown off with a can of
clean compressed air.
3. Laser Glass: In the top lid of the printer, behind the hinged protective cover is the protective laser glass. This glass
should be periodically cleaned with a clean soft lint free cloth. If this glass becomes dirty, all of the pages printed will be
light in the areas of the dirt.
4. All of these items just covered, as well as the condition of the toner cartridge effect the print quality and should be
checked before taking test prints.
Since the most important part of the toner cartridge is the OPC drum, special attention should be taken with this part.
To help determine the condition of the OPC Drum, the printer’s intensity should be set to the darkest setting while
taking a test print. Having the intensity set to the darkest setting will help to show up any OPC Drum flaws that may not
show up with the intensity set to the normal mid setting.
5. To set the intensity, Turn the printer OFF-LINE. Press the LEVEL 2 button. Press the down arrow button until
DENSITY= appears on the display. Press the right arrow button, the word SET will appear. Press the Up arrow until 5
stars appear on the display. Press the right arrow button, the word SET will disappear. Press the ONLINE button 2X to
return to the READY state.
6. To run a test print, turn the printer OFF-LINE. Press the LEVEL 2 button. Press the down arrow until FEATURE PRINT
appears on the display. Press the right arrow button, the word PRINT will appear. Press the right arrow again, the
entire display will flash, and 1 page will print out. press the ONLINE button 2X to return to the READY state.
7. Once you have the print out’s, they need to be examined to determine possible cartridge defects. In general, any
marks on the paper that shouldn’t be there indicate a problem. You should also examine print areas for problems such
as light print, and poor black fills.
8. Some of the more common toner cartridge problems are:
Dirty Primary Charge Felt; Located inside the toner cartridge, this will show on the test page as small random small
dots usually on the top 1/3 of the page. All cartridges (OEM or rebuilt) have a tendency to do this to some extent, but if
the felt is dirty it will be very noticeable. Worn out primary change felt will appear on the test pages as light vertical gray
streaks - there is no fix for this, the cartridge should be disposed of.
9. Scratched drum; this is shown by a very thin, perfectly straight line that runs from the top to the bottom of the test page.
10. Chipped drum; This will show as a dot or series of dots that repeat 3 times per page. Any drum defects will repeat 3
times per page based on the drum circumference of 3.68"
11. Light damaged drum; This will show up as a shaded area on the test print that should be white. Again this will repeat 3
times per page.
12. Bad wiper blade; This will show as either a gray line approximately 1/8" thick, or as shading across the entire page. In
either case there will be a film of toner on the drum surface.
CARTRIDGE PRINTING THEORY
1. The toner cartridge printing process is best explained as a series of steps or stages. (See the following diagram).
2. The first stage in the printing process is the conditioning stage. This is where the Conductive Felt Strip places a uniform
negative DC voltage on the OPC drum surface. The amount of the negative DC voltage placed on the drum is
controlled by the printers intensity setting.
3. In the second stage (also called the imaging section), the laser beam is fired onto the OPC drum surface. The laser
beam dissipates the OPC drum charge to ground wherever it strikes the drum, leaving a latent electrostatic image. The
OPC drums circumference is 3.68" and therefore makes approximately three revolutions for each printed page.
4. The third or developing stage is where the toner is developed on the drum by the developing section (or supply
chamber), which contains the toner particles. Lets take a closer look at this section. The Static Roller in this cartridge is
different from most in that it is a foil type sleeve fit around a foam core. The toner is held to the static roller by a DC
voltage supplied by the high voltage power supply. This voltage is controlled by the printers intensity setting, and
causes either more or less toner to be attracted by the static roller. This in turn will either increase or decrease the
print density. The toner is first fed to the static roller by the feed roller. The amount of toner on the static roller is
controlled by the metal doctor blade which is gapped to keep the amount of toner on the static roller constant.
5. As the laser exposed areas of the OPC Drum approach the static roller, the toner particles are attracted to the drum’s
surface due to the opposite voltage potentials of the toner, and laser exposed areas of the OPC drum.
6. This image is then transferred to the paper as it passes below the drum by the transfer charge roller, which places a
positive charge on the back of the paper. This positive charge causes the negatively charged toner on the drum’s
surface to be attracted to the page. The small diameter of the drum, combined with the stiffness of the paper causes the
paper to peel away from the drum. The static charge eliminator weakens the attractive forces between the negatively
charged drum surface, and the positively charged paper. Without this help, thin paper may wrap itself around the drum.
7. The image is then fused on to the paper by the fuser assembly, which is comprised of the upper and lower fuser rollers.
The lower rubber roller presses the page up into the upper roller which then melts the toner into the paper. The upper
roller is a hard Teflon coated, heated roller.
8. The fourth stage is where the OPC drum is cleaned. On average, approximately 90% of the toner is transferred to the
paper during the print cycle. The remaining 10% remains on the OPC drum and is cleaned off the Drum by the wiper
blade, guided into the waste chamber by the recovery blade, and stored in the waste chamber.
The OPC Drum now ready to be Conditioned by the Primary Charge felt, and start the print cycle again.
RECOMMENDED SUPPLIES
Microsoft OLE DB Provider for ODBC Drivers error '80004005'
[Microsoft][ODBC Microsoft Access Driver]General error Unable to open registry key 'Temporary (volatile) Jet DSN
for process 0x3464 Thread 0x21dc DBC 0x84683ec Jet'.
/script/catSearch.asp, line 58