1
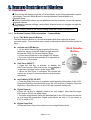
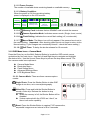
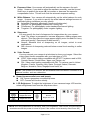
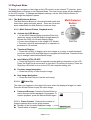
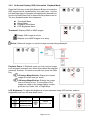
1
Product Overview…………………………………………………………………………………… 3
2
Getting Started…………………………………………………………………………………...…. 3
3
4
5
6
2.1
Loading the Batteries……………………………………………………………………..….. 3
2.2
Attach the hand Strap ………………………………………………………...………..……. 3
2.3
Inserting and Removing an SD/MMC Memory Card (Optional).………………….…..…. 4
2.4
Turning the Camera Power ON/OFF………………………………………………………. 4
2.5
Capturing Images……………………………………………………………………….……. 4
Camera Controls and Displays …………………………………………………………….…… 5
3.1
Camera Mode………………………………………………………………………………… 5
3.2
Playback Mode……………………………………………………………………………….. 8
Connecting Your Camera to Your Computer……………………………………...…………… 11
4.1
Installing the USB Driver……………………………………………………………………… 11
4.2
Transferring Images to your Computer…………………………………...……..…………. 11
4.3
Printing your Images……………………………………………………………………………11
4.4
PC/Web Camera Mode…………………………………………………………………………11
Using the V3632 Camera with VideoImpression 1.6…………………………………………. 13
5.1
Installing VideoImpression 1.6 …………………………………………………………….. 13
5.2
Using Your Camera with VideoImpression 1.6……………….…………………………….. 13
Vivicam 3632 Specifications…………………………………..…………………………….….. 16
Page 2 of 16
Revised 01 July 03
The parts of the camera are identified below. For more information on the function of each part, refer
to the following sections.
Front View
Rear View
Bottom View
Memory
card door
2.1 Loading the Batteries
Insert two AA batteries into the Battery
Compartment observing the polarity indications
(+,-) as shown in the illustration.
2.2 Attach the Hand Strap
Attach the hand strap shown in the illustration.
Page 3 of 16
2.3 Inserting and Removing an SD/MMC Memory Card. (Optional)
The Vivicam 3632 has 16 MB resident (internal) flash memory. Of this, 14 MB is available to store
your images and movie clips. You may wish to purchase a Secure Digital (SD) or Multi-Media Card
(MMC) memory card to extend the image storage capacity of your camera. Note that when an SD or
MMC card is used with the Vivicam 3632, the camera will automatically use the memory card in
preference to the internal memory.
Inserting an SD/MMC Card: Open the memory card compartment door by lifting the small handle
molded into the edge of the memory compartment door. Insert an SD or MMC Card into the memory.
Orient the memory card with the pins to be inserted first, and the face of the memory card (with
manufacturers logo and card capacity information) facing the back of the camera (the side with LCD
display.) The card will click into place. Close the memory card door.
Removing an SD/MMC Card: Open the memory card door. Push slightly on the memory card
and it will partially eject so that you may grasp the card by its back edge.
NOTE:
SD cards have a write-protect tab to prevent valuable data from being erased.
If your SD card is protected, images cannot be recorded on it. If an attempt is made to record or
delete an image on a locked card, the camera will display a message, “SD Card Locked” on the
LCD display monitor.
To use the SD card, unlock it by sliding the write-protection tab to the unlocked position.
The camera will power off automatically, if the Memory card door is opened.
2.4 Turn the Camera Power ON/OFF
Power ON: Press and hold the POWER BUTTON for two to three seconds until the LED
Indicator illuminates green. You will hear an audible tone sequence as the camera powers
up.
Power OFF: Press and hold the POWER BUTTON for one to two seconds until you hear
an audible tone sequence.
Auto Power OFF: To conserve battery power, the camera will automatically shut down in
60 seconds if no camera operations are utilized.
2.5 Capturing Images
For detailed descriptions of setting options, refer to the “Camera Control and Displays” section.
Power up your Camera: The camera will always power-up and be prepared to capture
still images, as this is the most common use. (You may then switch to burst or movie modes.)
Focus Adjustment: Slide the Focus Switch to the up (normal) position, or down (macro)
position to set the range-of-focus to either Macro (close-up) or Normal. Select the Macro
position when your subject is closer than 24 inches. Select the Normal position when the
subject is beyond 24 inches. (The icons on the camera present a flower for close-up, and a
mountain for distance shooting.)
Flash Setting Adjustment: Turn the flash on or off according to the scene lighting
conditions. Note that the camera will generally work faster when the flash is set to OFF.
Frame the Subject: Use the viewfinder or LCD image display to compose your picture.
Zoom in and out on the subject by pressing Up or Down on the Multi Selector button.
Self-Timer Setting: For self-portraiture, set the Self-Timer function first.
Capture Images: Press the Shutter Button to take photos or capture videos.
NOTE: To prevent blurred images, hold the camera steadily until you hear the beep tone.
Page 4 of 16
3.1 Camera Mode
The camera will always power-up in Camera Mode, and it will be prepared to capture
still images. Press the Mode Button to change between Camera-Mode and
Playback-Mode.
Within Camera Mode there are two additional camera functions: movie clip capture,
and burst capture.
To changing camera settings, use the Multi Selector button to navigate through the
setting options.
Note: Camera Mode is the default setting when the camera is powered on.
3.1.1 On-Screen Display (OSD) Information – Camera Mode:
3.1.1.1 The Multi Selector Button:
The Multi Selector Button is a thumb-activated switch that works like a game
controller switch. There are five active areas underneath the Multi Selector, known as
Keys.
Activate the OSD Menus:
• On the Multi Selector Button press the Enter Key
(press the center of the MS Button straight down) to
activate the OSD (On-Screen Display) Menu.
• A menu bar will appear on the image LCD Monitor
• The menu will close automatically if no operation is
performed in 10 seconds.
Multi Selector
Button
Self-Timer ON/OFF:
• Press the Left Key to activate, or disable, the
Self-Timer function. Note that a timer icon
appears
in the lower left-hand corner of the image LCD.
• When the Self-Timer is activated, the camera will
capture an image 10 seconds after the shutter button
is pressed.
Info ON/Info OFF/LCD OFF:
• Press the Right Key once to suppress camera-setting information on the LCD.
Press the Right Key a second time to turn the LCD monitor off entirely. Press the
Right key a third time to turn on the LCD with complete setting info.
Digital Zoom-In:
• Press the Up Key to (digitally) zoom-in on your subject. Note that the image
LCD must be ON to use digital zoom.
• The zoom magnification value will be displayed on the LCD monitor and can be
up to 4 times the original size. Digital zoom can be set from 1.0 X (no zoom) to
4.0 X in steps of 0.2.
Digital Zoom-Out:
• Press the Down Key to decrease the zoom magnification factor.
Page 5 of 16
3.1.1.2 Frame Counter:
The number of available shots remaining based on available memory.
3.1.1.3. Battery Condition:
When the power is ON, the remaining battery
power is displayed on the LCD monitor.
Display
Meaning
Sufficient
Battery
Power
Batteries are
Partially Used
Battery Power
Nearing
Exhaustion
Batteries
Completely
Exhausted
3.1.1.4.
Memory Card: Indicates that an SD/MMC card is inside the camera.
3.1.1.5.
Camera Operation Mode: Indicates camera mode. (Single, burst, movie)
3.1.1.6.
Flash Setting: Indicates the current flash setting (off, or automatic).
3.1 1.7. Macro Mode: The Macro icon will only appear if the camera lens is set to
the macro setting. (Important: After shooting close-ups do not forget to return to the
Normal setting. If your images are consistently blurred – check the macro setting.)
3.1.1.8.
Self-Timer: To delay the shutter release for 10 seconds.
3.1.2 OSD Menu Icons – Camera Mode
Press the Enter key on the Multi Selector Button to invoke the OSD control menus
symbolized by five main icons. Use the Left and Right keys to navigate and highlight
the desired icon. Use the Up and Down Keys to peruse the drop-down menus. The
five camera-mode icons represent:
Camera Mode Menu
Resolution Menu
Flash Setting Menu
Advanced Settings Menu
LCD Brightness Menu
3.1.2.1 Camera Mode: There are three camera capture
modes:
Single Photo: Press the Shutter Button to take ONE
image at one time, as in normal photography.
Video Clip: Press and hold the Shutter Button to
record a video clip. Release the button to stop
recording.
When the memory is full, the Shutter Button will be
disabled.
Videos captured with the V3632 are “silent”, as
there is no audio capability
Burst: Press the Shutter Button to capture FIVE consecutive,
sequential images over an interval of 8 to 9 seconds.
Page 6 of 16
3.1.2.2 Resolution: Options for setting image resolution. Depending upon what
capture mode you are using, the meaning of Hi, Std, and Low will change:
Single Photo Mode:
High Resolution: 2048 x 1536 pixels – interpolation to 3 Megapixel images
Standard Resolution: 1600 x 1200 pixels – native camera resolution
Low Resolution: 800 x 600 pixels
Video Clip Mode:
High Resolution: 640 x 480 pixels
Standard Resolution: 320 x 240 pixels
Low Resolution: 320 x 240 pixels
Burst Mode:
High Resolution: 1600 x 1200 pixels
Standard Resolution: 1600 x 1200 pixels
Low Resolution: 800 x 600 pixels
3.1.2.3 Flash Setting:
Flash Off: The flash will not fire under any
light conditions.
Auto Flash: The flash fires automatically (if
needed) according to the lighting conditions.
3.1.2.4 Advanced Settings: Six options are available:
Page 7 of 16
Exposure Value: Your camera will automatically set the exposure for each
image. However, if you wish to adjust the exposure manually, use the Up and
Down keys to position the arrow ( ) to increase or decrease the exposure
compensation value. This will over ride the automatic exposure setting.
White Balance: Your camera will automatically set the white balance for each
image. However, if you wish to specify the white balance settings because of
particular lighting conditions you may specify:
Automatic: Automatic adjustment (camera will determine).
Daylight: For photography outdoors on a sunny day.
Fluorescent: For photography under standard fluorescent lighting.
Tungsten: For photography under tungsten lighting.
Sharpness:
You may specify the level of sharpness for images taken by your camera Hard: The image is processed to increase sharpness, making edges more
distinct. (This may make the image appear slightly more focused but it may
affect print quality. Experiment for best results.)
Normal: Standard level of sharpening on all images, suited to most
applications.
Soft: Amount of sharpening reduced below normal level resulting in softer
images.
Video Format:
You may connect your camera to a television to show your images. Select the
video output format compatible with your television or VCR.
NTSC: Video output setting compatible with NTSC TV systems used in USA,
Canada, Mexico, South Korea, Japan, and Taiwan, etc.
PAL: Video output setting compatible with PAL TV systems used in United
Kingdom, France, Germany, Italy, Spain, Portugal, Ireland, Denmark,
Belgium, Australia, China, Singapore and India, etc.
NOTE: The camera LCD monitor will be disabled when the camera connects to an
external monitor, such as a television.
Sound (camera audio tones and beeps):
ON: Camera generates sounds/beep tones.
OFF: Camera will function silently.
LCD Brightness: To adjust the brightness of your cameras image LCD monitor,
select a brightness level from the drop-down menu.
Icon
Description
High
Brightness Level
Low
Brightness Level
Icon
Description
Normal
Brightness Level
NOTE: Your new preferences for resolution, flash, LCD brightness, video format, and sound will be
retained even after the power is turned off (even if the camera is shut down by Auto-Power Off.)
Page 8 of 16
3.2 Playback Mode
To display your images or video clips on the LCD monitor (or an external TV monitor), press
the Mode Button to change to the Playback Mode. The most recent image will be displayed
on the LCD monitor. To change the playback settings, use the Multi Selector Button to
navigate through the playback options.
3.2.1 The Multi Selector Button:
The Multi Selector Button is a thumb-activated switch that
works like a game controller switch. There are five active
areas underneath the Multi Selector, known as Keys.
Multi Selector
Button
3.2.1.1 Multi Selector Button, Playback mode:
Activate the OSD Menus:
• On the Multi Selector Button press the Enter Key
(press the center of the MS Button straight down) to
activate the OSD (On-Screen Display) Menu.
• A menu bar will appear on the image LCD Monitor
• The menu will close automatically if no operation is
performed in 10 seconds.
Thumbnail Display:
• Press the Left Key to display up to nine images in an array of small thumbnail
previews. Use the Left and Right keys to navigate the thumbnails. Press the Enter
key to enlarge a selected thumbnail image.
Info ON/Info OFF/LCD OFF:
• Press the Right Key once to suppress camera-setting information on the LCD.
Press the Right Key a second time to turn the LCD monitor off entirely. Press the
Right key a third time to turn on the LCD with complete setting info.
Previous Image Navigation:
• Press the Up Key to view the prior image.
Next Image Navigation:
• Press the Down Key to view the next image.
3.2.1.2.
Video Clip
The video icon appears in the upper left corner when the displayed image is a video.
Press the Shutter Button to play the video image.
Pause and Resume: Press the Shutter Button to
pause the movie while playback is in progress. To
resume playback, press the Shutter Button again.
3.2.1.3. Frame Counter: Presents the number of
images captured and current image number
Number of the Currently Displayed Image
Total Number of Images
Page 9 of 16
3.2.2 On-Screen Display (OSD) Information, Playback Mode:
Press the Enter key on the Multi Selector Button to invoke the
OSD control menus symbolized by four main icons. Use the
Left and Right keys to navigate and highlight the desired icon.
Use the Up and Down Keys to peruse the drop-down menus.
The four playback-mode icons represent:
Thumbnail Menu
Delete Menu
Playback Zoom Menu
LCD Brightness Menu
Thumbnail: Displays ONE or NINE images
: Display ONE image at a time
: Displays up to NINE images in an array
Delete: Delete all images, or only the image currently being displayed.
Playback Zoom: In Playback mode you may view an image
in an enlarged (zoomed) size. Movie clips cannot be enlarged
(zoomed), however. To return to normal size, press the Enter
Key.
1.0X Image Magnification: Display the viewed
image at current size (no zoom).
2.0X Image Magnification: Enlarge the image
size by a factor of two. To view areas of the
image not visible in the image display monitor,
press the Up, Down, Left, or Right Keys.
LCD Brightness: To adjust the brightness of your cameras image LCD monitor, select a
brightness level from the drop-down menu.
Icon
Description
High
Brightness Level
Low
Brightness Level
Icon
Description
Normal
Brightness Level
Page 10 of 16
4.1 Install the Camera Drivers
Insert the V3632 installation CD into your CD-ROM drive.
The installation menu will appear on computer screen automatically.
Click the "Install Device Driver" menu bar to install camera drivers.
When the installation is complete restart your computer.
NOTE:
If the software installation menu does not appear automatically, browse the CD and find a
program file named “launch.exe” in the root directory and double-click on it.
Windows XP users do not require a driver to download images.
The USB driver is required for all users who wish to use the PC/web cam feature.
4.2 Transfering Images to your Computer – (Mass Storage Mode)
The Vivicam 3632 can connect to you computer in two, very different ways. The first mode
(most common) is called Mass Storage Mode, and the second is known as PC/Web Camera
Mode. If you wish to simply transfer images from your camera to your computer use the
Mass Storage Mode. If you wish to use your camera as a live video camera (perhaps as a
videoconferencing camera) you will use the PC/Web Camera Mode. (Note: the PC/Web
Camera Mode is not supported on Mac OS.)
4.2.1 Mass Storage Mode (Default mode)
Power off your camera.
Connect your camera to your computer with the supplied USB cable.
The camera will detect the computers USB connection and automatically
power-up. Note that the LED will blink RED and the image LCD will be off.
The camera is now in “mass storage” mode. This means that your computer will
regard the camera (the camera’s memory) as a removable storage volume –
much like a floppy disk, or CD ROM.
From the Windows desktop double click on My Computer.
Look for an icon labeled “Removable Disk”. (It will be assigned a drive letter,
such as f:, or g:). This icon represents the memory (mass storage) inside your
camera. Double click on this “Removable Disk “ icon.
You should see a folder entitled, “DCIM” – meaning Digital Camera IMages.
Double click on the DCIM folder. You will find one or more folders there.
Transfer the folders containing your images to your computers hard drive and
note their location. You may Copy & Paste image folders from camera memory
to your computers desktop. Alternatively, you may drag and drop folders from
the camera to your computers hard drive using your mouse.
You may rename the folders to make it easier to locate them later.
Double click to open these folders and you will find your images.
The following diagram outlines this process.
Note: after you have successfully transferred your images to your computer you may delete the
images from the camera.
Page 11 of 16
4.3 Printing your Images
Once you have transferred
your images to your
computer you may edit them
using any image-editing
program that works with the
popular JPG image file
format.
The Lexmark Photo Center
program includes an image
editor that allows you to crop,
rotate, resize, and adjust your
images. You may also add
text to any image.
Getting your images into the
Lexmark Center Program is
easy. Open the Lexmark
Photo Center Program. Click
on the text link, “Photos
Shown are from this folder”
and navigate to the folder containing your images. Or, open a folder with your images and
then drag & drop them into Photo Center workspace. Once an image has been placed in the
Lexmark Photo Center workspace you may edit the image by double clicking on it to open
the editor. Once you have edited your images you may print them from the Lexmark Photo
Center control program.
Page 12 of 16
4.4 PC/Web Camera Mode
Not only does our camera capture still images and movies clips but it can also we used to
transfer live video to your PC for applications such as video conferencing and video
production. Here’s how to use the Vivicam 3632 in the PC/Web Camera mode:
Power off your camera.
Connect your camera to your computer with the supplied USB cable.
The camera will detect the computers USB connection and automatically
power-up. Note that the LED will blink RED and the image LCD will be off. The
camera is now in “mass storage” mode.
Press the mode button on the back of the camera to switch to PC/Web Camera
mode
The LED indicator will change from RED to GREEN, indicating that the camera is
now in PC/Web Camera mode.
In PC/Web Camera mode, you can use your favorite video application software
to do video recording, video e-mail, or live video broadcasting on the Internet
from your PC. Windows XP users can use Windows Movie Maker.
Arcsoft VideoImpressions is included with the V3632. It is described in the
following sections.
As you can see, your V3632 is quite versatile. After transferring your images to your
computer (using mass storage mode) you can adjust, edit, and manipulate your images
using any image editing application program or printing program.
In a similar fashion, video clips that you have taken with you camera can be transferred to
your computer and edited using a video editing application program such as Arcsoft
VideoImpression.
Live video (PC/Web cam mode) can be used with a number of third-party applications
including Microsoft’s NetMeeting, MS Messenger, Yahoo Messenger, and many other
popular video-based applications. To use your Vivicam 3632 with these applications you
must connect your camera to your PC in PC/Web Camera mode. Then, refer to the specific
instructions for your messaging application, provided by the software provider.
Page 13 of 16
The Vivicam 3632 does more than take great still images. It also allows you to capture video
in two distinctly different ways.
1) You may capture short video movie clips using the movie mode as described in
section 3.1.2.1. In this manner movie clips are stored to camera memory (or memory
card) as AVI (Audio/Video Interlaced) files. (Of course, there is no sound capability
with the 3632 so the audio channel is not used.) You may playback movie clips on the
camera itself, or transfer them to your computer to playback using a player such as
Windows Media player, Real Player, or QuickTime player.
2) You may also capture movies directly to your PC while the camera is connected to
your PC in PC/Web Cam mode (section 4.4). In this manner the camera captures
video imagery and ports it directly to your PC’s hard drive for storage. You may use a
microphone (not included with camera) to capture audio along with the video. This
mode of operation is often called “tethered mode” as the camera is tethered to the PC
via USB connection.
The Vivicam 3632 comes with Arcsoft VideoImpression video editing software that allows
you to playback, capture, and edit video.
5.1 Install VideoImpression Application Software
Reinsert the V3632 CD ROM and return to the software installation main menu.
Click "Install Application Software" in the menu bar and follow the on-screen
instructions to install VideoImpression 1.6.
When the installation is completed, an Arcsoft group will appear as a sub-folder
in the program folder of the Start Menu.
5.2 Using Your Camera with VideoImpression
Connect the computer and camera with the supplied USB cable.
The camera will detect the computers USB connection and automatically
power-up. Note that the LED will blink RED and the image LCD will be off. The
camera is now in “mass storage” mode.
Press the mode button on the back of the camera to switch to PC/Web Camera
mode
The LED indicator will change from RED to GREEN, indicating that the camera is
now in PC/Web camera mode.
To launch VideoImpression, click Start, Programs, Arcsoft, VideoImpression
The VideoImpression Main Screen will appear on your desktop.
Control Buttons
Option
Buttons
Timer Window
Video Playback Control
Page 14 of 16
5.2.1 Capture Live Camera Video:
To capture live video from your camera using VideoImpression –
Click on the New
button.
On the next screen, click on the Capture button to acquire live video.
Alternatively, to use an AVI video clip from your camera –
Click on the Get button to open a previously saved movie clip (AVI file.)
5.2.2 Working with “Albums”: Use the tools on the Albums Screen to modify your
movie.
Still Image Template
Albums Screen
Get
Acquire
Capture
Sort
Delete
Add to
Storyboard
Play
Movie
Edit
Movie
5.2.3 Working with the “Story-board”:
Select images and add a thumbnail to your Storyboard by drag-n-drop or by
highlighting a thumbnail and clicking on the Edit Movie icon. This will take you to the
editing screen.
Storyboard Screen
5.2.4 More Help: VideoImpression provides extensive online help. If you need more
information or instructions on how to use a specific feature or tool, click the Help (?)
button in the upper right-hand corner of the screen.
Page 15 of 16
ITEM
SPECIFICATION
Image Sensor
CMOS Sensor, 2.0 Mega Pixel Native resolution
Operating Modes
Digital Still Camera, PC/Web Camera, Video-Clip/Movie Capture
Computer Interface
USB
TV Out
NTSC or PAL, selectable
Storage Memory
Built-in 16MB Flash Memory (14 MB available for image storage); SD/MMC
Memory Card Interface
Still Image Resolution
HI (2048 x 1536) – 3 MP by interpolation, STD (1600 x 1200) – 2 MP Native
resolution, LO (800 x 600)
USB Video Frame Rate
Up to 20 fps at QVGA resolution (320 x 240)
Up to 15 fps at VGA resolution (640 x 480)
Video Clip/Movie Rate
Up to 8 fps at VGA resolution (640*480)
White Balance
Automatic, with Manual presets for daylight, tungsten, fluorescent
Exposure
Automatic, with manual eV compensation
LCD Display
1.5” Color LCD (TFT)
Self-timer
10 Second delay
Flash Modes
Two modes: Automatic, Off
File Formats
JPEG; AVI
Viewfinder
Built-in Optical Viewfinder
Focus Range
Normal: 24 inches (60cm) to Infinity
Macro: Centered at 14 inches (35cm)
Focal Length
f = 8.64 mm
Aperture
F/2.8
Power Supply
Two AA Batteries (alkaline); or USB (when connected to PC)
OS Support
Microsoft Windows 98/98SE/2000/ME/XP
Dimension
3.9” x 2.7” x 1.4” (100 mm x 68 mm x 36 mm)
Page 16 of 16