1
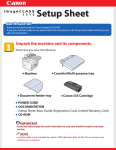
Series
Starter Guide
Please read this guide before operating this equipment.
After you finish reading this guide, store it in a safe place for future reference.
CANON INC.
30-2, Shimomaruko 3-chome, Ohta-ku, Tokyo 146-8501, Japan
CANON U.S.A., INC.
One Canon Plaza, Lake Success, NY 11042, U.S.A.
CANON CANADA INC.
6390 Dixie Road Mississauga, Ontario L5T 1P7, Canada
CANON EUROPA N.V.
Bovenkerkerweg 59-61 1185 XB Amstelveen, The Netherlands
CANON FRANCE S.A.S.
17, quai du Président Paul Doumer 92414 Courbevoie Cedex, France
CANON COMMUNICATION & IMAGE FRANCE S.A.S.
12, rue de I’Industrie 92414 Courbevoie Cedex, France
CANON (U.K.) LTD.
Woodhatch, Reigate, Surrey, RH2 8BF, United Kingdom
CANON DEUTSCHLAND GmbH
Europark Fichtenhain A10, 47807 Krefeld, Germany
CANON ITALIA S.p.A.
Via Milano, 8 20097 San Donato Milanese (MI) Italy
CANON ESPAÑA, S.A.
c/ Joaquín Costa 41, 28002 Madrid, Spain
CANON LATIN AMERICA, INC.
703 Waterford Way Suite 400, Miami, Florida 33126 U.S.A.
CANON AUSTRALIA PTY. LTD
1 Thomas Holt Drive, North Ryde, Sydney, N.S.W. 2113, Australia
CANON CHINA CO., LTD
15F, North Tower, Beijing Kerry Centre, 1 Guang Hua Road, Chao Yang District, 100020, Beijing, China
CANON SINGAPORE PTE. LTD.
1 HarbourFront Avenue #04-01 Keppel Bay Tower, Singapore 098632
FA7-8938 (000)
© CANON INC. 2006
PRINTED IN JAPAN OR CHINA
ENG
Set Up the Machine
Unless otherwise mentioned, the illustrations used in this manual are those taken from
imageCLASS MF3240, and also the menus described in this manual are based on the model
MF3240.
1
Depending on the model of your machine, some settings may not be available and the number on
the top of each menu may vary.
Unpacking the Machine
Before Setting Up the Machine
● Remove all shipping tapes on the
machine.
● When moving the machine, grip the handles
on both left and right sides of the machine and
lift it carefully, as shown in the illustration right.
● The machine illustration may differ slightly
from your machine.
2
Do You Have Everything?
●Machine
●Output Tray
●Cassette Extension
●Power Cord
●Extension Cover
●Destination Labels*
●Toner Cartridge
●Telephone Cable*
●USB Cable
●Starter Guide (This Document)
●Basic Guide
●User Software CD
●Limited Warranty Notice*
* MF3240 Only
Manuals for the Machine
● Starter Guide (This Document): Machine set-up and software installation
● Basic Guide : Basic features, maintenance, machine settings, and specifications
● Advanced Guide (in User Software CD): Advanced features, system monitor, and reports and lists
● Software Guide (in User Software CD): Printer, scanner, and PC faxing settings from a computer
3
4
Install Toner Cartridge
1
2
3
4
B
A
Remove the toner cartridge from the bag.
Keep the bag for future use.
Gently rock the toner cartridge five or six times to
distribute toner inside.
Place the toner cartridge on a flat and stable
surface. Fold the tab (A) on the sealing tape, and
pull it out straight (B) while supporting the toner
cartridge.
Open the front cover.
NOTE
– Make sure that the tab itself is detached from the
toner cartridge.
– Do not pull out the sealing tape at an angle.
5
6
A
B
B
C
Hold the toner cartridge and align the
protrusions (A) on both sides of the toner
cartridge to the guides (B) in the machine, then
gently slide the toner cartridge into the machine
as far as it will go.
Be sure to position the arrow mark (C) on the
toner cartridge toward the inside of the machine.
5
Close the front cover.
CAUTION
Be careful not to get your fingers caught.
6
Set Up the Paper Cassette and Load Paper
1
2
3
4
*
)
Insert the output tray into the front slot on the
machine.
Pull out the paper cassette completely.
CAUTION
Pull the paper cassette straight/forward. Pulling it at
an angle may damage the paper sensing lever inside
the machine.
5
6
A
B
)
Attach the cassette extension to the paper
cassette. The slots (A) are keyed and must be
inserted at a 90° angle. Once inserted, fold the
extension (B).
Pinch and slide the rear paper guide (A) to
match the size of paper (B).
NOTE
Confirm that the rear paper guide is fitted in the paper
size slit correctly.
7
A
*
)
)
Fan the paper stack and even the edges.
7
Load the paper into the paper cassette with the
print side down. Make sure the paper stack sits
below the hooks (A) on the rear paper guide.
Pinch and slide the lock release lever so that the
side paper guides match the side of paper.
NOTE
Make sure the paper stack does not exceed the load
limit mark (A) and it is loaded under the hooks (B) on
the side paper guides.
8
8
9
NOTE
)
)
– The default paper size/type setting is <A4> and
<PLAIN PAPER>. When you load other size and/or
type of paper, change the paper size/type setting.
For details, see Chapter 3, “Setting Paper Size and
Type,” in the Basic Guide.
– For loading paper in the multi-purpose feeder, see
Chapter 3, “Print Media,” in the Basic Guide.
*
Gently insert the paper cassette as far as it will
go.
CAUTION
Do not push in the paper cassette at an angle. Doing
so may damage the paper sensing lever inside the
machine.
Insert the tabs on the extension cover at an
angle into the slots (A) on the back of the
machine, and carefully lower the cover (B) until it
sits on the cassette extension beneath it.
CAUTION
Do not load paper from the back of the machine.
Doing so may damage the paper feeding assembly
inside the machine.
NOTE
If you do not completely insert the paper cassette into
the machine, paper jams may occur.
9
10
Connect Telephone Cables (MF3240 Only)
*
)
Connect the supplied telephone cable to the line jack (A) and the wall jack.
Connect your external telephone to the external device jack (B) if required.
11
12
Connect Power Cord
Connect Power Cord
1
2
Ex.
100%
A4
TEXT
Connect the power cord into the rear socket and
the wall outlet.
1
The machine enters standby mode.
NOTE
There is no power switch.
e
What if...
● <CLOSE COVER/FRONT COVER> is displayed:
Make sure that the front cover is closed properly. (See “Install Toner Cartridge,” on p. 5.)
● <TONER IS NOT SET/INSERT THE TONER> is displayed:
Make sure that the toner cartridge is installed properly. (See “Install Toner Cartridge,” on p. 5.)
● <LOAD PAPER> is displayed:
Make sure that paper is loaded in the machine. (See “Set Up the Paper Cassette and Load Paper,” on p. 7.)
13
WARNING
This product emits low level magnetic flux. If you use a
cardiac pacemaker and feel abnormalities, please move
away from this product and consult your doctor.
NOTE
– During electrical storms, disconnect the power cord
from the power outlet. (Any sent or received documents
stored in memory are backed up for about 60 minutes.)
– Whenever you unplug the machine, wait at least five
seconds before you plug it in again.
– Do not plug the machine into an uninterruptible power
supply (UPS).
14