1
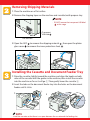
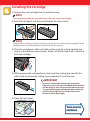
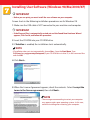
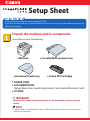
Setup Sheet
Thank you for purchasing the Canon imageCLASS D340.
To get your machine ready for use, please follow the instructions in this Setup Sheet before referring to any
other documentation.
Unpack the machine and its components.
Check that you have the following:
● Machine
●
●
●
●
Document feeder tray
● Cassette/Multi-purpose
● Canon
tray
S35 Cartridge
POWER CORD
DOCUMENTATION
(Setup Sheet, Basic Guide, Registration Card, Limited Warranty Card)
CD-ROM
IMPORTANT
• Save your sales receipt for proof of purchase in case your machine requires warranty
service.
NOTE
• A printer cable is not included. You need a USB cable (less than 16.4ft./5m) to connect your
machine to a computer.
Removing Shipping Materials
1 Place the machine on a flat surface.
2 Remove the shipping tapes on the machine and cassette/multi-purpose tray.
NOTE
• DO NOT remove the transparent USB label
at this stage
Transparent
USB label
Left side view
3 Open the ADF to remove the shipping material , then open the platen
glass cover to remove the inner protection sheet .
Installing the Cassette and Document Feeder Tray
1 Raise the cassette slightly toward the machine, and align the hooks on both
sides of the cassette with the guides in the machine, then install the cassette
into the machine as far as it will go 1. Then gently lower the cassette 2.
2 Insert the tabs on the document feeder tray into the holes on the document
feeder until it clicks.
2
1
2
1
NOTE
• Install the cassette so that there is no space between the cassette and the feeding slot.
Connecting the Power Cord
When the power cord is plugged into the machine and into the wall outlet, the machine is turned on.
There is no separate ON/OFF power switch. Once connected, the machine needs to warm up before
you can use it. The LCD displays PLEASE WAIT, then INSTALL CARTRIDGE. The LCD returns to the
standby display when you install the cartridge and load paper in the cassette or multi-purpose tray.
NOTE
• Insert the power cord straight into the power cord
connector on the left side of the machine.
Do not insert it at an angle. Otherwise, the machine
may not be properly connected to the power source
and may not turn on. If this happens, disconnect the
power cord, and reconnect it correctly after a minute
or more.
• When disconnecting or connecting the power cord, be
sure to unplug or plug the power cord from the wall
outlet, not from the power cord connector on the
machine.
Loading Paper in the Cassette
1 Load the paper stack in the cassette.
• Insert the paper stack into the cassette
as far as it will go.
2 Slide the width guides
and the length
guide
to fit the size of the paper stack.
• Adjust the guides so that there is no space
between the guides and the paper.
NOTE
• Make sure the paper stack does not exceed the
width and length guides’ claws.
3 Set the multi-purpose tray on top of the
cassette.
Installing the Cartridge
1 Remove the new cartridge from its protective bag.
NOTE
• Save the protective bag. You may need it later when you remove the cartridge.
2 Rock the cartridge 5 or 6 times to distribute the toner evenly.
Instructions
Drum protective shutter
NOTE
• Always hold the cartridge as shown so that the side with the instructions are facing upward. Do not
forcefully move or push the protective shutter of the drum in any way.
3 Place the cartridge on a flat and stable surface, grip the sealing tape tab and
snap it in the direction shown below. Make sure that the tab itself is detached
from the cartridge.
Tab
4 While grasping the cartridge firmly, slowly pull the sealing tape tab with the
other hand to remove the sealing tape completely. Discard the tape.
IMPORTANT
• Be sure to remove the sealing tape completely.
Otherwise, toner will not be supplied to the machine
and no image or text will be transferred to the page.
• To avoid breaking the sealing tape when removing,
pull the tab straight out. Do not pull it out at an
upward or downward angle.
5 Open the right cover.
Turn over to
continue
Right cover
6 Hold the cartridge and position the arrow mark on the cartridge towards the
inside of the machine shown below.
7 Align the projections
on both sides of the cartridge to the guides
in the
machine (location 1) and gently slide the cartridge into the machine until the
right cover slightly rises up (location 2).
IMPORTANT
• The right cover moves simultaneously with the action of the cartridge. Do not push the
cartridge farther than the location 2. Doing so will result in catching your hand in the
right cover.
8 Close the right cover, and the cartridge will be set in place (location 3).
Installing User Software (Windows 98/Me/2000/XP)
IMPORTANT
• Before you can print, you must install the user software on your computer.
Screen shots in the following installation procedures are for Windows 98.
1 Make sure the USB cable is NOT connected to your machine and computer.
IMPORTANT
• If the Plug and Play is automatically carried out and the Found New Hardware Wizard
appears, click Cancel, and follow this procedure.
2 Insert the CD-ROM into your CD-ROM drive.
3 If AutoRun is enabled, the installation starts automatically.
NOTE
• If installation does not start automatically, choose Run... from the Start Menu, Type
D:\Drivers\us_eng\prnsetup\Setup.exe (if your CD-ROM drive is drive D:) in the command line
and click OK.
4 Click Next> .
5 When the License Agreement appears, check the contents. Select I accept the
terms in the license agreement, then click Next> .
NOTE
• The message recommending to restart your computer
may appear under some operating systems. In this case,
continue installing after restarting your computer.
6 Check Install Printer Driver through a USB Connection, then click Next> .
When the screen (on the upper right) appears, follow the procedure below
6-1 Be sure to remove the transparent USB label
6-2 Connect the USB cable
.
to the machine and computer.
The program will start installing the Printer Driver automatically.
USB interface connection
7 When the following screen appears, select Yes, I want to restart my computer now.
Then click Exit.
Reading Electronic Manuals
To see the guides, proceed as follows.
1 Insert the CD-ROM into your CD-ROM drive.
2 On the Windows desktop, click Start, and then Click Run...
3 In the Run dialog box, type D:\Manuals and click OK ( where D: is the CD-ROM
drive containing the installation disk ).
The Printer Guide is available in the manuals folder.
NOTE
• If you do not have Adobe Acrobat Reader installed on your computer, follow the procedure below
to install it.
1 Insert the CD-ROM into your CD-ROM drive.
2 On the Windows desktop, click Start, and then Click Run...
3 In the Run dialog box, type D:\Acrobat and click OK (where D: is the CD-ROM
drive containing the installation disk ).
4 Double-click the .exe file in the Acrobat folder.
Part no. HT3-2120-000-V.2.0
© 2002 Canon Inc.
Canon is a registered trademark of Canon Inc.
All other products and brand names are registered
trademarks or trademarks of their respective owners.
Specifications subject to change without notice.
XXXXXX
PRINTED IN CHINA