1
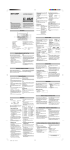
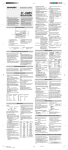
Part Names
Before Using
Selection keys
POWER
MENU
COMPOSE
INBOX
Previous page key
OUTBOX
ADDRESS
!
@
#
$
%
^
&
1
2
3
4
5
6
7
~
=
+
[
]
{
}
/
\
E
R
T
Y
U
I
O
P
A
S
Z
A
D
G
COPY
PASTE
X
C
V
A
MAIN
F
CUT
SMBL
WORD
?
@
H
J
K
N
M
,
"
2. Initializing
The product must be initialized when it is used for the first time.
1.
Press and hold the Power key (
2.
While holding the Power key, push the RESET button
on the bottom of the unit using a pen or other pointed
object. Do not use a sharp tipped object.
0
DEL
:
;
.
2
DONE
SPAC E
).
ENTER
L
'
B
)
9
W
CAPS
2nd
(
8
1
Cancel key
TM-20
MENU
Set the battery replacement switch on the back to
“REPLACE BATTERIES” (the red dot becomes visible).
Backlight key
PREFERENCES
Q
1.
Next page key
SCHEDULE
Read me first!
1. Installing the Batteries
POWER key
PREFERENCES
@ key
2
!
~
@
#
+
=
$
[
%
]
(
&
^
{
Top (when closed)
/
}
/
DEL
PocketMail button
ENTER
CAPS
CUT
COPY
?
A A
SMBL
MAIN
WORD
,
PASTE
;
:
-
-
RESET button
)
DONE
98JT(TINSE1321PCZZ)
OLY85EW000210
85-EW00-021066
PRINTED IN CHINA
Included in this Package
RECEIVE
SEND
FINISH
Progress
bar lights
START
2.
Slide the battery cover off.
3.
Insert two batteries on top of the ribbon tab.
Make sure the batteries are correctly aligned for polarity, as
shown below.
1
The following message will appear.
Bottom
Microphone release switch
4.
Replace the battery cover.
Microphone
•
•
•
•
•
•
•
Sharp TM-20
Two AA Alkaline Batteries
TM-20 Quick Start Guide (This sheet)
TM-20 Operation Manual
One 3.5” Floppy Disk
One Interface Cable
PC Interface User’s Guide
3.
Press Y to initialize the unit.
Follow the setup procedure below.
Reset button
Speaker
Battery cover
Battery replacement switch
5.
Set the battery replacement switch to “NORMAL
OPERATION”.
Please contact your dealer if any of the above items
are not included in the package or if they are broken.
Note:
The product will not function unless the battery replacement
switch is in the “NORMAL OPERATION” position.
Setting Up
Welcome to PocketMail™ Service
The product takes you through the steps needed to setup the
product before use.
We strongly recommend that you complete the entire SETUP
procedure before starting to actually use your product.
After initializing, the Welcome message appears. Press ENTER
to continue.
1.
If the city in your time zone does not appear, press
or
on the right of the display to display more cities.
• You can jump to a particular country by pressing the first
letter of that country’s name.
2.
Select the desired city by moving the cursor using
or
in the lower right corner.
3.
If the city is currently on Daylight Saving Time, press
the [DST] Selection key on the right of Menu window.
4.
Press DONE when ready.
Then press ENTER to setup the time and date.
This unit gives you the ability to send and receive electronic mail
messages, called PocketMail messages. Completely portable, this
unit lets you communicate with colleagues, friends, and family
members wherever you are. First, you need to sign up with the
PocketMail Service. You may also sign up via the Web, at
www.pocketmail.com.
1. Sign Up for PocketMail™ Service
Preferred:
6.
1.
2.
If the display is not clear, press
and
in the lower
right corner until the display is satisfactory.
Press
DONE
Then press
to go to the next setup item.
Input the date in the DATE field. Or press the
[CALENDAR] Selection key on the right of Menu
window to view the calendar. Use
and
to select
the current month, then use , ,
and
to
select today’s date.
1.
When you finish setting the clock as described
previously, the Sign Up screen appears.
8.
Press
DONE
2.
Press the [SIGN UP NOW] Selection key on the right of
Menu window. The Sign up information screen appears.
3.
Dial 1-(800) 390-5034 to sign up with the PocketMail
Service. (Monday – Friday 8am–5pm PST).
4.
The PocketMail Customer Service representative will
guide you through initial unit configuration and account
setup.
when ready.
2. Setting the Clock
After setting the Display contrast, the following list of cities appears.
Then, press
ENTER
to Sign Up for PocketMail Service!
Menu window
POWER
MENU
• To move the cursor to the Code field, press
in the lower
right corner.
Note:
Selection keys
To select an item in the Menu window,
press the Selection key on the right of
the item.
Because the sign up is not finished, you cannot exchange
PocketMail messages yet.
INBOX or
OUTBOX on
COMPOSE ,
the left of the display, the screen for step 2 reappears and you
must complete the sign up procedure.
The sign up procedure is complete.
You can now exchange PocketMail messages with the
Selection keys
Press
to move to the TIME field. Enter the time,
preceding single-digit hours and minutes with “0”.
Press P to select PM or A for AM.
If you selected [DO IT LATER] in step 2, the main screen
appears as follows:
When you press
Press ENTER once the date has been selected. The
calendar window disappears and the date now
appears in the DATE field.
7.
when ready.
ENTER
@pocketmail.com
Web site password:
5.
Press ENTER after confirming a completion message
that appears on the display. (Then the compose
message screen appears.)
to
Before calling the PocketMail Service to setup an
account, please have a pen and paper and the following
information:
Four digit customer
account security code:
The Display contrast screen appears.
6.
DONE
Note:
to
1. Setting the Display contrast
After entering the required information, press
sign up.
Note:
The Set Time/Date screen appears.
The Basic Instructions screen appears.
ENTER
Read the instructions carefully and press
proceed to the setup procedure described below.
5.
Please write down the activation code and keep it
somewhere where you won’t lose it. You need it in case
you have to reset your unit.
PocketMail Customer Service Center by following the
procedure overleaf.
Welcome to PocketMail™ Service
1.
Improper Alignments
When the transmission is successful, the unit will emit dual tone.
2. Composing Your First Message
1.
After you sign up for service, the compose message
screen appears.
Immediately after one of these tones,
listen to the recorded telephone
message. It will tell you if your
transmission was successful or not.
Push the Microphone release switch in the direction of
the arrow until the Microphone pops up.
SE
ND
FINISH
RE
T
SE
ND
RE
IVE
CE
ST
AR
CE
ST
A
R
FINISH
T
IVE
Microphone
release switch
Note:
• If you have received messages, repeating beeps will
sound for 10 seconds. You can remove the unit from
the phone at the “Received Messages” beeps. (Pressing the POWER key at anytime can stop the beeps.)
• The lights indicate how much progress has been made.
Off-center of earpiece
2.
Enter the E-mail addresses in the To field.
Type: [email protected]
3.
Then press
2.
to move the cursor to the Cc field.
For now let's leave it blank.
4.
Press
to move the cursor to Sub (Subject) field.
Type: New User
6.
Press
FINISH
SEND
RECEIVE
or
) once, letting go, then pressing the letter.
5.
START
START
Earpiece
Mouthpiece
CAPS
• Capital letters are made by pressing SHIFT key (
Adjust the Microphone and Speaker position to
align with the handset’s earpiece and mouthpiece.
Microphone
Too much space
to move the cursor to Message field.
For now let's leave it blank or experiment by typing a brief
message.
Detail
Press
1.
Dial 1-800-762-5386
(1-800-POCKETM).
2.
Listen to the voice prompt.
DONE
to save your message.
The OUTBOX appears, where your outgoing mail is stored
until you dial into the PocketMail Network to send it.
Speaker
(Be sure to adjust)
3.
the rubber cup of the
unit microphone fits
snugly over the
telephone earpiece.
Preparation
Two of the lights indicate whether the device
is sending or receiving messages.
Before using your TM-20 for the first time, familiarize yourself with
the sounds that your TM-20 makes.
After every transmission, you will hear either dual tone
for a successful transmission or a low pitched tone if the
transmission failed.
PocketMail
button
Rubber cup should cover
all holes in telephone
earpiece
FINISH
T
SE
N
Hang up the telephone and close the microphone.
6.
Open your unit and press the POWER key (
power up.
7.
Press
OUTBOX
) to
.
"S" indicates that the message was sent successfully.
D
RE
CE
IVE
To familiarize yourself, try pressing and holding the
PocketMail button until START light is ON and
listen to the sound pattern.
The unit will emit a low pitched tone to indicate an
error. Repeat this procedure until you can
recognize the distinctive error sound at the end of
the communication procedure.
the unit speaker is as
close to the telephone
mouthpiece as
possible.
ST
AR
Close the unit. It doesn't matter whether the power
is ON or OFF.
5.
Press and hold the PocketMail button until the START
light is on and then release the PocketMail button.
PocketMail button
Note:
The progress bar lights move
from START to FINISH for
each SEND or RECEIVE.
Immediately place unit into position
over the telephone receiver.
Align the unit to a telephone* so that:
3.
3. Sending & Receiving Messages
FINISH
* Does not work with Digital Cellular and PCS Telephones.
Refer to corresponding page in the Operation Manual.
4.
Unit talks to the PockeMail Network. Do not remove
the unit until you hear dual tone or a low pitched
tone.
Note:
• If there is no “S”, check the microphone and speaker
position according to Preparation Section and repeat
steps 1-7 of this Detail section.
• Your unit sends and receives PocketMail messages
each time you connect to the PocketMail Network.
Three Common Uses for the TM-20
Welcome to PocketMail™ Service
Customer Support
for PocketMail™ Service
1. Primary E-mail account
Status Symbol Guide
4. Reading Received Messages
1.
Press
INBOX
"
.
You should have three new messages welcoming you to
PocketMail, as shown below.
" Message has been replied to.
''
" Message has been forwarded.
" " Message has been read.
If you don’t have a PC, or if you have a PC but aren’t connected to
the Internet you can use the TM-20 as your primary E-mail
account. Or perhaps you have E-mail at work but can’t use it for
personal E-mail. Now you have your own personal E-mail account
where you can send/receive messages with complete peace of
mind and privacy.
2. Second “Mobile” E-mail account
" " Unread Message.
Message Sender Message Subject
New Message Indicator:
' ' indicates a new unread message. Once read,
the dot disappears.
2.
Select a PocketMail message using
or
ENTER
to open the selected message.
and press
"
" " This is only a Message title (no body).
"
" Message is on hold.
"
•
,
" Message title has been marked for complete download.
" Incomplete message.
: Use to scroll message.
,
ENTER
If you already have business E-mail, PocketMail account is a great
second E-mail account for when you are mobile. Just like you give
people your cell phone number when you are out of the office, give
important people your new PocketMail E-mail address when you’re
out of the office.
With PocketMail Service, it’s easy; simply use the TM-20’s Group
function to create groups of up to 10 of your most frequent
contacts and send a message to them every time you travel. They
can then simply REPLY to your message every time they want to
reach you.
E-mail:
Phone:
[email protected]
800-390-5036
(Monday – Friday 8am–5pm PST)
Web Site: www.pocketmail.com
Tasks you can perform from here are:
• Mailbox Consolidation
The PocketMail Network can grab copies of your
electronic mail from your existing accounts and
send them transparently to your PocketMail device.
With this feature, you can access your existing
electronic mail accounts from anywhere.
• Clear Old Messages
• Clear All Messages
Note: The clear Old Messages and Clear All Messages features
are also accessible through PocketTools in your TM-20.
: Use to close message.
Congratulations! You have just discovered how easy it is to
send and receive PocketMail messages.
For more complete instructions on using your new unit, refer
to the operation manual. Some features you may wish to use
right away are:
Message Title Preview–
is ideal for those who receive many messages a day.
Mailbox Consolidation–
sends copies of incoming messages from your other
electronic mail accounts to your TM-20.
3. Second “Mobile” Personal E-mail account
"
" Message has been sent.
" " Message will be sent on next logon.
Already have a private E-mail or Hot Mail account? If your ISP
(Internet Service Provider) offers POP3 access you can get copies
of your mail sent to your PocketMail account and then access
these messages via the TM-20. It’s as easy as logging on to the
PocketMail web site (www.pocketmail.com) and choosing the
“Mailbox Consolidation” option. Don’t worry, your original E-mail
account will still have all your unread messages intact. Optionally
you can even set the TM-20’s return address to your original
E-mail account. Then when they reply to you, you’ll get the reply in
your original E-mail account (which will of course be forwarded to
you PocketMail account as well).
Customer Support Reference
www.sharp-usa.com
Sharp Web Site
Information about the TM-20
FAQs, and other resources
www.pocketmail.com PocketMail™ web site
Information about the
PocketMail service and setting
up your account
1-800-390-5034
PocketMail™ Sign up hotline
For sign up for your PocketMail
account (8am to 5pm PST M-F)
1-800-390-5036
PocketMail™ Customer
Service
For questions about billing,
problems with your PocketMail
account, etc. (8am to 5pm PST
M-F)
1-800-POCKETM
(800-762-5386)
PocketMail™ Access number
1-630-378-3590
Sharp Customer Assistance
Center
For questions about the TM-20
(7am to 7pm CST M-F)
Note: PocketMail™ Service described in this guide is the
responsibility of PocketScience Inc. The description and
features of the service in this guide are delivered from
PocketScience Inc. SHARP is not responsible for the
performance or support of PocketMail Service.