1
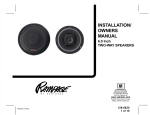
INSTALLATION/
OWNERS
MANUAL
6”x 9”, 5”x 7”, 4”x 6”
SPEAKERS
SPECIFICATIONS
MODEL
PS-2461
PS-2571
PS-2695
PS-2696
PS-2697
Nominal Dia.
4"x 6"
5"x 7"
6"x 9"
6"x 9"
6"x 9"
Description
2-Way
2-Way
2-Way
2-Way
3-Way
Impedance
4 Ohms
4 Ohms
4 Ohms
4 Ohms
4 Ohms
Freq. Resp.
(Hz)
60-20,000
50-20,000
40-20,000
40-20,000
40-20,000
Sensitivity (dB)
90
91
92
90
92
Power Handling
75 Watts
100 Watts
150 Watts
200 Watts
150 Watts
X
X
X
X
X
X
X
X
Features
Cone
(Polypropylene)
Installation
Speaker Grilles
Speaker Wire
X
X
X
X
X
Hardware
X
X
X
X
X
4"x 6"
5"x 7"
6"x 9"
6"x 9"
6"x 9"
2"
2-1/2"
3"
3-1/2"
3-1/2"
Mounting Dia.
Mounting Depth
-2-
PRE-INSTALLATION TIPS
Before beginning your installation, read the following tips on proper
placement of speakers and how to obtain the best sound from the
speakers you have selected.
No. 1:
Always try to have the speakers aimed at the listener. Never install
speakers in a manner that would direct sound toward the floor of the
car. The only exception to not aiming a speaker would be the rear
deck (package shelf behind rear seat). The natural curve of the rear
window, combined with the wide-dispersion tendency of bass sounds,
allows woofers to perform exceptionally well in this location. This is
not true for high-frequency sounds which will be absorbed by the
roof liner long before they reach your ears.
or fire panels make poor mounting surfaces and tend to vibrate
when used. This is far more critical when installing large power producing woofers. Mount your speakers securely! If the speaker
has four mounting holes, use all of them.
No. 4:
Woofers need “breathing” room! For a speaker to perform efficiently,
it must move large amounts of air. If you restrict this airflow (try to fit
a large speaker in a small space or if you undercut the recommended
mounting hole size), you won’t have an efficient speaker. Conversely,
the enclosure you mount them in should be somewhat sealed. In
other words, if you mount speakers in door panels, don’t cut any
extra holes in the door.
No. 2:
High and mid-frequency sounds are very directional (the higher the
frequency, the more directional it is). This simply means that a tweeter
or mid-range speaker pointing toward the floor (or roof) will only be
clearly heard in the direction at which it is pointed. For this reason, it
is critical that tweeters and mid-range speakers always be installed
so they aim in toward the passenger area and as high in the car as
possible (on top of dash or high up in door panels). Never install
tweeters low in the car.
No. 5:
Tweeters can go in places other speakers can’t. They don’t need
“breathing” room or reinforced mounting panels. All they require is
directional placement. (See tip No. 2.)
No. 3:
Select solid mounting panels! Always make certain the selected
panel is solid and securely attached to the car. Clipped-in plastic
No. 7:
Don’t skimp on the quality of the speaker wiring. All Audiovox speakers include wiring rated to properly transmit the normal power load
the speaker is designed for.
No. 6:
Never let any part of the speaker (except the mounting flange) touch
any part of the car. You’ll be amazed what noises a speaker (and
your car) can produce when one touches the other.
-3-
INSTALLATION INSTRUCTIONS
CAUTION: Do not mount the speakers in
the following locations:
- Where the door window glass comes in contact with the
speaker.
- Where the speaker comes in contact with the window crank
handles or gear assemblies when rotated.
- Where the speakers come in contact with the trunk springs,
shock towers, or trunk lid.
- Where the speakers come in contact with gas tanks or fuel
lines.
- Where the speakers come in contact with the rear window glass,
car wall, etc.
We strongly recommend that you read these instructions first before you commence speaker installation. If the instructions appear
to be too difficult, or if you lack any of the equipment necessary to
finish the job, perhaps it would be more prudent to refer the installation to a qualified, car stereo professional.
Be Innovative - If you’re mechanically inclined, remove door panels, dash, side panels, etc., and really get into the basic construction of the car. You’ll be amazed at the vast amount of good-toexcellent speaker locations a car can conceal.
If You Don’t Wish to Cut Holes - Consider the hang-on or surface-mount type of speakers. Just pick a reasonably flat panel, drill
a few holes, fasten a few screws, and you’re listening to stereo.
INSTALLING OVAL SPEAKERS IN REAR DECKS OR
FLAT SURFACES
Most cars are factory-equipped with speaker openings in the rear
deck (package shelf). By examining the underside of this panel,
using trunk access, you will probably find at least one (usually two)
oval-shaped holes in the steel underliner of the rear deck.
The size of these holes vary with the make of car, but the most
common openings are for 6”x9”, 5”x7”, and 4”x10” speakers. Occasionally, you’ll find a 5” or 5-1/4” round hole.
Selecting the Speaker Location
Use the following guidelines to select the speaker location:
Ease of Installation - The car manufacturer provides at least two,
and possibly four, pre-cut openings in all cars. When only two are
provided, one is usually in the rear deck and the other is in the front
dash. Provisions for four speakers usually include two rear deck
openings and two door or dash openings. A car manufacturer picks
speaker locations that simplify installation and fit available spaces.
They are not always the best places for sound reproduction.
Using Factory Openings - The one advantage to using the factory
openings is you avoid having cut sheet metal, as the holes are prepunched. You normally have only to cut away thin plastic or fiber
panels that conceal the openings. Openings near the floor should
be avoided if at all possible.
1. Examine the deck panel thoroughly. Observe movement of the
trunk springs, trunk lid, support hinges, power antenna, etc.
Obviously, you don’t want to install a speaker where the arc of
a moving trunk support would interfere with the speaker grille.
Avoid all areas that might cause interference with the normal
functions of the trunk lid and/or antenna assembly.
CAUTION: Even professional installers have mounted a speaker
and then found out it interfered with some moving part.
2. Check the speakers you have purchased against the existing
holes in the steel sub-liner by placing the speaker against the
-4-
bottom of the opening and check that the speaker matches the
shape of the existing cut-out. Also check that the four speaker
mounting holes align with the four existing holes in the steel subliner.
Cutting Speaker Opening
Prepare the speaker opening as follows:
NOTE: This procedure can also be used for any flat panel install
(Wagons, Vans, etc.) that have sufficient space behind the
panel for recessing the speaker. (The panel must be removable or accessible from behind.)
1. Provided that all holes align, place speaker aside and
proceed to cut out the oval opening in the fiber panel that
covers the existing hole in the steel sub-liner.
NOTE: It is easier to cut the opening if you use a sharp serrated
steak knife in a sawing motion. Use care not to over-cut the
hole size by periodically checking the speaker grille.
Speaker Cutting Detail
2. Once the speaker openings have been cut, pierce the four
speaker mounting holes and enlarge them to a diameter of
3/16”.
1. Place grille on top of package shelf, allowing the studs to
protrude through the holes you previously punched.
2. Place the speaker below the shelf and align it over the four
studs of the grille. Secure the speaker using four speed clips
included. If the grille requires screws and nuts, insert the
screws from the top of the rear deck, and through the grille
and speaker; secure grille and speaker with hex nuts.
Grille Installation
Inspect the grille included with the speaker. If the grille contains
existing threaded studs projecting from it , skip this section. If the
grille contains four threaded holes in it, locate the threaded rods
included with the speaker and screw them firmly into the holes in
the grille. The third grille type contains four holes for use with four
screws. Proceed with grille installation as follows:
3. Repeat entire procedure for remaining speaker.
4. Wire speakers per instructions for your stereo system.
-5-
Speaker Mounting Details
The following illustrations define the requirements for mounting the
speaker on the near and far sides of the mounting surface or independent mounting board.
Typical Speaker Mounting and Grille Installation
-6-
AUDIOVOX CORPORATION (the Company) warrants to the original retail purchaser of this product that should this product or any part thereof,
under normal use and conditions, be proven defective in material or workmanship within 12 months from the date of original purchase, such
defect(s) will be repaired or replaced with new or reconditioned product (at the Company's option) without charge for parts and repair labor.
To obtain repair or replacement within the terms of this Warranty, the product is to be delivered with proof of warranty coverage (e.g. dated bill
of sale), specification of defect(s), transportation prepaid, to the warranty center at the address shown below.
This Warranty does not extend to the elimination of car static or motor noise, to correction of antenna problems, to costs incurred for installation,
removal, or reinstallation of the product, or damage to tapes, compact discs, accessories, or vehicle electrical systems.
This Warranty does not apply to any product or part thereof which, in the opinion of the Company, has suffered or been damaged through
alteration, improper installation, mishandling, misuse, neglect, accident, or by removal or defacement of the factory serial number/bar code
label(s) or markings. THE EXTENT OF THE COMPANY'S LIABILITY UNDER THIS WARRANTY IS LIMITED TO THE REPAIR OR
REPLACEMENT PROVIDED ABOVE AND, IN NO EVENT, SHALL THE COMPANY'S LIABILITY EXCEED THE PURCHASE PRICE PAID BY
PURCHASER FOR THE PRODUCT.
This Warranty is in lieu of all other express warranties or liabilities. ANY IMPLIED WARRANTIES, INCLUDING ANY IMPLIED WARRANTY
OF MERCHANTABILITY, SHALL BE LIMITED TO THE DURATION OF THIS WRITTEN WARRANTY. ANY ACTION FOR BREACH OF ANY
WARRANTY HEREUNDER INCLUDING ANY IMPLIED WARRANTY OF MERCHANTABILITY MUST BE BROUGHT WITHIN A PERIOD OF
30 MONTHS FROM DATE OF ORIGINAL PURCHASE. IN NO CASE SHALL THE COMPANY BE LIABLE FOR ANY CONSEQUENTIAL OR
INCIDENTAL DAMAGES FOR BREACH OF THIS OR ANY OTHER WARRANTY, EXPRESS OR IMPLIED, WHATSOEVER. No person or
representative is authorized to assume for the Company any liability other than expressed herein in connection with the sale of this product.
Some states do not allow limitations on how long an implied warranty lasts or the exclusion or limitation of incidental or consequential damage
so the above limitations or exclusions may not apply to you. This Warranty gives you specific legal rights and you may also have other rights
which vary from state to state.
U.S.A. : AUDIOVOX CORPORATION, 150 MARCUS BLVD., HAUPPAUGE, NY 11788 l 1-800-645-4994
CANADA : CALL 1-800-645-4994 FOR LOCATION OF WARRANTY STATION SERVING YOUR AREA
-7-
Form No. 128-4502B
© 2000 Audiovox Electronics Corp., Hauppauge, NY 11788
128-5879