1
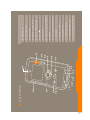
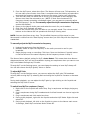
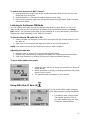
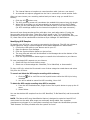
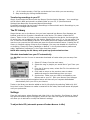
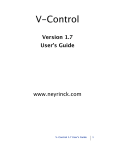
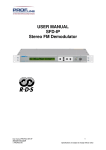
Neuros User’s Guide 2nd edition 1 2 10 09 07 02 12 Tour of Neuros 13 14 15 16 01 11 08 06 05 04 03 16 LINE-LEVEL INPUT CONNECTOR 15 HEADPHONE CONNECTOR 14 POWER CONNECTOR 13 USB CONNECTOR 12 BACKPACK RELEASE 11 FORWARD 10 PLAY/PAUSE (POWER ON/OFF) 09 REWIND 08 SCROLL DOWN/VOLUME DOWN 07 BACK/STOP 06 SELECT/ 05 SCROLL UP/VOLUME UP 04 KEYPAD LOCK/UNLOCK 03 HISI/RECORD 02 PRESET BUTTONS 01 MICROPHONE Table of Contents Neuros, Your Music Frequency ........................................................................................................................................................ 4 Package Contents.............................................................................................................................................................................. 4 Minimum System Requirements ................................................................................................................................................. 4 Battery .............................................................................................................................................................................................. 5 Neuros Synchronization Manager Software ..................................................................................................................................... 5 Getting Started............................................................................................................................................................................. 6 Installation Instructions ............................................................................................................................................................... 6 Importing Music to the Neuros Sync Manager............................................................................................................................ 7 Importing Playlists....................................................................................................................................................................... 7 Transferring Music to Your Neuros............................................................................................................................................. 7 View Entire Library/View Library on Neuros............................................................................................................................. 8 Creating Playlists......................................................................................................................................................................... 8 Synchronizing with 2 or More PCs/ Orphan Tracks.................................................................................................................... 8 Using the Neuros as a Portable Storage device................................................................................................................................. 9 Navigating Neuros .......................................................................................................................................................................... 10 Powering On/ Off ...................................................................................................................................................................... 10 Xi Menus ................................................................................................................................................................................... 10 Releasing the Player .................................................................................................................................................................. 10 Managing and Playing Audio ......................................................................................................................................................... 11 Menu Overview......................................................................................................................................................................... 11 Auto-resume .............................................................................................................................................................................. 12 Browse While Play .................................................................................................................................................................... 12 Bookmarking ............................................................................................................................................................................. 12 Playlists........................................................................................................................................................................................... 12 Creating Playlists....................................................................................................................................................................... 12 To play a playlist ....................................................................................................................................................................... 12 My Mix Playlist......................................................................................................................................................................... 12 Real-time My Mix Playlist Modification................................................................................................................................... 13 MyFi: Broadcast Neuros through any FM radio ............................................................................................................................. 13 Listening to the Neuros FM Radio.................................................................................................................................................. 15 To turn the Neuros FM radio On or Off .................................................................................................................................... 15 Adjusting the radio dial ............................................................................................................................................................. 15 To set a radio station as a preset ................................................................................................................................................ 15 Using HiSi (Hear It! Save It!)......................................................................................................................................................... 15 Identifying HiSi Samples........................................................................................................................................................... 16 Recordings ...................................................................................................................................................................................... 17 Transferring recordings to your PC ........................................................................................................................................... 18 The PC Library ............................................................................................................................................................................... 18 Schedule downloads from your PC automatically ..................................................................................................................... 18 Settings ........................................................................................................................................................................................... 18 To adjust Auto-Off .................................................................................................................................................................... 18 MyFi settings- Mode, Quality and Auto Scan ........................................................................................................................... 19 To adjust Shuffle ....................................................................................................................................................................... 19 To adjust Repeat ........................................................................................................................................................................ 19 To adjust the Equalizer .............................................................................................................................................................. 20 To set Backpack Swapping........................................................................................................................................................ 20 To adjust Presets........................................................................................................................................................................ 20 To adjust Backlight.................................................................................................................................................................... 21 To adjust Contrast...................................................................................................................................................................... 21 To view Sync Log ..................................................................................................................................................................... 21 To adjust Record Quality........................................................................................................................................................... 21 To adjust Date and Time ........................................................................................................................................................... 21 To Restore Defaults................................................................................................................................................................... 21 To view Properties..................................................................................................................................................................... 21 Backpack Swapping........................................................................................................................................................................ 22 Firmware and Software Updates..................................................................................................................................................... 22 Troubleshooting.............................................................................................................................................................................. 22 Support Information........................................................................................................................................................................ 23 Important Safety Information ......................................................................................................................................................... 23 FCC Rules and Regulations ............................................................................................................................................................ 24 Warranty ......................................................................................................................................................................................... 24 3 Neuros, Your Music Frequency Congratulations, you have purchased the world’s first digital audio computer. Your Neuros digital audio computer lets you listen, explore, and enjoy music in ways not possible before. Experience these unique features: • MyFi “My Frequency”: broadcast your digital music through any FM radio. See MyFi • HiSi- “Hear It! Save It!”: identify new music with a click of the HiSi button (with the • • in the Table of Contents for detailed information. “hand” symbol on it). See Hisi in the Table of Contents for detailed information. Neuros Synchronization Manager (NSM): The NSM software synchronizes your Neuros with downloads from your PC and Internet music services. Recording: create digital recordings in MP3 and WAV file formats from FM radio, built-in microphone, or line input. Other important features include: large backlit display; digitally enhanced FM tuner; flexible design with removable backpack to accommodate new technology without having to buy an entire new unit; automatic software and firmware upgrades for new features and future format support. Please visit www.neurosaudio.com for the latest news, product enhancements, on-line forum discussions and surveys. Package Contents Everything you need to get started! For additional accessories see Neuros Gear at www.neurosaudio.com. Neuros digital audio computer Neuros Earphones Wall Power Adapter USB Cable Belt Clip (Neuros 128MB only) Car Power Adapter (Neuros HD units only) Neuros Synchronization Manager Application Installation CD Neuros User’s Guide Minimum System Requirements PC with 1 available USB port. (For USB2.0 speed, a USB2.0 PC card is required) Internet Explorer 5.1or higher Pentium 233 MHz 64 RAM 160MB available hard disk space Microsoft ® Windows 98SE, Me, Windows 2000, Windows XP View detailed technical specifications at www.neurosaudio.com/technicalspecifications 4 Battery The rechargeable, factory-replaceable battery in the Neuros backpacks provides up to 10 hours of continuous playback (depending on usage). Using MyFi, high encoding rates, and cold temperatures will reduce playback time. Charging the Batteries The battery can be charged while the unit is turned On or Off, and even when the player is not inserted in the backpack. Putting a full charge on the batteries takes about 8 hours. It is not possible to overcharge the batteries on the Neuros. Important: Please charge the battery on the Neuros 8 hours before first Synchronization with the Neuros Sync Manager Application. Battery Full Indicator The battery icon blinks when fully charged. System Status Icon An oval, blinking icon sits to the left of the battery monitor. This icon will blink when the system is busy. Replacing the Batteries Please see our Battery replacement policy at www.neurosaudio.com/support/NeurosProductsfaq.asp#a8 Neuros Synchronization Manager Software The Neuros Synchronization Manager (NSM) is your essential tool for synchronization from your PC to your Neuros, and from your Neuros to your PC. You must synchronize using NSM to transfer music to the Neuros for playback. With the Neuros Synchronization Manager you can: • Transfer the music stored on your PC for playback on your Neuros • Import songs and playlists from many popular media players, including MusicMatch, Windows Media Player, WinAmp and Zinf, and transfer to Neuros • Manage and organize your songs by Title, Artist, Album and Genre. • Rename recordings made on the Neuros. • Edit your ID3 tags. ID3 tags are file information, like Artist and Album, that are usually embedded in music files when they are converted from CD by a Media Player or a CD conversion software application. • Create and manage playlists to transfer to Neuros • Identify title and artist of HiSi samples. • Check for Updates for NSM software and Neuros firmware 5 Getting Started You are now ready to install the Neuros Synch Manager and begin downloading files to the Neuros. Installation Instructions 1. Install application by inserting the Neuros Synchronization Manager CD-ROM and following onscreen installation instructions. If installation screens do not automatically appear, view CD contents through Windows Explorer and click the “Setup” icon. The installation will take a few minutes. The PC will prompt you to reboot to complete installation (select “Yes”). Installation will start automatically after reboot, and prompt screens will walk you through to completion. 2. Turn on the Neuros by pressing and holding the Play button for a few seconds. The Play button is located directly below the Joystick button. 3. Connect your Neuros via the USB cable provided. Your Neuros must be connected to your PC to set User Preferences and to synchronize. 4. Open your Neuros Sync Manager application. With Neuros connected to your PC, you will be prompted to complete your User Preferences. Enter in your User Name 5. Complete User Preferences. A default path has been set for the folder location on your PC to store the HiSi samples and recordings that you make on the Neuros. Your serial number should automatically be filled in. 6. If not, click “Get ID” (your Neuros must be connected via USB for the application to read your serial number). Click OK to complete. If you cannot “get ID” and are a Windows 98 SE user, please see the Win 98 driver installation instructions here: http://neurosaudio.com/support/win98install.asp 7. You will be prompted to register. Registration is required to use the Neuros HiSi song identification feature. Your registration profile will also be available to you when you login at www.neurosaudio.com, where you can participate in user forums and learn about new features and Products). 8. Check for Firmware and Software Upgrades. After installation, Neuros Synch Manger will automatically search for a more updated version of the Neuros Device firmware. This will be sent to the device the first time you Synchronize. To check for updates to the Neuros Synch Manager application, go to the Help Menu and select Check for Application Updates. 9. You now can begin loading music file information into the Neuros Sync Manager. See the next section, “Importing Music to the Neuros Synch Manager.” 6 NOTE: The CD-ROM includes USB drivers specifically for Windows 98SE. Neuros uses the default USB drivers that come with the other (Me, 2000, and XP) Windows operating systems. See Win 98 driver installation instructions at http://neurosaudio.com/support/win98install.asp Importing Music to the Neuros Sync Manager From the file menu, choose “Search Computer for Music” and identify the directories/files you would like to transfer songs from. Another option is to open a folder using Windows Explorer and drag and drop songs into the Tracks window. Album, Artist and Genre information will be automatically loaded if they are already present in your files’ ID3 tags. Importing Playlists Playlists can be imported from other media players or created in the Neuros Sync Manager. Playlists can be imported to Neuros Sync Manger in two ways: • Select “Import Playlists from Media Player” from the File menu. Neuros Sync Manager will search your computer and produce a dialog box where you can check the boxes for the playlists you want to import. Click the "Import" button. • Search Computer for Music from the File Menu will import playlists found in a particular folder or directory. Neuros will import playlists with the following extensions: *.asx, *.wpl, *.m3u,*.b4s and *.pls. These formats are used by the following players: • Windows Media Player (included in the Windows O/S) • Music Match (www.Musicmatch.com) • Winamp (www.winamp.com) • Zinf (www.zinf.org) Transferring Music to Your Neuros 1. Once your tracks are organized to your satisfaction in the Neuros Sync Manager, select the songs and playlists you would like to transfer to your Neuros. Right-click the selection and choose the option “Add to Neuros” from the menu, or click the Add to Neuros icon on the toolbar. Playlists must also be tagged Add to Neuros to appear on the Neuros. or choose “Synchronization” from the Tools menu to 2. Click the Synchronization icon activate transfer. Once the “Synchronization Completed” message appears in the Neuros Sync Manager Messages window and the “Do not disconnect” message disappears from your Neuros display screen, you can safely disconnect the USB from the device. Note: It is highly recommended that you connect the power supply to the Neuros during Synchronization. 7 View Entire Library/View Library on Neuros The Neuros Sync Manager Tool bar allows you to choose between two views of your audio files: • View Entire Library: • View Library on Neuros: Neuros Shows all items indexed in Neuros Sync Manager. Only displays the Tracks and Playlists that are on the NOTE: When the "View Library on Neuros" button is selected, you cannot see tracks you have imported into Neuros Sync Manager that have not been transferred to the device. Detailed instructions and additional information can be found through the Help files in the Neuros Synchronization Manager. Creating Playlists To create a new playlist, click on the Create New Playlist icon or select Playlists in the Navigation Panel and right-click. When the Playlist Setup dialog box appears, fill in a name for the playlist and an optional description. Your playlist's name will then appear in the list of playlists. You can then add tracks to your new playlist by dragging tracks onto the playlist name or selecting a track, right-clicking and selecting Add to Playlist. Synchronizing with 2 or More PCs/ Orphan Tracks What are Orphan Tracks? "Orphan tracks" are music and recordings that are on the Neuros device but do not have a corresponding entry in Neuros Sync Manager. If you have Neuros Sync Manager installed on 2 or more PCs, Synchronizing can create Orphan tracks on the device. The database of playable tracks on the device will be based on the contents of the Neuros Synch Manger application with which the device was last Synchronized. Instead of installing NSM on 2 or more PCs to download music to the Neuros from each PC, users may want to utilize the Neuros as a Portable Storage Device to move the music files to one PC. See “Using the Neuros as a Portable Storage Device”, below. How are "Orphan Tracks" created? Orphan tracks can be created in three ways: • When a user who has already loaded files on the Neuros device Synchronizes for the first time with a new installation of Neuros Sync Manager (on the original PC or a second PC). • Deleting a track or recording already tagged on the Neuros from the NSM Tracks or Recordings window and the NSM Deleted Tracks bin before Synchronization. • When music and recordings are added to the Neuros device by dragging and dropping tracks directly into the Music folder on the Neuros device drive through Windows Explorer or My Computer. How can I tell Neuros Sync Manager to find Orphan Tracks? 8 Neuros Sync Manager will search for orphan tracks when the “Find orphans on device” icon on the far right of the NSM toolbar is pressed down before Synchronizing. The Search for Orphan Tracks feature can also be saved as a setting by selecting "Application Preferences" in the Tools drop-down menu, selecting "Synchronization" and checking the Search For Orphan Tracks box. When NSM finds orphan tracks on the Neuros, a "Found Orphan Tracks" dialog box will appear. You have a number of options available to handle the tracks according to your own preferences: If you select: Add to PC and NSM: Tracks are added to the NSM database and a copy of the track is made in a location on the PC chosen by the user. Add to NSM Only: Tracks are added to the NSM database but are not copied to the user’s PC. The Neuros device drive will be listed as the location of the original track. “Add to NSM Only” is the best option for users who want to store their tracks on the Neuros device and not their PC. NOTE: It is always a good idea to keep a backup copy of files stored on the Neuros. Leave on Neuros: Tracks are left on the device and no entry is made in the NSM database for the tracks. Tracks selected Leave on Neuros will not be playable on the device. Delete from Neuros: Tracks are removed from the device and placed in the NSM Deleted Tracks bin. NOTE: Using the "Orphan Tracks" feature of Neuros Sync Manager will significantly increase Synchronization time, so select the icon only when you need to use the feature. Using the Neuros as a Portable Storage device In addition to being an audio player, the Neuros is also a USB Mass Storage Device. Any file or program that can be stored on a PC can be stored on the Neuros. To store files on the Neuros, 1. Connect the USB cable to the Neuros and the PC. 2. Go to My Computer or Windows Explorer and identify the Neuros drive. The Neuros will be called “Removable Disk” in your list of drives. 3. Open the Neuros drive. Copy the folder from your PC onto the Neuros drive, or create a folder and drag data into it from your PC. Do not copy or drag data into any of the default folders on the Neuros. 4. Connect the Neuros via USB cable to the PC to which you want to transfer files. Open the Neuros drive. Copy the files on the Neuros and then paste them into the location on the PC you choose. 5. Delete the files from the Neuros drive (Optional). Music files copied or dragged into the default Music folder on the Neuros will not be playable on the device unless the Orphan Tracks search is done. See “Orphan Tracks”, above. NOTE: Make sure before running any program on the Neuros drive that the program supports being run on a removable drive. 9 Navigating Neuros Easy-to-use menus and thumb-controlled Joystick allow for onefinger navigation on the Neuros digital audio computer. Using the Joystick you can: • Adjust the Volume by pressing Up or Down while listening to a track or the FM Radio. • Click Up and Down to scroll within a menu • Click Right to select or view Xi (Extra Information) menus • Click Back to return to a previous menu. Powering On/ Off Turn on the Neuros by pressing and holding the Play button for a few seconds. The Play button is located directly below the Joystick button. Xi Menus Neuros uses pop-up menus called Xi (for Extra Information Menu) to give you shortcuts to player functions. When you see the Xi icon, right click on the Joystick button and the Xi pop-up menu will appear. Click Up and Down to scroll through these menus. Click Right for your menu choice. Some Xi options include: Stop – stops the currently playing track Play – playback of song or playlist Info - more information about a song (title, artist, album) Equalizer – choose between 6 adjustable 5-band Equalizer settings. MyFi mode – turns MyFi on or off. (See MyFi in Table of Contents) MyFi Gain – during track playback, right-click and select MyFi Gain Add to My Mix – adds the song to the playlist you create on Neuros. Shuffle –choose between playing songs in Sequential or Random order Repeat – plays the song or selected songs repeatedly Remove- (My Mix playlist only) remove songs from the My Mix playlist. Does not remove the song from your Neuros or PC, just the My Mix playlist. Delete – delete songs from your Neuros or from your PC’s hard drive. Delete on Sync- remove songs from your Neuros, but not the NSM database, upon your next Synchronization. Releasing the Player The two-part design of the Neuros, (player and backpack) allow for easy upgrades and new technology adoption by developing new backpacks. To release the player from the backpack press and hold the backpack release lever (to the left of the power connector). With the other hand press down from the top of the player. 10 To insert the player lay the player flat on the backpack so that the T-shaped indentation on the back of the player is meshed with the T-shaped upraised part on the backpack. Then press down on the player (but not on the LCD Screen) and slide the unit up until you hear a click. When correctly inserted the tab to the left of the power jack on the backpack should be almost touching the player. NOTE: The player needs to be inserted into a backpack to function, as the batteries which supply power to the player are located in the backpack. Managing and Playing Audio Play songs and recordings with a click of the Play button, create your my Mix playlist on the fly, schedule downloads from your PC Library collection, and view the files on your Neuros. The menus include arrows to indicate that a sub-menu follows the current menu. A scroll bar running down the length of the menu indicates that more listings are available by using the Up and Down keys to scroll. Menu Overview There are five Audio menu options: • Neuros Audio: lists all the Songs, Playlists, Albums, Artists and Genres loaded on your Neuros and available for playback • • • FM Radio HiSi PC Library: lists all the tracks stored on your PC but not loaded on your Neuros. • Settings Because the PC library does not contain the actual media, songs in the PC Library cannot be played. Using the Xi menu, these tracks can be scheduled for automatic download from Neuros Sync Manager upon your next synchronization. Playing Music Clicking the Play button from almost any menu will begin playing the first song listed. For different selections explore the Neuros Audio menu: • Select from Songs, Playlists, Artists, Albums, Genres or Recordings • Scroll pressing Up and Down on the Joystick through the listings to identify your choice • Click Play to start immediate playback, or click Right to view the Xi menu for more options. Listening to tracks in Sequential or Random order 11 From the Settings menu, select Shuffle Select from Sequential (songs played in the order in which they are listed on the Neuros) or Random. Repeating one or more tracks From the Settings menu, select Repeat Select from Off (no repeat), Repeat One (repeats same song continuously) or Repeat All (repeats entire track list, artist, album or playlist continuously). Auto-resume Neuros will power up to the same location in a song or recording as when the unit shut down. Browse While Play Users can now browse through menus during music playback. To return to the “Now Playing” or radio window, repeatedly press the back button. The system will automatically return to the playback screen after 30 seconds. Bookmarking You can create up to 5 bookmarks by pressing and holding a preset button at the place in a track you would like to bookmark. Lead Character Search Pressing the fast-forward button in any list (Songs, Playlists, Artists, Genres, Recordings) will skip forward to the next letter of the alphabet in the list. Playlists Create playlists using the Neuros Synchronization Manager and import playlists from your favorite media players. Or create your own custom mix right on your Neuros (called My Mix). My Mix is the playlist that can be created both in Neuros Sync Manager and on the Neuros device. Later when you sync, your custom mix will be transferred to the Neuros Sync Manager. See ‘My Mix Playlist’, below. Creating Playlists To create a new playlist, click on the Create New Playlist icon or select Playlists in the Navigation Panel and right-click. When the Playlist Setup dialog box appears, fill in a name for the playlist and an optional description. Your playlist's name will then appear in the list of playlists. You can then add tracks to your new playlist by dragging tracks onto the playlist name or selecting a track, right-clicking and selecting Add to Playlist. To play a playlist 1. From the Neuros Audio menu, select Playlists to view all playlists transferred from your PC along with the My Mix playlist that you create on the Neuros. 2. Scroll to the playlist you would like to play and click the Play button. My Mix Playlist My Mix is the playlist that can be created both in Neuros Sync Manager and on the Neuros device. Right click on the Joystick during track playback and select Add to My Mix. 12 Since only one My Mix playlist can be created on the device at a time, you may want to transfer this playlist to NSM and clear this space so a new My Mix playlist can be made on the Neuros device. The My Mix playlist can be saved by creating and naming a new playlist in Neuros Sync Manager and dragging the songs from My Mix into it. Then the My Mix playlist can be cleared. The new playlist you created in NSM can be transferred back onto Neuros. To save, name and clear My Mix Playlist 1. When you connect the Neuros device to your PC with the USB cable, the My Mix playlist is automatically updated in the Neuros Sync Manager Playlists view. 2. Click on the My Mix playlist in NSM and the tracks will be displayed 3. Create a new Playlist with a name of your choice. 4. Click on the My Mix playlist and select the tracks. 5. Drag the tracks in My Mix to the new playlist you just created (put your cursor over the playlist's name). 6. Clear your My Mix playlist by deleting the tracks (unless you specify, they will not be deleted from your hard drive). To create and add tracks to the My Mix playlist 1. Identify the song or recording you would like to add to My Mix from the Songs or Recordings menus. 2. Right click on the Joystick to pop up the Xi menu. 3. Select “Add to My Mix”. A confirmation message will let you know that you have successfully added that selection to the My Mix playlist. 4. Left click on the Joystick to return to the previous menu to select additional tracks for the My Mix playlist. Real-time My Mix Playlist Modification While listening to music, you can add additional tracks to your My Mix playlist. This will allow you to listen to the playlist and add or remove upcoming songs. Songs are listed in the order in which they are added. MyFi: Broadcast Neuros through any FM radio Now you can enjoy your music everywhere and anywhere. With the built-in FM transmitter on the Neuros, you can broadcast your music in the car, the office or the house. No need for additional accessories or wires! With the Neuros Auto Scan feature, Neuros will automatically scan the FM dial and return to you the most available frequency for your broadcast. Using MyFi 1. Initiate Auto Scan. First plug in your earphones since they will act as an antenna for the Neuros tuner. Then, go to the Settings menu and Select MyFi. 13 2. From the MyFi menu, select Auto Scan. The Neuros will scan over 70 frequencies, so this can take a few minutes. Auto Scan is complete when the blinking eye animation stops and the frequency selected remains on the screen. Unplug your earphones. 3. Tune the radio that you would like to use for your broadcast to the frequency that Neuros Auto Scan has returned to you. (NOTE: If Auto Scan chooses an FM frequency already containing a broadcast signal, you may want to manually adjust the FM frequency. See the To manually adjust the MyFi transmission frequency section that follows). 4. Return to the Neuros Audio menu and select the music for your broadcast. 5. Click Play. MyFi Playback will begin. 6. Control the volume using your FM radio as you normally would. The volume control buttons on the Neuros are not operational while MyFi is being used. NOTE: You can Auto Scan at any time. The identified frequency will be stored on your Neuros and is visible from the “Now Playing” screen when you click Play with the earphones unattached. To manually adjust the MyFi transmission frequency 1. Unplug the earphones from the Neuros. 2. Manually select an open FM frequency on the radio you want to use for your broadcast. 3. Begin playing a song or recording. Click Up or Down on the Neuros’ Joystick button to set the Neuros to the same frequency as the frequency chosen in Step 2. The Neuros factory default setting for MyFi is Auto Detect. This means that when Neuros detects earphones, MyFi will not be available. Unplug your earphones when you want to use MyFi to broadcast through any FM radio. Through MyFi on the Settings menu, you can change the setting to have MyFi always off. You can also choose the MyFi Quality- Mono or Stereo. To adjust MyFi Gain Through MyFi on the Settings menu, you can now adjust the MyFi gain (FM broadcast volume) before using MyFi by selecting Gain and using the Joystick to increase or decrease gain. During track playback, you can adjust the MyFi gain by right-clicking on the Joystick and selecting the MyFi Gain Xi menu. To switch from MyFi to earphones (5 ways) 1. Right click on the Joystick and select Stop. Plug in earphones and begin playing any track. 2. Plug in earphones during MyFi broadcast and click fast forward one time to begin the next. 3. Plug in earphones and click rewind one time. 4. During track playback, right-click the Joystick and select MyFi Mode. Right-click and select Off. 5. During track playback, left click on the Joystick to return to the Neuros main menu. In Settings, select MyFi and select Mode. Select Off. 14 To switch from earphones to MyFi (3 ways) 1. Unplug earphones. Right-click on the Joystick and select Stop for the current track. Begin playing a new track. 2. Unplug earphones. Click fast forward to begin the next track. 3. During track playback, right-click the Joystick and select MyFi Mode. Right-click and select Auto-detect. Listening to the Neuros FM Radio You can listen to the radio through the Neuros integrated FM radio. When you are in FM Radio mode, you can also use the HiSi automatic song identification feature (see Using HiSi, below). You can also record what you are listening to on the radio directly into MP3 or WAV format. (See Recordings in the Table of Contents) To turn the Neuros FM radio On or Off 1. Select FM Radio on the Neuros main menu and right-click the Joystick button to turn the radio on. 2. Right click on the Joystick and Right click Stop to turn the FM Radio off. NOTE: Your earphones act as your antenna to improve radio reception. Adjusting the radio dial 1. Manually tune by clicking the Forward and Rewind buttons. 2. Rapidly scan frequencies by pressing and holding the Forward and Rewind buttons. 3. Seek next frequency by double-clicking the Forward and Rewind buttons. To set a radio station as a preset 1. Select the radio station for which you would like to assign a preset button. 2. While the station is playing, press and hold down the preset button of your choice. 3. The preset number will appear on your screen. Using HiSi (Hear It! Save It!) You can record a HiSi sample using one of the following three convenient options: 1. The Neuros radio. Simply select “FM RADIO” and then tune in any radio station using the Fast Forward or Rewind button. 15 2. The internal Neuros microphone to record another radio (such as a car stereo). 3. An external microphone plugged into the line-in connector to record another radio. After you have chosen your recording method and you hear a song you would like to identify: button once. 1. Click the HiSi 2. The HiSi recording screen will countdown the needed thirty-second song clip length. 3. When HiSi is complete you will automatically be returned to either the FM Radio menu (for HiSi recordings made from the Neuros radio) or the main Neuros menu (for HiSi recordings made from the internal microphone or line input connector). Neuros will save these samples as files with date, time, and radio station (if using the Neuros radio) as the file name. These files will be stored in the “To be identified” file accessible from the HiSi menu (go to Neuros Main Menu). When you synchronize with your PC, these files will be transferred to the Neuros Sync Manager for identification. Identifying HiSi Samples To identify your HiSi clips, you must be connected to the Internet. The HiSi clip initiates a digital fingerprint which is matched against a web-based database for identification. 1. Connect the USB cable to your Neuros and to your PC. 2. Open the Neuros Sync Manager 3. Click the Synchronization button on the tool bar. 4. The song title and artist will be identified in the Messages box at the bottom of the Neuros Sync Manager 5. Click the Synchronization button again to transfer this information to your Neuros. To view completed HiSi requests on your Neuros: 1. Select HiSi from the main Neuros menu 2. Select one of three categories: Identified, To be Identified, or Unsuccessful To play a HiSi clip, select the file stored in one of three categories noted above and select Play from the Xi menu. To cancel and delete the HiSi sample recording while underway 1. Click the HiSi or Left Click on the Joystick button while the HiSi clip is being recorded. 2. You will be asked to cancel the HiSi recording, Yes or No? To delete the HiSi sample recording when HiSi is complete 1. From the HiSi finished screen, Right click on the Joystick button to pop-up the Xi menu 2. Select Delete. You can also delete HiSi samples from the HiSi Identified, To Be Identified, and Unsuccessful menus NOTE: The Neuros HiSi song identification feature is designed to match at least 95% of music heard on the radio. New songs are continually being added. Poor reception (earphones not plugged in) or incomplete recordings can impair the identification process. “Best Guesses” are also provided when the system isn’t sure. 16 Recordings Create MP3 or Wav files from FM Radio, Microphone, any audio device or external microphone (through line-level input). Use your Neuros to record directly to the MP3 or WAV file format with the built-in microphone and digital encoding capability. Neuros offers three recording options: • FM Radio Recordings – recording what you hear on Neuros FM Radio to MP3 or WAV format. • Voice Recordings – using the built-in microphone, record notes or memos to yourself and others. • Line In Recordings – using a “line-in” connection, any device with an audio output can be the source of recordings created and stored onto your Neuros in the MP3 or WAV format. NOTE: Because of increased hard drive spin on WAV recordings, it is not recommended to use WAV for recordings made with the internal Mic on the Neuros. The recording quality can be adjusted: sample rate MP3 64 Kbps 96 Kbps 128 Kbps 160 Kbps WAV 8 kHz 44 kHz 48 kHz memory needed for 1 minute of recording time 500 KB 750 KB 1 MB 1.25 MB 1 MB 5 MB 6 MB From Neuros FM 1. Tune your Neuros FM radio to the station which you would like to record. 2. Double-click the HiSi button to start recording. Important a single click will record a thirty second HiSi clip. 3. Stop recording by clicking the Back button or clicking the HiSi button. From Microphone 1. 2. 3. 4. Double-click the HiSi button to start recording. Start speaking into the Neuros built-in microphone (top of player). Stop recording by clicking the Back button. Adjust gain (recording volume) by pressing up or down on the Joystick (20 for recording quieter sounds, 0 for louder sounds) From Line-level input 1. Plug in external microphone or line out from any audio device from which you wish to record into the line-level input connector on the bottom right side of your Neuros using standard 1/8” audio jack connectors. You must use a powered microphone or have a battery pre-amp. The Neuros does not supply power to external microphones. HiSi button to start recording. 2. Double-click the 3. Adjust gain (recording volume) by pressing up or down on the Joystick (12 for recording quieter sounds, 17 4. -12 for louder sounds). Click Play on the device from which you are recording. 5. Stop recording by clicking the Back button. Transferring recordings to your PC Simply Synchronize the Neuros with the Neuros Synchronization Manager. Your recordings will be listed in NSM and stored in a default folder on your PC, C:\Documents and Settings\User Name\My Documents\Neuros\Recordings. Completed recordings can be found in Recordings in Neuros Audio and in Recordings in your Neuros Sync Manager after transfer. The PC Library Songs that are not on the Neuros, but you have imported into Neuros Sync Manager are indexed, and this list of tracks is transferred to the device. This index is called the PC Library. Tracks in the PC Library cannot currently be played on the device, but through the Xi menus they can be added to My Mix playlist, deleted from your PC, or you can select "Get File" to have the track added to Neuros. All of these actions will happen automatically the next time you connect the USB cable and press the Synchronization button. Creating the PC Library is a default setting of Neuros Sync Manager, but users can disable this function by un-checking "Create PC Library Database on Neuros" in the Synchronization preferences under "Application Preferences" in the Tools drop-down menu. NOTE: Not creating the PC Library will speed up Synchronization time. Schedule downloads from your PC automatically Use Get File from the Xi menu to automate downloads of tracks when you are away from your PC. 1. Select PC Library from the main menu 2. Select the song or playlist you would like to “get” from your PC 3. From the Xi pop-up menu, select Get File. You selection will be confirmed. 4. Click back to return to the previous menu to select additional songs for download next time you sync. 5. Synchronize. Make sure your USB is connected to your Neuros and to your PC. With your Neuros Sync Manager open, click the Synchronization button and have all your requests downloaded automatically from your PC to your Neuros. Tracks in the library can also be added to the My Mix playlist by selecting “Add to My Mix” from the Xi menu. Because no media is contained in the index, that track cannot be played until you synchronize. Settings From the main menu, select Settings and right-click on the Joystick. Scroll down to view all the options available. Right-clicking any item from this menu will open a new window that will allow you to activate or modify the feature’s settings. To adjust Auto-Off (automatic power off when Neuros is idle) 18 1. From the Settings menu, select Auto-off 2. Select from Off, after 5 minutes, after 10 minutes, after 15 minutes, after 30 minutes, after 60 minutes. Left click to save your selection. MyFi settings- Mode, Quality and Auto Scan To change MyFi Mode: 1. From the Settings menu, select MyFi, then select Mode. 2. Select either Off or Auto Detect The default MyFi setting is Auto Detect. In this mode, your Neuros will turn off MyFi when earphones are plugged in and will turn on when no earphones are plugged in. With no earphones attached, selecting Play will start MyFi for broadcast through an FM radio. To adjust MyFi Quality: 1. From the MyFi Settings menu, select MyFi Quality, then select Quality. 2. Select either Mono or Stereo. The default setting for MyFi is Mono. You can change this setting to Stereo. 3. Adjust MyFi Gain (optional). You can increase the gain on your MyFi broadcast through the MyFi entry in Settings, or by right-clicking and selecting MyFi Gain during track playback and right-clicking. NOTE: Mono broadcasting has better resistance to interference than does Stereo. If you are using the Neuros in congested areas and are having trouble with interference, try using the Mono setting. To initiate Auto Scan (See Using MyFi, above). NOTE: Earphones must be plugged in (they act as the Neuros FM tuner antenna) for Auto Scan to work properly To learn how to broadcast your music through any FM radio, see “MyFi” in the Table of Contents. To adjust Shuffle From the Settings menu, select Shuffle Select from Sequential (songs played in the order in which they are listed on the Neuros) or Random. To adjust Repeat From the Settings menu, select Repeat Select from Off (no repeat), Repeat One (repeats same song continuously), Repeat All (repeats entire track list, artist, album or playlist continuously). 19 To adjust the Equalizer The Neuros allows you to choose between 6 adjustable 5-band Equalizer settings. The EQ can be set and adjusted either from the Equalizer menu available under Settings or by rightclicking on the Joystick during track playback and selecting Equalizer. Choose the EQ genre you want and right-click to view the adjustable Low, Middle and High sound graphic EQ. Adjust the settings by pressing up or down on the Joystick button. Selecting Restore Defaults from the EQ Genre List will return all settings back to the factory defaults. Left-click to exit the EQ menus. To set Backpack Swapping There are two options when you right-click on Backpack Swap, Controls and Restore Flash. Right-click on Controls to view whether Backpack Swap is set to Auto Detect (the default setting) or Off. Auto Detect checks to see if the contents of the Flash chip have changed since the player was last inserted in the Hard Drive backpack. Selecting Off will cause the contents of the Flash Chip to be cleared each time the player is inserted in the 128 MB backpack, just like in the original 1.x Neuros device firmware. See Backpack Swapping in the TOC for more information. To adjust Presets To set and view Presets Songs, playlists, albums, genres, recordings, HiSi samples, and radio stations can all be set as a preset and activated when one of the five preset buttons is pressed and held down for several seconds. When the preset button is pressed after the preset has been entered, the album, artist or genre will begin playback from the first song of the list. Your selection will be confirmed. To program a song or recording as a preset: Press and hold the Preset button during the first 15 seconds of playback of the desired song, and the song will be saved as a preset from the beginning of the song. Note: Holding the preset button after the first 15 seconds of playback of a track will save a bookmark in the track as a preset. Playback will not start from the beginning of the track. To program an album, artist, or genre as a preset: Press and hold a preset button during the first fifteen seconds of any song of a playlist, artist, album or genre listing. Your selection will be confirmed. The playlist, album, artist or genre will be saved as a preset. When the preset button is pressed after the preset has been entered, the album, artist or genre will begin playback from the first song of the list. To program a radio station as a preset 1. Select the radio station for which you would like to assign a preset button. 2. While the station is playing, press and hold down the preset button of your choice. 3. The preset number will appear on your screen. 20 To view your preset assignments: 1. Go to the Settings menu. 2. Select Presets. Your presets will be listed. Presets cannot be played from this view. To adjust Backlight 1. From the Settings menu, select Backlight 2. Select Off to have the orange backlight always off, or select off after 10 seconds or off after 30 seconds. NOTE: The backlight will always stay on when the power cord is inserted. To adjust Contrast 1. From the Settings menu, select Contrast. 2. Press Up and Down on the Joystick to adjust the contrast of the display. To view Sync Log The Sync log displays the status of information to be synchronized with your PC. From the Settings menu, select Sync Log. • Pending: the number of tracks/files to be transferred to the PC at the next Sync. • Completed the number of tracks/files successfully transferred from the Neuros to the PC and from the PC to the Neuros. • Failed: the number of tracks/files that were not successfully transferred at the last Sync between the PC and the Neuros. To adjust Record Quality 1. From the Settings menu, select Record Quality. 2. Choose from 64 kbps MP3, 96 kbps MP3, 128kbps MP3, or 160 kbps MP3, 8 KHz WAV, 44.1 KHz WAV and 48 KHz WAV. Higher kbps settings create higher quality recording, but also create larger file sizes. WAV files are considerably larger than MP3 files. To adjust Date and Time 1. From the Settings menu, select Date and Time. Right clicking on the Joystick moves you from month > date > year > hour > minute > AM/PM. 2. Press Up and Down on the Joystick to change the values of the settings within each field. 3. Right click to confirm the setting and move to the next field. 4. When complete, Left click on the Joystick to exit and return to the Settings menu. To Restore Defaults 1. From the Settings menu, select Restore Defaults (factory settings). 2. Select Yes or No To view Properties 1. From the Settings menu, select Properties 2. View available memory on your Neuros, the firmware version on your Neuros, and your Neuros player serial number. 21 Backpack Swapping With Neuros Firmware 2, “on-the-fly” backpack swapping is available. When you use the 128 MB Neuros backpack, music you synchronize is stored on the internal flash chip on the player. You can now save the flash chip contents (tracks, recordings, playlists, presets, etc.) when you insert the player into the hard drive backpack. When the player is inserted in the hard drive backpack, a message will appear, asking if you wish to “Save Flash Contents to Hard Drive”. Clicking Yes will begin saving the flash memory contents onto the hard drive. When you are ready to use the smaller backpack, before you remove the player from the Hard Drive backpack, Go to Settings on the main menu and select “Backpack Swap”. Then select “Restore Flash” and “Yes”. The contents of the flash chip will be restored and the Neuros will shut down. When the player is reinserted in the smaller backpack, the flash contents will be restored and ready to play. Firmware and Software Updates Users can easily upgrade their Neuros Synch Manager Application and Neuros device firmware through the Check for Updates options available in the NSM Help Menu We have made the update process automatic. To update firmware or software: 1. You must be connected to the Internet to update your Neuros Sync Manager application software and your Neuros device firmware. 2. From the Neuros Sync Manager, select Help and then select either Check for NSM Software Updates or Check for Neuros Firmware Updates. 3. For firmware updates, select the Synchronization button to transfer these upgrades to your Neuros. 4. Follow the PC prompts for NSM application updates and follow the Neuros display prompts for firmware updates. NOTE: If you have a USB 2.0 backpack, you must have Neuros FW 2 installed. Do not use firmware version 1.45 or lower with your USB 2 backpack. Troubleshooting Problem Neuros is not responding to button clicks. Screen is frozen or device stopped working. MyFi not working. Solution 1. Make sure keypad lock is in the down position. 2. Shut off Neuros by pressing Up on the Joystick button and the Play button at the same time. 3. Wait 15 seconds. Press and hold Play to restart. MyFi Off is selected. From the settings menu, make sure MyFi is set to Auto Detect. MyFi does not have good reception. See the MyFi FAQs at www.neurosaudio.com/support/MyFifaq.asp I am trying to make a voice or line-in recording, but only a 30- second HiSi Recording is made. Click the I just Synchronized the Neuros with button to stop the HiSi recording. Double-click the HiSi button to make a recording. See “Orphan Tracks” in the Table of 22 another PC. Now my old music is gone. What happened? I deleted a track from Neuros Sync Manager and it was deleted from the Neuros. What happened? The Neuros says No records Available After I Synchronized. Unit will not power on My recordings sound distorted. The music I downloaded from the internet will not play properly on my Neuros. Contents of this manual. Tracks deleted from NSM will be deleted from the Neuros, unless also deleted from the Deleted Items bins. Open the Deleted Track bin. Select all of the Tracks and click Restore. Add the tracks to Neuros and Synchronize. Synchronize again. Check NSM Messages window for error messages. Synchronization may not have completed successfully. If problems persist, contact Customer Support. Try any of the following: 1. Make sure the lock button is in down position. 2. Make sure the wall adapter is fully plugged in to outlet. Try a different outlet if possible. 3. Remove the player from the backpack. Plug in the power cord. Reinsert the player. Press and hold the Play button. 4. If you have the car adapter, try powering on the unit with car adapter. 5. Contact Customer Support if problem is not solved by any of the above. Lower the gain setting during recording. The files you downloaded probably have Copyright Protection, called DRM protection. The Neuros cannot play DRM protected files. Delete the tracks from the device and NSM. Support Information For technical, order, or sales support visit www.neurosaudio.com/support, or call us toll-free at 1-866-5-Neuros (563-8767) or contact us via email at [email protected] For help in learning how to find and download music and in converting your CDs into digital format, please email us at [email protected] For additional information on how to develop custom Xi scripts, see www.neurosaudio.com/developers For Neuros forums see http://www.neurosaudio.com/forums Important Safety Information Warning 23 • • • • • Risk of electrical shock - do not disassemble. No user serviceable parts are inside Neuros. Do not disassemble or modify your Neuros. Refer servicing to qualified professional. Do not remove rechargeable battery from the unit. To reduce the risk of shock or injury do not use or operate your Neuros near water. Do not use in places exposed to strong magnetic or electrostatic fields. Never plug the charger/AC adaptor into the earphone port. FCC Rules and Regulations This equipment has been tested and found to comply with the limits for a Class B digital device, pursuant to Part 15 of the FCC Rules. These limits are designed to provide reasonable protection against harmful interference in a residential installation. This equipment generates, uses and can radiate radio frequency energy and, if not installed and used in accordance with the instructions, may cause harmful interference to radio communications. However, there is no guarantee that interference will not occur in a particular installation. If this equipment does cause harmful interference to radio or television reception, which can be determined by turning the equipment off and on, the user in encouraged to try to correct the interference by one or more of the following measures: - Reorient or relocate the receiving antenna. - Increase the separation between the equipment and receiver. - Connect the equipment into an output on a circuit different from that to which the receiver is connected. - Consult the dealer or an experienced radio/TV technician for help. - A shielded cable must be used when connecting a peripheral to the serial ports. Changes not expressly approved by the party responsible for compliance could void the user’s authority to operate the equipment. Operation is subject to the following two conditions: (1) This device may not cause harmful interference; and (2) this device must accept any interference received, including interference that may cause undesired operation. To reduce potential radio interference to other users, the antenna type and its gain should be so chosen that the equivalent isotropically radiated power (EIRP) is not more than that required for successful communication. Warranty Neuros Limited Warranty - Parts and Labor Neuros Audio, LLC (“NA”) warrants your Neuros digital audio computer and accessories to be free from defects in material and workmanship within the following warranty period, starting from the date of sale to the original consumer purchaser. 90 Days - Labor / 1 Year - Parts If this product should prove defective within the first NINETY (90) DAY warranty period, NA will repair or replace the product (at its sole discretion) free of charge. Said product must be returned to NA at the consumer's expense and must include dated proof of purchase. In addition, NA will replace any covered part (with a new or remanufactured part) of this product which proves defective during the next NINE (9) MONTHS after the NINETY (90) DAY labor warranty period. NA warrants replacement products or parts provided under this warranty against defects in materials and workmanship from the date of the replacement or repair for ninety (90) days or for the remaining portion of the original product's warranty, whichever provides longer coverage for you. This warranty does not apply to any Neuros digital audio computer and accessories that are used for commercial, rental, or industrial purposes, are damaged by accident, misuse, abuse, improper line voltage, water, lightning, or any acts of God. This warranty is void if product is altered, modified, or if any parts or service covered by this warranty are furnished by anyone other than NA or its Authorized Warranty Station. This warranty does not cover carrying cases, batteries, cosmetic parts, or any other accessories used in connection with the product or consequential damages due to a defect in the product. ALL IMPLIED WARRANTIES ARE LIMITED TO THE DURATION OF THIS WARRANTY. THIS IS THE COMPLETE WARRANTY BY NA AND NO OTHER WARRANTY, EXPRESS OR IMPLIED, IS VALID AGAINST NA. SOME JURISDICTIONS DO NOT ALLOW LIMITATIONS ON HOW LONG AN IMPLIED WARRANTY LASTS OR AN EXCLUSION OR LIMITATION OF INCIDENTAL OR CONSEQUENTIAL DAMAGES, SO THE ABOVE LIMITATIONS OR EXCLUSIONS MAY NOT APPLY TO YOU. 24 If your Neuros digital audio computer or accessories should prove defective during the next NINE (9) MONTHS following the NINETY (90) DAY labor warranty period, contact NA, and on request NA will give you information on where to send your unit for warranty service. Your dated sales receipt or other proof of purchase will establish your eligibility for warranty service. NA will be responsible only for labor or parts, as applicable, rendered under this warranty and not the loss of any unit, or stored data or programs, delivered to NA or its Authorized Warranty Station. This warranty gives you specific legal rights, and you may have other rights which may vary from jurisdiction to jurisdiction. Neuros Audio, LLC 2 N. Riverside Plaza, Suite 200 Chicago, Illinois 606o6 PHONE 866-5-NEUROS (866-563-8767) - KEEP YOUR SALES SLIP WITH THIS WARRANTY STATEMENT - 25