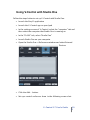
1
V-Control
Version 1.7
User’s Guide
www.neyrinck.com
V-Control 1.7 User’s Guide e
1
Contents
Contents..........................................................................................2
Welcome to V-Control..................................................................... 4
Features ..................................................................................................................................................... 5
Quick Start...................................................................................... 6
Setting up V-Control for use with your D.A.W....................................................................................... 6
Using V-Control ....................................................................................................................................... 6
Setting Up a Local Network with Wi-Fi.......................................... 7
Installing Ney-Fi........................................................................................................................................ 7
General Troubleshooting............................................................................................................................ 8
Using the MultiPanel.....................................................................10
Using the V-Window...................................................................... 11
Operational Notes.................................................................................................................................... 12
V-Window Tips....................................................................................................................................... 12
Using the Jog/Shuttle/Scrub Wheel...............................................13
Using V-Control with Pro Tools....................................................14
Setting up V-Control as a control surface in Pro Tools........................................................................ 14
Channel Strip Interface............................................................................................................................ 17
Right-Hand Side Controls....................................................................................................................... 19
Bottom of Screen Controls .................................................................................................................... 20
Transport Popup Window........................................................................................................................ 21
Edit Panel................................................................................................................................................. 23
Modifiers Popup Window....................................................................................................................... 27
Keypad Popup Window ......................................................................................................................... 28
Surround Panel......................................................................................................................................... 30
Insert/Plug-In Editing Popup Window ................................................................................................... 32
Known Issues with V-Control 1.7 and Pro Tools.................................................................................. 33
Using V-Control with Cubase/Nuendo..........................................34
Setting up V-Control in Cubase/Nuendo................................................................................................ 34
Channel Strip Interface .......................................................................................................................... 36
Right-Hand Side Controls ...................................................................................................................... 38
Bottom of Screen Controls .................................................................................................................... 41
Transport Popup Window........................................................................................................................ 42
Edit Panel................................................................................................................................................. 42
Locator Popup Window........................................................................................................................... 44
Channel Popup Window.......................................................................................................................... 45
Known Issues with V-Control 1.7 and Cubase/Nuendo........................................................................ 48
Using V-Control with Logic .......................................................... 49
Setting up V-Control in Logic................................................................................................................ 49
Channel Strip Interface .......................................................................................................................... 51
Right-Hand Side Controls ...................................................................................................................... 53
Bottom of Screen Controls .................................................................................................................... 54
2
V-Control 1.7 User’s Guide
Transport Popup Window ...................................................................................................................... 55
Edit Panel................................................................................................................................................. 56
Plug-In Panel .......................................................................................................................................... 58
Instrument Panel ..................................................................................................................................... 60
Known Issues with V-Control 1.7 and Logic........................................................................................ 61
Using V-Control with Final Cut 5, 6, or 7...................................... 62
Setting up V-Control in Final Cut.......................................................................................................... 62
Channel Strip Interface .......................................................................................................................... 63
Right-Hand Side Controls ...................................................................................................................... 64
Bottom of Screen Controls .................................................................................................................... 65
Shortcut Keys........................................................................................................................................... 66
Using V-Control with Media Composer........................................69
Setting up V-Control in Media Composer (Windows and OS X)........................................................ 69
Channel Strip Interface .......................................................................................................................... 77
Right-Hand Side Controls....................................................................................................................... 77
Bottom of Screen Controls .................................................................................................................... 79
Shortcut Keys........................................................................................................................................... 80
Additional Modes.......................................................................... 82
Setup of Additional D.A.W. Modes....................................................................................................... 83
Channel Strip-Additional D.A.W. Modes............................................................................................... 84
Bottom of Screen-Additional D.A.W. Modes........................................................................................ 86
Right Hand Side Controls-Additional D.A.W. Modes........................................................................... 87
Edit Panel-Additional D.A.W. Modes.................................................................................................... 88
Using V-Control with Audition ..................................................... 89
Using V-Control with Digital Performer .......................................94
Using V-Control with FL-Studio ...................................................97
Using V-Control with Live ............................................................ 98
Using V-Control with Metric Halo “MIO” Console .....................100
Using V-Control with Reaper ..................................................... 102
Using V-Control with Reason .....................................................103
Using V-Control with SONAR ..................................................... 106
Using V-Control with Studio One ............................................... 110
Using V-Control with Tracktion ................................................. 121
V-Control 1.7 User’s Guide e
3
Welcome to V-Control
V-Control Pro is an iPad app that provides a virtual multi-touch control
surface for Digital Audio Workstation (D.A.W.) software applications
including Pro Tools®, Logic®, Cubase/Nuendo® and many more.
V-Control acts as a multi-touch control surface, allowing the user to
access transport, editing and mixing functions, as well as touch-based
access to graphical plug-in interfaces, on both Macintosh OS X and
Microsoft Windows systems.
In tandem with your iPad, V-Control’s portability, small footprint, and
ease-of-use provide a powerful addition for the user.
4
V-Control 1.7 User’s Guide
Features
V-Control offers the following overall feature set. Note that the specific
features available will vary by specific D.A.W. See each section of the
manual for specific details)
•
Control fader level and stereo panning per channel
•
Control of mute, solo, and track arming per channel
•
Multi-segment level metering per channel
•
Full display of track names and touch-based channel selection
•
Touch and swipe based channel banking, single or 8-channels
•
Edit auxiliary send volume, incl. send muting and pre/post status
•
D.A.W. plug-in editing using both native interface and full touchcontrol, as well as encoder/LCD display based editing
•
Flip mode inverts functions of channel faders and rotary controls
•
Select specific automation modes separately for each channel
•
Full transport controls, jog/shuttle strip, and control of common
transport related functions (loop, punch, online, etc.)
•
Detailed time counter, small and large-sized versions
•
Cursor Diamond for track navigation and vertical/horizontal zoom
control
•
Full editing commands panel, with large amount of shortcut
controls completely customized for each specific D.A.W. platform.
•
Quick access to mark in and mark out creation and recall
•
Dedicated mixer/editor window toggling commands
•
Automation write enable/disable for volume, pan, mute, send
•
Integrated user’s manual, accessible from within the app
V-Control 1.7 User’s Guide e
5
Quick Start
Setting up V-Control for use with your D.A.W.
•
Launch the Ney-Fi wireless hosting application on your Mac or
Windows system (See details below on installing Ney-Fi). Ney-Fi
must be running in order for the V-Control app on the iPad to
communicate with the D.A.W. running on your computer.
•
Configure the connections in your specific D.A.W. as per the
instructions in the appropriate section of the user’s manual.
•
Within the V-Control app itself, select the gear icon button to
display the settings window.
•
In this settings window's computer table, select the target
computer you wish to connect to.
•
In this window's “D.A.W.” section, select the specific D.A.W. you
wish to connect to.
•
Enjoy!
·
Using V-Control
V-Control’s Interface consists of the following main areas:
6
•
The channel strip interface that displays eight channels of the
D.A.W. at a time, with assorted controls
•
A vertical row of buttons on the right hand side of the screen,
offering various functions and shortcuts
•
A horizontal row of controls on the bottom of the screen, offering
mainly transport commands and a time counter
•
Various popup windows for additional functions
•
The “MultiPanel” window, which offers additional areas such as the
Edit Panel, V-Window, and inline instruction manual.
•
A jog/shuttle/scrub wheel. Double-tap the mixer area to
view/hide the wheel. The preferences section lets you make the
wheel transparent so you can see all your meters and faders.
V-Control 1.7 User’s Guide
Setting Up a Local Network with Wi-Fi
V-Control uses the iPad’s Wi-Fi capabilities to communicate with your
D.A.W. Please make sure the D.A.W. computer and the iPad are connected
to the same local area network (LAN).
While you can get very good performance when wirelessly connected to
your host computer, you can achieve the highest levels of performance in
one of the following two ways:
•
Configuring your host computer to use a "hard-wired" Ethernet
connection to your local network
•
Using a direct Wi-Fi connection between the iPad and computer.
o For information on setting up a direct computer-tocomputer network on a Mac, see “Creating a computer-tocomputer network in Mac Help.
o For information on setting up a direct computer-tocomputer network on Windows, look online for information
about creating an “ad-hoc” Windows network.
Installing Ney-Fi
Ney-Fi is a free utility that must be installed and run on your D.A.W.
computer.
Ney-Fi creates a virtual software MIDI port for the D.A.W. software to
communicate with V-Control over your network, so it must be running
for V-Control to detect the D.A.W. system.
Follow these instructions to install Ney-Fi:
•
Quit the D.A.W. software if it is currently running.
•
Download the appropriate OS X or Windows Ney-Fi installer at
www.neyrinck.com/downloads
•
For the Windows installer:
o Launch the "Ney-Fi Setup.exe" application to install the NeyFi app, MIDI driver and runtime libraries.
V-Control 1.7 User’s Guide e
7
o The runtime libraries installer is a separate installer that you
will need to authorize. Make sure to also install Bonjour if it
is not already installed.
•
For the Mac Installer:
o Double-click the downloaded installer to unzip the
downloaded installer package, if Safari has not automatically
done so.
o Double click the “Ney-Fi.pkg” icon to launch the mac installer
o Follow the installer’s onscreen instructions to complete the
installation process
•
Connect your computer to your chosen local network.
•
Launch Ney-Fi
o Windows: Click on the Start Menu, locate “Ney-Fi” and launch
the Ney-Fi application.
o Mac: Launch Ney-Fi from the applications folder
Ney-Fi is a simple “menu-bar only” application on the Mac, and a "system
tray application" on Windows, thus there is nothing for you to configure
on either operating system.
General Troubleshooting
•
Verify the iPad and target D.A.W. computer are connected to the
same local area network.
•
Verify that the Ney-Fi utility is running on your host D.A.W.
computer.
o On Mac OS X Ney-Fi operates as a menu bar application, and
should be visible in the upper right-hand corner area of the
monitor.
o On Windows Ney-Fi operates as a system tray utility, and
should be visible among other Windows system tray
programs.
8
V-Control 1.7 User’s Guide
•
Verify that V-Control sees the D.A.W. computer on the network by
touching the gear icon to display the Setup window. Check the
computer table (located in the settings window) to verify your
computer is selected
•
Verify that you have selected V-Control as the MIDI input and
output source in the control surface setup window of your D.A.W..
•
Verify that Bonjour is installed on your Windows systems.
•
Verify that firewall blocking is disabled for Ney-Fi
V-Control 1.7 User’s Guide e
9
Using the MultiPanel
V-Control offers a “MultiPanel”, a versatile sliding window that can
display various additional content to the main interface.
To toggle the MultiPanel on/off, tap the MultiPanel icon
which is located in the lower right-hand corner of the V-Control
interface.
The MultiPanel window will appear, displaying a blank interface if it has
not yet been used.
To select a specific set of content to display within the MultiPanel, tap the
second MultiPanel button, located in the upper left-hand corner of the
MultiPanel window.
Choices for the MultiPanel window include:
•
The “V-Window” (see next section for details)
•
Edit Panel (specific to each D.A.W. mode)
•
V-Control User’s Guide
•
Plug-In (Logic mode only)
•
Instrument (Logic mode only)
•
Surround Panner (Pro Tools mode only)
Touch the “full-screen” icon at the top of the MultiPanel window to switch
the MultiPanel can be toggled in and out of “full screen” mode by tapping
on the icon looks like a double-sided arrow.
Touch the MultiPanel icon again to close the MultiPanel window and
return to the normal V-Control interface.
10
V-Control 1.7 User’s Guide
Using the V-Window
V-Control has the ability to natively display and control D.A.W. plug-in
windows, as well as other computer application windows, directly within
V-Control itself.
Using this function, users are free to adjust an effect or instrument plugins directly from within V-Control, using a finger to drag and/or tap the
assorted controls.
This process offers powerful new capabilities for adjusting a mix and
tweaking effects, since it allows for plug-ins to be adjusted comfortably
with one’s fingers, all while retaining the native plug-in interface carefully
designed by the plug’s software authors.
The process works as follows, for all D.A.W. modes:
•
Open the MultiPanel window, then select “V-Window” in the list of
choices on the left side of the window.
•
Press the “select” button in the upper right hand corner off Window,
to choose among all available computer windows to display and
control.
o The choices are organized first by computer application, and
then from within the various windows within each application
•
Select the specific window you wish to control, which in many cases
would be the floating window of an effect or instrument plug-in
•
The V-window interface will display a copy of the specifically
selected computer window.
•
Touch the controls in the window, which will have the same effect
as adjusting those controls with a mouse.
V-Control 1.7 User’s Guide e
11
Operational Notes
•
In some cases, V-Window will see a new plug-in window
automatically. However, it will occasionally go dark. If this occurs,
simply tap the select button and re-select the specific window you
wish to control.
•
V-Window is designed to be as responsive as possible to a mouse
drag operation. This means that it does not respond to iPadspecific gestures such as pinch, drag, and double tap.
•
To adjust the area of the virtual window that can be seen and
controlled, touch the “Adjust” button, which allows you to:
•
Drag the window in V-Control to see the desired content.
•
Pinch to enlarge or reduce the size of the window display.
•
When this action has been completed, touch the “Done” button.
•
Note that, when using V-Window, not only is the selected window
displayed, but also all windows "above" it, allowing windows such
as popup messages to be seen can be seen. This means that
sometimes you may select a window, but will actually see a
different window above.
If this occurs, simply tap on a section of the desired window to
bring it forward in the V-Window.
V-Window Tips
Although V-Window is particularly useful for adjusting plug-ins, it can be
used to control and adjust ANY open window on the target computer.
Thus, it can be used for any mouse-based action that must be performed
in a remote location.
•
From a plug-in window in Pro Tools, apply various inserts to the
tracks directly, to switch to a different plug-in.
•
Control the Automation panel in Pro Tools
•
Control a separate application altogether, such as an audio
sampler.
•
From a plug-in window in Logic, select various inserts and tracks
directly, to change to a different plug-in.
12
V-Control 1.7 User’s Guide
•
Control the entire computer desktop, to select various menu bar
functions.
As with all other content of the MultiPanel, the V-Window can be viewed
in full screen mode, letting you work with as much screen real estate as
possible.
V-Control 1.7 User’s Guide e
13
Using the Jog/Shuttle/Scrub Wheel
V-Control has a jog/scrub/shuttle wheel that can be optionally displayed
in all DAW modes except Audition, Final Cut 7, and Media Composer.
The wheel is permanently placed in the user interface for Audition, Final
Cut 7, and Media Composer. For the other DAW modes, you can show /
hide the wheel by double-tapping the mixer channel strip area. The
wheel can optionally be made partially transparent so you can see all
meters and fader underneath it. To set it transparent, go to the Setup
popover, select Preferences, and set the Transparent Wheel Off/On
control.
14
V-Control 1.7 User’s Guide
Using V-Control with Pro Tools
Setting up V-Control as a control surface in Pro Tools
To set up V-Control for use with Pro Tools, perform the following steps:
•
Launch the Ney-Fi application
•
In Pro Tools, select: Setup > MIDI > Input Devices.
•
Enable the V-Control and both V-panner MIDI inputs by selecting
their respective check boxes.
•
Select the Peripherals dialog
from the Setup menu.
V-Control 1.7 User’s Guide e
15
•
Select the MIDI Controllers tab, and then set up the following three
controllers:
o For Controller #1, select type “HUI” and then select “VControl” as both the “receive from” and “send to” choices.
Select “8” for the “# of channels” field.
o For controller #2, select type “SurroundPan” and then select
“V-Pan 1” as both the “receive from” and “send to” choices.
Select “0” for the “# of channels” field.
o For controller #3, select type “SurroundPan” and then select
“V-Pan 2” as both the “receive from” and “send to” choices.
Select “0” for the “# of channels” field.
•
16
Close and re-open
V-Control on the iPad. If everything is set up correctly, the
V-Control 1.7 User’s Guide
computer running Ney-Fi will be available to choose from in the
computer table in the settings window.
•
V-Control and Pro Tools should now have complete bi-directional
control of each other.
•
The above steps are a one-time process and do not need to be
repeated again.
V-Control 1.7 User’s Guide e
17
Channel Strip Interface
The channel strip interface is the area that allows adjusting levels and
panning, adjusting sends, and working with mute and solo controls. It
contains the following controls, going from top to bottom:
Channel Name: V-Control will automatically display the name of your Pro
Tools track at the top of the channel, in an abbreviated form.
Channel Select: Touch the scribble strip at the top of channel to select a
channel. Use the modifier buttons to manage selection and operations on
multiple channels.
Fader: Touch the fader and drag it up and down to adjust the signal level
of the channel. Since the iPad uses a multi-touch interface, multiple
faders can be adjusted at once just like on a real hardware mixer.
Double-tap the fader-cap to move the fader level to 0 dB (unity gain).
You can disable the double-tap feature in the Preferences section of the
Setup.
Bank Increment/Decrement: Using two fingers, touch the surface in the
fader area away from a fader cap and swipe left or right. Each swipe will
bank left or right eight channels.
Channel Increment/Decrement: Using one finger, touch the surface in
the fader area away from a fader cap and drag left or right. Each swipe
will bank left or right one channel at a time.
Keep your finger down and keep dragging to increment more than one
channel.
Level Meter: The channel strip contains a multi-segment meter display
that displays the signal level of the channel’s audio.
Clear Peaks: Touch the peak indicator on any given meter to clear its
red-colored peak (overload) indicator.
Solo: Touch the solo button to solo the channel. Press it again to un-solo
the channel.
Mute: Touch the mute bottom to mute the channel. Press it again to
unmute the channel.
Record: Touch the record button to record-arm the channel. Press it
again to record-safe the channel.
18
V-Control 1.7 User’s Guide
Insert / Plug-In Editing: Touch the INS button of a channel to display VControl’s insert/plug-in display, where you can adjust parameters of
plug-ins inserted on the channel. For more information, see the section
titled “Insert/Plug-In Editing Popup Window”.
Touch the button again to turn off bypass for all 10 insert slots inserted
in the channel. The inserted effects are now active again in the audio
path.
Automation Mode: Touch the “A” button of a channel to display the
automation mode popup window, which allows selection of the following
different automation modes:
•
Off: Turns automation for the channel off
•
Read: Switches the channel to automation “read” mode.
•
Touch: Switches the channel to automation “touch” mode.
•
Latch: Switches the channel to automation “latch” mode.
•
Write: Switches the channel to automation “write” mode.
•
Trim: Switches the channel to automation “trim” mode.
•
Status: Display current automation status of the selected channel
•
All: Select this if you want to set the automation mode for all
tracks.
Rotary Controls: These virtual knobs allow you to adjust both channel
panning as well as send levels A-E for the relevant Pro Tools channel,
when used in conjunction with the “Pan” and “A-E” buttons on the right
hand side.
To adjust the rotary encoder, touch the encoder and swipe using an updown or side-to side motion.
The rotary encoders operate as follows, when used to adjust stereo
panning:
•
Touch the Pan button again to switch between the Left and Right
pan controls, when working with a stereo track (the Pan button
blinks when the right panner is active).
The rotary encoders operate as follows, when used to adjust channel
auxiliary sends
V-Control 1.7 User’s Guide e
19
•
Touch buttons A, B, C, D, or E to select which of the five aux sends
in Pro Tools to adjust
•
Tap the center of the rotary control to toggle the send between
pre-fader and post fader status (V-Control Pro only).
•
A mute button is also present below the sends. When this button is
toggled on, tapping the center of the encoder will mute the send,
as opposed to toggling its pre/post status.
NOTE: Due to limitations in the “HUI” control surface protocol, that VControl must use to communicate with Pro Tools, adjustments of
auxiliary sends F-J are not available.
Right-Hand Side Controls
The buttons on the right hand side of the screen control various
additional functions, and work as follows:
Pan: Touch this button to switch the rotary control to panning mode,
allowing the user to adjust L-R panning of each channel.
A-E: Touch any of these 5 buttons to switch the rotary controls to
auxiliary send controls for sends A-E.
Flip: Touch this button to reverse the functionality of the channel faders
and the rotary controls, allowing you to adjust aux sends using the
faders.
When flip mode is active, the channel mute button acts as a send mute.
Mute: Touch this control to switch the rotary control touch function from
pre/post control, to send-mute control. Touch the mute button again to
return the rotary controls to pre/post controls.
Edit/Mix: Touch this button to toggle the Pro Tools interface on the
computer between its two main interface screens: “Edit” and “Mix”
Record: Touch this button to put all channels into record arm mode.
Auto Input: Touch this button to toggle Pro Tools in an out of “autoinput” mode
Group Suspend: Touch this button to suspend all track groups that have
been created. Touch the button again to resume all normal grouping
function.
20
V-Control 1.7 User’s Guide
Auto Suspend: Touch this button to suspend all automation that has
been written to the session. Touch the button again to switch the
automation back on.
Keypad: Touch this button to toggle the V-control keypad popup window
on/off. See the section titled “Keypad Popup Window” for further details.
Mark In: Touch this button to set a mark in point at the current location
of the play head.
Mark Out: Touch this button to set a mark out point at the current
location of the play head.
Save: Touch this button to save the current session.
Undo: Touch this button to undo the last performed action of the
session.
Escape: Touch this key to cancel out any onscreen dialog, similar to
pressing the escape key on a computer keyboard.
MultiPanel: Touch this button to display the MultiPanel interface. Touch
the button again to close the MultiPanel.
Bottom of Screen Controls
The buttons on the bottom of the screen offer various transport related
controls, as well as the settings page button and the modifier keys popup
window. The controls work as follows:
Settings: Touch the “gear” button to bring up the settings screen. Touch
the button again to return to the main interface.
Modifiers: Touch this button with the vertical arrow icon to toggle the
modifiers key popup window on/off. See the section titled “Modifiers
Popup Window” for further details.
Banking Popup Window (<>): Touch this button to bring up the banking
popup window, which contains 4 buttons that allow banking the
displayed channels left or right, either 1 or 8 channels at a time.
These buttons serve as an alternate interface for bank/channel
increment/decrement, for users who prefer this method to the onefinger/two-finger swiping method.
V-Control 1.7 User’s Guide e
21
Time counter: This display reflects the ongoing session time counter
from Pro Tools. It can display the session counter as SMPTE,
minutes/seconds, or bars and beats, as selected in the Pro Tools session.
Big Counter Display: Touch the left area of the counter display to show
or hide the big counter, which will show the scrolling time value at a
much larger size. Touch the same spot on the counter again to close the
big counter window.
Note that you can still touch the faders with this display active.
Pre-Roll: Touch the pre-roll area of the counter to toggle the Pro Tools
pre-roll function on when playing or recording. Touch the pre-roll area
again to turn pre-roll off.
Post Roll: Pressing the post-roll area of the counter to toggle the Pro
Tools post-roll function on when playing or recording. Touch the postroll area again to turn post-roll off.
Return to Zero: Touch this button to move the playback cursor to the
start point of the project.
Rewind: Touch this button to move the play head backwards within
project
Fast Forward: Touch this button to move the play head forwards within
the project.
End: Touch this button to move the play head to the end point of the
project.
Stop: Touch this button to stop the transport of the current session.
Play: Touch this button to start playback of the current session.
Record: Touch this button to begin recording in the current session.
Transport Popup Window
The buttons in the transport popup window offer additional transport
related commands, and work as follows:
Loop: Touch this button to toggle the transport’s loop function on/off.
The button illuminates when the loop function is active.
22
V-Control 1.7 User’s Guide
Quick Punch: Touch this button to toggle the quick-punch function
on/off, which allows for real-time punching in the Pro Tools software.
The button illuminates when the quick punch function is active.
Online: Touch this button with the clock icon to toggle the Pro Tools
session’s online (chase) status on/off.
Memory Locations
1-8: Touch any of the buttons 1-8 to quickly navigate to the respective
memory location.
Create: Touch the create button, in conjunction with one of the 8
buttons, to create a new memory location from the current play head
position, and assign it to that number.
Audition: Touch this button to perform the “audition” function on a
selected audio clip.
Wheel Button: Touch this button to display the Jog/Shuttle Wheel.
V-Control 1.7 User’s Guide e
23
Edit Panel
V-Control’s Pro Tools mode offers a comprehensive edit panel, offering
many handy shortcuts and functions. To use the edit panel, touch the
MultiPanel button, and then select “edit” from the list of choices.
The edit panel includes the following groups of controls.
I/O Controls:
Input: Touch this button to temporarily switch the channel displays to
show the currently assigned hardware input feeding each channel.
Output: Touch this button to temporarily switch the channel displays to
show the currently assigned hardware output fed by each channel.
Assign: Touch this button to use each channel’s rotary control to assign
an input or output to the appropriate channel.
Group Controls:
Status: Touch this button to show the group status for each channel, in
its corresponding channel display.
Create: Touch this button to create a group from any currently selected
channels.
Window
Edit: Touch this button to switch the Pro Tools main interface to the edit
window.
Mix: Touch this button to switch the Pro Tools main interface to the mix
window.
Memory: Touch this button to toggle the Pro Tools memory (locators)
window on/off.
Transport: Touch this button to toggle the Pro Tools transport window
on/off.
Ins/pl: Touch this button to toggle the Pro Tools “insert in place”
function on/off.
24
V-Control 1.7 User’s Guide
Setup: Touch this button to toggle the Pro Tools session setup window
on/off.
Auto Write
Vol: Touch this button to toggle the channel volume automation
parameter on/off, when any channels are in automation write mode.
Pan: Touch this button to toggle the channel pan automation parameter
on/off, when any channels are in automation write mode.
Send Vol: Touch this button to toggle the channel send volume
automation parameter on/off, when any channels are in automation write
mode.
Plug-in: Touch this button to toggle the channel plug-in automation
parameter on/off, when any channels are in automation write mode.
Mute: Touch this button to toggle the channel mute automation
parameter on/off, when any channels are in automation write mode.
Send-mute: Touch this button to toggle the send-mute automation
parameter on/off, when any channels are in automation write mode.
Mode
Shuffle: Touch this button to switch the editing grid to “shuffle” mode.
Spot: Touch this button to switch the editing grid to “spot” mode.
Slip: Touch this button to switch the editing grid to “slip” mode.
Grid: Touch this button to switch the editing grid to “grid” mode.
Zoom Preset
Store: Touch this button to store the current zoom settings into a zoom
preset, when used in conjunction with one of the 1-4 buttons.
Recall: Touch this button to recall one of the four stored zoom settings,
when used in conjunction with one of the 1-4 buttons.
V-Control 1.7 User’s Guide e
25
1-4: Used in conjunction with the store and recall buttons, as described
above.
Tool
Trim: Switches the computer cursor to the “trim” tool.
Zoom: Switches the computer cursor to the “zoom” tool.
Select: Switches the computer cursor to the “select” tool.
Scrub: Switches the computer cursor to the “scrub” tool.
Grab: Switches the computer cursor to the “grab” tool.
Pencil: Switches the computer cursor to the “pencil” tool.
Command
Capture: Touch this button to issue the “capture” command in Pro Tools.
Separate: Touch this button to issue the “separate” command in Pro
Tools, dividing the selected audio clip into two separate ones at the
current location of the play head.
Cut: Touch this button to cut the currently selected audio clip, removing
it from the session but also copying it into the copy buffer memory.
Copy: Touch this button to copy the currently selected audio clip into the
copy buffer memory.
Paste: Touch this button to paste the audio clip currently residing into
the memory buffer, into the session at the current location of the play
head.
Delete: Touch this button to delete the currently selected audio clip,
removing it from the session.
Cursor Diamond:
Nav/Zoom/Select: Touch this button to toggle the use of the cursor
diamond between:
26
V-Control 1.7 User’s Guide
•
Zoom Mode: In this mode, the cursor up/down keys adjust the
waveform height of the tracks, while the cursor left/right keys
adjust the zoom level of the edit timeline.
•
Nav Mode: In this mode, the cursor up/down keys allow you to
select a track, while the cursor left/right keys allow selection of
audio regions within a track
V-Control 1.7 User’s Guide e
27
Modifiers Popup Window
This popup window offers several modifier keys (duplicating the modifier
keys found on a standard computer keyboard). These keys provide
variant functions when used in conjunction with other commands.
•
Touch the modifiers button at the lower left side of the app to
display the modifier keys popup window.
•
Touch each modifier key you want to be active; the modifier keys
will hold their current state so you don’t have to keep a finger on
them while you’re using them.
•
All modifier keys will be deactivated when you close the modifier
buttons display.
•
The four modifier keys behave the same way as when used from a
computer keyboard within Pro Tools:
o
“Shift” emulates the Shift key on a computer keyboard
o “Control” emulates the Control key on a computer keyboard
o “Option” emulates the Option key on a computer keyboard
o “Command” emulates the Command key on a computer
keyboard
·
Pressing the “default” key disengages any previously activated
modifier keys.
NOTE: The commands issued by the modifier window are “sticky”, which
allows them to be used in combination with any commands used in the
channel automation popups.
28
V-Control 1.7 User’s Guide
Keypad Popup Window
The keypad popup window provides a numeric keypad that provides
many control features for Pro Tools, and works as follows:
Note that Pro Tools must be the foreground app on the computer, and
will not receive the keypad commands if it is in the background.
Clear: Touch this button to clear any previously entered values from the
counter.
= (Capture Time Code): Touch this button to capture the value of any
time code currently entering the session, and enter it into the session’s
time code window.
/ (Enter Start/End Length): Touch this button in conjunction with the
numbers keys to assign a start and end time to the session.
* (Enter Main Counter): Touch this button in conjunction with the
number keys, to enter a time code value into the main session counter
window.
- (Nudge Back): Touch this button to nudge a selected audio clip
backwards in time, by the assigned nudge value.
+ (Nudge Forward): Touch this button to nudge a selected audio clip
forwards in time by the assigned nudge value.
Enter (Create Memory Location): Touch this button to create a new
memory location at the current location of the play head.
1 (Rewind): Touch this button to move the playback cursor backwards
within the project.
2 (Fast-Forward): Touch this button to move the play head forward
within the project.
3 (Record): Touch this button to begin recording in the current session.
4 (Loop Playback): Touch this button to toggle the loop playback
function on/off.
5 (Loop Record): Touch this button to toggle the loop record function
on/off.
6 (Quick Punch): Touch this button to toggle the Pro Tools “Quick Punch”
function on/off, allowing you to perform live recording punches in the
session.
V-Control 1.7 User’s Guide e
29
7 (Metronome): Touch this button to toggle the audible metronome
on/off.
8 (Count-Off): Touch this button to toggle the count-off function on/off.
9 (Merge/Replace): Touch this button to toggle the Pro Tools
merge/replace function on/off.
30
V-Control 1.7 User’s Guide
Surround Panel
V-Control’s Pro Tools mode offers a surround-panning panel, allowing
you to control surround panning of a track when Pro Tools is set up with
a surround-sound mixer (as opposed to stereo).
To use the Surround Panel, touch the MultiPanel button, and then select
“Surround Panner” from the list of choices.
This Surround Panel contains the following controls:
Surround Panner Display: This screen shows the current position of the
track within the surround sound field.
Two surround panner screens are shown in the popup, in total. This
allows you to:
•
Adjust the panning of both sides of a stereo track
•
Adjust the panning of two mono tracks, simultaneously
Each panner window has its own set of independent controls allowing
them to work as two completely separate panning modules.
Pan-Position Screen: Touch and drag a path in this display to control the
surround pan position of the audio track, within the surround-panning
field. This touchscreen area emulates the hardware panner joystick on a
Pro Tools surround panner.
NOTE: Due to limitations of the surround panner protocol, the screen will
not show any indication of the current position of the audio signal, within
the sound field. One workaround to this limitation would be to use the
V-Window feature to display and control a panner window so you can see
the pan position.
Cursor Left Button: Touch this button to move panner focus to the track
above (if the Pro Tools Edit window is active) or to the left (if the Pro
Tools Mix window is active).
Cursor Right Button: Touch this button to move panner focus to the
track below (if the Pro Tools Edit window is active) or to the right (if the
Pro Tools Mix window is active).
Cursor Up Button: Touch this button to step upwards through the main
output, and send panners on the focused track (so that you can select a
panner to control).
V-Control 1.7 User’s Guide e
31
Cursor Down Button: Touch this button to step downwards through the
main output, and send panners on the focused track (so that you can
select a panner to control).
Window Button: Touch this button to toggle on/off the panner window of
the targeted main output or send in your Pro Tools session
Right Button: Touch this button to toggle focus between panners on a
stereo track, allowing you to choose between surround panning of the
left or right side of the track, in a single surround pan screen.
32
V-Control 1.7 User’s Guide
Insert/Plug-In Editing Popup Window
The insert/plug-in editing window allows you to adjust parameters of an
inserted plug-in. It contains the following displays and controls:
Rotary Controls: These four controls perform two separate functions:
•
Selects a specific plug-in to assign to an insert slot
•
Adjusts parameter values for an assigned plug-in
Parameter Displays: These four display slots show the currently
assigned plug-ins and plug-in parameters.
Assign: Touch this button to assign a plug-in to the relevant channel.
Ins/Params: Touch this button to toggle the parameter display between
two functions:
•
Insert Mode: The display shows what plug-ins are assigned to a
particular insert
•
Parameter Mode: The display show the parameters available to a
selected plug-in, allowing them to be adjusted with the rotary
controls
Window: Touch this button to toggle the GUI window on/off for the
selected plug-in.
Bypass: Touch this button to bypass all inserts on the relevant channels.
Compare: Touch this button to toggle between the last adjusted
parameter and the previous setting, allowing an A/B comparison of a
parameter adjustment.
Page Right: Touch this button to page right to the next four effects
parameters to be edited.
Page Left: Touch this button to page right to the previous four effects
parameters to be edited.
V-Control 1.7 User’s Guide e
33
Known Issues with V-Control 1.7 and Pro Tools
•
The “Create Location” button in V-Control Pro will not operate
correctly if Pro Tools has the setting "Use Separate Play and Stop
Keys" enabled. You may instead use the keypad to create a
memory location by typing period and enter.
•
The “Grab Tool” button in V-Control Pro will only cycle you through
the Separation and Object Grab tools. You must select the Time
Grab Tool directly in Pro Tools.
•
The Zoom Preset buttons 1-4 will not operate correctly unless you
press Recall or Store before you select them.
•
Loop Record mode is not indicated. The HUI protocol that VControl uses does not provide the ability to display it, but does
allow it to be switched using the keypad.
•
Pro Tools must be in the foreground to receive commands via the
Keypad popup window..
•
Pro Tools must be in the foreground to use the zoom presets,
memory locations, tool select, edit mode select features in the Edit
popover.
34
V-Control 1.7 User’s Guide
Using V-Control with Cubase/Nuendo
Setting up V-Control in Cubase/Nuendo
To use V-Control with the Macintosh OS X or Windows versions of Cubase
or Nuendo, perform the following steps:
•
Launch the Ney-Fi application
•
Launch the V-Control app on your Ipad
•
In the settings screen of V-Control, select the “computer” tab and
then select the computer that Cubase is running on
•
In the “D.A.W.” tab, select “Cubase”
•
Launch Cubase on your computer
•
Click on the “Devices” menu at the top of the screen, then click on
“Device Setup”. The device setup window will appear.
V-Control 1.7 User’s Guide e
35
•
In the device setup window, click on “Remote Devices” in the lefthand column, and then click on the “plus” sign.
•
A drop-down list of remote devices will appear. Select “Mackie HUI”
from the drop-down list.
•
A device named ”Mackie HUI” will now appear in the device list,
with settings for it shown on the right-hand side. Click on the
fields for “MIDI Input” and “MIDI Output” and select “V-Control” as
the choice for both fields.
36
V-Control 1.7 User’s Guide
•
Click “OK” to close the Cubase remote devices window.
•
V-Control and Cubase/Nuendo should now have complete bidirectional control with each other. Verify operation by adjusting
the faders and transport controls in both the V-Control app and
the Cubase/Nuendo software. Actions performed in the
Cubase/Nuendo software and V-Control should be reflected in the
other.
Channel Strip Interface
The channel strip interface is the area that allows adjusting levels and
panning, adjusting sends, and working with mute and solo controls. It
contains the following controls from top to bottom:
Channel Name Display: This display at the top of each channel displays
the name of the channel, matching the channel name in the D.A.W.
software itself.
Channel Select: Touch the track name at the top of a channel to select
that channel. The selected channel changes to light grey to show it has
been selected.
Panning/Aux Level Controls: These controls allow you to adjust both
channel panning as well as send levels 1-8 for the channel. Their specific
function is selected using the “Pan”, “1-4”, and “-5-” buttons on the right
hand side of the V-Control interface.
The panning/aux level controls work as follows, when used to adjust
stereo panning:
•
Touch the pan button, on the right hand side of V-Control. The
horizontal swiping motion now controls panning for each channel.
•
A vertical blue line will indicate the current panning position.
The level controls work as follows, when used to adjust channel auxiliary
sends
•
To adjust one of the first four aux sends, touch one of the buttons
1-4, on the right hand side of V-Control.
V-Control 1.7 User’s Guide e
37
•
To control aux sends 5-8, touch the -5- button repeatedly, it will
scroll through values 5, 6, 7, and 8, allowing you to select any of
those aux sends.
•
Swipe the level controls in to increase/decrease the level of the
selected aux send
•
Tap the center of the control to toggle the send on/off, allowing for
quick and easy bypassing of the channel aux send. The bypass
function can also be controlled by the “send bypass” button,
located further down on the channel strip.
Mute (M): Touch the mute bottom to mute the channel. Press it again to
unmute the channel.
Solo (S): Touch the solo button to solo the channel. Press it again to unsolo the channel.
Automation Arm (Displayed as an “R” or “W”): Touch this control to
arm/disarm automation for the channel, whether it is currently set to
read or write mode.
Insert Bypass: Touch this control to bypass the inserts of the relevant
channel. The button will illuminate when the channel inserts are
bypassed.
Sends Bypass/Sends Pre-Post Button: This dual-purpose button covers
one of two functions at any given time, depending on the state of the
“Pre/Post” button located on the right hand side of the V-Control
interface.
•
Sends Bypass: Touch the button to bypass the sends for the
currently selected channel and aux send. The button will illuminate
when the selected is bypassed.
Touch the button again to stop bypassing the send. Note that this
icon is not present if the level controls are currently set to control
panning.
•
Pre/Post Button: Touch the button to toggle the currently selected
aux send to pre-fader or post-fader status. The button illuminates
an orange color when the aux is configured as pre-fader.
Input Monitor (Speaker Icon): Touch the small speaker icon at the
bottom of the channel strip to turn on input monitoring for the channel.
Touch it again to turn the input monitoring off.
38
V-Control 1.7 User’s Guide
The button illuminates when input monitoring is turned on.
Record Arm Button: Press the record button to record-arm the channel.
Press it again to record-safe the channel.
Fader: Touch the fader and drag it up and down to adjust the signal level
of the channel. Since the iPad uses a multi-touch interface, multiple
faders can be adjusted at once just like on a real hardware mixer.
Double-tap the fader-cap to move the fader level to 0 dB (unity gain).
Level Meter: The channel strip contains a detailed level meter that
displays the signal level of the channel’s audio.
Bank Increment/Decrement: Using two fingers, swipe the surface in the
fader area (but not in the area of a fader cap) in a left or right motion.
Each swipe will bank left or right eight channels at a time.
Channel Increment/Decrement: Using one finger, touch the surface in
the fader area (but not in the area of a fader cap) and drag in a left or
right motion. Each swipe will bank left or right one channel at a time.
Keep your finger down and keep dragging to increment more than one
channel.
Right-Hand Side Controls
The buttons on the right hand side of the iPad screen control various
additional functions, and work as follows:
Pan: Touch this button to switch the channel pan/aux controls to
panning mode.
1-4: Touch any of these 4 buttons puts to switch the channel pan/aux
controls into auxiliary send control for sends 1-4
-5-: Touch this button to cycle through controlling aux sends 5, 6, 7,
and 8. The display will change to show which aux send is currently being
controlled by the channel level controls.
Pre/Post: Touch this button to toggle the channel send button between
two different functions:
V-Control 1.7 User’s Guide e
39
·
Pre/Post: In this mode, the master pre/post button is lit orange and
the channel sends buttons toggle each channel’s send between
pre-fader and post-fader status, for the currently selected aux
send.
·
Send Bypass: In this mode, the master pre/post button is not
illuminated, and the channel send buttons act as a bypass control
for the currently selected aux send.
Automation On/Off |R|: Touch this button to toggle automation on/off
for all channels in the current session. The button illuminates to show
when automation for all channels is armed.
Automation Read/Write (“R” or “W”): Touch this button to toggle the
function of the individual channel automation buttons.
•
When the automation read/write button displays as R, then the
individual channel automation buttons are set to R, the automation
read status can be toggled on/off on a per-channel basis.
•
When the automation read/write button displays as R, then the
individual channel automation buttons are set to W, and
automation write status can be toggled on/off on a per-channel
basis.
Clear Mutes |M|: Touch this button to unmute any and all channels that
are currently muted.
Clear Solos |S|: Touch this button to un-solo any and all channels that
are currently soloed.
Mixer: Touch this button to toggle the Cubase session between its mixer
and edit windows.
Soft Keys 1 and 2: These buttons can be custom-configured to perform
many different assignable functions with Cubase/Nuendo. To configure
the soft keys:
•
Within Cubase/Nuendo, select the “devices” menu, then select
“device setup”
•
In the “Remote Devices” column on the left, select “Mackie HUI”
•
On the right hand side, you will see a column labeled “button”
with two entries:
o Audition”: This corresponds to Soft Key 1.
40
V-Control 1.7 User’s Guide
o “Window/A”: This corresponds to Soft Key 2.
•
Click on the “category” and “command” columns to select
among the available Cubase/Nuendo functions
•
Click “apply” and then “OK”
The two soft keys will now control the two functions you have assigned.
Channel: Touch this button to bring a popup window that allows editing
of various channel functions, including:
•
Channel EQ
•
Channel Sends
•
Channel I/O Routing
•
Channel Inserts
Touch the button again to close the window.
For more information, refer to the section titled “Channel Popup Window”.
Locate: Press thus button to toggle the Locator Window On/Off. See the
section titled “Locator Popup Window” for more details.
Set Left: Touch this button to set a mark in point at the current location
of the play head.
Set Right: Touch this button to set a mark out point at the current
location of the play head.
Save: Touch this button to save the current session.
Undo: Touch this button to undo the last performed action of the
session.
V-Control 1.7 User’s Guide e
41
Bottom of Screen Controls
The buttons on the bottom of the V-Control interface work as follows:
Settings: Touch this button to bring up the V-Control settings screen.
Touch it again to return to the main interface.
Banking Popup Window: Touch this button to bring up the banking
popup window, which contains 4 buttons that allow banking the
displayed channels left or right, either 1 or 8 channels at a time.
These buttons serve as an alternate interface for bank/channel
increment/decrement, for users who prefer this method to the onefinger/two-finger swiping method described above.
Time counter: This counter displays the current time location in
Cubase/Nuendo, mirroring the time format currently used in the
application’s counter window.
Big Counter Display: Touch the left area of the counter display to show
or hide the “Big Counter”, which displays the counter at a much larger
size. Touch the left area of the counter to hide the Big Counter display.
Note that you can still touch the faders with the big counter display
active.
Transport Popup Window: Touch the right-hand side of the counter to
toggle the transport popup window on/off, which offers additional
transport related controls.
See section entitled “Transport Popup Window” for more details.
Go to Left (L<): Touch this button to move the play head to the current
mark-in point of the session.
Go to Right (R>): Touch this button to move the play head to the current
mark- out point of the session.
Go to Start (|<): Touch this button to move the play head to the start of
the current session.
Go to End (>|): Touch this button to move the play head to the end of
the current session.
Rewind: Press and hold the button to rewind the play head.
Fast Forward: Press and hold the button to fast-forward the play head.
42
V-Control 1.7 User’s Guide
Loop: Touch this button to toggle the transport loop function on/off. The
button illuminates when the loop function is active.
Stop: Touch this button to stop the transport of the current session.
Play: Touch this button to start playback of the current session.
Record: Touch this button to punch-in to record, in the current session.
The button illuminates in red when recording is active. Touch the play
button to punch out of record.
Transport Popup Window
The transport popup window provides additional transport-related
controls, and works as follows:
Auto Punch: Touch this button to toggle the “auto punch-in” function
on/off. The button illuminates when the auto-punch function is active.
Edit Panel
V-Control’s Cubase mode offers a comprehensive edit panel, offering
many handy shortcuts and functions. To use the edit panel, touch the
MultiPanel button, and then select “Edit” from the list of choices.
The edit panel includes the following groups of controls:
Command Section: This section contains various editing commands
Cut: Touch this button to cut the currently selected audio clip,
removing it from the session but also copying it into the copy buffer
memory.
Copy: Touch this button to copy the currently selected audio clip into
the copy buffer memory.
Paste: Touch this button to paste the audio clip that is currently
residing into the memory buffer into the session at the current location
of the play head.
Delete: Touch this button to delete the currently selected audio clip,
removing it from the session.
V-Control 1.7 User’s Guide e
43
Window Section: This section contains buttons for toggling various
Cubase windows on/off.
Marker: Touch this button to toggle the markers window on/off.
Transport: Touch this button to toggle the transport window on/off.
CPU: Touch this button to toggle the session CPU percentage window
Navigation Section: This section contains buttons for navigating among
the session as well as changing zoom levels.
Cursor Diamond: The cursor diamond works in two modes: “Select” and
“Zoom”:
Select Mode: In this mode, the cursor center key is not illuminated, and
the cursor keys work as follows:
•
The cursor up/down buttons navigate which channel is selected
•
The cursor left/right buttons navigate among the selected
channel’s audio clips, selecting each clip in series as the cursor
buttons are pressed.
Zoom Mode: In this mode, the cursor center key is illuminated green, and
the cursor keys work as follows:
•
The cursor up/down buttons zoom the height of the session tracks
to be taller/shorter
•
The cursor left/right buttons zoom the time-scale of the session
timeline to be shorter/longer.
44
V-Control 1.7 User’s Guide
Locator Popup Window
The locator popover provides a numeric keypad that provides many
control features for Cubase/Nuendo, and works as follows:
•
Use the number buttons to enter a numerical value for a desired
location, and then press the Set Position (Enter) button to go to
that location.
•
Enter a number and then press Move Back (+) to move the current
location back by that amount.
•
Enter a number and then press Move Forward (-) to move the
current location forward by that amount.
•
When typing in a numerical value, use the Delete Last Char (Clear)
button to delete the most recently entered number in time counter
window.
V-Control 1.7 User’s Guide e
45
Channel Popup Window
V-Control’s Cubase mode offers a “Channel” popup window, which allows
adjustment of various channel functions including:
• Channel EQ
• Channel Sends
• Channel I/O Routing
• Channel Inserts
The channel window contains the following controls:
EQ button: Touch this button to adjust the 4-band, stock
Cubase/Nuendo channel EQ.
Sends Button: Touch this button to adjust the channel sends.
Routing Button: Touch this button to select the audio input sources and
audio output destinations for the selected channel, on your audio
interface.
Insert Button: Touch this button to insert effects on the selected channel
and adjust their parameters.
Rotary Controls: The function of the four rotary controls changes
depending on which mode has been selected. See below for details.
Display Button: Touch this button to toggle the displays located above
the rotary controls, between displaying parameter names, and parameter
values.
For example, pressing this button, when the popup window is displaying
a reverb time on one of the rotary controls, would toggle between
displaying “revtime” and “2.5sec”.
Toggle Button: The function of the toggle button changes depending on
which mode has been selected. See below for details.
The functions of the channel popup window will always follow the
currently selected channel. If a user selects a different channel using
either the V-Control interface, or within Cubase/Nuendo itself, then the
contents of the popup window will update to reflect the new channel the
user has selected.
46
V-Control 1.7 User’s Guide
Adjusting EQ: When the popup window’s “EQ” button is pressed, the
popup window displays “EQ+” in the upper left hand corner, and the
window works as follows:
Band Selection: Swipe the top of the popup window to select among the
4 bands of EQ that can be adjusted. Each band of EQ has its own page of
controls, as follows:
•
Page 1: Low Band
•
Page 2: Low-Mid Band
•
Page 3: High-Mid Band
•
Page 4: High Band
Gain: Rotate this control to adjust the boost/cut of the currently selected
EQ band.
Frequency: Rotate this control to adjust the center frequency of the
currently selected EQ band.
Q: Rotate this control to adjust the Q (bandwidth) of the currently
selected EQ band.
On/Off: Rotate this control to toggle the EQ on/off for the specific band
of EQ that is currently displayed.
Toggle Button: Touch this button to toggle all 4 bands of EQ on/off for
the currently selected channel.
Adjusting Sends: When the popup window’s “Sends” button is pressed,
the popup window will display “FX Send+” in the upper left hand corner,
providing an alternate sends interface to the one at the top of the channel
strip. The window works as follows:
Send Selection: Swipe the top of the popup window to select which of the
8 channel sends to adjust. The page number in the upper right-hand
corner of the window corresponds to the currently selected send (for
example, page 5 of 8 means you are currently adjusting send 5).
Level: Rotate this control to adjust the level of the currently selected
send
FX On/Off: Rotate this control to turn the selected send on/off, using it
as a send bypass control).
V-Control 1.7 User’s Guide e
47
FX Pre: Rotate this control to toggle the send between pre-fader and
post-fader status. When the rotary control is illuminated, the send is
configured as “pre-fader”.
Toggle Button: Touch this button to toggle all 8 sends on/off for the
selected channel.
Adjusting Input/Output Routing: When the popup window’s “Routing”
button is pressed, the popup window displays “Routing” in the upper left
hand corner and the window works as follows:
Output Bus: Rotate this control to select among the available audio
outputs offered by the audio interface hardware. The display above the
rotary control shows all input connections as the control is rotated.
Monitor: Rotate this control to toggle input monitoring on/off for the
Monitor destination.
Input Bus: Rotate this control to select among the available audio inputs
offered by the audio interface hardware. The display above the rotary
control shows all output connections as the control is rotated.
Swipe the top of the popup window to navigate to the 2nd page of
controls, which includes:
Phase: Rotate this control to invert the phase of the channel’s audio by
180°
Gain: This control has no effect in current versions of Cubase/Nuendo.
Adjusting Inserts: When the popup window’s “Inserts” button is pressed,
the popup window displays “Inserts” in the upper left hand corner, and
the window works as follows:
FX: Rotate this control to select which of the 8 channel insert slots to
adjust. The display above the rotary control will show which insert slot is
currently being adjusted.
On/Off: Rotate this control to toggle the bypass state on/off for the
currently selected insert slot. The control reads “on” when the insert is
active and “off” when the insert is bypassed.
Selected Effect: Rotate the third control in the window to scroll through
all available stock and third party insert effects available to
48
V-Control 1.7 User’s Guide
Cubase/Nuendo. The display above the rotary control will show which
insert effect is currently selected.
Parameter Adjustment: Swipe the top of the popup window to navigate
to additional pages, where the parameters of the selected insert can be
adjusted, 4 at a time. The number of pages available to swipe to will
depend on the particular effect that is selected; An insert effect with a
large number of parameters will have more pages of parameters to
adjust.
Toggle Button: When adjusting inserts with the popup window, the
toggle button has no effect.
Known Issues with V-Control 1.7 and Cubase/Nuendo
•
The pan controls are not updated by Cubase when it is "reset" in
the HUI Setup if already set to pan mode. To better reset it, tap the
Send 1 control before resetting.
•
Cubase does not set V-Control's counter when first launching or
resetting. Cubase will refresh the counter when it changes to a new
value.
V-Control 1.7 User’s Guide e
49
Using V-Control with Logic
IMPORTANT NOTE: Make sure that you have updated Logic to the latest
version of 9.1.6 or higher.
Logic 9.1.6 and above have corrected various bugs related to the Open
Sound Protocol (OSC), the control surface language that V-Control uses
to communicate with Logic.
Among other fixes, version 9.1.6 corrects an issue where V-Control’s
meters did not work correctly, when using Logic in 64-bit mode.
To make sure you have the latest version of Logic, select the “software
update” option in the Apple menu. Any available updates to Logic will be
presented for download and installation.
Setting up V-Control in Logic
To set up V-Control for use with Logic for the first time, perform the
following steps:
•
Launch the Ney-Fi application
•
Launch Logic
•
Launch the V-Control app on your Ipad
•
In the settings screen of V-Control, select the “computer” tab and
then select the computer that Logic is running on
•
In the “D.A.W.” tab, select “Logic”
•
Since V-Control acts as a “native” Logic control surface, Logic
should automatically detect the V-Control app as a valid control
surface once it has finished launching
•
Logic will then display a message that it has detected a new control
surface called “V-Control” and will offer to add it to its list of
supported control surfaces. Click “OK”
•
At this point, the computer running Ney-Fi will be available to
choose from in the computer table that is located in the settings
window. V-Control and Logic will now have complete bi-directional
control of each other.
50
V-Control 1.7 User’s Guide
IMPORTANT NOTE: When Logic presents the dialog box that it has
detected a new control surface. It will offer a checkbox option that
says “Do not display this window again”. Checking this box will turn
off the automatic discovery process of new control surface and thus
turn off automatic installation of control surfaces.
DO NOT check this box! It is very important to have Logic always
automatically detect attached control surfaces, in order for V-Control
to work correctly with Logic.
Updated versions of V-Control and Logic: If you are setting up VControl and Logic and it is NOT the first time you have done the setup
process (such as using a post 1.2 update of the V-Control app), it is
important to manually remove the existing V-Control profile from
Logic, so that the new version of V-Control can be automatically
detected.
This removal process can be done with the following steps:
•
In the Logic drop-down menus, select Preferences/Control
Surfaces/Setup.
•
In the setup window that appears, you will see a large icon
labeled “V-Control”. Highlight the icon and press the keyboard’s
delete key, to delete it.
•
Confirm your decision to delete the profile, when asked in the
resulting dialog box.
•
Before closing the “setup” dialog box, click on the “new” tab at
the top, and make sure that “automatic installation” is checked.
•
Quit Logic
At this point you may follow the steps for setting up V-Control with
Logic, as described on the previous page, with the confidence that the
latest installed version of the V-Control app will be automatically
detected and used by Logic.
V-Control 1.7 User’s Guide e
51
Channel Strip Interface
The channel strip interface allows adjustment of channel levels, adjusting
of panning and aux sends, and working with mute, solo, and automation
controls. It contains the following controls from top to bottom:
Channel Name Display: This display at the top of each channel displays
the name of the channel, as set in the D.A.W. software itself.
Channel Select: Touch the track name at the top of a channel to select
that channel. The selected channel changes to light grey to show it has
been selected.
Automation Mode: The thinner text box below the channel name is the
automation display. It displays the current automation state for that
channel.
Touch the text box to display the automation mode popup menu where
the channel’s different automation modes can be selected, including:
•
Off: Turns automation for the channel off
•
Read: Switches the channel to automation “read” mode.
•
Touch: Switches the channel to automation “touch” mode.
•
Latch: Switches the channel to automation “latch” mode.
•
Write: Switches the channel to automation “write” mode.
Rotary Encoders: These virtual knobs allow you to adjust both channel
panning, as well as auxiliary send levels 1-8, for the corresponding
channel. Their specific function is selected using the “Pan” and “1-8”
buttons on the right hand side of the V-Control interface.
To adjust the rotary encoder, touch the encoder and swipe using an updown or side-to side motion.
The rotary encoders operate as follows, when used to adjust stereo
panning:
•
Touch the pan button, on the right hand side of V-Control. The
rotary controls now adjust panning for each channel.
•
The pan pot will display the pan position, and at the same time a
pan value will be displayed as a numerical value inside the pan pot.
52
V-Control 1.7 User’s Guide
The rotary encoders operate as follows, when used to adjust channel
auxiliary sends
•
Touch one of the buttons 1-8, on the right hand side of V-Control,
to select which of the 8 aux sends in Logic to adjust. The rotary
controls now control the aux send level for the selected send.
Mute (M): Touch the mute button to mute the channel. Press it again to
unmute the channel.
Solo (S): Touch the solo button to solo the channel. Press it again to unsolo the channel.
Input Monitor (I): Touch the “I” button to turn on input monitoring for
the channel. Touch it again to turn the input monitoring off.
Record (R): Touch the record bottom to record-arm the channel. Press it
again to record-safe the channel.
Fader: Touch the fader and drag it up and down to adjust the signal level
of the channel. Since the iPad uses a multi-touch interface, multiple
faders can be adjusted at once just like on a real hardware mixer.
The fader cap displays the current gain level for the channel. When the
fader level is actually being adjusted, the dB levels will appear above the
fader cap, so that the dB display is not blocked by your finger.
Double-tap the fader cap to return it to 0dB (unity gain).
Level Meter: The channel strip contains a detailed level meter that
displays the signal level of the channel’s audio.
Bank Increment/Decrement: Using two fingers, swipe the surface in the
fader area (but not in the area of a fader cap) in a left or right motion.
Each swipe will bank left or right eight channels at a time.
Channel Increment/Decrement: Using one finger, touch the surface in
the fader area (but not in the area of a fader cap) and drag in a left or
right motion. Each swipe will bank left or right one channel at a time.
Keep your finger down and keep dragging to increment more than one
channel.
V-Control 1.7 User’s Guide e
53
Right-Hand Side Controls
The buttons on the right hand side of the V-Control interface work as
follows:
Pan: Touch this button to switch the rotary encoders to panning mode.
Win: Touch this button to toggle between the edit and mix windows in
Logic
1-8: Touch any of these eight buttons to switch the rotary controls into
auxiliary send control for sends 1-8
Clear Mutes |M|: Touch this button to unmute any and all channels that
are currently muted.
Clear Solos |S|: Touch this button to un-solo any and all channels that
are currently soloed.
Group Suspend: Touch this button to suspend all track groups that have
been created. Pressing the button again will resume the normal grouping
function.
Set Left: Touch this button to set a mark in point at the current location
of the play head.
Set Right: Touch this button to set a mark out point at the current
location of the play head.
Punch Left: Touch this button to set an auto-punch in point at the
current location of the play head.
Punch Right: Touch this button to set an auto-punch out point at the
current location of the play head.
Save: Touch this button to save the current session.
Undo: Touch this button to undo the last performed action of the
session.
Redo: Touch this button to redo the last performed action of the session.
54
V-Control 1.7 User’s Guide
Bottom of Screen Controls
The buttons on the bottom of the V-Control interface work as follows:
Settings: Touch this button to bring up the V-Control settings screen.
Touch it again to return to the main interface.
Banking Popup Window: Touch this button to bring up the banking
popup window, which contains 4 buttons that allow banking the
displayed channels left or right, either 1 or 8 channels at a time.
These buttons serve as an alternate interface for bank/channel
increment/decrement, for users who prefer this method to the onefinger/two-finger swiping method described above.
Time counter: This display displays the current time location in Logic. It
can display the session counter as SMPTE, minutes/seconds, or bars and
beats.
NOTE: Swipe left or right on the time counter to issue a jog/shuttle
command to the transport. This allows you to move the play head and
jog/shuttle the session audio.
Transport Popup Button: Touch the transport popup button to display
the transport popup window, which offers additional transport related
controls. Touch the transport popup button again to close the popup
window.
See section entitled “Transport Popup Window” for details.
Loop: Touch this button to turn on the loop playback function in Logic.
Touch it again to turn the loop function back off.
Metronome: Touch this button to turn on Logic’s internal metronome.
Touch it again to turn the metronome back off.
Go To Left: Touch this button to move the play head to the current mark
in point of the session.
Go To Right: Touch this button to move the play head to the current
mark out point of the session.
Rewind: Touch this button momentarily to rewind the play head
backwards by one beat.
Fast Forward: Touch this button momentarily to advance the play head
forward by one beat.
V-Control 1.7 User’s Guide e
55
Stop: Touch this button to stop the transport of the current session.
Play: Touch this button to start playback of the current session.
Pause: Touch this button to pause playback of the session. Touch it
again to un-pause the playback.
Record: Touch this button to punch-in to record, in the current session.
Touch the play button to punch out of record.
Transport Popup Window
The Transport Popup Window offers various transport-related controls,
easing navigation among your Logic session. The controls include:
Punch: Touch this button to turn on Logic’s “auto-punch” feature, which
will automatically punch the transport in and out of record based on the
auto punch-in and auto punch-out points. Touch the button again to
turn auto-punch off.
Bars: Touch this button to switch the counter display to show bars/beats.
SMPTE: Touch this button to switch the counter display to display SMPTE
units, displayed in hours, minutes, seconds, and frames.
Big: Touch this button to show or hide the “Big Counter”, which displays
the counter at a much larger size. Touch the button again to hide the Big
Counter display.
Note that you can still touch the faders with the big counter display
active.
Marker 1-8 Buttons: Touch any of the 8 marker buttons to move the
play head to the appropriately numbered marker.
Previous Marker Button: Touch this button to move the play head to the
previous marker
Next Marker Button: Touch this button to move the play head to the
next marker
56
V-Control 1.7 User’s Guide
Edit Panel
V-Control’s Logic mode offers a comprehensive edit panel, offering many
handy shortcuts and functions. To use the edit panel, touch the
MultiPanel button, and then select “Edit” from the list of choices.
The buttons in the Edit Panel work as follows:
Automation Write Section: This section allows the user to filter
automation status for various channel parameters.
Volume: Touch this button to toggle all volume automation on/off in
the current session.
Pan: Touch this button to toggle all panning automation on/off in the
current session.
Mute: Touch this button to toggle all mute automation on/off in the
current session.
Send Volume: Touch this button to toggle all aux sends volume
automation on/off in the current session.
Plug-In: Touch this button to toggle all plug-in parameter automation
on/off in the current session.
Solo: Touch this button to toggle all solo parameter automation on/off
in the current session.
Command Section: This section contains various editing commands
Cut: Touch this button to cut the currently selected audio clip,
removing it from the session but also copying it into the copy buffer
memory.
Copy: Touch this button to copy the currently selected audio clip into
the copy buffer memory.
Paste: Touch this button to paste the audio clip that is currently
residing into the memory buffer into the session at the current location
of the play head.
V-Control 1.7 User’s Guide e
57
Delete: Touch this button to delete the currently selected audio clip,
removing it from the session.
Select All: Touch this button to select all clips residing on the currently
selected track.
Window Section: This section contains buttons for toggling various
Logic windows on/off.
Arrange: Touch this button to toggle the Logic arrange window on/off.
Mixer: Touch this button to toggle the Logic mixer window on/off.
Event: Touch this button to toggle the Logic event editor window
on/off.
Score: Touch this button to toggle the Logic notation scoring window
on/off.
Transform: Touch this button to toggle the Logic transform window
on/off.
Hyper: Touch this button to toggle the Logic hyper-editor window
on/off.
Piano: Touch this button to toggle the Logic Piano View window on/off.
Transport: Touch this button to toggle the Logic transport bar on/off.
Environment:
on/off.
Touch this button to toggle the environment window
Audio Pool: Touch this button to toggle the Logic audio pool window
on/off.
Sample Editor: Touch this button to toggle the sample editor window
on/off.
Markers: Touch this button toggle the Logic markers window on/off.
Screen Set Section: Touch any of these 9 buttons to switch to 9
different screen sets that you have configured in Logic.
58
V-Control 1.7 User’s Guide
Plug-In Panel
V-Control’s Logic mode offers an effect plug-in editing panel. To use the
Plug-In panel, touch the MultiPanel button, and then select “Plug-In”
from the list of choices
The plug-in panel allows you to adjust parameters of an inserted plug-in.
It works as follows:
•
Touch the channel name at the top of a channel to select the
channel whose plugins you wish to highlight.
o Note that the plug-in editing window only works for plug-ins
that are inserted on an audio track. Plug-ins that resides on
an auxiliary return or master fader cannot be edited.
•
Navigate to the V-Control plug-in panel, within the MultiPanel.
•
A vertical row of buttons on the left hand side of the window will
display the names of any plug-ins that have been inserted into the
channel’s 12 available plug-in slots. Each of these buttons can be
touched to allow adjustment of that specific plug-in’s individual
parameters.
•
A second row of vertical buttons allow you to toggle on/off the
bypass status of any individual plug-in. The button illuminates to
show if a plug-in is currently bypassed.
•
As you select a specific a plug-in from the 12 buttons on the left,
the names and parameter values of the various plug-in’s
parameters are displayed on 16 separate rotary controls.
•
Adjust the rotary controls to change the setting of a specific plugin parameter.
•
A rotary control can be “double-tapped” to change the control to
its minimum position. A 2nd double tap will then change the control
to its maximum position. This approach is particularly useful for
parameters that only have a 2-position state (such as on/off);
Instead of rotating the control to select between the two states, it
can simply be double-tapped repeatedly to toggle between the two
states of the parameter.
•
If more than 16 parameters are present for the select plug-ins, tap
the “< page” and page >” buttons to navigate to the different
pages of parameters.
V-Control 1.7 User’s Guide e
59
•
To adjust the plug-ins for a different channel in Logic, simply
select a different channel in the V-Control mixer interface (which
can be done without having to close the plug-in window).
•
Note that, although Logic will allow more than 12 plug-ins to be
inserted into a track, V-Control only allows adjustment of the first
12 plug-ins.
NOTE: Logic requires a track to be in the Arrange window for a control
surface to access the plug-in inserts.
By default, aux, output, and master tracks do not get placed in the
Arrange window, which means that plug-ins for these tracks will not be
controllable by V-Control.
To eliminate this restriction, simply move these tracks to the arrange
window by selecting them and then using the key command Control-T.
60
V-Control 1.7 User’s Guide
Instrument Panel
V-Control’s Logic mode offers an instrument plug-in editing panel. To
use the Plug-In panel, touch the MultiPanel button, and then select
“Instrument” from the list of choices
The instrument panel allows you to adjust parameters of an inserted
instrument. It works as follows:
• Touch the channel name at the top of a channel to select the
channel whose instrument you wish to highlight.
• In Logic, select the specific instrument plug-in you wish to edit, so
that it’s interface window appears on the computer
•
Navigate to the V-Control instrument panel, within the MultiPanel.
•
The panel will display 24 separate rotary encoders, each
representing a particular parameter of the software instrument, and
labeled with the parameter name below the encoder itself.
•
Adjust the rotary controls to change the setting of a specific plugin parameter.
•
A rotary control can be “double-tapped” to change the control to
its minimum position. A 2nd double tap will then change the control
to its maximum position. This approach is particularly useful for
parameters that only have a 2-position state (such as on/off);
Instead of rotating the control to select between the two states, it
can simply be double-tapped repeatedly to toggle between the two
states of the parameter.
•
If more than 24 parameters are present for the select plug-ins, tap
the “< page” and page >” buttons to navigate to the different
pages of parameters.
•
To adjust the plug-ins for an instrument on a different track within
Logic, simply tap on the corresponding channel within V-Control.
The instrument editor will dynamically update to allow control of
the new instrument plug-in.
NOTE: Logic requires a track to be in the Arrange window for a control
surface to access the instrument inserts.
V-Control 1.7 User’s Guide e
61
By default, aux, output, and master tracks do not get placed in the
Arrange window, which means that plug-ins for these tracks will not be
controllable by V-Control.
To eliminate this restriction, simply move these tracks to the arrange
window by selecting them and then using the key command Control-T.
Known Issues with V-Control 1.7 and Logic
If Ney-Fi is updated to fix problems or add features, it will be necessary
to manually remove V-Control from Logic's controller setup window in
preferences, then re-perform the initial setup procedure (see setup
section for details).
62
V-Control 1.7 User’s Guide
Using V-Control with Final Cut 5, 6, or 7
Setting up V-Control in Final Cut
To set up V-Control for use with Final Cut for the first time, perform the
following steps:
•
Launch the Ney-Fi application
•
Launch the V-Control app on your Ipad. It is very important to
launch V-Control before launching Final Cut
•
Launch Final Cut
•
In the “tools” menu, select “control surfaces”
•
Use the “+” symbol to add a new control surface
•
In the list of options, select a “Mackie Control”
•
Select V-Control as the MIDI input and output ports for your
selected control surface
•
Close the Control Surface configuration window
•
In the settings screen of V-Control, select the “computer” tab and
then select the computer that Logic is running on
•
In the “D.A.W.” tab, select “Final Cut 7”
•
Since V-Control acts as a “native” Logic control surface, Logic
should automatically detect the V-Control app as a valid control
surface once it has finished launching
•
At this point, the computer running Ney-Fi will be available to
choose from in the computer table that is located in the settings
window. V-Control and Final Cut will now have complete bidirectional control of each other.
Note that V-Control does not work with the latest version of Finalcut
(Final Cut X), due to changes in the control surface protocols that Final
Cut X supports.
V-Control 1.7 User’s Guide e
63
Channel Strip Interface
The channel strip interface allows adjustment of channel levels, adjusting
of panning, and working with mute and solo controls. It contains the
following controls from top to bottom:
Channel Name Display: This display at the top of each channel displays
the name of the channel, as set in the Final Cut software itself.
Channel Select: Touch the track name at the top of a channel to select
that channel. The selected channel changes to light grey to show it has
been selected.
Pan Controls: These virtual knobs adjust panning for each channel, when
they are swiped in an up-down motion or side-to-side.
Mute (M): Touch the mute button to mute corresponding audio channel.
Press it again to unmute the channel.
Solo (S): Touch the solo button to solo the corresponding audio channel.
Press it again to un-solo the channel.
Fader: Touch the fader and drag it up and down to adjust the signal level
of the channel. Since the iPad uses a multi-touch interface, multiple
faders can be adjusted at once just like on a real hardware mixer.
Double-tap the fader cap to return it to 0dB (unity gain).
Bank Increment/Decrement: Using two fingers, swipe the surface in the
fader area (but not in the area of a fader cap) in a left or right motion.
Each swipe will bank left or right eight channels at a time.
64
V-Control 1.7 User’s Guide
Right-Hand Side Controls
The buttons on the right hand side of the V-Control interface work as
follows:
Master Fader: Touch this button to toggle on/off a “master fader”
window, where you can adjust the master audio level of your session.
Save: Touch this button to save the current session.
Undo: Touch this button to undo the last performed action of the
session.
Enter: Touch this key to issue an “enter” command, similar to the
enter/return key on the computer keyboard.
Cancel: Touch this key to cancel out any onscreen dialog, similar to
pressing the escape key on a computer keyboard.
Cursor Up/Down buttons: Touch these keys to navigate left/right
among available audio clips.
Cursor Left/Right Buttons: Touch these keys to navigate up/down
among available audio clips.
MultiPanel Button: Touch this button to toggle the MultiPanel window
on/off.
V-Control 1.7 User’s Guide e
65
Bottom of Screen Controls
The buttons on the bottom of the V-Control interface work as follows:
Settings: Touch this button to bring up the V-Control settings screen.
Touch it again to return to the main interface.
Banking Popup Window: Touch this button to bring up the banking
popup window, which contains two buttons that allow banking the
displayed channels left or right, eight channels at a time.
These buttons serve as an alternate interface for the bank
increment/decrement function, for users who prefer this method to the
two-finger swiping method described above.
“Big” Button: Touch this button to show/hide the “Big Counter”, which
displays the counter at a much larger size. Touch the left area of the
counter to hide the Big Counter display.
Note that you can still touch the faders with the big counter display
active.
Time Counter: This display displays the current time location in Logic. It
can display the session counter in SMPTE format (hours / minutes /
seconds/ frames). It also acts as a jog control. Drag your finger across
the counter in a left or right motion to jog the play head along the
timeline.
Previous Marker: Touch this button to move the play head to the
previous marker position.
Next Marker: Touch this button to move the play head to the next
marker position.
Go To Start: Touch this button to move the play head to the current mark
in point of the sequence.
Rewind/Fast Forward: Touch these buttons to change the playback
speed forwards or backwards. Tapping a button multiple times will
increase the speed in that direction."
Go To End: Touch this button to move the play head to the current mark
out point of the sequence.
Stop: Touch this button to stop the transport of the current sequence.
Play: Touch this button to start playback of the current sequence.
66
V-Control 1.7 User’s Guide
Shortcut Keys
V-Control’s Final Cut mode offers a comprehensive set of 80 separate
customizable shortcut keys.
These shortcut keys can be assigned, within Final Cut, to the functions of
your choices, and the keys can be assigned custom labels, as well as
preset labels and icons, on the V-Control interface.
The shortcut keys work as follows:
•
The shortcut keys are set up as a group of 16 keys, which
correspond to the F1-F16 keys on a computer keyboard.
•
Alternate sets of 16 keys can be accessed by pressing one of the
four latching modifider buttons, which will then switch the interface
to a separate set of 16 keys.
•
To assign custom functions to the keys, select Tools/Keyboard
Layout/Customize from within Final Cut.
•
Use the “custom keyboard layout” window that appears in Final Cut,
to map your desired functions to the 16 functions keys, as well as
the modofier key variant sets.
Assigning A Preset Icon and Function Name to the Shortcut Keys
•
Press and hold a shortcut key.
•
A popup menu will appear with different menu categories of Final
Cut functions. Tap on a category name.
•
The popup menu will switch to a list of icons and names for
functions within that category. Select a specific entry in the list.
•
The icon is displayed on the button and the label is changed.
Assigning A Custom Name to the Shortcut Keys
•
To apply a custom label to any of the keys in the V-Control
interface, tap the black test name underneath the key. An onscreen
keyboard will appear.
V-Control 1.7 User’s Guide e
67
•
Type the desired cutom name and then press the “hide keyboard”
button. The custom name will now ppear underneath the shortcut
key.
•
Tap any of the shortcut keys, on the V-Control interface, to issue
the desired function within Final Cut.
Important Note: Editing the button’s icon and label in V-Control does
NOT change the key command assignment itself, within Final Cut. You
MUST edit the key command assignment, within Final Cut, to match the
function that you have assigned an icon/label to, within V-Control.
68
V-Control 1.7 User’s Guide
V-Control 1.7 User’s Guide e
69
Using V-Control with Media Composer
V-Control version 1.7 works with the Windows and OS X versions of
Media Composer. V-Control emulates the “Command-8” control surface
when working with Media Composer. Please refer to the Media Composer
documentation on working with a Command 8 control surface, for further
details.
Setting up V-Control in Media Composer (Windows and OS
X)
To set up V-Control for use with Media Composer, perform the following
steps:
•
Launch the Ney-Fi application
•
70
In Media Composer, follow the documentation to set up the
application with a Avid Command 8 Control surface.
•
Open the Preferences window
•
Double-click the Controller Settings item to display the
Controller Settings dialog.
•
In the Controller menu, select “Command 8”
•
In the Port menu, select “V-Control”
•
In the Gain Controller Port” menu, select “V-Control”
•
Click Edit Settings to display the Command8 Controller
Settings Window.
V-Control 1.7 User’s Guide
•
•
This Command 8 Controller Settings window lets you map
Media Composer commands to Command 8 buttons. VControl Pro uses some of these buttons to implement VControl Pro features. Almost all of V-Control Pro's features
use the default command mappings. But a few need to be
changed. The next steps show you the critical buttons to
map.
•
Looking at the next picture, make sure the buttons
highlighted in green and yellow are configured as shown.
The yellow ones are the default settings and most likely do
not need to be changed. The green one labeled Plug-in must
be mapped to the Timeline window and the Mix button must
be mapped to the Mixer window. These are not the default
settings and most likely need to be changed.
V-Control 1.7 User’s Guide e
71
72
V-Control 1.7 User’s Guide
•
Next, press the SHIFT key on your computer keyboard and
the Command 8 Controller Settings window will display the
commands mapped to the buttons for the SHIFT key. Make
sure the buttons highlighted in green and yellow are
configured as shown. The yellow ones are the default
settings and most likely do not need to be changed. The
green one labeled Plug-in must be mapped to the Audio EQ
window and the Mix button must be mapped to the
Composer window. These are not the default settings and
most likely need to be changed.
V-Control 1.7 User’s Guide e
73
74
•
Next, press the COMMAND key on your computer keyboard
and the Command 8 Controller Settings window will display
the commands mapped to the buttons for the COMMAND
key. Make sure the buttons highlighted in yellow are
configured as shown. The yellow ones are the default
settings and most likely do not need to be changed.
•
Next, press the CONTROL key on your computer keyboard
and the Command 8 Controller Settings window will display
the commands mapped to the buttons for the CONTROL key.
Make sure the buttons highlighted in yellow are configured
as shown. The yellow ones are the default settings and most
likely do not need to be changed.
V-Control 1.7 User’s Guide
•
•
Click “OK” in the Command 8 Controller Settings window to
close it.
•
Click “OK” in the Controller Settings window to close it.
•
Close and re-open V-Control on the iPad. If everything is set up
correctly, the computer running Ney-Fi will be available to choose
from in the computer table in the settings window.
•
V-Control and Media Composer should now have complete bidirectional control of each other.
•
The above steps are a one-time process and do not need to be
repeated again.
V-Control 1.7 User’s Guide e
75
Channel Strip Interface
The channel strip interface allows adjustment of channel levels, adjusting
of panning, and working with mute and solo controls. It contains the
following controls from top to bottom:
Channel Name Display: This display at the top of each channel displays
the name of the channel, as set in the D.A.W. software itself.
Mute (M): Touch the mute button to mute the channel. Press it again to
unmute the channel.
Solo (S): Touch the solo button to solo the channel. Press it again to unsolo the channel.
Rotary Encoders: These virtual knobs allow you to adjust the left right
panning for the corresponding channel.
Fader: Touch the fader and drag it up and down to adjust the signal level
of the channel. Since the iPad uses a multi-touch interface, multiple
faders can be adjusted at once just like on a real hardware mixer.
Double-tap the fader cap to return it to 0dB (unity gain).
Right-Hand Side Controls
The buttons on the right hand side of the screen control various
additional functions, and work as follows:
EQ: Touch this button to display the EQ window and make it the
frontmost app.
Composer: Touch this button to display the Composer window and make
it the frontmost app.
Timeline: Touch this button to display the Timeline window and make it
the frontmost app.
Mixer: Touch this button to display the Mixer window and make it the
frontmost app.
76
V-Control 1.7 User’s Guide
Undo: Touch this button to undo the last performed action of the
session.
Redo: Touch this button to redo the last undone action of the session.
Mode: Touch this button to toggle between Source/Record and Trim
mode
Add Edit: Touch this button to issue the “add edit” command in Media
Composer
Clear Mark In: Touch this button to clear the currently set mark in point
Clear Mark Out: Touch this button to clear the currently set mark out
point
Set Audio Mark In: Touch this button to set an audio mark in point at the
current location of the play head.
Set Audio Mark Out: Touch this button to set an audio mark out point at
the current location of the play head.
Set Mark In: Touch this button to set a mark in point at the current
location of the play head.
Set Mark Out: Touch this button to set a mark out point at the current
location of the play head.
MultiPanel: Touch this button to display the MultiPanel interface. Touch
the button again to close the MultiPanel.
V-Control 1.7 User’s Guide e
77
Bottom of Screen Controls
The buttons on the bottom of the screen offer various controls, and work
as follows:
Settings: Touch the “gear” button to bring up the settings screen. Touch
the button again to return to the main interface.
Go To Start (IL): Touch this button to move the play head to the start
point of the project.
Play Reverse: Touch this button play the current project in reverse.
Touch the button multiple times to speed up the reverse playback speed.
Play Forward: Touch this button play the current project forward. Touch
the button multiple times to speed up the reverse playback speed.
Play: Touch this button to start playback of the current session.
If the session is currently stopped, touch the button begin playback.
If the session is currently playing, touch the button to stop.
Record: Touch this button to begin recording automation data, for any
channels that have their channel automation button (A) active.
Rewind: Touch this button to move the play head backwards within
project
Fast Forward: Touch this button to move the play head forwards within
the project.
Go to Mark In: Touch this button to move the session to the currently set
mark in point.
Go to Mark Out: Touch this button to move the session to the currently
set mark out point.
Step back 10 frames: Touch this button to move the play head
backwards by 10 frames.
Step forward 10 frames: Touch this button to move the play head
forwards by 10 frames.
Step back 1 frame: Touch this button to move the play head backwards
by 1 frame.
Step forward 1 frame: Touch this button to move the play head forward
by 1 frame.
78
V-Control 1.7 User’s Guide
Shortcut Keys
V-Control’s Media Composer mode offers a comprehensive set of 80
separate customizable shortcut keys.
These shortcut keys can be assigned, within Media Composer, to the
functions of your choices, and the keys can be assigned custom labels, as
well as preset labels and icons, on the V-Control interface.
The shortcut keys work as follows:
•
The shortcut keys are set up as a group of 16 keys, which
correspond to various hardware buttons on a Command 8 control
surface (see setup section for details).
•
Alternate sets of 16 keys can be accessed by pressing one of the
four latching modifider buttons, which will then switch the interface
to a separate set of 16 keys.
Assigning A Function Name to the Shortcut Keys
•
Press and hold a shortcut key.
•
A popup menu will appear with different menu categories of Media
Composer functions. Tap on a category name.
•
The popup menu will switch to a list of names for functions within
that category. Select a specific entry in the list.
•
The selected function name is displayed underneath the button.
Additionally, the button surface contains a 2 letter abbreviation of
the selected function.
•
Alternatively, touch the text name underneath a button, to bring up
an onscreen keyboard where you can type in a custom name that
will appear underneath the button.
V-Control 1.7 User’s Guide e
79
Important Note: Editing the button’s icon and label in V-Control does
NOT create the key command assignment itself, within Media Composer.
You MUST edit the key command assignment, within Media Composer, to
match the function that you have assigned a label to, within V-Control.
Refer to the screen shot below for a reference of which controls, in Media
Composer’s “Command 8 Controller Settings” correspond to the 16
function buttons in V-Control’s user interface.
80
V-Control 1.7 User’s Guide
Additional Modes
V-Control offers customized control of several additional D.A.W.
programs, as well as the DSP console for a popular audio interface. The
additional modes include:
• Audition (Adobe)
• Digital Performer (Mark of the Unicorn)
• FL Studio (Image-Line)
• Live (Ableton)
• MIO Console (Metric Halo)
• Reaper (Cockos)
• Reason (Propellorheads)
• SONAR (Cakewalk)
• Studio One (Presonus)
• Tracktion (Mackie)
For the above supported D.A.W.s, V-Control offers truly customized
control, including:
•
Customized shortcut functions available in the edit panel of each
D.A.W. mode, providing helpful functions for the specific D.A.W.
•
Up to six customized modes for the channel rotary controls,
allowing them to control up to six separate functions such as
panning, send levels, effects parameter adjustment, etc.
V-Control 1.7 User’s Guide e
81
Setup of Additional D.A.W. Modes
For the additional D.A.W. modes listed in the previous page, the VControl software communicates with the target software by emulating a
“Mackie Control” hardware control surface.
To set up V-Control for use with any of the above fourteen D.A.W.s,
perform the following steps:
•
Launch the Ney-Fi application
•
In your D.A.W. software of choice, set up the application to work
with a Mackie Control hardware control surface. Consult your
D.A.W. application’s documentation for the specific steps on how to
do so.
•
When asked to select a MIDI input port for the Mackie Control,
select “V-Control” from the list of available MIDI ports.
•
When asked to select a MIDI output port for the Mackie Control,
select “V-Control” from the list of available MIDI ports.
•
Close and re-open V-Control on the iPad. If everything is set up
correctly, the computer running Ney-Fi will be available to choose
from in the computer table in the settings window.
•
V-Control and the D.A.W should now have complete bi-directional
control of each other.
The above steps are a one-time process and do not need to be repeated.
82
V-Control 1.7 User’s Guide
Channel Strip-Additional D.A.W. Modes
The channel strips in all additional D.A.W. modes contain the following
common controls, which work as follows:
Channel Display: This display at the top of each channel shows the name
of the channel, as configured in the D.A.W. software itself.
Depending on which of the six modes has been selected for the rotary
encoders, the scribble strip may also display other data such as:
•
Plug-in parameters that are currently being edited using the rotary
controls
•
Level metering for each of the 8 channels
•
Aux send levels for each of the 8 channels
Channel Select: Touch the track name at the top of a channel to select
that channel. The selected channel changes to light grey to show it has
been selected.
Channel Rotary Control: Located near the top of each channel strip, this
rotary control adjust different parameters such as channel panning,
channel auxiliary send levels, or plug-in parameters.
For most of the additional D.A.W. modes, the rotary controls perform up
to six different functions, and these specific functions vary from mode to
mode. The six specific functions for each of the rotary control modes are
described, in detail, in each D.A.W. mode’s specific section of the user’s
manual.
Fader: Touch the fader and drag it up and down to adjust the signal level
of the channel. Since the iPad uses a multi-touch interface, multiple
faders can be adjusted at once just like on a real hardware mixer.
Double-tap the fader cap to return the fader to 0dB (unity gain).
Level Meter: This multi-segment meter displays the level of the channel
signal.
Note that some D.A.W.s do not communicate metering information to VControl, in which case the meter will remain inactive.
Record Button: Touch the record button to record-arm the channel.
Press it again to record-safe the channel.
V-Control 1.7 User’s Guide e
83
Solo Button: Touch the solo button to solo the channel. Press it again to
un-solo the channel.
Mute Button: Touch the mute bottom to mute the channel. Press it again
to un-mute the channel.
Bank Increment/Decrement: Using two fingers, swipe the surface in the
fader area (but not in the area of a fader cap) in a left or right motion.
Each swipe will bank left or right eight channels at a time.
Channel Increment/Decrement: Using one finger, touch the surface in
the fader area (but not in the area of a fader cap) and drag in a left or
right motion. Each swipe will bank left or right one channel at a time.
Keep your finger down and keep dragging to increment more than one
channel.
84
V-Control 1.7 User’s Guide
Bottom of Screen-Additional D.A.W. Modes
When using any of the additional modes, the bottom of the V-Control
interface contains the following controls, which work as follows:
Settings: Touch this button to bring up the V-Control settings screen.
Touch it again to return to the main interface.
Banking Popup Window: Touch this button to bring up the banking
popup window, which contains 4 buttons that allow banking the
displayed channels left or right, either 1 or 8 channels at a time.
These buttons serve as an alternate interface for bank/channel
increment/decrement, for users who prefer this method to the onefinger/two-finger swiping method described above.
Time Counter: This counter displays the current time location in the
D.A.W. session, mirroring the time format currently used in the
application’s counter window.
NOTE: Swipe left or right on the time counter to issue a jog/shuttle
command to the transport. This allows you to move the play head and
jog/shuttle the session audio.
“Big” Button: Touch this button to show/hide the “Big Counter”, which
displays the counter at a much larger size. Touch the left area of the
counter to hide the Big Counter display.
Note that you can still touch the faders with the big counter display
active.
Rewind Button: Touch this button to rewind the play head back, within
the current session. The specific shuttling action will vary depending on
the specific D.A.W. being used.
Fast-Forward Button: Touch this button to move the play head forward,
within the current session. The specific shuttling action will vary
depending on the specific D.A.W. being used.
Stop Button: Touch this button to stop the transport of the session.
Play Button: Touch this button to start playback of the current session.
Record Button: Touch this button to punch-in to record, in the current
session. Touch the play button to punch out of record.
V-Control 1.7 User’s Guide e
85
Right Hand Side Controls-Additional D.A.W. Modes
Rotary Encoder Mode Buttons 1-6: Touch any of these 6 buttons to
assign the channel rotary encoders to a specific function.
The six specific functions for each of the rotary control modes are
described, in detail, in each D.A.W. mode’s specific section of the user’s
manual. Within each D.A.W. mode, the encoder mode buttons are labeled
with the names of the six specific functions.
NOTE: Some D.A.W. modes, such as Studio One, do not offer different
modes for the rotary encoders, and thus do not have these six buttons
displayed in their right-hand column.
For these two D.A.W. modes, the rotary controls always control stereo
panning of the channel signal.
Rotary Encoder Mode Two-Digit Display: This two-digit display offers
additional information relevant to the channel encoders.
For example, a common use for one of the six channel encoder modes is
an “aux send” mode, where the channel encoders are used to control the
levels of the channel auxiliary sends.
In this case, the user may repeatedly press the encoder mode button to
“page” through the different aux sends they can adjust, and this 2-digit
display would visually remind the user which auxiliary send they have
paged to.
Master Fader Button: Touch this button to toggle on/off a master fader,
allowing you to control the master fader of your D.A.W software.
MultiPanel Button: Touch this button to toggle the V-control sliding
window on/off. The sliding window offers additional controls for the
currently selected D.A.W. mode, including
•
The V-Window
•
The Edit Panel
•
The V-Control user’s guide
86
V-Control 1.7 User’s Guide
Edit Panel-Additional D.A.W. Modes
The edit panel (accessed by pressing the MultiPanel button, and then
selecting “edit”) is available for most of the additional D.A.W modes. It
contains the following controls, which work as follows:
Custom Buttons: For each of the additional D.A.W. modes, the edit panel
offers a large amount of various additional shortcut buttons, which can
be used to work with the D.A.W. software more quickly and efficiently.
These additional D.A.W. functions are completely customized for each of
the additional D.A.W.s, as opposed to a “one-sized fits all” approach.
The buttons in the edit panel contain detailed labeling for each control, to
indicate their specific function within each of the additional D.A.W.
modes.
Cursor Diamond: This set of controls contains cursor up, down, left and
right buttons, as well as a center “OK” button.
The specific function of the cursor diamond varies according to which
additional D.A.W. mode it is being used with, but in general performs the
following types of functions:
•
Controlling the zoom level of the horizontal and vertical access of
the D.A.W. session
•
Navigating among audio clips within the session, allowing for
selection of a specific audio clip without using the mouse
•
Navigating the play head among the D.A.W. session timeline
Jog/Shuttle Strip: Swiping this strip moves the play head back and forth
within the session.
Jog/Shuttle Mode button: Touch this button to change the specific
mode of the jug/shuttle strip, within the D.A.W. In most cases, it switches
the mode of the strip between a “jog” type function and a “shuttle” type
function.
NOTE: The jog/shuttle mode button is not available in all additional
D.A.W. modes.
V-Control 1.7 User’s Guide e
87
Using V-Control with Audition
Follow the steps below to set up V-Control with Audition:
•
Launch the Ney-Fi application
•
Launch the V-Control app on your Ipad
•
In the settings screen of V-Control, select the “computer” tab and
then select the computer that Audition is running on
•
In the “D.A.W.” tab, select “Audition”
•
Launch Audition on your computer
•
In the preferences menu of Audition, select the “Control Surface”
window in Audition
•
In the “Device Class” menu, select “Mackie” the click “Configure”
88
V-Control 1.7 User’s Guide
•
In the window that appears, click on the “Add” button, then click
“OK”
•
In the configuration window, select “V-Control” as both the MIDI
input and output device.
V-Control 1.7 User’s Guide e
89
When using V-Control with Audition, the controls work as follows:
Right-Hand Side Controls:
Track: Touch this button toggle channel focus between the first 8
channels or the last 8 channels of the session
Pan: Touch this button to switch the encoders to pan mode. In this mode,
the channel encoders are used to adjust left-right panning for their
corresponding channel.
EQ: Touch this button to switch the encoders to “EQ” mode. In this mode,
the rotary encoders are used to adjust the equalizer of the currently
selected channel.
Undo: Touch this button to undo the last performed action of the
session.
Redo: Touch this button to redo the last performed action of the session.
Zoom Button: Touch this button to toggle the function of the adjacent
arrow keys between two different modes:
•
Zoom Mode: The up/down arrow keys adjust the height of the
tracks, while the left/right arrow keys adjust the zoom level of the
session timeline.
•
Track Mode: The up/down arrow keys select a specific track in the
session, while the left/right arrow keys select a specific clip in the
currently selected track.
Function Keys
V-Control offers two sets of 16 soft keys. To access the second set, press
the shift button located on the left.
The soft keys correspond to certain buttons on a Mackie Control
Universal, which V-Control emulates. In Audition, you can assign specific
commands to these buttons by selecting the Button Assignments window
from Preferences->Control Surface.
The 16 button functions for the default set are as follows:
90
V-Control 1.7 User’s Guide
•
F1-F8 (Assignable)
•
MIDI Tracks
•
Escape
•
Audio Tracks
•
Audio Instrument
•
Aux
•
Busses
•
Outputs
•
User
The 16 shifted button functions are as follows:
•
Shift
•
Option
•
Control
•
Alt/Command
•
Save
•
Undo
•
Cancel
•
Mixer
•
Add Cue Marker
•
Loop
•
Set In
•
Set Out
•
Move to Beginning
V-Control 1.7 User’s Guide e
91
•
Move to End
•
Flip
Assigning A Custom Function Name to the Shortcut Keys
•
Press and hold a shortcut key.
•
A popup menu will appear with different menu categories of
Audition functions. Tap on a category name.
•
The popup menu will switch to a list of names for functions within
that category. Select a specific entry in the list.
•
The selected function name is displayed underneath the button.
Additionally, the button surface contains a 2 letter abbreviation of
the selected function.
•
Alternatively, touch the text name underneath a button, to bring up
an onscreen keyboard where you can type in a custom name that
will appear underneath the button.
92
V-Control 1.7 User’s Guide
Using V-Control with Digital Performer
Follow the steps below to set up V-Control with Digital Performer:
•
Launch the Ney-Fi application
•
Launch the V-Control app on your Ipad
•
In the settings screen of V-Control, select the “computer” tab and
then select the computer that Digital Performer is running on
•
In the “D.A.W.” tab, select “Digital Performer”
•
Launch Digital Performer on your computer
•
Select Digital Performer’s “Control Surface Setup” window and
configure it as seen in the screen shot below:
V-Control 1.7 User’s Guide e
93
When using V-Control with Digital Performer, the controls work as
follows:
Pan: Touch this button to switch the encoders to pan mode. In this mode,
the channel encoders are used to adjust left-right panning for their
corresponding channel.
FX: This button changes to the Effect mode which lets you edit the effects
on the track inserts.
When the encoders are set to FX mode you can select which specific effect
to edit by holding this button and tapping the V-Pot of the track you
want to edit.
Send: Touch this button to switch the encoders to “send” mode. In this
mode, the rotary encoders are used to adjust auxiliary send levels for
each channel.
Arrow Up/Down: The arrow buttons perform different tasks, depending
on the specific mode the encoders are currently set to. They work as
follows:
•
When the encoders are set to “Pan” mode, they scroll the main
window up and down.
•
When the encoders are set to “FX mode” they change which specific
insert to adjust.
•
When the encoders are set to “Send” mode, they adjust which
specific send to adjust
Edit: Touch this button to enable “edit” mode in the D.A.W. session.
Flip: Touch this button to “flip” the functionality of the rotary encoders to
the channel faders. When flip mode is engaged, any parameters that are
normally controlled by the rotary encoders are not controlled by the
channel faders.
Touch the flip button again to return the faders to their normal operation.
Solo: Use this button to disable and re-enable the solo function of all
tracks that are currently soloed.
Save: Touch this button to save the current session.
94
V-Control 1.7 User’s Guide
Undo: Touch this button to undo the last performed action of the
session.
Redo: Touch this button to redo the last performed action of the session.
Punch Left: Touch this button to set an auto-punch in point at the
current location of the play head.
Punch Right: Touch this button to set an auto-punch out point at the
current location of the play head
Set Left: Touch this button to set a mark in point at the current location
of the play head.
Set Right: Touch this button to set a mark out point at the current
location of the play head.
Edit Panel: Touch this button to toggle the multi-panel view on/off.
When the multi-panel is open, touch the multi-panel button in the
window’s upper-left corner to display additional editing commands for
Digital Performer
V-Control 1.7 User’s Guide e
95
Using V-Control with FL-Studio
When using V-Control with FL-Studio, the controls work as follows:
Pan: Touch this button to switch the encoders to pan mode. In this mode,
the channel encoders are used to adjust left-right panning for their
corresponding channel.
Stereo: Touch this button to switch the encoders to stereo mode.
Sends: Touch this button to switch the encoders to “sends” mode. In this
mode, the rotary encoders are used to adjust auxiliary send levels.
Effects: Touch this button to switch the encoders to “effects” mode. In
this mode, the encoders are used to edit various parameters of the
channel effects plug-ins.
EQ: Touch this button to switch the encoders to “EQ” mode. In this mode,
the rotary encoders are used to adjust the equalizer of the currently
selected channel.
Free: Touch this button to switch the encoders to “free” mode
Flip: Touch this button to “flip” the functionality of the rotary encoders to
the channel faders. When flip mode is engaged, any parameters that are
normally controlled by the rotary encoders are not controlled by the
channel faders.
Touch the flip button again to return the faders to their normal operation.
Smooth: Touch this button to activate FL-Studio’s smoothing function.
96
V-Control 1.7 User’s Guide
Using V-Control with Live
Follow the steps below to set up V-Control with Live:
•
Launch the Ney-Fi application
•
Launch the V-Control app on your Ipad
•
In the settings screen of V-Control, select the “computer” tab and
then select the computer that Live is running on
•
In the “D.A.W.” tab, select “Live”
•
Launch Live on your computer
•
Open the Live->Preferences window.
•
Select the MIDI / Sync tab.
•
Set up a control surface and configure it as seen in the screen shot
below:
V-Control 1.7 User’s Guide e
97
When using V-Control with Live, the controls work as follows:
I/O: Touch this button to switch the encoders to “I/O” mode. In this
mode, the rotary encoders are used to select input and output
assignments for the different channels.
•
Touch once to select the track’s Input Type chooser.
•
Touch twice to select the track’s Input Channel chooser.
•
Touch three times to select the Output Type chooser.
•
Touch four times to select the Output Channel chooser.
Sends: Touch this button to switch the encoders to “send” mode. In this
mode, the rotary encoders are used to adjust auxiliary send levels.
Pan: Touch this button to switch the encoders to pan mode. In this mode,
the channel encoders are used to adjust left-right panning for their
corresponding channel.
Plug-Ins: Touch this button to switch the encoders to “plug-ins” mode.
In this mode, the encoders are used to edit various parameters of the
channel plug-ins.
Page Left: Touch this button to page left on the scribble strip display,
when the encoders are controlling plug-in parameters and there are more
parameters present than will fit on a single page.
Page Right: Touch this button to page right on the scribble strip display,
when the encoders are controlling plug-in parameters and there are more
parameters present than will fit on a single page.
Flip: Touch this button to “flip” the functionality of the rotary encoders to
the channel faders. When flip mode is engaged, any parameters that are
normally controlled by the rotary encoders are not controlled by the
channel faders.
Touch the flip button again to return the faders to their normal operation.
Returns: Touch this button to enable “return” mode. When return mode
is enabled the channel strip will show and control the return tracks, as
opposed to the normal mode of only displaying tracks in Live that contain
clips.
98
V-Control 1.7 User’s Guide
Using V-Control with Metric Halo “MIO”
Console
V-Control can display and control the various aspects of the Metric Halo
family of audio interfaces and its accompanying DSP control panel
software “MIO Console” used with audio interfaces from Metric Halo.
Using V-Control, interface owners can now set up monitor mixes for
recording musicians more quickly and easily, or make adjustments to a
monitor mix wirelessly when not located near the computer.
The MIO console mode works as follows:
Trim: Touch this button to switch the encoders to “trim” mode. In this
mode, the rotary encoders are used to adjust the trim (gain) of the
interface’s analog inputs.
In this mode, the top line of the channel display shows the current trim
level while the bottom line displays the channel name of the input
Pan: Touch this button to switch the encoders to “pan” mode. In this
mode, the rotary encoders are used to adjust the L-R panning of each
channel.
Sends: Touch this button to switch the encoders to “sends” mode. In this
mode, the V-Control interface works as follows:
•
The MIO Console’s “sends” window will automatically open and
display on your computer screen
•
V-Control’s channel faders will now adjust the auxiliary send levels
for each channel.
•
V-Control’s rotary encoders will now adjust the stereo panning of
the channel input signal as it is sent to the stereo send output
•
The channel mute and solo buttons control mute and solo of the
channel as it is sent to the send output.
•
The channel rec button controls the pre/post status of the channel
as it is sent to the send output.
•
If more than one group of sends have been configured in the
current console setup, touch the sends button again to switch the
encoders to the next set of sends. V-Control’s 2-digit display will
V-Control 1.7 User’s Guide e
99
display the number of the current group of sends that is being
controlled, and the MIO console will switch the send window to the
corresponding send.
•
When you switch to any of the other two encoder modes in VControl (trim or pan), the sends window on the MIO console will
automatically close.
Master Volume Control: Swipe left or right along the time code counter
to adjust the Metric Halo console’s master volume level up or down.
Record Button: Touch the “REC” button to enable/disable recording for
each input on the Metric Halo audio interface, for the MIOP console’s built
in multi-track recording software.
Phase Inversion: In all three encoder modes, touch the encoder button
to toggle phase inversion on/off for the corresponding channel
Note: The Master Fader popup in MIO Console mode does not have any
effect on the master fader of the master fader on the Metric Halo console.
It has been left in this mode, in the event that the console’s master fader
becomes controllable, in the future, through the Mackie Control Protocol.
For this version of V-Control, the console’s master volume can be
adjusted by swiping your finger along the time code counter.
10
0
V-Control 1.7 User’s Guide
Using V-Control with Reaper
V-Control can work with Reaper software on two different levels of
functionality, as follows:
Using V-Control with Reaper’s “Stock” Mackie Control Support
•
Reaper version 4 and above contains basic built-in support for the
Mackie Control protocol
•
When working with Reaper’s built-in Mackie Control profile, V-Control
supports fader, mute, solo, and record arm controls, as well as the
transport keys and jog/shuttle control.
•
Additionally, the channel rotary controls adjust stereo panning for
each channel only. Additional modes for the rotary controls are not
supported.
•
The edit panel controls only a small amount of functions, which
have not been documented by the Reaper team, and thus are not
officially supported in V-Control.
Using V-Control with Reaper’s Mackie Control Based Plug-Ins
•
Additional control surface plug-ins for Reaper can be downloaded
and installed, which offer an increased level of Mackie Control
support for Reaper, as well as a higher level of documentation
•
When Reaper has been configured to support the Mackie Control
through one of these plug-ins, additional features are available
when using V-Control’s Reaper modes, including:
o Up to 6 separate modes for the channel rotary encoders
o A large variety of shortcut functions for the edit panel
NOTE: When V-Control is used with Reaper, the button labels for the
encoder modes, and the buttons used in the edit panel, are not
customized to the functions within Reaper. This is due to the fact that
there are different Mackie Control based plugins for Reaper, making it
difficult for a single set of V-Control button labels to apply to all
situations.
V-Control 1.7 User’s Guide e
10
1
Using V-Control with Reason
Follow the steps below to set up V-Control with Reason:
•
Launch the Ney-Fi application
•
Launch the V-Control app on your Ipad
•
In the settings screen of V-Control, select the “computer” tab and
then select the computer that Reason is running on
•
In the “D.A.W.” tab, select “Reason”
•
Launch Reason on your computer
•
In Reason, open the Preferences window.
•
Select Control Surfaces and click Add.
•
Set up a control surface and configure it as seen in the screen shot
below:
10
2
V-Control 1.7 User’s Guide
•
The window should now display the following screen:
When using V-Control with Reason, the controls work as follows:
V-Control 1.7 User’s Guide e
10
3
1: Touch this button to switch the encoders to “auxiliary send 1” mode. In
this mode, the rotary encoders are used to levels for auxiliary send 1 in
Reason’s built-in mixer.
2: Touch this button to switch the encoders to “auxiliary send 2” mode. In
this mode, the rotary encoders are used to levels for auxiliary send 2 in
Reason’s built-in mixer.
Pan: Touch this button to switch the encoders to pan mode. In this mode,
the rotary encoders are used to adjust left-right panning for their
corresponding channel.
Aux Return: Touch this button to switch the encoders to “aux return”
mode. In this mode, the rotary encoders control the levels of the auxiliary
returns in Reason’s built-in mixer.
Treble: Touch this button to switch the encoders to “treble” mode. In this
mode, the rotary encoders are used to boost/cut the treble tone control
of their corresponding channel, on Reason’s built-in mixer.
Bass: Touch this button to switch the encoders to “bass” mode. In this
mode, the rotary encoders are used to boost/cut the bass tone control of
their corresponding channel, on Reason’s built-in mixer.
Flip: Touch this button to “flip” the functionality of the rotary encoders to
the channel faders. When flip mode is engaged, any parameters that are
normally controlled by the rotary encoders are not controlled by the
channel faders.
Touch the flip button again to return the faders to their normal operation.
Normal: Touch the normal button to undo the flip function and return
the faders and rotary encoders to normal operation.
10
4
V-Control 1.7 User’s Guide
Using V-Control with SONAR
Follow the steps below to set up V-Control with Sonar:
•
Launch the Ney-Fi application
•
Launch the V-Control app on your Ipad
•
In the settings screen of V-Control, select the “computer” tab and
then select the computer that Sonar is running on
•
In the “D.A.W.” tab, select “Sonar”
•
Launch Sonar on your computer
•
In Sonar select Edit->Preferences->Control Surfaces. Then set up a
Mackie Control controller as seen in the following screen shot:
V-Control 1.7 User’s Guide e
10
5
•
Sonar provides optional settings for the Macke Control controller.
To adjust the optional settings, select the Utilities menu and then
select Mackie Control - 1. Be sure to enable metering if you want to
see meters displayed in V-Control.
When using V-Control with SONAR, the controls work as follows:
Track/Bus: Touch this button to switch the encoders to “track/bus”
mode.
Send: Touch this button to switch the encoders to “send” mode. In this
mode, the rotary encoders are used to adjust auxiliary send levels.
Pan: Touch this button to switch the encoders to pan mode. In this mode,
the channel encoders are used to adjust left-right panning for their
corresponding channel.
10
6
V-Control 1.7 User’s Guide
Plugin: Touch this button to switch the encoders to “Plugin” mode. In this
mode, the encoders are used to edit various parameters of the channel
effects plug-ins.
EQ: Touch this button to switch the encoders to “EQ” mode. In this mode,
the rotary encoders are used to adjust the equalizer of the currently
selected channel.
Comp: Touch this button to switch the encoders to “Compressor” mode.
In this mode, the rotary encoders are used to adjust the compressor of
the currently selected channel.
Flip: Touch this button to “flip” the functionality of the rotary encoders to
the channel faders. When flip mode is engaged, any parameters that are
normally controlled by the rotary encoders are not controlled by the
channel faders.
Touch the flip button again to return the faders to their normal operation
Edit: Touch this button to toggle edit mode on/off in the current session.
Custom Naming of F1-F8 Keys: The edit panel for V-Control’s SONAR
mode contains, among other commands, 8 buttons labeled F1-F8. These
buttons correspond to the F1-F8 commands in the SONAR application
itself.
Since the SONAR application allows you to customize the functions of the
F1-F8 keys, V-Control allows custom naming of its 8 corresponding F
keys, allowing you to remember what custom function you have assigned
to them within SONAR.
To assign a custom name to the F1-F8 keys in the edit panel of VControl’s Sonar mode, perform the following steps:
•
Navigate to the edit panel within SONAR mode
•
Press and hold, then release any of the F1 through F8 keys. A large
scrollable list of functions will appear
•
Swipe the list to navigate its alphabetized contents, and when you
see the name that corresponds to the custom function you have
V-Control 1.7 User’s Guide e
10
7
assigned to that key in the SONAR application itself, tap the name
in the list.
•
The list will disappear and you will now see that custom name
assigned to the function key.
Important Note: Editing the button’s icon and label in V-Control does
NOT change the key command assignment itself, within SONAR. You
MUST edit the key command assignment, within SONAR, to match the
function that you have assigned an icon/label to, within V-Control.
10
8
V-Control 1.7 User’s Guide
Using V-Control with Studio One
Follow the steps below to set up V-Control with Studio One:
•
Launch the Ney-Fi application
•
Launch the V-Control app on your Ipad
•
In the settings screen of V-Control, select the “computer” tab and
then select the computer that Studio One is running on
•
In the “D.A.W.” tab, select “Studio One”
•
Launch Studio One on your computer
•
Open the Studio One->Preferences window and select External
Devices.
•
Click the Add… button.
•
Set up a control surface as show in the following screen shot:
V-Control 1.7 User’s Guide e
10
9
•
Click OK
When using V-Control with SONAR, the controls work as follows:
Clear Solo: Touch this button to clear the solo status of any and call
channels.
11
0
V-Control 1.7 User’s Guide
Save: Touch this button to save the current session.
Undo: Touch this button to undo the last performed action of the
session.
Redo: Touch this button to redo the last performed action of the session.
Flip: Touch this button to “flip” the functionality of the rotary encoders to
the channel faders. When flip mode is engaged, any parameters that are
normally controlled by the rotary encoders are not controlled by the
channel faders.
Touch the flip button again to return the faders to their normal operation.
Global View: Touch thus button to switch Sonar to “Global View” status.
Note: Unlike the other additional D.A.W. modes, there are not any
different rotary encoder modes when controlling Studio One. The rotary
encoders will always control stereo panning of the corresponding
channel.
Custom Naming of F1-F8 Keys: The edit panel for V-Control’s Studio
One mode contains, among other commands, 8 buttons labeled F1-F8.
These buttons correspond to the F1-F8 commands in the Studio One
application itself.
Beginning with version 2.04, Studio One allows you to customize the
functions of the F1-F8 keys. V-Control allows custom naming of its 8
corresponding function keys, allowing you to remember what functions
you have assigned to them.
To assign a custom name to the F1-F8 keys in the edit panel of VControl’s Studio One mode, perform the following steps:
•
Navigate to the edit panel within Studio One mode
•
Touch the text field that sits underneath the function button.
•
In the onscreen keyboard that appears, type your desired custom
name, and then tap the “keyboard close” button at the bottom right
hand side of the onscreen keyboard.
•
The keyboard will close and you will now see that custom name
assigned.
V-Control 1.7 User’s Guide e
11
1
Important Note: Editing the button’s icon and label in V-Control does
NOT change the key command assignment itself, within SONAR. You
MUST edit the key command assignment, within SONAR, to match the
function that you have assigned an icon/label to, within V-Control.
11
2
V-Control 1.7 User’s Guide
Using V-Control with Tracktion
When using V-Control with Tracktion, the controls work as follows:
Pan: Touch this button to switch the encoders to pan mode. In this mode,
the channel encoders are used to adjust left-right panning for their
corresponding channel.
Aux: Touch this button to switch the encoders to “aux” mode. In this
mode, the rotary encoders are used to adjust auxiliary send levels.
To select which specific auxiliary send to adjust, use the “page left” and
“page right” buttons to select which of the eight auxiliary sends to
control.
Plug-In: Touch this button to switch the encoders to “plug-in” mode. In
this mode, the encoders are used to edit various parameters of the
channel plug-ins.
When a plug-in is selected, the first two channel slots show the track
name and the plug-in name.
The next six encoders are assigned to the first six parameters of the
plug-in. If the plug-in has more than six plug-ins, the “Page Left” and
“Page Right” buttons can be used to scroll through them.
Marker: Touch this button to switch the encoders to “marker” mode. In
this mode, the scribble strip will display various markers that have been
created for the project, and the encoders can be touched to instantly
move the play head to the corresponding marker.
Page Left: Touch this button to page left on the scribble strip display,
when the encoders are controlling plug-in parameters and there are more
parameters present than will fit on a single page.
Page Right: Touch this button to page right on the scribble strip display,
when the encoders are controlling plug-in parameters and there are more
parameters present than will fit on a single page.
Flip: Touch this button to “flip” the functionality of the rotary encoders to
the channel faders. When flip mode is engaged, any parameters that are
normally controlled by the rotary encoders are not controlled by the
channel faders.
Touch the flip button again to return the faders to their normal operation.
V-Control 1.7 User’s Guide e
11
3
Edit: Touch this button to put the four cursor keys into “edit” mode.
Depending on the current cursor key mode, the cursor keys work slightly
differently when edit is selected.
In all encoder modes except the plug-in mode, the behavior of the cursor
controls is determined by the object that currently has focus in Tracktion.
•
If a clip is selected, the cursor buttons can be used to navigate
through the clips in an edit. The left and right buttons move to the
previous or next clips on the current track. The up and down
buttons move to clips in the preceding or subsequent tracks.
•
If a track is selected, the up and down buttons can be used to move
focus up or down within the track list. The left and right buttons
are ignored.
•
If the plug-in assignment mode is active, or a filter is currently
selected in Tracktion, the cursor controls will navigate between
plug-ins in the filter section.
11
4
V-Control 1.7 User’s Guide