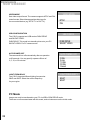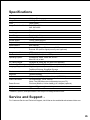
1
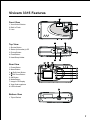
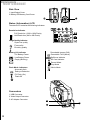
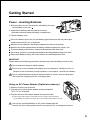
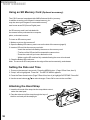
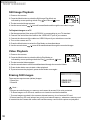
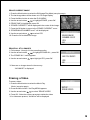
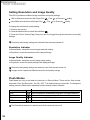
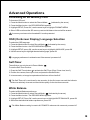
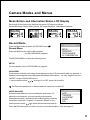
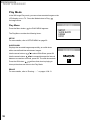
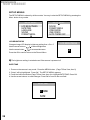
Vivicam 3315
User Manual
English.
1
digital camera
user’s manual
Warranty Policy
This camera is under warranty for one full year from the date of purchase by the original purchaser. In case of
defects in materials or workmanship we will, at our discretion, will repair or replace the camera free of charge.
This warranty applies to the camera only. This warranty does not include batteries, software, or other accessories
which have not been manufactured by Vivitar. This warranty will not be honored if the camera has been
mishandled, damaged, tampered with, or altered by anyone other than the manufacturer. This warranty is
extended to the original purchaser and is not transferable. Other than for the warranty herein, Vivitar is not
responsible for loss, damage, loss of use, or inconvenience of any kind.
A defective camera returned under warranty must be accompanied by a description of the problem and proof
of purchase with the date of purchase clearly indicated. Prior to returning a product please contact Customer
Service or Technical Support for an RMA (Return Material Authorization) and shipping instructions. All related
transportation costs and insurances are at the owner’s expense. Any alteration of this warranty cannot be made
without the written approval from Vivitar.
Every attempt has been made to make this Instruction Manual is as accurate as possible. However, the
product described herein is subject to change and continued product development. This manual describes, in
general, the V3315 camera and popular accessories. The camera you purchase may deviate somewhat from
the product described herein. Different retailers and dealers will bundle (customize) the product in different
ways, especially with regards to batteries, AC adapters, memory cards, cables, and software.
FCC Notice
This equipment has been tested and found to comply with the limits for a Class B digital device, pursuant to
part 15 of the FCC Rules. These limits are designed to provide reasonable protection against harmful interference
in a commercial installation. This equipment generates, uses, and can radiate radio frequency energy and if
not installed and used in accordance with the instructions, may cause harmful interference to radio
communications. However, there is no guarantee that interference will not occur in a particular installation. If
this equipment does cause harmful interference to radio or television reception, detectable by turning the
equipment in question off and on, the user is encouraged to try to correct the interference by one or more of the
following measures: 1) Reorient or relocate the receiving antenna, 2) Increase the distance between the
equipment and the receiver, 3) Connect the equipment to an outlet on a different circuit than that to which the
receiver is connected. Consult your dealer or an experienced radio/TV technician for help.
A shielded-type DC power cable incorporated with a ferrite core is required to meet the FCC emission limits
and to prevent interference with nearby radio and television reception. Use only shielded I/O cables with a
ferrite core to connect this equipment to host computer or TV set. Shielded AC power cables and shielded I/O
cables are required in order to meet the FCC emission limits. It is essential that only the supplied cords and
cable(s) be used.
Rev. tp020909
2
WARNING
Do not use this camera if it is emitting smoke (or an unusual odor), if it becomes unusually hot to the
touch, produces a peculiar noise, or exhibits any other abnormal conditions. Operating the camera in
any of these circumstances may cause a fire or an electrical shock. Stop using the camera immediately,
turn the camera off, remove the batteries, and disconnect the power source if you are using an AC power
adapter. Contact your dealer or authorized service facility for repairs. Never attempt to repair this camera
by yourself as this may be dangerous.
Do not expose the camera to moisture and make sure no water gets into the camera. Take particular
care when using the camera under extreme weather conditions, such as rain or snow, or when operating
the camera at the beach on near water. Avoid using this camera in places subject to extreme moisture.
Do not use the camera if water has entered the camera. Turn the camera off, remove the batteries, and
disconnect the power source if you are using an AC power adapter. Unplug the adapter from the AC
power outlet after you have disconnected the camera. Contact your dealer or authorized service facility.
Do not continue to use the camera as this may cause a fire or an electrical shock.
Do not touch the power plug during a thunderstorm if you are using the AC power adapter. This may
cause an electrical shock.
Do not use the camera if any foreign objects have entered the camera. Turn the camera off, remove the
batteries, and disconnect the power source if you are using an AC power adapter. Unplug the adapter
from the AC power outlet after you have disconnected the camera. Contact your dealer or authorized
service facility. Do not continue to use the camera as this may cause a fire or an electrical shock.
Do not place the camera in an unstable location such as on a wobbly table or sloping surface where the
camera may fall or tip over and cause injury. If the camera has been dropped or damaged, turn the
camera off and remove the batteries or AC power adapter. Contact your dealer or authorized service
facility. Do not continue to use the camera as this may cause a fire or an electrical shock.
Do not insert or drop metallic or other foreign objects into the camera through access points such as the
SD memory card slot. This may cause a fire or an electrical shock.
Do not attempt to modify this camera. Do not remove the camera casing. This may cause a fire or an
electrical shock. Internal inspection, and repairs should only be carried out by an authorized service
facility.
Never operate this camera in any way while driving a vehicle. This may cause a traffic accident.
3
digital camera
user’s manual
CAUTION
Do not place this camera in a location affected by oil fumes or steam, such as near a cooking
stove or humidifier. This may cause a fire or an electrical shock.
Do not leave this camera in a location subject to extremely high temperatures, such as in a
sealed vehicle or in direct sunlight. Exposure to high temperatures may adversely affect the
camera case and internal components and may cause a fire.
Do not cover or wrap the camera or AC power adapter with a cloth or quilt. This may cause
heat to build up and distort the camera case and cause a fire. Always use the camera and
accessories in well-ventilated locations.
Handle the camera carefully and do not expose the camera to shock or vibration. Handling the
camera roughly may cause a malfunction.
When handling and moving the camera, always unplug it from the power source (if you are
using an AC power adapter). Unplug the adapter from the AC power outlet after you have
disconnected the camera. Failure to do so may result in an electrical shock.
Do not use batteries other than those specified for use with your camera. Use of unsuitable
batteries may result in the batteries splitting, or leaking that may cause a fire, injury, or soiling
of the battery compartment.
When placing the batteries into the camera, check the polarity markings on the batteries ( - and
+ ) to ensure that the batteries are inserted correctly. Incorrect battery polarity will result in
camera inoperability and may result in the batteries splitting or leaking and causing a fire,
injury, or soiling of the battery compartment.
Remove the batteries if the camera will not be used for an extended period of time. The batteries
may leak and cause a fire, injury or soiling of the battery compartment. If the batteries leak,
clean and wipe the battery compartment carefully and install new batteries. Wash your hands
carefully if you touch the battery fluid.
4
Table of Contents
6
7
7
7
7
7
8
8
8
9
9
10
10
10
11
11
11
12
12
12
13
14
14
15
15
15
15
15
16
16
17
17
17
18
19
20
22
23
23
24
24
24
25
Introduction
Vivicam 3315 Features
Front View
Top View
Rear View
Bottom View
Side View
Status (Information) LCD
Input/Output Connectors
Getting Started
Power - Installing Batteries, AC adapter
Using an SD Memory Card
Setting Date and Time
Attaching the Hand Strap
Basic Operations
Record a Still Image
Recording a Video
Still Image Playback
Video Playback
Erasing Still Images
Erasing a Video
Setting Image Resolution and Quality
Flash Modes
Advanced Operations
Formatting an SD (Secure Digital) Memory Card
OSD (On-Screen Display)Language Selection
Self-Timer
White Balance
EV compensation
Viewing Image Information and Thumbnails
Camera Modes and Menus
Mode Button and the Status Information LCD display
Record Mode
Play Mode
DPOF
Setup Menus
PC Mode
Transferring Images to Your Computer
Driver Installation
Connecting the Camera to Your Computer
Downloading Your Images
Using the V3315 as a PC Camera
Specifications
5
digital camera
user’s manual
Introduction
Thank you for purchasing the Vivicam 3315 digital camera. With this camera, you can enjoy the new
world of digital imaging. Digital imaging brings new life to photography - combining the latest in
consumer electronics technology with traditional photographic paradigms. Digital cameras make
photography more interesting and fun.
This instruction manual will guide you through the digital imaging process (picture taking). Keep this
manual on hand and enjoy your new V3315. If you prefer to view this instruction manual in another
language, please check the Vivitar website at www.vivitar.com
Thank you,
The Vivitar Digital Camera Development Team
6
Vivicam 3315 Features
2
Front View
1
1. View finder Window
2. Built-in Flash
3. Lens
3
1
3
Top View
1. Shutter Button
2. Status (Information) LCD
3. Picture Button
4. Flash Button
5. Hand Strap Holder
5
2
4
8
9
1
Rear View
1. Power Button
2. Menu Button
3. /Self-timer Button
4. /2X Zoom Button
5. OK Button
6. Mode Button
7. Image LCD Display
8. View finder eyepiece
9. LED Indicator
2
3
4
5
6
7
1
Bottom View
1. Tripod Socket
7
digital camera
user’s manual
Side View
1. Input/Output Cover
2. Battery /SD Memory Card Cover
2
1
Status (Information) LCD
The status LCD contains the following indicators:
Resolution Indicator
Full Resolution (1280 x 1024 Pixels)
Half Resolution (640 x 480 Pixels)
Image Quality Indicator
Super fine quality
Fine quality
Economy quality
Battery Life Indicator
Full Battery Power
Low Battery Power
Empty (Blinking)
Recordable Images (Still)
Recordable Time (Movie)
Self-timer Indicator
SD Card Indicator
Record Mode
Play Mode
Movie Mode
Flash Mode Indicators
Automatic flash
Red-eye Reduction
Fill Flash (On)
Flash-Off
Connectors
1. USB Connector
2. Video Output Connector
3. AC Adapter Connector
2
1
3
8
Getting Started
Power - Inserting Batteries
1. Slide the battery cover in the direction indicated by the arrow
on the battery cover door
2. Insert two AA batteries with the polarity as shown:
(Note also the decal inside the battery compartment)
3. Close the battery cover
Do not mix battery types (use only one battery type at a time) as this may cause poor
camera performance, fire, or explosion
Batteries must be placed in the battery compartment with correct polarity
Batteries should be replaced when the battery indicator displays the “empty” icon
To improve battery performance, replace both batteries at the same time
Do not drop, puncture, or disassemble batteries and keep batteries away from heat
Remove the batteries if they will not be used for an extended period of time
IMPORTANT
Please observe the following precautions as these may cause the battery to split or leak:
Do not attempt to charge an alkaline battery
Do not carry or store a battery with objects such as metal pens, necklaces, coins, or
hairpins as this could short circuit the positive + and negative - terminals of a battery
Do not subject batteries to strong mechanical shock or impact, such as hitting them
with a hammer, stepping on them, or dropping them
Using an AC Power Adapter (Optional accessory)
1. Open the i/o port cover as shown:
2. Connect one end of the power adapter to the port labelled
“DC in 3V” as illustrated:
3. Plug the other end of the power adapter into a power outlet
(A power supply must provide 3.3 VDC rated at 2.5 A for proper camera operation)
(An AC adapter is an optional accessory and is not usually included with the camera)
Use only the specified batteries or AC power adapter with this
camera, the use of other power sources may cause a fire, or damage the camera
9
digital camera
user’s manual
Using an SD Memory Card (Optional accessory)
The V3315 camera is equipped with 8 MB of internal (built-in) memory.
In addition to saving your images in internal memory, you
may also store your images on a removable memory
card known as an SD (Secure Digital) card.
An SD memory card is not included with
the camera but be purchased at a computer,
photo, or electronics store.
To insert an SD memory card:
1. Make sure to turn the camera off
2. Open the Battery/SD memory card cover on the side of the camera (page 8)
3. Insert an SD card into the memory card slot:
* Insert the card as indicated by the arrow on the memory card
* The face of the SD card will be towards the camera lens
* Press the card until you hear a distinctive click
* Make sure the SD card has fully seated allowing the cover to be closed
3. Close the Battery/SD card cover
Note: To remove an SD card press on the edge of the card momentarily, and release
Setting the Date and Time
1. Power on the camera in any mode. Press the MENU button. (Page 1/Rear View, item 2)
2. “Setup” will be highlighted. Press OK. The SETUP MENU appears.
3. Press the Down Arrow button (Page 7/Rear View, item 4) to highlight DATE/TIME. Press OK.
4. Use the arrow buttons
to make changes. Press OK to move to the next field.
Attaching the Hand Strap
1. Insert the thin end of the strap into the strap holder cutout,
under the metal post
2. Pass the other end of the strap through the loop of
the thin cord and pull the strap tight
10
Basic Operations
Record a Still Image
To record a still image:
1. Power on the camera
2. Press the Mode button to select the Record Mode
as shown:
3. Use the view finder window or image LCD display to frame your image
4. Press the Shutter button
* For 2X digital zoom, turn on the LCD monitor and press /X2 button
Recording a Video
To record a video (movie):
1. Power on the camera
as shown:
2. Press the Mode button to select the Movie Mode
3. Press the Shutter button to start recording
4. Press the Shutter button again to stop recording
* The maximum recording time for each movie clip is 15 seconds
Imaging Tips
For successful imaging, please follow these suggestions:
Holding the Camera
Hold the camera firmly with both hands and brace your elbows
lightly against your body
Take care to keep your fingers, hair and the camera strap away
from the camera lens
Use the view finder or image LCD display to frame your shot
When using the view finder, brace the camera against your
forehead to stabilize your shot
Shutter Button Release
Press the shutter button slowly and gently with your index finger
Keep the camera steady while pressing the shutter button
Release the shutter button when you hear the first beep - this indicates the image has been taken
* The second beep signals the completion of the image processing and readiness for another shot
* You can review your recorded still or movie images on either the LCD image display or on a TV as
described in the subsequent sections of this manual
11
digital camera
user’s manual
Still Image Playback
1. Power on the camera
2. Press the Mode button to select the Still-Image Play Mode as
indicated by arrows pointing at both Play
3. The last recorded image appears
4. Use the arrow buttons
and Record
icons:
to scroll forward/backward through the recorded images
To Playback Images on a TV
1. Set the appropriate Video output (NTSC/PAL) corresponding to your TV standard
2. Connect one end of the video cable to the “VIDEO OUT” port of your camera
3. Connect the other end of the cable to a VIDEO IN port of your television or monitor
4. Turn on the camera and TV
5. Press the Mode button to select the Play Mode, as described above
6. Use the arrow buttons
to scroll forward/backward through the recorded images
Video Playback
1. Power on the camera
2. Press the Mode button to select the Movie Play Mode as
indicated by arrows pointing at both the Play
and Movie
icons:
3. The last recorded video appears
4. Use the arrow button to scroll forward/backward through the recorded videos
5. Press shutter button once to start a video playback
6. To pause/resume the playback, press shutter button once again
Erasing Still Images
There are two ways to erase (delete) images:
* Erase One
* Erase All
ERASE MENU
ERASE ONE
ERASE ALL
Note * Images recorded images on a memory card cannot be erased if it is write-protected
* To erase images on an SD card, make sure to insert the card before deletion
* To erase images recorded in the cameras internal memory, do not insert an SD card
* External memory (SD card) always has priority over internal memory - whenever a memory card
is inserted into the camera the camera will use the memory card for both capture and playback
12
ERASE CURRENT IMAGE
1. Press the Mode button to select the Still-Image Play Mode (see prior page)
2. The last image taken will be shown on LCD image display
3. Press the Menu button to enter the PLAY MENU
4. Use the arrow buttons
to highlight ERASE, press OK
5. ERASE ONE is highlighted, press OK
6. “ERASE CURRENT?” will be displayed in the center of the image:
7. Press the OK button to move to the “ERASE CURRENT” menu
8. “ERASE IMAGE NUMBER xxxx?” will be displayed:
9. Use the arrow buttons
to select YES
10. Press the OK to delete this image
ERASE CURRENT?
ERASE CURRENT
ERASE IMAGE
NUMBER 00003?
YES
NO
ERASE ALL STILL IMAGES
1. Follow steps 1 through 4 in the preceding section
2. Use the arrow buttons
4. Use the arrow buttons
ERASE ALL
to highlight ERASE ALL, press OK
3. The “ERASE ALL” menu appears:
to highlight YES, press OK
ARE YOU SURE?
YES
NO
* If there are no images stored in the memory
“NO IMAGE” is displayed
Erasing a Video
To erase a video:
1. Press the Mode button to select the Movie Play
Mode (see prior page)
2. Press the Menu button - the Play MENU appears
3. Use the arrow button
PLAY MENU
SETUP
ERASE VIDEO
to select “ERASE VIDEO”
4. Press OK - follow the screens prompts to delete the video
* If no videos are present, “No Movie” will be displayed
13
digital camera
user’s manual
Setting Resolution and Image Quality
The V3315 provides six different image resolution and quality settings:
1280 x 1024 pixels resolution with Super Fine
640 x 480 pixels resolution with Super Fine
, Fine
, Fine
, or Economy
, or Economy
quality
quality
To change the resolution & quality setting:
1. Power on the camera
2. Press the Mode button to select Record Mode
3. Press the “Picture” button (Page 7/top view, item 3) to toggle through the resolution and quality
settings
Resolution and Quality settings are retained if the camera powered off
Resolution Indicator
In Record Mode - shows the current image resolution setting
In Play Mode - shows the resolution of the captured image
Image Quality Indicator
In Record Mode - shows the current image quality setting
In Play Mode - shows the quality setting of the displayed image
Resolution and quality settings are retained, even if the camera turned off
Images can be captured at different resolution and quality settings
Flash Modes
Flash Mode can only be set when the camera is in Record Mode. There are four flash modes:
Automatic, Red- Eye Reduction, On (Fill), OFF. The default setting is Automatic. To change the
setting, press the Flash button repeatedly until the desired mode is selected.
Mode
Icon
Auto
Red-Eye Reduction
Fill-in
OFF
Description
Flash is enabled to automatically activate in low light conditions
Precursor flash to reduce red-eye effects
Flash is always ON (fill flash)
Flash is always off
The Flash Mode selection is retained even if the camera is turned off
14
Advanced Operations
Formatting an SD Memory Card
To format an SD card:
1. Press the Mode button to select the Record Mode:
(indicated by the arrow)
2. Press the Menu button - the RECORD MENU appears
3. Highlight SETUP, Press OK, use the arrow keys to highlight FORMAT MEDIA
4. Select YES to reformat the SD memory card and all data on the card will be erased
A memory card cannot be formatted if it is write-protected
OSD (On-Screen Display) Language Selection
To select the OSD language:
1. Press the Mode button to select Record Mode:
(indicated by the arrow)
2. Press the Menu button - the RECORD MENU appears
3. Highlight SETUP, press OK; use the arrow keys to highlight LANGUAGE, press OK
4. Use the arrow keys to highlight the desired language, press OK
Language preference is retained even if the camera is powered off
Self-Timer
The self-timer can only be set in Record Mode:
To use the Self-Timer function:
1. Press the Self-Timer button to activate the Self-Timer (Page 7/rear view, item 3)
2. Position the camera, frame your shot, and press the Shutter button
3. In ten seconds, an image is captured and the timer will turn itself off
The Self-Timer will count down for ten seconds; for the first seven seconds the indicator
blinks at a relatively slow rate and then blinks rapidly for the last three seconds
White Balance
To select a White Balance preference:
1. Press the Mode button to select Record Mode:
(indicated by the arrow)
2. Press the Menu button. The RECORD MENU appears.
3. Highlight SETUP, Press OK, use the arrow keys to highlight WHITE BALANCE, press OK
4. Select the desired white balance preference, press OK
The White Balance setting is reset to AUTOMATIC whenever the camera is powered off
15
digital camera
user’s manual
EV Compensation
The V3315 will automatically adjust the camera shutter speed
EV
for the proper exposure of each scene. Occasionally, it is
desirable to manually override the automatic exposure
value (EV) to accommodate special scene circumstances.
To invoke EV compensation:
1. Press the Mode button to select Record Mode:
2. Press the Menu button. The RECORD MENU appears.
3. Use the arrow buttons to highlight EV COMPENSATION, press OK
4. Use the arrow buttons to specify the desired EV
The EV range is from -1.5 to +1.5 in steps of 0.3 EV
COMPENSATION
+0.0
The EV setting is reset to 0.0 whenever the camera is powered off
Viewing Image Information and Thumbnails
Image information is recorded for each image when it is captured
In Still-Image Play Mode:
, the OK button acts as a switch to cycle through:
* Single image playback
* Image information overlay
* Multiple thumbnail display (if there is more than one image in memory)
* Image information off
1. Press the Mode button to select the Still-Image Play Mode:
(indicated by the arrow)
2. Press the OK button to scroll through display options
3. When viewing multiple thumbnails - use the arrow buttons
4. Press the OK button to preview at full screen
16
to locate a particular image
Camera Modes and Menus
Mode Button and Information Status LCD Display
Each press of the mode button switches the status LCD display as follows:
Record Still Image, Record Video (Movie), Still Image Playback , Video/Movie Playback
Record Mode
RECORD MENU
Press the Mode button to select the RECORD mode:
Record Menu
Press the MENU button while in Record Mode
- the RECORD MENU appears:
SETUP
QUICKVIEW
WHITE BALANCE
EV COMPENSATION
The RECORD MENU contains the following items:
SETUP
For more details, refer to SETUP MENU on page 20
QUICKVIEW
If Quickview is enabled, each image will be displayed on the LCD momentarily after it is captured. If
disabled, each image will not be displayed immediately after capture. You may Toggle Quickview
ON/OFF using the QUICKVIEW menu:
1. Use the arrow buttons:
to select On or OFF, press OK to confirm
The Quickview preference is retained when the camera is powered off
WHITE BALANCE
Automatic white balance is recommended for most cases. For
particular circumstances, you may manually select another
white balance preset - according to the ambient lighting conditions.
Select from: Automatic, Tungsten, Fluorescent, Shade, or Sun.
Use the arrow buttons:
WHITEBALANCE
AUTO
TUNGSTEN
FLUORSCENT
SHADE
SUN
to select the desired white balance.
Press the OK button again to confirm and return to the Record Menu. See also page 15.
17
digital camera
user’s manual
Play Mode
In the Still-Image Play mode, you can review recorded images on the
LCD display or on a TV. Press the Mode button to Play:
for image review.
PLAY MENU
Play Menu
Press the Menu button:
, the PLAY MENU appears:
The Play Menu contains the following items:
SETUP
For more details, refer to SETUP MENU on page 20
SLIDE SHOW
Displays the recorded images sequentially, as a slide show
with a user-defined interval between images.
Use the arrow buttons:
to select Slide Show, press OK
Use the arrow buttons:
to increase/decrease the interval
between one and ten seconds, press OK. The slide show starts.
Press the OK button:
while a slide show is playing to
interrupt the show and return to the Play Mode
ERASE
For more details, refer to “Erasing....... ” on pages 12 & 13
18
SETUP
SLIDE SHOW
ERASE
DPOF
SLIDE SHOW
DELAY,SEC.
3
DPOF (Digital Print Order Format)
The V3315 supports the DPOF system. To use DPOF, you must use an SD memory card, as DPOF
information can only be stored on a memory card. Using DPOF, all your images and DPOF settings
will be saved on the SD memory card for printing on a DPOF enabled printer.
DPOF User Interface
1. Press the Mode button to Still-Image PLAY mode:
2. Use the arrow buttons
DPOF print specification
3. Press the Menu button, the PLAY MENU appears
4. Use the arrow buttons:
DPOF
to select an image for
to select DPOF, then OK
PRINT QUANTITY
PRINT SIZE
ENABLE
5. The DPOF Sub-menu will be shown with three selections:
PRINT QUANTITY, PRINT SIZE, and ENABLE.
Use arrow buttons
to select one of the items, press OK
PRINT QUANTITY
PRINT QUANTITY * Use the arrow buttons:
to specify quantity from 1 to 9
* Press OK to confirm and return to the DPOF Sub-menu
0
PRINT SIZE * Use the arrow buttons:
to specify size
* You can specify PRINT STD, 3X5, 4X6, 5X7, 8x10 (inches)
* Press OK to confirm and return to the DPOF Sub-menu
If your printer only supports DPOF version 1.0, you
must set PRINT STD for the “PRINT SIZE”
PRINT SIZE
PRINT STD
3X5
4X6
5X7
8X10
ENABLE * Use the arrow buttons:
to toggle ENABLE or DISABLE
* If you select “ENABLE” and press OK, the camera will save the settings and
return to the Still-Image PLAY MENU
* If you select “DISABLE” and press OK, the camera will discard this image’s DPOF setting
and return to the Still-Image PLAY MENU
19
digital camera
user’s manual
SETUP MENUS
The SETUP MENU is shared by all four modes. You may invoke the SETUP MENU by pressing the
Menu button in any mode:
SETUP MENU
SETUP MENU
SOUND
FORMAT MEDIA
VIDEO MODE
USB CONFIG
AUTO POWER OFF
LCD BRIGHTNESS
DATE/TIME
LANGUAGE
SOUND
FORMAT MEDIA
LCD BRIGHTNESS
Changes image LCD display brightness setting from +5 to - 5
Use the arrow buttons:
Use the arrow button
LCD BRIGHTNESS
to select Brightness
to increase/decrease
+3
Press the OK to confirm return to the Record Menu
The brightness setting is retained even if the camera is powered off
DATE/TIME
1. Power on the camera in any mode. Press the MENU button. (Page 7/Rear View, item 2)
2. “Setup” will be highlighted. Press OK. The SETUP MENU appears.
3. Press the Left Arrow button (Page 7/Rear View, item 4) to highlight DATE/TIME. Press OK.
4. Use the arrow buttons to make changes. Press OK to move to the next field.
DATE/TIME
01/01/00
12:12
20
LANGUAGE
Selects the OSD menu language. There are eight languages:
English, French, German, Italian, Spanish, Japanese, Traditional
Chinese, and Simplified Chinese. (Default=English)
Select a language using the arrow buttons:
LANGUAGE
, press OK
Control returns to the SETUP MENU automatically when the
change is made.
Language preference is retained when the camera
is powered off
LANGUAGE
SOUND
Enables/disables the sound effects (beeps) associated with
camera operations. You may choose to turn on, or off,
camera sound effects which occur each time a camera button is
pressed. (Default=OFF)
Use the arrow buttons:
SOUND
to select on/off, press OK
Control returns to the SETUP MENU when the change is made.
ON
OFF
The sound preference setting is retained when the
camera is powered off
FORMAT MEDIA
Formats the SD memory card and erases all data from the card.
Use the arrow buttons:
to select FORMAT MEDIA, press OK
“Are You Sure?” will be displayed
Use the arrow buttons:
to select YES, press OK
The memory card will be reformatted.
(Select NO to cancel and return to the SETUP MENU)
“RESET IMAGE NO.?” will be displayed
Use the arrow buttons:
to select YES or NO, press OK
FORMAT MEDIA
ARE YOU SURE?
YES
NO
* Resetting the image number will cause images in the camera
to be sequentially numbered beginning again from 0001.
21
digital camera
user’s manual
VIDEO MODE
Sets video output format. The camera supports NTSC and PAL
video formats. Select the appropriate video type for
the connected device (e.g. NTSC TV or PAL TV).
USB CONFIGURATION
The V3315 supports two USB modes: DISK DRIVE
and SILENT VIDEO.
DISK DRIVE: This mode is to transfer pictures to your PC
SILENT VIDEO: For PC camera mode
AUTO POWER OFF
The camera will turn off automatically after no-operation
or 90 seconds. You may specify a power-off time of:
3, 5, 10, or 30 minutes.
LIGHT FREQUENCY
The V3315 supports different lighting frequencies:
50HZ and 60HZ. Select the correct frequency
for your region.
VIDEO MODE
NTSC
PAL
USB CONFIG
DISK DRIVE
SILENT VIDEO
AUTO POWER OFF
3 Min
5 min
10 Min
30 Min
Cancel
LIGHT FREQUENCY
50HZ
60HZ
PC Mode
Images can only be transferred to your PC via USB in DISK DRIVE mode.
There are no menus associated with this mode, and no buttons are active in this mode.
22
Transferring Images to Your Computer
Before transferring images to your computer, please review the following guidelines Operating Environments
* Images stored in the camera can be transferred to a computer using the USB cable
Windows OS:
MS Windows 98, 98SE, 2000, Me, or Windows XP
Memory: 64 MB RAM
Other:
CD-ROM drive, USB port
Macintosh (Download Only - PC camera mode not supported for Mac) OS:
Mac OS 9.0 or higher
CPU:
Power PC or higher
Memory: 64 MB RAM
Other:
CD-ROM drive, USB port
Note: Imaging software applications included with the V3315 are supported on PC only
Trademarks Windows 98, Windows 98SE, Windows 2000, Windows Me, and Windows XP are
registered trademarks of Microsoft Corporation in the U.S.. and other countries.
Macintosh, Mac OS and Power PC are trademarks or registered trademarks of Apple Computer
in the U.S. and other countries.
Other company names and product names are trademarks or registered trademarks of their
respective owners.
Driver Installation
If you are planning to transfer your images to a computer, make sure to complete the camera driver
installation before the camera connection. The steps are as below:
1. Insert the V3315 CD-ROM disc into your CD-ROM drive
2. The setup program starts - follow the on screen instructions to complete the driver installation
3. Restart your computer
23
digital camera
user’s manual
Connecting the Camera to Your Computer
1. Plug one end of the USB cable into the camera USB port
2. Plug the other end of the USB cable to your computer’s USB port
* Downloading images consumes battery power very quickly - use an external SD memory card
reader or an AC power adapter whenever transferring images to your computer
* “Disk Drive” will appear on the LCD display when connected to a computer
Downloading Images
1. After connecting the camera, power-on the camera
2. From the Windows desktop, double-click on My computer to find “Removable Disk” (the camera)
3. Double click on Removable Disk and subsequent folders to locate your Images and Videos
4. Drag & Drop, or Cut & Paste image files from the Removable Disk to a new folder in your hard disk
5. Once the copy process has been completed, the images have been successfully downloaded
from the camera to your computer
Using the V3315 as a PC Camera (PC only)
The V3315 can also serve as a PC video camera using third-party video software such as Microsoft
NetMeeting or Video Maker (XP):
1. Make sure you have installed the camera video driver
2. Set the V3315 to USB silent video mode * From the Setup Menu, USB CONFIG, select SILENT VIDEO (see page 22)
3. Connect the USB cable to the camera and to your PC’s USB port
4. Place the camera on a desktop or on top of your computer monitor
5. Turn on the camera
6. Launch Microsoft NetMeeting or Video Maker and follow the instructions for that application
For more information about the operation of your video application software, please
refer to its respective software help files and documentation
24
Specifications
Effective pixels
1.3 Mega Pixels
Image Sensor
1.3 Mega Pixel CMOS
Color
10 Bit (RGB)
Image Resolution Modes Full: 1280 x 1024
Half: 640 x 480
Lens
Fixed Focus
Focal length
9.0 mm
Focal Range
Four feet to infinity
Zoom
2X Digital Zoom
Shutter Speed
1/20 to 1/2500 second
Exposure Compensation +/- 1.5 EV in 0.3 EV steps
White Balance
Auto, Manual
Memory
Internal: NAND type Flash memory 8 MB
External: SD (secure digital) memory card (optional)
Compression Method
JPEG
File Format
EXIF, DPOF, AVI (Motion JPEG)
Operating System
Windows 98, 98SE, 2000, Me, and XP
Mac OS 9.0, or later
PC Camera Mode
Windows 98, 2000, Me, XP (Mac not supported)
Software (for PC only)
MGI Photo Suite SE, Photo Vista
Language Support
English, Japanese, German, French, Spanish, Italian,
Traditional Chinese, Simplified Chinese
Flash
Built-In: Auto, On/Fill, OFF, Red-Eye Reduction
Self-timer
10 seconds delay
i/o Ports
DC power in, USB port, Video Output (NTSC/PAL)
USB Frame Rate
14.8 frames/sec. (VGA, QVGA)
(Note: The USB frame rate is dependant on your PC)
Power Source
2 AA size (Alkaline, Lithium battery); AC-Adapter (optional)
Weight
Approx. 120 grams without battery
Dimension
106 mm x 65 mm x 35 mm
* Features, Options, and Specifications are subject to change without notice
Service and Support For Customer Service and Technical Support, visit Vivitar on the worldwide web at www.vivitar.com
25