1
Symantec Enterprise Security
Manager™ Reporting
Implementation Guide
Version 6.1
Symantec Enterprise Security Manager™ Reporting
Implementation Guide
The software described in this book is furnished under a license agreement and may be
used only in accordance with the terms of the agreement.
Documentation version 6.1
Copyright Notice
Copyright © 1998–2004 Symantec Corporation.
All Rights Reserved.
Any technical documentation that is made available by Symantec Corporation is the
copyrighted work of Symantec Corporation and is owned by Symantec Corporation.
NO WARRANTY. The technical documentation is being delivered to you AS-IS, and
Symantec Corporation makes no warranty as to its accuracy or use. Any use of the
technical documentation or the information contained therein is at the risk of the user.
Documentation may include technical or other inaccuracies or typographical errors.
Symantec reserves the right to make changes without prior notice.
No part of this publication may be copied without the express written permission of
Symantec Corporation, 20330 Stevens Creek Blvd., Cupertino, CA 95014.
Trademarks
Symantec, the Symantec logo, and LiveUpdate are U.S. registered trademarks of Symantec
Corporation. Symantec Enterprise Security Architecture (SESA), Symantec Enterprise
Security Manager, Symantec Incident Manager, Symantec Security Response, Symantec
NetRecon, and Symantec Vulnerability Assessment are trademarks of Symantec
Corporation.
This product includes software developed by the Apache Software Foundation
(http://www.apache.org/).
Other brands and product names that are mentioned in this manual may be trademarks or
registered trademarks of their respective companies and are hereby acknowledged.
Technical support
As part of Symantec Security Response, the Symantec global Technical Support
group maintains support centers throughout the world. The Technical Support
group’s primary role is to respond to specific questions on product feature/
function, installation, and configuration, as well as to author content for our
Web-accessible Knowledge Base. The Technical Support group works
collaboratively with the other functional areas within Symantec to answer your
questions in a timely fashion. For example, the Technical Support group works
with Product Engineering as well as Symantec Security Response to provide
Alerting Services and Virus Definition Updates for virus outbreaks and security
alerts.
Symantec technical support offerings include:
■
A range of support options that give you the flexibility to select the right
amount of service for any size organization
■
Telephone and Web support components that provide rapid response and
up-to-the-minute information
■
Upgrade insurance that delivers automatic software upgrade protection
■
Content Updates for virus definitions and security signatures that ensure
the highest level of protection
■
Global support from Symantec Security Response experts, which is
available 24 hours a day, 7 days a week worldwide in a variety of languages
for those customers enrolled in the Platinum Support Program
Advanced features, such as the Symantec Alerting Service and Technical
Account Manager role, offer enhanced response and proactive security
support
Please visit our Web site for current information on Support Programs. The
specific features available may vary based on the level of support purchased and
the specific product that you are using.
■
Licensing and registration
If the product that you are implementing requires registration and/or a license
key, the fastest and easiest way to register your service is to access the
Symantec licensing and registration site at www.symantec.com/certificate.
Alternatively, you may go to www.symantec.com/techsupp/ent/enterprise.html,
select the product that you wish to register, and from the Product Home Page,
select the Licensing and Registration link.
Contacting Technical Support
Customers with a current support agreement may contact the Technical
Support group via phone or online at www.symantec.com/techsupp.
Customers with Platinum support agreements may contact Platinum Technical
Support via the Platinum Web site at www-secure.symantec.com/platinum/.
When contacting the Technical Support group, please have the following:
■
Product release level
■
Hardware information
■
Available memory, disk space, NIC information
■
Operating system
■
Version and patch level
■
Network topology
■
Router, gateway, and IP address information
■
Problem description
■
Error messages/log files
■
Troubleshooting performed prior to contacting Symantec
■
Recent software configuration changes and/or network changes
Customer Service
To contact Enterprise Customer Service online, go to www.symantec.com, select
the appropriate Global Site for your country, then choose Service and Support.
Customer Service is available to assist with the following types of issues:
■
Questions regarding product licensing or serialization
■
Product registration updates such as address or name changes
■
General product information (features, language availability, local dealers)
■
Latest information on product updates and upgrades
■
Information on upgrade insurance and maintenance contracts
■
Information on Symantec Value License Program
■
Advice on Symantec's technical support options
■
Nontechnical presales questions
■
Missing or defective CD-ROMs or manuals
SYMANTEC SOFTWARE LICENSE AGREEMENT
Symantec Enterprise Security Manager Reporting
SYMANTEC CORPORATION AND/OR ITS
SUBSIDIARIES (“SYMANTEC”) IS WILLING TO
LICENSE THE SOFTWARE TO YOU AS AN
INDIVIDUAL, THE COMPANY, OR THE LEGAL ENTITY
THAT WILL BE UTILIZING THE SOFTWARE
(REFERENCED BELOW AS “YOU” OR “YOUR”) ONLY
ON THE CONDITION THAT YOU ACCEPT ALL OF THE
TERMS OF THIS LICENSE AGREEMENT. READ THE
TERMS AND CONDITIONS OF THIS LICENSE
AGREEMENT CAREFULLY BEFORE USING THE
SOFTWARE. THIS IS A LEGAL AND ENFORCEABLE
CONTRACT BETWEEN YOU AND THE LICENSOR. BY
OPENING THIS PACKAGE, BREAKING THE SEAL,
CLICKING THE “AGREE” OR “YES” BUTTON OR
OTHERWISE INDICATING ASSENT
ELECTRONICALLY, OR LOADING THE SOFTWARE,
YOU AGREE TO THE TERMS AND CONDITIONS OF
THIS AGREEMENT. IF YOU DO NOT AGREE TO THESE
TERMS AND CONDITIONS, CLICK THE “I DO NOT
AGREE” OR “NO” BUTTON OR OTHERWISE INDICATE
REFUSAL AND MAKE NO FURTHER USE OF THE
SOFTWARE.
1. License:
The software and documentation that accompanies
this license (collectively the “Software”) is the
proprietary property of Symantec or its licensors and
is protected by copyright law. While Symantec
continues to own the Software, You will have certain
rights to use the Software after Your acceptance of this
license. This license governs any releases, revisions, or
enhancements to the Software that the Licensor may
furnish to You. Except as may be modified by an
applicable Symantec license certificate, license
coupon, or license key (each a “License Module”) that
accompanies, precedes, or follows this license, and as
may be further defined in the user documentation
accompanying the Software, Your rights and
obligations with respect to the use of this Software are
as follows.
You may:
A. use the number of copies of the Software as have
been licensed to You by Symantec under a License
Module. If the Software is part of a suite containing
multiple Software titles, the number of copies You may
use may not exceed the aggregate number of copies
indicated in the License Module, as calculated by any
combination of licensed Software titles. Your License
Module shall constitute proof of Your right to make
such copies. If no License Module accompanies,
precedes, or follows this license, You may make one
copy of the Software You are authorized to use on a
single computer;
B. make one copy of the Software for archival
purposes, or copy the Software onto the hard disk of
Your computer and retain the original for archival
purposes;
C. use the Software on a network, provided that You
have a licensed copy of the Software for each computer
that can access the Software over that network;
D. use the Software in accordance with any written
agreement between You and Symantec; and
E. after written consent from Symantec, transfer the
Software on a permanent basis to another person or
entity, provided that You retain no copies of the
Software and the transferee agrees in writing to the
terms of this license.
You may not:
A. copy the printed documentation that accompanies
the Software;
B. sublicense, rent, or lease any portion of the
Software; reverse engineer, decompile, disassemble,
modify, translate, make any attempt to discover the
source code of the Software, or create derivative works
from the Software;
C. use the Software as part of a facility management,
timesharing, service provider, or service bureau
arrangement;
D. use a previous version or copy of the Software after
You have received and installed a disk replacement set
or an upgraded version. Upon upgrading the Software,
all copies of the prior version must be destroyed;
E. use a later version of the Software than is provided
herewith unless You have purchased corresponding
maintenance and/or upgrade insurance or have
otherwise separately acquired the right to use such
later version;
F. use, if You received the software distributed on
media containing multiple Symantec products, any
Symantec software on the media for which You have
not received permission in a License Module; nor
G. use the Software in any manner not authorized by
this license.
2. Content Updates:
Certain Software utilize content that is updated from
time to time (including but not limited to the following
Software: antivirus software utilize updated virus
definitions; content filtering software utilize updated
URL lists; some firewall software utilize updated
firewall rules; and vulnerability assessment products
utilize updated vulnerability data; these updates are
collectively referred to as “Content Updates”). You
shall have the right to obtain Content Updates for any
period for which You have purchased maintenance,
except for those Content Updates that Symantec elects
to make available by separate paid subscription, or for
any period for which You have otherwise separately
acquired the right to obtain Content Updates.
Symantec reserves the right to designate specified
Content Updates as requiring purchase of a separate
subscription at any time and without notice to You;
provided, however, that if You purchase maintenance
hereunder that includes particular Content Updates on
the date of purchase, You will not have to pay an
additional fee to continue receiving such Content
Updates through the term of such maintenance even if
Symantec designates such Content Updates as
requiring separate purchase. This License does not
otherwise permit the licensee to obtain and use
Content Updates.
3. Limited Warranty:
Symantec warrants that the media on which the
Software is distributed will be free from defects for a
period of thirty (30) days from the date of delivery of
the Software to You. Your sole remedy in the event of a
breach of this warranty will be that Symantec will, at
its option, replace any defective media returned to
Symantec within the warranty period or refund the
money You paid for the Software. Symantec does not
warrant that the Software will meet Your requirements
or that operation of the Software will be uninterrupted
or that the Software will be error-free.
TO THE MAXIMUM EXTENT PERMITTED BY
APPLICABLE LAW, THE ABOVE WARRANTY IS
EXCLUSIVE AND IN LIEU OF ALL OTHER
WARRANTIES, WHETHER EXPRESS OR IMPLIED,
INCLUDING THE IMPLIED WARRANTIES OF
MERCHANTABILITY, FITNESS FOR A PARTICULAR
PURPOSE, AND NONINFRINGEMENT OF
INTELLECTUAL PROPERTY RIGHTS. THIS
WARRANTY GIVES YOU SPECIFIC LEGAL RIGHTS.
YOU MAY HAVE OTHER RIGHTS, WHICH VARY
FROM STATE TO STATE AND COUNTRY TO
COUNTRY.
4. Disclaimer of Damages:
SOME STATES AND COUNTRIES, INCLUDING
MEMBER COUNTRIES OF THE EUROPEAN
ECONOMIC AREA, DO NOT ALLOW THE LIMITATION
OR EXCLUSION OF LIABILITY FOR INCIDENTAL OR
CONSEQUENTIAL DAMAGES, SO THE BELOW
LIMITATION OR EXCLUSION MAY NOT APPLY TO
YOU.
TO THE MAXIMUM EXTENT PERMITTED BY
APPLICABLE LAW AND REGARDLESS OF WHETHER
ANY REMEDY SET FORTH HEREIN FAILS OF ITS
ESSENTIAL PURPOSE, IN NO EVENT WILL
SYMANTEC BE LIABLE TO YOU FOR ANY SPECIAL,
CONSEQUENTIAL, INDIRECT, OR SIMILAR
DAMAGES, INCLUDING ANY LOST PROFITS OR LOST
DATA ARISING OUT OF THE USE OR INABILITY TO
USE THE SOFTWARE EVEN IF SYMANTEC HAS BEEN
ADVISED OF THE POSSIBILITY OF SUCH DAMAGES.
IN NO CASE SHALL SYMANTEC'S LIABILITY EXCEED
THE PURCHASE PRICE FOR THE SOFTWARE. The
disclaimers and limitations set forth above will apply
regardless of whether or not You accept the Software.
5. U.S. Government Restricted Rights:
RESTRICTED RIGHTS LEGEND. All Symantec products
and documentation are commercial in nature. The
software and software documentation are
“Commercial Items,” as that term is defined in 48
C.F.R. section 2.101, consisting of “Commercial
Computer Software” and “Commercial Computer
Software Documentation,” as such terms are defined in
48 C.F.R. section 252.227-7014(a)(5) and 48 C.F.R.
section 252.227-7014(a)(1), and used in 48 C.F.R.
section 12.212 and 48 C.F.R. section 227.7202, as
applicable. Consistent with 48 C.F.R. section 12.212, 48
C.F.R. section 252.227-7015, 48 C.F.R. section 227.7202
through 227.7202-4, 48 C.F.R. section 52.227-14, and
other relevant sections of the Code of Federal
Regulations, as applicable, Symantec's computer
software and computer software documentation are
licensed to United States Government end users with
only those rights as granted to all other end users,
according to the terms and conditions contained in this
license agreement. Manufacturer is Symantec
Corporation, 20330 Stevens Creek Blvd., Cupertino, CA
95014, United States of America.
6. Export Regulation:
Certain Symantec products are subject to export
controls by the U.S. Department of Commerce (DOC),
under the Export Administration Regulations (EAR)
(see www.bxa.doc.gov). Violation of U.S. law is strictly
prohibited. Licensee agrees to comply with the
requirements of the EAR and all applicable
international, national, state, regional and local laws,
and regulations, including any applicable import and
use restrictions. Symantec products are currently
prohibited for export or re-export to Cuba, North
Korea, Iran, Iraq, Libya, Syria and Sudan or to any
country subject to applicable trade sanctions. Licensee
agrees not to export, or re-export, directly or
indirectly, any product to any country outlined in the
EAR, nor to any person or entity on the DOC Denied
Persons, Entities and Unverified Lists, the U.S.
Department of State's Debarred List, or on the U.S.
Department of Treasury's lists of Specially Designated
Nationals, Specially Designated Narcotics Traffickers,
or Specially Designated Terrorists. Furthermore,
Licensee agrees not to export, or re-export, Symantec
products to any military entity not approved under the
EAR, or to any other entity for any military purpose,
nor will it sell any Symantec product for use in
connection with chemical, biological, or nuclear
weapons or missiles capable of delivering such
weapons.
7. General:
If You are located in North America or Latin America,
this Agreement will be governed by the laws of the
State of California, United States of America.
Otherwise, this Agreement will be governed by the
laws of England and Wales. This Agreement and any
related License Module is the entire agreement
between You and Symantec relating to the Software
and: (i) supersedes all prior or contemporaneous oral
or written communications, proposals, and
representations with respect to its subject matter; and
(ii) prevails over any conflicting or additional terms of
any quote, order, acknowledgment, or similar
communications between the parties. This Agreement
shall terminate upon Your breach of any term
contained herein and You shall cease use of and
destroy all copies of the Software. The disclaimers of
warranties and damages and limitations on liability
shall survive termination. Software and
documentation is delivered Ex Works California, U.S.A.
or Dublin, Ireland respectively (ICC INCOTERMS 2000).
This Agreement may only be modified by a License
Module that accompanies this license or by a written
document that has been signed by both You and
Symantec. Should You have any questions concerning
this Agreement, or if You desire to contact Symantec
for any reason, please write to: (i) Symantec Customer
Service, 555 International Way, Springfield, OR 97477,
U.S.A., (ii) Symantec Customer Service Center, PO BOX
5689, Dublin 15, Ireland, or (iii) Symantec Customer
Service, 1 Julius Ave, North Ryde, NSW 2113,
Australia.
8. Additional Uses and Restrictions:
A. If the Software You have licensed is Symantec
Enterprise Security Manager, notwithstanding any of
the terms and conditions contained herein, the
following additional terms apply to the Software:
1. Permission to use the software to assess Desktop,
Server, or Network machines does not constitute
permission to make additional copies of the Software.
2. You may use the Software to assess no more than the
number of Desktop machines set forth under a License
Module. “Desktop” means a desktop central processing
unit for a single end user.
3. You may use the Software to assess no more than the
number of Server machines set forth under a License
Module. “Server” means a central processing unit that
acts as a server for other central processing units.
4. You May use the Software to assess no more than the
number of Network machines set forth under a License
Module. “Network” means a system comprised of
multiple machines, each of which can be assessed over
the same network.
B. If the Software you have licensed includes Report
Studio You may use the single (1) user license of Report
Studio that is received with the Software only.
Additional Report Studio licenses must be purchased
separately.
Contents
Technical support
Chapter 1
Introducing Symantec Enterprise Security
Manager Reporting
About Symantec ESM Reporting ....................................................................... 17
About Symantec Enterprise Reporting ............................................................ 18
Components of Symantec ESM Reporting ....................................................... 19
What you can do with Symantec ESM Reporting ........................................... 20
How Symantec ESM Reporting works .............................................................. 22
Where to get more information ......................................................................... 22
Chapter 2
Before you Install Symantec ESM Reporting
Before you install Symantec ESM Reporting .................................................. 23
About the Database Foundation installer ................................................ 24
About the Database Link installer ............................................................. 25
About the Symantec Enterprise Reporting installer .............................. 25
About the Reports Package installer ........................................................ 26
Planning for the Symantec ESM Reporting Database Foundation ...... 27
Planning for the Symantec ESM Reporting Database Link ................... 27
Planning for Symantec Enterprise Reporting ......................................... 27
Planning for the Symantec ESM Reporting Reports Package .............. 28
Ensuring network connectivity ................................................................. 28
Setting Microsoft SQL Server database authentication ........................ 28
System requirements .......................................................................................... 29
Additional requirements for all computers ............................................. 36
Additional Windows requirements ........................................................... 37
Additional UNIX requirements .................................................................. 38
Chapter 3
Installing Symantec ESM Reporting
Installing Symantec ESM Reporting ................................................................. 41
Install on Windows computers using IBM DB2 ....................................... 42
Install on Windows computers using Microsoft SQL Server ................ 62
Install on Windows computers using Oracle ........................................... 72
Installing on UNIX computers using Oracle ............................................ 75
Silently installing the Symantec ESM Reporting Database Link ......... 90
10 Contents
Post-installation tasks ........................................................................................ 97
Changing the Symantec ESM Reporting Database Link ........................ 97
Stopping and restarting the Symantec ESM Reporting Database
Link on UNIX ........................................................................................ 98
Configuring Symantec Enterprise Reporting .......................................... 98
Configuring the Apache HTTP Web server ............................................. 99
Checking the installation logs for errors or warnings ........................... 99
Checking the Symantec ESM Reporting Database Link log
for errors ............................................................................................. 101
Restoring database performance ............................................................ 102
Uninstalling the Symantec ESM Reporting Database Foundation .... 103
Uninstalling the Symantec ESM Reporting Database Link ................ 103
Uninstalling Symantec Enterprise Reporting ....................................... 104
Uninstalling the Symantec ESM Reporting Reports Package ............ 105
Chapter 4
Securing Symantec ESM Reporting
About security considerations ......................................................................... 107
Securing JDBC driver communications .................................................. 108
Securing communications between Symantec Enterprise
Reporting components ...................................................................... 108
Securing email ............................................................................................ 109
About backups ............................................................................................ 110
About HTTP Web server security ............................................................ 110
About user account permissions ..................................................................... 110
About anonymous access and administrator accounts ....................... 114
Assigning user account permissions using the Symantec ESM
Reporting Database Link .................................................................. 115
Manually assigning user account permissions using SQL
commands ........................................................................................... 116
Removing user account permissions ...................................................... 118
Viewing current user permissions .......................................................... 119
About auditing in Symantec ESM Reporting ................................................ 121
Locating logs ............................................................................................... 121
Using audit reports .................................................................................... 122
Chapter 5
Running Symantec ESM Reporting
About the user interface ................................................................................... 126
Opening the user interface ............................................................................... 126
Customizing the user interface ....................................................................... 127
About the administration tools ....................................................................... 127
Contents
About reports .....................................................................................................128
About state reports ....................................................................................129
About trend reports ...................................................................................129
About queries .............................................................................................130
Locating reports .................................................................................................131
Running Reports ................................................................................................131
Selecting report prompts ..................................................................................132
Scheduling reports ............................................................................................133
Exporting report information ..........................................................................134
Emailing reports ................................................................................................135
About Query Studio ...........................................................................................135
About using queries ...........................................................................................136
Planning your query ..................................................................................136
Data items ...................................................................................................137
Metadata model divisions .........................................................................138
Using defined queries .......................................................................................140
Add or remove columns in queries .........................................................140
Filter queries ..............................................................................................141
Format queries ...........................................................................................142
Sort queries .................................................................................................142
Summarize queries ....................................................................................143
Adding charts to a query ..........................................................................143
About custom groups in queries ..............................................................144
About Report Studio ..........................................................................................144
Using Report Studio ..........................................................................................144
Planning your report .................................................................................145
Opening Report Studio ..............................................................................145
Creating a new report ................................................................................145
Modifying an existing report ...................................................................146
About insertable objects ...........................................................................146
Deleting an existing report ......................................................................148
Configuring and updating the database .........................................................148
Enabling trending ......................................................................................148
Updating description information in the database ..............................151
Removing old data from your database .................................................152
11
12 Contents
Appendix A
About Symantec ESM Reports
About the reports in Symantec ESM Reporting ............................................ 155
Account domain permissions (query) ..................................................... 155
Account permissions (query) ................................................................... 156
Account policy permissions (query) ....................................................... 156
Account template permissions (query) .................................................. 156
Agent audit schedule ................................................................................. 156
Agent audit schedule (query) ................................................................... 157
Agent compliance distribution by line of business .............................. 157
Agent compliance Distribution by manager .......................................... 157
Agent compliance (query) ........................................................................ 157
Agent counts by manager ......................................................................... 158
Agent counts by manager (query) ........................................................... 158
Agent level (query) .................................................................................... 158
Agent level by line of business ................................................................ 158
Agent level by line of business (query) ................................................... 159
Agent level by manager ............................................................................ 159
Agent level by manager (query) ............................................................... 159
Agent properties (query) .......................................................................... 160
Agent summaries (query) ......................................................................... 160
Agent Summary ......................................................................................... 160
Agent trends (query) ................................................................................. 160
Agent violations (query) ........................................................................... 160
Agents not assigned to user-defined domains (query) ........................ 161
Agents not running a policy before a specified date ............................ 161
Agents with errors by line of business ................................................... 161
Audit (query) ............................................................................................... 161
Audit errors by line of business (query) ................................................. 161
Audit errors (query) ................................................................................... 162
Audits scheduled for today (query) ......................................................... 162
Change event details ................................................................................. 162
Change events (query) ............................................................................... 162
Compliance by line of business ................................................................ 163
Compliance by manager ........................................................................... 163
Compliance by manager (query) .............................................................. 163
Daily agent level trend by line of business ............................................ 164
Daily agent level trend by manager ........................................................ 164
Daily compliance trend by manager ....................................................... 164
Daily violations trend by line of business .............................................. 165
Daily violations trend by manager .......................................................... 165
Domain trends (query) .............................................................................. 165
License (query) ........................................................................................... 165
License counts by manager (query) ........................................................ 165
Contents
Manager - domain - agent (query) ...........................................................166
Message compliance by line of business ................................................166
Message details - found issues .................................................................166
Messages (query) ........................................................................................166
Monthly agent level trend by line of business ......................................167
Monthly agent level trend by manager ..................................................167
Monthly compliance trend by line of business .....................................167
Monthly compliance trend by manager .................................................167
Monthly violations trend by line of business ........................................168
Monthly violations trend by manager ....................................................168
Policy audit schedule .................................................................................168
Policy audit schedule (query) ...................................................................168
Policy Runs .................................................................................................169
Quarterly agent level trend by line of business ....................................169
Quarterly agent level trend by manager ................................................169
Quarterly compliance trend by line of business ...................................169
Quarterly compliance trend by manager ...............................................170
Quarterly violations trend by line of business ......................................170
Quarterly violations trend by manager ..................................................170
Suppressed message details .....................................................................170
Suppression configuration .......................................................................171
Suppression configuration (query) .........................................................171
Suppression configuration (query) .........................................................171
Symantec report template ........................................................................171
Upcoming scheduled audits (query) .......................................................171
Violations by line of business ..................................................................172
Violations by line of business (query) .....................................................172
Violations by manager ..............................................................................172
Violations by manager (query) ................................................................172
Weekly agent level trend by line of business ........................................173
Weekly agent level trend by manager ....................................................173
Weekly compliance trend by line of business .......................................173
Weekly compliance trend by manager ...................................................173
Weekly violations trend by line of business ..........................................174
Yearly agent level trend by line of business ..........................................174
Yearly agent level trend by manager ......................................................174
Yearly compliance trend by line of business .........................................175
Yearly compliance trend by manager .....................................................175
Yearly violations trend by line of business ............................................175
Yearly violations trend by manager ........................................................175
13
14 Contents
Appendix B
About the Symantec ESM Reporting metadata model
About the Query Studio metadata model ....................................................... 177
Metadata model divisions ......................................................................... 178
Query subject prompts .............................................................................. 179
Combinations of data objects ........................................................................... 179
Descriptions of data items ............................................................................... 181
Structure of data items ..................................................................................... 181
Administration folder structure .............................................................. 182
Message Information folder structure ................................................... 196
Message Summaries folder structure ..................................................... 203
Appendix C
About the Symantec ESM Reporting database schema
About the database schema ............................................................................. 231
Tables in the database schema ........................................................................ 232
Database Views .................................................................................................. 256
Views with localizable text ....................................................................... 256
Views without text ..................................................................................... 259
Appendix D
System assessment checklists
About system assessment checklists .............................................................. 263
Symantec ESM Reporting Database Foundation checklist ......................... 263
Symantec ESM Reporting Database Link checklist ...................................... 264
Symantec Enterprise Reporting checklist ..................................................... 266
Symantec ESM Reporting Report Package checklist ................................... 267
Appendix E
About Symantec ESM Reporting categories
About the categories in Symantec ESM Reporting ...................................... 269
Determining messages and modules in a category ...................................... 280
Appendix F
Symantec ESM Reporting installation scripts
About Symantec ESM Reporting installation scripts .................................. 281
About the installation scripts for IBM DB2 ................................................... 282
About the connection scripts for IBM DB2 .................................................... 284
About the installation scripts for Microsoft SQL Server ............................. 285
About the installation scripts for Oracle ....................................................... 287
CD Replacement Form
Glossary
Contents
Index
15
16 Contents
Chapter
1
Introducing Symantec
Enterprise Security
Manager Reporting
This chapter includes the following topics:
■
About Symantec ESM Reporting
■
Components of Symantec ESM Reporting
■
What you can do with Symantec ESM Reporting
■
How Symantec ESM Reporting works
■
Where to get more information
About Symantec ESM Reporting
Symantec ESM Reporting is a tool that lets you dynamically create and present
reports on the state of your Symantec ESM Agent computers, and on the state of
your Symantec ESM application configuration. Symantec ESM Reporting uses
tools that let you organize, limit, or expand data in your report to fit your needs.
Symantec ESM Reporting lets you do the following:
■
Send security information from Symantec ESM Managers to the Symantec
ESM Reporting database
■
Query the Symantec ESM Reporting database for security information
■
Format the query results in reports
■
Control access to the information in the Symantec ESM Reporting database
■
Manage reports, report schedules, and user accounts
18 Introducing Symantec Enterprise Security Manager Reporting
About Symantec Enterprise Reporting
■
Create reports tailored to your specific needs
The reports that you can create with Symantec ESM Reporting let you track the
security state of your network over time. This application lets you present data
from your Symantec ESM database to managers, executives, auditors, or
operations personnel.
For managers and executives, you can use the reports to show changes to your
network security over any given length of time for any area of your network.
You can create many types of charts, graphs, and tables to tailor the reports to
the preferences of your managers, or to a standard organizational format.
For employees who are responsible for continued improvement of network
security, you can provide reports that show areas that need improvement. These
reports can show the entire network or focus on part of a policy on a single
computer.
You can also create reports that help you manage your Symantec ESM
application more effectively. These reports can help you find unused or locked
accounts, and accounts with inappropriate permissions. Other reports can show
you schedules for your policy runs, helping you identify areas of your network
that need to be audited more or less frequently, or that could be audited at a
more opportune time.
You can look at the policies that are being run on your computers and decide
whether to implement additional or more appropriate policies. You can find
reporting errors such as Symantec ESM Agents that are failing to report, or
errors in policy runs. You can also look at the versions of your Symantec ESM
components to determine what areas of your network need upgrades or whether
they have the most current security updates.
Symantec ESM Reporting lets you view information about your Symantec ESM
application. The reports can be modified for audience, purpose and scope, and
can be automated so that the most current information can be appropriately
disseminated.
About Symantec Enterprise Reporting
Symantec Enterprise Reporting is the reporting engine that provides
comprehensive reporting for Symantec enterprise security products. Symantec
ESM Reporting integrates Symantec ESM with Symantec Enterprise Reporting
through a database foundation, database link, and a reports package. Symantec
Enterprise Reporting provides a Web-based user interface that you can use to
generate, view, email, and print a wide range of reports for Symantec ESM.
Introducing Symantec Enterprise Security Manager Reporting
Components of Symantec ESM Reporting
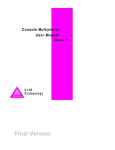
Components of Symantec ESM Reporting
Symantec ESM Reporting includes the components that are depicted in Figure
1-1. These components install separately.
Figure 1-1
Symantec
ESM
Manager
Symantec
ESM
Reporting
Database
Link
Symantec ESM Reporting components
Database
server
Symantec
ESM
Reporting
database
Symantec
Enterprise
Reporting
database
JDBC Driver
Symantec
ESM
Reporting
Report
Package
Symantec
Enterprise
Reporting
Web server
JDBC Driver
Symantec ESM Reporting components
The Symantec ESM Reporting Database Foundation creates the Symantec ESM
Reporting database and the Symantec Enterprise Reporting database with their
schemas and tables.
The Symantec ESM Reporting Database Link sends security information from
the proprietary databases of one or more Symantec ESM Managers to the
Symantec ESM Reporting database. To ensure that the Symantec ESM Reporting
database contains current information, the Symantec ESM Reporting Database
Link runs in background as follows:
■
On computers with Windows operating systems, the Symantec ESM
Reporting Database Link runs as a service.
■
On computers with UNIX operating systems, the Symantec ESM Reporting
Database Link runs as a daemon.
19
20 Introducing Symantec Enterprise Security Manager Reporting
What you can do with Symantec ESM Reporting
The Symantec ESM Reporting Report Package includes the queries that produce
new and existing reports and the functions that let users create ad hoc reports.
Third-party components
Symantec Enterprise Reporting includes the Web browser interface, the report
forms, and the functions that generate reports in Symantec ESM Reporting.
These functions let users schedule existing reports and create new queries and
reports.
Symantec Enterprise Reporting installs with anonymous access enabled. You
can use the Symantec Enterprise Reporting configuration tool to require an
authentication protocol. The authentication protocol lets you restrict access to
Symantec ESM Reporting.
The Web server provides the Web browsers on your network with connections to
Symantec Enterprise Reporting.
The JDBC Drivers provide the Symantec ESM Reporting Database Link and
Symantec Enterprise Reporting with connections to their respective databases.
What you can do with Symantec ESM Reporting
Symantec ESM reporting has many tools that let you create, organize, and
present reports and queries using diverse data from the Symantec ESM
Reporting database. For example, you can create a report about account
privileges with a chart or graph that displays the number of accounts with the
same level of privileges. You can create a report containing the names and
numbers of Symantec ESM Agent host computers that are compliant with a
specific policy. You can also create reports using disparate information that you
can combine to provide new insights into your enterprise configurations.
Symantec ESM Reporting includes tools to help you organize your data and
tailor it to your specific needs. The Report Studio tool lets you create new
reports using a template to help you get started. The Query Studio tool lets you
customize a pre-formatted query and add, remove, filter, and format the data to
the arrangement that you need. Both of these tools include a metadata model
that lets you extract information from the Symantec ESM Reporting database.
In addition to these tools, the Symantec ESM Reporting Report Package provides
you with many reports that inspect every facet of your Symantec ESM
application. Through these reports, Symantec ESM Reporting provides you with
appropriate information about your Symantec ESM Managers, Domains, Agents,
Policies, suppression configurations, account configurations, Agent levels,
message information, policy runs, audit schedules, licenses, and other topics.
Introducing Symantec Enterprise Security Manager Reporting
What you can do with Symantec ESM Reporting
In addition to the reports that provide information about the current state of
your network, Symantec ESM Reporting provides reports that show trend
information. Date ranges let you show how the security of your enterprise has
changed over time to conform to your organizational security policies.
Symantec ESM Reporting lets you control access to your sensitive enterprise
data. Read, write, and execute permissions let you limit access according to each
user’s needs. Symantec ESM Reporting supports a separation of duties. You can
set up user accounts that limit user access to only the data for which they are
responsible.
Symantec ESM Reporting lets you to schedule reports to run automatically. This
ensures that your reports will always be current.
Key features in Symantec ESM Reporting let users:
■
Create and view reports and edit database queries that display information
from several areas of your Symantec ESM application such as account
administration, agent configurations, change notifications, policy
compliance, and security information
■
Access current or trended information about the compliance of network
resources to your organizational security policies
■
Configure report information as Web reports, Excel spreadsheets, printed
reports, and report views
■
Restrict access to the information in reports and the Symantec ESM
Reporting database
■
Reduce hardware and maintenance costs related to the information needs of
large numbers of users
■
Reduce support and training costs
■
Reduce IT workload, tighten security and raise user productivity by
empowering users in a controlled fashion with access to information from
Symantec ESM policy runs
■
Reduce hardware administration costs through broad platform support
21
22 Introducing Symantec Enterprise Security Manager Reporting
How Symantec ESM Reporting works
How Symantec ESM Reporting works
The Symantec ESM Reporting Database Link sends security data from the
Symantec ESM Manager databases to the Symantec ESM Reporting database.
Symantec Enterprise Reporting uses a metadata model that lets you use queries
to find any information in the Symantec ESM Reporting database. You can also
use the metadata model to create reports that are tailored to your specific
information needs. Symantec Enterprise Reporting delivers the information as
interactive Web pages, Excel spreadsheets, report views, or via email.
Where to get more information
This document describes the implementation of Symantec ESM Reporting with
Symantec Enterprise Reporting. For more information about using Symantec
Enterprise Reporting, see the User’s Guide, the Administration and Security
Guide, and the other Symantec Enterprise Reporting documents in the Docs/
Symantec Enterprise Reporting directory on the CD installation set.
For more information about Symantec ESM, see the Symantec Enterprise
Security Manager knowledge base on the Symantec Technical Support Web site
at:
www.symantec.com/techsupp/enterprise.
The knowledge base link is the first one under Technical Support. You can find
the Symantec Enterprise Security Manager knowledge base listed under Policy
Compliance.
To obtain an updated version of the Symantec ESM User’s Guide or other
Symantec ESM documents, see the Symantec Public FTP site at:
ftp://ftp.symantec.com/public/english_us_canada/products/
symantec_enterprise_security_manager
Chapter
2
Before you Install
Symantec ESM Reporting
■
Before you install Symantec ESM Reporting
■
System requirements
Before you install Symantec ESM Reporting
Symantec ESM Reporting has three main parts:
■
A relational database that stores Symantec ESM Reporting data.
■
A reporting database link that transfers data from the Symantec ESM
Managers to the Symantec ESM Reporting database.
■
A reporting application that lets you create, view, customize, and schedule
reports. You can use a Web browser to access the application. The browser
does not require additional software to access the reports.
Symantec provides four installation programs that you must run in the
following sequence to fully install Symantec ESM Reporting:
■
Database Foundation
■
Database Link
■
Symantec Enterprise Reporting
■
Reports Package
24 Before you Install Symantec ESM Reporting
Before you install Symantec ESM Reporting
Before you install Symantec ESM Reporting, ensure that the Symantec ESM
Managers have been upgraded to Symantec ESM 6.0 or 5.5, and Security Update
1901. Also ensure that the computers on which Symantec ESM Reporting
components and Symantec Enterprise Reporting components will be installed
are properly prepared and that you have the logon and other installation
information.
See “About system assessment checklists” on page 263.
About the Database Foundation installer
The Database Foundation installer creates two databases with their necessary
tables and initial data:
■
The Symantec ESM Reporting database stores the data from the Symantec
ESM Managers.
■
The Symantec Enterprise Reporting database stores the queries and reports
that Symantec provides as well as the queries and reports that you create.
Symantec provides the database scripts for the Database Foundation installer
on the CD in the database_loader/sql/<database_name> folder. You can change
the scripts to customize the databases for your organization. For only IBM DB2
and MS-SQL, if you change the scripts, you must still run the database installer
to load the initial data. Select the Import Data option on the Choose Install Set
panel to skip the database creation step.
On the computer on which you installed the relational database server, run the
Database Foundation installer. This installer creates the ESM and SER databases
for Symantec ESM Reporting. The databases serve all of the Symantec ESM
Managers and Symantec ESM Reporting Database Links on the network. You
can install both databases on the same drive or install each database on a
separate drive.
Note: Symantec does not provide a relational database server for Symantec ESM
Reporting. You must purchase the relational database server from a database
vendor. If you have not already installed a relational database server, you must
perform the database server installation before installing the Database
Foundation. Before you can perform the database server installation, you must
obtain the name and password of an account on the host computer with
permissions to create databases.
Before you Install Symantec ESM Reporting
Before you install Symantec ESM Reporting
About the Database Link installer
You can install one Symantec ESM Reporting Database Link for several
managers or a separate Symantec ESM Reporting Database Link for each
manager. The Symantec ESM Reporting Database Link can be installed on a
manager computer or another host computer. Because of the impact to
performance, do not install the Symantec ESM Reporting Database Link on the
database server computer.
Before you install the Symantec ESM Reporting Database Link, you must
complete the following tasks:
■
Run the Database Foundation installer to create the Symantec ESM
Reporting databases.
■
Obtain the name and password of an account on the database server to
which the Symantec ESM Reporting Database Link will send data. The
database account must have rights to read and write to all of the tables and
views in the database. If you run the Database Foundation installer or the
manual installation scripts, the ESM_DB_LINK_USER account will be
created for you.
■
Obtain the name and password of an account on each Symantec ESM
Manager from which the Symantec ESM Reporting Database Link will send
data. The manager account must have manage user rights and read-only
access rights to all domains and policies.
About the Symantec Enterprise Reporting installer
Symantec Enterprise Reporting includes the following components:
■
Report Server - the report engine that renders reports.
■
Gateway - the component that installs on the Web server computer.
■
Content Manager - the component that communicates with the Symantec
Enterprise Reporting database.
■
Web Server - the component that hosts Symantec Enterprise Reporting.
You can install all of the Symantec Enterprise Reporting components on a single
computer. For more complex configurations, install the components on separate
computers. To scale for larger deployments, you may need to install the same
components on more than one computer.
For more information, see the installation options in the Architecture and
Planning Guide. You can find this guide on the CD in the Docs\Symantec
Enterprise Reporting directory.
25
26 Before you Install Symantec ESM Reporting
Before you install Symantec ESM Reporting
Before you can perform the Symantec Enterprise Reporting installation, you
must complete the following tasks:
■
Install JDBC drivers for your database on each computer on which you
install the Content Manager. If you are using IBM DB2 as your relational
database server, you must install the DB2 run-time client. The run-time
client includes the JDBC drivers and other required software. JDBC drivers
let applications that are written using the Java programming language
interface with the database. JDBC drivers are usually specific to a database,
and database vendors normally provide the JDBC drivers for their databases
without cost. Third-party JDBC drivers for some databases may provide
better performance than the drivers supplied by the database vendors.
■
Run the Database Foundation installer to create and populate the required
databases, or manually create the databases and run the Database
Foundation to populate them.
■
Install a Web server to host Symantec Enterprise Reporting. The installer
can install and configure an open-source version of the Apache HTTP server.
If you select another Web server, you must manually configure the Web
server after installing Symantec Enterprise Reporting.
About the Reports Package installer
Before you can perform the Symantec ESM Reporting Reports Package
installation, you must complete the following tasks:
■
Run the Database Foundation installer to create the Symantec ESM
Reporting databases.
■
Run the Symantec Enterprise Reporting installer and install its components
on at least one host computer.
■
Obtain the URL to the Symantec Enterprise Reporting Gateway.
■
Obtain the namespace, user name, and password of an account with the
required privileges.
■
Obtain the location of the Content Manager’s deployment directory.
■
Obtain the type and version of the relational database.
■
Obtain the name of the database computer (the database alias for IBM DB2).
■
Obtain the name and password of an account on the database that the
Content Manager can use to retrieve data for reports. This account must
have read access to all of the tables and views in the database that contain
Symantec ESM Reporting data. If you run the Database Foundation installer,
the ESM_CM_USER account is created for you.
Before you Install Symantec ESM Reporting
Before you install Symantec ESM Reporting
Planning for the Symantec ESM Reporting Database Foundation
Use the following task list to plan for the Symantec ESM Reporting Database
Foundation installation:
■
Estimate the message volume from the Symantec ESM Reporting Database
Link computers.
■
Determine the amount of data that you want to keep online.
■
Select the database server. Symantec ESM Reporting uses the Symantec
ESM Reporting database to store information from the Symantec ESM
Reporting Database Link computers. Symantec Enterprise Reporting uses
the Symantec Enterprise Reporting database to store report information.
■
Select the user accounts, passwords, and role groups for the Symantec ESM
Reporting database and the Symantec Enterprise Reporting database.
■
Select the URL, user account, and password for the database connection.
■
Determine the type and number of required computers.
Planning for the Symantec ESM Reporting Database Link
Use the following task list to plan for the Symantec ESM Reporting Database
Link installation:
■
Select a compatible JDBC Driver for the database server. For IBM DB2 7.2,
you must specify the Java 1.2 Driver.
See the JDBC Driver documentation.
■
Select the Symantec ESM Managers for each Symantec ESM Reporting
Database Link.
You can select one or more Symantec ESM Managers for each Symantec
ESM Reporting Database Link. Do not select the same Symantec ESM
Manager for two or more Symantec ESM Reporting Database Links.
■
Determine the type and number of required computers.
Planning for Symantec Enterprise Reporting
Use the following task list to plan for the Symantec Enterprise Reporting
installation:
■
Select a compatible JDBC Driver for the database server. For IBM DB2 7.2,
you must specify the Java 1.2 Driver.
See the JDBC Driver documentation.
■
Select a compatible Web server. By default, Symantec Enterprise Reporting
installs the Apache HTTP Web server.
27
28 Before you Install Symantec ESM Reporting
Before you install Symantec ESM Reporting
■
Select an optional authentication service.
■
Determine the type and number of required computers.
Planning for the Symantec ESM Reporting Reports Package
Use the following task list to plan for the Symantec ESM Reporting Reports
Package installation:
■
Select the user accounts, passwords, and role groups for the Symantec ESM
Reporting Gateway.
Ensuring network connectivity
Appropriate routing must exist between the computers on which you will install
the Symantec ESM Reporting Database Foundation, Symantec ESM Reporting
Database Link, Symantec Enterprise Reporting, and Symantec ESM Reporting
Reports Package and the computers on which you installed the database server
and the Symantec ESM Managers. In addition, ensure that there is no firewall or
device policy blocking the connections between these computers.
Setting Microsoft SQL Server database authentication
On Windows computers using Microsoft SQL server, you must select Microsoft
SQL Server and Windows authentication mode so that the Symantec ESM
Reporting Database Foundation can create the ESM and SER databases.
To select Microsoft SQL Server and Windows authentication
1
On the computer on which you are installing the Symantec ESM Reporting
Database Foundation, click Start > Programs > Microsoft SQL Server >
Enterprise Manager.
2
On the SQL Server Enterprise Manager tree, expand Microsoft SQL Server >
SQL Server Group.
3
Right-click <database_name>.
4
Click Properties.
5
On the Security tab, click SQL Server and Windows.
Before you Install Symantec ESM Reporting
System requirements
System requirements
Before you install Symantec ESM, ensure that the computers on which you plan
to install Symantec ESM components meet the minimum requirements in Table
2-1:
Table 2-1
Symantec ESM system requirements
System resources
Symantec ESM
Manager
System requirements
Microsoft Windows
■
Windows 2003 Server.
■
Windows 2000 Professional, Server, or Advanced Server with
Service Pack 1.0 or higher.
■
Microsoft Windows NT 4.0 Server or Workstation with
Service Pack 5.0 or higher.
UNIX
Symantec ESM
Agent
■
Sun Solaris v2.7, 2.8, or 2.9.
■
HP-UX v10.20, 11, or 11i.
■
IBM AIX v4.3.2 through 5.2.
Microsoft Windows
■
Windows 2003 Server.
■
Windows 2000 Professional, Server, or Advanced Server with
Service Pack 1.0 or higher.
■
Windows XP Professional
■
Microsoft Windows NT 4.0 Server or Workstation with
Service Pack 5.0 or higher.
UNIX
■
Sun Solaris v2.7, 2.8, or 2.9.
■
HP-UX v10.20, 11, or 11i.
■
IBM AIX v4.3.2 through 5.2.
■
Red Hat Linux v7.1, 8, 9, AS/ES 2.1, or 3.0 (x86).
■
SuSE Linux Standard Server v8.0 (x86).
■
Compaq Tru64 v4.
■
SGI Irix v6.3
Novell NetWare
■
NetWare v4.1, 4.2, 5.0, or 6.0.
Digital VMS Midrange
■
Open VMS v7.2 or 7.3 (Alpha processor).
IBM OS/400 Midrange
■
IBM iSeries (OS/400) V5R1M0 or V5R2M0).
29
30 Before you Install Symantec ESM Reporting
System requirements
Table 2-1
Symantec ESM system requirements
System resources
System requirements
Symantec ESM
Console
■
Windows 2003 Server.
■
Windows 2000 Professional, Server, or Advanced Server with
Service Pack 1.0 or higher.
■
Windows XP Professional
■
Microsoft Windows NT 4.0 Server or Workstation with
Service Pack 5.0 or higher.
Before you install Symantec Enterprise Reporting, ensure that the computers on
which you plan to install Symantec Enterprise Reporting components meet the
minimum requirements in Table 2-2:
Table 2-2
Symantec Enterprise Reporting system requirements
System resources
System requirements
Database hardware
Small, 1 server (up to 100 report users, 100’s of Symantec ESM
Agents).
■
2 GHz dual processors.
■
4 GB RAM.
■
10 GB free disk space.
Medium, 3 servers (500 report users, 1,000 to 10,000 Symantec
ESM Agents).
One ReportNet Web server.
■
2 GHz dual processors.
■
4 GB RAM.
■
25 GB free disk space.
Two ReportNet application servers.
■
2 GHz dual processors.
■
4 GB RAM.
■
25 GB free disk space.
Large, (more than 500 report users, more than 10,000 Symantec
ESM Agents).
■
Sales engineers can help you with capacity planning.
Before you Install Symantec ESM Reporting
System requirements
Table 2-2
Symantec Enterprise Reporting system requirements
System resources
System requirements
Database
application
(For operating system versions, check vendor specifications.)
Oracle 9i.
■
Solaris
Microsoft SQL Server.
■
Microsoft Windows 2000.
IBM DB2.
■
IBM DB2 v7.2 or 8.1 on Microsoft Windows.
31
32 Before you Install Symantec ESM Reporting
System requirements
Table 2-2
Symantec Enterprise Reporting system requirements
System resources
System requirements
Database driver
Oracle.
■
Oracle JDBC driver for Java 1.3 (Classes 12.zip). Download
this driver from http://www.oracle.com. Symantec Enterprise
Reporting does not function correctly with earlier versions of
this driver.
Microsoft SQL Server.
■
Microsoft SQL Server requires a fully supported JDBC 2.x
driver.
The computers on which you are installing the Symantec
ESM Reporting Database Foundation must use the Microsoft
JDBC driver for SQL Server 2000. Do not use third-party JDBC
Drivers for the Microsoft SQL Server database.
IBM DB2 8.1
■
Use the default driver that installs with the DB2 database.
You can find this driver at the following default path:
C:/Program Files/IBM/SQLLIB/java/db2java.zip
For this driver, you must include the following string in the
library path during the installations of both the Symantec
ESM Reporting Database Link and Symantec Enterprise
Reporting: C:/Program Files/IBM/SQLLIB/BIN
The path may vary if you did not use the default installation
path for the DB2 installation.
IBM DB2 7.x
■
Configure DB2 7.x to use the correct JDBC driver. This
requires that you run the .bat file located at the following
path before you install the Symantec ESM Reporting
applications:
C:/Program Files/SQLLIB/java12/usejdbc2.bat
The path may vary if you did not use the default DB2
installation path.
If you installed DB2 7.x at the default location, the correct
driver is available at the following path:
C:/Program Files/SQLLIB/java/db2java.zip
■
For this driver, you must include the following string in the
library path during the installations of both the Symantec
ESM Reporting Database Link and Symantec Enterprise
Reporting: C:/Program Files/SQLLIB/BIN
The path may vary if you did not use the default installation
path for the DB2 installation.
Before you Install Symantec ESM Reporting
System requirements
Table 2-2
Symantec Enterprise Reporting system requirements
System resources
System requirements
Web server
■
Microsoft IIS on Windows.
■
iPlanet on Solaris.
■
Apache on Windows or Solaris.
Web browser
Symantec Enterprise Reporting and Report Viewer
■
Internet Explorer 6 SP1
■
Internet Explorer 5.5 SP2
■
Netscape 7.1
Query Studio
■
Internet Explorer 6 SP1
■
Internet Explorer 5.5 SP2
■
Netscape 7.1
Report Studio
■
Internet Explorer 6 SP1
■
Internet Explorer 5.5 SP2
Note: When you use Type 2 JDBC drivers with .dll files or shared libraries, you
must include the path to the shared files in the library path steps in the
installations of the Symantec ESM Reporting Database Link and Symantec
Enterprise Reporting.
Where possible, use IBM DB2 8.1 for Symantec ESM Reporting. IBM DB2 8.1
requires less administrative overhead and has better performance than IBM DB2
7.2.
33
34 Before you Install Symantec ESM Reporting
System requirements
Before you install Symantec ESM Reporting Database Link, ensure that the
computers on which you plan to install Symantec ESM Reporting Database Link
components meet the minimum requirements in Table 2-3:
Table 2-3
Symantec ESM Reporting Database Link system requirements
System resources
System requirements
Hardware
■
1 GHz processor.
■
1 GB RAM.
■
77 MB free disk space.
■
Windows 2003 Server.
■
Windows 2000 Professional, Server, or Advanced Server with
Service Pack 3.0 or higher.
■
Sun Solaris v2.7 through 2.9.
■
HP-UX v11 through 11i.
■
IBM AIX v5.1 through 5.2
■
Oracle 9i.
■
Microsoft SQL Server 2000.
■
IBM DB2 v7.2 or 8.1.
Server operating
system
Databases
Before you Install Symantec ESM Reporting
System requirements
Table 2-3
Symantec ESM Reporting Database Link system requirements
System resources
System requirements
Database driver
Oracle.
■
Oracle 1.4 JDBC driver. Download this driver from
http://www.oracle.com. Symantec Enterprise Reporting does
not function correctly with earlier versions of this driver.
Microsoft SQL Server.
■
Microsoft SQL Server requires a fully supported JDBC 2.x
driver.
The computers on which you are installing the Symantec
ESM Reporting Database Link must use third-party JDBC
Drivers for the Microsoft SQL Server database. Do not use the
Microsoft JDBC driver for SQL Server 2000.
See the jTDS JDBC Drivers at http://sourceforge.net or the list
of JDBC Drivers at http://servlet.java.sun.com/products/jdbc/
drivers.
IBM DB2 8.1
■
Use the default driver that installs with the DB2 database.
You can find this driver at the following default path:
C:/Program Files/IBM/SQLLIB/java/db2java.zip
For this driver, you must include the following string in the
library path during the installations of both the Symantec
ESM Reporting Database Link and Symantec Enterprise
Reporting: C:/Program Files/IBM/SQLLIB/BIN
The path may vary if you did not use the default installation
path for the DB2 installation.
IBM DB2 7.x
■
Configure DB2 7.x to use the correct JDBC driver. This
requires that you run the .bat file located at the following
path before you install the Symantec ESM Reporting
applications:
C:/Program Files/SQLLIB/java12/usejdbc2.bat
The path may vary if you did not use the default DB2
installation path.
If you installed DB2 7.x at the default location, the correct
driver is available at the following path:
C:/Program Files/SQLLIB/java/db2java.zip
For this driver, you must include the following string in the
library path during the installations of both the Symantec
ESM Reporting Database Link and Symantec Enterprise
Reporting: C:/Program Files/SQLLIB/BIN
The path may vary if you did not use the default installation
path for the DB2 installation.
35
36 Before you Install Symantec ESM Reporting
System requirements
Additional requirements for all computers
The following requirements apply to all computers:
■
If you perform a custom installation of the ESM and SER databases, use the
database names that you assign instead of the default database names when
installing the Symantec ESM Reporting Database Link, Symantec
Enterprise Reporting, and Symantec ESM Reporting Reports Package. Also,
use the database names that you assign when configuring Symantec
Enterprise Reporting.
■
If the host computer on which you are installing the Symantec ESM
Reporting Database Link uses Oracle OCI drivers, do the following tasks
before running the Database Link installer:
■
Set up the OCI client.
■
Set up the ORACLE_HOME environment variable with the location of
the installed Oracle files.
■
Set up the appropriate environment variable for the operating system
with the location of the OCI’s libraries and drivers:
LD_LIBRARY_PATH for Solaris computers.
SHLIB_PATH for HPUX computers
LIBPATH for AIX computers.
■
If you are installing the Symantec ESM Reporting Database Link to a
destination other than the default directory, you must ensure that the path
does not contain multi-byte characters.
■
To add or delete a Symantec ESM Manager or make another change to an
installed Symantec ESM Reporting Database Link, you must use the
installation CD to run the Database Link installer on the host computer and
type the new configuration information.
■
If Cognos is already installed on the computers on which you are installing
Symantec Enterprise Reporting, use the Enterprise Reporting Configuration
utility to change the name of the node under the ReportNet Service. This
changes the name of the service so that Symantec Enterprise Reporting can
install.
If you decide to uninstall Cognos after changing the name of the service,
you must stop the service before proceeding. After the uninstaller finishes,
delete the Cognos installation directory if necessary.
■
If you are installing Symantec Enterprise Reporting on two or more host
computers, you must install a separate content store for each of them. See
the Architecture and Planning Guide on the CD in the Docs\Symantec
Enterprise Reporting directory.
Before you Install Symantec ESM Reporting
System requirements
■
If the host computer on which you are installing Symantec Enterprise
Reporting has already installed a Web server, you must manually configure
the Web server to function with Symantec Enterprise Reporting. See the
Installation and Configuration Guide on the CD in the Docs\Symantec
Enterprise Reporting directory.
■
Before you can reinstall the Symantec ESM Reporting Database Foundation,
you must stop all of the Symantec ESM Reporting Database Links that are
connected to the database.
■
On Windows computers, you must stop the Symantec ESM Reporting
Database Link service.
On UNIX computers, you must stop the Symantec ESM Reporting
Database Link daemon.
See “Stopping and restarting the Symantec ESM Reporting Database Link
on UNIX” on page 98.
■
Additional Windows requirements
The following requirements apply to Windows computers:
■
The Windows computers on which you are installing the Symantec ESM
Reporting Database Foundation, the Symantec ESM Reporting Database
Link, Symantec Enterprise Reporting, or the Symantec ESM Reporting
Reports Package must not be running the Symantec pcAnywhere service.
■
The Windows computers on which you are installing the Symantec ESM
Reporting Database Foundation, the Symantec ESM Reporting Database
Link, Symantec Enterprise Reporting, or the Symantec ESM Reporting
Reports Package must display at least 256 colors and 800 by 600 pixels.
■
The Windows computers on which you installed IBM DB2 must maintain a
2:1 ratio of tablespace to index space because the Symantec ESM Reporting
Database Foundation installer creates databases that use database managed
tablespaces.
■
The Windows computers on which you are installing the Symantec ESM
Reporting Database Link must install third-party JDBC Drivers for the
Microsoft SQL Server database. The Symantec ESM Reporting Database
Link is not fully compatible with the Microsoft JDBC Driver for Microsoft
SQL Server. See the jTDS JDBC Drivers at http://sourceforge.net or the list of
JDBC Drivers at http://servlet.java.sun.com/products/jdbc/drivers.
37
38 Before you Install Symantec ESM Reporting
System requirements
■
■
On Windows computers using DB2, do one of the following when installing
the Symantec ESM Reporting Database Link or Symantec Enterprise
Reporting:
■
Specify the JDBC .app driver if the host computer has installed a runtime client that can establish a local connection with the DB2 database
server across the network.
■
Specify the JDBC .net driver if the host computer must establish a
remote connection with the DB2 database server across the network.
On Windows computers using Microsoft SQL server, ensure that the
following user accounts do not exist in the \Microsoft SQL Servers\
SQL Server Group\<host_computer>\Security\Logins folder before
installing the Symantec ESM Reporting Database Foundation:
■
ESM_CM_USER
■
ESM_DB_LINK_USER
■
ESM_REPORT_USER
■
ESMDB10
Additional UNIX requirements
The following requirements apply to UNIX computers:
■
On UNIX computers, you must run the command xhost +localhost as root
before starting to install Symantec ESM Reporting. This command lets other
users run the installation programs.
■
On UNIX computers, you must set the DISPLAY variable before starting to
install Symantec ESM Reporting. Set DISPLAY = hostname:0.0 and then
export DISPLAY.
■
On UNIX computers that use an IBM DB2 runtime client to connect to a
remote database server using the app driver, you must add the runtime
library lib directory to the LD_LIBRARY_PATH environment variable before
you start installing the Symantec ESM Reporting Database Link. To set the
LD_LIBRARY_PATH variable, use the export (sh, bash, ksh) or setenv (csh)
commands. For example, if the IBM DB2 runtime client is in the /opt/IBM/
db2/V8.1 directory and the user session uses a sh shell, to set the
LD_LIBRARY_PATH variable, do the following at the system command
prompt:
■
type LD_LIBRARY_PATH=$LD_LIBRARY_PATH:/opt/IBM/db2/
V8.1/lib.
■
type export LD_LIBRARY_PATH.
Before you Install Symantec ESM Reporting
System requirements
■
On HP-UX computers on which you are installing the Symantec ESM
Reporting Database Link, you must mount the CD using pfs. The Symantec
ESM Reporting CD file names use Rock Ridge Extensions. To mount the CD
using pfs:
■
Add a line of text to the /etc/pfs_fstab file in the following format:
[device_file] [mount_point] [filesystem_type] [translation method]
For example, type /dev/dsk/c0t0d0 /sd_cdrom
pfs-rrip xlat=unix 0.
■
Open a UNIX shell.
■
Start the pfs daemons.
#nohup /usr/sbin/pfs_mountd&
#nohup /usr/sbin/pfsd&
■
Mount the Symantec ESM Reporting installation CD by typing
pfs_mount /cdrom.
■
After you finish installing the Symantec ESM Reporting Database Link,
unmount the CD by typing pfs_umount /cdrom.
■
On Solaris computers on which you are installing the Symantec ESM
Reporting Database Foundation, the account that you are using to run the
installer must have permission to write to the /var/opt/oracle/oratab file.
■
On Solaris computers on which you are installing the Symantec ESM
Reporting Database Foundation, the Oracle database server must have
created at least one database before running the Database Foundation
installer. The installer will report an error if the listener.ora or tnsnames.ora
files are missing.
■
On Solaris computers on which you are installing Symantec Enterprise
Reporting, you must define ORACLE_HOME before running the Symantec
Enterprise Reporting installer.
■
On Solaris computers on which you are installing Symantec Enterprise
Reporting, ensure there is adequate disk space for the components.
39
40 Before you Install Symantec ESM Reporting
System requirements
Chapter
3
Installing Symantec ESM
Reporting
■
Installing Symantec ESM Reporting
■
Post-installation tasks
Installing Symantec ESM Reporting
Before you install Symantec ESM Reporting, do the following tasks:
■
Install or upgrade to Symantec ESM 6.0 or 5.5. If this is a new installation,
run several Symantec ESM policies.
■
Install or select an IBM DB2, Oracle, or Microsoft SQL Server (MS-SQL)
database server for the Symantec ESM Reporting database and the
Symantec Enterprise Reporting database.
■
Solaris computers on which you install an Oracle database server must
install a Web server before installing Symantec Enterprise Reporting.
You can download the Apache HTTP Web server from the Apache Web
site at http:\\www.apache.org.
■
Windows computers on which you install an IBM DB2 or MS-SQL
database server can install a Web server during the Symantec
Enterprise Reporting installation.
42 Installing Symantec ESM Reporting
Installing Symantec ESM Reporting
Install on Windows computers using IBM DB2
Symantec ESM Reporting can install on a mix of Windows and UNIX computers
using an IBM DB2, MS-SQL, or Oracle database server. The following procedures
describe the installation of Symantec ESM Reporting on Windows computers
using an IBM DB2 database server.
Installing the Symantec ESM Reporting Database Foundation
for IBM DB2
The installation process consists of doing one of the following tasks:
■
Install the Symantec ESM Reporting Database Foundation for IBM DB2.
■
Use SQL scripts to create the databases for IBM DB2.
See “About the Database Foundation installer” on page 24.
Create the ESM and SER databases
When you run the Database Foundation installer and select the Default DB2
option, the installer creates two databases. By default, ESM is the name of the
Symantec ESM Reporting database and SER is the name of the Symantec
Enterprise Reporting database. Each database has 2 GB for User and Index
tablespaces.
If your installation requires larger table spaces, Symantec provides SQL scripts
that let you manually create the ESM and SER databases. You must still use the
Database Foundation installer to import the necessary data into the databases.
After importing the data, you must run an additional SQL script to tune the
database.
See “About Symantec ESM Reporting installation scripts” on page 281.
Note: For only IBM DB2 7.2, you must log on to the computer on which you
installed IBM DB2 using the DB2ADMIN account.
To install the Symantec ESM Reporting Database Foundation for IBM DB2
1
On the computer on which you installed IBM DB2, access the Symantec ESM
Reporting Windows CD. If the autorun feature does not start, double-click
setup.bat.
2
On the Symantec Enterprise Security Manager (ESM) 6.1 Reporting CD
panel, in the left pane, click Database Foundation.
Installing Symantec ESM Reporting
Installing Symantec ESM Reporting
3
In the right pane, do the following tasks:
■
Review the information
■
Complete the installation prerequisites
■
Click Execute the Database Foundation Installer.
4
On the Introduction panel, click Next.
5
On the License Agreement panel, click I accept the terms of the License
Agreement, and then click Next.
6
On the Choose Install Set panel, do one of the following tasks:
■
To let the Database Foundation installer create the ESM and SER
databases and import the necessary data, click Default DB2, and then
click Next.
The Symantec ESM Reporting Database Foundation installer creates
the ESM and SER databases with 2 GB each for the User and Index
tablespaces. If your installation requires larger tablespaces, you must
manually create the ESM and SER databases, and then select the
Import Data option.
■
To import the necessary data into the ESM and SER databases that you
manually created, click Import Data, and then click Next.
If you select this option, the installer skips steps 7 through 13 and
prompts you to choose the type of database in which to store your
Symantec ESM Reporting data. Go to step 14.
■
If you intend to manually create the ESM and SER databases but have
not yet done so, click Cancel.
Symantec provides scripts that let you manually create the ESM and
SER databases. You can find the scripts on the Symantec Enterprise
Security Manager (ESM) 6.1 Reporting Windows CD in the SQL
directory. You can change the scripts to customize the databases for
your organization.
Note: After clicking Next, if you want to select a different database option,
you must cancel the Symantec ESM Reporting Database Foundation
installation and start over.
7
On the Choose... panel, do one of the following tasks:
■
Select the db2cmd.exe file to use in the list and then click Next.
■
To select another file path, click Choose Other, and then click Choose.
In the Please Select db2cmd.exe File dialog box, select the desired
db2cmd.exe file, click Open, and then click Next.
43
44 Installing Symantec ESM Reporting
Installing Symantec ESM Reporting
8
On the Database(s) to Create panel, do one of the following tasks:
■
To create the Symantec ESM Reporting database and the Symantec
Enterprise Reporting database, click Create both the ESM and SER
Databases, and then click Next.
■
To create only the Symantec ESM Reporting database, click Create the
ESM Database only, and then click Next.
■
To create only the Symantec Enterprise Reporting database, click
Create the SER Database only, and then click Next.
Note: Symantec ESM Reporting requires both the ESM and SER databases to
function.
9
On the Get Database Names panel, do one of the following tasks:
■
To specify the default Symantec ESM Reporting Database Name and
Symantec Enterprise Reporting Database Name, click Next.
■
To specify different database names, type the names in the related text
boxes, and then click Next.
10 On the Database Drive panel, do one of the following tasks:
■
To specify the default drive, click Next.
■
To specify another drive for the databases to store data, type the name
of the drive in the text box, and then click Next.
11 On the Default Password panel, do the following tasks:
■
In the Default Password text box, type a secure password for the
database accounts.
■
In the Confirm Default Password text box, retype the password.
12 On the Symantec ESM Reporting database accounts panel, do one of the
following tasks:
■
To specify the default account name and password for the Symantec
ESM Reporting Database Link account and the Symantec Enterprise
Reporting account, click Next.
■
To specify another account name or password for the Symantec ESM
Reporting Database Link account or the Symantec Enterprise
Reporting account, type the information in the related text boxes, and
then click Next.
Installing Symantec ESM Reporting
Installing Symantec ESM Reporting
13 On the Symantec Enterprise Reporting database accounts panel, do one of
the following tasks:
■
To specify the default account name and password for the Content
Store account, click Next.
■
To specify another account name or password for the Content Store
account, type the information in the related text boxes, and then click
Next.
14 On the Choose Database Type panel, select DB2, and then click Next.
Note: If you selected Default DB2 in step 6, the installer skips this step.
15 On the JDBC Driver panel, do one of the following tasks:
■
To specify the default JDBC Driver Class and JDBC Classpath, and JDBC
Library Path, click Next.
■
To specify another JDBC Driver Class, JDBC Classpath, or JDBC Library
Path, type the information in the related text boxes, and then click
Next.
Note: For IBM DB2 7.2, you must specify the Java 1.2 Driver. See the JDBC
Driver documentation.
16 On the Database Connection panel, do one of the following tasks:
■
To specify the default database URL and user account name, type the
password of the user account in the text box, and then click Next.
■
To specify another database URL, user name, and password, type the
information in the related text boxes, and then click Next.
17 On the Pre-Install Summary panel, click Install.
Note: If the Symantec ESM Reporting Database Foundation installer reports
that it cannot find the local settings directory, set the TEMP and TMP
environment variables to a path that does not contain international
characters. Then rerun the Symantec ESM Reporting Database Foundation
installer.
45
46 Installing Symantec ESM Reporting
Installing Symantec ESM Reporting
18 On the Install Complete panel, click Yes, restart my system, and then click
Done.
Note: In a DB2 cluster, the Symantec ESM Reporting Database Foundation
installer creates the following database user accounts on the primary node:
■
ESM_DB_LINK_USER
■
ESM_REPORT_USER
ESM_CM_USER
You must manually create these accounts on the secondary node.
■
To manually create the ESM and SER databases for IBM DB2
See “About the installation scripts for IBM DB2” on page 282.
1
On the computer on which you installed IBM DB2, at the system command
prompt, change to the Symantec ESM Reporting Windows CD.
2
Change to the sql\db2 folder.
3
Type create_esm_db
4
Type create_ser_db
5
Start the Symantec ESM Reporting Database Foundation installer. The
process is the same as installing the Symantec ESM Reporting Database
Foundation for IBM DB2 except for the following change:
On the Choose Install Set panel, click Import Data, and then click Next.
See “To install the Symantec ESM Reporting Database Foundation for IBM
DB2” on page 42.
6
At the system command prompt, change to the Symantec ESM Reporting
Windows CD.
7
Change to the sql\db2\createESMdb folder.
8
Type post_install
Note: If you changed the name of the ESM database in the installation
scripts, you must change the name of the ESM database in the
post_install.cmd script.
9
Restart the host computer system.
Installing Symantec ESM Reporting
Installing Symantec ESM Reporting
Installing the Symantec ESM Reporting Database Link for
IBM DB2
The installation process includes the following tasks:
■
Install, connect, and test the IBM DB2 run-time client for the Symantec ESM
Reporting Database Link.
■
Install the Symantec ESM Reporting Database Link for IBM DB2.
Install, connect, and test the IBM DB2 run-time client for the Symantec
ESM Reporting Database Link
Symantec does not provide a run-time client for the IBM DB2 database server.
You can download the IBM DB2 Run-Time Client from the IBM DB2 Web site at
http://www.ibm.com/software/data/db2/udb/support.html.
To install the IBM DB2 8.1 run-time client for the Symantec ESM Reporting
Database Link
1
On the computer on which you are installing the Symantec ESM Reporting
Database Link, double-click the IBM DB2 Run-Time Client installation file.
2
On the Welcome to the DB2 Setup wizard panel, click Next.
3
On the License Agreement panel, click I accept the terms in the license
agreement, and then click Next.
4
On the Select the installation type panel, to select the typical installation,
click Next.
5
On the Select the installation folder panel, to select the default drive and
directory, click Next.
6
On the Configure NetBIOS panel, click Next.
7
On the Start copying files panel, click Install.
8
On the Setup is complete panel, click Finish.
To connect the IBM DB2 8.1 run-time client for the Symantec ESM Reporting
Database Link
1
On the computer on which you are installing the Symantec ESM Reporting
Database Link, at the system command prompt, change to the Symantec
ESM Reporting Windows CD.
2
Change to the sql\db2\runtime folder.
3
Type catalog_esm_db <host_computer_name> ESM 50000
47
48 Installing Symantec ESM Reporting
Installing Symantec ESM Reporting
Note: If you changed the name of the ESM database in the installation scripts,
you must change the name of the ESM database in the catalog_esm_db script.
To test the IBM DB2 8.1 run-time client connection for the Symantec ESM
Reporting Database Link
1
At the db2 command prompt, type CONNECT TO <database-alias- name>
AS USER <database-user-name>. For example, CONNECT TO ESM as USER
ESM_DB_LINK_USER.
2
At the prompt to Enter current password for <database-user-name>, type
the ESM_DB_LINK_USER account password.
3
Verify that the database connection was successful.
4
Exit from the Command Line Processor.
To install the IBM DB2 7.2 run-time client for the Symantec ESM Reporting
Database Link
◆
On the computer on which you are installing the Symantec ESM Reporting
Database Link, access the IBM DB2 installation CD, select the run-time
client installation, and then select the default installation settings.
To connect and test the IBM DB2 7.2 run-time client for the Symantec ESM
Reporting Database Link
1
On the computer on which you are installing the Symantec ESM Reporting
Database Link, click Start > Programs > IBM DB2 >
Configuration Assistant.
2
In the DB2 Message prompt to add a database, click Yes.
If the DB2 Message prompt does not display, on the Menu bar, click
Selected, and then click Add Database Using Wizard.
3
On the Select how you want to set up a connection panel, click Manually
configure a connection to a database, and then click Next.
4
On the Select a communications protocol, click TCP/IP and then click Next.
5
On the Specify TCP/IP communication parameters panel, do the following
tasks:
6
■
In the Host name text box, type the name of the computer on which you
installed IBM DB2.
■
In the Port number text box, type 50000.
Click Next.
Installing Symantec ESM Reporting
Installing Symantec ESM Reporting
7
On the Specify the name of the database to which you want to connect panel,
in the Database name text box, type ESM.
8
Click Next.
9
On the Register this database as a data source panel, uncheck the Register
this database for ODBC check box, and then click Next.
10 On the Specify the node options panel, in the Operating system list box,
click Windows, and then click Next.
11 On the Specify the system options panel, click Finish.
12 In the Test Connection dialog box, on the Connections tab, do the following
tasks:
■
In the User ID text box, type ESM_DB_LINK_USER.
■
In the Password text box, type the ESM_DB_LINK_USER password.
■
Click Test Connection.
13 In the Test Connection dialog box, on the Results tab, verify that the CLI
connection was successful.
14 Exit from the DB2 Configuration Assistant.
Install the Symantec ESM Reporting Database Link for IBM DB2
See “About the Database Link installer” on page 25.
To install the Symantec ESM Reporting Database Link for IBM DB2
1
On the computer on which you are installing the Symantec ESM Reporting
Database Link, access the Symantec ESM Reporting Windows CD. If the
autorun feature does not start, double-click setup.bat.
2
On the Symantec Enterprise Security Manager (ESM) 6.1 Reporting CD
panel, in the left pane, click Database Link.
3
In the right pane, do the following tasks:
■
Review the information
■
Complete the installation prerequisites
■
Click Execute the Database Link Installer.
4
On the Introduction panel, click Next.
5
On the License Agreement panel, click I accept the terms of the License
Agreement, and then click Next.
6
On the Choose Installation Type panel, click Initial Installation, and then
click Next.
49
50 Installing Symantec ESM Reporting
Installing Symantec ESM Reporting
7
On the Choose Install Folder panel, do one of the following tasks:
■
To select the default folder, click Next.
■
To select another folder, click Choose.
In the Browse for Folder dialog box, select the desired location, click
OK, and then click Next.
Note: If you select the ..\Symantec\ESM folder, uninstalling Symantec ESM
will remove the Symantec ESM Reporting Database Link.
8
On the Database Type Selection panel, click DB2, and then click Next.
9
On the JDBC Driver Information panel, do one of the following tasks:
■
To specify the default JDBC Driver Class, JDBC Classpath, JDBC Library
Path, and SQL Dialect, click Next.
■
To specify another JDBC Driver Class, JDBC Classpath, JDBC Library
Path, and SQL Dialect, type the information in the related text boxes,
and then click Next.
Note: For only IBM DB2 7.2, you must specify the Java 1.2 Driver. See the
JDBC Driver documentation.
10 On the Database Connection panel, do one of the following tasks:
■
To specify the default database URL and account name, type the
password of the ESM_DB_LINK_USER account in the related text box,
and then click Next.
■
To specify another database URL, user name, and password, type the
information in the related text boxes, and then click Next.
11 On the ESM Manager Connection panel, do the following tasks:
■
Type the name of the Symantec ESM Manager.
■
Type the user name of an account on the manager with manage user
rights and read only access rights to all domains and policies.
■
Type the password of the manager account.
Specify the port number of the manager.
Click the right-arrow to add the manager to the list. Optionally, repeat these
steps to let the Symantec ESM Reporting Database Link connect to another
Symantec ESM Manager.
■
Installing Symantec ESM Reporting
Installing Symantec ESM Reporting
Warning: Do not connect two Symantec ESM Reporting Database Links to
the same Symantec ESM Manager and database. The database link log will
report primary key failures.
If you specify connections to several Symantec ESM Managers during the
installation of a Symantec ESM Reporting Database Link, a race condition
may cause some ESM database errors during the initial transfer of data. You
can correct the errors by stopping and restarting the Symantec ESM
Reporting Database Link.
See “Checking the Symantec ESM Reporting Database Link log for errors”
on page 101.
12 On the Pre-Install Summary panel, click Install.
13 On the Install Complete panel, click Done.
Note: In the C:\Program Files\Symantec\Reporting_Database_Link\server\
default\conf\log4j.xml file, the default settings limit the Symantec ESM
Reporting Database Link log file to a maximum file size of 50 MB and three
backups. You can change the MaxFileSize value to increase the file size and
the MaxBackupIndex value to increase the number of backup files.
Installing Symantec Enterprise Reporting for IBM DB2
The installation process includes the following tasks:
■
Install, connect, and test the IBM DB2 run-time client for Symantec
Enterprise Reporting.
■
Configure an installed Apache HTTP Web server for Symantec Enterprise
Reporting.
■
Install Symantec Enterprise Reporting for IBM DB2
■
Configure the installed Apache HTTP Web server for LDAP authentication.
Install, connect, and test the IBM DB2 run-time client for Symantec
Enterprise Reporting
Symantec does not provide a run-time client for the IBM DB2 database server.
You can download the IBM DB2 Run-Time Client from the IBM DB2 Web site at
http://www.ibm.com/software/data/db2/udb/support.html.
51
52 Installing Symantec ESM Reporting
Installing Symantec ESM Reporting
To install the IBM DB2 8.1 run-time client for Symantec Enterprise Reporting
◆
On the computer on which you are installing Symantec Enterprise
Reporting, install the IBM DB2 8.1 run-time client. The process is the same
as installing the IBM DB2 8.1 run-time client for the Symantec ESM
Reporting Database Link.
See “To install the IBM DB2 8.1 run-time client for the Symantec ESM
Reporting Database Link” on page 47.
To connect the IBM DB2 8.1 run-time client for Symantec Enterprise
Reporting
1
On the computer on which you are installing Symantec Enterprise
Reporting, at the system command prompt, change to the Symantec ESM
Reporting Windows CD.
2
Change to the sql\db2\runtime folder.
3
Type catalog_esm_db <host_computer_name> ESM 50000
4
Type catalog_ser_db <host_computer_name> ESM 50000
Note: If you changed the name of the ESM or SER database in the installation
scripts, you must change the name of the ESM or SER database in the
catalog_esm_db or catalog_ser_db scripts.
To test the IBM DB2 8.1 run-time client connection for Symantec Enterprise
Reporting
◆
On the computer on which you are installing Symantec Enterprise
Reporting, test the IBM DB2 8.1 run-time client connection. The process is
the same as testing the IBM DB2 8.1 run-time client connection for the
Symantec ESM Reporting Database Link except for the following changes:
■
At the DB2 command prompt, type CONNECT TO <database-aliasname> AS USER <database-user-name>
For example, CONNECT TO ESM as USER ESM_REPORT_USER.
At the DB2 command prompt, type CONNECT TO <database-aliasname> AS USER <database-user-name>
For example, CONNECT TO SER as USER ESM_CM_USER.
See “To test the IBM DB2 8.1 run-time client connection for the Symantec
ESM Reporting Database Link” on page 48.
■
Installing Symantec ESM Reporting
Installing Symantec ESM Reporting
To install the IBM DB2 7.2 run-time client for Symantec Enterprise Reporting
◆
On the computer on which you are installing the Symantec ESM Reporting
Database Link, access the IBM DB2 7.2 installation CD, select the run-time
client installation, and then select the default installation settings.
To connect and test the IBM DB2 7.2 run-time client for Symantec Enterprise
Reporting database
◆
On the computer on which you are installing Symantec Enterprise
Reporting, connect the IBM DB2 7.2 run-time client. The process is the same
as connecting the IBM DB2 7.2 run-time client for the Symantec ESM
Reporting Database Link except you must make the following changes for
the ESM database connection:
■
On the Specify the name of the database to which you want to connect
panel, in the Database name text box, type ESM.
In the Test Connection dialog box, on the Connections tab, do the
following tasks:
In the User ID text box, type ESM_REPORT_USER
In the Password text box, type the ESM_REPORT_USER password.
Click Test Connection.
You must make the following changes for the SER database connection:
■
■
On the Specify the name of the database to which you want to connect
panel, in the Database name text box, type SER
In the Test Connection dialog box, on the Connections tab, do the
following tasks:
In the User ID text box, type ESM_CM_USER
In the Password text box, type the ESM_CM_USER password.
Click Test Connection.
See “To connect and test the IBM DB2 7.2 run-time client for the Symantec
ESM Reporting Database Link” on page 48.
■
Configure an installed Apache HTTP Web server for Symantec Enterprise
Reporting
If the computer on which you are installing Symantec Enterprise Reporting has
already installed an Apache HTTP Web server, you must manually configure the
Web server for Symantec Enterprise Reporting.
53
54 Installing Symantec ESM Reporting
Installing Symantec ESM Reporting
To configure the installed Apache HTTP Web server for Symantec Enterprise
Reporting
1
On the computer on which you are installing Symantec Enterprise
Reporting, use a text editor to open the C:\Program Files\
Apache Group\Apache2\conf\httpd.conf file.
2
In the ScriptAlias section, find the following line of text:
ScriptAlias /cgi-bin/ “C:/Program Files/Apache Group/
Apache2/cgi-bin/”
3
Immediately below that line, type the following two lines of text:
ScriptAlias “/Enterprise_Reporting/cgi-bin/
C:/Program Files/Symantec/Enterprise_Reporting/
cgi-bin/”
ScriptAlias “/Enterprise_Reporting/cgi-bin
C:/Program Files/Symantec/Enterprise_Reporting/
cgi-bin”
4
At the end of the httpd.conf file, type the following lines of text:
<Directory “C:/Program Files/Symantec/
Enterprise_Reporting/cgi-bin/”>
Options Indexes FollowSymlinks
AllowOverride None
Order allow,deny
Allow from all
</Directory>
Alias “/Enterprise_Reporting/help/
C:/Program Files/Symantec/Enterprise_Reporting/
webcontent/documentation/”
<Directory “C:/Program Files/Symantec/
Enterprise_Reporting/webcontent/documentation/”>
Options Indexes FollowSymlinks
AllowOverride None
Order allow,deny
Allow from all
</Directory>
Alias “/Enterprise_Reporting/ C:/Program Files/
Symantec/Enterprise_Reporting/webcontent/”
Alias “/Enterprise_Reporting C:/Program Files/
Symantec/Enterprise_Reporting/webcontent”
<Directory “C:/Program Files/Symantec/
Enterprise_Reporting/webcontent/”>
Options Indexes FollowSymlinks
AllowOverride None
Order allow,deny
Allow from all
</Directory>
Installing Symantec ESM Reporting
Installing Symantec ESM Reporting
5
Save the updated httpd.conf file.
6
Stop the Apache2 service.
7
Start the Apache2 service.
Install Symantec Enterprise Reporting for IBM DB2
Note: Symantec Enterprise Reporting must connect to an HTTP Web server. If
you want the computer on which you are installing Symantec Enterprise
Reporting to install the Apache HTTP Web server, you must confirm that the
computer does not have any Apache directories or subdirectories.
To install Symantec Enterprise Reporting
1
On the computer on which you are installing Symantec Enterprise
Reporting, access the Symantec ESM Reporting Windows CD. If the autorun
feature does not start, double-click setup.bat.
2
On the Symantec Enterprise Security Manager (ESM) 6.1 Reporting CD
panel, in the left pane, click Symantec Enterprise Reporting.
3
In the right pane, do the following tasks:
■
Review the information.
■
Complete the installation prerequisites.
■
Click Execute the Symantec Enterprise Reporting Installer.
4
On the Introduction panel, click Next.
5
On the License Agreement panel, click I accept the terms of the License
Agreement, and then click Next.
6
On the Installation Location panel, do one of the following tasks:
7
■
To select the default folder, click Next.
■
To select another folder, click Choose.
In the Browse for Folder dialog box, select the desired folder, click OK,
and then click Next.
On the Choose Install Set panel, do one of the following tasks:
■
To select the default software installation set, click Next.
■
If the computer on which you are installing Symantec Enterprise
Reporting has already installed a Web server, uncheck the Web Server
check box, and then click Next.
55
56 Installing Symantec ESM Reporting
Installing Symantec ESM Reporting
8
9
On the Shortcut Folder panel, to let all of the users see the shortcuts, check
the Make the shortcuts visible to all users check box. Then do one of the
following tasks:
■
To select the default folder for the shortcuts, click Next.
■
To specify a different folder for the shortcuts, select a folder in the list,
and then click Next.
On the Choose Database Type panel, click IBM DB2, and then click Next.
10 On the Choose... panel, do one of the following tasks:
■
To select a JDBC Driver, select the desired driver in the list, and then
click Next.
■
To select another JDBC Driver, click Choose other.
In the Please Select Your JDBC Driver dialog box, select the JDBC
Driver, and then click Open.
11 On the Installation Summary panel, click Install.
Note: After clicking Install, you cannot cancel the installation.
If you did not uncheck the Web Server check box on the Choose Install Set panel,
during the installation, the Symantec Enterprise Reporting installer will warn
you that it is about to install and configure the Apache HTTP Web server
installer.
To install the Apache HTTP Web server for Symantec Enterprise Reporting
Note: The Apache HTTP Web server uses port 80 by default. If the computer on
which you are installing the Apache Web server is already using port 80 for
another application, you must manually change the Apache HTTP Web server to
use a different port number. For example, port 8000 or port 8080.
1
On the Welcome to the Installation Wizard for Apache HTTP Server 2.0.49
panel, click Next.
2
On the License Agreement panel, click I accept the terms in the license
agreement, and then click Next.
3
On the Read this First panel, click Next.
Installing Symantec ESM Reporting
Installing Symantec ESM Reporting
4
On the Server Information panel, do one of the following tasks:
■
To select the default network domain, server name, administrator’s
email address, and port number, click Next. You must specify the
required information that does not display by default.
■
To specify a different network domain, server name, administrator’s
email address, or port number, specify the required information, and
then click Next.
5
On the Setup Type panel, click Typical, and then click Next.
6
On the Destination Folder panel, do one of the following tasks:
■
To select the default folder, click Next.
■
To select another folder, click Change.
In the Change Current Destination Folder panel, type the destination
folder path, click OK, and then click Next.
7
On the Ready to Install the Program panel, click Install.
8
On the Installation Wizard Completed panel, click Finish.
To finish installing Symantec Enterprise Reporting
◆
On the Install Complete panel, confirm that the Start Enterprise Reporting
Configuration check box is checked, and then click Done.
To configure the Symantec Enterprise Reporting database
1
In the left pane, under Data Access, right-click Content Store, and then click
Delete.
2
In the left pane, under Data Access, right-click Content Manager, and then
click New resource > Database.
3
In the New resource - Database dialog box, do the following tasks:
■
In the Name text box, type SER
■
In the Type list box, click DB2 database.
4
Click OK.
5
In the right pane, SER - Database - Resource Properties, click the Value text
box for the User ID and password, and then click the pencil icon to the right
of the Value text box.
57
58 Installing Symantec ESM Reporting
Installing Symantec ESM Reporting
6
In the Enter the user ID and password dialog box, do the following tasks:
■
In the User ID text box, type ESM_CM_USER.
■
In the Password text box, type the password of the ESM_CM_USER
account.
■
In the Confirm password text box, type the password of the
ESM_CM_USER account.
7
Click OK.
8
In the right pane, SER - Database - Resource Properties, in the Value text box
for the Database name, type SER
9
Click the Save configuration icon on the toolbar.
10 Click Close.
11 Click the Start icon on the toolbar.
12 Click Close.
13 Exit from the Enterprise Reporting Configuration utility.
14 In the Configuration Complete, Reboot Needed dialog box, click Yes.
Warning: For only IBM DB2 7.2, you must wait a minimum of five minutes after
the computer restarts before beginning to install the Symantec ESM Reporting
Reports Package. The computer must have time to create the table spaces in the
SER database.
Configure the installed Apache HTTP Web server for LDAP authentication
If you are using LDAP to authenticate users for Symantec Enterprise Reporting,
you must manually configure the LDAP server for Symantec Enterprise
Reporting.
To configure the installed Apache HTTP Web server for LDAP authentication
1
On the computer on which you are installing Symantec Enterprise
Reporting, use a text editor to open the C:\Program Files\
Apache Group\Apache2\conf\httpd.conf file.
2
In the ScriptAlias section, find the following line of text:
ScriptAlias “/Enterprise_Reporting/cgi-bin C:/Program Files/
Symantec/Enterprise Reporting/cgi-bin”
Installing Symantec ESM Reporting
Installing Symantec ESM Reporting
3
Immediately below that line, type the following two lines of text:
Alias /Enterprise_Reporting “C:/Program Files/Symantec/
Enterprise_Reporting/webcontent”
Alias /Enterprise_Reporting/help “C:/Program Files/Symantec/
Enterprise_Reporting/webcontent/documentation”
4
At the end of the httpd.conf file, type the following lines of text:
<Directory “C:/Program Files/Symantec/Enterprise_Reporting/
webcontent”>
Options Indexes MultiViews
</Directory>
To enable LDAP name space authentication for Symantec Enterprise
Reporting
Note: The following example describes the process of creating a name space
using the LDAP that installs with Symantec Enterprise Security Architecture™
(SESA™).
1
On the LDAP computer on which you installed LDAP authentication, verify
that the server is configured for Port 389. This port creates an insecure
connection by default.
2
On the computer on which you are installing Symantec Enterprise
Reporting, click Start > Programs > Symantec Enterprise Reporting >
Enterprise Reporting Configuration.
3
In the left pane, under Security, right-click Authentication, and then click
New resource > Namespace.
4
In the right pane, in the New resource - Namespace dialog box, do the
following tasks:
■
In the Name text box, type ESM
■
In the Type list box, click LDAP.
5
Click OK.
6
In the right pane, under Namespace - Resource Properties, do the following
tasks:
■
In the Namespace ID text box, type a unique identifier for the name
space. For example, type ESM
■
In the Host and port text box, type the
<LDAP server computer hostname>:
<port number>. For example, type LDAPserver:389
■
In the Base Distinguish Name text box, type the domain controller
names. For example, type dc=esm, dc=ses, o=symc_ses
59
60 Installing Symantec ESM Reporting
Installing Symantec ESM Reporting
■
In the User lookup text box, type userid=${userID}, ou=People
■
In the Bind user DN and password text boxes, type the values if the
LDAP authentication provider must bind to the directory server using a
specific Bind user DN and password to perform searches. If no values
are specified, the LDAP authentication provider binds as anonymous.
■
In the Accounting mappings (Advanced) text box, change the default
user name from uid to userid.
■
In the remaining text boxes, select the default values.
7
In the left pane, under Security, click Authentication, and then click
Cognos.
8
In the right pane, under Cognos - Namespace - Resource Properties, in the
Allow anonymous access list box, select False.
9
Click the Save configuration icon on the tool bar.
10 In the Enterprise Reporting Configuration dialog box, click Close.
11 Click the Restart icon on the tool bar.
12 In the Enterprise Reporting Configuration dialog box, click Close.
13 Exit from the Enterprise Reporting Configuration utility.
Install the Symantec ESM Reporting Reports Package for IBM
DB2
This process installs the Symantec ESM Reporting Reports Package for IBM
DB2.
See “About the Reports Package installer” on page 26.
To install the Symantec ESM Reporting Reports Package for IBM DB2
1
On the computer on which you installed the Symantec Enterprise Reporting
Content Manager, access the Symantec ESM Reporting Windows CD. If the
autorun feature does not start, double-click setup.bat.
2
On the Symantec Enterprise Security Manager (ESM) 6.1 Reporting CD
panel, in the left pane, click Reports Package.
3
In the right pane, do the following tasks:
4
■
Review the information.
■
Complete the installation prerequisites.
■
Click the Execute the Reports Package Installer link.
On the Introduction panel, click Next.
Installing Symantec ESM Reporting
Installing Symantec ESM Reporting
5
On the License Agreement panel, click I accept the terms of the License
Agreement, and then click Next.
6
On the Gateway URL panel, do the following tasks:
7
8
9
■
Specify the URL of the Symantec Enterprise Reporting Gateway.
■
To use anonymous login, check the Anonymous Login check box.
To use LDAP or another form of user authentication, uncheck the
Anonymous Login check box.
On the Gateway Credentials panel, do the following tasks:
■
In the Security Namespace ID text box, type the Gateway Security
Namespace ID.
■
In the User Name text box, type the Symantec Enterprise Reporting
Gateway user name.
■
In the Password text box, type the Symantec Enterprise Reporting
Gateway password.
On the Deployment Directory panel, do one of the following tasks:
■
To select the default directory, click Next.
■
To select another directory, click Choose.
■
In the Browse for Folder dialog box, select the desired directory, click
OK, and then click Next.
On the Database Type panel, click DB2, and then click Next.
10 On the Database Source panel, do the following tasks:
■
In the DB User Name text box, type ESM_REPORT_USER
■
In the DB Password text box, type the password of the
ESM_REPORT_USER account.
■
In the Database Name text box, type ESM
11 On the Pre-Installation Summary panel, click Install.
12 On the Install Complete panel, click Done.
To test the Symantec ESM Reporting Reports Package
1
On the computer on which you installed Symantec Enterprise Reporting,
open a Web browser, and then type http://localhost/Enterprise_Reporting.
2
Select the Public Folders tab.
3
Select the Symantec ESM link.
4
Select and expand the desired query or report.
61
62 Installing Symantec ESM Reporting
Installing Symantec ESM Reporting
Install on Windows computers using Microsoft SQL Server
Symantec ESM Reporting can be installed on a mix of Windows and UNIX
computers using an IBM DB2, Microsoft SQL Server (MS-SQL), or Oracle
database server. The following procedures describe the installation of Symantec
ESM Reporting on Windows computers using a Microsoft SQL Server database
server.
Installing the Symantec ESM Reporting Database Foundation
for MS-SQL Server
The installation process consists of doing one of the following tasks:
■
Installing the Symantec ESM Reporting Database Foundation for MS-SQL.
■
Using SQL scripts to create the databases for MS-SQL.
See “About the Database Foundation installer” on page 24.
Create the ESM and SER databases
When you run the Database Foundation installer and select the Default MS SQL
Server option, the installer creates two databases. By default, ESM is the name
of the Symantec ESM Reporting database and SER is the name of the Symantec
Enterprise Reporting database. Each database has 2 GB of space.
If your installation requires larger table spaces, Symantec provides SQL scripts
that let you manually create the ESM and SER databases. You must still use the
Database Foundation installer to import the necessary data into the databases.
See “About Symantec ESM Reporting installation scripts” on page 281.
To install the Symantec ESM Reporting Database Foundation for MS-SQL
1
On the computer on which you installed MS-SQL, access the Symantec ESM
Reporting Windows CD. If the autorun feature does not start, double-click
setup.bat.
2
On the Symantec Enterprise Security Manager (ESM) 6.1 Reporting CD
panel, in the left pane, click Database Foundation.
3
In the right pane, do the following tasks:
■
Review the information
■
Complete the installation prerequisites
■
Click Execute the Database Foundation Installer
4
On the Introduction panel, click Next.
5
On the License Agreement panel, click I accept the terms of the License
Agreement, and then click Next.
Installing Symantec ESM Reporting
Installing Symantec ESM Reporting
6
On the Choose Install Set panel, do one of the following tasks:
■
To let the Database Foundation installer create the ESM and SER
databases and import the necessary data, click Default MS SQL Server,
and then click Next.
The Symantec ESM Reporting Database Foundation installer creates
the ESM and SER databases with 2 GB each for the User and Index
tablespaces. If your installation requires larger tablespaces, you must
manually create the ESM and SER databases, and then select the
Import Data option.
■
To import the necessary data into the ESM and SER databases that you
manually created, click Import Data, and then click Next.
If you select this option, the installer skips steps 7 through 14 and
prompts you to choose the type of database in which to store your
Symantec ESM Reporting data. Go to step 15.
■
If you intend to manually create the ESM and SER databases but have
not yet done so, click Cancel.
Symantec provides scripts that let you manually create the ESM and
SER databases. You can find the scripts on the Symantec Enterprise
Security Manager (ESM) 6.1 Reporting Windows CD in the SQL
directory. You can change the scripts to customize the databases for
your organization.
Note: After clicking Next, if you want to select a different database option,
you must cancel the Symantec ESM Reporting Database Foundation
installation and start over.
7
On the Searching panel, select the desired path to the isql.exe file, and then
click Next.
8
On the Choose... panel, do one of the following tasks:
9
■
To select the default location, click Next.
■
To select another location, click Choose other.
■
In the Please Select isql.exe file dialog box, select the location, and then
click Open.
Click Next.
10 On the Get Database Names panel, do one of the following tasks:
■
To specify the default Symantec ESM Reporting Database Name and
Symantec Enterprise Reporting Database Name, click Next.
■
To specify other database names, type the names in the related text
boxes, and then click Next.
63
64 Installing Symantec ESM Reporting
Installing Symantec ESM Reporting
11 On the Database Drive panel, do one of the following tasks:
■
To specify the default drive, click Next.
■
To specify another drive for the databases to store data, type the name
of the drive in the text box, and then click Next.
12 On the Default Password panel, do the following tasks:
■
In the Default Password text box, type a secure password.
■
In the Confirm Default Password text box, retype the default password.
13 On the Symantec ESM Reporting database accounts panel, do one of the
following tasks:
■
To specify the default account name and password for the Symantec
ESM Reporting Database Link account and the Symantec Enterprise
Reporting account, click Next.
■
To specify another account name or password for the Symantec ESM
Reporting Database Link account or the Symantec Enterprise
Reporting account, type the information in the related text boxes, and
then click Next.
14 On the Symantec Enterprise Reporting database accounts panel, do one of
the following tasks:
■
To specify the default account name and password for the Content
Store account, click Next.
■
To specify another account name or password for the Content Store
account, type the information in the related text boxes, and then click
Next.
15 On the Choose Database Type panel, click Microsoft SQL Server 2000, and
then click Next.
Note: If you selected Default MS SQL Server in step 6, the installer skips
this step.
16 On the JDBC Driver panel, do one of the following tasks:
■
To specify the default JDBC Driver Class, JDBC Classpath, and JDBC
Library Path, click Next.
■
To specify another JDBC Driver Class, JDBC Classpath, and JDBC
Library Path, type the information in the related text boxes, and then
click Next.
Installing Symantec ESM Reporting
Installing Symantec ESM Reporting
Warning: The computers on which you are installing the Symantec ESM
Reporting Database Foundation must use the Microsoft JDBC driver for SQL
Server 2000. Do not use third-party JDBC Drivers for the Microsoft SQL
Server database.
17 On the Database Connection panel, do one of the following tasks:
■
To specify the default database URL and user account name, type the
password of the user account in the text box, and then click Next.
■
To specify another database URL, user name, and password, type the
information in the text boxes, and then click Next.
18 On the Pre-Install Summary panel, click Install.
Note: If the Symantec ESM Reporting Database Foundation installer reports
that it cannot find the local settings directory, set the TEMP and TMP
environment variables to a path that does not contain international
characters. Then rerun the Symantec ESM Reporting Database Foundation
installer.
19 On the Install Complete panel, click Done.
To manually create the ESM and SER databases for MS-SQL
See “About the installation scripts for Microsoft SQL Server” on page 285.
1
On the computer on which you installed MS-SQL, at the system command
prompt, change to the Symantec ESM Reporting Windows CD.
2
Change to the sql\sqlserver folder.
3
Type create_esm_db
4
Type create_ser_db
5
Start the Symantec ESM Reporting Database Foundation installer. The
process is the same as installing the Symantec ESM Reporting Database
Foundation for MS-SQL except for the following change:
On the Choose Install Set panel, click Import Data, and then click Next.
See “To install the Symantec ESM Reporting Database Foundation for MSSQL” on page 62.
6
At the system command prompt, change to the Symantec ESM Reporting
Windows CD.
7
Change to the sql\sqlserver\createESMdb folder.
8
Type post_install
65
66 Installing Symantec ESM Reporting
Installing Symantec ESM Reporting
Note: If you changed the name of the ESM database in the installation
scripts, you must change the name of the ESM database in the
post_install.bat script.
Installing the Symantec ESM Reporting Database Link for
MS-SQL
The installation process consists of installing the Symantec ESM Reporting
Database Link for MS-SQL.
See “About the Database Link installer” on page 25.
To install the Symantec ESM Reporting Database Link for MS-SQL
1
On the computer on which you are installing the Symantec ESM Reporting
Database Link, access the Symantec ESM Reporting Windows CD. If the
autorun feature does not start, double-click setup.bat.
2
On the Symantec Enterprise Security Manager (ESM) 6.1 Reporting CD
panel, in the left pane, click Database Link.
3
In the right pane, do the following tasks:
■
Review the information
■
Complete the installation prerequisites
■
Click Execute the Database Link Installer
4
On the Introduction panel, click Next.
5
On the License Agreement panel, click I accept the terms of the License
Agreement, and then click Next.
6
On the Choose Installation Type panel, click Initial Installation, and then
click Next.
7
On the Choose Install Folder panel, do one of the following tasks:
■
To select the default location, click Next.
■
To select another location, click Choose.
In the Browse for Folder dialog box, select the desired location, click
OK, and then click Next.
Note: If you select the ..\Symantec\ESM folder, uninstalling Symantec ESM
will remove the Symantec ESM Reporting Database Link.
8
On the Database Type Selection panel, click MS SQL Server 2000, and then
click Next.
Installing Symantec ESM Reporting
Installing Symantec ESM Reporting
9
On the JDBC Driver Information panel, do one of the following tasks:
■
To specify the default JDBC Driver Class, JDBC Classpath, JDBC Library
Path, and SQL Dialect, click Next.
■
To specify another JDBC Driver Class, JDBC Classpath, JDBC Library
Path, and SQL Dialect, type the information in the related text boxes,
and then click Next.
See the JDBC Driver documentation.
Warning: The computers on which you are installing the Symantec ESM
Reporting Database Link must use third-party JDBC Drivers for the
Microsoft SQL Server database. Do not use the Microsoft JDBC driver for
SQL Server 2000. See “System requirements” on page 29.
10 On the Database Connection panel, do one of the following tasks:
■
To specify the default database URL, type the user name and password
of the ESM_DB_LINK_USER account in the related text boxes, and then
click Next.
■
To specify another database URL, user name, and password, type the
information in the related text boxes, and then click Next.
11 On the ESM Manager Connection panel, do the following tasks:
■
Type the name of the Symantec ESM Manager.
■
Type the user name of an account on the manager with manage user
rights and read-only access rights to all domains, policies, and
templates.
■
Type the password of the manager account.
■
Specify the port number of the manager.
Click the right-arrow to add the manager to the list.
Optionally, repeat these steps to let the Symantec ESM Reporting Database
Link connect to another Symantec ESM Manager.
■
Warning: Do not connect two Symantec ESM Reporting Database Links to
the same Symantec ESM Manager and database. The database link log will
report primary key failures.
If you specify connections to several Symantec ESM Managers during the
installation of a Symantec ESM Reporting Database Link, a race condition
may cause some ESM database errors during the initial transfer of data. You
can correct the errors by stopping and restarting the Symantec ESM
Reporting Database Link.
See “Checking the Symantec ESM Reporting Database Link log for errors”
on page 101.
67
68 Installing Symantec ESM Reporting
Installing Symantec ESM Reporting
12 On the Pre-Install Summary panel, click Install.
13 On the Install Complete panel, click Done.
Note: In the C:\Program Files\Symantec\Reporting_Database_Link\server\
default\conf\log4j.xml file, the default settings limit the Symantec ESM
Reporting Database Link log file to a maximum file size of 50 MB and three
backups. You can change the MaxFileSize value to increase the file size and
the MaxBackupIndex value to increase the number of backup files.
Installing Symantec Enterprise Reporting for MS-SQL
The installation process includes the following tasks:
■
Configure an installed Apache HTTP Web server for Symantec Enterprise
Reporting.
■
Install Symantec Enterprise Reporting for MS_SQL.
■
Configure the installed Apache HTTP Web server for LDAP authentication.
Configure an installed Apache HTTP Web server for Symantec Enterprise
Reporting
If the computer on which you are installing Symantec Enterprise Reporting has
already installed an Apache HTTP Web server, you must manually configure the
Web server for Symantec Enterprise Reporting.
To configure the installed Apache HTTP Web server for Symantec Enterprise
Reporting
◆
On the computer on which you are installing Symantec Enterprise
Reporting, configure the installed Apache HTTP Web server.
See “Configure an installed Apache HTTP Web server for Symantec
Enterprise Reporting” on page 53.
Install Symantec Enterprise Reporting for MS_SQL
Note: If you want the computer on which you are installing Symantec Enterprise
Reporting to install an Apache HTTP Web server, confirm that the computer
does not have any Apache directories or subdirectories.
Installing Symantec ESM Reporting
Installing Symantec ESM Reporting
To install Symantec Enterprise Reporting
1
On the computer on which you are installing Symantec Enterprise
Reporting, access the Symantec ESM Reporting Windows CD. If the autorun
feature does not start, double-click setup.bat.
2
On the Symantec Enterprise Security Manager (ESM) 6.1 Reporting CD
panel, in the left pane, click Symantec Enterprise Reporting.
3
In the right pane, do the following tasks:
■
Review the information.
■
Complete the installation prerequisites.
■
Click Execute the Symantec Enterprise Reporting Installer
4
On the Introduction panel, click Next.
5
On the License Agreement panel, click I accept the terms of the License
Agreement, and then click Next.
6
7
8
9
On the Installation Location panel, do one of the following tasks:
■
To select the default folder, click Next.
■
To select another folder, click Choose.
In the Browse for Folder dialog box, select the desired folder, click OK,
and then click Next.
On the Choose Install Set panel, do one of the following tasks:
■
To select the default software installation set, click Next.
■
If the computer on which you are installing Symantec Enterprise
Reporting has already installed a Web server, uncheck the Web Server
check box, and then click Next.
On the Shortcut Folder panel, do the following tasks:
■
To specify a different folder for the shortcuts, select a folder in the list.
■
To let the users see the shortcuts, check Make the shortcuts visible to
all users.
Click Next.
10 On the Choose Database Type panel, click MS SQL Server 2000, and then
click Next.
11 On the Installation Summary panel, click Install.
Note: After clicking Install, you cannot cancel the installation.
69
70 Installing Symantec ESM Reporting
Installing Symantec ESM Reporting
To install the Apache HTTP Web server for Symantec Enterprise Reporting
Note: If you do not uncheck the Web Server check box, the Symantec Enterprise
Reporting installer automatically starts up the Apache HTTP Web server
installer.
The Apache HTTP Web server uses port 80 by default. If the computer on which
you are installing the Apache Web server is already using port 80 for another
application, you must manually change the Apache HTTP Web server to use a
different port number. For example, port 8000 or port 8080.
See “To install the Apache HTTP Web server for Symantec Enterprise
Reporting” on page 56.
To finish installing Symantec Enterprise Reporting
◆
On the Install Complete panel, confirm that the Start Enterprise Reporting
Configuration check box is checked, and then click Done.
To configure the Symantec Enterprise Reporting database
1
In the left pane, under Data Access, right-click Content Store, and then click
Delete.
2
In the left pane, under Data Access, right-click Content Manager, and then
click New resource > Database.
3
In the New resource - Database dialog box, do the following tasks:
■
In the Name text box, type SER.
■
In the Type list box, click Microsoft SQL Server database.
4
Click OK.
5
In the right pane, SER - Database - Resource Properties, click the Value text
box for the User ID and password, and then click the pencil icon to the right
of the Value text box.
6
In the Enter the user ID and password dialog box, do the following tasks:
■
In the User ID text box, type ESM_CM_USER
■
In the Password text box, type the password of the ESM_CM_USER
account.
■
In the Confirm password text box, type the password of the
ESM_CM_USER account.
7
Click OK.
8
In the right pane, SER - Database - Resource Properties, in the Value text box
for the Database name, type SER
Installing Symantec ESM Reporting
Installing Symantec ESM Reporting
9
Click the Save configuration icon on the toolbar.
10 Click Close.
11 Click the Start icon on the toolbar.
12 Click Close.
13 Close the Enterprise Reporting Configuration utility.
Configure the installed Apache HTTP Web server for LDAP authentication
◆
If you are using LDAP to authenticate users for Symantec Enterprise
Reporting, you must manually configure the LDAP server for Symantec
Enterprise Reporting.
To configure the installed Apache HTTP Web server for LDAP authentication
◆
See “Configure the installed Apache HTTP Web server for LDAP
authentication” on page 58.
To enable LDAP name space authentication for Symantec Enterprise
Reporting
◆
See “To enable LDAP name space authentication for Symantec Enterprise
Reporting” on page 59.
Enable LDAP Secure Socket Layer (SSL) on Windows for Oracle
1
On the LDAP computer on which you installed LDAP authentication, log on
using an account with rights to change SSL status.
2
In the left pane, under Security, click SSL, and then click Settings.
3
In the right pane, under SSL status, click SSL on.
4
Click Update.
5
Restart the host computer system.
Note: If you install SSL on the Solaris computer on which you installed
Symantec Enterprise Reporting and you set up signed certificates on the SSL
server for Symantec Enterprise Reporting to use, then no changes are required
for Symantec Enterprise Reporting on Solaris to use LDAP on Windows. See the
Installation and Configuration Guide in the Docs/Symantec Enterprise
Reporting directory on the CD installation set.
71
72 Installing Symantec ESM Reporting
Installing Symantec ESM Reporting
Install the Symantec ESM Reporting Reports Package for
MS-SQL
The installation process includes the following tasks:
■
To install the Symantec ESM Reporting Reports Package for MS-SQL
■
To test the Symantec ESM Reporting Reports Package
To install the Symantec ESM Reporting Reports Package for MS-SQL
◆
On the computer on which you installed the Symantec Enterprise Reporting
Content Manager, install the Symantec ESM Reporting Reports Package.
The process is the same as installing the Symantec ESM Reporting Reports
Package for IBM DB2 except for the following change:
On the Database Type panel, click Microsoft SQL Server 2000, and then
click Next.
See “To install the Symantec ESM Reporting Reports Package for IBM DB2”
on page 60.
See “About the Reports Package installer” on page 26.
To test the Symantec ESM Reporting Reports Package
See “To test the Symantec ESM Reporting Reports Package” on page 61.
Install on Windows computers using Oracle
Symantec ESM Reporting can be installed on a mix of Windows and UNIX
computers using an IBM DB2, Microsoft SQL Server (MS-SQL), or Oracle
database server. The following procedures describe the installation of Symantec
ESM Reporting on Windows computers using an Oracle database server on a
Solaris computer.
Installing the Symantec ESM Reporting Database Foundation
for Oracle
The installation process includes the following tasks:
■
Configure the environment variables for the Oracle user.
■
Install the Symantec ESM Reporting Database Foundation for Oracle.
Configure the environment variables for the Oracle user
See “To configure the environment variables for the Oracle user” on page 76.
Installing Symantec ESM Reporting
Installing Symantec ESM Reporting
Install the Symantec ESM Reporting Database Foundation for Oracle
See “Install the Symantec ESM Reporting Database Foundation for Oracle” on
page 76.
Installing the Symantec ESM Reporting Database Link on
Windows for Oracle
The installation process includes the following tasks:
■
Install, connect, and test the Oracle JDBC Drivers for the Symantec ESM
Reporting Database Link.
■
Install the Symantec ESM Reporting Database Link on Windows for Oracle.
Install, connect, and test the Oracle JDBC Drivers for the Symantec ESM
Reporting Database Link
Symantec does not provide JDBC Drivers for the Oracle database server. You can
download Oracle JDBC Drivers from the Sun Microsystems Web site at
http://servlet.java.sun.com/products/jdbc/drivers.
On the computer on which you are installing the Symantec ESM Reporting
Database Link, download, install, connect, and test the Oracle JDBC Drivers.
Install the Symantec ESM Reporting Database Link on Windows for Oracle
On the computer on which you are installing the Symantec ESM Reporting
Database Link, access the Symantec ESM Reporting Windows CD. The process is
the same as installing the Symantec ESM Reporting Database Link for IBM DB2
except on the Database Type Selection panel, click Oracle, Next.
See “To install the Symantec ESM Reporting Database Link for IBM DB2” on
page 49.
Installing Symantec Enterprise Reporting on Windows for
Oracle
The installation process includes the following tasks:
■
Configure the environment variables for Symantec Enterprise Reporting.
■
Install, connect, and test the Oracle JDBC Drivers for Symantec Enterprise
Reporting.
■
Install Symantec Enterprise Reporting on Windows for Oracle.
■
Install the Apache HTTP server for Symantec Enterprise Reporting.
■
Finish installing Symantec Enterprise Reporting on Windows for Oracle.
■
Configure the Symantec Enterprise Reporting database.
73
74 Installing Symantec ESM Reporting
Installing Symantec ESM Reporting
Configure the environment variables for Symantec Enterprise Reporting
See “To configure the environment variables for Symantec Enterprise
Reporting” on page 83.
Install, connect, and test the Oracle JDBC Drivers for Symantec
Enterprise Reporting
Symantec does not provide JDBC Drivers for the Oracle database server. You can
download Oracle JDBC Drivers from the Sun Microsystems Web site at
http://servlet.java.sun.com/products/jdbc/drivers.
On the computer on which you are installing Symantec Enterprise Reporting,
download, install, connect, and test the Oracle JDBC Drivers.
Install Symantec Enterprise Reporting on Windows for Oracle
Perform the installation of Symantec Enterprise Reporting on Windows
computers using DB2 except on the Choose Database Type panel, click Oracle,
Next.
See “To install Symantec Enterprise Reporting” on page 55.
Install the Apache HTTP server for Symantec Enterprise Reporting
See “To install the Apache HTTP Web server for Symantec Enterprise
Reporting” on page 56.
Finish installing Symantec Enterprise Reporting on Windows for Oracle
See “To finish installing Symantec Enterprise Reporting” on page 57.
Configure the Symantec Enterprise Reporting database
Perform the configuration of the Symantec Enterprise Reporting database on
Windows computers using DB2 except on the New resource - Database dialog
box, in the Type list box, click Oracle database, and then click Next.
See “To configure the Symantec Enterprise Reporting database” on page 57.
Configure the installed Apache HTTP Web server for LDAP authentication
See “To configure the installed Apache HTTP Web server for LDAP
authentication” on page 58.
Enable LDAP name space authentication for Symantec Enterprise Reporting
See “To enable LDAP name space authentication for Symantec Enterprise
Reporting” on page 59.
Installing Symantec ESM Reporting
Installing Symantec ESM Reporting
Install the Symantec ESM Reporting Reports Package for Oracle
See “To install the Symantec ESM Reporting Reports Package for Oracle” on
page 90.
Installing on UNIX computers using Oracle
Symantec ESM Reporting can install on a mix of Windows and UNIX computers
using IBM DB2, Microsoft SQL Server (MS-SQL), or Oracle database server. The
following procedures describe the installation on Solaris using Oracle.
Installing the Symantec ESM Reporting Database Foundation
for Oracle
The installation process includes the following tasks:
■
Configure the environment variables for the Oracle user.
■
Install the Symantec ESM Reporting Database Foundation for Oracle.
■
Using SQL scripts to create the databases for Oracle.
See “About the Database Foundation installer” on page 24.
Create the ESM and SER databases
When you run the Database Foundation installer and select the Default Oracle
option, the installer creates two databases. By default, ESM is the name of the
Symantec ESM Reporting database and SER is the name of the Symantec
Enterprise Reporting database. Each database has 2 GB for User and Index
tablespaces.
If your installation requires larger table spaces, Symantec provides SQL scripts
that let you manually create the ESM and SER databases. These scripts also
import the necessary data into the databases. After the scripts finish importing
data, you must run an additional SQL script to tune the database.
See “About Symantec ESM Reporting installation scripts” on page 281.
Configure the environment variables for the Oracle user
Environment variables provide critical information for the Oracle user.
75
76 Installing Symantec ESM Reporting
Installing Symantec ESM Reporting
To configure the environment variables for the Oracle user
◆
On the computer on which you installed Oracle, in the .profile file for the
Oracle user, ensure that the following environment variables are set:
Table 3-1
New environment variables
Variable name
Description
ORACLE_BASE
The full path name to the base directory for all Oracle
versions.
ORACLE_HOME
The full path name to the directory that contains the
database client software or the entire database installation.
ORACLE_SID
The Oracle Server system identifier or instance name.
Note: Ensure that the Oracle user has its shell set to /bin/sh. This is the shell
that applies to the .profile file for the Oracle user.
Install the Symantec ESM Reporting Database Foundation for Oracle
See “About the Database Foundation installer” on page 24.
To install the Symantec ESM Reporting Database Foundation for Oracle
Note: If you perform a custom installed of the ESM and SER databases, use the
database names that you assign instead of the default database names when
installing the Symantec ESM Reporting Database Link, Symantec Enterprise
Reporting, and Symantec ESM Reporting Reports Package.
1
On the computer on which you installed Oracle, access the Symantec ESM
Reporting Solaris CD. At the system command prompt, type setup.sh
2
On the Symantec Enterprise Security Manager (ESM) 6.1 Reporting CD
panel, in the left pane, click Database Foundation.
3
In the right pane, do the following tasks:
■
Review the information
■
Complete the installation prerequisites
■
Click Execute the Database Foundation Installer
4
On the Introduction panel, click Next.
5
On the License Agreement panel, click I accept the terms of the License
Agreement, and then click Next.
Installing Symantec ESM Reporting
Installing Symantec ESM Reporting
6
On the Choose Install Set panel, do one of the following tasks:
■
To let the Database Foundation installer create the ESM and SER
databases and import the necessary data, click Default Oracle, and
then click Next.
■
To import data into the ESM and SER databases, click Import Data, and
then click Next.
For Oracle only, do not select this option. The SQL scripts import the
necessary data automatically after creating the ESM and SER
databases.
If you select this option, the installer skips steps 7 through 10 and
prompts you to choose the type of database in which to store your
Symantec ESM Reporting data. Go to step 11.
■
If you intend to manually create the ESM and SER databases but have
not yet done so, click Cancel.
Symantec provides scripts that let you manually create the ESM and
SER databases. You can find the scripts on the Symantec Enterprise
Security Manager (ESM) 6.1 Reporting Windows CD in the SQL
directory. You can change the scripts to customize the databases for
your organization.
Note: After clicking Next, if you want to select a different database option,
you must cancel the Symantec ESM Reporting Database Foundation
installation and start over.
7
8
9
On the Get Database Names panel, do the following tasks:
■
In the Symantec ESM Reporting database text box, type ESM
■
In the Symantec Enterprise Reporting database text box, type SER
On the Default Password panel, do the following tasks:
■
In the Default Password text box, type a secure password.
■
In the Confirm Default Password text box, retype the default password.
On the Symantec ESM Reporting database accounts panel, do one of the
following tasks:
■
To specify the default password for the Sys and System built-in
accounts, and the default account name and password for the
Symantec ESM Reporting Database Link account and the Symantec
Enterprise Reporting account, click Next.
■
To specify another password for the Sys or System built-in accounts, or
the account name and password for the Symantec ESM Reporting
Database Link account or the Symantec Enterprise Reporting account,
type the information in the related text boxes, and then click Next.
77
78 Installing Symantec ESM Reporting
Installing Symantec ESM Reporting
10 On the Symantec Enterprise Reporting database accounts panel, do one of
the following tasks:
■
To specify the default password for the Sys and System built-in
accounts, and the default account name and password for the Content
Store account, click Next.
■
To specify another password for the Sys or System built-in accounts, or
the account name and password for the Content Store account, type the
information in the related text boxes, and then click Next.
11 On the Choose Database Type panel, click Oracle, and then click Next.
Note: If you selected Default Oracle in step 6, the installer skips this step.
12 On the JDBC Driver panel, do one of the following tasks:
■
To specify the default JDBC Driver Class, JDBC Classpath, and JDBC
Library Path, replace <ORACLE_HOME> with the ORACLE_HOME
directory, and then click Next.
■
To specify another JDBC Driver Class, JDBC Classpath, and JDBC
Library Path, type the information in the related text boxes, and then
click Next.
13 On the Database Connection panel, do one of the following tasks:
■
To specify the default database URL and user name, type the password
of the user account in the text box, and then click Next.
■
To specify another database URL, user name, and password, type the
information in the related text boxes, and then click Next.
14 On the Pre-Install Summary panel, click Install.
Note: If the Symantec ESM Reporting Database Foundation installer reports
that it cannot find the local settings directory, set the TEMP and TMP
environment variables to a path that does not contain international
characters. Then rerun the Symantec ESM Reporting Database Foundation
installer.
15 On the Install Complete panel, click Done.
Note: During the installation of the Symantec ESM Reporting Database
Foundation, the installer creates an Oracle user account. This account is not
intended for users. The purpose of the account is to provide a schema name.
The account has full access to all of the database tables but does not have
connect privileges or a password. The installer deactivates the account to
prevent unauthorized access.
Installing Symantec ESM Reporting
Installing Symantec ESM Reporting
To manually create the ESM and SER databases for Oracle
See “About the installation scripts for Oracle” on page 287.
1
On the computer on which you installed Oracle, at the system command
prompt, change to the Symantec ESM Reporting Solaris CD.
2
Change to the sql/oracle directory.
3
Type create_esm_db.sh
4
Type create_ser_db.sh
5
Type ./populate_esm_db.sh <system_user> <password>
<database_name>
6
Type ./post_install.sh <system_user> <password> <database_name>
Note: ESM is the default <database_name>.
To enable redo log archival for the Symantec ESM Reporting database and
Symantec Enterprise Reporting database
1
2
Modify the initESM.ora file.
■
In a text editor, open the initESM.ora file and type
log_archive_start=true
log_archive-dest_1 = 'location = /u01/oradata/ESM/arch'
■
Save and close the initESM.ora file.
■
Verify that the archive directory exists and if it does not, change to
Oracle user, and then type
mkdir /u01/oradata/ESM/arch
Modify the initSER.ora file.
■
In a text editor, open the initSER.ora file and type
log_archive_start=true
log_archive-dest_1 = 'location = /u01/oradata/SER/arch'
■
Save and close the initSER.ora file.
■
Verify that the archive directory exists and if it does not, change to
Oracle user, and then type
mkdir /u01/oradata/SER/arch
79
80 Installing Symantec ESM Reporting
Installing Symantec ESM Reporting
3
4
Shut down and restart the Oracle database that supports the ESM database
and the SER database.
■
Open a Terminal window to the ESM database and SER database
computer as Oracle user and type
sqlplus /nolog
■
At the sqlplus prompt, type
connect / as sysdba
shutdown immediately
startup mount
Change the Oracle database to enable redo log archival.
■
Open a Terminal window to the ESM database and SER database
computer as Oracle user and type
sqlplus /nolog
■
At the sqlplus prompt, type
alter database archivelog;
alter database open;
archive log list
Installing the Symantec ESM Reporting Database Link for
Oracle
The installation process includes the following tasks:
■
Install the Oracle JDBC Drivers for the Symantec ESM Reporting Database
Link.
■
Install the Symantec ESM Reporting Database Link for Oracle.
Install the Oracle JDBC Drivers for the Symantec ESM Reporting Database
Link
Symantec does not provide JDBC Drivers for the Oracle database server. You can
download Oracle JDBC Drivers from the Sun Microsystems Web site at
http://servlet.java.sun.com/products/jdbc/drivers.
To install the Oracle JDBC Drivers for the Symantec ESM Reporting Database
Link
◆
On the computer on which you are installing the Symantec ESM Reporting
Database Link, download and install the Oracle 9i JDBC Drivers.
Installing Symantec ESM Reporting
Installing Symantec ESM Reporting
Warning: The net and app JDBC Drivers for IBM DB2, MS-SQL, and Oracle can
send user names, passwords, and other sensitive information in clear text form
across your network.
To secure the JDBC Driver connections, use encrypted third-party JDBC Drivers.
If your database computers are in a physically secure location, you can isolate
the JDBC Driver connections by setting up a dual home host through a
physically secure segment of the network. The connection can pass sensitive
information in clear text but unauthorized personnel cannot access it.
Install the Symantec ESM Reporting Database Link for Oracle
See “About the Database Link installer” on page 25.
To install the Symantec ESM Reporting Database Link
1
On the computer on which you are installing the Symantec ESM Reporting
Database Link, access the Symantec ESM Reporting Solaris CD. At the
system command prompt, type setup.sh
2
On the Symantec Enterprise Security Manager (ESM) 6.1 Reporting CD
panel, in the left pane, click Database Link.
3
In the right pane, do the following tasks:
■
Review the information
■
Complete the installation prerequisites
■
Click Execute the Database Link Installer
4
On the Introduction panel, click Next.
5
On the License Agreement panel, click I accept the terms of the License
Agreement, and then click Next.
6
On the Choose Installation Type panel, click Initial Installation, and then
click Next.
7
On the Choose Install Folder panel, do one of the following tasks:
■
To select the default location, click Next.
■
To select another location, click Choose.
■
In the Browse for Folder dialog box, select the desired location, click
OK, and then click Next.
Note: If you select the ../Symantec/ESM directory, uninstalling Symantec
ESM will remove the Symantec ESM Reporting Database Link.
8
On the Database Type Selection panel, click Oracle, and then click Next.
81
82 Installing Symantec ESM Reporting
Installing Symantec ESM Reporting
9
On the JDBC Driver Information panel, do one of the following tasks:
■
To specify the default JDBC Driver Class, JDBC Classpath, JDBC Library
Path, and SQL Dialect, click Next.
■
To specify another JDBC Driver Class, JDBC Classpath, JDBC Library
Path, and SQL Dialect, type the information in the related text boxes,
and then click Next.
10 On the Database Connection panel, do one of the following tasks:
■
To specify the default database URL, type the user name and password
of the Oracle account in the related text boxes, and then click Next.
■
To specify another database URL, user name, and password, type the
information in the related text boxes, and then click Next.
11 On the ESM Manager Connection panel, do the following tasks:
■
Type the name of the Symantec ESM Manager.
■
Type the user name of an account on the manager with manage user
rights and read only access rights to all domains, policies, and
templates.
■
Type the password of the manager account.
■
Specify the port number of the manager.
Click the right-arrow to add the manager to the list.
Optionally, repeat these steps to let the Symantec ESM Reporting Database
Link connect to another Symantec ESM Manager.
■
Warning: Do not connect two Symantec ESM Reporting Database Links to
the same Symantec ESM Manager and database. The database link log will
report primary key failures.
If you specify connections to several Symantec ESM Managers during the
installation of a Symantec ESM Reporting Database Link, a race condition
may cause some ESM database errors during the initial transfer of data. You
can correct the errors by stopping and restarting the Symantec ESM
Reporting Database Link.
See “Checking the Symantec ESM Reporting Database Link log for errors”
on page 101.
12 On the Pre-Install Summary panel, click Install.
13 On the Install Complete panel, click Done.
Installing Symantec ESM Reporting
Installing Symantec ESM Reporting
Note: In the /opt/Symantec/Reporting_Database_Link/server/
default/conf/log4j.xml file, the default settings limit the Symantec ESM
Reporting Database Link log file to a maximum file size of 50 MB and three
backups. You can change the MaxFileSize value to increase the file size and
the MaxBackupIndex value to increase the number of backup files.
Installing Symantec Enterprise Reporting for Oracle
The installation process includes the following tasks:
■
Configure the environment variables for Symantec Enterprise Reporting.
■
Install the Oracle run-time client for Symantec Enterprise Reporting.
■
Install the Apache HTTP Web server for Symantec Enterprise Reporting.
■
Install Symantec Enterprise Reporting for Oracle.
■
Configure the installed Apache HTTP Web server for LDAP authentication.
Configure the environment variables for Symantec Enterprise Reporting
Environment variables provide critical information during the installation of
Symantec Enterprise Reporting.
To configure the environment variables for Symantec Enterprise Reporting
◆
On the computer on which you are installing Symantec Enterprise
Reporting, ensure that the owner has set up the following environment
variables:
Table 3-2
New environment variables
Variable name
Description
ORACLE_HOME
The full path name to the directory that contains the
database client software or the entire database installation.
TNS_ADMIN
The path name to the tns files including tnsnames.ora. This
file calls the Oracle database to determine the required server
connections.
LD_LIBRARY_PATH
The path name to the directory that contains the Oracle
library files.
NLS_LANG
The setting that provides support for multilingual databases.
Its three components are language, territory, and character
set. Ensure that the character set is UTF8, UTF16,
AL32UTF8, or 16UTF16.
83
84 Installing Symantec ESM Reporting
Installing Symantec ESM Reporting
Table 3-2
New environment variables
Variable name
Description
JAVA_HOME
The path name to the directory that contains Java 1.3.1_07.
Install the Oracle run-time client for Symantec Enterprise Reporting
Symantec does not provide an Oracle run-time client for the Symantec
Enterprise Reporting database.
To install the Oracle run-time client for the Symantec Enterprise Reporting
database
1
On the computer on which you are installing Symantec Enterprise
Reporting, access the Oracle installation CD, and then perform an Oracle 9i
client installation.
2
Click Runtime, and then click Next.
3
Click Install, and then click Next.
To configure and test the Oracle run-time client for the Symantec ESM
Reporting data base
1
On the computer on which you are installing Symantec Enterprise
Reporting, run Net Manager.
2
Click Service Naming.
3
Click Create.
4
In the Service name text box, type ESM, and then click Next.
5
In the Select a communications protocol, click TCP/IP and then click Next.
6
Type the name of the database computer, and then click Next.
7
In the service name text box, type sid, and then click Next.
8
In the Test Connection dialog box, on the Connections tab, do the following
tasks:
9
■
In the User ID text box, type ESM_REPORT_USER
■
In the Password text box, type the ESM_REPORT_USER password.
■
Click Test Connection.
In the Test Connection dialog box, on the Results tab, verify that the CLI
connection was successful.
10 Exit from the Net Configuration Manager.
Installing Symantec ESM Reporting
Installing Symantec ESM Reporting
Install the Apache HTTP Web server for Symantec Enterprise Reporting
Symantec does not provide a Web server for Symantec Enterprise Reporting.
You can download the latest Web server binary from the Apache HTTP Server
Web site at http://httpd.apache.org/download.cgi.
Note: The Apache HTTP Web server uses port 80 by default. If the computer on
which you are installing the Apache Web server is already using port 80 for
another application, you must manually change the Apache HTTP Web server to
use a different port number. For example, port 8000 or port 8080.
To install the Apache HTTP server for Symantec Enterprise Reporting
◆
See “To install the Apache HTTP Web server for Symantec Enterprise
Reporting” on page 56.
To configure the Apache HTTP server for Symantec Enterprise Reporting
1
On the computer on which you installed the Apache HTTP server, use a text
editor to open the ../apache group/apache2/conf/httpd.conf file.
2
In the ScriptAlias section, find the following line of text:
ScriptAlias /cgi-bin/ “/usr/local/apache group/apache2/cgi-bin/”
3
Immediately below this line, type the following two lines of text:
ScriptAlias ../Enterprise_Reporting/cgi-bin/ “/opt/Symantec/
Enterprise_Reporting/cgi-bin/”
ScriptAlias ../Enterprise_Reporting/cgi-bin “/opt/Symantec/
Enterprise_Reporting/cgi-bin”
85
86 Installing Symantec ESM Reporting
Installing Symantec ESM Reporting
4
At the end of the httpd.conf file, type the following lines of text:
<Directory “/opt/Symantec/Enterprise_Reporting/cgi-bin/”>
Options Indexes FollowSymlinks
AllowOverride None
Order allow,deny
Allow from all
</Directory>
Alias /Enterprise_Reporting/help/ “/opt/Symantec/
Enterprise_Reporting/webcontent/documentation/”
<Directory
“/opt/Symantec/Enterprise_Reporting/webcontent/documentation/”>
Options Indexes FollowSymlinks
AllowOverride None
Order allow,deny
Allow from all
</Directory>
Alias /Enterprise_Reporting/ “/opt/Symantec/
Enterprise_Reporting/webcontent/”
Alias /Enterprise_Reporting “/opt/Symantec/
Enterprise_Reporting/webcontent”
<Directory “/opt/Symantec/Enterprise_Reporting/webcontent/”>
Options Indexes FollowSymlinks
AllowOverride None
Order allow,deny
Allow from all
</Directory>
5
Save the updated httpd.conf file.
6
Stop the Apache2 daemon.
7
Start the Apache2 daemon.
Install Symantec Enterprise Reporting for Oracle
See “About the Symantec Enterprise Reporting installer” on page 25.
To install Symantec Enterprise Reporting
Note: Symantec ESM Reporting file names use Rock Ridge Extensions.
See “System requirements” on page 29.
1
On the computer on which you are installing Symantec Enterprise
Reporting, access the Symantec ESM Reporting Solaris CD. At the system
command prompt, type setup.sh
Installing Symantec ESM Reporting
Installing Symantec ESM Reporting
2
On the Symantec Enterprise Security Manager (ESM) 6.1 Reporting CD
panel, in the left pane, click Symantec Enterprise Reporting.
3
In the right pane, do the following tasks:
■
Review the information.
■
Complete the installation prerequisites.
■
Click Execute the Symantec Enterprise Reporting Installer
4
On the Introduction panel, click Next.
5
On the License Agreement panel, click I accept the terms of the License
Agreement, and then click Next.
6
On the Installation Location panel, do one of the following tasks:
■
To select the default location, click Next.
■
To select another location, click Choose.
In the Browse for Folder dialog box, select the desired location, click
OK, and then click Next.
7
On the Choose Install Set panel, specify the default components, and then
click Next.
8
On the Shortcut Folder panel, do the following tasks:
9
■
Specify the default program folder.
■
Check the Make the shortcuts visible check box if you want the users to
see the shortcuts.
Click Next.
10 On the Choose Database Type panel, click Oracle, and then click Next.
11 On the Choose JDBC Driver panel, do one of the following tasks:
■
To select a JDBC Driver, select the desired driver in the list, and then
click Next.
■
To select another JDBC Driver, click Choose other.
In the Please Select Your JDBC Driver dialog box, select the JDBC
Driver, and then click Open.
12 On the Installation Summary panel, click Install.
Note: On Solaris computers, the free disk space requirements for Symantec
Enterprise Reporting do not change when you select different components.
After clicking Install, you cannot cancel the installation.
87
88 Installing Symantec ESM Reporting
Installing Symantec ESM Reporting
To finish installing Symantec Enterprise Reporting
◆
On the Install Complete panel, confirm that the Start Enterprise Reporting
Configuration check box is checked, and then click Done.
To configure the Symantec Enterprise Reporting database
1
In the left pane, under Data Access, right-click Content Store, and then click
Delete.
2
In the left pane, under Data Access, right-click Content Manager, and then
click New resource > Database.
3
In the New resource - Database dialog box, do the following tasks:
■
In the Name text box, type SER.
■
In the Type list box, click Oracle database.
4
Click OK.
5
In the right pane, SER - Database - Resource Properties, click the Value text
box for the User ID and password, and then click the pencil icon to the right
of the Value text box.
6
In the Enter the user ID and password dialog box, do the following tasks:
■
In the User ID text box, type ESM_CM_USER.
■
In the Password text box, type the password of the ESM_CM_USER
account.
■
In the Confirm password text box, type the password of the
ESM_CM_USER account.
7
Click OK.
8
In the right pane, SER - Database - Resource Properties, in the Value text box
for the Database name, type SER
9
Click the Save configuration icon on the toolbar.
10 Click Close.
11 Click the Start icon on the toolbar.
12 Click Close.
13 Exit the Enterprise Reporting Configuration utility.
To start the ReportNet Service for Symantec Enterprise Reporting
1
On the computer on which you installed Symantec Enterprise Reporting, at
the system command prompt, change to the /opt/Symantec/
Enterprise_Reporting/bin directory.
2
Type crnctl.sh start
Installing Symantec ESM Reporting
Installing Symantec ESM Reporting
Configure the installed Apache HTTP Web server for LDAP authentication
If you are using LDAP to authenticate users for Symantec Enterprise Reporting,
you must manually configure the LDAP server for Symantec Enterprise
Reporting.
To configure the installed Apache HTTP Web server for LDAP authentication
Note: If you are using LDAP to authenticate users for Symantec Enterprise
Reporting, you must manually configure the LDAP server for Symantec
Enterprise Reporting.
1
On the computer on which you installed the Apache HTTP server, use a text
editor to open the .../apache group/apache2/conf/httpd.conf file.
2
In the ScriptAlias section, find the following line of text:
ScriptAlias .. /Enterprise_Reporting/cgi-bin “/opt/Symantec/
Enterprise_Reporting/cgi-bin”
3
Immediately below this line, type the following two lines of text:
Alias ../Enterprise_Reporting “/opt/Symantec/
Enterprise_Reporting/webcontent”
Alias .. /Enterprise_Reporting/help “/opt/Symantec/
Enterprise_Reporting/webcontent/documentation”
4
At the end of the httpd.conf file, type the following lines of text:
<Directory “/opt/Symantec/Enterprise_Reporting/webcontent/”>
Options Indexes MultiViews
</Directory>
To enable LDAP name space authentication for Symantec Enterprise
Reporting
Note: If you are using LDAP to authenticate users for Symantec Enterprise
Reporting, you must manually configure the LDAP server for Symantec
Enterprise Reporting.
◆
See “To enable LDAP name space authentication for Symantec Enterprise
Reporting” on page 59.
Install the Symantec ESM Reporting Reports Package for
Oracle
The installation process includes the following task:
■
Install and test the Symantec ESM Reporting Reports Package for Oracle.
89
90 Installing Symantec ESM Reporting
Installing Symantec ESM Reporting
Install and test the Symantec ESM Reporting Reports Package for Oracle
See “About the Reports Package installer” on page 26.
To install the Symantec ESM Reporting Reports Package for Oracle
◆
On the computer on which you installed the Symantec Enterprise Reporting
Content Manager, install the Symantec ESM Reporting Reports Package.
The process is the same as installing the Symantec ESM Reporting Reports
Package for IBM DB2 except for the following change:
On the Database Type panel, click Oracle, and then click Next.
See “To install the Symantec ESM Reporting Reports Package for IBM DB2”
on page 60.
To test the Symantec ESM Reporting Reports Package
See “To test the Symantec ESM Reporting Reports Package” on page 61.
Silently installing the Symantec ESM Reporting Database Link
You can silently install the Symantec ESM Reporting Database Link on a
computer that has a Windows or UNIX operating system. You must run the
silent installation program from the command prompt on the host computer.
Note: If you perform a custom installation of the ESM database, use the database
name that you assign instead of the default database name in the response file
when silently installing the Symantec ESM Reporting Database Link.
The installation program uses a response file to provide necessary information.
On the Symantec Enterprise Security Manager (ESM) 6.1 Reporting CD for each
operating system, see the sample SilentInstallExample.properties file in the
database_link directory.
You can use any text editor to set the values of the variables in the properties
file. The values must correspond to the settings for your host computers and
database server:
■
Set the values of the variables using the syntax: <variable name>=<value>.
Do not put a space before or after the equal sign.
■
Precede the backslash characters that are commonly found in the file paths
on Microsoft Windows with another backslash.
■
Do not change the names of any variables except when you are connecting
the Reporting Database Link to multiple managers. You can specify multiple
managers by having each manager use the next higher number than the
previous manager in its variable names.
Installing Symantec ESM Reporting
Installing Symantec ESM Reporting
■
Do not delete any variables in the file. Leave the value blank if you do not
want it set.
Table 3-3 lists the valid values that you can set for the variables in the properties
file.
Table 3-3
Properties file values
Variable name
Valid values
Syntax
INSTALLER_UI
Silent: Do not change this
value.
INSTALLER_UI=silent
CHOSEN_INSTALL_
SET
Initial: Installs the Reporting
Database Link on a host
computer for the first time.
CHOSEN_INSTALL_SET=Initial
Update: Changes the
manager credentials,
database, or database
credentials for the installed
Reporting Database Link.
USER_INSTALL_DIR
Set to the directory where
you want the Reporting
Database Link to install.
Windows example:
USER_INSTALL_DIR=
c:\\Program Files\\Symantec\\
ESM Reporting Database Link
UNIX example:
USER_INSTALL_DIR=/opt/
Symantec/
Reporting_Database_Link
DB2
ORACLE
SQL_SERVER
CUSTOM_DB
Set the variable to 1 for the
type of database where you
want the Reporting Database
Link to send data. Set the
other variables to 0.
DB2 example:
DB2=1
ORACLE=0
SQL_SERVER=0
CUSTOM_DB=0
91
92 Installing Symantec ESM Reporting
Installing Symantec ESM Reporting
Table 3-3
Properties file values
Variable name
Valid values
Syntax
JDBC_DRIVER
JDBC_CLASSPATH
JDBC_LIBRARY_PATH
Information about the JDBC
driver to use. The defaults
include:
DB2 8.1 example:
■
DB2 8.1
JDBC_DRIVER=
COM.ibm.db2.jdbc.app.
DB2Driver
JDBC_CLASSPATH=
C:\\Program Files\\
IBM\\SQLLIB\\ java\\
db2java.zip;C:\\
Program Files\\IBM\\
SQLLIB\\ java\\
db2jcc.jar
JDBC_LIBRARY_PATH=
C:\\Program Files\\
IBM\\SQLLIB\\BIN
■
DB2 7.2
JDBC_DRIVER=
COM.ibm.db2.jdbc.app.
DB2Driver
JDBC_CLASSPATH=
C:\\Program Files\\
SQLLIB\\ java12\\
db2java.zip
JDBC_LIBRARY_PATH=
C:\\Program Files\\
SQLLIB\\BIN
■
ORACLE 9i
JDBC_DRIVER=oracle.
jdbc.driver.OracleDriver
JDBC_CLASSPATH=
<ORA_HOME>/jdbc/lib/
ojdbc14.jar
JDBC_LIBRARY_PATH=
SQL SERVER 2000
(Microsoft JDBC Driver)
JDBC_DRIVER=COM.ibm.db2.
jdbc.app.DB2Driver
JDBC_CLASSPATH=
C:\\Program Files\\
IBM\\SQLLIB\\ java\\
db2java.zip;C:\\
Program Files\\IBM\\
SQLLIB\\ java\\db2jcc.jar
JDBC_LIBRARY_PATH=C:\\
Program Files\\IBM\\SQLLIB\\
BIN
Installing Symantec ESM Reporting
Installing Symantec ESM Reporting
Table 3-3
Properties file values
Variable name
Valid values
Syntax
JDBC_DRIVER
JDBC_CLASSPATH
JDBC_LIBRARY_PATH
■
SQL_DIALECT
The SQL_DIALECT is used to DB2 example:
SQL_DIALECT=net.sf.hibernate.
customize the Reporting
Database Link for the specific dialect.DB2Dialect
SQL syntax that is used by
each database. If this variable
is left blank, the Reporting
Database Link will attempt to
determine the correct dialect
to use.
SQL SERVER 2000
JDBC_DRIVER=
com.microsoft.jdbc.
sqlserver.
SQLServerDriver
JDBC_CLASSPATH=C:\\
Program Files\\
Microsoft SQL Server
2000 Driver for
JDBC\\lib\\msbase.jar;
C:\\Program Files\\
Microsoft SQL Server
2000 Driver for
JDBC\\lib\\mssqlserver.
jar;C:\\Program Files\\
Microsoft SQL Server
2000 Driver for JDBC\\
lib\\msutil.jar
JDBC_LIBRARY_PATH=
For the three supported
databases, the correct
dialects are:
DB2: net.sf.hibernate.dialect.
DB2Dialect
ORACLE: net.sf.hibernate.
dialect.Oracle9Dialect
SQL SERVER 2000: net.sf.
hibernate.dialect.
SQLServerDialect
93
94 Installing Symantec ESM Reporting
Installing Symantec ESM Reporting
Table 3-3
Properties file values
Variable name
Valid values
Syntax
DB_URL
Connection information for
the database. URL formats
are normally:
DB2 8.1 example:
DB_URL=jdbc:db2:ESM
■
DB2 7.2 or 8.1
jdbc:db2:<db_name>
■
ORACLE 9i
jdbc:oracle:thin:@
<host>:<port>:
<db_name>
■
SQL SERVER 2000
(Microsoft JDBC Driver)
jdbc:microsoft:sqlserver://
<host>[:<port>]
[\\<instance_name>];
SelectMethod=Cursor;
DatabaseName=<db_name>
where '\\<instance_name>'
may be omitted for the
default instance and ':<port>'
may be omitted for the
default port
DB_USER
DB_PASSWORD
Provide the user name and
password of a database user
account with insert, update,
and delete rights to all of the
ESM tables in the database.
The user account must also
have select rights to all ESM
views in the database.
DB_USER=ESM_DB_LINK_
USER
DB_PASSWORD= <password>
Installing Symantec ESM Reporting
Installing Symantec ESM Reporting
Table 3-3
Properties file values
Variable name
Valid values
Syntax
ESM_CONNECTION_
MANAGER_COUNT
ESM_HOST_1
ESM_PORT_1
ESM_USER_1
ESM_PASSWORD_1
Specify multiple managers by
having each manager use the
next higher number than the
previous manager in its
variable names.
For example, connecting the
Reporting Database Link to two
managers:
You must provide the
manager system name
(resolvable by DNS) and the
port number. The Reporting
Database Link uses the same
port number as the ESM
console to connect to the
manager. The default port
number is 5600.
ESM_CONNECTION_
MANAGER_COUNT=2
ESM_HOST_1=computer1
ESM_PORT_1=5600
ESM_USER_1=user1
ESM_PASSWORD_1=password1
ESM_HOST_2=computer2
ESM_PORT_2=5600
ESM_USER_2=user2
ESM_PASSWORD_2=password2
You must also provide the
user name and password of a
manager user account with
Manage user rights and read
access rights to all domains
and policies.
If you wanted to specify a
second manager, you must
provide the connection
information for that
manager. You can continue to
add managers by
incrementing the number
each time, and setting the
ESM_CONNECTION_MANAG
ER_COUNT to the total
number of managers.
Warning: For the USER_INSTALL_DIR value, if you specify the \\ESM directory,
uninstalling Symantec ESM will remove the Symantec ESM Reporting Database
Link.
On HP-UX computers, the uninstaller does not uninstall the jre folder and its
contents if you install the Symantec ESM Reporting Database Link to a location
other than the default directory and then uninstall the Symantec ESM
Reporting Database Link.
95
96 Installing Symantec ESM Reporting
Installing Symantec ESM Reporting
For the ESM_HOST_1 value, do not connect two Symantec ESM Reporting
Database Links to the same Symantec ESM Manager and database. The database
link log will report primary key failures.
If you specify connections to several Symantec ESM Managers during the
installation of a Symantec ESM Reporting Database Link, a race condition may
cause some ESM database errors during the initial transfer of data. You can
correct the errors by stopping and restarting the Symantec ESM Reporting
Database Link.
See “Checking the Symantec ESM Reporting Database Link log for errors” on
page 101.
Performing a silent Symantec ESM Reporting Database Link installation
After you change the values in SilentInstallExample.properties file, you can run
the silent Database Link installer.
To change the sample properties file
1
Open a text editor.
2
Access the Symantec Enterprise Security Manager (ESM) 6.1 Reporting CD.
3
Change to the database_link directory.
4
Copy the properties file in the database_link directory.
■
For only Windows installations, copy the properties file to a temporary
folder.
■
For only UNIX installations, copy the properties file to a tmp directory.
5
Open the properties file.
6
Change the values in the properties file to correspond to the settings for
your host computer and database server.
See Table 3-3, “Properties file values,” on page 91.
7
Save the modified properties file.
To perform a silent Symantec ESM Reporting Database Link installation on
Windows
1
At the system command prompt, change to the temporary folder containing
the modified properties file.
2
Type install -f <path to the modified properties file>
Installing Symantec ESM Reporting
Post-installation tasks
To perform a silent Symantec ESM Reporting Database Link installation on
UNIX
1
At the system command prompt, change to the tmp directory containing the
modified properties file.
2
Type install.sh
To check the status of the installation
◆
See “To check the Database Link installation log” on page 100.
Post-installation tasks
Symantec ESM Reporting post-installation tasks include:
■
Changing the Symantec ESM Reporting Database Link
■
Stopping and restarting the Symantec ESM Reporting Database Link on
UNIX
■
Configuring Symantec Enterprise Reporting
■
Configuring the Apache HTTP Web server
■
Checking the installation logs for errors or warnings
■
Restoring database performance
■
Uninstalling the Symantec ESM Reporting Database Foundation
■
Uninstalling the Symantec ESM Reporting Database Link
■
Uninstalling Symantec Enterprise Reporting
■
Uninstalling the Symantec ESM Reporting Reports Package
Changing the Symantec ESM Reporting Database Link
If you add or delete a Symantec ESM Manager or make another change to an
installed Symantec ESM Reporting Database Link, you must use the installation
CD to run the Database Link installer on the host computer and type the new
configuration information.
On Windows computers, after the Database Link installer finishes, confirm that
the Symantec ESM Reporting Database Link service has started.
To start the Symantec ESM Reporting Database Link service
1
On the host computer, access the services list.
2
If the Symantec ESM Reporting Database Link service does not have a
status of Started, start the service.
97
98 Installing Symantec ESM Reporting
Post-installation tasks
Stopping and restarting the Symantec ESM Reporting Database Link
on UNIX
On UNIX computers, you must use the ReportingDatabaseLink script to stop and
restart the Symantec ESM Reporting Database Link process.
To stop the Symantec ESM Reporting Database Link process
1
Change to the /opt/Symantec/ESM_Reporting_Database_Link/bin directory.
2
At the system command prompt, type ReportingDatabaseLink stop
To restart the Symantec ESM Reporting Database Link process
1
Change to the /opt/Symantec/ESM_Reporting_Database_Link/bin directory.
2
At the system command prompt, type ReportingDatabaseLink start
Configuring Symantec Enterprise Reporting
After you install Symantec Enterprise Reporting, you must change some default
configuration settings to run multiple reports concurrently on different Web
browsers. Use an account that has execute permissions for the Administration
secured function.
To configure Symantec Enterprise Reporting
1
Open the Symantec Enterprise Reporting user interface.
See “Opening the user interface” on page 126.
2
On the toolbar, click Tools, and then click Server Administration.
3
Click Configure.
4
Click <http://host_computer_name:9300>.
5
In the Actions list, click Set properties - BatchReportService.
6
Click Settings.
7
In the Number of low affinity connections for the batch report service value
text box, change the value from 4 to 2.
8
Click OK.
9
In the Actions list, click Set properties - ReportService.
10 Click Settings.
11 In the Number of low affinity connections for the interactive report service
value text box, change the value from 4 to 2.
Installing Symantec ESM Reporting
Post-installation tasks
12 In the Queue time limit of report service in seconds value text box, change
the value from 30 to 300.
13 In the Maximum number of interactive report service processes, change the
value from 2 to the result of multiplying the number of processors on the
Symantec Enterprise Reporting host computer by 2.
For example, if the host computer has two processors, change the value from
2 to 4.
14 Click OK.
Configuring the Apache HTTP Web server
After you install the Apache HTTP Web server, you must change some default
configuration settings to run multiple reports concurrently on different Web
browsers.
To configure the Apache HTTP Web server
1
On the computer on which you are installing Symantec Enterprise
Reporting, use a text editor to open the C:\Program Files\
Apache Group\Apache2\conf\httpd.conf file.
2
Under MaxKeepAliveRequests, type 1000.
3
Under the KeepAliveTimeout, type 300.
4
Stop and then restart the Apache2 service.
Checking the installation logs for errors or warnings
Each installer creates a separate installation log. Some installers create more
than one installation log.
Check the installation logs for errors or warnings
The installation logs contain lists of messages from the installers. Some logs
contain summary tables listing the number of successes, warnings, non-fatal
errors, or fatal errors.
To check the Database Foundation installation log
1
On the computer on which you installed the Symantec ESM Reporting
Database Foundation, open a text editor.
99
100 Installing Symantec ESM Reporting
Post-installation tasks
2
Do one of the following tasks:
■
On Windows computers, browse to the
C:\Documents and Settings\Administrator\Local Settings\temp folder.
■
On UNIX computers, change to the /tmp directory.
3
Open the Symantec_ESM_Reporting_Database_Foundation_InstallLog.log
file and check for any warnings or errors.
4
If you used the Database Foundation installer to create the ESM database,
open the Symantec_ESM_Reporting_DB_Creation.log file and check for any
warnings or errors.
5
If you used the Database Foundation installer to create the SER database,
open the Symantec_Enterprise_Reporting_DB_Creation.log file and check
for any warnings or errors.
To check the Database Link installation log
1
On the computer on which you installed the Symantec ESM Reporting
Database Link, open a text editor.
2
Do one of the following tasks:
3
■
On Windows computers, browse to the
C:\Program Files\Symantec\ESM Reporting Database Link folder.
■
On UNIX computers, change to the /opt/Symantec/ESM/
Reporting_Database_Link directory.
Open the Symantec_ESM_Reporting_Database_Link_InstallLog.log file and
check for any warnings or errors.
To check the Symantec Enterprise Reporting installation log
1
On the computer on which you installed Symantec Enterprise Reporting,
open a text editor.
2
Do one of the following tasks:
■
On Windows computers, browse to the
C:\Program Files\Symantec\Enterprise_Reporting\instlog folder.
■
On UNIX computers, change to the /opt/
Symantec Enterprise_Reporting/instlog directory.
3
Open the tl-CRN<build ID number>.txt file and check for any warnings or
errors.
4
Open the tl-CRN<build ID number>-summary error.txt file and check for
any warnings or errors.
Installing Symantec ESM Reporting
Post-installation tasks
To check the Reports Package installation log
1
On the computer on which you installed the Symantec ESM Reporting
Reports Package, open a text editor.
2
Do one of the following tasks:
3
■
On Windows computers, browse to the
C:\Documents and Settings\Administrator\Local Settings\temp folder.
■
On UNIX computers, change to the /tmp directory.
Open the Symantec_ESM_Reports_Package_InstallLog.log file and check for
any warnings or errors.
Checking the Symantec ESM Reporting Database Link log for errors
If you specify connections to several Symantec ESM Managers during the
installation of a Symantec ESM Reporting Database Link, a race condition may
cause some ESM database errors during the initial transfer of data. You can
correct the errors by stopping and restarting the Symantec ESM Reporting
Database Link.
To check the Database Link log for errors
1
On the computer on which you installed the Symantec ESM Reporting
Database Link, open a text editor.
2
Do one of the following tasks:
■
On Windows computers, browse to the
C:\Program Files\Symantec\ESM Reporting Database Link\logs folder.
■
On UNIX computers, change to the
/opt/Symantec/ESM Reporting Database Link/logs directory.
3
Check the file for messages containing the text, “duplicate rows for
columns.”
4
If you find these error messages in the log, you must do one of the following
tasks to stop and restart the Symantec ESM Reporting Database Link:
■
On Windows computers, use Windows Services to stop and restart the
Symantec ESM Reporting Database Link.
■
On UNIX computers, see “Stopping and restarting the Symantec ESM
Reporting Database Link on UNIX” on page 98. ‘
101
102 Installing Symantec ESM Reporting
Post-installation tasks
Restoring database performance
Loading large volumes of data into a database can cause database performance
problems.
Restore database performance on Windows using IBM DB2
Symantec provides two scripts that you can use to restore database
performance. The REORG.cmd script reorders the data for more efficient access.
The RUNSTATS.cmd script gathers statistics for the schema. You must run the
REORG.cmd script before running the RUNSTATS.cmd script.
You should run the RUNSTATS script at five to ten minute intervals and run the
REORG script at least hourly while the Symantec ESM Reporting Database Links
load the ESM database. After this initial start up period, you can run the scripts
on a weekly basis or whenever database performance slows down.
You must copy the RUNSTATS and REORG scripts to a physical disk drive on
your computer.
To copy the REORG.cmd script and RUNSTATS.cmd script
1
At the IBM DB2 command prompt, access the Symantec ESM Reporting
installation CD for Windows.
2
Do one of the following:
3
■
For IBM DB2 v8.1, change to the SQL\DB2\createESMdb folder.
■
For IBM DB2 v7.2, change to the SQL\DB2\createESMdb\db2_72 folder.
Copy the REORG.cmd and RUNSTATS.cmd scripts to a path on the database
server computer.
To run the REORG.cmd script
◆
At the IBM DB2 command prompt, type reorg.
To run the RUNSTATS.cmd script
◆
At the IBM DB2 command prompt, type runstats.
Restore database performance on Solaris using Oracle
You can use a SQL Plus command to restore database performance. The
command gathers statistics for the schema. You should run the command at
hourly intervals while the Symantec ESM Reporting Database Links load the
ESM database. After this initial start up period, you can run the command on a
nightly basis or whenever database performance slows down.
Installing Symantec ESM Reporting
Post-installation tasks
To run the SQL Plus command
◆
At the SQL Plus command prompt, type
execute dbms_stats.gather_schema_stats <‘ESMDB10’,
dbms_stats.auto_sample_size>, cascade => true);
Uninstalling the Symantec ESM Reporting Database Foundation
This is a database maintenance function. You must drop the ESM and SER
databases to uninstall the Symantec ESM Reporting Database Foundation.
Uninstalling the Symantec ESM Reporting Database Link
The Symantec ESM Reporting Database Link uninstaller removes only the
Symantec ESM Reporting Database Link from the host computer. If you silently
installed the Symantec ESM Reporting Database Link, the uninstaller will
silently remove the Symantec ESM Reporting Database Link.
Note: On an HP-UX computer using an Oracle database, the Symantec ESM
Reporting Database Link uninstaller cannot remove the default Symantec ESM
Reporting Database Link installation directory or the JRE directory with its bin
and lib directories. You must manually remove these directories after the
uninstaller finishes.
Uninstall the Symantec ESM Reporting Database Link
Uninstalling the Symantec ESM Reporting Database Link consists of the
following tasks:
■
Starting the Symantec ESM Reporting Database Link uninstaller on
Windows or UNIX computers.
■
Uninstalling the Symantec ESM Reporting Database Link.
To start the Symantec ESM Reporting Database Link uninstaller on a
Windows computer
1
Click Start > Settings > Control Panel.
2
Double-click Add/Remove Programs.
3
Click Symantec ESM Reporting Database Link
4
Click Change/Remove.
103
104 Installing Symantec ESM Reporting
Post-installation tasks
To start the Symantec ESM Reporting Database Link uninstaller on a UNIX
computer
1
At the system command line, change to the /opt/Symantec/ESM/
Reporting_Database_Link/
Uninstall Symantec ESM Reporting Database Link directory.
2
Type ./Uninstall_Symantec_ESM_Reporting_Database_Link.
To uninstall the Symantec ESM Reporting Database Link
1
On the Introduction panel, click Uninstall.
2
On the Uninstall Complete panel, do one of the following tasks:
■
For UNIX computers, click Done.
■
For Windows computers, click Yes, restart my system, and then click
Done.
Uninstalling Symantec Enterprise Reporting
Symantec Enterprise Reporting uninstaller removes Symantec Enterprise
Reporting and the Symantec ESM Reporting Report Package from the host
computer.
Uninstall Symantec Enterprise Reporting
Uninstalling Symantec Enterprise Reporting consists of the following tasks:
■
Starting the Symantec Enterprise Reporting uninstaller on Windows or
UNIX computers.
■
Uninstalling Symantec Enterprise Reporting.
To start the Symantec Enterprise Reporting uninstaller on a Windows
computer
1
Click Start > Settings > Control Panel.
2
Double-click Add/Remove Programs.
3
Click Symantec Enterprise Reporting.
4
Click Change/Remove.
To start the Symantec Enterprise Reporting uninstaller on a UNIX computer
1
At the system command line, change to the /opt/Symantec/
Enterprise_Reporting/uninstall directory.
2
Type ./Uninstall_Symantec_Enterprise_Reporting
Installing Symantec ESM Reporting
Post-installation tasks
To uninstall Symantec Enterprise Reporting
1
On the Introduction panel, click Next.
2
On the Uninstall Wizard panel, select the language that you want to use, and
then click Next.
3
In the Uninstall Wizard dialog box, click Yes.
4
On the Uninstall Complete panel, click Done.
Uninstalling the Symantec ESM Reporting Reports Package
Uninstalling Symantec Enterprise Reporting also uninstalls the Symantec ESM
Reporting Reports Package.
105
106 Installing Symantec ESM Reporting
Post-installation tasks
Chapter
4
Securing Symantec ESM
Reporting
This chapter includes the following topics:
■
About security considerations
■
About user account permissions
■
About auditing in Symantec ESM Reporting
About security considerations
The reports that Symantec ESM Reporting generates contain sensitive
information regarding computers in your network. This information could be
used by an attacker to compromise your network.
The Symantec ESM Reporting database holds the data for your network,
including computer names, account names for your Symantec ESM user
accounts and your Symantec Enterprise Reporting user accounts, specific
security violations for computers in your network, and other data.
You can improve the security of your sensitive data by considering the following
points:
■
Authentication to Symantec Enterprise Reporting
■
JDBC communications between components of Symantec ESM Reporting
■
Communications between computers where you installed components of
Symantec ESM reporting (if you did a distributed installation)
■
Communications between the Web server and Web browsers
■
Email security
■
Backups and backup security
108 Securing Symantec ESM Reporting
About security considerations
■
Log files
■
Network security
■
Web browser security
■
Enabling Symantec Enterprise Reporting auditing
Note: Communications between Symantec ESM and the Symantec Enterprise
Reporting Database Link are inherently secure.
Securing JDBC driver communications
The Symantec ESM Reporting Database Link and the Java content store
components of Symantec Enterprise Reporting use JDBC communications to
communicate with the Symantec ESM database. The net and app drivers in the
run-time clients for IBM DB2, MS-SQL, and Oracle databases can send user
names, passwords, and other sensitive information in clear text form across
your network via these JDBC connections.
See “Planning for the Symantec ESM Reporting Database Link” on page 27
“Planning for Symantec Enterprise Reporting” on page 27.
To secure the JDBC Driver connections, use encrypted third-party JDBC drivers.
Securing communications between Symantec Enterprise Reporting
components
Symantec Enterprise Reporting uses several components that can be installed
on separate computers. If you do a distributed installation of these components,
the communications between them may not be secure. The components of
Symantec Enterprise Reporting are as follows:
■
Report Server - The report engine that renders reports.
■
Gateway - The component that installs on the Web server computer.
■
Content Manager - The component that communicates with the Symantec
Enterprise Reporting database.
■
Web Server - The component that hosts Symantec Enterprise Reporting.
See “About the Symantec Enterprise Reporting installer” on page 25 for more
information about these components.
To secure these communications, place computers behind a firewall.
Securing Symantec ESM Reporting
About security considerations
If your computers are in a physically secure location, you can isolate these
connections by setting up a dual-homed host through a physically secure
segment of the network. The connection can pass sensitive information in clear
text but unauthorized personnel cannot access it.
Securing saved reports
When you save reports to your computer, the file permissions may allow others
to access and view the report. You may need to take additional steps to ensure
that your reports are secure.
To secure saved reports
◆
Do one or more of the following:
■
Using your operating system, modify the file permissions to allow
access to the report to only authorized individuals.
■
Encrypt the report files.
About printing reports
Connections to network printers may not be secure. Use Parallel port or USB
printers where possible.
Securing email
Symantec Enterprise Reporting incorporates an option to email reports directly
from the Symantec Enterprise Reporting interface. This function sends email
insecurely, and can be intercepted and read by an unintended recipient.
You may be able to use this function if you are sending email to a recipient
within your network and you know that the email will not be sent to a server
outside of your protected network. However, if the email travels outside of your
network, the communications could be intercepted, or the email could be
retrieved from a store-and-forward email server (where email can be stored even
after it is sent to the intended recipient).
To email a report securely
1
Save the report to your computer.
See “Exporting report information” on page 134.
This procedure also involves some safety considerations.
See “Securing saved reports” on page 109.
109
110 Securing Symantec ESM Reporting
About user account permissions
2
Do one of the following:
■
Add the report as an attachment, then use your email tool to encrypt
the entire email before you send it to the recipient.
■
Encrypt the file then add the file to your email as an attachment.
About backups
The information in the Symantec Enterprise Reporting database can be critical
to an organization. Consider backing up this database. However, if you backup
the database, keep in mind the following points:
■
Communications between your database and your network backup solution
may not be secure. Use Symantec Client VPN to secure this connection.
■
Keep backup storage media secure by protecting it from physical
compromise.
About HTTP Web server security
The default settings of Symantec Enterprise Reporting use http as the Web
protocol. To secure your Web server, you should configure it to use https or
another secure protocol.
Many commercial Web servers are preconfigured to use https or another secure
protocol. Consult your vendor documentation for information on configuring
and using these protocols.
If your Web server does not come configured to use SSL, instructions for
obtaining SSL and configuring to work with your Web server are readily
available on the Internet.
About user account permissions
You can update Symantec ESM Reporting user permissions at any time. These
user permissions can be entered manually using SQL commands, or can be
synchronized to implement Symantec ESM user account permissions user
rights match in Symantec ESM Reporting. Additional SQL commands are
necessary to implement this synchronization feature.
For users that do not have ESM accounts, you can add user permissions for
LDAP or NTLM accounts, and assign appropriate permissions by mapping the
LDAP or NTLM to a Symantec ESM account.
See “Assigning user account permissions using the Symantec ESM Reporting
Database Link” on page 115.
Securing Symantec ESM Reporting
About user account permissions
Table 4-1 displays and explains the four database tables that hold permissions
for Symantec ESM Reporting.
In addition to these permission settings, you can use Symantec Enterprise
Reporting to control user rights when generating, adding, editing, or deleting
reports. See the Administration and Security Guide for information on access
permissions. You can find this guide on the CD in the Docs\Symantec Enterprise
Reporting directory.
Table 4-1
Symantec ESM Reporting permissions tables
Table name
Description
RPT_ALL_MGR_PERM
Has rights to view all data, and overrides permissions in all
other tables. This table is never updated with the
Symantec ESM Reporting Database Link.
See “Manually assigning user account permissions using
SQL commands” on page 116.
RPT_MANAGER_PERM
Provides view of individual managers, and the policies and
domains that are associated with the managers.
RPT_POLICY_PERM
Contains data for specific policies.
RPT_DOMAIN_PERM
Contains data for specific domains.
ACCOUNT_MAPPING
Holds the accounts that are synchronized via the
Symantec Enterprise Reporting Database Link
Table 4-2
RPT_ALL_MGR_PERM database table fields
Field name
Description
USER_NAME
Holds the user name. User names appearing in this field
have access to the specified data on all managers.
VIEW_ALL_DOMAINS
Holds a boolean value. A 1 in this field indicates that the
associated user can view data for all domains on all
managers. A 0 in this field indicates that the user cannot
view all domains, however, you can put data into the other
tables to give users rights to specific domains.
VIEW_ALL_POLICIES
Holds a boolean value. A 1 in this field indicates that the
associated user can view data for all policies on all
managers. A 0 in this field indicates that the user cannot
view all policies, however, you can put data into the other
tables to give users rights to specific policies.
111
112 Securing Symantec ESM Reporting
About user account permissions
Table 4-2
RPT_ALL_MGR_PERM database table fields
Field name
Description
VIEW _ESM_ACCOUNTS
Holds a boolean value. A 1 in this field indicates that the
associated user can view data for all Symantec ESM user
accounts on all managers. A 0 in this field indicates that
the user cannot view all Symantec ESM user accounts,
however, you can put data into the other tables to give
users rights to specific Symantec ESM user accounts.
Table 4-3
RPT_MANAGER_PERM database table fields
Field name
Description
USER_NAME
Holds the user name.
MANAGER_ID
Holds the manager name for which the user has
permissions. This data comes from the MANAGER table.
IS_ESM ACCOUNT
Holds a boolean value that indicates whether this user
information is updated by the Symantec ESM Reporting
Data Link. Do not modify this field if it contains a boolean
one.
VIEW_ALL_DOMAINS
Holds a boolean value that indicates whether this user has
permissions to view all domains for the manager.
VIEW_ALL_POLICIES
Holds a boolean value that indicates whether this user has
permissions to view all policies for the manager.
VIEW_ESM_ACCOUNTS
Holds a boolean value that indicates whether this user has
permissions to view all Symantec ESM user accounts for
the manager.
Table 4-4
RPT_DOMAIN_PERM database table fields
Field name
Description
USER_NAME
Holds the user name.
IS_ESM ACCOUNT
Holds a boolean value that indicates whether this user
information is updated by the Symantec ESM Reporting
Data Link. Do not modify this field if it contains a boolean
one.
Securing Symantec ESM Reporting
About user account permissions
Table 4-4
RPT_DOMAIN_PERM database table fields
Field name
Description
DOMAIN_ID
Holds the domain ID for which the user has permissions.
This value comes from the ESM_DOMAIN table.
Table 4-5
RPT_POLICY_PERM database table fields
Field name
Description
USER_NAME
Holds the user name.
IS_ESM ACCOUNT
Holds a boolean value that indicates whether this user
information is updated by the Symantec ESM Reporting
Data Link. Do not modify this field if it contains a boolean
one.
POLICY_ID
Holds the policy name for which the user has permissions.
This value comes from the POLICY table.
Table 4-6
ACCOUNT_MAPPING database table fields
Field name
Description
USER_NAME
Holds the user name of the NTLM, LDAP, or other
authentication account that is used to log into Symantec
Enterprise Reporting.
ACCOUNT_ID
Holds the Symantec ESM account ID taken from the
ACCOUNT table.
See “Assigning user account permissions using the
Symantec ESM Reporting Database Link” on page 115.
113
114 Securing Symantec ESM Reporting
About user account permissions
About anonymous access and administrator accounts
If you enabled anonymous access during installation, you should disable it to
prevent unauthorized users from gaining network access.
However, you need to create an administrator account with all privileges to pre
vent loss of administration rights to your application. If you disable anonymous
access, you cannot access Symantec Enterprise Reporting until you create an
administrator account.
See “Manually assigning user account permissions using SQL commands” on
page 116.
To disable anonymous access
1
Open the ESM Reporting Configuration tool. See the Configuration User
Guide for more information on using this application.
2
In the left pane, click to Security > Authentication > Cognos.
3
In the Allow Anonymous Access field, click False.
In addition to disabling anonymous access to your Web server, in order to
enforce permissions for legitimate users, you need to delete the anonymous
access account entry in the RPT_ALL_MGR_PERM table of the database.
If you disabled anonymous access during installation, you must delete the
anonymous account rows from the database to enforce user permissions. If you
do not remove this from the database, anonymous user accounts will have
access to all data in the database.
To delete the anonymous access account information from the database
◆
Use the following SQL command:
DELETE FROM ESMDB10.RPT_ALL_MGR_PERM WHERE USER_NAME =
‘Anonymous’
Securing Symantec ESM Reporting
About user account permissions
Assigning user account permissions using the Symantec ESM
Reporting Database Link
The synchronization feature of Symantec ESM Reporting imports permissions
from Symantec ESM. To use this feature, you must map the account user names
in the USER_NAME field of the ACCOUNT table of the Symantec ESM Reporting
database to the USER_NAME field in the ACCOUNT_MAPPING table.
The USER_NAME field in the ACCOUNT_MAPPING table is the same as the
authentication user name of the user account for Symantec Enterprise
Reporting. The USER_NAME field of the ACCOUNT table is the user name for
the Symantec ESM account.
To map user names
1
Create an account for Symantec Enterprise Reporting using LDAP or
another authentication server. See vendor documentation for instructions
on creating user accounts with authentication servers.
2
Use the following SQL command as a template to map the Symantec
Enterprise Reporting name to the authentication server user name.
This SQL command would take the ESM user name of jon_smith and map it
to an authentication server user name of JON-SMITH.
INSERT INTO ESMDB10.ACCOUNT_MAPPING (USER_NAME, ACCOUNT_ID)
VALUES ('JON-SMITH', (SELECT ACCOUNT.ACCOUNT_ID FROM
ESMDB10.ACCOUNT WHERE ACCOUNT.USER_NAME = 'jon_smith'))
More than one authentication server user name may be mapped to a single
Symantec ESM user name.
To map a Symantec ESM account regardless of manager to the same
Symantec Enterprise Reporting user account
◆
Use the following SQL command as a template to map the accounts:
INSERT INTO ESMDB10.ACCOUNT_MAPPING (USER_NAME, ACCOUNT_ID)
SELECT '<Symantec Enterprise Reporting user name>', ACCOUNT_ID
FROM ESMDB10.ACCOUNT A WHERE A.USER_NAME='<Symantec ESM account
user name>'
115
116 Securing Symantec ESM Reporting
About user account permissions
To map a specific Symantec ESM account on a specific manager to the same
Symantec Enterprise Reporting user account
◆
Use the following SQL command as a template to map the accounts:
INSERT INTO ESMDB10.ACCOUNT_MAPPING ( USER_NAME, ACCOUNT_ID
) SELECT '<Symantec Enterprise Reporting user name>',
ACCOUNT_ID FROM ESMDB10.ACCOUNT A, ESMDB10.MANAGER M WHERE
A.MANAGER_ID = M.MANAGER_ID AND A.USER_NAME='<Symantec ESM
account user name>' AND M.MANAGER_NAME='<Symantec ESM Manager
name>'
Manually assigning user account permissions using SQL commands
To manually update the permissions, you need to use SQL commands. Use an
SQL application to access the Symantec ESM Reporting Database and update
your permissions.
The following examples show how to update permissions in several situations,
including:
■
Give administrator privileges
■
Give rights to specific policies and domains on all managers
■
Give rights to all policies and domains on specific managers
■
Give rights to specific policies and domains on specific managers
To create an account with administrator privileges
◆
The following set of SQL commands gives administrator privileges to an
account, including rights to all information in the Symantec ESM Reporting
Database:
SELECT * FROM ESMDB10.RPT_ALL_MGR_PERM
INSERT INTO ESMDB10.RPT_ALL_MGR_PERM VALUES ('Administrator', 1,
1, 1)
Securing Symantec ESM Reporting
About user account permissions
To create an account with rights to specific policies and domains on all
managers
◆
The following set of SQL commands gives a user named eric rights to view
specific domains (Windows 2000 Agents, and the ALL Agents domain), and
specific policies (Phase 1 and Phase 2) on all managers:
SELECT * FROM RPT_ALL_MGR_PERM
INSERT INTO ESMDB10.RPT_ALL_MGR_PERM VALUES ('eric', 0, 0, 0)
INSERT INTO ESMDB10.RPT_DOMAIN_PERM (USER_NAME, IS_ESM_ACCOUNT,
DOMAIN_ID) SELECT 'eric', 0, DOMAIN_ID FROM ESMDB10.ESM_DOMAIN
WHERE DOMAIN_NAME IN ('Windows 2000 Agents', 'All Agents')
INSERT INTO ESMDB10.RPT_POLICY_PERM (USER_NAME, IS_ESM_ACCOUNT,
POLICY_ID) SELECT 'eric', 0, POLICY_ID FROM ESMDB10.POLICY WHERE
POLICY_NAME IN ('Phase 1', 'Phase 2')
To create an account with rights to all policies and domains on specific
managers
◆
The following set of SQL commands gives a user named jeremy rights to
view all domains and policies on a specific manager (Manager_0):
INSERT INTO ESMDB10.RPT_MANAGER_PERM (USER_NAME, MANAGER_ID,
IS_ESM_ACCOUNT, VIEW_ALL_DOMAINS, VIEW_ALL_POLICIES,
VIEW_ESM_ACCOUNTS)
SELECT 'jeremy', MANAGER_ID, 0, 1, 1, 1 FROM ESMDB10.MANAGER
WHERE MANAGER_NAME IN ('Manager_0')
To create an account with rights to specific policies and domains on specific
managers
◆
Use the following sets of commands as templates to do specific actions:
■
The following set of SQL commands gives a user named alan access to
Manager_1 data, but not blanket access to all domains or policies. It
gives him access ESM user account information from Manager_1:
INSERT INTO ESMDB10.RPT_MANAGER_PERM (USER_NAME, MANAGER_ID,
IS_ESM_ACCOUNT, VIEW_ALL_DOMAINS, VIEW_ALL_POLICIES,
VIEW_ESM_ACCOUNTS)
SELECT 'alan', MANAGER_ID, 0, 0, 0, 1 FROM ESMDB10.MANAGER
WHERE MANAGER_NAME IN ('Manager_1')
117
118 Securing Symantec ESM Reporting
About user account permissions
■
The following set of SQL commands gives a user named alan access to
Manager_2 data, but not blanket access to all domains or policies. It
denies him access ESM user account information from Manager_2:
INSERT INTO ESMDB10.RPT_MANAGER_PERM (USER_NAME, MANAGER_ID,
IS_ESM_ACCOUNT, VIEW_ALL_DOMAINS, VIEW_ALL_POLICIES,
VIEW_ESM_ACCOUNTS)
SELECT 'alan', MANAGER_ID, 0, 0, 0, 0 FROM ESMDB10.MANAGER
■
The following set of SQL commands gives a user named alan access to
specific domains (All Agents, Domain_0, and Domain_1) on specific
managers (Manager_1 and Manager_2):
INSERT INTO ESMDB10.RPT_DOMAIN_PERM (USER_NAME,
IS_ESM_ACCOUNT, DOMAIN_ID)
SELECT 'alan', 0, DOMAIN_ID FROM ESMDB10.ESM_DOMAIN D,
ESMDB10.MANAGER M WHERE D.MANAGER_ID = M.MANAGER_ID AND
D.DOMAIN_NAME IN ('All Agents', 'Domain_0', 'Domain_1') AND
M.MANAGER_NAME IN ('Manager_1', 'Manager_2')
■
The following set of SQL commands gives a user named alan access to
specific policies (Policy_0 and Policy_1) on specific managers
(Manager_1 and Manager_2):
INSERT INTO ESMDB10.RPT_POLICY_PERM (USER_NAME,
IS_ESM_ACCOUNT, POLICY_ID)
SELECT 'alan', 0, POLICY_ID FROM ESMDB10.POLICY P,
ESMDB10.MANAGER M WHERE P.MANAGER_ID = M.MANAGER_ID AND
P.POLICY_NAME IN ('Policy_0', 'Policy_1') AND M.MANAGER_NAME
IN ('Manager_1', 'Manager_2')
Removing user account permissions
Personnel changes may require you to delete user accounts. The method for
deleting user accounts varies depending on whether the Symantec Reporting
Database Link is automatically updating the Symantec Enterprise Reporting
user accounts.
If the user account is being updated in this way, you can remove the user
accounts automatically when you delete the corresponding accounts in the
Symantec ESM console. If you created the account manually using SQL
commands, then the following set of SQL commands is required to delete user
accounts.
Securing Symantec ESM Reporting
About user account permissions
To delete user accounts manually
◆
Use the following sets of commands as templates to do specific actions
■
The following command removes access to specific policies (Phase 1
and Phase 2 on a specific manager (Manager_1) from a specific user
(User1):
DELETE FROM ESMDB10.RPT_POLICY_PERM WHERE USER_NAME =
'User1' AND POLICY_ID IN (SELECT POLICY_ID FROM
ESMDB10.POLICY P, ESMDB10.MANAGER M WHERE P.MANAGER_ID =
M.MANAGER_ID AND P.POLICY_NAME IN ('Phase 1', 'Phase 2') AND
M.MANAGER_NAME = 'Manager_1')
■
The following set of commands removes all access to ESM data from
specific users (User1 and User2):
DELETE FROM ESMDB10.RPT_MANAGER_PERM WHERE IS_ESM_ACCOUNT =
0 AND USER_NAME IN ('User1', 'User2')
DELETE FROM ESMDB10.RPT_DOMAIN_PERM WHERE IS_ESM_ACCOUNT = 0
AND USER_NAME IN ('User1', 'User2')
DELETE FROM ESMDB10.RPT_POLICY_PERM WHERE IS_ESM_ACCOUNT = 0
AND USER_NAME IN ('User1', 'User2')
DELETE FROM ESMDB10.RPT_ALL_MGR_PERM WHERE USER_NAME IN
('User1', 'User2')
■
The following command revokes a specific permission (view all
policies) on a specific manger (Manager1) from a user named Joe:
UPDATE ESMDB10.RPT_MANAGER_PERM SET VIEW_ALL_POLICIES = 0
WHERE USER_NAME='Joe' AND MANAGER_ID IN (SELECT MANAGER_ID
FROM ESMDB10.MANAGER WHERE MANAGER_NAME IN ('Manager1'))
Viewing current user permissions
You can use SQL commands to view the current permissions for Symantec
Enterprise Reporting users.
To view user permissions
◆
Use the following sets of commands to view user permissions:
■
Use the following command to view all domain-specific permissions:
SELECT P.USER_NAME, D.DOMAIN_NAME, M.MANAGER_NAME FROM
ESMDB10.RPT_DOMAIN_PERM P, ESMDB10.ESM_DOMAIN D,
ESMDB10.MANAGER M WHERE P.DOMAIN_ID = D.DOMAIN_ID AND
M.MANAGER_ID = D.MANAGER_ID
119
120 Securing Symantec ESM Reporting
About user account permissions
■
Use the following command to view all policy-specific permissions:
SELECT R.USER_NAME, P.POLICY_NAME, M.MANAGER_NAME FROM
ESMDB10.RPT_POLICY_PERM R, ESMDB10.POLICY P, ESMDB10.MANAGER
M WHERE R.POLICY_ID = P.POLICY_ID AND M.MANAGER_ID =
P.MANAGER_ID
■
Use the following command to view all manager-specific permissions:
select user_name, manager_name, is_esm_account,
view_all_domains, VIEW_ALL_POLICIES, VIEW_ESM_ACCOUNTS FROM
ESMDB10.RPT_MANAGER_PERM R, ESMDB10.MANAGER M WHERE
R.MANAGER_ID = M.MANAGER_ID
■
Use the following command to view all cross-manager permissions:
select * from esmdb10.rpt_all_mgr_perm
■
Use the following command to view all cross-manager permissions for
a specific user (User1):
select * from esmdb10.rpt_all_mgr_perm where user_name =
'User1'
■
Use the following command to view all domain permissions for a
specific user (User1):
select p.user_name, d.domain_name, m.manager_name from
esmdb10.rpt_domain_perm p, esmdb10.esm_domain d,
esmdb10.manager m where p.domain_id = d.domain_id and
m.manager_id = d.manager_id and p.user_name = 'User1'
Securing Symantec ESM Reporting
About auditing in Symantec ESM Reporting
About auditing in Symantec ESM Reporting
Symantec Enterprise Reporting uses several logs to let you keep track of events.
It also has a set of audit reports that display audit events. You can look at the
logs to see the events for components of Symantec Enterprise Reporting, You
can also use the logs with the reporting interface to create custom reports.
Locating logs
The following tables show you the default installation location for auditing logs
and describe the data in the logs. If you install the application in a folder other
than the default folder, the location of the logs will vary.
Table 4-7
Reporting interface logs
Log name
Location
Description
CRNServer.log
Windows: \Program Files
Records events that occur in
\Symantec\Enterprise_Reporting the Symantec Enterprise
\logs
Reporting interface.
UNIX: /opt/Symantec/
Enterprise_Reporting/logs
localhost_access_
log<date>.txt
Windows: \Program Files
Records user activity in
\Symantec\Enterprise_Reporting Symantec Enterprise
\logs
Reporting.
UNIX: /opt/Symantec/
Enterprise_Reporting/logs
tomcat.log
Windows: \Program Files
The Tomcat servlet log.
\Symantec\Enterprise_Reporting
\logs
UNIX: /opt/Symantec/
Enterprise_Reporting/logs
121
122 Securing Symantec ESM Reporting
About auditing in Symantec ESM Reporting
Table 4-8
Symantec Enterprise Reporting Database Link logs
Log name
Location
Description
Database_link.log
Windows: \Program Files\
Symantec\
Enterprise_Reporting\
Database Link\logs
Records events for the
Symantec Enterprise
Reporting Database Link.
UNIX: /opt/Symantec/
Enterprise_Reporting/
Database Link/logs
service.log
Windows: \Program Files\
Symantec\
Enterprise_Reporting\
Database Link\logs
The service control log for the
Symantec Enterprise
Reporting Database Link.
UNIX: /opt/Symantec/
Enterprise_Reporting/
Database Link/logs
Using audit reports
To use audit reports, you must set the audit log level, install the audit reports
package, and create the tables for the audit reports.
About setting the audit log
The Symantec Enterprise Reporting log can be adjusted to record events in five
levels of detail to meet your security needs. See the Administration and Security
Guide for information about the five levels of auditing. You can find this guide
on the CD in the Docs\Symantec Enterprise Reporting directory.
To set the logging level
1
On the portal toolbar, click Server Administration.
2
Click the Configure tab.
3
In the Actions column, click the set properties button for the dispatcher or
configuration folder you want.
4
Click the Settings tab to view all the configuration settings.
Securing Symantec ESM Reporting
About auditing in Symantec ESM Reporting
5
In the Value column, type a new value for the following settings, each of
which represents a logging category:
■
Audit logging level
■
Audit run-time usage logging level
■
Audit administration logging level
■
Audit other logging level
Note: If you want to reset a configuration setting to its default value, check
its check box and click Reset to default value.
6
Click OK.
About audit reports
Symantec Enterprise Reporting audit reports are included in the Symantec ESM
Reporting sample report package, in a file called Cognos_Audit.zip. See the
Installation and Configuration Guide for information on installing and using
these reports. You can find this guide on the CD in the Docs\Symantec
Enterprise Reporting directory.
About audit table creation
To create these reports you must first create the audit tables.
To create the audit tables
1
Open Enterprise Reporting Configuration.
2
Click Local Configuration > Environment > Logging.
3
Right click Logging, and then click New Resource > Destination.
4
Type a name for the New Database Resource.
5
Change the Type to Database and then click OK.
6
Right click the newly created Auditing DB, and then click New Resource >
Database.
7
Type a name for the new database.
8
Select the database type.
9
Click OK.
10 In the right panel, type the appropriate database name, user ID, password,
server, and port number.
11 From the File menu, click Save.
123
124 Securing Symantec ESM Reporting
About auditing in Symantec ESM Reporting
12 Restart the Cognos ReportNet service to create the new tables in the Content
Manager database.
The tables are:
■
COGIPF_ACTION
■
COGIPF_USERLOGON
■
COGIPF_NATIVEQUERY
■
COGIPF_PARAMETER
■
COGIPF_RUNJOB
■
COGIPF_RUNJOBSTEP
■
COGIPF_RUNREPORT
■
COGIPF_VIEWREPORT
■
COGIPF_SYSPROPS
Chapter
Running Symantec ESM
Reporting
This chapter includes the following topics:
■
About the user interface
■
Opening the user interface
■
Customizing the user interface
■
About reports
■
Locating reports
■
Running Reports
■
Selecting report prompts
■
Scheduling reports
■
Exporting report information
■
Emailing reports
■
About Query Studio
■
About using queries
■
Using defined queries
■
Using Report Studio
■
Enabling trending
5
126 Running Symantec ESM Reporting
About the user interface
About the user interface
Symantec ESM Reporting uses a Web-based user interface for creating reports.
This lets you use the application from any computer that can connect to your
Web server.
The first time that you log into Symantec ESM Reporting, your interface opens
to the Welcome tab, a Public Folders tab, and a My Folders tab.
The Welcome tab has several tools that let you customize your workspace to
meet your needs and preferences, to create reports, to customize your
workspace, and to access other tools to administer your Symantec ESM
Reporting application.
The Public Folders tab contains all of the Symantec ESM reports that you have
permissions to view or run.
You can use the My Folders tab to save your customized reports.
Symantec ESM Reporting has a help link on each page in the interface. When
you click on the help link, Symantec ESM Reporting opens the help page that
relates to the task that you are performing. The help pages provide systematic
instructions on using Symantec ESM Reporting.
Opening the user interface
To use Symantec ESM Reporting, you must access the Web server, then log on to
the application.
To open the user interface
1
In the address box of a supported Web browser, type
http://<Symantec ESM Reporting Web server name>/
Enterprise_Reporting
Note: You may need to use https:// if http has been disabled.
2
If anonymous logon is disabled, in the Symantec Enterprise Reporting
Logon page, do the following:
■
In the User Name field, type the name of a user account that has the
required permissions to use the desired reports.
■
In the Password field, type the user account password.
Running Symantec ESM Reporting
Customizing the user interface
Note: The user name and password are the LDAP or NTLM authentication
sever account user name and password.
See “Installing Symantec ESM Reporting” on page 41.
Customizing the user interface
You can add tabs, folders, reports, and other information to your workspace
when you use the customization tool to customize your interface. This lets you
combine reports with other information sources such as bookmarks and Web
pages to personalize your workspace.
To customize the user interface
1
On the Welcome page, click New Page.
2
Use the tools in the upper-right corner to add content and edit the layout of
the content.
Place your mouse over each icon for each tool to see pop-up text that
describes the tool.
3
Click the Help link in each tool to see the function of each tool, or refer to the
Administration and Security Guide for detailed information. You can find
this guide on the CD in the Docs\Symantec Enterprise Reporting directory.
About the administration tools
The Welcome page has links to several tools that let you administer Symantec
ESM Reporting (some of the listed tools may be available only to users with the
proper permissions). Table 5-1 describes the administration tools.
Table 5-1
Symantec ESM Reporting administration tools
Tool name
Tool function
Preferences
Lets you organize the format and layout of your
workspace. You set default display settings and pages
using this tool.
Directory
Lists and lets you administer Users, Groups, and Roles in
Symantec ESM Reporting. You can also manage data
sources, distribution lists, and printers from this tool.
Capabilities
Lets you administer the features and permissions for the
reporting tools such as Report Studio.
127
128 Running Symantec ESM Reporting
About reports
Table 5-1
Symantec ESM Reporting administration tools
Tool name
Tool function
Schedule Management
Lets you schedule report runs and view the history of
reports that have been previously scheduled.
See “Scheduling reports” on page 133.
Server Administration
Lets you optimize your reporting servers for best
performance. Use this tool to do load balancing, view the
status of services, and a host of other functions.
Deployment
Lets you import and export data between your reporting
servers.
Note: Table 5-1 is a quick reference to the administration tools. For detailed
descriptions and step procedures, see the online Help or the Administration and
Security Guide on the CD in the Docs\Symantec Enterprise Reporting directory.
About reports
Symantec Enterprise Reporting is an application that allows you to create
reports and organize data dynamically. Symantec Enterprise Reporting lets you
select, associate, and filter columns for the data that you want contained in the
report, as well as arrange the graphic display of the reports.
Symantec ESM has several customizable reports and queries that let you view
and present information about any aspect of your Symantec ESM application.
Because the reports are Web-based, you can create reports from any computer
that can access your reporting Web server.
Symantec ESM Reporting has three types of reports: state reports, trend
reports, and queries. Trend and state reports let you view the security status of
your network at a point in time, or observe changes over a period of time. Both
of these report types let you include specific data in your report.
Warning: If you delete any of the reports that come with Symantec ESM
Reporting, you must reinstall the reports package from your installation CD to
restore them.
Running Symantec ESM Reporting
About reports
In addition, Symantec ESM Reporting uses Query Studio for creating queries.
This tool lets you add or remove columns from queries and interactively link
information that may not be in a report. When using queries, you can add,
remove, filter, and organize report data that is in the columns as well as add or
remove columns. In the user interface, queries are denoted with a pencil icon,
while reports use a triangle icon. Both types of reports can be found in the Public
Folders tab.
About state reports
The most basic reports in Symantec ESM Reporting are state reports. State
reports display a snapshot of your network security status at a point in time.
State reports use the most recent information that is in your Symantec ESM
Reporting database. This information is derived from the most recent job run
for each agent. You can schedule state reports to run at regular intervals to
ensure that your reports contain the latest data.
State reports have prompts that let you select all available data or a subset of
that data. For example, if a report displays information about your Symantec
ESM Managers, you can select just those managers that you want. If a report has
information about domains for a manager, you can select the managers, then
select from among the domains on those managers and the report shows only
information about those domains.
See “About Symantec ESM Reports” on page 155.
About trend reports
Trend reports show information over a period of time. You can select the
beginning and end dates to show data for any period of time for which you have
data. A graph shows how the state of your network has changed over time, and a
table shows data for each point in time. Data for these reports is derived from
policy runs on a per domain basis.
Note: Because state and trend reports derive data in different ways, state and
trend reports for the same day may differ slightly. Because state reports use the
last policy run for each agent regardless of domain or date, state reports may
access a set of policy runs over wider range of dates and may report slightly
different information.
Like state reports, trend reports have prompts that let you show trends for only
the data that you want. You can use prompts to select or filter managers,
domains, agents, or other data.
See “About Symantec ESM Reports” on page 155.
129
130 Running Symantec ESM Reporting
About reports
Note: For trend reports, when you select a policy, Symantec ESM Reporting only
lets you select modules for that policy that have trend data available. If you
select a policy that has no modules with trend data available, no modules appear
in the selection menu and you cannot run the report.
About queries
Queries are a type of customizable report in Symantec ESM Reporting. After you
run a query, you can filter the contents of columns, add columns, or remove
columns. You can add related information, of you can completely change the
query to select any available information and reporting on a completely
different type of data. If you do this, you have the option to save the new query.
You should save the query in a new place with a unique name.
Warning: If you overwrite the Symantec default queries, you must reinstall the
original package to restore the query. Also, your new query may be overwritten
when you install package updates.
When you create reports using queries, remember that you must use related
data, or the Query Studio may find a meaningless relationship among the
information objects, or it may give you an error indicating that it could not find
a relationship.
See “About the Symantec ESM Reporting metadata model” on page 177.
Query Studio implements prompts. When you use information objects from
certain query subjects, the Query Studio brings up prompt pages that let you
select from the policies, modules, managers, and domains that you want. This
allows you to focus your queries to only the information that you need. Different
query subjects prompt for different data.
See “Query subject prompts” on page 179.
Query Studio is limited in that it does not offer all the aggregation features that
are available in the report studio. Therefore, reports and queries with similar
columns may differ slightly in numbers because of the way that the reports are
aggregated. Generally, these issues can be overcome by adding columns to the
queries that are automatically aggregated in the reports such as manager, agent
or domain columns.
Also, if you use the Symantec standard queries to build new queries, you may get
results that differ from similar reports due to some cascading limitations. To
overcome this limitation, you should build a new query.
Running Symantec ESM Reporting
Locating reports
Query Studio has color limitations as well. When creating charts with Query
Studio, the application uses a color scheme that assigns a color to the first data
item and another color to the second data item. These colors cannot be changed
unless you rearrange the data items. For example, if you create a report that has
a column that indicates the number of red, yellow, and green messages, the
Query Studio may assign the color blue to the bar indication the number of red
messages, and the color red to the bar that indicates the number of green
messages. To fix this, simply rearrange the columns so that the correct color is
assigned to the correct column.
Locating reports
By default, all Symantec ESM Reporting reports are placed in the Public Folders
tab. Reports in this area are accessible to all users that have the correct
permissions. The My Folders tab is only accessible to your specific user account.
All the reports that come with Symantec ESM Reporting are placed in the
Symantec ESM folder in the Public Folders tab. These reports are placed in
either the Technical or the Executive subfolder, and then in one of several
additional subfolders that further categorize the reports.
See “About Symantec ESM Reports” on page 155.
When you use the Report Studio to create new reports or modify existing
reports, do not overwrite the default Symantec reports. Note that updates from
Symantec may overwrite your changes.
Running Reports
After you locate the Symantec ESM Reporting reports, you can begin running
them to get the information that you require.
To run reports
◆
Double-click the title of the report.
Note: When you run reports, if you have a large amount of data, Symantec
Enterprise Reporting shows a circling arrow to indicate that the report is
running. This arrow has a cancel button that allows you to stop the report and
return to the interface. This button does not cancel the query to the database. If
you start and stop several reports in succession using the cancel button, you will
have multiple simultaneous queries to the database that can significantly
reduce database performance.
131
132 Running Symantec ESM Reporting
Selecting report prompts
Selecting report prompts
Most reports in Symantec ESM Reporting have prompts that let you filter data
when you run the reports. These prompts are classified as optional or required.
Asterisks indicate required prompts.
If a prompt is required, you must select at least one of the given values for the
report to function. If you do not select a value for the prompt, the Next and
Finish buttons remain dimmed and you cannot run your report.
If a prompt is optional, and you do not select any values for it, all values for the
prompt are automatically selected, and data for each value displays in the
report.
When you run a report, the prompt values that you select are automatically
saved with the report. The next time that you run the same report, you can click
the Finish button before proceeding through all of the prompt selection screens.
When you do this, the report runs using saved prompt values for any prompts
that you did not change.
Prompts use text selection boxes, drop-down menus, check boxes, and radio
buttons to help you select the values. Single-value prompts are denoted with
radio buttons and drop-down menus, while multiple-value prompts use check
boxes and list boxes.
Your report may also have action buttons that are used to update values in
certain prompt selection fields.
For example, if you run a report that groups data by managers and domains, you
may see a list of managers, a button labeled Refresh Domains, and a list of
domains. If you select all the managers, and then click the Refresh Domains
button, the list of domains remains the same. If you select fewer than all of the
managers, and you click the Refresh Domains button, the list changes to reflect
only those domains that are on the managers that you selected. If you select a
manager and do not click the Refresh Domains button, and then select a domain
that is not on the manager that you selected, the report fails and the interface
reports an error.
To select prompts for your reports:
◆
Do each of the following as necessary
■
Select one or more values from a list box.
■
Select only one value from a drop-down menu.
■
Select one or more values from a check box.
■
Select only one value from a radio button.
■
Refresh to update prompt values.
Running Symantec ESM Reporting
Scheduling reports
Scheduling reports
You can schedule reports to run at a time that is convenient for you, such as
during off hours when demands on the network are low.
You can schedule reports individually or in a group by using a job. You can
schedule reports to run by minute, hourly, daily, weekly, monthly, or yearly.
Only one schedule can be associated with each report or job. If you require
multiple schedules for the same report, you can create report views and then
create a schedule for each report view. Jobs have their own schedules, and these
schedules are independent from report schedules.
After you create a schedule, the report or job runs at the time and date specified.
You can then manage the properties of your schedules.
The following procedures outline the methods necessary for creating a basic
report schedule. For detailed steps to create group schedules, manage, change,
suspend, or delete schedules, see the online Help, or the Administration and
Security Guide on the CD in the Docs\Symantec Enterprise Reporting directory.
To schedule a report using a recurring interval
1
In Public Folders or My Folders, click the schedule button for the report that
you want to schedule.
2
Under Frequency, select how often you want the schedule to run. The
Frequency section is dynamic and changes with your selection. Wait until
the page is updated before selecting the frequency.
3
Under Start, select the date and time when you want the schedule to start.
4
Under End, select when you want the schedule to end. If you want to create
the schedule but not apply it right away, check Disable the schedule . To
later enable the schedule, uncheck the check box.
5
Under Formats, click the format you want for the report output.
6
Under Languages, click Select the languages to select a different or
additional language for the report.
7
Under Delivery, choose to save the report, print the report, or send the
report by email. You must select at least one delivery method.
Note: You are prompted for values only if the report specification or model
includes prompts or if you have access to more than one sign-on, even if you
selected the Prompt for values check box.
8
Click OK.
133
134 Running Symantec ESM Reporting
Exporting report information
Note: To schedule a report to run once, set the end date and time to limit the
report runs to one.
To run a scheduled entry once
1
From the Tools menu on the Welcome tab, click Schedule Management.
2
Click the Schedule tab and show the filter options.
3
In the Scope list, click the filter to use when showing the schedules.
4
In the Status list, click the status to use for filtering and then click Apply to
see a list of scheduled entries.
Note: To sort the entries by the modified time, click the Modified column
header.
5
Click Run a scheduled entry once .
Exporting report information
When you run a report, Symantec ESM Reporting lets you save the report in one
of several formats. These formats include report views, HTML, PDF, Microsoft
Excel, XML, and comma separated values. These report formats can be saved
and exported as necessary.
To save a report in a different format
1
Run a report
2
Click the button in the upper-right that converts the report to the desired
format.
3
Save the report in the selected format.
Note: Reports saved in this manner may not be secure.
See “Securing saved reports” on page 109.
Running Symantec ESM Reporting
Emailing reports
Emailing reports
You can also email the report directly to any user that has an account in
Symantec Enterprise Reporting, or you can type in the address of the recipient.
Note: Ensure that you have set up your reporting server to communicate with
your SMTP server. See the Installation and Configuration Guide for instructions
on setting up this connection. You can find this guide on the CD in the
Docs\Symantec Enterprise Reporting directory.
To email a report
1
Run a report.
2
Click email.
3
Do one or more of the following:
■
Select the Symantec ESM Reporting user to whom you want to email
the report from the list of users.
■
Type the email address of the recipient of the report in the address box.
Separate the addresses with semicolons.
Warning: Email sent using this function is insecure and may be intercepted and
read by an unintended recipient.
See “Securing email” on page 109.
About Query Studio
Symantec ESM Reporting uses both reports and queries. Reports are set and
cannot be modified outside of the Report Studio tool. Queries are dynamic and
let you insert and remove information. The tables and graphs update
automatically.
See “Using Report Studio” on page 144.
These functions are available because queries automatically open in the Query
Studio tool. This tool uses a metadata model that lets you dynamically add and
remove information from your queries.
See “Metadata model divisions” on page 138.
See “About the Symantec ESM Reporting metadata model” on page 177.
135
136 Running Symantec ESM Reporting
About using queries
The metadata model is a product of a package that Symantec has created for
Symantec ESM Reporting. Queries and reports in Symantec ESM Reporting do
not function unless the Symantec ESM Reporting package is the currently
selected package.
Symantec Enterprise reporting is capable of using multiple packages, however,
Symantec ESM Reporting has only one package available. For more information
on packages, and the Query Studio, see the Query Studio User Guide, and the
other Symantec Enterprise Reporting documentation.
About using queries
Symantec ESM Reporting uses queries to let you search through your enterprise
data. You can create a query from scratch, or you can use one of the many
defined queries. The defined queries can be used in their default forms, or you
can alter them to display exactly the information that you need.
This section of this document is intended to let you quickly review the features
of the Query Studio. This section does not fully cover every feature of the Query
Studio. For complete documentation of the Query Studio, see the Query Studio
User Guide on the CD in Docs\Symantec Enterprise Reporting directory.
Planning your query
Before using the Query Studio, you must determine the question that you want
to answer with your query. The following list outlines some questions that you
may want to answer before beginning your query:
■
Is the query related to the security state of your enterprise, or is it related to
the administration of Symantec ESM?
■
Who is the audience?
■
What information should the query find? Do I want to know about my
agents, policies, security levels, message counts, message information, or
some other information?
■
What is the scope of the query? Do I want to know about my enterprise, a
section of my enterprise, or a single computer?
■
How do I want to group my information? By manager, by policy, or do I want
organize my data in another way?
Running Symantec ESM Reporting
About using queries
If you have not planned what you want the report to say, and how you want to
group it, it is possible to create queries that have little meaning. For example, if
you create a query that has a column for managers, agents, policies, and
modules, the report has little meaning unless you add a metric that explains
something about those data items. You may want to display the number of red,
yellow, and green messages on a specific agent. However, to do this, you would
have to reorder the columns and possibly add a Domains column. If your report
had columns ordered according to managers, domains, policies, modules, and
agents, and then had columns for the numbers of green, yellow and red
messages, you could easily see for any agent, the number of messages for each
policy and module at each level. You could also easily locate the agent according
manager and domain. You could order this query in several ways depending on
what items are most important to you.
When you have answered appropriate planning questions you will be able to
formulate an exact query to meet your needs. The remainder of this section
explains how to use the Query Studio tool to create a query that is specific to
your needs.
Data items
Queries use a metadata model that lets you find and insert information into your
view. The metadata model is made up of folders, query subjects, information
objects, facts, and filters.
Table 5-2 displays the icons in the metadata model that represent each object,
and describe their functions.
Table 5-2
Component
Metadata model components
Icon
Description
Folder
Folders hold all other objects that are in the metadata
model. The metadata model uses folders
Query subject
Query subjects represent tables in the database. They
generally hold information objects.
Information object
Information objects are the main report items. They
represent columns in a report. Managers, agents,
domains, and policies are examples of information
objects. Information objects often relate to fields in a
table in the database.
137
138 Running Symantec ESM Reporting
About using queries
Table 5-2
Component
Metadata model components
Icon
Description
Fact
A fact is a quantifiable column in a report. Examples of
facts include numbers of messages, and numbers of
types and severities of messages. Facts should generally
be inserted into reports after information objects.
Filter
Filters are convenient and powerful ways of quickly
getting to the information that you need. When you add
a filter to a report, you get only that information in your
report that is specified by the filter. For example, if you
added a filter named ‘Red Msgs Only’, any columns that
you add to your report that have information about
messages will only display information about red
messages.
Metadata model divisions
The metadata model is divided into three major sections: Administration,
Message Information, and Message Summaries. Each section is delineated by its
own folder.
Each folder has many query subjects with information objects in it that you can
use to build effective queries. For a detailed description of each data item, see
“About the Query Studio metadata model” on page 177.
Data items from one section of the metadata model often do not pertain to other
sections. Because each section of the model has its own specific purpose,
combining data items from separate sections of the metadata model can result
in errors or meaningless reports. For example if you were to take a query that
had columns with data about the managers, policies, and messages, you could
not add a column about account privileges without first removing the columns
about policies and messages. Policies and messages are data items pertaining to
security, and account privileges is a data item that relates to administration.
Attempting to mix unrelated data types in a query results in meaningless
reports and can generate errors.
Additionally, some columns that you can use in a query are meaningless unless
they are grouped according to data that is in another column. For example, if
you put a column in a query that displays manager information and then put in
a column that has data on user permissions, the query has little value unless you
put in a column that has information on user accounts.
Running Symantec ESM Reporting
About using queries
Some examples of data items that have these types of dependencies include data
items that display information about user permissions, agent properties,
suppression information, change events, message information, agent counts,
compliance percentages, severity counts, violation counts, and parameters.
Note: Symantec ESM Reports has two data items in the metadata model that
may not contain any information. The Asset Tag and Description data items
under Agent in the Administration folder are not supported in Symantec ESM
6.1, but may be supported in future versions. You can use an SQL tool to add
information to these two fields in the Database.
In the Query Studio tool, the query subjects contain related information objects,
facts and filters. When you create queries, use the data items from within a
single query subject.
Administration
The administration folder contains all the data items that relate to the
administration of your Symantec ESM application. Data items in this section
relate to Symantec ESM user accounts, message suppressions, audit schedules,
manager-agent communications configurations and similar types of data.
Message Information
The Message Information section of the metadata model contains the security
related information objects that you need to find the security state of computers
in your enterprise. Information objects in this section include policies, message
titles, message descriptions, and change events.
These information objects are intended to be used to locate individual issues and
display the details about specific problems at the agent level. Reports that you
generate with these data items are intended for the people responsible for
operations and day-to-day computer security maintenance.
Message Summaries
The Message Summaries section contains all of the fact items that are in the
metadata model. Use these fact items with the information objects that are in
the Message Information section to quantify your queries. Fact item columns
should be placed in the report after the information objects.
These data objects are intended to create reports that display the current overall
security state of your enterprise. The facts let you quantify the security state of
your computers to use in reports to executives and managers.
139
140 Running Symantec ESM Reporting
Using defined queries
Using defined queries
Symantec ESM Reporting uses several defined queries that you can use as a
starting point when working in Query Studio. You can use these queries in their
original format, but they are intended to be modified in order to find data that is
specific to your needs.
The defined queries are in the same folders with the standard reports, but
queries have the word query in the title. If you have changed the name of the
queries, or have created your own queries, you can differentiate between reports
and queries because queries are marked with pencil icons while reports are
marked with triangles.
Using queries requires you to select data items from the metadata model and
add them to your query. By default, newly added columns attach to the right of
the last column in the report, but you can place them anywhere in the report.
You can also add graphs, charts and other data to the report.
Add or remove columns in queries
When using queries, one of the most basic tasks is to add columns to the query.
The columns in the query are created from a data item in the metadata model.
You can add columns that show data about any information in your ESM
database, so adding and removing columns is the simplest way to show the exact
data that you need in your query.
You can place columns in any location in the report, including to the left of, to
the right of, or between existing columns. You can also add information that
spans existing columns by adding information above the columns. For complete
information on how to add information to a query and on the effects of adding
information to a specific location in a query, see the Query Studio User Guide on
the CD in the Docs\Symantec Enterprise Reporting directory.
To add data to a defined query
1
Select Insert Data from the menu on the upper-left side of the screen to see
the metadata model.
2
Determine the type of report that you are trying to create. Depending of the
type report that you want to create, do one of the following:
■
If the query is for a Symantec ESM Administration report, use data
items in the Administration folder of the metadata model.
■
If the query is intended to provide specific information to operations
personnel to improve the security of agent computers, use data items in
the Message Information folder in the metadata model.
Running Symantec ESM Reporting
Using defined queries
■
If the query is intended for management to provide information on
current security status, use the data items in the Message Summaries
folder of the metadata model.
3
Expand the metadata model to locate the data items that you want to
include in the query.
4
Do one of the following:
■
To add the data item column to the right of all information, select the
data item and click the Insert button on the lower-left of the screen.
■
To add the data item to the left of any column in the report, drag the
data item heading of any column, and drop it there. The new column is
added to the left of that column. This works to place a column between
two existing columns.
■
To add information that spans columns, drag the data item to a location
directly above the columns, and then drop it there.
Note: When you drag data items to locations in the query, a small black line
shows the location where the data will be added when you drop it
To remove columns from queries
1
Right-click the heading of the column that you want to remove.
2
Select Delete from the menu.
Filter queries
Filters let you remove unwanted data from a query. For example, if you were
creating a query that showed audits that had completed in the last week, and
you wanted to filter for only those audits that finished with errors, you could
build the query, and then place a filter called Errors Only in the query. The
query would then display only those audits that had errors.
You can filter your queries in two ways. You can use a filter that is part of the
metadata model to encompass an entire query. An example of this type of filter
is the Errors Only example described previously. You can also filter by column.
When you filter on columns, the interface provides you with each available
value in the column. You use check boxes to select those values that you want to
display in the report.
For example, if you had a query that uses a Managers column and you had data
for 15 managers, you could filter that column to show data for only the first
three managers in the database.
141
142 Running Symantec ESM Reporting
Using defined queries
To use filters that are in the metadata model
◆
Select the filter from the metadata model, and click Insert.
To filter by column
1
Click on the heading of the column that you want to filter.
2
Click the Filter icon.
See Table 5-2 for a graphic that shows what the Filter icon looks like.
3
At the bottom of the query, check the boxes that correspond to the values
that you want to display in the report.
4
Click OK.
Format queries
You can format the columns in a query to display only a specific number of
characters in a column. For example, if you had a manager called
‘First_Enterprise_Manager’, you could format the column that displays the
manager name to display only a certain number of characters. If you set the
character limit to nine, the column would display ‘First_Ent’. This setting is
useful when you have many columns in your query and need to save space.
To format your queries
1
Click Edit Data from the menu on the upper-left of the screen.
2
Click on the heading of the column that you want to format.
3
Click Format from the menu on the left side of the screen.
4
From the Category drop-down menu, select Text.
5
In the Number of Visible Characters field, type the number of characters
that you want to see.
6
Click OK.
Sort queries
You can sort columns in queries in ascending or descending order. The columns
that are to the right of the sorted column change in accordance with the sort.
To sort columns in a query
1
Click Edit Data from the menu on the upper-left of the screen.
2
Click on the heading of the column that you want to sort.
3
Click Sort from the menu on the left of your screen.
Running Symantec ESM Reporting
Using defined queries
4
Under Sort Order, click the radio button that corresponds to the type of sort
that you want.
5
Click OK.
Summarize queries
When you summarize queries, Symantec Enterprise Reporting displays counts
of items in a column that has subordinate columns. Summarizing a query is a
good way to quickly quantify it. For example if you had a report that displayed a
column for managers, then domains, then agents, and showed the number of red
messages on each agent, you could summarize the report. It would then display
the numbers of red messages on the domains and managers as well.
For a complete explanation of summarizing queries, see the Query Studio User
Guide on the CD in the Docs\Symantec Enterprise Reporting directory.
To summarize a report
1
Click Edit Data from the menu on the upper-left of the screen.
2
Click on the heading of the column that you want to summarize.
3
Click Summarize in the menu on the left of your screen.
4
From the Summary for Footers drop-down menu, click Count.
5
Click OK.
Adding charts to a query
You can add charts and graphs any query that has is quantified using a fact as a
data item in the query. The Query Studio has more than 25 charts and graphs
that you can use to display your data.
Note: Charts are unavailable in queries that do not contain at least one fact as a
data item.
Note: Because charts use default colors, using a chart to display information on
red, yellow, and green agents may be misleading. For example, unless you place
the columns in exact order, the bar in a bar chart that displays the number of
green agents may be colored red. To solve this issue, rearrange the order of the
columns in the report until the chart colors correspond to data type.
143
144 Running Symantec ESM Reporting
About Report Studio
To add a chart to a query
1
Create a query that uses a fact or other measured data item.
2
In the menu on the upper-left side of the screen, click Change Layout.
3
Click Chart... in the menu on the left of your screen.
4
In the Chart Type menu, select the chart category that you want.
5
Click the radio button that corresponds to the chart style that you want.
6
Click OK.
About custom groups in queries
You can create custom groups to produce a new report item containing values
that are meaningful to you. Use custom groups to:
■
Convert a list of numeric results into broader categories.
■
Reduce the number of values into a smaller, more meaningful set.
Custom groups are available in Symantec Enterprise Reporting. See the Query
Studio User Guide. You can find this guide on the CD in the Docs\Symantec
Enterprise Reporting directory.
About Report Studio
The Query Studio is a unique and effective tool for creating queries on the fly
that answer specific security questions. It is intended to be quick and effective.
However, you may want to create reports that have a more customized look and
style. Report studio lets you do this. You can use Report Studio to create a report
from scratch, or you can open an existing report in Report Studio and modify it.
Using Report Studio
This section of this document lets you quickly review the basic features of the
Report Studio so that you can become familiar with the tool. To fully understand
all the features of the report studio tool, see the Report Studio User Guide. You
can find this guide on the CD in the Docs\Symantec Enterprise Reporting
directory.
Running Symantec ESM Reporting
Using Report Studio
Planning your report
Before using the Report Studio, you must determine the question that you want
to answer with your report. The following list outlines some questions that you
may want to answer before beginning to build your report:
■
Is the report related to the security state of your enterprise, or is it related to
the administration of Symantec ESM?
■
Who is the audience?
■
What information should the report find? Do I want to know about my
agents, policies, security levels, message counts, message information, or
some other information?
■
What is the scope of the report? Do I want to know about my enterprise, a
section of my enterprise, or a single computer?
■
How do I want to group my information? By manager, by policy, or do I want
to organize my data in another way?
When you have answered these questions, you will be able to formulate a report
to meet your needs. The remainder of this section explains how to use the
Report Studio tool to create a report that is specific to your needs.
Opening Report Studio
Report Studio is a separate application from Symantec ESM Reports, however,
you can access it from the Symantec ESM Reporting interface.
To open Report Studio
◆
In the Symantec ESM Reporting interface, click Report Studio. This link is
always available in the Symantec ESM Reporting interface.
■
If you click this link when a report or query is open, that report or
query opens in Report Studio as a template.
■
If no report is open when you open Report Studio, the tool prompts you
to choose the type of report that you want to create, and then open a
blank report.
Creating a new report
You can build a new report using the Report studio tool. Symantec ESM
Reporting includes a template that you can use to create your own reports. You
can also use one of the default report types that is found in Report Studio. See
the Report Studio online help for information about creating a new report.
145
146 Running Symantec ESM Reporting
Using Report Studio
Modifying an existing report
You can use one of the reports in Symantec ESM Reports as a template that you
can modify. If you have a report open in the Symantec ESM Reporting interface,
and you open the Report Studio tool from the interface, the report is
automatically imported into the Report Studio tool as a template. You can then
modify the report to create new reports.
Note: Do not overwrite existing Symantec ESM Reports. If you overwrite them,
you must reinstall the package to recover the original report. Also, if you
overwrite the existing reports, your changes can be lost when you update the
reporting package.
Typically, you would not use queries as templates for creating reports because
such reports will not work when used with multiple packages. However,
Symantec ESM Reports only has one package, so unless you have other
packages, you can use queries as report templates.
About insertable objects
The Report Studio tool uses drag-and-drop functionality to let you quickly build
reports. The tool lets you drag items into the report and place them exactly
where you need them.
Note: When you place items in a report, if you do not place them directly next to
an existing item, the report tool may not be able to place the item in the report.
You can place item in reports from the metadata model, from the toolbox, or
from other areas in the explorer bar. You can add charts, tables, graphics, text
HTML, links, and other types of data to your reports.
See the online Help or the Report Studio User Guide for complete information on
adding data to your reports. You can find this guide on the CD in the
Docs\Symantec Enterprise Reporting directory.
Running Symantec ESM Reporting
Using Report Studio
Toolbox items
In addition to text and images, the Toolbox tab in the Insertable Objects pane
contains other objects that you can add to a report. To add an object, drag or
double-click it from the Toolbox tab.
Table 5-3
Toolbox items
Object
Description
Calculation
Adds a calculated column.
Block
Adds an empty block, a container in which you can insert
other objects. This is useful for controlling where objects
appear.
Table
Adds a table, a container in which you can insert other
objects. This is useful for controlling where objects appear.
Hyperlink
Adds a hyperlink so that users can jump to another place,
such as a Web site.
Row Number
Numbers each row of data returned when the report is run.
HTML
Adds a container in which you can insert HTML code, such
as a link to a multimedia file. Note: HTML items appear
only when you run the report in HTML format.
Layout Component
Reference
Adds a reference to another object. Useful when you want
to reuse an object.
Conditional Block List
Adds an empty block that you can use for conditional
formatting.
Field Set
Adds an empty block that has a caption. This is similar to
the Block object, but with a caption.
Hyperlink Button
Adds a hyperlink in the form of a button.
About the metadata model
You can insert items from the metadata model in the Insertable Objects pane
into your reports. The metadata model is identical to the Query Studio metadata
model. Appendix B explains the metadata model and all of its data items.
147
148 Running Symantec ESM Reporting
Configuring and updating the database
Deleting an existing report
You can delete existing reports in the Symantec ESM Reports user interface.
To delete an existing report
1
Navigate to the report that you want to delete.
2
In the column on the right, click More...
3
Click Delete.
4
Click OK.
Configuring and updating the database
You can configure and update the Symantec Enterprise Reporting Database
using SQL commands. This section describes how to do the following:
■
Enable trending
■
Update agent description and asset tag information in the database
■
Purge old data from the database.
Enabling trending
You can enable trending for Symantec ESM Reporting categories. By default,
trending is available for the policy compliance category. You can also enable
trending in other categories so that the Symantec ESM Reporting Database Link
will import and retain proper information in the database to do trend reports.
The available categories are listed in Table 5-4.
Note: Trending is not retroactive. You can only create trended reports on data
transferred after trending is enabled.
Table 5-4
Category identifiers
Category
Category ID
Policy Compliance
1
Patch Assessment
2
Change Notification
3
ESM Error
4
System Error
5
Running Symantec ESM Reporting
Configuring and updating the database
Table 5-4
Category identifiers
Category
Category ID
ESM Administrative Information
6
System Information
7
ICE
8
In order to enable trending, you will need to use Structured Query Language
(SQL) commands in the Symantec ESM Reporting database. The following SQL
commands are examples of standard SQL commands that you can use.
The following command is an example of how to show all top-level categories in
the database. Future updates may add categories that are not displayed in Table
5-4.
To show all top level categories
◆
Use the following example command:
SELECT STRING_VALUE AS CATEGORY, CATEGORY_ID AS CATEGORY FROM
ESMDB10.CATEGORY, ESMDB10.CONTENT_STRING_MAP WHERE CATEGORY_TYPE = 1
AND CATEGORY_NAME_CODE = STRING_CODE
The following command is an example of how to enable trending for all modules
in a category.
To enable trending for modules for the category Change Notification
◆
Use the following example command:
UPDATE ESMDB10.CATEGORY SET TREND = 1 WHERE PARENT_CATEGORY_ID =
(SELECT CATEGORY_ID FROM ESMDB10.CATEGORY,
ESMDB10.CONTENT_STRING_MAP WHERE CATEGORY_TYPE = 1 AND
CATEGORY_NAME_CODE = STRING_CODE AND STRING_VALUE = 'Change
Notification')
The following is an example of how to disable trending all modules in a category.
To disable trending for modules for the category Change Notification
◆
Use the following example command
UPDATE ESMDB10.CATEGORY SET TREND = 0 WHERE PARENT_CATEGORY_ID =
(SELECT CATEGORY_ID FROM ESMDB10.CATEGORY,
ESMDB10.CONTENT_STRING_MAP WHERE CATEGORY_TYPE = 1 AND
CATEGORY_NAME_CODE = STRING_CODE AND STRING_VALUE = 'Change
Notification')
You can enable trending for all categories that incorporate a specific module.
The following set of commands gives an example of how to see all the top-level
categories for a specific module.
149
150 Running Symantec ESM Reporting
Configuring and updating the database
To show top level categories for module Account Integrity
◆
Use the following example command set:
SELECT STRING_VALUE AS CATEGORY, CATEGORY_ID FROM ESMDB10.CATEGORY,
ESMDB10.CONTENT_STRING_MAP WHERE CATEGORY_TYPE = 1 AND
CATEGORY_NAME_CODE = STRING_CODE AND CATEGORY_ID IN (SELECT
PARENT_CATEGORY_ID FROM ESMDB10.CATEGORY,
ESMDB10.CONTENT_STRING_MAP WHERE CATEGORY_TYPE = 2 AND
CATEGORY_NAME_CODE = STRING_CODE AND STRING_VALUE = 'Account
Integrity')
Category
CATEGORY_ID
System Information
7
ESM Administrative Information
6
System Error
5
Change Notification
3
Policy Compliance
1
The following command set shows an example of how to enable trending for all
categories that use the Account Integrity module
To enable trending for the module Account Integrity
◆
Use the following example command set:
update esmdb10.category set trend = 1 where category_id in (select
category_id from esmdb10.category, esmdb10.content_string_map where
category_type = 2 and category_name_code = string_code and
string_value = 'Account Integrity')
You can disable trending for all categories that use a specific module. The
following set of commands shows an example of how to do this.
To disable trending for the module Account Integrity
◆
Use the following example command set:
UPDATE ESMDB10.CATEGORY SET TREND = 0 WHERE CATEGORY_ID IN (SELECT
CATEGORY_ID FROM ESMDB10.CATEGORY, ESMDB10.CONTENT_STRING_MAP WHERE
CATEGORY_TYPE = 2 AND CATEGORY_NAME_CODE = STRING_CODE AND
STRING_VALUE = 'Account Integrity')
Running Symantec ESM Reporting
Configuring and updating the database
Updating description information in the database
Future versions Symantec ESM will have a manager-console enhancement that
lets you add description and asset tag information for agents in the Agent
Properties dialog box in the Symantec ESM Console Fields to hold this
information are found in the Symantec Enterprise Reporting Database. If you do
not have this enhancement, or you have not entered any agent information
these fields are blank, and the description and asset tag information objects in
the metadata model are blank when you use them in queries or reports. Paths to
these blank information objects are:
■
Symantec ESM > Administration > Manager - Domain - Agent >
Agent Properties > Description
■
Symantec ESM > Administration > Manager - Domain - Agent >
Agent Properties > Asset Tag
If you don’t have the Symantec ESM enhancement, you can still enter
description and asset tag information using SQL commands.
To add description and asset tag data to the database
◆
Do one or more of the following:
■
To update the description field, use the following SQL command:
UPDATE ESMDB10.AGENT SET DESCRIPTION = '<My Description>'
WHERE AGENT_NAME = '<agent name>'
■
To update the asset tag field, use the following SQL command:
UPDATE ESMDB10.AGENT SET ASSET_TAG = '<My asset tag data>'
WHERE AGENT_NAME = '<agent name>'
You can also use an SQL command to verify that the information is correct, or
you can run a query.
To verify your data using SQL commands
◆
Do one or more of the following:
■
To verify your description information, use the following command:
SELECT AGENT_NAME, DESCRIPTION FROM ESMDB10.AGENT
■
To verify your asset tag information, use the following command:
SELECT AGENT_NAME, ASSET_TAG FROM ESMDB10.AGENT
Note: The console enhancement is not available in current versions of Symantec
ESM. Future versions will have this enhancement. If you update a description or
asset tag in the console, it will overwrite any changes that you made using these
SQL commands.
151
152 Running Symantec ESM Reporting
Configuring and updating the database
Removing old data from your database
Symantec Enterprise Reporting has a utility that purges your Symantec
Enterprise Reporting database. This utility has several parameters that let you
specify exactly what data to purge. This purge utility installs with the Symantec
Reporting Database Link. The utility is a Java executable, and requires a
properties file to run.
About the properties file
Table 5-5 outlines and describes each statement that is required in the
properties file for the DBPurge utility to run correctly.
Table 5-5
DBPurge utility properties file
Property
Description
Example
dbpurger.jdbc.url
This specifies your datasource.
dbpurger.jdbc.url=jdbc\:db2\://
localhost\:6789/ESM
dbpurger.user
This specifies the user name of a dbpurger.user=<DBUserName>
user authorized to access the
Symantec Enterprise Reporting
database.
dbpurger.password This specifies the password for
the user account.
dbpurger.password=<Pa$$w0rd>
dbpurger.jdbc.
driver.jar
This specifies the java zip file
than contains the driver for the
database.
dbpurger.jdbc.driver.jar=
lib/db2java.zip
dbpurger.jdbc.
driver
This specifies the JDBC driver
that is used to connect the
Symantec Reporting Database
Link to the database.
dbpurger.jdbc.driver=
COM.ibm.db2.jdbc.net.DB2Driver
hibernate.
properties.
filename
This specifies the hibernate
hibernate.properties.filename=
properties file for your database db2.hibernate.properties
driver.
db.schema
This specifies the name of the
database schema. The default
name is ESMDB10.
purge.
category_trend
purge.category_trend=true
This is a boolean that specifies
whether to purge the
CATEGORY_TREND table in the
database. Valid values are true
and false.
db.schema=ESMDB10
Running Symantec ESM Reporting
Configuring and updating the database
Table 5-5
DBPurge utility properties file
Property
Description
Example
purge.
policy_changelog
This is a boolean that specifies
whether to purge the
POLICY_CHANGELOG table in
the database. Valid values are
true and false.
purge.policy_changelog=true
purge.chg_
message_event
purge.chg_message_event=true
This is a boolean that specifies
whether to purge the
CHG_MESSAGE_EVENT table in
the database. Valid values are
true and false.
purge.manager_
poll_error
This is a boolean that specifies
purge.manager_poll_error=true
whether to purge the
MANAGER_POLL_ERROR table
in the database. Valid values are
true and false.
purge.
days_to_keep
purge.days_to_keep=90
This specifies the number of
days of data that remain in the
database. A day is defined as the
time between midnight and
midnight. The current day is
disregarded.
purge.rows_per_
transaction
This specifies the number of
rows to purge with each call to
the database. Setting this
parameter requires special
consideration. See “Using the
purge.rows_per_transaction
parameter” on page 154 for
more information.
purge.rows_per_transaction=
5000
153
154 Running Symantec ESM Reporting
Configuring and updating the database
Locating and using the DBPurger utility files
The DBPurger utility uses a .bat file to run. Running this .bat file accesses the
DBPurger utility’s Java executable. This .bat file also adds the appropriate files
to the computer’s path so that the DBPurger utility can function correctly.
To run the DBPurger
1
2
Modify the dbpurger.properties file to contain data that is specific to your
database. The properties file can be found at the following path:
■
Windows: \Program Files\Symantec\ESM Reporting Database
Link\bin\dbpurger.properties
■
UNIX: /opt/Symantec/ESM Reporting Database Link/bin/
dbpurger.properties
Do one of the following:
■
For Windows, run the DBPurger.bat file that is in the same folder as the
properties file.
■
For UNIX, run the dbpurger.sh file that is in the same folder as the
properties file.
Using the purge.rows_per_transaction parameter
The purge.rows_per_transaction parameter has some characteristics that you
need to consider. The number that you specify tells the DBPurge utility the
number of rows in the database tables to delete per call to the database. If you
set this value to 0, the DBPurge utility deletes all applicable rows in one call to
the database. However, when you set this value to 0, the database locks and
cannot accept another call during the time that the DBPurge utility is deleting
rows, and data from the Symantec Reporting Database Link can be lost. If you
set this value to a number greater than 0, the database checks for other calls
between purge commands. However, if you set the number to a low value, the
DBPurge utility must send a large number of separate commands to the
database and purge utility may take a substantial amount of time to purge the
database. The default value is 5000, however, you may need to change this value
to optimize it for your database.
Appendix
A
About Symantec ESM
Reports
This appendix includes the following topic:
■
About the reports in Symantec ESM Reporting
About the reports in Symantec ESM Reporting
Symantec ESM Reports includes several default reports that you can use to
determine the state of your Symantec ESM Agents. Reports come in several
categories, including executive and technical level reports. Reports include
topics on agent states, audit errors, and Symantec ESM management. The
following is a description of each report and query in Symantec ESM Reports.
Note: If you generate a report that contains no data, Symantec Enterprise
Reporting may return an error entitled General Error. If you are using a
reporting Web server on the local host, this error gives stack trace details for the
error in addition to reporting the error.
Account domain permissions (query)
This query retrieves the permissions that each Symantec ESM user account has
for each domain on every manager in the database. Account permissions
columns show whether a user account is active or locked out, whether a user can
view or modify domains, and whether a user can run policies and update
snapshots.
Default path: Public Folders > Symantec ESM > Technical > Administration >
Accounts
156 About Symantec ESM Reports
About the reports in Symantec ESM Reporting
Account permissions (query)
Use this query as a template to create your own custom queries in Query Studio
using the Account Permissions query subject in the metadata model.
Default path: Public Folders > Symantec ESM > Technical > Custom Queries
Account policy permissions (query)
This query retrieves the permissions that each Symantec ESM user account has
for each policy on every manager in the database. Account permissions columns
show whether a user account is active or locked out and whether a user can view,
modify, or run a policy on the manager.
Default path: Public Folders > Symantec ESM > Technical > Administration >
Accounts
Account template permissions (query)
This query displays the permissions that each Symantec ESM user account has
for each template on every manager in the database. Account permissions
columns show whether a user account is active or locked out and whether a user
can read or modify a template on the manager.
Default path: Public Folders > Symantec ESM > Technical > Administration >
Accounts
Agent audit schedule
This report displays the scheduled start time and date for audits of the agents on
selected managers. You select a policy with its related managers. The report
displays a schedule of the start times for the agents that are associated with the
selected policies and managers. Additional information in the report includes
the job ID and module names for selected policies.
Default path: Public Folders > Symantec ESM > Technical > Administration >
Audits
About Symantec ESM Reports
About the reports in Symantec ESM Reporting
Agent audit schedule (query)
This query retrieves the start time and date for audits of all agents that are on
selected managers. The query lets you select any or all managers and policies. It
then displays a schedule of the start times for audits of the agents on selected
managers using selected policies. You can also specify certain domains on a
manager and get audit information for those domains. Additional information
in the report includes the job ID and module names for selected policies that
were audited.
Default path: Public Folders > Symantec ESM > Technical > Administration >
Audits
Agent compliance distribution by line of business
This report shows the distribution of agents in a domain, as a function of
compliance percentages. A bar chart shows the number of agents in each
compliance percentage category. You select the domain, manager, policy, and
module for which you want to view data about the distribution of reporting
agents.
Default path: Public Folders > Symantec ESM > Executive > Policy Compliance >
Compliance Percentage
Agent compliance Distribution by manager
This report shows the distribution of agents on a manager as a function of
compliance percentages. A bar chart shows the number of agents in each
compliance percentage category. You select the manager, domain, policy, and
module for which you want to retrieve data about the distribution of the
reporting agents.
Default path: Public Folders > Symantec ESM > Technical > Policy Compliance >
Compliance Percentage
Agent compliance (query)
This query lists policy compliance percentages for agents in your enterprise.
This query displays policy compliance data for selected policies and related
modules for selected managers and domains. It also shows the date and time of
the policy run from which the data was retrieved. Data is taken from the most
recent successful policy run for each agent.
Default path: Public Folders > Symantec ESM > Technical > Policy Compliance >
Compliance Percentage
157
158 About Symantec ESM Reports
About the reports in Symantec ESM Reporting
Agent counts by manager
This report displays the number of agents in each domain on every manager in
your database. It also shows the total number of agents on every manager.
Default path: Public Folders > Symantec ESM > Technical > Administration >
Agents
Agent counts by manager (query)
This query retrieves the number of agents in each domain on every manager in
your database.
Default path: Public Folders > Symantec ESM > Technical > Administration >
Agents
Agent level (query)
Use this query to retrieve security levels for agents on any or all managers and
domains in your enterprise. This query displays the agent level (either red,
yellow, or green) for all agents on selected managers and domains. You can
select any or all managers and domains and the query reports data about the
associated agents. You can also select any or all polices and modules. The query
shows security levels for each agent that is included in your selections. The
query also shows the date of the policy runs from which the data was retrieved.
Default path: Public Folders > Symantec ESM > Technical > Policy Compliance >
Agent Level
Agent level by line of business
This report shows the number of agents at each security level for a selected
module in a selected domain. When you make the domain, manager, policy, then
module selections, the report displays the number of agents at each level,
grouped by module and then by domain. The report displays data as both a chart
and a table.
Default path: Public Folders > Symantec ESM > Executive > Policy Compliance >
Agent Level
About Symantec ESM Reports
About the reports in Symantec ESM Reporting
Agent level by line of business (query)
This query retrieves agent security levels for all agents in selected domains.
When you make the domain, manager, policy, then module selections, the query
displays the agent levels of all agents for all selected managers and domains.
The query also shows the date and time of the policy run from which the data
was retrieved. The query displays data in table form. You can modify the query
to meet your needs.
Default path: Public Folders > Symantec ESM > Executive > Policy Compliance >
Agent Level
Agent level by manager
This report shows agent security levels for agents that are audited by specific
managers. It lets you select a policy with any or all related modules, and then it
shows you security levels for all agents on selected managers and the specified
domain. The report displays data as both a chart and a table.
Note: In this report, when reporting on all modules, agent counts for the All
Modules row may not appear to correlate with the agent count in the individual
modules. The reason for this is that the All Modules row assesses the overall
security level of the agents while the individual module rows assess the security
level of each agent in regard to a single module only.
Default path: Public Folders > Symantec ESM > Technical > Policy Compliance >
Agent Level
Agent level by manager (query)
This query lists agent security levels for agents that are examined by specific
managers. It lets you select a policy with any or all related modules, along with
any or all managers and domains. It then shows you the number of agents at
every security level on the selected managers.
Default path: Public Folders > Symantec ESM > Technical > Policy Compliance >
Agent Level
159
160 About Symantec ESM Reports
About the reports in Symantec ESM Reporting
Agent properties (query)
This query displays the properties of each agent on every manager in your
database. The properties columns that this query shows include Platform,
Symantec ESM Version, SU Version, OS, Agent Name, Port, Protocol,
Description, and Asset Tag.
Default path: Public Folders > Symantec ESM > Technical > Administration >
Agents
Agent summaries (query)
Use this query as a template to create your own custom queries in Query Studio
using the Agent Summaries query subject in the metadata model.
Default path: Public Folders > Symantec ESM > Technical > Custom Queries
Agent Summary
This report shows the number of red, yellow, and green messages for agents that
you select. You select the policy, modules, managers, domains, and agents, and
the report displays the agent data from the most recent policy run sorted by
category, module, manager, and domain. The report also displays the total
number of messages and the date of the policy run.
Default path: Public Folders > Symantec ESM > Technical > Console Views
Agent trends (query)
Use this query as a template to create your own custom queries in Query Studio
using the Agent Trends query subject in the metadata model.
Default path: Public Folders > Symantec ESM > Technical > Custom Queries
Agent violations (query)
This query retrieves information about policy violations on your agents. The
query displays policy compliance data for selected policies and related modules
on each selected manager and domain. Results are grouped by policies and
modules. The query also shows the number of violations by severity levels.
Default path: Public Folders > Symantec ESM > Technical > Policy Compliance >
Violation Counts
About Symantec ESM Reports
About the reports in Symantec ESM Reporting
Agents not assigned to user-defined domains (query)
This query retrieves the name of every Symantec ESM Agent that is registered
to a manager but is not listed in a user-defined domain. These agents appear
only in the All Agents domain.
Default path: Public Folders > Symantec ESM > Technical > Administration >
Agents
Agents not running a policy before a specified date
This report displays the agents that will not run a specific policy until after a
specified date. You select a policy, manager, domain, and audit date, and the
report shows which of the selected agents will not run the policy until after the
date you select.
Default path: Public Folders > Symantec ESM > Technical > Administration >
Audits
Agents with errors by line of business
This report shows the number of agents in a domain that are reporting errors.
The report displays a graph and a table. When you select, the policy, the domain,
and the manager, the report shows the number of agents with audit errors for
each domain and manager. Data is for the most recent policy run for each agent.
Default path: Public Folders > Symantec ESM > Executive > Administration
Audit (query)
Use this query as a template to create your own custom queries in Query Studio
using the Audit query subject in the metadata model.
Default path: Public Folders > Symantec ESM > Technical > Custom Queries
Audit errors by line of business (query)
This report shows the number of agents in a domain that are reporting errors.
The report groups the error messages by domain, manager and agent. When you
select domains, managers, and policies, the report shows audit error messages
for each agent for the most recent policy run.
Default path: Public Folders > Symantec ESM > Technical > Administration >
Errors
161
162 About Symantec ESM Reports
About the reports in Symantec ESM Reporting
Audit errors (query)
Use this query to retrieve all audit errors on managers and domains in your
enterprise. The tabular information is grouped according to manager, domain,
and policy. It also shows the job ID, the agent error, the module name, and the
module error. You can filter the query based on any of these categories.
Default path: Public Folders > Symantec ESM > Technical > Administration >
Errors
Note: Error descriptions are truncated to 510 characters. This is also true in
Symantec ESM.
Audits scheduled for today (query)
This query lists the audits that are scheduled to run on the current day. This
report shows the manager name, the policy name, the job ID, the start time, and
the run state for the policies.
Default path: Public Folders > Symantec ESM > Technical > Administration >
Audits
Change event details
This tabular report shows how agents have been changed since the last
snapshot. You can specify policy, module, and severity, on any or all managers,
domains, and agents. The report generates event titles, names, information, and
descriptions for change events for each agent you select.
Default path: Public Folders > Symantec ESM > Technical > Message
Information > Change Notification
Change events (query)
Use this query as a template to create your own custom queries in Query Studio
using the Change Events query subject in the metadata model.
Default path: Public Folders > Symantec ESM > Technical > Custom Queries
About Symantec ESM Reports
About the reports in Symantec ESM Reporting
Compliance by line of business
This report shows policy compliance percentages for selected domains. It lets
you select a policy with any or all related modules, and then it displays policy
compliance percentage data about that policy for all selected managers and
domains. A policy compliance percentage figure for a domain is a figure that
represents the aggregate of policy compliance percentages of all agents in the
domain.
Default path: Public Folders > Symantec ESM > Executive > Policy Compliance >
Compliance Percentage
Compliance by line of business (query)
This query retrieves policy compliance percentages for selected domains. You
select a policy with any or all related modules, and then the query retrieves
policy compliance percentage data about that policy for all selected managers
and domains. The query displays data in table form.
Default path: Public Folders > Symantec ESM > Executive > Policy Compliance >
Compliance Percentage
Compliance by manager
This report shows policy compliance percentages for managers. It lets you select
a policy with any or all related modules, and a selected domain, and then it
shows you policy compliance percentage data about that policy for selected
managers. Information includes module, manager, and compliance percentage
information. The report displays data as both a bar chart and a table.
Default path: Public Folders > Symantec ESM > Technical > Policy Compliance >
Compliance Percentage
Compliance by manager (query)
This query retrieves policy compliance percentages for managers. It lets you
select a policy with any or all related modules, as well as the domains and
managers for which you want data, and then it shows you policy compliance
percentage data about each module for the selected policy on selected managers.
Information includes module, manager, domain, and compliance percentage
information.
Default path: Public Folders > Symantec ESM > Technical > Policy Compliance >
Compliance Percentage
163
164 About Symantec ESM Reports
About the reports in Symantec ESM Reporting
Daily agent level trend by line of business
This report shows daily agent security level trends for a selected manager and
domain. You select a policy with a related module on any manager and domain
in your enterprise. After you select a date range, the report displays a trend
chart that shows the number of agents for that manager and domain that are at
each security level (either red, yellow, or green) for the selected policy and its
related module. The report displays data as both a chart and a table.
Default path: Public Folders > Symantec ESM > Executive > Policy Compliance >
Agent Level
Daily agent level trend by manager
This report shows daily agent security level trends for a selected manager. You
select a policy with a related module on any manager and domain in your
enterprise. You then select a date range, and the report displays a trend chart
that shows the number of agents in the selected domain at each security level
(red, yellow, and green) for the selected policy and its related module. The report
also displays the data as a table.
Default path: Public Folders > Symantec ESM > Technical > Policy Compliance >
Agent Level
Daily compliance trend by line of business
This report shows daily compliance percentage trends for a selected domain.
You select a policy with a related module on any manager and domain in your
enterprise. After you select a date range, the report displays a trend chart that
shows the aggregate level of compliance for all agents in the domain. The report
also displays data in table form.
Default path: Public Folders > Symantec ESM > Executive > Policy Compliance >
Compliance Percentage
Daily compliance trend by manager
This report shows daily compliance percentage trends for a selected manager.
You can select a policy with a module on any manager and domain in your
enterprise. You then select a date range, and the report displays a trend chart
that shows the aggregate level of compliance for a selected domain. The report
also displays the data as a table.
Default path: Public Folders > Symantec ESM > Technical > Policy Compliance >
Compliance Percentage
About Symantec ESM Reports
About the reports in Symantec ESM Reporting
Daily violations trend by line of business
This report shows the daily policy violation trends for any selected module. You
select a policy with a related module, and then select managers, domains, and a
date range. The report displays a trend chart that shows policy violations for a
selected manager and domain. The report also displays the data in table form.
Default path: Public Folders > Symantec ESM > Executive > Policy Compliance >
Violation Counts
Daily violations trend by manager
This report shows daily policy violation trends for a selected manager. You
make policy, module, manager, domain, and date range selections, and the
report displays a trend chart that shows policy violations for all agents that are
examined by the selected manager and domain. The report also displays data as
a table.
Default path: Public Folders > Symantec ESM > Technical > Policy Compliance >
Violation Counts
Domain trends (query)
Use this query as a template to create your own custom queries in Query Studio
using the Domain Trends query subject in the metadata model.
Default path: Public Folders > Symantec ESM > Technical > Custom Queries
License (query)
Use this query as a template to create your own custom queries in Query Studio
using the License query subject in the metadata model.
Default path: Public Folders > Symantec ESM > Technical > Custom Queries
License counts by manager (query)
This report shows the number of licenses that are registered to each manager.
You select one or more managers, and the query displays the manager name, the
total number of agent licenses that are registered to that manager, the number
of licenses that are being used, and the number of licenses that are available.
Default path: Public Folders > Symantec ESM > Technical > Console Views
165
166 About Symantec ESM Reports
About the reports in Symantec ESM Reporting
Manager - domain - agent (query)
Use this query as a template to create your own custom queries in Query Studio
using the Manager - Domain - Agent query subject in the metadata model.
Default path: Public Folders > Symantec ESM > Technical > Custom Queries
Message compliance by line of business
This report shows whether agents in a domain comply with the security
conditions that are reported by specific messages in a policy. When you select a
policy and a message from that policy, the report displays whether each agent in
every user-defined domain in your database complies or does not comply with
the condition that is reported by the selected message.
Default path: Public Folders > Symantec ESM > Executive > Administration
Note: In order to minimize duplicate data entries from a single agent, this report
shows data for only user-defined domains.
Message details - found issues
This report shows the details of messages that were reported by the agents that
you select. The report lets you select the policy, category, module, message
severity, manager, domain, and agents, then it shows you the messages that the
managers, domains, and agents that you select reported during the last policy
run.
Default path: Public Folders > Symantec ESM > Technical > Message
Information
Messages (query)
Use this query as a template to create your own custom queries in Query Studio
using the Messages query subject in the metadata model.
Default path: Public Folders > Symantec ESM > Technical > Custom Queries
About Symantec ESM Reports
About the reports in Symantec ESM Reporting
Monthly agent level trend by line of business
This report shows monthly agent security level trends for a selected manager
and domain. You select a policy with a related module on any manager and
domain in your enterprise. After you select a date range, the report displays a
trend chart that shows the number of agents for that manager and domain that
are at each security level (either red, yellow, or green) for the selected policy and
its related module. The report displays data as both a chart and a table.
Default path: Public Folders > Symantec ESM > Executive > Policy Compliance >
Agent Level
Monthly agent level trend by manager
This report shows monthly agent security level trends for a selected manager.
You select a policy with a related module on any manager and domain in your
enterprise. You then select a date range, and the report displays a trend chart
that shows the number of agents in the selected domain at each security level
(red, yellow, and green) for the selected policy and its related module. The report
also displays the data as a table.
Default path: Public Folders > Symantec ESM > Technical > Policy Compliance >
Agent Level
Monthly compliance trend by line of business
This report shows monthly compliance percentage trends for a selected domain.
You select a policy with a related module on any manager and domain in your
enterprise. After you select a date range, the report displays a trend chart that
shows the aggregate level of compliance for all agents in the domain. The report
also displays data in table form.
Default path: Public Folders > Symantec ESM > Executive > Policy Compliance >
Compliance Percentage
Monthly compliance trend by manager
This report shows monthly compliance percentage trends for a selected
manager. You can select a policy with a module on any manager and domain in
your enterprise. You then select a date range, and the report displays a trend
chart that shows the aggregate level of compliance for a selected domain. The
report also displays the data as a table.
Default path: Public Folders > Symantec ESM > Technical > Policy Compliance >
Compliance Percentage
167
168 About Symantec ESM Reports
About the reports in Symantec ESM Reporting
Monthly violations trend by line of business
This report shows the monthly policy violation trends for any selected module.
You select a policy with a related module, and then select managers, domains,
and a date range. The report displays a trend chart that shows policy violations
for a selected manager and domain. The report also displays the data in table
form.
Default path: Public Folders > Symantec ESM > Executive > Policy Compliance >
Violation Counts
Monthly violations trend by manager
This report shows monthly policy violation trends for a selected manager. You
select a policy with a related module, and then select a date range. The report
displays a trend chart that shows policy violations for all agents that are
examined by the selected manager and domain. The report also displays data as
a table.
Default path: Public Folders > Symantec ESM > Technical > Policy Compliance >
Violation Counts
Policy audit schedule
This report shows the audit schedule for a policy on managers in your database.
You select a policy and its associated managers and domains, and the report
displays the managers and domains that the policy ran on, the policy start
times, the Job IDs, and the modules that run in that policy.
Default path: Public Folders > Symantec ESM > Technical > Administration >
Audits
Policy audit schedule (query)
This query retrieves the audit schedules for policies on managers in your
database. You select the managers and policies, and the query shows the
managers, the policies, the domains that the policies run on, the policy start
times, the Job IDs, and the modules that run in each policy.
Default path: Public Folders > Symantec ESM > Technical > Administration >
Audits
About Symantec ESM Reports
About the reports in Symantec ESM Reporting
Policy Runs
This report shows all policy run information and is sorted by job ID. When you
select a policy with associated managers, domains, and agents, the report
displays the run state, the start time, the finish time, the policy, the domain, and
the audit status for each job ID.
Default path: Public Folders > Symantec ESM > Technical > Console Views
Quarterly agent level trend by line of business
This report shows quarterly agent security level trends for a selected manager
and domain. You select a policy with a related module on any manager and
domain in your enterprise. After you select a date range, the report displays a
trend chart that shows the number of agents for that manager and domain that
are at each security level (either red, yellow, or green) for the selected policy and
its related module. The report displays data as both a chart and a table.
Default path: Public Folders > Symantec ESM > Executive > Policy Compliance >
Agent Level
Quarterly agent level trend by manager
This report shows quarterly agent security level trends for a selected manager.
You select a policy with a related module on any manager and domain in your
enterprise. You then select a date range, and the report displays a trend chart
that shows the number of agents in the selected domain at each security level
(red, yellow, and green) for the selected policy and its related module. The report
also displays the data as a table.
Default path: Public Folders > Symantec ESM > Technical > Policy Compliance >
Agent Level
Quarterly compliance trend by line of business
This report shows quarterly compliance percentage trends for a selected
domain. You select a policy with a related module on any manager and domain
in your enterprise. After you select a date range, the report displays a trend
chart that shows the aggregate level of compliance for all agents in the domain.
The report also displays data in table form.
Default path: Public Folders > Symantec ESM > Executive > Policy Compliance >
Compliance Percentage
169
170 About Symantec ESM Reports
About the reports in Symantec ESM Reporting
Quarterly compliance trend by manager
This report shows quarterly compliance percentage trends for a selected
manager. You can select a policy with a module on any manager and domain in
your enterprise. You then select a date range, and the report displays a trend
chart that shows the aggregate level of compliance for a selected domain. The
report also displays the data as a table.
Default path: Public Folders > Symantec ESM > Technical > Policy Compliance >
Compliance Percentage
Quarterly violations trend by line of business
This report shows the quarterly policy violation trends for any selected module.
You select a policy with a related module, and then select managers, domains,
and a date range. The report displays a trend chart that shows policy violations
for a selected manager and domain. The report also displays the data in table
form.
Default path: Public Folders > Symantec ESM > Executive > Policy Compliance >
Violation Counts
Quarterly violations trend by manager
This report shows quarterly policy violation trends for a selected manager. You
select a policy with a related module, and then select a date range. The report
displays a trend chart that shows policy violations for all agents that are
examined by the selected manager and domain. The report also displays data as
a table.
Default path: Public Folders > Symantec ESM > Technical > Policy Compliance >
Violation Counts
Suppressed message details
This report shows the details of messages that are suppressed on the agents that
you select. The report lets you select the policy, category, module, message
severity, manager, domains, and agents, then it shows you the messages that the
managers, domains, and agents that you select reported as suppressed during
the last policy run.
Default path: Public Folders > Symantec ESM > Technical > Message
Information
About Symantec ESM Reports
About the reports in Symantec ESM Reporting
Suppression configuration
This report displays information about current suppression configurations for
Symantec ESM Managers. The report lets you select the policies, modules,
platforms, and managers for which you want to view suppression configuration
information. You can also limit suppression information according to creation
date, expiration date, last used date, and whether the suppression is currently
enabled.
Default path: Public Folders > Symantec ESM > Technical > Administration >
Suppression Configuration
Suppression configuration (query)
This query shows suppression configuration information for the managers in
your database. The query displays information on suppressions for managers,
accounts, policies, platforms, modules, creation date, expiration date, date last
used, wildcard information, and whether suppressions are currently enabled.
Default path: Public Folders > Symantec ESM > Technical > Administration >
Suppression Configuration
Suppression configuration (query)
Use this query as a template to create your own custom queries in Query Studio
using the Suppression Configuration query subject in the metadata model.
Default path: Public Folders > Symantec ESM > Technical > Custom Queries
Symantec report template
Use this template as a framework for creating your own reports in Report
Studio.
Default path: Public Folders > Symantec ESM > Technical > Report Template
Upcoming scheduled audits (query)
This query lists the audits that are scheduled to run within a time period that
you specify. For each Audit, the query shows the manager name, the domain
name, the policy name, the job ID, the start time, the run state for the policies,
and the user name of the Symantec ESM account that created the policies.
Default path: Public Folders > Symantec ESM > Technical > Administration >
Audits
171
172 About Symantec ESM Reports
About the reports in Symantec ESM Reporting
Violations by line of business
This report displays security compliance data for modules on selected domains.
The information is grouped according to modules, then by domain. It also shows
the number of messages at each security level (red, yellow, and green). The
report displays data as both a chart and a table.
Default path: Public Folders > Symantec ESM > Executive > Policy Compliance >
Violation Counts
Violations by line of business (query)
This query retrieves security compliance data for modules in selected domains.
By default, the results are grouped by domains, and they display the number of
messages at each security level (red, yellow and green) for each domain, as well
as the total number of messages. The query displays data as both a chart and a
table. You can modify the query to meet your needs.
Default path: Public Folders > Symantec ESM > Executive > Policy Compliance >
Violation Counts
Violations by manager
This report shows policy violations on selected managers. You select a policy,
with its related modules, a domain, and any or all managers. A bar chart shows
the distribution of the violations across each manager, the number of violations
for each manager, and the severity level of each message. This information is
also shown as a table.
Default path: Public Folders > Symantec ESM > Technical > Policy Compliance >
Violation Counts
Violations by manager (query)
This query retrieves information about policy violations on selected managers.
You select a policy, with its related modules, and any or all managers and
domains. The number of violations and severity levels are shown as a table.
Default path: Public Folders > Symantec ESM > Technical > Policy Compliance >
Violation Counts
About Symantec ESM Reports
About the reports in Symantec ESM Reporting
Weekly agent level trend by line of business
This report shows weekly agent security level trends for a selected manager and
domain. You select a policy with a related module on any manager and domain
in your enterprise. After you select a date range, the report displays a trend
chart that shows the number of agents for that manager and domain that are at
each security level (either red, yellow, or green) for the selected policy and its
related module. The report displays data as both a chart and a table.
Default path: Public Folders > Symantec ESM > Executive > Policy Compliance >
Agent Level
Weekly agent level trend by manager
This report shows weekly agent security level trends for a selected manager.
You select a policy with a related module on any manager and domain in your
enterprise. You then select a date range, and the report displays a trend chart
that shows the number of agents in the selected domain at each security level
(red, yellow, and green) for the selected policy and its related module. The report
also displays the data as a table.
Default path: Public Folders > Symantec ESM > Technical > Policy Compliance >
Agent Level
Weekly compliance trend by line of business
This report shows weekly compliance percentage trends for a selected domain.
You select a policy with a related module on any manager and domain in your
enterprise. After you select a date range, the report displays a trend chart that
shows the aggregate level of compliance for all agents in the domain. The report
also displays data in table form.
Default path: Public Folders > Symantec ESM > Executive > Policy Compliance >
Compliance Percentage
Weekly compliance trend by manager
This report shows weekly compliance percentage trends for a selected manager.
You can select a policy with a module on any manager and domain in your
enterprise. You then select a date range, and the report displays a trend chart
that shows the aggregate level of compliance for a selected domain. The report
also displays the data as a table.
Default path: Public Folders > Symantec ESM > Technical > Policy Compliance >
Compliance Percentage
173
174 About Symantec ESM Reports
About the reports in Symantec ESM Reporting
Weekly violations trend by line of business
This report shows the weekly policy violation trends for any selected module.
You select a policy with a related module, and then select managers, domains,
and a date range. The report displays a trend chart that shows policy violations
for a selected manager and domain. The report also displays the data in table
form.
Default path: Public Folders > Symantec ESM > Executive > Policy Compliance >
Violation Counts
Weekly violations trend by manager
This report shows weekly policy violation trends for a selected manager. You
select a policy with a related module, and then select a date range. The report
displays a trend chart that shows policy violations for all agents that are
examined by the selected manager and domain. The report also displays data as
a table.
Default path: Public Folders > Symantec ESM > Technical > Policy Compliance >
Violation Counts
Yearly agent level trend by line of business
This report shows yearly agent security level trends for a selected manager and
domain. You select a policy with a related module on any manager and domain
in your enterprise. After you select a date range, the report displays a trend
chart that shows the number of agents for that manager and domain that are at
each security level (either red, yellow, or green) for the selected policy and its
related module. The report displays data as both a chart and a table.
Default path: Public Folders > Symantec ESM > Executive > Policy Compliance >
Agent Level
Yearly agent level trend by manager
This report shows yearly agent security level trends for a selected manager. You
select a policy with a related module on any manager and domain in your
enterprise. You then select a date range, and the report displays a trend chart
that shows the number of agents in the selected domain at each security level
(red, yellow, and green) for the selected policy and its related module. The report
also displays the data as a table.
Default path: Public Folders > Symantec ESM > Technical > Policy Compliance >
Agent Level
About Symantec ESM Reports
About the reports in Symantec ESM Reporting
Yearly compliance trend by line of business
This report shows yearly compliance percentage trends for a selected domain.
You select a policy with a related module on any manager and domain in your
enterprise. After you select a date range, the report displays a trend chart that
shows the aggregate level of compliance for all agents in the domain. The report
also displays data in table form.
Default path: Public Folders > Symantec ESM > Executive > Policy Compliance >
Compliance Percentage
Yearly compliance trend by manager
This report shows yearly compliance percentage trends for a selected manager.
You can select a policy with a module on any manager and domain in your
enterprise. You then select a date range, and the report displays a trend chart
that shows the aggregate level of compliance for a selected domain. The report
also displays the data as a table.
Default path: Public Folders > Symantec ESM > Technical > Policy Compliance >
Compliance Percentage
Yearly violations trend by line of business
This report shows the yearly policy violation trends for any selected module.
You select a policy with a related module, and then select managers, domains,
and a date range. The report displays a trend chart that shows policy violations
for a selected manager and domain. The report also displays the data in table
form.
Default path: Public Folders > Symantec ESM > Executive > Policy Compliance >
Violation Counts
Yearly violations trend by manager
This report shows yearly policy violation trends for a selected manager. You
select a policy with a related module, and then select a date range. The report
displays a trend chart that shows policy violations for all agents that are
examined by the selected manager and domain. The report also displays data as
a table.
Default path: Public Folders > Symantec ESM > Technical > Policy Compliance >
Violation Counts.
175
176 About Symantec ESM Reports
About the reports in Symantec ESM Reporting
Appendix
B
About the Symantec ESM
Reporting metadata model
This appendix includes the following topics:
■
About the Query Studio metadata model
■
Combinations of data objects
■
Descriptions of data items
■
Structure of data items
About the Query Studio metadata model
Large amounts of information in a database are categorized based on metadata,
which is the classification of units of content so they can be retrieved and
combined in useful and meaningful ways.
The information in the Symantec ESM Reporting metadata model is organized
to cover all enterprise domains, in all lines of business. Reports and queries
created with the Symantec ESM Reporting metadata model give a consistent
view of enterprise data. This creates a common foundation for sharing
information, whether with analysts, developers, or managers.
Analysts and programmers use the data model to create reports in an easy-tounderstand format. These reports illustrate security issues and trends that
decision makers can use to increase the security of the enterprise network and
maintain compliance with security policies.
178 About the Symantec ESM Reporting metadata model
About the Query Studio metadata model
Metadata model divisions
The Symantec ESM Reporting metadata model arranges ESM data into three
main areas:
■
Administration
■
Message Information
■
Message Summary
Each area is contained within its own folder. You can use the data items in the
folder to build effective queries.
About the Administration folder
The Administration folder contains data items that relate to the administration
of your Symantec ESM application, such as Symantec ESM user accounts,
message suppressions, audit schedules, Manager-Agent communications
configurations, and similar types of data.
About the Message Information folder
The Message Information folder contains data items that relate to the security
state of computers in your enterprise, such as policies, message titles, message
descriptions, and change events.
These data items are intended to display the details about specific problems at
the Agent level. Reports that you generate with these data items are intended
for operations personnel, and those responsible for day-to-day computer
security maintenance.
About the Message Summaries folder
The Message Summaries folder contains data items that relate to fact items in
the metadata model. Combine these facts with data items that are in the
Message Information section to quantify your queries. Fact item columns should
be placed in the report after the information objects.
These data objects are intended to create reports that display the current overall
security state of your enterprise. The facts let you quantify the security state of
your computers to use in reports to executives and managers.
About the Symantec ESM Reporting metadata model
Combinations of data objects
Query subject prompts
The Query Studio uses prompts with certain query subjects to help you focus
your queries to only the information that you need. When you use information
objects from certain query subjects, the Query Studio brings up prompt pages
that let you select from the policies, modules, managers, and domains that you
want. The following table outlines the prompts that are associated with each
query subject
Table B-1
Query subject prompts
Query subject
Associated prompts
Account permissions
manager
Agent summaries
policy, module, manager, domain
Agent trends
policy, module, manager, domain
Audits
policy, manager, domain
Change events
policy, manager, domain
Domain trends
policy, module, manager, domain
Messages
policy, module, manager, domain
Suppressions
policy
Note: If you create queries from scratch, the Query Studio cannot remember
what prompt values that you selected. Each change requires you reenter the
prompt values. Also, the Query Studio cannot determine which prompts are
necessary based on the columns that you add to the query and requests all
associated prompts regardless of whether you use a related column. To work
around this issue, when you use the query studio, use the queries in the Custom
Queries folder in the user interface.
Combinations of data objects
When you create queries, you must use information objects, filters, and facts
from within the same query subject. Using data objects from different query
subjects may result in errors.
179
180 About the Symantec ESM Reporting metadata model
Combinations of data objects
Objects that require another object
Some data objects must combine with other objects to return useful
information, for example a query that uses only Asset tag or Description. An
effective query will combine one of these objects with an object such as Agent
name or Domain.
Data items from one section of the metadata model often do not pertain to other
sections. Because each section of the model has its own specific purpose,
combining data items from separate sections of the metadata model can result
in errors or meaningless reports.
Some examples of data items that have these types of dependencies include the
following:
■
User permissions
■
Agent properties
■
Suppression information
■
Change events
■
Message information
■
Agent counts
■
Compliance percentages
■
Severity counts
■
Violation counts
■
Parameters
For example, if you create a query including columns of data about the
Managers, Policies, and Messages, you cannot add a column about Account
Privileges without first removing the columns about Policies and Messages.
This is because Policies and Messages are data items that relate to security, and
Account Privileges is a data item that relates to Administration. Mixing
unrelated data items in a query can result in meaningless reports, and can
generate cross-join errors.
Note: The Symantec ESM Reports metadata model has two data items that may
not contain any information. The Asset Tag and Description data items (under
Agent in the Administration folder) are not supported in Symantec ESM 6.1, but
may be supported in future versions. You can use an SQL tool to add information
to these two fields in the database.
About the Symantec ESM Reporting metadata model
Descriptions of data items
Descriptions of data items
Data objects in the Symantec ESM Reporting metadata model are classified as
query subjects, information objects, facts, or filters. Table B-2 lists the different
types of data items and descriptions of each type.
Table B-2
Different types of data items
Type of data item
Description
Query subjects
Query subjects represent tables in the database. They generally
hold information objects.
Information objects
Information objects are the main report items. They represent
columns in a report. Managers, Agents, Domains, and Policies are
examples of information objects. Information objects often relate
to fields in a table in the database.
Facts
A fact is a quantifiable column in a report. Examples of facts
include numbers of messages, and numbers of types and
severities of messages. Facts should generally be inserted into
reports after information objects.
Filters
Filters control and limit the data so you can display the specific
information you need. When you add a filter to a report, it refines
the displayed information to be more specific.
Structure of data items
The following set of tables describes the data items in the Symantec ESM
Reports metadata model. Data items described in these tables include
information objects, filters, and facts.
See “Data items” on page 137.
The tables include the name of the data item, a description of the data item, and
a container. Containers can be either folders or query subjects. At the top of
each table is a path to locate the data items that shows the folders of query
subjects that you must expand in the tree to access the data item.
181
182 About the Symantec ESM Reporting metadata model
Structure of data items
Administration folder structure
The following data items are included in the Administration folder:
Table B-3
Path: Administration/Account permissions/[Data item]
Container
Data item
Description
Account
permissions
Manager
A unique character string that identifies a
Symantec ESM Manager.
Account name
A unique character string that identifies the
Symantec ESM account.
Active
True/false value that identifies whether the
Symantec ESM account is active.
Locked out
True/false value that identifies whether the
Symantec ESM account is locked out.
Disabled
True/false value that identifies whether the
Symantec ESM account is disabled.
Table B-4
Path: Administration/Account permissions/Domains/[Data item]
Container
Data item
Description
Domains
Domain
A unique character string that identifies the
Symantec ESM Domain for a manager.
View domain
True/false value that identifies whether the user
can view all Symantec ESM domains.
Modify domain
True/false value that identifies whether the user
can modify all Symantec ESM domains.
Run policy on domain
True/false value that identifies whether the user
can run a Symantec ESM policy on a specific
domain.
Snapshot updates
True/false value that identifies whether the user
can create or update snapshots on a specific
domain.
About the Symantec ESM Reporting metadata model
Structure of data items
Table B-5
Path: Administration/Account permissions/Policies/[Data item]
Container
Data item
Description
Policies
Policy
A unique character string that identifies a
specific Symantec ESM Policy for a manager.
View policy
True/false value that identifies whether the user
can view all Symantec ESM policies.
Modify policy
True/false value that identifies whether the user
can modify all Symantec ESM policies.
Run policy
True/false value that identifies whether the user
can run a Symantec ESM policy on a specific
domain.
Table B-6
Path: Administration/Account permissions/Template/[Data item]
Container
Data item
Description
Template
Template name
A unique character string that identifies a
template from a specific Symantec ESM Policy.
Modify template
True/false value that identifies whether the user
can modify a specific Symantec ESM template.
Read template
True/false value that identifies whether the user
can run a Symantec ESM policy on a specific
domain.
183
184 About the Symantec ESM Reporting metadata model
Structure of data items
Table B-7
Path: Administration/Account permissions/Advanced/[Data item]
Container
Data item
Description
Advanced
Perform remote
installs/upgrades
True/false value that identifies whether the user
can perform a remote installation upgrade.
Register agents with
manager
True/false value that identifies whether the user
can register Agents.
Modify own password
True/false value that identifies whether the user
can modify his own password.
Modify ESM options
True/false value that identifies whether the user
can modify Manager options.
Manage user rights
True/false value that identifies whether the user
can manage Symantec ESM user rights.
Table B-8
Path: Administration/Account permissions/Codes/[Data item]
Container
Data item
Description
Codes
LOCKED_OUT_KEY
A boolean integer that identifies whether the
Symantec ESM account is locked out.
ACTIVE_KEY
A boolean integer that identifies whether the
Symantec ESM account is active.
POLICY_ID
An hexadecimal string that uniquely identifies
the specific policy.
DOMIAIN_ID
An hexadecimal string that uniquely identifies
the specific domain.
MANAGER_ID
An hexadecimal string that uniquely identifies
the specific manager.
About the Symantec ESM Reporting metadata model
Structure of data items
Table B-9
Path: Administration/Audit/[Data item]
Container
Data item
Description
Audit
Finish time
The system time of the end of a specific audit.
Start time
The system time of the start of a specific audit.
Job ID
A character string that identifies a specific
audit.
Run state
True/false value that identifies the current state
of the policy run including complete, running,
stopped, reporting errors, and other policy run
states.
Audit status
True/false value that identifies whether the
policy run completed without errors.
Account username
A unique character string that identifies the
username of a specific Symantec ESM account.
Policy
A unique character string that identifies a
specific Symantec ESM Policy for a manager.
Module
A unique character string that identifies a
specific Symantec ESM Module.
Manager
A unique character string that identifies a
specific Symantec ESM Manager.
Domain
A unique character string that identifies the
Symantec ESM Domain for a manager.
185
186 About the Symantec ESM Reporting metadata model
Structure of data items
Table B-10
Path: Administration/Audit/Agent State/[Data item]
Container
Data item
Description
Agent State
Agent
A unique character string that identifies a
specific Symantec ESM Agent on a manager.
Audit date
The system date for a specific audit.
Full policy run
Yes/no value that identifies whether the policy
run was a full policy run.
Successful audit
Yes/no value that identifies whether the policy
run completed successfully.
Erred module
A unique character string that identifies the
name of the module with errors.
Agent error
Displays the messages associated with agent
errors that are returned during policy runs.
Module error
Displays the messages associated with module
errors that are returned during policy runs.
About the Symantec ESM Reporting metadata model
Structure of data items
Table B-11
Path: Administration/Audit/Codes/[Data item]
Container
Data item
Description
Codes
AUDIT_ID
A unique character or numeric string that
identifies a specific audit.
AGENT_ID
A character or numeric string that identifies the
name of the Symantec ESM Agent host
computer.
MANAGER_ID
The unique character or numeric string that
identifies a Symantec ESM Manager
POLICY_ID
A character or numeric string that identifies the
Symantec ESM policy.
SHORT_NAME
A string of variable length (up to 32 characters)
that identifies the short name of an ESM
Module.
RUN_STATE_ID
An integer that identifies the run state of a
policy run.
USER_DEFINED_KEY
Integer that identifies whether the Symantec
ESM domain can be defined by the user.
DOMAIN_ID
A unique character or numeric string that
identifies the Symantec ESM domain.
FULL_POLICY_RUN_
KEY
A boolean integer that specifies whether the
policy run was a full policy run.
AUDIT_SUCCESSFUL_
KEY
A boolean integer that specifies whether the
policy run was successful.
AGENT_AUDIT _
ERR_ID
An character or numeric that specifies the agent
error.
187
188 About the Symantec ESM Reporting metadata model
Structure of data items
Table B-12
Path: Administration/Manager - Domain - Agent/[Data item]
Container
Data item
Description
Manager Domain Agent
Manager
A unique character string that identifies a
specific Symantec ESM Manager.
Domain
A unique character string that identifies the
Symantec ESM Domain for a manager.
Agent
A unique character string that identifies a
specific Symantec ESM Agent on a manager.
Policy
A unique character string that identifies a
specific Symantec ESM Policy for a manager.
Domain count
Fact that counts the number of Domains per
Manager.
Agent count
Fact that counts the number of Agents per
Manager.
About the Symantec ESM Reporting metadata model
Structure of data items
Table B-13
Path: Administration/Manager - Domain - Agent/Agent Properties/
[Data item]
Container
Data item
Description
Agent
Properties
Port
A unique character string that identifies the
port number of a specific Symantec ESM Agent.
Protocol
A unique character string that identifies that
identifies the communication protocol.
Proxy agent
A unique character string that identifies the
name of the proxy agent installed on the Agent.
ESM version
A unique character string that identifies the
version number of Symantec ESM that is
installed on the Agent.
OS
A unique character string that identifies the
type of operating system that the Agent has
installed.
Description
A unique character string that describes the
Agent. The string can include multi-byte
unicode characters for international use.
(Unsupported in Symantec ESM 6.1)
Asset tag
A unique character string that can contain
information from a physical security sticker or
barcode. (Unsupported in Symantec ESM 6.1)
SU version
A unique character string that identifies the
Security Update version number.
Live update
True/false value that identifies whether
LiveUpdate is active on the Agent.
Platform
A unique character string that identifies the
platform that the Symantec ESM Agent is
running on.
189
190 About the Symantec ESM Reporting metadata model
Structure of data items
Table B-14
Path: Administration/Manager - Domain - Agent/Codes/[Data item]
Container
Data item
Description
Codes
AGENT_ID
A character or numeric string that identifies
the name of the Symantec ESM Agent host
computer.
OS_VERSION_ID
The unique character or numeric string that
identifies the operating system of the agent.
DOMAIN_ID
A unique character or numeric string that
identifies the Symantec ESM domain.
MANAGER_ID
The unique character or numeric string that
identifies a Symantec ESM Manager
POLICY_ID
A character or numeric string that identifies
the Symantec ESM policy.
USER_DEFINED_KEY
Integer that identifies whether the Symantec
ESM domain can be defined by the user.
LIVE_UPDATE_KEY
A boolean integer that specifies whether
LiveUpdate is enabled on the agent.
About the Symantec ESM Reporting metadata model
Structure of data items
Table B-15
Container
Path: Administration/Suppression Configuration/[Data item]
Data item
Description
Suppression
Suppression title
Configuration
A unique character string that identifies the
title of a specific Symantec ESM suppression
configuration.
Suppressed name
A unique character string that identifies the
name of the suppression configuration.
Suppressed
information
A unique character string that identifies what
information is being suppressed on a specific
agent.
Suppressed agent
A unique character string that identifies the
name of the suppressed agent based on the
configuration.
Account name
A unique character string that identifies the
Symantec ESM account that created the
suppression.
Name wildcarded
True/false value that identifies whether
suppression is configured to suppress messages
of a specific type from all agents regardless of
the user, account, or computer name.
Information
wildcarded
True/false value that identifies whether
suppression is configured to suppress messages
of a specific type from all agents regardless of
the message text.
Agent wildcarded
True/false value that identifies whether
suppression is configured to suppress messages
of a specific type regardless of the agent from
which the message came.
Enabled
True/false value that identifies whether the
suppression is currently enabled.
Comment
A string of variable length (up to 512 characters)
that can include multi-byte unicode characters
for international use.
Creation date
The system time for the creation date of the
suppression configuration.
Last used date
The system date and time for the last time that
the suppression configuration was used.
191
192 About the Symantec ESM Reporting metadata model
Structure of data items
Table B-15
Container
Path: Administration/Suppression Configuration/[Data item]
Data item
Suppression
Expiration date
Configuration
Table B-16
Description
The system date and time of the expiration date
of the suppression configuration.
Module
A unique character string that identifies a
specific Symantec ESM Module.
Platform
A unique character string that identifies the
platform that the Symantec ESM Agent is
running on.
Manager
A unique character string that identifies a
specific Symantec ESM Manager.
Policy
A unique character string that identifies a
specific Symantec ESM Policy for a manager.
Path: Administration/Suppression Configuration/Codes/[Data
item]
Container
Data item
Description
Codes
POLICY_ID
A character or numeric string that identifies the
Symantec ESM policy.
MANAGER_ID
The unique character or numeric string that
identifies a Symantec ESM Manager
OS_MODULE_ID
A unique character or numeric string that
identifies the operating system module.
INFO_WILDCARDED_
KEY
A boolean integer that specified whether an
information wildcard is active in the
suppression.
AGENT_
WILDCARDED_
KEY
A boolean integer that specified whether an
agent wildcard is active in the suppression.
NAME_WILDCARDED_
KEY
A boolean integer that specified whether a name
wildcard is active in the suppression.
ENABLED_KEY
A boolean integer that specifies whether the
suppression is enabled.
About the Symantec ESM Reporting metadata model
Structure of data items
Table B-17
Path: Administration/License/[Data item]
Container
Data item
Description
License
Manager
Specifies the name of the manager.
Number of licenses
Shows the total number of agent licenses. This
represents the total number of agents that can
be registered to a manager.
Used licenses
Show the number of agent licenses used to
register agents to a manager. This represents
the number of agents that are currently
registered to a manager.
Remaining licenses
Shows the number of agent licenses remaining.
This represents the number of agents that can
still be registered to the manager.
Table B-18
Path: Administration/Agent Filters/[Data item]
Container
Data item
Description
Agent Filters
Not assigned to user
defined domain
Predefined filter that limits the displayed data
to agents that are not assigned to a user-defined
domain.
Agents in user defined
domains only
Predefined filter that limits the displayed data
to agents that are assigned to a user-defined
domain.
In policy run
Predefined filter that limits the displayed data
to agents that are assessed in a policy run.
193
194 About the Symantec ESM Reporting metadata model
Structure of data items
Table B-19
Path: Administration/Audit Filters/[Data item]
Container
Data item
Description
Audit Filters
Audits not yet finished
Predefined filter that limits the displayed data
to audits that have not yet finished according to
the audit state data.
Audits not yet started
Predefined filter that limits the displayed data
to audits that have not yet started according to
the audit state data.
Audits finished
Predefined filter that limits the displayed data
to audits that have completed according to the
audit state data.
Audits finished in last n Filter that limits the displayed data when you
days
specify audits that were finished in a number of
days that you specify.
Audits finished today
Predefined filter that limits the displayed data
to audits that have not yet finished within the
last day.
Audits scheduled in
next n days
Filter that limits the displayed data when you
specify audits that scheduled to start in a
number of days that you specify.
Audits scheduled today
Predefined filter that limits the displayed data
to audits that start on the current day.
Audit state only
Predefined filter that limits the displayed data
to only data about audit states.
About the Symantec ESM Reporting metadata model
Structure of data items
Table B-19
Path: Administration/Audit Filters/[Data item]
Container
Data item
Description
Audit Filters
Last finished audit
errors
Predefined filter that limits the displayed data
to audit error information for only the most
recently completed audit.
Next audit for policy
Filter that limits the displayed data to
information about the next scheduled audit for
a specific policy.
Scheduled audits only
Predefined filter that limits the displayed data
to information about upcoming scheduled
audits.
Audit errors only
Predefined filter that limits the displayed data
to information pertaining to policy run errors.
Agent errors only
Predefined filter that limits the displayed data
to information pertaining to errors that are
reported by agents.
User defined domains
only
Predefined filter that limits the displayed data
to data about user-defined domains and agents
in those domains.
Table B-20
Path: Administration/Suppression Filters/[Data item]
Container
Data item
Description
Suppression
Filters
Expired within last n
days
Filter that limits the displayed data to
suppressions that have expired within the
number of days that you specify.
Will expire within n
days
Filter that limits the displayed data to
suppressions that will expire within the number
of days that you specify.
Created within last n
days
Filter that limits the displayed data to
suppressions that were created within the
number of days that you specify.
195
196 About the Symantec ESM Reporting metadata model
Structure of data items
Message Information folder structure
The following data items are included in the Message Information folder:
Table B-21
Path: Message Information/Messages/[Data item]
Container
Data item
Description
Messages
Message title
A unique character string that identifies the
title of a specific Symantec ESM message.
Message description
A unique character string that describes the
message. The string can include multi-byte
unicode characters for international use.
Message format
A unique character string that describes the
replaceable parameter structure of a specific
Symantec ESM message.
Message name
A unique character string that displays the
message name.
Message info
A unique character string that displays the
message information.
Audit date
Specifies the date of the policy run.
Severity
A character string that identifies the level of
severity: Red, Yellow, or Green.
Suppressed
True/false value that indicates whether a
message is suppressed.
Category
A unique character string that identifies the
category of a specific Symantec ESM message.
Module
A unique character string that identifies a
specific Symantec ESM Module.
Compliant
True/false value that indicates whether a
message represents an agent security state that
is compliant with the policy.
Policy
A unique character string that identifies a
specific Symantec ESM Policy for a manager.
Manager
A unique character string that identifies a
specific Symantec ESM Manager.
Domain
A unique character string that identifies the
Symantec ESM Domain for a manager.
About the Symantec ESM Reporting metadata model
Structure of data items
Table B-21
Path: Message Information/Messages/[Data item]
Container
Data item
Description
Messages
Agent
A unique character string that identifies a
specific Symantec ESM Agent on a manager.
Table B-22
Path: Message Information/Messages/Codes/[Data item]
Container
Data item
Description
Codes
SUPPRESSED_KEY
A boolean integer that identifies if the
Symantec ESM compliance message can be
suppressed by users.
COMPLIANCE_KEY
A boolean integer that identifies whether a
message is from a compliant Symantec ESM
Agent.
USER_DEFINED_KEY
A boolean integer that identifies whether the
Symantec ESM Domain can be defined by the
user.
MESSAGE_STATE_ID
A character string (up to 32 letters) that
identifies the state of a Symantec ESM
message.
POLICY_ID
A character or numeric string that identifies
the Symantec ESM policy.
MANAGER_ID
The unique character or numeric string that
identifies a Symantec ESM Manager
DOMAIN_ID
A unique character or numeric string that
identifies the Symantec ESM domain.
AGENT_ID
A character or numeric string that identifies
the name of the Symantec ESM Agent host
computer.
MESSAGE_ID
An integer that identifies a message.
SEVERITY_ID
A small integer (0 - 4) that identifies the level
of severity.
MODULE_ID
A character or numeric string that identifies a
specific Symantec ESM module.
CATEGORY_ID
An integer that identifies the category of a
specific Symantec ESM message.
197
198 About the Symantec ESM Reporting metadata model
Structure of data items
Table B-23
Path: Message Information/Message Filters/[Data item]
Container
Data item
Description
Message
Filters
Messages occurred
today
Predefined filter that limits the displayed data
to messages that were reported on the current
day.
Messages occurred in
last n days
Filter that limits the displayed data to messages
that were reported within the number of days
that you specify.
Messages occurred
between these dates
Filter that limits the displayed data to messages
that were reported between two dates that you
specify.
Red msgs only
Predefined filter that limits the displayed data
to messages that indicate a red security level.
Yellow msgs only
Predefined filter that limits the displayed data
to messages that indicate a yellow security level.
Green msgs only
Predefined filter that limits the displayed data
to messages that indicate a green security level.
Suppressed msgs only
Predefined filter that limits the displayed data
to messages that are suppressed.
Not suppressed msgs
only
Predefined filter that limits the displayed data
to messages that are not suppressed.
Compliant msgs only
Predefined filter that limits the displayed data
to only messages that indicate that the agent
host computer is in compliance with the policy.
Not compliant msgs
only
Predefined filter that limits the displayed data
to only messages that indicate that the agent
host computer is not in compliance with the
policy.
Msgs in user defined
domains only
Predefined filter that limits the displayed data
to messages reported by computers that are in
user-defined domains.
About the Symantec ESM Reporting metadata model
Structure of data items
Table B-24
Path: Message Information/Message Filters/Category Filters/[Data
item]
Container
Data item
Description
Category
Filters
All messages
Filter that displays all messages.
Change notification
Predefined filter that limits the displayed data
to messages in the Change Notification category.
ESM administrative
information
Predefined filter that limits the displayed data
to messages in the ESM Administrative
Information category.
ESM error
Predefined filter that limits the displayed data
to messages in the ESM error category.
ICE
Predefined filter that limits the displayed data
to messages in the ICE category.
Patch assessment
Predefined filter that limits the displayed data
to messages in the Patch assessment category.
Policy compliance
Predefined filter that limits the displayed data
to messages in the Change Notification category.
System error
Predefined filter that limits the displayed data
to messages in the System Error category.
System information
Predefined filter that limits the displayed data
to messages in the System Information category.
199
200 About the Symantec ESM Reporting metadata model
Structure of data items
Table B-25
Path: Message Information/Change Events/[Data item]
Container
Data item
Description
Change
Events
Event title
Displays a title that specifies the type of change
event.
Event description
Displays an in-depth description of the event.
Event format
Displays replaceable parameter formatting data
that the Symantec ESM console uses when
formatting events.
Event name
Displays the change event name.
Event information
Displays additional information about the
change event.
Audit date
The system date for a specific audit.
Severity
Displays the security level of the change event,
either green, yellow, or red.
Suppressed
True/false value that identifies whether
information about Symantec ESM compliance
has been suppressed.
Category
Displays the category that the change event
message falls under.
Module
A unique character string that identifies a
specific Symantec ESM Module.
Policy
A unique character string that identifies a
specific Symantec ESM Policy for a manager.
Manager
A unique character string that identifies a
specific Symantec ESM Manager.
Domain
A unique character string that identifies the
Symantec ESM Domain for a manager.
Agent
A unique character string that identifies a
specific Symantec ESM Agent on a manager.
About the Symantec ESM Reporting metadata model
Structure of data items
Table B-26
Path: Message Information/Change Events/Codes/[Data item]
Container
Data item
Description
Codes
SUPPRESSED_KEY
A integer that identifies if the Symantec ESM
compliance message can be suppressed by users.
USER_DEFINED_KEY
Integer that identifies whether the Symantec
ESM domain can be defined by the user.
POLICY_ID
The unique character or numeric string that
identifies a Symantec ESM policy.
MANAGER_ID
The unique character or numeric string that
identifies a Symantec ESM Manager
DOMAIN_ID
A unique character or numeric string that
identifies the Symantec ESM domain.
AGENT_ID
A character or numeric string that identifies the
name of the Symantec ESM Agent host
computer.
MESSAGE_ID
An integer that identifies a message.
CATEGORY_ID
An integer that identifies the category.
MODULE_ID
A character or numeric string that identifies a
specific Symantec ESM module.
201
202 About the Symantec ESM Reporting metadata model
Structure of data items
Table B-27
Path: Message Information/Change Event Filters/[Data item]
Container
Data item
Description
Change
Event Filters
Events occurred today
Predefined filter that limits the displayed data
to events that occurred on the current day.
Events occurred in last
n days
Filter that limits the displayed data to events
that occurred within the number of days that
you specify.
Events occurred
between these dates
Filter that limits the displayed data to events
that occurred between two dates that you
specify.
Suppressed events only Predefined filter that limits the displayed data
to suppressed change event messages.
Events in user defined
domains only
Predefined filter that limits the displayed data
to change event messages that were generated
by agents that are in user-defined domains.
About the Symantec ESM Reporting metadata model
Structure of data items
Message Summaries folder structure
The following data items are included in the Message Summaries folder:
Table B-28
Path: Message Summaries/Agent Summaries/[Data item]
Container
Data item
Description
Agent
Summaries
Policy
A unique character string that identifies a
specific Symantec ESM Policy for a manager.
Category
A unique character string that identifies the
category of a specific Symantec ESM message.
Module
A unique character string that identifies a
specific Symantec ESM Module.
Manager
A unique character string that identifies a
specific Symantec ESM Manager.
Domain
A unique character string that identifies the
Symantec ESM Domain for a manager.
Agent
A unique character string that identifies a
specific Symantec ESM Agent on a manager.
Level
Specifies the security level, either red, yellow, or
green.
Audit Date
The system date and time for a specific audit.
Table B-29
Path: Message Summaries/Agent Summaries/Agent Counts/[Data
item]
Container
Data item
Description
Agent
Counts
Rating
Displays the rating of the focus object. A rating
is an integer. Red agent messages contribute 10
points to a rating, yellow messages contribute 1
point to a rating, and green messages do not
contribute to a rating.
Red agents
Shows the number of red agents for the focus
object.
Yellow agents
Shows the number of yellow agents for the focus
object.
Green agents
Shows the number of green agents for the focus
object.
203
204 About the Symantec ESM Reporting metadata model
Structure of data items
Table B-30
Path: Message Summaries/Agent Summaries/Compliance Counts/
[Data item]
Container
Data item
Description
Compliance
Counts
Agent compliance %
Show a number that rates a compliance
percentage for agents. This fact only works
correctly when agents are specified individually
in a previous column of the query.
Compliance %
Shows a number which rates the compliance
percentage for the focus object.
0-10% counts
Shows the number of agents that have a
compliance percentage level that falls between
0 - 10 percent.
>10-20% counts
Shows the number of agents that have a
compliance percentage level that falls between
10 - 20 percent.
>20-30% counts
Shows the number of agents that have a
compliance percentage level that falls between
20 - 30 percent.
>30-40% counts
Shows the number of agents that have a
compliance percentage level that falls between
30 - 40 percent.
>40-50% counts
Shows the number of agents that have a
compliance percentage level that falls between
40 - 50 percent.
>50-60% counts
Shows the number of agents that have a
compliance percentage level that falls between
50 - 60 percent.
>60-70% counts
Shows the number of agents that have a
compliance percentage level that falls between
60 - 70 percent.
>70-80% counts
Shows the number of agents that have a
compliance percentage level that falls between
70 - 80 percent.
>80-90% counts
Shows the number of agents that have a
compliance percentage level that falls between
80 - 90 percent.
About the Symantec ESM Reporting metadata model
Structure of data items
Table B-30
Path: Message Summaries/Agent Summaries/Compliance Counts/
[Data item]
Container
Data item
Description
Compliance
Counts
>90-100% counts
Shows the number of agents that have a
compliance percentage level that falls between
90 - 100 percent.
Table B-31
Path: Message Summaries/Agent Summaries/Message Counts/
[Data item]
Container
Data item
Description
Message
Counts
Red messages
Shows the number of red messages for the focus
object.
Yellow messages
Shows the number of yellow messages for the
focus object.
Green messages
Shows the number of green messages for the
focus object.
Messages
Shows the total number of reported messages.
Suppressed messages
Shows the number of suppressed messages for
the focus object.
Unique messages
Shows the number of unique messages for the
focus object.
Unique suppressed
messages
Shows the number of unique, suppressed
messages for the focus object.
Unique possible
messages
Shows the number of unique possible messages
for the focus object.
Violations
Shows the number of messages that indicate
that the agent is out of compliance with the
policy.
205
206 About the Symantec ESM Reporting metadata model
Structure of data items
Table B-32
Path: Message Summaries/Agent Summaries/Severity Counts/
[Data item]
Container
Data item
Description
Severity
Counts
Severity level
Displays the security level, either red, yellow, or
green.
Severity ID
A small integer (0 - 4) that identifies the level of
severity.
Red messages per
severity
Displays the number of red messages. Messages
with a severity level of four are red messages.
Yellow messages per
severity
Displays the number of yellow messages at each
severity level. Yellow messages can have a
severity level of one, two, or three.
Green messages per
severity
Displays the number of green messages.
Messages with a severity level of zero are green
messages.
Messages per severity
Displays the number of messages at each
severity or security level.
Suppressed messages
per severity
Displays the number of suppressed messages at
each severity security level.
Unique messages per
severity
Displays the number of unique messages at each
severity security level.
Unique suppressed
messages per severity
Displays the number of unique suppressed
messages at each severity security level.
Unique possible
messages per severity
Displays the number of unique possible
messages at each severity security level.
Possible messages may or may not have been
reported in a policy run.
About the Symantec ESM Reporting metadata model
Structure of data items
Table B-33
Path: Message Summaries/Agent Summaries/Codes/[Data item]
Container
Data item
Description
Codes
POLICY_ID
The unique character or numeric string that
identifies the Symantec ESM policy.
CATEGORY_ID
An integer that identifies the category.
MODULE_ID
A character or numeric string that identifies a
specific Symantec ESM module.
MANAGER_ID
The unique character or numeric string that
identifies a Symantec ESM Manager
DOMAIN_ID
A unique character or numeric string that
identifies the Symantec ESM domain.
AGENT_ID
A character or numeric string that identifies
the name of the Symantec ESM Agent host
computer.
SEVERITY_ID
A small integer (0 - 4) that identifies the level
of severity.
207
208 About the Symantec ESM Reporting metadata model
Structure of data items
Table B-34
Path: Message Summaries/Summary Filters/[Data item]
Container
Data item
Description
Summary
Filters
All messages category
Predefined filter that shows all messages.
Change notification
category
Predefined filter that limits the displayed data
to only those messages in the Change
Notification category.
ESM administrative
information category
Predefined filter that limits the displayed data
to only those messages in the ESM
Administrative Information category.
ESM error category
Predefined filter that limits the displayed data
to only those messages in the ESM Error
category.
ICE category
Predefined filter that limits the displayed data
to only those messages in the ICE category.
Patch assessment
category
Predefined filter that limits the displayed data
to only those messages in the Patch Assessment
category.
Policy compliance
category
Predefined filter that limits the displayed data
to only those messages in the Policy Compliance
category.
System error category
Predefined filter that limits the displayed data
to only those messages in the System Error
category.
System information
category
Predefined filter that limits the displayed data
to only those messages in the System
Information category.
About the Symantec ESM Reporting metadata model
Structure of data items
Table B-35
Path: Message Summaries/Prompts/Trend_Interval_Prompt/[Data
item]
Container
Data item
Description
Trend_
Interval_
Prompt
Prompt key
Displays an integer that represent a time
interval prompt
Time interval
Displays the prompt values for time
intervals in trend reports. Intervals include
daily, weekly, monthly, quarterly, and
annually.
Note: These information
objects are used only for
creating report prompts in
Report Studio
Table B-36
Path: Message Summaries/Prompts/Category_Module_Prompt/
[Data item]
Container
Data item
Description
Category_
Module_
Prompt
CATEGORY_ID
An integer that identifies the category.
MODULE_ID
A numeric string that identifies a specific
Symantec ESM module.
Note: These information
Category
objects are used only for
creating report prompts in
Report Studio.
Module
TREND
Displays the category names that appear
in the prompt.
Displays the module names that appear in
the prompt.
A boolean prompt that determines
whether the report displays trended data.
209
210 About the Symantec ESM Reporting metadata model
Structure of data items
Table B-37
Path: Message Summaries/Prompts/Category_Name_Prompt/
[Data item]
Container
Data item
Description
Category_
Name_
Prompt
CATEGORY_ID
An integer that identifies the category.
Category
Displays the category names that appear
in the prompt.
Note: These information
objects are used only for
creating report prompts in
Report Studio.
Table B-38
Path: Message Summaries/Prompts/Policy_Manager_Prompt/
[Data item]
Container
Data item
Description
Policy_
Manager_
Prompt
Policy
A unique character string that identifies a
specific Symantec ESM Policy for a
manager.
Note: These information
Manager
objects are used only for
creating report prompts in
Domain
Report Studio.
A unique character string that identifies a
specific Symantec ESM Manager.
A unique character string that identifies
the Symantec ESM Domain for a manager.
POLICY_ID
An integer that identifies the specific
policy.
MANAGER_ID
The unique character or numeric string
that identifies a Symantec ESM Manager
DOMAIN_ID
A unique character or numeric string that
identifies the Symantec ESM domain.
About the Symantec ESM Reporting metadata model
Structure of data items
Table B-39
Path: Message Summaries/Prompts/Severity Parameter Map
Query/[Data item]
Container
Data item
Description
Severity Parameter Map
Query
SEVERITY_ID
A small integer (0 - 4) that identifies the
level of severity.
Note: These information
SEVERITY
objects are used only for
creating report prompts in
Report Studio.
Table B-40
Displays the security level for severities,
either red, yellow, or green.
Path: Message Summaries/Prompts/Boolean_Prompt/[Data item]
Container
Data item
Description
Boolean_
Prompt
STRING_KEY
An integer (zero or one) that refers to the
string value for boolean prompts in
reports
Note: These information
objects are used only for
STRING_VALUE The string value (No or Yes) for boolean
creating report prompts in
prompts in reports.
Report Studio.
211
212 About the Symantec ESM Reporting metadata model
Structure of data items
Table B-41
Path: Message Summaries/Prompts/Module Message/[Data item]
Container
Data item
Description
Boolean_
Prompt
Module
A unique character string that identifies a
specific Symantec ESM Module.
Note: These information
Message title
objects are used only for
creating report prompts in
Report Studio.
MODULE_ID
Table B-42
A unique character string that identifies
the title of a specific Symantec ESM
message.
A character or numeric string that
identifies a specific Symantec ESM
module.
CATEGORY_ID
An integer that identifies the category.
MESSAGE_ID
An integer that identifies a message.
CATEGORY_TY
PE
An integer that identifies a category type.
The eight high-level categories have a
type of 1 and subcategories such as
module categories have a type of 2.
Path: Message Summaries/Prompts/All_Messages/[Data item]
Container
Data item
Description
All_
Messages
CATEGORY_ID
An integer that identifies the category.
Category
Displays the category names that appear
in the prompt.
Note: These information
objects are used only for
creating report prompts in
Report Studio.
About the Symantec ESM Reporting metadata model
Structure of data items
Table B-43
Path: Message Summaries/Prompts/Policy_Compliance/[Data
item]
Container
Data item
Description
Policy_
Compliance
CATEGORY_ID
An integer that identifies the category.
Category
Displays the category names that appear
in the prompt.
Note: These information
objects are used only for
creating report prompts in
Report Studio.
Table B-44
Path: Message Summaries/Prompts/Filters/[Data item]
Container
Data item
Description
Filters
Select a policy
Filter used in prompts that lets the user
select from among the displayed policies.
Note: These filters are used
only for creating report
Select a
prompts in Report Studio. category
Filter used in prompts that lets the user
select from among the displayed
categories.
Select a module
Filter used in prompts that lets the user
select from among the displayed modules.
Select a
manager
Filter used in prompts that lets the user
select from among the displayed
managers.
Select a domain
Filter used in prompts that lets the user
select from among the displayed
domains.
Select a agent
Filter used in prompts that lets the user
select from among the displayed agents.
213
214 About the Symantec ESM Reporting metadata model
Structure of data items
Table B-45
Path: Message Summaries/Trends/Agent Trends/[Data item]
Container
Data item
Description
Agent
Trends
Policy
A unique character string that identifies a
specific Symantec ESM Policy for a manager.
Category
A unique character string that identifies the
category of a specific Symantec ESM message.
Module
A unique character string that identifies a
specific Symantec ESM Module.
Manager
A unique character string that identifies a
specific Symantec ESM Manager.
Domain
A unique character string that identifies the
Symantec ESM Domain for a manager.
Agent
A unique character string that identifies a
specific Symantec ESM Agent on a manager.
Level
Displays the security level, either red, yellow, or
green, of the focus object.
Audit Date
The system date for a specific audit.
Audit date/time
The system date and time for a specific audit.
About the Symantec ESM Reporting metadata model
Structure of data items
Table B-46
Path: Message Summaries/Trends/Agent Trends/Agent Counts/
[Data item]
Container
Data item
Description
Agent
Counts
Level
Displays the security level, either red, yellow, or
green, of the focus object.
Rating
Displays the rating of the focus object. A rating
is a number between zero and four. Red objects
have a rating of four, yellow objects have a
rating of between one and three, and green
objects have a rating of zero.
Red agents
Shows the number of red agents for the focus
object.
Yellow agents
Shows the number of yellow agents for the focus
object.
Green agents
Shows the number of green agents for the focus
object.
Audited agents
Shows the total number of audited agents for
the focus object.
Total agents
Shows the total number of agents associated
with the ficus object.
215
216 About the Symantec ESM Reporting metadata model
Structure of data items
Table B-47
Path: Message Summaries/Trends/Agent Trends/Compliance
Counts/[Data item]
Container
Data item
Description
Compliance
Counts
Agent compliance %
Show a number that rates a compliance
percentage for agents. This fact only works
correctly when agents are specified individually
in a previous column of the query.
Compliance %
Shows a number which rates the compliance
percentage for the focus object.
0-10% counts
Shows the number of agents that have a
compliance percentage level that falls between
0 - 10 percent.
>10-20% counts
Shows the number of agents that have a
compliance percentage level that falls between
10 - 20 percent.
>20-30% counts
Shows the number of agents that have a
compliance percentage level that falls between
20 - 30 percent.
>30-40% counts
Shows the number of agents that have a
compliance percentage level that falls between
30 - 40 percent.
>40-50% counts
Shows the number of agents that have a
compliance percentage level that falls between
40 - 50 percent.
>50-60% counts
Shows the number of agents that have a
compliance percentage level that falls between
50 - 60 percent.
>60-70% counts
Shows the number of agents that have a
compliance percentage level that falls between
60 - 70 percent.
>70-80% counts
Shows the number of agents that have a
compliance percentage level that falls between
70 - 80 percent.
>80-90% counts
Shows the number of agents that have a
compliance percentage level that falls between
80 - 90 percent.
About the Symantec ESM Reporting metadata model
Structure of data items
Table B-47
Path: Message Summaries/Trends/Agent Trends/Compliance
Counts/[Data item]
Container
Data item
Description
Compliance
Counts
>90-100% counts
Shows the number of agents that have a
compliance percentage level that falls between
90 - 100 percent.
Table B-48
Path: Message Summaries/Trends/Agent Trends/Date Trends/
[Data item]
Container
Data item
Description
Date Trends
Day of week
A small integer that corresponds to the day of
the week. 1 = Sunday, 2 = Monday, etc.
Day of month
A small integer that corresponds to the day of
the month.
Week
A small integer that corresponds to the week of
the year. from 1 to 52.
Month
A small integer that corresponds to the month
of the year. 1 = January, 2 = February, etc.
Quarter
A small integer that identifies the quarter of the
year. 1 = First Quarter, 2 = Second Quarter,
3 = Third Quarter, 4 = Fourth Quarter
Year
A small integer that corresponds to the current
year.
First audit date per
week
Shows the date of the first audit that occurs
each week.
Daily audit date
The system time for the date of the next
scheduled daily audit.
Weekly audit date
The system time for the date of the next
scheduled weekly audit.
Monthly audit date
The system time for the date of the next
scheduled monthly audit.
Quarterly audit date
The system time for the date of the next
scheduled quarterly audit.
Yearly audit date
The system time for the date of the next
scheduled yearly audit.
217
218 About the Symantec ESM Reporting metadata model
Structure of data items
Table B-49
Path: Message Summaries/Trends/Agent Trends/Message Counts/
[Data item]
Container
Data item
Description
Message
Counts
Red messages
Shows the number of red messages for the focus
object.
Yellow messages
Shows the number of yellow messages for the
focus object.
Green messages
Shows the number of green messages for the
focus object.
Messages
Shows the total number of reported messages.
Suppressed messages
Shows the number of suppressed messages for
the focus object.
Unique messages
Shows the number of unique messages for the
focus object.
Unique suppressed
messages
Shows the number of unique, suppressed
messages for the focus object.
Unique possible
messages
Shows the number of unique possible messages
for the focus object.
Violations
Shows the number of messages that indicate
that the agent is out of compliance with the
policy.
About the Symantec ESM Reporting metadata model
Structure of data items
Table B-50
Path: Message Summaries/Trends/Agent Trends/Severity Counts/
[Data item]
Container
Data item
Description
Severity
Counts
Severity level
Displays the security level, either red, yellow, or
green.
Severity ID
A small integer (0 - 4) that identifies the level of
severity.
Red messages per
severity
Displays the number of red messages. Messages
with a severity level of four are red messages.
Yellow messages per
severity
Displays the number of yellow messages at each
severity level. Yellow messages can have a
severity level of one, two, or three.
Green messages per
severity
Displays the number of green messages.
Messages with a severity level of zero are green
messages.
Messages per severity
Displays the number of messages at each
severity or security level.
Suppressed messages
per severity
Displays the number of suppressed messages at
each severity or security level.
Unique messages per
severity
Displays the number of unique messages at each
severity or security level.
Unique suppressed
messages per severity
Displays the number of unique suppressed
messages at each severity or security level.
Unique possible
messages per severity
Displays the number of unique possible
messages at each severity or security level.
Possible messages may or may not have been
reported in a policy run.
219
220 About the Symantec ESM Reporting metadata model
Structure of data items
Table B-51
Path: Message Summaries/Trends/Agent Trends/Codes/[Data
item]
Container
Data item
Description
Codes
POLICY_ID
The unique character or numeric string that
identifies the Symantec ESM policy.
CATEGORY_ID
An integer that identifies the category.
MODULE_ID
A character or numeric string that identifies a
specific Symantec ESM module.
MANAGER_ID
The unique character or numeric string that
identifies a Symantec ESM Manager
DOMAIN_ID
A unique character or numeric string that
identifies the Symantec ESM domain.
AGENT_ID
A character or numeric string that identifies
the name of the Symantec ESM Agent host
computer.
SEVERITY_ID
A small integer (0 - 4) that identifies the level
of severity.
About the Symantec ESM Reporting metadata model
Structure of data items
Table B-52
Path: Message Summaries/Trends/Domain Trends/[Data item]
Container
Data item
Description
Agent
Trends
Policy
A unique character string that identifies a
specific Symantec ESM Policy for a manager.
Category
A unique character string that identifies the
category of a specific Symantec ESM message.
Module
A unique character string that identifies a
specific Symantec ESM Module.
Manager
A unique character string that identifies a
specific Symantec ESM Manager.
Domain
A unique character string that identifies the
Symantec ESM Domain for a manager.
Agent
A unique character string that identifies a
specific Symantec ESM Agent on a manager.
Level
Displays the security level, either red, yellow, or
green, of the focus object.
Audit Date
The system date for a specific audit.
Audit date/time
The system date and time for a specific audit.
221
222 About the Symantec ESM Reporting metadata model
Structure of data items
Table B-53
Path: Message Summaries/Trends/Domain Trends/Agent Counts/
[Data item]
Container
Data item
Description
Agent
Counts
Level
Displays the security level, either red, yellow, or
green, of the focus object.
Rating
Displays the rating of the focus object. A rating
is a number between zero and four. Red objects
have a rating of four, yellow objects have a
rating of between one and three, and green
objects have a rating of zero.
Red agents
Shows the number of red agents for the focus
object.
Yellow agents
Shows the number of yellow agents for the focus
object.
Green agents
Shows the number of green agents for the focus
object.
Audited agents
Shows the total number of audited agents for
the focus object.
Total agents
Shows the total number of agents associated
with the focus object.
About the Symantec ESM Reporting metadata model
Structure of data items
Table B-54
Path: Message Summaries/Trends/Domain Trends/Compliance
Counts/[Data item]
Container
Data item
Description
Compliance
Counts
Agent compliance %
Show a number that rates a compliance
percentage for agents. This fact only works
correctly when agents are specified individually
in a previous column of the query.
Compliance %
Shows a number which rates the compliance
percentage for the focus object.
0-10% counts
Shows the number of agents that have a
compliance percentage level that falls between
0 - 10 percent.
>10-20% counts
Shows the number of agents that have a
compliance percentage level that falls between
10 - 20 percent.
>20-30% counts
Shows the number of agents that have a
compliance percentage level that falls between
20 - 30 percent.
>30-40% counts
Shows the number of agents that have a
compliance percentage level that falls between
30 - 40 percent.
>40-50% counts
Shows the number of agents that have a
compliance percentage level that falls between
40 - 50 percent.
>50-60% counts
Shows the number of agents that have a
compliance percentage level that falls between
50 - 60 percent.
>60-70% counts
Shows the number of agents that have a
compliance percentage level that falls between
60 - 70 percent.
>70-80% counts
Shows the number of agents that have a
compliance percentage level that falls between
70 - 80 percent.
>80-90% counts
Shows the number of agents that have a
compliance percentage level that falls between
80 - 90 percent.
223
224 About the Symantec ESM Reporting metadata model
Structure of data items
Table B-54
Path: Message Summaries/Trends/Domain Trends/Compliance
Counts/[Data item]
Container
Data item
Description
Compliance
Counts
>90-100% counts
Shows the number of agents that have a
compliance percentage level that falls between
90 - 100 percent.
Table B-55
Path: Message Summaries/Trends/Domain Trends/Date Trends/
[Data item]
Container
Data item
Description
Date Trends
Day of week
A small integer that corresponds to the day of
the week. 1 = Sunday, 2 = Monday, etc.
Day of month
A small integer that corresponds to the day of
the month.
Week
A small integer that corresponds to the week of
the year. from 1 to 52.
Month
A small integer that corresponds to the month
of the year. 1 = January, 2 = February, etc.
Quarter
A small integer that identifies the quarter of the
year. 1 = First Quarter, 2 = Second Quarter,
3 = Third Quarter, 4 = Fourth Quarter
Year
A small integer that corresponds to the current
year.
First audit date per
week
Shows the date of the first audit that occurs
each week.
Daily audit date
The system time for the date of the next
scheduled daily audit.
Weekly audit date
The system time for the date of the next
scheduled weekly audit.
Monthly audit date
The system time for the date of the next
scheduled monthly audit.
Quarterly audit date
The system time for the date of the next
scheduled quarterly audit.
Yearly audit date
The system time for the date of the next
scheduled yearly audit.
About the Symantec ESM Reporting metadata model
Structure of data items
Table B-56
Path: Message Summaries/Trends/Domain Trends/Message
Counts/[Data item]
Container
Data item
Description
Message
Counts
Red messages
The number of red messages for the focus
object.
Yellow messages
The number of yellow messages for the focus
object.
Green messages
The number of green messages for the focus
object.
Messages
Shows the total number of reported messages.
Suppressed messages
Shows the number of suppressed messages for
the focus object.
Unique messages
Shows the number of unique messages for the
focus object.
Unique suppressed
messages
Shows the number of unique, suppressed
messages for the focus object.
Unique possible
messages
Shows the number of unique possible messages
for the focus object.
Violations
Shows the number of messages that indicate
that the agent is out of compliance with the
policy.
225
226 About the Symantec ESM Reporting metadata model
Structure of data items
Table B-57
Path: Message Summaries/Trends/Domain Trends/Severity
Counts/[Data item]
Container
Data item
Description
Severity
Counts
Severity level
Displays the security level, either red, yellow, or
green.
Severity ID
A small integer (0 - 4) that identifies the level of
severity.
Red messages per
severity
Displays the number of red messages. Messages
with a severity level of four are red messages.
Yellow messages per
severity
Displays the number of yellow messages at each
severity level. Yellow messages can have a
severity level of one, two, or three.
Green messages per
severity
Displays the number of green messages.
Messages with a severity level of zero are green
messages.
Messages per severity
Displays the number of messages at each
severity or security level.
Suppressed messages
per severity
Displays the number of suppressed messages at
each severity or security level.
Unique messages per
severity
Displays the number of unique messages at each
severity or security level.
Unique suppressed
messages per severity
Displays the number of unique suppressed
messages at each severity or security level.
Unique possible
messages per severity
Displays the number of unique possible
messages at each severity or security level.
Possible messages may or may not have been
reported in a policy run.
About the Symantec ESM Reporting metadata model
Structure of data items
Table B-58
Path: Message Summaries/Trends/Domain Trends/Codes/[Data
item]
Container
Data item
Description
Codes
POLICY_ID
The unique character or numeric string that
identifies the Symantec ESM policy.
CATEGORY_ID
An integer that identifies the category.
MODULE_ID
A character or numeric string that identifies a
specific Symantec ESM module.
MANAGER_ID
The unique character or numeric string that
identifies a Symantec ESM Manager
DOMAIN_ID
A unique character or numeric string that
identifies the Symantec ESM domain.
AGENT_ID
A character or numeric string that identifies
the name of the Symantec ESM Agent host
computer.
SEVERITY_ID
A small integer (0 - 4) that identifies the level
of severity.
227
228 About the Symantec ESM Reporting metadata model
Structure of data items
Table B-59
Path: Message Summaries/Trends/Category Filters/[Data item]
Container
Data item
Description
Category
Filters
All messages
Filter that displays all messages.
Change notification
Predefined filter that limits the displayed data
to messages in the Change Notification category.
ESM administrative
information
Predefined filter that limits the displayed data
to messages in the ESM Administrative
Information category.
ESM error
Predefined filter that limits the displayed data
to messages in the ESM error category.
ICE
Predefined filter that limits the displayed data
to messages in the ICE category.
Patch assessment
Predefined filter that limits the displayed data
to messages in the Patch assessment category.
Policy compliance
Predefined filter that limits the displayed data
to messages in the Change Notification category.
System error
Predefined filter that limits the displayed data
to messages in the System Error category.
System information
Predefined filter that limits the displayed data
to messages in the System Information category.
About the Symantec ESM Reporting metadata model
Structure of data items
Table B-60
Path: Message Summaries/Trends/Trend Filters/[Data item]
Container
Data item
Description
Trend Filters
Agent Latest Audit
Predefined filter that limits the displayed data
to data that was reported from the latest audit
for selected agents.
Agent daily audit
Predefined filter that limits the displayed data
to data that was reported from audits for
selected agents on a specific date or dates.
Agent weekly audit
Predefined filter that limits the displayed data
to data that was reported from audits for
selected agents on a specific week or weeks.
Agent monthly audit
Predefined filter that limits the displayed data
to data that was reported from audits for
selected agents on a specific month or months.
Agent quarterly audit
Predefined filter that limits the displayed data
to data that was reported from the audit for
selected agents on a specific quarter or quarters.
Agent yearly audit
Predefined filter that limits the displayed data
to data that was reported from the audit for
selected agents on a specific year or years.
Select an agent audit
date range
Predefined filter that lets the user choose a date
range for agent trend queries or reports.
Domain Latest Audit
Predefined filter that limits the displayed data
to data that was reported from the latest audit
for agents in specified domains.
Domain daily audit
Predefined filter that limits the displayed data
to data that was reported from audits for agents
in specified domains on a specific date or dates.
Agent weekly audit
Predefined filter that limits the displayed data
to data that was reported from audits for agents
in specified domains on a specific week or
weeks.
Agent monthly audit
Predefined filter that limits the displayed data
to data that was reported from audits for agents
in specified domains on a specific month or
months.
229
230 About the Symantec ESM Reporting metadata model
Structure of data items
Table B-60
Path: Message Summaries/Trends/Trend Filters/[Data item]
Container
Data item
Description
Trend Filters
Agent quarterly audit
Predefined filter that limits the displayed data
to data that was reported from audits for agents
in specified domains on a specific quarter or
quarters.
Agent yearly audit
Predefined filter that limits the displayed data
to data that was reported from audits for agents
in specified domains on a specific year or years.
Select a domain audit
date range
Predefined filter that lets the user choose a date
range for domain trend queries or reports.
Trended modules
Predefined filter that limits the displayed data
to data on modules that have trending enabled.
Appendix
C
About the Symantec ESM
Reporting database
schema
This appendix includes the following topics:
■
About the database schema
■
Tables in the database schema
About the database schema
This schema is the underlying structure of fields for the Symantec Reporting
Database.
To ensure compatibility among the different databases that you can use with the
database link, the Symantec ESM Reporting Database uses data types that are
common to many types of information modeling tools. Table C-1 shows what
types of information can reside in each data type.
Table C-1
Data types and their contents
Data type
Contents
CHAR(X)
Holds a unique character string in a fixed-size field, where X is the
number of characters.
NVARCHAR(X)
Holds a string of variable length (up to X characters) that can
include multi-byte unicode characters for international use.
TINYINT
Boolean-like number field that identifies whether a condition is
true or false. When used to hold a boolean, a value of zero equates
to false, and a value greater than zero equates to true.
232 About the Symantec ESM Reporting database schema
Tables in the database schema
Table C-1
Data types and their contents
Data type
Contents
SMALLINT
Boolean that identifies whether a condition is true or false.
VARCHAR(X)
Holds a unique character string with a maximum size of X.
INTEGER
Holds a number with the specific value of an object
TIMESTAMP
DATETIME
DATE
Contains the system time of a specific event.
Tables in the database schema
Each table below (Table C-2 through Table C-52) corresponds to a table in the
database, and each row corresponds to a field in that table. The tables in this
appendix include field names, data types, descriptions of fields, and indicate
whether the field is a primary key, a foreign key, or both.
Table C-2
Account table
Field name
Description
Key type
Account_ID
CHAR(32) - Holds the unique character string
that identifies the Symantec ESM account.
Primary key
User_Name
NVARCHAR(18) - Holds the user name.
Active
TINYINT - Boolean that identifies whether the
Symantec ESM account is active.
Locked_out
TINYINT - Boolean that identifies whether the
Symantec ESM account is locked out.
Deleted
TINYINT - Boolean that identifies whether the
Symantec ESM account is deleted.
Register_only
TINYINT - Boolean that indicates whether the
Symantec ESM account is a register-only
account.
Manager_ID
CHAR(32) - Holds the unique character string
that identifies a Symantec ESM Manager.
Foreign key
About the Symantec ESM Reporting database schema
Tables in the database schema
Table C-3
Account_Permission table
Field name
Description
Crt_all_policies
SMALLINT - Boolean that identifies whether the
user can create all policies.
Exec_all_policies
SMALLINT - Boolean that identifies whether the
user can execute all policies.
Read_all_policies
SMALLINT - Boolean that identifies whether the
user can read all policies.
Write_all_policies
SMALLINT - Boolean that identifies whether the
user can write all policies.
Crt_all_domains
SMALLINT - Boolean that identifies whether the
user can create all domains.
Exec_all_domains
SMALLINT - Boolean that identifies whether the
user can execute all domains.
Read_all_domains
SMALLINT - Boolean that identifies whether the
user can read from all domains.
Snp_up_all_domains
SMALLINT - Boolean that identifies whether the
user can perform snapshot updates within a
domain.
Write_all_domains
SMALLINT - Boolean that identifies whether the
user can write to all domains.
Crt_all_templates
SMALLINT - Boolean that identifies whether the
user can create all templates.
Read_all_templates
SMALLINT - Boolean that identifies whether the
user can read all templates.
Wrt_all_templates
SMALLINT - Boolean that identifies whether the
user can write all templates.
Manage_accounts
SMALLINT - Boolean that identifies whether the
user can manage all accounts.
Mod_mgr_options
SMALLINT - Boolean that identifies whether the
user can modify Manager options.
Mod_own_password
SMALLINT - Boolean that identifies whether the
user can modify his own password.
Register_agents
SMALLINT - Boolean that identifies whether the
user can register Agents.
Key type
233
234 About the Symantec ESM Reporting database schema
Tables in the database schema
Table C-3
Account_Permission table
Field name
Description
Remote_inst_upgrd
SMALLINT - Boolean that identifies whether the
user can perform a remote installation upgrade.
Account_ID
CHAR(32) - Holds the unique character string
that identifies the Symantec ESM account.
Table C-4
Key type
Primary key/
Foreign key
Acct_Domain_Perm table
Field name
Description
Execute_domain
SMALLINT - Boolean that identifies whether the
user has execute permissions for a domain.
Read_domain
SMALLINT - Boolean that identifies whether the
user can read a specific domain.
Snpshot_upd_domain
SMALLINT - Boolean that identifies whether the
user can perform snapshot updates for a domain
in the Symantec ESM console.
Write_domain
SMALLINT - Boolean that identifies whether the
user can write to a specific domain.
Account_ID
CHAR(32) - Holds the unique character string
that identifies the Symantec ESM account.
Primary key/
Foreign key
Domain_ID
CHAR(32) - Holds a unique character string that
identifies the Symantec ESM domain.
Primary key/
Foreign key
Table C-5
Key type
Acct_Policy_Perm table
Field name
Description
Execute_Policy
SMALLINT - Boolean that identifies whether the
user can execute a policy.
Read_Policy
SMALLINT - Boolean that identifies whether the
user can read a policy.
Write_Policy
SMALLINT - Boolean that identifies whether the
user can write to a policy.
Key type
About the Symantec ESM Reporting database schema
Tables in the database schema
Table C-5
Acct_Policy_Perm table
Field name
Description
Key type
Account_ID
CHAR(32) - Holds the unique character string
that identifies the Symantec ESM account.
Primary key/
Foreign key
Policy_ID
CHAR(32) - Holds the unique character string
that identifies the Symantec ESM policy.
Primary key/
Foreign key
Table C-6
Acct_Template_Perm table
Field name
Description
Key type
Account_ID
CHAR(32) - Holds the unique character string
that identifies the Symantec ESM account.
Primary key/
Foreign key
Template_name
VARCHAR(64) - Holds the unique character
string that identifies the template name.
Primary key
Read_template
SMALLINT - Boolean that identifies whether the
user can read the template.
Write_template
SMALLINT - Boolean that identifies whether the
user can write to the template.
Table C-7
Agent table
Field name
Description
Key type
Agent_ID
CHAR(32) - Holds a character string that
identifies the name of the Symantec ESM Agent
host computer.
Primary key/
Foreign key
Port
INTEGER - Holds the value that identifies the
port number of the Agent.
Protocol
VARCHAR(16) - Holds a string of variable length
(up to 16 characters) that identifies the
communication protocol.
Proxy_agent
VARCHAR(128) - Holds a string that identifies
the name of the proxy agent for audited
computers that have operating systems that
require proxy agents.
235
236 About the Symantec ESM Reporting database schema
Tables in the database schema
Table C-7
Agent table
Field name
Description
LiveUpdate
TINYINY - Boolean that identifies whether
LiveUpdate is enabled on the Agent.
Version
VARCHAR(64) - Holds the version number of
Symantec ESM that is installed on the Agent.
OS_info
VARCHAR(128) - Holds a string that identifies
the type of operating system that the Agent has
installed
SU_Version
CHAR(16) - Holds a character string that
identifies the Security Update version number.
Agent_name
VARCHAR(128) - Holds a string of variable
length (up to 128 characters) that identifies the
name of the Agent that is installed
Description
NVARCHAR (2000) - Holds a string of variable
length (up to 2000 characters) that describes the
agent. The string can include multi-byte unicode
characters for international use. (Unsupported
in Symantec ESM 6.1)
Asset_tag
VARCHAR(64) - Holds a string of variable length
(up to 64 characters) that can contain
information from a physical security sticker or
barcode. (Unsupported in Symantec ESM 6.1)
OS_version_ID
CHAR(32) - Holds a character string that
identifies the operating system version number.
Foreign key
Manager_ID
CHAR(32) - Holds the unique character string
that identifies a Symantec ESM Manager.
Foreign key
Table C-8
Key type
Agent_Audit_Error table
Field name
Description
Key type
Agent_audit_err_ID
CHAR(32) - Holds a unique character string that
identifies an Agent audit error.
Primary key
Agent_ID
CHAR(32) - Holds a character string that
identifies the name of the Symantec ESM Agent
host computer.
Foreign key
About the Symantec ESM Reporting database schema
Tables in the database schema
Table C-8
Agent_Audit_Error table
Field name
Description
Key type
Audit_ID
CHAR(32) - Holds a unique character string that
identifies a specific audit.
Foreign key
Table C-9
Agent_Err_Str_Map table
Field name
Description
String_value
NVARCHAR (2000) - Holds a string that can
include multi-byte unicode characters for
international use.
Agent_audit_err_ID
CHAR(32) - Holds a unique character string that
identifies the Agent audit error.
Primary key/
Foreign key
Locale_ID
CHAR(32) - Holds a string of fixed length (32
characters) that identifies which language
Symantec ESM is using.
Primary key/
Foreign key
Table C-10
Key type
Agent_ESM_Domain table
Field name
Description
Key type
Domain_ID
CHAR(32) - Holds a unique character string that
identifies the Symantec ESM domain.
Primary key/
Foreign key
Agent_ID
CHAR(32) - Holds a character string that
identifies the name of the Symantec ESM Agent
host computer.
Primary key/
Foreign key
Table C-11
Agent_Group table
Field name
Description
Key type
Group_ID
CHAR(32) - Holds a unique character string that
identifies the agent, domain, or manager group.
Primary key
237
238 About the Symantec ESM Reporting database schema
Tables in the database schema
Table C-12
Agent_Stat_Str_Map table
Field name
Description
Key type
Audit_ID
CHAR(32) - Holds a unique character string that
identifies a specific audit.
Primary key
Locale_ID
CHAR(32) - Holds a string of fixed length (32
characters) that identifies which language
Symantec ESM is using.
String_value
NVARCHAR (2000) - Holds a string that can
include multi-byte unicode characters for
international use.
Table C-13
Account_mapping table
Field name
Description
Key type
User_Name
NVARCHAR(18) - Holds the Symantec
Enterprise Reporting user name.
Primary key
Account_ID
CHAR(32) - Holds the unique character string
that identifies the Symantec ESM account.
Primary key/
Foreign key
Table C-14
Audit_stat_str_map table
Field name
Description
Key type
Audit_ID
CHAR(32) - Holds a unique character string that Primary key/
identifies a specific audit.
Foreign key
Locale_ID
CHAR(32) - Holds a string of fixed length (32
characters) that identifies which language
Symantec ESM is using.
String_value
NVARCHAR (2000) - Holds a string that can
include multi-byte unicode characters for
international use.
Primary key/
Foreign key
About the Symantec ESM Reporting database schema
Tables in the database schema
Table C-15
Audit_State table
Field name
Description
Key type
Policy_ID
CHAR(32) - Holds the unique character string
that identifies the Symantec ESM Policy.
Primary key/
Foreign key
Audit_date
DATETIME - Holds the date and time of the
latest audit for a policy or agent.
Audit_successful
SMALLINT - Boolean that identifies whether the
policy completed without errors.
Full_policy_run
SMALLINT - Boolean that identifies whether the
policy run was a full policy run.
Audit_ID
CHAR(32) - Holds a unique character string that
identifies a specific audit.
Foreign key
Agent_ID
CHAR(32) - Holds a character string that
identifies the name of the Symantec ESM Agent
host computer.
Primary key/
Foreign key
Table C-16
Category table
Field name
Description
Key type
Category_ID
INTEGER - Holds an integer that identifies the
category. Link this field to the String_Code field
in the Content_String_Map table to identify the
categories.
Primary key
Parent_Category_ID
INTEGER - Holds an integer that identifies a
parent category.
Foreign key
Category_Type
INTEGER - Holds an integer that identifies a
category type. The eight high-level categories
have a type of 1 and subcategories such as
module categories have a type of 2.
Category_Name_Code
VARCHAR(20) - Holds a string that identifies the
category name code.
Trend
TINYINT - Boolean that identifies whether the
policy completed without errors.
Short name
VARCHAR(32) - Holds the short name for
Symantec ESM modules
Foreign key
239
240 About the Symantec ESM Reporting database schema
Tables in the database schema
Table C-17
Category_Message table
Field name
Description
Key type
Category_ID
INTEGER - Holds an integer that identifies the
category. Link this field to the String_Code field
in the Content_String_Map table to identify the
categories.
Primary key/
Foreign key
Message_ID
INTEGER - Holds an integer that identifies a
message.
Primary key/
Foreign key
Table C-18
Cat_trend_daily table
Field name
Description
Group_ID
CHAR(32) - Holds a unique character string that
identifies the group.
Policy_ID
CHAR(32) - Holds the unique character string
that identifies the Symantec ESM policy.
Category_ID
INTEGER - Holds an integer that identifies the
category. Link this field to the String_Code field
in the Content_String_Map table to identify the
categories.
Audit_datetime
DATETIME - Holds the date and time of the
related audit.
Table C-19
Key type
Category_Trend table
Field name
Description
Key type
Policy_ID
CHAR(32) - Holds the unique character string
that identifies the Symantec ESM policy.
Primary key/
Foreign key
Audit_date
DATE - Holds the audit date.
Audit_datetime
DATETIME - Holds the date and time of the
related audit.
Primary key
About the Symantec ESM Reporting database schema
Tables in the database schema
Table C-19
Category_Trend table
Field name
Description
Key type
Category_ID
INTEGER - Holds an integer that identifies the
category. Link this field to the String_Code field
in the Content_String_Map table to identify the
categories.
Primary key/
Foreign key
Group_ID
CHAR(32) - Holds a unique character string that
identifies the group.
Primary key/
Foreign key
Severity_ID
SMALLINT - Holds a small integer that identifies Primary key/
the level of severity.
Foreign key
Messages
INTEGER - Holds an integer that counts the
number of messages.
Suppr_messages
INTEGER - Holds an integer that counts the
number of suppressed messages.
Unique_messages
INTEGER - Holds an integer that counts the
number of unique messages.
Unique_suppr_msgs
INTEGER - Holds an integer that counts the
number of unique suppressed messages.
Unique_PSBL_msgs
INTEGER - Holds an integer that counts the
number of unique possible messages for a
specific agent or policy.
Grouped_agents
INTEGER - Holds an integer that counts the
possible agents in a domain.
Run_agents
INTEGER - Holds an integer that counts the
agents that were run during an audit.
Table C-20
Chg_Message_Event table
Field name
Description
Key type
Chg_msg_event_ID
CHAR(32) - Holds a unique character string that
identifies change message event.
Primary key
Audit_datetime
DATETIME - Holds the date and time of the
related audit.
Suppressed
TINYINT - Boolean that identifies whether the
related message is suppressed.
241
242 About the Symantec ESM Reporting database schema
Tables in the database schema
Table C-20
Chg_Message_Event table
Field name
Description
Key type
Message_ID
INTEGER - Holds an integer that identifies a
message.
Foreign key
Policy_ID
CHAR(32) - Holds the unique character string
that identifies the Symantec ESM policy.
Foreign key
Agent_ID
CHAR(32) - Holds a character string that
identifies the name of the Symantec ESM Agent
host computer.
Foreign key
Table C-21
Chg_Msg_String_Map table
Field name
Description
Key type
Chg_msg_event_ID
CHAR(32) - Holds a unique character string that
identifies the change message event.
Primary key/
Foreign key
Locale_ID
CHAR(32) - Holds a string of fixed length (32
characters) that identifies which language
Symantec ESM is using.
Primary key/
Foreign key
String_type
CHAR(4) - Indicates whether the string is a name Primary key
of info string.
String_value
NVARCHAR (2000) - Holds a string that can
include multi-byte unicode characters for
international use.
Table C-22
Content_String_Map table
Field name
Description
Key type
String_value
NVARCHAR (2000) - Holds a string that can
include multi-byte unicode characters for
international use.
String_code
CHAR(32) - Uniquely identifies a specific string.
Primary key
Locale_ID
CHAR(32) - Holds a string of fixed length (32
characters) that identifies which language
Symantec ESM is using.
Primary key/
Foreign key
About the Symantec ESM Reporting database schema
Tables in the database schema
Table C-23
Date_Dimension table
Field name
Description
Key type
Date_Key
Contains the system time for the date of a
specific event.
Primary key
Quarter
SMALLINT - Holds an integer that identifies the
quarter of the year. 1 = First Quarter, 2 = Second
Quarter, 3 = Third Quarter, 4 = Fourth Quarter
Day_of_month
SMALLINT - Holds an integer that corresponds
to the day of the month.
Week_of_year
SMALLINT - Holds an integer that corresponds
to the week of the year. 1 = The first week of the
year, 22 = The 22nd week of the year, and so
fourth.
Month_of_year
SMALLINT - Holds an integer that corresponds
to the month of the year. 1 = January, 2 =
February, and so forth.
Year_value
SMALLINT - Holds an integer that corresponds
to the current year.
Weekday
SMALLINT - Holds an integer that corresponds
to the day of the week. 1 = Sunday, 2 = Monday,
etc.
Table C-24
ESM_Audit table
Field name
Description
Key type
Audit_ID
CHAR(32) - Holds a unique character string that
identifies a specific audit.
Primary key
Start_time
TIMESTAMP - Contains the system time of the
start of a specific audit.
Finish_time
TIMESTAMP - Contains the system time of the
end of a specific audit.
Job_ID
VARCHAR(20) - Holds a string that identifies the
job code.
Policy_ID
CHAR(32) - Holds the unique character string
that identifies the Symantec ESM policy.
Foreign key
243
244 About the Symantec ESM Reporting database schema
Tables in the database schema
Table C-24
ESM_Audit table
Field name
Description
Key type
Account_ID
CHAR(32) - Holds the unique character string
that identifies the Symantec ESM account.
Foreign key
Domain_ID
CHAR(32) - Holds a unique character string that
identifies the Symantec ESM domain.
Foreign key
Run_state
SMALLINT - Integer that identifies whether the
the recorded state of a policy run at the last poll
of the manager.
Foreign key
Table C-25
ESM_Audit_Agent table
Field name
Description
Key type
Audit_ID
CHAR(32) - Holds a unique character string that
identifies a specific audit.
Primary key/
Foreign key
Agent_ID
CHAR(32) - Holds a character string that
identifies the name of the Symantec ESM Agent
host computer.
Primary key/
Foreign key
Table C-26
ESM_Audit_ESM_Module table
Field name
Description
Key type
Audit_ID
CHAR(32) - Holds a unique character string that
identifies a specific audit.
Primary key/
Foreign key
Short_name
VARCHAR(32) - Holds a string of variable length Primary key/
Foreign key
(up to 32 characters) that identifies the short
name of an ESM Module.
Table C-27
ESM_Check table
Field name
Description
Key type
Letter
CHAR(1) - Uniquely identifies checks for each
module.
Primary key
About the Symantec ESM Reporting database schema
Tables in the database schema
Table C-27
ESM_Check table
Field name
Description
Key type
OS_module_ID
CHAR(32) - Identifies the module
Primary key/
Foreign key
Description_code
VARCHAR(20) - Code that uniquely identifies a
check description.
Title_code
VARCHAR(20) - Code that uniquely identifies a
check description.
Table C-28
ESM_Check_Message table
Field name
Description
Letter
CHAR(1) - Uniquely identifies module checks for Primary key/
message display.
Foreign key
OS_module_ID
CHAR(32) - Uniquely identifies modules for
message display.
Primary key/
Foreign key
Message_ID
INTEGER - Holds an integer that identifies a
message.
Primary key/
Foreign key
Table C-29
Key type
ESM_Domain table
Field name
Description
Key type
Domain_ID
CHAR(32) - Holds a unique character string that
identifies the Symantec ESM domain.
Primary key/
Foreign key
Domain_Name
VARCHAR(64) - Holds a string of variable length
(up to 64 characters) that identifies the name of
a domain.
User_defined
TINYINT - Boolean that identifies whether the
Symantec ESM domain can be defined by the
user.
Manager_ID
CHAR(32) - Holds the unique character string
that identifies a Symantec ESM Manager.
Foreign key
245
246 About the Symantec ESM Reporting database schema
Tables in the database schema
Table C-30
ESM_Module table
Field name
Description
Short_name
VARCHAR(32) - Holds a string of variable length Primary key
(up to 32 characters) that identifies the short
name of an ESM Module.
Long_name_code
NVARCHAR(18) - Holds a string of variable
length (up to 18 characters) that identifies the
short name of an ESM Module. Can include
multi-byte unicode characters for international
use. Joined the CONTENT_STRING_MAP table.
Table C-31
Key type
ESM_OS_Module table
Field name
Description
Key type
OS_module_ID
CHAR(32) - String that identifies the operating
systems specific to the modules.
Foreign key
Platform
VARCHAR(32) - Holds a string of variable length
(up to 32 characters) that identifies the platform
for a specific OS Module.
Short_name
VARCHAR(32) - Holds a string of variable length Foreign key
(up to 32 characters) that identifies the short
name of an ESM Module.
Table C-32
Locale_Map table
Field name
Description
Locale_code
VARCHAR(32) - Holds a string of variable length
(up to 32 characters) that identifies the language
being used.
Locale_ID
CHAR(32) - Holds a string of fixed length (32
characters) that identifies which language
Symantec ESM is using.
Key type
Primary key
About the Symantec ESM Reporting database schema
Tables in the database schema
Table C-33
Manager table
Field name
Description
Key type
Manager_ID
CHAR(32) - Holds the unique character string
that identifies a Symantec ESM Manager.
Primary key/
Foreign key
Manager_name
NVARCHAR(128) - Holds the name of the
Symantec ESM Manager.
Max_agents
INTEGER - Holds an integer that corresponds to
the maximum number of agents per specific
manager.
Last_poll_status
VARCHAR(32) - Holds data that specifies the
state of a manager the last time that the
Symantec Reporting Database Link attempted to
contact the manager.
Last_poll_datetime
TIMESTAMP - Contains the system time for the
date of the end of a specific manager poll.
Table C-34
Manager_Poll_Error table
Field name
Description
Key type
Mgr_poll_error_ID
CHAR(32) - Code that uniquely identifies
manager poll error string.
Primary key
Error_string
VARCHAR(256) - The message text for manager
poll errors.
Error_datetime
TIMESTAMP - Contains the system time for a
specific error event.
Manager_ID
CHAR(32) - Holds the unique character string
that identifies a Symantec ESM Manager.
Table C-35
Foreign key
Message table
Field name
Description
Key type
Message_ID
INTEGER - Holds an integer that identifies a
message.
Primary key
247
248 About the Symantec ESM Reporting database schema
Tables in the database schema
Table C-35
Message table
Field name
Description
Title_code
VARCHAR(20) - Code that identifies the message
title.
Description_code
VARCHAR(20) - Code that identifies the message
description.
Format_code
VARCHAR(20) - Code that identifies the message
format.
Severity_ID
SMALLINT - Holds a small integer that identifies Foreign key
the level of severity.
Table C-36
Key type
Message_Name_Info table
Field name
Description
Key type
Name_info_ID
CHAR(32) - Code that identifies the message
status for localization and suppression.
Primary key
Suppressed
SMALLINT - Boolean that identifies whether the
message information was suppressed.
Message_state_ID
CHAR(32) - Holds the unique character string
that identifies the current state of the message.
Table C-37
Foreign key
Message_State table
Field name
Description
Key type
Message_state_ID
CHAR(32) - Holds the unique character string
that identifies the current state of the message.
Primary key
Policy_ID
CHAR(32) - Holds the unique character string
that identifies the Symantec ESM policy.
Foreign key
Audit_datetime
TIMESTAMP - Contains the system time for the
date of a specific audit.
Message_ID
INTEGER - Holds an integer that identifies a
message.
Foreign key
About the Symantec ESM Reporting database schema
Tables in the database schema
Table C-37
Message_State table
Field name
Description
Short_name
VARCHAR(32) - Holds a string of variable length Foreign key
(up to 32 characters) that identifies the short
name of the message.
Agent_ID
CHAR(32) - Holds a character string that
identifies the name of the Symantec ESM Agent
host computer.
Total_messages
INT - Holds the total number of messages.
Suppr_messages
INT - holds the total number of suppressed
messages.
Table C-38
Key type
Foreign key
Message_String_Map table
Field name
Description
Key type
Name_info_ID
CHAR(32) - Code that identifies the message for
localization.
Primary key/
Foreign key
Locale_ID
CHAR(32) - Holds a string of fixed length (32
characters) that identifies the language that
Symantec ESM is using.
Primary key/
Foreign key
String_type
CHAR(4) - String that identifies whether a
message is a name or an info message.
Primary key
String_value
NVARCHAR (2000) - Holds a string that can
include multi-byte unicode characters for
international use.
Table C-39
Mod_Err_Str_Map table
Field name
Description
Key type
String_value
NVARCHAR (2000) - Holds a string that can
include multi-byte unicode characters for
international use.
Short_name
VARCHAR(32) - Holds a string of variable length Primary key/
(up to 32 characters) that identifies the short
Foreign key
name of an ESM Module.
249
250 About the Symantec ESM Reporting database schema
Tables in the database schema
Table C-39
Mod_Err_Str_Map table
Field name
Description
Key type
Agent_audit_err_ID
CHAR(32) - Holds the unique character string
that identifies each agent audit error.
Primary key/
Foreign key
Locale_ID
CHAR(32) - Holds a string of fixed length (32
characters) that identifies which language
Symantec ESM is using.
Primary key/
Foreign key
Table C-40
Module_Audit_Error table
Field name
Description
Short_name
VARCHAR(32) - Holds a string of variable length Primary key/
(up to 32 characters) that identifies the short
Foreign key
name of an ESM Module.
Agent_audit_err_ID
CHAR(32) - Holds the unique character string
that identifies each agent audit error.
Table C-41
Key type
Primary key/
Foreign key
Policy table
Field name
Description
Key type
Policy_ID
CHAR(32) - Holds the unique character string
that identifies the Symantec ESM policy.
Primary key
Policy_name
VARCHAR(32) - Holds the unique character
string that identifies each policy.
Manager_ID
CHAR(32) - Holds the unique character string
that identifies a Symantec ESM Manager.
Table C-42
Foreign key
Policy_Changelog table
Field name
Description
Hash
CHAR(32) - Holds the unique character string
that identifies the hash of the corresponding
Symantec ESM Policy.
Key type
About the Symantec ESM Reporting database schema
Tables in the database schema
Table C-42
Policy_Changelog table
Field name
Description
Key type
Change_datetime
TIMESTAMP - Contains the system time for the
date and time of a specific changelog event.
Primary key
Policy_ID
CHAR(32) - Holds the unique character string
that identifies the Symantec ESM policy.
Primary key/
Foreign key
Table C-43
Policy_OS_Version table
Field name
Description
Key type
OS_version_ID
CHAR(32) - Code that identifies the operating
system version.
Primary key
Platform
VARCHAR(32) - String that holds the name of
the operating system.
Table C-44
Report_String_Map table
Field name
Description
Key type
String_key
INTEGER - Code for identifying a data
information string within a grouping of data
information strings.
Primary key
String_group
INTEGER - Code for identifying a logical
grouping of strings.
Primary key
Locale_ID
CHAR(32) - Holds a string of fixed length (32
characters) that identifies which language
Symantec ESM is using.
Primary key/
Foreign key
String_value
NVARCHAR (2000) - Holds a string that can
include multi-byte unicode characters for
international use.
Table C-45
RPT_all_mgr_Perm table
Field name
Description
Key type
User_Name
NVARCHAR(18) - Holds the user name.
Primary key
251
252 About the Symantec ESM Reporting database schema
Tables in the database schema
Table C-45
RPT_all_mgr_Perm table
Field name
Description
View_all_domains
TINYINT - Boolean integer that shows whether a
user has permissions to view all domains in
Symantec ESM Reporting,
View_all_policies
TINYINT - Boolean integer that shows whether a
user has permissions to view all policies in
Symantec ESM Reporting,
View_ESM_accounts
TINYINT - Boolean integer that shows whether a
user has permissions to view all accounts in
Symantec ESM Reporting,
Table C-46
Key type
RPT_Domain_Perm table
Field name
Description
Key type
User_Name
NVARCHAR(18) - Holds the user name for the
Symantec Enterprise Reporting user account.
Primary key
IS_ESM_account
TINYINT - Boolean integer that shows whether
user permissions to view data in Symantec ESM
Reporting are synchronized with user
permissions in the Symantec ESM Console, This
data should not be altered.
Policy_ID
CHAR(32) - Holds the unique character string
that identifies the Symantec ESM policy.
Table C-47
Primary key/
Foreign key
RPT_Manager_Perm table
Field name
Description
Key type
User_Name
NVARCHAR(18) - Holds the user name for the
Symantec Enterprise Reporting user account.
Primary key
Manager_ID
CHAR(32) - Holds the unique character string
that identifies a Symantec ESM Manager.
Primary key/
Foreign key
About the Symantec ESM Reporting database schema
Tables in the database schema
Table C-47
RPT_Manager_Perm table
Field name
Description
IS_ESM_account
TINYINT - Boolean integer that shows whether
user permissions to view data in Symantec ESM
Reporting are synchronized with user
permissions in the Symantec ESM Console, This
data should not be altered.
View_all_domains
TINYINT - Boolean integer that shows whether a
user has permissions to view all domains in
Symantec ESM Reporting,
View_all_policies
TINYINT - Boolean integer that shows whether a
user has permissions to view all policies in
Symantec ESM Reporting,
View_ESM_accounts
TINYINT - Boolean integer that shows whether a
user has permissions to view all accounts in
Symantec ESM Reporting,
Table C-48
Key type
RPT_Policy_Perm table
Field name
Description
Key type
User_Name
NVARCHAR(18) - Holds the user name.
Primary key
IS_ESM_account
TINYINT - Boolean integer that shows whether
user permissions to view data in Symantec ESM
Reporting are synchronized with user
permissions in the Symantec ESM Console, This
data should not be altered.
Policy_ID
CHAR(32) - Holds the unique character string
that identifies the Symantec ESM policy.
Table C-49
Primary key/
Foreign key
Run_state_string table
Field name
Description
Key type
Run_state
SMALLINT - Boolean that identifies whether the Primary key
policy run was a full policy run.
String_code
VARCHAR(20) - Code that identifies a specific
string.
253
254 About the Symantec ESM Reporting database schema
Tables in the database schema
Table C-50
Severity table
Field name
Description
Key type
Severity_ID
SMALLINT - Holds a small integer that
identifies the level of severity.
Primary key
Severity_name_code
VARCHAR(20) - Code that identifies a severity
name string.
Rating_multiplier
INTEGER - Integer that holds values for the
amount of points that a message adds to a
rating. Ten points for a red message, 1 point for
a yellow message, and zero points for a green
message.
Table C-51
SU_Version table
Field name
Description
Platform
CHAR(16) - Holds the operating system type and Primary key
version.
SU_version
CHAR(16) - Holds the Security Update version
for thae computer.
Locale_ID
CHAR(32) - Holds a string of fixed length (32
characters) that identifies which language
Symantec ESM is using.
Table C-52
Key type
Primary key/
Foreign key
Suppression table
Field name
Description
Key type
Suppression_ID
CHAR(32) - Holds the unique character string
that identifies the supression.
Primary key
Suppression_name
NVARCHAR(256) - Holds the data that identifies
the suppression by name.
Info_string
NVARCHAR (2000) - Holds a string that can
include multi-byte unicode characters for
international use.
Agent
NVARCHAR(256) - Holds the name of the agent.
About the Symantec ESM Reporting database schema
Tables in the database schema
Table C-52
Suppression table
Field name
Description
Key type
Name_wildcarded
SMALLINT - Holds a boolean that shows
whether a supression is using a wildcard in the
name.
Info_wildcarded
SMALLINT - Holds a boolean that shows
whether a supression is using a wildcard in the
information.
Agent_wildcarded
SMALLINT - Holds a boolean that shows
whether a supression is using a wildcard in the
agent name.
Enabled
SMALLINT - Boolean that identifies whether
message suppression was enabled.
Suppr_comment
NVARCHAR(512) - Holds a string that can
include multi-byte unicode characters for
international use.
Creation_date
TIMESTAMP - Contains the system time of the
creation of a specific suppression event.
Last_used_date
TIMESTAMP - Contains the system time for the
date of the last time the suppression was used.
Expiration_date
TIMESTAMP - Contains the system time for the
date and time of the suppression’s expiration.
OS_module_ID
CHAR(32) - Holds the unique character string
that identifies the Symantec ESM operating
system module.
Foreign key
Policy_ID
CHAR(32) - Holds the unique character string
that identifies the Symantec ESM policy.
Foreign key
Message_ID
INTEGER - Holds an integer that identifies a
message.
Foreign key
Account_ID
CHAR(32) - Holds the unique character string
that identifies the Symantec ESM account.
Foreign key
255
256 About the Symantec ESM Reporting database schema
Database Views
Database Views
The following views represent objects that you can use to create reports.
Because the views behave exactly like database tables, they can be queried and
joined to other tables and views as if they were tables. Use of all of the views
listed here in place of using the underlying tables where appropriate.
Note: There are some views in the database that are not documented here. These
views have been depreciated. Avoid using these views.
Views with localizable text
In the following views, the LOCALE_CODE field is the language code.
An example of a locale code for english is as follows: (LOCALE_CODE = 'en')
The following query returns all of the category strings and important category
information for the english locale code:
SELECT * FROM ESMDB10.CATEGORY_STRINGS WHERE LOCALE_CODE = 'en'
CATEGORY_STRINGS
This is a view of the internationalized strings for high level categories including
Policy compliance, Change notification, and all other categories with a
CATEGORY_TYPE of 1.
Table C-53
CATEGORY_STRINGS
Field name
Data type
Length
Nulls
LOCALE_CODE
VARCHAR
32
No
CATEGORY_ID
INTEGER
4
No
CATEGORY_NAME
VARGRAPHIC
2000
No
TREND
SMALLINT
2
Yes
CATEGORY_TYPE
INTEGER
4
Yes
About the Symantec ESM Reporting database schema
Database Views
ESM_MODULE_STRINGS
This is a view of all of the internationalized strings from the ESM_MODULES
table as defined in Symantec ESM.
Table C-54
ESM_MODULE_STRINGS
Field name
Data type
Length
Nulls
LOCALE_CODE
VARCHAR
32
No
LOCALE_ID
CHARACTER
32
No
SHORT_NAME
VARCHAR
32
No
LONG_NAME
VARGRAPHIC
2000
No
MESSAGE_STRINGS
This is a view of all of the internationalized strings from the MESSAGES table as
defined in Symantec ESM.
Table C-55
MESSAGE_STRINGS
Field name
Data type
Length
Nulls
LOCALE_CODE
VARCHAR
32
No
MESSAGE_ID
INTEGER
4
No
DESCRIPTION
VARGRAPHIC
2000
No
TITLE
VARGRAPHIC
2000
No
FORMAT
VARGRAPHIC
2000
No
SEVERITY_ID
SMALLINT
2
No
SEVERITY_NAME
VARGRAPHIC
2000
No
MODULE_STRINGS
This is view of the internationalized strings from the CATEGORY table for the
categories that correspond to the modules that are defined in Symantec ESM.
Table C-56
MODULE_STRINGS
Field name
Data type
Length
Nulls
LOCALE_CODE
VARCHAR
32
No
CATEGORY_ID
INTEGER
4
No
257
258 About the Symantec ESM Reporting database schema
Database Views
Table C-56
MODULE_STRINGS
Field name
Data type
Length
Nulls
CATEGORY_NAME
VARGRAPHIC
2000
No
MODULE_NAME
VARGRAPHIC
2000
No
MOD_CATEGORY_ID
INTEGER
4
No
TREND
SMALLINT
2
Yes
SEVERITY_STRINGS
This is a view of all of the internationalized strings from the SEVERITY table.
Although there are five severity levels defined (0 - 4), they usually map to only 3
security levels (red, yellow, and green) as defined in Symantec ESM.
Table C-57
SEVERITY_STRINGS
Field name
Data type
Length
Nulls
LOCALE_CODE
VARCHAR
32
No
SEVERITY_ID
SMALLINT
2
No
RATING_MULTIPLIER
INTEGER
4
Yes
SEVERITY_NAME
VARGRAPHIC
2000
No
CHG_MSG_DETAILS
This is a view of the internationalized strings for the CHG_MESSAGE_EVENT
table. This table holds the change management details from the Symantec ESM
change management modules.
Table C-58
CHG_MSG_DETAILS
Field name
Data type
Length
Nulls
LOCALE_CODE
VARCHAR
32
No
CHG_MSG_EVENT_ID
CHARACTER
32
No
POLICY_ID
CHARACTER
32
No
AGENT_ID
CHARACTER
32
No
AUDIT_DATETIME
TIMESTAMP
10
Yes
MESSAGE_ID
INTEGER
4
No
About the Symantec ESM Reporting database schema
Database Views
Table C-58
CHG_MSG_DETAILS
Field name
Data type
Length
Nulls
NAME
VARGRAPHIC
2000
Yes
INFO
VARGRAPHIC
2000
Yes
MSG_STATE_DETAILS
This is a view of the internationalized strings for the messages generated by the
Symantec ESM Managers.
Table C-59
MSG_STATE_DETAILS
Field name
Data type
Length
Nulls
LOCALE_CODE
VARCHAR
32
Yes
MESSAGE_STATE_ID
CHARACTER
32
No
POLICY_ID
CHARACTER
32
No
AGENT_ID
CHARACTER
32
No
AUDIT_DATETIME
TIMESTAMP
10
Yes
MESSAGE_ID
INTEGER
4
Yes
SHORT_NAME
VARCHAR
32
No
CATEGORY_ID
INTEGER
4
Yes
MODULE_ID
INTEGER
4
No
SUPPRESSED
SMALLINT
2
Yes
NAME
VARGRAPHIC
2000
Yes
INFO
VARGRAPHIC
2000
Yes
Views without text
The remaining views do not contain text details, therefore, no locale is
selectable. These views are primarily used for gathering message metrics and
statistics.
259
260 About the Symantec ESM Reporting database schema
Database Views
CAT_AGENT_TREND
This view represents historical message trend metrics for specific agents.
Table C-60
CAT_AGENT_TREND
Field name
Data type
Length
Nulls
POLICY_ID
CHARACTER
32
No
AGENT_ID
CHARACTER
32
No
AUDIT_DATETIME
TIMESTAMP
10
No
AUDIT_DATE
DATE
4
No
SEVERITY_ID
SMALLINT
2
No
MODULE_ID
INTEGER
4
No
MESSAGES
INTEGER
4
Yes
SUPPR_MESSAGES
INTEGER
4
Yes
UNIQUE_MESSAGES
INTEGER
4
Yes
UNIQUE_SUPPR_MSGS
INTEGER
4
Yes
UNIQUE_PSBL_MSGS
INTEGER
4
Yes
GROUPED_AGENTS
INTEGER
4
Yes
RUN_AGENTS
INTEGER
4
Yes
CAT_DOMAIN_TREND
This view represents message trend metrics for domains. Each domain
represents a single domain on a specific Symantec ESM Manager. To get metrics
for domains that span managers you must join this table on a query which
selects all appropriate domains.
Table C-61
CAT_DOMAIN_TREND
Field name
Data type
Length
Nulls
POLICY_ID
CHARACTER
32
No
DOMAIN_ID
CHARACTER
32
No
AUDIT_DATETIME
TIMESTAMP
10
No
AUDIT_DATE
DATE
4
No
SEVERITY_ID
SMALLINT
2
No
About the Symantec ESM Reporting database schema
Database Views
Table C-61
CAT_DOMAIN_TREND
Field name
Data type
Length
Nulls
MODULE_ID
INTEGER
4
No
MESSAGES
INTEGER
4
Yes
SUPPR_MESSAGES
INTEGER
4
Yes
UNIQUE_MESSAGES
INTEGER
4
Yes
UNIQUE_SUPPR_MSGS
INTEGER
4
Yes
UNIQUE_PSBL_MSGS
INTEGER
4
Yes
GROUPED_AGENTS
INTEGER
4
Yes
RUN_AGENTS
INTEGER
4
Yes
261
262 About the Symantec ESM Reporting database schema
Database Views
MESSAGE_STATE_INFO
This view represents current message metrics for agents.
Table C-62
MESSAGE_STATE_INFO
Field name
Data type
Length
Nulls
CATEGORY_ID
INTEGER
4
Yes
MODULE_ID
INTEGER
4
No
POLICY_ID
CHARACTER
32
No
AGENT_ID
CHARACTER
32
No
AUDIT_DATETIME
TIMESTAMP
10
Yes
SEVERITY_ID
SMALLINT
2
No
MESSAGE_ID
INTEGER
4
No
SHORT_NAME
VARCHAR
32
No
MESSAGE_STATE_ID
CHARACTER
32
No
MESSAGES
INTEGER
4
Yes
SUPPR_MESSAGES
INTEGER
4
Yes
UNIQUE_MESSAGES
INTEGER
4
No
UNIQUE_SUPPR_MSGS
INTEGER
4
No
UNIQUE_PSBL_MSGS
INTEGER
4
No
Appendix
D
System assessment
checklists
This appendix includes the following topics:
■
About system assessment checklists
■
Symantec ESM Reporting Database Foundation checklist
■
Symantec ESM Reporting Database Link checklist
■
Symantec Enterprise Reporting checklist
■
Symantec ESM Reporting Report Package checklist
About system assessment checklists
These system assessment checklists can help you evaluate the suitability of the
computers on which you plan to install Symantec ESM Reporting components or
Symantec Enterprise Reporting components.
Symantec ESM Reporting Database Foundation
checklist
See “Symantec ESM system requirements” on page 29.
Table D-1
Symantec ESM Reporting Database Foundation checklist
Question
What is the computer’s name?
Response
264 System assessment checklists
Symantec ESM Reporting Database Link checklist
Table D-1
Symantec ESM Reporting Database Foundation checklist
Question
Response
If you are installing on a distributed
configuration, what are the names and
intended uses of the other computers?
What is the computer’s communication
protocol address?
What operating system is running on the
computer?
What version of the operating system is
running on the computer?
What relational database management
system is running on the computer?
What version of the relational database
management system is running on the
computer?
What is the installation file system path
name?
Do you have access to accounts with the
required privileges on the computer?
What CD-ROM drive can you use to load
the software?
Can you run a network connectivity test to
verify that the computer can connect to the
computers in the Symantec ESM Reporting
Database Link checklist and the Symantec
Enterprise Reporting checklist?
Symantec ESM Reporting Database Link checklist
See “Symantec ESM Reporting Database Link system requirements” on page 34.
Table D-2
Symantec ESM Reporting Database Link checklist
Question
What is the computer’s name?
Response
System assessment checklists
Symantec ESM Reporting Database Link checklist
Table D-2
Symantec ESM Reporting Database Link checklist
Question
What is the computer’s communication
protocol address?
What operating system is running on the
computer?
What version of the operating system is
running on the computer?
Does the computer have sufficient memory
and free disk space to install and run the
Symantec ESM Reporting Database Link
software?
For UNIX systems, does the computer have
sufficient swap space to run the software?
What is the installation file system path
name?
What Web server is running on the
computer?
What JDBC drivers are running on the
computer?
Do you have access to accounts with the
required privileges on the computer?
What CD-ROM drive can you use to load
the software?
What version of Symantec ESM is running
on the Symantec ESM Manager computers?
Can you run a network connectivity test to
verify that the computer can connect to the
computers in the Database Foundation
checklist and the Symantec ESM Reporting
Database Link checklist?
Response
265
266 System assessment checklists
Symantec Enterprise Reporting checklist
Symantec Enterprise Reporting checklist
See “Symantec Enterprise Reporting system requirements” on page 30.
Table D-3
Symantec Enterprise Reporting checklist
Question
What is the computer’s name?
If you are installing on a distributed
configuration, what are the names and
intended uses of the other computers?
What is the computer’s communication
protocol address?
What operating system is running on the
computer?
What version of the operating system is
running on the computer?
Does the computer have sufficient memory
and free disk space to install and run the
Symantec Enterprise Reporting software?
What is the installation file system path
name?
What Web server is running on the
computer?
What JDBC drivers are running on the
computer?
Does your security policy require login
authentication?
Do you have access to accounts with the
required privileges on the computer?
What CD-ROM drive can you use to load
the software?
Can you run a network connectivity test to
verify that the computer can connect to the
computers in the Database Foundation
checklist and the Symantec ESM Reporting
Database Link checklist?
Response
System assessment checklists
Symantec ESM Reporting Report Package checklist
Symantec ESM Reporting Report Package checklist
See “Symantec ESM system requirements” on page 29.
Table D-4
Symantec ESM Reporting Report Package checklist
Question
What is the computer’s name?
If you are installing on a distributed
configuration, what are the names and
intended uses of the other computers?
What is the computer’s communication
protocol address?
What operating system is running on the
computer?
What version of the operating system is
running on the computer?
What relational database management
system is running on the computer?
What is the installation file system path
name?
Do you have access to accounts with the
required privileges on the computer?
What CD-ROM drive can you use to load
the software?
Can you run a network connectivity test to
verify that the computer can connect to the
computers in the Symantec ESM Reporting
Database Link checklist and the Symantec
Enterprise Reporting checklist?
Response
267
268 System assessment checklists
Symantec ESM Reporting Report Package checklist
Appendix
E
About Symantec ESM
Reporting categories
This appendix includes the following topic:
■
About the categories in Symantec ESM Reporting
About the categories in Symantec ESM Reporting
Symantec ESM Reporting uses categories as a way to classify messages. The
following list displays each category:
■
Change notification
■
ESM administrative information
■
ESM error
■
ICE
■
Patch assessment
■
Policy compliance
■
System error
■
System information
270 About Symantec ESM Reporting categories
About the categories in Symantec ESM Reporting
Categories are created from the messages that Symantec ESM generates. These
messages are also associated with Symantec ESM Modules. Any module that
contains one or more messages that fall in a certain category is also associated
with that category. The following table displays the modules that are in each
category and describes each category. The modules associated with each
category may vary depending on your security update level.
Table E-1
Symantec ESM Reporting Categories
Category
Module
Description
Change
Notification
Account Integrity
This category contains all messages
that have to do with changes to
snapshots on Symantec ESM Agent
computers. It reports messages that
are related to snapshots that deal
with new, modified, and deleted
messages.
File Attributes
File Find
File Watch
Network Integrity
Object Integrity
Oracle Accounts
Oracle Auditing
Oracle Configuration
Oracle Profiles
Oracle Roles
Oracle Tablespace
Registry
Startup Files
ESM
Administrative
Information
Account Information
Account Integrity
Active Directory
Backup Integrity
This category contains messages
that inform the user of actions that
Symantec ESM took. For example,
messages regarding the creation of a
snapshot or checks that were not
performed fall into this category.
Unexpected actions could indicate
security risks.
About Symantec ESM Reporting categories
About the categories in Symantec ESM Reporting
Table E-1
Category
Symantec ESM Reporting Categories
Module
Device Integrity
Discovery
Disk Quota
Encrypted File System
File Access
File Attributes
File Find
File Information
Description
271
272 About Symantec ESM Reporting categories
About the categories in Symantec ESM Reporting
Table E-1
Symantec ESM Reporting Categories
Category
Module
Description
ESM
Administrative
Information
File Watch
This category contains messages
that inform the user of actions that
Symantec ESM took. For example,
messages regarding the creation of a
snapshot or checks that were not
performed fall into this category.
Unexpected actions could indicate
security risks.
Integrated Command Engine
Login Parameters
Network Integrity
OS Patches
Object Integrity
Oracle Accounts
Oracle Auditing
Oracle Configuration
Oracle Networks
Oracle Objects
Oracle Passwords
Oracle Patches
Oracle Profiles
Oracle Roles
Oracle Tablespace
Password Strength
Program Find (Queries)
Registry
Response
SQL Server Auditing
SQL Server Configuration
SQL Server Objects
SQL Server Password Strength
SQL Server Roles
Startup Files
Symantec Product Info
About Symantec ESM Reporting categories
About the categories in Symantec ESM Reporting
Table E-1
Symantec ESM Reporting Categories
Category
Module
Description
ESM
Administrative
Information
SysVal - Control
This category contains messages
that inform the user of actions that
Symantec ESM took. For example,
messages regarding the creation of a
snapshot or checks that were not
performed fall into this category.
Unexpected actions could indicate
security risks.
SysVal - Security
SysVal - Storage
System Auditing
System Mail
System Queues
User Files
ESM Error
Account Information
Account Integrity
Active Directory
Backup Integrity
Device Integrity
Discovery
Disk Quota
Encrypted File System
File Access
File Attributes
File Find
File Information
File Watch
Integrated Command Engine
Login Parameters
Network Integrity
OS Patches
Object Integrity
Oracle Accounts
Oracle Auditing
Messages in this category inform
users of Symantec ESM Policy
configuration errors. The errors that
these messages report can be
corrected by adjusting Symantec
ESM Policy configurations.
273
274 About Symantec ESM Reporting categories
About the categories in Symantec ESM Reporting
Table E-1
Symantec ESM Reporting Categories
Category
Module
Description
ESM Error
Oracle Configuration
Messages in this category inform
users of Symantec ESM Policy
configuration errors. The errors that
these messages report can be
corrected by adjusting Symantec
ESM Policy configurations.
Oracle Networks
Oracle Objects
Oracle Passwords
Oracle Patches
Oracle Profiles
Oracle Roles
Oracle Tablespace
Password Strength
Program Find (Queries)
Registry
Response
SQL Server Auditing
SQL Server Configuration
SQL Server Objects
SQL Server Password Strength
SQL Server Roles
Startup Files
Symantec Product Info
SysVal - Control
SysVal - Security
SysVal - Storage
System Auditing
System Mail
System Queues
User Files
About Symantec ESM Reporting categories
About the categories in Symantec ESM Reporting
Table E-1
Symantec ESM Reporting Categories
Category
Module
Description
ICE
Integrated Command Engine
Messages in this category are all
derived from the Integrated
Command Engine module. The
messages in this category are
difficult to classify because the
meaning of the messages can vary
depending on the Integrated
Command Engine scripts.
Patch Assessment OS Patches
Messages in this category report
information on the state of
operating system patches. These
messages detail whether a computer
has all of the necessary patches.
Policy Compliance Account Information
This category contains messages
that report whether a Symantec
ESM Agent host computer complies
with a Symantec ESM Policy.
Security levels associated with these
messages rate the severity of the
security risk to these computers.
Account Integrity
Active Directory
Backup Integrity
Device Integrity
Disk Quota
Encrypted File System
File Access
File Attributes
File Find
File Watch
Login Parameters
Network Integrity
OS Patches
Object Integrity
Oracle Accounts
Oracle Auditing
Oracle Configuration
275
276 About Symantec ESM Reporting categories
About the categories in Symantec ESM Reporting
Table E-1
Category
Symantec ESM Reporting Categories
Module
Policy Compliance Oracle Networks
Oracle Objects
Oracle Passwords
Oracle Patches
Oracle Profiles
Oracle Roles
Oracle Tablespace
Password Strength
Program Find (Queries)
Registry
Response
SQL Server Auditing
SQL Server Configuration
SQL Server Objects
SQL Server Password Strength
SQL Server Roles
Startup Files
Symantec Product Info
SysVal - Control
SysVal - Security
SysVal - Storage
System Auditing
System Mail
System Queues
User Files
Description
This category contains messages
that report whether a Symantec
ESM Agent host computer complies
with a Symantec ESM Policy.
Security levels associated with these
messages rate the severity of the
security risk to these computers.
About Symantec ESM Reporting categories
About the categories in Symantec ESM Reporting
Table E-1
Symantec ESM Reporting Categories
Category
Module
Description
System Error
<All Modules>
Messages in this category report
errors on Symantec ESM Agent host
computers that prevent or
invalidate a policy run. These can be
regarded as audit errors.
Account Information
Account Integrity
Active Directory
Backup Integrity
Device Integrity
Discovery
Disk Quota
Encrypted File System
File Access
File Attributes
File Find
File Information
File Watch
Integrated Command Engine
Login Parameters
Network Integrity
OS Patches
Object Integrity
Oracle Accounts
Oracle Auditing
Oracle Configuration
Oracle Networks
Oracle Objects
Oracle Passwords
Oracle Patches
Oracle Profiles
277
278 About Symantec ESM Reporting categories
About the categories in Symantec ESM Reporting
Table E-1
Symantec ESM Reporting Categories
Category
Module
Description
System Error
Oracle Roles
Messages in this category report
errors on Symantec ESM Agent host
computers that prevent or
invalidate a policy run. These can be
regarded as audit errors.
Oracle Tablespace
Password Strength
Program Find (Queries)
Registry
Response
SQL Server Auditing
SQL Server Configuration
SQL Server Objects
SQL Server Password Strength
SQL Server Roles
Startup Files
Symantec Product Info
SysVal - Control
SysVal - Security
SysVal - Storage
System Auditing
System Mail
System Queues
User Files
System
Information
<All Modules>
Account Information
Account Integrity
Active Directory
Backup Integrity
Discovery
Disk Quota
Messages in this category report
information that can be used to
manually assess or audit a
computer. These messages do not
have a direct implication regarding
the security state of the computer.
About Symantec ESM Reporting categories
About the categories in Symantec ESM Reporting
Table E-1
Symantec ESM Reporting Categories
Category
Module
Description
System
Information
Encrypted File System
Messages in this category report
information that can be used to
manually assess or audit a
computer. These messages do not
have a direct implication regarding
the security state of the computer.
File Access
File Attributes
File Find
File Information
Login Parameters
Network Integrity
OS Patches
Object Integrity
Oracle Accounts
Oracle Auditing
Oracle Configuration
Oracle Networks
Oracle Objects
Oracle Passwords
Oracle Patches
Oracle Profiles
Oracle Roles
Oracle Tablespace
Password Strength
Program Find (Queries)
Registry
Response
SQL Server Configuration
Startup Files
System Auditing
System Mail
279
280 About Symantec ESM Reporting categories
Determining messages and modules in a category
Table E-1
Symantec ESM Reporting Categories
Category
Module
Description
System
Information
System Queues
Messages in this category report
information that can be used to
manually assess or audit a
computer. These messages do not
have a direct implication regarding
the security state of the computer.
User Files
Determining messages and modules in a category
To find the messages that are associated with each category, you can run a query
in Query Studio. This query can also show the modules.
To run a message query
1
Open Query Studio.
2
Expand the Message Information folder.
3
Expand the Messages query subject.
4
5
Insert the following information objects in order:
■
Category
■
Module
■
Message Title
Group the Category column. For detailed steps to group columns, see the
online Help, or the Administration and Security Guide. You can find this
guide on the CD in the Docs\Symantec Enterprise Reporting directory.
Appendix
F
Symantec ESM Reporting
installation scripts
This appendix includes the following topics:
■
About Symantec ESM Reporting installation scripts
■
About the installation scripts for IBM DB2
■
About the connection scripts for IBM DB2
■
About the installation scripts for Microsoft SQL Server
■
About the installation scripts for Oracle
About Symantec ESM Reporting installation scripts
The Database Foundation installer creates the ESM database for Symantec ESM
Reporting, the SER database for Symantec Enterprise Reporting, and installs all
of the necessary components to a single disk drive. If you are creating the ESM
and SER databases on separate physical disk drives, installing to a cluster, or
installing on an IBM DB2 database server and want more than 2 GB for Index
tablespaces and 2 GB for User tablespaces, Symantec provides SQL scripts that
let you manually create the ESM and SER databases. For only DB2 and Microsoft
SQL Server, you must use the Database Foundation installer to import the
necessary data into the databases. After importing the data, you must run an
additional SQL script to tune the database.
See “About the Database Foundation installer” on page 24.
IBM DB2 8.1, Symantec provides additional scripts that let you connect the runtime client to the Symantec ESM Reporting Database Link and Symantec
Enterprise Reporting.
See “Checking the installation logs for errors or warnings” on page 99.
282 Symantec ESM Reporting installation scripts
About the installation scripts for IBM DB2
About the installation scripts for IBM DB2
On the Symantec ESM Reporting Windows CD in the sql\db2 folder, Symantec
provides the create_esm_db.bat file. You can use this .bat file to execute a
command file. The command file executes the sql scripts that create the ESM
database. The sql scripts are in the sql\db2\createESMdb folder.
The sql scripts create the data file for the database in the <database_name>Data
folder. By default, the sql scripts create the ESM database in the C:\ESMDATA
folder. To improve database performance, you can use a text editor to change
the default disk drive in the sql scripts, specifying one physical disk drive for the
Index tablespaces and another physical disk drive for the Data tablespaces.
You can use a text editor to change the create_esm_db.bat file and specify a
different location for the data file in which the ESM database will be created.
To change the location of the file for the ESM database
1
Use a text editor to open the sql\db2\create_esm_db.bat file.
2
Change C:\ESMDATA to the specified location.
To change the name of the ESM database
1
Use a text editor to open the sql\db2\createESMdb\create_db.sql file.
2
Change the appropriate section of the script file.
If you change the name of the ESM database in the installation scripts, you must
change the name of the ESM database in the create_esm_db.cmd script and the
post_install.cmd script.
The installer creates three tablespaces using the default location:
■
Tablespace ESM_32K_IDX_TS
The file name is C:\ESMDATA\INDEX32K.
■
Tablespace ESM_32K_USR_TS
The file name is C:\ESMDATA\USER32K.
■
Tablespace ESM_32K_TMP_TS
The file name is C:\ESMDATA\TEMP32K.
If you change the data file location in the create_esm_db.bat file, you must also
change the create_tablespace.sql script in the sql\db2\createESMdb folder.
To change the ESM database tablespace location or any of its parameters
1
Use a text editor to open the sql\db2\create_esm_db\
create_tablespace.sql script.
2
Change the appropriate sections of the script file.
Symantec ESM Reporting installation scripts
About the installation scripts for IBM DB2
To change the location of the tablespace ESM_32K_IDX_TS,
ESM_32K_USR_TS, or ESM_32K_TMP_TS or any of its parameters
1
Use a text editor to open the sql\db2\create_esm_db\
create_tablespace.sql script.
2
Change the appropriate sections of the script file.
Example 1
To change the location of the ESM database to D:\MyDatabase
1
Use a text editor to open the sql\db2\create_esm_db.bat file.
2
Find the line of text containing C:\ESMDATA.
3
Change C:\ESMDATA to D:\MyDatabase.
4
The modified line of text should read as follows:
if not exist D:\MyDatabase mkdir D:\MyDatabase
5
Use a text editor to open the sql\db2\createESMdb\
create_tablespace.sql file.
6
Find the lines of text containing C:\ESMDATA.
7
Change C:\ESMDATA to D:\MyDatabase.
8
The modified lines of text should read as follows:
USING( File ‘D:\MyDatabase\...’ )
Example 2
To change the location of the tablespace
1
Use a text editor to open the sql\db2\createESMdb\
create_tablespace.sql file.
2
Find the line of text containing using C:\ESMDATA\... to a new location.
You can use a similar process to manually create the SER database. On the
Symantec ESM Reporting Windows CD in the sql\db2 folder, Symantec provides
the create_ser_db.bat file. You can use this .bat file to execute a command file.
The command file executes the sql scripts that create the SER database. The sql
scripts are in the sql\db2\createSERdb folder.
You can use a text editor to do the following tasks:
■
Change the create_ser_db.bat file and specify a different location for the
data file in which the SER database will be created.
283
284 Symantec ESM Reporting installation scripts
About the connection scripts for IBM DB2
■
Change the create_db.sql file and specify a different name for the SER
database.
The installer creates two tablespaces using the default location:
■
Tablespace TSN_SYS_SERCS
The file name is C:\SERDATA\CNT_SYS_SERCS.
■
Tablespace TSN_USER_SERCS
The file name is C:\SERDATA\CNT_USER_SERCS.
About the connection scripts for IBM DB2
On the Symantec ESM Reporting Windows CD in the sql\db2 folder, Symantec
provides the catalog_esm_db.bat and catalog_ser_db.bat files for only IBM DB2
v8.1. You can use the .bat files to connect the run-time client to the Symantec
ESM Reporting Database Link and Symantec Enterprise Reporting. The sql
scripts are in the sql\db2\runtime folder.
You can use a text editor to do the following tasks:
■
Change the catalog_esm_db.bat file and specify a different name for the
ESM database.
■
Change the catalog_ser_db.bat file and specify a different name for the SER
database.
Symantec ESM Reporting installation scripts
About the installation scripts for Microsoft SQL Server
About the installation scripts for Microsoft SQL
Server
On the Symantec ESM Reporting Windows CD in the sql\sqlserver folder,
Symantec provides the create_esm_db.bat file. You can use this .bat file to
execute the sql scripts that create the ESM database. The sql scripts are in the
sql\sqlserver\createESMdb folder.
Note: If you use the Database Foundation installer to create the ESM database,
the installer creates the data file for the database in the <database_name>Data
folder. By default, the Database Foundation installer creates the ESM database
in the C:\ESMDATA folder. During the installation, you can specify another
volume for the <database_name>Data folder.
You can use a text editor to change the create_esm_db.bat file and specify a
different location for the data file in which the ESM database will be created. If
you change the location of the ESM database in the installation scripts, you
must change the location of the ESM database in the other .sql files that depend
on the location. For example, the post_install.bat script.
To change the location of the file for the ESM database
1
Use a text editor to open the sql\sqlserver\create_esm_db.bat file.
2
Change C:\ESMDATA to the specified location.
To change the name of the ESM database
1
Use a text editor to open the sql\sqlserver\createESMdb\
create_database.sql file.
2
Change the appropriate section of the script file.
The installer associates the following files with the ESM database:
■
Database file: C:\<database_name>\ESMDATA.mdf
■
Log file: C:\<database_name>\ESMlog.ldf
If you change the name of the ESM database in the installation scripts, you must
change the name of the ESM database in the create_esm_db.bat script and the
post_install.bat script.
285
286 Symantec ESM Reporting installation scripts
About the installation scripts for Microsoft SQL Server
Example 1
To change the location of the database file to D:\MyServer
1
Use a text editor to open the sql\sqlserver\create_esm_db.bat file.
2
Find the line of text containing C:\ESMDATA.
3
Do one of the following tasks:
4
■
Change C:\ESMDATA to D:\MyServer.
■
Copy the “if not exist” line and change C:\ESMData to D:\MyDatabase.
The modified lines of text should read as follows:
FILENAME=’D:\MyServer\ESMData.mdf’
FILENAME=’D:\MyServer\ESMLog.ldf’
5
Use a text editor to open the sql\sqlserver\createESMdb\
create_database.sql file.
6
Find the line of text containing C:\ESMDATA.
7
Change C:\ESMDATA to D:\MyServer.
8
The modified lines of text should read as follows:
FILENAME=’D:\MyServer\ESMData.mdf’
FILENAME=’D:\MyServer\ESMLog.ldf’
You can use a similar process to manually create the SER database. On the
Symantec ESM Reporting Windows CD in the sql\sqlserver folder, Symantec
provides the create_ser_db.bat file. You can use this .bat file to execute the sql
scripts that create the SER database. The sql scripts are in the
sql\sqlserver\createSERdb folder.
You can use a text editor to do the following tasks:
■
Change the create_ser_db.bat file and specify a different location for the
data file in which the SER database will be created.
■
Change the create_database.sql file and specify a different name for the SER
database. By default, the database name is SERDATA.
The installer associates the following files with the SER database:
■
Database file: C:\<database_name>\SERdata.mdf
■
Log file: C:\<database_name>\SERlog.ldf
Symantec ESM Reporting installation scripts
About the installation scripts for Oracle
About the installation scripts for Oracle
When you run the Database Foundation installer and select the Default Oracle
option, the installer creates two databases. By default, ESM is the name of the
Symantec ESM Reporting database and SER is the name of the Symantec
Enterprise Reporting database.
If you use the Database Foundation installer to create the ESM database, the
installer creates the data files, control files, and tablespaces in
$ORACLE_BASE/oradata/$ORACLE_SID. The installer associates the following
files with the ESM database:
■
Control files: control01.ctl, control02.ctl, and control03.ctl
■
Database system file: system01.dbf
■
Database temporary tablespace: temp01.dbf
■
Database undo tablespace: undotbs01.dbf
■
Database Log files: redo01.log (group 1), redo02.log (group 2), and redo03.log
(group 3)
The installer associates the following tablespaces and files:
■
Tablespace ESM_32K_IDX_TS
This tablespace is used for indexes. The file name is esmidx01.dbf.
■
Tablespace ESM_32K_USR_TS
This tablespace is the user space. The file name is esm01.dbf.
■
Tablespace ESM_32K_TMP_TS
This tablespace is the user temporary tablespace. The file name is
esmtemp01.dbf.
On the Symantec ESM Reporting Solaris CD, Symantec provides the
create_esm_db.sh shell script. The shell script calls sql scripts that you can use
to manually create the ESM database. The sql scripts for the ESM database are in
the sql/oracle/createESMdb directory. You can change the scripts to specify a
different location for the files.
If you change file locations, you must create the corresponding directories if
they do not exist. You must also comment out the related lines of code in the
oracle/create_esm_db.sh shell script so that it cannot create an extra directory.
If you prefer, you can change the code to create the required directories. For
example, you can type the following:
#if [ ! -d $ORACLE_BASE/oradata/$ORACLE_SID ]; then
#
mkdir -p $ORACLE_BASE/oradata/$ORACLE_SID
#else
287
288 Symantec ESM Reporting installation scripts
About the installation scripts for Oracle
#
rm -f $ORACLE_BASE/oradata/$ORACLE_SID/*
#fi
To change the location of the control files for the ESM database
1
Use a text editor to open the sql/oracle/createESMdb/init file.
2
Change control01.ctl, control02.ctl, and control03.ctl to the specified
location.
Make sure the new directories are created in the create_esm_db.sh file first.
To change the ESM database system file, temporary tablespace, undo
tablespace, or any of its redo01.log files
1
Use a text editor to open the sql/oracle/createESMdb/CreateDB.sql script.
2
Change the appropriate sections of the script file.
Make sure the new directories are created in the create_esm_db.sh file first.
To change the location of the tablespace ESM_32K_IDX_TS,
ESM_32K_USR_TS, or ESM_32K_TMP_TS
1
Use a text editor to open the sql/oracle/createESMdb/CreateTableSpaces.sql
script.
2
Change the appropriate sections of the script file.
Make sure the new directories are created in the create_esm_db.sh file first.
To change the name of the ESM database
1
Use a text editor to open the sql/oracle/create_esm_db.sh file.
2
Change create_esm_db.sh to the specified name, for example,
MyESMDatabase.
Example 1
To change the location of the control files to /myNewControlFilesLocation/
1
Use a text editor to open the sql/oracle/createESMdb/init file.
2
Find the line of text containing control01.ctl.
3
Change the location from "$ORACLE_BASE/oradata/$ORACLE_SID/
control01.ctl" to "/myNewControlFilesLocation/control01.ctl".
4
Make the same change for control02.ctl and control03.ctl.
5
The modified line of text should read as follows:
control_files=("/myNewControlFilesLocation/control01.ctl",
"/myNewControlFilesLocation/control01.ct2",
"/myNewControlFilesLocation/control03.ctl")
Symantec ESM Reporting installation scripts
About the installation scripts for Oracle
Example 2
To change the location of the database file system to
/oradata/myTestDatabase
1
Use a text editor to open the sql/oracle/createESMdb/CreateDB.sql file.
2
Change the line containing
DATAFILE ‘$ORACLE_BASE/oradata/$ORACLE_SID/SYSTEM01.DBF
to
DATAFILE '/oradata/myTestDatabase/system01.dbf.
Example 3
To change the location of the tablespace ESM_32K_USR_TS to
/ynewlocation/myDB
1
Use a text editor to open, sql/oracle/createESMdb/CreateTableSpaces.sql.
2
Find the line containing CREATE TABLESPACE ESM_32K_IDX_TS.
3
Change the next line from DATAFILE '$ORACLE_BASE/oradata/
$ORACLE_SID/esmidx01.dbf' to DATAFILE '/mynewlocation/myDB/
esmidx01.dbf'
You can use a similar process to manually create the SER database. On the
Symantec ESM Reporting Solaris CD, Symantec provides the create_ser_db.sh
shell script. The shell script calls the sql scripts that create the SER database.
The sql scripts for the SER database are in the sql/oracle/createSERdb directory.
You can change the scripts to specify a different location for the files.
If you use the Database Foundation installer to create the SER database, the
installer creates the data files, control files, and tablespaces in $ORACLE_BASE/
oradata/$ORACLE_SID. The Database Foundation installer associates the
following files with the SER database:
■
Control files: control01.ctl, control02.ctl, and control03.ctl.
■
Database system file: system01.dbf
■
Database temporary tablespace: temp01.dbf
■
Database undo tablespace: undotbs01.dbf
■
Database Log files: redo01.log (group 1), redo02.log (group 2), and redo03.log
(group 3).
The installer associates the following tablespaces and files:
■
Tablespace SER_32K_USR_TS
This tablespace is the user space. The file name is ser01.dbf.
289
290 Symantec ESM Reporting installation scripts
About the installation scripts for Oracle
■
Tablespace SER_32K_TMP_TS
This tablespace is the user temporary tablespace. The file name is
sertemp01.dbf.
Symantec ESM 6.1 Reporting™
CD Replacement Form
CD REPLACEMENT: After your 60-Day Limited Warranty, if your CD becomes unusable, fill out and return 1) this
form, 2) your damaged CD, and 3) your payment (see pricing below, add sales tax if applicable), to the address
below to receive replacement CD. DURING THE 60-DAY LIMITED WARRANTY PERIOD, THIS SERVICE IS FREE.
You must be a registered customer in order to receive CD replacements.
FOR CD REPLACEMENT
Please send me: _______ CD Replacement(s)
Name ______________________________________________________________________________________________________
Company Name _____________________________________________________________________________________________
Street Address (No P.O. Boxes, Please)_________________________________________________________________________
City _______________________ State ____________ Zip/Postal Code ___________________________________________
Country* __________________ Daytime Phone ________________________________________________________________
Software Purchase Date______________________________________________________________________________________
*This offer limited to U.S., Canada, and Mexico. Outside North America, contact your local Symantec office or
distributor.
Briefly describe the problem:_________________________________________________________________________________
CD Replacement Price
Sales Tax (See Table)
Shipping & Handling
TOTAL DUE
$ 10.00
______
$ 9.95
______
SALES TAX TABLE: AZ (5%), CA (7.25%), CO (3%), CT (6%), DC (5.75%), FL (6%), GA (4%),
IA (5%), IL (6.25%), IN (5%), KS (4.9%), LA (4%), MA (5%), MD (5%), ME (6%), MI (6%),
MN (6.5%), MO (4.225%), NC (6%), NJ (6%), NY (4%), OH (5%), OK (4.5%), PA (6%), SC
(5%), TN (6%), TX (6.25%), VA (4.5%), WA (6.5%), WI (5%). Please add local sales tax (as
well as state sales tax) in AZ, CA, FL, GA, MO, NY, OH, OK, SC, TN, TX, WA, WI.
FORM OF PAYMENT ** (Check One):
___ Check (Payable to Symantec) Amount Enclosed $ __________ ______ Visa _____ Mastercard _____ AMEX
Credit Card Number ______________________________________________________ Expires _________________________
Name on Card (please print) ___________________________________ Signature ___________________________________
**U.S. Dollars. Payment must be made in U.S. dollars drawn on a U.S. bank.
MAIL YOUR CD REPLACEMENT ORDER TO:
Symantec Corporation
Attention: Order Processing
555 International Way
Springfield, OR 97477 (800) 441-7234
Please allow 2-3 weeks for delivery within the U.S.
Symantec, Symantec Enterprise Security Manager, and Symantec ESM
are trademarks of Symantec Corporation.
Other brands and products are trademarks of their respective holder/s.
© 2004 Symantec Corporation. All rights reserved. Printed in the U.S.A.
Glossary
agent
See Symantec ESM Agent.
audit
In Symantec ESM, an audit is a policy run.
category
In Symantec ESM Reporting, a category is a group of related messages that separate
modules can return. The term is specific to Symantec ESM Reporting.
checks
In Symantec ESM, a check examines a specific setting or attribute of an agent. You can
enable or disable a check. When a check is enabled in a policy run, it returns a message
with a security level.
compliant
In Symantec ESM Reporting, this parameter indicates whether an agent or domain
conforms to a policy, module, message, or category. Agents or domains with a red or
yellow security level are out of compliance.
compliance percentage
In Symantec ESM Reporting, compliance percentage is a numerical value that shows
how close an agent, manager, or domain is to being fully compliant. The value is
calculated by taking the total number of reported compliant messages, and dividing it
by the total number of possible reported messages. Messages that are not reported by
disabled checks and suppressed messages are not counted in compliance percentage.
console
See Symantec ESM Console.
domain
In Symantec ESM, a domain is a set of computers. You can specify a domain based on
organizational structure, such as computers in the accounting department, computer
configuration or function, such as computers that function as Web servers, or other
criteria.
ESM Agent
See Symantec ESM Agent.
ESM Enterprise Console
See Symantec ESM Console.
ESM Manager
See Symantec ESM Manager.
line of business
In Symantec ESM Reporting, a line of business is an organizational structure. For
example, the accounting department, legal department, or sales department is a line of
business.
manager
See Symantec ESM Manager.
294 Glossary
message
In Symantec ESM Reporting, a message contains text and a security level that describe a
specific, non-compliant condition in an agent. Checks return messages in policy runs.
Disabled checks do not return messages.
message level
In Symantec ESM Reporting, message level is the security level of a reported message.
policy
In Symantec ESM Reporting, a policy consists of a document (hardcopy or electronic)
that outlines specific requirements or rules that must be met. This includes the
activities or states that are allowed, required, or forbidden within a specific
environment.
In Symantec ESM, a policy is a set of security checks that can audit the security of
agents. You can change the security checks in a policy to conform with your
organizational security policy.
policy compliance
Policy compliance software audits and scores adherence to your company's security
policy by analyzing the settings of controls on information systems in the enterprise.
policy configuration
management
Policy configuration management includes the control and configuration of security
gateways (for example, firewalls). Through policy configuration management,
administrators can distribute security policy changes to one or more organizational
units without having to direct the changes to individual security gateways.
security domain
Security domains group computers for security purposes. Security domains can be
based on attributes, such as operating system, location, function, and role. Security
domains often correspond to Symantec ESM Domains.
security level
Security levels are red, yellow, and green. A red security level represents a serious threat
to security. A yellow security level is of moderate concern. A green security level
represents no risk to security.
In Symantec ESM, security levels depict the security of agents, managers, and domains
at their highest levels. For example, if one agent is red, then the entire domain is red.
Similarly, if the highest module in a policy is yellow, then the entire policy is yellow.
SESA (Symantec
Enterprise Security
Architecture)
The centralized, scalable management architecture that is used by Symantec security
products. SESA has managers and agents that are separate from Symantec ESM
Managers and Agents. Symantec ESM can communicate with and report data to SESA
Managers via the ESM SESA Bridge.
severity
In Symantec ESM Reporting, severity is the measure of Symantec ESM security level.
The colors red, yellow, or green represent the different levels.
severity ID
In Symantec ESM Reporting, severity ID is a number from 4 to 0. Severity ID rates the
overall impact and risk to Symantec ESM Agents. Red severities have a severity ID of 4.
Yellow severities have a severity ID of 3, 2 or 1. Green severities have a severity ID of 0.
Symantec Enterprise
Reporting
Symantec Enterprise Reporting is a reporting engine that provides reporting for
Symantec Enterprise security products. Symantec ESM Reporting integrates Symantec
ESM with Symantec Enterprise Reporting through a database foundation, database link,
and a reports package.
Glossary
Symantec ESM Agent
In Symantec ESM, the agent consists of a module server and its communications
component. The agent performs security assessments on its host system and returns
the results to the Symantec ESM Manager. Agents also store snapshot files of systemspecific and user-account information, make user-requested corrections to files, and
update snapshots to match the corrected files.
Symantec ESM Manager
In Symantec ESM, the manager coordinates the work of its registered agents, provides
communication between the agents and the user interfaces, and stores security data.
Symantec ESM Console
In Symantec ESM, the Symantec ESM Console is the graphical user interface (GUI) that
lets users administer managers and agents. The Symantec ESM Console receives user
input, sends audit requests to the managers, and formats the resulting security
assessment data for displays or reports.
Symantec ESM Reporting
Symantec ESM Reporting provides the database foundation, database link, and the
reports package that integrates Symantec ESM with Symantec Enterprise Reporting.
Symantec ESM Reporting lets you dynamically create and present reports on the state
of your Symantec ESM Agent computers, and on the state of your Symantec ESM
application configuration.
violation
In Symantec ESM Reporting, a violation is reported when a policy run returns a
message with a red or yellow security level. Each message is counted as one violation.
295
296 Glossary
Index
A
C
about
administration tools 127
auditing 121
categories 269
Database Foundation installer 24
Database Link installer 25
insertable objects 146
printing reports 109
queries 130
Query Studio 135
reporting prompts 132
reports 128
Reports Package installer 26
state reports 129
Symantec Enterprise Reporting 18
Symantec Enterprise Reporting installer 25
Symantec ESM Reporting 17
trend reports 129
user interface 126
using queries 136
account permissions 110
additional requirements
all computers 36
UNIX computers 38
Windows computers 37
administration tools 127
administrator account, creating 116
administrator account permissions 114
all computers, additional requirements 36
anonymous access, disabling 114
audit log, setting 122
audit logs 121
audit report 122
audit reports 122, 123
audit tables, creating 123
auditing 121
categories 269
change notification 269
determining modules and messages 280
ESM administrative information 269
ESM error 269
ICE 269
patch assessment 269
policy compliance 269
system error 269
system information 269
change silent install properties file, Database
Link 96
changing an installed, Database Link 97
check
Database Link installation log 101
installation logs 99
components of, Symantec ESM Reporting 19
configure, Enterprise Reporting database 57, 70, 88
configure environment variables
for Enterprise Reporting 83
for Oracle 76
configure HTTP Web server
for Enterprise Reporting 54, 68, 85
for LDAP authentication 58, 71, 89
configure post-installation
Enterprise Reporting 98
HTTP Web server 99
configure run-time client, for Enterprise
Reporting 84
connect 7.2 run-time client
for Database Link 48
for Enterprise Reporting 53
connect 8.1 run-time client
for Database Link 47
for Enterprise Reporting 52
create ESM and SER databases
for IBM DB2 42
for MS-SQL 62
for Oracle 75
creating an administrator account 116
B
backups 110
before installing, Symantec ESM Reporting 23
298 Index
creating reports 145
custom groups 144
D
data items 137
database, purging old data 152
database authentication, setting Microsoft SQL
Server 28
Database Foundation, uninstalling 103
Database Foundation installer
about 24
planning for 27
Database Link
change silent install properties file 96
changing an installed 97
checking installation log 101
connecting 7.2 run-time client 48
connecting 8.1 run-time client 47
installing 7.2 run-time client 48
installing 8.1 run-time client 47
installing JDBC Drivers 80
perform silent install 96
silent install properties file 91
stopping and starting 98
system requirements 34
testing 7.2 run-time client 48
testing 8.1 run-time client 48
uninstalling 103
Database Link installer
about 25
planning for 27
database performance, restore 102
DBPurger utility 152
DBPurger utility properties file 152
defined queries 140
deleting reports 147
disabling anonymous access 114
E
email, securing 109
emailing reports 135
enable LDAP authentication, for Enterprise
Reporting 59, 71, 89
enable redo log for ESM and SER databases, for
Oracle 79
enabling 148
enabling trending 148
ensuring network connectivity 28
Enterprise Reporting
configure HTTP Web server 54, 68, 85
configure run-time client 84
configuring environment variables 83
configuring post installation 98
connect 7.2 run-time client 53
connecting 8.1 run-time client 52
install HTTP Web server 56, 70
installing 55, 69, 86
installing 7.2 run-time client 53
installing 8.1 run-time client 52
installing HTTP Web server 85
installing run-time client 84
test 7.2 run-time client 53
testing 8.1 run-time client 52
testing run-time client 84
uninstalling 104
Enterprise Reporting database
configuring 57, 70, 88
start ReportNet Service 88
error logs 121
ESM and SER databases
create manually for IBM DB2 46
create manually for MS-SQL 65
create manually for Oracle 79
for IBM DB2 42
for MS-SQL 62
for Oracle 75
exporting report information 134
F
finding reports 131
formatting queries 142
G
GUI 126
H
how it works, Symantec ESM Reporting 22
HTTP Web server
configuring for Enterprise Reporting 54, 68, 85
configuring for LDAP authentication 58, 71, 89
configuring post-installation 99
installing for Enterprise Reporting 56, 70, 85
Index
I
J
IBM DB2
create ESM and SER databases 42
installing Database Foundation 42
installing Database Link 49
installing Reports Package 60
manually create ESM and SER databases 46
testing Reports Package 61
information, where to get more 22
insertable objects 146
install, Enterprise Reporting 55, 69, 86
install 7.2 run-time client
for Database Link 48
for Enterprise Reporting 53
install 8.1 run-time client
for Database Link 47
for Enterprise Reporting 52
install Database Foundation
for IBM DB2 42
for MS-SQL 62
for Oracle 76
install Database Link
for IBM DB2 49
for MS-SQL 66
for Oracle 81
install HTTP Web server, for Enterprise
Reporting 85
install JDBC Drivers, for Database Link 80
install on Solaris computers, using Oracle 75
install on UNIX computers, using Oracle 75
install on Windows computers
using IBM DB2 42
using Microsoft SQL Server 62
install Reports Package
for IBM DB2 60
for MS-SQL 72
for Oracle 90
install run-time client, for Enterprise Reporting 84
installation log, checking Database Link 101
installation logs, checking 99
installing HTTP Web server, for Enterprise
Reporting 56, 70
interface 126
internal auditing 122
JDBC driver communications, securing 108
L
LDAP authentication
configure HTTP Web server 58, 71, 89
enable for Enterprise Reporting 59, 71, 89
Locating logs 121
locating reports 131
logs 121
auditing 121
locating 121
M
manually create ESM and SER databases
for IBM DB2 46
for MS-SQL 65
for Oracle 79
mapping user names 115
messages in categories 280
metadata model 135, 138, 147
Microsoft SQL Server, setting database
authentication 28
modifying reports 146
modules in categories 280
more information, Symantec ESM Reporting 22
MS-SQL
create ESM and SER databases 62
installing Database Foundation 62
installing Database Link 66
installing Reports Package 72
manually create ESM and SER databases 65
testing Reports Package 72
MS-SQL Server, installing on Windows
computers 62
N
network connectivity, ensuring 28
O
Oracle
configuring environment variables 76
create ESM and SER databases 75
enable redo log for ESM and SER databases 79
installing Database Foundation 76
installing Database Link 81
299
300 Index
Oracle (continued)
installing Reports Package 90
manually create ESM and SER databases 79
testing Reports Package 90
P
packages 122, 135
perform silent install, Database Link 96
permissions
assigning 115
assigning administrator 114
assigning in the database 116
removing 118
user account 110
viewing 119
planning for
Database Foundation installer 27
Database Link installer 27
Reports Package 28
Symantec Enterprise Reporting 27
planning queries 136
printing 109
prompts 132
properties file, DBPurger utility 152
purging old database data 152
Q
queries 130, 136
adding charts 143
adding columns 140
custom groups 144
defined 140
filtering 141
formatting 142
planning 136
removing columns 140
sorting 142
summarizing 143
Query Studio 135
R
removing, database data 152
removing user permissions 118
report parameters, selecting 132
report prompts 132
Report Studio 144
creating reports 145
Report Studio 144 (continued)
modifying reports 146
opening 145
toolbox 147
reports 128
about 128
creating 145
deleting 147
emailing 135
exporting 134
locating 131
modifying 146
running 131
scheduling 133
Reports Package
planning for 28
uninstalling 105
Reports Package installer, about 26
requirements
all computers 36
Database Link 34
Symantec Enterprise Reporting 30
Symantec ESM 29
UNIX computers 38
Windows computers 37
restore, database performance 102
running reports 131
S
scheduling reports 133
securing
email 109
JDBC driver communications 108
saved reports 109
Symantec Enterprise Reporting
components 108
Web servers 110
security considerations 107
selecting report parameters 132
SER and ESM databases
create manually for IBM DB2 46
create manually for MS-SQL 65
create manually for Oracle 79
enable redo log 79
for IBM DB2 42
for MS-SQL 62
for Oracle 75
service logs 121
Index
setting database authentication, Microsoft SQL
Server 28
setting the audit log 122
seved reports, securing 109
silent install properties file, Database Link 91
sorting queries 142
SQL commands
assigning user permissions 116
removing user permissions 118
viewing user permissions 119
start ReportNet Service, Enterprise Reporting
database 88
state reports 129
stopping and starting, Database Link 98
Symantec Enterprise Reporting 122
about 18
planning for 27
system requirements 30
Symantec Enterprise Reporting components,
securing 108
Symantec Enterprise Reporting Database, purging
old data 152
Symantec Enterprise Reporting Database Link,
mapping user accounts 115
Symantec Enterprise Reporting installer, about 25
Symantec ESM, system requirements 29
Symantec ESM Reporting
about 17
before installing 23
components of 19
how it works 22
interface 126
more information 22
reports 128
what you can do with 20
synchronizing user accounts 115
system requirements
Database Link 34
Symantec Enterprise Reporting 30
Symantec ESM 29
T
test 7.2 run-time client
for Database Link 48
for Enterprise Reporting 53
test 8.1 run-time client
for Database Link 48
for Enterprise Reporting 52
test Reports Package
for IBM DB2 61
for MS-SQL 72
for Oracle 90
test run-time client, for Enterprise Reporting 84
toolbox 147
tools 127
trend reports 129
trending 148
U
uninstall
Database Foundation 103
Database Link 103
Enterprise Reporting 104
Reports Package 105
UNIXcomputers, additional requirements 38
user account permissions 110
user interface 126
customizing 127
opening 110, 126
tools 127
user names, mapping 115
User permissions, viewing 119
user permissions
assigning 116
removing 118
using audit reports 122
using IBM DB2, installing on Windows
computers 42
using Microsoft SQL Server, installing on Windows
computers 62
using Oracle, installing on Solaris computers 75
V
viewing user permissions 119
W
Web server security 110
what you can do with, Symantec ESM Reporting 20
where to get more information 22
Windows computers, additional requirements 37
301