1
Avid
®
iNEWS Newsroom Computer System
™
Setup and Configuration Manual
Version 2.0
m a k e m a n a g e m ove | m e d i a ™
Avid
®
Copyright and Disclaimer
Product specifications are subject to change without notice and do not represent a commitment on the part
of Avid Technology, Inc.
The software described in this document is furnished under a license agreement. You can obtain a copy of
that license by visiting Avid's Web site at www.avid.com. The terms of that license are also available in the
product in the same directory as the software. The software may not be reverse assembled and may be
used or copied only in accordance with the terms of the license agreement. It is against the law to copy the
software on any medium except as specifically allowed in the license agreement.
Avid products or portions thereof are protected by one or more of the following United States patents:
4,746,994; 4,970,663; 5,045,940; 5,267,351; 5,309,528; 5,355,450; 5,396,594; 5,440,348; 5,452,378;
5,467,288; 5,513,375; 5,528,310; 5,557,423; 5,568,275; 5,577,190; 5,584,006; 5,640,601; 5,644,364;
5,654,737; 5,715,018; 5,724,605; 5,726,717; 5,729,673; 5,745,637; 5,752,029; 5,754,851; 5,781,188;
5,799,150; 5,812,216; 5,852,435; 5,905,841; 5,929,836; 5,929,942; 5,930,445; 5,930,797; 5,946,445;
5,987,501; 5,999,190; 6,016,152; 6,018,337; 6,023,531; 6,023,703; 6,031,529; 6,058,236; 6,061,758;
6,091,778; 6,105,083; 6,118,444; 6,128,001; 6,134,607; 6,137,919; 6,141,691; 6,157,929; 6,160,548;
6,167,404; 6,198,477; 6,201,531; 6,223,211; 6,249,280; 6,269,195; 6,317,158; 6,317,515; 6,330,369;
6,351,557; 6,353,862; 6,357,047; 6,392,710; 6,404,435; 6,407,775; 6,417,891; 6,426,778; 6,449,019;
6,473,094; 6,477,271; 6,489,969; 6,512,522; 6,532,043; 6,539,163; D396,853; D398,912. Additional U.S.
and foreign patents pending.
No part of this document may be reproduced or transmitted in any form or by any means, electronic or
mechanical, including photocopying and recording, for any purpose without the express written permission
of Avid Technology, Inc.
Copyright © 2004 Avid Technology, Inc. and its licensors. All rights reserved. Printed in USA.
The following disclaimer is required by Sam Leffler and Silicon Graphics, Inc. for the use of their TIFF
library:
Copyright © 1988–1997 Sam Leffler
Copyright © 1991–1997 Silicon Graphics, Inc.
Permission to use, copy, modify, distribute, and sell this software [i.e., the TIFF library] and its
documentation for any purpose is hereby granted without fee, provided that (i) the above copyright notices
and this permission notice appear in all copies of the software and related documentation, and (ii) the
names of Sam Leffler and Silicon Graphics may not be used in any advertising or publicity relating to the
software without the specific, prior written permission of Sam Leffler and Silicon Graphics.
THE SOFTWARE IS PROVIDED “AS-IS” AND WITHOUT WARRANTY OF ANY KIND, EXPRESS,
IMPLIED OR OTHERWISE, INCLUDING WITHOUT LIMITATION, ANY WARRANTY OF
MERCHANTABILITY OR FITNESS FOR A PARTICULAR PURPOSE.
IN NO EVENT SHALL SAM LEFFLER OR SILICON GRAPHICS BE LIABLE FOR ANY SPECIAL,
INCIDENTAL, INDIRECT OR CONSEQUENTIAL DAMAGES OF ANY KIND, OR ANY DAMAGES
WHATSOEVER RESULTING FROM LOSS OF USE, DATA OR PROFITS, WHETHER OR NOT ADVISED
OF THE POSSIBILITY OF DAMAGE, AND ON ANY THEORY OF LIABILITY, ARISING OUT OF OR IN
CONNECTION WITH THE USE OR PERFORMANCE OF THIS SOFTWARE.
The following disclaimer is required by the Independent JPEG Group:
Portions of this software are based on work of the Independent JPEG Group.
The following disclaimer is required by Paradigm Matrix:
Portions of this software licensed from Paradigm Matrix.
The following disclaimer is required by Ray Sauers Associates, Inc.:
“Install-It” is licensed from Ray Sauers Associates, Inc. End-User is prohibited from taking any action to
derive a source code equivalent of “Install-It,” including by reverse assembly or reverse compilation, Ray
Sauers Associates, Inc. shall in no event be liable for any damages resulting from reseller’s failure to
perform reseller’s obligation; or any damages arising from use or operation of reseller’s products or the
software; or any other damages, including but not limited to, incidental, direct, indirect, special or
consequential Damages including lost profits, or damages resulting from loss of use or inability to use
reseller’s products or the software for any reason including copyright or patent infringement, or lost data,
even if Ray Sauers Associates has been advised, knew or should have known of the possibility of such
damages.
The following disclaimer is required by Videomedia, Inc.:
“Videomedia, Inc. makes no warranties whatsoever, either express or implied, regarding this product,
including warranties with respect to its merchantability or its fitness for any particular purpose.”
“This software contains V-LAN ver. 3.0 Command Protocols which communicate with V-LAN ver. 3.0
products developed by Videomedia, Inc. and V-LAN ver. 3.0 compatible products developed by third parties
under license from Videomedia, Inc. Use of this software will allow “frame accurate” editing control of
applicable videotape recorder decks, videodisc recorders/players and the like.”
The following disclaimer is required by Altura Software, Inc. for the use of its Mac2Win
software and Sample Source Code:
©1993–1998 Altura Software, Inc.
Attn. Government User(s). Restricted Rights Legend
U.S. GOVERNMENT RESTRICTED RIGHTS. This Software and its documentation are “commercial
computer software” or “commercial computer software documentation.” In the event that such Software or
documentation is acquired by or on behalf of a unit or agency of the U.S. Government, all rights with
respect to this Software and documentation are subject to the terms of the License Agreement, pursuant to
FAR §12.212(a) and/or DFARS §227.7202-1(a), as applicable.
Trademarks
888 I/O, AirPlay, AirSPACE, AirSPACE HD, AniMatte, AudioSuite, AudioVision, AutoSync, Avid, AVIDdrive,
AVIDdrive Towers, AvidNet, AvidNetwork, AVIDstripe, Avid Unity, Avid Xpress, AVoption, AVX, CamCutter,
ChromaCurve, ChromaWheel, DAE, D-Fi, D-fx, Digidesign, Digidesign Audio Engine, Digidesign Intelligent
Noise Reduction, DigiDrive, DigiTranslator, DINR, D-Verb, Equinox, ExpertRender, FieldPak,
Film Composer, FilmScribe, FluidMotion, HIIP, HyperSPACE, HyperSPACE HDCAM, IllusionFX,
Image Independence, Intraframe, iS9, iS18, iS23, iS36, Lo-Fi, Magic Mask, make manage move | media,
Marquee, Matador, Maxim, MCXpress, Media Composer, MediaDock, MediaDock Shuttle, Media Fusion,
Media Illusion, MediaLog, Media Reader, Media Recorder, MEDIArray, MediaShare, Meridien, MetaSync,
NaturalMatch, Nearchive, NetReview, NewsCutter, OMF, OMF Interchange, OMM,
Open Media Framework, Open Media Management, ProEncode, Pro Tools, QuietDrive, Recti-Fi,
RetroLoop, rS9, rS18, Sci-Fi, Softimage, Sound Designer II, SPACE, SPACEShift, Symphony, the Avid|DS
logo, Trilligent, UnityRAID, Vari-Fi, Video Slave Driver, VideoSPACE, and Xdeck are either registered
trademarks or trademarks of Avid Technology, Inc. in the United States and/or other countries.
iNEWS, iNEWS ControlAir, and Media Browse are trademarks of iNews, LLC.
All other trademarks contained herein are the property of their respective owners.
Footage
Arizona Images — KNTV Production — Courtesy of Granite Broadcasting, Inc.,
Editor/Producer Bryan Foote.
Canyonlands — Courtesy of the National Park Service/Department of the Interior.
WCAU Fire Story — Courtesy of NBC-10, Philadelphia, PA.
Women in Sports – Paragliding — Courtesy of Legendary Entertainment, Inc.
Avid® iNEWS™ Newsroom Computer System Setup and Configuration Manual
Part # 0130-06339-01 Rev B • 25 October 2004
Contents
Using This Guide
Who Should Use This Manual . . . . . . . . . . . . . . . . . . . . . . . . . . . . . . . . . 1
About This Manual . . . . . . . . . . . . . . . . . . . . . . . . . . . . . . . . . . . . . . . . . . 2
Symbols and Conventions . . . . . . . . . . . . . . . . . . . . . . . . . . . . . . . . . . . . 3
If You Need Help . . . . . . . . . . . . . . . . . . . . . . . . . . . . . . . . . . . . . . . . . . . 4
...With the Syntax of Console Commands . . . . . . . . . . . . . . . . . . . . . 5
Related Information . . . . . . . . . . . . . . . . . . . . . . . . . . . . . . . . . . . . . . . . . 6
If You Have Documentation Comments . . . . . . . . . . . . . . . . . . . . . . . . . . 6
How to Order Documentation . . . . . . . . . . . . . . . . . . . . . . . . . . . . . . . . . . 7
Avid Educational Services . . . . . . . . . . . . . . . . . . . . . . . . . . . . . . . . . . . . 7
Chapter 1
Introduction
What is Avid Unity for NEWS? . . . . . . . . . . . . . . . . . . . . . . . . . . . . . . . . 10
iNEWS NRCS . . . . . . . . . . . . . . . . . . . . . . . . . . . . . . . . . . . . . . . . . 11
Third-Party Connectivity and Open Integration . . . . . . . . . . . . . . . . 12
System Administrator Tasks. . . . . . . . . . . . . . . . . . . . . . . . . . . . . . . . . . 13
Basic Tasks . . . . . . . . . . . . . . . . . . . . . . . . . . . . . . . . . . . . . . . . . . . 13
User Tasks. . . . . . . . . . . . . . . . . . . . . . . . . . . . . . . . . . . . . . . . . . . . 14
Database Tasks . . . . . . . . . . . . . . . . . . . . . . . . . . . . . . . . . . . . . . . . 14
Security Tasks . . . . . . . . . . . . . . . . . . . . . . . . . . . . . . . . . . . . . . . . . 15
Customizing the System . . . . . . . . . . . . . . . . . . . . . . . . . . . . . . . . . 15
Storage Maintenance Tasks . . . . . . . . . . . . . . . . . . . . . . . . . . . . . . 15
Device Tasks . . . . . . . . . . . . . . . . . . . . . . . . . . . . . . . . . . . . . . . . . . 16
Reviewing Default Settings . . . . . . . . . . . . . . . . . . . . . . . . . . . . . . . 17
Troubleshooting . . . . . . . . . . . . . . . . . . . . . . . . . . . . . . . . . . . . . . . . 17
Chapter 2
The iNEWS Console
Overview. . . . . . . . . . . . . . . . . . . . . . . . . . . . . . . . . . . . . . . . . . . . . . . . . 20
The Console Display . . . . . . . . . . . . . . . . . . . . . . . . . . . . . . . . . . . . 21
Standard Console Operations . . . . . . . . . . . . . . . . . . . . . . . . . . . . . . . . 22
i
Starting the Console . . . . . . . . . . . . . . . . . . . . . . . . . . . . . . . . . . . . . 22
The System Operator . . . . . . . . . . . . . . . . . . . . . . . . . . . . . . . . . . . . 23
The Console Superuser . . . . . . . . . . . . . . . . . . . . . . . . . . . . . . . . . . 23
Entering Superuser Mode . . . . . . . . . . . . . . . . . . . . . . . . . . . . . 24
Exiting Superuser Mode. . . . . . . . . . . . . . . . . . . . . . . . . . . . . . . 24
Changing System Administration Passwords . . . . . . . . . . . . . . . . . . 25
Exiting the Console. . . . . . . . . . . . . . . . . . . . . . . . . . . . . . . . . . . . . . 26
Troubleshooting a Frozen Console . . . . . . . . . . . . . . . . . . . . . . . . . 27
Types of Console Commands. . . . . . . . . . . . . . . . . . . . . . . . . . . . . . . . . 28
Server Commands . . . . . . . . . . . . . . . . . . . . . . . . . . . . . . . . . . . . . . 29
Console Control Commands. . . . . . . . . . . . . . . . . . . . . . . . . . . . . . . 30
Console Function Keys. . . . . . . . . . . . . . . . . . . . . . . . . . . . . . . . . . . 31
Assigning a Command to a Function Key . . . . . . . . . . . . . . . . . 32
Changing the Assignment of a Function Key . . . . . . . . . . . . . . . 32
Deleting the Definition of a Function Key . . . . . . . . . . . . . . . . . . 32
Displaying Function Key Assignments . . . . . . . . . . . . . . . . . . . . 32
Selecting Servers . . . . . . . . . . . . . . . . . . . . . . . . . . . . . . . . . . . . . . . . . . 33
Selecting One or More Servers . . . . . . . . . . . . . . . . . . . . . . . . . . . . 33
Zooming in on One Server . . . . . . . . . . . . . . . . . . . . . . . . . . . . . . . . 34
Console History. . . . . . . . . . . . . . . . . . . . . . . . . . . . . . . . . . . . . . . . . . . . 35
Viewing Recent Console History . . . . . . . . . . . . . . . . . . . . . . . . . . . 37
Viewing Logged Console History . . . . . . . . . . . . . . . . . . . . . . . . 38
Using the Remote Console . . . . . . . . . . . . . . . . . . . . . . . . . . . . . . . . . . . 40
Dialing in to the Console. . . . . . . . . . . . . . . . . . . . . . . . . . . . . . . . . . 40
Executing Commands Remotely . . . . . . . . . . . . . . . . . . . . . . . . . . . 41
Logging out from a Remote Console . . . . . . . . . . . . . . . . . . . . . . . . 42
Logging out a Remote User from the Main Console. . . . . . . . . . . . . 42
The Console Configuration File. . . . . . . . . . . . . . . . . . . . . . . . . . . . . . . . 42
Viewing the Configuration File . . . . . . . . . . . . . . . . . . . . . . . . . . . . . 43
Sample Console Configuration File . . . . . . . . . . . . . . . . . . . . . . 43
Editing the Console Configuration File . . . . . . . . . . . . . . . . . . . . . . . 44
Console Configuration Keywords . . . . . . . . . . . . . . . . . . . . . . . . . . . 45
Chapter 3
Getting Started
Starting the System. . . . . . . . . . . . . . . . . . . . . . . . . . . . . . . . . . . . . . . . . 50
ii
Shutting Down the System . . . . . . . . . . . . . . . . . . . . . . . . . . . . . . . . . . . 53
Starting a System in Single-Server Mode. . . . . . . . . . . . . . . . . . . . . . . . 56
Chapter 4
Users
Viewing User Accounts. . . . . . . . . . . . . . . . . . . . . . . . . . . . . . . . . . . . . . 60
Modifying User Traits . . . . . . . . . . . . . . . . . . . . . . . . . . . . . . . . . . . . . . . 62
User Traits . . . . . . . . . . . . . . . . . . . . . . . . . . . . . . . . . . . . . . . . . . . . 63
User ID and User Name . . . . . . . . . . . . . . . . . . . . . . . . . . . . . . 63
Type. . . . . . . . . . . . . . . . . . . . . . . . . . . . . . . . . . . . . . . . . . . . . . 63
Edit Mode . . . . . . . . . . . . . . . . . . . . . . . . . . . . . . . . . . . . . . . . . 64
Queues . . . . . . . . . . . . . . . . . . . . . . . . . . . . . . . . . . . . . . . . . . . 65
Read Rate . . . . . . . . . . . . . . . . . . . . . . . . . . . . . . . . . . . . . . . . . 65
Session/Configuration/Queue Features . . . . . . . . . . . . . . . . . . 66
Password. . . . . . . . . . . . . . . . . . . . . . . . . . . . . . . . . . . . . . . . . . 67
User Preferences... . . . . . . . . . . . . . . . . . . . . . . . . . . . . . . . . . . 67
Get from Template... . . . . . . . . . . . . . . . . . . . . . . . . . . . . . . . . . 67
Changing a User’s Password. . . . . . . . . . . . . . . . . . . . . . . . . . . . . . 68
User Preferences . . . . . . . . . . . . . . . . . . . . . . . . . . . . . . . . . . . . . . . 69
Session Tab. . . . . . . . . . . . . . . . . . . . . . . . . . . . . . . . . . . . . . . . 70
Confirmations Tab . . . . . . . . . . . . . . . . . . . . . . . . . . . . . . . . . . . 71
Backup Tab . . . . . . . . . . . . . . . . . . . . . . . . . . . . . . . . . . . . . . . . 73
Refresh Tab. . . . . . . . . . . . . . . . . . . . . . . . . . . . . . . . . . . . . . . . 73
Layout Tab. . . . . . . . . . . . . . . . . . . . . . . . . . . . . . . . . . . . . . . . . 75
Search Results Tab . . . . . . . . . . . . . . . . . . . . . . . . . . . . . . . . . . 78
Simplified Users . . . . . . . . . . . . . . . . . . . . . . . . . . . . . . . . . . . . . . . . 78
Workspaces Section . . . . . . . . . . . . . . . . . . . . . . . . . . . . . . . . . 79
Application Section . . . . . . . . . . . . . . . . . . . . . . . . . . . . . . . . . . 80
Creating New Users . . . . . . . . . . . . . . . . . . . . . . . . . . . . . . . . . . . . . . . . 81
Creating a New User Area in the News Database . . . . . . . . . . . . . . 82
Adding a New User Account . . . . . . . . . . . . . . . . . . . . . . . . . . . . . . 84
Copying User Traits to Another User Account. . . . . . . . . . . . . . 84
Creating a New User Account . . . . . . . . . . . . . . . . . . . . . . . . . . 86
Enabling a New User to Receive Mail . . . . . . . . . . . . . . . . . . . . . . . 87
Searching for User Information. . . . . . . . . . . . . . . . . . . . . . . . . . . . . . . . 87
Removing User Accounts . . . . . . . . . . . . . . . . . . . . . . . . . . . . . . . . . . . . 91
iii
The User Manager Account . . . . . . . . . . . . . . . . . . . . . . . . . . . . . . . . . . 92
The Database Manager Account . . . . . . . . . . . . . . . . . . . . . . . . . . . . . . 93
Logging Out All Users . . . . . . . . . . . . . . . . . . . . . . . . . . . . . . . . . . . . . . . 94
Chapter 5
Stories Queues, and Directories
Overview . . . . . . . . . . . . . . . . . . . . . . . . . . . . . . . . . . . . . . . . . . . . . . . . . 98
Adding a Directory or Queue. . . . . . . . . . . . . . . . . . . . . . . . . . . . . . . . . . 99
A Few Restrictions: . . . . . . . . . . . . . . . . . . . . . . . . . . . . . . . . . . 99
Creating a New Directory . . . . . . . . . . . . . . . . . . . . . . . . . . . . . . . . 101
Creating a New Queue . . . . . . . . . . . . . . . . . . . . . . . . . . . . . . . . . . 103
Setting up the Outgoing Mail Queue . . . . . . . . . . . . . . . . . . . . 104
Setting up the Dead Letter Queue . . . . . . . . . . . . . . . . . . . . . . 106
Creating a New Story . . . . . . . . . . . . . . . . . . . . . . . . . . . . . . . . . . . 106
Removing a Directory or Queue . . . . . . . . . . . . . . . . . . . . . . . . . . . 107
Renaming a Directory or Queue . . . . . . . . . . . . . . . . . . . . . . . . . . . 107
Viewing Database Traits . . . . . . . . . . . . . . . . . . . . . . . . . . . . . . . . . . . . 110
From the iNEWS Workstation... . . . . . . . . . . . . . . . . . . . . . . . . . . . 110
From the iNEWS Console. . . . . . . . . . . . . . . . . . . . . . . . . . . . . . . . 111
Sending Output from the List Command to a Printer . . . . . . . . 112
Getting Information about Stories . . . . . . . . . . . . . . . . . . . . . . 112
Finding out Who Moved, Duplicated, or Killed a Story. . . . . . . 114
Recovering a Killed Story. . . . . . . . . . . . . . . . . . . . . . . . . . . . . 116
Changing Database Traits . . . . . . . . . . . . . . . . . . . . . . . . . . . . . . . . . . 117
Database Traits Summary . . . . . . . . . . . . . . . . . . . . . . . . . . . . . . . . . . 120
Directory/Queue Properties Dialog Box . . . . . . . . . . . . . . . . . . . . . 121
Forms Tab . . . . . . . . . . . . . . . . . . . . . . . . . . . . . . . . . . . . . . . . 122
Groups Tab . . . . . . . . . . . . . . . . . . . . . . . . . . . . . . . . . . . . . . . 129
Abstract Tab. . . . . . . . . . . . . . . . . . . . . . . . . . . . . . . . . . . . . . . 131
Maintain Tab . . . . . . . . . . . . . . . . . . . . . . . . . . . . . . . . . . . . . . 133
User Interface Tab . . . . . . . . . . . . . . . . . . . . . . . . . . . . . . . . . . 138
Locks Tab. . . . . . . . . . . . . . . . . . . . . . . . . . . . . . . . . . . . . . . . . 141
Locking and Unlocking . . . . . . . . . . . . . . . . . . . . . . . . . . . . . . . . . . . . . 142
Identifying Locked Queues and Stories . . . . . . . . . . . . . . . . . . . . . 142
From the iNEWS Workstation... . . . . . . . . . . . . . . . . . . . . . . . . 142
From the Console... . . . . . . . . . . . . . . . . . . . . . . . . . . . . . . . . . 143
iv
Types of Locks. . . . . . . . . . . . . . . . . . . . . . . . . . . . . . . . . . . . . . . . 146
Edit Lock . . . . . . . . . . . . . . . . . . . . . . . . . . . . . . . . . . . . . . . . . 146
User Lock . . . . . . . . . . . . . . . . . . . . . . . . . . . . . . . . . . . . . . . . 147
Order Lock. . . . . . . . . . . . . . . . . . . . . . . . . . . . . . . . . . . . . . . . 149
Production Lock. . . . . . . . . . . . . . . . . . . . . . . . . . . . . . . . . . . . 149
Unbusy Stories and Queues . . . . . . . . . . . . . . . . . . . . . . . . . . . . . 149
Chapter 6
Groups
Overview. . . . . . . . . . . . . . . . . . . . . . . . . . . . . . . . . . . . . . . . . . . . . . . . 154
Viewing Group Information . . . . . . . . . . . . . . . . . . . . . . . . . . . . . . . . . . 154
From the Console... . . . . . . . . . . . . . . . . . . . . . . . . . . . . . . . . . . . . 154
From a Workstation.... . . . . . . . . . . . . . . . . . . . . . . . . . . . . . . . . . . 155
Creating a New Group . . . . . . . . . . . . . . . . . . . . . . . . . . . . . . . . . . . . . 156
Step 1 - Choosing a Group Name . . . . . . . . . . . . . . . . . . . . . . . . . 156
Step 2 - Create New Group at Console . . . . . . . . . . . . . . . . . . . . . 157
Step 3 - Specifying Members of a New Group. . . . . . . . . . . . . . . . 157
Group Checker . . . . . . . . . . . . . . . . . . . . . . . . . . . . . . . . . . . . . . . . . . . 158
Group Checker Error Messages . . . . . . . . . . . . . . . . . . . . . . . . . . 160
Renaming a Group . . . . . . . . . . . . . . . . . . . . . . . . . . . . . . . . . . . . . . . . 163
Step 1 - Change Group Name in System . . . . . . . . . . . . . . . . . . . 163
Step 2 - Change Group Name in SYSTEM.GROUPS . . . . . . . . . . 164
Deleting a Group . . . . . . . . . . . . . . . . . . . . . . . . . . . . . . . . . . . . . . . . . 164
Creating or Modifying Multiple Groups . . . . . . . . . . . . . . . . . . . . . . . . . 165
Adding Members to an Existing Group. . . . . . . . . . . . . . . . . . . . . . . . . 166
Users as Members of a Group . . . . . . . . . . . . . . . . . . . . . . . . . . . . 166
Groups as Members of Other Groups . . . . . . . . . . . . . . . . . . . . . . 166
Avoiding Recursion . . . . . . . . . . . . . . . . . . . . . . . . . . . . . . . . . 166
Workstations as Members of Groups. . . . . . . . . . . . . . . . . . . . . . . 168
Combining Permissions. . . . . . . . . . . . . . . . . . . . . . . . . . . . . . 169
Setting an Automatic Timeout . . . . . . . . . . . . . . . . . . . . . . . . . 170
Group Access and Usage Restrictions. . . . . . . . . . . . . . . . . . . . . . . . . 171
Access and Usage Examples . . . . . . . . . . . . . . . . . . . . . . . . . . . . 172
Group Traits for the Database . . . . . . . . . . . . . . . . . . . . . . . . . . . . . . . 172
Read Group . . . . . . . . . . . . . . . . . . . . . . . . . . . . . . . . . . . . . . . . . . 174
Write Group . . . . . . . . . . . . . . . . . . . . . . . . . . . . . . . . . . . . . . . . . . 175
v
Notification Group . . . . . . . . . . . . . . . . . . . . . . . . . . . . . . . . . . . . . . 176
Restricted Group . . . . . . . . . . . . . . . . . . . . . . . . . . . . . . . . . . . . . . 177
Restricting Both Reading and Writing. . . . . . . . . . . . . . . . . . . . . . . 177
Transferring Group Assignments . . . . . . . . . . . . . . . . . . . . . . . . . . 178
Hiding Queues and Directories. . . . . . . . . . . . . . . . . . . . . . . . . . . . 178
Mail Aliases . . . . . . . . . . . . . . . . . . . . . . . . . . . . . . . . . . . . . . . . . . . . . . 179
Creating a Mail Alias. . . . . . . . . . . . . . . . . . . . . . . . . . . . . . . . . . . . 180
Mail Aliases for Other Machines or the Internet . . . . . . . . . . . . . . . 181
Chapter 7
Keyboards and Macros
Understanding Macros and Keyboards. . . . . . . . . . . . . . . . . . . . . . . . . 184
Customizing Workstation Keyboards . . . . . . . . . . . . . . . . . . . . . . . . . . 184
Creating a New Keyboard Story . . . . . . . . . . . . . . . . . . . . . . . . . . . 185
Creating a Macro. . . . . . . . . . . . . . . . . . . . . . . . . . . . . . . . . . . . . . . . . . 187
Adding Comments . . . . . . . . . . . . . . . . . . . . . . . . . . . . . . . . . . . . . 188
Assigning Macros to Keys . . . . . . . . . . . . . . . . . . . . . . . . . . . . . . . 188
Predefined System Function Keys . . . . . . . . . . . . . . . . . . . . . . 189
State Keys . . . . . . . . . . . . . . . . . . . . . . . . . . . . . . . . . . . . . . . . 191
Using Plain Text in Macros . . . . . . . . . . . . . . . . . . . . . . . . . . . . . . . 192
Repeating Macros . . . . . . . . . . . . . . . . . . . . . . . . . . . . . . . . . . . . . 192
Notes of Caution for Creating Macros . . . . . . . . . . . . . . . . . . . 193
Keyboard Checker . . . . . . . . . . . . . . . . . . . . . . . . . . . . . . . . . . . . . . . . 194
Error Messages . . . . . . . . . . . . . . . . . . . . . . . . . . . . . . . . . . . . . . . 195
Warning Messages . . . . . . . . . . . . . . . . . . . . . . . . . . . . . . . . . 197
Assigning a Default Keyboard to a User . . . . . . . . . . . . . . . . . . . . . . . . 198
Chapter 8
Forms
Form Names, Locations and Guidelines . . . . . . . . . . . . . . . . . . . . . . . . 204
Guidelines for Designing Forms . . . . . . . . . . . . . . . . . . . . . . . . . . . 204
Creating Forms . . . . . . . . . . . . . . . . . . . . . . . . . . . . . . . . . . . . . . . . . . . 204
Customizing Forms. . . . . . . . . . . . . . . . . . . . . . . . . . . . . . . . . . . . . 207
Label Borders. . . . . . . . . . . . . . . . . . . . . . . . . . . . . . . . . . . . . . 212
Assigning a Form as a Queue or Story Form . . . . . . . . . . . . . . . . . . . . 213
Form Field Types and Definitions . . . . . . . . . . . . . . . . . . . . . . . . . . . . . 214
iNEWS MCS/ControlAir Fields and Forms. . . . . . . . . . . . . . . . 226
vi
Standard iNEWS Forms . . . . . . . . . . . . . . . . . . . . . . . . . . . . . . . . . . . . 228
Account Queue Form . . . . . . . . . . . . . . . . . . . . . . . . . . . . . . . . . . . 229
Mail Form . . . . . . . . . . . . . . . . . . . . . . . . . . . . . . . . . . . . . . . . . . . . 230
Print Form . . . . . . . . . . . . . . . . . . . . . . . . . . . . . . . . . . . . . . . . . . . 230
Find All Form . . . . . . . . . . . . . . . . . . . . . . . . . . . . . . . . . . . . . . . . . 231
Wire Story Form. . . . . . . . . . . . . . . . . . . . . . . . . . . . . . . . . . . . . . . 232
Chapter 9
Character Generator Title Entry
Overview of CG Title Entry . . . . . . . . . . . . . . . . . . . . . . . . . . . . . . . . . . 234
Title Entry Setup and Configuration . . . . . . . . . . . . . . . . . . . . . . . . . . . 236
Understanding CG Templates . . . . . . . . . . . . . . . . . . . . . . . . . . . . 236
CG Template Backgrounds . . . . . . . . . . . . . . . . . . . . . . . . . . . . . . . . . 238
Required Bitmaps . . . . . . . . . . . . . . . . . . . . . . . . . . . . . . . . . . . . . 239
Capture Tool . . . . . . . . . . . . . . . . . . . . . . . . . . . . . . . . . . . . . . . . . 240
Hardware Requirements for Capture Tool. . . . . . . . . . . . . . . . 240
Installation of Capture Tool . . . . . . . . . . . . . . . . . . . . . . . . . . . 240
Using the Capture Tool . . . . . . . . . . . . . . . . . . . . . . . . . . . . . . 241
CG Template Editor . . . . . . . . . . . . . . . . . . . . . . . . . . . . . . . . . . . . . . . 243
Edit Title Entry Template Window . . . . . . . . . . . . . . . . . . . . . . . . . 244
Creating a New Template . . . . . . . . . . . . . . . . . . . . . . . . . . . . 248
Using Font PreSets . . . . . . . . . . . . . . . . . . . . . . . . . . . . . . . . . 253
Title Entry Security . . . . . . . . . . . . . . . . . . . . . . . . . . . . . . . . . . . . . . . . 255
Access to CG Template Editor. . . . . . . . . . . . . . . . . . . . . . . . . . . . 255
Access to CG Title Entry . . . . . . . . . . . . . . . . . . . . . . . . . . . . . . . . 256
Chapter 10
System Configuration Files
Overview. . . . . . . . . . . . . . . . . . . . . . . . . . . . . . . . . . . . . . . . . . . . . . . . 260
Making a Backup File. . . . . . . . . . . . . . . . . . . . . . . . . . . . . . . . . . . 261
Viewing System Files . . . . . . . . . . . . . . . . . . . . . . . . . . . . . . . . . . . 262
Printing a Copy of a File. . . . . . . . . . . . . . . . . . . . . . . . . . . . . . . . . 263
Licensing of iNEWS Components . . . . . . . . . . . . . . . . . . . . . . . . . . . . 264
Devices. . . . . . . . . . . . . . . . . . . . . . . . . . . . . . . . . . . . . . . . . . . . . . . . . 265
Viewing Information About Devices . . . . . . . . . . . . . . . . . . . . . . . . 266
List C Message Columns. . . . . . . . . . . . . . . . . . . . . . . . . . . . . 267
Configuration File . . . . . . . . . . . . . . . . . . . . . . . . . . . . . . . . . . . . . . . . . 269
vii
Changing the Configuration File . . . . . . . . . . . . . . . . . . . . . . . . . . . 273
Testing the Site Configuration File After Changing. . . . . . . . . . . . . 273
Incorporating Configuration Changes . . . . . . . . . . . . . . . . . . . . . . . 274
Hosts File . . . . . . . . . . . . . . . . . . . . . . . . . . . . . . . . . . . . . . . . . . . . . . . 275
System Profiles Files. . . . . . . . . . . . . . . . . . . . . . . . . . . . . . . . . . . . . . . 276
Changing the System Profile . . . . . . . . . . . . . . . . . . . . . . . . . . . . . 277
Listing Parameter Settings . . . . . . . . . . . . . . . . . . . . . . . . . . . . . . . 278
System Profile Parameters . . . . . . . . . . . . . . . . . . . . . . . . . . . . . . . 279
Adding Devices to Your iNEWS System . . . . . . . . . . . . . . . . . . . . . . . . 285
Adding a PCU or PC-PCU . . . . . . . . . . . . . . . . . . . . . . . . . . . . . . . 285
PCU Device Numbering . . . . . . . . . . . . . . . . . . . . . . . . . . . . . . 290
Adding a Workstation . . . . . . . . . . . . . . . . . . . . . . . . . . . . . . . . . . . 291
Adding a Printer . . . . . . . . . . . . . . . . . . . . . . . . . . . . . . . . . . . . . . . 292
Adding a Wire . . . . . . . . . . . . . . . . . . . . . . . . . . . . . . . . . . . . . . . . . 298
Alternative Editing of the Site Configuration File. . . . . . . . . . . . . . . . . . 299
Intersystem Messaging . . . . . . . . . . . . . . . . . . . . . . . . . . . . . . . . . . . . . 301
Sending Intersystem Messages . . . . . . . . . . . . . . . . . . . . . . . . . . . 301
Receiving Intersystem Messages . . . . . . . . . . . . . . . . . . . . . . . . . . 303
Database Change . . . . . . . . . . . . . . . . . . . . . . . . . . . . . . . . . . 306
iNEWS Workstation Session Behavior. . . . . . . . . . . . . . . . . . . 306
Chapter 11
Printers
System Printing . . . . . . . . . . . . . . . . . . . . . . . . . . . . . . . . . . . . . . . . . . . 308
The Printer Profile Files in /site/printers . . . . . . . . . . . . . . . . . . . . . 308
Customizing Print Effects (Fonts) . . . . . . . . . . . . . . . . . . . . . . . . . . 310
Defining a Font. . . . . . . . . . . . . . . . . . . . . . . . . . . . . . . . . . . . . 310
Combining Print Effects . . . . . . . . . . . . . . . . . . . . . . . . . . . . . . 311
Defining Print Forms . . . . . . . . . . . . . . . . . . . . . . . . . . . . . . . . . . . . 311
Defining a Form . . . . . . . . . . . . . . . . . . . . . . . . . . . . . . . . . . . . 312
Combining Setup Options . . . . . . . . . . . . . . . . . . . . . . . . . . . . 312
Font and Form Space Available. . . . . . . . . . . . . . . . . . . . . . . . 313
Printer Profile Options . . . . . . . . . . . . . . . . . . . . . . . . . . . . . . . . . . 313
Profile-Only Options . . . . . . . . . . . . . . . . . . . . . . . . . . . . . . . . . 314
Profile and Style Options . . . . . . . . . . . . . . . . . . . . . . . . . . . . . 318
Standard Header and Footer Options . . . . . . . . . . . . . . . . . . . 320
viii
User-Selected Headers and Footers . . . . . . . . . . . . . . . . . . . . 321
Profile Option Defaults. . . . . . . . . . . . . . . . . . . . . . . . . . . . . . . 322
Using Special Characters in a Profile . . . . . . . . . . . . . . . . . . . . . . 323
Using Nonprinting Characters . . . . . . . . . . . . . . . . . . . . . . . . . 323
Avoiding Characters Used by the System . . . . . . . . . . . . . . . . 324
Creating and Using Print Styles . . . . . . . . . . . . . . . . . . . . . . . . . . . . . . 327
Creating a Style Story . . . . . . . . . . . . . . . . . . . . . . . . . . . . . . . . . . 328
Changing System Profile Options . . . . . . . . . . . . . . . . . . . . . . 328
Selecting Forms. . . . . . . . . . . . . . . . . . . . . . . . . . . . . . . . . . . . 329
Identifying and Selecting Fonts . . . . . . . . . . . . . . . . . . . . . . . . 330
Local Printing . . . . . . . . . . . . . . . . . . . . . . . . . . . . . . . . . . . . . . . . . . . . 333
Local Printing Dialog Box . . . . . . . . . . . . . . . . . . . . . . . . . . . . . . . . 334
Local Print Style Options . . . . . . . . . . . . . . . . . . . . . . . . . . . . . . . . 340
Banner Format Options . . . . . . . . . . . . . . . . . . . . . . . . . . . . . . 346
Example Style Story . . . . . . . . . . . . . . . . . . . . . . . . . . . . . . . . 348
Managing Printers . . . . . . . . . . . . . . . . . . . . . . . . . . . . . . . . . . . . . . . . 350
Removing a Pending Print Request. . . . . . . . . . . . . . . . . . . . . . . . 350
Restarting the Current Print Request. . . . . . . . . . . . . . . . . . . . . . . 351
Reordering a Pending Print Request . . . . . . . . . . . . . . . . . . . . . . . 351
Cancelling a Runaway Print Job . . . . . . . . . . . . . . . . . . . . . . . . . . 351
Responding to a “Printer Offline” Problem . . . . . . . . . . . . . . . . . . . 352
Chapter 12
Wires
Adding a Wire – Avid Data Receiver . . . . . . . . . . . . . . . . . . . . . . . . . . 354
Phase 1 . . . . . . . . . . . . . . . . . . . . . . . . . . . . . . . . . . . . . . . . . . . . . 354
Phase 2 . . . . . . . . . . . . . . . . . . . . . . . . . . . . . . . . . . . . . . . . . . . . . 355
Phase 3 . . . . . . . . . . . . . . . . . . . . . . . . . . . . . . . . . . . . . . . . . . . . . 357
Phase 4 . . . . . . . . . . . . . . . . . . . . . . . . . . . . . . . . . . . . . . . . . . . . . 357
Adding a Wire – PCU Port . . . . . . . . . . . . . . . . . . . . . . . . . . . . . . . . . . 358
Phase 1 . . . . . . . . . . . . . . . . . . . . . . . . . . . . . . . . . . . . . . . . . . . . . 358
Phase 2 . . . . . . . . . . . . . . . . . . . . . . . . . . . . . . . . . . . . . . . . . . . . . 359
Phase 3 . . . . . . . . . . . . . . . . . . . . . . . . . . . . . . . . . . . . . . . . . . . . . 363
Phase 4 . . . . . . . . . . . . . . . . . . . . . . . . . . . . . . . . . . . . . . . . . . . . . 364
Wire Profile Files . . . . . . . . . . . . . . . . . . . . . . . . . . . . . . . . . . . . . . . . . 366
Wire Profile Options . . . . . . . . . . . . . . . . . . . . . . . . . . . . . . . . . . . . . . . 368
ix
Using Special Characters in a Profile . . . . . . . . . . . . . . . . . . . . . . . . . . 382
Entering Nonprinting Characters . . . . . . . . . . . . . . . . . . . . . . . . . . 382
Entering Characters by Alias . . . . . . . . . . . . . . . . . . . . . . . . . . 382
Entering Characters by Decimal Value . . . . . . . . . . . . . . . . . . 382
Avoiding Characters Used by the System . . . . . . . . . . . . . . . . . . . 383
Converting Text with Accents and Diacritical Marks. . . . . . . . . . . . 384
Distributing Stories from the Wire . . . . . . . . . . . . . . . . . . . . . . . . . . . . . 386
Defining Distribution of Wire Stories . . . . . . . . . . . . . . . . . . . . . . . . 386
Creating a Distribution Name . . . . . . . . . . . . . . . . . . . . . . . . . . 387
Identifying a Destination Queue . . . . . . . . . . . . . . . . . . . . . . . . 388
Changing Notification Priority. . . . . . . . . . . . . . . . . . . . . . . . . . 389
Setting the Transmit or Always Options . . . . . . . . . . . . . . . . . . 389
Adding a Distribution Line. . . . . . . . . . . . . . . . . . . . . . . . . . . . . . . . 390
Avoiding Hidden Categories . . . . . . . . . . . . . . . . . . . . . . . . . . . . . . 390
Using the WIRES.ALL Notification Priority . . . . . . . . . . . . . . . . . . . 391
Distributing Unknown Wires . . . . . . . . . . . . . . . . . . . . . . . . . . . . . . 392
Maximum Number of Lines. . . . . . . . . . . . . . . . . . . . . . . . . . . . . . . 393
Mailboxes . . . . . . . . . . . . . . . . . . . . . . . . . . . . . . . . . . . . . . . . . . . . 393
Purge Intervals . . . . . . . . . . . . . . . . . . . . . . . . . . . . . . . . . . . . . . . . 393
Internationalization . . . . . . . . . . . . . . . . . . . . . . . . . . . . . . . . . . . . . 394
Operating Wire Keyword Searches. . . . . . . . . . . . . . . . . . . . . . . . . . . . 394
Setting up Keyword Searching . . . . . . . . . . . . . . . . . . . . . . . . . . . . 394
Additional Information about Search Jobs . . . . . . . . . . . . . . . . . . . 397
Suppressing a Search . . . . . . . . . . . . . . . . . . . . . . . . . . . . . . . 397
Default Entry . . . . . . . . . . . . . . . . . . . . . . . . . . . . . . . . . . . . . . 397
Keyword Limitations . . . . . . . . . . . . . . . . . . . . . . . . . . . . . . . . . 398
Keyword Searching . . . . . . . . . . . . . . . . . . . . . . . . . . . . . . . . . . . . 398
Using Parentheses in Searches. . . . . . . . . . . . . . . . . . . . . . . . 400
Tips on Building Search Rules . . . . . . . . . . . . . . . . . . . . . . . . . 401
User Notification. . . . . . . . . . . . . . . . . . . . . . . . . . . . . . . . . . . . 402
Removing a Rule Set . . . . . . . . . . . . . . . . . . . . . . . . . . . . . . . . 402
Sending a Story to More Than One Queue . . . . . . . . . . . . . . . 402
Default Directory Paths . . . . . . . . . . . . . . . . . . . . . . . . . . . . . . 402
The Keyword Mailbox. . . . . . . . . . . . . . . . . . . . . . . . . . . . . . . . 403
Keyword Checker Messages . . . . . . . . . . . . . . . . . . . . . . . . . . . . . . . . 403
x
Chapter 13
Servers
Overview. . . . . . . . . . . . . . . . . . . . . . . . . . . . . . . . . . . . . . . . . . . . . . . . 408
Adding a Server Program to the System . . . . . . . . . . . . . . . . . . . . . . . 409
Job Lists: Queues, Stories, and Commands . . . . . . . . . . . . . . . . . . . . 412
Defining Tasks for Servers. . . . . . . . . . . . . . . . . . . . . . . . . . . . . . . 413
Adding a Scan Line in a Job List Story . . . . . . . . . . . . . . . . . . 414
Defining a Server Command Set. . . . . . . . . . . . . . . . . . . . . . . 415
Defining Mailbox Tasks . . . . . . . . . . . . . . . . . . . . . . . . . . . . . . . . . 419
Using Mailboxes . . . . . . . . . . . . . . . . . . . . . . . . . . . . . . . . . . . 419
Assigning a Mailbox to a Queue . . . . . . . . . . . . . . . . . . . . . . . 422
Defining Timed-Interval Tasks . . . . . . . . . . . . . . . . . . . . . . . . . . . . 423
Action Servers . . . . . . . . . . . . . . . . . . . . . . . . . . . . . . . . . . . . . . . . . . . 425
Adding an Action Server . . . . . . . . . . . . . . . . . . . . . . . . . . . . . . . . 427
Assigning Field Validation . . . . . . . . . . . . . . . . . . . . . . . . . . . . . . . 430
Background and Possible Uses of Validation . . . . . . . . . . . . . 430
Using Validation with Action Servers or Tx Links . . . . . . . . . . 431
Using the Validation Feature . . . . . . . . . . . . . . . . . . . . . . . . . . 431
Validation Job List Commands . . . . . . . . . . . . . . . . . . . . . . . . 433
Mirroring Rundowns. . . . . . . . . . . . . . . . . . . . . . . . . . . . . . . . . . . . 434
Polling for Action Servers/Tx Links . . . . . . . . . . . . . . . . . . . . . 435
Configuring Rundown Mirroring. . . . . . . . . . . . . . . . . . . . . . . . 436
Distribution Servers . . . . . . . . . . . . . . . . . . . . . . . . . . . . . . . . . . . . . . . 440
Assigning Distribution Codes . . . . . . . . . . . . . . . . . . . . . . . . . . . . . 441
Using Wildcards and the Destination Queue. . . . . . . . . . . . . . 442
From the Command Line. . . . . . . . . . . . . . . . . . . . . . . . . . . . . 443
Using an Action Server or Tx Link . . . . . . . . . . . . . . . . . . . . . . 443
Instructions in the Wire Distribution Story . . . . . . . . . . . . . . . . 444
Matching and Case . . . . . . . . . . . . . . . . . . . . . . . . . . . . . . . . . 445
Matching and Order. . . . . . . . . . . . . . . . . . . . . . . . . . . . . . . . . 445
Adding a Distribution Server . . . . . . . . . . . . . . . . . . . . . . . . . . . . . 446
Parallel Wire Servers . . . . . . . . . . . . . . . . . . . . . . . . . . . . . . . . . . . . . . 450
Adding a Parallel Wire Server . . . . . . . . . . . . . . . . . . . . . . . . . . . . 451
Keyword Servers . . . . . . . . . . . . . . . . . . . . . . . . . . . . . . . . . . . . . . . . . 458
Adding a Keyword Server . . . . . . . . . . . . . . . . . . . . . . . . . . . . . . . 462
System Servers . . . . . . . . . . . . . . . . . . . . . . . . . . . . . . . . . . . . . . . . . . 468
xi
Seek Servers . . . . . . . . . . . . . . . . . . . . . . . . . . . . . . . . . . . . . . . . . 468
Installing a Seek Server . . . . . . . . . . . . . . . . . . . . . . . . . . . . . . 469
Fast Text Search (FTS) Servers. . . . . . . . . . . . . . . . . . . . . . . . . . . 471
FTS Workflow. . . . . . . . . . . . . . . . . . . . . . . . . . . . . . . . . . . . . . 471
Installing FTS Components . . . . . . . . . . . . . . . . . . . . . . . . . . . . . . 474
...On the Windows-based Server . . . . . . . . . . . . . . . . . . . . . . . 475
...On iNEWS Servers (Linux) . . . . . . . . . . . . . . . . . . . . . . . . . . 478
Batch Indexing . . . . . . . . . . . . . . . . . . . . . . . . . . . . . . . . . . . . . 482
Archival and Backup . . . . . . . . . . . . . . . . . . . . . . . . . . . . . . . . 484
Print Servers . . . . . . . . . . . . . . . . . . . . . . . . . . . . . . . . . . . . . . . . . . 485
Adding a Print Server . . . . . . . . . . . . . . . . . . . . . . . . . . . . . . . . 486
Mail Servers . . . . . . . . . . . . . . . . . . . . . . . . . . . . . . . . . . . . . . . . . . 488
Disabling Mail to All Users . . . . . . . . . . . . . . . . . . . . . . . . . . . . 488
Using Network Mail . . . . . . . . . . . . . . . . . . . . . . . . . . . . . . . . . 488
Using 8-Bit Characters in Mail . . . . . . . . . . . . . . . . . . . . . . . . . 489
Character Conversion Table for Underscore-Prefix Format. . . 490
Monitor Servers. . . . . . . . . . . . . . . . . . . . . . . . . . . . . . . . . . . . . . . . . . . 495
Configuring Monitor Servers . . . . . . . . . . . . . . . . . . . . . . . . . . . . . . 496
Configuration Summary . . . . . . . . . . . . . . . . . . . . . . . . . . . . . . 496
Configuration Details . . . . . . . . . . . . . . . . . . . . . . . . . . . . . . . . 497
Styles . . . . . . . . . . . . . . . . . . . . . . . . . . . . . . . . . . . . . . . . . . . . . . . 519
Creating Styles. . . . . . . . . . . . . . . . . . . . . . . . . . . . . . . . . . . . . 521
Using the Monitor Server . . . . . . . . . . . . . . . . . . . . . . . . . . . . . . . . 526
Network iNEWS Systems Using Rx/Tx Links . . . . . . . . . . . . . . . . . . . . 528
Sending Story Forms . . . . . . . . . . . . . . . . . . . . . . . . . . . . . . . . . . . 528
Setting Automatic Update . . . . . . . . . . . . . . . . . . . . . . . . . . . . 529
Updating Queue Considerations . . . . . . . . . . . . . . . . . . . . . . . 530
Changing Queue Order . . . . . . . . . . . . . . . . . . . . . . . . . . . . . . 531
Adding Rx/Tx Links. . . . . . . . . . . . . . . . . . . . . . . . . . . . . . . . . . . . . 531
Adding Network Links . . . . . . . . . . . . . . . . . . . . . . . . . . . . . . . 532
Chapter 14
Web Publishing and Access
Web Publishing . . . . . . . . . . . . . . . . . . . . . . . . . . . . . . . . . . . . . . . . . . . 542
Setting Up Txnet to Send HTML. . . . . . . . . . . . . . . . . . . . . . . . . . . 542
Default HTML Export Template and Queue. . . . . . . . . . . . . . . 545
xii
Creating an HTML Export Template . . . . . . . . . . . . . . . . . . . . . . . 545
Adding Story Entity References. . . . . . . . . . . . . . . . . . . . . . . . 545
NSML to HTML Conversion. . . . . . . . . . . . . . . . . . . . . . . . . . . 548
Using Optional Format Strings . . . . . . . . . . . . . . . . . . . . . . . . 552
A Sample HTML Export Template. . . . . . . . . . . . . . . . . . . . . . 555
Web Access . . . . . . . . . . . . . . . . . . . . . . . . . . . . . . . . . . . . . . . . . . . . . 559
The Web Server. . . . . . . . . . . . . . . . . . . . . . . . . . . . . . . . . . . . . . . 559
Web Access Login . . . . . . . . . . . . . . . . . . . . . . . . . . . . . . . . . . . . . 559
Web Access Story Templates . . . . . . . . . . . . . . . . . . . . . . . . . . . . 560
Web Access Directory and Queue Templates . . . . . . . . . . . . . . . . 563
Template Entities. . . . . . . . . . . . . . . . . . . . . . . . . . . . . . . . . . . 564
Web Access Configuration. . . . . . . . . . . . . . . . . . . . . . . . . . . . . . . 572
Appendix A
Command References
Programs Invoked by iNEWS . . . . . . . . . . . . . . . . . . . . . . . . . . . . . . . . 578
Commands Used by Avid Personnel Only . . . . . . . . . . . . . . . . . . . . . . 578
Linux Commands Used in iNEWS . . . . . . . . . . . . . . . . . . . . . . . . . . . . 579
Console Control Commands . . . . . . . . . . . . . . . . . . . . . . . . . . . . . . . . 580
Console Server Commands . . . . . . . . . . . . . . . . . . . . . . . . . . . . . . . . . 584
Job List Commands . . . . . . . . . . . . . . . . . . . . . . . . . . . . . . . . . . . . . . . 627
Dialog Commands . . . . . . . . . . . . . . . . . . . . . . . . . . . . . . . . . . . . . . . . 633
Appendix B
System Files
/etc/dhcpd.conf . . . . . . . . . . . . . . . . . . . . . . . . . . . . . . . . . . . . . . . . . . . 642
/etc/hosts . . . . . . . . . . . . . . . . . . . . . . . . . . . . . . . . . . . . . . . . . . . . . . . 642
/site/config . . . . . . . . . . . . . . . . . . . . . . . . . . . . . . . . . . . . . . . . . . . . . . 643
/site/printers/hplaser1 . . . . . . . . . . . . . . . . . . . . . . . . . . . . . . . . . . . . . . 647
/site/system. . . . . . . . . . . . . . . . . . . . . . . . . . . . . . . . . . . . . . . . . . . . . . 647
/site/wires/anpa7. . . . . . . . . . . . . . . . . . . . . . . . . . . . . . . . . . . . . . . . . . 648
console.cfg . . . . . . . . . . . . . . . . . . . . . . . . . . . . . . . . . . . . . . . . . . . . . . 649
SYSTEM.CLIENT.WINDOWS . . . . . . . . . . . . . . . . . . . . . . . . . . . . . . . 650
SYSTEM.CONFIGURE.301-ACTION . . . . . . . . . . . . . . . . . . . . . . . . . 651
SYSTEM.MAP . . . . . . . . . . . . . . . . . . . . . . . . . . . . . . . . . . . . . . . . . . . 652
SYSTEM.RESOURCE . . . . . . . . . . . . . . . . . . . . . . . . . . . . . . . . . . . . . 654
SYSTEM.WIRES.DISTRIBUTION . . . . . . . . . . . . . . . . . . . . . . . . . . . . 656
xiii
SYSTEM.WIRES.KEYWORDS. . . . . . . . . . . . . . . . . . . . . . . . . . . . . . . 657
SYSTEM.WIRES.KEYWORDS-AP. . . . . . . . . . . . . . . . . . . . . . . . . . . . 657
SYSTEM.WIRES.KEYWORDS-AP2. . . . . . . . . . . . . . . . . . . . . . . . . . . 658
Appendix C
Standard Dictionaries
Using Dictionaries to Define Messages and Commands . . . . . . . . . . . 660
Customizing Dictionaries. . . . . . . . . . . . . . . . . . . . . . . . . . . . . . . . . . . . 662
Changing Default Dictionary Values . . . . . . . . . . . . . . . . . . . . . . . . 662
Restoring Dictionary Defaults . . . . . . . . . . . . . . . . . . . . . . . . . . . . . 666
Utility Messages Dictionary (/site/dict/messages) . . . . . . . . . . . . . . . . . 667
DBServer Program Messages . . . . . . . . . . . . . . . . . . . . . . . . . . . . 669
Disconnect Program Messages . . . . . . . . . . . . . . . . . . . . . . . . . . . 669
Category and Keyword Check Program Messages . . . . . . . . . . . . 670
Keyboard Check Program Messages . . . . . . . . . . . . . . . . . . . . . . . 671
Keyboard Check Program Messages for Macros . . . . . . . . . . . . . . 671
Grpcheck Messages . . . . . . . . . . . . . . . . . . . . . . . . . . . . . . . . . . . . 673
Wire Program Messages . . . . . . . . . . . . . . . . . . . . . . . . . . . . . . . . 675
Mail Server Messages . . . . . . . . . . . . . . . . . . . . . . . . . . . . . . . . . . 676
Validation (Action) Server . . . . . . . . . . . . . . . . . . . . . . . . . . . . . . . . 676
Seek Server Messages . . . . . . . . . . . . . . . . . . . . . . . . . . . . . . . . . 676
Last Login Messages . . . . . . . . . . . . . . . . . . . . . . . . . . . . . . . . . . . 677
Messages for Print Server . . . . . . . . . . . . . . . . . . . . . . . . . . . . . . . 678
Message for the Sony Barcode Printer. . . . . . . . . . . . . . . . . . . . . . 678
dbtraits Messages . . . . . . . . . . . . . . . . . . . . . . . . . . . . . . . . . . . . . 678
ccumsgs Dictionary (/site/dict/ccumsgs) . . . . . . . . . . . . . . . . . . . . . . . . 678
PCU Messages. . . . . . . . . . . . . . . . . . . . . . . . . . . . . . . . . . . . . . . . 679
Commands Dictionary (/site/dict/ccucmds) . . . . . . . . . . . . . . . . . . . . . . 682
Job List Commands . . . . . . . . . . . . . . . . . . . . . . . . . . . . . . . . . . . . 687
Queues Dictionary (/site/dict/queues) . . . . . . . . . . . . . . . . . . . . . . . . . . 688
Words Dictionary (/site/dict/words) . . . . . . . . . . . . . . . . . . . . . . . . . . . . 691
Connect Dictionary (/site/dict/doac) . . . . . . . . . . . . . . . . . . . . . . . . . . . 695
Telex Dictionary (/site/dict/telex) . . . . . . . . . . . . . . . . . . . . . . . . . . . . . . 699
Dial Dictionary (/site/dict/dial) . . . . . . . . . . . . . . . . . . . . . . . . . . . . . . . . 701
Keyboard Macros Dictionary (/site/dict/keymacros) . . . . . . . . . . . . . . . 702
Printer Messages Dictionary (/site/dict/printmsgs) . . . . . . . . . . . . . . . . 704
xiv
Case-shifting Dictionary (/site/dict/shift) . . . . . . . . . . . . . . . . . . . . . . . . 705
MCS Dictionary (/site/dict/mcs) . . . . . . . . . . . . . . . . . . . . . . . . . . . . . . 707
Device Types Used by Monitor Servers and Drivers . . . . . . . . . . . 707
Special Strings Recognized by the Monitor Server . . . . . . . . . . . . 708
Error Messages for the Monitor Server . . . . . . . . . . . . . . . . . . . . . 708
Error Messages Shared by Monitor Servers and Drivers . . . . . . . 711
Driver Errors Sent to MCT Only . . . . . . . . . . . . . . . . . . . . . . . . . . . 711
Driver Errors Sent to MCT and Possibly to Console & Mon User . 711
Driver Errors Sent to User Only . . . . . . . . . . . . . . . . . . . . . . . . . . . 712
Status Reported in Device Status Field . . . . . . . . . . . . . . . . . . . . . 712
Appendix D
PCU Reference
Overview. . . . . . . . . . . . . . . . . . . . . . . . . . . . . . . . . . . . . . . . . . . . . . . . 714
PCUs . . . . . . . . . . . . . . . . . . . . . . . . . . . . . . . . . . . . . . . . . . . . . . . . . . 714
Resetting a PCU . . . . . . . . . . . . . . . . . . . . . . . . . . . . . . . . . . . . . . 715
PCU LED Displays . . . . . . . . . . . . . . . . . . . . . . . . . . . . . . . . . . . . . 715
Connecting Devices to a PCU . . . . . . . . . . . . . . . . . . . . . . . . . . . . 717
Locating Ports . . . . . . . . . . . . . . . . . . . . . . . . . . . . . . . . . . . . . 717
Connecting a PCU to the System . . . . . . . . . . . . . . . . . . . . . . . . . 717
Appendix E
Character Maps
ASCII (7-bit) Character Set. . . . . . . . . . . . . . . . . . . . . . . . . . . . . . . . . . 719
IBM Character Set . . . . . . . . . . . . . . . . . . . . . . . . . . . . . . . . . . . . . . . . 725
dbrestore Character Map (Arabic) . . . . . . . . . . . . . . . . . . . . . . . . . . . . 732
Sample Arabic Wire Profile. . . . . . . . . . . . . . . . . . . . . . . . . . . . . . . . . . 733
Appendix F
Environment Variables
Registry Editor . . . . . . . . . . . . . . . . . . . . . . . . . . . . . . . . . . . . . . . . . . . 738
Environment Variables (Registry Values). . . . . . . . . . . . . . . . . . . . . . . 739
CCColor . . . . . . . . . . . . . . . . . . . . . . . . . . . . . . . . . . . . . . . . . . . . . 740
DestinationOrder . . . . . . . . . . . . . . . . . . . . . . . . . . . . . . . . . . . . . . 742
MailLookup. . . . . . . . . . . . . . . . . . . . . . . . . . . . . . . . . . . . . . . . . . . 743
MsgMailAlert . . . . . . . . . . . . . . . . . . . . . . . . . . . . . . . . . . . . . . . . . 744
PIColor . . . . . . . . . . . . . . . . . . . . . . . . . . . . . . . . . . . . . . . . . . . . . . 746
RGB Hexadecimal Color Chart . . . . . . . . . . . . . . . . . . . . . . . . 747
xv
ShowTimingBar . . . . . . . . . . . . . . . . . . . . . . . . . . . . . . . . . . . . . . . 748
SyncToServer . . . . . . . . . . . . . . . . . . . . . . . . . . . . . . . . . . . . . . . . . 752
Delete_Notify . . . . . . . . . . . . . . . . . . . . . . . . . . . . . . . . . . . . . . . . . 754
Environmental Variables for Servers. . . . . . . . . . . . . . . . . . . . . . . . . . . 755
Appendix G
Managing Traits at the Console
Viewing User Traits from the Console. . . . . . . . . . . . . . . . . . . . . . . . . . 760
Modifying User Traits from the Console . . . . . . . . . . . . . . . . . . . . . . . . 761
Changing a Users’ Password . . . . . . . . . . . . . . . . . . . . . . . . . . . . . 762
Listing Users Who Do Not Have Passwords . . . . . . . . . . . . . . 764
User Traits Console Command Summary . . . . . . . . . . . . . . . . . . . . . . 768
Managing Database Traits from the Console . . . . . . . . . . . . . . . . . . . . 773
Getting Basic Information . . . . . . . . . . . . . . . . . . . . . . . . . . . . . . . . 773
Getting Detailed Information . . . . . . . . . . . . . . . . . . . . . . . . . . . . . . 774
Changing Database Traits from the Console . . . . . . . . . . . . . . . . . . . . 775
Changing a Parent Directory Only . . . . . . . . . . . . . . . . . . . . . . . . . 775
Database Traits Console Command Summary. . . . . . . . . . . . . . . . . . . 776
Sortfield . . . . . . . . . . . . . . . . . . . . . . . . . . . . . . . . . . . . . . . . . . 785
Purge Interval. . . . . . . . . . . . . . . . . . . . . . . . . . . . . . . . . . . . . . 787
Abstract Printing. . . . . . . . . . . . . . . . . . . . . . . . . . . . . . . . . . . . 788
Mailbox. . . . . . . . . . . . . . . . . . . . . . . . . . . . . . . . . . . . . . . . . . . 790
The dis Column . . . . . . . . . . . . . . . . . . . . . . . . . . . . . . . . . . . . 791
Managing Group Traits at the Console . . . . . . . . . . . . . . . . . . . . . . . . . 793
Groups . . . . . . . . . . . . . . . . . . . . . . . . . . . . . . . . . . . . . . . . . . . . . . 793
Restricting Access Using Read and Write Limitations . . . . . . . . . . 795
Removing Directory or Queue Restrictions . . . . . . . . . . . . . . . . . . 796
Appendix H
The Line Editor, ed
Launching ed. . . . . . . . . . . . . . . . . . . . . . . . . . . . . . . . . . . . . . . . . . . . . 798
Specifying Lines to Edit . . . . . . . . . . . . . . . . . . . . . . . . . . . . . . 798
Searching the File . . . . . . . . . . . . . . . . . . . . . . . . . . . . . . . . . . 800
Editing Commands . . . . . . . . . . . . . . . . . . . . . . . . . . . . . . . . . . . . . 801
Saving Changes . . . . . . . . . . . . . . . . . . . . . . . . . . . . . . . . . . . . . . . 804
Quitting ed . . . . . . . . . . . . . . . . . . . . . . . . . . . . . . . . . . . . . . . . . . . 805
Index
xvi
Using This Guide
Congratulations on your purchase of an Avid iNEWS newsroom computer
system. It is a vital part of the Avid Unity for News system solution that
integrates with other Avid systems and third-party equipment to provide an
ideal nonlinear workflow and optimize the news production process.
This manual provides information on how to manage the iNEWS
newsroom computer system, consisting of:
n
•
A console
•
One or more servers
•
Various clients, such as iNEWS Workstations and printers
The documentation describes software features and hardware related to
the iNEWS newsroom computer system, which is extremely customizable.
Your system may not contain certain features and/or parts that are
mentioned in the documentation.
Who Should Use This Manual
This manual is written for system administrators who are managing the
iNEWS newsroom computer system (NRCS). It is strongly recommended
that system administrators have prior experience in or classroom
knowledge of Red Hat Linux system administration. All iNEWS system
administrators need to:
•
Manage user accounts, security and permissions
•
Start up and shut down iNEWS NRCS
•
Perform file system maintenance, backup, and recovery
Using This Guide
•
Maintain disks
•
Monitor processes
•
Configure and monitor the network
About This Manual
This manual is part of a two-book set designed to keep pace with current
advances in the Avid system’s news production capabilities. The
set—made up of this book and the Avid iNEWS Operations and
Troubleshooting Manual—is a comprehensive resource of all the
information you will need to take advantage of the many options available
to you. This manual will lead you through even the most complex
procedures with task-oriented instructions. The information provided here
builds on basic news production procedures described in the help system
and other user-based guides, while adding a complete explanation of all the
tools and techniques required to manage the newsroom computer system,
including useful tips, shortcuts, and custom options.
The Contents lists all topics included in this guide. They are presented with
the following overall structure:
2
•
The Introduction helps you get oriented with beginning concepts and
general workflow and provides valuable pointers to keep in mind as
you proceed.
•
The main body of this guide follows the natural flow of your work,
with clear and comprehensive step-by-step procedures.
•
Finally, a detailed Index helps you quickly locate specific topics.
Symbols and Conventions
Symbols and Conventions
Avid documentation uses the following symbols and conventions:
Symbol or Convention Meaning or Action
n
A note provides important related information,
reminders, recommendations, and strong
suggestions.
c
A caution means that a specific action you take could
cause harm to your computer or cause you to lose
data.
w
A warning describes an action that could cause you
physical harm. Follow the guidelines in this
document or on the unit itself when handling
electrical equipment.
>
This symbol indicates menu commands (and
subcommands) in the order you select them. For
example, File > Import means to open the File menu
and then select the Import command.
t
This symbol indicates a single-step procedure.
Multiple arrows in a list indicate that you perform
one of the actions listed.
Margin tips
In the margin, you will find tips that help you
perform tasks more easily and efficiently.
Italic font
Italic font is used to emphasize certain words and to
indicate variables.
Courier Bold font
Courier Bold font identifies text that you type, such
as commands entered at the console multiplexor.
Output displayed on the console screen will appear
in regular Courier font.
3
Using This Guide
Symbol or Convention Meaning or Action
n
Lengthy console displays may be edited to emphasize only the most
important information in this manual. An ellipsis (...) represents portions of
the console display not shown in the text. The console can display each
server’s prompt based on the system ID (typically a station’s call letters)
and the server’s name. Examples in this manual use NRCS as the fictional
station and system ID. For instance, the following is the console prompt for
server A on the NRCS system: NRCS-A$
Click
Quickly click and release the left mouse button.
Double-click
Click the left mouse button twice rapidly.
Right-click
Quickly click and release the right mouse button.
Drag
Click and hold the left mouse button while you move
the mouse.
Ctrl+key
Press and hold the first key, such as Ctrl, Alt, or
Shift, while you press the second key.
If You Need Help
If you are having trouble using iNEWS:
1. Retry the action, carefully following the instructions given for that task
in this guide. It is especially important to check each step of your
workflow.
2. Check for the latest information that might have become available
after the documentation was published in one of two locations:
n
4
-
If release notes are available, they ship with your application CD,
are in PDF format, and may be viewed from the CD using Adobe®
Reader, a program freely available on the Internet.
-
If ReadMe files are available, they are supplied in your Avid
application folder. ReadMe files are also available from Help.
Release notes and ReadMe files are also available on the Avid Knowledge
Center.
If You Need Help
3. Check the documentation that came with your Avid application or your
hardware for maintenance or hardware-related issues.
4. Visit the Knowledge Center at www.avid.com/support. Online support
services are available 24 hours per day, 7 days per week. Search this
online Knowledge Center to find answers, to view error messages, to
access troubleshooting tips, to download updates, and to read/join
online message-board discussions.
5. For Technical Support, please call 800-800-AVID (800-800-2843).
For Broadcast On-Air Sites and Call Letter Stations, call
800-NEWSDNG (800-639-7364).
...With the Syntax of Console Commands
If you are at the console, and are unsure about the function of a console
command, use the help command.
To view instructions about using a command, type help followed by the
name of the command. For instance, type help dbvisit for an
explanation of the dbvisit command. The following data appears:
dbvisit -<d or v or i> -{r or m name] -[s] [block# ...]
‘r’ for read only
‘s’ for “slow” to eliminate cache usage
‘m’ for machine name to disconnect
‘i’ to just validate isam files
n
Because of the margin limitations of this manual, console command lines
may appear wrapped to multiple lines. This does not necessarily indicate
the need to press an Enter key. Unless otherwise indicated, console
commands should be typed on a single line, allowing the computer to wrap
the text whenever the command line stretches beyond the screen margin.
See “Types of Console Commands” on page 28 for more information.
5
Using This Guide
Related Information
The following documents provide more information about the iNEWS
newsroom computer system:
•
iNEWS NRCS Prep, Installation, and Upgrade Manual
•
iNEWS NRCS Training Guide
•
iNEWS NRCS Release Notes
The following documents provide more information about some of the
other Avid products that integrate with the iNEWS newsroom computer
system:
n
•
iNEWS ControlAir Installation and Operations Manual
•
iNEWS ControlAir User Manual
•
iNEWS ControlAir Release Notes
•
Avid Data Receiver Installlation and Operations Manual
•
MOS Gateway Installation and Operations Manual
•
MOS Gateway Release Notes
•
Media Browse Installation and Operations Manual
•
Media Browse Training Manual
•
Media Browse Release Notes
For the latest information on all Avid products and documentation on other
Unity for News products, such as the Avid AirSPACE video server, Avid
Active ContentManager, or the Avid NewsCutter nonlinear editing system,
see the Avid Knowledge Center: http://support01.avid.com.
If You Have Documentation Comments
We’d appreciate any comments or suggestions you may have about this
document or any other piece of documentation. Please restrict your
comments to documentation issues.
6
How to Order Documentation
Please e-mail your documentation comments to:
[email protected]
Include the title of the document, its part number, and the specific section
you are commenting on in all correspondence.
How to Order Documentation
To order additional copies of this documentation from within the
United States, call Avid Sales at 800-949-AVID (800-949-2843). If you are
placing an order from outside the United States, contact your local
Avid representative.
Avid Educational Services
For information on courses/schedules, training centers, certifications,
courseware, and books, please visit www.avid.com/training or call
Avid Sales at 800-949-AVID (800-949-2843).
7
Using This Guide
8
Chapter 1
Introduction
As part of the Avid Unity for News broadcast solution, the iNEWS
newsroom computer system is an integrated, digital news creation, and
production system. It provides journalists, producers, directors, writers,
and technical personnel in a newsroom with an array of tools to make their
jobs easier.
This chapter contains the following main sections:
•
What is Avid Unity for NEWS?
•
System Administrator Tasks
Chapter 1 Introduction
What is Avid Unity for NEWS?
The Avid Unity for News system is a nonlinear shared storage media
network that enables the immediate and simultaneous availability of
footage upon acquisition to both journalists and editors; the sharing of
footage among teams for shot selection, script writing, and production; the
parallel editing of news packages and promotions; and on-air playout,
without dubbing back to tape, within moments of story completion. It is a
truly integrated broadcasting solution that minimizes lag between
processes, where even activities such as asset management and Web
updating become concurrent tasks that facilitate production, without
interfering with the primary objective of putting the news on the air.
In the Avid Unity for News workflow, the Avid iNEWS newsroom
computer system provides up-to-date news data throughout the newsroom
and seamlessly links all tasks in the production process, such as wire
service, assignment desk, script writing, browse, editing, rundown,
playout, and device control tasks.
The Avid Unity for News environment consists of integration between
several Avid products, such as:
•
The Avid iNEWS newsroom computer system
•
The Avid Media Browse system, including Avid Capture Manager
•
The Avid iNEWS ControlAir system
•
The Avid NewsCutter nonlinear editing system
•
Avid Active ContentManager
•
Avid AirSPACE video server(s)
Your newsroom may have any one or all of these products and others not
mentioned in this brief summary.
10
What is Avid Unity for NEWS?
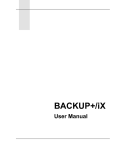
The figure below shows a typical high- and low-resolution workflow, from
capture to playout, in a shared storage environment with an iNEWS
newsroom computer system:
iNEWS NRCS
An iNEWS newsroom computer system (NRCS) provides:
•
News gathering from video, audio, and text sources
•
News production, including:
-
Story creation and script editing
-
Show planning and creation
11
Chapter 1 Introduction
•
News to air, including:
-
On-air playback control
-
File exporting
-
Internet publishing
In an Avid Unity for News environment, Web production processes can
occur in parallel with newcast production.
For more information,
see “NRCS
Components” in
Chapter 1 of the
iNEWS Installation and
Upgrade Manual.
Some primary components of iNEWS NRCS include:
•
Linux-based computers running the iNEWS Server software. In this
manual, these host computers are referred to as the iNEWS Servers, or
individually as server A, server B, and so forth.
•
An IBM/Intel-compatible personal computer (PC) running the iNEWS
console multiplexor program. This PC is known as the console. See
Chapter 2, “The iNEWS Console” for more information.
•
Windows-based computer running the iNEWS client software. These
PCs are known as iNEWS Workstations
•
Other clients, such as printers.
Third-Party Connectivity and Open Integration
Avid’s commitment to open integration and conformance with industrystandard technologies is clearly demonstrated as a major feature of the
Unity for News product set. Avid supports open integration by, among
other methods, offering no fewer than 13 Applications Programming
Interfaces (APIs) for Avid products to interact with third-party devices,
software, and custom development, such as the general NRCS-MOS
protocol agreement, or Transfer Manager APIs.
The iNEWS system is capable of interfacing with a wide variety of major
control systems and servers with dedicated device interfaces, including
Omnibus™ and Sony®. The iNEWS system has an efficient Active-X
implementation of the MOS protocol, which greatly extends its interfacing
abilities. For instance, in conjunction with iNEWS, ControlAir provides a
12
System Administrator Tasks
central point of control for up to 32 production devices, such as video
servers, character generators, and still store machines from third-party
manufacturers; a sample of which is provided in Table 1.
Table 1
Third-Party Integration
Device Type
Manufacturers
Video Servers
Sony, Grass Valley™, and Quantel
Character Generators
Chyron, Aston, Pinnacle, Abekas, Quantel, and Pixel
Power
Still Store Machines
Leitch® and Quantel
The Avid Unity Transfer Manager productivity tool synchronizes with the
iNEWS rundown to determine file transfer priority—the story that appears
sooner in the rundown will automatically be ranked higher in the queue,
and playout order of the newscast matches the rundown precisely.
In addition to conforming to accepted, standard file formats, such as Open
Media Framework (OMF), Avid systems accept media in more than 30
other file formats, allowing them to accept, use, track, and present any
media, images, graphics, audio, scripts, or notes.
System Administrator Tasks
The following sections introduce many system administrator
responsibilities and the system’s capabilities and functions.
Basic Tasks
Before you can customize or maintain the iNEWS newsroom computer
system, you must learn several basic tasks, which include:
•
Start up or shut down iNEWS NRCS, which includes logging out users
and taking the system offline.
13
Chapter 1 Introduction
•
Backing up a site file before making file modifications.
•
Send system administrator commands from the console to one or more
of your system’s computers.
•
Be a console superuser, capable of setting up special superuser
permissions.
User Tasks
A user is anyone who can log in to the database and use iNEWS NRCS.
Your responsibilities regarding users are:
•
Monitor user information, such as users’ access privileges and which
users are currently logged in.
•
Customize the traits of users’ accounts to enable users to more
effectively use the system.
•
Provide a new employee access to the information stored in the
iNEWS NRCS database by creating a new user account.
•
Remove user accounts of former employees to prevent improper
access to the iNEWS NRCS database.
Database Tasks
The iNEWS system database contains the information your oganization
needs to function. A system administrator’s tasks associated with the
database include:
14
•
Design forms (that is, story templates) to display important
information about stories in a queue.
•
Monitor changes to files and queues in the database.
•
Unlock or delete any item in the database, and recover items that were
accidentally deleted or corrupted.
•
Create new folders or queues in the iNEWS system database to meet
your organization’s expanding needs.
•
Remove a directory or queue from the database, if it is no longer used.
•
Change the name or traits of an existing directory or queue.
System Administrator Tasks
•
Assign the mailbox trait to queues for configuring automatic story
distribution into and out of queues.
Security Tasks
There are many ways to ensure the security of your iNEWS system. Your
responsibilities regarding system security include:
•
Monitor and change passwords or force users to change them by
setting up system checks and modifications.
•
Monitor user login activity to guard against unauthorized use of the
iNEWS system.
•
Assign security to a directory or queue, limiting access to a specific
group of users.
•
Restrict database access by placing users into security groups based on
job roles and need for information.
Customizing the System
Your responsibilities regarding customization include:
•
Customize command names, message text, and other items by
changing their entries in your system’s dictionary files.
•
Remove your custom dictionary translations by reverting to the default
settings for command names, message text, and other items.
•
Create templates for the CG Title Entry tool.
•
Design and assign custom keyboards for users with a unique set of
keyboard macros.
Storage Maintenance Tasks
You will want to monitor the database regularly to ensure adequate storage.
Storage maintenance tasks include:
15
Chapter 1 Introduction
•
Monitor how much free space is available in the database and, if
necessary, increase the amount to prevent the system from running out
of space.
•
Perform preventive database maintenance by periodically running
certain utility programs that can find and fix minor problems before
they become serious.
•
Backup the entire database or portions of it onto tape, so if necessary,
the information can be restored to the database later.
•
Make a backup copy of files, such as the site file, on tape any time you
make important changes.
Device Tasks
A device is any kind of hardware or software that performs a specific
function when it is set up on the iNEWS system. Your responsibilities
regarding devices include:
16
•
List the parameters of any device running on your system or list all
devices of one type.
•
Add any type of device to your system, if you have the capacity and
license permission.
•
Edit site-specific files, to change the setup information for a device in
your system’s configuration file.
•
Reconfigure the system so it recognizes any changes you make to your
system’s devices.
•
Setup printer styles so that different tasks can be printed in predesignated formats.
•
Setup servers which are utility programs that automatically perform
various actions on the stories in your database.
•
Change wire distribution and sorting of data coming into your database
from a wire service to queues based on their category codes or content.
•
Write dialogs (lists of instructions) for each service to automate the
connection process. A service is a device that connects a user to a
remote computer system.
System Administrator Tasks
Reviewing Default Settings
Your responsibilities regarding system profiles, default settings, and
command syntax include:
•
Changing a system profile setting to change your system’s operation.
•
Reviewing default settings of all system profile parameters.
•
Reviewing command syntax for edit, console, and job list commands.
Troubleshooting
Your troubleshooting responsibilities include:
•
Transfer system activities from a halted computer to other system
computers. If a computer connected to the system has been halted,
bring the system back to operation using the remaining computers.
•
Reconnect a computer that has been halted. Following routine
maintenance, reintegrate a computer into your system’s operation.
17
Chapter 1 Introduction
18
Chapter 2
The iNEWS Console
The iNEWS console multiplexor serves as a “command center” that
enables system administrators to monitor and maintain the iNEWS
newsroom computer system.
This chapter contains the following main sections:
•
Overview
-
•
•
The Console Display
Standard Console Operations
-
Starting the Console
-
The System Operator
-
The Console Superuser
-
Exiting the Console
-
Troubleshooting a Frozen Console
Types of Console Commands
-
Server Commands
-
Console Control Commands
-
Console Function Keys
•
Selecting Servers
•
Console History
•
Using the Remote Console
•
The Console Configuration File
Chapter 2 The iNEWS Console
Overview
The iNEWS console multiplexor—commonly known as the console—is an
IBM/Intel-compatible personal computer (PC) running custom-created
Avid software. The console PC connects—via a serial link—to computers
running the iNEWS Server software, and communicates with each server
simultaneously.
With an external analog modem line, the console also provides a secure
remote console feature, that allows a system administrator or Avid
Customer Support personnel, if necessary, to do routine maintenance and
diagnostic work while away from the computer room. See “Using the
Remote Console” on page 40 for more information.
Figure 1 shows a sample layout for a dual-server newsroom computer
system.
Console
Multiplexor
Modem
Two Mirrored
iNEWS Servers
Figure 1
20
Layout of iNEWS NRCS Console and Servers
Overview
The Console Display
Although the console can control multiple servers, your console has one
screen, which is often divided into regions to separate the output from each
server. The user can alter the display to show multiple regions or a single
region.
Figure 2 shows a console display for a dual-server system; the console
screen is divided into two regions. Your console screen has as many
regions as there are host servers in your system.
“A” computer
region
“B” computer
region is
selected.
Figure 2
Console Screen for a Dual-Server System
To identify which region belongs to which server, the console displays the
name of the server that a region represents in that region’s lower right
corner.
n
Each server’s name is based on the system ID (typically a station’s call
letters) and the server’s name (usually a single letter, such as A, B, or C).
Examples in this manual use NRCS as the fictional station and system ID,
as shown in Figure 2.
21
Chapter 2 The iNEWS Console
In Figure 2, the top region displays the output from server A, and the
bottom region displays the output from server B. The wavy lines (^^^) to
the left of the identifier for server B indicate that it is currently selected or
active. Each region will have its own server and command prompts, after
which you may enter various commands. See “Types of Console
Commands” on page 28 for more information.
Should data shown in a region extend beyond the size of the screen, the
user may temporarily pause the display output. See “To pause the screen
display:” on page 35 for more information.
Standard Console Operations
The following section contains information about basic console operations,
such as starting the console, logging in, entering console superuser mode,
and troubleshooting.
Starting the Console
If your console has been turned completely off, it should start the console
program automatically when it boots up. If not, it may be started from the
operating system prompt.
To start up the console from your operating system prompt:
1. Type: console
2. Press Enter.
The console display will appear with multiple regions—as shown in
Figure 2 on page 21—each region associated with a server and showing
the following prompt:
login:
22
Standard Console Operations
The System Operator
System administrators must log in to iNEWS NRCS at the console
differently than other users who log in at an iNEWS Workstation.
Ordinarily, system administrators always remain logged in on each of your
system’s servers as the system operator.
To log in as the system operator:
1. Select the server(s) displaying the login prompt. See “Selecting
Servers” on page 33 for more information.
2. Type: so
3. Press Enter.
To keep the password
confidential, the
console does not
display what you type.
4. If your system has a password for this account—and most do—then
type in the password when prompted, and press Enter.
The system operator password is set during installation of the iNEWS
Server software on the iNEWS Servers. For information about
changing the system operator password, see “Changing System
Administration Passwords” on page 25.
The Console Superuser
A console superuser has special system privileges that allow more
powerful (and therefore potentially more dangerous) commands.
The console’s server prompt is the visual indicator for whether you are
logged in as a system operator or a superuser. The server prompt for a
system operator login ends with a dollar sign ($). The server prompt while
in superuser mode ends in a pound sign (#).
The system operator prompt looks like this:
NRCS-A$
The superuser prompt looks like this:
NRCS-A#
23
Chapter 2 The iNEWS Console
n
If a command example in this manual shows the superuser prompt
—ending in a pound sign (#)—you must be a superuser to use the
command.
Follow the procedures explained in the next section to get to the superuser
prompt.
Entering Superuser Mode
A console superuser password is required for entering superuser mode.
This password is the same as the root user password, which is set during
installation of the Linux operating system on the iNEWS Servers. See
“Changing System Administration Passwords” on page 25 for more
information.
To enter console superuser mode:
1. If you are not already logged in, then log in as a system operator, by
typing: so
2. Type: su
3. Press Enter.
To keep the password
confidential, the
console does not
display what you type.
c
4. Type the superuser password at the password prompt, and press Enter.
After you type the password correctly, the console shows that you are a
console superuser by changing the dollar sign ($) at the end of the server
prompt to a pound sign (#). If you enter an incorrect password, the console
displays an error message and lets you try again.
To prevent users from typing unauthorized commands, never leave the
console unattended when in superuser mode. You should log in as
superuser only when you need to type a superuser command, and exit
console superuser mode immediately after typing the command.
Exiting Superuser Mode
To exit from console superuser mode and return to system operator
mode:
t
24
Press Ctrl+D.
Standard Console Operations
The console shows that you are a console system operator by changing the
pound sign (#)at the end of the console’s server prompt to a dollar sign ($).
Changing System Administration Passwords
When logging in to the console as either a system operator or console
superuser, a password is needed. These system administration passwords
are typically set by Avid Customer Support technicians during the
installation of either the iNEWS Server software or the Linux operating
system (OS). However, they may be changed later by system
administrators at the console.
Keep a confidential record of password changes. Knowing the passwords is
critical. If you forget your passwords, the operating system may need to be
reinstalled from scratch by Avid Customer Support technicians.
n
For more information on changing the password for the remote console,
see “Editing the Console Configuration File” on page 44.
To change the system operator password:
1. Log in as a system operator, using the current password.
2. At the server prompt, type the password command, as shown:
NRCS-A$ passwd
3. Press Enter.
4. When prompted, type a new password, and press Enter.
n
If the system operator password is fewer than six characters or is based on
a word in the dictionary, the system will issue a “BAD PASSWORD...”
message, but it will accept such passwords. The system will not accept a
blank password.
5. When prompted to confirm, retype the new password, and press Enter.
25
Chapter 2 The iNEWS Console
To change the superuser password:
1. Enter superuser mode, using the current password.
2. At the superuser prompt, type the password command, as shown:
Changing the superuser
password also changes
the Linux root user
password, which if set
during the Linux OS
installation, must be
more than six
characters, initially.
n
NRCS-A# passwd
3. Press Enter.
4. When prompted, type a new password, and press Enter.
5. When prompted to confirm, retype the new password, and press Enter.
If the password does not match, the system displays an error message. Start
over by retyping the new password in step 4. Also, if the superuser
password is fewer than six characters or is based on a word in the
dictionary, the system will issue a “BAD PASSWORD...” message, but it
will accept such passwords. The system will not accept a blank password.
6. Press Ctrl+D to exit console superuser mode.
Exiting the Console
You should leave the console on at all times while the iNEWS system is
running. However, the following situations may require you to exit the
console:
•
You need to edit the console’s configuration file. See “The Console
Configuration File” on page 42 for more information.
•
The console is frozen, and you are unable to unfreeze it using the
methods described in “Troubleshooting a Frozen Console” on page 27.
To exit the console:
1. Press the Command key, as shown in Figure 3 on page 31.
2. Press Ctrl+E.
3. When COMMAND EXIT appears, press Enter.
After the console software completely shuts down, the prompt for your
operating system will appear.
26
Standard Console Operations
Troubleshooting a Frozen Console
If the servers on your system are not responding to commands and are not
displaying messages, there are several possible procedures you can do to
identify and resolve the problem:
To check and restart scrolling:
1. Ensure that you or someone else has not stopped scrolling. If that is the
case, XOFF is displayed under the region where scrolling has stopped,
as shown in Figure 5 on page 36.
2. Press Ctrl+Q to start scrolling.
It may also be possible that the server ports have stopped sending and
receiving.
To restart sending and receiving from server ports:
See “Console Control
Commands” on page
30 for more
information.
1. Press the Command key, as shown in Figure 3 on page 31.
2. Type: x
3. Press Enter.
If this does not restore the console, static electricity may have frozen one
or more of the servers’ I/O ports.
n
In the previous two procedures, the XON command is shown being issued
in two ways: first, by pressing Ctrl+Q and second, by pressing the
Command key and typing x. Either way will accomplish the exact same
thing.
To reset the servers’ I/O ports:
1. Select the affected server(s). See “Selecting Servers” on page 33 for
more information.
2. Press the Command key, as shown in Figure 3 on page 31.
3. Type: r (for reset).
4. Press Enter.
27
Chapter 2 The iNEWS Console
Another possible cause of a frozen console is an application program that
will not stop running. If you suspect this problem, you can stop the
program, and log in again to the console.
To stop a runaway program:
1. Select the affected server(s). See “Selecting Servers” on page 33 for
more information.
2. Hold down the Control key and press the backslash key (Ctrl+\).
This stops the program on the selected server(s).
If this does not stop the program so that the console displays a system
prompt, suspend the program by pressing Ctrl+Z—or whatever the
suspend (susp) character is. The default is Ctrl+Z.
You can use the jobs command to list suspended programs and kill
suspended programs by using the kill command along with a percent sign
(%) and the job number, such as: kill %1.
If the console still does not respond, exit the console program and restart it
as described in “Exiting the Console” on page 26 and “Starting the
Console” on page 22.
Types of Console Commands
You can type two kinds of commands at the console:
•
Server commands are sent to the iNEWS Servers.
•
Console control commands are sent to the iNEWS console software
that communicates with the servers.
Some examples of server and console control commands appear as part of
procedures in “Standard Console Operations” on page 22. Further
information on these commands are provided in the next two sections of
this chapter. Also, see “If You Need Help...With the Syntax of Console
Commands” on page 5 for more information.
28
Types of Console Commands
Server Commands
The iNEWS system will not recognize server commands entered in upper
case. Type server commands at the console in lower case after the prompt
for the server to which you want the command sent. For instance, if you
want to send a command to server A, type the command after the server
prompt associated with server A.
n
The console displays each server’s prompt based on the system ID and the
server’s name, separated by a hyphen. Examples in this manual use NRCS
as the system ID and single letters—such as A, B, or C—as the server
name.
For instance, the server prompt may appear like this:
NRCS-A$
The appearance of the server prompt varies, depending on how the system
administrator is logged in to the console. See “The Console Superuser” on
page 23 for more information.
An example of a server command is the list sessions command—or
list s command—which when sent to an iNEWS Server will return
information about who is logged in.
To send a server command to multiple servers simultaneously:
t
Type the command followed by a pound sign (#).
The # character acts as a place holder for each server name. It is replaced
with each server’s computer name, such as A or B, before the console
sends the server command to all servers in the system. This allows system
administrators to send commands to multiple servers without having to
select each server and send commands individually. For instance, the
connect # command sends connect a to server A, connect b to
server B, and so forth.
To stop a server command:
t
Press Delete.
29
Chapter 2 The iNEWS Console
If that does not work, press Ctrl+C—the stty interrupt character. Doing so
will interrupt the command’s execution. As a last resort, pressing the
Control and Backslash keys (Ctrl+\—the stty quit character) will stop the
command’s execution. Avid recommends you should attempt to “interrupt”
before trying to “quit” the execution.
If the server sends a message while you are typing a command, the console
stops displaying your keystrokes to display the message. However, it
continues to record what you type. After it has displayed the message, then
the console will display the data you typed in its entirety.
If you are interrupted by a console display or have mistyped a command,
you can cancel the entire command line and start over by typing Ctrl+U.
n
The character used to issue the command that cancels an entire command
line—known as the “kill” character—may be customized, using the stty
command. For instance, to set it to “at” character, you would type:
stty kill @. To reset it to the default Ctrl+U, type:
stty kill ^U.
The same customization capability applies to the “intr” or “interrupt”
character, which is used to interrupt a running program. For instance, to
set it to the Delete key, type: stty intr ^?. To reset it to the default
Ctrl+C, type: stty intr ^C.
To clarify, the ^U and ^C —shown above— mean to hold the Shift key
down and press the 6 key, to get the ^ character, and then the U or C letter
key respectively. The same applies to the ^?. You can view these settings by
entering the server command: stty -a
Console Control Commands
The Enter key on the
numeric keypad will be
called the Command
key throughout this
manual to prevent
confusion with the
Enter key on the
keyboard.
30
The Enter key on the numeric keypad is the console’s Command (CMD)
key. See Figure 3. When you press it, the console displays the command
prompt—also called the command line—from which you can type in
commands.
The command prompt appears as shown:
COMMAND^
Types of Console Commands
To enter console control commands:
1. Press the Command key, as shown in Figure 3.
2. Type the console control command.
Some of the most common console control commands are those used
to activate a region of the console display—by selecting an iNEWS
Server(s)—and those commands used to view a record of messages
displayed on the console, known as the console history. These
commands are explained in “Selecting Servers” on page 33 and
“Console History” on page 35. For a complete list of console control
commands, see “Console Control Commands” on page 580.
3. Press Enter—also called the Return key—on the standard keyboard for
the command to be executed.
Figure 3 shows the location of the two keys on a typical console keyboard.
Function keys
Return key
CMD key
Standard keyboard
Figure 3
Numeric keypad
Typical iNEWS Console Keyboard
If you make a mistake when typing a command, use the Backspace key to
move the cursor back and then type over the error.
Console Function Keys
The system administrator may preprogram the keyboard function keys to
execute commands. For instance, you may program F1 to select server A,
F2 to select server B, and F7 to move up 200 lines in the console history
buffer.
31
Chapter 2 The iNEWS Console
Assigning a Command to a Function Key
To assign a command to a function key:
1. Press the Command key.
2. Type the name of the function key you want to use, followed by the
equal sign (=) and the command the key is supposed to execute. The
following example assigns the command of choosing server A to the
F1 key: f1=c a
3. Press Enter.
To assign a command sequence to a function key—that is, include the
Command and Enter keys in the definition—use the open brace ({) to
represent Command, and the close brace (}) to represent Enter. For
example, to program the complete command sequence (press Command
key, type computer command to select all servers, and press Enter) to
function key F10, you would type: f10={c *}
Changing the Assignment of a Function Key
To change a command assigned to a function key:
t
Assign a new definition to the key.
Deleting the Definition of a Function Key
To delete a function key’s command assignment:
t
Assign it a null value.
Displaying Function Key Assignments
To find out the command (if any) assigned to a key:
1. Press the Command key.
2. Type the name of the key, such as, F9.
3. Press Enter.
Press Command again to clear the command assignment from the console
screen.
32
Selecting Servers
Selecting Servers
On the console, you can select one server or multiple servers at the same
time. For instance, some commands must be executed on all servers
simultaneously, so on a two-server system, you must select both server A
and B before typing in the command.
Selecting One or More Servers
To select only server A:
1. Press the Command key, as shown in Figure 3 on page 31.
2. Do one of the following:
t
Type: computer a
t
Type: c a
3. Press Enter.
To select both the A and B servers:
1. Press the Command key, as shown in Figure 3 on page 31.
2. Do one of the following:
t
Type: computer ab
t
Type: c ab
3. Press Enter.
To select all servers in the iNEWS system:
1. Press the Command key, as shown in Figure 3 on page 31.
2. Type: c *
3. Press Enter.
Selecting all servers enables you to send a command to all of them
simultaneously. When you select all servers, each server region’s bottom
line changes to a wavy line of caret symbols (^^^). Only one cursor
appears, usually in the top region; however, the console commands you
type appear simultaneously in each region of the console screen.
33
Chapter 2 The iNEWS Console
Zooming in on One Server
In addition to the computer command, you can also use the zoom
command to select a server. Unlike the computer command, which
operates in multiple region mode, zoom selects one server at a time and
devotes the entire console screen to that server (or region).
To zoom in on one server, such as server B:
1. Press the Command key, as shown in Figure 3 on page 31.
2. Do one of the following:
t
Type: zoom b
t
Type: z b
3. Press Enter.
Figure 4 shows the console screen after “zooming in” on server B’s region.
Figure 4
34
“Zooming In” On Server B
Console History
To restore the screen to its former multiple region state, use the
computer command to select any server. It does not matter which one
you select; the console screen will revert to a multiple region display, and
the region for the selected server will have the cursor.
Console History
When output from a server command consists of more lines than can fit in
a region, lines will be scrolled off the screen. To view this data—known as
console history—in screen-sized chunks, you must pause the screen
display.
n
The system may also be configured to log console history for viewing at a
later time.
To pause the screen display:
t
n
Press Ctrl+S. The console screen temporarily stops scrolling.
Pressing Ctrl+-S does not have any effect if you are using a remote
console. A remote console is connected by a modem dial-in from an
external location. See “Using the Remote Console” on page 40 for more
information.
35
Chapter 2 The iNEWS Console
When the screen is full of text, XOFF appears at the bottom of the selected
region, as shown in Figure 5.
Figure 5
XOFF Message Indicating Scrolling Is Paused
To manually resume scrolling:
t
Press Ctrl+Q.
Even if you do not press Ctrl+Q, the console automatically resumes
scrolling after a pause of 60 seconds.
36
Console History
Viewing Recent Console History
The console maintains a history buffer containing messages that have
appeared on the screen. You can go back in “console history” to review
prior activity on any of the iNEWS Servers.
Top of History
(Oldest Portion)
Console
Screen
Bottom of History
(Newest Portion)
Figure 6
Console History
As shown in Figure 6, the “top” of the buffer contains the oldest
information; the “bottom” of the buffer contains the most current.
To view recent history on a particular server:
1. Zoom in to the server whose history you want to review.
2. Press the Command key, as shown in Figure 3 on page 31.
Pressing Enter is
equivalent to down 1
3. Type one of the console history commands: up, down, top, or
bottom.
The top and bottom commands move the console screen to the top
or bottom of the history.
The up and down commands by themselves move the console screen
up or down one line in the history. If you follow the up or down
commands with a number, the console screen will move up or down
that number of lines in the history. For instance, up 10, moves up—or
back in the console history—10 lines. If you follow the up or down
37
Chapter 2 The iNEWS Console
commands with a word, the console screen will search from the current
position backward or forward for that word, and if found, moves to the
line containing that word. The commands are not case sensitive.
n
The pound character (#) is a wild card that can be included in the word to
be searched for with the up and down commands. It is also used to search
for numbers. For instance, up 10# is a numerical search, and is not the
same as up 10, which will move up 10 lines in the console history.
4. Press Enter.
The print command may also be used to view lines of console history.
When the command is followed by a number, the screen will display that
number of lines of history, starting from the current position. When the
print command is followed by the word, all, the screen will display all
lines from the current position scrolling to the bottom of the history, or
newest line of information.
n
The print command does not send console history text to the printer. The
command for printing lines of history is list, followed by either a
number or the word, all. See “Console Control Commands” on page 580
for more information.
Viewing Logged Console History
You can configure iNEWS to log console history to disk for later review.
The logs are written to the hard drive on your console PC, traditionally in
the C:\Console directory. The logs are named as shown in Table 2.
Table 2
38
Log Names
File for server A:
File for server B:
Contains the following
information:
log.a1
log.b1
Most recent console history
log.a2
log.b2
Old console history
log.a3
log.b3
Older console history
Console History
Table 2
Log Names
File for server A:
File for server B:
Contains the following
information:
log.a4
log.b4
Oldest console history
The log.a1 file is the most recent console history; you can also view it as
shown in prior examples using the up command.
As the log.a1 file fills up, old files are renamed and a new log.a1 file is
created as follows:
•
log.a1 is renamed log.a2
•
log.a2 is renamed log.a3
•
log.a3 is renamed log.a4
•
A new log.a1 is created
The log files are ASCII text files that can be read with any word processing
program. You must exit the console program if you want to edit the logs in
any way.
n
You can use the console view command to view the log files without editing
or exiting to DOS, but view only lets you start at the top of the file and
scroll down. You cannot move back or search for words.
Both the presence or absence of disk logging and the size of the log files
can be configured in the console.cfg file. See “The Console
Configuration File” on page 42 for more information..
39
Chapter 2 The iNEWS Console
Using the Remote Console
The console should have a modem attached to it. This enables someone in
another location to call up the console and log in, thereby turning the
remote computer into a remote console. The primary use for a remote
console is to enable Avid Customer Support technicians or system
administrators to perform diagnostic and maintenance work on the iNEWS
system from a remote location.
This section explains how to dial in over a modem line, what you can
expect to see on the remote screen, and how to execute commands
remotely.
Dialing in to the Console
To dial in to the console, you must have a computer that transmits and
receives ASCII characters. You must also have set the following modem
options:
If you do not see the
prompt immediately,
pressing Enter should
display it.
n
40
•
Eight data bits
•
No Parity
•
One stop bit
•
Any baud rate supported by your console’s modem
To prevent unauthorized people from dialing in to the console, remote
access is protected with a password. When you dial in, you see a
PASSWORD prompt on the screen. After you type the correct modem
password, the console connects you to the first server listed in the console
configuration file, usually server A.
The modem password is set in the console’s configuration file. See
“Editing the Console Configuration File” on page 44 for more
information.
Using the Remote Console
At the console, MDM is displayed at the bottom of the region representing
the server that was selected from the remote console. Commands typed at
the remote console are sent to that server and displayed on its console
region. Likewise, output from that server are displayed both on the console
and the remote console.
Executing Commands Remotely
After logging in, you can type commands and review history almost as if
you were seated at the console itself. All commands except zoom are
available from the remote console. Just as at the console, these commands
can be abbreviated using the first letter in each command.
There are also some differences when using a remote console:
•
The remote console displays screen input and output for only one
server at a time, even if you have more than one selected.
When you select two or more servers, the order in which you list the
servers in the computer command determines which server’s display
you see. For instance, if you type c ab to select servers A and B, you
see output only from server A on the remote console, even though
what you type is sent to both A and B.
•
n
Use the Escape character instead of the Command key to display the
console command prompt.
The Escape character, by default, is set to the Escape (Esc) key; however,
the character may be customized, using the escape command in the
following format: escape <char>
For instance, to set the Escape character to the keystroke combination of
the Control and Y keys (Ctrl+Y), type: escape Ctrl+Y
The Ctrl in the above command means to hold down the Control key
while pressing the Y letter key. It is important to remember that the escape
command can only be used from a remote console and there must be a
space after the escape command.
To reset the Escape character to its default, type the escape command,
space, then press the Escape key. For instance: escape Esc
41
Chapter 2 The iNEWS Console
Logging out from a Remote Console
To log out after you finish using the remote console:
1. Press the Escape character.
2. Type: l
The lowercased L in
step 2 stands for logout.
3. Press Enter.
4. When the remote console redisplays the PASSWORD prompt, hang up
your modem.
Logging out a Remote User from the Main Console
If you are at the main console and discover that you or someone else has
been using the remote console but did not log out when they were done,
you can log them out from the main console.
To log out a remote console user from the main console:
1. Press the Command key.
2. Type: m
The m in step 2 stands
for modem.
n
3. Press Enter.
Always follow this procedure before disconnecting the modem on the main
console.
The Console Configuration File
The console uses information from its own configuration file—a text file
called console.cfg—to set a number of parameters, such as:
42
•
Whether or not disk logging is enabled
•
Information about each of the servers connected to the console
•
Information about the remote console
The Console Configuration File
This section contains a sample configuration file, and defines the console
configuration keywords and their parameters.
Viewing the Configuration File
To view the configuration file:
1. Zoom in on one server, such as server A:
a. Press the Command key.
b. Type: z a
c. Press Enter.
2. Press the Command key.
3. Do one of the following:
t
Type: view console.cfg
t
Type: v console.cfg
4. Press Enter to display the first line in the console configuration file.
5. Continue pressing Enter to scroll through the file.
Sample Console Configuration File
Here is a sample console configuration file:
log c:log * 32768
computer
;“A” server
name a
label NEWS
irq 3
hostess 2c0
speed 9600
;
43
Chapter 2 The iNEWS Console
computer
name b
label NEWS
irq 3
hostess 2c8
speed 9600
;
;“B” server
computer
name c
label NEWS
irq 3
hostess 2d0
speed 9600
;
;“C” server
modem
;Remote console
password turtle
irq 3
hostess 2d8
speed 1200
The configuration file consists of a list of keywords, such as name and
label. Most keywords are followed by parameters, such as a and NEWS.
The keyword modem identifies the start of the modem (remote console)
section. The keyword computer identifies a server section. Each
server—including the archive server, if your system has one—and the
modem must have its own section in the console configuration file.
All keywords and their parameters are described in detail in Table 3.
Editing the Console Configuration File
Probably the only modification you will ever need to make to the console’s
configuration file is to change the modem password, used when logging in
from a remote console.
44
The Console Configuration File
n
The console configuration file is stored on a DOS PC, so you need to use a
DOS editing tool, such as edit to change it. You could also copy the file
to a diskette and take it to another location to edit using Microsoft’s
program, NOTEPAD, on a Windows-based PC.
Console Configuration Keywords
Table 3 lists all the configuration keywords and their parameters, if they
have any.
Table 3
Console Configuration Keywords
Keyword
Explanation
computer
Indicates the beginning of a server section. Must appear at the
top of each server section on the configuration file.
hostess <port-address>
Indicates which port address (in hex) the console uses to
communicate with a particular device (that is, a server or the
modem). This information, which is dictated by the hardware,
was placed in the configuration file when your system was
installed and should not be changed.
irq <interrupt-request-number>
To get the attention of the console, each device (that is, the
servers and the modem) connected to the console must have
its own interrupt request with which it can signal the console.
The irq keyword tells the console which interrupt request to
expect from each device.
This information, which is dictated by the hardware, was
placed in the configuration file when your system was
installed and should not be changed.
label <region-name>
Defines a label that the console uses to identify each server’s
region of the console screen. The label can be up to 15
alphanumeric characters long, and is typically the system ID,
a hyphen, and the server letter—A, B, C, or D.
45
Chapter 2 The iNEWS Console
Table 3
Console Configuration Keywords (Continued)
Keyword
Explanation
log <drive:filename> [server(s)]
[max size]
Enables disk logging. No matter what filename (for example,
history) you designate here, the system always uses
extensions like A1, A2, and B1, as indicated in “Viewing
Logged Console History” on page 38. If you do not follow the
filename with a list of the servers for which you want history
to be recorded, the console records history for all servers. If
you omit a log size it defaults to 16,384 bytes.
This example creates a history file on drive B for servers A
and B: log b:history ab
modem
Indicates the beginning of a modem section of the
configuration file.
name <computer-name>
Names the server described in that section of the
configuration file. Each server must have A, B, C, or D as its
name.
password <password>
The modem password that must be typed when someone logs
in at a remote console. The password can have up to eight
alphanumeric characters and is case sensitive.
portaddress <port>
Selects the DOS address (in hex) the console should use to
communicate with a particular device, such as a modem. This
information which is dictated by the hardware, is placed in the
configuration file during installation and should not be
changed. Each device must have a port address defined in its
section. The portaddress keyword is used instead of
hostess when your system has four servers and a modem.
In that case, the modem must use com1 as its port. The port
parameter should always be defined as 3f8.
speed <baud-rate>
Sets the baud rate for communication between the console and
the server. The baud rate is the only communication parameter
you can alter; the console ports always communicate at 9600
baud, eight data bits, no parity, and one stop bit.
46
The Console Configuration File
Table 3
Console Configuration Keywords (Continued)
Keyword
Explanation
timeout <minutes:seconds>
Allows you to set a time-out value for any modem connection.
The system automatically logs out a modem connection if
there is no activity for a specified amount of time. For
instance, a value of 6:00 would automatically log out a
modem connection after six minutes of inactivity. This
keyword, which should only be used in the modem section,
provides added protection should a user forget to logout from
a modem connection to the console.
With a value of 0:00—the default value—the feature is
disabled, which means the system will not log out a modem
connection regardless of inactivity length. The maximum
value is 546 minutes and 7 seconds (546:07).
47
Chapter 2 The iNEWS Console
48
Chapter 3
Getting Started
System Administrators are responsible for knowing how to start up and
shut down the iNEWS system. This requires logging in at the console
multiplexor, which is done differently than other iNEWS users and
provides access to features that others do not. Information on using the
console, including logging in, is covered in Chapter 2. This chapter
provides specifics on starting up and shutting down the newsroom
computer system.
This chapter contains the following main sections:
•
Starting the System
•
Shutting Down the System
•
Starting a System in Single-Server Mode
Chapter 3 Getting Started
Starting the System
The following procedure shows you how to reboot your servers and
synchronize them. This is primarily for dual or triple-server systems. For
steps on starting a system in single-server mode, see “Starting a System in
Single-Server Mode” on page 56.
n
Because the following procedure applies to an entire system that has been
shut down, you must perform all the steps on all servers, except where
otherwise indicated.
To start your iNEWS system, do the following:
1. Power up or reboot servers in one of the following ways, depending on
how you shut down your system:
a. If you turned off the servers when you shut down your system,
boot them to the login prompt by turning them on.
b. If you halted the servers when you shut down your system, boot
each server from the console. Servers that have their operating
systems halted will display the following line ten times—one per
second:
Press any key to continue.
If no key is pressed, the bootup will continue normally after ten
seconds. If a key is pressed, the system displays a message similar
to the following:
GRUB version 0.93 (640K lower/523256K upper memory)
+----------------------------------------------+
| Red Hat Linux (2.4.20-6smp)
|
| Red Hat Linux-up (2.4.20-6)
|
| Red Hat Linux (2.4.20-6smp) SERIAL CONSOLE
|
+----------------------------------------------+
Use the ^ and v keys to select which entry is highlighted.
Press Enter to boot the selected OS, ‘e’ to edit the
commands before booting, ‘a’ to modify the kernel
arguments before booting, or ‘c’ for a command line.
50
Starting the System
The default is the SERIAL CONSOLE option, for booting to the
iNEWS console. The other options should not be used for any
reason, unless instructed to do so by Avid Customer Support
personnel. Press Enter to continue.
c
If the system was not shut down as described in “Shutting Down the
System” on page 53, check the console history for messages indicating
that all servers shut down at the same time. Do not connect servers
unless you are sure their databases are mirrored. If you cannot find
messages indicating simultaneous shutdown, or are otherwise unsure
whether the disks are mirrored, call Avid Customer Support for
assistance before proceeding. If the servers are not mirrored, it will be
necessary to bring the system up as a single-server system and go
through the re-mirroring process. See “Starting a System in SingleServer Mode” on page 56 for more information.
If the system was taken through a normal shut down according to
instructions, the databases would still be mirrored and you can
continue the normal startup procedure.
2. Select all servers. See “Selecting Servers” on page 5 for more
information.
3. Log in as a system operator by typing: so
4. When prompted, type the password.
5. Type: connect #
The # character acts as a place holder for each server name, allowing
you to send a single command to multiple servers simultaneously. So,
typing connect # will send connect a to server A, connect b
to server B, and so forth.
When connected, each server displays status messages and the system
prompt returns.
6. Messages similar to the following appear:
connect successful for NRCS-A, starting servers...
A is OFFLINE. ID is NRCS.
System is A. Master is A.
Disk status is OK. The database is OPEN.
51
Chapter 3 Getting Started
Connecting servers provides each server with a unique name and
causes each one to read and interpret the system profile. The servers
can work together as a system after reading the system profile
information.
7. (Optional) Check for edit and order locks if you are restarting the
system after a power failure.
During a power failure, the system may not have had time to remove
edit and order locks from the database before shutting down. When
you restart the system, remove these locks.
n
Checking for edit and order locks may take time depending on the size of
the database. In an emergency, bypass this step to get the system running.
Go back later and remove locks to provide system access. The system can
detect invalid locks and will ignore them.
To remove edit and order locks:
a. Select one server.
b. Type: dbclean -x .
The -x option tells dbclean to skip queues or directories marked
with a skip flag, reducing the time it takes to run.
The period (.) after the -x causes dbclean to start at the root
directory of the database, so that it does not miss any part of the
database not marked with a skip flag.
8. Select all servers. See “Selecting Servers” on page 5 for more
information.
9. Type: startup
Information similar to the following appears:
Checking free space...
Sep 10 15:42:51 NRCS msg: System is being configured
database size 10002352,free 9955000=100%,freelist 1991
Starting NRCS programs...
booting device 100 on port 1
booting server 130
52
Shutting Down the System
The Startup command does the following:
•
Causes the master computer (usually server A) to read the
configuration file
•
Brings each server online so users can log in
•
Checks database free space (dbfree)
•
Starts all devices and utility programs—called servers
The console displays device-ready messages (Hot-to-go) as each
device starts up, indicating that the device is online and available.
n
Resources used for iNEWS Workstation sessions do not print any messages
until a workstation establishes a connection.
Shutting Down the System
If you need to turn off your servers or reboot the system, first shut down
the system. Shutting down the system:
n
•
Saves any open stories
•
Removes any remaining edit and order locks
•
Ensures that each server’s copy of the database is the same
Because the system requires that you shut down all servers at the same
time, most steps in this procedure are performed on all servers
simultaneously. Except where instructed to do otherwise, ensure that you
have selected all servers before performing each step. See “Selecting
Servers” on page 33 for more information.
53
Chapter 3 Getting Started
To shut down your iNEWS system:
1. Log out all users, according to the procedures provided in “Logging
Out All Users” on page 94.
c
You must ensure that all users are logged out if shutting down the
system. If a user is in a connect session when the system is shut down,
the user’s workstation stops, the session is disconnected, and any
unsaved work is lost. Ensure any connect session users have logged out
before you continue the shutdown procedure.
2. Ensure all servers are selected, then type: status
This will display the systems current configuration status; verify that
the servers are still connected to each other and running in the normal
AB configuration for dual-server systems or ABC configuration for
triple-server systems. If they are, you may continue with normal
shutdown procedures.
c
If the servers do not all display the same configuration settings—such
as “System is AB”—then the databases on the servers are most likely
not mirrored and must not be brought back up using normal startup
procedures. Contact Avid Customer Support before proceeding.
3. Type: shutdown
A message similar to the following appears:
WARNING! This will stop all devices on this
computer, and close the database.
To prevent loss of work in progress, 'logout all'
first.
Do you really want to do this (y/n)?
4. To continue, type: y
Press Enter. The screen appears similar to the following:
Do you really want to do this (y/n)? y
/exc/shutdown: Stopping all devices
/exc/shutdown: Closing database
54
Shutting Down the System
The shutdown process stops all workstations, wires, and other devices,
and no further changes can be made to the database.
5. Enter superuser mode by typing: su
6. When prompted, enter the password.
The screen appears similar to the following
NRCS-A$ su
password:
SU: so/dev/console
NRCS-A#
When the superuser prompt appears, shut down the system by using a
form of the init command, as shown:
NRCS-A# halt
Broadcast message from root (ttySO) (Fri ...)
The system is going down for system halt NOW!
INIT: Stopping atd: [ OK ]
Stopping keytable: [ OK ]
...
Turning off swap:
Turning off quotas:
Unmounting file systems:
Halting system...
flushing ide devices: hda
System halted.
7. Turn off each server.
To start up the system again, follow the procedure in “Starting the System”
on page 50.
55
Chapter 3 Getting Started
Starting a System in Single-Server Mode
If the servers were not operating in their normal system configuration, such
as AB in dual-server systems, or if they were not shutdown using normal
procedures according to instructions in this manual, the databases on the
servers may not be mirrored.
c
If the databases are not mirrored, you must not bring the system up
using normal start up procedures as instructed in “Starting the
System” on page 50 or you will risk database corruption.
If non-mirrored servers, the system administrator must bring the system up
in single-server mode and then go through the database re-mirroring
process. This section provides the steps for starting a system in singleserver mode.
n
Contact Avid Customer Support for assistance with triple-server systems.
It may be possible to start these systems in a dual-server mode, depending
on the circumstances of the shutdown.
To start the iNEWS system in single-server mode:
1. Power up or reboot the server that you want the system to run on.
2. Select that server. See “Selecting Servers” on page 5 for more
information.
3. Log in as a system operator by typing: so
4. When prompted, type the password.
5. Do one of the following:
t
To connect server A as a single system, enter the following
command:
connect a single=a
t
To connect server B as a single system, enter the following
command:
connect b single=b
56
Starting a System in Single-Server Mode
Notice in the sample
message that the
“System is A” not AB
or ABC.
Messages similar to the following appear:
Sep 10 16:25:52 inews-a last message repeated 15 times
...
Sep 10 16:26:44 inews-a work:[2034]workserver Hot-to-go
connect successful for NRCS-A, starting servers...
A is OFFLINE. ID is NRCS
System is A. Master is A.
Disk status is OK. The database is OPEN.
NRCS-A$
6. (Optional) Check for edit and order locks if you are restarting the
system after a power failure.
During a power failure, the system may not have had time to remove
edit and order locks from the database before shutting down. When
you restart the system, remove these locks.
n
Checking for edit and order locks may take time depending on the size of
the database. In an emergency, bypass this step to get the system running.
Go back later and remove locks to provide system access. The system can
detect invalid locks and will ignore them.
To remove edit and order locks:
a. Select one server.
b. Type: dbclean -x .
The -x option tells dbclean to skip queues or directories marked
with a skip flag, reducing the time it takes to run.
The period (.) after the -x causes dbclean to start at the root
directory of the database, so that it does not miss any part of the
database not marked with a skip flag.
7. Type: startup
57
Chapter 3 Getting Started
Information similar to the following appears:
Checking free space...
Sep 10 15:42:51 NRCS msg: System is being configured
database size 10002352,free 9955000=100%,freelist 1991
Starting NRCS programs...
booting device 100 on port 1
booting server 130
The entire newsroom computer system will now be run off the single
server. The commands entered on a single-server system for shutting down
are the same as those used to shut down a dual-server or triple-server
system. To return to a dual or triple-server system, it will be necessary to
complete the database re-mirroring process.
58
Chapter 4
Users
People in your newsroom must have user accounts to use the iNEWS
newsroom computer system. Each user account has various user traits
associated with it that capture information about the user’s interaction with
the system—information such as passwords, keyboard preferences, and
permissions for story editing.
This chapter tells how the system administrator can access and change user
account information from any iNEWS Workstation. However, user traits
can also be viewed and modified at the console. The procedures for using
the console is covered in Appendix G.
This chapter contains the following main sections:
•
Viewing User Accounts
•
Modifying User Traits
•
Changing a User’s Password
•
User Preferences
•
Simplified Users
•
Creating New Users
•
Removing User Accounts
•
The User Manager Account
•
The Database Manager Account
•
Logging Out All Users
Chapter 4 Users
Viewing User Accounts
You must be logged on as a superuser or user manager (umanager) to
change user traits. For an explanation of the umanager account and
privileges, see “The User Manager Account” on page 92.
To view traits associated with a particular user account:
1. Select Tools > Options > Users.
The Manage User Accounts dialog box appears.
2. Enter the user name in the User ID field.
n
An asterisk (*) in the User ID field will result in all user accounts listed
when you click Search or press Enter. To search for all users with names
that start with a certain letter, type that letter followed by an asterisk.
3. Do one of the following:
60
t
Click Search.
t
Press Enter.
Viewing User Accounts
The results of the search appear in the User List field located in the
center of the dialog box. The data provided in the field includes: User
ID and Name, last time the user logged in, whether the user account
has superuser privileges, and so forth. The scroll bar at the bottom of
the field may be used to view the rest of the User Account data.
n
The Print User List button will send the User Account data for the results
appearing in the User List field to the printer. There is no option to
selectively limit what data is printed.
4. Do one of the following:
n
t
Double-click the user name in the User List field.
t
Click the name once to select it, and then click the Modify/Display
button.
The Modify button will appear with the word Display on it if you do not
have authority to modify user accounts. This applies to user managers
(umanager) who cannot alter superuser accounts. Also, the traits shown in
the dialog box will appear gray to indicate that the information is for
viewing only.
The Modify User Account dialog box appears.
61
Chapter 4 Users
The dialog box shows user traits associated with the account you chose,
such as the user’s name, read rate, and mail queue name. All user traits
shown in the various sections of the Modify User Account dialog box are
explained in detail in “User Traits” on page 63.
Modifying User Traits
You must be logged on as a superuser or user manager (umanager) to
change user traits. The superuser account is an iNEWS user account with
superuser type access privileges. It is not the same as the superuser mode
used at the console. See “User Traits” on page 63 for more information.
For an explanation of the umanager account and privileges, see “The User
Manager Account” on page 92
To modify a user’s traits from an iNEWS Workstation, do the
following:
1. Access the Modify User Account dialog box as explained in “Viewing
User Accounts” on page 60. An example of the dialog box is shown in
Figure 7 on page 63.
2. Select or deselect check boxes, as required. Fill in the fields in the
Queues section of the dialog box. See “User Traits” on page 63 for
more information.
n
You can click the Get from Template button to copy traits from another predefined user account. The template must be selected prior to the start of
account modification or the button will be inaccessible (grayed out). See
“Copying User Traits to Another User Account” on page 84 for more
information.
3. Create or change the password, as explained in “Changing a User’s
Password” on page 68.
4. Click User Preferences and modify settings, as explained in “User
Preferences” on page 69.
The Cancel button
closes the dialog box
without saving
changes.
62
5. Click OK to save modifications.
Modifying User Traits
User Traits
The Modify User Account dialog box—shown in Figure 7—divides each
user’s traits into sections, such as Type, Edit Mode, Queues, and so forth.
These sections are explained in the following summary of all user traits.
Figure 7
Modify User Account Dialog Box
User ID and User Name
The User Name field contains the user’s real name. It should not be
confused with the User ID, which the system uses to identify account
activity. For instance, a user may have an account with a User ID
danielmi; his real User Name is Daniel Mitchell, but he will type
danielmi, his User ID, to log on to iNEWS.
Type
The Type section contains the check boxes that determine what type of
user account is assigned to the user, and consequently, what privileges. If
the check box is selected, the type is applied to that user account.
63
Chapter 4 Users
•
Superuser
– A superuser account allows the user complete
access to administration features, such as user
accounts, the database, the System directory, and
connect sessions to the console that controls the
servers.
•
Black Listed
– A black listed account cannot be used to log in to
an iNEWS Workstation. This type is used for
special accounts, such as umanager and
dbmanager. It is not intended for standard user
accounts. Another practical use for this trait is to
quickly disable an account of someone leaving or
someone who works intermittently.
•
Simplified
– A simplified account sets certain access limits,
such as the maximum number of iNEWS
Workspaces allowed. See “Simplified Users” on
page 78 for more information.
Edit Mode
The Edit Mode section’s radio buttons set up the condition of the PC
keyboard’s Insert key at log in.
64
•
Insert
– The Insert editing mode, when selected, means if a
user types text between two characters, the text is
inserted at the cursor position without overwriting
the character to the right of the cursor.
•
Overwrite
– The Overwrite editing mode, when selected,
means each character a user types replaces the
next character to the right of the cursor as the
cursor moves through the text.
Modifying User Traits
Queues
The iNEWS system provides a People directory in the database file
structure that allows system administrators to set up a personal directory
and two queues for each user as data storage. The Queues fields in the
Modify User Account dialog box indicate the navigation paths (or
locations) of the user’s personal directory and queues.
n
The actual directory and queues are not created here. See “Creating a New
User Area in the News Database” on page 82 for more information.
•
Home
– The Home field contains the path to the directory
(folder) where the Destination and Mail queues
are stored in the database file structure.
•
Destination
– The Destination field contains the path to the
queue provided for the user as a storage location,
such as Notes.
•
Mail
– The Mail field contains the path to the user’s Mail
queue, which is where all e-mail to that user is
kept in the database.
Read Rate
The Read Rate is the user’s spoken reading rate in words per minute. The
average English reading rate is 180 words per minute. The iNEWS system
uses the read rate of the designated user (presenter) to determine the audio
(air) time of a story.
65
Chapter 4 Users
Session/Configuration/Queue Features
There are three sections of the Modify User Account dialog box pertaining
to features.
The Session Features section defines access to other parts of the system.
•
Media Browse
– The Media Browse check box determines access to
the Media Browse application.
•
Broadcast Control– The Broadcast Control check box is a nonfunctioning option, reserved for future
development.
•
Connect Services– The Connect Services check box determines
access to Connect to Service.
The Configuration Features section pertains to the look of the iNEWS
Workspace.
•
Toolbars
– The Toolbars check box determines whether the
user can create custom toolbars.
•
Color Highlights – The Color Highlights check box determines
whether the user can customize the highlighting
status colors in the queue.
•
Highlight Read ...– The Highlight Read Stories check box specifies
that unread stories in the queue are highlighted on
the user’s screen. The highlight is removed when
the cursor is positioned on the story.
The Queue Features section pertains to access privileges in the Queue
panel of the iNEWS Workspace.
•
66
Reorder Stories – The Reorder Stories check box determines
authority to alter the order of the stories in a
queue.
Modifying User Traits
•
Create/Kill ...
– The Create/Kill Folders/Queues check box
determines authority to create or delete queues and
folders (directories) in the database file structure,
as seen in the Directory panel of the iNEWS
Workspace.
•
Kill All Stories – The Kill All Stories check box determines
authority to delete all stories from a queue at one
time. The data is actually moved from the selected
queue to the DEAD queue where it remains (and
can be accessed) until purged.
•
Password
– The Password button opens a dialog box that you
can use to set up or change the password
protecting access to the user account.
•
Force Change
– The Force Change check box determines whether
the user is forced to change the assigned password
the next time he logs on.
Password
See “Changing a User’s
Password” on page 68
for more information.
User Preferences...
The User Preferences button is used to view and/or modify a user’s
preferences, such as keyboard, printer, and confirmation settings. See
“User Preferences” on page 69 for more information.
Get from Template...
The Get from Template button is only used when copying the traits of one
user’s account to another. See “Adding a New User Account” on page 84
for more information.
67
Chapter 4 Users
Changing a User’s Password
To change a user’s password:
1. Click the Password button in the Modify User Account dialog box,
shown in Figure 7 on page 63.
The Change User’s Password dialog box appears:
2. Type the password in the New password field.
3. Confirm the new password by retyping it in the Confirm new password
field.
n
The password must be a minimum of five alphanumeric characters (and a
maximum of 12 characters) with no spaces. Use the system profile to set or
change a required length for all passwords for your site.
4. Do one of the following:
68
t
Click OK to store the password for saving after all modifications
to the user’s account are done. This will close the dialog box. The
process of saving the password is only completed after the OK
button on the Modify User Account dialog box is also clicked.
t
Click Cancel to close the dialog box without saving changes.
Modifying User Traits
User Preferences
To change user preferences:
1. Click the User Preferences button in the Modify User Account dialog
box, shown in Figure 7 on page 63.
The Preferences dialog box will appear, containing several tabs.
n
System administrators can use the Preferences dialog box to set up default
preferences for users, such as a default printer. However, the Preferences
dialog box is—by default—accessible to users, so they can alter these
settings at any time. To learn how the system administrator can limit
access to this dialog box and its features, see “Simplified Users” on
page 78.
2. Modify the preference settings on each tab as needed. The settings are
described in detail in the next sections of this chapter.
3. Do one of the following:
t
Click OK to store the preferences for saving after all modifications
to the user’s account are done. This will close the dialog box. The
process of saving the preferences is only completed after the OK
button on the Modify User Account dialog box is also clicked.
t
Click Cancel to close the dialog box without saving preference
changes.
69
Chapter 4 Users
Session Tab
The Session tab has two sections, which system administrators can use to
set up default user preferences.
70
•
Keyboard
– The keyboard drop-down list contains a list of
keyboards (or sets of macros) that can be assigned
to the user account as a default for when he logs
in. The Reload button allows the keyboard
assignment to take effect without having the user
log off and back on.
•
Printing
– The Printing drop-down lists contain two lists: one
of Printers and another of pre-defined Styles that
can be assigned to the user account as defaults for
when he prints data from an iNEWS Workstation.
Modifying User Traits
Confirmations Tab
The Confirmations tab is divided into sections and contains check boxes
that determine whether iNEWS NRCS prompts the user to confirm a
request before completing the command.
•
Saving Story
– When Saving Story is checked, iNEWS
Workstation will display a confirmation message
to save changes before closing an edited story. If
you do not select the Saving Story check box, the
system automatically saves changes before closing
stories.
•
Large Print Jobs– When Large Print Jobs is checked, iNEWS
Workstation will display a confirmation message
before sending potentially large print jobs to the
printer, such as the text of all stories in a queue.
•
Exit
– When Exit is checked, iNEWS Workstation will
display a confirmation message when the user
attempts to close the iNEWS NRCS program at
the workstation.
71
Chapter 4 Users
Drag/Drop section
•
Story Operations– When Story Operations is checked, iNEWS
Workstation will display a confirmation message
before moving a story when you use the mouse to
drag it to its new position.
•
Queue Operations– When Queue Operations is checked, iNEWS
Workstation will display a confirmation message
before moving all stories in a queue when you use
the mouse to drag them to their new position.
•
Queue Reorder – When Queue Reorder is checked, iNEWS
Workstation will display a confirmation message
before moving a story to a new location in the
same queue.
Delete/Kill section
A production
cue marker
(shown here)
appears in the Story
Text panel. These
markers are also known
as grommets.
72
•
Story
– When Story is checked, iNEWS Workstation will
display a confirmation message before deleting a
story or stories.
•
Mail or Message – When Mail or Message is checked, iNEWS
Workstation will display a confirmation message
before deleting e-mail or instant messages.
•
Production Cue – When Production Cue is checked, iNEWS
Workstation will display a confirmation message
before deleting a production cue and its marker
from a story.
Modifying User Traits
Backup Tab
The Backup tab defines the settings for the iNEWS Workstation to
automatically back up work in a current session to a specified location at
specific time intervals.
•
Interval
– Interval specifies the number of minutes between
story backups. The default is 10 minutes. Set the
interval to 0 (zero) minutes to turn off the
automatic backup feature.
•
Directory
– Directory specifies the path name—the location in
which iNEWS Workstation should store backup
copies of stories. The location should be a
directory (folder) on the harddrive of the local
PC/workstation. You can type the path in
manually, or click the Browse button to select the
directory from the Browse dialog box.
Refresh Tab
The Refresh tab sets the seconds for refreshing the screen at the
workstation.
73
Chapter 4 Users
n
This preference is unique because it only affects the workstation on which
it is set.
Set the number to zero (0) for instant updating—that is, if you do not want
to delay refreshes.
74
Modifying User Traits
Layout Tab
The Layout tab is divided into sections and contains buttons and check
boxes that determine the layout of panels and workspaces in the iNEWS
Workstation main window.
•
Start in Session – The Start in Session field specifies the default
session that will appear on screen when the user
logs in to iNEWS Workstation.
•
Get Current
– The Get Current button will reset the preferences
on the Layout tab to what was set when the dialog
box opened.
Arrangement section
– iNEWS Workstation, depending on which
•
Arrangement button is selected, will display
the panels of the iNEWS Workspace accordingly.
•
Zoom
– When Zoom is checked, iNEWS Workstation will
display the iNEWS Workspace in zoom
mode—that is, zoomed into one of the three
panels: Directory, Queue or Story.
75
Chapter 4 Users
•
Hide Form
– When Hide Form is checked, iNEWS Workstation
will display the Story panel with its Story Form
panel hidden. The user can choose to show the
Story Form panel by selecting the option to show
the form from the Story drop-down menu.
Gridlines section
•
Horizontal
– When Horizontal is checked, iNEWS Workstation
will display horizontal gridlines between rows in
the Queue panel.
•
Vertical
– When Vertical is checked, iNEWS Workstation
will display vertical gridlines between columns in
the Queue panel.
Preview Lines
•
n
76
Use Default
– When Use Default is checked, iNEWS
Workstation will display the default number of
preview lines for each story in the Queue panel as
defined by the queue’s properties. When Use
Default is not checked, every queue will display
only one line of information per story in the Queue
panel.
Users can manually override the Preview Lines setting by selecting the
Story Preview option in the View drop-down menu. In the Story Preview
dialog box, the user can override the default setting by typing in a number
in the Lines to preview field. This overrides the setting for the queue while
displayed. Once the user exits the queue, the queue’s default setting is
reinstated. If the user wants to return to the default setting manually (as
defined in the queue’s properties), the user can click the Default button in
the Story Preview dialog box.
Modifying User Traits
The following figures show the difference between Queue panel displays
with and without Preview lines. The first is the display using the default of
seven preview lines, as defined in the queue’s properties.
The second figure shows the Queue panel display without preview lines.
This is the view when “Use Default” is unchecked, unless otherwise
specified.
77
Chapter 4 Users
Search Results Tab
The Search Results tab allows you to set the default form used in the
Queue panel of the Search Results workspace.
•
Use form
– iNEWS Workstation will use the form selected
from the Use form drop-down list when displaying
the results from searches in iNEWS NRCS. The
forms you can choose from are those created and
stored in SYSTEM.FORMS. See “Creating Forms”
on page 204 for more information.
Simplified Users
A simplified user is one that has certain limitations pertaining to the
iNEWS Workstation. As the system administrator, you can define the
limitations and then assign them to users. Only one set of limitations can
be defined, which is then applied to all user accounts with the simplified
user trait. In other words, either a user account has the simplifed user trait,
with its designated limitation settings, or it does not.
Some of the Simplified User Settings lock the user’s preferences to those
defined by the system administrator using the Preferences dialog box. See
“User Preferences” on page 69 for more information.
78
Modifying User Traits
To set up or modify the simplified user limitations:
1. Access the Modify User Account dialog box as explained in “Viewing
User Accounts” on page 60. An example of the dialog box is shown in
Figure 7 on page 63.
2. Click the Simplified UI button.
The Simplified User Settings dialog box appears.
The dialog box divides the settings into two sections, which are
explained in the next sections of this chapter.
3. Select or deselect check boxes, as required.
4. Click the OK button to save the settings and close the Simplified User
Settings dialog box.
n
Use the Reset button to discard changes and reset the check box settings to
what they were when the dialog box opened.
Workspaces Section
The Workspaces section of the dialog box provides settings that pertain to
the arrangement and quantity of workspaces within the iNEWS
Workstation’s main window.
•
Limit Number to:– When Limit Number to is checked, iNEWS
Workstation will prevent the user from opening
more workspaces than the number specified. This
limit does not apply to the workspaces opened
using the Urgent Wire and Mail buttons. However,
79
Chapter 4 Users
this does lock the Urgent Wire workspace so the
user is unable to navigate to other queues or
directories in that workspace.
•
Lock Arrange
– When Lock Arrange is checked, iNEWS
Workstation will prevent the user from altering the
arrangement of panels in the Workspace. This
disables the Arrangement buttons on the standard
Layout toolbar. The setting is locked into the
default arrangement as defined in the user’s User
Account Preferences.
•
Lock Layout
– When Lock Layout is checked, iNEWS
Workstation will prevent the user from altering the
layout of workspaces in the iNEWS Workstation
main window. This disables the Layout buttons on
the standard Layout toolbar. The setting is locked
into the default layout as defined in the user’s User
Account Preferences.
•
Lock Zoom
– When Lock Zoom is checked, iNEWS
Workstation will prevent the user from altering the
zoom of panels in the iNEWS Workspace. The
setting is locked into the default as defined in the
user’s User Account Preferences.
Application Section
The Application section of the dialog box provides settings that pertain to
accessing certain iNEWS features at any workstation.
80
•
Lock Toolbars
– When Lock Toolbars is checked, iNEWS
Workstation will prevent the user from altering the
display of toolbars.
•
Lock Sessions
– When Lock Sessions is checked, iNEWS
Workstation will prevent the user from creating or
altering sessions. The user will be locked to
sessions created prior to the Lock Sessions being
applied to the user account.
Creating New Users
•
Disable Title Entry – When Disable Title Entry is checked, iNEWS
Workstation will prevent user access to the Title
Entry dialog box, used to enter production cues
in stories, and the Edit Title Entry Template
dialog box, used to create CG templates for the
Title Entry feature.
•
Disable User Prefs...– When Disable User Prefs Dlg is checked,
iNEWS Workstation will prevent user access to
the Preferences dialog box. The user will be
unable to alter user preferences, such as default
printer settings. The user will be locked to
settings already in place at the time Disable
User Prefs Dlg is applied to the user account.
See “User Preferences” on page 69 and
“Simplified Users” on page 78 for more
information.
Creating New Users
To set up new users in iNEWS NRCS, you need to follow these three
procedures, which are explained in detail in this section:
1. Create areas in the iNEWS NRCS database file structure where the
user can store notes and receive mail. See “Creating a New User Area
in the News Database” on page 82 for more information.
2. Add a new user account so that your system recognizes the user. This
includes setting up the user traits associated with the account. See
“Adding a New User Account” on page 84 for more information.
3. Enable the new user to receive mail by adding him or her to the
appropriate group. See “Enabling a New User to Receive Mail” on
page 87 for more information.
81
Chapter 4 Users
Creating a New User Area in the News Database
Each user needs an area in the database to keep notes and to receive e-mail.
Usually, these areas are separate queues called Notes and Mail. These
queues are kept in a sub-folder—with the user’s account name—in the
People directory.
The common practice is to separate the first level of People sub-folders by
using the first initial of the user’s last name—otherwise, since the system is
limited to 250 user names in the People directory, your site may eventually
reach the limit.
For instance, the Home directory for user DANIELMI would be:
PEOPLE.D.DANIELMI. The Notes and Mail queues would be:
PEOPLE.D.DANIELMI.NOTES and PEOPLE.D.DANIELMI.MAIL,
respectively.
You must be logged on
to iNEWS NRCS with
a user account that has
authority to create new
directories and/or
queues to complete this
procedure.
To create a new directory (folder):
1. Using the database file structure in the Directory panel of the iNEWS
Workspace, select the directory under which you want the new folder
to be created, as shown in the following example.
Select the PEOPLE folder, then the
folder with the alphabetic name corresponding to the first letter of the user’s
name, such as D. The new folder will be
created in the D directory (folder), such
as DANIELMI.
2. Do one of the following:
82
t
Select Tools > New Folder.
t
Right-click on the folder in the Directory panel, and select New
Folder from the pop-up menu.
Creating New Users
A new folder is created under the selected folder. The New-Folder
appears at the end of the list of existing folders.The title, New-Folder,
is highlighted, so you can rename it.
3. Type the name of the new folder.
4. Press Enter to save the new folder name. You can now open the new
folder (directory) by double-clicking on it.
To create a new queue, such as the Notes and Mail queues for user
DANIELMI:
1. Navigate to and select the folder created to hold the queue you want to
create, such as PEOPLE.D.DANIELMI.
2. Do one of the following:
t
Select Tools > New Queue.
t
Right-click on the folder in the Directory panel, and select New
Queue from the pop-up menu.
83
Chapter 4 Users
A new queue appears under the folder you selected. The New-Queue
appears at the end of the list of existing queues.The title, New-Queue,
is highlighted, so you can rename it.
3. Type the name of the new queue, such as MAIL or NOTES.
4. Press Enter to save the new queue name. You can now open the new
queue by double-clicking on it.
n
There are some restrictions pertaining to adding directories and queues in
the database. See “Adding a Directory or Queue” on page 99 for more
information.
Adding a New User Account
When adding a new user account, you have the option of creating the
account from scratch, or copying the traits of another user account already
in the system. Both options are covered in this section.
Copying User Traits to Another User Account
Before you can copy user traits from one user account to another, you must
first select the account you want to copy—that is, select an account to use
as a template for the new account you are going to create.
84
Creating New Users
To define an account as a template for copying to other accounts:
1. Select Tools > Options > Users.
The Manage User Accounts dialog box appears.
Figure 8
n
Manage User Accounts Dialog Box
If you do not have superuser privileges, which permits access to the
Manage User Accounts dialog box, the system will prompt you for the
umanager password. If the umanager account does not exist in the system,
then access is only allowed to system administrators—that is, those with
superuser privileges. See “The User Manager Account” on page 92 for
more information. Also, see “User Traits” on page 63 for more
information on the superuser trait and its privileges.
2. Search for the user account you want to copy—that is, use as a
template.
3. Select the User ID when it appears in the search results list.
4. Click Copy. The User ID should appear to the right of the button.
When no template is selected for copying, the words, “No template
set,” appears to the right of the Copy button.
85
Chapter 4 Users
You are now ready to create a new user account and copy the user traits, or
copy the traits to an account that already exists in the system.
Creating a New User Account
To add a new user account:
1. Select Tools > Options > Users.
The Manage User Accounts dialog box appears as shown in Figure 8
on page 85.
2. Click New User.
The Add New User dialog box appears.
3. In the User ID field, enter the login name of the user account.
4. (Optional) In the User Name field, enter the user’s real name.
5. Do one of the following:
t
86
Click the appropriate check boxes for the user traits you want to
set. See “User Traits” on page 63 for more information.
Searching for User Information
The Get from Template
button is enabled when
a user account is
selected as a template
via the Copy button on
the Manage User
Accounts dialog box.
t
Click the Get from Template button to copy traits for another predefine user account. See “Copying User Traits to Another User
Account” on page 84 for more information.
6. Click Add to add the new user account.
Enabling a New User to Receive Mail
This section gives you the basic steps you need to follow to enable a new
user to receive mail. If you need more information, refer to the information
on groups in Chapter 6.
To enable a new user to receive mail:
t
Add the user to a group in SYSTEM.GROUPS. When the group story
is saved, the mail delivery files are updated automatically.
A group story is one that you created in the system for groups in your
organization such as newscasters, staff, or reporters. By adding the
user to a group, the user inherits the security traits that were set up for
that group.
Searching for User Information
A search capability in iNEWS NRCS enables you to search for
information about a particular user by specifying a user name and
including certain criteria to refine the search. You can specify any
alphanumeric characters in the search. You can use the asterisk (*), which
acts as a wildcard, only as a suffix—not as a prefix or in the middle of a
word. Used alone, the wildcard is equivalent to “all.” Used with additional
information, the wildcard serves as a parameter to the search.
For instance, if you are searching for all user accounts beginning with
Dave, type Dave* (no space).
87
Chapter 4 Users
To search for information about users:
1. Select Tools > Options > Users.
The Manage User Accounts dialog box appears.
2. Type the name of the user in the User ID field and click Search.
If you search with a wildcard character and the system finds multiple
matches, a results box appears listing all “hits”. You can specify one by
double-clicking on it; this opens the specified user’s information in
another dialog box.
The results of the search appear in the User List field in the center of
the dialog box.
To quickly locate a name in the User List, type the name you want; the
list will be positioned to a point matching what you type. User names
are not case-sensitive, so you can use lowercase. To prevent you from
having to type the whole name, the system automatically tries to match
the letters you supply with a name in the list. Continue typing until the
system locates the name you want.
3. Click Advanced to refine your search for a user.
88
Searching for User Information
The Advanced Search Settings dialog box appears with the All Users
setting selected by default.
4. Select from the settings to specify additional search criteria. The
criteria options are explained in detail below.
Advance Search Criteria
Setting
Description/Choice
All Users
Search through all user accounts on the server.
Superusers
Confine the search to user accounts with the
superuser attribute.
Non-Superusers
Confine the search to user accounts without the
superuser attribute.
Blacklisted Users
Confine the search to user accounts with the
blacklisted attribute.
Non-Blacklisted Users
Confine the search to user accounts without the
blacklisted attribute.
89
Chapter 4 Users
Setting
Description/Choice
Members of Group
Confine the search to user accounts belonging to the
security group you select from the drop-down list.
Users Without Password
Confine the search to user accounts that do not have
passwords.
Simplified Users
Confine the search to user accounts that have the
simplified user trait.
Non-Simplified Users
Confine the search to user accounts that do not have
the simplified user trait.
Date Range
Confine the search to dates you specify in the From
and To fields and the kind of date range:
When the user last logged in
When the user account was created
When the password changed
Specify the date by either clicking the arrow buttons
or typing the dates in ddmmmyyyy format. Indicate
the day with two digits, the month with three letters,
and the year with four digits.
5. Click OK to confirm your advanced search setting or click Cancel to
cancel it.
6. Click Search to initiate the search.
A progress bar appears if a lengthy search is underway.
The results of the search appear in the User List field in the center of the
Manage User Accounts dialog box.
Above the field, iNEWS NRCS will display a brief statement indicating
what matched the search criteria, such as:
All users matching ‘*‘:
90
Removing User Accounts
Use the horizontal scroll bar at the bottom of the User List field to view the
information headings, such as User Name, Last Login, Read Rate, and so
forth.
Removing User Accounts
You must have access to the Manage User Accounts dialog box to remove
user accounts. In other words, you must be logged on as a system
administrator—that is, with an account that has superuser privileges—or
successfully enter the user manager (umanager) password to remove user
accounts.
n
Before removing user accounts from the system, remove the users’ names
from the stories in SYSTEM.GROUPS. This reduces the potential for mail
bounce back errors.
To remove user accounts:
1. Select Tools > Options > Users.
The Manage User Accounts dialog box appears. See Figure 8 on
page 85.
n
If you are logged on as a system administrator, the Manage User Accounts
dialog box will appear automatically, following step 1. Otherwise, iNEWS
NRCS will prompt you for the umanager password (if that account exists in
the system) before allowing access to the dialog box.
2. Enter the user name in the User ID field.
3. Click Search or press Enter. The results of the search appear in the
User List field.
4. Select the name of the user you want to remove by clicking the name
in the User List field.
5. Click Remove.
6. Click OK to remove the user or Cancel to stop the removal.
91
Chapter 4 Users
n
After removing the user, you will also need to remove the user’s Home
directory and the Notes and Mail queues by deleting them from the
system’s database file structure.
The User Manager Account
A user manager has some special system privileges, but not as many as a
system administrator/superuser. For instance, user managers can add,
remove, or change any user account, except those with the superuser
attribute.
There can be only one user manager account in iNEWS NRCS; however,
several users may acquire user manager privileges by successfully entering
the user manager password when prompted. Unlike a superuser account,
the user manager account is not used to log in to the system. Users with
user manager privileges log in to their own accounts, as usual. When they
need to do user manager tasks, they must access the Manage User
Accounts dialog box, by typing in the user manager password.
To create a user manager account:
1. Create a user account as explained in “Adding a New User Account”
on page 84.
2. Give the account a User ID: umanager.
3. Assign a password to this account.
4. Make the umanager account blacklisted so that no one can use it to log
in.
5. Assign the account superuser status to prevent a user manager (or
anyone who is not a superuser) from changing its password.
6. Tell user managers the password for the umanager account.
c
92
For further security, a write-access group should be assigned to
SYSTEM.GROUPS and only those with user manager privileges should
be included in the group. If no write-access group is assigned to
SYSTEM.GROUPS, then all users who know the umanager password
can access the Manage User Accounts dialog box by selecting Tools >
Options > Users. After a write-access group is set up, any user
The Database Manager Account
managers with nonsuperuser accounts must be included in the writeaccess group for SYSTEM.GROUPS or they will not be allowed access
to the Manage User Accounts dialog box. See “Groups Tab” on
page 129, “Users as Members of a Group” on page 166, and
“Restricting Both Reading and Writing” on page 177 for more
information.
The Database Manager Account
A database manager has some special system privileges, but not as many as
a system administrator/superuser. For instance, database managers can
add, remove, or change any database trait to a directory or queue in the
iNEWS NRCS database from a workstation. Database managers also have
access to the CG Template Editor, used to create and modify template for
the Title Entry feature.
There can be only one database manager account in iNEWS NRCS;
however, several users may acquire database manager privileges by
successfully entering the database manager password when prompted.
Unlike a superuser account, the database manager account is not used to
log in to the system. Users with database manager privileges log in to their
own accounts, as usual. When they need to do database manager tasks,
they must access the Directory/Queue Properties dialog box. To modify
anything in the dialog box, they must provide the database manager
password.
To create a database manager account:
1. Create a user account as explained in “Adding a New User Account”
on page 84.
2. Give the account a User ID: dbmanager.
3. Assign a password to this account.
4. Make the dbmanager account blacklisted so that no one can use it to
log in.
5. Assign the account superuser status to prevent a user manager (or
anyone who is not a superuser) from changing the dbmanager
password.
93
Chapter 4 Users
6. Tell database managers the password for the database manager
account.
Logging Out All Users
Sometimes maintenance of the iNEWS system requires you to first log out
all users before completing a certain task, such as shutting down the
system. This section explains the best way to log out all users from the
console.
To log out all users:
1. Select all servers. See “Selecting Servers” on page 33 for more
information.
The offline command
prevents users from
logging in.
2. Take the system offline by typing: offline
Use offline silent if you want to suppress output of messages
from new user login attempts.
3. Use the broadcast command to send a message warning all users that
are logged in that they must log out and why. If the system will be shut
down, include the time it will be shut down. Here are a few examples:
NRCS-A$ broadcast WARNING\! System shut down at 12PM
NRCS-A$ broadcast LOG OUT\! System shut down in 5 min.
NRCS-A$ broadcast -d LOG OUT\! Shut down in 10 seconds.
n
The backslash (\) before the exclamation point (!) is required because the
exclamation point is a reserved character in Linux.
You may add -d after broadcast and before the message if you want
your message to appear at the workstation as a popup message.
4. At the specified shutdown time, check the system for any users still
logged in by selecting one server and typing: list s
94
Logging Out All Users
A message similar to the following appears:
G505 miller
A
G500 allen
B
G507 stevens
R801 stevens
A
A
The list s command lists:
•
The device controlling the session
•
The user account used for the session
•
The server servicing the session
5. Check the system for any connect session users, by typing: list s
If there are any connect session users, a message similar to the
following will appear:
G507 stevens
R801 stevens
A
A
Connect session will show up as an ‘R’ device. The system
administrator must notify them of the shutdown by some other means,
such as by telephone.
c
You must ensure that all users are logged out if shutting down the
system. If a user is in a connect session when the system is shut down,
the user’s workstation stops, the session is disconnected, and any
unsaved work is lost. Ensure any connect session users have logged out
before you continue the shutdown procedure.
6. Select all servers.
7. Log out all users by typing: logout all
n
If a user is editing a story, the system saves the file and then logs out the
user. The command will not log out users who are in connect sessions.
95
Chapter 4 Users
96
Chapter 5
Stories Queues, and
Directories
All relevant iNEWS information—except the system software and the
Linux files—is stored in the iNEWS NRCS database. This database
contains scripts, rundowns, e-mail, messages, users, groups and their
memberships, and any other kind of information that is entered into the
system. Some database maintenance, such as altering the database file
structure and traits, can be done from the console or from any iNEWS
Workstation. This chapter focuses on maintenance tasks at the workstation
when possible. However, when a task can be done at both the workstation
and console, the console information is provided as an appendix in this
manual. See procedures for using the console in Appendix G.
This chapter contains the following main sections:
•
Overview
•
Adding a Directory or Queue
•
Viewing Database Traits
•
Changing Database Traits
•
Database Traits Summary
•
Locking and Unlocking
Chapter 5 Stories Queues, and Directories
Overview
The iNEWS NRCS database is where all the data, such as scripts,
rundowns, user accounts, and so forth, are stored. The database is
structured in a way to promote ease of maintenance. For instance, it
contains a file structure made up of directories, that contain other folders or
queues, which in turn contain stories. It works similar to a filing cabinet.
Stories with text and
production cues are
in queues.
Queues are stored in
directories.
Directories contain queues
or other subdirectories—
also known as sub-folders
—and make up the root of
the database file structure.
In iNEWS NRCS, the database file structure can be seen (depending on
your access privileges) in the Directory panel of the iNEWS Workspace.
Directories, also known as folders, are
indicated by manila folders, such as this
People directory.
Queues are indicated by three
overlapping pieces of paper, such as
this Mail queue.
98
Adding a Directory or Queue
The scripts, notes, e-mail, news stories, and other kinds of information are
all called stories; each story is associated with a particular queue, and each
queue with a single directory. A directory can also be contained within
another directory in which case it would be called a subdirectory or subfolder of that directory.
Directories and queues have database traits that determine how the system
manages the stories they contain, and also what actions users can perform
with those stories.
For instance, by modifying the database traits of a particular queue, you
can:
•
Set its stories to read-only
•
Restrict who can read them
•
Enable the system to routinely purge stories in the queue that are older
than a certain number of days
Database traits are used in conjunction with the user traits discussed in
Chapter 4. For instance, stories in a queue with a security restriction set as
a database trait can be read only by users whose user traits include the
appropriate security level.
Adding a Directory or Queue
Before you can modify the database traits of queues or directories, the
queues and directories must exist in the database. If they do not, you can
create them from the iNEWS Workstation.
A Few Restrictions:
There are certain restrictions you should be aware of when creating new
directories and queues.
•
The total path name of a directory, including the separator characters
(.), cannot exceed 60 characters.
•
The total path name of a queue, including the separator characters (.),
cannot exceed 62 characters.
99
Chapter 5 Stories Queues, and Directories
n
•
Each branch of a path name—that is the name between
periods—cannot exceed 20 characters.
•
The number of directory levels available is limited to 31.
•
You cannot use a space or period in directory or queue names.
•
The system has a limit of 250 queues per directory.
The 250 limit also applies to first-level sub-folders in a directory. If you
need more than 250 in a directory, such as personal employee folders,
create alphabetic sub-folders on the first level, then place the personal
folders in the matching sub-folder. For instance, in a given directory, you
could have 26 sub-folders, each with one of the 26 letters of the English
alphabet as a name. This enables you to have 250 personal folders in each
of the 26 alphabetic sub-folders; that’s enough personal folders for up to
6,500 employees. See “Creating a New User Area in the News Database”
on page 82 for more information.
While punctuation marks can be used in path names, Avid recommends
their use be limited to dashes and underscores only to avoid confusion for
FTP clients, like teleprompters, accessing the database.
Ordinarily, directories and queues are listed in alphabetical order within
their parent directory. However, you can add items to a directory in a
different order. For instance, if you had directories for each month in the
Futures directory, you would want them to appear in order by month
(January, February, and so on). To do this, turn on the sequential database
trait for the parent directory before you create the new items. See
“Database Traits Summary” on page 120 for more information.
100
Adding a Directory or Queue
Creating a New Directory
To create a new directory (folder):
1. Log in as a system administrator unless you have write-access to the
parent queue or directory. This ensures that you have full access to the
database.
2. Using the database file structure in the Directory panel of the iNEWS
Workspace, select the directory under which you want the new folder
to be created, as shown in the following example.
For instance, you could select the Shows folder if
you want to add a new directory for a 10 PM show.
After the new sub-folder (10P) is created, you can
create queues or additional sub-folders in it.
n
If you are creating a new first-level directory, be sure to select the server
rather than a directory (folder).
3. Do one of the following:
t
Select Tools > New Folder.
t
Right-click on the directory—or server, if you are creating a new
first-level folder—in the Directory panel, and choose New Folder
from the pop-up menu.
101
Chapter 5 Stories Queues, and Directories
A new folder is created under the selected folder. The New-Folder
appears at the end of the list of existing folders.The title, New-Folder,
is highlighted, so you can rename it.
4. Type the name of the new folder, such as 10P.
5. Press Enter to save the new folder name. The newly created folder will
inherit the database traits of its parent directory initially. You can open
the new folder by double-clicking on it.
n
102
Once created, directories cannot be renamed from the iNEWS Workstation.
If you incorrectly name a newly created directory, delete it and recreate it
with the appropriate name.
Adding a Directory or Queue
Creating a New Queue
To create a new queue, such as the Rundown and Master queues for
the 10PM show:
1. Navigate to and select the directory (folder) created to hold the queue
you want to create.
Select the Shows folder, then the 10P folder, if you
want to add a new queue for a 10PM show. The new
queue will be created in the 10P folder.
2. Do one of the following:
t
Select Tools > New Queue.
t
Right-click on the folder in the Directory panel, and choose New
Queue from the pop-up menu.
103
Chapter 5 Stories Queues, and Directories
A new queue appears under the folder you selected. The New-Queue
appears at the end of the list of existing queues.The title, New-Queue,
is highlighted, so you can rename it.
3. Type the name of the new queue, such as RUNDOWN or MASTER.
4. Press Enter to save the new queue name. The newly created queue will
inherit the database traits of its parent directory initially. You can open
the new queue by double-clicking on it.
n
Once created, queues cannot be renamed from the iNEWS Workstation. If
you incorrectly name a newly created queue, delete it and recreate it with
the appropriate name.
Setting up the Outgoing Mail Queue
When someone sends e-mail, the first thing your system does is move the
mail to the outgoing mail queue, usually called SYSTEM.MAIL.OUT.
104
Adding a Directory or Queue
n
Mail always uses the
form that is assigned to
the outgoing mail
queue. See “Mail
Form” on page 230 for
more information.
The outgoing mail queue’s name is defined in /site/dict/queues.
When your system was installed, the outgoing mail queue was defined in
this dictionary as SYSTEM.MAIL.OUT. To change this name, modify the
dictionary entry in /site/dict/queues. The token used to define the outgoing
mail queue is Q_MAILOUT.
After mail arrives in that queue, a utility program known as the mail server
processes and sends it to its intended destination. If the outgoing mail
queue, SYSTEM.MAIL.OUT, does not exist in the System directory, the
mail server cannot distribute e-mail. To create this queue, follow the
instructions provided in “Creating a New Queue” on page 103, making
these adjustments:
•
The queue’s name should be “Out.”
•
The queue should be located in the Mail folder, which is in the System
directory. If the Mail folder (directory) does not exist, create it. See
“Creating a New Directory” on page 101 for more information.
Moreover, the Out queue’s read group must be set properly for the mail
server to process mail correctly. See “Read Group” on page 174 for more
information. Although not required, you can restrict read permission for
the queue SYSTEM.MAIL.OUT to a group that has no users. Doing so
does not interfere with anyone’s ability to send e-mail, but it prevents
anyone (except superusers) from reading mail that is in
SYSTEM.MAIL.OUT waiting to be processed. See “Restricting Both
Reading and Writing” on page 177 for more information.
Also, for your system to notify the mail server when new mail arrives in
SYSTEM.MAIL.OUT, that queue must have the same mailbox number
assigned to it as the mail server. If the queue does not have a mailbox or
has an incorrect one, your system has no way to notify the mail server
when there is mail to process. See “Mailbox section” on page 134 for more
information.
n
The mailbox number is not solely related to e-mail. This database trait lets
you link a queue to a server (utility program) so that the system notifies the
server program when stories are added to or edited in the queue. See
“Mailbox section” on page 134 and Chapter 13 for more information.
105
Chapter 5 Stories Queues, and Directories
Setting up the Dead Letter Queue
Your system must also have a dead letter queue, usually called
SYSTEM.MAIL.ERROR. This queue is a final destination for any e-mail
that your system is unable to deliver to the addressee or return to the
sender.
n
The dead letter queue’s name is defined in /site/dict/queues as
SYSTEM.MAIL.ERROR. To change the name of the queue, modify its
dictionary entry in /site/dict/queues.
If SYSTEM.MAIL.ERROR does not exist, any mail that the mail server
cannot deliver or return to the sender is put in the Dead queue. To create
this queue, follow the instructions provided in “Creating a New Queue” on
page 103, making these adjustments:
•
The queue’s name should be “Error.”
•
The queue should be located in the Mail folder, located in the System
directory. If the Mail folder (directory) does not exist, create it. See
“Creating a New Directory” on page 101 for more information.
Returned mail may contain sensitive information. Therefore, restrict read
permission for SYSTEM.MAIL.ERROR to a group that has no members.
Then, only superusers can read mail in the queue. See “Read Group” on
page 174 for more information. Examine the queue occasionally to see
whether any mail exists.
Creating a New Story
To create a new story in a queue:
1. Navigate to the queue in which you want to create a story.
2. Open the queue by double-clicking on it.
3. Press the Insert key. A new story is inserted at the top of the queue.
106
Adding a Directory or Queue
Removing a Directory or Queue
If a queue or story is locked, unlock it first before removing it from the
database.
Also, each directory or queue should be empty of other directories, queues,
and stories, before it is removed, but it is not required.
c
If a directory contains sub-folders or queues when you attempt to
remove it, iNEWS NRCS will prompt you for confirmation. If you
affirm the remove command, the directory and all its contents will be
removed from the system. Caution should be taken so that sub-folders
and sub-queues are not inadvertently removed.
To remove a directory or queue from the database:
1. Log in as a system administrator unless you have write-access to the
queue or directory.
2. Select the directory or queue you want to remove.
3. Do one of the following:
t
Select Tools > Remove Folder (or Remove Queue).
t
Right-click on the directory or queue, then select Remove Folder
(or Remove Queue) from the pop-up menu.
Renaming a Directory or Queue
You cannot change the name of a directory or queue from an iNEWS
Workstation. However, you can rename one from the console. All traits are
preserved when a folder or queue is renamed.
c
Do not rename queues on an active database. Do not run directory or
queue modification console commands (such as dbvisit or dbtraits) at
the same time as the rename command.
107
Chapter 5 Stories Queues, and Directories
To rename a directory or queue in the database:
1. At the console, enter superuser mode.
2. Select all computers. See “Selecting One or More Servers” on page 33
for more information.
3. Take the system offline, by typing the command: offline
4. Broadcast a message instructing users to log out.
5. Logout all users on the system, before renaming a queue or directory.
This ensures that no stories are open for editing and no devices are
running while rename is executing.
c
If users are not logged out, changes to stories may not be saved after
the queue or directory is renamed. It is often most efficient to make
several name changes at once. See “Logging Out All Users” on page 94
for more information.
6. Type: stop all. This command stops running all utility
programs—known as servers—wire programs, and devices.
7. Select one computer.
8. Type the rename command to rename the folder or queue. Use the
following format:
rename
[-v|-r]
<from>
<to>
For instance, to rename your People folder to PEOPLE.STAFF, select
one computer and type:
NRCS-B# rename people people.staff
A message similar to the following appears:
Do you really want to rename
PEOPLE
and all its sub-directories to PEOPLE.STAFF ?
56 records will be modified [y/n]:
To display a console message for each renamed folder and queue,
include the -v (for verbose) option with the rename command, such as:
NRCS-B# rename -v people people.staff
108
Adding a Directory or Queue
c
If an attempt to rename a folder or queue was interrupted by a system
crash, complete it by re-entering the same command with the -r
option. Use this option only to resume an interrupted renaming—at
any other time, its use will corrupt the database.
9. To continue with the renaming, type: y
A message similar to the following appears:
56 records will be modified [y/n]: y
Adding new directories...
Updating directory names...
56 directories renamed
1 directories added
The system verifies that the queue or folder you specified exists, and it
creates new folders necessary to complete your command (such as
STAFF in this example). If you choose a pathname over 63 characters,
the following appears:
TO: name too long
n
Before modifying files, the system checks for name length overflow. If any
of the directory/queue names exceed their maximum length, no changes are
made.
10. A verification request appears:
Do you want to update the user file (MAIL, HOME, DEST)?
[y/n]:
The user file is where the names of users’ mail queues, home folders,
and automatic destinations are stored. If you answer y, any item
affected by renaming is changed automatically. If you answer n, you
must change them yourself. Typically, answer y.
Do you want to update the user file (MAIL, HOME, DEST)?
[y/n]: y
23 user records modified
11. Manually update any other references on the iNEWS system to the
renamed folders.
109
Chapter 5 Stories Queues, and Directories
c
Update the references while the system is unavailable to users. Failure
to update any references affected by renaming a folder or queue can
cause problems with system operation.
These references can include:
•
Command bar icons set up by users
•
Your system’s service table
•
Dialogs
•
Keyboard description stories
•
Server or Rx/Tx link job lists
•
Wire distribution or keyword stories
•
Your system’s queue dictionary (/site/dict/queues)
12. Select all servers.
13. Restart all devices by typing: restart
You will see Hot-to-go messages as each device starts.
14. Bring the system back online by typing: online
This allows users to log in.
15. Exit from superuser mode by pressing Ctrl+D.
Viewing Database Traits
You can get information about your iNEWS database from both the
iNEWS console and workstations. Which one you use depends on what
information you want.
From the iNEWS Workstation...
To get database information on a specific directory or queue from an
iNEWS Workstation:
1. Log in to iNEWS NRCS at an iNEWS Workstation.
2. Open an iNEWS Workspace.
110
Viewing Database Traits
3. Navigate to the directory or queue you want in the Directory panel.
4. Right-click on the directory or queue name.
5. Select Properties in the pop-up menu.
The Directory/Queue Properties dialog box shows you the properties
(traits) for the directory or queue you selected; however, its look may
vary. For instance, the Locks tab does not appear when viewing
properties of directories. If you are not logged in as a system
administrator, and a database manager account was not created in
iNEWS NRCS, the dialog will appear like this:
The options in the dialog box appear gray, indicating they are for
viewing only and cannot be altered. So, any user can view the traits of
directories and queues in the iNEWS database from a workstation.
From the iNEWS Console
To get information about stories in your iNEWS database, or to view a list
of database traits for several directories or queues at once, you can use the
list command at your console:
111
Chapter 5 Stories Queues, and Directories
•
list d <folder/queue name> provides information about
directories or queues
•
list q <queue name> provides information about stories in
queues.
Both of these commands have a verbose option, such as list d-v,
that gives you more detailed information. For instance, a verbose
list, such as list q-v, includes read and write group information
for each story in the queue. Read and write groups are explained in
Chapter 6. Also, see Appendix G.
Sending Output from the List Command to a Printer
Sometimes you may want a printout of database traits assigned to certain
queues and directories. This can be done at the console.
To send the output from list d or list q to a system printer (PCU
serial port), precede the command with print and the printer number. Use
the same printer number you use when printing from an iNEWS
Workstation.
For instance, to send to printer 4 a list of the traits for the Rundowns
directory and all the subdirectories and queues in that directory, type:
print 4 list d rundowns
If you use a non-existent printer number in the command, the resultant
print story will be placed in the DEAD queue where you may retrieve it.
The print command works with any variation of the list command or
with any command that generates output on the console screen.
Getting Information about Stories
The list q command lists story information for any of your system’s
queues. The basic format of the command is as follows:
list
n
112
q
<queue name>
[<record limit>]
The <record limit> specifies the number of stories from the queue you
want to list. Queues may contain thousands of stories so a command
without a specified <record limit> may scroll large amounts of output.
Viewing Database Traits
For instance, to limit the list to the first three stories in
PEOPLE.CAROLYN.NOTES, type:
list q people.carolyn.notes 3
A message similar to the following appears:
PEOPLE.CAROLYN.NOTES.SEARCH id=449889
rec quick index
LHDM-WObfpRmF f.id
time
2
pm-chronology --DM-W------- 457243 165
3
pm-thumbnails --DM-W------- 487595 163
modified-time
Jul 10 16:16:39 2000
Jul 10 16:21:17 2000
By default, the stories are listed in chronological order, with the oldest
story first.
To list information for a particular story, use this format:
list qindex=<index value> q <queue name>
The index value is the value of the selected sort field of the story you want
to list. This value is typically the text found in the title field, but you can set
different fields as the index field. The quick index value must be a single
word, with no spaces, and can be uppercase or lowercase.
For instance, to get story information for a story called Nomad in the queue
PEOPLE.SMITH.NOTES, type:
list qindex=nomad q people.smith.notes
A screen similar to the following appears:
PEOPLE.SMITH.NOTES id=449889
rec quick index
LHDM-WObfpRmF
3901 bc-exp--nomad --DM---------
f.id
time
420690 165
modified-time
Jul 6 20:23:11 2000
In this example of the story in PEOPLE.SMITH.NOTES, the D and M
flags appear, indicating the story is duplicated and has the modified flag
set.
113
Chapter 5 Stories Queues, and Directories
The one-letter flags (LHDM-WObfpRmF) after the quick indexes provide
current status information. The flags are:
L
H
D
M
W
O
Locked
Held
Duplicated
Modified
--------Wire
Ordered
b
f
p
R
m
F
Story’s body (text) is edit locked
Story’s fields are edit locked
Story’s production cues are edit locked
Read-only
Mail
Floating
You cannot change any of these flags from the console, except the editlocked status, which you can remove from a story with the unbusy console
command. For instructions, see “Unbusy Stories and Queues” on page 149.
Finding out Who Moved, Duplicated, or Killed a Story
To list the last person to move, duplicate, or kill a particular story in a
queue, use this format of list q:
list qindex=<search word> q-mb <queue name> <record limit>
Since the Index field is typically the field containing the story’s title (slug),
it can be used as the <search word>.
The <search word> is a word from the Index (sort) field of the story. It
must be a single word, with no spaces. It is not case-sensitive. The
<record> is the numerical limit of stories provided in response to your list
command—for instance, the most recent stories killed in the Dead queue.
To list this information for each story in a queue when you do not know a
word in the Index field—the story’s title—use this format:
list
q-mb <queue name> <record limit>
The b in the command is optional. The difference between list q-mb
and list q-m is:
114
list
q-m
lists begins at the oldest story in the queue
list
q-mb
lists from the most recent material in the queue,
Viewing Database Traits
such as the most recently killed stories in Dead.
You can also run the command without the m to see the date and time
stories were moved, duplicated or killed. For instance, type:
list q-b dead 5
A screen similar to the following appears:
DEAD id=123231
rec
quick index
LHDM-WObfpRmF
0
---M--O-----1
kyw-directors --DM--O-----
f.id
time modified-time
314490 0
Sep 6 09:51:58 2000
313587 15
Sep 5 11:47:33 2000
-2
a
---M--------
161746 11
-3
sep 2000
---M--------
314093 0
Sep 5 17:34:19 2000
-4
008
--DM--O-----
313555 600
Sep 5 16:49:24 2000
Sep 6 09:15:06 2000
Here is an example of how to obtain the five most recently killed stories in
dead:
list q-mb dead 5
A screen similar to the following appears:
DEAD id=123231
rec
quick index
LHDM-WObfpRmF f.id
0
---M--O----- 314490
-1
kyw-directors --DM--O----- 313587
time user name
0
palmer
15
williams
-2
a
---M-------- 161746
11
-3
sep 2000
---M-------- 314093
0
-4
008
--DM--O----- 313555
600
adbpurge
ragusa
As shown in the example, some stories may be sent to the Dead queue by
system processes, such as the automatic dbpurge (adbpurge). Lines without
names are old versions of stories that were not written in the database by a
user; for instance, they may have been put in the database through txnet.
Here is an example of how to get information for a story called “Camera”
in the ASSIGNMENTS.MONDAY queue:
list qindex=camera q-m assignments.monday
115
Chapter 5 Stories Queues, and Directories
A screen similar to the following appears:
ASSIGNMENTS.MONDAY id=14569
rec
quick index
LHDM-WObfpRmF f.id
0
camera
--DM-------- 16217
time user name
274
williams
Williams was the last person to move, duplicate, or kill this story;
list q-m does not make any distinction between these actions. Killed
stories can reside only in the Dead queue, while duplicated stories will
have the D flag on their listing, as shown in the previous example.
n
If a utility program, such as a server or link, moves, duplicates, or kills a
story, its device number is listed in the list q-m or list q-mb
display.
When using the list command, long list results will scroll out of sight on
the console screen. Since you may need to search through a long list of
stories, such as 5000 in the Dead queue, you can redirect the output of the
list command to a file in the database. For instance, the follow example
redirects output to a user’s Notes queue.
NRCS-A# list q-mb dead 5000 | doc pu people.p.palmer.notes
Recovering a Killed Story
You can recover a story that has been killed—moved to and currently
resides in the Dead queue—from any iNEWS Workstation.
To retrieve a story to the database from the Dead queue:
1. Log in as a system administrator—that is, with a superuser account.
This ensures you access to the Dead queue. On most systems, access to
the Dead queue is restricted.
2. Navigate to the Dead queue in the Directory panel and open it by
double-clicking on it.
The Dead queue cannot
be indexed, so do not
use the Fast Text
Search feature.
3. Locate the story that you want to recover in the Dead queue, by
scanning the list of stories displayed in the Queue panel for the story
title (slug) or using the Find or Find All command.
4. Select the story or stories you want to retrieve by doing one of the
following:
116
Changing Database Traits
t
Click on the selector button located to the left of the story’s row in
the Queue panel. The entire row is highlighted when selected.
t
Move cursor to row and press Shift-Spacebar.
t
Click on each row while holding down the Control (Ctrl) key to
select multiple stories. The Shift key can be held down if you want
to select all story rows between two mouse clicks.
5. Copy the selected story (or stories) to the new location by doing one of
the following:
t
Click on and drag the highlighted selection to another queue in the
Directory panel and release. The selected stories will be copied to
the new queue location.
t
Use the Copy and Paste buttons or the Edit menu options to copy
and paste the highlighted selection into a new queue location.
t
Use the Duplicate command to copy the highlighted selection to
another location—particularly if the Dead queue is read-only.
Changing Database Traits
You must be logged on as a system administrator—that is using an account
with the superuser trait—or provide the database manager (dbmanager)
password to change database traits of directories and queues. For more
information on dbmanager, see “The Database Manager Account” on
page 93.
As the system administrator, you can alter database traits of a single
directory (folder) or apply your changes to any subdirectories or queues in
that parent directory as well.
When you change a directory’s traits from a workstation, the changes only
affects the directory you selected, unless you specify otherwise. This is
directly opposite to what happens when changing database traits at the
console. See Appendix G for more information.
n
Avid recommends you ensure that no users are working in a directory or
queue prior to altering the database traits of that directory or queue.
117
Chapter 5 Stories Queues, and Directories
To change database traits:
1. Navigate to the directory you want to change in the Directory panel of
the iNEWS Workstation.
2. Right-click on that directory.
3. Select Properties from the pop-up menu. One of two things will
happen, which will determine what you are to do next.
t
If you are logged on as a system administrator, the Directory
Properties dialog box will appear. Go to step 5.
t
If you are not logged on as a system administrator, the Directory
Properties dialog box will appear in read-only mode—that is, all
the fields in the dialog box will be gray, which indicates they are
for viewing only. Go to step 4.
4. Click on the dbmanager login button (located at the bottom left corner
of the dialog box) to gain access to change traits in the dialog box.
118
Changing Database Traits
The system will prompt you for the database manager password. Fill it
in, click OK.
The Database Manager Password dialog box disappears, and the
dbmanager login button in the Directory Properties dialog box is
replaced with a check box. Go on to step 5.
119
Chapter 5 Stories Queues, and Directories
If you are altering the
traits of a queue, you
can skip step 5
completely because the
Apply changes... check
box does not apply and
will not appear in the
Queue Properties
dialog box.
n
Selecting and/or
unselecting check
boxes in the
Directory/Queue
Properties dialog box
does not apply changes
immediately. Only step
7 does that.
5. Do one of the following:
t
Click on the check box labeled Apply changes to all subdirectories
and queues, if you want the changes you make to apply to all
queues and subdirectories in the parent directory.
t
Do not select the Apply changes... check box, if you only want to
change the traits of the chosen directory. The database traits are
applied only to the directory selected when the Directory
Properties dialog box opened.
Selecting the Apply changes... check box does not apply the new settings at
that point. It just indicates whether you intend to apply them to all
subdirectories and queues. Also, when you apply your changes to all
subdirectories and queues, those changes are not immediately apparent at
all workstations. Users should log off and back on to see the changes.
6. Make changes to the various traits as needed. These traits are
explained in detail in the next section of this chapter.
7. Click OK to save changes & apply settings.
Database Traits Summary
Assigning traits can be done from the iNEWS Workstation as well as the
console. For information on viewing and altering database traits from the
console, see Appendix G.
On the iNEWS Workstation, the database traits are grouped together on
various tabs in the Directory/Queue Properties dialog box. This section
provides a detailed description of the dialog box, tabs and database traits.
In some cases, traits offer a selection of options, such as what read group is
assigned to a queue. These traits are usually shown as drop-down lists in
the dialog box. In other cases, traits are either assigned to a queue or
not—that is, the trait is “turned on” or “turned off.” These traits are usually
shown as check boxes in the dialog box.
120
Database Traits Summary
Directory/Queue Properties Dialog Box
The appearance of the Directory/Queue Properties dialog box’s changes
slightly, depending on whether you choose to view properties for a queue
or a directory. First, the dialog box’s title bar will appear different,
indicating that choice—either Directory Properties or Queue Properties.
Other differences include check boxes and tabs. For instance, the Apply
changes... check box—shown at left—only appears in the bottom left
corner of the Directory Properties dialog box. Also, the Ordered check box
only appears in the right column of the Forms tab in the Queue Properties
dialog box.
The number of tabs varies as well, depending on whether you choose to
view properties for a queue or a directory.
The tabs are:
•
Forms
•
Groups
•
Abstract
•
Maintain
•
User Interface
•
Locks (This tab only appears for Queue properties.)
Each tab is explained in the following sections.
121
Chapter 5 Stories Queues, and Directories
Forms Tab
The Forms tab is unique because it is the only tab that allows access to
certain items even when a user is connected to a local database, as opposed
to the mirrored database on the system’s servers.
n
122
If you are connected to a local database on your workstation, you can still
change the queue and story form selection using the drop-down lists.
However, all other traits in the Directory/Queue Properties dialog box will
appear gray, indicating access to them is read-only.
•
Queue
– The Queue drop-down list, allows you to select a
form used to display information in the Queue
panel. The form defines what fields appear, which
should be a sub-set of the fields used in the story
form. A field included in the queue form that does
not actually exist in the story form cannot be
written to in the Queue panel. When !<none> is
selected, no form is applied. This drop-down list is
the equivalent of the database trait (dbtrait),
qform, at the console.
•
Story
– The Story drop-down list, allows you to select a
form used to display information in the form fields
of the Story Form panel. When !<none> is
Database Traits Summary
selected, no form is applied. This drop-down list is
the equivalent of the dbtrait, sform, at the
console.
•
n
Index Field
– The Index Field drop-down list, allows you to
select a form field used if a queue is sorted
(usually the Title field, also known as Slug
field). Additionally, the cursor is placed on
this form field by default when a user
displays stories in a queue. This drop-down
list is the equivalent of the dbtrait,
sortfield, at the console.
The optional fields in the Index Field drop-down list depend on the form
selected in the Story drop-down list on the Forms tab. For instance, if you
select a story form that only contains two fields, such as Title and Writer,
then those two fields will be the only options listed in the Index Field dropdown list.
•
Update existing...– The Update existing stories to use story form
check box, when selected, changes the story form
assignment for previously existing stories within a
queue. This check box is the equivalent of the
dbtrait, cform, at the console.
•
Strip embedded...– The Strip embedded form info for existing
stories check box, when selected, removes
embedded form traits from stories. For
instance, queues with the Forms Allowed
trait stamps the look of the story form into the
story. Assigning a different story form to one
of these queues and selecting Update
existing... check box will not affect the look of
stories with the embedded forms. You would
need to strip the embedded “look” from the
story so it would then use the form assigned
to the queue it is in. This check box is the
equivalent of the dbtrait, stripform, at the
console.
123
Chapter 5 Stories Queues, and Directories
n
124
The Update existing... and Strip embedded... check boxes are not database
traits, but rather, they are used to apply current settings and/or changes in
the dialog box at present. This means they will always appear unchecked
when the dialog box opens, and they will not appear at all if the
Directory/Queue Properties dialog box is opened in read-only mode.
•
Forms Allowed – The Forms Allowed check box must be assigned to
all queues in the Forms directory. The forms will
not work without this database trait applied.
Additionally, this trait can be assigned to any
queue in the database, but is usually only assigned
to other queues that receive stories from other
systems via rxnet/txnet and then build forms
for those stories, as needed. This check box is the
equivalent of the dbtrait, +f|-f, at the console.
•
Indexed
– The Indexed check box, when selected, applies the
Index trait. This trait is assigned to queues and
directories that you want to be indexed by the Fast
Text Search (FTS) server. This allows for quicker
searching of the queue or directory.
This check box is the equivalent of the dbtrait,
+index|-index, at the console. See “Batch
Indexing Directories (Folders)” on page 483 for
more information.
•
Sorted
– The Sorted check box, when selected, applies the
sort trait, which determines whether or not the
stories in a queue will be sorted. Queues with the
sort trait are sorted by the form field you choose in
the Index Field drop-down list. For instance, you
may want to sort a rundown queue by the Page
Number field, so when a user changes the
numbering in the fields of that column, the rows
automatically adjust to the numerical order. See
“Starting the Queue Sort Function” on page 128
for more information. This check box is the
equivalent of the dbtrait, +so|-so, at the
console.
Database Traits Summary
The Ordered check box
only appears on the
Queue Properties
dialog box, not the
Directory Properties
dialog box.
•
Ordered
– The Ordered check box is a unique check box,
because it may appear as read-only, depending on
the circumstance. It is provided to show you
whether a queue is currently ordered. This is
particularly helpful in identifying queues that have
the sort trait, but are no longer being sorted
because a user manually adjusted the order of the
stories in the queue. If a sorted queue was
manually ordered, the check box appears white
and contains a checkmark, which you can remove
if you want to reinstate the sorting feature.
Unchecking the check box is the equivalent of the
dbtrait, -o, at the console. See “Starting the
Queue Sort Function” on page 128 for more
information. However, if a queue is not ordered at
present, then the box will appear gray and empty.
You cannot select this box to order a queue. See
“Finding out Who Last Ordered a Queue” on
page 143 for more information.
Index Field/Story Form Compatibility Error Messages
A story form is a form that defines the fields displayed in the Story Form
panel of the iNEWS Workspace. The fields typically consist of important
information about the stories kept in the queue, such as the title, writer’s
name, and the dates the story was created or modified. The field chosen as
the Index Field in the Queue Properties dialog box serves two purposes:
•
It is the field used to sort stories in sorted queues.
•
When the Index Field is selected during a Find or FInd All search of a
non-indexed queue, the system is able to return search results faster.
The Index Field is not associated with Fast Text Searches (FTS).
Therefore, it is crucial that the field selected as the Index Field actually
exists as part of the story form. For this reason, the system will check for
compatibility between the settings of the Story drop-down list and the
Index Field drop-down list. Depending on the list selections, various
messages may appear.
125
Chapter 5 Stories Queues, and Directories
When the index field is already defined based on the current story form
setting, and a user selects a different form from the Story drop-down list,
the system will check to see if the field chosen as the index field exists in
the new story form. If it does not, a warning is issued. For instance, the
Index Field drop-down list is set to a field, such as Audio-Time, and the
Story drop-down list is set to the Rundown story form. At the current
settings, there is no warning because the Audio-Time field exists in the
Rundown story form. However, if the user changes the story form from
Rundown to another form that does not have the Audio-Time field, the
following message appears.
The Audio-Time field is no longer in the Index Field drop-down list. The
user must select another field from the list as the warning message
instructed. When the user clicks on the Index Field drop-down list, the
system refreshes the list of options to display only those fields that exist in
the currently selected story form.
n
126
Normally, pressing the Escape (Esc) key after the Index Field drop-down
list is open (and therefore, refreshed), will close the list, retaining the
original field selection. However, if the original field choice does not exist
in the newly chosen story form—such as the Audio-Time field in the
previously mentioned example—the list closes without any selection made,
in which case, the setting appears blank.
Database Traits Summary
If you select no story form—or set it to !<none>— then the system is
forced to blank out the index field and issue the following warning
message.
This means the Index Field drop-down list will be inaccessible and appear
grayed out. When the index field setting is blank, the system will use the
default field, which is the Title field (also called the Slug field).
When an index field is blank—or in other words, no field is selected—the
following message appears.
If the index field drop-down list was already set to the Title field when the
Directory/Queue Properties dialog box opened, and the user manually
blanks out the setting, the following message appears.
The above message indicates that by blanking out the index field setting,
the default field, which is Title, is automatically applied. Since the default
is the same field as the original field setting, no change occurs.
127
Chapter 5 Stories Queues, and Directories
Starting the Queue Sort Function
If someone orders a sorted queue, the sorting is disabled even though the
trait is still applied to the queue. You restart the Queue Sort Function from
the console or any iNEWS Workstation. See “Starting the Queue Sort
Function from the Console” on page 786 for more information.
When a sorted queue is ordered, the Queue Properties dialog box will
appear similar to this:
n
You cannot use the Ordered check box to apply the Ordered attribute. In
other words, when the box is not checked, it will appear gray, indicating
that it is read-only. Ordering a queue is done by manually moving stories
around within the Queue panel.
To turn off the Ordered attribute and allow the queue to resume its
original sorting function from the workstation:
1. Click on the Ordered check box, removing the checkmark.
2. Click OK to save the change.
128
Database Traits Summary
n
When turning off the Ordered check box and clicking OK—the equivalent
of dbtrait -o—the current contents of the queue will be sorted,
immediately and automatically. Any stories added to the queue or stories
edited in the queue will be sorted.
Groups Tab
•
General
– The General check box, when selected, specifies
that stories moved to the queue will retain their
original security restrictions, namely, their read
and write groups. For instance, in most cases, sites
restrict access to the Dead queue, but to further
guarantee security of stories, the General trait is
applied to the Dead queue. This prevents users
who do have access to the Dead queue from
opening restricted stories after they are deleted
from other queues that were inaccessible to the
users. See Chapter 6, “Groups,” on page 6-153 for
more information. This check box is the
equivalent of the dbtrait, +g|-g, at the console.
129
Chapter 5 Stories Queues, and Directories
130
•
Read Group
– The Read Group drop-down list allows you to
restrict read access to a queue or directory to a
group of users. Users who are not in the read
group cannot see the directory or queue. When
!<none> is selected, no group is applied;
therefore, all users will have read access to the
queue or directory. The groups are not created
here. See Chapter 6, “Groups,” on page 6-153 for
more information. This drop-down list is the
equivalent of the dbtrait, rg, at the console.
•
Write Group
– The Write Group drop-down list allows you to
restrict write access to a queue or directory. Users
who are not in the write group cannot add or
modify data in the directory or queue. Users
cannot delete stories in any queue if they are not in
the write group for the Dead queue. When
!<none> is selected, no group is applied;
therefore, all users will have write access to the
queue or directory. The groups are not created
here. See Chapter 6, “Groups,” on page 6-153 for
more information. This check box is the
equivalent of the dbtrait, wg, at the console.
•
Notify Group
– The Notify Group drop-down list allows you to
specify what group of users is notified whenever
stories are added to or modified in a queue. When
!<none> is selected, no group is applied;
therefore, no users will be notified of additions or
modifications to the queue or directory. The
groups are not created here. See Chapter 6,
“Groups,” on page 6-153 for more information.
This check box is the equivalent of the dbtrait, ng,
at the console.
Database Traits Summary
Abstract Tab
Abstract printing
applies only to system
printing, not local
printing.
When a story is added to or modified in an abstract print queue, the system
automatically prints a portion of the story, as defined by the properties on
the Abstract tab.
•
Print
– The Print check box, when selected, applies the
abstract print trait to a queue or directory. The
other aspects of this trait, such as printers and
styles, cannot be applied until this trait is turned
on. This check box is the equivalent of the dbtrait,
al, at the console.
•
Printers:
– The Printers: drop-down list allows you to select a
printer the system will use to automatically print
abstracts for the queue. This drop-down list is the
equivalent of the dbtrait, ap, at the console.
131
Chapter 5 Stories Queues, and Directories
•
Styles:
•
Lines section
– The Styles drop-down list allows you to select a
style the system will use when automatically
printing abstracts for the queue. This drop-down
list is the equivalent of the dbtrait, as, at the
console.
-
All lines - story... – The All lines - story format radio button,
when selected indicates the queue has the
abstract print trait, and the system will print
all lines of new or modified stories in story
format as an abstract from that queue. This is
equivalent of the dbtrait, a1 127, at the
console.
-
All lines - script...– The All lines - script format radio button,
when selected, indicates the queue has the
abstract print trait, and the system will print
all lines of new or modified stories in script
format—that is, including production
cues—as an abstract from that queue. This is
equivalent of the dbtrait, a1 126, at the
console.
-
Lines 1 through – The Lines 1 through radio button, when
selected, indicates the queue has the abstract
print trait, and the system will print the
designated number of lines of each new or
modified story as an abstract from that queue.
This is equivalent of the dbtrait, a1 N, at the
console.
Uses for Abstract Printing
A common use for this feature is to print abstracts of wire stories on a
specific topic. To do this, set up a wire keyword story to send to an abstract
printing queue a copy of every wire story relating to the topic.
You can also use abstract printing to create a “paper trail” of changes made
to stories in a particular queue. For instance, a producer may want a record
of changes made to a show’s scripts. By making the queue where these
132
Database Traits Summary
scripts are written an abstract printing queue, the user can have the system
print a record of every change made. Also, if the queue’s form includes a
“modified by” field, the producer can get a record of who made each
change.
n
If you edit a story in an abstract printing queue, your system prints an
abstract of the new version of the story when you save the changes. To
avoid printing an abstract, move stories to a queue that is not an abstract
printing queue before editing them.
Maintain Tab
•
Save Old Versions– The Save Old Versions drop-down list determines
how many old story versions are retained in each
queue. The Save Old Versions drop-down list is
the equivalent of the dbtrait, save-|n|o|a, at
the console. Options include:
-
Save None – Retains no old versions of a story
when a new revision is saved in the queue.
133
Chapter 5 Stories Queues, and Directories
n
n
See “Using Mailboxes”
on page 419 for more
information.
134
-
Save Previous – Retains the previous version
of a story when a new revision is saved in the
queue.
-
Save Original – Retains the original version of
a story when a new revision is saved in the
queue.
-
Save All – Retains all versions of a story when
a new revision is saved in the queue.
The Save Old Versions trait is queue-specific. For instance, a story is
moved from a queue that saves all versions to a queue saving none. In this
case, all versions are moved to that queue, but the next time the story is
edited and saved, the old versions are sent to the Dead queue. The
command dbdump honors the Save Old Versions when set to Save None
and will only dump the latest version of a story in the queue with that trait.
•
Skip Backup
– The Skip Backup check box determines whether or
not a directory or queue is left out of database
backups. This check box is the equivalent of the
dbtrait, +x|-x, at the console, and is also known
as a skip flag.
•
Update
– The Update check box indicates whether or not the
stories in a queue will be replaced as new versions
are moved or copied to it. This check box is the
equivalent of the dbtrait, +u|-u, at the console.
The Update trait does not affect stories that are restored from tape
backups. If you restore a story to a queue that already contains a version of
that story, you will have two versions of the same story, even if the queue is
assigned the update trait.
•
Mailbox section
The Mailbox section does not apply to the e-mail feature of iNEWS
NRCS. These mailboxes are “signal carriers” by which utility
programs, called servers, are notified to perform a pre-defined task.
This section’s trait is the equivalent of the dbtrait, mail, at the
console. There are two types of mailboxes:
Database Traits Summary
•
-
System
– The System radio button and drop-down list
are used to assign mailboxes reserved for
system functions, such as the keyboard and
form checkers. Each queue or directory that
needs a reserved system mailbox is assigned
the correct one when the system is installed
by Avid Customer Support personnel.
Options include: All, Keyboard, Keyword,
Distribution, and Group. See “Reserved
Mailboxes” on page 421 for more
information.
-
Standard
– The Standard radio button and drop-down list
are used to assign mailboxes to queues. These
are mailboxes used by utility programs you
can configure, such as action servers. The
mailbox number assigned to the queue must
match the device number of the server
monitoring it, as defined in the
/site/config file. Valid mailbox
numbers are one through 4096. See “Using
the list Command to View Assigned
Mailboxes” on page 501 for more
information.
Purge
– The Purge section allows you to set the
reoccurrence schedule for purging a queue. The
purge interval determines how old stories in a
queue can get before they are purged. Every hour,
your system removes any stories that are older
than their queue’s purge interval and places the
stories in the Dead queue. The Purge section’s
Days and Hours spin boxes are the equivalent of
the dbtrait, purgeinterval, at the console.
135
Chapter 5 Stories Queues, and Directories
Choosing Queues to be Purged
Any queue to which the system automatically sends stories should be
purged regularly. For instance, queues in the Wires directory should be
purged often , or else the database fills up with old wire stories. If you set
up a keyword story to send stories to a queue, ensure that queue is purged
regularly. Otherwise, you risk running low on space.
Purging is the first step
in the process of
freeing up space. Only
when stories are
removed from the Dead
queue by the dbserver
program is any
database space freed.
Queues that do not automatically receive material usually do not need to be
purged regularly. For instance, queues in the People directory are not
normally purged automatically, since they usually only receive stories
when users add them to their personal queues.
Choosing a Purge Interval
Different parts of your database contain different kinds of stories, and the
purge interval you set for each queue depends upon the kinds of stories in
the queue. Some material, for instance, may need to be held only 24 hours
while other material may need to be held three days—or not purged at all.
By choosing each directory or queue’s purge interval based on the kinds of
stories found there, you enable your system to remove old material that is
no longer needed and make room for new material.
You can have purge intervals as long as 2729 days and 23 hours or as short
as one hour. Additionally, you can set the purge interval to zero hours to
turn purging off for a particular directory or queue. You can adjust the
purge interval to suit the rate at which stories are added to the queue. In
general, the faster stories are added to a queue, the shorter you should
make the queue’s purge interval. Old stories that you restore from tape are
treated as if they were just created.
n
136
Old stories restored from tape are treated as newly created stories unless
the dbrestore -M option was used when the stories were restored from
tape. The -M option preserves the modification time of the story recorded
when the story was dumped to tape.
Database Traits Summary
If you notice an increase in the rate at which stories enter a particular
directory or queue, you may need to reduce its purge interval. For instance,
if you add another wire service to your system, the number of stories
entering wires each hour increases, and you probably need to reduce the
purge interval of wires to allow the system to keep up with this increase.
Matching Purge Intervals
When choosing a purge interval, pay attention to queues that are likely to
contain copies of stories held in other queues. Copies of stories are really
pointers that point back to the original story. The actual story cannot be
removed until all the copies have been purged. Otherwise, the copies
would not have a story to which they could point.
Ensure queues that are
likely to hold copies of
a story have roughly
the same purge
intervals as the queue
that holds the original.
n
In most systems, for instance, all wire stories are sent to WIRES.ALL and
copies of each story are distributed to other queues in the Wires directory.
This means that the system cannot purge a wire story until all the story’s
copies are also ready to be purged. To ensure that the story and its copies
are ready to be purged at about the same time, the queues in the Wires
directory are usually given similar purge intervals.
If someone edits a copy of a story and then saves the changes, the system
replaces the pointer with an actual story. Consequently, you do not need
worry about copies that have been edited, since they no longer point back
to the original story.
Purge Intervals and the Purge Limit
If the system detects that it is running low on space, it purges beyond each
queue’s purge interval, if necessary, to build up the free list. Your system
profile contains a parameter called the purge limit, which prevents the
system from purging more than a certain number of hours beyond each
queue’s purge interval.
In an emergency, your system purges as many hours beyond the purge
interval as the purge limit allows. Queues that contain important
information should have a purge interval at least five hours greater than the
purge limit. This ensures that stories up to five hours old are never purged,
even in a “low on space” emergency.
137
Chapter 5 Stories Queues, and Directories
User Interface Tab
•
138
Preview Lines
– The Preview Lines spin box allows you to set a
number of lines per story that will appear as a
preview in the Queue panel. Usually, a queue will
only show one line of information per story,
similar to what appears in the fields of the Story
Form panel. By applying the preview trait, users
can also see a preview of each story’s text in the
Queue panel, without having to open the entire
story. A setting of zero will show the one line of
information that is the standard; A setting of one
will show that line plus one line of text, and so
forth. This trait can be overridden by a user’s
preferences. See “Preview Lines” on page 76 for
more information. The maximum number of
preview lines allowed is 22. This spin box is the
equivalent of the dbtrait, dis, at the console.
Database Traits Summary
n
•
Inverted
– The Inverted check box, when selected, will force
the most recent stories in a queue to be displayed
at the top. Otherwise, the most recent stories will
appear at the bottom. This check box is the
equivalent of the dbtrait, +i|-i, at the console.
•
Sequential
– The Sequential check box, when selected, will
force a directory to list its contents—of subdirectories and queues—in the order in which they
were created. Otherwise, the contents are listed in
alphabetical order. This check box is the
equivalent of the dbtrait, +s|-s, at the console.
•
Refresh
– The Refresh check box, when selected, assigns the
Refresh trait to a queue, so the system will begin
automatically refreshing your screen when
changes are made in the queue. This means when
you are looking at a queue in the Queue panel, you
will immediately see changes made to that queue
by other users. This check box is the equivalent of
the dbtrait, +refresh|-refresh, at the
console.
Use the Refresh trait only on important queues, like rundown queues that
are often modified by multiple users simultaneously. To automatically
refresh a queue, your system must spend a lot of time monitoring
workstations where users are viewing that queue. Assigning the refresh
trait to too many queues that are often accessed at the same time greatly
increases the amount of work your system has to do and may severely
degrade its overall performance.
•
Watch Appends – The Watch Appends check box, when selected,
allows a queue to monitor incoming data for new
stories sent by the wire service, appends them to
the wire queue, and immediately displays them to
users who have that wire queue open. While this
trait can be applied to any queue in iNEWS
NRCS, it is crucial that it be assigned to queues
that receive wire service data, such as the
WIRES.ALL queue. This check box is the
equivalent of the dbtrait, +w|-w, at the console.
139
Chapter 5 Stories Queues, and Directories
140
•
Batch Allowed
– The Batch Allowed check box, when selected,
indicates whether or not the kill, move, or
duplicate operations can be performed against an
entire queue. Unchecking this box for a particular
queue does not affect the ability of people to kill,
move, or duplicate individual stories in the queue,
as long as they have appropriate permissions. This
check box is the equivalent of the dbtrait, +q|-q,
at the console. See Appendix G for more
information on Batch Allowed, also known as
Queue Operations Allowed.
•
Printable
– The Printable check box indicates whether you can
use the print command to print all stories in the
queue with a single command. This trait is usually
applied to rundown queues, such as
SHOWS.5PM.RUNDOWN. This trait does not limit
or prevent the ability to print a single story (or
script) in a queue. This check box is the equivalent
of the dbtrait, +p|-p, at the console and applies
to system printing.
•
Confirm Edit
– The Confirm Edit check box, when selected, will
instruct iNEWS NRCS to prompt for confirmation
before allowing a user to edit a story in the queue.
This trait is typically assigned to queues in which
users are likely to read but not change stories. It
should not be assigned to queues with stories that
are edited often. Doing so will needlessly slow
down the performance of your system. This check
box is the equivalent of the dbtrait, +r|-r, at the
console.
•
Text Timing
– The Text Timing check box, when selected,
activates the timing clocks that appear at the
bottom of the Story panel for all stories in the
queue. This check box is the equivalent of the
dbtrait, +t|-t, at the console. The clocks are:
-
TTC – Time from start of story to cursor
-
BLK – Time of blocked (or highlighted) text
Database Traits Summary
-
EST – Estimated read time of entire story
Locks Tab
The Locks tab is unique for two reasons: first, it only appears in the
Properties dialog box for a queue not a directory, and secondly, it is a readonly tab. It is provided for informational purposes only. It cannot be used
to alter the Lock/Unlock settings of a queue.
•
User Lock
– The Locked check box in the User Lock section
indicates that a user has either acquired an easy
lock or a key lock on the queue. The User Lock
field indicates the name of that user. If the queue is
easy locked, access to the locked queue is limited
to a system administrator (with a superuser
account) or the user who locked the queue. If the
queue is key locked, access to the locked queue is
limited to a system administrator (with a superuser
account) or any user who knows the key
(password). The check box and field depict the
141
Chapter 5 Stories Queues, and Directories
current condition of the queue, so both are blank
when the queue is not locked. However, you can
find out the name of the last user to have locked
the queue by going to the console.
•
Order Lock
– The Locked check box in the Order Lock section
indicates the queue is order locked at present,
which limits who can rearrange the order of stories
in the queue. The Order Lock fields indicates the
user name and device which implemented the
order lock, and when it happened. The check box
and fields depict the current condition of the
queue, so both are blank when the queue is not
order locked. However, you can find out the name
of the last user to have order locked the queue by
going to the console.
Locking and Unlocking
This section provides information on the types of locks and how to
determine when a story or queue is locked and by whom. It also has
information on how to remove certain locks.
Identifying Locked Queues and Stories
Varying information on which queues and stories are locked and by whom
may be obtained from either the iNEWS Workstation or the console.
From the iNEWS Workstation...
At the iNEWS Workstation, you can identify currently locked queues by
the padlock that appears over queue icons in the Directory panel. As shown
at left, a similar padlock appears on the selector buttons in the Queue panel
when stories are locked. While the padlocks do not tell you who initiated
the lock, you can find that out for currently locked queues at the iNEWS
Workstation by viewing the Queue Properties dialog box. The information
is provided on the Locks tab as shown on page 141. To access this dialog
box, right-click on the queue in the Directory panel, and select Properties.
142
Locking and Unlocking
If a queue or story is not locked at present, but you want to know who last
locked it, you must use the console.
From the Console...
You can find out more from the console about locked queues and stories,
even if they are no longer locked.
Finding out Who Last Locked a Queue
To find out the last user to have locked a queue, go to the console, and use
the list command in the following format:
list
d-u
[<queue name>]
For instance, to find out who last locked the PEOPLE.SNOW.MAIL
queue, type:
list d-u people.snow.mail
See Appendix G for
more information on
the list command oneletter flags.
The name of the person who last locked the queue appears in the lockuser
column.
SRPlo-LIsUGQSXWFiT
Q-------I----S----
lockuser
edmonds
directory
PEOPLE.SNOW.MAIL
In this case, edmonds appears to be the last person to have ever locked the
PEOPLE.SNOW.MAIL queue. If the queue has never been locked, the
name of the person who created the queue appears.
n
The L flag of the list command output shows whether the queue is locked at
present.
Finding out Who Last Ordered a Queue
To find out who last order locked—that is, rearranged the order of a sorted
queue and from which device the order was initiated, go to the console and
use the list command in the following format:
list
d-o
[<queue name>]
For instance, to find out who last ordered the CAST.MID.RUNDOWN
queue, type:
list d-o cast.mid.rundown
143
Chapter 5 Stories Queues, and Directories
The name of the person who last ordered the queue appears in the
orderuser column.
SRPlo-LIsUGQSXWFiT orderuser
QSRP-----sU-Q------ williams
device
301
directory
CAST.MID.RUNDOWN
In this case, williams was the last person to order this queue. If the queue
has never been ordered, the order username will be blank and the device
number will be zero (0). If no queue name is entered in the command, the
order information for all folders and queues is displayed.
n
Using the list command does not provide any indication of whether the
queue is ordered at present.
To resume sorting in a sorted queue that has been ordered, see “Starting the
Queue Sort Function” on page 128.
Finding out Who Last Locked the Story
You can use the wholockedit command at the console to find out who last
locked each story in a particular queue. Follow wholockedit with the name
of the queue you want to investigate.
For instance, to find out who locked the stories in the
SHOW.10PM.RUNDOWN queue, type:
wholockedit show.10pm.rundown
144
Locking and Unlocking
A screen similar to the following appears:
rec(4) locked by danielmi
modified by danielmi on 2004-02-09 11:53:20
<fields>
<f id=page-number>A04</f>
<f id=presenter>DB</f>
<f id=title>MAYORAL RACE</f>
<f id=var-3>VO/W</f>
<f id=video-id>clip13</f>
<f id=mos-title></f>
<f id=event-status></f>
<f id=status>OK</f>
<f id=item-channel></f>
<f id=audio-time uec>20</f>
<f id=runs-time>0</f>
<f id=total-time>20</f>
<f id=back-time></f>
<f id=modify-date>1076349200</f>
<f id=modify-by>danielmi</f>
<f id=endorse-by></f>
<f id=cume-time></f>
<f id=air-date></f>
<f id=tape-time></f>
</fields>
In the previous example, the story, MAYORAL RACE, is the only one in
the queue that is locked. The last user to lock and the last user to modify
the story are provided; they aren’t always the same. If no stories are locked
in the queue, the system will display the message: no stories
locked.
To see the status of every story in the queue, add all to the end of the
command, after the queue name.
145
Chapter 5 Stories Queues, and Directories
Types of Locks
There are four types of locks that can apply to either stories or queues: Edit
lock, User lock, Order lock, Production lock. Not all the locks apply to
both stories and queues. All four types are explained in the following
sections.
Edit Lock
An Edit lock is applied to a story to prevent multiple users from editing the
story at the same time. The Edit lock is applied in two ways:
•
Manually – when a user types Ctrl+E. This locks both the story form
and body when neither are already locked by the system.
•
Automatically – by the system, which occurs in a segmented way
when a user begins typing in either the story body or the story form.
For instance, when a user types in the Story Text panel, the system
locks the story’s body. But another user may still type in the Story
Form panel, which results in an automatic lock of the story’s form for
that user.
When a user attempts to manually lock a story by typing Ctrl+E, the
system checks for segmented Edit locks. If one exists for either
segment—the body or form—iNEWS notifies the user.
Additionally, edit lock indicators are provided on the Status bar.
The user, danielmi, locked the story form.
The user, danielmi, locked the story’s body.
The user, danielmi, locked the entire story, body and
form.
The user, jeff, locked the story body, but the user,
danielmi, has the Edit lock for the story form.
146
Locking and Unlocking
Removing a Story’s Edit Lock
The Edit lock is removed automatically when a story is saved, or when a
user navigates to another location in the database. A user can manually
remove the Edit lock (while remaining in the story) by saving the story or
by doing one of the following:
t
Type Ctrl+E.
t
Select Story > Edit unlock.
t
Click the Edit lock button on the Main toolbar (shown at left). The Edit
lock is removed when the button no longer appears pushed in.
If a story is mistakenly left edit locked, it is considered to be in a busy
state. You must unbusy the story before anyone can edit it. See “Unbusy
Stories and Queues” on page 149 for more information.
User Lock
A User lock is a lock that is manually (or purposefully) applied to a story
or a queue by a user to limit who can see the contents of the queue or story.
Additionally, there are two types of User locks:
•
A Key lock is when a user locks the queue and applies a password,
known as a key, to the queue. At that point, only system administrators
and users who know the key can access the queue or story.
•
An Easy lock is when a user locks the queue or story and applies their
User ID as the key to the queue. At that point, only system
administrators and users who log in using that User ID can access the
queue or story.
When the user forgets the key or is unavailable to log in and unlock the
queue or story, you must remove the lock before anyone can access the
queue or story.
147
Chapter 5 Stories Queues, and Directories
Removing a Story’s User Lock Without a Key
Before you unlock any story, find out who locked the story. You want to
make certain that you do not unlock a story that is being used at the time.
See “Finding out Who Last Locked the Story” on page 144 for more
information.
To unlock a story without knowing its key:
1. Log in as a system administrator—that is, with a superuser account.
You must be a system administrator to remove a lock for which you do
not know the key.
2. Double-click on the story to open it in the Story panel. The system will
prompt for the key.
3. Press Enter. The story will open without the key, because you logged
in with a superuser account.
4. Position your cursor in the Story panel.
5. Select Tools > Unlock Story. A User Unlock Story dialog box will
appear.
6. Click the Unlock button.
7. Save the story.
Removing a Queue’s User Lock Without a Key
Before you unlock (unbusy) any queue, find out who locked the queue.
You want to make certain that you do not unlock a queue that is being used
at the time. See “Finding out Who Last Locked a Queue” on page 143 for
more information.
To unlock a queue without knowing its key:
1. Log in as a system administrator—that is, with a superuser account.
You must be a system administrator to remove a lock for which you do
not know the key.
2. Select the queue to unlock.
3. Select Tools > Unlock Queue. The User Unlock Queue dialog box
appears.
4. Click the Unlock button.
148
Locking and Unlocking
5. Click OK.
Order Lock
An Order lock is automatically applied to a queue by the system. The
system places an Order lock on each queue being ordered—that is, while
someone is moving a story in the queue. After the story is moved, the
system automatically removes the Order lock. So, the lock only applies to
the queue during the actual moving process. If you try to move a different
story in a queue already being ordered, the system displays a busy message
and temporarily denies order access to the queue.
If a queue is mistakenly left order locked, it is considered to be in a busy
state. You must unbusy the queue from the console before anyone can
order it. See “Unbusy Stories and Queues” on page 149 for more
information.
Production Lock
A Production lock is similar to an Order lock in that it prevents multiple
users from changing the order of a queue simultaneously. The difference is
that a Production lock is manually applied to a queue by a user. Also, a
queue will retain a Production lock until the user unlocks it.
To remove a Production lock from an iNEWS Workstation:
t
Select Tools > Production Lock. A check mark appearing next to the
Production Lock menu option indicates whether the lock in place.
t
Navigate to another queue. Production Lock is disabled automatically.
If a queue is mistakenly left with a Production lock, it is considered to be in
a busy state. You must unbusy the queue from the console before anyone
can order it.
Unbusy Stories and Queues
Whenever a story or queue cannot be unlocked from a workstation, you
can remove the locks by going to the console and using the unbusy
command.
149
Chapter 5 Stories Queues, and Directories
c
Always ensure a lock is invalid first. Determine whether the edit or
order lock is not the result of someone actually editing a story or
ordering a queue. Unbusying a story or queue currently in use can
cause serious problems.
To unbusy a story or queue at the console:
1. Type the unbusy command
2. Follow it (on the same line) with the name of the locked queue or the
queue that contains the locked story. For instance, if a locked story was
in SHOW.SCRIPTS or that queue was order-locked, unbusy it by
typing:
unbusy show.scripts
3. Press Enter.
One of the following will happen:
•
The unbusy command checks the queue for an Order/Production
lock. If it finds one, the console displays the following prompt:
‘shoe.scripts’ Production locked by news from terminal
607 at 2004-02-28 17:51:46
User news no longer logged in at terminal 607 - Unlock?
(n/y/q)
To unbusy the queue, type y; otherwise, type n.
c
Do not remove an order lock that you have not already determined is
invalid.
•
150
The unbusy command checks for an edit-locked story in the queue.
If it finds one, it checks the workstation where the story was last
edited. If anyone is logged in at that workstation, the console
displays the story’s form and prompts you to check with the person
who is logged in at that workstation. For instance, if the story,
Locking and Unlocking
Shootout, was last edited at workstation 11 and user, Smith, is
currently logged in at workstation 11, the console displays the
following:
WORKSTATION TAKE FROM MOVED STATUS TIME
shootout 03-30 3044 APv1al--hr Fri Apr 26 17:37 READY 0:47
did you check with smith who is at workstation 11 ?
workstation(11) unbusy ? (n/y/q)
To unbusy the story, type y, which will remove the edit lock.
Otherwise, type q to quit.
c
If a story is unbusied at the console while a user is editing it, when the
user tries to save the story, the story is saved to the Dead queue, and
the user gets an error message that states:
Story save failed: Error: Story saved to dead.
151
Chapter 5 Stories Queues, and Directories
152
Chapter 6
Groups
This chapter explains how to create groups in iNEWS and use the system’s
group-related features to customize system usage. In some cases you will
use the console, while in other cases, you can complete modifications from
the iNEWS Workstation. When possible, procedures are explained using
the workstation, but some can also be accomplished at the console, with
extensive use of the gtraits command. This command is similar to the
utraits command and the dbtraits command. All three commands are
explained in Appendix G. This chapter also covers viewing and modifying
information in the SYSTEM.GROUPS queue at the iNEWS Workstation
and /site/system file at the console.
Topics covered in this chapter include:
•
Overview
•
Viewing Group Information
•
Creating a New Group
•
Group Checker
•
Renaming a Group and Deleting a Group
•
Creating or Modifying Multiple Groups
•
Adding Members to an Existing Group
•
Group Access and Usage Restrictions
•
Group Traits for the Database
•
Mail Aliases
Chapter 6 Groups
Overview
The iNEWS newsroom computer system lets you categorize users by
placing accounts belonging to people with similar needs into the same
group. Organizing users in this way enables you to more easily customize
your system to suit individual and small group needs. It also enables you to
apply security restrictions at the group level.
For instance, you can:
•
Restrict access to a particular queue so that only members of a certain
group can use it
•
Have the system notify a group of users when changes are made to a
queue in which they are interested
•
Send mail to a group name and have the system take care of the task of
sending the mail to each individual in the group
You can create as many as 250 groups, and you can assign an unlimited
number of users to each group.
Viewing Group Information
From the Console...
At the console, various versions of the gtraits command are used for
viewing and modifying group information. You must be a console
superuser before using any form of this command, as indicated by the
below prompt, NRCS-A#. See “The Console Superuser” on page 23 for
more information.
To get information for a list of all groups in the iNEWS database:
t
Type: NRCS-A# gtraits list-
To get a list of all the members of a particular group, such as
producers:
t
154
Type: NRCS-A# gtraits list producers
Viewing Group Information
To get a list of all groups a particular user belongs to:
t
Type the command followed by the user’s ID, such as:
NRCS-A# gtraits list danielmi
Sometimes, for security reasons, groups are assigned as group traits to
directories and queues in the database. This information can be viewed
from the console by using the list d-v console command, which lists each
queue’s assigned read, write, and notification groups.
To list group information for a specific queue, use this format:
list d-g <queue name>
To list all queues in the database that have a particular group assigned as
their read, write, or notification group, use this format:
list rwng=<group name> d
n
All of the gtraits list variants can be produced using list g.
From a Workstation...
You can also view group membership and group assignment information
from an iNEWS Workstation. However, since groups are created at the
console, the information you receive can potentially be out of sync with the
information that is actually in the database. Therefore, use this method as a
quick way to get information that you recognize may require verification at
the console.
To view information about group memberships from a workstation:
1. Locate the SYSTEM.GROUPS queue in the Directory panel.
2. Double-click the Groups queue to open it.
The Queue panel contains a list of the names of the existing groups
with the first group name selected. The members of the group appear
in the Story panel.
3. To view the contents of different groups, do one of the following:
t
Use the mouse to click a different group listed in the Queue panel.
155
Chapter 6 Groups
t
Use the Up or Down arrow keys or the scroll bar on the right side
of the Queue panel to move to another group.
t
Use Page Up or Page Down keys to scroll several groups (up or
down) in the list at a time.
To view what group is assigned to a queue or directory for read and
write access, or for notification purposes, do the following from a
workstation:
1. Locate the queue or directory you want to know about in the Directory
panel.
2. Right-click on the queue or directory.
3. Select Properties from the pop-up menu. The Queue/Directory
Properties dialog box will appear.
4. Select the Groups tab. See “Groups Tab” on page 129 for more
information.
Creating a New Group
Creating a new group is a three-step process:
•
Step 1 - Choosing a Group Name
•
Step 2 - Create New Group at Console
•
Step 3 - Specifying Members of a New Group
The first part of the procedure must be done at the console. The last is done
at the iNEWS Workstation.
Step 1 - Choosing a Group Name
Before you actually create a new group, you need to decide on the name of
the group. To choose a group name, follow these guidelines:
156
•
Group names cannot be more than 20 characters long and cannot
contain spaces. A group name longer than 20 characters will be
truncated to 20 characters.
•
You cannot use a name already used as someone’s User ID.
Creating a New Group
•
Some words are reserved by the system for special purposes, and
cannot be used as names for groups. These words—which include:
alias, all, group, and restricted—are defined in the Words dictionary as
W_ALIAS, W_ALL, W_GROUP, and W_RESTRICTED, respectively.
•
Choose a name that indicates the purpose or general makeup of the
group, for instance, you may want to call the group that includes all
your producers by the name “producers.”
View the list of groups in the SYSTEM.GROUPS queue to ensure the name
you select is not being used for another group. If an existing group already
uses a name, determine whether its members are the same as those users
you want to assign to your group. The existing group may represent these
users, so you can use it instead of creating a new one.
Step 2 - Create New Group at Console
To enter the new group name in the iNEWS database:
1. Verify that the new group name is not already used by typing the
following kind of command at the console:
NRCS-A# gtraits list fieldreporters
fieldreporters is not a user or group name
In the example, the system response indicates that fieldreporters is not
currently a group name. You should receive a similar response before
proceeding.
2. Use gtraits add to create the new group name in the system.
NRCS-A# gtraits add fieldreporters
Added group fieldreporters
Step 3 - Specifying Members of a New Group
To specify members of the new group at an iNEWS Workstation:
1. Open the System folder from the Directory panel.
2. Open the Groups queue.
3. Do one of the following:
t
Select File > New Story.
157
Chapter 6 Groups
t
Press the Insert key.
In the Queue panel, a blank row appears in the group list, and a blank
story appears in the Story panel.
n
When your iNEWS newsroom computer system was installed, membership
lists for several groups common to newsrooms were placed in the Groups
queue. To make it easy to maintain, each list was placed in a separate
story. Continue this convention to organize groups. You can put more than
one group’s membership list (or all of them) in a single story.
4. Type the name of the group, such as fieldreporters, in the Title (Slug)
field of the Queue panel or in the corresponding field of the Story
Form panel.
5. Press Enter.
6. Click inside the Story Text panel and type the group name and
membership list in this format:
group fieldreporters
user-ID user-ID . . .
user-ID user-ID . . .
. . .
7. Select File > Save Story.
This procedure creates a story, stored in SYSTEM.GROUPS, that bears the
group name and contains the membership list for that group. The system
will refer to the story anytime its group is applied to security measures or
other system features.
Group Checker
When you save your changes to a group, the system automatically runs the
server program known as the group checker, which looks for errors in the
stories in SYSTEM.GROUPS.
The group checker may also be run manually from the console by typing
the command, grpcheck, using the following format:
grpcheck [-v[v]] <name of queue>
158
Group Checker
For instance, to manually start the group checker to check group
membership lists in the database, type: grpcheck -v system.groups
The group checker may take a minute or two to process. When it finishes,
the system sends you one or more messages describing the results. The
system alerts you to the fact that you have received a message by an audio
tone and a flashing Message bar button in the menu bar.
Click the Message bar button to read the messages from the group checker.
The name, grpcheck, appears in the From field. The messages appear in the
Message field.
If the group checker finds no errors in the story you have created to list the
members of the new group, you get a GROUPS story OK message.
History button
From field
Message field
Message bar button
If the group checker finds an error, it sends a message indicating the story
and the line in that story in which the error occurs. For a complete list of
group checker messages, see “Group Checker Error Messages” on
page 160.
In some cases, multiple errors are discovered, resulting in several error
messages.
To display the entire list of error messages sent to you, do one of the
following:
t
Click the History button.
t
Select Communicate > Messages > Show History.
159
Chapter 6 Groups
You can also copy or paste the contents of the group checker messages to
another file.
If the errors are not serious, the last message is GROUPS story accepted,
with errors. The group checker applies changes that were not in error.
If there are serious errors, the last message is GROUPS story NOT Ok,
indicating that the group checker could not use any changes because of
errors.
The group checker examines whatever work you just completed along with
everything else in SYSTEM.GROUPS. This means that if some of the error
messages you see are not related to your changes, they are possibly the
result of changes another user made in a different story in
SYSTEM.GROUPS.
Group Checker Error Messages
The following is an alphabetical listing of error messages you may see
when you create or edit group membership lists or alias definitions. The
group checker usually takes a minute or two to completely process the
stories in SYSTEM.GROUPS and report any error messages.
Bad workstation device specification
You did not enter a workstation’s device number or device name
correctly. Usually, this happens because you did not use a closing
brace (}) in the declaration.
Cannot open default aliases file
The group checker could not open an internal file that it uses to check
alias entries. Call Avid Customer Support.
Cannot open new aliases file
The group checker could not create a new aliases file to reflect the
changes you made. Call Avid Customer Support.
Cannot save old aliases file
An internal error occurred. Call Avid Customer Support.
Duplicate group or alias name
You tried to create two groups or aliases with the same name.
160
Group Checker
Failed to open queue
Due to an internal error, the group checker was unable to open
SYSTEM.GROUPS. Call Avid Customer Support.
Failed to open story
Due to an internal error, the group checker was unable to open one of
the stories in SYSTEM.GROUPS. Call Avid Customer Support.
Group or alias word missing. Skipping text
You did not begin a mail alias definition with the word, alias, or a
group membership list with the word, ‘group’. This is followed by the
line number where the group checker expected to find ‘alias’ or
‘group’. The W_GROUP and W_ALIAS dictionary tokens define what
words, such as ‘alias’ or ‘group’, are used by the group checker. The
tokens may be customized in the /site/dict directory on the
iNEWS Server.
GROUPS story accepted, with errors
Errors appear in the group story, but none are serious. The group
checker will use the entries that do not have errors. The entries that
have errors are ignored.
GROUPS story NOT OK
Serious errors appear in the group story, and the group checker cannot
use it.
GROUPS story OK
There are no problems with the group story.
Ignoring words following alias name
Any words you include on the same line after the name of the alias you
are defining are ignored.
Ignoring words following group name
Any words you include on the same line after the name of the group
you are defining are ignored.
Improper use of reserved word
You cannot use a reserved word, such as ‘alias’ and ‘group’, as a group
or alias name.
161
Chapter 6 Groups
Internal groupchecker error
Some undefined error occurred while the group checker was running.
Call Avid Customer Support.
Invalid name follows word “alias”
The name of the alias is invalid, such as being too long. Check the alias
and remove or correct the user name.
Invalid name follows word “group”
The name of the group is invalid, such as being too long. Check the
group’s membership list and remove or correct the user name.
More than 50,000 alias names created
The system created many pseudo-alias names to break up individual
aliases into lists of 1000 characters or less. Call Avid Customer
Support.
Missing alias name
You did not follow the word, alias, with the name you want the alias to
have.
Missing group name
You did not follow the word, group, with the name of a group.
Name already used as alias name
You created a group with the same name as an alias already defined in
the story or queue.
Name already used as group name
You created an alias with the same name as a group already defined in
the story or queue.
No groups or aliases found
All stories in SYSTEM.GROUPS are empty—they contain no aliases
or groups.
Not a workstation device
You included something in braces ({ }) that is not a workstation device
name or number. The message is followed by the name you tried to
include as a workstation.
162
Renaming a Group
Not a user or workstation
You defined something that is not a recognized user or workstation as a
member of a group.
Recursive group membership
You defined a membership list that created a recursion error. See
“Group Access and Usage Restrictions” on page 171 for more
information.
User name used as group or alias name
You cannot give a group or an alias the same name as an existing user.
Renaming a Group
To rename a group in the iNEWS newsroom computer system, you must
complete two steps:
•
Step 1 - Change Group Name in System
•
Step 2 - Change Group Name in SYSTEM.GROUPS
Step 1 - Change Group Name in System
To change the group name in the system’s database, do the following
at the console:
t
Type the gtraits r command, which has this syntax:
gtraits
r <old-group-name> <new-group-name>
For instance, to change the group name “producers” to
“5pmproducers,” type:
NRCS-A# gtraits r producers 5pmproducers
Renamed producers to 5pmproducers.
163
Chapter 6 Groups
Step 2 - Change Group Name in SYSTEM.GROUPS
To change the name in the membership list story:
1. Locate the group’s membership list story in SYSTEM.GROUPS.
2. Modify the name of the group, which appears in the the title field of
the queue and story form, and on the first line of the story.
3. Change the group name if it appears as a member in any other
membership lists.
n
If you do not do step 3, the next time you make a change in that story, the
group checker warns you that the membership list uses an invalid group
name. See “Group Checker” on page 158 for more information.
Deleting a Group
To delete a group in the system:
1. Delete the name in the system’s database at the console using the
gtraits d command, which has this syntax:
gtraits d <group-name>
For instance, to delete the group “5pmproducers”, type:
NRCS-A# gtraits d 5pmproducers
Marked 5pmproducers for deletion.
This first step is a two-stage process. The gtraits command you type
marks the group for deletion. The group is actually deleted the next
time the system runs the dbpurge process, which it does at 15 minutes
past every hour.
n
You cannot use any gtraits commands on a group that is marked for
deletion but still waiting to be deleted.
2. Delete the group name and its membership list story in
SYSTEM.GROUPS.
3. Delete the group name if it appears as a member in any other
membership lists.
164
Creating or Modifying Multiple Groups
n
If you do not do step 2, the next time you make a change in the queue, the
group checker spots the deleted group’s membership list and warns you
that it uses an invalid group name. If you do not do step 3, the next time you
make a change in that membership list story, the group checker warns you
that the membership list uses an invalid group name. See “Group
Checker” on page 158 for more information.
Creating or Modifying Multiple Groups
The gtraits console command has an interactive mode in which you can
execute group-related commands without entering gtraits each time. Use
this mode when there are a number of gtraits commands you want to enter
in succession.
To enter the gtraits interactive mode:
1. Become a superuser. See “The Console Superuser” on page 23 for
more information.
2. Type:
NRCS-A# gtraits i
>
The command replaces the normal system prompt with an angle
bracket (>) to indicate that you are in interactive mode. At this prompt,
you can enter any gtraits command, such as changegroup or add,
without typing the gtraits command for each operation.
For instance, to add the group “5pmproducers”, type:
> add 5pmproducers
If you were not in interactive mode, the entire command line would be
required, such as: gtraits add 5pmproducers.
3. Type quit or q to leave interactive mode.
165
Chapter 6 Groups
Adding Members to an Existing Group
There are three possibilities for membership in a group. For instance, an
individual user can be a member of a group, one group can be a member of
another group (making all the users of the first group members of the
second), and a workstation can be a member of a group.
Users as Members of a Group
You must be at an iNEWS Workstation to change group membership.
To add individual users to an existing group:
1. Open the System folder from the Directory panel.
2. Open the Groups queue.
3. Locate the story or stories in your SYSTEM.GROUPS queue
containing the group membership list you want to add or modify.
4. Open that story in the Story panel.
5. Type in the user ID(s) you want to add to the group.
6. Select File > Save Story.
7. Verify the approval of the story from the messages sent to you from the
system’s group checker server program.
Groups as Members of Other Groups
In addition to adding individual users to groups, you can add an entire
group to another group. The members of the first group become members
of the second group. The order in which you define groups in your
SYSTEM.GROUPS queue is not important; however, care should be taken
to avoid recursion.
Avoiding Recursion
When you make groups members of other groups, do not create a
membership list that contains a circular reference, also called recursion.
The following is an explanation of recursion in a membership list.
166
Adding Members to an Existing Group
When the group checker examines a group’s membership list story, it
builds an internal list of the group’s members. If one member is the name
of another group, the group checker must determine the members of the
second group and add them to the first group’s internal membership list.
For instance, in the following diagram, Group B is a member of Group A.
When the group checker evaluates the membership list for Group A, it
creates an internal membership list for Group A that contains users
Fujitano, Clancy, Meyer, Rosario, Chen, Reyes, and Smith. This example
is not recursive and causes no problems for the group checker.
Gr oup A
Gr oup B
Fujitano
Rosa rio
Clancy
B
Che n
Reyes
Me yer
Sm ith
Recursion occurs when the group checker cannot resolve memberships
because one group in the chain refers to another group higher up in the
chain. For instance, a case of recursion would occur if Group B is a
member of Group A, but Group A is also a member of Group B.
Gr oup A
Gr oup B
Fujitano
Clancy
B
Meyer
Rosario
Chen
A
Smith
The group checker cannot create internal membership lists for these
groups. When it evaluates Group A, it sees that Group B belongs to Group
A and tries to add B group’s members to A group’s internal list. However,
one of the Group B members is Group A, which the group checker has still
not resolved. The group checker cannot proceed.
If you see a recursion error message, examine your membership lists for
incidents like this and remove the recursive reference. In the previous
example, either remove Group B from the membership list for Group A or
Group A from the membership list for Group B.
167
Chapter 6 Groups
To check for recursion at the console:
t
Type: NRCS-A# grpcheck -v system.groups
The group checker displays the title of the story in which it finds an error
and a description of the error. For instance, after typing the grpcheck -v
command, the following output shows a story with the title group_249 that
has recursive entries in its membership list:
grpcheck: 09:09:13 [CONSOLE] [group_249] Recursive group membership
a->b->a
grpcheck: 09:09:13 [CONSOLE] [group_249] GROUPS story NOT OK
Workstations as Members of Groups
Suppose you have a workstation that is used by several staff members, all
of whom are producers. When they use this workstation, they need access
to the queues that members of the producers group normally have access
to. When they are using other workstations, they do not need the special
producer privileges.
You can grant the producer workstation the security permissions granted to
the producer group by adding its session number as a member to the group
called producers in SYSTEM.GROUPS.
When a user logs in at a workstation, the system ordinarily combines any
system permissions the user already has with permissions the workstation
may have. For instance, a user belonging to the writers group who logs in
at a workstation assigned to the producers group would have access to
directories and queues accessible to both groups.
System permissions that apply to workstations are assigned using the
security parameter that is set in the /site/system file. The security
parameter in this file is either OR or AND. OR security uses the security
level set for either the user or the workstation. AND security uses the
security level set for both the user and the workstation. For more
information on how to edit the /site/system file, see Chapter 10,
“System Configuration Files”.
168
Adding Members to an Existing Group
A workstation can only be used as a member of a group if that PC is
assigned a dedicated session in the iNEWS configuration file. For instance,
an iNEWS Workstation, identified as 319, is assigned a certain group
membership. Its configuration line appears with a specified session
number, but is not dedicated to any particular PC, as shown:
inws
319
-
0
gnews ;nondedicated
The session, 319, is nondedicated, meaning that any PC in the newsroom
may be logged in on session 319, and therefore view whatever area is
restricted to the group 319 is assigned to. To restrict a queue or directory to
a specific workstation, such as 319, then in addition to adding that
workstation’s session number to the group’s membership, the line in the
configuration file must be dedicated to a specific PC’s IP address.
inws
c
319 192-168-20-136 0
gnews ;nondedicated
Using session numbers in groups will provide proper security only if
you have dedicated resources locking down specific PCs to specific
resources in the configuration file. This requires that PCs have set IP
addresses and would not work in a DHCP environment, where a PC
may not always receive the same IP address. See “Group Access and
Usage Restrictions” on page 171 for more information.
Combining Permissions
Combining group and workstation permissions enables you to choose to
apply additional security to your system, or less security:
•
For additional security, you can specify that users at a particular
workstation have membership in both human and workstation groups
to perform certain actions.
•
For less security, you can force the system to check only whether a
user at a particular workstation is a member of either the human or the
workstation group.
Being More Restrictive
To be more restrictive about the permissions granted to users, include the
security parameter in your system profile and assign it the value “and.”
169
Chapter 6 Groups
For instance, you may use this security level for read permissions on a
queue that should be read only by producers that are both members of the
producers group and are sitting at the producers workstation.
Being Less Restrictive
Omitting the security parameter from the system profile or assigning it a
value of “or” indicates that a user on a workstation is considered to be in a
certain group if either the user or the workstation is a member of the target
group.
Setting an Automatic Timeout
Either type of security described previously works well only if users log
out from their workstations when they leave their desks. Otherwise, anyone
with access to the workstation where a user logged in can take advantage
of that user’s or workstation’s permissions.
To prevent this, you can set your workstations to automatically log out
after a certain period of inactivity.
To do that, you need to edit one or more special timeout parameters in the
system profile—that is, the /site/system file—at the console. See
Chapter 10, “System Configuration Files” for more information on how to
edit the /site/system file.
There are two types of timeout parameters:
•
Idle timeout
•
Login timeout
Modifying Idle Timeout
The most useful kind of automatic timeout is the idle timeout, which logs
out a workstation if no activity has taken place on it in a specified length of
time.
To change this value for local workstations (those that are most likely
within the newsroom), modify the localtimeout value in /site/system.
170
Group Access and Usage Restrictions
To set the idle timeout value for dial-up workstations, modify the
remotetimeout value in /site/system.
Modifying Login Timeout
You can set certain types of workstations to disconnect a user who does not
log in within a certain length of time. For network workstations and DOS
PCs, modify the netlogintimeout value in /site/system.
To set this parameter for dialup workstations, modify the logintimeout
value in /site/system.
Timeout Value Settings and Format
All four timeout parameters accept values in the mmm:ss (minutes and seconds) format. The following table lists the parameters, the types of workstations they affect, and their maximum and default values.
Parameter
Workstation types
Maximum
Default
localtimeout
Serial, network, PCs
540:00
00:00*
remotetimeout
Dial-up (line devices
and connect sessions)
540:00
00:00*
*
Disables timeouts
Group Access and Usage Restrictions
The iNEWS newsroom computer system is designed to be used by a large
group of people, ranging from temporary writer interns to technical
producers. To ensure the correct level of security on a system that is
accommodating such a wide range of capabilities and responsibilities,
restrict access to sensitive areas of the database to people with a need to
access the information.
171
Chapter 6 Groups
The iNEWS newsroom computer system has security features that let you
provide these kind of access restrictions. For instance, you can assign
groups to a queue as a read and/or write group trait. By doing so, you can
control which users can read and/or write stories in that queue.
c
If you do not assign groups to a directory or queue as read and write
group traits, the directory or queue is available to all users.
Access and Usage Examples
Here are some other examples of how access is modified based on group
trait assignments:
•
If a user’s ID does not appear in the group(s) assigned as both read and
write group traits for a queue, a user will be unable to create a story in
that queue. In other words, the user will not have read and write
permission to that queue.
•
A user also needs both read and write permission to lock or unlock a
queue.
•
A user who has only write permission to a queue can copy or move a
story into that queue; however, without read permission, the user will
be unable to see the queue and its contents in the Directory panel.
•
It is possible to change a directory’s read or write group, and thereby
modify the read-and-write permissions for all the stories in all the
queues in that directory.
•
Stories that you move or duplicate into a queue whose general trait is
turned on, retain their original security. For instance, the Dead queue
usually has this trait turned on so that stories moved there retain the
read-and-write restrictions from their original queues.
Group Traits for the Database
There are four group traits that can be assigned to queues and directories in
the database:
•
172
General
Group Traits for the Database
n
•
Read Group
•
Write Group
•
Notify Group
You must be a system administrator—that is, logged in with a superuser
account—or know the database manager password to modify any trait in
the Directory/Queue Properties dialog box. See “Directory/Queue
Properties Dialog Box” on page 121 for more information..
All four of the group traits can be assigned at the console and the iNEWS
Workstation. For procedures at the console, see “Groups” on page 793 for
more information. Procedures at the workstation, using the Groups tab in
the Directory/Queue Properties dialog box, are covered in this chapter.
The General trait, when applied to a queue, means that stories moved to the
queue will retain their original security restrictions, as set by the read and
write group traits. This will prevent any unintentional accessibility to
stories that are moved from a highly secure queue to one that is widely
accessible to users.
173
Chapter 6 Groups
The other three group traits (Read, Write, and Notify) restrict who can read
or write stories in a queue and indicate who is notified when stories are
changed in it. Each of these group traits is explained in the following
sections. See “Groups Tab” on page 129 for more information.
n
The General trait would normally be assigned to the Dead queue.
When a group assignment on a queue is changed from the GUI, the group
security assigned to the stories in the queue is changed and the system
automatically re-applies the security change to each individual story. If
there are many stories in the queue, the client will apear to hang while the
new security setting is adjusted for each story and control will not be
returned to the user until it is done.
n
If the queue has the General trait, changing the group security on the
queue does NOT change the security assignment on the pre-existing stories
created under the old group assignment.
Read Group
A directory or queue’s read group specifies who can read stories in the
queue. Users who are not in the read group for the directory or queue
cannot see the directory or queue in the file structure displayed in the
Directory panel.
To assign a group as a read group to a queue or directory:
1. Locate the directory or queue you want to modify in the Directory
panel.
2. Open the Directory/Queue Properties dialog box by right-clicking on
the folder or queue in the Directory panel and selecting Properties
from the pop-up menu.
3. Select the Groups tab.
4. Select a group from the Read Group drop-down list. Only groups that
are already created in the system database will appear in the list. When
!<none> is selected, no group is applied; therefore, all users will
have read access to the queue or directory.
5. Click OK to save settings.
174
Group Traits for the Database
To remove a group as a read group from a queue or directory:
1. Locate the directory or queue you want to modify in the Directory
panel.
2. Open the Directory/Queue Properties dialog box by right-clicking on
the folder or queue in the Directory panel and selecting Properties
from the pop-up menu.
3. Select the Groups tab.
4. Select !<none> from the Read Group drop-down list. When
!<none> is selected, no group is applied; therefore, all users will
have read access to the queue or directory.
5. Click OK to save settings.
Write Group
A queue’s write group specifies who can add or modify stories in the
queue.
n
Users cannot kill stories if they are not in the write group for the Dead
queue.
To assign a group as a write group to a queue or directory:
1. Locate the directory or queue you want to modify in the Directory
panel.
2. Open the Directory/Queue Properties dialog box by right-clicking on
the folder or queue in the Directory panel and selecting Properties
from the pop-up menu.
3. Select the Groups tab.
4. Select a group from the Write Group drop-down list. Only groups that
are already created in the system database will appear in the list.
5. Click OK to save settings.
175
Chapter 6 Groups
To remove a group as a write group from a queue or directory:
1. Locate the directory or queue you want to modify in the Directory
panel.
2. Open the Directory/Queue Properties dialog box by right-clicking on
the folder or queue in the Directory panel and selecting Properties
from the pop-up menu.
3. Select the Groups tab.
4. Select !<none> from the Write Group drop-down list. When
!<none> is selected, no group is applied; therefore, all users will
have write access to the queue or directory.
5. Click OK to save settings.
Notification Group
A queue’s notification group specifies which users are notified whenever
stories are added to or modified in the queue.
To assign a group as a notify group to a queue or directory:
1. Locate the directory or queue you want to modify in the Directory
panel.
2. Open the Directory/Queue Properties dialog box by right-clicking on
the folder or queue in the Directory panel and selecting Properties
from the pop-up menu.
3. Select the Groups tab.
4. Select a group from the Notify Group drop-down list. Only groups that
are already created in the system database will appear in the list.
5. Click OK to save settings.
To remove a group as a notification group from a queue or directory:
1. Locate the directory or queue you want to modify in the Directory
panel.
2. Open the Directory/Queue Properties dialog box by right-clicking on
the folder or queue in the Directory panel and selecting Properties
from the pop-up menu.
176
Group Traits for the Database
3. Select the Groups tab.
4. Select !<none> from the Notify Group drop-down list. When
!<none> is selected, no group is applied; therefore, no users will be
notified whenever modifications are made to the queue or directory.
Click OK to save settings.
Restricted Group
Members of the restricted group are prevented from accessing directories
and queues that have no group traits assigned. For instance, if you set a
queue’s Read and Write group settings—located on the Groups tab of the
Directory/Queue Properties dialog box—to !<none>, then that queue has
no Read or Write group assigned; therefore, a member of the restricted
group will not be able to see or write to that queue. The restricted group is
commonly used at sites for temporary users. The system administrator can
assign a temporary user to the restricted group and then to a limited set of
specific groups. That user is then restricted to only those directories and
queues that have those specific groups.
Restricting Both Reading and Writing
You may need to restrict a queue so that one group of users can read and
write in that queue, while another group can only read stories.
Suppose you want to restrict your Assignments directory. In most systems,
a few people—mostly those at the assignments desk—need write
permission to this directory. A larger number of users, such as writers and
reporters, need to read, but not edit, stories in the Assignments directory.
The people who should have read-and-write permission for the
Assignments directory come from different areas of the newsroom, so it is
unlikely a group exists with just those users. However, you could set it up
like this:
177
Chapter 6 Groups
1. Create a group called assignments to represent users who need write
permission for the Assignments directory.
2. Similarly, create a group called staff to represent users who need read
permission.
3. Assign the staff group to the directory’s read group trait and the
assignments group to the directory’s write group trait.
Transferring Group Assignments
You may need to locate every instance where a particular group is assigned
to a directory or queue and change that assignment so that another group is
assigned to that directory or queue. Use this form of the gtraits console
command:
gtraits
transfer current-group-name new-group-name
Groups are marked for transfer, but no changes are made to any directories
or queues until dbpurge runs. Both groups that you include in the gtraits
transfer command must already exist.
Hiding Queues and Directories
In addition to restricting access to various queues, you can use group
access and usage restrictions to hide queues or directories by placing a
strict read restriction on them.
A number of queues on your system probably have very tight write
security to ensure that only certain users can create and edit stories in those
queues. If other users do not need to read the stories in the queue, you may
give the queue tight read security. This prevents the queue from appearing
on unauthorized users’ screens. Some examples of this are the Dead queue,
a Suggestions queue, an Employee Evaluations queue, and so forth.
n
178
All users that you want to have the capability to send stories to these
queues need to have write access to the queue, but not necessarily read
access. For instance, all users will need write access to the Dead queue so
Mail Aliases
they can delete stories in other queues, which then moves them to the Dead
queue. But you can limit who has access to the Dead queue by using the
read group trait to restrict access to a certain group of users.
Another example is the System directory, which is usually restricted so that
only superusers can write stories there. You can hide this directory so that
it does not appear in the main directory for normal users by setting its read
group to a group that has no users. Because superusers can read everything
in the database, they can still see the directory.
Many put the system
administrator’s name in
the sysop group for email purposes.
For this example, your system could use an empty group called sysop,
which is then assigned as the read group trait for the System directory.
To set the System directory’s read group to sysop:
1. Locate the directory or queue you want to modify in the Directory
panel.
2. Open the Directory/Queue Properties dialog box by right-clicking on
the folder or queue in the Directory panel and selecting Properties
from the pop-up menu.
3. Select the Groups tab.
4. Select the sysop group from the Read Group drop-down list. If it does
not appear in the list, it has not been created in the system database.
See “Creating a New Group” on page 156 for more information.
5. Click OK to save settings.
Mail Aliases
Some groups already in your system probably represent collections of
people to whom you or other users want to send mail. For instance, you
may want to send mail to all the producers in your newsroom. Producers
probably already exist as a group in your system, and the mail system can
use the producers group membership information to direct the mail to the
right people.
179
Chapter 6 Groups
You may also want to send mail to a group like the entire staff of your
5 p.m. newscast. That group may not already exist, and the need for such a
group may be related solely to mail delivery and not system security.
If you have such a need, do not create a group solely to meet the mail
delivery objective. Use a mail alias, instead.
Creating a Mail Alias
A mail alias is a name up to 20 characters long that represents a group of
people who often receive similar mail. Each mail alias acts like a
distribution list. This way, instead of sending mail to each user
individually, you can send mail to the alias and the mail server distributes a
copy of the mail story to each user on the group’s membership list.
Like groups, mail aliases are defined in stories in the Groups queue in the
System directory.
n
You can have an unlimited number of aliases, but only 250 groups. Groups
should primarily be used for security purposes; Aliases are not used for
security purposes, only for mail delivery.
To create a mail alias, do the following at an iNEWS Workstation:
1. Open the System folder in the Directory panel.
2. Open the Groups queue.
3. Select File > New Story.
A new blank Story panel appears. In the Queue panel, a blank entry in
outline appears.
4. Type the name of the alias in the blank field of the Queue panel or in
the corresponding title field of the Story Form panel.
5. Click inside the Story panel and type the alias name and membership
list in this format:
alias alias-name
user-ID user-ID group-name …
user-ID alias-name …
180
Mail Aliases
An alias’s membership list must begin with the word alias followed
by the name of the alias and one or more lines that list user IDs,
groups, or aliases that you want to include.
6. Select File > Save Story.
n
While using aliases for mail distribution, the removal of a user’s account
may result in mail bounce back errors if that user’s name remains listed in
SYSTEM.GROUPS stories. Remember to remove users names from stories
in SYSTEM.GROUPS before removing the user accounts from the system.
This will reduce the potential for mail bound back errors.
Mail Aliases for Other Machines or the Internet
You can send mail to a user on another system connected to your system
over the network. When you put a network mail address in a mail story’s
TO field, the mail server routes the mail to the correct address, which can
be another machine on your iNEWS system or anywhere on the Internet.
You can make it easier to use network mail addresses by assigning them
mail aliases. Then, when you want to mail to someone who is not on a
system connected to yours, use the mail alias.
To assign a mail alias to a network mail address, do the following at
an iNEWS Workstation:
1. Open the System folder in the Directory panel.
2. Open the Groups queue.
3. Select File > New Story.
A new blank Story panel appears. In the Queue panel, a blank entry in
outline appears.
4. Type the name of the alias in the blank field of the Queue panel or in
the corresponding title field of the Story Form panel.
5. Click inside the Story panel and type the alias name and membership
list in this format:
alias alias-name
network-address...
181
Chapter 6 Groups
For instance, to assign the network address jan@kbba_a.bba to a
mail alias called Jan, type:
alias Jan
jan@kbba_a.bba
6. Select File > Save Story.
182
Chapter 7
Keyboards and Macros
Macros are time-saving routines you can assign to a key or key
combination on your keyboard, which then can be evoked with one or two
simple keystrokes. A single macro can be the shortcut to an entire
command sequence.
A keyboard is a group of macros (programmable key definitions) that is
stored in a description (story) file in the system directory. Each keyboard
typically contains macros grouped according to specific job or task, such
as a Producer keyboard.
This chapter explains how you can use macros and description files to
customize keyboards within the following sections:
•
Understanding Macros and Keyboards
•
Customizing Workstation Keyboards
•
Creating a Macro
•
Keyboard Checker
•
Assigning a Default Keyboard to a User
Chapter 7 Keyboards and Macros
Understanding Macros and Keyboards
Macros let the user enter multiple characters and commands with a single
key or key combination. You, as the system administrator, determine the
function of each macro key. You can assign any command, sequence of
commands, or plain text to a key or key combination. A set of macros is
called a keyboard because it defines various actions that take place based
on the keys pressed on an actual keyboard. A keyboard is usually created to
contain a set of macros associated with a specific job, such as writer or
producer.
For instance, suppose a writer in your newsroom frequently writes scripts
for a particular reporter. You can assign the text in that reporter’s usual
sign-off to a macro key on the writer’s keyboard. Then the writer could put
the entire text of the reporter’s sign-off in stories by pressing that key. This
same key may be associated with a different macro, such as one that opens
a rundown queue, if the user is a producer using a different keyboard, or set
of macros.
Keyboards in iNEWS are stored in queues in the SYSTEM.KEYBOARDS
directory. See “Customizing Workstation Keyboards” on page 184 for
more information.
You can assign macros to function keys, such as F1, F2, F3, and so forth,
across the top of the keyboard and to the numeric keys on the numeric
keypad, located at the right side of the keyboard. On iNEWS Workstations
you can use other keys known as state keys, such as Control (Ctrl), in
conjunction with the function and numeric keypad keys as shortcuts to
entire command sequences. See “Creating a Macro” on page 187 for more
information.
Customizing Workstation Keyboards
An iNEWS Workstation keyboard can contain more than 100 macros,
representing possible states of the 12 function keys plus the 10 numeric
keypad keys.
184
Customizing Workstation Keyboards
For example, possible combinations for F7 are:
n
F7
Ctrl+Shift+F7
Shift+F7
Alt+Shift+F7
Ctrl+F7
Alt+Ctrl+F7
Alt+F7
Alt+Ctrl+Shift+F7
The iNEWS newsroom computer system will not recognize the Shift state
key used in combination with the numeric keypad keys. For instance,
{Shift-{Ctrl-{kp9}}} is the same as {Ctrl-{kp9}}. If a user
attempts to create a macro with this combination of keys, the system’s
keycheck program will issue an error message: (M_NUMKEYNOSHIFT)
“Shifted numeric keypad 0-9 keys cannot be
assigned.”
The keyboard, or set of macros, is actually a story that is saved in a specific
location in iNEWS. The macros are listed as text in the story. To create a
keyboard containing a set of macros for iNEWS Workstations, you create a
story in one of the queues in the SYSTEM.KEYBOARDS directory.
The first story in the queue with a title containing the string inws, which
is not case-sensitive, is used as the keyboard macro definition story for
iNEWS Workstation.
Creating a New Keyboard Story
To create a new keyboard story:
1. Create a queue to hold the story in SYSTEM.KEYBOARDS. To do this
from the Directory panel:
a. Navigate to SYSTEM.KEYBOARDS and right-click on the folder.
b. Select New Queue.
The queue name must begin with a three-digit number. Append a
hyphen immediately after the number, then a descriptive name for
the keyboard. If the number is less than 100, you must supply
leading zeros.
For instance, to create a new keyboard named Producers, you
could name the queue 005-PRODUCERS.
185
Chapter 7 Keyboards and Macros
c
Queues with the number 256 or greater will not work. The valid
numerical range for queue names is 000-255 as shown in the follow
examples: system.keyboards.000-installation
system.keyboards.255-archivist
You can have at most 250 queues defined in SYSTEM.KEYBOARDS.
Although the numbers 251-255 are valid, you cannot have actual
queues numbered 251-255, since those would exceed the 250 limit on
the number of queues in a single directory.
2. Open the newly created queue. To do this from the Directory panel, do
one of the following:
t
Double-click on the Queue icon
t
Select the queue and press Enter.
3. Press the Insert key to create a new, blank keyboard story in the queue.
If an existing keyboard story is similar to the new keyboard description
you want to create, you can copy it into the queue and modify it rather
than creating a keyboard story from scratch.
n
If writing macros for iNEWS Workstation, the story’s slug must contain
inws in it.
4. Create or modify the macros in the keyboard story. See “Creating a
Macro” on page 187 for more information.
5. Save the keyboard story.
n
186
The “key” mailbox is used by the iNEWS keycheck program, which checks
for errors immediately after a keyboard story is saved. See “Keyboard
Checker” on page 194 for more information. The “key” mailbox must be
set on keyboard queues. The mailbox trait can be viewed and changed from
the Directory Properties dialog box. See “Directory/Queue Properties
Dialog Box” on page 121 and “Maintain Tab” on page 133 for more
information.
Creating a Macro
Creating a Macro
Keyboard macros begin with the “at” symbol (@) and are written in
segments which make up a macro definition. The segments include a Key
Indicator, a Separator symbol (~) , an Action, and an optional Comment.
The segments must appear in the proper order for the macro to work
correctly.
For instance: <Key Indicator> <Separator> <Action> <Comment>
The following is an example of a macro definition:
@{f4}~{alt gd}wires.all{enter};Go to wires.all
This macro allows the user to press F4 to navigate to the WIRES.ALL
queue rather than completing the longer process—typing Alt+G+D to open
the Destination dialog box, then typing WIRES.ALL, and pressing
Enter—to do the same thing.
The segments of the sample macro definition are explained below:
Macro segment
Function
@{f4}
The Key Indicator begins the macro definition line with
the @ symbol. Then, {f4} indicates that the macro is
invoked when a user presses and releases the key(s)
defined within the braces—in this case, the F4 key. The
braces { } are used to group letters together as one key
or combination of keys.
~
The Separator is the tilde character (~) and it divides the
key you are defining from the action that the macro is to
perform.
{alt
gd}wires.all{enter}
The Action includes a series of keystroke combinations.
{alt gd} presses Alt, then types gd (for the Go,
Destination drop-down menu options), and releases Alt.
Then wires.all is typed in the text field in the
Destination dialog box. And {enter} presses the Enter key
and releases it.
;Go to wires.all
The optional Comment begins with the ; and provides a
description of what the macro does.
187
Chapter 7 Keyboards and Macros
Adding Comments
Do not use the semicolon character in a macro. If you include a semicolon
(;) in a description line in iNEWS, everything following that character is
treated as a comment by the system and is ignored.
A keyboard macro in iNEWS NRCS can be as long as you want. All text
that appears with an “at” symbol (@) at the start of a paragraph through to
the end of that paragraph is considered to be part of a macro (except for
comments as indicated by a semicolon).
If you create a macro longer than 80 characters, let the system wrap the
cursor around to the next line. When you finish the macro, press Enter to
start a new line for another macro. However, be sure that the next line starts
with the @ symbol or a semicolon.
n
If you end a paragraph and start another paragraph with anything other
than an @ symbol or a semicolon, you will get an error message indicating
an invalid key definition.
Assigning Macros to Keys
Keyboard macros for iNEWS NRCS are written using the key names
which are in the file: /site/dict/keymacros. You can use
alphabetic and numeric keys, and most punctuation marks in a macro.
However, some punctuation marks are reserved for specific functions
within a macro, as shown in this section’s Key Names table.
For instance, because the open brace ({), close brace (}), and tilde (~)
characters have special meanings, you cannot use them as plain text in a
macro. You can use the @ symbol in the action of the macro—to the right
of the Separator, or tilde(~)—but not as plain text on the left-side of the
Separator, where it indicates the start of a new macro definition.
Only certain keys can be defined as indicators for macros. On the iNEWS
Workstation, you can define macros for the function keys, and the numeric
keypad keys, located at the right side of any standard PC keyboard.
188
Creating a Macro
n
To use the numeric keys on the numeric keypad, Num Lock must be off.
In most cases, you can define macros by combining the function or keypad
keys with one or more state keys, such as Alt+F7. The other keys—listed
in the second part of Key Names table as Edit, Arrow, and Miscellaneous
keys—can appear in macros, but cannot have macros assigned to them.
Key Names
Function
Keys
Keypad
Keys
State
Keys
Edit
Keys
Arrow
Keys
Miscellaneous Reserved
f1
kp0
shift
insert
up
tab
@ (in Indicator)
f2
kp1
ctrl
home
down
backspace
~
f3
kp2
alt
pageup
left
space
{
f4
kp3
pagedown
right
enter
}
f5
kp4
end
f6
kp5
f7
kp6
f8
kp7
f9
kp8
f10
kp9
;
f11
f12
Predefined System Function Keys
Some function keys have predefined system functions, such as F1, which
opens the iNEWS Online Help System. These keys are provided as
accelerator keys for common user functions.
189
Chapter 7 Keyboards and Macros
c
Redefining these predefined keys is allowed, but is not recommended.
If you save a macro for a key that has a predefined function, the
system displays a warning message stating that a reserved key has
been redefined. See “Warning Messages” on page 197 for more
information.
The following table shows the standard predefined system function keys.
190
Function Key or
Key Combination
Predefined System
Function
F1
Opens the iNEWS Online Help System
F2
Edit a field (or cell) in the Queue panel
F3
Find Next
Alt+F4
Exits the iNEWS program
Ctrl+F4
Closes a workspace
F5
Refreshes display in Queue or Story panel
Ctrl+F5
Discard changes
F6
Toggles between Instruction panel
(production cue) and Story Text panel
Shift+F6
Toggles between Story Text and Story Form
panels
F7
Opens Wire Urgent Workspace (Wire Priority
queue)
Shift+F7
Opens Wire Alert History window
F8
Toggles Message toolbar on and off
Shift+F8
Opens Message History dialog box
F9
Toggles Mail Workspace open and closed
Creating a Macro
State Keys
The Alt, Shift, and Ctrl keys are known as state keys, because their state
affects what happens when another key is pressed. For instance, pressing
F7, Shift+F7, Alt+F7, Alt+Shift+F7, and so on, can execute different
macros.
To include a state key in a macro:
1. Begin with an open brace character ({)to indicate that a key is being
pressed.
2. Follow with the name of the state key, such as Alt.
3. Since a state key does not do anything by itself, enter the name of the
next key pressed along with it. Enclose this key in another set of braces
{ } if it is a function or numeric keypad key, such as F7 or kp1.
4. End with a close brace character (}) to indicate the release of the state
key.
n
The iNEWS newsroom computer system will not recognize the Shift state
key if used in combination with the numeric keypad keys. For instance,
{Shift-{CTRL-{kp9}}} is the same as {CTRL-{kp9}}
You can use state keys in the Indicator or Action sections of a
macro—either as the indicator for defining the macro key combination or
within the actions that the macro is to carry out. Here is an example:
@{alt{f8}} ~ {alt crl}
In the example, a state key is in the key indicator combination (Alt+F8)
that executes the macro which contains another state key in the macro
action itself (Alt+C+R+L).
Braces are used to group letters that are key names or key-combinations.
For instance, {alt{f8}} is not the same as {alt f8}. In the first
example, the Alt key is held down while the function key, F8, is pressed. In
the second example, the Alt key is held down, while two separate keys, F
and 8, are pressed in sequence.
191
Chapter 7 Keyboards and Macros
The following table shows more examples of key combinations and how
they appear in macros. The second combination shows how to write a
macro using multiple state keys combined. It does not matter whether
letters like these are in uppercase or lowercase in macros.
Key Combinations
Macro
Ctrl+kp1
{ctrl{kp1}}
Alt+Shift+F7
{alt{shift{F7}}}
Alt+G+D
{alt gd}
Using Plain Text in Macros
Besides using individual keys and key combinations in a macro definition,
you can also have the macro enter plain text. This could be text you include
in stories often or text that you enter in the fields of a dialog box in
iNEWS. For example:
@{ctrl{f9}}~{space} Roll tape - Sound up full
{space}{enter}
Whenever you include plain text in a macro, all spaces in the text are
preserved. The case (lowercase or uppercase) is preserved as well.
Repeating Macros
If there are actions performed at the workstation that require executing the
same command or series of commands over and over, you can create a
repeating macro that performs this action. Once invoked, a repeating macro
executes at regular intervals until the user presses Ctrl+Break or Escape.
To have a macro in an iNEWS keyboard perform a repeating function,
place the command {repeat} just before the actions you want the macro
to repeat.
192
Creating a Macro
As an example, create a macro that makes it easier to browse wires and
assign it to the F4 key. This macro takes the user to WIRES.ALL and then
scrolls down one story at a time. It pauses briefly on each story, so the user
can read the title and decide whether to read the story. The user stops
scrolling by pressing Ctrl+Break or Escape.
To create this repeating macro:
1. Begin the macro by typing @{f4}~ to indicate that it is for the F4 key.
2. After the Separator (~), type {alt gd} wires.all {enter} to
open a window displaying WIRES.ALL.
3. Add the repeating portion of the macro, which moves the user down
one line at a time at regular intervals. Begin by typing {repeat} to
indicate that what follows is repeated. Then type {down} to move the
cursor down one line in the queue.
The range for the
{pause} option is 1
to 60 seconds.
4. Use the {pause} command to make the macro pause a few seconds
on each story. Follow this command with the number of seconds you
want the repeating macro to pause. To make the macro pause two
seconds before repeating, type {pause 2}.
The macro should be one continuous line of text. Otherwise, allow the
computer to wrap the text if it extends beyond screen margins.
The completed macro looks like this:
@{f4}~{alt gd}wires.all{enter}{repeat}{down}
{pause 2}
Notes of Caution for Creating Macros
When creating macros—whether or not they are repeating macros— care
should be taken. First, certain commands should never be used in macros.
c
Do not use the Duplicate or Kill commands in repeating macros. Doing
so raises the risk of accidentally killing the wrong stories or filling up
the database and causing a “low-on-space” condition.
Secondly, all macros should be created using steps only to a point where
varying options are not a possibility. For instance, a system administrator
wants a macro designed to open a story and type a specific production cue
193
Chapter 7 Keyboards and Macros
on a certain line, then save the story and open the next one in the lineup.
The system administrator must keep in mind that the process for editing
stories may vary for each user depending on user preferences or queue
location. In other words, in some cases, a user may start to save a story and
be prompted by a dialog box that requests confirmation. This confirmation
box is a user preference that varies with each user. A similar confirmation
dialog box may appear if a user is opening a story in a read-only queue. So,
any macro must incorporate these possibilities or stop prior to them.
Otherwise, the macro may hang up on an unexpected dialog box.
n
To immediately stop a macro that is in progress for any reason—including
one hung up on an unexpected dialog box—press the Escape (Esc) key.
Keyboard Checker
Whenever you modify and save macros in a keyboard description story, the
system checks the keyboard and all its macros for problems that may
prevent the macro from working properly. If it finds a problem, it sends
you a message describing the error.
n
Error messages are prefixed with inws macro #%d. The %d represents
the macro number. Macros are numbered from one (1) at the beginning of
the story. Some of the error messages will include the macro key identifier.
The iNEWS system will also issue a warning if any predefined system
function keys—that is, those keys reserved for iNEWS system
functions—are replaced with a macro. This warning can be ignored if you
want to override the pre-defined system function keys with a macro. See
“Predefined System Function Keys” on page 189 for more information.
As long as you get a Keyboard ok message, the description story can be
used, but go back and fix any noted problems so the keyboard does what it
is supposed to.
194
Keyboard Checker
Error Messages
The following table contains a list of messages from the message
dictionary that can appear after you save a keyboard description story.
Error message
Explanation
Duplicate key description
(M_KEYDUP)
You defined the same function key twice in the
story; remove one of the definitions.
First key description does not begin You must use an @ symbol as the first
with @ (M_KEYSTART)
noncomment character in the description story.
Invalid key number (M_KEYRANGE)
You tried to define a function key with a
number that is not supported.
Keyboard description contains too
many characters (M_KEYLONG)
This description story is too long. Shorten the
macros by using command abbreviations, or
deleting macros you do not use.
Keyboard NOT usable
You must fix the errors in this description story
before you can use it.
Keyboard ok
(M_KEYBAD)
(M_KEYOK)
You may use this keyboard, even if it has
errors.
Missing key number separator (~)
(M_KEYSEP)
You must follow the key number of an
extended programmable key with a tilde (~).
Not enough key descriptions
(M_KEYMIN)
You must include lines for all the standard VT
keys. Include only the key’s number on a blank
line, if you don’t want to assign a function to a
standard key.
Warning: a key definition contains a One of your key definitions has a repeating
repeating function (M_KEYREP)
function. If this is not what you want, edit the
description.
Warning: badly placed @ exists in
key definition line (M_KEYFUNKY)
A line in the story contains an @ symbol that is
not the first character in the line or between two
commands. If this is not what you want, edit
the description.
195
Chapter 7 Keyboards and Macros
Error message
Explanation
Memory allocation error(M_BADMEMORY) An internal error; contact Avid Technical
Support.
196
Unable to stack keywords
(M_BADSTACK)
An internal error; contact Avid Technical
Support.
Mismatched {} (M_MISMATCH)
The macro does not have paired brackets.
No {} found for reserved word
(M_RESWORD)
A reserved word (key name) was found but was
not enclosed in brackets.
Could not locate }%d (M_NOLOCATE)
Unbalanced { } pairs. Missing a }. The %d
represents the occurrence number of the
expected }.
Circular reference to macro #%d:
(M_REFERENCE)
A circular reference was found in the macro.
The %d represents the macro number of the
reference.
Multiple tildes (~) found
(M_TWOTILDES)
A macro definition cannot contain a tilde (~).
Multiple macro keys: %s %s
(M_TWOTAGS)
An invalid key indicator specified—it contains
two key names. Each %s represents a key
name.
Unexpected: %s (M_UNEXPECTED)
An invalid key indicator specified—it contains
plain text. The %s represents the unexpected
text.
Unknown macro key identifier: %s
(M_UNKNOWN)
An invalid key indicator specified—it contains
a key name that is not one of the recognized
key names. The %s represents the unknown key
name.
No tilde (~) found (M_NOTILDE)
There is no tilde (~) separating the key
indicator from the key action.
No macro key tag (M_NOTAG)
There was no key name included in the key
indicator.
Keyboard Checker
Error message
Explanation
Shifted numeric keypad 0-9 keys
cannot be assigned macros
(M_NUMKEYNOSHIFT)
You cannot assign a macro to a keystroke
combination of Shift and a numeric keypad
key.
Empty macro (M_EMPTY)
There was no key action data in the macro
definition.
Duplicate macro definition: %s
(M_TWODEFS)
There was a duplicate key indicator defined.
The %s represents the key indicator.
Invalid pause interval (M_BADPAUSE)
The interval included in the pause command
was not a number between one and sixty.
Isolated keyboard state:
(M_LONESTATE)
A state key (Alt, Shift, or Ctrl) was specified
but did not modify the action of any other key,
such as: {shift} instead of {shift abc}
%s does not distribute
(M_DISTRIBUTE)
A non-state key (not Alt, Shift, or Ctrl) was
found while another key was still depressed,
such as: {insert{home}}. The %s represents the
key still depressed.
Ignoring: %s (M_IGNORING)
The state of a macro definition was expected
but did not begin with an at character (@). All
of the text is being ignored. The %s represents
the text being ignored.
Warning Messages
The following table lists the messages that appear if the keys reserved for
iNEWS system functions are redefined.
Reserved key
Warning message
F1
Warning: “Help” key redefined (M_STDHELP)
F3
Warning: “Find Next” key redefined (M_STDFINDNEXT)
Alt-F4
Warning: “Exit” key redefined (M_STDEXIT)
197
Chapter 7 Keyboards and Macros
Reserved key
Warning message (Continued)
CTRL-F4
Warning: “Window Close” key redefined (M_STDCLOSE)
CTRL-F5
Warning: “Discard Changes” key redefined
(M_STDDISCARD)
F5
Warning: “Refresh” key redefined (M_STDREFRESH)
F6
Warning: “Script Swap” key redefined (M_STDSCRIPT)
F7
Warning: “GoTo Priority Queue” key redefined
(M_STDPRIORITYQUEUE)
Shift-F7
Warning: “GoTo Alerts History” key redefined
(M_STDALERTSHISTORY)
F8
Warning: “Communicate Message Bar” key redefined
(M_STDMESSAGEBAR)
Shift-F8
Warning: “Communicate Message Show History” key
redefined (M_STDMESSAGEHISTORY)
F9
Warning: “Communicate Open/Close Mail key
redefined (M_STDMAIL)
Assigning a Default Keyboard to a User
Users can select a keyboard—that is, a set of macros—to use at any time
by using the Preferences option in the Tools menu. The system
administrator can assign the default keyboard for a user, which appears
when the user first logs on.
When you add a new user to the system, you may want to assign a
keyboard as a default for the user at that time, according to the role the user
plays in your newsroom. For instance, a new writer may get the “user”
keyboard, a new producer would be assigned the “producer” keyboard, and
so forth.
198
Assigning a Default Keyboard to a User
You assign a set of macros as a user’s keyboard by assigning the keyboard
story containing those macros to that user. When the user presses a
programmable key, the system looks at the user’s assigned keyboard story
and executes the macro assigned to that key.
To assign a keyboard to a user as a default from an iNEWS
Workstation:
1. Select Tools > Options > Users. The Manage User Accounts dialog
box appears.
2. Do one of the following:
If you clicked New
User rather than
Modify in step 2, the
dialog box appearing in
step 3 will be titled
Add New User. See
“Adding a New User
Account” on page 84
for more information.
t
Create a new user account by clicking New User.
t
Modify an existing user account by selecting a user and clicking
Modify.
199
Chapter 7 Keyboards and Macros
3. In the Modify User Account dialog box, click User Preferences.
n
Access to the Modify User Account or Add New User dialog boxes are
restricted to certain users, such as system administrators and user
managers—that is, users who know the umanager password. See
“Modifying User Traits” on page 62 for more information.
4. In the Preferences dialog box, click the Session tab, if not already
selected.
200
Assigning a Default Keyboard to a User
5. Use the Keyboard drop-down list to select a keyboard for the user.
6. Click Reload.
7. Click OK to save the new keyboard assignment and close the
Preferences dialog box.
8. Click OK to save the modified user account and close the Modify User
Account dialog box.
9. Do one of the following:
t
Select another user to assign a keyboard to, and click Modify.
t
Click Close to close the Manage User Accounts dialog box.
10. The next time the user logs in, the computer will automatically assign
the new keyboard. If the user is already logged in, he or she needs to
reload the keyboard or log out and then log back in to use the new
keyboard assignment.
n
Users can choose a different keyboard than what is assigned to their user
accounts at any time by doing the following: Select Tools > Options >
Preferences. Then, choose the Session tab, pick a keyboard from the dropdown list, and click the Reload button.
201
Chapter 7 Keyboards and Macros
202
Chapter 8
Forms
You can use standard iNEWS forms that come with the system or
customize your database by creating forms and assigning them to queues,
based on the kind of information you want to appear in the stories in those
queues. You can also use forms in your database to replicate any preprinted
forms that you use currently, such as rundowns and assignment sheets.
This chapter explains the following:
•
Form Names, Locations and Guidelines
•
Creating Forms
•
Assigning a Form as a Queue or Story Form
•
Form Field Types and Definitions
•
Standard iNEWS Forms
Chapter 8 Forms
Form Names, Locations and Guidelines
You create forms that are stored as stories in queues located in the database
file structure under the main system folder, SYSTEM.FORMS. The folder
name format is SYSTEM.FORMS.N.NAME, where N is the first letter of
the form name.
For instance, a rundown form may be SYSTEM.FORMS.R.RUNDOWN.
You can have up to 250 forms starting with each letter.
Guidelines for Designing Forms
Follow these general guidelines in designing forms:
•
The story form and queue form can be different, but all fields
displayed in the queue form must exist in the story form before you
can enter or display data in that field.
•
In iNEWS, you cannot system print wider than 80 columns. If a form
extends beyond 80 columns, the extra columns will be dropped from
printing.
Creating Forms
You can create a new form from any iNEWS Workstation. This section
outlines the procedures for constructing a basic form for a rundown. After
building this form, you can easily modify it to match the rundown you
currently use.
The following procedure takes you through steps to create the basic
rundown form, which can be used to create any form in the system.
To create a new form at a workstation:
1. Navigate to the SYSTEM.FORMS folder. The queue for the new form
must be stored in the SYSTEM.FORMS folder.
2. Select Tools > New Folder. A new highlighted directory labeled NewFolder appears.
204
Creating Forms
You can skip steps 3 &
4 if the alphabet folders
already exist in the
SYSTEM.FORMS
directory.
3. Type the name of the folder, such as R.
4. Select the alphabet folder, such as R (the folder for forms with names
that begin with the letter R), in which you want to create the new form.
5. Do one of the following:
t
Select Tools > New Queue.
t
Right-click on the folder and select New Queue from the pop-up
menu.
A new highlighted file labeled New-Queue appears.
6. Type the new form queue’s name, such as Rundown.
7. The Forms Allowed attribute should be inherited from the parent
queue, SYSTEM.FORMS, but you can ensure the Forms Allowed
database trait is applied to the queue by doing the following:
a. Right-click on the queue in the Directory panel to open the Queue
Properties dialog box.
b. Select the Forms Allowed check box so that a check mark appears.
See “Changing
Database Traits” on
page 117 and “Forms
Tab” on page 122 for
more information.
c. Click OK to save changes. Otherwise, you will be unable to create
a form in that queue.
205
Chapter 8 Forms
8. Double-click the queue to display it in the Queue panel.
9. Do one of the following:
If the story form fields
do not appear, click on
the Story drop-down
menu and select the
option to Show Form
Area.
t
Select File > New Story.
t
Position your cursor in the Queue panel and press the Insert key.
A new story row appears in the Queue panel and opens in the Story panel.
At the top of the Story panel, there is the Story Form panel that displays the
story form fields (using the default form or the form previously assigned to
the queue). The following graphic shows the Queue and Story Form panels
with some standard form fields.
Queue panel with
a new story row
Story Form panel
with six fields
10. Modify each field to customize the new form. For instance, you would
need to select each field’s type, which defines the field’s function
within the form. See “Customizing Forms” on page 207 and “Form
Field Types and Definitions” on page 214 for more information.
Since a basic rundown form does not necessarily use the default fields,
as shown in the above graphic, field modification is needed. For
instance, the form may include the following fields:
206
•
Page field uses the PAGE-NUMBER field type
•
Title (or Slug) field uses the TITLE field type
•
Presenter (or Anchor) field uses the PRESENTER field type
•
Writer (or Reporter) field uses either the CREATE-BY or
WRITER field type
Creating Forms
n
n
When a new story is created, and the field called Writer is a CREATE-BY
field type, it is filled in automatically but cannot be changed by users.
However, if the WRITER field type is selected for the field called Writer,
then when a new story is created, the field is filled automatically, but data
in it can be changed manually by a user.
•
Graphics (or Production Notes) field uses the VAR-N field type,
where N is any number
•
Audio time field uses the AUDIO-TIME field type
•
Back time field uses the BACK-TIME field type
Text and production cues may be placed into the body of the form and text
may be put into the form fields; if so, all data contained in the story form
will appear in a new story whenever one is created in a queue with that
story form.
11. Save the story and exit the queue, accepting current fields and form
properties as the new form.
Customizing Forms
After you create the form queue in SYSTEM.FORMS, you can modify
fields to customize the new form.
To customize a form, open its story and do the following:
1. Put the cursor in the Story Form panel and right-click. A pop-up menu
will appear.
There are three menu options for customizing form fields: Insert Field,
Delete Field, and Field Properties. Access to these options vary, based
on whether or not you right-click on a field in the Story Form panel.
Another option in the
pop-up menu is Label
Borders. See “Label
Borders” on page 212
for more information.
2. Choose an option in the pop-up menu, based on one of the following
(The choice you make also determines which dialog box appears):
207
Chapter 8 Forms
t
Select Delete Field if you want to remove an existing field from
the form. (The field you right-clicked on is the one you will delete
if you choose this option.) The Confirm Field Delete dialog box
will appear. Go to step 3.
t
Select Field Properties to modify properties of an existing form
field. Go to step 4.
t
Select Insert Field to add a new field to the form. Go to step 5.
3. Confirm your command to delete the field and, if necessary, return to
step 2 to continue modifying form fields.
208
Creating Forms
4. The Form Properties dialog box appears.
Use the Apply to radio buttons to determine whether you want your
property modifications to be applied to:
n
•
Current field—the one you right-clicked on
•
Current row—all fields in the row of the field you right-clicked on
•
Entire form—all fields in the form
The rest of the Form Properties dialog box offers the same form options as
those explained in step 5.
209
Chapter 8 Forms
5. The Insert Field dialog box appears.
Select various form options—as explained in the following table—to
determine appearance and function of field(s) in the form.
210
Option
Explanation
Label
Enter current field’s name you want to appear in the Story
Form panel.
Type
Select a field type from the drop-down list, which defines
the field’s function. See “Form Field Types and Definitions”
on page 214 for a detailed explanation of the various types
you can choose, including variable fields that allow you to
make up your own field names, such as “shot” or “printed.”
Starts new row
Select this check box to force the field to be the first one in
the next row of the form.
Creating Forms
Option
Explanation
Label size
Enter a numerical value to determine the label size.
This size is in approximate characters. Using a proportional
font will, of course, cause the number of characters to vary.
Generally, label size should be set to edit size plus one.
Edit size
Enter a numerical value to determine the space text will fill
in the field.
The numerical value entered for edit-size does not limit the
amount of text that can be typed in the field, but just the
amount of text viewed in the field at any one time.
n
Attributes
System administrators can set a limit for text in Story
Form fields, using a Registry value defined as VT
Compatibility at each workstation.
Select attributes for the form field.
• Read-Only check box determines whether the form field
can be read (not modified).
• Affects Ready check box determines whether the form
field participates in determining the Ready field value.
Text alignment
Select text position within the field.
Label placement
Select label position.
• Top (default) puts label on top of the field
• Bottom puts label below the field
• Left or Right puts label to either side of the field.
Label alignment
Select way in which label aligns (left, center, or right) with
the field.
Text style
Select appearance of text (bold, italic, or underline) in the
field.
Label style
Select appearance of the label (bold, italic, or underline).
n
Any combination of these attributes may be selected.
211
Chapter 8 Forms
6. Do one of the following:
t
Click OK in the Form Properties dialog box to record changes to
an existing form and close the dialog box.
t
Click Insert Before or Insert After in the Insert Field dialog box,
depending on where you want the new field to appear in the form
in relation to the field (or cursor position) you right-clicked on in
step 1. This will record the changes and close the dialog box.
7. Save story in the form queue, by clicking the Save button or selecting
File > Save.
After a form is created and customized, it can be assigned to other queues
in the database as either the queue form, which dictates appearance of the
queue, or story form, which dictates appearance of stories created in the
queue.
Label Borders
Label borders provide various information about fields in a tool tip format.
To turn on Label borders in the Story Form panel:
1. Right-click in the Story Form panel.
2. Select Label Borders in the pop-up menu.
3. Position mouse pointer over a field label to view tool tip.
When selected, rectangular borders are placed around the labels for each
field in the form. When the mouse pointer is positioned over a field’s label,
a tool tip appears that displays that field’s type, and the character count for
the field position and label size.
For instance, the field called Slug (shown above) is a TITLE field located
12 characters in from the left with a label size of 18 characters. So, from
the position of the Slug field, you can determine the Pg Number field has a
Label size of 12 characters. Also, the Contact field, in the example, is
located 30 characters in from the left—that is, its position in the row is
212
Assigning a Form as a Queue or Story Form
equal to the sum of the label sizes for the fields directly to its left. This is
the case for sites that follow the general recommendation by Avid that
label sizes be equal to each field’s edit size plus one. However, if the fields’
edit sizes are larger than their label sizes, a field’s position in the row
would be based on the larger of the two. You may confirm these figures by
positioning your mouse over the fields and viewing the tool tips that appear
for each field. Similar to those that appear for labels, field tool tips also
provide character count for position and edit size.
n
Positioning labels to the left or right of fields rather than above or below
will also result in adjustments for calculating field positions on a row,
since both the label and edit sizes would have to be included instead of the
larger of the two.
Assigning a Form as a Queue or Story Form
Queue and Story forms are database traits that allow you to assign different
forms to different folders and queues using the Directory/Queue Properties
dialog box at the workstation, or the dbtraits command at the console. For
more information on how to assign a form at the console, see “Queue
Form” and “Story Form” on page G-23.<--Fix XREF
You assign these traits to define the appearance of information in the
Queue panel and Story Form panel.
To assign a form at an iNEWS Workstation:
1. Navigate to the directory (folder) or queue you want in the Directory
panel.
2. Right-click to open the Directory/Queue Properties dialog box. Access
to this dialog box and its appearance varies, depending on certain
circumstances. See “Directory/Queue Properties Dialog Box” on
page 121 for more information.
3. Do either or both of the following:
t
Use the Queue drop-down list on the Forms tab to select the form
you want to apply to the directory as queue form database trait.
213
Chapter 8 Forms
t
Use the Story drop-down list on the Forms tab to select the form
you want to apply to the directory as story form database trait.
See “Forms Tab” on page 122 for more information.
4. Click OK to save changes and apply the new queue/story form
settings.
n
Users should log off and sign back on to view the new queue/story form
settings.
Form Field Types and Definitions
Form field types are explained in this section. Included is the suggested
maximum or minimum length for each field (where applicable) and
whether a user can enter text in the field.
You can repeat only the variable and AFF-READY-N fields in a form,
where N is a different number for each occurrence, such as
AFF-READY-1. You can use all other fields only once.
The following table provides explanation of forms pertaining to broadcast
and/or machine control and which fields are typically used in a variety of
forms/queues.
Field Type
AFF-READY-N
Description
AFF-READY-N fields are created when a system is converted from Avid
Netstation to iNEWS. The AFF-READY-N fields are assigned the “Affects
(N represent any number)
Ready” attribute when created. This means the field affects the display in
the READY status field and allows a user to initialize a story and change its
status. There can be more than one AFF-READY-N field in a form. If any
AFF-READY-N field within a form contains a “?” then the READY field
displays a NOT READY message. If a question mark does not appear in any
of the AFF-READY-N fields in the form, then the Ready field displays a
READY message. This field should precede the READY status field in the
form. In iNEWS, the “Affects Ready” attribute can be assigned to any field
in a form and the result would be the same behavior as described here
pertaining to the AFF-READY-N field. For more information, see the
definition for the READY field in this document.
214
Form Field Types and Definitions
Field Type
Description (Continued)
AIR-DATE
When a story is aired using the show-timing function, the date and time it
airs is inserted in this read-only field. This field is designed to show which
story is currently on-air and give users a sense of how much time remains
until a later story goes to air. As the producer syncs timing on stories, the
queue display on other iNEWS Workstations shows that story in a different
color. (Peach is the standard default color rule.) The format on iNEWS
Workstation is controlled by the workstation control panel for regional
settings.
These fields are used differently, depending on the queue in which they are
used. They appear in Machine Control Terminal (MCT) forms and some
(N represents 1 through 5;
ControlAir forms. Also, many of the fields have different meaning,
X represents any number)
depending on the device type. For instance, in an MCT form, the event ID
for a video/cart machine goes in the APP1-1 field, but in the APP2-1 field
for a CG or SS, where the APP1-1 field is used for the style. These fields
were previously used in the mail and account forms in Avid Netstation, but
are no longer used for those forms in iNEWS. The APPN-X fields have
been renamed in iNEWS and occur only in template conversion from Avid
Netstation.
APPN-X to APPN-X
AUDIO-TIME
This field will display the estimated time for reading a story, which can be
estimated by the computer system or entered into the field by a user. If a
user enters a time in the field, the system will use it to calculate the total
time. If there is also a TAPE-TIME field in the form, the system adds the
TAPE-TIME to the AUDIO-TIME to calculate the story’s total time.
Without any user input, the system will display an estimated time based on
the length of the story and presenter’s read rate, which is obtained from the
PRESENTER field in the form. If there is no PRESENTER field or it does
not contain a user ID, then audio time is based on the system’s default read
rate. The length of the story is actually the word count of the story, since
the read rate is based on words per minute.
If a user has entered a time in the field and wants to restore the audio time
calculated by the system, the user should remove entered data from the
field with the space bar, delete, or backspace key. After the cursor leaves
the form field, the system will then display the computer-calculated audio
time and recalculate total time accordingly.
215
Chapter 8 Forms
216
Field Type
Description (Continued)
BACK-TIME
The system displays the back-time in this field. The back-time field is
usually eight characters wide, such as 00:00:00. A user can enter data in
this field to indicate hard-hit times for back-timing to certain points within
a program.
CA-CAPTURED
This field displays total number of characters captured during a session
connection; it is one of eight special fields used in the SYSTEM.ACCOUNT
queue form for logging connection time activity. Although this field is not
required, omitting it will prevent iNEWS from displaying the
corresponding information in the form.
CA-DIRECTION
This field displays the direction of incoming or outgoing connections. It is
one of eight special fields used in the SYSTEM.ACCOUNT queue form for
logging connection time activity. Although this field is not required,
omitting it will prevent iNEWS from displaying the corresponding
information in the form.
CA-ELAPSED
This field displays elapsed time of a session connection. It is one of eight
fields used in the SYSTEM.ACCOUNT queue for logging connection time
activity. Although this field is not required, omitting it will prevent iNEWS
from displaying corresponding information in the form.
CA-IDENT
This field displays the connection identifier. It is one of eight fields used in
the SYSTEM.ACCOUNT queue for logging connection time activity.
Although this field is not required, omitting it will prevent iNEWS from
displaying corresponding information in the form.
CA-ORIGIN
This field displays the origin machine name. It is one of eight special fields
used in the SYSTEM.ACCOUNT queue form for logging connection time
activity. Although this field is not required, omitting it will prevent iNEWS
from displaying corresponding information in the form.
CA-RECEIVED
This field displays the total number of characters received from a remote
system during a connection. It is one of eight special fields used in the
SYSTEM.ACCOUNT queue form for logging connection time activity.
Although this field is not required, omitting it will prevent The iNEWS
system from displaying corresponding information in the form.
CA-REMOTE
This field displays the remotely connected machine name. It is one of eight
special fields used in the SYSTEM.ACCOUNT queue form for logging
connection time activity. Although this field is not required, omitting it will
prevent iNEWS from displaying corresponding information in the form.
Form Field Types and Definitions
Field Type
Description (Continued)
CA-SENT
This field displays the total number of characters sent to a remote system
during a connection. It is one of eight special fields used in the
SYSTEM.ACCOUNT queue form for logging connection time activity.
Although this field is not required, omitting it will prevent iNEWS from
displaying corresponding information in the form.
CG-ADDR
This field holds the ID’s or recorded page addresses from the character
generator on which a super is written by the CG interface.
This field is primarily used in association with machine control systems
and ControlAir systems. See “iNEWS MCS/ControlAir Fields and Forms”
on page 226 for further information on when and how this field is used.
CG-TEMPLATE
This field contains template information for the character generator,
namely the address on the character generator of the template or tab field to
be used for the requested super. This field is primarily used in association
with machine control systems and ControlAir systems. See “iNEWS
MCS/ControlAir Fields and Forms” on page 226 for further information on
when and how this field is used.
CG-TEXT
This field contains text of the super from the machine control instruction
requested by a user in the script. It is written into specified template fields
on the character generator interfaced with iNEWS. This field is primarily
used in association with machine control systems and ControlAir systems.
See “iNEWS MCS/ControlAir Fields and Forms” on page 226 for further
information on when and how this field is used.
CHANNEL
The letter or numerical identifier of the on-air output or playback channel
of an interfaced production device is located in this field. Most production
devices have two or more channels. This field is primarily used in
association with machine control systems and ControlAir systems. See
“iNEWS MCS/ControlAir Fields and Forms” on page 226 for further
information on when and how this field is used.
CREATE-BY
When you open a new story, the system enters your user name in this field.
The name is permanent and cannot be erased or overwritten. In a Mail
form, this field is used to indicate who sent the E-mail.
CREATE-DATE
When you create a new story, the system stores the date and time the story
was created in this read-only field. The format on iNEWS is controlled by
the workstation control panel for regional settings.
217
Chapter 8 Forms
218
Field Type
Description (Continued)
CUME-TIME
The computer displays the cumulative (cume) time. This field represents
the time of all the stories—except the selected story—added together. It
has a suggested minimum length of five characters, and is typically eight
characters.
DEVICE-MGR
This field displays the device name controlling a particular event. This field
is primarily used in association with machine control systems and
ControlAir systems. See “iNEWS MCS/ControlAir Fields and Forms” on
page 226 for further information on when and how this field is used.
DURATION
This field displays the playing length of an event, such as how long a
certain piece of video will be aired or the duration of a CG or still store
effect. This field is primarily used in association with machine control
systems and ControlAir systems. See “iNEWS MCS/ControlAir Fields and
Forms” on page 226 for further information on when and how this field is
used.
EFFECT
This field holds the effect name requested in association with a machine
control or broadcast control event that will be applied to the character
generator or still store machine when it’s taken to air. For instance: a wipe
or a dissolve. This field is primarily used in association with machine
control systems and ControlAir systems. See “iNEWS MCS/ControlAir
Fields and Forms” on page 226 for further information on when and how
this field is used.
Form Field Types and Definitions
Field Type
Description (Continued)
ENDORSE-BY
This field enables a user with write-access to the queue to endorse stories
in that queue. When a story is first saved in a queue, the field is red and
blank. Whenever a user endorses the story, the system places that user’s
name in the ENDORSE-BY field corresponding to that story and the field
changes to green.
To manually endorse a story, click on the field in the queue. If another user
subsequently changes the story and saves it, the ENDORSE-BY field turns
yellow but the endorser’s name remains in the field. This indicates the story
was changed by one user after it had been approved by another. The
endorser can see who made the change by looking in the MODIFY-BY
field if there is one in the story form. The endorser can also withdraw
approval by opening the story form and deleting the user id from the
ENDORSE-BY field.
If the ENDORSE-BY field is not shown in the Queue panel, a user can still
endorse the story by typing a character in the ENDORSE-BY field located
in the story form. A non-system administrator (non-superuser) cannot kill
an endorsed story if another user has the Production Lock set.
n
EVENT-STATUS
The story form must include a MODIFY-BY field to show the green
"endorsed" status in the ENDORSE-BY field.
This field displays availability and play status of an MCS/ControlAir event,
as reported by the production device involved. For instance, a video event
could be reported as N/L (not loaded), CUED,PLAYING, or STOPPED,
among other things. In rundown and Event List forms only the status of a
video event can be displayed. In Machine Control Terminal (MCT) and
iNEWS ControlAir Workstation forms, this field can also contain the status
of CG and still store events. EVENT-STATUS is primarily used in
association with machine control systems and ControlAir systems. See
“iNEWS MCS/ControlAir Fields and Forms” on page 226 for further
information on when and how this field is used.
219
Chapter 8 Forms
Field Type
Description (Continued)
ITEM-CHANNEL
This field is required to allow changing of the channel that primary events
will play on. It does not apply to events entered as production cues in the
story body. The ITEM-CHANNEL field is used to set or display the
channel for primary ControlAir video events.
A user can edit this field—thereby changing the play out channel for a
primary event—manually or through the Assign Channel dialog box at the
iNEWS Workstation. Any changes made at an iNEWS Workstation will be
relayed to the appropriate device.
n
220
When using the Assign Channel dialog box for ControlAir Plugin
(CAP) events, the channel information is displayed in the ITEMCHANNEL field. It is no longer appended to information in the
VIDEO-ID field, as was the case in versions prior to iNEWS 2.0.
LITERAL
This field is a non-editable field, typically used as a label or spacer to assist
in alignment of other fields within the Story Form.
MAIL-CC
This field is used in the Mail story form to display names of users receiving
a copy of an E-mail message.
MAIL-TO
This field is used in the Mail story form to display names of users to whom
an E-mail message is sent.
MODIFY-BY
This field contains the name of whoever most recently modified a story. A
user cannot edit this field.
MODIFY-DATE
Displays date and time story was last modified. Every time a story is edited
and saved, the system updates this field.
MODIFY-DEV
If a device name for a workstation is included in the configuration file, it
appears in this field when a story is saved at that workstation. If the device
name is not included in the configuration file, this field displays the IP
address of the workstation that was used when the story was saved. The
maximum number of characters for a device name is eight, but the IP
address can contain up to 15 characters.
MOS-ACTIVE
This write-protected field is required for the Story Form to accept MOS or
CAP events. The field’s content is created by the software when MOS or
CAP events are created. Content may be cleared if the user selects Delete
Machine Control from the right-click pop-up menu.
Form Field Types and Definitions
Field Type
Description (Continued)
MOS-DURATION
This editable field is required to allow duration information from MOS or
CAP events to be included in calculations for CUME-TIME, BACK-TIME
or TOTAL-TIME fields.
A user can enter a value, which appears bold, directly into this field, which
will be used only in show-timing calculations. Such user-entered
information does not become part of MOS or CAP events that are passed
on to the appropriate MOS device or ControlAir in the case of CAP events.
Deleting user-entered information from the field will allow show-timing to
revert back to duration information supplied by MOS or CAP events.
The contents of MOS-DURATION field are only used if a RUNS-TIME
field is present in the story. The contents of the MOS-DURATION field is
added to the computed runs time of the story and this total is shown in the
RUNS-TIME field. If the user enters a time in the RUNS-TIME field, the
MOS-DURATION field contents are ignored.
MOS-SUBEVENT
This field is reserved for future use.
MOS-TITLE
This write-protected field is required to allow the display of descriptive text
associated with MOS or CAP events.
NSML-LITERAL
This field is only seen in stories and forms transferred from an Avid
Netstation database to an iNEWS database and cannot be created by a user.
The field is a by-product of the database conversion process and represents
a protected field in the Netstation template.
PAGE-NUMBER
This field is used primarily to arrange stories in a queue. If a queue is set to
sort stories by page number, users can change the order of stories in the
queue by entering in new page numbers. This is commonly done with
rundowns, because it allows the producer to quickly change the order of
stories by assigning them new page numbers. This field can also be
displayed on the WinCue prompter. The system uses the first six characters
of the field as a page number when the story is printed. This field is used in
printing only when the story is printed using the “print script” option.
PRESENTER
The system uses the name of the user from this field to look up the user
read-rate. The system then calculates audio time for the story based on the
user read-rate. If a form does not contain a PRESENTER field, the system
calculates the audio time, based on the default read-rate set in the system
profile. (This is usually 180 wpm in English.)
221
Chapter 8 Forms
Field Type
Description (Continued)
READY
In some cases, the system places status information, such as NEW, HOLD,
LOCKED, or WIRE in this field. For instance, a wire story starts with the
WIRE status. When a user changes the story, it changes from WIRE to
READY. In the Mail form, the READY field is used to indicate whether an
E-mail message is NEW or was READ.
A user cannot enter data in this field, but it can be altered based on
information put in other fields with the “Affects Ready” attribute in the
form. In these cases, iNEWS checks the “Affects Ready” fields in the form
for a “?” and if any one of the fields are empty or contain that character as
the first non-blank character, then the READY field displays a NOTREADY status. However, iNEWS displays READY in the READY field if
none of the fields with the “Affect Ready” attribute contain a question
mark.
222
RESULT-INDEX
This field is in forms used to define the display of iNEWS database search
results. It contains the sequence number that indicates the original order of
items within the search results.
RESULT-LOC
This field is in forms used to define the display of iNEWS database search
results. It contains the location of data found during a search, such as the
name of a queue containing the story found matching the search criteria.
Form Field Types and Definitions
Field Type
Description (Continued)
RUNS-TIME
This field displays the sum of all “runs=” times in a story’s production cues
plus the contents of the MOS-DURATION field. If the RUNS-TIME field
is not present in the story form, then the runs time entries will not be
calculated. It it’s not present along with MOS-DURATION, then the time
from the MOS-DURATION field will not be added to the story’s total time.
Runs time entries and the RUNS-TIME form field are not updated when
the iNEWS Workstation is connected only to the local database. When
connected to both the local database and server, the runs times will be
updated when the local database story is edited. Also, when the story is
copied from the local database into a queue on the iNEWS Server, its runs
times will then be updated accordingly.
The field functions much like the AUDIO-TIME field in that it can accept
user entered times while still maintaining the “real” runs time. For
example, a user can manually enter a time of 45 seconds in the field and
that time will be reflected in the TOTAL-TIME field. The sum of runs time
entries as calculated in the RUNS-TIME field are also included along with
time from story text in the text timing clocks, located at the bottom of the
Story panel. However, if a user manually edit the RUNS-TIME field, that
data will not be included in the times calculated for the text timing clocks.
By default, the Runs Time feature uses the word RUNS (not case-sensitive)
to indicate a runs time entry, which is quite flexible. Some examples are:
RUNS=25
RUNS=1:30
RUNS = 25
RUNS 1:30
TAPE RUNS 115
You can change this default by redefining the token W_RUNS on the server
in /site/dict/words.
n
SEARCH-ID
A runs time entry of 115, as shown in the last example above, is the
equivalent of one minute and fifty-five seconds (1:55). The number
115, without a colon, is interpreted as the number of seconds. So,
115 is not the same as 1:15.
This field, which contains the request ID number, is used by the Find All
and Fast Text Search features of iNEWS.
223
Chapter 8 Forms
224
Field Type
Description (Continued)
STATUS
This field is used in a rundown queue. It will display “OK” or “ERROR,”
depending on the machine control event. The ControlAir system
monitoring program sets this field to indicate whether there are any errors
in the production cues in stories of the rundown. In the
SYSTEM.ACCOUNT queue form used for logging connection activity, the
STATUS field is used to display the type of connection.
STILL-ID
In an Event List or Composite List queue, this field displays the
alphanumeric identifier for a still store graphic. This field is primarily used
in association with machine control systems and ControlAir systems. See
“iNEWS MCS/ControlAir Fields and Forms” on page 226 for further
information on when and how this field is used.
STILL-PRESET
This field contains the number or letter designation of a predefined still
store format. It is typically used in the form for the still store device event
list, and is recognized by the iNEWS ControlAir Workstation. This field is
primarily used in association with machine control systems and ControlAir
systems. See “iNEWS MCS/ControlAir Fields and Forms” on page 226 for
further information on when and how this field is used.
STYLE
This field contains the MCS/ControlAir style name specified when a user
requests a CG or Still Store event in the production cue. It is typically an
alpha or alphanumeric sequence that is a maximum of eight characters
long. For instance, iNEWS translates a CG style into an address on the
character generator at which a template is stored. That template is then
used to build the requested super. Styles are defined in stories in the
SYSTEM.RESOURCE queue. They define the details, such as CG
template, number of fields, still preset or playback effect, that define an
event. This field is primarily used in association with machine control
systems and ControlAir systems. See “iNEWS MCS/ControlAir Fields and
Forms” on page 226 for further information on when and how this field is
used.
TAPE-TIME
A user can enter the tape’s run time in this field. If there is an AUDIOTIME field, the system adds tape time to audio time to calculate the story’s
total time.
Form Field Types and Definitions
Field Type
Description (Continued)
TITLE
This field is used to give each story a name. Occasionally referred to as the
“Slug” field, it is the default quick “index field” for sorting stories in a
queue. The first 20 characters of any field defined as the sort field of a
queue is extracted and used as the “quick index” for the story. The TITLE
field is usually selected as the “index field.” That means it is the field
searched when a user conducts a Find or Find All search function and
specifies a search of the index field. In a Mail form, this field is used to
display the Subject of the E-mail message sent. In the SYSTEM.ACCOUNT
queue form used for logging connection activity, the TITLE field is used to
display the Service name.
TOTAL-TIME
The computer stores the total time for a story in this field, calculated based
on the sum of information from the RUNS-TIME, TAPE-TIME and
AUDIO-TIME fields. If the AUDIO-TIME field isnot present,the
computed audio time is used. The RUNS-TIME and TAPE-TIME fields
must be present to be included in the total time. The story’s total time is
used when calculating back-time. If none of the three field types are
present, the total story time is a computed adio time.
VAR-N
This variable field was carried over from the Avid Netstation template
conversion. It is typically used for generic editable text fields. Users can
make up their own new fields using descriptive names, such as “crew” for a
field that lists a reporter/photographer team assigned to cover a story. The
user can employ anything for a field name with the following restrictions:
(N represents any
number.)
VIDEO-ID
•
The name must be 12 characters or less
•
The name must begin with a letter of the alphabet
•
It can include any letters (a-z), numbers (0-9), a dash (-) or a period (.)
•
The name is not case sensitive. User-created field names are treated the
same as variable fields.
This field is used in the rundown queue to display the tape number or clip
ID for video. It is also found in forms for the composite and video event
lists. This field is primarily used in association with machine control and
ControlAir systems.
225
Chapter 8 Forms
Field Type
Description (Continued)
WRITER
When someone creates a new story, the system automatically enters his or
her user name in this field if it is present in the form. You can also enter
text and change the name.
n
n
Distribution codes assigned to wire stories are placed in the
WRITER field if it is present on the form used for wire stories. The
codes would also be placed in a MODIFY-BY or CREATE-BY field if
either are present in the story as well.
Write-protected fields may be edited if the third-party vendor supplies an
editor interface. Otherwise, such fields can be modified only by deletion or
by replacement. To delete, use the Delete Machine Control option from the
right-click pop-up menu. To replace, use the Import From Plugin option or
drag-and-drop a MOS or CAP event from any source.
iNEWS MCS/ControlAir Fields and Forms
Certain field options within iNEWS are used in specialized forms, which
deal with various devices that interface with the iNEWS newsroom
computer system. These forms work in part with the Machine Control
System (MCS) or iNEWS ControlAir system monitoring programs.
n
The application fields available in Avid Netstation are now used only by
the Machine Control Terminal, which cannot use new field types because
of the limitation in the number of fields usable by PCU programs.
In certain cases, some fields in these forms are filled out by the system
rather than users. The monitor utility program in iNEWS recognizes a new
set of descriptive MCS field types in the Rundown, Event list, and
Composite list forms.
226
Form Field Types and Definitions
Here’s a brief description of these forms:
Data Type
Rundown Forms
RUNDOWN FORMS This is the form used by stories in the rundown queue.
The monitor program may extract text from some fields
in this form and may put text in others. It also copies text
from the rundown form to Event List/Composite List and
MCT forms. Only event information for video devices is
currently placed in the rundown story form.
n
EVENT LIST
FORMS
The monitor server program places information about an
event destined for a specific device in the form fields of
the Event List story. It also copies rundown field
text—for instance, title and page number—into matching
fields in the Event List story form.
COMPOSITE LIST
FORMS
The monitor server program puts information about
events destined for all devices in the form fields of the
Composite List story. It also copies rundown field
text—for instance, the title and page number—into
matching fields in the Composite List story form.
MCT FORMS
All MCS device "drivers" use a Machine Control
Terminal form to hold displayable data for the MCT
monitoring program. Some event status is passed through
the fields in this form.
ControlAir FORMS
The function of the iNEWS ControlAir Workstation form
is similar to the MCT form in that it controls which data
will be displayed on the playback screen. Currently, the
iNEWS ControlAir Workstation only extracts the PAGENUMBER from this form, but in future releases it will
use all fields in the form. Fields defined for use only by
the iNEWS ControlAir Workstation are: DURATION,
CHANNEL, and DEVICE-MGR.
See “Monitor Servers” on page 495 for more information.
227
Chapter 8 Forms
Below is a chart of form fields filled in by the monitor server (utility)
program:
Data Type
Event List
Rundown Forms Forms
Composite List
Forms
MCT Forms
(MCS only)
Error Status
STATUS
Video ID/Address
VIDEO-ID
VIDEO-ID
VIDEO-ID
APP1-1
Video Status
EVENT-STATUS
EVENT-STATUS
EVENT-STATUS
AFF-READY-1
Video Duration
TAPE-TIME
TAPE-TIME
CG Address
CG-ADDR
CG-ADDR
APP2-1
CG Template
CG-TEMPLATE
CG-TEMPLATE
APP3-1
CG Text
CG-TEXT
CG-TEXT
VAR-1
Still Store Address
STILL-ID
STILL-ID
APP2-1
Still Store Preset
STILL-PRESET
STILL-PRESET
APP3-1
CG/SS Style
STYLE
STYLE
APP1-1
CG/SS Effect
EFFECT
EFFECT
MODIFY-DEV
CG/SS Event Status
AFF-READY-1
MCT Current Event
WRITER
Sony Barcode SOM
APP4-1
APP4-1
Sony Barcode EOM
APP5-1
APP5-1
Standard iNEWS Forms
The iNEWS system contains a number of standard forms, each designed
for use with one of the system’s features. The forms your system provides
are ready to use, but you can also customize them. You can add or remove
fields from a form or change a field’s title.
228
Standard iNEWS Forms
Account Queue Form
The system keeps a record of events, such as who logged into a connect
session, the service used, and length of the connect session. This
information is made available when the system creates a story in the
SYSTEM.ACCOUNT queue and puts information in the story’s form. A
form designed for this must be assigned to SYSTEM.ACCOUNT, or your
system cannot display the information. The standard account queue form is
usually stored in the queue SYSTEM.FORMS.A.ACCOUNT.
The following table shows the fields used in the Account Queue form.
Field Label
Field Type
Service name
TITLE
User
CREATE-BY
Date and time
CREATE-DATE
Connection type
STATUS
Origin machine name
CA-ORIGIN
Incoming or outgoing connection
CA-DIRECTION
Remote machine name
CA-REMOTE
Elapsed time of session connection
CA-ELAPSED
Connection identifier
CA-IDENT
Total characters sent to remote system
CA-SENT
Total characters received from remote system CA-RECEIVED
Total characters captured
CA-CAPTURED
You are not required to include any of these fields in the account queue
form. However, omitting a field prevents the system from displaying
information associated with that field in the account queue.
229
Chapter 8 Forms
Mail Form
The Mail feature has a form specially designed for mail stories. This form
has fields for elements such as the subject of your message, name of
message recipient, and people you want copied on the message. The mail
form is stored in SYSTEM.FORMS.M.MAIL. The system includes a mail
form, but you can specify a form for the mail feature to use by assigning
the form to the SYSTEM.MAIL.OUT queue.
You may modify this form to suit your system needs. The following fields
are used by the Mail queue.
Field Label
Field Type
To
MAIL-TO
Subject
TITLE
Cc
MAIL-CC
From
CREATE-BY
Only the To field is required. A form that does not have the other fields is
still usable.
Print Form
The system maintains a separate print queue for each of your printers.
When someone sends a story to a printer, the system places it in the
printer’s print queue behind any pending print requests.
While a print request is held in a print queue, the system displays
information in the print request’s form, such as creator of the print request
and time the request was made. To display this information, the print queue
must have a form designed to display print queue information.
Your system’s standard print queue form is assigned to your system’s print
queues. This form is stored in SYSTEMS.FORMS.P.PRINTER.
230
Standard iNEWS Forms
The following table shows field types used in the print queue form.
Field Label
Field Type
Title/Folder
TITLE
Date Printed
CREATE-DATE
By
CREATE-BY
Style
VAR-1
Type
STATUS
Copies
PAGE-NUMBER
None of these fields is required. However, omitting any field would prevent
the display of information associated with that field.
Find All Form
Your system uses the form assigned to SYSTEM.SEEK, or whichever
queue is specified for Q_SEEK in the system dictionary
(/site/dict/queues) as the find all form. Since the system expects
to find certain information in each of the form’s fields, the form assigned to
SYSTEM.SEEK must be designed for use with the find all command.
The follow table shows field types used in the find all form.
Field Label
Field Type
Id
SEARCH-ID
Status
READY
Search For
VAR-1
Search Where
APP1-1
Results Queue
TITLE
Search Type
APP2-1
231
Chapter 8 Forms
n
Field Label
Field Type
Max Hits
PAGE-NUMBER
Notify Hits
APP3-1
Hits so Far
PRESENTER
By
CREATED BY
Started At
CREATE-DATE
The find all command must have certain information to perform a
search. If you leave out a required field, the iNEWS Workstation displays a
Missing form field message whenever someone tries to use the
find all command.
Wire Story Form
The name of the form
used for wire stories is
defined by the Words
dictionary token
W_WIRE_FORM.
232
To display information such as title, time moved, source, and average
reading time in each wire, the system contains a wire story form. It is
assigned to the wire queues and stored in SYSTEM.FORMS.W.WIRES.
Any changes you make to this form do not take effect until you restart the
wire. The following table shows field types used in the wire story form.
Field Label
Field Type
Title
TITLE
From
WRITER or CREATE-BY
Moved
CREATE-DATE
Status
READY
Time
AUDIO-TIME
FlashWord
PRESENTER
Number
PAGE-NUMBER
Chapter 9
Character Generator
Title Entry
The iNEWS newsroom computer system provides journalists, producers,
directors, writers, and technical personnel in a newsroom with an array of
tools to make their jobs easier. One such tool is the CG Title Entry feature,
which enables newsroom personnel to simulate character-generated
graphics at the iNEWS Workstation. By offering a graphical view of CG
information, iNEWS helps production staff verify the accuracy and quality
of the data prior to air.
This chapter explains the following:
•
Overview of CG Title Entry
•
Title Entry Setup and Configuration
•
CG Template Backgrounds
•
CG Template Editor
•
Title Entry Security
Chapter 9 Character Generator Title Entry
Overview of CG Title Entry
When writing scripts, journalists are typically required to include
information in the script that will appear as a character-generated graphic
when the story is aired. These graphics, called supers or CGs, must be
entered into the script in such a way that iNEWS can identify the
information as data for the character generator. This method of
identification uses production cues—also called machine
instructions—which are separated from the story text.
The first production
cue example appears
graphically later in this
section.
Here is an example of a production cue for a CG with one line of text for
the graphic and one line of information for production staff.
*CG live
USA Hockey Championships
Here is another example of a production cue for a CG with two lines of text
for the graphic and two lines of information for iNEWS and production
personnel:
*CG live
Ellen Miller
City Hall
Take cg at 10 seconds in...
In the example, the user cannot visually determine how information will
appear on air when the data is loaded in the character generator template.
For instance, will the data fit into the actual text fields on the CG template?
The answer to this question cannot be determined from the production cue
text. However, the Title Entry feature allows for this possibility by offering
a graphic-style dialog box.
The dialog box displays sample templates, complete with backgrounds and
text fields, similar to actual CG templates that appear on air. These sample
templates—which are configured and modified by system administrators
using the CG Template Editor—can be filled in by the users, and
information is applied to the production cue within the script. When
configured accordingly, the Title Entry dialog box can provide users with
visual verification of whether text they enter will fit in fields of actual
234
Overview of CG Title Entry
character-generated graphics. Producers can use the Title Entry dialog box
to preview CG information in scripts in order to check the appearance and
accuracy prior to airing the production cue.
The following graphic shows how a single-lined production cue appears in
the Title Entry dialog box, using a template background that has a 16 x 9
screen ratio.
Dimensions
Toggle Button
The black button at the bottom of the window allows users to toggle
markers on and off, indicating what part of the graphic would be visible
within the standard 4 x 3 screen ratio.
235
Chapter 9 Character Generator Title Entry
n
The Title Entry feature can only be accessed by users when the cursor is
located in the Story panel of the iNEWS Workspace. Access to Title Entry
can also be limited to certain users. See “Title Entry Security” on
page 255 for more information.
Title Entry Setup and Configuration
Before you can use the Title Entry feature, templates must be created by
the system administrator in iNEWS to simulate the actual graphics used by
the character generator. The person responsible for setting up the templates
should have a good understanding of how CGs are created on the character
generator, because it is important that templates in Title Entry correspond
to those used by the character generator.
Understanding CG Templates
Most CGs are comprised of both background graphics and text fields. A
background graphic could be a small color bar that spans the bottom third
portion of the television screen, a full-screen graphic, a logo in the corner
of the screen, and so forth. See “CG Template Backgrounds” on page 238
for more information.
The text fields vary as well. A CG template can contain numerous text
fields, with each one having different predefined properties, such as screen
location and font style. Typically, users can write text in the fields, but
some may contain predefined text that users cannot edit. For instance, a
CG can have a field with the predefined word, FILE, which would be aired
over file video of previous news coverage.
236
Title Entry Setup and Configuration
An example of a standard CG template is a two-line lower-third CG. In the
following example, the bar separating the two rectangular boxes make up
the background. The boxes are the text fields, which can be filled in by a
user.
CG text fields are also
known as tab fields,
referring to the key
used to navigate from
one field to another.
n
In a CG template, the character generator assigns each text field a number,
indicating the order in which fields can be filled in. For instance, a user
types a name in field one, then navigates to the second field in the sequence
using the Tab key, and types the person’s job title or location.
Knowing the numeric field assignments of each template is crucial,
because the sequence in the Title Entry dialog box must match the tab
field’s sequence on the corresponding character generator’s template.
CG templates are stored on the character generator at locations assigned or
represented by identification numbers known as Template numbers. These
numbers can be used by the CG operator to recall templates, which are
filled in and aired during a show. However, in iNEWS, aliases are usually
assigned to each template to provide users with an easier way of
recognizing the template.
For instance, a template containing one field—one line of text—used to air
the location of a story may be stored on the character generator as template
502, but users type in the alias loc1 in the production cue.
The assignment of aliases to Template numbers is stored in the Resource
queue located in the System directory (SYSTEM.RESOURCE). These
same aliases must be established first and used in naming the templates for
Title Entry.
c
The Title-Entry queue in the System directory (namely,
SYSTEM.TITLE-ENTRY) is used to limit access to the CG Template
Editor. When the CG Template Editor starts, it gains a lock on
237
Chapter 9 Character Generator Title Entry
SYSTEM.TITLE-ENTRY, which guarantees that only one system
administrator can modify the set of templates at any given time. The
Title-Entry queue must be created, if it does not already exist, prior to
creating templates. See “Creating a New Queue” on page 103 for more
information. Do not manually edit the data in this queue. When
configuring templates or setting up new ones, use the CG Template
Editor provided in the software. See “CG Template Editor” on
page 243 for more information.
CG Template Backgrounds
Before creating CG templates for Title Entry, the system administrator
should capture an image of the actual CG templates on the character
generator as bitmaps. These bitmaps are used as background images in the
creation process of corresponding templates in iNEWS.
The Capture Tool is a program—included with your iNEWS software
CD—used to capture template backgrounds on character generators. It
captures the templates as bitmaps with the exact specifications (400 x 300
pixels) for a screen ratio of 4 x 3, one of two acceptible ratios for Title
Entry templates.
n
If you chose to use some other method of capturing bitmaps on the
character generator, you must create bitmaps in one of two sizes. Standard
size is 400 x 300 pixels with 256 or more colors. The iNEWS CG Title
Entry also supports images for a 16 x 9 screen ratio, which requires
bitmaps with the larger dimensions of 560 pixels wide by 315 pixels high.
The Capture Tool can be used only to capture bitmaps for the smaller 4 x 3
screen ratio.
You can store the bitmaps anywhere on the network as long as they are
accessible from the iNEWS Workstation used to run the CG Template
Editor. When the CG Template Editor program creates Title Entry
templates, the chosen bitmaps are copied to the iNEWS database, at which
point the bitmaps on the network, created by the Capture Tool (or other
software) may be disposed of.
238
CG Template Backgrounds
This section will explain what bitmaps are needed, hardware requirements
for the Capture Tool, the installation process and procedures for using the
Capture Tool to capture bitmaps with 400 x 300 pixel dimensions.
Required Bitmaps
Two slightly different bitmaps of each unique CG template should be
captured from the character generator. First, capture the CG template with
the text fields full of text.
n
Do not use spaces. Each text field in the actual CG template filled out with
information from a user should have a solid string of characters in it when
the bitmap is made. Fixed-width fonts allow for absolute accuracy;
however, proportional fonts can be used. The character limit of a field with
fixed-width fonts will be the same no matter which letters of the alphabet
are used to fill it up. Proportional—also known as variable-width—fonts
contain some letters that are wider than others, so the character limit may
vary. For instance, the character limit of a field with a proportional font
may be nine letters if “M” is used to fill up the field, but that limit
increases to 25 when the letter “I” is used instead. A good mix of wide and
narrow letters should be typed in the field to fill it up if a proportional font
is used.
The first bitmap provides a graphical demonstration of character width
allowed in a text field and the position of that field on the screen. This
bitmap will be used to align text fields and fonts on the Title Entry
template when created in the CG Template Editor.
Secondly, capture the CG template with empty text fields as a bitmap. This
bitmap will replace the first one in the final version of the Title Entry
template. It will be used as the template background shown in the Title
Entry dialog box.
239
Chapter 9 Character Generator Title Entry
Capture Tool
The Capture Tool is a program used to capture graphical representations of
templates on character generators. The tool captures a template as a
bitmap, with dimensions of 400 x 300 pixels, which can then be used as a
background image in the iNEWS Title Entry templates.
n
The Capture Tool does not support images with dimensions of 560 x 315
pixels, the size used for a screen ratio of 16 x 9.
Hardware Requirements for Capture Tool
The hardware requirements to operate Capture Tool are:
•
133 Mhz IBM PC
•
32 MB RAM
•
10 MB Hard Disk space available
•
XGA Monitor
•
Osprey® 100 Video Card
Installation of Capture Tool
For more information
on the Osprey 100
video card, visit the
Web site:
www.ViewCast.com.
Before you can install Capture Tool, the Osprey 100 video card should
already be installed, according to the instructions provided with the card by
ViewCast.com, Incorporated.
To install Capture Tool:
1. Run the setup program (setup.exe) from your iNEWS CD. This
program is on the CD in a subdirectory called GTECapture.
Follow any instructions as prompted in the program. The setup process will
install the capture tool on your PC and create a Program Files group called
Title Entry Capture Tool.
n
240
You must provide a baseband video signal to the input of your Osprey card.
This signal can be from a VCR or from your internal routing system. It
does not require time-base corrected video; however, corrected video will
produce better images.
CG Template Backgrounds
Using the Capture Tool
To use the Capture Tool to capture a bitmap image:
1. Select Start > Program > Capture Tool.
The Capture Tool program checks for multiple video card drivers and
display a dialog box similar to the Select Capture Driver dialog box:
241
Chapter 9 Character Generator Title Entry
2. Select the driver for the card used to capture images (typically, the
Osprey card). After the selection is made, the tool will open a window
showing incoming video.
3. Click the Capture button to freeze the image. After the image is frozen,
the Save button is activated.
4. Click Save to save the image as a bitmap to be used in the iNEWS CG
Template Editor window.
n
242
When using the Capture Tool, the image saved will be exactly 400 x 300
pixels, which is one of two sizes supported for Title Entry templates. There
is no need to adjust the size.
CG Template Editor
5. Select the location in the Save As dialog box where you want to save
the bitmap.
Remember this location, which should be accessible from the PC
running CG Template Editor. You will refer to it later while using the
CG Template Editor.
Repeat this procedure as often as needed to supply the necessary
bitmap images for templates used by the Title Entry feature. After the
bitmaps are saved, you are ready to proceed in making iNEWS CG
Title Entry templates using the CG Template Editor.
CG Template Editor
System administrators should use the CG Template Editor to create
and modify templates referenced by the Title Entry dialog box.
To start the CG Template Editor:
1. Sign on to iNEWS.
2. Select Tools > CG Templates. For superusers, the Edit Title Entry
Template window will open.
243
Chapter 9 Character Generator Title Entry
n
In some cases, a password is required before access to the CG Template
Editor is allowed. See “Title Entry Security” on page 255 for more
information.
Edit Title Entry Template Window
The Edit Title Entry Template window contains several template options,
which can be used to create templates that graphically represent actual
CGs aired from the character generator.
Some options available to the system administrator are:
n
244
•
Select a bitmap for a CG template background
•
Add, modify, or delete text fields in a template
•
Reorder sequence of text fields
•
Limit editorial access to text fields
•
Modify font size, color, style, and so forth
•
Provide helpful Tool Tip text, which appears in the Title Entry dialog
box when a user positions the mouse over a text field.
Options in the CG Template Editor do not directly affect features of actual
CG templates on the character generator, but should be used to correctly
reflect to the iNEWS user facsimiles of CG templates on the character
generator that are as accurate as possible.
CG Template Editor
The Edit Title Entry Template window’s toolbars—located at the top and
bottom of the window—contain various buttons and drop-down menus,
used to configure template options.
The following table provides details about the toolbar buttons and menus
in Edit Title Entry Template window.
Button or Menu
Options and Explanation
Template drop-down
menu
Options include: New, Open, Save and so forth.
This menu is used to open new or existing
templates, save modified templates, and to close
the window.
245
Chapter 9 Character Generator Title Entry
246
Button or Menu
Options and Explanation
Edit drop-down menu
Options include: Background, Add Field, Font
PreSets, and so forth. This menu is used for
adding or deleting items to a template, such as a
background or field, and setting predefined
Fonts.
Logo button
This button is the same as the Background option
in the Edit drop-down menu. It allows the user to
select a bitmap graphic as a template background.
Text Fields button
This button is the same as the Add Field option in
the Edit drop-down menu. It allows the user to
add a text field to a Title Entry template, which
can then be positioned and sized accordingly.
X button
This button is the same as the Delete Field option
in the Edit drop-down menu. It allows the user to
delete the selected text field from a Title Entry
template.
1-2-3 button
This button is the same as the Field Order option
in the Edit drop-down menu. It allows the user to
rearrange the numerical tab sequence of the text
fields in a Title Entry template.
Text Color button
This button is the same as the Text Color option
in the Edit drop-down menu. It allows the user to
change the color of the font used in a text field as
displayed in the Title Entry dialog box.
Justify drop-down list
Options include: Left Justify, Right Justify, and
Center Justify. This list is used to set the
alignment of text in a field. The drop-down list
will continue to display the current setting of the
selected field when the list is closed. The default
is Left-Justify.
CG Template Editor
Button or Menu
Options and Explanation
Editing drop-down list
Options include: Writable, Read Only, Optional
and Required. This list allows the user to
determine whether a field is Writable or Read
Only, and whether it is a required field. If
Required is chosen, the user of CG Title Entry
will be required to fill out the field with text
before saving the production cue. Because the
user is prevented from entering text in a readonly field, if Read Only is chosen, the user of the
CG Template Editor is required to fill out the
field with text before saving the template. Blank,
read-only fields are not permitted. The dropdown list will continue to display the current
setting of the selected field when the list is
closed. The default is Writable-Optional.
Allowed Characters drop- Options include: All characters OK, Uppercase
down list
Only, Lowercase Only, and Define Subset. This
list allows the user to limit the type of characters
allowed in a text field. For instance, if the text
field should only contain numerical sports scores,
then the user could use the Define Subset option
to limit the allowed characters in that field to the
numbers: 0123456789. As shown, do not use a
comma to separate the numbers or it too will be
allowed in the field. The Define Subset option is
case-sensitive.
Font PreSets drop-down
list
Options include: 10 user-definable font display
settings. This list allows the user to store up to 10
font display settings created by the user as
PreSets. These can later be selected when making
new templates with fields that contain the same
size and style of font, saving the user from having
to recreate the font repeatedly. The first font
stored is particularly important because it
becomes the field properties default for the
Template Editor at start up.
247
Chapter 9 Character Generator Title Entry
Button or Menu
Options and Explanation
True-Type Fonts dropdown list
Options include: any true-type font installed on
the workstation, such as Times New Roman. This
list allows the user to select a font that matches or
closely resembles the font used on the actual
CGs.
Font Style drop-down
menu
Options include: Bold, Italic, Underline, and
Strike through. This allows the user to define the
style of font used in the selected text field.
Tool Tip field
This field allows the user to type in text that will
appear as a Tool Tip box in the Title Entry dialog
box, when a user positions the mouse over the
text field. For instance, if a user should type only
a person’s name or location in the field, the Tool
Tip text for that field could be: Type Person
or Location Name Here.
Creating a New Template
The CG Template Editor is used to recreate a template that will simulate
the appearance of information sent to actual templates aired by the
character generator. This section assumes those actual CG templates were
already captured as bitmaps and stored in a file accessible to the user
creating a new template. See “Required Bitmaps” on page 239 for more
information.
c
Since template names must match the alias associated with the actual
CG template number used by the character generator, the aliases must
be defined before opening the CG Template Editor. For instance, if a
user typically types *CG loc1 as the first line of a production cue for
a 1-line location CG, then the Title Entry template created for that CG
should also be named loc1.
Aliases are defined in SYSTEM.RESOURCE. The CG Template Editor
will not start if there are no available aliases to save templates to.
248
CG Template Editor
When the Create Title Entry Template window first opens, it appears with
a graphic that highlights the first step in the process for creating new
templates.
To create a new template from the Create/Edit Title Entry Template
window:
1. Define a temporary background for the template by doing one of the
following:
To create another new
template when an
existing one already
appears in the window,
use the Template dropdown menu, and select
New.
t
Click the Logo button.
t
Click the Edit drop-down menu, then select Background.
2. Select a bitmap from the directory where you stored them. This is the
bitmap of the actual CG template you want to recreate in the Template
Editor. See “Required Bitmaps” on page 239 for more information.
249
Chapter 9 Character Generator Title Entry
n
If a template already
has a text field and it is
selected, then any new
field added to the
template will follow
size and font styles for
that original field.
The first bitmap you choose should be the one that contains text fields filled
with characters. In upcoming steps, you will use this bitmap to align the
text fields and the font in the template, before replacing it with another
bitmap containing empty text fields.
3. Add a text field by doing one of the following:
t
Click the Text Fields button.
t
Click the Edit drop-down menu, then select Add Field.
4. Click on the new text field and drag it into position over the text-filled
area pictured in the bitmap—one field per line of text in the bitmap.
You can also adjust the position of the text field by using any of the
following key combinations:
•
Ctrl+Right Arrow
Move field to the right
•
Ctrl+Left Arrow
Move field to the left
•
Ctrl+Up Arrow
Move field up
•
Ctrl+Down Arrow
Move field down
5. Use the mouse to resize the text field to reflect the size of the text area
in the bitmap.
6. Use the True-Type Font drop-down list or the PreSet list to select a
font similar to the font used by the character generator, as seen in the
bitmap.
7. Type the same characters shown in the bitmap into the new text field.
The font may or may not line up exactly over that of the bitmap. To
enable Title Entry to accurately reflect the text as it will appear on
actual CGs, you must align the field and characters with those shown
in the bitmap.
8. Adjust the height and width of the font by using the following key
combinations:
250
•
Alt+Right Arrow
Expand width of font
•
Alt+Left Arrow
Contract width of font
•
Alt+Up Arrow
Expand height of font
•
Alt+Down Arrow
Contract height of font
CG Template Editor
This may take some time and will require experimentation with fonts
and font styles, before the characters align with those of the bitmap.
The goal is to make certain the text field you create in the template has
the same character limit as the area shown in the bitmap when the
exact characters are used in both.
9. Use the backspace key to erase characters from the field once the font
and field alignment is complete.
10. Repeat steps 5-11 as needed for each text field in the template.
n
If text fields on several CG templates use the same font and field size, you
do not have to repeat steps 9 and 10 with each new template created. You
can duplicate a field (including all its size and font properties) within a
template by holding the Control (Ctrl) key down, clicking on the field, and
dragging its copy to a new location within the template. You can also reuse
field properties by saving them as a Font PreSet, which can then be
selected for use when creating other templates. See “Using Font PreSets”
on page 253 for more information.
11. Determine the justification of text in each field. Select the field and use
the Justify drop-down list.
12. Determine whether a user can write in each field, and whether the user
is required to fill in a field by using the Editing drop-down list. If you
make a field required, then the user must enter some data into that field
when using Title Entry before iNEWS will accept the production cue.
This does not apply to the field while in the CG Template Editor.
However, if you make a field read-only, it must contain some text so
you will be required to put some text in the field while in the CG
Template Editor. Users will be prevented from altering that text in the
read-only field when using Title Entry.
The Read Only option can be used for setting up templates that
standardize certain commonly used CGs. For instance, you have a CG
that has two fields: one for any council member’s name and the second
that should contain the words, City Council Member. But, users
sometimes just write Councilman or worse, they misspell Council. You
could make the second field read only and pre-define the words that
appear in the field.
251
Chapter 9 Character Generator Title Entry
n
The Allowed Character
option is case-sensitive.
Also, notice the
example in step 15 does
not include commas,
such as:
1,2,3,4,OT,F
If commas are
included, then commas
will also be accepted in
the field.
n
If a field is pre-defined on the actual CG template, such as LIVE or FILE, it
should appear as part of the background—saved as part of the
bitmap—not as a read-only field on the Title Entry CG template.
13. Determine which characters are allowed in each text field. Select the
field, then choose from the options in the Allowed Characters dropdown list. If you choose to define your own subset of characters, a
dialog box will appear, where you must then type in only those
characters you want to allow in the field. For instance, you can limit
what a user types into a field for a Sports CG to only characters:
1234OTF—representing 1st-4th quarter, OT for over-time, and F for
final.
14. Type in the text for the field’s Tool Tip. The Tool Tip will appear in the
Title Entry dialog box when the user positions the mouse over that
field. To enter Tool Tip text, click on the Tool Tip field at the bottomright corner of the Edit Title Entry Template window, then type your
text in the field provided. You must press Enter to save the tool tip text.
Alt+L can be used to select and enter data into the Tool-Tip field. Also,
each Tool Tip will appear with a number in the CG Template Editor
window. The number indicates that field’s order in the template. These
numbers do not appear as part of actual Tool Tips over fields of the Title
Entry dialog box.
15. Replace the background of the template with the bitmap of the CG
Template containing empty text fields. To chose another bitmap, do
one the following:
t
Click the Logo button.
t
Select Edit > Background.
16. Save the template by doing one of the following:
c
252
t
Select Template > Save.
t
Type Ctrl+S.
The template name must match the pre-defined alias associated with
the actual CG template number used by the character generator.
Aliases are defined in SYSTEM.RESOURCE.
CG Template Editor
Using Font PreSets
Font PreSets are a time-saving feature for system administrators using the
CG Template Editor to create Title Entry templates.
After a system administrator sets up a text field and saves it as part of a
template, he can store settings for that field as a Font PreSet. The Font
PreSet can then be selected when the system administrator needs to add a
field with those same settings to another template. For instance, the text
field of a one-line location CG is saved as a Font PreSet, which is later
used to create the first field in a two-line name CG, a two-line live CG, and
so forth, because all fields use the same font style and field size.
n
You can have a maximum 10 Font PreSets in iNEWS. The first one stored is
particularly important, because it becomes the field properties default for
the CG Template Editor at start up. Save the PreSets for major font/field
variations. Because you are limited to 10, it is not recommended they be
used for minor variations, such as a font color change. You can replace
any Font PreSet with a new one if all of the PreSets are taken.
To save a field as a Font PreSet:
1. Open the template containing the field you want to save as a Font
PreSet.
2. Click on the specific field to select it.
3. Do one of the following:
t
Select Edit > Font PreSets.
t
Press the F7 key.
253
Chapter 9 Character Generator Title Entry
The Manage Font PreSets dialog box will appear, with the first
available PreSet option highlighted.
4. Click Add to save the selected field as a new Font PreSet. The name of
the newly added field will appear in place of existing data on the
highlighted PreSet option.
5. Click OK to close the dialog box.
n
You cannot save a field’s settings as a Font PreSet until after the field is
saved as part of a template. If you attempt to set a Font PreSet using a
newly created field from an unsaved template, iNEWS will issue the
following advisory.
To delete an existing Font PreSet:
1. Open the Manage Font PreSets dialog box, by doing one of the
following:
t
254
Select Edit > Font PreSets.
Title Entry Security
t
Press the F7 key.
2. Select the PreSet you want to delete from the list.
3. Click Delete.
4. Click OK to close the dialog box.
To choose an existing Font PreSet for a selected text field:
1. Click the Font PreSets drop-down list at the bottom of the Edit Title
Entry Template window.
2. Select the Font PreSet you want to use for the chosen field.
Title Entry Security
Access to CG Template Editor and CG Title Entry is determined separately
per user account. A user who can use CG Title Entry will not necessarily
have access to CG Template Editor, while another user can be denied the
ability to use both features.
Access to CG Template Editor
Access to CG Template Editor is limited to system administrators, or
superusers, and those who know the password for dbmanager, if that user
account is created by a system administrator. This is the same dbmanager
account that is used to modify database traits. See “The Database Manager
Account” on page 93 and “Changing Database Traits” on page 117 for
more information.
When a non-superuser attempts to launch the CG Template Editor from the
Tools menu, the following dialog box appears:
255
Chapter 9 Character Generator Title Entry
If the correct password is not given, then iNEWS will notify the user and
deny access to the Edit Title Entry Template window.
n
Only one person on the network can use CG Template Editor to edit Title
Entry templates at a time.
Access to CG Title Entry
The availability of CG Title Entry is dependent on two things: cursor
position in the iNEWS Workspace and permission granted in the user’s
account.
When a user’s cursor is in any panel other than the Story panel, the Titling
option in the Tools menu will appear gray, indicating that Title Entry is
unavailable. Additionally, a system administrator, or those authorized with
the umanager password, can limit access to Title Entry.
There is no individual user setting that enables or prevents access to CG
Title Entry. However, those users whose accounts are set as “Simplified”
may be prevented from accessing CG Title Entry.
256
Title Entry Security
To prevent access to CG Title Entry for all simplified users:
1. Sign on as a system administrator, or with your own user account if
you know the umanager password.
2. Select Tools > Options > Users. System administrators will see the
Manage User Accounts window open. Others will be prompted to give
the umanager password first before the Manage User Accounts
window will open.
3. Indicate the user, by providing the User ID. The Search button is
available to help locate the user’s account if the ID is unknown.
257
Chapter 9 Character Generator Title Entry
4. Click the Simplified UI button. The Simplified User Interface dialog
box will appear.
5. Click on the Disable Title Entry checkbox to select it.
6. Click OK.
258
Chapter 10
System Configuration Files
Information about your iNEWS system’s hardware devices (workstations
and printers), connections (wires and links), and iNEWS Servers is stored
in configuration files. A representative sample of each iNEWS
configuration file is contained in this chapter. A comprehensive list of
sample configuration files is contained in Appendix B. Procedures for
editing configuration files using the line editor, ed are provided in
Appendix H.
This chapter contains:
•
Overview
•
Making a Backup File
•
Viewing System Files
•
Printing a Copy of a File
•
Licensing of iNEWS Components
•
Devices
•
Viewing Information About Devices
•
Configuration File
•
Hosts File
•
System Profiles Files
•
Adding Devices to Your iNEWS System
•
Alternative Editing of the Site Configuration File
•
Intersystem Messaging
Chapter 10 System Configuration Files
Overview
Configuration of the iNEWS newsroom computer system is controlled by
settings stored as text files in the (root) Site directory on the software area
of the system’s hard disk. Files in the Site directory or subdirectories
include:
•
/site/config
•
/site/system
•
/site/wires/<file name>
•
/site/printers/<file name>
•
/site/dict
•
/site/mcs
Because many system files are located in the Site directory, they are also
referred to as site files.
n
All files in the Site directory, including the system profile and configuration
file, can contain only Roman characters.
Some other important files are stored in the ETC directory, such as:
•
/etc/dhcpd.conf
•
/etc/hosts
Samples of these and other system files are provided in Appendix B.
Changes to system configuration are made by editing these text files. The
recommended method is at the console using the line editor, ed. Unlike
Microsoft® Word or similar word processing programs, ed deals with text
files on a line-by-line basis.
To learn more about the
line editor, refer to one
of the books available
in bookstores on the
Linux operating system
with sections devoted
to ed.
260
The most likely reason for you to use ed is to modify system files, such as
/site/config or /site/dict/queues. For instance, if you add a
workstation to your system, you will need to add the computer’s
configuration information to the configuration file in the Site directory.
Some procedures for editing certain files are provided in this chapter. For
Overview
further information about the line editor, type info ed at the console.
Additional information, including details on how to use the line editor, ed,
is provided in Appendix H of this manual.
c
n
It is vital that you ensure system files remain identical across all
iNEWS Servers. When you modify a site file, make the same changes
to each server’s copy of the file, or your system will not run properly.
Select all servers before you open a file for editing to ensure changes
you make are applied to each server’s copy of the file.
The Linux graphical X-window login offers additional Linux GUI tools for
system management. Tasks such as changing IP addresses and checking
hardware are much easier within the X-window GUI. However, if all
iNEWS Servers have the GUI installed as part of the Linux installation, it
does take additional resources to run and requires additional hardware,
such as monitor, keyboard, and mouse. Some system managers may not
want to run the GUI full-time so as to reserve memory and other resources
for the iNEWS Server processes.
While the impact of running the GUI is probably not terribly significant on
modern hardware with speedy processors and plenty of RAM, Avid does
not test the software or system performance with the GUI running. This
editing alternative is not required or supported by Avid.
Before editing any system file, you can view, print, and as recommended,
make a backup copy of the file.
Making a Backup File
When you want to make changes to a system file, begin by making a
backup copy of the file, and then edit the backup file. That way, if you
make a mistake during the editing process, your original file version is
preserved.
When copying a file, use this format:
cp <file pathname> <new pathname>
For instance, to copy the configuration file in the Site directory, type:
NRCS-A$ cp /site/config /site/config.test
261
Chapter 10 System Configuration Files
Viewing System Files
When viewing a system file, use the more command at the console. The
format is: more <file pathname>
Only part of the
configuration file is
shown here. An entire
example is available in
Appendix B.
For instance, to view your copy of the configuration file, created in the
previous section’s example, type:
NRCS-A$ more /site/config.test
Information similar to the following appears:
host
ab a
net
10
reslist 121
servers 141 201 211
; console connect
; Print, Mail,
Keyword
;
host
...
262
servers
servers
servers
servers
reslist
reslist
reslist
reslist
reslist
231 233
251 253
271 273
281 283
301 303
311 313
321 323
401:402
501:504
ab b
net
reslist
servers
servers
servers
servers
reslist
reslist
reslist
reslist
; 20
122
232 234
252 254
272 274
282 284
302 304
312 314
322 324
601:604
235
255
275
285
305
315
325
241
257
277
287
307
317
327
243 245 ; Seek & FTS
259
; Action servers
279
; Monitor servers
289
; Monitor servers
309
; Txnet
319
; Rxnet
329
; Rxnet
; Web Access
; iNEWS sessions
236
256
276
286
306
316
326
242
258
278
288
308
318
328
244
260
280
290
310
320
330
;
;
;
;
;
;
;
;
;
net connect
Seek & FTS
Action servers
Monitor servers
Monitor servers
Txnet
Rxnet
Rxnet
iNEWS sessions
Overview
The more command allows you to view one page at a time, which is
especially useful for really long files. The cat command may also be
used, particularly for smaller files.
The following example shows the cat command and sample output for
viewing the system profile, a text file stored in /site/system.
NRCS-A$ cat /site/system
The system output looks similar to the following:
NRCS-A$ cat /site/system
id=NRCS
net=abc
lowwater=100000 highwater=105000 purgelimit=5
load=5
pausetimeout=0:05
;
; defaults - if parameter not present these values are assumed
;
unless overridden on the command line.
;
; auto_upgrade=yes
lowwater=100000
remotetimeout=0:00
; clockmax=12
maxhits=500
scriptlhmax=40
; excluded_video=none
min_passwd_length=5
scriptrhmax=40
; highwater=105000
msgserver=silent
security=or
; lastlogin=yes
pausetimeout=0:30
timechar=:
; load=0
purgelimit=0
timer=verbose
; localtimeout=0:00
readrate=180
wordlength=0
Printing a Copy of a File
To send a file to a serial printer instead of viewing it on the console screen,
precede the cat command with print and the number of the printer you
want to use. Use this number to refer to that printer when you print from a
computer connected to the iNEWS system.
For instance, to print /site/config.test on printer number 1, type:
print 1 cat /site/config.test
n
The list c printer command will list any configured system
printers.
263
Chapter 10 System Configuration Files
Licensing of iNEWS Components
Each time the iNEWS newsroom computer system is configured, your
licensing information is checked. This information determines the number
of devices you are authorized to connect to the system. An error message
appears if the configuration file defines more devices than are licensed in
any of the following categories:
•
All serial devices (printers, wires, and so forth)
•
PCUs
•
iNEWS and network workstations
To display your system’s licensing limits, at the console, type:
NRCS-A$ status license -OR- status l (lowercase L)
A message similar to the following will appear on your screen:
A is ONLINE and has been CONFIGURED. ID is NRCS.
System is AB. Master is A.
Disk status is OK. The database is OPEN.
Site Key: 001234
CPUs: 3
PCUs: 2
Serial devices: 8
Workstation addresses: 3000
Workstation resources: 1000
COM resources: 1
Web Access resources: 2
Wire Server resources: 8
Remote Searching allowed.
The Workstation addresses category indicates how many IP
and/or Ethernet addresses can be specified in the
SYSTEM.CLIENT.WINDOWS story. The iNEWS Server will only accept
a connection from a workstation that is identified in the appropriate story;
otherwise, an error is given stating that the workstation is “not authorized
to connect.”
264
Devices
The resources category defines the total number of simultaneous login
sessions. The Wire Server resources line indicates the number of wire
server resources allowed for the Avid Data Receiver.
n
When the system is configured, if the number of IP addresses present in the
SYSTEM.CLIENT.WINDOWS story exceeds the number of addresses, a
diagnostic is produced. The system will be configured. This differs from
exceeding other license limits.
To change license allowances, contact an Avid sales representative.
Devices
The iNEWS newsroom computer system supports the following types of
devices:
The server listed here is
not the same as the
computers used as
iNEWS Servers,
typically given names
with the station’s call
letters and an A, B, or
C. For instance,
NRCS-A.
•
Workstation – The PC device on which a user can log in to the iNEWS
newsroom computer system known as an iNEWS Workstation.
•
Printer – A device that prints stories and scripts. The iNEWS
newsroom computer system supports serial and Windows printing. It
also supports the ability to print to a queue in the iNEWS database.
•
Wire – A device that processes wire service stories in the database.
•
WireServer – A device that allows an Avid Data Receiver instance to
connect to the iNEWS newsroom computer system.
•
Service – A device that allows a user to connect to another computer
system from a workstation.
•
Server – A utility program that performs tasks on stories in a queue,
based on defined instructions. Supported server types are action,
distribution, parallel wire, monitor, and keyword. Other servers
facilitate searches, mail, and printing. See “Servers” on page 14-1 for
more information. <--Fix XREF
•
Rx/Tx Network Link – Device designed for receiving or transferring
stories between computer systems.
•
COM – A (connection) device used by some Avid applications, such as
MOS Gateway, to communicate with the iNEWS Server.
265
Chapter 10 System Configuration Files
•
Remote Search – A device that allows iNEWS users to search content
on a remote iNEWS newsroom computer system.
Viewing Information About Devices
To view information about devices connected to your system, use forms of
the list c console command. The console command list c prints
information to the console screen about configuration of a device or
devices. The format for this command is:
list
c [<device type, device number, or program name>]
The device type or device number is optional. If you do not enter them, you
get a list of the configuration information for all devices in your system.
When you type list c at the console, information similar to the
following appears:
DEV
DEVICE_TYPE
COMPUTER CCU
C60
pcu
A-pcu60
PRINTER SPEED OPTIONS
60
P
S200 monitor
A
N200
S401 txnet
A-net
N401
A
N522
DEVNAME
pcu60
txnet
...
S522 seek
If you follow list c with the name of a program, iNEWS lists every
device on your system that uses that program.
For instance, to find out how many devices use the action server program,
type:
list c action
266
Devices
Information similar to the following appears:
DEV
DEVICE_TYPE COMPUTER CCU
PRINTER SPEED OPTIONS DEVNAME
S344 action
A
N344
S345 action
A
N345
To list configuration information for device number 344, type:
list c 344
A message similar to the following appears:
DEV
DEVICE_TYPE COMPUTER CCU
S344 action
A
PRINTER SPEED OPTIONS DEVNAME
N344
List C Message Columns
There are eight columns in the list c messages.
•
DEV
•
DEVICE_TYPE
•
COMPUTER
•
PCU
•
PRINTER
•
SPEED
•
OPTIONS
•
DEVNAME
Each column is explained in this section.
DEV
– Lists the device number. The number is preceded by a
capital letter identifying the type of device.
267
Chapter 10 System Configuration Files
The device identifiers (the first element of the display under DEV) are
defined as follows:
Identifier
n
B
Web browsers
c
COM devices
G
iNEWS Workstation graphical user interface
L
Serial resource (line)
M
MCS driver, MCS PC
P
Printer
R
Network resource
r
Remote Search devices
S
Server, special
U
Unused
W
Wire
DEVICE_TYPE
– The program that runs the device. For instance,
workstations have gnews listed in this column.
COMPUTER
– Identifies the computer to which a PCU (or a device,
through its PCU) is attached. For instance, a network
PCU running on computer A and using the network
name pcu10 would have A-pcu10 in this column.
The COMPUTER column also indicates on which computer server a
service or server (utility) program is running.
PCU
268
Supported Device
– Contains the PCU device number and port on that
PCU to which the device is attached. For instance, a
device connected to port 4 on PCU 20 has 20-4 in
this column. If the device is a PCU, only its device
number appears here.
Configuration File
PRINTER
– Lists the printer number assigned to the device. For
instance, a terminal assigned printer number 2
would have 2 in this column. Wires display a join or
raw option.
Servers and specials use this column to indicate
which mailbox they use to receive notifications. For
instance, a txnet link with notification mailbox 189
would have N189 in this column.
SPEED
– Indicates the bps rate used for communication
between a device and its PCU.
OPTIONS
– Lists any modifiers to the device’s speed, such as bits
per character, parity, and handshaking. For PCUs, a
P is listed.
DEVNAME
– Lists the device’s name, if it has one, which can be
used for group membership and placed in the
DEVNAME field of stories.
Configuration File
The configuration file (/site/config) is a system road map. It lists all
devices, servers, and resources configured to run on your system and how
they are connected. If a device is not in the site configuration file, the
system will not know about it and cannot use it. Standard devices and
resources you may configure in this file include terminals, printers,
iNEWS Workstations, and wire services.
Each server for your system has a copy of this file that it reads when it
starts up and when you execute the configure command. However, it is
only the configuration file on the master computer that is active and used
when the system is started up.
c
Whenever you make changes to a site file, such as the configuration
file, be sure to select all servers in your system at the console. Unlike
database stories, site files are not automatically mirrored from one
269
Chapter 10 System Configuration Files
computer’s disk to another. See “Selecting Servers” on page 33 for
more information. Also, see Appendix H for information on using the
line editor, ed, to make changes to site files.
An example of a configuration file is located in Appendix B.
The site configuration file is divided into two major sections: the host
section and the device section (or body). The host section contains
information about various configurations your system can run, and devices
used in each of those configurations.
The format for each host section is:
host
<system configuration>
<net>
<reslist>
<servers>
Parameter
Description
System configuration
Refers to whether the system is running single,
dual, or triple. For instance, a standard
installation with two iNEWS Servers runs in a
dual configuration: AB. Installations with three
servers are known as triple systems, and
normally run in ABC configuration.
Refers to the particular iNEWS Server in the
system that runs in this configuration. The
iNEWS Servers are computers connected to the
console, run the iNEWS application software,
and contain the iNEWS database. See “Selecting
Servers” on page 33 for more information.
Refers to devices configured on that particular
iNEWS Server in that system configuration
(Communicate via the network).
Refers to resources configured on that particular
iNEWS Server in that system configuration.
computer
net
reslist
270
<computer>
Configuration File
Parameter
Description
servers
Refers to various utility programs called servers
that are configured to run on that particular
iNEWS Server in that system configuration. This
term should not be confused with the computers,
also called servers, which run the iNEWS
application software. See “Servers” on page 407
for more information.
The top host section details the device, resource, and utility program
numbers that run on the A server in a dual AB configuration. The second
host section details ones assigned to server B.
Information in the third and fourth host section is used by the system if one
of the servers fails. In the sample site configuration file, the host a a
section contains a list of all the devices, including ones normally assigned
to server B. If server B experiences a failure and is shut down, the system
can be reconfigured to run all devices, resources, and servers (utility
programs) on A. The host b b section contains a list of all the devices,
including ones that normally run on server A, in case that server
experiences a failure and is shut down.
When you run the configure command, the master computer (usually
server A) looks at the current system configuration and then assigns
devices listed for each iNEWS Server in that system configuration to each
iNEWS Server.
In the sample /site/config file, the odd numbered devices are
assigned to server A and even numbered devices are assigned to server B in
a dual AB configuration.
Any item number listed in the host section must have a corresponding line
in the device section or body of the configuration file, and vice versa. For
instance, if you are adding an iNEWS Workstation resource to the body of
the file, you must also add it to one or more host sections so the system
knows which server would be responsible for it under various conditions.
271
Chapter 10 System Configuration Files
The following table shows some of the more common device configuration
lines.
Type
Number Speed
Printer
Program Name
Comment
gnews
–
;iNEWS Workstation (PC)
–
;laserjet4
inws
301
–
1
printer
37
9600
4
wire
38
9600
anpa7
AP
–
;AP wire
wireserver
801
news
–
AP
–
;Data Receiver instance
line
42
38400-8na
modem
hayes
;dialout
line
42
38400-8na
radio
direct
;serial to WXYZ radio
resource
226
console
–
server
211
monitor
211
–
;6pm show
server
233
action
233
–
;action server
server
234
mail
234
–
;mail server
server
235
action
–
–
;timed action
special
51
19200
mct
–
200
;MCTerminal
special
220
0
txnet
220
–
;txnet to archive
special
55
9600
telex
55
telxl
;telex
driver
45
9600-8nh
infindriver
CG1
driver
62
9600-8nh
qpboxdriver SS
;Picturebox
mcspc
80
mcspc1
infindriver
CG2
;Chyron 2
com
701
–
1
gnews
–
;Component client
com
702
10.2.1.35
1
gnews
–
;Component client
rsearch
703
–
1
gnews
–
;Remote Search client
rsearch
704
10.2.1.35
1
gnews
–
;Remote Search client
272
;net connect
;Chyron 1
Configuration File
n
The number of configured com resources are limited to the number of
license com resources and rsearch resources are only allowed if Remote
Searching is licensed; the number of rsearch resources are not
otherwise limited by license. If Remote Searching is not allowed, the
system will not be configured if there are any rsearch resources defined.
Changing the Configuration File
Whenever you add, remove, or modify devices on your system, you must
make corresponding changes to the configuration file—also referred to as
the /site/config file. Changing this file requires the use of the line
editor. See Appendix H for more information.
To edit the configuration file:
1. Select all servers. See “Selecting Servers” on page 33 for more
information.
2. Type:
ed /site/config
3. What information is edited in the file depends on the device.
Editing procedures for specific devices are provided in later sections of
this chapter. See “Adding Devices to Your iNEWS System” on
page 285 for more information.
Do not use an
uppercase (W) in step 4.
4. Type w to write (save) your changes to disk.
5. Type q to quit the line editor.
Testing the Site Configuration File After Changing
Whenever you make changes to /site/config, always run a test on the
changes to ensure there are no problems with the new configuration. By
doing so, the test will warn of problems or if license limits are exceeded.
Some configuration problems will prevent system configuration and
startup.
273
Chapter 10 System Configuration Files
To run the test, use the configure console command in the following
format:
configure <config file> <system> <computer>
System refers to the set of servers that make up your iNEWS system, while
computer is the server whose configuration you have changed. In
“Changing the Configuration File” the procedural example showed steps
for adding a workstation to PCU 10, which is connected to server A in an
AB (dual server) system.
The following example shows the command for testing the configuration
of server A in an AB system:
NRCS-A$ configure /site/config
ab a
When the prompt returns, the configuration file has been checked. If the
system detects any errors, it displays bad configuration messages.
To help you debug the file, the output displays the line numbers of any
lines that have errors.
Incorporating Configuration Changes
After testing, to put the new configuration into effect:
1. Stop any devices affected by the new configuration.
2. Take the system offline by typing:
offline
3. Configure the system, using the following command format:
configure (master computer)
4. Bring the system back online by typing:
online
5. Wait for messages from the system being configured, and then restart
the newly added devices or any devices affected by the new
configuration.
n
274
If you change the type of device on a PCU port, the entire PCU may need
to be stopped and restarted.
Hosts File
To list contents of the site configuration file, at the console type:
cat /site/config
The configuration file that appears on your screen is similar to the sample
provided in Appendix B.
Semicolons precede comments and blank lines separate sections.
The sample file in Appendix B (to which we refer throughout this
explanation) may not match your system’s file exactly, but it contains
examples of the different kinds of entries you may find in your file.
n
On lines of the /site/config files where device numbers are listed, a
range of numbers may be specified—two numbers separated only by a
colon (:). This is useful at sites with many resources, servers, and sessions.
For instance, the resource line below shows device numbers listed
individually, then the line is repeated, showing how it may appear as a
range.
reslist 100 100 102 103 104 105 106 107 108 109
reslist 100:109
Similarly, you can specify a device range for definitions, such as:
inws 201:210 - 1 gnews ; iNEWS Workstation (PC)
This is equivalent to 10 lines, each with a different device number, with all
other information on the line applying to each device definition. If an IP
address is specified, a device range cannot be specified.
Hosts File
The hosts file (/etc/hosts) is a road map to other computers on the
network that your iNEWS Servers need to know about or
communicate with. It lists IP addresses of other computers and the
computers' names, along with any alternate names or aliases by
which the other computers are known. Workstations need not be
listed in the hosts file, but putting them in will maintain an
inventory of already used IP addresses. If a computer is not listed in
the hosts file, the iNEWS Servers will not know about it. This
includes PCU units, archive computers, routers, and mail gateways.
275
Chapter 10 System Configuration Files
An example of a hosts file is located in Appendix B.
System Profiles Files
For your system’s servers to work together, they need access to basic
system information, such as how many computers are in the system and
how the computers are connected. Each server must also have access to
system parameters, such as the default read rate and script margins. This
information is kept in system profile files whose names reflect the
information they contain. For instance, information about wires is kept in
/site/wires and information about printers is kept in
/site/printers.
Sample system profile files are in Appendix B. The most important
of these profile files is the system profile(/site/system), which is
discussed in the sections that follow. When you start your system,
each server reads its copy of the system profile and incorporates the
material into its operation.
An example of the system profile is provided in “Viewing System Files” on
page 262.
The system profile contains several parameters. Each parameter begins
with an identifying keyword, followed by an equal sign (=) and the
parameter’s value. When an iNEWS Server reads its system profile, it finds
each parameter’s value by searching for the keyword that represents that
parameter.
For instance, to find the system ID, each server searches its system profile
for the keyword, id, and reads the parameter associated with that keyword
located after the equal sign. If the server searched the system profile in the
example on page 262, it would find that NRCS was the parameter
associated with the keyword, id.
Most, but not all, parameters have default values the system uses if the
parameter is not present in the system profile. Consequently, a system
profile usually includes only parameters that you want to set differently
276
System Profiles Files
from their default values, and those that have no default values and must be
set in the system profile. Your system profile may not contain the same
parameters as the example.
Changing the System Profile
System profile parameters are configured in the system when servers are
connected. After the system profile in /site/system is modified, the
system should be shut down and restarted to get the servers to read the
modified system profile.
For instance, to change the localtimeout parameter in your system profile
file, do the following at the console:
This procedure, which
modifies the
/site/system file
uses ed, the line editor.
If you do not know how
to use ed to modify
lines in the file, please
see Appendix H.
1. Select all servers. See “Selecting Servers” on page 33 for more
information.
2. Type:
ed /site/system
A message similar to the following appears:
editing /site/system
213
3. Find the line that contains the localtimeout parameter, such as:
scriptrhmax=20 localtimeout=45:00 remotetimeout=30:00
4. Change the 45:00 value for that parameter to 15:00:
scriptrhmax=20 localtimeout=15:00 remotetimeout=30:00
Do not use an
uppercase (W) in step 5.
See Appendix H for
more information.
n
5. Type w to write (save) your changes to disk.
6. Type q to quit ed.
When you modify your system profile, separate parameters from each other
with spaces, tab spaces, or carriage returns.
7. Shut down the system, and then start it up again.
277
Chapter 10 System Configuration Files
When you start the system, each server reads its system profile and
incorporates parameters in that file in its operation.
n
You must reboot the servers and connect the system to get the servers to
read the system profile file.
Listing Parameter Settings
To find out which parameters the system is using:
1. At the console, type status all. This command displays the
system profile settings the system has incorporated in its operation.
Information similar to the following appears:
A is ONLINE and has been CONFIGURED. ID is NRCS.
System is AB. Master is A.
Disk status is OK. The database is OPEN.
System was last configured at 2004-04-19 13:53:49
Dbtraits changes recorded at 2004-04-02 13:06:36
auto_upgrade=yes
clockmax=12
excludedvideo=none
lastlogin=yes
load=5
localtimeout=0:00
maxhits=500
min_passwd_length=5
pausetimeout=0:05
readrate=180
remotetimeout=0:00
scriptlhmax=40
scriptrhmax=40
security=or
timechar=:
wordlength=0
The status all command lists values for all parameters defined in
the profile, except for the low and high watermarks and the purge limit.
Parameters not explicitly defined in the system profile will appear in
the list with their default values.
To list current low and high watermarks and the purge limit, type:
cat /site/system
See “Viewing System Files” on page 262 and “System Profile
Parameters” for more information.
278
System Profiles Files
System Profile Parameters
Each system profile description below includes information about the
values that parameter can have and whether or not the parameter has a
default value. If there is a default value, it is underscored. If a
parameter does not have a default value, you must give it a value in the
system profile.
n
The connect command can override anything in the profile by adding
<parameter>=<value> on the connect command line.
auto_upgrade=[yes | no]
Determines whether a user running an outdated version of the iNEWS
Workstation (client) software is allowed to upgrade it automatically. If
set to no, it means users of outdated software are not asked if they want
to upgrade. The default is auto_upgrade=yes.
clockmax=[12 | 24]
Determines how backtimes/cumetimes (cumulative) are displayed—12
or 24-hour format. While the iNEWS Workstation always displays
these times in 24-hour format, this setting is used by various utility
(server) programs whenever a date/time is formatted, such as when an
action server processes a mailto command and a story is sent as an
email message. It used by system printing as well. The default is 12.
excludedvideo=[director | none]
Determines the handling of director video when received in Story
Exchange Protocol (SEP) format. If set to none, this text is converted
into bold italic text. If set to director, the text is converted into closed
caption (CC) text.
highwater=<# of block units>
(2500)
Establishes the upper limit to which dbserver attempts to rebuild the
free list. Set this parameter far enough above the low watermark so the
system is not in danger of slipping beneath that mark. The number you
enter represents actual blocks of database space, where a block is one
kilobyte. For instance, a high watermark of 6250 (recommended for
most systems) represents 6250 blocks. The default value is 2500.
279
Chapter 10 System Configuration Files
id=<system name>
Gives the system a name. The system uses this name in some of its
messages and in the prompts. The system name defined here must
match that used in the /etc/hosts file (a file used by networking
software), must be in uppercase, and can be up to eight characters
long. There is no default value, so you must set it in the system profile.
lastlogin=[yes | no]
Lets you suppress on a user’s workstation display of last time user was
logged in. Setting no accomplishes this; the default is lastlogin=yes.
load=<number of connections>
(0)
Specifies the maximum numerical difference the system tries to
maintain between network connections from Windows-based clients
on different servers in your system. This is called load balancing, and
it is intended to keep one server from handling a much higher number
of connections than any other server.
For instance, if you set this parameter to 5, the system distributes
connection requests so the difference in the number of connections is
no higher than 5. If you had 2 active connections on server A, and 7 on
B, the next request to connect to B would be shifted to A. Connection
requests for A would be allowed, until the number of connections on A
was 5 more than on B.
The default value for this parameter is 0, which means load balancing
does not occur.
localtimeout=<min:sec>
(00:00)
As a security precaution, your system automatically logs out
workstations if they are idle longer than the time set in this parameter.
If a story is open at an idle workstation, the system saves the story
before logging out the workstation. Setting localtimeout=00:00
prevents the system from logging out workstations. This is the default
setting if it is not set in the system profile.
The localtimeout parameter is set in minutes and seconds. For
instance, to have the system log out any workstation idle for more than
two hours, set this parameter to 120:00. The maximum value is 540
minutes.
280
System Profiles Files
lowwater=<# of block units>
(1250)
Establishes minimum disk space that the system tries to keep available
for immediate use. Use it with the highwater and purgelimit
parameters to control how the system recycles space in the database.
Set this parameter in units of actual database blocks, where a block is
one kilobyte (1KB). For instance, a low watermark of 5000
(recommended for most systems) equals 5000 blocks of database
space.
If the number of blocks in the free list falls below the low watermark,
the system runs dbserver to reclaim the oldest stories from the Dead
queue, recycling the space onto the free list. This continues until the
free list is restored to the high watermark. If you do not include this
parameter, the system uses the default value of 1250 blocks.
master=<computer name>
Designates one of your system’s servers as the master computer, which
controls all database activity and performs the majority of
housekeeping, such as running dbpurge every hour and invoking
dbserver when low on space.
Generally, this parameter is left out of the system profile, causing the
system to designate as the master computer the server whose name is
alphabetically first (usually server A). You can specify a server as the
master computer using the connect console command. The format is:
connect <computer> master=<name>
maxhits=<number of hits>
(500)
Defines maximum number of hits, or matches, that a background
search—including Fast Text Search (FTS)—can find. For instance,
setting this parameter to 50 limits the total number of hits in a single
search to 50. The maximum number you can specify is 32765. If you
do not assign a value, the system uses a default value of 500.
min_passwd_length=<number of characters>
(5)
Defines minimum password length for your users. For instance, setting
min_passwd_length=6 prevents users from creating passwords
shorter than six characters. The value may range between 1 and 12
characters. This does not apply to passwords you assign with the
utraits command, but if you assign a password that is too short, the
user will be forced to change it the next time he or she logs in. The
system uses 5 as the default value.
281
Chapter 10 System Configuration Files
msgserver=[silent | verbose]
Used only for debugging. To find out whether or not a mailbox is
working, set this parameter to verbose. This causes the console to
display a message whenever activity occurs in a queue with a mailbox
assigned to it. Change this parameter while the system is running using
the msgdebug command. The default setting is silent. This prevents
messages regarding mailbox activity from being displayed.
name=<computer name>
Each server must have a unique name (either A, B, C, or D) to
distinguish it from the other servers in the system. Typically, assign
these names during the startup process using the connect console
command—connect a for server A, and so forth—so it need not
appear in the system profile. There is no default value assigned.
net=<computer names>
If your system’s servers are connected over an Ethernet network,
include this parameter in the system profile. This allows you to specify
all servers in the network. For instance, in a system using three servers
named A, B, and C, this parameter would be set to net=abc in the
system profile.
Include this parameter only if your servers are connected on a network.
Using this parameter precludes use of the single parameter. There is no
default value assigned.
pausetimeout=<min:sec>
(00:30)
Sets a default value for the PAUSE command, which is used in some
keyboard definitions. Users can override this default value. If not set,
the system assumes a value of 30 seconds.
purgelimit=<hours>
(0)
If dbserver reclaims all space available in Dead queue without
restoring the free list to the low watermark, it begins to purge old
stories by making a series of passes through the database. On each
pass, dbserver temporarily decreases each queue’s purge interval by
one hour and removes any stories older than the new purge interval. It
continues doing this until it has rebuilt the free list to the high
watermark or reaches the purge limit.
282
System Profiles Files
The purge limit sets the maximum number of passes dbserver can
make through each queue. The total number of hours dbserver can
purge from a queue is equal to the queue’s purge interval minus your
system’s purge limit.
Use the purge limit to prevent dbserver from purging everything from
important queues in its attempt to build up the free list. For instance, if
you set the purge limit to two hours, queues with a 3-hour purge
interval retain at least one hour’s worth of stories, even in a low-onspace situation.
You can set the purge limit between 0 and 24. If not set, your system
uses a default value of zero hours, which prevents dbserver from
purging any queue beyond its purge interval.
readrate=<words/minute>
(180)
Sets the system’s default read rate. When you add a user to the system,
the Add New User dialog box will default to a read-rate of zero, which
will be replaced by the /site/system read rate when needed. After a user
has been added, you can change the user’s read rate using the Modify
User Account dialog box. See “Modifying User Traits” on page 62 for
more information. If not set, the system uses a default read rate of 180
words per minute.
remotetimeout=<min:sec>
(00:00)
This time-out value also applies to all connect sessions, including
sessions that connect a workstation at your station to another service.
If a story is open when the system logs out the workstation, the story is
saved. Disable the automatic logout of connect sessions by setting this
parameter to 00:00. The maximum value is 540:00. The default
that the system uses is 00:00 if this parameter is not included in the
system profile.
scriptlhmax=<number of columns>
(40)
Sets default width of left column of a scripted story. The width is set as
a number of characters from the left side of the screen. For instance, a
value of 20 causes the left column of a scripted story to be 20
characters wide, beginning from the left edge of the workstation
screen. The allowable range for this value is 2 to 78, inclusive. If not
set, the system uses a default value of 40.
283
Chapter 10 System Configuration Files
scriptrhmax=<number of columns>
(40)
Sets default width of right column of a scripted story. The width is set
as a number of characters from the end of the left column. For
instance, a value of 20 causes the right column of a scripted story to be
20 characters wide, beginning from the end of the left column. This is
not the same as scriptrhmax in the printer profile. The allowable
range is 2 to 78, inclusive. The sum of the scriptlhmax and
scriptrhmax values must not be greater than 80.
If not set, the system uses a default of 40. These settings are used
during system printing and provide defaults when not defined in the
profile or style.
security=[and | or]
Indicates how your system determines group access of a particular user
with a particular workstation (or other device). If set to and, both user
and workstation must be members of the same group for the user to
gain access to directories or queues assigned to that group. If set to or,
the user can access any database items assigned to groups containing
either the user or workstation. The default value is or.
single=<computer name>
Tells the system it is running on only one server and names that server.
If your system consists of a single server, include this parameter.
Generally, in systems with only one server, the name is A, and this
parameter is set to single=a.
timechar=<character>
(:)
Defines the character the system uses to separate hours, minutes, and
seconds in time displays. For instance, using a colon as the time
character displays the time as hh:mm:ss. A colon is the default.
timer=[silent | verbose]
Your system contains a timer program that is always running. If this
parameter is set to verbose, the server sends a time display to the
console every 15 minutes.
A
Sat Apr
3 14:45:00 2004 iNEWS
verbose is the default setting, so do not include when you want
timer messages to appear. To disable time displays, include this
parameter as timer=silent.
284
Adding Devices to Your iNEWS System
c
All time values in the system profile must be set in minutes and
seconds in the format <mm>:<ss>. Set a value for both minutes and
seconds. For instance, to specify a time of two minutes, type: 2:00. To
specify a time of 25 seconds, type: 0:25.
wordlength=<numeric value>
(0)
This determines the word counting strategy used. If set to zero, the old
word counting strategy is used; if set to a non-zero value, the new
character counting strategy is enabled. This is the number of characters
that are counted as one word. When counting, the system divides the
character count by the wordlength to determine the number of
“words” in the story.
Adding Devices to Your iNEWS System
When you add a device, such as a new printer, to your iNEWS system, you
need to put information about it in the appropriate configuration file(s).
This section gives you information about how to do that. It includes
complete procedures for adding PCUs, workstations, printers, and wires.
For information about adding connect services, see the iNEWS Operations
and Troubleshooting Manual.
Adding a PCU or PC-PCU
This section contains information about adding a Peripheral Controller
Unit (PCU) to your system.
There are two kinds of PCUs: older models in rack-mount cases and newer
models in standard PC cases. The latter is referred to as a PC-PCU. A PCPCU can be an ordinary PC with special additional hardware to give it
more serial ports.
See Appendix D for more information.
285
Chapter 10 System Configuration Files
To add a PCU or PC-PCU to your system:
1. Choose a device number.
By convention, PCU device numbers are multiples of 10. Choose the
next available multiple of 10. If the system already has four PCUs,
numbered 10 through 40, use 50 as the device number for the new
PCU. See “PCU Device Numbering” on page 290 for more
information.
2. Connect PCU or PC-PCU to network.
3. Add appropriate host definitions in the configuration file—that is
/site/config. See “Changing the Configuration File” on page 273
for more information.
The net line in each server’s host definition begins with the word net.
Follow this with a list of network PCUs or PC-PCUs that you want to
run on that computer.
For instance, in the host definitions shown below, PCUs 10 and 20 are
network PCUs running on server A, while PCUs 30 and 40 are
network PCUs running on server B.
host
;
host
ab
net
a
ab
net
b
10
20
30
40
a. Add new PCU to server B, so its host definition looks like this:
host
ab
net
b
30
40
50
b. Add new PCU to the appropriate alternate host definitions.
4. Add a PCU or PC-PCU line to the configuration file
/site/config.
The configuration line must begin with the word pcu (or pcpcu)followed by the device number and name. These are followed by
a list of the devices connected to the it. The following shows an
example of the format for a configuration line:
pcu <device #> <name> <dev 1> <dev 2> ...<dev 8>
286
Adding Devices to Your iNEWS System
Parameter
Description
device #
The device number. It must be listed in a host
definition. By convention, this is a multiple of 10.
name
The name of the PCU or PC-PCU. Can be any string, as
long as it begins with a letter and is no longer than six
characters. Names that appear in the configuration file
must match those listed in your /etc/hosts file.
End the configuration line with a list of connected devices, with their
numbers separated by spaces. The order in which you list devices must
correspond to the ports to which they are connected—the device
connected to port 1 must be first, the device connected to port 2 must
be second, and so on.
You can include up to eight devices in a PCU configuration line. By
convention, the device number is the sum of the port number and the
PCU’s device number. See “PCU Device Numbering” on page 290 for
more information.
Fill unused ports with hyphens (-).
Add the line following the device lines for PCU 50. Because devices
are not connected to the new PCU, the line would look like this:
pcu
50 pcu50 -
-
-
-
-
-
-
-
5. Add the PCU to the /etc/hosts file.
A PCU’s name must be a valid Internet name. It must resolve to an
Internet address, either by being included in the hosts file or by an
Internet name server.
An example PCU line from the hosts file may look like this:
125.0.10.50 pcu50
The hosts file also contains lines identifying each server in your
system. An example of the /etc/hosts file is provided in
Appendix B.
6. Add the PCU to the /etc/dhcpd.conf file.
287
Chapter 10 System Configuration Files
You must list each PCU running on your system in the file
/etc/dhcpd.conf.
An example of this file
is installed on the
server with the iNEWS
software.
Format of a PCU entry in the file is:
host <name> {
hardware ethernet <Ethernet address>;
fixed-address <IP address>;
}
Parameter
Description
name
Put the name, such as pcu50, in this position. This
must match the entry in /etc/hosts.
Ethernet address The Ethernet address is found on its Ethernet card.
IP address
Put the fixed IP address in this position.
A typical entry in /etc/dhcpd.conf may look like this:
host pcu50 {
hardware ethernet 00:d0:b7:4b:52:f8;
fixed-address 125.0.10.50;
}
n
The semicolons after the Ethernet and IP addresses are required. Also, the
entire PCU entry, starting with word host and ending with the closing
brace (}), must be inside the subnet entry for the network the PCU will
be connected to.
An example of a /etc/dhcpd.conf file with entries for both a
PCU and an MCSPC is provided in Appendix B.
7. (Optional) Use the configure command to test your changes.
Use the following form of the configure command:
configure
/site/config
<system>
<computer>
In the previous example, PCU 50 is added and running on server B in
an AB system. To test this change, type:
configure /site/config ab b
288
Adding Devices to Your iNEWS System
When the prompt returns, the configuration file has been checked. If
the system detects any errors, it displays bad configuration
messages.
8. Select the master computer (typically server A). See “Selecting
Servers” on page 33 for more information.
9. Become a console superuser. See “The Console Superuser” on page 23
for more information.
10. Take the server (master computer) offline by typing:
NRCS-A# offline
11. Reconfigure the system by typing:
NRCS-A# configure
A message similar to the following will appear:
Apr 5 15:41:49 NRCS-A msg System being configured
12. When the prompt returns, bring the server online again by typing:
NRCS-A# online
13. Exit superuser mode. (Ctrl+D)
14. Use the restart command followed by the PCU’s number to start
the new PCU or PC-PCU. For instance, for PCU 50, type:
NRCS-A$ restart 50
The system reports Hot-to-go messages.
For Rack mounted PCUs, the final LED display indicates the PCU’s
number.
At this point the PC-PCU has broadcast its bootp request. If it is on the
network and the iNEWS Server is properly configured to respond to
the PC-PCU,obtains its IP address and the following is displayed:
ethernet address: 00 20 AF 9F DD A5
internet address: 125.1.10.30
LEDS 00000
289
Chapter 10 System Configuration Files
n
After the PC-PCU has been properly configured and can be restarted from
the console, the monitor and keyboard may be removed. However some
PCs will not boot with the keyboard removed so before removing the
monitor and keyboard, it maybe necessary to go into the CMOS setup of
the PC to adjust its boot-up behavior.
15. (Optional) Back up your site files with the sitedump command.
PCU Device Numbering
Each PCU and device connected to it must have a unique device number.
Use device numbers to refer to devices when using commands such as
restart and when adding configuration lines to your configuration file.
Your system uses device numbers in its console messages, such as
failed to load device 11.
You can randomly assign different numbers to devices, but system
maintenance is simpler if you give each device a number that corresponds
to the PCU port to which it is connected. The numbering convention
described here has been established to make your system maintenance
work easier.
Network PCUs are usually given device numbers that are multiples of 10.
These numbers are usually sequential and begin with the number 10. So, in
a system with four network PCUs, the PCUs would have 10, 20, 30, and 40
as device numbers.
When your system was installed, each device connected to a PCU was
given a number that is the sum of the PCU’s device number and the
number of the PCU port to which the device is connected. For instance,
you would give a wire connected to port 1 on PCU 10 device number 11. A
printer connected to port 5 on PCU 20 would have device number 25.
Numbering your system’s devices in this way lets you quickly determine
which PCU—and which port on the PCU—a device is connected to just by
looking at the device’s number.
290
Adding Devices to Your iNEWS System
Adding a Workstation
To add any type of new workstation to your system:
1. Choose a device number for the workstation—determine the next
available number in the range you have set aside for these devices.
2. Connect workstation to network.
3. Add workstation to the configuration file stored on each server in your
system.
Add the workstation’s device number to a reslist line in the host
definitions.
To configure a workstation, use the format:
inws <dev #> <address> <printer #> gnews <dev name>
Parameter
Description
device #
Workstation’s device number.
address
If you use a hyphen (-), this resource is available to any
licensed PC on your system. If you place an IP address
here, this resource can be used only by the PC with that
address. Additionally, this can be the Ethernet address
assigned to the PC’s network card.
printer #
Default printer. This number must be assigned to a printer
listed in the configuration file. Entering 0 has the
workstation print to a printer connected directly to the
workstation.
device name
A device name up to eight characters used for group
security. If you assign a device name to a workstation, you
can grant security permissions to the workstation by
adding that name to the appropriate group story.
When someone edits and saves a story at this workstation,
its device name is placed in the devname field (if one
exists) in the Story Form panel. If you do not want to give
the workstation a device name, place a hyphen (-) in this
position.
291
Chapter 10 System Configuration Files
4. (Optional) Use the configure command to test your configuration
changes. The syntax is:
configure
/site/config
<system>
<computer>
For instance, type:
configure /site/config ab a
When prompt returns, the configuration file has been checked. If the
system detects any errors, it displays appropriate bad
configuration messages.
5. Reconfigure the system.
a. Select the master computer (typically server A). See “Selecting
Servers” on page 33 for more information.
b. Become a superuser. See “The Console Superuser” on page 23 for
more information.
c. Take the server (master computer) offline by typing:
NRCS-A# offline
d. Reconfigure the system by typing:
NRCS-A# configure
A message similar to the following will appear:
Apr 5 15:41:49 NRCS-A msg System being configured
e. When the prompt returns, bring the server online again by typing:
NRCS-A# online
f.
Exit from superuser mode. (Ctrl+D)
6. (Optional) Back up site files with the sitedump command any
time you add a device.
Adding a Printer
You can connect any kind of serial printer to the iNEWS system, and
configure each printer to take advantage of its special features.
For more information about printers, see Chapter 11.
292
Adding Devices to Your iNEWS System
Even if you never add a printer to your system, this information can help
you if you need to move a printer to a different PCU or modify a printer’s
profile.
To add a printer to your system:
1. Choose a device number for the printer. To do this, find an available
PCU port to which you want to connect the printer. For instance, if we
add a printer, such as HP LaserJet, to port 7 on PCU 10, we give the
printer device number 17. See “PCU Device Numbering” on page 290
for more information.
2. Connect printer to PCU.
3. Create a printer queue in the database in the SYSTEM.PRINTERS
directory. If you do not complete this step, any print requests to the
new printer will not be processed. This is done at an iNEWS
Workstation. See “Adding a Directory or Queue” on page 99 for more
information.
Here’s an example: The new printer is printer number 4, so the new
queue is called 004. The entire pathname is:
SYSTEM.PRINTERS.004.
n
Your system can handle up to 500 printers. Print queues for the first 250
printers are in the directory SYSTEM.PRINTERS. Print queues for the
next 250 printers are in SYSTEM.PRINTERS2.
4. Return to the console to finish adding the printer.
5. Add the printer to the configuration file, /site/config, on each
iNEWS Server in your system.
This involves adding the printer’s device number to the PCU’s
configuration line and adding a device configuration line for the
printer.
n
If you move a printer to another PCU, you must remove the printer’s
device number from the old PCU’s configuration line and add it to the new
PCU’s configuration line. Give the printer a new device number that
reflects the new PCU port to which you attached it.
293
Chapter 10 System Configuration Files
This procedure, which
modifies the
/site/config file
uses ed, the line editor.
If you do not know how
to use ed to modify
lines in the file as
required in step 5, see
“Configuration File” on
page 269 and
Appendix H.
a. Select all servers. See “Selecting Servers” on page 33 for more
information.
b. Type:
NRCS-A$ ed /site/config
editing /site/config
1259
c. Add printer’s device number to list of device numbers in the PCU
configuration line. For instance, for a printer connected to port 7
on PCU 10, the printer’s device number (17) is added to PCU 10’s
configuration line. At first, the line may appear similar to this:
pcu
10 pcu 10 11
12
13
14
15
16 - -
Ensure that you place the new device number in the position that
represents the port to which you connected the printer. For
instance—for the printer with device number 17—the printer’s
device number is placed in position 7 in PCU 10’s configuration
line. The new line should look like this:
pcu
10
pcu10
at
11
12
13
14
15
16
17
-
d. Add a configuration line for the new printer. By convention,
configuration lines are arranged according to device number. For
instance, the configuration line for the printer with device number
17 would be placed after the configuration line for device 16.
A regular printer configuration line uses the format:
printer
294
<device #>
<speed>
<printer #>
Parameter
Description
device #
The printer’s device number. It identifies the printer to which
the configuration line applies. Include this number in the
appropriate PCU configuration line.
speed
Sets the baud rate (bits per second) at which the printer
communicates with the PCU.
printer #
Assigns a logical printer number to the printer. Used in
workstation configuration lines to identify the printer that
devices use as their default printer. This is not the same as
the printer’s device number, but it is the same number that
you use to refer to the printer when you print to it from an
iNEWS Workstation.
Adding Devices to Your iNEWS System
For instance, the printer uses device number 17 and communicates
at 1200 baud, 7-bit, even parity, and users will refer to this printer
as printer 4. So, the new printer line looks like this:
printer
Do not use an
uppercase (W) in step 6.
See Appendix H for
more information.
17
1200-7e
4
;newsroom HP LaserJet
6. When you finish making changes to the configuration file, you must
save your changes before exiting the line editor. To do this, type:
w
After you press Enter, a number will appear representing the file size,
such as:
1306
7. Exit the line editor by typing:
q
8. Create a profile for the printer.
The easiest way to
create a profile is to
copy the standard
profile for the type of
printer you are adding
to a file for the new
printer’s profile. Then
make any necessary
modifications to the
copy you just made.
A printer’s profile must be in a file with the same name as the printer’s
device number. Also, this file must be located in the
/site/printers directory.
For instance—for an HP LaserJet printer connected to port 7 on PCU
10—you would copy the standard profile for the HP LaserJet
(/site/printers/hplaser) to a new file called
/site/printers/17. Then modify the profile so the system can
use a font module that has been added to the printer.
To copy a profile to a new file:
a. Select all servers. See “Selecting Servers” on page 33 for more
information.
c
As with all site files, each of the system’s servers must have its own
copy of the printer’s profile, so ensure that you select all servers before
you copy the standard profile.
9. Use the cp command to copy the standard profile, such as
/site/printers/hplaser for an HP LaserJet printer into a new
file on each server, such as /site/printers/17.
The format for this command is:
cp <file pathname copied> <new file pathname>
295
Chapter 10 System Configuration Files
The entire command line would look similar to this:
cp /site/printers/hplaser /site/printers/17
10. Use the cat command to examine the file and determine whether you
need to make any changes or additions. The format is:
cat <file pathname>
For instance, to examine the file for the printer connected to port 7 on
PCU 10, type:
NRCS-A$ cat /site/printers/17
A message similar to the follow will appear:
; HP LaserJet IVsi Printer profile
;
ejectcode
<ff>
ejectcount
1
idlecount
0
pagelength
66
scriptrhstart
32
scriptrhmax
23
scriptlhmax
25
scriptshift
yes
scripttemplate
no
;
expand
<esc>(OU<esc>(sp7.0h18vs0b11T <nul>;Courier
;
font 2
<esc>(s3B
<esc>(s0B
;Bold
font 3
<esc>(s4B
<esc>(s0B
;Extra Bold
font 4
<esc>&dD
<esc>&d@
;Underline
font 5
<esc>&dD<esc>(s3B<esc>&d@<esc>(s0B;Bold/Under
;
form 7
<esc>&100<esc>(s10H<esc>(s12V <nul>;landscape
form 8
<esc>&l1H
<nul>
;top tray
form 9
<esc>&14H
<nul>
;lower tray
11. (Optional) Test your configuration changes by using:
configure
296
/site/config
<system>
<computer>
Adding Devices to Your iNEWS System
For instance, a printer is added to PCU 10, which is connected to
server A in an AB system. To test this change, type:
configure /site/config ab a
12. When the prompt returns, the configuration file has been checked. If
the system detects any errors, it displays bad configuration
messages.
n
After editing the configuration file, you should reconfigure the system.
However, if you modified only an existing printer’s profile, you need only to
restart the printer to incorporate the changes. You may skip to step 14.
13. To have the system adopt changes you have made to the configuration
file, reconfigure it by doing the following:
a. Stop the PCU. For instance, to stop PCU 10, type:
stop 10
b. Select the master computer (typically server A). See “Selecting
Servers” on page 33 for more information.
c. Become a superuser. See “The Console Superuser” on page 23 for
more information.
d. Take the server (master computer) offline by typing:
NRCS-A# offline
e. Reconfigure the system by typing:
NRCS-A# configure
A message similar to the following will appear:
Apr 5 15:41:49 NRCS-A msg System being configured
f.
When the prompt returns, bring the server online again by typing:
NRCS-A# online
g. Exit from superuser mode. (Ctrl+D)
14. When you see the System being configured message, select
the server to which the printer’s PCU is connected and restart that
PCU.
Use the restart command in this format:
restart <PCU number>
297
Chapter 10 System Configuration Files
For instance, to restart the PCU 10, type:
NRCS-A$ restart 10
NRCS-A$ P10: 12:43:20 Hot-to-go
When you see a Hot-to-go message for the printer, as shown in the
previous example, you can begin to use it. If there are any errors in the
profile, the system reports them on the console when you restart the
printer.
15. (Optional) Back up site files using the sitedump command.
Adding a Wire
The iNEWS system supports the ingest of wire services in two ways:
•
Through a PCU port
•
Through an Avid Data Receiver wireserver resource
To add a wire for a PCU port, you must complete four phases in the setup.
You can edit just a wire
service’s profile.
298
•
Phase 1 - Connect the wire service to a PCU port.
•
Phase 2 - Create an entry for the wire service in the configuration file
and a wire profile for the wire service.
•
Phase 3 - Add the wire distribution information.
•
Phase 4 - Restart the wire service’s program to incorporate the changes
you made, so it can begin receiving and distributing wire
stories.
More information about wires is provided in Chapter 12, “Wires”. For a
step-by-step procedure outlining the four phases for adding a wire service
on a PCU port, see “Adding a Wire – PCU Port” on page 358. For more on
setting up wire ingest using the Avid Data Receiver, see “Adding a Wire –
Avid Data Receiver” on page 354.
Alternative Editing of the Site Configuration File
Alternative Editing of the Site Configuration File
The line editor is used at the console to edit site files, which are located on
an area of the server’s hard disk known as the software partition. If these
files, such as the /site/config file, are temporarily transferred to the
iNEWS database located on an area known as the database partition, you
can use an iNEWS Workstation to edit the file. Here is the alternative
method of editing a site file, such as the /site/config file, in the
database rather than using the line editor:
1. At an iNEWS Workstation, create a transfer queue—that is, go to a
directory, such as the System directory, and create a new queue to hold
the configuration file. A SYSTEM.TRANSFER queue may already be
set up on your system. See “Adding a Directory or Queue” on page 99
for more information.
n
When performing this procedure, there should be only one file—the one
you are working on—in SYSTEM.TRANSFER.
2. At the console, use the doc command to transfer material between the
software and database partitions.
The doc command format is:
doc -pu <queue name> <file to be transferred>
For instance, to transfer a copy of the configuration file to the
SYSTEM.TRANSFER queue, type:
doc -pu system.transfer /site/config
3. Return to an iNEWS Workstation.
4. Log in as a system administrator. (This is to ensure that you have
access to the System directory.)
5. Navigate to the SYSTEM.TRANSFER queue and open it by double
clicking on it.
6. Select the configuration file story in the queue and edit it in the Story
panel.
n
If you are adding devices in the bottom section of the configuration file, do
not forget to also add the device numbers in the hosts section at the top.
299
Chapter 10 System Configuration Files
7. Move file from database partition back to software partition using the
doc command again. The format is:
doc -gu <queuename> > <filename>
For instance, to move the new configuration file from the
SYSTEM.TRANSFER queue back into the Site directory, type:
doc -gu system.transfer > /site/config.new
n
The example shows the file is transferred into a temporary location
(/site/config.new rather than /site/config). This allows for
testing prior to actual file implementation.
8. Use the configure command to test the new configuration file, to
see if there are any problems with it. If none are found, you will get the
system prompt; otherwise, you will get an error message.
Here are some sample configuration tests:
configure
configure
configure
configure
configure
/site/config.new
/site/config.new
/site/config.new
/site/config.new
/site/config.new
abc a
ab a
a a
bc b
ac c
9. Copy the new configuration file into the correct location:
cp /site/config.new /site/config
10. Remote copy it to the other server(s):
rcp /site/config NRCS-B:/site/config
rcp /site/config NRCS-C:/site/config
11. Implement the new configuration by reconfiguring the system from the
master computer (typically server A).
a. Select the master computer.
b. Take the system offline by typing:
NRCS-A$ offline
c. Reconfigure the system by typing:
NRCS-A$ configure
d. Take the system back online by typing:
NRCS-A$ online
300
Intersystem Messaging
12. Return to the iNEWS Workstation and delete the configuration file
from SYSTEM.TRANSFER.
c
Usually, iNews Customer Support technicians edit the configuration
file on the console, in the software partition. If you leave a copy of the
file in the database, it is possible someone may change the file on the
console, so when you come back to edit the file in the database (which
you assume to be the more current version), it will actually be an
outdated version. To eliminate the possibility of confusion, delete the
file from the database when you are done.
Intersystem Messaging
Intersystem Messaging is a feature that allows a user to exchange messages
with another user on a separate iNEWS newsroom computer system, or
other third-party system with a compatible interface.
On iNEWS systems, intersystem messages can be sent from iNEWS
Workstation sessions, and from the console send utility. For intersystem
messaging to work, a system must have an agent that functions as
described in the following section. For iNEWS, this agent is integrated into
the iNEWS Server software.
RFC (Request For
Comments)
documentation is
provided at the
following Web sites:
http://sunsite.
auc.dk/RFC or
http://www.rfceditor.org/
To receive intersystem messages, a system must have a TCPMUX service
running. TCPMUX is defined by RFC 1078, “TCP Port Service
Multiplexer (TCPMUX).” Additionally, the system must have an
intersystem message service configured.
Sending Intersystem Messages
An intersystem send is attempted whenever a message send request has a
recipient name which includes an at symbol (@). It is assumed that this
represents a name in <user name>@<system name> format. This is
301
Chapter 10 System Configuration Files
the same format used for sending mail to a user on a foreign system, such
as the Internet. The <system name> parameter can be an IP address in
standard notation, such as 172.161.131.2.
The system name is resolved to an IP address through standard lookup
services.
A TCP connection to port 1 of the system is attempted. Port 1 is the “well
known port” (as defined in RFC 1700, “Assigned Numbers”) assigned to
the TCPMUX service.
After the connection is established, the string
inter_system_message<cr-lf> is sent. The receiving system
sends +<explanation><cr-lf> to indicate a positive
acknowledgement. This conforms to RFC 1078.
n
The service name—in this case, inter_system_message—is never
case-sensitive and <explanation> is any text that helps to explain the
reason for the response.
The sending system can then send the following string:
SEND<sp><user name><sp><sender’s name><sp><message
text><cr-lf>
In this string, the user name and sender’s name do not contain any spaces,
carriage returns, or line feeds. The names are as they are used within their
respective systems. The sender’s name should be suitable to use as the user
name in an intersystem message reply. The message text can contain
spaces but not carriage returns or line feeds. It is optional (so you can
check the logged-in status of the user). The iNEWS system will truncate
this string at the first line feed or at 72 characters.
After sending the intersystem message, the sending system should read a
single line, which is the receiving system’s response. On receipt of the
response, the sending system should close its connection. See “Receiving
Intersystem Messages” on page 303 for more information.
The sending system should be prepared to handle all of these error
conditions:
302
Intersystem Messaging
•
Time out on establishing connection to the receiving system’s
TCPMUX port
•
The receiving system actively refusing the connection on the
TCPMUX port
•
Connection closed by the receiving system at any time
•
A negative response -<explanation><cr-lf> to the
inter_system_message<cr-lf> request. This is a negative
TCPMUX response, and <explanation> is any text that helps to
explain the reason for the response.
Receiving Intersystem Messages
To receive intersystem messages, a system must respond to connections on
the TCPMUX port. On Linux systems, this is done by having a TCPMUX
service defined in /etc/services and /etc/inetd.conf.
To hook an intersystem message service into the TCPMUX service on a
Linux system, an entry must be included in the /etc/inetd.conf,
such as:
tcpmux/+inter_system_message stream tcp nowait <agent>
<parameters>
The inter_system_message string is the identifier used by the
sending system to select this service. This string is not case sensitive.
The plus character (+) preceding inter_system_message tells the
inetd daemon to handle the initial connection and negotiation. In this
case, when the inetd daemon determines that it has an intersystem message
agent, it will perform the positive acknowledgement (the +...<cr-lf>
response) and then invoke the agent program.
The agent program must be prepared to respond to the “SEND” command,
as described above.
The iNEWS agent program is /exc/ismessage. The suggested
parameter for the iNEWS intersystem message agent is ism. This
parameter can be anything and is used to identify the program in messages
printed to the system’s console. If an additional parameter is supplied and
303
Chapter 10 System Configuration Files
it is a non-zero decimal string, the /exc/ismessage program is put into
a verbose mode. When in verbose mode, the /exc/ismessage program
will print its responses onto the system console. This can be used to track
frequency and identity of intersystem messages.
n
The actual message text is not printed onto the console.
For iNEWS, the /etc/xinetd.d/ismessage file contains:
# default: on
# description: The ism server serves iNEWS InterSystem
Message requests.
service ismessage
{
id
disable
flags
socket_type
wait
user
server
log_on_failure+
}
=iNEWS-ismessage
=no
=REUSE
=stream
=no
=root
=/exc/ismessage
=USERID
Responses from the receiving agent program must conform to the
following syntax:
<3-digit response code><sp><explanation><cr-lf>
The 3-digit response code is modeled on FTP response codes (See Section
4.2 of RFC 959, “File Transfer Protocol”).
n
However, only single line responses are expected. The explanation is any
text excluding a carriage return – linefeed (cr-lf), which makes the
response better understood.
The receiving agent program will generate one of the following responses,
with the iNEWS receiving agent including the following explanations:
201 <user name> is logged in<cr-lf>
304
Intersystem Messaging
Message stored for the specified user (if there is message text) and the
user is currently logged in. User is notified of message arrival.
202 <user name> is not logged in<cr-lf>
Message stored for the specified user (if there is message text) and the
user is not currently logged in.
421 System not online<cr-lf>
System not connected, not configured, or not online. Message is
discarded.
430 No such user: <user name><cr-lf>
Username unknown on receiving system. Message is discarded.
450 Message save failed for: <user name><cr-lf>
Failed to properly store the message for the specified user. Message is
discarded.
500 Syntax error, command unrecognized<cr-lf>
The first “word” on the line was not “send.” The check for the word
“send” is case insensitive. Message is discarded.
501 Syntax error, insufficient parameters<cr-lf>
The “send” line has fewer than three space-delimited tokens.
Minimally “send”, <user name>, and <sender’s name> are
required, <message text> is optional. Message is discarded.
The iNEWS receiving agent will print diagnostics to the system’s console
when abnormal conditions are encountered. The diagnostics are:
ism: getpeername failed (<errno>) <errno string>
The sender’s IP address could not be determined.
ism: fgets error (<errno>) <errno string>
The read failed for the send command.
ism: gethostbyaddr failed (<errno>) <errno string>
The sender’s IP address could not be converted into a host name.
Errno is the Linux system error number returned on system function calls
and errno string is an explanation of that error code.
305
Chapter 10 System Configuration Files
The iNEWS receiving agent will accept intersystem messages directed to
the user’s computer. Messages addressed to “computer” will be printed on
the system’s console. The word “computer” can be localized using the
message dictionary token M_COMPUTER. A 201 computer is
logged in response will always be returned for messages directed to
“computer.”
Database Change
The iNEWS message file format includes the sending system’s IP address
for intersystem messages. When upgrading an iNEWS newsroom
computer system, a dbdump of the message file should be done to
preserve the message file content. After upgrading, a dbgen x (x
identifies the message file) command must be done. A dbrestore can
then be done to restore the message file.
iNEWS Workstation Session Behavior
There is virtually no difference between sending local messages and
sending intersystem messages. If the recipient’s name contains an at
symbol (@), name validation is not performed and an intersystem send is
attempted.
The only difference on receiving messages is that the complete sender’s
information is always returned. If it is a local message, a simple user name
is provided. If it is an intersystem message, the sender’s name will be
formatted as <sender’s name>@<system name>.
306
Chapter 11
Printers
Each printer on your system has a profile that contains the commands
iNEWS needs to control the printer, plus settings for options you may use
with the printer. When you restart a printer, your system checks its profile
for the necessary information. There are two types of printing that require
configuration: system and local printing. Managing both are covered in this
chapter. For information on how to connect a printer to iNEWS, see
“Adding a Printer” on page 292.
This chapter contains:
•
System Printing
•
Creating and Using Print Styles
•
Local Printing
•
Managing Printers
Chapter 11 Printers
System Printing
A system printer is connected to an iNEWS Server and not directly
connected to an iNEWS Workstation. Users can send print jobs to a system
printer from any iNEWS Workstation on the network. System printers can
be customized by configuring certain system profile files and forms.
The Printer Profile Files in /site/printers
Printer profiles are text files in the /site/printers directory. Your
system is installed with standard profiles for many popular printers.
To see which printer profiles are installed on your system, go to the console
and type:
ls /site/printers
Information similar to the following appears:
15
17
25
35
45
55
65
81
95
adx
apcarbon
apcarbonra
autocue
epson
facit
generic
genicom
hplaserjet
la120
laser
laser.bold
laser2
laser3
laser4
magnum2rev
nec
okidata
printronix
rawprint
ti820
ti850
ti855
ti880
today
today-script
This list contains numbered and alphanumeric filenames. Alphanumeric
files are the standard profiles for several different types of printers. For
instance, ti855 is the standard printer profile for the TI-855 printer.
Numbered files are profiles your system uses to operate your printers.
Numbered files in the list correspond to device numbers of printers in your
system. For the system to find the correct profile for each printer, the
profile must be stored in a numbered file corresponding to the printer’s
device number. For instance, a printer whose device number is 17 must
have its profile in a file named /site/printers/17.
308
System Printing
The standard profile for an HP LaserJet printer is in
/site/printers/hplaserjet. To list this file, type:
cat /site/printers/hplaserjet
Information similar to the following appears:
NRCS-A: cat /site/printers/hplaserjet
;HP Laserjet IVsi 14SEP00
;
ejectcode
<ff>
ejectcount
1
idlecount
0
pagelength
66
scriptrhstart 32
scriptrhmax
23
scriptlhmax
25
scriptshift
yes
scripttemplate no
;
expand
<esc>(0U<esc>(sp7.0h18vs0b11T <nul>
;
font 2
<esc>(s3B
<esc>(s0B
font 3
<esc>(s4B
<esc>(s0B
font 4
<esc>&dD
<esc>&d@
font 5
<esc>&dD<esc>(s3B <esc>&d@<esc>(s0B
;
form 1
<esc>E
<nul>
form 7
<esc>&l0O<esc>(s10H<esc>(s12V <nul>
;form 8 <esc>&l1H
<nul>
;form 9 <esc>&l4H
<nul>
;
;Courier
;Bold
;extra bold
;underline
;bold/Under
;reset
;landscape
;top tray
;lower tray
The first half of the file contains options that control margins, headers,
form feeds, and page length. The second half contains fonts and forms. The
fonts section defines control codes that select print effects, such as bold or
underlining. The forms section defines codes that set up the printer, such as
control codes to select a font module or set print quality.
309
Chapter 11 Printers
Control codes often use nonprinting characters such as the one generated
by the ESC key. All control codes in the profile above begin with the
character produced by the ESC key. Because this key does not produce a
printing character, enter it in the file as <esc>.
Customizing Print Effects (Fonts)
To turn print effects—such as bold or underlining—on and off, the iNEWS
system must send control codes to the printer. Control codes are defined as
font in a printer profile.
A profile can have up to 10 fonts, numbered from 1 to 10. Each font
defines the control code to turn on an effect and the control code to turn off
the effect. Usually, a font defines the control codes for one effect. However,
you can combine control codes for effects, such as bold and underlining, to
create complex fonts.
Defining a Font
Each font is defined on a separate line in a printer profile. The definition
must begin with the word font followed by the font number, which must
be between 1 and 10. This is followed by the control code that turns on the
effect, a few spaces, and the control code that turns off the effect.
Style stories select fonts by number, and any printer can use them. If you
have a style story that expects font 1 to represent bold text, define font
1 as bold in all your printer profiles.
For instance, to create a bold font, start a line with font 1, followed by
the code to turn on bold printing. For an HP laser printer, the code would
be <esc>(s3B. Follow that with a few spaces and the code to turn off
bold printing <esc>(s0B. The finished definition looks like this:
font 1
n
310
<esc>(s3B
<esc>(s0B
;bold print
Assign fonts consistently in all your printer profiles, such as font 1 is
bold; font 2 is underlined, and so on.
System Printing
Combining Print Effects
In many cases, you can combine two or more print effects by creating a
font containing the print effects control codes. Follow the font name with
control codes to turn on the print effects you want. Follow these codes with
a few spaces and control codes to turn off those print effects.
For instance, the HP LaserJet printer can print both bold and underlined
text. It uses <esc>(s3B and <esc> s0B to turn bold on and off and
<esc>&dD and <esc>(&d@ to turn underline on and off.
n
When you combine several print effects in one font, no spaces can occur
between control codes that turn on all print effects. Additionally, no spaces
can occur between control codes that turn them off.
For instance, combine two effects to create a font, such as font 5, that
prints bold and underline as follows:
font 5
<esc>&dD<esc>(s3B
;bold, underline
<esc>&d@<esc>(s0B
Defining Print Forms
When you send a story to a printer, your system must first initialize the
printer to prepare it to print according to the style you select. Define each
of the control codes that represent initialization commands as form. For
instance, define codes that select draft quality printing as form 1 and
codes that select letter quality printing as form 2. You can define up to 10
forms in a printer profile. See “Selecting Forms” on page 329 for more
information.
Each form contains on and off control codes for a different setup
command. Usually, a form contains control codes for one setup command,
but you can also combine control codes for different commands, such as
select both letter quality and a font module.
n
Forms may seem to be the same as fonts, but forms are used strictly to
initialize the printer. Therefore, use a form to set a printer to word
processing mode before printing, but not to turn on bold printing.
311
Chapter 11 Printers
Defining a Form
You define forms similarly to fonts. Each definition begins with the word
form followed by the form’s name. The form’s name contains a number
between 1 and 10. This is followed by a control code that initializes the
printer, a few spaces and, optionally, an off control code.
The form’s on control code is sent at the beginning of the print job, and the
form’s off control code is sent at the end of the job.
Each setup option has an on control code. Many—but not all—have an
off control code. If the setup option you are defining does not use an off
control code, you must put a <nul> where the off control code would be
located.
Always name forms consistently in each printer profile. For instance, in
each profile define form 1 as draft quality.
Suppose that you are creating a profile for your HP laser printer and want
to define a form that sets up the printer in landscape mode. Define this as
form 7.
Begin the line with form 7, and follow with the control code that puts the
printer in landscape mode. For an HP laser printer, the control code is:
<esc><&10o<esc>(s10H<esc>(s12V
The HP laser printer needs landscape mode turned off at the end of a print
request, so follow the on control code with <esc>E. The finished line
should look like this:
form 7
<esc>&10o<esc>(s10H<esc>(s12V
<esc>E ;landscape
Combining Setup Options
As with fonts, you can combine two or more setup options in one form.
You do this in the same way you would combine options for fonts. See
“Combining Print Effects” on page 311 for more information.
312
System Printing
Font and Form Space Available
The system reserves about 400 bytes of space for form and font definitions
for each system printer profile. Each character in a font or form
definition—including the spaces to separate on and off control codes and
the Enter character at the end of each line—uses space.
If you exceed the limit, the message Maximum Definitions
Already Made appears when you try to start the printer.
If you see this message, free some space by deleting forms or fonts from
that profile that you do not use. Alternatively, comment out any forms and
fonts you are not using by placing semicolons in front of them.
Printer Profile Options
Besides defining forms and fonts, you can set a number of options in the
profile to be used when a print request is sent to the system printer. These
options control formatting, such as the number of lines on each page,
whether or not the text is all uppercase, whether stories have a banner at the
top of each page, and so on.
These options fall into two categories:
•
Profile-only options are set in the printer profile.
•
Profile and style options are also set in the printer profile, but can be
temporarily overridden if a different value is specified in a style story
within the database.
Almost all of these options have default values the system uses if you do
not set the options.
For options pertaining to local printing, see “Local Print Style Options” on
page 340.
313
Chapter 11 Printers
Profile-Only Options
Profile-only options are set in the printer profile, and cannot be overridden
in a style story. Use options beginning with the word auto only with an
autocue printer, which produces teleprompter roll copy according to
European standards—that is, printing only the audio portion of a script.
The underlined item or number in parenthesis is the default value.
The profile-only options are described in the following table.
Option
Description
answerback <message to send> <expected reply> Use with printers that require the system to send a
specific message and then expect a certain answer back
from the printer before sending the story to the printer.
There is no limit on these strings.
autofield <form field>
(S)
Determines which form field of the story is used as a
header line when printing the story. The default value is
the title field (S). This is a Video Terminal (VT)
template field identifier character, not a field name.
autoindent <number of spaces> (0)
Sets the number of spaces to indent each line (as a
printing offset) on an autocue printer. The default value
is 0.
autolength <length of line> (30)
Sets the maximum length for lines of text on an autocue
printer. The default value is 30.
autopara <number of spaces> (3)
Controls the number of spaces an autocue printer
indents each paragraph. The default value is 3 spaces.
autospace <line spacing> (3)
Controls line spacing for an autocue printer. A value of
1 produces single-spaced text. A value of 2 produces
double-spaced text. A value of 3 is the default and
produces lines of text separated by two blank lines.
autoshift [yes | no]
Controls whether an autocue printer prints in uppercase
or mixed case. When the value is yes, it uses uppercase.
If set to no, text is printed as entered. The default value
is yes.
314
System Printing
Option
Description
done <queue name> (Dead)
Specifies the queue where a print request is sent after
the print job is done. The default value is the Dead
queue.
ejectcode <printer’s eject string>
Lets the system know which codes it must send to the
printer to execute a form feed. There is no default for
this option, so you must explicitly define the eject code
in the printer profile.
ejectcount <number of ejects> (1)
Selects the number of times your system sends the eject
code to the printer at the end of each print request. The
default is 1.
exlines <number of lines> (0)
Printers that print double-high text, such as the
Printronix P300, use one extra line per line of expanded
text. Use this option to set the number of additional
lines used when printing expanded text with the print
script command. The default is 0.
expand <start string> <end string>
Defines control codes that turn a printer’s expanded text
mode on and off. The system uses this option when
someone prints a story using the print script
command. If you do not define these control codes in a
printer’s profile, or if a printer cannot print expanded
text, the system prints scripts in normal text.
To set up, begin a line with expand. Follow that with
your printer’s control codes to turn on expanded
printing, a few spaces (or a tab space), and the control
codes to turn off expanded printing. For instance, if the
code to turn on expanded printing is <esc>P and the
code to turn it off is <esc>Q, define expanded printing
like this:
expand
<esc>P
expanded
font
<esc>Q
;(DP)
Defines control codes that turn on or off print effects,
such as bold or underlining. See “Customizing Print
Effects (Fonts)” on page 310 for more information.
315
Chapter 11 Printers
Option
Description
form
Defines control codes that represent initialization
commands, such as selecting draft quality. See
“Defining Print Forms” on page 311 and “Selecting
Forms” on page 329 for more information.
idlecount <number of ejects> (0)
Determines the number of ejects (as defined by the
ejectcode and ejectcount options) to be performed once
all pending print requests have been printed. The
default value of 0 prevents the system from ejecting a
page at the end of a print request.
initprint <printer’s initialization string>
The system uses these codes to initialize the printer
when you restart it. This may be lost when the printer is
powered off.
map <database character> <printer code>
Use to translate or map a database character to a
character the printer can print. Useful if you need
characters such as ¿ and £, which are available on many
printers but have a different code in the printer.
To map a translation of a database character, begin a
line with map. Add a few spaces and enter in the
database character you want to translate. Add a few
more spaces and enter the code you want the system to
send to the printer in place of that database character.
n
sbc_frames <frames per second>
Indicates the number of video frames transmitted in one
second. This value is used when calculating the
duration of a tape event. There is no restriction on this
value. However, Phase Alternate Lines (PAL) video
format transmits 25 frames per second and National
Television Systems Committee (NTSC) video format
transmits 30 frames per second. This Sony barcode
parameter is required.
n
316
The printer code is a single byte and not a
sequence of bytes.
If printer type is Sony-beta, sbc-frames must
be defined. Otherwise, a Missing required
barcode parameter message will appear.
System Printing
Option
Description
sbc_max_duration <[hh:]mm:ss:ff>
This Sony barcode parameter has two functions. It is
used to determine the maximum segment duration time
if raw time code is being used to calculate the segment
duration, which is calculated as the End Of Message
(eom) time code minus the Start Of Message (som)
time code. It is also used to check if a duration time
entered from the template does not exceed the duration
entered in the profile. In the format, hh is hours, mm is
minutes, ss is seconds, and ff is frames. The
maximum time allowed is 23:59:59:ff, where ff
is the value found in sbc_frames. This Sony barcode
parameter is required.
n
If printer type is Sony-beta,
sbc_max_duration must be defined.
Otherwise, a Missing required barcode
parameter message will appear.
sbc_som <hh:mm:ss:ff>
Enables the user to determine a constant Start Of
Message (som) timecode. The maximum value
permitted is 23:59:59:ff, where ff is the value
found in sbc_frames. This Sony barcode parameter
is optional.
sbc_eomstyle [<HH:mm:ss:ff>|<hh:mm:ss:FF>]
Enables a user to specify a constant End Of Message
(eom) style. A user can declare a constant hour field or
a constant frame field. It is not possible to declare both.
The format ends with either HH:mm:ss:ff, where HH
is the constant hour field value or hh:mm:ss:FF,
where FF is the constant frame field. The mm and ss
parts of the format are literal. If you specify a number
of hours, you must put ff for frames. If you specify a
number of frames, you must put HH for hours. This
Sony barcode parameter is optional.
sbc_bulkprint
Permits printing of multiple Sony barcode labels, when
the command print story is entered from the
directory level.
317
Chapter 11 Printers
Option
Description
scriptshift [yes | no]
Controls whether scripts are printed in uppercase. The
yes option prints scripts in uppercase; no prints scripts
as is. The default is yes.
type [generic | autocue | adx | sony_beta|
beeline]
Defines European Autocue, ADX, generic, beeline, and
Sony Barcode printers. If the profile is for any of these
printers, use this option to specify the printer. The
default value is generic.
Profile and Style Options
The options in the following table are set in the printer profile, but can be
overridden by settings in a style story. Generally, use a printer profile to set
these options to the values you want the system to use as defaults for a
particular system printer. When you create a style story, you need only
include these options to use a value different from the one defined in the
printer profile.
Option
Description
banner [yes | no | continuous]
Controls whether each page begins with a header that
includes the name of the user who printed the story, the
time, and the page number. If you want a banner, set this
option to yes. The default value is yes.
When you print a queue, your system numbers each story
in the queue, beginning with page one by default. To
make the page numbers continuous, set the banner option
to continuous.
blanks <number of blank lines> (3)
Controls the number of blank lines the system prints
following each story when printing a directory. A value of
1 results in single spacing (no blanks between stories), a
value of 2 gives double spacing, and so on. The minimum
value is 1. The default value is 3.
pagefooter <queue name> [<footer name>]
Use to include a footer on each page of printed output.
pageheader <queue name> [<header name>]
Use to include a header on each page of printed output.
318
System Printing
Option
Description
pagelength <number of lines> (65)
Determines the number of lines printed on a page before
the page is ejected. Specify a value of 1 for no page
breaks. Other valid values are 6 through 255. The system
uses the default if you specify an invalid value. The
default value is 65.
printform [yes | no | all]
Controls whether a story’s form is included in the printed
output. The yes option prints the form at the top of the
first page only; no prints the story without a form; and all
prints the form at the top of each page of the story. The
default value is yes.
n
printscriptform [yes | no | all]
Template is an alias for printform. Both are
recognized.
By default, a script is printed with only the title, page, and
presenter fields at the top of the first page. To print the
entire form on the first page, set this option to yes.
The printscriptform all option causes the entire
form to be printed on each page of the script. The
printscriptform no option causes the script to be
printed without any form information.
n
Scripttemplate is an alias for
printscriptform. Both are recognized.
scriptlhmax <number of columns> (28)
Sets margin of left (production cue) portion of a script.
Adjust this value if you are changing from a script printed
in normal text to a script printed in expanded text. The
default value is 28.
scriptrhmax <number of columns> (25)
Controls the right margin of a script. Normal settings are
from 20 to 30. The default value is 25.
scriptrhstart <column number> (29)
Sets starting column of right (audio) portion of a script. If
you are using normal-sized print, column 40 is the
midpoint of a page and the value generally used. If you
use expanded print, use a smaller value to accommodate
the larger text. The scriptrhstart printer-profile
option differs from the scriptrhstart parameter in
the system profile. The default value is 29.
319
Chapter 11 Printers
Option
Description
scriptspacing <number of lines> (2)
Sets spacing used between lines of printed text when
printing a script. Use a value of 2 for double-spacing. Use
a value of 1 (the minimum value) for single-spacing. The
default value is 2.
separator [yes | no]
Specify whether a row of equal (=) characters is printed
after a story’s form to separate it from the text of the story.
The default value is yes.
spacing <line spacing value> (2)
Controls line spacing of printed stories. Set the value to 1
for single-spacing, or 2 for double spacing. The default
value is 2.
Standard Header and Footer Options
Use the pageheader and pagefooter options to include headers and footers
in printed stories. You can put your header and footer stories anywhere in
your database. Group header stories in a queue called SYSTEM.HEADERS
and group footer stories in a queue called SYSTEM.FOOTERS.
To create a header or footer, enter the text into the story as you want it to
appear on the printed page. The total number of lines in the header and
footer combined cannot be more than half of the pagelength value.
For instance, if the pagelength is 66, the combined number of lines in
the header and footer cannot be more than 33. If the header/footer
combination exceeds half of the pagelength value, the system truncates
header and footer lines so that both fit on the page.
To select a header in a printer profile or a style story, use the
pageheader option. The format for this option is:
pageheader
320
<queue name>
<header name>
System Printing
The queue name is the full pathname of the queue containing the header
story you want to use. The header name is generally the title of the story in
that queue containing the header. It is defined by the Header queue’s
sorting index field, whose default is the Title field. For instance, to select a
header from SYSTEM.HEADERS called am-script, use the following:
pageheader
system.headers
am-script
To select a footer story in a printer profile or a style story, use the
pagefooter option. The format for this option is:
pagefooter
<queue name>
<footer name>
The footer name is generally the title of the story in that queue containing
the footer. It is defined by the Footer queue’s sorting index field, whose
default is the Title field. For instance, to select a footer from
SYSTEM.FOOTERS called am-script, use the following:
pagefooter
system.footers
am-script
Profiles and styles interpret spaces as delimiters; give your header and
footer stories titles that do not include spaces and left-justify them in the
title field.
User-Selected Headers and Footers
You can also let the user select the header or footer when the story is
printed. To enable this, the story must have a form field where the user can
enter the header or footer name.
To set up a profile or a style so the user can select a header or footer, use
the pageheader or pagefooter options. Put an equal sign followed
by a field name as the header or footer name.
For instance, suppose your Scripts queue has a form with a field called
footer where users can enter the title of the footer story they want to use.
Set up the pagefooter option in the printer’s printer profile:
pagefooter
system.footers
=footer
When someone uses that printer to print a story, the system looks for a
story in SYSTEM.FOOTERS with the name entered in the story’s footer
form field. The name must be an actual story in the queue named in the
pagefooter option, or the footer is not printed.
321
Chapter 11 Printers
Profile Option Defaults
Many profile options have default values.These options and their default
values are shown in the following table. Some of these profile options also
have minimum values. Options for which defaults or minimum values do
not apply are marked n/a.
322
Option Name
Default
Minimum
Maximum
answerback
n/a
n/a
n/a
autofield
S
n/a
n/a
autoindent
0
0
n/a
autolength
30
1
n/a
autopara
3
0
n/a
autoshift
yes
n/a
n/a
autospace
3
1
n/a
banner
yes
n/a
n/a
blanks
3
1
n/a
done
n/a
n/a
n/a
ejectcode
n/a
n/a
n/a
ejectcount
1
0
n/a
exlines
0
0
n/a
expand
n/a
n/a
n/a
idlecount
0
0
n/a
initprint
n/a
n/a
n/a
map
n/a
n/a
n/a
pagefooter
n/a
n/a
n/a
pageheader
n/a
n/a
n/a
System Printing
Option Name
Default
Minimum
Maximum
pagelength
65
1
255
printform
yes
n/a
n/a
printscriptform
no
n/a
n/a
scriptlhmax
28
1
79
scriptrhmax
25
1
79
scriptrhstart
29
2
79
scriptshift
yes
n/a
n/a
scriptspacing
2
1
n/a
separator
yes
n/a
n/a
spacing
1
1
n/a
type
generic
Setting this parameter to autocue/
adx/sony_beta/beeline
changes the program behavior for a
special purpose.
Using Special Characters in a Profile
Some printers use control codes that include nonprinting characters, such
as those produced by the Escape and Enter keys.
Others use characters such as semicolons (;), pound signs (#), and at (@)
symbols, which have a special meaning for your system or your system’s
console. You must enter these characters in your profile in a special way.
Using Nonprinting Characters
A nonprinting character is one that does not show up on your screen. You
can add a nonprinting character to a profile either by alias or by decimal
value.
323
Chapter 11 Printers
Adding Nonprinting Characters by Alias
Your system recognizes a number of aliases for many of the nonprinting
characters you may use in a printer profile. These aliases are two- or threeletter abbreviations that represent different characters. For instance, esc
represents Escape (ESC) and cr represents Enter.
When you put an alias in a printer profile, you must enclose it in angle
brackets (< >) so that your system recognizes it as an alias. For instance,
enter a font that used the Escape and Enter characters as follows:
font
3
<esc>4
<cr>5
Adding Nonprinting Characters by Decimal Value
You can represent any character by its decimal value. Enter the character’s
decimal value in angle brackets (< >) where you want it to appear in the
profile.
For instance, Escape has a decimal value of 27, and Enter has a decimal
value of 13. Accordingly, you could enter a font using these characters in
its control codes as follows:
font
3
<27>4
<13>5
See “Character Alias and Decimal Values” on page 325 for more
information.
Avoiding Characters Used by the System
Some printing characters are reserved for system use. Therefore, you
cannot include any of these characters as a control code by typing it. Some
of these characters and their system interpretations are listed in the
following table.
324
Character
How it is interpreted
;
Indicates the start of a comment
#
Represents the computer’s name
space
Separates on and off control codes
System Printing
Character
How it is interpreted
<
Indicates the start of character entered by alias or decimal value
@
Causes system to abandon the line you are typing
Character Alias and Decimal Values
If your printer uses control codes that contain any of the characters used by
the system, enter the characters by alias or by decimal value. The aliases
and decimal values for these characters are listed in the following table.
Character
Alias
Decimal Value
;
<sc>
<59>
#
<35>
space
<sp>
<32>
<
<<
<60>
@
\@
<64>
|
<vrl>
<124>
\
<bks>
<92>
<ctrl>A
<soh>
<1>
<ctrl>B
<stx>
<2>
<ctrl>C
<etx>
<3>
<ctrl>D
<eot>
<4>
<ctrl>E
<enq>
<5>
<ctrl>F
<ack>
<6>
<ctrl>G
<bel>
<7>
<ctrl>H
<bs>
<8>
325
Chapter 11 Printers
326
Character
Alias
Decimal Value
<ctrl>I
<ht>
<9>
<ctrl>J
<lf>
<10>
<ctrl>K
<vt>
<11>
<ctrl>L
<ff>
<12>
<ctrl>M
<cr>
<13>
<ctrl>N
<so>
<14>
<ctrl>O
<si>
<15>
<ctrl>P
<dle>
<16>
<ctrl>Q
<dc1>
<17>
<ctrl>R
<dc2>
<18>
<ctrl>S
<dc3>
<19>
<ctrl>T
<dc4>
<20>
<ctrl>U
<nak>
<21>
<ctrl>V
<syn>
<22>
<ctrl>W
<etb>
<23>
<ctrl>X
<can>
<24>
<ctrl>Y
<em>
<25>
<ctrl>Z
<sub>
<26>
<ctrl>[
<esc>
<27>
<ctrl>\
<fs>
<28>
<ctrl>]
<gs>
<29>
<ctrl>^
<rs>
<30>
Creating and Using Print Styles
Character
Alias
Decimal Value
<ctrl>_
<us>
<31>
<ind>
<ind>
<132>
<nel>
<nel>
<133>
<hts>
<hts>
<136>
<ri>
<ri>
<141>
<ss2>
<ss2>
<142>
<ss3>
<ss3>
<143>
<dcs>
<dcs>
<144>
<csi>
<csi>
<155>
<st>
<st>
<156>
Creating and Using Print Styles
For your printer profiles to be useful, you must have styles designed to take
advantage of them. Each of your system’s styles is defined in a separate
story in your database, called a style story. Each style story creates a
particular kind of printed output by selecting forms and fonts necessary to
produce the output. It may also override some options set in the printer’s
profile. In addition to using style stories to control printed output, you can
change default translations of special system words that control print
operations.
Print styles can be used to define printed output for both system and local
printers. Local printing style stories are created in the same location and in
the same manner as those for system printing. See “Local Printing” on
page 333 and “Local Print Style Options” on page 340 for more
information.
327
Chapter 11 Printers
Creating a Style Story
Each style story is held in its own queue in SYSTEM.STYLES. Queues in
this directory have names that are three-digit numbers, such as 001. This
lets you refer to each style by a number. For instance, a user can choose the
print style defined in the style story in queue 001 by selecting that queue.
Each three-digit queue name in the example can be followed by a hyphen
and a descriptive name, such as SINGLE-SPACE. This optional name is
used by the Print dialog box.
To create a new style story and queue:
1. Create the new queue in SYSTEM.STYLES. See “Creating a New
Queue” on page 103 for more information.
2. Choose the next available three-digit number for the queue name. For
instance, if 004 is the last queue name used, create a style 005. Give
the new queue a numerical name, such as 005-memo. The number is
followed by a hyphen and the descriptive word, memo.
n
The largest number that you can use as a queue name is 255 and the lowest
is 0. (Style 0 is the default style your system uses when someone enters a
print command without specifying a style.) You can have as many as 250
separate style stories.
3. After the queue is created, open it by double-clicking on it in the
Directory panel.
4. Create a new story to hold the style you want to create. See “Creating a
New Story” on page 106 for more information.
5. Create the new style by writing the various profile options, font, and
form information in the Story panel. This is explained in more detail in
the next sections.
6. Save the story.
Changing System Profile Options
The first part of your style story should contain options that are different
from the default values set in the printer profile. For instance, suppose that
profiles usually have the banner or running header option set to yes, the
328
Creating and Using Print Styles
spacing option set to 2 (double spacing), and a page length of 65 lines.
However, you want the memos to be single-spaced, printed without a
banner, with a maximum of 40 lines per page.
Change these options in the style story. Put banner no on the first line of
the style story, spacing 1 on the second line, and pagelength 40 on
the third.
Setting these options in a style story overrides their settings in the printer
profile, but only when this style is used. You can modify profile and style
options only in the style story; you cannot modify profile-only options.
The style options are
different for local
printing. See “Local
Print Style Options” on
page 340 for more
information.
These are the system profile options you can change in a style story for
system printing:
banner [yes | no | continuous]
blanks <number of blank lines>
pagefooter <queue name> <footer name>
pageheader <queue name> <header name>
pagelength <number of lines>
printform [yes | no | all]
printscriptform [yes | no | all]
scriptlhmax <column number>
scriptrhmax <column number>
scriptrhstart <column number>
scriptspacing <number of lines>
separator [yes | no]
spacing <line spacing value>
Selecting Forms
What appears next in the style story are forms selected to produce the
output you want. For instance, to print memos in letter quality mode,
choose forms that set up the printer to do that.
As part of this example, suppose that we must initialize letter quality and
word processing modes on printers to produce letter quality output. Also,
our system’s printer profiles define codes to initialize letter quality printing
and codes to initialize word processing mode as form 1 and form 2,
respectively.
329
Chapter 11 Printers
To add forms to the style story:
1. Type form and the numbers representing forms you want to add. For
instance, to add form 1 and form 2 to the style story, type:
form 1 2
2. Add a comment at the end of each line explaining the form’s purpose.
Begin the comment with a semicolon and then enter a short
explanation. If you use more than one form, ensure the forms do not
conflict.
n
The same word, form, is used in both the style story and printer profile,
but have different, although related, meanings. A form in the printer
profile defines a sequence of codes to be output to the printer when one of
the 10 possible forms is selected. When specifying a form in a style story,
you are selecting a list of forms to use that correspond to form numbers in
the printer profile. See “Defining a Form” on page 312 for more
information.
Identifying and Selecting Fonts
The fonts come last in the style story. This parameter allows you to match
video effects produced by the iNEWS Workstation to corresponding print
effects. For instance, you can match the bold video attribute, which
produces bold text on the screen, to the print effect that produces bold
printed text.
This is a multilevel process.
Video attributes produced by the iNEWS Workstation are converted to
video modes used for system printing. These video modes can be
associated with font numbers, in the style story. Fonts, defined and
associated with a number in the printer profile, produce the desired print
effect on paper.
There are a total of five video modes available for system printing. Their
standard names are:
330
•
NORMAL
•
BOLD
•
REVERSE
Creating and Using Print Styles
•
UNDERLINE
•
BOLDREVERSE
The following table is a chart displaying some of the different video
attributes that can be produced on the iNEWS Workstation and the
associated video modes.
Attribute
Video Mode
NORMAL
NORMAL
BOLD
BOLD
ITALIC
REVERSE
UNDERLINE
UNDERLINE
PRESENTER
REVERSE
CLOSED CAPTION
BOLDREVERSE
BOLD ITALIC
BOLDREVERSE
BOLD UNDERLINE
BOLD
ITALIC UNDERLINE
REVERSE
BOLD ITALIC UNDERLINE
BOLDREVERSE
As an example, we will map bold and underlined attributes on the iNEWS
Workstation to corresponding print effects. The printer profiles in our
example system are standardized so that they all define font 1 as
producing bold printed text, and font 3 as producing underlined text. We
assign bold to font 1 and underline to font 3.
When you assign a video mode to a font in a style story, you must refer to
the video mode by its standard name that your system recognizes for
system printing.
331
Chapter 11 Printers
To assign a video mode to a font in a style story, begin a line with the video
mode’s standard name followed by the font number you want to associate
with that video mode. For instance, to associate the bold video mode with
font 1, type a line in the style story similar to this:
bold
1
; bold text
We assign the underline video mode to font 3 in the same way, such as:
underline 3 ; underline text
When you save the story, the system incorporates the style story into its
operations so users can select that style when they print stories from the
database.
The bold video mode is also associated with the bold attribute on the
iNEWS Workstation. The underline video mode is associated with the
underline attribute on the iNEWS Workstation. When you type some bold
text in a story in the iNEWS Workstation, that bold text is associated with
the bold video mode. When you print that story using a style story, which
associated bold video mode with font 1, the bold text you typed into
your story on the iNEWS Workstation will print bold-faced on paper.
There is one more important system dictionary file, which determines how
attributes of field labels and field text in Story forms are associated with
the five standard video modes. This file is called convertvideo and
exists in the /site/dict directory.
n
332
In some cases, the /site/dict/convertvideo directory may not be
present on the system.
Local Printing
The standard form for this file is shown here:
NRCS-A$ cat /site/dict/convertvideo
;
attribute
;
field-style-to-video
<b>
field-style-to-video
<b><u>
field-style-to-video
<b><i>
field-style-to-video
<b><i><u>
field-style-to-video
<i>
field-style-to-video
<i><u>
field-style-to-video
<u>
label-style-to-video
<b>
label-style-to-video
<b><u>
label-style-to-video
<b><i>
label-style-to-video
<b><i><u>
label-style-to-video
<i>
label-style-to-video
<i><u>
label-style-to-video
<u>
c
mode
bold
bold
boldreverse
boldreverse
reverse
reverse
underline
bold
bold
boldreverse
boldreverse
reverse
reverse
underline
Avid strongly cautions that you not change this file.
The letters in angle brackets (< >) represent attributes. For instance, <b>
represents the bold attribute. The <i> represents italic. The <u>
represents the underline attribute. Words in the right column represent
video modes associated with attributes. This file affects how Story forms
are displayed on video display terminals and how they are printed to
system printers.
Local Printing
Local printing is any print request sent to a printer directly accessible to the
iNEWS Workstation.
The iNEWS system includes an enhanced Local printing feature, also
called Windows printing. These enhancements include a dialog box that
offers users more options, such as selecting a predefined style when
printing locally.
333
Chapter 11 Printers
When local printing a
batch of stories, stories
that have a BLANK
body are not printed.
n
Local printing does require some setup preparation or alterations. For
instance, there are print style options that must be defined in
SYSTEM.STYLES. Both print style options and the dialog box are
explained here, starting with the dialog box.
Local printing is not available when the cursor is in the Directory panel,
unless it is on a queue that is currently displayed in the Queue panel. Local
printing is not recommended for stories larger than 10 kilobytes or 5
minutes, according to iNEWS timing. The iNEWS system will print these
files, but because the local printing is not handled in the background, it
may cause the workstation to appear “frozen” or “locked up” while the
system processes the print request.
Local Printing Dialog Box
334
Local Printing
The dialog box is divided into five sections: Scope, Options, Story
Preview, Copies, and Grid. There are also several buttons, which include:
Print Preview, Network, and Default. Each of these sections and buttons
are described in more detail in this part of the chapter.
Scope
The Scope section allows users to select one of four radio buttons to
indicate what they want to print.
The options these radio buttons offer are explained as follows:
The “Print the queue
view” option
determines whether the
Story Preview
checkbox is available.
See “Story Preview” on
page 336 for more
information.
•
Print the queue view - This option is available in most cases. A user’s
cursor does not have to be in the Queue panel of the iNEWS
Workspace for this option to be used. Even if the cursor is located in
the Story panel, the user can still print the queue view by selecting this
option.
•
Print selected portion of queue - This option is available when a
portion of the Queue panel is selected. Only that highlighted portion of
the queue view—which must be contiguous—will be printed when this
option is chosen. This option is not available when noncontiguous
lines in the queue are selected.
•
Print all stories in the queue - This option is available from the
Directory panel or Queue panel if the queue has the printable (+p)
database trait. This option will send the text of all stories in the queue
to the printer.
•
Print selected stories - This option is only available if a row or rows
of stories are selected in the Queue panel. The option will send text of
stories highlighted in the queue to the printer.
335
Chapter 11 Printers
•
Print current story - This option is available in all three panels of the
iNEWS Workspace. It will send the story that currently appears in the
Story panel to the printer.
Not all options are available all the time. Also, which option in the Scope
section is selected by default depends on which panel in the iNEWS
Workspace is activated—that is, in which panel the cursor is located.
Default Option Selection:
•
From the Directory panel, if the queue has the printable database trait,
it defaults to “Print all stories.” If the queue does not have the printable
database trait, it will default to “Print current story.”
•
From the Queue panel with one or more stories selected by the row
selector button, it will default to “Print selected stories.”
•
From the Queue panel with no stories selected, it will default to “Print
current story.”
•
From the Story Panel, it will default to “Print current story.”
Story Preview
The Story Preview section allows a user to print a preview or sample of
each script as part of the queue image. Consequently, this section is only
enabled if the “Print the queue view” option is chosen in the Scope section
of the dialog box. Otherwise, it will appear gray and be unavailable.
The Story Preview section, once enabled, has three options a user can
define, depending on how the queue view should be printed.
•
336
Story Preview - When this check box is selected, iNEWS will print
lines of each story, along with the queue view, as defined by the user in
the Story Preview section.
Local Printing
•
All lines - When this check box is selected, iNEWS will print all of
lines of each story, along with the queue image. When this option is
selected, the remaining option called Lines Per Story appears gray and
is unavailable.
•
Lines Per Story - When enabled, iNEWS will print the specified
number of lines of each story, along with the queue view. Lines of the
story will be printed below the row that corresponds to it in the queue
view. This option is disabled (appears gray) when the All lines option
is checked.
For instance, if a user wants to see the first few lines of each story in
addition to a show’s lineup, the user selects the “Print the queue view”
radio button in the Scope section of the dialog box, selects the Story
Preview check box, sets the Lines Per Story setting to 3, and clicks OK to
print it. The iNEWS system will print the first row of the lineup (or fields
of the Story Form), followed by three lines of that story, then the second
row and three lines of the second story, and so forth.
n
Rows as shown in the Queue panel may not match exactly rows of the
queue image printed with Story Preview selected. That is because iNEWS’
Story Preview printing feature is configurable. System administrators can
define what information appears in the columns of a Queue panel and in
fields of the Story Form panel. These two displays may or may not match
exactly. This is also the case for Story Preview printing. For instance, a
system administrator can designate which fields from the Story Form are
not printed. The default is to print all fields in the Story Form, as specified
within each story.
337
Chapter 11 Printers
Options
The Options section of the dialog box contains three choices for users:
Styles, Line Spacing, and Uppercase.
•
n
Various print style options can be defined by the system administrator and
are stored in the first story in the queues within SYSTEM.STYLES. See
“Local Print Style Options” on page 340 for more information.
•
n
Line Spacing - A user can configure how much space appears between
lines of text. A setting of one would result in single-spaced text, two
would be double-spaced, and so forth. This option will override any
line spacing predefined in the chosen print style.
The maximum number for line spacing allowed by default in the dialog box
is 10. A print style can exceed this maximum and that setting will appear in
the Line Spacing box when that style is chosen. However, if a user chooses
to manually override the style setting by changing it in the Local Printing
dialog box, then the default maximum of 10 will again take effect.
•
338
Styles - A user can choose from a drop-down list of predefined styles.
This feature is available when printing to both local and system
printers.
Uppercase - When this check box is selected, iNEWS will print all
text in uppercase (all capitalized letters). Whether this check box
appears selected by default when the dialog box first opens can be set
by the system administrator using a print style option. See “Local Print
Style Options” on page 340 for more information.
Local Printing
Copies
The Copies section allows the user to determine the number of copies
printed and whether multiple pages are collated.
The Collate check box is not available for selection unless multiple copies
are printed—that is, the number of copies is set to a number more than 1.
Grid
The Grid section of the dialog box contains two choices: Horizontal and
Vertical.
•
Horizontal - When this check box is selected, iNEWS will include
horizontal grid lines when printing the queue view image.
•
Vertical - When this check box is selected, iNEWS will include
vertical grid lines when printing the queue view image.
The default behavior of these check boxes is based on a user’s preferences.
Print Preview and Network buttons
Print Preview - This button allows users to preview queues or stories on
their screens prior to printing.
n
The Print Preview button is disabled when Story Preview is selected.
•
Network - This button offers the user more flexibility in selecting
which printer is used. The dialog box has two locations from which a
user can select a printer. The first is a drop-down list at the top of the
dialog box that displays a list of printers loaded on, or locally
339
Chapter 11 Printers
connected to, the computer the user is on. The second is the Network
button, which allows the user to select any printer available through the
network.
•
Default - This button returns settings of the Print dialog box back to
default preferences of the user.
Local Print Style Options
Local print style options are added to the styles already used by iNEWS for
system printing. They are stored in the first story in queues within
SYSTEM.STYLES with options for system printing. See “Creating a Style
Story” on page 328 for more information.
n
Do not make separate stories in the queues for system and local printing.
Because all options for local printing begin with the letters WIN, iNEWS
will ignore these options when conducting a system print.
In the story, options are specified with an option name—also known as a
token—followed by an equal sign (=) and then the parameter value. Each
option must be on its own line. A semicolon (;) will cause the remainder of
that line to be ignored, and can be used to make notes in reference to the
print option. The format looks like this:
<option name>=<parameter value>;<notes>
A sample story containing local print styles is provided later in this
document. See “Example Style Story” on page 348 for more information.
The local print options are not case-sensitive, but do have default settings
provided in the following table:
Options
Parameter Values
Defined
WinVTEmulation
YES | NO
Specifies whether blank lines will be added
to the script side to line up the production
cue and the marker (grommet) if the
production cue spans more than one line.
The default is NO and will keep local
printing functioning without inserting blank
lines.
340
Local Printing
Options
Parameter Values
Defined
WinCopyDriverSetting
YES | NO
Specifies if multiple copies should be sent
as a single print job rather than a separate
print job sent for each copy. Will allow the
printer to handle the printing to multiple
output bins. The default behavior is NO.
WinRundownFontFace
<font>
Specifies the font to be used when printing
the queue view. Underscores cannot be used
to represent a space in a font name. If a font
name is not specified, the currently
displayed font on screen will be used.
WinRundownFontSize
<font size>
Specifies a numeric value for the size of the
font in points when printing the queue view.
If a font face and font size is not specified,
the currently displayed font size on screen
will be used. If a font face is specified but
the font size is not, the font size will default
to 12.
WinRundownLeftMargin
<left margin>
Specifies a numeric value for the left margin
when printing the queue view. Measured in
inches. Default size for the left margin will
depend on the width of the queue view.
WinRundownRightMargin
<right margin>
Specifies a numeric value for the right
margin when printing the queue view.
Measured in inches. Default size for the
right margin will depend on the width of the
queue view.
WinRundownTopMargin
<top margin>
Specified a numeric value for the top
margin when printing the queue view.
Measured in inches. Default size is 1.
WinRundownBottomMargin <bottom margin>
Specifies a numeric value for the bottom
margin when printing the queue view.
Measured in inches. Default size is 1.
WinBannerBlanks
Specifies the number of blank lines printed
in between the banner and the start of the
story form. Default is 0 (zero).
<number of blank lines>
341
Chapter 11 Printers
Options
Parameter Values
Defined
WinPrintRundownForm
<form>
Defines what form is used when printing the
queue view. If a form is not specified, the
currently displayed form on screen will be
used.
WinPrintHide
YES | NO
Specifies whether to prevent certain text in
the story body from printing. Default is NO.
See WinPrintHideStart and
WinPrintHideStop on how to define what
text does not get printed.
WinPrintHideStart
<character string>
Specifies a character or character string that
will be used to mark the beginning of a
portion of text in the story body that is not
to be printed. Numbers and letters cannot be
used. Default is <<.
WinPrintHideStop
<character string>
Specifies a character or character string that
will be used to mark the end of a portion of
text in the story body that is not to be
printed. Numbers and letters cannot be
used. Default is >>.
WinWYSIWYG
YES | NO
Specifies whether to use WYSIWYG
printing in the printout. If YES, then the
font style/size for both the story form and
story body will be overridden by the font
style/size currently being used on screen for
the form and body. Default is NO.
WinSegmentPageBreak
YES | NO
Specifies whether to force a page break in
the queue view printout at “Break” lines.
Default is NO.
WinSpacing
<number of line spacing>
WinSpacing supports the use of decimals.
For example, WinSpacing=1.5 can be used
to define line spacing of 1 1/2 lines. Default
is 1.
WinColorPrint
YES | NO
Specifies whether to use color printing in
the story form on printouts. Default is YES.
342
Local Printing
Options
Parameter Values
Defined
WinPageFooter
<queue name>.<footer name> Specifies the use of a footer. The <footer
name> must match the name of a story in a
queue, as defined by the <queue name>,
located in SYSTEM.STYLES. Default is
NONE.
WinPageHeader
<queue name>.<header name> Specifies use of a header. The <header
name> must match the name of a story in a
queue, as defined by the <queue name>,
located in SYSTEM.STYLES. Default is
NONE.
WinHeaderFontFace
<font>
Specifies font used in the header and/or
footer on the printout. Underscore cannot be
used to represent a space. Does not
recognize bold, italic, or underline. Default
is MS Sans Serif.
WinHeaderFontSize
<font size>
Specifies a numeric value for the font size,
in points, used in the header and/or footer
on the printout. Default is 10.
WinBanner
YES | NO
Specifies whether to include the banner in
printout. Default is yes.
WinLeftBanner
<format>
Defines banner format options (such as user
name, page number, and queue name for
printout) on left side of banner. See “Banner
Format Options” on page 346 for more
information.
WinRightBanner
<format>
Defines banner format options (such as user
name, page number, and queue name for
printout) on right side of banner. See
“Banner Format Options” on page 346 for
more information.
WinBannerFontFace
<font>
Specifies font used in the banner on the
printout. Underscore cannot be used to
represent a space. Does not recognize bold,
italic, or underline. Default is MS Sans
Serif.
343
Chapter 11 Printers
Options
Parameter Values
Defined
WinBannerFontSize
<font size>
Specifies a numeric value for the font size,
in points, used in the banner on the printout.
Default is 10.
WinForm
YES | NO | ALL
Specifies whether a form is included in the
printout of each story. The YES option
specifies printing the form on first page of
each story; NO specifies none; ALL
specifies printing the form on every page of
each story.
WinPrintForm
<form>
Defines which form is used for printing.
Default is form specified within each story.
WinFormFontFace
<font>
Specifies font used in the form on the
printout. Underscore cannot be used to
represent a space. Does not recognize bold,
italic, or underlined text. Default is MS
Sans Serif.
WinFormFontSize
<font size>
Specifies a numeric value for the font size,
in points, used in the form on the printout.
Default is 10.
WinSeparator
YES | NO
Specifies whether a horizontal rule (line) is
printed after the Story Form row and before
the line of text from the story. Default is
NO.
WinBlanks
<number of blank lines>
Specifies a numeric value for blank lines
printed following each story when printing
the Story Preview. Default is 2.
WinSpacing
<number of line spacing>
Specifies a numeric value for the line
spacing of printed stories and queues.
Default is 1, which results in a singlespaced printout.
WinScriptShift
YES | NO
Specifies whether iNEWS selects the
Uppercase checkbox in Local Printing
dialog box by default, and prints all text in
uppercase. Default is YES.
344
Local Printing
Options
Parameter Values
Defined
WinBodyFontFace
<font>
Specifies font used in body of the printout.
Underscore cannot be used to represent a
space. System will print bold, italic, or
underlined text, as indicated in the original
text of story. This option also applies to
printed production cues. Default is MS Sans
Serif.
WinBodyFontSize
<font size>
Specifies a numeric value for the font size,
in points, used in the body of the printout.
Also applies to printed production cues.
Default is 10.
WinOrientation
<orientation>
Specifies an override of page orientation in
the Printer Properties dialog. Allowable
options are portrait or landscape.
Default is as specified by the Printer
Properties dialog.
WinScriptLeftWidth
<left width>
Specifies a numeric value for the
width—measured in inches—of the left side
of the story that contains production cues.
Default is 3.
WinScriptRightWidth
<right width>
Specifies a numeric value for the
width—measured in inches—of the right
side of the story that contains story text.
Default is 4.
WinLeftMargin
<left margin>
Specifies a numeric value for the left print
margin—measured in inches. Default is .50.
WinRightMargin
<right margin>
Specifies a numeric value for the right print
margin—measured in inches. Default is .50.
WinTopMargin
<top margin>
Specifies a numeric value for the top print
margin—measured in inches. Default is 1.0.
WinBottomMargin
<bottom margin>
Specifies a numeric value for the bottom
print margin—measured in inches. Default
is 1.0.
345
Chapter 11 Printers
n
The sum of the defaults: WinLeftMargin + WinScriptLeftWidth +
WinScriptRightWidth + WinRightMargin = .50 + 3 + 4 + .50 = 8.0. This
width does not exceed a standard page of 8.5.
Banner Format Options
In Local printing, iNEWS will include a banner at the top of printed text if
the style selected by the user includes the WinBanner=yes option.
The banner comes in two parts—a left side and a right side—each with its
own user-configurable option. The system administrator can set what
information appears in either side of the banner by using the local printing
style options WinLeftBanner and WinRightBanner.
n
Literal text can be used with WinLeftBanner and WinRightBanner
parameters. For instance, if you want the banner to print the word, “User”
followed by a user’s name, define the parameter this way:
WinLeftBanner=USER-&u-name
See “Example Style Story” on page 348 for other literal text examples.
These options recognize parameters only in certain formats, as shown in
the following table:
346
Format Parameter
Defined
&u-name
user name
&q-name
queue name
&date
date (according to Windows regional setting)
&time
time (according to Windows regional setting)
&f-title
slug
&f-page-number
page number
&f-presenter
presenter name (according to the presenter field)
Local Printing
To define a banner in a local print style:
1. Navigate to SYSTEM.STYLES in the Directory panel.
2. Double-click on the queue you want to modify, opening it in the Queue
panel.
3. Double-click on the first story in the queue. This will open or load that
story into the Story panel.
4. Position your cursor in the Story panel.
5. Press Enter to ensure your cursor is at the start of a new line.
6. Type WinBanner=yes on the new line. If this line already appears
somewhere in the style, you can skip this step.
7. Type WinLeftBanner= followed by a <format parameter>.
Separate multiple format parameters with single spaces. Format
parameters are shown in the preceding table.
For instance, if the left side of the banner should include the user’s
name and date, the local print style option would look something like
this:
WinLeftBanner=&u-name &date
n
The left banner print style option should be defined even if it will be blank;
otherwise, the system uses the default setting. To define the left banner as
blank, type: WinLeftBanner= leaving the remainder of the line after
the equal sign blank. The left banner default setting is:
WinLeftBanner=&u-name &date &time
8. Press Enter to make certain your cursor is at the start of a new line.
9. Type WinRightBanner= followed by a <format parameter>.
Separate multiple format parameters with single spaces. Format
parameters are shown in the preceding table.
For instance, if the right side of the banner should include the story
slug and queue name, the local print style option would look
something like this:
WinRightBanner=&f-title &q-name
347
Chapter 11 Printers
n
The right banner print style option should be defined even if it will be
blank; otherwise, the system uses the default setting. To define the right
banner as blank, type: WinRightBanner= leaving the remainder of the
line after the equal sign blank. The right banner default setting is:
WinRightBanner=&q-name &f-title &f-page-number
10. Save the story.
Example Style Story
The example style story shows only those style options pertaining to local
printing. An actual style story may also contain style options pertaining to
system printing. System style options are ignored when iNEWS handles a
local print job.
Here is an example of a local print style story stored in a queue located in
SYSTEM.STYLES:
348
Local Printing
WinWYSIWYG=yes
WinBanner=yes
WinLeftBanner=&q-name PAGE-&f-page-number SLUG-&f-title
WinRightBanner=Tal-&f-presenter USER-&u-name &date &time
WinBlanks=2
WinSegmentPageBreak=yes
WinColorPrint=no
WinScriptShift=no
WinScriptLeftWidth=3.5
WinScriptRightWidth=3.5
WinLeftMargin=0.75
WinRightMargin=0.75
WinTopMargin=1.0
WinBottomMargin=1.0
WinSeparator=yes
WinSpacing=1.5
WinForm=All ;NOTE-Other options=Yes, No
WinPrintForm=Rundown
WinPageHeader=header.default
WinPageFooter=footer.default
WinHeaderFontFace=Times New Roman
WinHeaderFontSize=10
WinBannerFontFace=Arial
WinBannerFontSize=12
WinFormFontFace=Arial
WinFormFontSize=10
WinBodyFontFace=Times New Roman
WinBodyFontSize=20
WinOrientation=portrait;Note-Only other options=landscape
WinRundownFontFace=Arial
WinRundownFontSize=10
WinRundownLeftMargin=0.50
WinRundownRightMargin=0.50
WinRundownTopMargin=0.75
WinRundownBottomMargin=0.75
WinBannerBlanks=2
WinPrintRundownForm=Rundown
WinPrintHide=yes
WinPrintHideStart=<<
WinPrintHideStop=>>
WinVTEmulation=no
WinCopyDriverSettings=yes
349
Chapter 11 Printers
Managing Printers
When someone prints a single story or an entire queue from the
workstation, it is called a print request. Your system allows any number of
users to send print requests to the same printer at the same time. Your
system schedules print requests in the order it receives them.
When you add a printer to your system, the system administrator creates a
print queue for that printer in SYSTEM.PRINTERS. The queue must not
be inverted to hold requests in the proper order. For instance, the queue for
printer 3 is called SYSTEM.PRINTERS.003.
Each print request is identified by its title (or queue), the time the user
printed it, user name, style used, number of copies to be printed, and print
command used.
Your system places the first print request it receives for a printer in that
printer’s print queue and then sends it to the printer. This is called the
current print request.
As more requests come in, they are placed below the current request in the
order received. These requests are called pending print requests. When the
printer finishes printing the current print request, the system removes it
from the queue and moves the pending print request below it up, making it
the new current print request.
Removing a Pending Print Request
Pending print requests are held in print queues like stories. You can remove
any pending print request that you do not want printed.
To remove a pending print request:
1. Open the appropriate print queue under SYSTEM.PRINTERS.
2. Select any print request.
3. Select Edit > Kill.
350
Managing Printers
Restarting the Current Print Request
To rebuild the print job:
1. Fix whatever caused your print job to be canceled.
2. Restart the printer using the restart command at the console.
For instance, if printer 35 jams, fix the jam and then rebuild the print
job by typing:
restart 35
Reordering a Pending Print Request
You can rearrange pending print requests by reordering the stories in
SYSTEM.PRINTERS. The printer does not stop while you reorder the
queue. If the current print request finishes while you are reordering the
queue, the next story at the top of the queue is processed.
Cancelling a Runaway Print Job
You can cancel an unwanted print job, such as printing the entire contents
of a queue instead of a single story.
To cancel a runaway print job:
1. Turn off the printer or put it offline.
2. Navigate to the SYSTEM.PRINTERS queue for the printer at an
iNEWS Workstation.
3. Kill the job request.
4. Restart the printer using the restart command at the console.
For instance, restart printer 35 by typing:
restart 35
5. Turn the printer back on, or put it online.
351
Chapter 11 Printers
Responding to a “Printer Offline” Problem
Occasionally, a system printer to which a print request has been submitted
is in an offline condition. The user who submitted the print request receives
the following message:
[System] P199: Unable to continue printing
The number following P is the device number of the printer to which the
request was submitted. A similar message appears on the console when the
offline condition is first detected.
A printer is considered offline by iNEWS if it has not responded to normal
flow control for three minutes. Consult your printer hardware manual for
information on recovering from an offline condition.
352
Chapter 12
Wires
All hardware and software components on your iNEWS system are
contained in profile files. Therefore, each wire service available to your
system has a wire profile file. This file contains commands your system
needs to control the wire, and also contains settings for options you can use
with that wire service. When you restart a wire service, your system checks
its profile for necessary information.
Major sections of this chapter are:
•
Adding a Wire – Avid Data Receiver
•
Adding a Wire – PCU Port
•
Wire Profile Files
•
Wire Profile Options
•
Using Special Characters in a Profile
•
Distributing Stories from the Wire
•
Operating Wire Keyword Searches
•
Keyword Checker Messages
Chapter 12 Wires
Adding a Wire – Avid Data Receiver
The Data Receiver is a highly configurable wire server designed to handle
all of a newsroom’s subscription wire feeds in a single server, while giving
iNEWS users access to the data from their desktops. It processes incoming
wire data from multiple input sources, including e-mail and traditional
serial feeds in multiple data formats. For more information on the Avid
Data Receiver, see the Avid Data Receiver Installation and Operations
Manual.
To add a wire for ingesting through the Data Receiver, you must complete
four phases in the setup.
•
Phase 1 - Ensure the Avid Data Receiver software is installed,
configured, licensed, and the wire feed is connected to the appropriate
port.
•
Phase 2 - Create an entry for the wire service in the configuration file
and a wire profile for the wire service.
•
Phase 3 - Add the wire distribution information.
•
Phase 4 - Reconfigure the system and start the Avid Data Receiver so it
can begin receiving and distributing wire stories.
Phase 1
The procedures for installing and configuring the Data Receiver is
provided in the Avid Data Receiver Installation and Operations Manual.
The following also must be completed on the iNEWS Server:
1. The iNEWS Server license must have wire server resources added to it.
An example of a license is shown in Chapter 10. See “Licensing of
iNEWS Components” on page 264 for more information. Each
instance of the Data Receiver requires its own wire server resource be
licensed and configured on the iNEWS Server.
n
354
Configuring more wire server resources in the iNEWS configuration file
(/site/config) than what is licensed will result in the system failing to
configure. If this happens, the system will display a message at the console
indicating that license limits were exceeded and by how much.
Adding a Wire – Avid Data Receiver
2. Choose a device number for each Data Receiver instance. This number
is required for later phases in the setup. Ensure that the number you
choose is not already in use.
3. Connect the wire feed to the selected port on the PC running the Data
Receiver software.
Phase 2
Wire service information must be added to two files in the Site directory on
the iNEWS Server(s):
•
The configuration file (/site/config)
•
The wire profile, located in /site/wires directory
To add wire service information to the configuration file:
1. Select all servers.
See “Changing the
Configuration File” on
page 273 for more
information.
2. Modify the iNEWS configuration file by adding the following:
a. Add a resource list entry to the host section of the
/site/config file on the iNEWS Server.
The format is:
reslist <device #> ;<comments>
For instance:
reslist 801 ;Data Receiver instance
n
For dual or triple server systems, the configuration file will have multiple
host sections to define which server handles which devices under various
circumstances. Resource list entries should be added to each host section
depending on which server you want the Data Receiver instances to run.
See “Configuration File” on page 269 for more information.
b. Add a wireserver resource line for each Data Receiver
instance to the devices sections of the /site/config file on the
iNEWS Server.
355
Chapter 12 Wires
The format is:
wireserver <device #> news <source> <join option>
Parameter
Description
device #
The Data Receiver instance device number.
source
The wire’s source name (capitalized portion of the distribution
name—AP, UP, and so forth). It is the same as the source name
used in the Data Receiver.
join
option
Links stories that have the same title. It is used with wire
services that routinely break stories into multiple takes. If you
place join in this position, users can view all takes of a story
with the get all or read all workstation commands. To
leave this option out of the configuration line, enter a hyphen (-).
Example:
wireserver
801
news
AP
-
The Data Receiver requires a wire profile in the /site/wires directory.
This text file is similar to those for PCUs; however, only two of the many
wire profile options used for PCUs are associated with the Data
Receiver—form and idle. The wire profile must have the same name as
the Data Receiver instance’s device number. See “Wire Profile Files” on
page 366 and “Wire Profile Options” on page 368 for more information.
To add a wire profile:
1. Select all servers.
This procedure, which
modifies the wire
profile in the
/site/wires
directory uses ed, the
line editor. If you do
not know how to use
ed, please see
Appendix H.
2. Use the ed command in the following format:
ed /site/wires/<device#>
For instance, type:
NRCS-A# ed /site/wires/801
Since the file doesn’t exist, the system will create it, but display a line
similar to the following:
/site/wires/801: No such file or directory
3. Add the necessary text to the file, but typing: a
356
Adding a Wire – Avid Data Receiver
Everything you type after pressing Enter will now be added to the file.
The two wire profile options that must be defined for a Data Receiver
are:
form <name>
idle <timeout> <interval> <notify group>
For instance, type:
form wire
idle 15:00 00:01 inews
4. Stop adding lines to the file, but typing a period (.) and press Enter.
Do not use an
uppercase (W) in step 5.
See Appendix H for
more information.
5. When you finish making changes to the profile, you must save your
changes before exiting the line editor. To do this, type:
w
After you press Enter, a number will appear representing the file size,
such as:
33
6. Exit the line editor by typing:
q
Phase 3
Each Data Receiver instance must have its own set of instructions in a
story, called the wire distribution story, located on the iNEWS system in
the Distribution queue in the SYSTEM.WIRES directory.
This phase is exactly the same as Phase 3 for setting up a wire connected to
a PCU port. See “Phase 3” on page 363 for more information.
Phase 4
The final phase in adding a wire is to check your setup by reconfiguring the
system and starting the Data Receiver.
357
Chapter 12 Wires
To reconfigure the system:
1. Take the system offline by typing:
This will incorporate
the changes you made
to the configuration file
in Phase 2.
offline
2. Configure the system, using the following command format:
configure
3. Bring the system back online by typing:
online
n
For information on how to start the Data Receiver, see the Avid Data
Receiver Installation and Operations Manual.
Adding a Wire – PCU Port
To add a wire service to your system, you must complete four phases in the
setup.
•
Phase 1 - Connect the wire service to a PCU port.
•
Phase 2 - Create an entry for the wire service in the configuration file
and a wire profile for the wire service.
•
Phase 3 - Add the wire distribution information.
•
Phase 4 - Restart the wire service’s program to incorporate the changes
you made, and so it can begin receiving and distributing wire stories.
Phase 1
To connect a wire service to iNEWS:
1. Choose a device number for the wire service.
Find an unoccupied PCU port. For instance, an AP wire is added to
port 6 on PCU 10, which means the wire has device number 16. See
“PCU Device Numbering” on page 290 for more information.
2. Connect wire to selected PCU port.
358
Adding a Wire – PCU Port
Phase 2
Wire service information must be added to the configuration file on each
server of your system. That includes adding the wire service’s device
number to the PCU’s configuration line and adding a configuration line for
the wire program that processes stories sent by the wire service. See
“Changing the Configuration File” on page 273 for more information.
n
If you move a wire service to another PCU, you must modify the entry for
the wire service’s program. Move the wire service’s device number from
the old PCU’s configuration line and add it to the new PCU’s
configuration line. Give the wire service a new device number that reflects
the new PCU port to which you attached it.
To modify the configuration file for a wire service:
1. Select all servers. See “Selecting Servers” on page 33 for more
information.
This procedure, which
modifies the
/site/config file
uses ed, the line editor.
If you do not know how
to use ed to modify
lines in the file as
required in step 2,
please see Appendix H.
2. Type:
NRCS-A$ ed /site/config
1259
3. Modify the configuration file (/site/config), by doing the
following:
a. Add the wire’s device number in the position that represents the
port to which you have connected the wire service. For instance,
for the wire service connected to port 6 of PCU 10, the wire
program’s device number (16) is added to PCU 10’s configuration
line. At first, the line may appear similar to this:
pcu
10 pcu10 11
12
13
14
15
- - -
b. Ensure that you place the new device number in the position
representing the port to which you connected the wire. For
instance—for the wire with device number 16—the wire’s device
number is placed in position 6 in PCU 10’s configuration line. The
new line should look like this:
pcu
10 pcu10 11
12
13
14
15
16 - -
359
Chapter 12 Wires
c. Add a configuration line for the new wire service. By convention,
the configuration lines are arranged according to device number.
For instance, the configuration line for the wire service with device
number 16 would be placed after the configuration line for device
15.
A wire program’s configuration line uses this format:
wire <dev #> <speed> <program> <source> <join option>
Parameter
Description
device #
The wire’s device number. Include this device number in device
numbers list in the configuration line for the PCU.
speed
Sets baud rate (bits per second) at which the wire communicates
with the PCU.
program
Used to process the wire. Ask the wire provider which
communications standard the wire conforms to.
source
The wire’s source name (capitalized portion of the distribution
name—AP, UP, and so forth). It is the same as the source name
used in the wire distribution story. Use the source name to create
an entry in the wire distribution story and keyword search job list
for the wire program. The source name is prepended to the
category and priority code information collected from the story
to form the distribution code. The distribution code is limited to
10 characters, so care must be taken to prevent the distribution
code from being truncated because of a long source name.
join
option
Links stories that have the same title. It is used with wire services
that routinely break stories into multiple takes. If you place
join in this position, users can view all takes of a story with the
get all or read all workstation commands. To leave this
option out of the configuration line, enter a hyphen.
For instance, the wire program device number is 16, and it needs to
communicate with the wire service at a speed of 1200 baud, 7 bit, even
parity. Also, the wire program uses the anpa7 program, and will be
referred to as AP. So, AP is the wire’s source. The new device
configuration line looks like this:
wire
360
16
1200-7e
anpa7
AP -
; ap wire
Adding a Wire – PCU Port
Do not use an
uppercase (W) in step 4.
See Appendix H for
more information.
4. When you finish making changes to the configuration file, you must
save your changes before exiting the line editor. To do this, type:
w
After you press Enter, a number will appear representing the file size,
such as:
1306
5. Exit the line editor by typing:
q
6. Create a profile for the wire.
The easiest way to do
this is to copy the
standard profile for the
type of wire service the
wire program works
with to the file holding
that wire program’s
profile, then modify the
copy.
n
A wire program’s profile must be in a file with the same name as the wire
service’s device number. That file must be located in the /site/wires
directory.
For instance, an AP wire service is installed at port 6 on PCU 10, and given
device number 16. Accordingly, the profile for the AP wire service is
copied to a new file called /site/wires/16. After the profile is
copied, modifications can be made.
If you move a wire service to a new PCU port and give it a new device
number, you need to give the corresponding wire program’s profile a new
name that matches its new device number. The best way to do this is to use
the move (mv) command. Type mv followed by the pathname of the file you
want to change and the new pathname you want the file to have.
To copy and modify a wire profile at the console:
1. Select all servers.
2. Use the cp command to copy the profile for the wire service. For
instance, to copy /site/wires/anpa7 (the profile for an AP wire
service) to a file on each server called /site/wires/16, type:
cp /site/wires/anpa7 /site/wires/16
3. To determine whether you need to make changes or additions, use the
cat command to view the file. The format is:
cat <file pathname>
For instance, to examine the file for the wire service connected to port
6 on PCU 10, type:
cat /site/wires/16
361
Chapter 12 Wires
A message similar to the following will appear:
; @(#) release/wires/anpa7
11.1 Date 00/05/22
; anpa7 - suitable for upi7, ap7, and cupi7
bits
7
start
<soh>
eos
<EOT>
category
------flags
peosline
title 30
;
map
<16>
<SP>
; TTS SPACE BAND
...
n
Before you modify a profile, use the copy (cp) command to make a backup
copy of the wire profile. Use the backup copy to restore the file.
To back up the profile, type cp followed by the full pathname of the file you
want to copy and the full pathname of the file to which you want to copy it.
(The destination filename can be a new file.)
4. If changes are needed, then edit the profile by doing the following:
This procedure, which
modifies the
/site/wires/16
file uses ed, the line
editor. If you do not
know how to use ed to
modify lines in the file
as required in step 4,
see Appendix H.
a. Select all servers. See “Selecting Servers” on page 33 for more
information.
b. Type:
NRCS-A$ ed /site/wires/16
245
c. Navigate to and modify lines in the file, as necessary. For instance,
to have the wire program convert all text in each story it processes
to uppercase, the word uppercase should be added after the flags
option.
At first, the line may look like this:
flags
peosline
The line should now look like this:
flags
362
peosline
uppercase
Adding a Wire – PCU Port
Do not use an
uppercase (W) in step
4d. See Appendix H for
more information.
d. When you finish making changes to the profile, you must save
your changes before exiting the line editor. To do this, type:
w
After you press Enter, a number will appear representing the file
size, such as:
306
e. Exit the line editor by typing:
q
Phase 3
Each wire program must have its own set of instructions in a story, called
the wire distribution story. When you add a new wire to your system, you
need to add new instructions to your system’s wire distribution story so it
knows how to distribute stories it receives from that wire service.
The wire distribution story is located in the Distribution queue in the
SYSTEM.WIRES directory.
To view the story, log in as a system administrator at an iNEWS
Workstation, and navigate to SYSTEM.WIRES.DISTRIBUTION.
Here is a partial sample of a wire distribution story:
AP#bloom##
AP#kip01##
APb###aa##
AP######o#
AP######s#
AP######i#
AP######w#
AP######n#
AP######a#
AP######f#
AP########
wires.bloomberg
wires.kipling
wires.features
wires.weather
wires.sports
wires.world
wires.washington
wires.national
wires.national
wires.biz
wires.all
always
URGENT
URGENT
URGENT
URGENT
URGENT
URGENT
363
Chapter 12 Wires
n
If you move a wire to a different PCU, the system continues to use whatever
instructions are in the wire distribution story for that wire.
Before making any modifications to the wire distribution story, make a
backup copy of the story.
To modify the story at an iNEWS Workstation:
1. Select the story in the Queue panel. The story’s text will appear in the
Story panel.
2. Click in the Story panel to place your cursor there.
3. Edit the story by changing or adding lines, as necessary.
4. Save the story, by doing one of the following:
a. Click the Save button.
b. Select File > Save.
n
The wire distribution story is typically set up by Avid Customer Support
technicians when your system is installed. If you need assistance in
modifying an existing wire distribution story, contact Avid Customer
Support. Also, a standard copy of a wire distribution story is available in
Appendix B.
Phase 4
The final phase in adding a wire to your system is to check your setup and
restart devices.
To check your setup for errors and restart the PCU and wire service:
5. (Optional) Test your configuration changes for errors by using:
configure
/site/config
<system>
<computer>
For instance, to test configuration changes for a wire added to a PCU
running on server A in an AB system, you would type at the console:
configure /site/config ab a
When the console prompt returns, the configuration file has been
checked. If the system detects any errors, it displays diagnostic
messages.
364
Adding a Wire – PCU Port
6. If you modified the configuration file, you must reconfigure the system
to adopt those changes. If you modified only an existing wire
program’s profile and did not make any changes to the configuration
file, skip to step 7.
a. Stop the PCU. For instance, to stop PCU 10, type:
stop 10
b. Select the master computer (typically server A). See “Selecting
Servers” on page 33 for more information.
c. Become a console superuser. See “The Console Superuser” on
page 23 for more information.
d. Take the system offline by typing:
NRCS-A# offline
e. Reconfigure the system by typing:
NRCS-A# configure
f.
When the prompt returns, bring the system online again by typing:
NRCS-A# online
g. Exit from superuser mode. (Ctrl+D)
A message similar to the following will appear:
Apr 5 15:41:49 NRCS-A msg System being configured
h. When you see the System being configured message,
select the server to which the PCU—and wire service—is
connected and use the restart command. For instance, to
restart PCU 10, type:
NRCS-A$ restart 10
You will see Hot-to-go messages indicating that the devices
on the PCU have been restarted and are ready to use.
i.
(Optional) Back up site files using the sitedump command.
7. If you modified only an existing wire program’s profile and did not
make any changes to the configuration file, restart the wire and it
begins to use changes you made to its profile. To do this:
a. Select the server to which the PCU is connected.
365
Chapter 12 Wires
b. Use the restart command in this format:
restart <device number>
c. For instance, to restart the device at port 6 of PCU 10, type:
NRCS-A$ restart 16
NRCS-A$ P16: 12:43:20 Hot-to-go
When you see a Hot-to-go message for the wire service, as
shown in the previous example, you can begin to use it. If there are
any errors in the profile, the system reports them on the console
when you restart the wire service.
Wire Profile Files
Each wire program’s profile contains instructions that tell the program how
to interpret and process stories it receives. Your system must have a
separate wire program for each wire service connected to it. Each wire
program, in turn, must have its own wire profile to process stories sent by
the wire service.
n
Wire profiles for Data Receiver instances are similar to those for wires
connected to PCU ports, except that only two wire profile options are used.
Examples of both types of wire profiles are shown in this section. See “Wire
Profile Options” on page 368 for more information.
Wire profiles are text files located in the /site/wires directory. Your
system is installed with standard profiles for most wire services. To see
which wire profiles are already installed on your system, use the ls
command to produce a list of filenames. Type:
NRCS-A$ ls /site/wires
Information similar to the following appears:
77
81
aap7
abc7
anpa7
366
apa6
apr5
aptv7
asca5
baycity7
bbcgns europa5
bbcmon5 globo5
busines7 gns5
cbs7
gns7
city7
iptc7
notimex5
prime7
prwire7
radcor5
reut5
sports7 ukpa5
sticker7 ukpa6
tass7
ukreut5
tndm7
ukreut7
ukafp5 uktelex5
Wire Profile Files
This list contains numbered filenames, such as 77 and 81, and
alphanumeric filenames, such as anpa7 and aptv. The alphanumeric files
are the standard profiles for several different types of wires. For instance,
the anpa7 file is the standard profile used by wires such as AP and UPI.
The numbered files are profiles your system actually uses. These files
correspond to device numbers used by your system’s wire programs.
Device numbers are specified in the configuration file. Each wire program
looks for its profile in a file in the /site/wires directory. The filename
must match the wire program’s device number. For instance, a wire
program with device number 17 looks for its profile in a file named
/site/wires/17.
To see what a wire profile looks like, use the cat command to list the
standard wire profile:
NRCS-A$ cat /site/wires/anpa7
Aa an example of a wire profile for a PCU, a display similar to the
following appears:
; @(#) release/wires/anpa7
11.1
Date 04/05/22
; anpa7 - suitable for upi7, ap7, and cupi7
;
bits
7
start
<soh>
eos
<EOT>
category
------flags
peosline
title
30
;
map
<16>
<SP>
; TTS SPACE BAND
map
<25>
<SP>
; EM SPACE
map
<29>
<SP>
; THIN SPACE
map
<30>
<SP>
; EN SPACE
...
map
<124>
5/8
map
<125>
3/4
map
<126>
7/8
367
Chapter 12 Wires
The following example is a wire profile for a Data Receiver instance:
; Data Receiver instance
form wires
idle 00:15 00:01 inews
Wire Profile Options
In general, each wire option available may appear only once in a wire
profile and may be assigned only one value. Exceptions are noted in the
descriptions.
n
Only two options—form and idle—are necessary in a wire profile for
wires ingested through Data Receiver.
accent
<character>
To convert wire codes into accented characters, a code is used to
identify the accent sequences. To enable accent sequence conversions,
specify the code that the wire service sends with this command. No
accent conversions are done if this command is omitted. Typically a
backspace (<bs>) is used to identify accent sequences.
answer <code string>
<name string>
For wires that require an answerback string sent before a story is
received, include a line with answ followed by the code string sent by
the wire service and the name string the iNEWS newsroom computer
system answers back.
bell
<character>
Some wire services send bell codes, which cause Teletype machines to
ring a bell, to indicate the relative priority of a story. The more bell
codes sent with a story, the more urgent the story. Usually, only the
older, slower wire services do this.
368
Wire Profile Options
Although your wire program does not assign a relative priority to a
story based on the number of bell codes in the story, it can upgrade a
story from routine (r) to urgent (u) if the story contains a bell
character. Type bell followed by the character the wire service uses
as a bell code.
This upgrades a routine story to urgent; it does not do anything if the
story’s priority is not set to routine. The bell character can be any
character.
bits
[5 | 6 | 7 | 8 | ibm]
Each character sent by a wire service is represented by a number of
data bits (ones and zeros). Different wire services use different
numbers of data bits to represent the characters they send. Older,
slower wire services use as few as five bits; newer, faster wire services
use seven or eight bits.
You must use the bits option in each wire program’s profile to
specify the number of bits the wire service uses to represent characters
it sends. Type bits followed by the number of bits the wire service
uses. Take special care not to specify an incorrect number, because that
may make it impossible for the wire program to receive stories
transmitted by the wire service. Type ibm as the bits value for a wire
that sends IBM PC format 8-bit characters.
See “IBM Character
Set” on page 725 for
more information.
The number of bits you specify also determines the character
translation table the wire program uses. This table tells the wire
program how to convert decimal values it receives to characters. The
number of bits you specify also sets the stop bits, parity, and
handshake options to values normally used by wire services that use
that number of bits.
The following table shows the character table, stop bits, parity, and
handshaking selected when you specify a certain number of data bits.
See “ASCII (7-bit)
Character Set” on
page 719 for more
information.
Bits
Character Table
Stop Bits
Parity
Handshake
5
Baudot
1.5
None
None
6
TTS
1
None
None
369
Chapter 12 Wires
Bits
Character Table
Stop Bits
Parity
Handshake
7
ASCII
1
Both
None
8
ASCII+DEC MCS
1
None
None
ibm
ASCII+PC
1
None
None
You can change stop bits, parity, and handshaking values individually
using the stopbits, parity, and handshake keywords within
the wire profile.
category
<string>
Each wire story has a distribution code that consists of the wire
program’s source name, the story’s category codes, and the story’s
priority code. Since different wire services attach different numbers of
category codes to their stories, use the category keyword to specify
how many category codes the wire program can expect with each story
it receives from the wire service.
Follow the keyword with a number of printable characters equal to the
number of codes the wire sends. For instance, if the wire service sends
seven category codes, follow category with seven hyphens as
shown here.
category
n
-------
These characters are refered to as a “string” and although hyphens are
used in standard profiles by convention, you can use any printable
character. The category code will be initialized to the string and then
whatever code is collected is written over the initial string.
Type the characters instead of the actual number to allow the wire
program to pad the category codes with those characters if the number
of codes sent is smaller than what you specify. For instance, if you use
the category keyword as shown above and the wire program
receives a story with only four category codes (a, n, j and x), it pads
the unused positions with hyphen (-) characters, such as an--j-x.
370
Wire Profile Options
The total distribution name cannot be longer than 10 characters.
Ensure the category length you specify combined with the length of
the wire’s source name and length of the story’s priority code is no
more than 10 characters. A wire program’s source name is defined in
its configuration line. Priority codes are always one-character long.
distribution <category> <word>
If the story contains a certain word, two wire programs—abc7 and
ukpa6—can assign a category code to a story. Follow the
distribution option with the category you want to assign, and
then the word the story must contain to be assigned that category. For
instance, to assign the category xlf to stories that contain the word
moonshot, type:
distribution
xlf
moonshot
The wire program searches only for a whole word. It does not
recognize the word if it is part of a longer word. You can specify
multiple distributions. Order of distribution lines in the profile is
significant, because the system searches for words in the order they are
given and stops searching a story after the first match, ignoring any
subsequent distribution lines.
Values you supply for the <category> and <word> must consist of
printable characters. The distribution option is used by two wire
programs—abc7 and ukpa6—all other programs ignore this
keyword if you use it in their profiles. If the <word> string you
specify contains a nonprintable character, enclose it in angle brackets
(< >). See “Entering Nonprinting Characters” on page 382 for more
information.
The iptc7 wire program uses the distribution option to control
the collection and placement of certain data into form fields. If the wire
profile contains: distribution
<fieldname>
priority
the "raw" priority code, which is a number from 1 to 6, will be stored
in the field identified by <fieldname>. If the story is displayed
using a form that contains <fieldname>, the "raw" priority code
will be shown. If the profile contains:
distribution
<fieldname>
catchline
the "Keyword-Catchline" text in the incoming wire story will be stored
in the field identified by <fieldname>. If the profile contains:
distribution
<fieldname>
headline
371
Chapter 12 Wires
the "slug", or first line of the story text, will be stored in the field
identified by <fieldname>.
There is one restriction on the <fieldname>, it cannot be one of the
reserved field names other than "TITLE". This means it cannot be any
of: CREATE-BY, PRESENTER, VAR-x, PAGE, and so forth.
n
Collecting text for fields defined by the distribution option is only
done prior to the first line of text being stored into the story. Furthermore,
the iptc "optional information" field is typically collected as text.
If the profile contains:
distribution
<fieldname> optionalinformation
the “optional information” text in the incoming wire story will be
stored in the field identified by <fieldname>. If <fieldname> is
a single hyphen (-), the “optional information” text will be discarded.
end
<string>
If the wire program receives stories from a wire service that marks the
end of each story with a special string, use the end command to define
that string in the program’s profile. Some wire services mark the end of
each story with a special character instead of a string. In that case, you
can use the end-of-story (eos) keyword to define the character.
To define the end-of-story string, type end followed by the string the
wire service uses. This string must consist of printable characters. For
instance, if the wire service uses nnnn as the end-of-story string, in
the wire profile type:
end
nnnn
A wire service may alternate between using an end-of-story character
and an end-of-story string. In that case, you may include both end and
eos in your profile. The wire program considers either to indicate the
end of the story.
eol <character>
If a wire service uses a special character (other than the standard line
feed) to indicate the end of a line, use the eol option to define that
character so it is converted to a line feed in all stories received from
that wire service.
372
Wire Profile Options
eop
<character>
Some wire services use a special character to indicate the end of a
paragraph in a story. Use the eop option to define the character that
wire service uses as the end of paragraph marker. The wire program
only converts the eop character when it appears as the last printable
character on the line.
For instance, if the wire service uses the greater than sign (>) to
indicate the end of a paragraph, you can use eop to signify any
occurrence of a > at the end of a line as an end of paragraph. Type:
eos
eop
>
<character> <character> <character> . . . <character>
If the wire program receives stories from a wire service that marks the
end of each story with a special character, use the eos keyword to
define that character in the program’s profile. Some wire services mark
the end of each story with a special string of characters. Use the end
command to define the string.
While wire services that use an end-of-story character generally use
the same character consistently, not all do. Some wire services change
characters with each Teletype operator shift change. If this is the case,
follow eos with all the different end-of-story characters the wire
service uses. The wire program considers the first occurrence of any of
these characters in a story to signal the end of the story.
To define the end-of-story character, type eos followed by the
characters your wire service uses. These characters can be any
character. See “Entering Nonprinting Characters” on page 382 for
more information.
For instance, if the wire service uses EOT as the end of story character,
enter the following in the wire profile:
eos
<EOT>
A wire service may alternate between using an end-of-story character
and using an end-of-story string. You can include both end and eos
in your profile. The wire program considers either one to indicate the
end of story.
373
Chapter 12 Wires
flags [lock or char | pblines | peosline | uppercase |
addheol]
The flags option allows you to control certain aspects of how wire
stories are displayed on your system. This keyword accepts up to five
values, each value separated by a space.
If your system is receiving a wire that uses a case-shift character, you
need to include a line in that wire’s profile that translates this character
to the value iNEWS expects (decimal <130>). If the case-shift
character from a particular wire service has a decimal value of <0>,
the instruction looks like this:
map
<0>
<130>
For more information, see the map command.
•
lock
Certain wires transmit only lowercase characters, but send a caseshift character to indicate when to start uppercase display. If you
follow flags with lock, characters sent after the case-shift
character in a wire story are all converted to uppercase until some
other shift character is sent.
•
char
Using char instead of lock in the flags line causes only the
next character following the case-shift character to be converted to
uppercase.
•
pblines
A wire program usually removes blank lines, such as lines used to
separate paragraphs, from the wire stories it processes. If you do
not want these lines removed, follow flags with pblines,
which prints blank lines.
•
peosline
Normally, a wire program will not include the line containing the
end-of-story string or end-of-story code in a wire story. If you
follow flags with peosline (print end-of-story line), the wire
program includes the line containing the end-of-story string or
end-of-story code as part of the story text.
374
Wire Profile Options
•
uppercase
By default, a wire program leaves the text of each wire story as the
wire service transmitted it. However, to force the wire program to
shift text in each story to uppercase, follow flags with
uppercase.
•
addheol
Some wires do not provide enough formatting information for
handling tabular material, which makes reading sports scores,
weather tables, and stock listings difficult on an iNEWS
Workstation. The addheol option causes the server to treat each
line break as an end of paragraph. The default wire profile
condition is that there is no addheol handling done.
flash <priority character> <word>
A flash option line specifies a correspondence between a certain
word that may appear in a received story and the priority code
character to be assigned to any story that contains that word. For
instance, to assign the priority u (urgent) to stories that contain the
word moonshot, type:
flash
u
moonshot
The wire program searches for the full word; it does not recognize the
word when it is part of a larger word. You can use up to 16 flash
keywords in a profile. The order of flash lines in a profile is
significant, because the wire program searches a story line by line for
words in the order they are given. If a flash word is found on a line,
the rest of that line is not searched, but subsequent lines in the story
will be searched.
n
Whenever a flash word is found and the story’s priority is set, the flash
word is saved and will be stored in the story’s PRESENTER form field.
However, the wire profile presenter option may affect the storing of a
flash word in the PRESENTER form field.
You must supply printable values for both the priority character and
the word. Also, while most wire programs search the entire text of
each story for the word, a few (ukpa5 and ukpa6) search only the
title.
375
Chapter 12 Wires
form <name>
The form option is the form name assigned to the wire story,
generally used to view the story. This form is the story form assigned
to queues that typically contain wire stories. In wire profiles for Data
Receiver instances, the <name> is usually wire.
n
The words dictionary contains W_WIRE_FORM /wire which is used as
the default if no form option is specified in the profile.
handshake
[auto | xon | both | none]
The handshake option specifies the type of handshaking (flow
control) used by the wire program. If you leave this option out of a
wire profile, the wire program uses the default value, which is none.
Since wire services do not usually use handshaking, most wire profiles
do not include this option.
If the wire service uses handshaking, you must include handshake to
specify the type it uses. If you follow handshake with xon, the wire
program uses XON/XOFF software flow control. If you follow it with
auto, the wire program uses RTS/CTS hardware flow control. If you
follow it with both, the wire program uses both in parallel.
idle
<timeout>
<interval>
<notify group>
The idle option is used in wire profiles for both PCUs and the Data
Receiver. It controls how your system handles a prolonged period of
inactivity, when no stories are received by iNEWS, for a wire. The
timeout value indicates how long the wire should be idle before
users are notified. For instance, a time-out value of 2:00 triggers
notification if no stories are received from this wire in two hours.
The notify group is optional; it contains the user group name on
iNEWS that is notified, through the top-of-screen message, if the timeout value is reached. A message is always sent to the console when this
happens. To disable sending a message to a group, put a hyphen (-) in
this position.
The interval value is used to repeat this notification if the wire remains
idle for an additional period of time beyond the time-out value. A timeout value of 2:00 combined with an interval of 15 notifies users after
two hours of idle time and every 15 minutes thereafter, as long as the
wire remains idle.
376
Wire Profile Options
The time-out and interval can have any values between 2 minutes and
24 hours, expressed in hh:mm format. Providing a value of 0 for the
time-out, or omitting the idle option from the profile altogether,
disables the idle time alert for this wire. An interval of 0 limits
notification to one initial message.
For more information,
see Appendix E.
map
<incoming character>
<translated string>
A map command translates a particular received character code into
one or more characters that can be displayed.
When you specify a value for the bits option, a standard translation
table is selected. The map command allows you to override the
standard translation table for individual characters.
Almost every wire service uses a few characters in a nonstandard way
to represent such things as fractions and em/en spaces and hyphens,
using variable character widths. Since each wire service may use
different characters, they cannot be translated in the standard
character-translation table. Instead, they must be translated
individually using the map command.
To translate a character to a string that can be displayed, follow map
with the wire service character and the character or string you want to
translate it to. For instance, suppose the wire service uses a value of 91
to represent the fraction 1/2. To display this on a workstation, map 91
to the string 1/2:
map
<91>
1/2
Enter the character you want to translate and the string to which you
want to convert it as either decimal values in angle brackets, such as
<32>, or as actual characters, such as a. A space in the string ends the
string. To translate to a string that contains a space, use <sp> to
represent the space, such as a<sp>b.
You may use up to 256 map commands in a profile, one for each
character. Decimal values used in map lines can be any value from 0 to
255.
pagenumber <length>
The pagenumber option specifies the number of characters allowed
as PAGE-NUMBER field information. The default value is five, with
the maximum number of 18 characters that can be collected. Most wire
programs collect a story number from the wire input. The length of this
377
Chapter 12 Wires
information varies from wire to wire. The pagenumber option is
similar to the title <length> and presenter <length>
options.
paragraph
<number>
Wire programs generally expect the first line in a new paragraph to
begin with three to five leading spaces. When the wire program
processes a story, it adjusts any line with at least that many spaces to
the standard five-space indent.
However, some wire services use only one or two leading spaces to
indicate when a line is the start of a new paragraph. If you have such a
wire service, you must let its wire program know how many leading
spaces indicate the beginning of a new paragraph. Use the
paragraph option, followed by the number of leading spaces the
wire service uses to indicate when a line is the start of a new
paragraph.
You cannot set this option to a value greater than four.
parity
[odd | even | both | none]
To set the parity option to something other than the default value
assigned with the bits option, include a parity value of odd, even,
both, or none, depending on whether the wire service includes a
parity bit with each character it sends and, if so, the kind of parity it
uses.
Set this option to none if the wire service does not use a parity bit.
This is usually the default setting, so if you do not include the parity
option in the profile, the wire program expects the wire service not to
use a parity bit. Set it to even if the wire service uses even parity. If
the wire service uses odd parity, set this option to odd. If the wire
service includes a parity bit with each character it sends, but the bit’s
setting does not matter, set this option to both. This instructs the wire
program to expect a parity bit but ignore its value.
presenter <length>
The presenter option specifies how many characters are allowed as
PRESENTER field information. The default value is 0, which means
that no presenter data will be stored in the wire story. Only wires
using the flash option and the bbcmon5 wire program collect data,
which is stored in the PRESENTER field.
378
Wire Profile Options
The flash word found in the story that causes the priority to change
is stored in the PRESENTER field. If you specify any flash options,
also specify a presenter <length> option. Presenter is similar to
the title <length> option.
priority
<character>
If you have a wire service that frequently transmits wire stories
without priority codes, use the priority option to assign a default
priority code to each story you receive. This is usually used with the
flash option, which assigns specific priorities to stories that meet
certain criteria.
To set a default priority, type priority followed by a printable
ASCII character indicating the priority you want attached to stories.
Common values for this option include r for routine (the default),
u for urgent, f for flash, and b for bulletin. Setting the
priority to <nul> causes no priority to be appended to the
distribution code of the story.
reverse
See “dbrestore
Character Map
(Arabic)” on page 732
and “Sample Arabic
Wire Profile” on
page 733 for more
information.
<characters>
[<embedded characters>]
The wire program has the ability to reverse the order in which figures
are displayed in the database, using the wire profile option called
reverse. This parameter is typically used at sites where the written
language is from right to left, such as Arabic sites. The syntax of this
option includes:
-
<characters> that are included in the sequence to be reversed.
Any of these characters can signal the start or end of the sequence.
-
<embedded characters> that are included in the sequence
to be reversed; however, they cannot start or end the sequence.
This string need not be present. An example would be:
reverse
0123456789
/,.
So any sequence of characters starting and ending with a digit that
may include a period, comma, or slash will be reversed. Here are a
few examples:
An input line “the systems as 9991/70/60.” would be
converted to “the systems as 06/07/1999.”
The period was not included in the reversal since it is an embedded
character and cannot be the last character in the sequence.
379
Chapter 12 Wires
The line "we had $00.000,01." is converted to "we had
$10,000.00."
The period between the zeros is reversed, along with the digits,
since it is "embedded" in the sequence.
start
<string>
The start option specifies the exact string of characters that
indicates the start of a received story. The entire string must be found
to start a story. The start string may include any character. You can use
the wildcard character <128> within the string to stand for a sequence
of any characters.
stopbits
[1 | 1.5 | 2]
To set the number of stop bits to a value other than the default, use the
stopbits option with the number of stop bits the wire service
transmits with each character. You generally do not need to use this
option, because setting the bits option usually sets the appropriate
stopbits value as well.
title
<length>
The title option specifies how much of each story’s title the wire
program puts in the story’s title field. The default value is 20
characters. If you want more or fewer characters, use title to
specify how many. For instance, title 30 causes the wire program
to use the first 30 characters of each story’s title.
While this option determines how much of a story’s title is available
for display, the size of the title field in the form where the story is sent
controls how much of the title can be displayed. The length of the form
fields is not specified in characters, and, because variable pitch fonts
are used, the 30 characters may not fit in a field of 25 units.
Often, wire services transmit stories with titles longer than the title
field. You can use the title option to have the wire program display
the entire title at the top of each story, as well as in the title field. Set
the title to a value equal to or less than the width of the title field. If a
story has a title longer than this value, it displays as much as it can in
the story’s title field, and then displays the entire title at the top of the
story as well.
380
Wire Profile Options
If you want the wire program to display as much as it can in the story’s
title field and not display the title at the top of the story, specify a large
value, such as 80, for this option. This will not affect the title field,
because characters that do not fit into it are lost.
tli <character>
The tli option allows most wire programs (excluding atelex5 and
baycity7) to recognize lines of text, starting with a tab line
indicator. If you do not specify a tli option, it defaults to a backspace
character. Wire input conforming to anpa format has lines that contain
tabular information and is introduced with a tli. The wire programs
ensure that each of these lines is stored in the database as a separate
paragraph. You can disable this feature by defining the tli to be zero
(null).
wait <minutes>
This controls the number of minutes a wire feed can be inactive (no
data delivered) before the wire program will automatically close and
save a partially collected story.
If this directive is not included in the wire profile, a wait interval of one
minute is assumed.
The <minutes> parameter is a simple decimal number. To express
an interval of one hour and five minutes, use wait 65.
The minimum value can be 0. The maximum value can be 255.
Specifying a wait value of zero causes the wire program to wait
indefinitely (and never automatically save a partially collected story).
The end of story sequence must be received to have the story saved
into the database. A wait value of zero will cause the wire program to
ignore all wire idle parameters.
Wire idle processing only occurs at the end of a wait interval. So idle
parameters smaller than the wait interval are “rounded up” to the next
multiple of the wait interval.
381
Chapter 12 Wires
Using Special Characters in a Profile
Some characters cannot be produced from the keyboard or are interpreted
differently by your system and, therefore, you must enter them in your
profile in a special way. Characters such as semicolons (;), pound signs (#),
and at symbols (@) have a special meaning for your system or your
system’s console. Additionally, you may need to set an option to a value
that includes nonprinting characters, such as those produced by the Escape
(Esc) and Enter keys.
Entering Nonprinting Characters
To add a nonprinting character to a profile, you must use either the alias or
the decimal value.
Entering Characters by Alias
Your system recognizes a number of aliases for many of the nonprinting
characters you may use in a wire profile. These aliases are two or threeletter abbreviations that represent different characters. For instance, esc
represents the Escape key and cr represents the Enter key.
When you put an alias in a wire profile, you must enclose it in angle
brackets (< >) so your system knows that it is an alias. For instance, here is
an eos line that uses the Escape character:
eos
<esc>
Entering Characters by Decimal Value
You can also represent any character, nonprinting or otherwise, by its
decimal value. Enter the character’s decimal value in angle brackets where
you want it to appear in the profile.
For instance, Escape has a decimal value of 27, and Enter has a decimal
value of 13. Here is an example of an eos line using the esc character:
eos
382
<27>
Using Special Characters in a Profile
Avoiding Characters Used by the System
Do not include any of the following characters as control codes. The
characters, and how the system interprets them, are listed in the table.
Character
Interpretation
;
Indicates the start of a comment
#
Represents the computer’s name
space
Used as a separator
<
Indicates start of a character entered by alias or decimal value
@
Causes system to abandon the line you are typing
The next table shows the aliases and decimal values you must use if you
need to use these characters as control codes.
Character
Alias
Decimal value
;
<sc>
<59>
<35>
#
n
space
<sp>
<32>
<
<<
<60>
@
\@
<64>
Enter the at (@) symbol by typing it, but only if you first type a backslash
(\) character. This causes the console to treat the @ as a normal character,
rather than the command to abandon the current line, and put it in the
profile you are editing.
383
Chapter 12 Wires
Converting Text with Accents and Diacritical Marks
Wire services that deliver 8-bit codes may send only a two-character
sequence, typically a nonspacing diacritical mark and a character. Wire
programs in iNEWS do not recognize these two character sequences.
However, each nonspacing diacritical mark can be mapped to one of the
recognized accent-mark/enable-accent codes listed in the table.
The bits option defines a mapping table to convert received wire codes
into codes used by the system. The system applies ASCII conversions to
codes 0-127 and the DEC Multinational Character Set (MCS) conversions
for codes 128-255. When you specify ibm, a selected map is used to
convert an IBM code into a DEC MCS code.
To send accented characters, wire services send a sequence of three
characters, typically an accent mark, an enable-accent code, and a
character, when the accented character is not included in the wire service
character set.
Wire programs in iNEWS convert these accent sequences into accented
characters in the DEC MCS. When the wire profile contains an accent
definition (typically a backspace character), the wire program provides the
following conversions.
384
Mark
Accent displayed
Supported characters
"
Umlaut ( ¨ )
ÄäËëÏïÖöÜüŸÿ
`
Grave (`)
ÀàÈèÌìÒòÙù
'
Acute ( ´ )
ÁáÉéÍíÓóÚú
^
Circumflex (ˆ)
ÂâÊêÎîÔôÛû
~
Tilde (˜)
ÃãÑñÕõ
,
Cedilla ( ¸ )
Çç
*
Ring ( ° )
Åå
/
Slash (/)
Øø
Using Special Characters in a Profile
If the wire service uses ISO characters, your map lines should look like
these:
; ISO accent mapping
map <193> `<bs> ;
map <194> '<bs> ;
map <195> ^<bs> ;
map <196> ~<bs> ;
map <200> "<bs> ;
map <202> *<bs> ;
map <203> ,<bs> ;
map <233> <216> ;
map <249> <248> ;
grave
acute
circumflex
tilde
umlaut
ring
cedilla
slash-O
slash-o
The ISO character set includes specific values for the Ø and ø characters,
rather than building them out of two other characters. These characters are
mapped to corresponding values in the DEC MCS (<216> and <248>).
Similar lines using different values are used for ANPA characters:
; ANPA accent mapping
map <196> '<bs> ; acute
map <197> ,<bs> ; cedilla
map <198> ^<bs> ; circumflex
map <199> `<bs> ; grave
map <200> /<bs> ; slash
map <201> ~<bs> ; tilde
map <202> "<bs> ; umlaut
map <203> *<bs> ; ring
map <204> _
; underline
The accent sequence that results from this mapping is paired with the
character that follows it in the wire service transmission and checked to see
whether the specified accent is available with that character. For instance,
the ISO sequence <202>a is mapped to *<bs>a by the iNEWS system,
and then converted to the å character.
385
Chapter 12 Wires
The ISO sequence <202>u is displayed as *u, because the ° accent is not
available for use with the letter u. The sequence <202>u received from an
ANPA wire is translated to “<bs>u by iNEWS and displayed as ü in the
story.
Distributing Stories from the Wire
Wire programs route each wire story they receive to an appropriate queue,
based on which wire service sent the story and the story’s distribution
code. This distribution system ensures that all sports-related wire stories
are sent to the sports wire queue, weather forecasts are sent to the weather
wire queue, and so on.
This section explains the method wire programs use to categorize and
distribute wire stories, and provides a process for customizing the
distribution of wire stories to keep up with the changing needs of your
newsroom.
Defining Distribution of Wire Stories
Each wire program must have its own entry in the wire distribution story.
The wire distribution story is the first story in the
SYSTEM.WIRES.DISTRIBUTION queue. If there is more than one
story in that queue, the first story is used. This entry consists of up to 150
instructions that tell the wire program how to distribute wire stories, based
on their wire service codes.
Each line in the story is called a distribution line. Each distribution line
consists of a distribution name, a destination queue, and an optional
notification priority constraint.
386
Distributing Stories from the Wire
Here is a sample of a wire distribution story:
AP#####a#
AP#####b#
AP#####d#
AP#####e#
AP#####f#
AP#####h#
AP#####h#
AP#####i#
AP#####l#
AP#####m#
AP#####o#
AP#####p#
AP#####q#
AP#####r#
AP#####s#
AP#####t#
AP#####v#
AP#####w#
AP#######
AP#######
wires.us-national
wires.us-national
wires.features
wires.briefs
wires.features
wires.business
wires.briefs
wires.us-national
wires.features
wires.business
wires.weather
wires.us-national
wires.sports-score
wires.rundowns
wires.sports-stories
wires.rundowns
wires.advisory.other
wires.washington
wires.all
wires.unknown
Creating a Distribution Name
Each distribution line must begin with a distribution name that sets the
criteria a story must meet to be sent to the destination queue specified in
that instruction. Begin the distribution name with the wire program’s
source name, as specified in the configuration file. Otherwise, the wire
program ignores that instruction.
The source name is the contents of the fifth column for the wire in the
/site/config file. The following wire on port 18 is named AX:
wire
18 9600-8n anpa7
AX - ;ap express
387
Chapter 12 Wires
Follow the source name with the wire service code you want that
instruction to handle. There must be no spaces between the source name
and code. Within the code, specify the category, service level, selector, and
priority codes a story must have for the wire program to send it to the
destination queue specified in the instruction.
In most cases, you need only specify the category code to distribute wires.
You generally use only the source name and category code positions in the
distribution name and fill the remainder of positions in the distribution
name with pound sign (#) characters, which the wire program ignores.
For instance, to create a distribution name that matches all Associated
Press sports stories you receive, begin the distribution name with the
source name of the wire program that handles the AP wire (AP in this
example) and put s in the ninth (second-to-last) position. It does not matter
what is in the remainder of the distribution name, so fill those positions
with # characters: AP######s#.
n
When you enter a distribution name, type the wire program’s source name
in the same case as it is defined in the configuration file. Similarly, wire
category and priority codes are always sent in lowercase, so enter them
that way in your distribution names.
Identifying a Destination Queue
Follow the distribution name with the full pathname of the destination
queue where you want the wire program to put any stories that match the
distribution name. For instance, to have the wire program send every story
that matches AP######s# to WIRES.SPORTS, specify that queue:
AP######s#
WIRES.SPORTS
If you create a distribution line with a destination queue that does not exist,
the system creates the queue when you save the distribution story. A queue
created this way inherits directory traits assigned to the Wires directory,
including the purge interval. If you want a different purge interval, use the
Directory Properties dialog box to change it. See “Changing Database
Traits” on page 117, “Directory/Queue Properties Dialog Box” on
page 121, and “Choosing Queues to be Purged” on page 136 for more
information.
388
Distributing Stories from the Wire
Changing Notification Priority
Normally, when your system receives a story the wire service has marked
as either BULLETIN or URGENT, it notifies everyone logged in. You can
change the priority level a story must have to merit notification. Set an
optional notification priority constraint in the distribution line.
You can set four notification priority constraint levels in each distribution
line. Each level restricts user notification to a higher degree. By
convention, type them in uppercase.
Priority Level
Description
URGENT
The lowest constraint level. Any story marked flash,
bulletin, or urgent by the wire service causes users to
be notified if this constraint level is specified.
BULLETIN
The next-lowest constraint level. Any story marked flash
or bulletin causes users to be notified if this constraint
level is specified.
BULLETIN is the default priority level; if you do not specify
a notification priority constraint in a distribution line, any
story that matches the distribution name in that line and has
this level or higher priority causes notification.
FLASH
The second-highest constraint level. When you set a
distribution line to this constraint level, stories that match the
distribution line’s distribution name must have a priority of
“flash” in your system to notify users.
SILENT
The highest constraint level. It prevents your system from
notifying users of the arrival of any story processed by that
distribution line. No story ever has a high enough priority to
override this constraint level.
Setting the Transmit or Always Options
You can apply two other options, TRANSMIT and ALWAYS, to a
distribution line.
389
Chapter 12 Wires
TRANSMIT
This option is used on distribution lines that send stories to queues scanned
by distribution servers. It causes the wire program to give the story a
distribution code that matches its wire service code before sending it to the
destination queue. This way, a distribution server that scans the destination
queue can distribute the story, based on its original wire-service code.
ALWAYS
If you want the wire program to distribute a copy of every story it receives
to a certain queue, place ALWAYS on the distribution line that sends stories
to that queue. The word ALWAYS may follow or precede a notification
priority constraint. Most often, this is used to send a copy of every story
received to WIRES.ALL:
AP#######
wires.all
ALWAYS
Adding a Distribution Line
Although your distribution story was set up for you when your system was
installed, you may need to modify it by changing an existing distribution
line or adding a new distribution line to the story.
For instance, to have the wire program that handles the AP wire service put
a copy of each Associated Press brief it receives in WIRES.BRIEFS and
notify you whenever it puts an AP brief marked urgent in this queue, add
the distribution line shown here:.
AP######d#
c
wires.briefs
URGENT
When you add a new distribution line, you must add it above any
distribution lines for WIRES.UNKNOWN or WIRES.ALL.
Avoiding Hidden Categories
When you add lines to your wire distribution story, you may get hidden
category error messages when you save the story. These errors occur when
the line or lines you have added are not in the proper position relative to
other lines in the story. The following example illustrates this problem and
shows how to fix it.
390
Distributing Stories from the Wire
Suppose you had this line in your wire distribution story:
UP######g#
wires.regional
In addition to this line, you wanted to add a line like this one:
UP#xyz##g#
wires.briefs
While this may seem straightforward, you get a hidden category error
message if you add the new line following the existing one. To understand
why, look at the two lines together.
UP######g#
UP#xyz##g#
wires.regional
wires.briefs
Suppose a story came from the wire service with a distribution code of
UPoxyzoogr or something else that would ordinarily match your new
WIRES.BRIEFS distribution line. The problem arises because the story
also matches the WIRES.REGIONAL line above that one, and, since the
wire distribution program stops checking the distribution story after it finds
a match, it never gets to the WIRES.BRIEFS line.
To avoid this problem, ensure that you arrange any distribution lines that
have common elements so the more specific line comes first in the
distribution story, like this:
UP#xyz##g#
UP######g#
wires.briefs
wires.regional
This rule of distribution does not apply to distribution lines that have the
same code but distribute the stories to different queues. These lines still
match the appropriate wire stories, as long as they are placed together in
the distribution story.
Using the WIRES.ALL Notification Priority
Your system sends only one notification for a story, even if the story
matches two or more distribution lines. However, since each line may have
a different notification level, the system chooses the lowest notification
level and uses it to determine whether to send a notification.
391
Chapter 12 Wires
This is important when considering the distribution line for WIRES.ALL.
By definition, each story received is distributed to this line as well as
others. Consequently, the notification priority set for this line can also
affect how notification levels are interpreted for other lines.
For instance, if the distribution line for WIRES.ALL has a notification
level of BULLETIN, any other distribution line set to a notification level of
FLASH or SILENT (higher levels) is downgraded to BULLETIN.
However, by setting the distribution line for WIRES.ALL to SILENT (the
highest notification level), you can ensure that all other distribution lines
for that wire have notification levels lower than WIRES.ALL. This ensures
their notification levels take precedence over those for WIRES.ALL.
Distributing Unknown Wires
A wire program puts stories that do not match any of its distribution lines
in the queue WIRES.UNKNOWN. Most systems have a distribution line that
uses a wildcard distribution code and the ALWAYS option to send a copy of
every story to WIRES.ALL. As a result, no story is unknown as far as the
wire program is concerned.
In many cases, you want to send stories that do not match normal
distribution codes to both WIRES.ALL and WIRES.UNKNOWN. To do
this, you need a special distribution line that sends a copy of any wire that
does not match a normal distribution code to WIRES.UNKNOWN before
sending it to WIRES.ALL.
If your system uses more than one wire service, the distribution lines for
each service should be in separate groups. Each group should have its own
distribution line for WIRES.UNKNOWN at the bottom of that group of
distribution lines, just above that group’s distribution line for
WIRES.ALL.
392
Distributing Stories from the Wire
Maximum Number of Lines
Each wire program’s entry in the distribution story can contain up to 150
distribution lines. To fix a distribution story so your system can use it,
divert distribution wires to the distribution server so the total for each wire
program is no more than 150. Once you remove excess distribution lines
and save the story, your system should accept the distribution story and
begin using it.
Mailboxes
Your system was installed with the reserved distribution mailbox assigned
to the queue SYSTEM.WIRES.DISTRIBUTION. This mailbox allows
the wire distribution checker (a server program) know when you make
changes to the distribution story. The checker in turn notifies the wire
programs that the distribution story has changed. This is the only way the
wire program knows to incorporate changes you make. See “Using
Mailboxes” on page 419 for more information.
n
Do not assign a different mailbox to this queue or assign this mailbox to
any other queue.
If you want everyone logged in on the system to be notified when a wire
story is placed in WIRES.ADVISORY.PRIORITY, you must assign the
reserved mailbox “all” to that queue. Mailboxes are assigned to queues
using the Queue Properties dialog box. See “Changing Database Traits” on
page 117 and “Reserved Mailboxes” on page 421 for more information.
Purge Intervals
Nowhere in your database are proper purge intervals as important as in the
Wires directory. All queues in the Wires directory should have roughly
similar purge intervals. If not, the system may not reclaim space used by
old wire stories efficiently.
n
Never use the wire distribution story to distribute wire stories to queues not
purged. Doing so can eventually lead to a low-on-space condition as the
queues fill up with old stories.
393
Chapter 12 Wires
Internationalization
You can modify the FLASH, URGENT, BULLETIN, SILENT, ALWAYS,
and TRANSMIT options by changing appropriate entries in the words
dictionary (/site/dict/words).
You must use the maketab command for the system to recognize
dictionary changes.
The system expects each option to begin with a unique letter and looks at
the first letter of the word to determine what it is. The system would find
TRANSMIT to be the same as TX.
Operating Wire Keyword Searches
In addition to receiving and distributing wire stories, a wire program can
also search stories it processes for keywords you want. When it finds a
story that satisfies one of your search rules, it copies that story to a queue
you specify. Using wire keyword searching can be an easy way to collect
stories of interest to specific writers in your newsroom.
Setting up Keyword Searching
Utility (server) programs, called keyword servers, can do keyword
searching in the same way as wires. They are listed differently in the search
job list, but otherwise searching and story distribution are handled the same
way.
See “Adding a
Keyword Server” on
page 462 for more
information.
394
To set up a keyword search for a wire or keyword server:
1. Check the search job list for existing entries.
The search job list is the first story in the
SYSTEM.WIRES.KEYWORDS queue.
Operating Wire Keyword Searches
Each job list entry uses the following format:
*[<number of queues>] [<name>] [< name>]
[<queue name>]
. . .
[<queue name>]
Begin each entry with an asterisk (*). Include a number, which
indicates the number of queue names that follow. Type 5 here if the
entry is for a wire program—this is also the default value.
Follow the asterisk and number combination with the device name of
the program that uses this entry or a source name for a wire. List two
or more names if you want more than one program to use the entry.
Names are specified in the configuration file.
Follow the first line with one or more lines that specify queues
containing keyword stories you want the program to use. A keyword
server can have as many as 20 queues.
If the program that uses the entry is a wire program, you can list as
many as five different queues here.
2. Create a keyword queue.
See “Adding a
Directory or Queue” on
page 99 for more
information.
By convention, keyword stories are placed in queues in
SYSTEM.WIRES, so create a queue called
SYSTEM.WIRES.APKEYWORDS.
3. Assign the reserved keyword mailbox to the new keyword queue.
See “The Keyword
Mailbox” on page 403,
“Changing Database
Traits” on page 117 and
“Reserved Mailboxes”
on page 421 for more
information.
If this mailbox is not assigned to this queue, your system cannot notify
the keyword server when you add new search rules to the keyword
story or modify existing ones. The keyword server will not examine
your changes for mistakes or notify programs that use that keyword
story of changes you made.
4. Add an entry to the search job list.
Ensure the keyword story queue you just created is listed in the wire
program’s search job list.
395
Chapter 12 Wires
The iNEWS system looks for the keyword story in the
SYSTEM.WIRES.APKEYWORDS queue, so the wire program’s
search job list should look similar to this:
* AP
system.wires.apkeywords
;
* kwdserver1
system.keywords.shuttle
system.keywords.recycle
When you save the story, the keyword checker examines your changes
for errors. Then it notifies all wire programs that keyword changes
were made.
n
See “Additional
Information about
Search Jobs” on
page 397 for more
information.
The keyword checker (kwdcheck) validates keyword search stories just as
the distribution checker (catcheck) validates wire distribution stories.
The keyword checker is different from the keyword server, which is the
utility program that does the actual wire keyword searching.
The number of queues you specify determines how many unique
keywords can be in each story. The formula for this is the maximum
number of unique keywords a wire program can use (250) divided by
the number of stories you declare. For instance, listing two queues
would mean each story could have a maximum of 125 unique
keywords.
5. Create a keyword story.
Wire and keyword server programs assume the first story in the queue
is the keyword story. If there is more than one story, ensure that your
keyword story is at the top of the queue.
6. Add search rules to the keyword story. See “Keyword Searching” on
page 398 for more information.
7. Save the keyword story.
The keyword checker examines the story for errors and creates any
destination queues that do not exist. If the keyword checker finds an
error, it sends a message to your workstation.
396
Operating Wire Keyword Searches
The most important of these messages advises you the story contains a
destination queue that does not have a purge interval.
Using a destination queue that is not purged does not prevent the
keyword story from being used, but you risk having any program that
uses the rule set collect stories in that queue until the system runs out
of space. We strongly recommend that all your destination queues have
purge intervals.
The messages you see after saving a keyword story are advisory
messages and do not prevent the keyword story from being used. Once
you have viewed all the messages, the program for which the keyword
story was designed begins using the rule sets in that keyword story to
search the stories it processes, as long as an entry for that program has
been made in the search job list.
Additional Information about Search Jobs
The following section provides additional information about search job list
features and important considerations.
Suppressing a Search
To prevent a program from doing any searching, create an entry for the
program that consists of an asterisk only and the program’s device or
source name, or do not include an entry for the program in the search job
list. If your search job list contains a default entry, you need to include
entries for each wire and keyword server program you want to keep from
doing any searching.
Default Entry
A default entry is one that begins with an asterisk, but does not specify a
device or source name. Often, a search job list contains a default entry
located at the bottom of the story. If a program is unable to find an entry
that contains its device name, it uses the default entry.
Your system uses a special utility (server) program, called keyword
checker, to check any changes you make to the search job list. For the
system to notify the keyword checker when you modify the search job list,
397
Chapter 12 Wires
assign the reserved system mailbox keyword to the
SYSTEM.WIRES.KEYWORDS queue. See “Changing Database Traits” on
page 117 and the “Maintain Tab” on page 133 for more information.
Keyword Limitations
Each wire program can have search rules that contain no more than 250
unique keywords. Divide the search rules among as many as five keyword
stories in different queues. The maximum number of unique keywords that
you can use in each queue’s keyword story is 250 divided by the number of
queues you specify in the program’s search job-list entry.
In a similar way, keyword servers can use search rules that contain a total
of 1000 unique keywords. Divide these search rules among as many as 20
different queues. The number of unique keywords allowed in each
keyword story is equal to the total number allowed for that keyword server
divided by the number of queues you include in the keyword server’s
search job list entry.
Keyword Searching
Each keyword story is a collection of rule sets. Each rule set contains the
search rules you want your program to use to identify stories relating to a
particular topic.
The format each rule set must have is as follows:
destination <queue name>
<search rule>
[<search rule>]
. . .
[<search rule>]
Each rule set begins with a destination line that names the queue where
copies of stories that satisfy any of the rule set’s search rules are placed.
This line must begin with the word destination, followed by the full
pathname of the destination queue. Two rule sets cannot use the same
destination queue.
398
Operating Wire Keyword Searches
Follow the destination line with one or more lines that contain search
rules you want a particular wire and keyword server program to use to
search. Each search rule occupies a separate line in the rule set.
For instance, the rule set in the following example begins with a
destination line that tells the program to put copies of stories that
satisfy either of the rule set’s search rules into
WIRES.KEYWORDS.DRUGS. The two lines that follow contain the search
rules the program uses to find stories relating to drugs:
destination
wires.keywords.drugs
panama AND drugs
drugs NOT pharmacy OR (drugs AND smuggling)
c
Never create a destination line that sends stories to a personal queue
or any queue not purged. Having a program send stories to such
queues can lead to an out-of-space condition.
Each search rule consists of one or more keywords you want a wire or
keyword server program to use to locate stories on a particular topic.
Each search rule is contained in a paragraph and is limited to
approximately 1000 characters or to the end of the paragraph, whichever is
less. You can have more than one search rule defined for each destination
queue. The only limitation is that you cannot exceed the number of unique
keywords allowed for the story. For details on the maximum number of
unique keywords, see “Keyword Limitations” on page 398.
If your search rule contains more than one keyword:
•
Include a space before and after each keyword so the system can
identify the start and end of each keyword. You can change default
delimiters by customizing the dictionary translation for the
W_DELIMITERS token in the words dictionary. Use the
makeccutab command and the maketab command to allow the
system to recognize dictionary changes.
Delimiters defined by W_DELIMITERS are used by the wire, seek,
and keyword server programs to find the start and end of words in
stories. These isolated words are matched with keywords from the
search list. Definition of the delimiters is not related to the task of
constructing search rules.
399
Chapter 12 Wires
•
Include the AND, OR, or NOT operator between two keywords:
AND requires that a story contain multiple keywords. For instance, a
rule like “drugs AND smuggling” finds only stories that contains both
of these words.
OR requires that a story have any of multiple keywords. For instance, a
rule like “cnn OR panama” finds any story that contains either of these
words.
NOT specifies that a story must not contain the keyword following the
operator. For instance, a rule like “drugs NOT pharmacy” finds any
story that has the word “drugs” in it but does not contain the word
“pharmacy.”
Using Parentheses in Searches
Wire and keyword server programs evaluate a search rule from left to right.
For instance, to find stories that contain either “air quality,” “clean air,” or
“dirty air,” create the following long search rule:
air AND quality OR air AND dirty OR air AND clean
Because these programs evaluate rules from left to right, they first see if a
story contains both “air” and “quality.” If a story does not contain both of
these keywords, the program checks whether it contains both “air” and
“dirty.” If the story does not, the program checks whether the story
contains both “air” and “clean.”
Using parentheses, you can control how a program evaluates the rule. For
instance, by rearranging the rule, we greatly simplify it:
air AND (quality OR dirty OR clean)
You can use as many sets of parentheses as necessary to have the program
evaluate the search rule.
For instance, to create a search rule that finds any story that contains either
the word “smog” or the words “air” and “quality,” but not “pollen” or
“airline,” build a rule such as the following:
smog OR ((air AND quality) NOT (pollen OR airline))
400
Operating Wire Keyword Searches
After you add your search rules to the keyword story and save, the keyword
checker examines your changes for errors. If there are no errors, it notifies
any program that uses that keyword story of what you have done so the
program can use your changes.
Tips on Building Search Rules
•
Each keyword must be a single word; two words without an operator
between them generate an error. For instance, you must use
space AND shuttle rather than space shuttle to find
stories about the space shuttle.
•
Each search rule is contained in a paragraph and is limited to
approximately 1000 characters or to the end of the paragraph,
whichever is less. Searches are not case-sensitive, so you can use
uppercase or lowercase letters.
•
Be careful using keywords that form the first part of larger words. For
instance, “air” finds stories that contain words like “airline” and
“airports” as well as “air.” To use a keyword like “air,” include the
NOT operator to exclude other words that begin with that keyword,
such as NOT airline.
However, wire and keyword server programs do not find keywords
when they appear in the middle or at the end of a word. For instance,
searching for “ports” does not locate stories that contain words like
“airports” or “sports.”
The success of your search depends on how well you design the search
rules; they should be specific enough so programs that use them find only
stories that relate to your topic.
Scanning stops either at the end of the story or after a maximum of 50
keywords are found. Then the search rules are used on the set of located
keywords. The program abandons that rule set when it finds a search rule
the story satisfies or when it exhausts all search rules in the rule set.
n
You can increase the efficiency of your searches by putting rules that are
most likely to find stories at the top of each rule set. Put the least complex
rules at the top.
401
Chapter 12 Wires
User Notification
You can have the system notify you when a program finds a story that
contains one of the keywords for which you are searching. Assign a group
you are in to the notification group trait of the queue(s) where the program
sends the stories. See “Notification Group” on page 176 for more
information. Your system then notifies you every time the program places a
story in one of these queues.
Removing a Rule Set
When a rule set becomes obsolete, remove it. Because a large number of
keyword searches slows your system, removing unused rule sets helps
maintain system efficiency.
If you are no longer using the rule set’s destination queue, remove it. This
frees up space in the database and helps keep it from being cluttered up
with unused queues.
Sending a Story to More Than One Queue
Wire and keyword server programs check stories they process against each
rule set in the keyword stories they use. When the program finds a match, it
sends a copy of the story to the rule set’s destination queue and continues
searching, using the remaining rule sets. Only the first 50 words identified
in the story will be used when checking the rule sets.
So, you can have a story copied to more than one destination queue by
repeating the same search rule in different rule sets.
Default Directory Paths
You usually need the full pathname to specify each rule set’s destination
queue. You must do this for the program performing the search, to locate
the destination queue.
Sometimes, all rule sets in a keyword story contain destination queues in
the same directory. In this case, set a default directory path for the keyword
story and then specify the destination queues by name rather than using the
full pathnames.
402
Keyword Checker Messages
To specify a default directory, enter the queue’s default directory in the
search job list entry that uses the keyword story. Follow the queue name
that contains the keyword story with the default directory pathname.
Use this feature with group security. You can allow users to manage their
own keyword searches but control where they send the stories.
The Keyword Mailbox
See “Changing
Database Traits” on
page 117 and
“Reserved Mailboxes”
on page 421 for more
information.
Assign the reserved keyword mailbox to the queue
SYSTEM.WIRES.KEYWORDS, which contains the search job list.
Otherwise, your system cannot notify the keyword checker when you make
changes to the search job list.
Always assign the keyword mailbox to queues that hold your keyword
stories. If this reserved system mailbox is not assigned, your system cannot
notify the keyword checker when you create new search rules or modify
existing ones.
When you modify an existing search rule or create a new one, the keyword
checker alerts programs that use that rule about the change. If the queue
does not have the keyword mailbox assigned to it, the keyword checker
cannot do this. Consequently, programs that use the search rule you created
or modified will not know about your changes until you restart them.
Keyword Checker Messages
The following messages from the message dictionary may appear when
you modify and save a keyword story:
Could not enter the queue
(M_BADQUEUE)
The specified destination is not accessible or an error occurred while
creating or entering the queue.
Default keyword list must be last
(M_WNOTLAST)
Placing the default keyword list anywhere but at the bottom of the
story will prevent those keyword lists that follow it from being used.
403
Chapter 12 Wires
Duplicate destination
(M_DUPEDEST)
The specified destination has already been used for another keyword
list.
Keyword too long
(M_KWDLONG)
Length of the keyword string is longer than maximum length allowed.
Maximum file number bad
(M_FILENUM)
The number of keyword stories has exceeded the maximum allowed.
The M_FILENUM diagnostic is produced if there is anything other than
a space, a five, or a twenty following the asterisk in the * AP line of
the wire program’s search job list. A sample of this job list is shown on
page 395.
The * AP is equivalent to *5 AP meaning that you can have at most 5
queue names specified that will contain the search rules for the AP
wire. Wires are limited to 250 unique keywords in the search rules. So
you can have 5 stories with each story containing 50 unique keywords.
If you have one story, it can contain 250. If you have 2 stories, each
story can contain 125, and so forth.
Keyword servers are limited to 1000 unique keywords in the search
rules. You can specify *20 kwdserver1 to indicate that this
keyword server may have as many as 20 queue names specified that
will contain the search rules for it. The example on page 395 limits the
list to 5 and therefore at most 250 unique keywords for kwdserver1.
missing
(M_MISSING)
The keyword story does not understand the specified rule set. Either an
operator is missing (AND, OR, or NOT) or an unmatched parenthesis
exists.
No destination found
(M_NODEST)
No destination is specified for a given rule set.
Not a queue
(M_NOTQUEUE)
The specified destination is not a valid queue name. Check whether it
is misspelled, or whether it is a directory.
Queue is never purged
(M_PURGEZERO)
The specified destination queue is never purged, which means stories
may accumulate in it and eventually cause a space problem in the
database.
404
Keyword Checker Messages
Syntax error
(M_SYNERROR)
The keyword checker does not understand the specified line. Check
whether format of the line is correct.
System error
(M_SYSERROR)
A system error has occurred that caused the keyword checker to
terminate.
Too many expressions (M_EXPMAX)
A single search rule is too complicated. It contains more than 500
words/operators.
Too many keyword distribution files
(M_KWFMAX)
The number of keyword distribution files exceeded the maximum
allowed.
Too many keywords
(M_KWDMAX)
The total number of unique keywords processed by the keyword
checker has exceeded the maximum allowed.
Unexpected
(M_UNEXPCTD)
The specified line has extra punctuation, such as an unmatched
parenthesis. Ensure that parentheses appear only in pairs.
UPDATE queue (M_UPDATEQ)
The specified destination queue is an update queue. This means that
each time a story is placed into the destination queue, the queue must
be searched to determine if a copy of the story is already in the queue.
This puts an unnecessary load on the system. Destination queues
should not have the update trait.
405
Chapter 12 Wires
406
Chapter 13
Servers
Do not confuse servers in this chapter with server hardware or file servers,
which are computers with the iNEWS database and running the iNEWS
application software. Those computers are referred to in this chapter as
iNEWS Server, server A, server B, and so forth. This chapter explains
setup and use of utility programs, also known as servers. There are various
types of these server programs, which perform a multitude of tasks. This
chapter contains the following information:
Major sections of this chapter are:
•
Overview
•
Adding a Server Program to the System
•
Job Lists: Queues, Stories, and Commands
•
Action Servers
•
Distribution Servers
•
Parallel Wire Servers
•
Keyword Servers
•
System Servers
-
Seek Servers & Fast Text Search (FTS) Servers
-
Print Servers
-
Mail Servers
•
Monitor Servers
•
Network iNEWS Systems Using Rx/Tx Links
Chapter 13 Servers
Overview
Servers are utility programs, which automatically perform various actions
on stories in the iNEWS database. Some are general purpose and do jobs
you define; others are narrowly defined, needing no instruction from you.
You can connect (network) server programs in separate systems together
using rx/tx links.
These various types of
server programs are
explained in more
detail in individual
sections later in this
chapter.
The types of servers available to you are:
•
Action servers – general-purpose servers that move, duplicate, remove,
or replace stories added to or edited in certain queues
•
Distribution servers – distribute stories to different queues, based on
each story’s distribution code
•
Parallel wire servers – allow you to have a wire distribution backup in
case you have problems with the usual wire port
•
Keyword servers – perform keyword searches on stories added to or
modified in the designated queues and then copy or move results to a
queue that you specify
•
System servers include:
•
-
Seek servers - perform searches
-
Fast Text Search (FTS) servers - perform fast text searches and
index stories in the FTS database
-
Print servers - format stories sent to printers
-
Mail servers - handle mail processing
Monitor servers – check a show’s event requests for errors, create
composite and event lists, and send playlists to iNEWS ControlAir.
Although listed as a special device in the configuration file, txnets are very
similar to servers in function and configuration. See “Network iNEWS
Systems Using Rx/Tx Links” on page 528 for more information.
408
Adding a Server Program to the System
Adding a Server Program to the System
The overall process of creating a server is the same for all server utility
programs.
Guidelines for adding a server to iNEWS are:
1. Check the configuration file (/site/config) and choose the next
available device number for the server program, from the range of 3digit numbers reserved for use by your system’s server programs, such
as 256 to 300.
2. Add the server program to the configuration file on each iNEWS
Server—such as server A and server B—in your system.
n
Changing the configuration file requires the use of a line editor. See
“Changing the Configuration File” on page 273 and Appendix H for more
information.
a. Select all iNEWS Servers. See “Selecting Servers” on page 33 for
more information.
b. Open and edit the configuration file, by typing (what appears in
bold):
NRCS-A$ ed /site/config
1259
c. Add the server program’s device number to the servers line in
the host section(s) of the configuration file for the iNEWS Server
on which the server program will run. For instance:
servers 257 258 259 260
The device number 260 is added to the servers line in this
example.
d. Add a configuration line for the server program. This line should
contain the mailbox number assigned to the server program, when
necessary.
n
Divide your server programs evenly among your iNEWS Servers to
distribute the load they put on your system. Additionally, ensure that you
modify the servers line for alternate host definitions for your iNEWS
Servers to include the server program’s device number. This ensures the
409
Chapter 13 Servers
server program can run on the surviving computer should one of your
iNEWS Servers stop functioning. See “Configuration File” on page 269
for more information.
The format for server programs’ configuration lines are:
server <device#> <type> <mailbox> <device name>
410
Parameter
Description
device #
The device number assigned to the server
program. This 3-digit number must also be
listed in the servers line in a host
definition.
type
The type of server program, such as action,
distribution, parallel, keyword,
seek, monitor, mailserver,
printserver, ftsseek, and ftsindex.
mailbox
The mailbox the server program uses. Valid
standard mailbox numbers are 1 through 4096.
This number typically matches the server
program’s device number. See “Using
Mailboxes” on page 419 for more
information.
device name
To give the server (utility program) a device
name, enter that name here (up to 8
characters). If not, enter a hyphen.
Adding a Server Program to the System
Comments appearing
after the semicolons (;)
are optional.
The following are sample configuration lines for various server
programs:
server
server
server
server
server
server
server
server
server
server
server
141
201
211
231
241
242
251
251
258
260
271
printserver
mailserver
keyword
seek
ftsindex
ftsseek
action
action
parallel
seek
monitor
141
201
211
231
241
242
251
258
260
271
- ;slave printing
- ;mailserver
keyword ;keyword svr
- ;seek server
- ;fts indexing
- ;fts searches
- ;action svr
- ;timed-action svr
devname2
seek ;seek server
- ;Morning show
Do not use an
uppercase (W) in step
2e. See Appendix H for
more information.
e. When you finish making changes to the configuration file, save
your changes and exit the line editor by typing:
Information pertaining
to steps 3, 4, 5, and 6
vary depending on the
type of server program.
These steps are
discribed in more detail
in individual sections
for each server program
later in this chapter.
3. Create a job list queue in the System directory of the iNEWS database.
See “Adding a Directory or Queue” on page 99 for more information.
The name and location of the job list queue in the System directory
varies, depending on the type of server program.
n
w
1279
q
4. Create a job list story with defined tasks. See “Job Lists: Queues,
Stories, and Commands” on page 412 for more information.
Check your job list before you save the story. When you start the server, it
checks for syntax errors in time intervals, but does not catch errors such as
misspelled queue names. You must make sure that everything is correct.
5. (Optional) Additional queues and stories may be required for some
utility programs, such as distribution and parallel servers. See
individual sections for each server program later in this chapter for
more information.
411
Chapter 13 Servers
6. Assign mailboxes to queues, if necessary. The queue’s mailbox
number should match the server program’s mailbox number, which
appears in its configuration line in the /site/config file.
7. (Optional) Test your configuration changes. See “Testing the Site
Configuration File After Changing” on page 273 for more information.
8. Reconfigure the system. See “Incorporating Configuration Changes”
on page 274 for more information. When adding server programs, you
do not need to stop anything to reconfigure the system.
9. Start the server program using the following command format:
restart <device#>
For instance:
NRCS-A$ restart 271
10. (Optional) Back up site files. See the iNEWS Operations and
Troubleshooting Manual for more information.
Job Lists: Queues, Stories, and Commands
Server programs, such as action and distribution servers, require a job list
queue to hold its job list story, a set of instructions telling the server
program what you want it to do. Job lists for each action, distribution,
parallel, and keyword server must be in its own job list queue in the
SYSTEM.CONFIGURE directory. The job list story must be the first story
in the appropriate queue. Also, the job list queue name must match the
server’s device number.
For instance, an action server with device number 257 would have a job list
queue named 257 in the Configure folder of the System directory. The full
pathname would be: SYSTEM.CONFIGURE.257. You may want to add a
description of the server’s function as part of its queue’s name. Do this by
using a hyphen, such as:
SYSTEM.CONFIGURE.257-DUP-TO-ARCHIVE.
Further examples are provided in procedures for adding various server
programs in their corresponding sections later in this chapter. A complete
list of job list commands is provide in Appendix A. See “Job List
Commands” on page 627 for more information.
412
Job Lists: Queues, Stories, and Commands
Defining Tasks for Servers
The job list story outlines tasks the server program is instructed to execute.
There are two types of tasks: mailbox tasks or timed-interval tasks. Most
servers execute mailbox tasks, while timed-interval tasks are executed by
action servers and tx links.
Both tasks must have a scan line that identifies the queue with which the
task is associated. See “Adding a Scan Line in a Job List Story” on
page 414 for more information. Follow this scan line with job list
commands you want the server to execute if stories have been added to or
modified in the task’s scan queue. These commands are the task’s
command set. See “Defining a Server Command Set” on page 415 for
more information.
Mailbox tasks are activities the server program is prompted to do whenever
something happens to a queue or its contents. Timed-interval tasks are
activities an action server or tx link is instructed to do at certain times.
The server program is inactive and said to be “asleep” until it is
“awakened” to execute a job list, either when scheduled to (a timedinterval task) or when stories are added to or changed in a queue (mailbox
task).
The difference between the two tasks is that a timed-interval task begins at
specified time intervals and a mailbox task does not. Also, timed-interval
tasks are only associated with action servers and tx links, while mailbox
tasks are used by other utility programs.
413
Chapter 13 Servers
The sequence of actions taken by an action server is shown in the following
diagram.
Server wakes up, eith er bec ause a
ti med inter val has elapsed or a
m ailbox n oti fic ation has been received.
(Timed
Interv al )
If awak en ed by a timed interval,
server exec utes th at task as soci ated
w ith th at ti med interv al.
(M ai lbox
Notification)
If awakened b y a mail box notification ,
server examines the queue named in
eac h m ailbox task’s s can li ne for a n ew
or modified sto ry and executes the
mai lbox tas k assoc iated w ith th e q ueue
con tain ing th e n ew or mo dified s tory .
After performing the
appropriate tas k(s ), the
server goes bac k to s leep.
Adding a Scan Line in a Job List Story
Both mailbox and timed-interval tasks must have a scan line that
identifies the queue you want associated with the task. The server performs
commands in the task’s command set on any new or modified stories in
this queue. A scan line must begin with the word scan followed by the
full pathname of a queue you want the task to watch. The format is:
scan
<queue name> [all | priority | everyentry]
In a mailbox task, the scan line is the first line in the task. See “Defining
Mailbox Tasks” on page 419 for more information. In a timed-interval
task, the scan line follows the time interval commands. See “Defining
Timed-Interval Tasks” on page 423 for more information.
n
414
A normal scan reads stories in its scan queue in chronological order, with
the oldest first. To reverse this order, use bscan instead of scan. Apart
from this distinction, scan and bscan operate identically. Use bscan
for long queues.A scan only processes modified stories, which are stories
added to or edited in the queue. The everyentry option causes different
behavior.
Job Lists: Queues, Stories, and Commands
If more than one queue is being scanned by a server, each scan only
processes 10 stories at a time from a queue before going on to the next
queue, unless the queue is designated as a priority queue or the all option
is used. The all option overrides the 10 entry limit and will cause all
entries in the queue to be processed before the server moves on to the next
scan set. The all option differs from the priority queue because the scan
queue does not preempt other scan sets and there is no limit to the number
of scan sets with the all option specified.
Defining a Priority Queue
You can set up a scan queue as a priority queue for processing new stories.
This means that the 10-story limit for scan does not apply to that queue;
all new or modified entries in the queue are processed before the server
moves on to the next queue. If the priority queue has no stories to process,
the system will scan each of the queues in normal order, returning to the
priority queue between each queue to check for new stories.
To designate a scan queue as a priority queue, add priority to the scan
line after the queue’s pathname. For instance:
scan SHOW.SCRIPTS.AM
priority
Defining an Every Entry Queue
The everyentry option forces the server to process each entry in a
queue, not just modified entries.
To designate a scan queue as an every entry queue, add everyentry to
the scan line after the queue’s pathname. For instance:
scan SHOW.SCRIPTS.AM
everyentry
Defining a Server Command Set
Follow a task’s scan line with a command set containing the commands
that you want the server to perform on new or modified stories in the queue
associated with that task. The set of commands that follow the scan line
are known as a scan set.
415
Chapter 13 Servers
A complete list of job
list commands are
provided in
Appendix A. See “Job
List Commands” on
page 627 for more
information. Also, see
“Ordered Queues and
the Order Command”
on page 418.
n
Many servers have unique job list commands that only they can use.
However, almost every server can use the following five commands.
dup
<destination queue name> [distribution code]
Copies stories in the scan queue to a queue you specify, optionally
including a distribution code. It must be followed by the name of a
queue into which you want the server program to duplicate stories.
When a server, such as an action server, duplicates a story, it replaces any
old version of the story in the destination queue with the updated version
only when the update database trait is applied to the destination queue.
When dup’ing, moving, or replacing a deleted queue entry, server
programs will not issue notifications; however, an environment variable
(DELETE-NOTIFY) may be used to change this behavior.
replace
<destination queue name>
Updates a story in the destination queue only if the original is changed
in the scan queue; it does not duplicate new stories from the scan
queue into the destination queue. The original story must first be
manually duplicated to the destination queue. Also, the destination
queue must have the update database trait.
move
<destination queue name> [distribution code]
Moves stories from the scan queue to a queue you specify, optionally
adding a distribution code to them. It must be followed by the name of
a queue into which you want the server to move stories and be the last
instruction in a scan set.
n
For dup, replace, and move, the destination queue name may be
formatted using the strftime syntax to create names based on the
current date and time. Use man strftime on the console to get a
description. The queue will be automatically created if it doesn’t exist.
remove
Deletes the story from a scan queue. It does not send stories to the
Dead queue but deletes them immediately. It must be the last
instruction in a scan set.
416
Job Lists: Queues, Stories, and Commands
n
Do not include both the remove and move command in a single scan set.
The server program cannot do anything else to the story once it executes
either one of these commands. Only one of these commands can appear in
each scan set, and it must be at the end of the scan set.
Here is an example of a command set that has an action server
duplicate new or modified stories in SHOW.SCRIPTS.AM to
BACKUP.MORNING-SCRIPTS and then remove them from
SHOW.SCRIPTS.AM:
at 10:00
on mon tue wed thu fri
scan show.scripts.am
dup backup.morning-scripts
remove
number
<field name>
<length>
<error queue name>
Places a unique number in a specified name of each scanned story
when the story is moved or duplicated to a new location. The
command should include the field name in which the number is placed,
the length in digits of the number (from 1 to 5), and the name of an
error queue where stories can be placed if the number cannot be
inserted in their forms.
n
The error queue name may be formatted using the strftime syntax and
will be automatically created if it doesn’t exist.
Depending on how many digits you specify, the story number can
range as high as 65535, at which point it resets and starts over at 1. The
number is also reset to 1 each day at midnight. Specifying fewer digits
results in the number rolling over at 9, 99, 999, or 9999. The number is
reset at startup. The version of the story with the number in it does not
replace the original story in the scan queue.
The numbered story is used for all operations in the scan set that
follow the number command. So, if a dup comes before the number
command in the scan set, the story duped is the story from the source
queue. If a move or dup comes after the number command in the
scan set, the numbered story is used for the move/dup.
417
Chapter 13 Servers
Processing Deleted Stories
Ordinarily, servers process stories that are deleted from their scan queues.
This counts as a modification. To override this function so that the server
takes no action when a story is deleted, you can include the ignore-del
command in the job list, preceding any scan lines that you want to ignore
deleted stories.
To switch back to the default handling of deleted stories later in the job list,
include the send-del command at that point.
Ordered Queues and the Order Command
Action servers and tx links can order queues by using the order
command in the job list command set. When dup, move, or replace
commands are specified while the order option is enforced, the destination
queue will be ordered to mirror the scan queue. The order command can
be turned on or off. The format is:
order [yes | no]
The yes option turns on the order command and the no option turns it off.
The order command is reset (turned off) at the start of each new scan set
within the job list story.
n
The order command cannot be placed between open and put
commands, which are used by tx links. Otherwise, it can appear anywhere
within a scan set to control the ordering of queues. Both open and put
commands can appear between order yes and order no commands
Here is an example of the order command used in an action server’s job
list story:
scan
scan
418
main.rundown.6pm all
order
dup slave1.rundown.6pm
order no
dup archive.rundown.6pm
order yes
dup slave2.rundown.6pm
main.rundown.11pm
;all option on
;order turned on
;will be ordered
;order turned off
;not ordered
;order turned on
;will be ordered
;all & order off
Job Lists: Queues, Stories, and Commands
Defining Mailbox Tasks
For a server program to respond immediately to changes in a queue, you
must set up mailbox tasks, by assigning the same mailbox number to the
server and queue you want it to watch. Otherwise, the server will not know
when changes are made to the queue.
As long as no stories are added to or changed in that queue, the server is
inactive or “asleep.” However, when a story is modified in or added to that
queue, the system wakes the server by notifying it through the mailbox. On
notification, the server program checks its job list for mailbox tasks. For
each mailbox task, it searches each scan queue to find modified stories and
then executes the instructions in it and goes back to sleep.
A server places some additional load on your system when it wakes and
executes a task. With mailbox tasks, you have no control over when the
server wakes up. Use this kind of task only when the server must act as
soon as a story is added to or modified in a particular queue.
In cases where the action can wait until a time when system use is light,
use timed-interval tasks, following the instructions in “Defining TimedInterval Tasks” on page 423.
n
All mailbox tasks must precede any timed-interval tasks in a job list. If a
queue identified in a timed-interval task has the server’s mailbox assigned
to it, the server is awakened when changes are made to the queue but the
queue is not scanned. That queue is scanned only at the designated time.
The server scans all mailbox task lists whenever it wakes up.
Using Mailboxes
The server program and the queue it watches must share the same mailbox.
There are two kinds of mailboxes: reserved and standard.
•
Reserved mailboxes are used with special server programs reserved for
system functions. See “Reserved Mailboxes” on page 421 for more
information.
419
Chapter 13 Servers
•
n
Standard mailboxes are used by server programs you can configure,
such as action servers. There are 4096 standard mailboxes available,
numbered 1 through 4096. When you create a server, choose a mailbox
number that is the same as the server’s device number.
These mailboxes are not related to your system’s electronic mail feature,
but are activation mechanisms or “signal carriers” by which servers are
notified to perform predefined tasks.
When the system detects that a story has been modified in or added to a
queue, such as PHONELISTS.PEOPLE, it checks to see if a mailbox is
assigned to the queue. If so, it notifies any utility program sharing that
mailbox that a change has occurred in the queue. That message causes the
utility program (in this case, an action server) to perform the task you have
assigned to it, such as duplicate information from
PHONELISTS.PEOPLE to PHONELISTS.ALL.
Several queues can be linked to a single server just by sharing the same
mailbox number as the server program.
The following is an example of how the mailbox tasks would appear in the
job list for the action server.
scan
scan
scan
scan
scan
420
phonelists.agencies
dup phonelists.all
phonelists.staff
dup phonelists.all
phonelists.sports
dup phonelists.all
phonelists.people
dup phonelists.all
phonelists.courts
dup phonelists.all
Job Lists: Queues, Stories, and Commands
Mailboxes are not limited to action servers, but can apply to other utility
programs, such as distribution, parallel, or keyword servers. For instance,
the WIRES.ALL queue can be assigned the same mailbox number as a
distribution server, or you could set up a WIRES.AP-SEARCH queue in
Wires with the same mailbox number as the keyword server.
The mailbox is an activation mechanism for a server program, so if a queue
has a mailbox number matching a server program, then that server is the
one activated or “awakened” whenever something happens to the queue.
Reserved Mailboxes
Reserved mailboxes are used only with servers reserved for your system to
use. Each of these mailboxes links a specific system queue or directory to
the server that watches that queue. Each queue that needs a reserved
mailbox was assigned the correct one when your system was installed. The
information presented here is intended to help you understand how your
system uses these reserved mailboxes. Unlike standard mailboxes, reserved
mailboxes are referred to by name, not by number. The name and purpose
of each of the reserved mailboxes appears in the following table.
Mailbox
Purpose
All
Assigned to a queue used by your system to notify all users when
an event occurs. The All mailbox should be assigned to the queue
where urgent wire stories are sent.
Distribution
(dist)
Assigned to the queue containing your system’s distribution story
for wires (usually SYSTEM.WIRES.DISTRIBUTION). This
mailbox is used by the server program, known as the distribution
checker.
Group
(grp)
Assigned to the system’s group queue (SYSTEM.GROUPS). This
mailbox is used by the server program, known as the group
checker, which checks your system’s group description stories for
errors.
Keyboard
(key)
Assigned to the directory that contains your system’s keyboard
stories (usually SYSTEM.KEYBOARDS). This mailbox is used by
the server program, known as keyboard checker, which checks
your system’s keyboard description stories for errors.
421
Chapter 13 Servers
Mailbox
Purpose
Keyword
(kwd)
Assigned to the queue with your system’s keyword stories
(usually SYSTEM.WIRES.KEYWORDS). This mailbox is used by
the server program, known as the keyword checker, which checks
your system’s keyword stories for errors.
Assigning a Mailbox to a Queue
To set up a particular server, you must assign a standard mailbox for that
server to associated queues.
To assign a mailbox to a queue:
1. Choose a mailbox number (1 through 4096). This number should
match the server’s device number.
a. Use the list c command at the console to ensure no other
device is using the mailbox number you have chosen.
For instance, to check mailbox 201, type:
list mailbox=201 c
Information similar to the following appears:
DEV DEVICE_TYPE COMPUTER CCU
PRINTER SPEED
OPTIONS
DEVNAME
b. If you see the device configuration header (as shown in step 1a)
with no information below it, then no device has that mailbox and
you can use that number. However, if configuration information
for a device appears below the header, that device has the same
mailbox as the one you chose. Therefore, choose another mailbox
number and repeat step 1a.
n
Multiple queues can share the same mailbox number. To list all queues and
directories in the database with a certain mailbox, use this format of the
list d command: list mail=<mailbox number> d
c. Log in to iNEWS Workstation as system administrator.
d. Assign the mailbox database trait to the queue.
422
Job Lists: Queues, Stories, and Commands
Mailboxes are assigned to queues in the same way other database
traits are—using the Queue Properties dialog box, as explained in
Chapter 5. See “Changing Database Traits” on page 117,
“Database Traits Summary” on page 120, and “Maintain Tab” on
page 133 for more information.
Defining Timed-Interval Tasks
Timed-interval tasks allow you to specify what time you want an action to
take place. For instance, you may want an action server to watch a queue
but not do anything to the new or modified stories until a time when system
use is light. Alternately, you may want an action server to monitor a queue
and wait until everyone is done using that queue before performing some
action on new or modified stories. Timed-interval tasks are also used with
rundown mirroring. See “Mirroring Rundowns” on page 434 for more
information.
In addition to action servers, timed-interval tasks are also associated with
tx links. However, this type of task is not used by other server programs,
like distribution and parallel servers. Unlike a mailbox task, a timedinterval task acts like an alarm clock and wakes the server at a time you
specify. On waking, the server examines the queues associated with that
timed-interval task. If there are any new or modified stories in these
queues, the server executes the commands in the tasks.
n
All mailbox tasks must precede any timed-interval tasks in a job list. If a
queue identified in a timed-interval task has the server’s mailbox assigned
to it, the server is awakened when changes are made to the queue but the
queue is not scanned. That queue is scanned only at the designated time.
The server scans all mailbox task lists whenever it wakes up.
For instance, you may create a timed-interval task that wakes the server at
3 A.M. to look for scripts added to or modified in the SCRIPTS.TODAY
queue in the last 24 hours. If the server finds any, you could instruct it to
move them to SCRIPTS.HOLDING.
423
Chapter 13 Servers
When you create a timed-interval task, you must begin it with the time
interval in which you want it to execute. To create the time interval you
want, use one or more of the following job list commands:
at
<hh:mm>
Sets the time of day when you want the task to wake up the server. Set
the time in hours and minutes using a 24-hour clock where 12 A.M.
(midnight) is 00:00 and 12 P.M. (noon) is 12:00.
For instance, at 3:30 wakes the server at 3:30 in the morning. If the
time is after midnight but before noon, you do not have to put a 0 in
front of the hour.
every
<D.HH>
every followed by a number of days and hours (in D.HH format)
specifies an interval you want the task to follow when waking the
server. For instance, every 0.12 wakes the server every 12 hours.
on
Names of the days of
the week are defined in
/site/dict/words.
<day> [<day>...]
Names the day or days on which you want the task to wake up the
server. For instance, on mon tue wakes the server on Monday and
Tuesday only.
You can combine these commands to create very specific time intervals.
For instance, to create a timed-interval task that executes every weekday at
10 A.M., begin the task with the following time interval:
at 10:00
ON mon tue wed thu fri
Example of Timed-Interval Tasks
Here is an example of how an action server’s job list uses timed-interval
tasks to move old scripts out of each show’s script queue after the show has
aired:
1. Separate timed-interval tasks for each show wakes the server 15
minutes after the show has aired. Because the three shows are not aired
on weekends, the timed-interval tasks wake the server only on
weekdays.
2. The morning show ends at 8 A.M., so have the first timed-interval task
wake the server at 8:15 A.M. and move the scripts in
SHOW.MORNING.SCRIPTS to SCRIPTS.TEMP-ARCHIVE.
424
Action Servers
3. The noon show ends at 1 P.M., so have the second timed-interval task
move the scripts in SHOW.NOON.SCRIPTS to SCRIPTS.TEMPARCHIVE at 1:15 P.M.
4. The evening show ends at 6 P.M., so have the third timed-interval task
move the scripts in SHOW.EVENING.SCRIPTS to
SCRIPTS.TEMP-ARCHIVE at 6:15 P.M.
Each timed-interval task must begin with a time interval indicating when
you want it to wake the server. This is followed by a scan line identifying
the queue you want the server to examine on that day and time. Finally, the
scan line is followed by one or more tasks to be performed on stories in
that queue at that time.
You can have multiple command sets controlled by a single timed-interval.
In this example, the finished tasks look like this:
at 8:15
on mon tue wed thu fri
scan show.morning.scripts
move scripts.temp-archive
at 13:15
on mon tue wed thu fri
scan show.noon.scripts
move scripts.temp-archive
at 18:15
on mon tue wed thu fri
scan show.evening.scripts
move scripts.temp-archive
Action Servers
An action server is a general-purpose utility program that automatically
performs specified routine tasks, such as moving or copying stories added
to or edited in certain queues, according to a job list you define. One action
server can perform multiple tasks not necessarily related to each other.
425
Chapter 13 Servers
•
Example: You want an action server to update a phone list. You have
organized several queues as phone lists:
PHONELISTS.AGENCIES, PHONELISTS.COURTS,
PHONELISTS.STAFF, PHONELISTS.SPORTS, and
PHONELISTS.PEOPLE. Additionally, you have created another
queue as a master phone list, PHONES.ALL, that holds all numbers in
the individual source phone queues. What you want the action server
to do is have PHONES.ALL updated whenever anyone adds or
changes a number in one of the source phone queues.
•
Example: You also want the action server to make a daily archive of all
the scripts used in your morning, noon, and evening news shows. After
each show, you want to move scripts in that show’s script queue to the
queue SCRIPTS.ARCHIVE-TEMP. At the end of the day, you want
to move everything in this queue to an archive queue named
SCRIPTS.MAY.01 on May 1, SCRIPTS.MAY.02 on May 2, and
so forth. You want the action server to automatically perform all of
these activities for you, rather than having to do them manually.
•
Example: You want to replicate data from a primary queue to a backup
queue, including any story additions, deletions, modifications, and
reordering, on the same system or through a tx link to another system’s
iNEWS Server or to an external third-party FTP server.
In the first bulleted example, mailbox tasks are required to achieve the
desired results. The server shares the same mailbox of the queue(s). See a
visual representation of how an action server uses mailbox tasks to
maintain a master phone list on page 420.
In the second example, timed-interval tasks are needed. See “Example of
Timed-Interval Tasks” on page 424 for another example of an action server
using timed-interval tasks to archive scripts. A timed-interval action server
operates on a queue at specified times without requiring a shared mailbox.
In the final example, polling is required for the rundown mirroring process.
See “Mirroring Rundowns” on page 434 for more information.
426
Action Servers
Adding an Action Server
Action servers can perform multiple or single tasks. They can be timerelated or respond to a system change. In this section, we will outline a
procedure where we will create an action server that performs the
following activities:
•
Update the master phone list as soon as anyone makes a change to any
of the source phone lists
•
Move each show’s scripts to SCRIPTS.ARCHIVE-TEMP at the end
of the show
To add an action server to your system:
1. Choose a device number and mailbox number for the server which will
also be used for associated queues.
2. Add the server (utility program) to the configuration file on each
iNEWS Server—such as servers A and B—in your system. For
instance:
server 256 action 256 - ;action server
Details for this step are provided in “Adding a Server Program to the
System” on page 409.
3. Create a job list queue in the Configure folder of the System directory
in the iNEWS database. The queue’s name, such as 256, is the number
selected in step 1. For instance, the full pathname is
SYSTEM.CONFIGURE.256.
n
Since the action server has a number of tasks, you can end the name with a
hyphen and a descriptive word, such as “general.” The pathname would
then look like: SYSTEM.CONFIGURE.256-GENERAL. See “Creating a
New Queue” on page 103 for more information.
4. Create a job list story with tasks for the server.
a. Open the job list queue, such as SYSTEM.CONFIGURE.256.
b. Create a new story, the first in the job list queue, to hold the action
server’s job list. See “Creating a New Story” on page 106 for more
information.
427
Chapter 13 Servers
See “Defining Tasks
for Servers” on
page 413 and “Job List
Commands” on
page 627 for more
information on tasks
and job list commands.
c. Add tasks that you want the server to perform; mailbox tasks first,
followed by timed-interval tasks. Ensure that each task in the job
list story has a scan line identifying a queue to scan, followed by
job list commands the server should execute if stories have been
added to or modified in the task’s scan queue.
Here is a job list story with mailbox tasks:
Here is a job list story with timed-interval tasks added:
n
428
You can have one server watch many different queues by putting a separate
task for each queue in the server’s job list. You can have one server
perform several tasks or have separate servers perform each task,
depending on the task. The number of jobs—a job is a scan plus the actions
for that scan—for a mailbox activated server should be as small as
Action Servers
possible because a change in a single queue could cause the server to do a
lot of work; when activated it will scan all queues in the job list, excluding
timed actions.
Ideally each queue should have a server, but because of system resource
limitations, this organization is rarely possible. Group queues according to
the rate they are generally updated (rarely, moderately, or frequently) and
assign servers to the groups.
5. Assign mailbox database traits, using the number matching the
mailbox assigned in step 2 on page 427 to the server in the
configuration file, to the appropriate queues.
a. Open the Queue Properties dialog box for a scan queue, such as
PHONELIST.AGENCIES. See “Changing Database Traits” on
page 117 for more information.
b. Click on the Maintain tab. See “Maintain Tab” on page 133 for
more information.
c. Select the Standard radio button.
d. Type in the mailbox number, such as 256.
e. Click OK to save changes.
6. Test your configuration changes. See “Testing the Site Configuration
File After Changing” on page 273 for more information.
7. Reconfigure the system. See “Incorporating Configuration Changes”
on page 274 for more information. When adding server programs, you
do not need to stop anything to reconfigure the system.
8. Start the server program using the following command format:
restart <device#>
For instance:
NRCS-A$ restart 256
9. (Optional) Back up site files.
429
Chapter 13 Servers
Assigning Field Validation
See “Adding Rx/Tx
Links” on page 531 for
more information.
Validation is an option for use with action servers and tx links. With it, you
can provide an action server or tx link with a list of acceptable values for
certain fields. When the action server or tx link processes a story, it checks
the contents of these fields to make sure each contains an entry you have
defined as acceptable for that field.
If all fields that you want checked contain acceptable entries, the server or
tx link continues to process the story according to the command set for the
task it is executing. However, if one of the fields you want checked
contains an invalid entry, the action server or tx link puts the story in an
error queue and ignores the remaining commands in the task.
Background and Possible Uses of Validation
Validation is designed to help users attach accurate distribution codes to
stories before sending them to a distribution server. See “Distribution
Servers” on page 440 for more information. Part of its function is to
combine entries in each field it checks into a distribution code. If all fields
contain acceptable values, it attaches that code to the story. You can have
the action server or tx link use a move or dup command to overwrite this
code with another one.
See “Assigning
Distribution Codes” on
page 441 for more
information.
This way, a user can put a code the user wants to attach to a story in one of
the story’s fields. The user can send the story to an action server or tx link
that is set up to check that field. If the field contains a valid distribution
code, the action server or tx link attaches that code to the story and sends
the story to a distribution server. Otherwise, it sends the story to an error
queue and notifies the user of the error.
You can also use validation to allow people to enter different parts of a
distribution code in different fields. If the action server or tx link
determines that these fields contain acceptable values, it combines the
contents of the fields into a distribution code, which it attaches to the story
before sending it to a distribution server.
Though validation was designed primarily to help create accurate
distribution codes, you can use it anywhere you need to have an action
server or tx link verify the contents of one or more of a story’s fields before
430
Action Servers
processing the story. For instance, you could use validation to have an
action server check the created by and modified by fields in each story it
processes to ensure that it accepts only stories created or modified by
certain users.
It could also be used to rid the rundown of unwanted pages before
archiving by searching for a specific string in a field and removing any
stories with that string. Any stories the producer did not want or need to
archive could be coded with that string and later stripped from the rundown
by a timed-interval action server using validation.
Using Validation with Action Servers or Tx Links
You can use validation with an action server or a tx link. Adding validation
to either uses the same process.
In the example, we set up the tx link to send stories marked with a
distribution code that indicates whether they are news or sports stories and
whether they are intended for television or radio. First, create a form that
writers can use to mark stories as either news or sports stories and indicate
whether they are intended for television or radio.
The writer indicates whether the story is for television or radio by typing
either tv or radio in the TV/RADIO field. Likewise, the writer indicates
whether the story is a news or sports story by typing either news or
sports in the NEWS/SPORTS field.
The tx link that we set up checks each of these fields. If it determines that
both contain valid entries, it combines the contents of these fields into a
distribution code. Then it attaches that code to the story and sends the story
to the affiliate.
Using the Validation Feature
To use the validation feature with a server, create a validation story that
contains the instructions you want the server to use for validation. This
story can be in any queue (such as SYSTEM.VALIDATION).
431
Chapter 13 Servers
The validation story consists of one or more verification instructions. Each
verification instruction identifies a field you want the server to check and
specifies a list of values that field is allowed to contain. The format for a
verification instruction is:
verify <field name> <length> [ignore]
<list of allowed values for the field>
1. Begin each verification instruction with the word verify followed by
the name of the field you want to check. For instance, put title here
to check a TITLE field.
2. Specify the number of characters you want to check in that field. For
instance, to check three characters, type 3. The server compares only
the first three characters that appear in that field against the list of
acceptable values for the field.
This number also controls how many characters in a field are used in
the distribution code. If you specify three, only the first three
characters in the field are used. The server converts any space
characters (trailing or embedded) to hyphens so that it can add them to
the distribution code.
3. (Optional) Use the ignore validation story in an instruction to
indicate, if the field is validated, the server should skip validation of
the other fields and build the distribution code as if all fields contained
acceptable values. If a preceding field failed validation, the story will
be considered invalid.
If the field fails verification, the server moves to the next field to be
verified and does not consider the story to be invalid. You can use
ignore only once in a validation story.
4. List the values you allow for the field. The value list must start on the
line following the verify command.
If you list more than one value, separate them with spaces. List as
many values on as many lines as necessary. Include + and - characters
to indicate ways in which you want the field to be checked.
432
•
A plus sign (+) means the field can be blank.
•
A minus sign (-) means the field can be any value except blank.
Action Servers
•
n
A plus and minus sign (+ -)used together means that any value is
acceptable for the field. This is not the same as using the ignore
option on that field.
For clarity, provide more characters for each item in the list of acceptable
values for a certain form than you have specified in the verify line. The
server ignores the extra characters. You can list possible values along with
the + - option, which tells the server to accept anything in that field as
valid. Any values you list in addition are superfluous, but harmless.
Validation Job List Commands
An action server or tx link has a job list that contains a separate task for
each queue you want it to watch. If you want an action server or a tx link to
validate fields, you must put the appropriate validation commands in each
task of the job list where you want it to check the fields.
The validate command must appear after the task’s scan command
Any commands that precede the validate command are processed
before the validate command; therefore, those commands are not
dependent on the outcome of the validation. There are two commands,
ignore and quiet, that alter the behavior of the validate command.
If present, they must preced the validate command to affect it.
quiet no
ignore yes
validate <validation queue name> <error queue name>
These job list commands are described as follows:
quiet no
An action server or tx link that validates fields displays a message only
if it encounters a field that does not contain an acceptable value.
Otherwise, it processes the story. If you include the quiet no validation
instruction in the task, the action server or tx link also displays a
message indicating success whenever it successfully validates a story.
433
Chapter 13 Servers
ignore yes
Occasionally, you may want to create a task that builds distribution
codes from the contents of certain fields, but does not validate those
fields. Include the ignore yes validation instruction in the task. Then,
the action server or tx link accepts whatever appears in the fields you
have it check.
validate <validation queue name> <error queue name>
The error queue name
is subject to
strftime formatting.
Include this instruction in the task for the action server or tx link to
validate fields when it executes the task. This instruction must begin
with the word validate followed by the queue containing the
validation story that you want the server to use with that task. Then, list
the error queue where you want the action server or tx link to place
stories that it cannot validate.
If you use either ignore yes or quiet no, they must precede this
instruction.
Mirroring Rundowns
Rundown mirroring takes what’s written in a primary queue and copies it
to a backup queue like a one-way mirror. All production
activities—conducted only in the primary queue—including story
additions, deletions, modifications, and reordering are replicated to the
backup queue by a timed-interval action server configured for polling.
Rundown mirroring is also available for tx links.
c
Conducting production activities directly into the backup queue is not
supported and may cause undesirable behavior. Avid suggests
assigning a restricted write group, such as “nobody-writes” to all
designated backup queues. This write group restriction will not
prevent the timed action server from completing its polling and
replicating tasks.
Additional guidelines for mirroring rundowns:
434
Features
Primary Rundown
Backup Rundown
Story and Queue forms
Same as Backup
Same as Primary
Action Servers
Features
Primary Rundown
Backup Rundown
Mailbox number
Different that Backup
Different than Primary
n
Rundown mirroring allows for two monitor
servers to load data from identical
rundowns to separate ControlAir Servers,
possibly controlling separate video servers.
For this to work, each rundown is linked to a
separate monitor servers through different
mailbox numbers.
Must have a purge
interval that ensures the
previous day’s contents
are purged prior to
production and rundown
mirroring the next day.
Purge interval
May have a zero purge
interval to allow
producers to manually
delete the previous day’s
contents.
Update trait
No update trait enabled. Must have the update
trait enabled.
Polling for Action Servers/Tx Links
Two job list commands, poll and bpoll, allow iNEWS to poll a local
source queue for a specified duration of time at specified intervals. The
source queue is scanned at every interval and stories with modified times
greater than the time of the last scan are processed. Polling stops when the
system time is greater than the time of the initial poll plus the polling
duration. The poll command scans the queue in a forward direction,
while bpoll scans the queue in a reverse direction. The syntax for both
commands is as follows:
poll/bpoll <queue name> [<polling interval> [<polling
duration>]]
If the polling interval and/or polling duration are omitted, a single scan of
the queue will be done. The syntax for the polling interval and polling
duration is hh:mm:ss, mm:ss, or ss. For the hh value, the range is 0 to
23. For the values of mm and ss, the range is 0 to 59. Both commands are
435
Chapter 13 Servers
restricted to a timed action set. They are not available as mailbox triggered
actions.
Configuring Rundown Mirroring
To configure rundown mirroring:
1. Determine what action servers are configured on your system and are
available to be used for rundown mirroring. You can use the grep
command to pull out all the lines from the /site/config file that
have the word "action" in them:
NRCS-A#
server
server
server
server
server
server
server
grep
243
244
245
251
252
253
254
action /site/config
action
243 action
244 action
245 action
action
action
action
-
;
;
;
;
;
;
;
timed-action
timed-action
timed-action
timed-action
In the example above, seven action servers are outlined in the
configuration file. Those numbered 251 - 254 have no mailbox
assigned to them, having a dash in the fourth column. Normally action
servers are linked via a shared mailbox number to a queue. But that is
not necessary for timed-interval action servers. For the purposes of this
procedure, 252 will be used.
2. Create a job list queue for the timed-action server in the
SYSTEM.CONFIGURE directory. Its name must start with the number
of the server, then a hyphen, then a descriptive name. For instance, any
of the following would be valid queue names for an action server
numbered 252.
SYSTEM.CONFIGURE.252-ACTION
SYSTEM.CONFIGURE.252-MIRRORING
SYSTEM.CONFIGURE.252-10PM-NIGHTCAST-MIRROR
SYSTEM.CONFIGURE.252-TIMED-ACTION
Action server 252 will look for it's job list in the queue you create. The
job list is a listing of commands the action server will perform. See
“Creating a New Queue” on page 103 for more information.
436
Action Servers
3. Create a new story in the queue, if one does not exist, and start writing
the job list. Here is a sample job list for action server 252:
at 20:30
poll SHOW.10PM-NIGHTCAST.RUNDOWN 00:00:05 3:30:00
order yes
dup SHOW-MIRROR.10PM-NIGHTCAST.RUNDOWN
n
Timed-interval action servers work off the iNEWS Server's clock. All times
must be listed in 24 hour military time. So, 20:30 in the above example
instructs the action server to begin at 8:30 PM.
The sample action server is instructed to poll the Nightcast rundown
queue once every 5 seconds (00:00:05) for a total of three and a half
hours (3:30:00) before automatically turning off at midnight (20:30
start time + 3:30:00 duration).
You may use the bpoll command instead of poll to instruct the
action server to begin the scan at the opposite end of the queue, in
which case the second command line of the job list would appear as
follows:
bpoll SHOW.10PM-NIGHTCAST.RUNDOWN 00:00:05 3:30:00
The order yes command ensures that re-ordering events in the
polled queue get transmitted to the backup queue. Without this, the
timed-interval action server would not pick up any reordering of the
rundown by the producer. The primary rundown queue and the backup
rundown queue would have the same stories, but they would not be in
the same order after the sequence of stories was changed in the
primary rundown. See “Ordered Queues and the Order Command” on
page 418 for more information.
n
The order yes command is only relevant when polling to or from an
iNEWS Server. It is not possible to "order" stories mirrored through a tx
link to an external, third party FTP server.
437
Chapter 13 Servers
Over-lapping Job Lists
Each joblist in a SYSTEM.CONFIGURE queue can have more than one
polling instruction servicing more than one rundown. For example, the job
list for timed-interval action server 252 may look like this:
at 09:30
poll SHOW.NOON.RUNDOWN 00:00:05 3:30:00
order yes
dup SHOW-MIRROR.NOON.RUNDOWN
;
at 15:30
poll SHOW.6PM.RUNDOWN 00:00:05 3:30:00
order yes
dup SHOW-MIRROR.6PM.RUNDOWN
;
at 20:30
poll SHOW.10PM-NIGHTCAST.RUNDOWN 00:00:05 3:30:00
order yes
dup SHOW.10PM-NIGHTCAST.RUNDOWN
The only restriction is that none of the polling actions in a job list for a
single timed-interval action server can overlap. Since the Noon show
begins at 09:30 and runs for three and a half hours, polling won't be done
until 1 PM (or 13:00). So another show cannot be scheduled to start in
this job list until after 1 PM.
If an overlap in polling is necessary, separate job lists for separate timedinterval action servers are required.
Polling Issues Related to Tx Links
Rundown mirroring may be used to poll rundown queues in an iNEWS
system and replicate the data to another system’s iNEWS Server or to a
third-part FTP server. The guidelines for mirroring still apply, such as
overlapping job list restrictions, purge intervals, and update traits. See the
table on page 434 and “Over-lapping Job Lists” on page 438 for more
information.
438
Action Servers
The follow are examples of job lists for rundown mirroring through a tx
link:
at 15:55
poll SHOW.4PM.RUNDOWN 00:00:05 1:00:00
open myftpserver user3 html system.webforms.s.scripts
put /shows/4pm
The above example would begin polling the SHOW.4PM.RUNDOWN at
3:55 PM, at five-minute intervals for one hour, then open a connection to an
external FTP server using the name, user3, and place stories in the
/shows/4pm folder in HTML format based on the HTML skeleton
outlined in the SYSTEM.WEBFORMS.S.SCRIPTS queue. See “Web
Publishing” on page 542 for more information.
n
FTP servers do not order stories, so that command line is not valid. Also,
the username in the job list (user3, in the above example) must exist as an
account in the iNEWS database and on the external FTP server. It must
have the same password on both systems, and have proper permissions on
the FTP server to create and overwrite files. If the user account is only
used for tx links, it may be blacklisted on the iNEWS Server to prevent it
being used for actual logins.
at 15:55
poll SHOW.4PM.RUNDOWN 00:00:05 2:00:00
order yes
open AVID-A transmituser nsml
put SHOWS.MADISON.4PM.RUNDOWN
n
News Story Markup Language (NSML) is the default format for
transmitting to iNEWS Servers, so the nsml on the open command line is
optional. Also, the pathname for the put command line uses periods (.)
when transmitting between iNEWS systems, unlike the slashes (/) used
when transferring to an FTP server.
439
Chapter 13 Servers
Distribution Servers
A distribution server is used to route stories based on their distribution
codes. Distribution codes are text strings of up to 32 characters which you
can assign to your stories. A distribution code that is longer than 32
characters is truncated to 32 characters before being assigned to the story.
When you assign a distribution code to a story, you overwrite any
distribution code that story may already have.
Distribution servers are usually used by large stations or networks who
write their own wire stories and send them to their affiliates. By attaching
distribution codes to these stories, their affiliates can distribute the stories
to appropriate queues.
Distribution servers can also monitor a queue. When a new story is added
to a queue, the distribution server will move the story to another queue
based on the distribution code and instructions you assign.
NEWSWIRE.IN
Distribution server checks
each story moved into any
queue it watches.
Then it moves the story to
another queue depending on
the story’s distribution code.
“toradio”
“toetc”
“totv”
NEWSWIRE.RADIO
NEWSWIRE.TV
NEWSWIRE.ETC
Also, distribution instructions in a distribution story can use the same
always, silent, urgent, flash, and bulletin options that wire
service distribution instructions use. These options must appear at the end
of the distribution instruction if you use them.
440
Distribution Servers
n
A distribution server is different from an action server in that it will always
remove each story from the source queue after distributing it. An action
server depends on the move and remove commands.
Assigning Distribution Codes
To create a distribution instruction that matches more than one distribution
code, use a wildcard. A wildcard is a special character (a pound sign (#) in
this case) that matches any character.
For instance, the following distribution instruction tells the distribution
server to match all code that begin with “tv” and send the story to
INEWSWIRE.TVNEWS:
tv#
inewswire.tvnews
When the wildcard character is placed at the end of the pattern, the
distribution server interprets it as an instruction to match all remaining
characters. If it occurs anywhere else in the pattern, the distribution server
matches only characters that occur in that position.
•
tv# – matches anything that begins with tv
•
AP#a – matches any code that begins with AP and contains the letter a
in the fourth position.
When the distribution server is trying to match a story’s code to an
instruction line, it stops at the first line that matches. It then looks for only
those lines in the story that have a pattern exactly like that line.
Suppose you have the following two instructions, and the distribution
server is trying to match a story with distribution code tvsports.
tv#
tvsports
inewswire.all
inewswire.tvsports
The distribution server matches the first instruction that contains the
pattern tv#, and then it looks for any other line that also contains the
pattern tv#. In this case, there is no such line, so it sends the story to
INEWSWIRE.ALL and not to INEWSWIRE.TVSPORTS.
441
Chapter 13 Servers
If you use just a wildcard character as a distribution code, that instruction
should come at the end of the job list story. For instance, to create an
instruction that handles all stories with distribution codes that do not match
any other distribution instructions. After the server matches a wildcard
only, it stops looking for additional matches for the story.
Using Wildcards and the Destination Queue
You can also use a wildcard as a part of a distribution instruction’s
destination queue. Whenever the distribution server uses that instruction
line, it replaces the wildcard with the distribution code attached to the story
it is processing.
For instance, suppose that your distribution story has the following
instruction line:
tvnews
inewswire.#
In this case, whenever it processes a story with the distribution code
tvnews, it uses this line. In doing so, it uses the story’s distribution code in
place of the wildcard in the destination queue and distributes stories with
the distribution code tvnews to INEWSWIRE.TVNEWS.
This is most useful when you also use a wildcard in the instruction’s
distribution code. You can create an instruction that handles stories with
several different distribution codes.
For instance, suppose you want your distribution server to send stories with
the distribution code tvnews to INEWSWIRE.TVNEWS and stories with
the distribution code tvsports to INEWSWIRE.TVSPORTS. You can
do this with a single instruction if you use a wildcard in the instruction’s
distribution code and destination queue:
tv# inewswire.#
This instruction causes the server to copy each story with the distribution
code tvnews to INEWSWIRE.TVNEWS. Likewise, it causes the
distribution server to copy each story with the distribution code
tvsports to INEWSWIRE.TVSPORTS.
442
Distribution Servers
n
If you try this, ensure that what gets substituted into the wildcard portion of
the destination queue forms the pathname of an existing queue. Otherwise,
the server cannot copy stories to that queue and sends them to
SYSTEM.UNKNOWN, or the default error queue you named.
From the Command Line
When moving or dup’ing stories from a session on an iNEWS
Workstation, you can use the move and dup commands to attach a
distribution code to a story. If people on your system use these commands
frequently to attach distribution codes to stories, you can publish the codes
that you want them to use.
Using an Action Server or Tx Link
Tx links are explained
in “Network iNEWS
Systems Using Rx/Tx
Links” on page 528.
You can attach distribution codes to stories that you send to a distribution
sever using an action server or a tx link. There are two ways to use action
servers and tx links to do this.
•
Dup or Move commands
•
Validate commands
Using Dup or Move Commands in Job Lists
You can use the move and dup commands in action server and tx link job
lists to attach distribution codes to the stories those servers process. For
instance, the following job list shows how you may have an action server
attach a distribution code to any story added to TVNEWS.OUT:
scan tvnews.out
dup inewswire.send tvnews
The job list tells the server to attach the code tvnews to each story it
handles and then copy the story to INEWSWIRE.SEND.
Use this method to automatically assign a particular distribution code to
every story added to a particular queue. If you need more flexibility in how
the server assigns codes, see “Assigning Distribution Codes” on page 441.
443
Chapter 13 Servers
Using Validate Commands in Job Lists
Action servers and tx links support a feature called validation. This feature
allows you to have an action server or tx link extract a distribution code
from a story’s form and check whether it is a valid code. If the code is
valid, the server attaches it to the story and sends the story to the
distribution server. If the code is invalid, the server puts the story in an
error queue and notifies the user. Validation is covered in more detail in
“Assigning Field Validation” on page 430.
Instructions in the Wire Distribution Story
A wire program relies on instructions in the wire distribution story to
determine what to do with each story it receives. This allows the wire
program to use each story’s wire service code to determine where to send
the story.
Each wire program can have no more than 150 distribution instructions. If
you need to handle more than 150 codes from a particular wire service, you
can use a distribution server to get around this limit.
Add special distribution instructions to the wire distribution story. These
instructions cause the wire program to look for stories with the wire
service codes that you want the distribution server to handle. The wire
program assigns each story a distribution code that matches their wire
service code and sends them to the distribution server’s source queue.
Those instructions should match the following format. They should begin
with a wire service code that you want the distribution server to handle.
Follow the code with the distribution server’s source queue. You must
follow the destination queue with the TRANSMIT option:
<wire service code> <destination queue name> TRANSMIT
When a story comes in with that wire service code, the wire program gives
the story a distribution code that matches its wire service code. Then the
wire program sends the story to the destination queue specified in the
instruction.
444
Distribution Servers
You can use options such as ALWAYS, SILENT, and URGENT with the
TRANSMIT option. A distribution instruction that assigns stories
distribution codes matching their wire service codes does not have to send
those stories directly to a distribution server. The instruction can send them
to an intermediate queue and then an action server can send them to the
distribution server.
Matching and Case
When using two or more distribution instructions that begin with the same
code, you must enter the codes in the same case. If you do not, the
distribution server does not execute all the instructions when it receives a
story with that distribution code.
When a distribution server processes a story, it begins by checking whether
the first instruction in its distribution story matches the story’s distribution
code. If not, the server checks the second instruction, and then the third,
and so on, until it finds one that matches the story’s distribution code.
When it finds a match, it sends the story to the queue specified in that
instruction. Then the distribution server does a case-sensitive search on the
remaining instructions in the distribution story to see whether any use
exactly the same distribution code (that is, the same code entered in the
same case) as the instruction that it has matched. If any instructions match,
the server sends the story to the queues specified in those instructions as
well.
For instance, if a distribution server successfully matches an instruction
with a distribution code of tvnews, it looks for other instructions that also
begin with tvnews and sends the story to the queues specified in those
instructions. It ignores instructions that have that code in a different case,
such as TvNews or TVnews.
Matching and Order
The order of instructions is important, especially when you have a
distribution code that also forms the beginning of another distribution
code, such as tv and tvnews. In this case, you need to make sure that
instructions that use the longer code appear before those that use the
shorter code.
445
Chapter 13 Servers
When the distribution server attempts to match an instruction’s code to a
story’s distribution code, it considers that it has a match if the instruction’s
code matches some initial portion of the story’s distribution code. For
instance, the distribution server would match an instruction for code tv to
a story with distribution code tvnews.
After the distribution server has matched an instruction code to the story, it
stops trying to match additional instructions to the story. Instead, it looks
for other instructions that have the same code as the story that it has
matched. It never matches the instructions with the longer codes.
If you had a distribution story with the following instructions in the order
shown below, and if you were to send a story with distribution code
tvnews to this distribution server, the distribution server would match the
first instruction in the distribution story but would never execute the
second:
tv
tvnews
newswire.tv
newswire.tvnews
In this example, the server always matches the first instruction to any story
that has a distribution code that begins with tv. Then it looks for other
instructions that have tv as their code. It never executes the instruction
that has the code tvnews. Always arrange such instructions so that those
with longer codes come before those with shorter codes. That way, only
stories with the distribution code tvnews (or longer) match the first line.
Stories with the code tv fall through the first line and match the
instruction in the second line.
Adding a Distribution Server
To set up a distribution server to watch a queue and distribute stories
placed in a queue:
Details for steps 1 and
2 are provided in
“Adding a Server
Program to the System”
on page 409.
1. Choose a device and mailbox number for the server that will also be
used for associated queues.
2. Add the server (utility program) to the configuration file on each
iNEWS Server—such as servers A and B—in your system.
For instance:
server 257 distribution 257 - ;distribution server
446
Distribution Servers
3. Create a job list queue in the Configure folder of the System directory
in the iNEWS database. The queue’s name, such as 257, is the number
selected in step 1. For instance, the queue’s full pathname is
SYSTEM.CONFIGURE.257.
n
You can end the name with a hyphen and descriptive word, such as
“distribution.” The queue’s full pathname would then look like:
SYSTEM.CONFIGURE.257-DISTRIBUTION. See “Creating a New
Queue” on page 103 for more information.
4. Create a job list story for the server, by doing the following.
a. Open the job list queue, such as SYSTEM.CONFIGURE.257.
b. Create a new story, the first in the job list queue, to hold the
distribution server’s job list. See “Creating a New Story” on
page 106 for more information.
5. Add tasks that you want the distribution server to perform; include a
separate task for each queue the server watches. Each task in the job
list story consists of two lines with the following format:
source <queue scanned by server>
distribution <distribution queue> [<error queue>]
source
Identifies which queue the distribution server should scan. This job
list command is the same as the scan command, used by action
servers. The queue is known as both the scan queue and source
queue.
If you do not specify
an error queue, the
distribution server
sends any such
stories to
SYSTEM.UNKNOWN.
distribution
Specifies the queue containing the distribution story and,
optionally, an error queue for stories whose distribution codes
cannot be processed.
For instance, the job list story may appear like this:
source newswire.in
distribution system.distribution.257 newswire.error
447
Chapter 13 Servers
n
Unlike action servers where the scan queue identifier (scan line), tasks,
and commands (instructions) are located altogether in the job list story, a
distribution server separates the instructions (except for the distribution
command), placing them in another queue and story, called the
distribution queue and distribution story, respectively. The distribution
queue is typically given the same numerical name as its corresponding job
list queue and is located in the SYSTEM.DISTRIBUTION directory.
6. Create the distribution queue and story, by doing the following:
a. Navigate to SYSTEM.DISTRIBUTION. (If this directory does
not exist, create it. See “Creating a New Directory” on page 101
for more information.)
b. Create a new queue, giving it the same numerical name as the job
list queue for the distribution server, such as 257. The full
pathname for the new queue would be
SYSTEM.DISTRIBUTION.257. See “Creating a New Queue”
on page 103 for more information.
c. Open the new queue and create the distribution story.
Each instruction in the distribution story is one line long and has
the following format:
<distribution code> <destination queue> [<options>]
For instance, suppose we know that some stories sent to our
distribution server have tvnews as their distribution code and
others have tvsports. We want the distribution server to send
stories with the tvnews code to INEWSWIRE.TVNEWS and
those with tvsports to INEWSWIRE.TVSPORTS.
In this case, you would type the following two instructions in the
distribution story:
tvnews inewswire.tvnews
tvsports inewswire.tvsports
If you want to send stories that have a certain distribution code to
more than one queue, follow this example:
tvnews inewswire.news
tvnews inewswire.all
tvsports inewswire.sports
tvsports inewswire.all
448
Distribution Servers
The choices for the options parameter are: ALWAYS, BULLETIN,
FLASH, MAIL, SILENT, and URGENT.
7. Assign mailbox database traits, using the number matching the
mailbox assigned in step 2 on page 446 to the server in the
configuration file, to the appropriate source queue(s), as identified in
step 5. For instance, the job list queue is named 257, so that is the
standard mailbox number assigned to queues identified in the job list
associated with the distribution server.
a. Open the Queue Properties dialog box for a scan queue, such as
NEWSWIRE.IN. See “Changing Database Traits” on page 117 for
more information.
b. Click on the Maintain tab. See “Maintain Tab” on page 133 for
more information.
c. Select the Standard radio button.
d. Type in the mailbox number, such as 257.
e. Click OK to save changes.
8. Repeat step 7 as needed for each source queue in the job list.
9. (Optional) Test your configuration changes. See “Testing the Site
Configuration File After Changing” on page 273 for more information.
Details for steps 10-12
are provided in
“Adding a Server
Program to the System”
on page 409.
10. Reconfigure the system.
11. Start the distribution server. For instance, to start a distribution server
with device number 257, type:
restart 257
12. (Optional) Back up site files using sitedump command.
449
Chapter 13 Servers
Parallel Wire Servers
Another use for a distribution server is to help provide backup wire
distribution in case the usual wire distribution fails—if, for instance, the
PCU port receiving the wire goes down. This is accomplished by a
distribution server working in tandem with a parallel wire server.
Incoming
wire stories
Primary wire port
Standard wire
distribution to
Wire queues
Wire
queues
Secondary wire port
Parallel server compares
two sets of stories: Nonidentical counterparts
are forwarded.
Distribution server
distributes stories to
Wire queues.
A parallel wire server works as follows:
The PCUs mentioned
her may be rackmounted PCUs or
PC-PCUs. Wire service
ingest may also involve
the Avid Data Receiver
rather than PCUs.
450
•
The same wire service is received through two different PCU ports:
preferably on two different PCUs on two different iNEWS Servers.
One of these ports uses the standard wire distribution feature, with a
line added to distribute its wires to the parallel wire server. The second
port uses one line in the distribution story, which routes its wire stories
to the parallel wire server.
•
The parallel wire server checks to make sure that each story received
from the secondary wire has a counterpart from the primary port. If a
secondary wire story cannot be matched, it is passed on to a
distribution server. No action is taken on unmatched primary wire
stories, since they were already distributed normally.
•
If the primary wire port fails, each secondary story your system
receives lacks a corresponding primary story, so the parallel wire
server passes each one to a distribution server. This server uses a
Parallel Wire Servers
distribution story nearly identical to the wire distribution story, so
stories are routed to the same queues as with standard wire
distribution. Wire reception thus appears normal to users.
Although using two PCU ports for the same wire may seem like a waste of
a port, this redundancy can be a lifesaver in the long run. However, a
parallel wire server is useful only for problems within the system such as a
PCU port or computer problem. If the reception problem is in phone lines,
satellite antenna, or the wire service distribution box, receiving wire stories
on two PCU ports does not help.
Database Components for Backup Wire Distribution
Only one set of parallel and distribution servers are necessary, even if you
are providing backup for up to ten wires. For backup wire distribution to
work, distribution and parallel servers require certain database
components, which are:
•
A pair of scan queues to hold incoming wire stories for comparison by
the parallel server—typically SYSTEM.PARALLEL.A1 and
SYSTEM.PARALLEL.A2.
•
A queue where the parallel server forwards unmatched stories for the
distribution server to scan—typically SYSTEM.PARALLEL.WIRES
•
A queue containing the wire distribution story for the distribution
server, should it need to take over wire distribution—typically
SYSTEM.PARALLEL.DISTRIBUTION
•
Queues containing job lists used by the parallel and distribution
servers located in the SYSTEM.CONFIGURE directory.
Adding a Parallel Wire Server
A parallel wire server monitors two wire inputs of the same wire on
different PCUs. If the primary source fails, the system will obtain stories
from the secondary. For your parallel wire server to be truly redundant,
each wire of the parallel server must be connected to an independent
source of the incoming service.
451
Chapter 13 Servers
Here, we assume that your site requires continuous reception of the AP
wire, so we set up two wire inputs and a parallel wire server to receive
stories from that wire service.
To add a parallel wire server to the iNEWS system:
Details for steps 1 and
2 are provided in
“Adding a Server
Program to the System”
on page 409.
1. Choose a device and mailbox number for the parallel server which will
also be used for associated queues.
2. Add the server program (server line) to the configuration file on
each iNEWS Server—such as servers A and B—in your system. For
instance:
server 258 parallel 258 - ;parallel server
However, additional editing of the configuration file
(/site/config) is required for parallel servers.
a. You must determine which PCU port is free for use as the second
wire port. If your main AP wire is on port 4 of PCU 10, it would
probably look like this in the configuration file:
wire 14 1200 anpa7 AP - ;AP wire
Wires using the anpa7
program to interpret
incoming stories, such
as AP, restrict device
names to two
characters. A1 and A2
are used in this
procedure.
See “PCU Device
Numbering” on
page 290 for more
information.
Change the device name AP to A1 to avoid name duplication, and
change the comment field at the end of the line to help identify it
as the primary wire port. It should look similar to this:
wire 14 1200 anpa7 A1 - ;primary AP wire
b. Choose an unused port on a different PCU running on a different
iNEWS Server for the secondary wire feed. For instance, if PCU
10 (with its AP wire on port 4) is running on server A, you should
select a PCU running on server B, such as PCU 20. If port 6 is
available on PCU 20, the server program’s device number, 26, is
added to PCU 20’s configuration line:
pcu 20 pcu20 pc 21 22 23 24 25 26
c. Then, the secondary wire line is added, which should look like
this:
wire 26 1200 anpa7 A2 - ;secondary AP wire
452
Parallel Wire Servers
d. Save the configuration file according to step 2e of “Adding a
Server Program to the System” on page 409.
n
Do not reconfigure or restart the wire programs yet. They do not match the
codes in SYSTEM.WIRES.DISTRIBUTION, so all wires would be sent
to WIRES.UNKNOWN.
3. Log in to an iNEWS Workstation. (You must create several queues and
stories, as well as modify some that may already exist.)
4. Create a folder (directory) called Parallel in the System directory. The
full pathname for this folder is SYSTEM.PARALLEL. See “Creating a
New Directory” on page 101 for more information.
5. In SYSTEM.PARALLEL, create four new queues, giving them the
following names: A1, A2, Wires, Distribution. The full pathnames for
these queues will be:
SYSTEM.PARALLEL.A1
SYSTEM.PARALLEL.A2
SYSTEM.PARALLEL.WIRES
SYSTEM.PARALLEL.DISTRIBUTION
See “Database Components for Backup Wire Distribution” on
page 451 for more information on the purpose for each of these
queues. Also, see “Creating a New Queue” on page 103 for
information on how to create a queue.
n
When wires are being distributed normally, the parallel server immediately
removes matching stories from A1 and A2 queues, so purging the queues is
not necessary. If the primary or secondary wire input stops reaching the A1
or A2 queue, automatic removal of stories from either queue stops. If the
parallel server (or the iNEWS Server it is on) dies, both queues continue to
fill up until you run out of space. Finally, if the distribution server dies,
SYSTEM.PARALLEL.WIRES fills up. To prevent these problems, set a
short purge interval (less than six hours) for these three queues: A1, A2,
and Wires. See “Choosing Queues to be Purged” on page 136 for more
information.
6. Assign mailbox database traits to three of the new queues, according to
the following criteria:
453
Chapter 13 Servers
•
SYSTEM.PARALLEL.A1 – shares same mailbox number as parallel
server, such as 258
•
SYSTEM.PARALLEL.A2 – shares same mailbox number as parallel
server, such as 258
•
SYSTEM.PARALLEL.WIRES – shares same mailbox number as
distribution server, such as 257
Mailbox numbers must match the server’s mailbox number, as
indicated in the configuration file. Otherwise, changes in the queue
will not activate the correct server program. To assign the mailbox
database trait to a queue, do the following:
a. Open the Queue Properties dialog box for a queue, such as
SYSTEM.PARALLEL.A1. See “Changing Database Traits” on
page 117 for more information.
b. Click on the Maintain tab. See “Maintain Tab” on page 133 for
more information.
c. Select the Standard radio button.
d. Type in the mailbox number, such as 258.
e. Click OK to save changes.
f.
Repeat steps a-e until queues have assigned mailboxes.
7. Create the parallel server’s job list queue in the
SYSTEM.CONFIGURE directory in the iNEWS database. The queue’s
name, such as 258, is the number selected for the parallel server in step
1. The queue’s full pathname is SYSTEM.CONFIGURE.258.
n
You can end the name with a hyphen and descriptive word, such as
“parallel.” The queue’s full pathname would then look like:
SYSTEM.CONFIGURE.258-PARALLEL.
8. Create a job list story with tasks for the parallel server.
a. Open the job list queue, such as SYSTEM.CONFIGURE.258.
b. Create a new story—the first in the job list queue—to hold the
parallel server’s job list. See “Creating a New Story” on page 106
for more information.
454
Parallel Wire Servers
c. Add tasks that you want the parallel server to perform. Each task
in the job list story consists of three lines, in the following format:
local <queue scanned by server>
remote <queue scanned by server>
distribution <destination queue>
The commands, local
and remote, do not
describe actual queue
locations; both queues
are on the same system.
local
Identifies which queue contains wire stories forwarded to the
parallel server through normal wire distribution. This job list
command is similar to the scan command, used by action servers.
The parallel server will scan the local queue and compare its
contents to those in the remote queue.
remote
Identifies which queue contains the wire stories received through
the secondary wire port. This job list command is similar to the
scan command, used by action servers. The parallel server will
scan the remote queue and compare its contents to those in the
local queue.
distribution
Specifies the destination queue where the parallel server forwards
unmatched stories from the remote queue—the source queue
scanned by the distribution server.
For instance, the job list story may appear like this:
455
Chapter 13 Servers
If the distribution
server has not been set
up, you must create it
as well as its job list
queue and story. See
“Adding a Distribution
Server” on page 446
for more information.
Your system’s wire
distribution queue and
story were included
when your system was
installed.
9. Modify the distribution server’s job list story.
For instance, go to SYSTEM.CONFIGURE.257-DISTRIBUTION
and add the following lines to its job list story:
source
system.parallel.wires
distribution system.parallel.distribution
10. Since you want the distribution server to distribute stories in the same
way as standard wire distribution, copy the system’s wire distribution
story (in SYSTEM.WIRES.DISTRIBUTION) to the
SYSTEM.PARALLEL.DISTRIBUTION queue.
a. Open the first story in SYSTEM.WIRES.DISTRIBUTION.
b. Select Edit > Copy To.
c. Enter SYSTEM.PARALLEL.DISTRIBUTION, the destination
queue.
11. Back up the original wire distribution story in the
SYSTEM.WIRES.DISTRIBUTION queue by making a copy of the
story in that queue.
12. Return to SYSTEM.WIRES.DISTRIBUTION to make the following
modifications:
a. Modify the bottom story (Leave the top copy unchanged, for now)
so your system’s wire distribution sends a copy of every incoming
wire story to the two queues scanned by the parallel server
(SYSTEM.PARALLEL.A1 and SYSTEM.PARALLEL.A2) as
specified in the parallel server’s job list story. To do this, add two
lines (as shown) below the line that sends a copy of each wire story
to WIRES.ALL. It should look like this:
AP########
A1########
A2########
456
wires.all
ALWAYS
system.parallel.a1
system.parallel.a2
URGENT
ALWAYS
TRANSMIT
Parallel Wire Servers
b. Modify every line in the wire distribution story that starts
with AP, changing AP to A1. This makes it possible to tell
whether a given wire story came from standard wire or
parallel server distribution. When you are done, the three
lines in the story should look like this:
A1########
A1########
A2########
n
wires.all
ALWAYS
system.parallel.a1
system.parallel.a2
URGENT
ALWAYS
TRANSMIT
Do not change the last line’s A2 to A1. The A2 indicates the line that
transmits stories to the SYSTEM.PARALLEL.A2 queue.
c. Save the story.
d. Move the modified distribution story (at the bottom) to the top of
the queue, using the order workstation command; this will make
it the primary wire distribution story.
13. Connect the secondary wire to the PCU port.
Before you can receive wires on the secondary wire port, ensure there
is a physical connection to provide those wires. Details vary depending
on the hardware, but in the example you must ensure a wire service
line is connected to the PCU port you listed in the configuration file
(26 in the example). See step 2a on page 452.
This wire service line could come from a DR400 box, an Equatorial
box, or some other kind of signal splitter or multiplexor. Ensure
cabling and connectors are correct. See your hardware installation
manual for details.
14. Reconfigure the system. See “Adding a Server Program to the System”
on page 409 for more information.
15. Restart the original wire port, and the parallel and distribution servers.
You also need to restart the PCU using the new wire program, such as
PCU20.
Ensure you select the iNEWS Server the original wire port, servers,
and PCU are configured on.
NRCS-A$ restart 257 258 20
457
Chapter 13 Servers
You will receive Hot-to-go messages for the devices on PCU 20.
Also, a message similar to the following will appear:
S258: Sat Jun
3 08:22:13 2000 matching system.parallel.a2
The message is from the parallel server and appears when it is started,
indicating the server is alive and comparing the standard wire
reception with wire stories routed to the A2 queue.
If primary reception fails, the parallel server gives the following
message when it wakes up the distribution server:
S258: Sat Jun 3 08:22:13 2000 distributing system.parallel.a2
This message is the only way to tell when the parallel server is
forwarding secondary wire stories for distribution. You can tell if these
stories are being distributed by A2 instead of A1 by checking the wiredistribution codes in the stories.
n
There may not be any indication if secondary wire distribution fails. Check
the local queue (SYSTEM.PARALLEL.A1) occasionally to see if it is
accumulating stories. If so, this would indicate a problem with reception of
the secondary wire.
If there is a problem with something other than the primary wire PCU
port—for instance, if the wire fails in the phone or satellite
connection—the redundancy provided by the parallel wire server cannot
provide continuous wire service reception.
Keyword Servers
A keyword server is a utility program that searches stories it processes for
specific keywords. It distributes copies of each story to different queues,
based on which keywords the story contains. Unlike wire and telex
programs, which are limited to searches that contain no more than 250
unique keywords, a keyword server can perform searches that contain as
many as 1000 unique keywords.
458
Keyword Servers
When you install a keyword server, it runs on one of your system’s iNEWS
Servers, not on a PCU. While this allows the keyword server to handle long
lists of search rules, it also means the keyword server may affect your
system’s performance.
The impact a keyword server has on your system depends on what kind of
equipment your system uses and how much of a load it is carrying. In some
cases, a keyword server will not have any impact at all. In others, there may
be a noticeable reduction in performance. If you find that a keyword server
degrades your system’s performance too much, reduce the amount of
searching the keyword server does.
c
Since keyword servers could affect your system’s performance, use
keyword servers only when wire capabilities are inadequate.
Suppose we have set up a wire program to perform keyword searching on
stories it receives from the Associated Press (AP). Wire programs can only
use 250 unique keywords in searches they perform.
To get around this limitation, a keyword server may be created to help the
wire program, which still searches each story it receives using its own
search rules. However, it also sends a copy of each story it receives to the
keyword server, which in turn searches each copy using its own search
rules. This effectively increases the number of unique keywords allowed to
1250: 1000 for the keyword server and 250 for the wire program.
An instruction is required in the wire distribution story that has the wire
program duplicate a copy of each story it receives to a queue, which the
keyword server watches. Some modification of the wire program’s
keyword job list queue (SYSTEM.WIRES.KEYWORDS) will also be
required.
Database Components for Expanded Wire Keyword Searches
For expanded wire keyword searches to work, the keyword server requires
certain database components. These components are:
•
Queue containing job list used by the keyword server. It must be
located in the SYSTEM.CONFIGURE directory.
459
Chapter 13 Servers
460
•
A source queue to hold incoming wire stories for scanning by the
keyword server—such as WIRES.AP-SEARCH.
•
A queue—typically named
SYSTEM.WIRES.KEYWORDS—containing the search job list story.
This queue is used by the system’s standard wire searching feature;
therefore, it should already exist in your database.
•
Queues containing stories with search rule sets of keywords and
destination queue names. The maximum number of search rule queues
are 20 per keyword server.
•
Destination queues where the keyword server forwards stories/search
results.
•
A queue containing the wire distribution story—typically named
SYSTEM.WIRES.DISTRIBUTION. This queue is used by the
system’s standard wire distributing feature; therefore, it should already
exist in your database.
Keyword Servers
Here is a sample workflow diagram for a keyword server.
W ire Stories
SYSTEM.WIRES.DISTRIBUTION
SYSTEM.WIRES.KEYWORDS
S tan d ard w ire
p rog ram sea rch in g
th rou g h sep ara te
S e arch R u le s Q u e u e s
(5 m ax)
K ey w ord serv er m on itors
this q u eu e , as d efine d in its
job list q u eu e,
SYSTEM.CONFIGURE.259
to
n t er
se rv
es se
p i rd
Co w o
y
ke
T h is se arch job list q u eu e
id en tifies q u e u e s w ith
se arch ru les for th e w ire
p rog ram an d k ey w ord
se rv ers.
K ey w ord S erv er's
S ou rce Q u eu e
S ea rch R u les Q u eu es
(2 0 m a x )
D estin a tion
Q u eu e
D estin atio n
Q u eu e
D estin a tio n
Q u eu e
461
Chapter 13 Servers
Adding a Keyword Server
To add a keyword server:
Details for steps 1 and
2 are provided in
“Adding a Server
Program to the System”
on page 409.
1. Choose a device and mailbox number for the keyword server which
will also be used for associated queues. A device name should also be
chosen, such as key1; it will be needed for the next step in the
procedure.
2. Add the server program (server line) to the configuration file on
each iNEWS Server—such as servers A and B—in your system.
n
In addition to adding the keyword server to the standard host definition
of the iNEWS Server on which you want it to run, ensure you also add it to
each alternate host definition.
A keyword server’s device name, such as key1, is used in the search job
list; ensure that you always include a device name when adding a keyword
server to the system. For instance, the configuration line may appear like
this:
server 211 keyword 211 key1 ;keyword server
See step 2 of “Adding a Server Program to the System” on page 409 for
more information.
3. Create a job list queue in the Configure folder of the System directory
in the iNEWS database. The queue’s name, such as 211, is the same
number selected in step 1. For instance, the queue’s full pathname is
SYSTEM.CONFIGURE.211.
n
462
You should end the name with a hyphen and descriptive word, such as
“key1.” The queue’s full pathname would then look like:
SYSTEM.CONFIGURE.211-KEY1. See “Creating a New Queue” on
page 103 for more information. In this example, the keyword server’s
device name is used as the descriptive word for the job list queue name.
The device name is an important factor of later steps in this procedure.
Keyword Servers
4. Create the keyword server’s job list story in the database, by doing the
following:
a. Open the job list queue, such as SYSTEM.CONFIGURE.211KEY1.
b. Create a new story, the first in the job list queue, to hold the
keyword server’s job list. See “Creating a New Story” on page 106
for more information.
c. Add tasks that you want the keyword server to perform; include a
separate task for each queue the server watches. Each task in the
job list story consists of only one line, with the following format:
source
<queue scanned by server>
source
Identifies which queue the keyword server should scan. This queue
is the same queue to which the wire program will be instructed to
send wire story copies.
For instance, here is an example of a job list story for a keyword server
that scans WIRES.AP-SEARCH when it gets a wake-up notification:
A single task is defined in the keyword server’s job list, with a
commented line—a line preceded with a semicolon (;)—offering
further details about the keyword server.
n
When the keyword server processes a story, it deletes it from the source
queue. You do not need to clear old stories out of the keyword server’s
source queue. It is recommended that you “hide” the source queue from
general user accounts, by assigning it a read group, such as sysops. See
“Groups Tab” on page 129 and “Read Group” on page 174 for more
information.
463
Chapter 13 Servers
5. Assign the mailbox database trait, using the mailbox assigned in step 2
to the keyword server in the configuration file, to the appropriate
source queue(s), as identified in step 4c. For instance, the job list queue
is named 211, so that is the standard mailbox number assigned to
queues identified in the keyword server’s job list.
a. Open the Queue Properties dialog box for a scan queue, such as
WIRES.AP-SEARCH. See “Changing Database Traits” on
page 117 for more information.
b. Click on the Maintain tab. See “Maintain Tab” on page 133 for
more information.
c. Select the Standard radio button.
d. Type in the mailbox number, such as 211.
e. Click OK to save changes.
6. Repeat step 5 as needed for each source queue in the job list.
7. Create the queues and stories to hold search rule sets for the keyword
server to use.
n
Each keyword server can have 1-20 search rules queues, each with its own
keyword story, containing keywords. Each keyword story must be the first
one in the queue, and contain a number of keywords equal to 1000 divided
by the number of search rule queues. For instance, if 4 queues are set up
for a keyword server, each queue’s keyword story can hold up to 250
keywords. This evenly distributes the 1000 keywords allowed for keyword
servers across search rules queues and their stories. If 10 queues are set
up, then each queue’s keyword story can have 100 keywords.
a. In this sample procedure, two search rules queues are created in
the SYSTEM.WIRES directory. For instance, the queues’ full
pathnames could be SYSTEM.WIRES.KWDSERVER-1 and
SYSTEM.WIRES.KWDSERVER-2.
b. In each queue, the first story is considered the keyword story, and
contains the rule set of keywords.
See “Setting up Keyword Searching” on page 394, “Keyword
Limitations” on page 398, and “Tips on Building Search Rules” on
page 401 for more information.
464
Keyword Servers
The format each rule set must have is as follows:
destination <queue name>
<search rule>
[<search rule>]
[<search rule>]
. . .
destination
Identifies the queue into which the keyword server will place the
results of its keyword search. The name and location of this queue
is customizable.
<search rule>
Each search rule consists of one or more keywords you want a
keyword server (utility program) to use to locate stories on a
particular topic.
c
Never create a destination line that sends stories to a personal queue
or any queue not purged. If a program sends stories to such queues, it
can lead to an out-of-space condition.
Here is an example of what a keyword story and its rule set may look
like.
destination
wires.keywords.drugs
panama AND drugs
drugs NOT pharmacy OR (drugs AND smuggling)
Each search rule occupies a separate line in the rule set. Also, the
number of keywords allowed (1000 for keyword servers) is defined by
the words, not the number of lines. For instance, in the previous
example, four keywords are used—since you do not count each
occurrence of a word (just the first), drugs is only counted once.
n
Each keyword in the story can have a maximum of 10 characters. More
examples and detailed information on rule sets and keyword searches are
available in Chapter 12. See “Operating Wire Keyword Searches” on
page 394 for more information.
465
Chapter 13 Servers
8. Add an entry to the first story in the search job list queue, typically
named SYSTEM.WIRES.KEYWORDS.
a. Go to that queue and open the first story for editing.
In step 8b, use the same
device name, which
was defined in the
configuration file in
step 2 on page 462,
and the queues with the
search rules, which
were created in step 7
on page 464.
b. Insert an entry for the keyword server into the job list, which must
begin with *20, followed by the keyword server’s device name. If
you do not want the program to do any searching, that is all you
need to put in the entry. If you want the program to search for
keywords, follow the device name with one or more lines that list
queues containing search rules you want the keyword server to
use.
For instance, the keyword server has key1 as its device name and
should use search rules in queues:
SYSTEM.WIRES.KWDSERVER1 and
SYSTEM.WIRES.KWDSERVER2.
Here is an example of how the story may appear.
n
466
An optional destination prefix may also be included with the indirect list
entries: *20 <device name> [<destination prefix>]
If provided, the prefix is prepended to the destination queue of the
destination line of the search rule.
Keyword Servers
9. Modify the wire distribution story—the first story in
SYSTEM.WIRES.DISTRIBUTION.
For the keyword server to search stories sent by the AP wire service,
the wire program must duplicate a copy of each story it receives to the
keyword server’s source queue. For this to happen, the wire
distribution story must be modified.
a. Open the story and add the new instruction on a single line, using
the following format:
<dev name><wire code> <distribution queue>
[<options>]
n
There must be no spaces between the device name and the wire service
code. The [<options>] should also be on the same line, separated from
the distribution queue by a space.
<dev name><wire code>
For instance, the wire program’s device name is AP. If you want
this instruction to match all wire stories regardless of their wire
service code, use ######## as the code, because it matches any
code.See “Creating a Distribution Name” on page 387 for more
information.
<distribution queue>
The distribution queue is where you want stories with the specified
code to be duplicated, such as WIRES.AP-SEARCH.
See the table on page
389 for more
information on these
options.
[<options>]
Finally, you can end the line with any of the following options:
ALWAYS, SILENT, URGENT, FLASH, BULLETIN, or TRANSMIT. For
instance, end the instruction with the ALWAYS option to ensure that
every wire the AP wire program processes is duplicated to the
keyword server’s source queue.
The finished instruction looks like:
AP########
wires.ap-search
ALWAYS
467
Chapter 13 Servers
Steps 10-13 are
described in more
detail in “Adding a
Server Program to the
System” on page 409.
10. (Optional) Test your configuration changes.
11. Reconfigure the system.
12. Start the keyword server.
When you see the System being configured message, select
the iNEWS Server where the keyword server is configured and start
the keyword server. For instance, type:
NRCS-A$ restart 211
When the system displays a Hot-to-go message, the keyword server
has successfully started.
13. (Optional) Back up site files with the sitedump console
command.
System Servers
Utility programs called system servers are usually included on your system
at installation. You cannot customize them; therefore, they are described
here in a limited way. This information should be enough for you to
maintain and use these servers, or add them if necessary.
System servers include:
•
Seek servers
•
Fast Text Search (FTS) servers (Search and Index)
•
Print servers
•
Mail servers
Seek Servers
Seek servers allow users to search for text in the background, while users
continue with other program activities, such as script writing. A seek
server must be installed on your system.
468
System Servers
The seek server program runs on the main iNEWS Server, while you
continue to work on your client computer (iNEWS Workstation). The seek
server works by scanning the regular iNEWS database, story by story,
going through the area you specified in the Find All dialog box. The seek
server then returns stories resulting from its search as stories are
encountered in the iNEWS database.
Seek search is used by anyone who uses iNEWS. The seek server can
search any non-indexed queue or folder in your iNEWS database. If your
site does not have a Fast Text Search (FTS) server, you will use the seek
search exclusively.
Installing a Seek Server
To set up the seek feature on your system:
1. Choose a device and mailbox number for the server program.
Editing the
configuration file
requires use of the line
editor. See “Adding a
Server Program to the
System” on page 409,
and Appendix H for
more information.
n
2. Add the server program’s information to the configuration file.
b. The seek server’s device number, such as 260, must appear in the
servers line in the host definition for the iNEWS Server, such
as server B, on which it runs. The line may appear as follows:
servers
257
258 259 260
In addition to adding the seek server to the standard host definition of the
iNEWS Server on which you want it to run, add it to each alternate host
definition.
c. Next, create a configuration line for the seek server at the bottom
of the configuration file.
A seek server configuration line should look similar to this:
server
260 seek
260 SEEK
;seek server
d. After adding information to the configuration file, save your
changes.
3. Create the seek queue in the database.
469
Chapter 13 Servers
The seek queue’s name is defined in the Q_SEEK token in the
/site/dict/queues file. Usually this name is
SYSTEM.SEEK. Go to your System directory and see if this queue
exists. If it does not, create it. See “Creating a New Queue” on
page 103 for more information.
n
This queue must exist for the seek command to work. Ensure the write
group restriction is not applied so all users can use seek. See “Write
Group” on page 175 for more information.
4. Assign a form to the Seek queue, SYSTEM.SEEK.
A standard seek form was included with of your standard forms. The
form is stored in SYSTEM.FORMS.S.SEEK. See “Find All Form” on
page 231 for more information.
For the seek command to use this form, assign it to the Seek queue
using the Queue Properties dialog box and its Form tab. See
“Changing Database Traits” on page 117, “Directory/Queue Properties
Dialog Box” on page 121, and “Forms Tab” on page 122 for more
information.
5. Assign a mailbox to the Seek queue.
For the seek server to process a seek request placed in the Seek queue,
your system must notify the seek server that a new seek request has
arrived there. So, the Seek queue’s mailbox number must match the
seek server’s mailbox number, as indicated in the configuration file.
Otherwise, changes in the queue will not activate the correct server
program.
To assign the mailbox database trait to a queue:
a. Open the Queue Properties dialog box for a queue, such as
SYSTEM.SEEK. See “Changing Database Traits” on page 117 for
more information.
b. Click on the Maintain tab. See “Maintain Tab” on page 133 for
more information.
c. Select the Standard radio button.
d. Type in the mailbox number, such as 260.
e. Click OK to save changes.
470
System Servers
More detailed
information for steps 69 is available in
“Adding a Server
Program to the System”
on page 409.
6. (Optional) Test your configuration changes for the iNEWS Server on
which you added the seek server program.
7. Reconfigure the system.
8. Use the restart console command to start the seek server.
9. (Optional) Back up site files using the sitedump command.
Fast Text Search (FTS) Servers
There are two server (utility) programs related to Fast Text Search (FTS):
those that perform fast text searches and those that index stories in the FTS
database. Both are explained in this section.
FTS is an alternative to the seek feature. FTS allows fast, efficient
searching through large quantities of text material using indexes.
n
While both seek and FTS searches operate in the background—that is, the
user can continue with other activities at the iNEWS Workstation while the
system searches the iNEWS database—FTS searches will generally be
faster than seek searches.
FTS Workflow
Fast text searching involves two separate activities: indexing data and
searching the index for data. Different components are required for these
separate activities to function.
471
Chapter 13 Servers
FTS Indexing
The following figure shows the workflow iNEWS follows to create Index
files of database stories, which can be queried later.
In a fast text search, the FTS server gets duplicate copies of material from
those queues and folders in the iNEWS database marked with the Index
icon (as shown at left). The system administrator identifies which queues
and folders the system should index. See “Batch Indexing” on page 482 for
more information. The material in those queues and folders is fully
indexed in the FTS server, so every word is added to an Index file.
For each word, the index lists information about all stories where that word
was encountered. The index is updated each time a story is added,
changed, or deleted in an indexed queue. For instance, a story is added to
WIRES.ALL. The system identifies that queue as an indexed queue and
prompts the ftsindex server program to forward copies of the data to the
FTS server for indexing.
472
System Servers
The following figure shows the workflow for a user’s FTS request—the
procedure iNEWS Workstation follows to search Index files and respond
with results (pointers to database stories containing search criteria
specified by the user).
In the above example, the user sends an FTS query to the iNEWS Server.
The request is received in SYSTEM.FTS, which notifies the ftsseek server
program to conduct the search. (This is accomplished because both the
SYSTEM.FTS queue and the server program share the same mailbox number.) The ftsseek server program contacts the FTS server, which conducts a
search of its Index files for data matching the user’s search criteria, and
then responds with pointers to those stories located in the iNEWS database. The ftsseek server program forwards the FTS server’s results to the
user at the iNEWS Workstation.
Fast text search acts much like an index in a book. In other words, the fast
text search stores references to where the information you search for is
stored. For instance, if you were to search for the word Bush, the FTS
server will note that the word appears in story 1, 8, 12, and 16. If you
looked for the word Chaney, the FTS server will find the word in stories 2,
8, and 12. If you look for stories containing Bush & Chaney, you can view
stories that appear in both lists (in this example, stories 8 and 12). This is
473
Chapter 13 Servers
faster than examining every story in the queue to see which contain both
words. Instead, the system does that for you, and you benefit from the
search.
If you invoke a background search (Find All or Find Global) for material in
a folder or queue marked with the Indexed icon, iNEWS sends your search
request to the FTS server. The FTS server will look up the words you
specified in the index, and return a list of the resulting stories to the
iNEWS Workstation.
Not all queues can be searched with the fast text search, simply because it
takes space and effort to maintain an index. Therefore, system
administrators will usually index only those queues searched often. You
can determine which queues are available for fast text searches in three
ways:
•
In the Directory panel, the queue will display an Index icon (as
shown in the WIRES.ALL queue at left)
•
In the Find All dialog box, you will see the word Indexed in the title
•
In the Directory/Queue Properties dialog box, the directory/queue
will have the index database trait
Installing FTS Components
FTS is an optional feature that requires certain configurations within the
iNEWS system as well as additional hardware and setup. For instance, FTS
requires the set up of two utility programs (ftsindex and ftsseek) on
iNEWS Servers. Additionally, two executable files (ftsidx.exe and
ftssch.exe) must be installed and running on a Windows-based server.
These components are described in further detail in the next sections of this
chapter.
474
System Servers
...On the Windows-based Server
The Windows-based server running the two FTS utility programs
(ftsidx.exe and ftssch.exe) is known as the FTS server. This
computer is not to be confused with the two FTS utility programs
(discussed in “...On iNEWS Servers (Linux)” on page 478) known as
ftsindex and ftsseek servers.
The FTS server should be running a Windows-based operating system. For
information on the current service pack, contact Avid Customer Support.
Installing ftsidx.exe and ftssch.exe
To install the executable files (FTS programs) required for FTS:
1. Insert the iNEWS CD into the FTS server’s CD ROM drive.
2. Navigate to the FTS folder on the CD.
3. Double-click on the setup program (setup.exe) and follow
instructions as they appear on screen.
4. The setup program will install several files, including ftsidx.exe
and ftssch.exe. Make a note of the directory (folder) where they
are installed.
5. A batch file—used to start the FTS processes (executable files installed
in step 4)—is located on the installation CD in the Misc folder. The
batch file is called go-fts.bat.
a. Copy that file to the directory in which you installed the
executable files, such as:
C:\Program Files\Avid\FTS
b. (Optional) Create a shortcut to the batch file on the desktop.
(Right-click and drag the file to the desktop, then select Create
Shortcut Here when the pop-up menu appears.)
c. This provides you with a desktop shortcut you can double-click to
launch the FTS programs: ftsidx.exe and ftssch.exe. See
“Starting ftsidx.exe and ftssch.exe” on page 476 for more
information.
475
Chapter 13 Servers
d. The batch file contains two command lines in the code that you
may need to modify based on the ports used by FTS. To open the
batch file for editing, right-click on the file and select Edit from
the pop-up menu. Locate the two lines in the code that look like
this:
@cgi-fcgi -start -connect :6100 ftsidx.exe
@cgi-fcgi -start -connect :6101 ftssch.exe
The W_BINDFTSI and
W_BINDFTSS tokens
are defined in the
/site/dict/words
file.
The number 6100 corresponds to the Index <port> defined for
W_BINDFTSI on the iNEWS Server, and 6101 corresponds to
the Search <port> defined for W_BINDFTSS on the iNEWS
Server. Ports 6100 and 6101 are defaults used by the FTS Index
and Search programs.
6. You must also create a directory (folder) on the FTS server that will be
used by the Index program to hold index files it makes. You can create
the directory using Windows Explorer.
a. Click Start.
b. Locate and select Windows Explorer in the Start menu.
c. Navigate to where you want the new directory to be and rightclick.
d. Select New Folder from the pop-up menu and name it, such as
Index. For instance, the full pathname could be: C:/Index.
n
The token W_INDEXBASE in the /site/dict/word file must be
defined to reference the directory created in step 6. See page 479 for more
information.
Starting ftsidx.exe and ftssch.exe
The executable file, ftsidx.exe, is known as the Index program and the
executable file, ftssch.exe, is called the Search program. These utility
programs are started from the MSDOS command console window.
c
476
The MSDOS command console window must not be closed (it may be
minimized) after starting the ftsidx.exe and ftssch.exe
programs. Closing the window will cause the two programs to exit.
System Servers
A batch file, called go-fts.bat, provided on the installation CD, can be
used to launch the Index and Search programs in the MSDOS command
console window. Otherwise, the programs can be launched manually.
To manually start the search and index programs on the FTS server:
1. Open the MSDOS command console window.
The W_BINDFTSI and
W_BINDFTSS tokens
are defined in the
/site/dict/words
file.
2. Enter the following commands:
cgi-fcgi -start -connect :6100 ftsidx.exe
cgi-fcgi -start -connect :6101 ftssch.exe
The 6100 corresponds to the index <port> defined for
W_BINDFTSI on the iNEWS Server. The 6101 corresponds to the
search <port> defined for W_BINDFTSS on the iNEWS Server.
n
If you restart FTS programs, you must also restart ftsseek and ftsindex
server programs on the iNEWS Server-side. Start Windows-side FTS
programs first; otherwise, ftsseek and ftsindex will exit with an error
message on the console.
To start multiple instances of the ftssch.exe program on the FTS
server, specify the number of instances to start in the cgi-fcgi
command line or batch file, such as:
cgi-fcgi -start -connect :6101 ftssch.exe 3
The example would start three instances of the ftssch.exe program. If
three ftsseek servers are configured, three simultaneous FTS searches can
be performed.You must stop the ftssch.exe program to restart it with
the new command.
Stopping ftsidx.exe and ftssch.exe
Use the Windows-based Task Manager to stop (kill) the FTS utility
programs, ftsidx.exe and ftssch.exe, as follows:
a. Open the Task Manager.
b. Click the Processes tab.
c. Select ftsidx.exe
d. Click EndTask, then OK in the confirmation dialog.
477
Chapter 13 Servers
e. Repeat steps c-d, selecting ftssch.exe instead.
...On iNEWS Servers (Linux)
The two utility programs used by FTS, known as ftsindex and ftsseek
servers, must be set up on iNEWS Servers—that is, computers running the
Linux operation system and iNEWS Server application, such as server A
and server B.
To set up these utility programs, you may need to create some queues, such
as SYSTEM.INDEX and SYSTEM.FTS, if they do not already exist in the
iNEWS database. Also, some editing of files in the Site directory is
required, particularly files in the /site/dict directory. To edit files in
/site/dict, you will use ed, the line editor.
The following table shows tokens defined in the Queues and Words
dictionary files in /site/dict. If the token name starts with a Q, the
dictionary is in /site/dict/queues. If it begins with a W, it is defined
in /site/dict/words.
478
FTS Dictionaries
Explanation
Q_INDEX queue
Identifies the queue—typically SYSTEM.INDEX—that
holds index requests from various server programs. The
ftsindex program reads index requests from this queue,
which is not visible on iNEWS Workstation.
Q_FTS queue
Identifies the queue—typically SYSTEM.FTS—that
holds indexed search requests, much like
SYSTEM.SEEK holds seek requests.
W_INDEXED
The word— typically set to INDEXED— used in indexed
search requests to indicate that an indexed search is being
requested. This type of search is similar to “fast” and
“slow” seek searches.
System Servers
FTS Dictionaries
Explanation
W_INDEXBASE
Defines location and name of index files on the FTS
server. Its format is <pathname>/<basename>. The
<pathname> is a directory that exists on the FTS
server. The <basename> is any name you choose for
index files. The FTS server will create four index files
with .inX appended to the <basename>, where X is 1,
2, 3, or 4, such as verdi.in1, verdi.in2, and so
forth. For instance, W_INDEXBASE could be defined as
c:/index/verdi
W_HITSWEIGHT
Weight parameter that determines search results ranking
by how many times a word appears in a story (number of
hits). Value ranges from 0-100. Default is 0.
W_AGEWEIGHT
Weight parameter that determines search results ranking
by age of stories. (Newer stories have higher weight and
appear at top.) Value ranges from 0-100. Default is 100.
W_LOCWEIGHT
Weight parameter that determines search results ranking
by location of words searched for. (Words or “hits” closer
to start of story have higher weight.) Value ranges from 0100. Default is 0.
W_BINDFTSI
Identifies the binding address for the FTS server and its
port, used for indexing. The format is
<server>:<port>. The <server> is the hostname
of the FTS server and <port> is the dedicated port
number used for FTS search indexing. The default is
ftsserver:6100 where ftsserver should be
replaced with the FTS server name and 6100 should be
replaced with the number for the TCP port used by the
ftsidx.exe program. If you named the FTS server
ftsserver and used port 6100, then no change is
necessary.
479
Chapter 13 Servers
FTS Dictionaries
Explanation
W_BINDFTSS
Identifies the binding address for the FTS server and its
port, used for searching. The format is
<server>:<port>. The <server> is the hostname
of the FTS server and <port> is the dedicated port
number used for FTS text searching. The default is
ftsserver:6101 where ftsserver should be
replaced with the FTS server name and 6100 should be
replaced with the number for the TCP port used by the
ftsindex.exe program. If you named the FTS server
ftsserver and used port 6101, then no change is
necessary.
Setting up ftsseek and ftsindex Servers
To set up the ftsseek and ftsindex servers:
1. At an iNEWS Workstation, verify whether the Index and FTS queues
exist in the System directory. If SYSTEM.INDEX and SYSTEM.FTS
do not exist, you must create them.
2. At the console, add a definition for Q_INDEX to
/site/dict/queues. For instance:
Q_INDEX /system.index
3. Add a definition for Q_FTS to /site/dict/queues. For instance:
Q_FTS
/system.fts
4. Configure ftsindex and ftsseek server programs.
a. Choose device and mailbox numbers for each server program.
See “Adding a Server
Program to the System”
on page 409 for more
information.
b. Edit /site/config , ensuring there is a server line for each
server program. For instance:
server
server
261
262
ftsseek 261
ftsindex 262
- ;fts searches
- ;fts indexing
c. Assign mailbox numbers to the appropriate queues in the System
directory. All ftsseek servers must be assigned the same mailbox
that is assigned to SYSTEM.FTS. For instance, assign 262 to the
queue defined for Q_INDEX, such as: SYSTEM.INDEX, and
480
System Servers
assign 261 to the queue defined for Q_FTS, such as:
SYSTEM.FTS. Further details for assigning mailbox numbers
(database traits) to queues are found in “Assigning a Mailbox to a
Queue” on page 422. Also, see “Changing Database Traits” on
page 117 for more information.
d. Assign a queue form and story form to queues defined for
Q_INDEX and Q_FTS (SYSTEM.INDEX and SYSTEM.FTS,
respectively). The forms should be the same queue and story forms
assigned to the queue defined for Q_SEEK, such as
SYSTEM.SEEK. See “Assigning a Form as a Queue or Story
Form” on page 213 for more information.
5. Add a definition for W_INDEXED to /site/dicts/words. It
should be set to INDEXED. For instance:
W_INDEXED
/INDEXED
6. Add a definition for W_INDEXBASE to /site/dicts/words.
Ensure the associated path exists on the FTS server and has
appropriate access privileges. It should be an absolute path. For
instance:
W_INDEXBASE
/c:/index/verdi
7. Add weight definitions for search results ranking factors (age , number
of hits, and location of hits) in /site/dict/words.
n
If all weight definition parameters (W_HITSWEIGHT, W_AGEWEIGHT,
and W_LOCWEIGHT) are set to zero, ranking order is undefined. Any
setting that is beyond the range of 0-100 is rounded to within the correct
range.
8. Set the binding address for indexing by adding a definition for
W_BINDFTSI to /site/dict/words. Use the format
<server>:<port>. For instance:
W_BINDFTSI
/dexy:6100
9. Set the binding address for searching by adding a definition for
W_BINDFTSS to /site/dict/words. Use the format
<server>:<port>. For instance:
W_BINDFTSS
n
/dexy:6101
You must define separate port numbers for W_BINDFTSI (indexing) and
W_BINDFTSS (searching) on the FTS server.
481
Chapter 13 Servers
Starting and Stopping ftsindex and ftsseek on the iNEWS Server
To start both FTS server programs (located on the iNEWS Server), use the
restart console command in the following format:
restart
<device number>
<device number>
For instance, select the appropriate server at the console, and type:
restart 261 262
To stop both FTS server programs (located on the iNEWS Server), use the
stop console command in the following format:
stop
<device number>
<device number>
For instance, select the appropriate server at the console, and type:
stop 261 262
n
Stop both ftsseek and ftsindex programs on the iNEWS Servers before the
FTS programs on the FTS (Windows-based) server. This will help ensure a
stable, quiescent index base for future use when you restart FTS search.
To stop the FTS programs on the FTS server from the console:
t
Type:
ftsdebug index shutdown
ftsdebug search shutdown
n
You must logout of and back into the Windows-based FTS server to restart
the programs on that server before restarting them on the iNEWS Servers.
For more information on the ftsdebug command, see iNEWS Newsroom
Computer System Operations and Troubleshooting Manual.
Batch Indexing
Index base is the set of
four Index files on the
FTS server, as defined
in W_INDEXBASE, in
/site/dict/
words.
482
Batch indexing is a procedure by which a system administrator can define
queues to be indexed or de-indexed, and cause an update of the index base
to incorporate the current state of the queues’ stories in the index base.
Batch indexing can be performed at either the queue or directory level by
applying the index database trait. See “Changing Database Traits” on
page 117 and “Database Traits Summary” on page 120 for more
information.
System Servers
To mark a queue as indexed and schedule an index base update, apply the
Index database trait to the queue using the Queue Properties dialog box.
This command marks the queue, WIRES.STATE, as indexed and submits
a request to update entries in the index base for all stories in the queue. The
queue will appear with the Indexed icon (shown at left) in the Directory
panel of the iNEWS Workspace.
Select Indexed check box
to apply the index
database trait. Click OK
to save changes.
Similarly, to mark a queue as deindexed and schedule an index base
update, uncheck the Indexed check box in the Queue Properties dialog box.
This command marks the queue, WIRES.STATE, as not indexed and
submits requests to remove all story entries for the queue from the index
base.
Batch Indexing Directories (Folders)
To mark all queues at every level under a directory (folder) as indexed and
schedule an index base update, apply the index database trait to the directory, using the Directory Properties dialog box. Similarly, to mark all
queues at all levels under a directory as deindexed and schedule uncheck
the Indexed check box in the Directory Properties dialog box. The ‘apply
changes to all subdirectories and queues’ check box must be checked to
have the change propagated to all subdirectories and queues of the
directory.
483
Chapter 13 Servers
n
The database traits program will ignore requests to index or deindex the
queues defined for the dictionary entries Q_SEEK, Q_FTS, Q_INDEX,
and Q_DEAD in /site/dict/queues.
Dynamic Indexing
Dynamic indexing is a function of the iNEWS Server that automatically
triggers an index change when a story is added, changed, moved, or
deleted. Set index database traits for queues to be indexed as in the Batch
Indexing instructions, and the iNEWS Server will automatically schedule
updates to the index base whenever a story in an indexed queue changes.
Archival and Backup
Copying and Archiving the Index Base Files
To save the current state of an index base, you must copy the Index files to
another location and then archive/back up the files as you would normally
do for a Windows-based server system. (See Microsoft’s server
documentation for details on backing up and archiving files.)
n
Archived index bases may be out of sync with the active iNEWS database.
Removing the Index Base and Reindexing (Optional)
If an index base becomes unusable, you should remove the index base on
the FTS server and reindex, by doing the following:
1. Stop the ftsseek and ftsindex server programs. See “Starting and Stopping ftsindex and ftsseek on the iNEWS Server” on page 482 for more
information.
2. Stop the ftssch.exe and ftsidx.exe programs on the FTS
server. See “Stopping ftsidx.exe and ftssch.exe” on page 477 for more
information.
3. Open the folder—tyically called INDEX—where the Index files reside.
This is the <path> portion of the <path>/<basename> defined
for W_INDEXBASE in /site/dict/words on the iNEWS Server.
For instance, W_INDEXBASE is defined as follows:
W_INDEXBASE
484
/c:/index/verdi
System Servers
In this example, the folder would be index on the FTS server.
4. Select all files whose names match the <basename> portion of the
<path>/<basename> defined by W_INDEXBASE.
5. Continuing with the example in step 3, the <basename> is verdi,
so you would select all files matching verdi, such as verdi.in1,
verdi.in2, and so forth.
6. Delete the selected files.
7. Restart the ftssch.exe and ftsidx.exe programs on the FTS
server. See “Starting ftsidx.exe and ftssch.exe” on page 476 for more
information.
8. Restart ftsseek and ftsindex server programs on the iNEWS Server.
See “Starting and Stopping ftsindex and ftsseek on the iNEWS Server”
on page 482 for more information.
9. At the console, issue a dbtraits command with the reindex
option for one or more folders that may contain indexed queues. This
will traverse the folder's hierarchy and schedule index requests for
each indexed queue found.
For instance, type:
dbtraits wires reindex
This will cause the system to revisit all queues anywhere under the
Wires directory and schedule indexed queues for indexing.
n
The ftsdebug command may be used to troubleshoot communication
between the iNEWS Servers and FTS programs, compare contents of
indexes and indexed queues, etc. For more information on this command,
see the iNEWS Newsroom Computer System Operations and
Troubleshooting Manual.
Print Servers
A print server allows users to employ the print command to print stories
to any queue in your system. When the story reaches the queue, it is
formatted so that it appears on the screen exactly as if you had sent it to a
system printer. This is referred to as printing to a story.
485
Chapter 13 Servers
n
Print servers use the system printing function, not the local printing
function.
Not every newsroom wants to use these features; only those that request it
have a print server added to their system during installation. If you want
the server, install it as described in “Adding a Print Server”.
Because a print server’s only job is to print stories to queues, it does not
need a mailbox or a job list. Installing one requires that you choose a
device number for the print server, add the print server to your system’s
configuration file, and assign it a profile.
You need install only one print server to make the print-to-story feature
available to everyone. In fact, you can only install one such server on your
system. Only one user at a time can use the print-to-story. Other users who
submit print requests while the server is busy have their requests queued, to
be sent when the server is available again.
Adding a Print Server
Installing a print server (utility program) requires only that you choose a
device number for the print server, add the print server to your system’s
configuration file, and assign it a profile. A print server does not need a
mailbox or a job list.
To add a print server to your system:
1. Choose a device number for the print server.
2. Add the server program information to the configuration file
(/site/config). See “Changing the Configuration File” on
page 273 for more information.
a. Select all iNEWS Servers. See “Selecting Servers” on page 33 for
more information.
b. Use ed to open the configuration file for editing by typing:
NRCS-A$ ed /site/config
1259
486
System Servers
c. The print server’s device number must appear in a servers line
in the host definition for the iNEWS Server on which it runs,
such as server B. Move to the servers line in server B’s host
definition. It should appear something like this:
servers
257 258 259 260 261 262
Then, add the print server’s device number , such as 263, to the
servers line in server B’s host definition.
servers
n
257 258 259 260 261 262 263
In addition to adding the print server to the standard host definition for
the iNEWS Server on which you want it to run, make sure that you also add
it to each alternate host definition.
3. Create a configuration line for the print server. A print server
configuration line uses the standard server format shown here:
server
<device #>
printserver
-
-
The new line should look like this:
server
Do not use an
uppercase (W) in step 4.
See Appendix H for
more information.
263 printserver
-
- ;print server
4. After adding the line, type:
w
1565
q
5. Create a printer profile exactly as you would for a printer connected to
a PCU, as described in Chapter 11. The print server’s profile must be
in a file named after the print server’s device number. For instance, put
it in: /site/printers/263.
More detailed
information for steps 69 is available in
“Adding a Server
Program to the System”
on page 409.
6. (Optional) Test your configuration changes for the iNEWS Server on
which you added the seek server program.
7. Reconfigure the system. You do not need to stop anything to
reconfigure the system.
8. Use the restart command to start the print server.
9. (Optional) Back up site files using the sitedump command.
487
Chapter 13 Servers
Mail Servers
Your system provides a mail feature that allows users to send mail
messages to other users. To enable the mail feature, a utility program
known as the mail server must be installed on your system. Generally, this
is done when your system is installed.
Disabling Mail to All Users
Ordinarily, a user can send mail to all, which sends a copy of the mail
story to every user on the system. To disable this feature, include an alias
for all in a story in SYSTEM.GROUPS that maps the word all onto a
nonexistent user name. The new alias may look like this:
alias all
not-allowed
Because not-allowed is not a valid user on your system, anyone who
tries to send mail to all will get the error message:
Returned mail: User unknown.
Using Network Mail
Your system has a hosts file that it uses to communicate with other devices
on the network. This file is found in /etc/hosts. Each iNEWS Server’s
hosts file is like a directory that includes the network addresses of all
computers on the network. The iNEWS Servers use that directory to find
the address of other computers. See “Hosts File” on page 275 for more
information.
The typical format of a line in the hosts file lists the Internet address of a
computer or other network device, followed by its name.
For instance, here is an /etc/hosts file for a three-server system:
124.4.0.1 nrcs-a a
124.4.0.2 nrcs-b b
124.4.0.3 nrcs-c c
488
System Servers
Using 8-Bit Characters in Mail
You can use 8-bit characters, such as accented letters (ñ, ó, and á), in both
mail messages and mail addresses. You send mail in a format compatible
with the MIME standard. By default, 8-bit characters will be represented in
the MIME standard quoted-printable format. See RFC 2045 at
http://www.rfc-editor.org/rfc/rfc2045.txt for more
information. You can change this behavior by setting the EIGHTMAIL
environment variable in /exc/.profile.
EIGHTMAIL=x-underscore-prefix causes mail to be encoded using
the iNEWS system underscore format. EIGHTMAIL=8bit or
EIGHTMAIL= turns off 8-bit encoding and sends unencoded 8-bit
characters without change.
Only two programs use EIGHTMAIL, namely grpcheck and the mail
server.
Grpcheck normally converts 8-bit characters in user, group, and alias
names to the iNEWS proprietary underscore-prefix format when
building the mail alias file (/site/.mail/aliases). This occurs
when EIGHTMAIL is not found in grpcheck's environment. If
EIGHTMAIL= or EIGHTMAIL=8bit is present in grpcheck's
environment, conversion is not done (the 8-bit characters are put into the
alias file). If EIGHTMAIL is in grpcheck's environment but is set to
some other value, it is ignored and grpcheck behaves as when
EIGHTMAIL is not found in the environment.
The mail server normally converts 8-bit characters in the From, To, and CC
names to underscore-prefix format and converts 8-bit characters in
text to quoted-printable format for outgoing mail messages. This
occurs when EIGHTMAIL is not found in mail server's environment or
when EIGHTMAIL=quoted-printable is found in mail server's
environment. If EIGHTMAIL= or EIGHTMAIL=8bit is present in mail
server's environment, no conversion is done (the 8-bit characters are
included in the outgoing mail message).
If EIGHTMAIL=x-underscore-prefix, mail server will convert 8bit characters in the From, To, and CC names and 8-bit characters in text to
underscore-prefix format. The mail server will include a
489
Chapter 13 Servers
Content-Transfer-Encoding: <type> statement in the
outgoing mail message. The <type> will be set to one of quotedprintable, x-underscore-prefix, or 8bit. This will be used by
the mail receiving program to determine how to convert back into 8-bit
characters.
The mail server's behavior may be more easily understood, as shown in the
following table.
Environment
From/To/CC
Names
(nothing)
underscore-prefix quoted-printable
EIGHTMAIL=quoted-printable
underscore-prefix quoted-printable
EIGHTMAIL=x-underscore-prefix
underscore-prefix underscore-prefix
EIGHTMAIL=
(no conversion)
(no conversion)
EIGHTMAIL=8bit
(no conversion)
(no conversion)
Text
Character Conversion Table for Underscore-Prefix Format
The iNEWS system uses the Character Conversion table (on page 491) to
convert 8-bit characters used in mail stories into 7-bit representation
strings when mail is sent and then converted back into their 8-bit values
when the mail is received at another iNEWS system.
If you are sending mail from a Linux system to iNEWS, the
Mail Compose strings in column four are required only in the address of
the mail; you can use either these strings or the standard VT220 compose
sequences within the message. Use the corresponding lowercase characters
in the address.
n
490
Character conversion data in the following table originates from the MS
(Windows) 1252 code page, which is used for such languages as: English,
German, French, Icelandic, Norwegian, Italian, Portuguese, Spanish,
Dutch, Finnish, and Swedish. Other languages, such as Arabic, Czech,
System Servers
Turkish, Polish, Hungarian, Slovenian, and so forth, use different code
pages. Contact Avid Customer Support for assistance with these language
conversions.
8-Bit
Character
Decimal
Hex
Mail
Compose
7-Bit
String
¡
161
A1
_}}
_}}
¢
162
A2
_c-
_|c
£
163
A3
_l-
_l=
¥
165
A5
_y-
_y=
§
167
A7
_so
_}s
¤
168
A8
_xo
_xo
©
169
A9
_oc
_oc
ª
170
AA
_}a
_a_
«
171
AB
_~~
_~~
°
176
B0
_o&
_o&
±
177
B1
_-+
_-+
2
178
B2
_2+
_^2
3
179
B3
_3+
_^3
µ
181
B5
_u-
_u/
¶
182
B6
_}p
_}p
·
183
B7
_+*
_^.
1
185
B9
_1+
_^1
º
186
BA
_}o
_o_
»
187
BB
_``
_``
491
Chapter 13 Servers
492
8-Bit
Character
Decimal
Hex
Mail
Compose
7-Bit
String
1/4
188
BC
_41
_41
1/2
189
BD
_21
_21
¿
191
BF
_{{
_??
À
192
C0
_`A
_`A
Á
193
C1
_A'
_A'
Â
194
C2
_A+
_^A
Ã
195
C3
_~A
_~A
Ä
196
C4
_A$
_A$
Å
197
C5
_A*
_A*
Æ
198
C6
_EA
_EA
Ç
199
C7
_}C
_C;
È
200
C8
_`E
_`E
É
201
C9
_E'
_E'
Ê
202
CA
_E+
_^E
Ë
203
CB
_E$
_E$
Ì
204
CC
_`I
_`I
Í
205
CD
_I'
_I'
Î
206
CE
_I+
_^I
Ï
207
CF
_I$
_I$
Ñ
209
D1
_~N
_~N
Ò
210
D2
_`O
_`O
Ó
211
D3
_O'
_O'
System Servers
8-Bit
Character
Decimal
Hex
Mail
Compose
7-Bit
String
Ô
212
D4
_O+
_^O
Õ
213
D5
_~O
_~O
Ö
214
D6
_O$
_O$
Œ
215
D7
_OE
_OE
Ø
216
D8
_O-
_O/
Ù
217
D9
_`U
_`U
Ú
218
DA
_U'
_U'
Û
219
DB
_U+
_^U
Ü
220
DC
_U$
_U$
Ÿ
221
DD
_Y$
_Y$
ß
223
DF
_ss
_ss
à
224
E0
_a`
_a`
á
225
E1
_a'
_a'
â
226
E2
_a+
_a^
ã
227
E3
_~a
_~a
ä
228
E4
_a$
_a$
å
229
E5
_a*
_a*
æ
230
E6
_ea
_ea
ç
231
E7
_}c
_c;
è
232
E8
_e`
_e`
é
233
E9
_e'
_e'
ê
234
EA
_e+
_e^
493
Chapter 13 Servers
494
8-Bit
Character
Decimal
Hex
Mail
Compose
7-Bit
String
ë
235
EB
_e$
_e$
ì
236
EC
_i`
_i`
í
237
ED
_i'
_i'
î
238
EE
_i+
_i^
ï
239
EF
_i$
_i$
ñ
241
F1
_~n
_~n
ò
242
F2
_o`
_o`
ó
243
F3
_o'
_o'
ô
244
F4
_o+
_o^
õ
245
F5
_~o
_~o
ö
246
F6
_o$
_o$
œ
247
F7
_oe
_oe
ø
248
F8
_o-
_o/
ù
249
F9
_u`
_u`
ú
250
FA
_u'
_u'
û
251
FB
_u+
_u^
ü
252
FC
_u$
_u$
ÿ
253
FD
_y$
_y$
Monitor Servers
Monitor Servers
Monitor server is a utility program—running on the iNEWS newsroom
computer system—that checks a show’s event requests for errors, creates
composite and event lists, and sends playlists to ControlAir and MOS
Gateway.
A monitor server must be assigned device and mailbox numbers—
typically, these numbers are the same, which makes the configuration
easier to remember. A device number is chosen for monitor server so
iNEWS recognizes the server (utility) program as a valid device. The
device number must be entered in the system’s configuration file. The
mailbox number must be assigned to both the show’s monitor server and its
rundown queue.
n
A mailbox is an activation mechanism for a server (utility) program, so if a
queue has a mailbox number matching a server program, then that server
is the one activated or “awakened” whenever something happens to the
queue.
The mailbox enables iNEWS to notify the monitor server of changes made
to a rundown queue—the one sharing the same mailbox number—while
that show is monitored. The monitor server then updates composite and
event lists, if necessary.
The monitor server is turned on when a user at an iNEWS Workstation
turns it on. When on, monitor server checks its assigned rundown for
machine control events, and builds playlists. It continues to monitor the
rundown for changes and performs as much error checking as it can—by
comparing machine control events with styles located in the
SYSTEM.RESOURCE queue—without communicating with any broadcast
equipment, including ControlAir. To learn more about styles and how
monitor servers check for errors, see “Styles” on page 519.
The monitor server loads data to the iNEWS ControlAir system or the
MOS Gateway system when a user instructs it to do so from an iNEWS
Workstation. The communication path between monitor server and
ControlAir, at this point, is explained in more detail in Chapter 1 of the
ControlAir Operations Manual. See also “Using the Monitor Server” on
page 526.
495
Chapter 13 Servers
n
It is recommended that producers turn the monitor server on early so it can
check the rundown queue throughout much of the show’s development.
Instructing the monitor server to load data should be done later, such as
just before taking the show to air.
Configuring Monitor Servers
When configuring monitor servers, there are certain tasks that must be
performed on the iNEWS Servers at the console, and at an iNEWS
Workstation. If your site already has the Machine Control System (MCS),
much of this work may already be done. These tasks must be completed to
download playlists and updates to the ControlAir system.
This section assumes:
•
Your site has a fully functioning network.
•
Your newsroom computer system servers are operational and running
the iNEWS Server software.
•
All iNEWS Servers are connected to a console multiplexor, to which
Avid Customer Support technicians have dial-in access.
•
The person performing the installation has attended an iNEWS,
AvidNews, or NetStation system administration course or has
equivalent experience. This includes having a working knowledge of
ed, the line editor and selecting servers at the console.
Configuration Summary
The set-up procedure has the following steps: Each step is explained
further in “Configuration Details”.
1. Creating a Monitor Server for Each Show (page 497)
2. Creating Composite and Event List Queues (page 502)
3. Set Up Queue and Story Forms (page 505)
4. Assigning Forms to Queues (page 506)
5. Create an Entry in the SYSTEM.MAP Story (page 507)
6. Updating the iNEWS System Dictionaries (Optional) (page 515)
496
Monitor Servers
n
Some configurations require updating styles in the SYSTEM.RESOURCE
story. For more information on how to do that, see “Styles” on page 519.
Configuration Details
The following steps do not include setting up external devices, such as
character generators and still stores, which play broadcast events. Refer to
the manufacturer’s documentation provided with the device and to the
Device Manager Guides, provided on the ControlAir Installation CD, for
more configuration details.
The configuration procedure comprises the following steps:
Step 1: Creating a Monitor Server for Each Show
This section assumes rundown queues for the shows being monitored
already exist. If not, create them before continuing.
To create and configure a monitor server:
1. Check the configuration file (/site/config) and choose the next
available device number for the monitor server, from the range of
3-digit numbers reserved for use by your system’s server programs,
such as 201 to 300.
Valid standard mailbox
numbers are 1 through
4096.
2. Choose an available mailbox number. For simplicity, this can be the
same 3-digit device number. Do the following:
a. Use the list console command to ensure no other device is using
the mailbox number you have chosen.
For instance, to check mailbox 266, type:
list mailbox=266 c
Information similar to the following appears:
DEV DEVICE_TYPE COMPUTER CCU PRINTER SPEED OPTIONS DEVNAME
n
For other list command options for determining mailbox assignments of
queues and servers, see “Using the list Command to View Assigned
Mailboxes” on page 501.
497
Chapter 13 Servers
b. If you see the device configuration header (as shown in step 2a)
with no information below it, then no device has that mailbox and
you can use that number. However, if configuration information
for a device appears below the header, that device has the same
mailbox as the one you chose. Therefore, choose another mailbox
number and repeat step 2a.
n
If the mailbox number is already being used, and you must choose another,
you may want to try another device number for the monitor server as well.
Typically, mailbox numbers match server program device numbers,
although this is not required. However, the mailbox number you select must
be assigned to the queue monitored by the server program. Multiple queues
can share the same mailbox number, but care must be take to avoid
conflicts. See “Using the list Command to View Assigned Mailboxes” on
page 501 for more information.
3. Add the monitor server to the /site/config file on each iNEWS
Server—such as server A and server B in a dual server system— by
doing the following:
c
Changing the
configuration file
requires the use of ed,
the line editor. See
Appendix H for more
information.
Always back up the /site/config file before making any changes.
See “Changing the Configuration File” on page 273 for more
information.
a. At the console, select all iNEWS Servers. See “Selecting Servers”
on page 33 for more information.
b. Use the ed command to open and edit the configuration file, by
typing:
ed /site/config
1259
After you press Enter, the editor responds by displaying a number,
as shown, indicating the file size expressed as the number of
characters, including spaces and returns.
c. Add the monitor server’s device number to the servers line in
the host definition for the iNEWS Server that will run the
monitor server program. For instance:
servers 261 263 265 267
498
Monitor Servers
The device number 267 is added to the servers line in this
example.
n
Do not confuse the
configuration line,
which starts with
server, and the
servers line
mentioned in 3c on
page 498, which lists
device numbers.
Divide your server programs evenly among your iNEWS Servers to
distribute the load they put on your system. For instance, put odd numbered
programs on server A and even numbered ones on server B. Additionally,
ensure that you also add the configuration line for the monitor server to
alternate host definitions for your iNEWS Servers. This ensures it can
run on the surviving computer should one of your iNEWS Servers stop
functioning.
d. Add a configuration line for the monitor server in the host
definition belonging to the iNEWS Server that will run the server
program. This line begins with the word server and contains the
mailbox number assigned to the monitor server.
The format for server programs’ configuration lines are:
server <device#> <type> <mailbox> <device name>
Parameter
Description
device #
The device number assigned to the server program.
This 3-digit number must also be listed in the
servers line in a host definition.
type
The type of server program is monitor.
mailbox
The mailbox the server program uses. Valid standard
mailbox numbers are 1 through 4096. This number
typically matches the server program’s device number.
device name
Monitor servers do not use a device name; enter a
hyphen (-).
499
Chapter 13 Servers
Comments appearing
after the semicolons (;)
are optional.
Do not use an
uppercase (W) in step
3e. See Appendix H for
more information.
The following are sample configuration lines for monitor server
programs:
server
264
monitor
264
- ;monitor server
server
265
monitor
265
- ;monitor server
server
266
monitor
266
- ;monitor server
server
267
monitor
267
- ;monitor server
e. When you finish making changes to the configuration file, save
your changes by typing:
w
f. When you press enter, a number will appear, such as 1279, indicating the file size. You can then exit the line editor by typing:
q
4. (Optional) Test your configuration changes. See “Testing the Site
Configuration File After Changing” on page 273 for more information.
n
After editing the configuration file (/site/config), it should be backed
up.
5. Reconfigure the system. See “Incorporating Configuration Changes”
on page 274 for more information. When adding server programs, you
do not need to stop anything to reconfigure the system.
n
500
Unlike other utility programs, it is not necessary to start a monitor server
when you add it to the configuration file. It starts when someone uses the
monitor on or monitor load command for the rundown queue to
which you have assigned the monitor server. See “Using the Monitor
Server” on page 526 for more information.
Monitor Servers
Mailboxes are assigned
to queues in the same
way other database
traits are—using the
Queue Properties
dialog box. See
“Directory/Queue
Properties Dialog Box”
on page 121 for more
information.
6. After you choose the monitor server’s mailbox number and verify that
it is not used by another device, you must also assign it to the show’s
rundown queue, being monitored by the monitor server.
For instance, if the monitor server’s mailbox number is 267 and it will
monitor the SHOWS.6PM.RUNDOWN queue, then that number must be
assigned to that queue.
See “Assigning a Mailbox to a Queue” on page 422 for more
information.
Using the list Command to View Assigned Mailboxes
Variations of the list command can be used at the console to determine
mailbox assignments for specific devices, queues, and so forth.
Since multiple queues can share the same mailbox, you can list all queues
and directories in the database that are using a certain mailbox, such as
267. To do this, type:
list mailbox=267 d
To find out which monitor server mailboxes are assigned, type:
list c monitor
The system displays configuration information for your system’s monitor
servers, similar to the following:
DEV DEVICE_TYPE COMPUTER CCU PRINTER SPEED OPTIONS DEVNAME
S264 monitor
A
N264
S265 monitor
B
N265
S266 monitor
A
N266
S267 monitor
B
N267
NRCS-A$
The mailbox number assigned to each monitor server appears in the
PRINTER column and begins with the letter, N.
To see if any servers are assigned a certain mailbox number, use the
following format: list mailbox=<mailbox number> c
501
Chapter 13 Servers
c
Two rundowns queues can share the same mailbox, but they should
never be monitored simultaneously. If two rundowns share the same
mailbox number, ensure that both their monitor servers do not run
simultaneously; otherwise, results could be unpredictable.
To check whether mailbox 267 is assigned to a server program, type:
list mailbox=267 c
Step 2: Creating Composite and Event List Queues
The monitor server scans stories for machine control events and builds lists
of these events, which can be referenced or used to transmit data to
production devices, such as character generators (CGs), video servers, and
still store machines. These lists, known as composite and event lists, are
optional, yet valuable, resources for a show’s director and production
device operators. An event list contains details for a specific device, while
a composite list contains status information for all devices connected
through ControlAir.
You may want to create only composite and/or event lists for certain
production devices. If you do not create list queues for some devices, the
monitor server will not create lists.
For these lists to exist, queues for them must be created—if they do not
already exist—and they must be “mapped” to the monitor server so it
knows where to put composite information and event lists.
The following procedure explains how to create queues. For more on
mapping them, see “Create an Entry in the SYSTEM.MAP Story” on
page 507.
502
Monitor Servers
To create and configure the composite and event list queues:
1. At an iNEWS Workstation, create the queues in the iNEWS database
by following the steps provided on page 103. See “Adding a Directory
or Queue” on page 99 for more information.
2. Name the new queue, such as COMPOSITE or CG1.
n
The pathname of each device’s event list queue is a combination of the
event list directory and the device manager’s name. For instance, if you
want an event list for the 6PM show that has a character generator called
CG1, you may select to place the event list queue in the SHOWS.6P
directory. The pathname would be SHOWS.6P.CG1. Using the same
example, the pathname for the composite list queue would be
SHOWS.6P.COMPOSITE.
The newly created queue will inherit database traits of its parent
directory initially. You can open the new queue by double-clicking on
it. For more information about queues and their database traits, see
Chapter 5.
503
Chapter 13 Servers
3. To have monitor server display information in these lists properly, each
queue must have a 1-line display and be assigned the proper queue
form. Assigning these forms is covered in “Assigning Forms to
Queues” on page 506.
To set the display of any queue, such as a composite or event list
queue:
a. Log in as a system administrator at an iNEWS Workstation.
b. Navigate to and right-click on the composite or event list queue in
the Directory panel.
c. Select Properties from the pop-up menu. The Queue Properties
dialog box appears.
d. Select the User Interface tab.
e. Set Preview Lines to the number of lines you want displayed in the
Queue panel.
f.
504
Click OK to save changes.
Monitor Servers
4. To ensure that you can use the queues effectively, remove the inverted
database trait and apply the refresh database trait to them. This can be
done by removing the check mark from the Inverted checkbox and
selecting the Refresh checkbox on the User Interface tab of the Queue
Properties dialog box at any iNEWS Workstation.
For more information about assigning database traits to queues, see
Chapter 5.
5. Assign a write security group to your event and composite list queues
to ensure that only the monitor server makes changes to the composite
and event lists. It is recommended that you restrict writing access of
these queues to superusers.
For more information on how to assign write groups to queues, see
“Group Traits for the Database” on page 172.
After the composite and event list queues are created, the monitor server
must be created—as described in step 1 on page 497—and mapped to
them. This will enable the monitor server to determine the queue where the
composite list should be placed and the directory where the event list
queues are located. The procedures for mapping the monitor server to
composite and event list queues are explained in “Create an Entry in the
SYSTEM.MAP Story” on page 507.
Step 3: Set Up Queue and Story Forms
All three queues—rundown, composite, and event list—use forms with
fields that may be filled in by monitor server programs.
Add fields to existing rundown queue and story forms in iNEWS, as well
as forms used by the composite and event list queues, using the following
guidelines:
For more information
on these form field
types, see “Form Field
Types and Definitions”
on page 214 and
“iNEWS
MCS/ControlAir Fields
and Forms” on
page 226.
•
Two fields are used in forms for all three queues: VIDEO-ID and
EVENT-STATUS.
•
Two fields are used in forms for rundown queues: STATUS and
TAPE-TIME.
505
Chapter 13 Servers
•
n
The following fields are used in forms for composite and event list
queues: MOS-TITLE, CG-ADDR, ITEM-CHANNEL, STILL-ID and
CG-TEXT. The following fields are used only for event list queues:
CG-TEMPLATE, STILL-PRESET, STYLE, and EFFECT.
For a field to exist in a queue form, it must also exist in a story form. See
Chapter 8 for more information.
Step 4: Assigning Forms to Queues
After you create queues to hold the composite and event lists, you must
assign forms containing iNEWS fields to each queue. For instance:
n
•
Assign a form designed to display composite list information to
SHOWS.6PM.COMPOSITE
•
Assign a form designed to display the information in a character
generator’s event list to SHOWS.6PM.CG1
Your system includes default forms—located in the SYSTEM.FORMS
directory—for composite, still store, character generator, and video event
list queues. If upgrading to iNEWS from a previous product version, such
as NetStation, you must update forms for composite and event list queues,
including rundown forms.
To assign a form to a queue at an iNEWS Workstation:
1. Navigate to the queue you want in the Directory panel.
2. Right-click on it.
3. Select Properties from the pop-up menu. The Directory/Queue
Properties dialog box will appear.
n
Access to the Directory/Queue Properties dialog box and its appearance
vary, depending on certain circumstances. See Chapter 5 for more
information.
4. Do either or both of the following:
See “Forms Tab” on
page 122 for more
information.
506
a. Use the Queue drop-down list on the Forms tab to select the form
you want to apply to the queue as the queue form database trait.
Monitor Servers
b. Use the Story drop-down list on the Forms tab to select the form
you want to apply to the queue as the story form database trait.
You must assign a queue form and a story form. The queue form
determines the look of the queue. The story form determines how an
event request is displayed when you double-click it.
For instance, to assign the standard composite list queue form to the
SHOWS.6PM.COMPOSITE queue, select the appropriate form from
the Queue drop-down list in the Queue Properties dialog box. To
assign a story form to this composite list, select the appropriate form
from the Story drop-down list in the Queue Properties dialog box.
n
The forms will only appear in the drop-down lists if they exist in the
database. For information about how to create your own forms or modify
existing forms, and about database traits, see Chapter 5 and Chapter 8.
5. If you made changes to an existing form, you must select the Update
existing stories to use story form. When this check box is selected,
iNEWS changes the story form assignment for existing stories with the
queue.
6. Click OK to save changes and apply the new queue/story form
settings.
n
Users should log off and sign back on to view the new queue/story form
settings.
Step 5: Create an Entry in the SYSTEM.MAP Story
The map story is a standard iNEWS database story and is always the first
story in the SYSTEM.MAP queue (as defined by Q_MMAP). It can be
opened and edited like any other iNEWS database story; however, access
to it is typically limited to system administrators who already have access
to the System directory.
When you create a show’s map story entry, you will usually specify that
monitor server create and maintain event and composite lists when
someone monitors the show.
507
Chapter 13 Servers
n
On a small system, the work required to update composite and event lists
could affect overall system performance. In these cases, specify in the
show’s SYSTEM.MAP story entry that monitor server should not create
composite and event lists, or that it create one and not the other.
After creating the show’s monitor server, add an entry for the show to your
system’s map story. This entry specifies to the show’s monitor server the
location of the show’s rundown queue, and composite and event lists.
Without this information, the monitor server will not create lists. The map
story entry also specifies the list of groups that can monitor a queue, and
when the monitor server turns itself off.
508
Monitor Servers
To add an entry for the show in the map story:
MOS Gateway is
another Avid product
that works with the
iNEWS newsroom
computer system to
control production
devices.
1. Open the SYSTEM.MAP story, which contains a separate entry for
each show that will be produced using ControlAir or MOS Gateway.
The following figure shows three sample entries, with four devices
each, in a SYSTEM.MAP story.
Each show’s map story entry must begin with a line called an entry header.
;RUNDOWN
EVENT DIR
COMP QUEUE
GROUP (OFF TIME)
;DEVICE
DEVNMAME
UPDATE
PLAYBACK FORM
(MSG DIR)
;
; ---6P uses monitor/mailbox 267 --SHOW.6P.RUNDOWN
SHOW.6P
SHOW.6P.COMPOSITE
- 2100
ss
ss@casvr-1,casvr-2
UPDATE bcs-bcw
cg
cg@casvr-1,casvr-2
UPDATE bcs-bcw
C:NEWS:500 699
cart
pdr@casvr-1,casvr-2
UPDATE bcs-bcw
3
mos
sony@mosgwy
UPDATE bcs-bcw
;
;
; ---10P uses monitor/mailbox 268 --SHOW.10P.RUNDOWN
SHOW.10P
SHOW.10P.COMPOSITE
- 130
ss
ss@casvr-1,casvr-2
UPDATE bcs-bcw
cg
cg@casvr-1,casvr-2
UPDATE bcs-bcw
C:NEWS:300 499
cart
pdr@casvr-1,casvr-2
UPDATE bcs-bcw
3
mos
sony@mosgwy
UPDATE bcs-bcw
;
;
; ---SPECIALS uses monitor/mailbox 269 --SHOW.SPECIALS.RUNDOWN
SHOW.SPECIALS
SHOW.SPECIALS.COMPOSITE - D130
ss
ss@casvr-1,casvr-2
UPDATE bcs-bcw
cg
cg@casvr-1,casvr-2
UPDATE bcs-bcw
C:NEWS:300 499
cart
pdr@casvr-1,casvr-2
UPDATE bcs-bcw
3
mos
sony@mosgwy
UPDATE bcs-bcw
The entry header must be followed by a device list.
2. Create an entry header, which specifies the following information for
each show:
•
The show’s rundown queue
•
The directory that holds the event list queue(s)
•
The composite list queue
•
Group of users who can monitor the show
509
Chapter 13 Servers
•
n
The show’s
rundown queue
The time you want the monitor to turn itself off—when you want
the system to stop monitoring the show.
The time may be enter as a specific time, such as 130 (1:30 AM) or 2100
(9:00 PM). It may also be entered as a duration, such as D130; the
monitor server will turn itself off 1 hour and 30 minutes after it was turned
on.
The directory that
holds the event
list queues
The composite list queue
The time you want
the monitor to turn
itself off
Groups
;RUNDOWN
EVENT DIR
COMP QUEUE
GROUP (OFF TIME)
;DEVICE
DEVNMAME
UPDATE
PLAYBACK FORM
(MSG DIR)
;
; ---6P uses monitor/mailbox 267 --SHOW.6P.RUNDOWN
SHOW.6P
SHOW.6P.COMPOSITE
- 2100
ss
ss@casvr-1,casvr-2
UPDATE bcs-bcw
cg
cg@casvr-1,casvr-2
UPDATE bcs-bcw
C:NEWS:500 699
cart
pdr@casvr-1,casvr-2
UPDATE bcs-bcw
3
mos
sony@mosgwy
UPDATE bcs-bcw
;
;
; ---10P uses monitor/mailbox 268 --SHOW.10P.RUNDOWN
SHOW.10P
SHOW.10P.COMPOSITE
- 130
ss
ss@casvr-1,casvr-2
UPDATE bcs-bcw
cg
cg@casvr-1,casvr-2
UPDATE bcs-bcw
C:NEWS:300 499
cart
pdr@casvr-1,casvr-2
UPDATE bcs-bcw
3
mos
sony@mosgwy
UPDATE bcs-bcw
;
;
; ---SPECIALS uses monitor/mailbox 269 --SHOW.SPECIALS.RUNDOWN
SHOW.SPECIALS
SHOW.SPECIALS.COMPOSITE - D130
ss
ss@casvr-1,casvr-2
UPDATE bcs-bcw
cg
cg@casvr-1,casvr-2
UPDATE bcs-bcw
C:NEWS:300 499
cart
pdr@casvr-1,casvr-2
UPDATE bcs-bcw
3
mos
sony@mosgwy
UPDATE bcs-bcw
-
510
Monitor Servers
You must specify the parameters in the entry header in the order indicated
in the following table.
Parameter
Definition
Rundown Queue
The full pathname of the show’s rundown queue.
Event List Directory
(Optional) The directory in which event lists are stored. The monitor server
combines information you put here with the device name. For instance, if you
specify SHOWS.6PM here and you have a still store machine called “ss1,” the
monitor server puts the still store’s event list in SHOWS.6PM.SS1. It is a good idea
to use the same directory that holds the show’s rundown. If you do not use this
field, put a dash here.
Composite List Queue
(Optional) The full pathname of the queue in which the show’s composite list is
stored. It is a good idea to put the composite list in the same directory as the
show’s rundown queue. If you do not use this feature, put a dash here.
Group of Users
(Optional) Put a security group in this field so that only superusers and people
assigned to that group can monitor the show.
Put a dash here if you do not want to restrict who can monitor the show.
Consider using different security groups for each show in a series of back-to-back
shows to prevent one show’s producer from starting or stopping another show’s
monitor server.
Off Time
The time you want the show’s monitor server to turn itself off. You can enter this
time as either a time of day or a duration. Enter the time of day in 24-hour format.
For instance, type 1915 to have the monitor server turn itself off at 7:15 PM.
Enter a duration by typing D before the value. For instance, enter a duration of
one hour and 30 minutes as D130. (These values are not case-sensitive.)
511
Chapter 13 Servers
3. List the devices used by the show; production devices for which you
want the show’s monitor server to process event requests.
;RUNDOWN
EVENT DIR
COMP QUEUE
GROUP (OFF TIME)
;DEVICE
DEVNMAME
UPDATE
PLAYBACK FORM
(MSG DIR)
;
; ---6P uses monitor/mailbox 267 --SHOW.6P.RUNDOWN
SHOW.6P
SHOW.6P.COMPOSITE
- 2100
ss
ss@casvr-1,casvr-2
UPDATE bcs-bcw
cg
cg@casvr-1,casvr-2
UPDATE bcs-bcw
C:NEWS:500 699
cart
pdr@casvr-1,casvr-2
UPDATE bcs-bcw
3
mos
sony@mosgwy
UPDATE bcs-bcw
;
;
; ---10P uses monitor/mailbox 268 --SHOW.10P.RUNDOWN
SHOW.10P
SHOW.10P.COMPOSITE
- 130
ss
ss@casvr-1,casvr-2
UPDATE bcs-bcw
cg
cg@casvr-1,casvr-2
UPDATE bcs-bcw
C:NEWS:300 499
cart
pdr@casvr-1,casvr-2
UPDATE bcs-bcw
3
mos
sony@mosgwy
UPDATE bcs-bcw
;
;
; ---SPECIALS uses monitor/mailbox 269 --SHOW.SPECIALS.RUNDOWN
SHOW.SPECIALS
SHOW.SPECIALS.COMPOSITE - D130
ss
ss@casvr-1,casvr-2
UPDATE bcs-bcw
cg
cg@casvr-1,casvr-2
UPDATE bcs-bcw
C:NEWS:300 499
cart
pdr@casvr-1,casvr-2
UPDATE bcs-bcw
3
mos
sony@mosgwy
UPDATE bcs-bcw
-
The monitor server can only process event requests for devices
specified in the device list; event requests for other devices generate
errors.
The parameters contained in the device list are explained in following
tables:
512
Monitor Servers
Parameter
Definition
Device Type
Specify the type of production device in this parameter.
n
The iNEWS newsroom computer system stores a Machine Control System
(MCS) dictionary file—named mcs—in the /site/dict directory. The
/site/dict/mcs file usually defines production device types as CG for
character generator, SS for still store machines, and CART for video
devices, such as video servers or cart machines. You must specify in the
device list a valid production device as defined in the dictionary file;
otherwise, the monitor server ignores that line and any that follow it, so it
cannot properly process event requests.
In some cases, iNEWS users may create machine control events that specify
devices by type rather than name. When the monitor server encounters such an
event, it sends it to the first device of that type defined in the show’s
SYSTEM.MAP story entry. If you have a show that uses two devices of the same
type, decide which device you want as the monitor server’s default, and define it
first in the show’s SYSTEM.MAP story entry.
Device Name
Specify the name of the production device in this parameter. If the device is
connected to the system through an MCS-PC or PC-PCU, only the device name is
needed in this parameter, such as CG1, SS, VID-A. The device name is assigned
to the production device in the iNEWS configuration file (/site/config). If
you are unsure of the device name, check its entry in this configuration file.
For devices interfaced through a ControlAir Server or MOS Gateway, the format
is:
<device name>@<ControlAir Server name>
<device name>@<MOS Gateway Server name>
In addition, a backup server may be specified. The backup server can be loaded in
place of the primary server; however, both may not be loaded at the same time.
For server pairs, the format is:
<device name>@<primary server name>, <backup server name>
Device names for ControlAir Server devices must match the device name
specified in the DMP file for one of the device managers configured on the
ControlAir Server. See the Avid iNEWS ControlAir Operations Manual for more
information.
513
Chapter 13 Servers
Parameter
Definition
Update
Specify whether you want the monitor server to update the device’s playlist when
someone modifies the rundown in this parameter. By default, these updates are
performed. Type noupdate in this parameter if you do not want the monitor
server to perform these updates.
Playback Form
Specify the form used to display each device’s machine control events. You can
use standard forms provided with your system, such as the bcs-bcw form, or
build your own. If you use a Machine Control Terminal (MCT), the standard
forms are MCT-CG, MCT-SS, and MCT-CART.
The last parameter of a device list line—Drive, Directory/User#, and so
forth—is defined in the following table.
Parameter
Definition
Parameters for Character Generators:
Drive
Select the disk drive you want the machine to use. If you leave this field empty, the
machine uses its default drive.
Directory/User#
Select the directory you want the character generator to use.
Address Range
Specify a range of addresses in this field. The monitor server uses this range to
store the forms it builds. To specify a range of addresses, enter the starting
address, followed by a space and the ending address. For instance, to reserve
addresses 1 through 199, type 1 199 in this field. The range of numbers must be
large enough to hold all character-generated graphics—also known as
supers—that monitor server is likely to build for the show. Also, ensure you do not
select a range that conflicts with the addresses the character generator uses to store
its permanent supers or CG forms.
n
Because the monitor server may skip an address to keep them contiguous
within a story, this range should be larger than the largest number of
possible addresses used.
Parameters for Still Stores:
Drive
514
Select the disk drive you want the machine to use. If you leave this field empty, the
machine uses its default drive.
Monitor Servers
Parameter
Definition
Directory/User#
If your still store machine has user numbers, use this field to specify the user
number you want to use for that show.
Stack
Specify the stack or playlist identifier you want the still store to use in this field.
Parameters for Video Machines:
Channel Assignment
This parameter specifies whether the iNEWS system, the ControlAir Workstation,
the device manager, or the video (cart) device assigns channels. Use these codes:
0 to have channels assigned by device
1 to have channel assigned by iNEWS
2 to have channels assigned by device manager
3 to have channels assigned by ControlAir Workstation
4. Save the map story.
5. Test monitor the show to ensure map story entries are functioning
correctly.
The monitor server only examines the show’s map story entry when a user
turns it on, so any changes to the show’s map story entry will not take
effect until then. Changes made to the show’s map story entry after the
show is monitored do not take effect until the next time the show is
monitored.
For this reason, you should monitor the show after creating or modifying
the show’s SYSTEM.MAP story entry to test the changes you make.
Monitoring the show allows the monitor server to check your work and
ensures smooth operation when you produce the show.
Step 6: Updating the iNEWS System Dictionaries (Optional)
Machine Control System (MCS) dictionary files in iNEWS can be
modified to customize the appearance of status indicators from various
devices. For instance, an Omnibus device, connected to iNEWS, shows a
video play-back status of “OnAir,” but the status field in the show rundown
on iNEWS shows “Play” instead. If the system administrator wants the two
515
Chapter 13 Servers
status indicators to match, the MCS dictionary file in iNEWS must be
modified. This will “translate” the iNEWS status wording so that it
corresponds to what appears on the actual device.
n
The monitor server uses the MCS dictionary to show status for all devices,
so ensure that words you choose apply to all devices. For instance, there is
no way for the play status to be “OnAir” for character generators and
“Playing” for video servers simultaneously.
Dictionary files are located in the /site/dict directory. This section
covers changes made only to the /site/dict/mcs file; if changes are
made to other dictionaries in the /site/dict directory, the procedure
may require more steps.
Editing the /site/dict/mcs Dictionary File
In the following procedure, as an example, the term “Play” is changed to
“OnAir” in the dictionary.
To edit the dictionary file:
1. Select all servers at the console, so changes you make are made to each
server’s copy of the file. See “Selecting Servers” on page 33 for more
information.
This procedure uses the
line editor. See
Appendix H for more
information.
2. Open /site/dict/mcs for editing by typing:
ed /site/dict/mcs
3. Navigate to the line with the word you want changed, such as “PLAY”
by typing:
/PLAY
The console will respond with a display similar to the following:
A_CAPLAY
/PLAY
In the above example, PLAY appears twice in the line.
n
516
When navigating in the file, remember the line editor is case-sensitive. So,
typing either /Play or /play will not locate a line with “PLAY.”
Monitor Servers
4. Substitute the new word, such as “OnAir,” for the second occurrence
of the existing word, PLAY, by typing:
s?/PLAY?/OnAir
The console will respond with a display similar to the following:
A_CAPLAY
/OnAir
n
Do not use an
uppercase (W) in step 5.
See Appendix H for
more information.
The question marks are necessary to prevent the editor from substituting
“OnAir” in place of the first occurrence of the word, “PLAY.” For
instance, typing s/PLAY/OnAir would result in the edited line
appearing as
/A_CAOnAir
/PLAY.
5. When you finish making changes to the dictionary file, save your
changes by typing:
w
6. When you press enter, a number will appear, such as 1279, indicating
the file size. You can then exit the line editor by typing:
q
n
See Appendix C for more information about Dictionary files.
If you change your existing MCS dictionary files, you must apply those
changes by running the makemctab command at the iNEWS console;
however, any monitor servers that are running at the time the command is
entered will not apply the changes. The monitor servers must be stopped
prior to running the makemctab command.
c
A system administrator who knows the device numbers for monitor
servers can choose to stop just those programs; however, it should be
done only during off-peak hours, when the monitor servers are not
used to monitor on-air shows.
517
Chapter 13 Servers
To update your iNEWS dictionaries:
The prompt endings
change from a dollar
sign ($)—indicating a
system operator
login—to a pound sign
(#)—indicating a
superuser login.
1. Select all servers.
2. At the console, type su to become a superuser and type the superuser
password. The prompts will appear as follows:
NRCS-A$ su
Password:
NRCS-A#
For security reasons, the console does not display the password you
type.
3. At the specified time, select one server and type the command list
s to check who is still logged in and which server programs are still
running.
A message similar to the following appears:
S264
2Af4
B
T11
miller
A
T82
allen
B
T101
R801
stevens
stevens
A
A
The list s command displays the device controlling the session, the
user account used for the session, and the server servicing the session.
In the example, the first line starts with an S, indicating a server
(utility) program, such as a monitor server. The 3-digit number after
the S is the device number. If you are unsure whether the device
number is that of a monitor server, check the iNEWS configuration file
(/site/config) for monitor servers and their assigned device
numbers. You can do this by using the list c command at the
console, in the following format: list c <device number>.
c
518
Server programs are only listed as a result of the list s command if
they are actually running, so they may be in use. Do not stop them
without first check with production staff to ensure you are not
stopping a monitor server that is monitoring a show that is on-air.
Monitor Servers
4. After checking with production staff, type list s again to confirm
whether all monitor servers are off.
5. Use the stop command followed by the device number(s) of monitor
servers. This further ensures they are stopped. For instance, type:
stop 264
6. Type makemctab -i to translate dictionaries used by monitor
servers.
7. Log off the iNEWS console.
Unlike other utility programs, monitor servers do not have to be restarted
from the iNEWS console. They are turned on and off from the iNEWS
Workstation.
Styles
Some sites use the monitor server alone—without any direct connection to
devices or ControlAir—to check machine control events within scripts for
errors and produce playlists that personnel can print out or refer to during
broadcasts.
Whether the monitor server in iNEWS is used alone or with ControlAir, it
must have a defined set of styles with which to compare machine control
events to work properly.
n
Styles apply to machine control events for character generators (CGs) and
still store (SS) machines. Video machines and MOS devices do not use
styles.
Styles are defined in stories located in the SYSTEM.RESOURCE queue of
the iNEWS database. Each style represents elements necessary for the
device (CG or SS) to produce a particular playback event.
n
Each device must have its own list of styles. If there are two production
devices of the same type, such as two CGs, users may assume that a style
that works on one device also works on the other. Consider creating a new
story for each device, defining the same styles for both devices to avoid
confusion. Because SYSTEM.RESOURCE stories for several devices can
519
Chapter 13 Servers
be lengthy, users can find information they need more efficiently if there is
one story per device. See “Creating Styles” on page 521 for more
information.
Styles make it easier to create event requests because they simplify the
information users must put into the request. Most importantly, styles
provide the information required for the monitor server to check machine
control events for errors, which is then reported to iNEWS users through
instant messages or by changing the color of the event when displayed in
the Story panel at an iNEWS Workstation. This information can also be
forwarded to the ControlAir system.
The following diagram shows where styles appear in the workflow.
Machine control events are anchored
to scripts at locations indicated by
production cue markers, shown below:
1. An iNEWS User
writes a script with
machine control
events and saves it
to a show's rundown
queue.
3. When the monitor
server finds errors during
the comparison, it reports
them to iNEWS users
through the Rundown
Queue, among other ways.
Styles
Rundown
Queue
2. If the monitor server is on and
checking its Rundown Queue, it
notices the newly saved script
and immediately compares the
data in machine control events
with styles provided in the
SYSTEM.RESOURCE queue.
SYSTEM.RESOURCE
Queue
Monitor Server
If you use effects in your character generator and still store styles, you
should develop a strategy for using them. How you use effects depends on
whether or not you use the ControlAir system:
520
Monitor Servers
•
If you have a ControlAir Workstation and want to include an effect in a
style, you must first define the style effect in the DMP file for the
device manager that controls the production device.
•
If you do not have a ControlAir Workstation, the effects you include in
your styles serve as instructions to your production device operators.
Develop a standard set of effect names that your production device
operators can easily understand.
Creating Styles
Styles are stored in stories, which are saved to the SYSTEM.RESOURCE
queue. These stories are created and edited like any other story in the
iNEWS newsroom computer system. However, if the queue has a write
security group assigned to it, you must belong to that group or be logged
on as a superuser to edit stories in the SYSTEM.RESOURCE queue.
c
If your SYSTEM.RESOURCE queue does not have a write security
group, one should be assigned. Because its stories define styles that
people will use to request playback events, assigning a write security
group helps ensure that only authorized personnel can edit these
stories. See Chapter 6 for more information.
To create a style:
1. At an iNEWS Workstation, navigate to the SYSTEM.RESOURCE
queue.
2. Do one of the following:
t
Open an existing story to edit.
521
Chapter 13 Servers
t
Click the File menu and select New Story. The new story is
created, and will appear with blank Story Form and Story Text
panels.
Story
Form
Panel
Story
Text
Panel
3. The story should begin with a commented header and parameter line
similar to the following:
;Resource File
;Dev
Style Template Effect
n
# of Fields ;Comments
Lines beginning with a semicolon (;) are comments and ignored by the
system. Comments may also be added to the end of lines.
4. Do one of the following:
t
If editing styles in an existing story, move to the appropriate line(s)
in the story.
t
If creating a new story, type the header as shown in step 3.
5. Enter a style entry line for the device, ensuring all parameters are
addressed, as explained in the following table. The information you
provide will vary slightly between styles for character generators and
still store machines.
522
Monitor Servers
Parameter
Definition
Device
The device name of the character generator or still store machine to which the
style applies. This name is defined in the device’s entry in the ControlAir
configuration file. For instance, CG, CG1, CG2, SS, and SS1.
Style
The name of the style. Specify a name, eight characters or less, containing at least
one alpha character. For instance, 1LINE , 2-LINE , and LLBOX are valid style
names, but 412 is not.
Template/Preset
This information differs depending on the device:
For CGs: Enter the character generator address where the pre-recorded super or
template that you want to use is located.
n
Many CGs allow alphanumeric addresses. Template addresses for these
machines can also be alpha-only addresses, which are very useful to CG
operators. Pre-recorded super addresses must be numeric only—at an
address outside the address ranges listed in the SYSTEM.MAP story.
For Still Stores: Enter the preset you want to include in the style. If the style
does not use a preset, type a dash ( - ) for this parameter. If you
specify an invalid preset, when the playlist is downloaded the
still store generates an error for event requests that use this style.
Effect
The name of a special effect you want to include in the style. If you do not want
to include a special effect, such as FADE or WIPE, type a dash for this parameter.
If you have a ControlAir Workstation and want to include an effect in a style, you
must first define the style effect in the DMP file for the device manager that
controls the production device.
If the operator plays the event requests from the device’s console, you can use any
name up to eight characters long to represent the effect you want. However,
ensure the operator is familiar with the name. When an event request uses this
style, the monitor server puts the effect name you specify here in the event list
entry for that event request. The operator uses the effect name to identify what
effect should be used when the event is played.
523
Chapter 13 Servers
Parameter
Definition
# of Fields
This information differs depending on the device:
For CGs: If the style uses a template, use this parameter to specify the number of
fields (or lines) in that template. Typing a number of fields here
specifies to ControlAir that the address refers to a template. The
number here also ensures that this style cannot be used to add more
text than there are fields in the template.
If the style uses a pre-recorded super address, type a zero here to
specify to ControlAir that this parameter refers to a specific CG
address. When you type a zero for this parameter, ControlAir ensures
that this style cannot be used to add text to the CG.
For Still Stores: If the style uses a fixed still number, put that number here.
Otherwise, type a dash for this parameter.
If you use this field, no address can be entered into the machine
control event. If you enter a dash for this parameter, you must
enter the still number with the machine control event before the
event can be loaded onto the still store’s event list, also known
as a still store stack.
6. When finished editing the styles in the story, save it by clicking the
Save button or selecting Save from the File menu.
7. Test new or edited styles by monitoring a rundown. Changes to
SYSTEM.RESOURCE stories do not take effect until a show
containing scripts with machine control events using the styles is
monitored. Also, if a monitor server is running when changes are
made, they will not take effect until it is restarted.
Some examples of styles for a character generator are shown in the sample
SYSTEM.RESOURCE story below:
;Dev
cg
cg
cg
cg
cg
cg
cg
cg
524
Style
Template
bnews
62
mm
75
lottopb
9993
world
50
nation
50
south
50
recap
52
nitetz
53
Effect
LOGO
# lines
0
1
12
1
1
1
1
1
Comment
;breaking news
;money matters
;lotto/powerball
;the world
;the nation
;the south
;recap
;11 tonight
Monitor Servers
cg
tvex
67
cg
intv1
1
cg
intv
2
cg
loc
4
cg
locdate
5
cg
date
6
cg
file
7
cg
ctsy
8
cg
sktch
10
cg
locskylv 24
cg
repsky
18
cg
loclv
19
cg
intvlv
20
cg
live
21
cg
replv
22
cg
lvsky
23
cg
rep
27
;
;special for NoonDay
cg
locn
1002
cg
innd
1001
cg
lond
1008
;
;SPORTS
cg
nl
950
cg
al
951
cg
nfl
952
cg
cf
953
cg
nba
954
cg
cbb
955
cg
nhl
956
cg
prep
957
cg
scr
960
;
; Anchors/Reporters
cg
sa
104
cg
salv
105
cg
sasky
107
WIPE
LOGO
-
0
1
2
1
2
1
0
1
1
1
1
1
2
0
1
0
1
;tv exclusive
;1 line interview
;2 line interview
;1 line locator
;locator with date
;date
;file tape
;courtesy
;sketches by
;live skycam locator
;reporter skycam
;live locator
;live interview 2 line
;live
;live generic reporter
;live skycam
;reporter not live
-
1
2
1
;1-line locator/noonday
;2 line interview noon
;live locator noon
-
10
10
10
10
10
10
10
16
4
;national league
;american league
;nfl
;college football
;nba
;college basketball
;nhl
;high school
;score lower third
-
0
0
0
; steve aveson
; steve aveson live
; steve aveson skycam
Here is an example of styles for a still store machine as shown in a sample
SYSTEM.RESOURCE story:
;picture box style
;Device
Style
Preset
Effect
Address
pb
rtbox
1
a1
-
pb
ltbox
1
a2
-
525
Chapter 13 Servers
Using the Monitor Server
This section provides some basic user information, which can be used to
test when the monitor server is set up and working properly. Procedures
include how to turn the monitor server on and off, as well as how to
instruct it to load or unload machine control event data.
To use the monitor server:
1. Log in to an iNEWS Workstation.
2. Open the appropriate rundown queue.
3. Select Tools > Monitor.
Quit Time indicates the
time that machine
control is automatically
turned off. Quit Time is
based on the run time
of the queue.
The status bar in the
iNEWS Workstation
displays the current
status of the monitor
server, such as:
MON=OFF
MON=ON
MON=LOAD
and MON=PART,
which stands for partial
device loads.
526
The Monitor Queue dialog box appears. The Quit Time or automatic
shut-off time appears at the bottom left corner of the dialog box.
4. Select a Monitor Mode based on the following options:
•
On
- turns the monitor server on and creates an event list for
each device in the rundown queue.
•
Load
- instructs the monitor server to load event lists to devices
you select.
•
Unload - clears device event lists (also known as playlists)
without turning the monitor server off.
Monitor Servers
•
Off
- turns the monitor server off, overriding the Quit Time
setting.
The Devices section of the Monitor Queue dialog box displays a list of
devices based on those defined for the rundown queue in the
SYSTEM.MAP story.
The list could include:
-
Specific devices, such as those connected through an MCS-PC or
PC-PCU
-
Servers, such as the ControlAir Server and/or MOS Gateway
Server
If you select Load, specify the device or server to load from the
Devices list, or select the All Devices checkbox to load all devices
associated with the rundown queue. To select up to three devices from
the list, without selecting all, press the Ctrl key while you click on each
item. If you select a server, the data will be loaded to all devices
associated with that server.
If you select the MOS Gateway Server that is interfacing with a device
that has multiple channels, such as an OmniBus automation system, a
second dialog box will appear, allowing you to select the channel from
a drop-down list.
5. Click OK to return to the previous dialog box.
6. Click OK again.
527
Chapter 13 Servers
Network iNEWS Systems Using Rx/Tx Links
This section introduces you to rx/tx links and explains their operation. Use
rx/tx links to transfer stories between iNEWS systems and other systems
using the Ethernet network. To send stories across a network connection,
use network rx/tx links. You can connect several servers or systems into a
network using rx/tx links.
For one system to send stories to another, it must have a Tx (transmit) link
configured. The other system must have an Rx (receive) link configured to
receive stories the tx link sends.
n
Information relevant to this section is also contained in “Assigning Field
Validation” on page 430.
Sending Story Forms
Your system can transmit story form information by sending the form
name with a story or by sending the full form with a story. The first way
reduces the time it takes the system to send a story to another system by
omitting the form and sending only the text of the story, including any text
contained in the form’s fields, and the form name. When the receiving
system gets a story without a full form, it uses the form name supplied with
the story. The form may not exist on the receiving system, but no check is
made by the rx link.
If the receiving system gives a story a new form, it fills in the fields of that
form as much as possible with the story’s original field text. For transfers
using the NSML format, if the original story had fields that are not present
in the new form, the text from those fields are stored in the field section of
the story, but are not displayed on screen and will be discarded when the
story is modified.
To ensure that transmitted stories have the same form on both systems,
instruct the system to send the full form with the transmitted stories. This is
done by adding a sendform line to the Tx job list. This instruction must
appear in the job list immediately following the scan line.
528
Network iNEWS Systems Using Rx/Tx Links
n
For transfers using the NSML format, if using the tx sendform option,
the queue on the receiving system should have the FORMS_ALLOWED
attribute. Avid recommends that if the volume of stories transferred is high,
whatever forms are used for stories should be resident on both systems,
especially when the two systems are ‘owned’ by the same customer.
Setting Automatic Update
When a new version of a story is transmitted to a queue that already
contains an older version of the same story, you usually want the receiving
system to replace the older version of the story with the new one. To do
this, enable the update trait on the queue where the received stories are
placed.
For instance, suppose an affiliate in Washington sends stories it uses for its
six o’clock show to your system as these stories are added to or modified in
the show’s rundown queue. On receipt of these stories from Washington,
your system puts them in WASHINGTON.RUNDOWN.6PM. You want your
system to dispose of old versions of stories as new versions come in from
Washington.
To set an automatic update:
1. Log in as a system administrator at an iNEWS Workstation.
2. Navigate to the queue WASHINGTON.RUNDOWN.6PM and right-click
on it.
3. Select Properties from the pop-up menu.
4. Click on the Maintain tab in the Queue Properties dialog box. See
“Maintain Tab” on page 133 for more information.
5. Click on the Update check box to turn on the update database trait in
the queue WASHINGTON.RUNDOWN.6PM.
6. Save changes and close the dialog box.
c
If you change the update trait and stories are in the queue, those
stories will not be replaced by updated versions. Turn on the trait
when the queue is empty.
529
Chapter 13 Servers
After you apply the update database trait, your system starts replacing
older versions of stories in WASHINGTON.RUNDOWN.6PM with new ones
as they come in from Washington.
If you have a tx link that sends stories to an update queue, any change you
make to a story in a queue watched by the tx link affects the copy of the
story in the other system. This includes killing a story, which causes the tx
link to notify the receiving system that the story has been killed. The
second system then kills its copy of the story as well. You can use the
ignore-del command to prevent the tx link from notifying the receiving
system when stories are killed.
Updating Queue Considerations
A story’s final destination queue and any intermediate queues through
which the story passes before reaching the destination queue must have
their update trait turned on. If not, the final destination queue does not
get updated. It does not matter if the queue where the story was created has
its update trait turned on.
The example below shows which queues must have their update trait
turned on if a story is transmitted directly from the queue in which it is
created to its final destination queue.
Transmit queue
Destination queue
Update
trait can
be on or
off.
Update
trait
should
be on.
If the story passes through an intermediate queue before reaching its destination
queue, both the intermediate queue and destination queue must have their
update traits turned on, as shown below.
Source queue
Update
trait can
be on or
off.
530
Transmit queue
Update
trait
should
be on.
Destination queue
Update
trait
should
be on.
Network iNEWS Systems Using Rx/Tx Links
Similarly, if a story received from one system is copied to another queue
for transmission to a third system, enable the update trait on every
queue through which the story passes, as shown below.
Sour ce que ue
Update
tra it can
be on or
off.
Tr ansmit que ue
Upda te
trait
should be
on.
Transmit queue
on first r ece iving
system
Destination queue
on second re ceiving
system
Update
tra it
should be
on.
Upda te
trait
should be
on.
Changing Queue Order
To have the system transmit queue ordering information, add an order
line to your network tx job list. When a local queue is ordered, information
is sent to the remote queue. That queue is ordered, identical to the local
queue. This also applies to action servers.
Ordinarily, when a queue in the transmitting system is ordered, changes are
not evident in the receiving system’s corresponding queue. This is
adequate for many queues, because their story order is not important.
However, story order is very important for other queues (for example,
rundown queues). These queues must be identical on the local and remote
systems.
Also, additions and deletions to a sorted queue on the local system do not
cause the system to transmit queue order change information. Ensure that
you turn on the sort attribute in the destination queue.
n
The destination (remote) queue must have its update trait turned on.
Adding Rx/Tx Links
If your iNEWS system is connected to the same network as another
iNEWS system, you can use network rx/tx links to allow one system to
automatically send stories to the other. For each rx or tx link, create an
entry in your system’s configuration file that defines where the link runs
and how it sets up.
531
Chapter 13 Servers
For instance, use network rx/tx links to have a networked iNEWS system
periodically send stories ready for archival to a third-party archive system
on the same network. Set these links up so that people can place stories
ready for archival in archive queues on the iNEWS system. Then, on
Sunday morning, the iNEWS system moves these stories to queues on the
archive system.
Give the iNEWS system a tx link that performs two tasks. At 3 A.M.
every Sunday, the first task moves any stories added to
ARCHIVE.SCRIPTS since the previous Sunday to
SYSTEM.TRANSFER.SCRIPTS on the archive system. Then, at 4
A.M. every Sunday morning, the second task moves any stories
added to ARCHIVE.PACKAGES that week to
FROM.NEWS.PACKAGES on the archive system.
Adding Network Links
To add network rx and tx links to your iNEWS system:
1. Ensure both systems are in the hosts file.
For two systems to use network rx/tx links to exchange stories, each
must have the name of the computer(s) used by the other system in its
hosts file.
Use the cat command to check each system’s hosts file and ensure
that necessary servers are listed. For instance, check the iNEWS
system:
NRCS-A$ cat /etc/hosts
A message similar to the following will appear:
125.0.0.1
125.0.0.2
125.0.0.3
...
NRCS-A
NRCS-B
ARCHIVE-C
The archive system’s server (ARCHIVE-C) is listed in this file. Now
check the archive system’s hosts file for NRCS-A and NRCS-B.
If you find that either system’s hosts file does not contain the names of
the computers belonging to the system to which you want it to connect,
call Avid Customer Support for help in modifying the file.
532
Network iNEWS Systems Using Rx/Tx Links
2. Choose device numbers for the links.
Reserve a range of numbers for network devices and always choose the
next available number from within that range. In the examples in this
manual, we have reserved numbers 301-399 for network devices.
To see which numbers are taken, check your system’s configuration
file. For this example, choose device number 301 for the network tx
link. On the archive system, we use device number 101 for our
network rx link.
3. Create the tx link job list queue in the database. See “Creating a New
Queue” on page 103 for more information.
This queue must be in SYSTEM.CONFIGURE. Its name must begin
with a three-digit number that matches the tx link device number.
For instance, create a queue named 301 to hold the job list. Follow the
number with a hyphen and a descriptive name, such as:
-txnet-to-archive. The full pathname of the queue would be
SYSTEM.CONFIGURE.301-txnet-to-archive.
n
Network rx links do not require job lists.
4. Open the newly created tx link job list queue.
5. Create the tx link job list story in the database.
n
Like action servers, tx links use mailbox and timed-interval tasks. Tasks
that you want the tx link to execute as soon as a story is modified in a
queue must be mailbox tasks, while those that you want the tx link to
execute at a specific time must be timed-interval tasks. See “Defining Tasks
for Servers” on page 413 for more information.
In a network tx link’s job list, you must always follow the scan line
with an open line and a put line, both of which are used only in this
type of job list.
The open line uses the open command in the following format to
open a network connection to the receiving system:
open
<computer name>[:<port>] <username> [<format>]
The computer name must match exactly with the name in the
/etc/hosts file.
533
Chapter 13 Servers
The port is the port number used by the rx link on the receiving system.
If it is omitted, the tx link program will use the port defined by the
rxnet service in its local /etc/services file; if there is not an rxnet
service defined, the tx link program will look up the FTP service in its
local /etc/services file.
The user name must have the same password on both systems.
n
If the format is HTML,
then the open
command syntax has
two more parameters.
See Chapter 14 for
more information.
n
To improve security of your tx link, apply the blacklist user trait to the user
name (account) you list here on both systems, which prevents anyone from
logging in under that name. This has no effect on name use in a job list. See
“User Traits” on page 63 for more information.
Possible formats are:
•
NSML - News Story Markup Language
•
2NSML - 2nd version of NSML contains extensions for MOS
support. Default format.
•
HTML - Hypertext Markup Language
•
SEP - Avid Netstation Story Exchange Protocol
The rxnet program uses an inactivity timer set to the system
localtimeout value. If rxnet does not receive a command within the
inactivity interval, it will exit. If the localtimeout value is zero (0), the
inactivity timer is disabled.
You must follow the open line with a put line, which uses the put
command in the following format to send stories to a queue on the
receiving system:
put
n
<target queue name>
The target queue name may be formatted using the strftime syntax,
may be whatever directory pathname that is appropriate for the target
system if not an iNEWS system, and will be automatically created if it
doesn’t exist, and if the target system allows.
If you do not name a queue, put uses the destination queue assigned to
the user you specified in the open command.
534
Network iNEWS Systems Using Rx/Tx Links
n
If you want stories you transmit to be distributed to more than one queue,
set up an action or distribution server on the receiving system to do this.
See “Adding an Action Server” on page 427 and “Adding a Distribution
Server” on page 446 for more information.
In this example, the network tx link’s job list requires two timedinterval tasks. At 3 A.M. each Sunday, the first task sends copies of
everything added to ARCHIVE.SCRIPTS in the last week to
SYSTEM.TRANSFER.SCRIPTS on the archive system. Then, at 4
A.M. every Sunday the second task sends copies of everything added to
or changed in ARCHIVE.PACKAGES to FROM.NEWS.PACKAGES
on the Archive system.
n
To ensure forms are transmitted with stories, include a sendform line in
the Tx job list. The sendform line must be added to the job list anywhere
after the scan command and applies to all following put commands. The
sendform option setting persists to the end of the current task of until a
sendform no command changes the setting within that task.
If you want any queue order changes in your scan queue to be
transmitted to your remote queue, include an order line in the Tx job
list. The order command must precede the open command to affect
the put command. Also, make sure the update trait of the
destination queue is turned on.
After the tx link has completed the first tasks, you may want it to
remove stories it sent from the scan queue. To have it do this, end both
tasks with the remove command.
n
If you use either move or remove, it must be the last command in the
task’s command set.
535
Chapter 13 Servers
The finished job list looks like the following:
You can use the following job list commands in a network tx link job
list. (These are the same commands used by action servers.)
at
bscan
dup
every
ignore
ignore-del
mailto
move
number
on
order
quiet
remove
replace
scan
send-del
sendform
validate
These are the same commands used by action servers; however, the
following commands can only be used by tx link: open, put,
publish, and extension.
The mailto joblist command’s synax is:
mailto
<recipient1> [<recipient2> ...]
The list of recipients is a space separated list; do not use commas.
The effect of this command is to send the modified story from the scan
queue as an email text message.
536
Network iNEWS Systems Using Rx/Tx Links
The sendform joblist option causes the field contents of the
modified story to be prefixed to the story's text.
The story form assigned to the modified story is used to determine
which fields are included and the order of the fields. When placing a
field into the email text message, the field will be preceded by the label
text from the story form. Each label/field pair will be put on a separate
line of the email text message. If the field does not have any label text,
the field name is used.
The AIR-DATE, MODIFY-DATE, and CREATE-DATE fields are
formatted with the strftime format: %x %X. This format can be
controlled by setting the environment variable—VT_TIME—to the
desired strftime format and including it in the action / txnet
program environment.
n
Only the modified story's text and field text if the sendform option is
"on" is put into the email text message. No production cues, anchor points,
nor attachment text is put into the email text message.
If write access for the destination queue on the receiving system in the
put command is restricted, the connection must be established with
the appropriate security to send stories to this queue. The user name
you specify in the task’s open command must belong to the necessary
group on the receiving system.
n
Usually, you assign a read group to the System directory that prevents most
users from reading stories in that directory. If you do not want to restrict
all of the System directory, consider restricting who can modify stories in
SYSTEM.CONFIGURE.
6. Add links to the configuration file on each iNEWS Server in your
system.
Changing the
configuration file
requires the use of ed,
the line editor. See
Appendix H for more
information.
a. Select all iNEWS Servers. See “Selecting Servers” on page 33 for
more information.
b. Use the ed command to open and edit the configuration file.
NRCS-A$ ed /site/config
1356
537
Chapter 13 Servers
c. Add the network tx link’s device number to a reslist line in the
appropriate host definitions. For instance, put the network tx link
on server A by adding a reslist line in its host definition
beneath the servers line, which is the last line in the host
configuration.
servers
reslist
n
The tx link must be
added to the
transmitting system and
the rx link must be
added to the receiving
system.
256 257 258 259 260 261 262 263
301
To keep the network tx link running if one of the iNEWS Servers fails, add
this line to each alternate host definition before proceeding.
7. Add a server and special line for the tx link. These lines are
generally grouped in one place in your configuration file. Append the
network tx link’s special line below the last server line using the
format shown:
special <device #> 0 txnet <mailbox> <device name>
The finished line (in bold) for the tx link should appear at the end of
the line grouping:
server
256
action
server
257
distribution 257
devname1 ;dist server
server
258
parallel
258
devname2
server
259
keyword
259
key1 ;keyword server
server
260
seek
260
seek ;seek server
server
261
ftsseek
261
- ;fts searches
server
262
ftsindex
262
- ;fts indexing
special
301
0
301
- ;tx link
txnet
256
actphon ;action svr
8. Create a special line for the rx link. Like the special line for the
tx link, place this line at the end of the file.
The general format for a network rx link configuration line is similar to
that of a network tx link:
special <device #> 0 rxnet <mailbox> <device name> [<IP
address>]
538
Network iNEWS Systems Using Rx/Tx Links
Since the rx link does not use a mailbox, place a hyphen in the mailbox
parameter. The rx link does not use the device name field, so place a
hyphen in that position, too. If an IP address is specified for the last
parameter, the rx link will only be used for connections from the
system with that IP address.
n
The rx link and tx link would be on different systems if supporting a job list
like the one shown on page 536.
The finished line should look like this:
special
Do not use an
uppercase (W) in step
3e. See Appendix H for
more information.
101
0
rxnet -
-
9. When you are done making changes to the /site/config file, save
your changes and exit the line editor by typing:
w
1401
q
10. (Optional) Use the configure command to test your configuration
changes. For instance, type:
configure /site/config ab a
11. Reconfigure the system.
a. Select the master computer (typically server A). See “Selecting
Servers” on page 33 for more information.
b. Type su to enter superuser mode and type the superuser password.
See “Entering Superuser Mode” on page 24 for more information.
c. Type:
NRCS-A# offline
NRCS-A# configure
d. Type:
NRCS-A# online
A message similar to the following appears:
A
Fri Oct
6 00:19:01 2000 msg System being configured
539
Chapter 13 Servers
e. Press Ctrl+D to exit from superuser.
f.
Repeat this step on the archive system to incorporate the network
rx link into its operation.
12. When you see the System being configured message, start the
tx link by typing restart followed by the tx link device number. For
instance:
NRCS-A$ restart 301
When the system displays a Hot-to-go message, the tx link has
been successfully started.
n
A network rx link is not restarted after you add it to your system. The
system starts the rx link automatically as soon as it receives something
from the transmitting system.
13. (Optional) Back up site files using the sitedump command
anytime you make significant changes.
540
Chapter 14
Web Publishing and Access
The iNEWS Web publishing feature allows users to publish news on the
World Wide Web (WWW) by transmitting stories to other computers in
Hypertext Markup Language (HTML) format. Web Access allows direct,
read-only browsing of the iNEWS database through the Web browser. This
chapter covers the Web publishing installation and process, as well as Web
Access.
•
•
Web Publishing
-
Setting Up Txnet to Send HTML
-
Creating an HTML Export Template
Web Access
-
The Web Server
-
Web Access Login
-
Web Access Story Templates
-
Web Access Directory and Queue Templates
-
Web Access Configuration
Chapter 14 Web Publishing and Access
Web Publishing
The configuration procedure for Avid’s Web publishing involves:
•
Setting up txnet to send Hypertext Markup Language (HTML)
•
Creating the HTML export template
•
Putting the HTML export template in a queue
After this setup is complete, Web publishing involves three steps:
1. Select a story from the news database.
2. Merge pieces of the story with an HTML export template to recreate
the story as an HTML document.
3. Use the txnet facility to put the HTML document onto another
computer, known as the Web Publishing server.
You can then revise the HTML-formatted story, as necessary, to complete
the publishing process.
Setting Up Txnet to Send HTML
To set up txnet to send HTML:
1. Establish Tx links. See “Network iNEWS Systems Using Rx/Tx Links”
on page 528 for more information.
The links (txnet) transfer stories between systems. You can send
stories to non-iNEWS systems. The only requirement is that the
receiving computer support File Transfer Protocol (FTP) so the
iNEWS Server can send stories to it.
2. Get the name of the Web server to which you will send the stories and
be sure it is listed in /etc/hosts.
3. Create a valid user account on the Web server.
4. Create that same user account on the iNEWS Server.
n
542
The Web server and iNEWS Server must have matching logins with
matching passwords.
Web Publishing
5. Create an entry in the job list for the txnet to specify sending stories in
HTML format rather than the standard iNEWS format, News Story
Markup Language (NSML).
open <computer name> <user name> HTML [<queue name>]
[<story name>]
n
The computer name can include a suffix in the form of :<port>. If
:<port> is omitted, the txnet program will use the port defined fory
the rxnet service in the /etc/services file and if there is not an
rxnet service defined, the txnet program will look up the FTP service in
the /etc/services file. This allows the txnet program to connect
to computers that use a different port for FTP connections.
a. Specify the Web publishing server name (to send the stories) as the
computer name.
b. Specify the user name that gives you access to the Web
publishing server (common user account).
c. Specify the format as HTML to enable Web publishing.
d. (Optional) Specify the <queue name> as the queue that contains
the HTML export template. If no queue is specified, a default is
used. See “Default HTML Export Template and Queue” on
page 545 for more information.
c
If you specify a queue, the entire queue name must be specified in the
open command. Otherwise, the system will issue a “Failed to get form
from...” error message when txnet is restarted. Also, if you specify a
queue that does not contain an HTML export template, Web
publishing will not work.
e. (Optional) Rather than use the default, which is the first story in
the queue, specify the story name in the queue.
Here is an example of a correctly written open command line:
open ntsrvr webtx html system.webforms.s.script-tx
6. After you have edited the txnet job list, restart txnet for your changes
to take effect.
543
Chapter 14 Web Publishing and Access
When HTML stories are placed on the Web server, they are assigned a
unique filename, similar to the following:
f6daab8.html
f6daab9.html
f6daaba.html
Additionally, a story named published.html is created in the
directory written to. The published.html file contains a listing of
each file exported to the server, in that directory, referenced by the quick
index field of the story. The format is:
<A HREF="qstamp.html">quickindex </A><BR>
Here is an example:
<A HREF="f6daab8.html">pre-show tease </A><BR>
<A HREF="f6daab9.html">bosnia </A><BR>
<A HREF="f6daaba.html">fort bragg </A><BR>
This story could be used as a base for creating an index page. Generation
of the published.html file can be turned off by a job list command
after the scan line: publish no. The default for this job list command is
yes. See “Job List Commands” on page 627 for more information.
A txnet job list command, called extension, is used to control the suffix
for file names when sending stories from txnet using the HTML format
option. The syntax is:
extension <suffix>
The <suffix> is any string of characters. When the story is output, the
story name will be constructed as:
<qstamp as 8 hexadecimal digits> . <suffix>
The <suffix> does not include the dot and will also apply to the
published file. So, instead of that file always being called
published.html, it will now be called published.<suffix>. If
no extension command is found in the job list, the suffix will be set to
html.
544
Web Publishing
Default HTML Export Template and Queue
The default HTML
export template is
shown in “Default
Story Template” on
page 562.
If you do not specify a queue in the job list where the HTML export
template resides, the system uses the default location. The default
location is constructed from the dictionary entries
Q_WEBPUB_FORMS and W_WEBPUB_FORM. These entries are
normally defined to be SYSTEM.WEBFORMS and PUBLISH-FORM
respectively; therefore, the default location is
SYSTEM.WEBFORMS.P.PUBLISH-FORM. If this queue does not
exist, or does not have an HTML export template, a hard-coded
default Web form is used instead.
Creating an HTML Export Template
The HTML export template defines the appearance of stories transmitted
out of iNEWS—that is, exported in HTML format. The template is stored
as a news database story whose text is in HTML, with optional embedded
references to story entities.
The iNEWS system contains an HTML export template to use as the
default, but you can customize it or create new templates.
Adding Story Entity References
In creating the HTML export template, you use HTML tags and add story
components or entities.
The three basic entities of a story are:
•
Field IDs
– Story information such as story title, creation
date, writer, and so forth. It is the information
you see in a Queue or Story Form panel.
•
Body
– Story text.
•
Production cue set
– Production cues entered in the Instruction
pane—to the left of a story’s text.
Specify entities in the HTML export template using an ampersand (&) to
mark the beginning of an entity and a semicolon (;) to mark the end. When
put in this notation, an entity is called a story entity reference.
545
Chapter 14 Web Publishing and Access
The following section shows the format for each story entity and its
corresponding story entity reference:
•
Field ID format is:
&f-<field_id>;[<optional format string>]
The field ID is replaced in the HTML output by information associated
with it. For instance, to create a field ID such as the title of a story to
appear in the HTML template, use the following:
<title>&f-title;</title>
You are combining HTML tags with the story entity reference. The
information in the field ID is now a title in the HTML export template,
and when it is merged with an actual story, it will contain the story’s
title, in HTML format. For instance, the title will look like this:
<title>LOTTERY-WIN</title>
The optional format string defines the format to be applied to
the field ID entity. The string applies to fields that are time-related,
such as the date or length of a story. Format strings are optional and
defaults are assumed if they are not specified. See the section on
optional format strings for more information on how to modify this
default display for date or time fields.
•
Body format is:
&body;
When encountered in the export template, it is replaced by the story
text in the resulting HTML output.
•
Production cue format is:
&aeset;
When encountered in the export template, it is replaced in the resulting
HTML output by a list of production cues defined in the production
cue set, a collection of all production cues for the story. Production
cues—also known as anchored elements—are anchored at specific
positions in the story text. How they display depends on their content
and the application displaying them.
The term aeset
stands for anchored
element set.
The rules for entity reference names are:
•
546
ASCII characters a-z, A-Z, period (.), and hyphen (-) are allowed. The
first character of a name is always in the set a- z or A-Z.
Web Publishing
n
•
A name can have a maximum of 12 characters.
•
Entity names are not case-sensitive, which means that &body, &BODY,
and &Body are equivalent.
Do not forget to precede the entity with an ampersand and close it with a
semicolon, such as &F-TITLE; or &DEFINE:P;”BR”.
The story entities are:
Entity
Explanation
&BODY;
Interpolate the story BODY section in place of the entity.
[false if story body section is empty]
[true if story body section is not empty]
&AESET;
Interpolate the story AESET section in place of the entity.
[false if story aeset section is empty]
[true if story aeset section is not empty]
&F-<name>;
Interpolate the named field from the story in place of the
entity.
If the entity is one of F-AIR-DATE, F-CREATE-DATE,
F-MODIFY-DATE, F-MOS-DURATION, F-AUDIOTIME, F-BACK-TIME, F-CUME-TIME, F-TOTALTIME, or F-TAPE-TIME, the field is output using the
strftime function.
Furthermore, a formatting string can follow these fields.
The formatting string must immediately follow the ‘;’ of the
entity and be enclosed in single or double quote characters.
See “Time and Date Fields” on page 553 for more
information.
[true if the field is present in the story]
[false if the field is not present in the story or is blank or
empty]
547
Chapter 14 Web Publishing and Access
Entity
Explanation
&IF:<entity-name>; If the entity yields a true condition, process template text up
to a closing ELSE or ENDIF in the output stream. If the
entity yields a false condition, skip over all template text up
to the next ELSE or ENDIF (not output).
Empty and blank fields are treated as a false IF condition.
Only fields which are present and contain at least one nonblank character cause a true IF condition.
&ELSE;
Terminates the first part of an IF condition. If the IF
condition was “true,” it is now treated as “false” and all
template text up to the closing ENDIF is skipped. If the IF
condition was “false,” it is now treated as “true” and all
template text up to the closing ENDIF is processed.
&ENDIF;
Terminates an IF condition or an IF/ELSE combination.
&FIELDS;
Only used for test conditions
[false if story fields section is empty or blank]
[true if story fields section is not empty]
NSML to HTML Conversion
The iNEWS system uses the News Story Markup Language (NSML) as its
native story storage format. When HTML format is selected, the txnet
program converts the NSML into HTML as stories are exported.
Various NSML tags can be redefined on export and translated to another
code, if desired. For instance, it would be possible to translate the NSML
paragraph tag into an HTML break tag (<BR>) instead of the default
HTML paragraph tag (<P>).
By placing DEFINE statements at the top of the HTML export template
before the <HTML> line, the default conversion of NSML tags into HTML
tags can be modified. Format of a DEFINE statement is:
Single or double quotes
can be used.
548
&DEFINE:<tag>;“<string>”
Web Publishing
-OR&DEFINE;<tag>;’<string>’
The string includes all characters up to the matching delimiting quote; this
allows inclusion of the other quotation mark within the string.
Standard definitions, which can be redefined, are listed below:
Opening
NSML
Tag
Output String
Closing
NSML
Tag
Output String
P
“\r\n<p>”
/P
“</p>”
I
“<i>”
/I
“</i>”
U
“<u>”
/U
“</u>”
B
“<b>”
/B
“</b>”
PI
“<i>”
/PI
“</i>”
CC
“<b><i>”
/CC
“</i></b>”
A
“\r\n<!--a-->”
/A
“\r\n<!--/a-->”
AE
“\r\n<!--ae-->”
/AE
“\r\n<!--/ae-->”
AP
“\r\n<p>”
/AP
“</p>”
MC
“\r\n<!--mc-->”
/MC
“\r\n<!-- /mc -->”
IMG
“\r\n<!--img-->”
PB
“\r\n<!--pb-->”
TAB
“\r\n<!--tab-->”
WP
“\r\n<!--wp-->”
For instance, to redefine the open paragraph conversion, use:
&DEFINE:P;“output this”.
549
Chapter 14 Web Publishing and Access
To redefine the close paragraph conversion, use:
&DEFINE:/P;“found a close paragraph tag”.
n
The delimiting quotation mark must immediately follow the end of the
entity, namely the semicolon.
To include a carriage return or a line feed, use \r and \n in the
<string>.
The display format for date or time fields can also be modified by a
DEFINE statement in the HTML skeleton form:
•
&DEFINE:<type>;“<format>”
or
&DEFINE;<type>;’<format>’
Define default formats used to convert AIR-DATE,
CREATE-DATE, and MODIFY-DATE data into date strings, and
formats used to convert AUDIO-TIME, BACK-TIME,
CUME-TIME, TAPE-TIME, MOS-DURATION, and
TOTAL-TIME data into time strings. The format includes all
characters up to the matching delimiting quote (this allows
inclusion of the other quotation mark within the format).
The “type” names used and default “formats” are:
DATE “%D %T”
TIME “%M:%S”
Format strings are defined by the strftime function.
You can still include a format string to override the default when
referencing any of these fields individually, as in:
&f-create-date;“%c”
n
A lowercase c is recommended; an uppercase C would denote the two digit
century, such as &f-create-date;”%C”.
•
550
&DEFINE:<entity name>;“<string>”
Web Publishing
Define standard entity representations for each of the four
characters: left and right angle brackets (< >), ampersand (&), and
quotation mark (“).
&DEFINE:lt;“...”
&DEFINE:gt;“...”
&DEFINE:amp;“...”
&DEFINE:quot;“...”
The default definitions are (respectively): <, >, &,
and ".
•
&SHOW:A;
Causes output of tags for locating and referencing anchors and
production cues (anchored elements). This is the default, which is
the opposite functionality prior to introduction of this entity.
The string produced whenever an NSML <a> tag is encountered
in the “template” is:
<A NAME=“A<id>” HREF=“#AE<id>”>[<id>]</A>
For an NSML <ae> tag, the string produced is:
<A NAME=“AE<id>” HREF=“#A<id>”>[<id>]</A>
The <id> is the production cue identifier, typically a small
number.
This results in strings such as “[1]” appearing as HTML
links in the text at the anchor point and also preceding the
production cue. The two links point at each other.
•
&HIDE:A;
Suppresses output of HTML anchor tags.
Empty fields and non-present fields in the HTML output are noted with
comments similar to the following:
<!-- “var-1” field is empty -->
<!-- “app1-1” field not present -->
•
&HIDE:COMMENTS;
If the &HIDE:COMMENTS; entity is processed, comments
normally generated for the conditions “field not present”
and “field is empty” will not be output to the HTML
document.
551
Chapter 14 Web Publishing and Access
This does not affect comments generated from error conditions.
•
&SHOW:COMMENTS;
Generation of these HTML comments can be turned back on
using &SHOW:COMMENTS;.
Web Story Directives
Any story can contain Web Story directives. Directives are included
as text. This allows system administrators to embed HTML codes
within stories. Without these directives, characters and symbols
such as the greater than sign (>) would normally be translated to
> and not appear as HTML coding when exported to the Web
server.
Directives
Explanation
#HTMLSTART#
All text in the story after this directive is processed as literal
text. Four characters—<, >, &, and ”— are output without
being converted into HTML entities. Furthermore, all NSML
tags are stripped from the input stream so they are not
converted. However, to make viewing the HTML source a
little easier, each paragraph closing tag is converted and
output as a Carriage-Return / Line-Feed pair.
#HTMLEND#
This will terminate the processing of story text as literal text.
Using Optional Format Strings
Optional format strings apply to date and time-related fields that you use
for the field ID story entity references. You can add several time or date
elements together (after the field ID) to create an optional format string,
which changes the presentation of the time or date information field.
n
552
The optional time format strings must be enclosed within quotes in the
HTML export template.
Web Publishing
Time and Date Elements
The time and date elements to use in an optional format string to modify
date and time field ID areas may vary depending on the version of Linux.
Use info strftime at the console to get the format directives.
The difference between %U and %W is which day is considered the first
day of the week. Week number 01 is the first week in January, with a
Sunday for %U or a Monday for %W. Week number 00 contains those
days before the first Sunday or Monday in January for %U and %W,
respectively.
Time and Date Fields
See “Form Field Types
and Definitions” on
page 214 for more
information.
Only certain fields—those relating to time and date—can recognize the
optional format string, made up of the time and date elements. Specify
these fields in field IDs, using the types shown here:
Field Type
Description
Default Format
AIR-DATE
The date and time a story %D %T
airs, using the show timing
function
CREATE-DATE
Seconds since January 1,
1970 00:00:00 GMT
%D %T
MODIFY-DATE
Seconds since January 1,
1970 00:00:00 GMT
%D %T
MOS-DURATION
Runtime, in seconds, of a %M:%S
MOS item that is inside
the Story Form
AUDIO-TIME
%M:%S
Audio read time of the
story in seconds. Normally
based on read rate and
word count, but can be
entered by the user
553
Chapter 14 Web Publishing and Access
Field Type
Description
Default Format
BACK-TIME
Hard in-time of the story, %M:%S
in seconds
CUME-TIME
Hard out-time of the story, %M:%S
in seconds
If you use field names in the field IDs without creating an optional format
string, default formats for the field types, as listed in the previous table’s
“Default Format” column, are used.
Time and Date Field Example
For instance, you decide to include a story creation date in the HTML
template. Instead of using defaults provided for the CREATE-DATE field
(%D %T - date as %m/%d/%y and time as %h:%m:%s), you want the
creation date information to appear differently.
1. Choose the following date and time elements:
•
%a – Abbreviated weekday name
•
%B – Full month name
•
%d – Day of month (01 - 31)
•
%Y – Year as ccyy
•
%r – Time as %I:%M:%S [AM|PM]
2. Enter elements in the optional format string, enclosing the string
within quotes.
The field_ID story entity reference looks like this:
&f-create-date;“%a %B %d %Y %r”
The field_ID is embedded in HTML format tags. If the HTML
export template is applied, the entry looks like this:
<b>CREATE-DATE:</b>&f-create-date;“%a %B %d %Y %r”
Data from the field would appear on the page similar to this:
CREATE-DATE: Sat July 10 2004 5:30:45 PM
554
Web Publishing
n
Without the spaces between each element inside the quotation marks—such
as, “%a%B%d%y%r”—the date will appear as one continuous word. For
instance: CREATE-DATE: SatJuly1020045:30:45PM
A Sample HTML Export Template
The following sample shows a news story in an iNEWS HTML export
template used to define the appearance of the story, and the resulting
HTML output.
Characteristics of the Story
The story has the following characteristics:
•
TITLE field with an associated value TEASE-BREAK
•
MODIFY-DATE field with an associated value 862347754
•
PRESENTER field with an associated value SB*
•
PAGE-NUMBER field with an associated value 75
•
Two production cues (each formatted in its own paragraph):
VO ENG
Coming Up Next…
•
Story text:
(BELL)
STILL AHEAD ON EYEWITNESS NEWS...
THE MAXWELL CLUB HONORS SOME OF OUR AREA'S BEST HIGH
SCHOOL FOOTBALL PLAYERS. YOU'LL MEET THEM... COMING UP.
555
Chapter 14 Web Publishing and Access
Contents of the Export Template
An HTML export template is applied to the story. The template’s contents
look like this:
<html>
<head>
<title>&f-title;</title>
<h1>
&f-title;
</h1>
</head>
<body>
<!--This is an example of an iNEWS HTML template.-->
<table border="4" width="100%">
<tr>
<td colspan=1 align="left" width="10%">
<b>PAG:</b>&f-PAGE-NUMBER;
</td>
<td colspan=1 align="left" width="40%">
<b>MOD-DATE:</b>&f-modify-date;
</td>
<td colspan=1 align="left" width="50%">
<b>PRESENTER:</b>&f-PRESENTER;
</td>
</tr>
<tr>
<h2><th colspan=2 align="left" align="left">Story:
</th></h2>
</tr>
<tr>
<td colspan=2 align="left" width="100%"> <p>&BODY;
</td>
</tr>
<tr>
<h2><th colspan=2 align="left" >Anchored Element
List:</th></h2>
</tr>
<tr>
556
Web Publishing
<td colspan=2 align="left" width="100%">
&AESET;
</td>
</tr>
</table>
</body>
</html>
The next section shows the HTML output as a result of this process.
Resulting HTML Output
<html>
<head>
<title>TEASE/BREAK</title>
<h1>
TEASE/BREAK
</h1>
</head>
<body>
<!--This is an example of an iNEWS HTML form.-->
<table border="4" width="100%">
<tr>
<td colspan=1 align="left" width="50%">
<b>PAG:</b>75
</td>
<td colspan=1 align="left" width="40%">
<b>MOD-DATE:</b>04/29/97 14:02:34
</td>
<td colspan=1 align="left" width="50%">
<b>PRESENTER:</b>SB*
</td>
</tr>
557
Chapter 14 Web Publishing and Access
<tr>
<h2><th colspan=2 align="left" align="left">Story:
</th></h2>
</tr>
<tr>
<td colspan=2 align="left" width="100%">
(BELL)
STILL AHEAD ON EYEWITNESS NEWS...
THE MAXWELL CLUB HONORS SOME OF
OUR AREA'S BEST HIGH SCHOOL FOOTBALL
PLAYERS.
YOU'LL MEET THEM... COMING
UP.
</td>
</tr>
<tr>
<h2><th colspan=2 align="left" >Anchored Element
List:</th></h2>
</tr>
<tr>
<td colspan=2 align="left" width="100%">
<p><I>VO ENG</p>
<p>Coming Up Next…
</td>
</tr>
</table>
</body>
</html>
558
Web Access
Web Access
The Web Access software is normally installed with your iNEWS
newsroom computer system, which:
•
Accesses the database
•
Formats the story the user selects into Hypertext Markup Language
(HTML), using the default HTML export template
•
Presents the story to the user’s Web browser
Format of information sent to the user’s Web browser is configurable by
the system administrator. How the directory listing, queue contents, and
stories are converted to HTML for presentation are governed by HTML
templates inside the database.
The Web Server
The Apache Web server is loaded on iNEWS Servers as part of the Linux
system, and automatically launches when those servers are booted. You
can check to see if the Apache Web server is currently running on your
system by pointing your browser to:
http://<servername>
The <servername> is the iNEWS Server name you normally log in to
from the iNEWS Workstation. If the Web server is running, you should see
a test page with the Apache logo.
Web Access Login
You must have at least one Web session configured on your system to log
in over the Web. The format of a Web session resource in the
/site/config file is:
websession
<session number>
such as:
websession
401
559
Chapter 14 Web Publishing and Access
Each websession <session number> must be included in a
reslist list in each appropriate host section of the /site/config
file.
To log in to the iNEWS database with a Web browser, point the browser to
the following URL:
http://<servername>/cgi-bin/NewsWeb
This will open a page containing a drop-down list of iNEWS Servers
accessible via the Web. When you select one of those servers and click
submit, you will be taken to a login screen. If you know the servers
configured for Web Access, you may include their names in the URL to go
directly to the login dialog page:
http://<servername>/cgi-bin/NewsWeb.nrcs-a
At the login dialog screen, enter your user name and password and click
login. When logging in over the Web for read-only database access, group
security on the system is respected. Users who do not have access to
queues and directories protected by a read-group will not see those areas
when they log in over the Web.
n
The message of the day screen is not displayed when logging in via a Web
browser.
Web Access Story Templates
When users view a story in their Web browser, the system presents the
story in HTML format. The appearance of this story is configurable by the
system administrator via a Web Access template, similar to the HTML
export templates used for Web publishing.
When accessing iNEWS over the Web, the story form assigned to a story is
noted and a corresponding Web Access form is searched for under queues
specified by the Q_WEBACC_FORMS entry in the system’s queues
dictionary. The default location for the Web Access form (HTML export
template) is SYSTEM.WEBFORMS.
The appropriate Web Access form is sought from:
SYSTEM.WEBFORMS.<first letter of story form>.
<story form>.
560
Web Access
For instance, if the form assigned to the story was called script, then the
Web Access form—that is, the top HTML export template—in the queue,
SYSTEM.WEBFORMS.S.SCRIPT would be used to display the story.
Stories assigned the rundown story form would be displayed with the
Web Access form in SYSTEM.WEBFORMS.R.RUNDOWN. Stories
assigned the memo story form would look for the top HTML export
template in the queue, SYSTEM.WEBFORMS.M.MEMO, for their display
on the Web browser.
If a corresponding Web Access form was not created, the system uses the
HTML export template in the default Web Access queue as specified by
the W_WEBACC_FORM entry in the words dictionary. The default value is
ACCESS-FORM. So, a story assigned a form that does not have a
corresponding SYSTEM.WEBFORMS queue will be displayed with the
system-wide default HTML export template in
SYSTEM.WEBFORMS.A.ACCESS-FORM.
n
If a system-wide default Web Access form has not been created, the story
will be displayed with a hard-coded default.
The following Web Access form locations will be checked, in order, for an
HTML export template to display stories:
1. SYSTEM.WEBFORMS.<first letter of story
form>.<story form>
2. SYSTEM.WEBFORMS.A.ACCESS-FORM
3. Hard-coded internal default
You may create HTML export templates to define the appearance of stories
viewed via a Web browser. The export template is stored as an iNEWS
database story whose text is in HTML with optional embedded references
to story entities. The iNEWS system contains an HTML export template to
use as the default, but you can customize it or create new templates, using
story entities. A full listing of all entities available to Web Access forms
used for database browsing appears in “Template Entities” on page 564.
n
The same HTML export templates set up on your system for exporting
stories in HTML format can also be used when browsing the database over
the Web. See “Adding Story Entity References” on page 545 for more
information.
561
Chapter 14 Web Publishing and Access
Default Story Template
The following is the default story template, provided with the iNEWS
software.
<html>
<head>
<title>&F-TITLE;</title>
</head>
<body>
<table border=4 width='100%'>
<tr>
<td colspan=1 width='50%'><b>CREATED BY:</b>&F-CREATE-BY;
</td>
<td colspan=1 width='50%'><b>CREATED:</b>&F-CREATE-DATE;
</td>
</tr>
<tr>
<td colspan=1 width='50%'><b>PAGE:</b>&F-PAGE-NUMBER;
</td>
<td colspan=1 width='50%'><b>MODIFIED:</b>&F-MODIFY-DATE;
</td>
</tr>
<tr><h2>
<th align=left colspan=2>Story:
</th></h2>
</tr>
<tr>
<td colspan=2 width='100%'>&BODY;
</td>
</tr>
<tr><h2>
<th align=left colspan=2>Anchored Element List:
</th></h2>
</tr>
<tr>
<td colspan=2 width='100%'>&AESET
</td>
</tr>
</table>
</body>
</html>
562
Web Access
Web Access Directory and Queue Templates
The iNEWS system allows the system administrator to customize the
display of directory listings and listings of a queue’s contents via systemwide directory and queue HTML export templates rather than predefined
formats. However, it is not necessary to customize directory and queue
templates. Defaults can be used, if desired. See “Default Directory
Template” on page 570 and “Default Queue Template” on page 571 for
more information.
The template used for directory pages is located in the queue defined by
the Q_WEBACC_FORMS and W_WEBACC_FORM definitions
(SYSTEM.WEBFORMS.A.ACCESS-FORM). To distinguish this
directory template from the story template, the directory template is
identified by having the word directory as the first word in the index
field (also known as the sortfield). Only a single template is required for
directory page construction.
The template used for queue pages is located in the queue defined by the
Q_WEBACC_FORMS definition and the queue form name assigned to the
queue being displayed. This is similar to how story forms are handled. To
identify the template as a queue template, the word queue must appear as
the first word in the index field (also known as the sortfield). This allows
both the queue template and story template with the same name to reside in
the same queue.
If a queue template is not found using the queue form name of the queue,
the system looks in the queue defined by the Q_WEBACC_FORMS and
W_WEBACC_FORM definitions, similar to story templates. The queue
template is identified with the word queue as the first word in the index
field.
Put the system-wide default Web Access form (HTML export template) at
the top of the SYSTEM.WEBFORMS.A.ACCESS-FORM queue. Place
stories titled directory and queue beneath the form used by default to
display story contents.
563
Chapter 14 Web Publishing and Access
Template Entities
The following table lists all of the available entities that can be placed in
either a story, directory, or queue template. The Q- and D- entities are only
valid for Web Access. They are not available for Web Publishing. If an
entity is not valid for a certain type of template, it is noted in the entity
description.
Each entity has IF condition definitions included following the text
handling description. If an entity is not valid for a certain type of template,
it will always result in a false condition when tested. Empty and all blank
fields produce a false IF condition. Only fields present in the story and
containing at least one non-blank character cause a true IF condition.
n
Do not forget to precede the entity with an ampersand and close it with a
semicolon, such as &F-TITLE; or &DEFINE:P;”BR”
Entity
Explanation
&BODY;
Interpolate story BODY section in place of entity.
[false if story body section is empty]
[true if story body section is not empty]
&AESET;
Interpolate story AESET section in place of entity.
[false if story aeset section is empty]
[true if story aeset section is not empty]
564
Web Access
Entity
Explanation
&F-<name>;
Interpolate the named field from the story in place of the
entity.
If the entity is one of F-AIR-DATE, F-MOS-DURATION,
F-CREATE-DATE, F-MODIFY-DATE, F-AUDIO-TIME,
F-BACK-TIME, F-CUME-TIME, F-TOTAL-TIME, or
F-TAPE-TIME, the field is output using the strftime
function.
Furthermore, a formatting string can follow these fields. It
must immediately follow the ‘;’ of the entity and be
enclosed in single or double quotation marks.
Default format for the *-DATE fields is “%D %T”. Default
format for the *-TIME fields is “%M:%S”.
[true if the field is present in the story]
[false if the field is not present in the story or is blank or
empty]
&IF:<entity-name>;
If the entity yields a true condition, process template text
up to a closing ELSE or ENDIF in the output stream. If
the entity yields a false condition, skip over all template
text up to the next ELSE or ENDIF (not output).
Empty and blank fields are treated as a false IF condition.
Only fields which are present and contain at least one
non-blank character cause a true IF condition.
&ELSE;
Terminates the first part of an IF condition. If the IF condition was “true,” it is now treated as “false” and all template text up to the closing ENDIF is skipped. If the IF
condition was “false,” it is now treated as “true” and all
template text up to the closing ENDIF is processed.
&ENDIF;
Terminates an IF condition or an IF/ELSE combination
&FIELDS;
Only used for test conditions
[false if story fields section is empty or blank]
[true if story fields section is not empty]
565
Chapter 14 Web Publishing and Access
Entity
Explanation
&REPEAT;
Bracket a section of the template text, up to an
ENDREPEAT entity. The bracketed text will be processed
for each object to be displayed on the page. This is only
valid for directory and queue templates. If there are no
objects to be displayed, the directory or queue is empty,
and all of the bracketed text is skipped over.
&ENDREPEAT;
Terminates a REPEAT section. If there is another subdirectory or queue entry to be displayed on the page, template processing will continue at the preceding REPEAT
entity. If there are no more objects to be displayed, template processing continues at the point following this
entity.
&D-CHILD;
Interpolate current subdirectory name in place of the
entity. Not valid for queue or story templates.
[always true]
&D-COUNT;
Interpolate number of sub-directories contained in current directory. This is intended primarily for test conditions, to determine if a directory is empty. Not valid for
queue or story templates.
[false for empty directory]
[true for directory with at least one entry]
&D-CURRENT;
Interpolate a link reference, such as HREF, to current subdirectory entry in place of the entity. Not valid for queue
or story templates.
[false for an empty directory]
[true for a directory with at least one subdirectory]
&D-DIRECTORY;
Nothing, only used for test condition. Not valid for queue
or story templates. This is the opposite of D-QUEUE.
[true if the current subdirectory is a directory]
[false if the current subdirectory is a queue]
&D-LOGOUT;
Interpolate a link reference, such as HREF, which includes
a Web Access server logout request in place of the entry.
[always true]
566
Web Access
Entity
Explanation
&D-NAME;
Interpolate the current directory name in place of the
entity.
[always true]
&D-PARENT;
Interpolate a link reference, such as HREF, to the parent
directory of the current directory in place of the entity.
[false when current directory is the root directory]
[true when current directory is not the root directory]
&D-QUEUE;
Nothing, only used for test condition. Not valid for queue
or story templates. This is the opposite of D-DIRECTORY.
[true if the current subdirectory is a queue]
[false if the current subdirectory is a directory]
&D-SERVER;
Interpolate the server name (computer name) in place of
the entity.
[always true]
&Q-COUNT;
Interpolate number of queue entries contained on current
page. This is intended primarily for test conditions, to
determine if a queue is empty. Not valid for directory
templates.
[false for empty queue]
[true for queue with at least one entry]
[always true for story template]
&Q-CURRENT;
Interpolate a link reference, such as HREF, to current
queue entry in place of the entity. This includes the complete URL-string to identify the current story position
within the queue. Not valid for directory templates.
[false for empty queue]
[true for queue with at least one entry]
[always true for story template]
&Q-HREF;
alias for Q-CURRENT (preferred name)
567
Chapter 14 Web Publishing and Access
Entity
Explanation
&Q-LOGOUT;
Interpolate a link reference, such as HREF, which includes
a Web Access server logout request in place of the entry.
[always true]
&Q-MODIFY-DATE;
Interpolate modified time of current queue entry in place
of the entity. Not valid for directory templates. The modified time is formatted using the strftime function with
a default format definition of “%D %T”. This format can
be redefined via the DEFINE:DATE entity described
below. Just as with *-DATE fields, you can supply a format following this entity.
n
This is the queue entry modified time and NOT the
story modified time.
[always true]
&Q-NAME;
Interpolate current queue name in place of the entity.
[always true]
&Q-NEXT;
Interpolate a link reference, such as HREF, to the next
queue entry within the queue. This includes the complete
URL-string to identify the next queue entry position
within the queue. Not valid for directory templates.
[false in queue template when current page contains last
queue entry]
[true in queue template when current page does not contain last queue entry]
[false in story template when current story is the last story
in the queue]
[true in story template when current story is not the last
story in the queue]
&Q-PARENT;
Interpolate a link reference, such as HREF, to parent directory of current queue in place of the entity.
[always true]
568
Web Access
Entity
Explanation
&Q-PREV;
Interpolate a link reference, such as HREF, to the previous
queue entry within the queue. This includes the complete
URL-string to identify the previous queue entry position
within the queue. Not valid for directory templates.
[false in queue template when current page contains first
queue entry]
[true in queue template when current page does not contain first queue entry]
[false in story template when current story is the first
story in the queue]
[true in story template when current story is not the first
story in the queue]
&Q-QUICK-INDEX;
Interpolate quick index contents of current queue entry.
Not valid for directory templates.
n
Twenty (20) characters are always interpolated.
This is different than story field contents where
only the text present is interpolated.
[always true]
&Q-SERVER;
Interpolate the server name (computer name) in place of
the entity.
[always true]
&Q-STORY-TIME;
Interpolate story read time of current queue entry in place
of the entity. Not valid for directory templates. The modified time is formatted using the strftime function with
a default format definition of “%M:%S”. This format can
be redefined via the DEFINE:TIME entity described
below. Just as with *-TIME fields, you can supply a format
following this entity.
[always true]
See “NSML to HTML Conversion” on page 548 for more information.
569
Chapter 14 Web Publishing and Access
Default Directory Template
The following is the default directory template included with the iNEWS
software:
<html>
<head>
&IF:D-PARENT;
<title>&D-SERVER;</title>
&ELSE;
<title>&D-SERVER;:&D-NAME;</title>
&ENDIF;
</head>
<body><a name=top></a>
<h3>
&IF:D-PARENT;
<img hspace=5 src=’/icons/folder.open.gif’>[&D-SERVER;]&D-NAME;
&ELSE;
<img hspace=5 src='/icons/comp.gray.gif'>[&D-SERVER;]
&ENDIF;
</h3>
<img src='/icons/blank.gif' hspace=5><a href=&DLOGOUT;>[Logout]</a>
&IF:D-PARENT;
<a href=&D-PARENT;>
<img src='/icons/back.gif' hspace=5 border=0>Return to Parent
Directory
</a>
&ENDIF;
<hr>
&IF:D-COUNT;
&REPEAT;
<a href=&D-CURRENT;>
&IF:D-QUEUE;
<img src='/icons/text.gif’ hspace=5 border=0>
&ELSE;
<img src='/icons/folder.gif’ hspace=5 border=0>
&ENDIF;
&D-CHILD;
</a>
<br>
&ENDREPEAT;
&ELSE;
<img src='/icons/blank.gif' hspace=5>[Empty]<br>
&ENDIF;
</body>
</html>
570
Web Access
Default Queue Template
The following is the default queue template included with the iNEWS software:
<html>
<head><title>&Q-SERVER;:&Q-NAME;</title></head>
<body>
<a name=top></a>
<h3>
<img src='/icons/folder.open.gif' hspace=5>
[&Q-SERVER;]&Q-NAME;
</h3>
<hr>
<img src='/icons/blank.gif' hspace=5><a href=&QLOGOUT;>[Logout]</a>
<a href=&Q-PARENT;>
<img src='/icons/back.gif' hspace=5 border=0>Return to Parent
Directory
</a>
&IF:Q-COUNT;
&IF:Q-PREV;
<a href=&Q-PREV;>
<img src='/icons/left.gif' hspace=5 border=0>[Previous Page]
</a>
&ENDIF;
&IF:Q-NEXT;
<a href=&Q-NEXT;>
[Next Page]<img src='/icons/right.gif' hspace=5 border=0>
</a>
&ENDIF;
<pre>
&REPEAT;
<a href=&Q-CURRENT;>
<img src='/icons/script.gif' hspace=5 border=0>
&Q-QUICK-INDEX; &Q-MODIFY-DATE;
</a>
<br>
&ENDREPEAT;
</pre>
571
Chapter 14 Web Publishing and Access
<img src='/icons/blank.gif' hspace=5><a href=&QLOGOUT;>[Logout]</a>
<a href=&Q-PARENT;>
<img src='/icons/back.gif' hspace=5 border=0>Return to Parent
Directory
</a>
&IF:Q-PREV;
<a href=&Q-PREV;>
<img src='/icons/left.gif' hspace=5 border=0>[Previous Page]
</a>
&ENDIF;
&IF:Q-NEXT;
<a href=&Q-NEXT;>
[Next Page]<img src='/icons/right.gif' hspace=5 border=0>
</a>
&ENDIF;
&ELSE;
<img src='/icons/blank.gif' hspace=5 border=0>[Empty]<br>
&ENDIF;
</body>
</html>
Web Access Configuration
Error messages returned by the Web Access server can be adjusted by
editing a system dictionary. In addition, various default parameters can be
adjusted.
Configuration parameters for the Web Access server must be included in
the file /site/web/configuration, accessible by the Web Access
server on the computer on which the Web Access server is running. This
file is read once when the Web Access server starts.
announce attempted logins=<value>
If the value is non-zero, all unsuccessful logins will be printed on the
console. This includes failures due to an unknown user name, an
invalid password, or a blacklisted user. The default is zero (0).
572
Web Access
announce logins=<value>
If the value is non-zero, all logins will be printed on the console. The
default is zero (0).
diagnostics=<value>
This is primarily for debugging purposes. The value is a bitmask,
which controls printing of diagnostics. For instance, if the value is odd,
such as the 1 bit is on, a diagnostic is printed every time a session is
requested but all session licenses are in use.The default is zero (0).
hard expire = <seconds>
Number of seconds of inactivity which will force a reauthentication by
the user and release the Web session for another user to log in to. The
default is 1200 (20 minutes).
putenv=<environment string>
Allows environment settings to be put into the initial environment. The
environment string should be of the form name=value. This will be
primarily used for debugging purposes.
queue entries per page = <number>
Number of stories to put on a queue page. This can be a number from 1
to 50. The default is 50.
soft expire = <seconds>
Number of seconds of inactivity before the session license can be
reused for another session. This will only affect a user if the server gets
a session request and does not have any free session licenses. The
server attempts to obtain the oldest session license—that is, the one
that has been inactive the longest. If that session has been inactive for
more than the soft expire interval, it will be reused. (Anytime a session
is inactive for more than the hard expire interval, the user will be
required to reauthenticate the session.) The default is 300 (5 minutes).
The following definitions must be present in the file
/site/web/strings, accessible by the Web Access server on the
computer on which the Web Access server program is running. The format
of this file is the same as all dictionary files. This file is read once when
the Web Access server starts. Definitions can be localized, as necessary.
session error
/iNEWS news session error
573
Chapter 14 Web Publishing and Access
574
session login
/iNEWS news session login
session terminated
/Your iNEWS news session has been
successfully terminated!
offline
/iNEWS news is offline.
try again later
/Please try again later.
cannot set subdirectory
/Cannot set subdirectory.
cannot open dir file
/Cannot open directory file.
cannot open queue
/Cannot open queue.
cannot access
/Cannot access
invalid certificate
/Invalid session certificate
no license
/No Web Access licenses available.
name
/Name:
password
/Password:
login
/Login
clear login
/Clear Form
enter login
/Please enter your name and password
reauthenticate
/iNEWS news Web session reauthentication
session expired
/Your iNEWS news session authentication has
expired
reenter login
/Please re-enter your user name and password.
not authorized
/You are not authorized to access the iNEWS
database
Web Access
bad login
/The user name and/or password you entered
are not valid.
no login see admin
/If you do not have a login, see your system
administrator.
story unavailable
/You cannot access this story.
cgi short post
/input length less than CONTENT_LENGTH
cgi empty post
/CONTENT_LENGTH is missing
cgi empty query
/QUERY_STRING is null
cgi unknown request
/unknown REQUEST_METHOD
cgi expression error
/Expression error
cgi upload error
/Create of upload file failed
cgi no request
/REQUEST_METHOD is missing
;
;Used by “NewsWeb” script
;
no servers
/There are no iNEWS Servers configured.
server session
/iNEWS Server selection
server error
/iNEWS Server selection Error
server admin
/See your system administrator
server submit
/submit
server select
/Please select an iNEWS Server and click on
“submit.”
575
Chapter 14 Web Publishing and Access
576
Appendix A
Command References
Most of your system’s commands are special commands provided by Avid.
The commands you are most likely to need are listed and explained in this
appendix, along with examples.
c
Some available commands are meant to be used only by Avid
technicians or under the supervision of Avid personnel. These
commands may cause damage if used improperly. They are listed in
this appendix on page 578.
This appendix contains the following main sections:
•
Programs Invoked by iNEWS
•
Commands Used by Avid Personnel Only
•
Linux Commands Used in iNEWS
•
Console Control Commands
•
Console Server Commands
•
Job List Commands
•
Dialog Commands
Appendix A Command References
Programs Invoked by iNEWS
The following programs are invoked and used by your iNEWS system. Do
not use them as commands.
action
ftsseek
nxserver
bio.conf
gnews
parallel
bioserver
ismessage
prtscanner
boot
keyword
rxnet
brand
license
seek
cgi-fcgi
mailserver
server
connect.sh
mct
snews
console
monitor
start
copyright
monserver
telex
disconnect
news
txnet
distribution
newsmail
webaccserver
ftsindex
NewsWeb.fcgi
workserver
Commands Used by Avid Personnel Only
The following commands are used by Avid personnel only.
578
attach
dblock
msgdebug
bdump
dbprint
nsupgrade
binhex
dbsize
poke
biodebug
detach
qcheck
Linux Commands Used in iNEWS
biosleep
diddle
qstampcheck
biostat
download
qxcheck
catcheck
finit
rcat
ccuputwire
ftsdebug
traverse
ccuq
ifis
unjumble
ccureset
ifmaster
userclean
ccuspeed
ifsu
wdump
ccutime
iftapeis
workdebug
dbcopy
keycheck
wxlate
dbgen
kwdcheck
xi
dblinks
load
Linux Commands Used in iNEWS
The following Linux commands are available in iNEWS. For further
information, see the reference material that came with your Linux system.
To obtain command syntax and other usage information, type the man
command along with the command name. For instance, to get information
about the grep command, type:
man grep
cat
kill
pwd
cp
more
rm
date
mv
sync
df
passwd
telnet
grep
ps
579
Appendix A Command References
Console Control Commands
The table below lists available console control commands and their functions.
Keyword
Explanation
bottom
Moves you to the newest (bottom) line in the history.
computer
[computer-name(s) | *]
Selects one or more of your system’s servers, so that you can type a
command on the selected server(s). The command may be
abbreviated: typing c or computer plus the computer name(s) of
the servers you want to select will work. Type the command plus an
asterisk (*) to select all servers, such as c *.
down [number-of-lines |
keyword>
Moves you that many lines forward (down) in the history.
•
down number-of-lines moves you that many lines forward
in the history. For example, typing down 30 moves you forward
30 lines. If you follow down with a number greater than the
number of lines between your current position and the last line in
the history, the down command moves you to the last (newest)
line in the history.
•
down keyword searches forward through the history from your
current position for that word. For example, to search forward for
a line containing the word, list, type: down list.
The down command is not case sensitive. If you specify PEOPLE,
people is a valid match. If the system does not find the keyword
before reaching the bottom of the history, the console beeps and
you are returned to the current line.
•
down with no parameter moves you down one line.
A wildcard character (#) can be used to match any character or to a
search for a number. For instance, down 160# will search for the
number 160 instead of moving down 160 lines.
580
Console Control Commands
Keyword
Explanation
Exit Function
To leave the console program and return to the MS-DOS prompt:
1. Press the Command key.
2. Press Ctrl+E.
3. Press Enter.
(You cannot type exit at the Command prompt.)
Type console at the prompt to restart the console program.
function-key-number=
definition
Assigns a command to a console function key. For instance, to assign
the list s command to the F9 key, type f9=list s. To include
Command and Enter keys in a function key definition, use braces. For
instance, to include those keystrokes in the previous assignment
example, type f9={list s}. To list the current assignment of a
function key, type the key number by itself plus Enter on the
command line. The valid range is f1-f14. Avid recommends no
definition be made for F14, which defaults to the Command key. F13
corresponds to the plus (+) key on the numeric keypad.
list [#-of-lines | all]
Sends some number of lines of the history to the printer attached to
the console multiplexor.
•
list followed by a number, such as list 3, prints that many
lines of the history beginning at the current line.
•
list all prints everything from the current line to the
newest line.
•
list with no parameter prints the current line.
When using list, the word PRINTER appears on the command
line. If PRINTER is displayed but nothing is being printed, ensure
that the printer is plugged in, turned on, online, and has paper. The
console assumes a printer is connected to the PC’s parallel port,
where output is sent. To cancel a list command while output is
printing, press any key; printing stops and your position in the history
moves to the last line sent to the printer.
logclose
Writes all history currently in memory to disk and then disables disk
logging. You can use it to change log disks.
logopen
Resumes history disk logging after it has been disabled with
logclose.
581
Appendix A Command References
Keyword
Explanation
logout
Logs you out from a remote console. To log out, press the Escape key
and type logout. The remote console displays the
PASSWORD prompt, and you can then hang up your modem.
modem
Typed at the main console, this command logs out a remote console
user. Before you type this command, ensure that the remote console
user is not in the middle of an operation. The command may be
abbreviated: typing m or modem will work.
print [number-of-lines | Displays a number of lines of the history on the console screen.
all]
• print followed by a number displays that many lines of the
history beginning at the current line.
•
print all displays everything from the current line to the
newest line.
•
print with no parameter displays the current line.
To cancel a print command while it is displaying console history,
press any key. The console stops at the line last displayed on the
screen, and your position in the history moves to that line.
reset
Attempts to unfreeze one or more of the console’s I/O ports, if
communication has failed between the console and your system’s
servers.
To use reset, select the servers that are affected, press the Command key, and type the command. The command may be abbreviated:
typing r or reset will work.
top
582
Moves you to the oldest line in recent console history. To see history
older than this, use the view command to view a history disk log file.
Console Control Commands
Keyword
Explanation
up [number-of-lines |
keyword]
Moves you backward (up) some number of lines in the history.
•
up number-of-lines moves you that many lines back in the
history. For example, typing up 30 moves you back 30 lines.
If you follow up with a number greater than the number of lines
between your current position and the first line in the history, the
up command moves you to the first line in the history.
•
up keyword searches backward through the history from your
current position for that word. For example, to search backward
for a line containing dbpurge, type up dbpurge.
The up command is not case sensitive. If you specify PEOPLE,
people is a valid match. If the system does not find the keyword
before reaching the top of the history, the console beeps and you
are returned to the current line.
•
up with no parameter moves you back one line.
A wildcard character (#) can be used to match any character or to a
search for a number. For instance, up 160# will search backwards
for the number 160 instead of moving up 160 lines.
view <drive:filename>
Displays a DOS text file on your console screen.
Use this command to look at old history that has been saved to disk or
to read other disk files, such as the console configuration file. Before
you type this command, use the zoom command to display only one
server’s region on the console screen. (You can choose any server.)
While you are viewing a file, you can only move down through it (as
opposed to back or up in the file). Each time you press the Enter key,
the file scrolls down one line.
To stop viewing the file and return to normal console operation, press
the Command key.
The command may be abbreviated: typing v or view plus the
filename will work.
x
Restarts the sending and receiving of information by the computers’
console ports.It stands for XON and causes an XON character to be
sent to the server for each selected region. If you are having trouble
communicating with your servers from the console, try this
command. If it does not work, use the reset command.
583
Appendix A Command References
Keyword
Explanation
zoom <computer-name>
Selects a single server and fills the console screen with its region. To
return the screen to its normal split-screen, multi-region state, select
any server with the computer command. The command may be
abbreviated: typing z or zoom plus the computer name will work.
n
For commands that include an individual server letter (A, B, C, or D), use
the pound (#) character to send to multiple servers without typing them
individually; The console will convert the # to the server’s letter, such as A
or B. For instance, if you type connect #, the console sends the
command connect A to server A, connect B to server B, and so forth.
To enter a # without it converting to a server letter, press the Enter key on
the numeric keypad, then press Shift+3.
Console Server Commands
You must enter commands in lowercase. Your system does not recognize
commands entered in uppercase.
broadcast
broadcast
<message>
Sends a message to everyone logged in. The -d option will issue the
broadcast in a popup window. For instance, to send a message, select one
server and type:
NRCS-A$ broadcast -d System going down at 12:00
n
configure
Certain characters are interpretted by the bash shell program, so when
including characters, such as angled brackets, exclamation points,
asterisks, or pound signs (<,>,!,*,#) in the <message>, the entire
message should be placed within quotation marks to prevent the program
from interpretting them.
configure [-ns] [<config file> [<system> <computer>]]
Incorporates changes to your configuration file into your system’s
operation, and checks the configuration file for any errors.
584
Console Server Commands
For instance, suppose you made changes to PCUs 10 and 20, which are
connected to server A in an AB system. To test these changes, become a
superuser and type:
NRCS-A# configure /site/config ab a
If no <config file> is specified, /site/config is used.
If a service has been added to a database story in SYSTEM.SERVICE, use
configure -s so the service can be recognized.
If an Ethernet or Internet address has been added to a database story in the
SYSTEM.CLIENT.WINDOWS directory, use configure -n to
validate the address and allow it to be recognized by the system.
In both cases, you must first take the system offline, enter the configure
command, then put the system back online.
connect
connect
<name>
[<option>=<value>] …
The connect command names each server in the system, and tells each
how many other servers there are in the system and how to communicate
with them. For instance:
NRCS-A$ connect a net=ab
n
The connect command reads the /site/system file for options. If an
option is specified on the command line and also in the /site/system
file, the command line setting takes precedence.
connect Command Options
auto_upgrade=<yes | no>
msgserver=<silent | verbose>
clockmax=(12 | 24)
name=<a | b | c |d>
disk=<status>
pausetimeout=<mm:ss>
excludedvideo=(director | none)
purgelimit=<number of hours>
highwater=<number_of_blocks>
readrate=<number of words per minute>
id=<system name>
remotetimeout=<mm:ss>
585
Appendix A Command References
dbclean
lastlogin=<yes | no>
scriptlhmax=<number of columns>
load=<number>
scriptrhmax=<number of columns>
localtimeout=<mm:ss>
security=<and | or>
lowwater=<number_of_blocks>
single=<name> or
net=<name,name[,name,name]>
master=<a| b | c |d>
timechar=<character>
maxhits=<number>
timer=<silent | verbose>
min_passwd_length=<number>
wordlength=<number>
dbclean
[-x]
<directory name>
When starting up after a power failure, use dbclean to remove any edit
or order locks in the database. Run the command before startup or log
everyone off the system by typing logout all before issuing this
command.
The most common usage of dbclean scans all queues except those
marked with the skip flag. To use this command, after logging out all the
users, type:
NRCS-A$ logout all
NRCS-A$ dbclean -x .
dbclose
dbclose
Closes the database.
c
586
If you use this command while users are active, changes to stories will
be lost.
Console Server Commands
dbdev
dbdev
Reports the disk partitions in use and the number of blocks allocated for
the database on each disk partition. To find out the size of your database,
type:
dbdev
A message similar to the following appears:
/dev/rp5
/dev/rp6
/dev/rp7
0
60001
120124
60000
120123
999999
The numbers reported are the first and last blocks for each partition. The
last number of the report (999,999 in the example above) is the size of the
database.
dbdump
dbdump
<keys>
[<option>] …
Dumps individual stories or the entire database to tape.
This command can be interrupted. The program will continue dumping to
reach an appropriate quitting point.
Valid Keys
Description
a
Append to current dump
c
Create new dump
C
Create new dump, don’t ask if it’s ok.
d
Dump the news directory
i
Dump indexed files (such as, user index)
s
Show quick index of dumped stories
v
Verbose output
x
Ask before dumping indexed file
587
Appendix A Command References
Valid Options
Description
-a
Use alternate device for dump
<device>
-d
Dump news directory skeleton (no stories)
-f
[file]
Dump to file (use ‘+’ for standard output)
-m
<minutes>
Dump files modified in last x minutes
-n
<namelist>
Only dump listed directories
-N
<computer name>
Network dump to specified computer
To dump everything except those directories marked with a skip flag, type:
dbdump c
To dump a queue to a new tape, add -n and the queue name to the
command. For instance, to dump the queue SCRIPTS.JUNE.01 to a new
tape, type:
dbdump c -n scripts.june.01
By replacing the c with an a, you can add a queue to a tape without erasing
information already on the tape. For instance, to append
SCRIPTS.JUNE.10 to a tape, type:
dbdump a -n scripts.june.10
Dumps already on the tape are skipped and this dump is added to the end.
dbfree
dbfree [-cf]
Reports the size of the database and the size of the free list—that is, the
amount of free blocks available. To display this information, type:
dbfree
A message similar to the following appears:
data base size 4106240, free 72600=18%, freelist 2904
588
Console Server Commands
n
The freelist is compressed, so there can be as many as 5000 free blocks
accounted for in each freelist block.
To display the amount of free space in your software area, type:
df
Prior to the system being configured, there are two maintenance options
that may used with the dbfree command.
The format is dbfree [-cf].
The c option is used to check for cleared free blocks. The f option is used
to “unclear” cleared free blocks.
dblines
dblines
[b | c | f | n | q | s | v |+S|-S|-O]
<pathname>
Checks the database for story errors.
Valid Keys
Description
b
Story block count only (no checking)
c
Complete check
f
Compare fields in story form with fields in story. Report
those not found in both.
n
Do not fix errors
-O
Do not report orphaned story record errors
q
List queue names
s
Skip queues that are skipped by dbdump
+S
Fix script related errors
-S
Skip (not report) script related errors
v
Verbose output
w
Check word counts
589
Appendix A Command References
n
Valid Keys
Description
x
For qstamp checking
The dblines program normally will not fix script related errors; if you want
to do so, the +S option must be specified and the n option must not be
specified.
Use this command weekly as part of normal database maintenance. Start
dblines before you go home and run it in the background. To run
dblines in the background, precede dblines with a print
command. Including a period with the command checks the entire
database.
For instance, to run dblines in the background and send any error
messages to system printer 2, type:
print 2 dblines
If dblines finds any errors related to queue corruption, call Avid
Customer Support for assistance.
dboriginal
dboriginal [-a] <pathname>
Removes all old versions of stories in a queue to the freelist, so use it only
on queues where you do not need to retain these old versions. For instance,
to remove the old story versions in ARCHIVE.MARCH, type:
dboriginal archive.march
Use the dboriginal command to reclaim space when the system is low
on space.
The dboriginal command will print diagnostics, indicating how many
stories were examined and how many old versions were removed. The
command removes old versions for unshared stories—those with a link
count of 1—in a queue. The option, -a, allows the command to remove
old versions from all stories (shared and unshared).
590
Console Server Commands
n
The dboriginal command can also be used to remove old versions from
stories in a queue that has the save none attribute. When stories are
moved to or copied to a queue, all old versions are retained even if the
queue has this attribute; only when a story is edited are the old versions
removed.
As indicated by the
pound sign (#) in the
prompt, you must be in
superuser mode to
execute commands.
Also, you must use 24hour military time.
It should only be necessary to run this command once or twice a year.
Below is an example of using the at command to execute a dboriginal
command at a specified schedule and directing it to a specified area
(archive).
dbpurge
dbpurge
NRCS-A# at 11:10
/exc/dboriginal archive
<Ctrl+D>
job 1001340809.a at Sat Jul 10 11:10:00 2004
NRCS-A#
<path>
[- h | l | f]
[<interval>]
(Superuser conditional)
dbpurge purges the database to regain space.
Valid Keys
Description
-
Condition used as <path> parameter. Purges all queues with the
default interval
-v
Condition used as <path> parameter. Purge all queues listed in
the command in verbose mode
-h
Include held entries (must be superuser to use this option) in the
purge
-l
Include locked entries (must be superuser to use this option) in
the purge
-f
Include future dated entries (must be superuser to use this option)
in the purge
Interval is expressed in <hours> or <days>.<hours>
591
Appendix A Command References
n
Any queues that have a write group assigned will not be purged when
dbpurge runs as a non-superuser.
The system automatically purges the directories and queues each hour to
move old material from high-turnover queues (such as the Wires queues)
into the Dead queue. Normally locked and held stories are not purged
regardless of their age. Use this command only in an emergency when you
need to regain some space. Stories can receive a date in the future if your
system date is inaccurate. If you have future-dated stories because the
system date was inaccurately set, remove them using the -f option or wait
until the date expires. You must be a console superuser to run dbpurge on
write-protected queues. For instance, to purge all stories in the Wires
queues older than five hours, type:
dbpurge wires 5
Typing dbpurge - purges all queues in the database according to each
queue’s purge interval. dbpurge -v does the same, and prints a message
on the console for each queue purged.
You can also use dbpurge to remove held and locked stories from the
database. To remove all locked stories from all queues in the People
directory, type:
dbpurge people -l
To remove all held stories from a queue, use dbpurge, but substitute -h
for -l.
n
dbrestore
The dbpurge command can be run only on the master computer.
dbrestore
<key>
[option] ...
The dbrestore command restores data dumped via dbdump to the
iNEWS database. Automatic data conversions are performed to convert
data from older database revisions to the current database format.
Conversion from the Avid NetStation database format is controlled with
conversion parameters stored in a database conversion profile file
—normally, /site/dict/conversion or optionally specified with
the dbrestore -c option). For NetStation dbdumps, existing form
592
Console Server Commands
templates stored in directory records and in stories will be converted to
form names consisting of three digits. See the qform, and sform database
traits.
If your database is damaged, you can restore it from your backup tape by
typing:
dbrestore div
When you use dbrestore, restoring large numbers of stories can cause a
temporary out-of-space condition.
Press Delete to stop a dbrestore in progress.
dbrestore Command Key Options
Keys:
s
Restore stories only
d
Restore stories with their original directories
i
Restore ISAM files
v
Verbose output; list directory names
vv
List directory names and each title
x
Ask before restoring each ISAM file
f
Print facts about blocks and times
t
Print table of contents; do not restore
Options:
-a <device>
Restore from alternate device
-c <filename>
Database conversion profile filename
-C <filename>
Character map filename
-d
<date>[-<date>]
-f [file]
Restore from a file (use ‘+’ for standard input)
593
Appendix A Command References
n
dbserver
-i
Do not index. Do not post index request to
SYSTEM.INDEX when a story is restored in an indexed
queue.
-k
<keyword> (You can specify multiple keywords.)
-m <value>
Maximum number of stories to restore
-M
Preserve modification times
-n [=]
<directory>[=<new name>]
-N
Read from network socket for dump data
-p <queue>
Only with key letter s, will create queue
-s <platform>
Linux
You cannot use both the s and d options in the same command. Select one
or the other; not both. Additionally, you must be a superuser to list ISAM
files.
dbserver
<high water>
Reclaims space from the Dead queue and places it on the free list. Use
dbserver to build up the free list prior to periods of peak use.
When you use dbserver, specify the total number of free blocks you
want to have in the free list. If the free list contains 25,000 blocks and you
want to build up the free list to 100,000 blocks, type:
dbserver 100000
n
When the free list contains the desired number of blocks dbserver stops.
If you specify a number that is smaller than the current free list size,
dbserver will not do anything.
You can also use dbserver to place all space in the Dead queue on the
free list. To do so, specify that you want to rebuild the free list to an
unreasonably large size.
594
Console Server Commands
For instance, on a maximum 16 gigabyte database, type:
dbserver 16000000
The dbserver command is invoked when the system is booted and runs
in the background continually monitoring the number of free database
blocks based on the high and low water marks specified in the system
profile.
dbsort
dbsort
[-v]
<queue name>
The dbsort command sorts stories in any queue by the quick-index field,
and should primarily be used to verify that the quick-index field accurately
reflects the story sort field contents. For instance, if RUNDOWN.AM has the
page-number field set as its quick-index field, type the following to sort the
queue by page number:
dbsort rundown.am
If no quick-index field has been set for the queue, its stories are sorted by
the value of the title field. If a sorted queue is ordered, the sorting is
disabled. Using dbsort starts the sorting again. Only a superuser can sort
queues with nonzero write groups.
n
Dbtraits will automatically sort a queue when the sort attribute is turned
on with the +so option. An ordered queue is automatically sorted when the
ordered attribute is turned off with the -o option.
Use the -v option to verify the sort field. The system checks that the
quick-index field in the database has the same data as the sort field in the
story. This option provides no sorting function, but it updates the quickindex field so that your next sort is based on current information.
dbtraits
dbtraits <pathname> [only] [<option> <value>]
[+|- mode] …:
dbtraits Command Options
abstractlines or al
queueform or qform
abstractprinter or ap
readgroup or rg
abstractstyle or as
reindex
595
Appendix A Command References
changeform or cform
save
displaylines
sortfield or sf
mailbox or mb
storyform or sform
notify or ng
stripform
purgeinterval <days.hours>
writegroup or wg
Sets and modifies database traits.
To assign a story form called rundown to the RUNDOWNS.5PM directory,
type:
dbtraits rundowns.5pm storyform rundown
To assign a queue form called rundown to the RUNDOWNS.5PM directory,
type:
dbtraits rundowns.5pm queueform rundown
n
Assigning forms can be combined to one command line, such as:
dbtraits rundowns.5pm storyform rundown queueform rundown
dbtraits Command Modes
596
f
Forms allowed
g
General
i
Inverted
index
Indexed
o
unorder (- only)
p
Printable
q
Queue operations allowed
r
Read access
refresh
Queue refresh
Console Server Commands
dbvisit
s
Sequential
so
Sorted
t
Text timing clocks
u
Update
w
Watch appends
x
Skip
dbvisit
-<d | v | i> -[r | m name]
[-s]
[block# …]
dbvisit Command Options
n
-d
Display progress by printing dots
-i
Validate ISAM file record and key sizes
-m
Machine name to disconnect (for online use)
-r
Read only; do not rebuild free list
-s
Operate in slow mode to eliminate cache usage
-v
Verbose output; print name of each queue
The validation is a validation of ISAM key and record sizes to prevent
problems after software upgrades when the key and/or record sizes of any
ISAM files changed for the new software release.
Scans the database for errors, then rebuilds the free list and fixes bad storylink counts. A list of block numbers can be specified, as shown by the
[block# …] parameter above. A diagnostic is printed whenever
dbvisit encounters one of the specified blocks, which is helpful for
tracking down database corruption. Use dbvisit once a month as a part
of your regular maintenance.
There are two ways to run dbvisit:
597
Appendix A Command References
c
dial
•
Without the -m option: The system must be offline and shut down. No
one can log in until dbvisit is complete.
•
With the -m option: Specify a machine that will be running dbvisit.
The system must be offline and shutdown only long enough to enter
the dbvisit command. Remaining machines can be brought up for
users to log into. After the dbvisit procedure is complete, the
machine running dbvisit can be reconnected following the normal
procedure.
Before you run dbvisit, ensure the system is offline, all PCUs are
stopped, and the system is shut down. If dbvisit reports any errors,
do not rebuild the free list; call Avid Customer Support for assistance.
dial -p<port> [-i<devid> -o<options> - b|c|d|e|q|S|t| m<modem> -n<phone#>]
This command makes a connection between a workstation and a modem,
passing data in both directions. Use it only in the service table, not from
the console.
dial Command Options
598
-b
Binary data
-c
Check evidence of modem
-d
Direct (no modem)
-e
Echo
-i
Device ID for a direct-line device
-m
Modem type
-n
Phone number
-o
Communications options
-p
Port number
-q
Allow user to quit with Control <space>
-S
Special device
Console Server Commands
-t
dictionary
Touch tone
dictionary [-update] <dictionary> | <directory> ...
Any combination of dictionary names and dictionary directories can be
specified. For each directory specified, all dictionaries within that directory
will be compared to their standard dictionary counterpart. Only missing
and obsolete dictionary tokens are identified; definitions are not compared.
The standard dictionary name begins with a pound sign (#) and is expected
to reside in the same directory. A dictionary update is only done when the
-update flag is specified; otherwise, the dictionary is only checked, by
default. Any tokens found in the standard dictionary that are missing from
the dictionary will be added and those found in the dictionary that are
missing from the standard dictionary will be removed.
diskclear
diskclear
[-|u]
(Superuser only)
Marks each block of a server’s database as invalid so that you can copy a
new database to the disk. To clear the disk, select a server and type:
diskclear -
Do this prior to connecting a replacement server to a running system.
c
Using this command erases the server’s entire database.
To reverse the effects of diskclear, type:
diskclear u
Arguments
Description
-
Clear database
-+
Writes to disk (cannot be repaired by running diskclear u)
--
Read database blocks
-<number>
The number of blocks to process at one time
599
Appendix A Command References
diskcopy
Arguments
Description
u
Unclear database
diskcopy -[<# of simultaneous copies>]
diskcopy <start block> [<end block>]
diskcopy -s
Copies database from master computer (usually server A) to a replacement
computer. Enter it on the replacement server.
Select the -s parameter to minimize impact on system performance.
doc
doc
doc
-g[qu] <queue> [<title>...]
-p[qu] <queue> [<file>...]
title must be one word or enclosed in quotes.
The -g option does not take any file name parameters; standard output is
assumed. If output is to be written into a file, shell file redirection must be
used (as in “> output-file-name”). The -g option defaults to plain text
input / output and lines are terminated with CR/LF characters.
The q modifer specifies that the input / output will be in NSML format (not
plain text). The u option specifies Linux line termination is used—that is,
lines are terminated with an LF character.
The -p option will take input from its standard input if no files are
specified. This will put a single story into the database composed of the
data read from its standard input up to an end of file condition.
ed
ed <file pathname>
This command initiates the line editor used to edit text files. Since each
server has its own copy of each site file, always select all servers before
editing a site file. Procedures for using this line editor are covered in
Appendix H. The line editor is a Linux-supplied program; refer to Linux
documentation for more information.
600
Console Server Commands
force
force
force
force
force
force
(Superuser only)
n
[-q]
[-q]
[-q]
[-q]
[<name>] ...
“created>date1<date2” [<name>] ...
“lastlog>date1<date2” [<name>] ...
“passchg>date1<date2” [<name>] ...
When using angled brackets (>,<)in a parameter, they must be enclosed
within quotation marks. The same applies to characters, such as the
exclamation point (!) and asterisk (*).
This command forces users to change their password. For instance, to force
user Harris to change her password, type:force harris
grpcheck
grpcheck [-v] <group story queue>
This command validates groups and aliases defined in each of the stories in
the group directory (SYSTEM.GROUP by default). It then builds the alias
file used by iNEWS.
grpcheck Command Options
gtraits
-v
Display processing status as grpcheck traverses the queue.
-vv
Display processing status as well as group, user, and alias statistics
encountered.
-vvv
Display messages from -v and -vv, as well as the final list of groups
and their members.
gtraits
add
<group name>
(Superuser only)
This command creates groups of users and modifies the security of existing
groups.
601
Appendix A Command References
The following lines show syntax for the gtraits command:
gtraits
gtraits
gtraits
gtraits
gtraits
gtraits
gtraits
name>
changegroup <pathname>
delete <group name>
interactive
listlist [<group name>|<user name>]
rename <old group name> <new group name>
transfer <source group name> <destination group
The first letter of each option can be used for shorthand.
help
help
<command name>
Displays information on how to use other commands. For instance, to get
instructions for the list command, type:
help list
A message similar to the following appears:
usage:
list
list
list
list
list
hogs
hogs
configuration
directory
terminal
user
queue <name>
[<termid> | <name>...]
[<name>...]
[<termid> | <name>...]
[<name>...]
[<record limit>]
[<pathname>]
Scans the directories or queues you specify and displays usage information
for them. You can use this command to get an idea of which queues are
consuming the most space and how much is being consumed. This
command is also useful when used on the People directory. For instance, to
display usage information for the People directory, type:
hogs people
To execute a hogs command and send the results to a system printer, use
the following format:
NRCS-A$ print <system printer number> hogs .
602
Console Server Commands
A display similar to the following appears:
%
0
USED
136
SHARED
20
HELD
0
LOCKED
0
PURGE
0
QUEUE NAME
PEOPLE.ARLIN
This command can take up to 12 hours to generate. The primary number to
observe is the number under USED. If this number is much higher for a
certain queue than the numbers for other queues, you can determine where
material needs to be downsized.
As indicated by the
pound sign (#) in the
prompt, you must be in
superuser mode to
execute commands.
Also, you must use 24hour military time.
Below is an example of using the at command to execute a hogs
command at a specified schedule, sending the results to a file
(hogs.report), and then using the doc command to copy that file to a
queue for later review.
idiff
idiff <file1> <file2>
NRCS-A# at 11:10
/exc/hogs . > /tmp/hogs.report
doc -pu people.sysadmin.notes /tmp/hogs.report
<Ctrl+D>
job 1001340698.a at Sat Jul 10 11:10:00 2004
NRCS-A#
This command allows you interactively compare two files and select
and/or edit the portions of the files that differ and create a composite file.
The program displays the differing portions of two files and gives you the
option to put the portion from the first file or the second file into the output
file.
You can also edit the display using the vi program and put the resulting
portion into the output file, named idiff.out.
list
list [mailbox=<# | name>]
name>] ...
c
[<terminal #> | <program
list configuration
[<termid> | <name>...]
list directory [- (a | f | g | o | s | u | v)]
[<name>...]
list group
<name | {name}>
603
Appendix A Command References
list queue [- (a | b | d | f | g | m | s | v)]
<name> [<record limit>]
list session [- v | p]
[<termid> | <name> ...]
list user [- (h | l | m | p | r | t | v)]
[<name | groupname>...]
list Blob [-v]
[<name>]
Configuration Options
computer=<name>
mailbox=[<number> | <name>]
Directory Options
list ap=<number> d
list as=<number> d
list flags=<flags> d
n
The flags=<flags> directory option allows the use of
directory flags from the set
SRP(p/l)opLIsUGQ(O/N/A)XWFi to be used to select
the directory entries to be listed. To see all indexed directory
entries use: list flags=i d. To see all sequential, readonly, and printable directory entries use:
list flags=SRP d.
list form=<name> d
n
The form=<name> directory option matches the directory
entry queue form and story form names.
list mailbox=[<number | name>] d
list ng=<group> d
list purge=[<days>.<hours> | <hours>] d
list rg=<group> d
604
Console Server Commands
list rwg=<group> d
list rwng=<group> d
list save=[last | original | none | all] d
list sortfield=<field> d
list wg=<group> d
Queue Options
list qindex=<index value>
User Options
list blacklist=[b | -] user
list “created>date1<date2” user
list keyboard=<number> user
list “lastlog>date1<date2” user
list “passchg>date1<date2” user
list password= user
list readrate=<number> user
list session=<number> user
list simplified=[s | -] user
list su=[n | -] user
605
Appendix A Command References
list B
list c
Lists details of the “system blobs” stored on the server. System blobs are
used to store bitmaps for the title-entry tool and for the simplified user
interface settings. The following is a sample output:
# list B
File-Id
449
457
84435
84363
84403
88956
103749
498
530
546
638
653
662
Size
7287
7238
6066
6066
1171
265255
15439
11212
15439
91416
14342
8608
26673
104423
40
Date
Jul 10
Jul 10
Nov 30
Nov 30
Nov 30
Jan 4
Mar 22
Jan 14
Jan 14
Jan 26
Apr 4
Apr 4
Apr 5
00
00
00
00
00
01
01
00
00
00
00
00
00
Time
07:27:19
07:28:16
08:16:39
10:44:13
10:56:40
16:05:18
00:40:24
15:35:28
15:53:46
09:47:30
13:11:17
13:18:09
13:46:54
Mar 21 01 15:16:28
Name
BM000001
BM000002
BM000003
BM000004
BM000005
BM000006
BM000007
BM000008
BM000009
BM000010
BM000011
BM000012
BM000013
SimplifiedUISettings
Lists current configuration of the system.
list c Command Options
computer=<name>
mailbox=[<number> or <name>]
list d
list [<option>] d-[a | f | g | o | s | u | v]
[<directory name>...]
list d Command Options
606
d-a
Abstract printing traits
d-f
Queue and story form names
d-g
Group information
d-o
Order user
Console Server Commands
d-s
Son count and sequence number
d-u
Lock user
d-v
Verbose mode
Lists information about the specified directory or queue. If no directory or
queue name follows d, the command displays information on the entire
database.
For instance:
# list d dead
SRPlo-LIsUGQSXWFiT
Q-R-----I--G--X---# list d-f dead
SRPlo-LIsUGQSXWFiT
Q-R-----I--G--X---# list d-v dead
SRPlo-LIsUGQSXWFiT
DEAD:
Q-R-----I--G--X---rg=queue form=
list g
list
g
sortfield
TITLE
purge dis mbox directory
P3.0 D1 DEAD
queue form story form directory
DEAD
sortfield
purge ap,
TITLE
P3.0
al, as
A000,000,000
wg=-
dis mbox
D1 ng=-
story form=
[<user or group name>] ...
Lists group information.
list q
list [<option>] q-[a | b | d | f | g | m | s | v] <name>
[<limit>]
list q Command Options
q-a
Record address
q-b
Reverse order
q-d
Include deleted entries
q-f
Story form
q-g
Read-and-write group information
607
Appendix A Command References
q-m
Who moved, duplicated, or killed the queue
q-s
Queue stamp
q-v
Verbose output
Lists information on the contents of a queue. For instance:
NRCS-B$ list q people.palmer.new 1
A display similar to the following appears:
PEOPLE.PALMER.NEW id=126126
rec quick index
LHDM-WObfpRmF
25
h-disd
---M---------
f.id
13735
time modified-time
1
May2 17:07 2000
The index value consists of the selected sort field of the story you want to
list. The quick index (qindex) value is optional, but must be a single
word, and is not case-sensitive.
For instance, to get information for a story called “Nomad” in the queue
PEOPLE.SMITH.NOTES, type:
list qindex=nomad q people.smith.notes
list s
list s -[p | v] [<session id> | <name>]...
Lists session information, such as users currently logged in.
The -p option causes the process id for the controlling session process to
be printed. The -v option causes the IP address for the session to be
printed if the session is a network session, such as an iNEWS Workstation.
list u
list [<option>] u[-(h | l | m | p | t | r | v)]
or group name>]...
[<user
Lists user traits information, such as read rate, the keyboard description
story, system setup and preferences, and mail and home queues.
608
Console Server Commands
If no name follows u, the command displays information about all users;
otherwise, it displays information about the listed user, such as:
NRCS-A$ list u-v danielmi
The verbose result of the command will look something like this:
user
rr
kb
su
m
SOEKCVTH
sc
queues
danielmi
180
0
n
i
-OEKCVTH
sc
dest: PEOPLE.D.DANIELMI.NOTES
home: PEOPLE.D.DANIELMI
mail: PEOPLE.D.DANIELMI.MAIL
NRCS-A$
The flags (rr kb su m SOEKCVTH sc) in the header provide current
status information. The flags are:
rr
Readrate
K
Can Kill All
kb
Keyboard
C
Can Connect
su
Superuser
V
Can Video Browse
m
Insert/Overstrike Mode
T
Can Technical Direct
S
Simplified User
H
Can Highlight Read
O
Can Order
s
Can Configure Shortcut Toolbar
E
Can Enter & Remove
c
Can Configure Colors
The letters in the header are defined as follows:
u-h
Home queue
u-l
Last login
u-m
Mail queue
u-p
Preferences
u-r
Real name
u-t
Tracking information
609
Appendix A Command References
u-v
Verbose output
<option>
list blacklist=[b | -] user
list “created>date1<date2” user
list keyboard=<number> user
list “lastlog>date1<date2” user
list “passchg>date1<date2” user
list password= user
list readrate=<number> user
list session=<number> user
list simplified=[s | -] user
list su=[n | -] user
n
When using angled brackets (>,<)in an option, as shown above, they must
be enclosed within quotation marks. The same applies to characters, such
as the exclamation point (!) and asterisk (*), as shown below.
list user “a*”
Lists all users whose login names begin with the letter ‘a’.
logout
logout
logout
[<device #>] ...
all
Logs out a workstation. When you use logout, it saves the user’s work
before logging out his or her workstation. This command does not log out
users in a connect session.
To log out specific workstations, follow the logout command with the
device numbers of the workstations you want to log out. For instance, to
log out workstations 12, 34, and 91, type:
logout 12 34 91
610
Console Server Commands
To log out all workstations, use logout all. Before logging users out,
always broadcast a warning message and give them a chance to log out on
their own.
makeccutab
makeccutab
-i[sv]
(Superuser only)
Builds new dictionary translations into PCU programs.
To use this command, stop all PCUs, then become superuser and type:
makeccutab -i
n
For testing, the command format is: makeccutab -f [sv]
filename.
makeccutab Command Options
n
makemctab
s
Standard translations
v
Verbose output
vv
Very verbose: show progress plus translations
The dictionary definitions are installed into the
/exc/ccu/at/printer file.
The file into which the dictionary definitions are installed are
/exc/monitor, all configured mcs drivers resident in the
/exc/ccu/at directory, /exc/ccu/at/cmct, and all configured
mcspc drivers resident in the /exc/ccu/tftp/mcspc directory.
The usage for the makemctab is the same as the makeccutab.
makeshift
makeshift -[v|i|a|p|r|f <shift-file>] file1 file2 ...
(Superuser only)
Manages the case-shifting dictionary that iNEWS uses to determine how to
convert lowercase characters to their uppercase counterparts, and viceversa.
611
Appendix A Command References
Use the makeshift command in maintenance mode when you install
iNEWS to implement the case-shifting dictionary appropriate for the
national language used at your site.
makeshift Command Options
612
v
Verbose. To diagnose the case-shifting dictionary for
potential errors, displaying messages for each line in the
file. Checks that the file is readable and contains shift
tables.
i
Install. To install the shift table into files you specify in the
filename list.
a
Ask. To confirm installation of each file as you are
installing the shift tables. Forces installation.
p
Print. To print shift tables contained in each file you
specify in the filename list, with formatting similar to that
in the default case-shifting dictionary. This option does not
build or install the shift tables.
f
File. Specify with a <shift-file> filename, to use a file
other than the default file for the case-shifting dictionary.
The default file is (/site/dict/shift).
r
Recursive. (For directories.)
<shift-file>
When you specify the -f option, enter the case-shifting
dictionary name you want to use instead of the
/site/dict/shift file.
<file1> <file2> ...
When you specify the -i or -p option, enter one or more
file names to install or print. If you specify a directory path
instead of a file name, the makeshift program
processes each file in the directory, then returns to the
original directory.
[path]
When processing files in a directory, the makeshift
program ignores additional directory pathnames it
encounters, rather than recursively scanning child
directories. To have makeshift scan all files in a
directory, specify the directory path in the filename list.
Console Server Commands
maketab
maketab
-i[sv]
(Superuser only)
maketab Command Options
s
Standard translations
v
Verbose output
Use this command after making changes to the dictionaries (or before the
system is connected) to build the new translations into programs. To use
this command, first stop all PCUs. Then become a superuser and type:
maketab -i
The usage for the maketab is the same as the makeccutab.
n
msgclean
For maketab, the dictionary definitions are installed into the following
programs: /exc/news, /exc/gnews, /exc/snews,
/exc/nxserver, and /exc/newsmail. Day and month abbreviation
definitions are installed into:/exc/news,/exc/gnews, /exc/snews,
/exc/nxserver, /exc/newsmail, /exc/telex, /exc/rxnet,
and /exc/server.
msgclean -[r|d|o|t] [<username>|<number of days>]
msgclean Command Options
n
-r
Remove invalid messages
-d
Show messages that are removed
-o
Show outstanding messages
-t
Tabulate outstanding messages
<username>
Specified user (use “*” for wildcard match)
“#<days>”
Older than number of days
When using characters, such as angled brackets (>,<), the pound sign (#),
exclamation point (!) and asterisk (*), they must be enclosed within
quotation marks.
613
Appendix A Command References
If you remove a user who has unread messages, those messages remain in
the database. You can remove them using the msgclean command
followed by -rd. For instance, to remove the pending messages for all
users that have been removed from the system, type:
msgclean -rd “*”
You can substitute the name of a removed user for the “*” to remove only
the messages for that user.
offline
offline [silent]
Puts iNEWS offline. Users cannot log in, but users already on the system
can continue normal function. The silentoption suppresses diagnostics
for network connections that are refused because the system is offline.
Both nxserver and workserver typically generate these diagnostics.
The datastamp generator, server timer, includes an indication that the
system is offline in the timestamp messages produced on the console. This
provides feedback that the system is offline when the silentoption was
specified.
The status command will print “OFFLINE (silent)” when the system is
offline with the silent option turned on.
You can keep the system offline and turn off the silent option by
reentering the offline command without the silent option.
online
online
Puts iNEWS online. Users can log in and use the system.
otod
otod
<number> …
otod Command Options
614
leading 0
Octal
leading 0x
Hex
leading =
Next characters (as characters)
Console Server Commands
leading -
Negative number
leading _
Two-character compose sequence
leading %
strftime format - subsequent numbers formatted
with format for local and gmt times
leading L
locale to use for date formats
This command converts numbers from one base (such as decimal) to
another (such as octal). For instance, to convert decimal 32, type:
otod 32
A message similar to the following appears:
h(0x20) o(040) d(32) u(32) SP
32.0.0.0 Wed Dec 31 16:00:32 1969
In this listing, h stands for hexadecimal, o for octal, d for decimal, and u
for unsigned decimal. The number conversions are followed by the
corresponding ASCII character (space, in this case), and the date value.
The 32.0.0.0 is the number shown in IP address format.
The % and L options can assist you in handling different locale settings and
formats. The following are two examples:
Type: otod %X 32
A message similar to the following appears:
h(0x20) o(040) d(32) u(32) SP
0.0.0.32 Wed Dec 31 18:00:32 1969
lcl: 18:00:32
gmt: 00:00:32
Type: otod Lfr 32
615
Appendix A Command References
A message, with the date in French, similar to the following appears:
locale is fr
h(0x20) o(040) d(32) u(32) SP
0.0.0.32 mercredi 31 décembre 1969, 18:00:32
print
print
<printer #>
<command>
Redirects the output from any console command into a story in the Dead
queue and prints it.
For instance, to print the configuration file on printer 1, type:
print 1 cat /site/config
query
query
query
<pcu #> | <mcs pc devid>
<device #> <qtype> [parameters]
Syntax:
<devid>
<devid>
<devid>
<devid>
<devid>
<devid>
<devid>
<devid>
<devid>
<devid>
<devid>
<devid>
ioregister
iocontrol
proc
input
output
read <addr> <length>
absread <seg> <addr> <length>
writeb <addr> <byte value in hex>
writew <addr> <word value in hex>
abswrite <seg> <addr> <word value in hex>
netstat
bstat
Tests communication between a PCU or MCS-PC and its server. Type
query followed by the device number of the PCU or MCS-PC. For
instance, to test PCU 20, type:
NRCS-A$ query 20
616
Console Server Commands
A message similar to the following appears if the PCU or MCS-PC is
functioning properly:
#(@) 1.5.1.12 DOS PCUOS OK
If the system returns an OK message a few seconds after you execute the
command, the PCU or MCS-PC is functioning properly. If there is a problem, the server displays a failed message after about a minute.
reconnect
reconnect
<name>
[<option>=<value>] …
The options for this command are the same as for the connect command.
c
Enter the correct identifier, such as A, B, C,or D, for the host computer
(server). The reconnect command must be entered on all of the
currently connected servers as well as the server to be reconnected.
Thereconnect command will exit with a diagnostic if the specified
server is already connected.
Connects a server to a running iNEWS newsroom computer system. You
must type the diskclear command first on the server being reconnected
before reconnecting it to the iNEWS newsroom computer system.
rename
rename
[- u|v|r]
<old name>
<new name>
(Superuser only)
rename Command Options
c
-u
Update user records only, changing mail, destination, and home
directory entries that match <old name>
-v
Verbose output
-r
Resume interrupted operation
System must be offline. Resuming interrupted operations after
changing queue or directory names could cause loss of data.
617
Appendix A Command References
Renames any directory or queue in the database. You must become
superuser, take the system offline, and log out all users before using
rename.When you use this command, the system must be named and
offline. For instance, to rename the People directory to PEOPLE.STAFF,
type:
rename people people.staff
The command creates any new directory levels that are necessary.
reorder
reorder <parent> <child> <position>
This allows you to change the order of a directory by putting one of the
child entries into a new position in the directory. Reordering is only done
for Sequential directories.
The <position> parameter can be:
-a <sibling>
-b <sibling>
-<number>
+<number>
<number>
(place <child> after <sibling>)
(place <child> before <sibling>)
(move <child> up <number> positions)
(move <child> down <number> positions)
(place <child> at <number> position)
The <child> and <sibling> parameters do not include the full
pathname; only the last level name relative to the parent name.
restart
restart
c
[-v]
<device> | all
If you restart a device when a user is editing, data could be lost.
Restarts one or more devices, an entire PCU (and its devices), or every
PCU and their devices on a server. The restart command stops and
reloads the currently executing program(s).
To restart a device, type restart followed by the device number. For
instance, to restart printer 41, type:
restart 41
To restart all devices on a PCU, type restart followed by the PCU’s
device number. To restart all devices on your system, type:
restart all.
618
Console Server Commands
After each restart, you see a Hot-to-go message for each device as it
starts. If the device does not start, you see a message indicating that the
restart of that device has failed.
searchtape
searchtape [on <device>] [from <date> to <date>]
[<max # stories>] for <word> ...
searchtape [on <device>] [just <date>]
[<max # stories>] for <word> ...
Use one of the following date formats: YY, YYMM, YYMMDD, or
CCYYMMDD.
Searches a tape created by the dbdump command and recovers stories
from it. Stories that contain a word specified in your search are restored to
the queue SYSTEM.SEARCHTAPE. For instance, to search a tape for
stories containing the word “dinosaur,” type:
searchtape for dinosaur
A message similar to the following appears:
8 stories restored to SYSTEM.SEARCHTAPE
In this case, searchtape found eight stories containing the word
“dinosaur” and placed them in SYSTEM.SEARCHTAPE.
When searching a tape, you can specify a date range when the story was
saved, as well as the maximum number of stories for the system to restore.
send
send
<username>
“<message>”
Lets you send instant and intersystem messages to users from the console.
Messages can be sent to the special user—computer—on another system
by using the username, computer@other-system. These messages
are printed on the console of the other system.
Here are two examples of messages sent to user Smith:
send smith “are you editing ap-arson”
send smith “please log out now”
619
Appendix A Command References
shutdown
shutdown
c
Typing this command while users are editing may cause data loss.
Stops all devices and closes the database. It is used before halting the
system. To use this command, you must first select all servers and log
everyone off the system.
sitedump
sitedump
[-d<device> | -f<file>] [-ehv]
(Superuser only)
Makes backups of your system’s site files.
sitedump Command Options
siterestore
-d
<device> is the name of a tape device. The actual device name used
will be /dev/<device>. The default is /dev/tape.
-f
<file> is the name of a file to use as the archive.
-e
Eject tape when done.
-h
Help - show usage information.
-v
Verbose
siterestore [-d<device> | -f<file>] [-ehtv] [<file> ...]
(Superuser only)
c
All site files will be replaced by the version on the backup tape. You
will lose the version currently on your system.
Restores site files and programs backed up to tape with sitedump.
n
After performing a siterestore, run the grpcheck command to rebuild the
mail aliases file.
siterestore Command Options
620
-d
<device> is the name of a tape device. The actual device name used
will be /dev/<device>. The default is /dev/tape.
-f
<file> is the name of a file to use as the archive.
Console Server Commands
-e
Eject tape when done.
-h
Help - show usage information.
-t
Show table of contents; no files are restored.
-v
Verbose
<file> ... Only the named files are restored. If a directory is specified, all files in
the directory will be restored.
softdump
softdump
[-d <device>] [-ehv]
Dumps a complete image of the software area of the disk to tape.
n
You must be a superuser to backup the root disk.
With the exception of -f, the options for softdump are the same as the
sitedump command.
softrestore
c
softrestore
[-d <device>] [-ehtv] [<pattern>...]
This function must be performed from single-user mode. Restoring an
old or inaccurate version of the data may cause functionality
problems.
Use this command only when advised to do so by Avid personnel to
restore the software area of the disk from a softdump tape.
n
You must be a superuser to restore the root disk.
softrestore Command Options
-d
<device> is the name of a tape device. The actual device name
used will be /dev/<device>. The default is /dev/tape.
-e
Eject tape when done.
-h
Help - show usage information.
-t
Show table of contents; no files are created.
621
Appendix A Command References
-v
Verbose
<pattern> ... Select only files with names that match pattern.
startup
startup
Starts the system’s devices after they have been shut down. The system
must be offline and all devices must be stopped.
status
status
[all | license]
Displays system connection information: which server is the master, if
system is running single or dual, and the disk status.
There are three disk statuses:
•
OK
- When the system is up and running either as dual or
single.
•
Cleared
- When you have cleared the database of a failed server.
•
Unknown
- When you reconnect the CPUs following a
diskclear. When the diskcopy procedure has completed and the database has been mirrored, the disk
status will change back to OK.
To list basic system information, type:
status
A message similar to the following appears:
A is online ID is NRCS
System is AB. Master is A.
Disk status is UNKNOWN
To list system options set in the system profile, type:
status all
To list the system’s license information, type:
status license
622
Console Server Commands
stop
stop
c
[-v] all | <device number>
If you stop a device when a user is editing on the device, data could be
lost.
Stops activity on a server prior to shutting it down. Before using the stop
command to stop an activity, use the broadcast command to notify
users the system will be going down, and log out all devices on the affected
servers. To stop all devices on a server, use stop all.
To stop a device, follow stop with the number of the device you want to
stop. For instance, to stop workstation 12, type:
stop 12
The stop all command differs from the shutdown command in that
the free list remains in memory and is not flushed back to the disk.
su
su
This Linux command allows you to enter superuser mode. Type su, then
type the superuser password when prompted.
The display looks similar to the following:
NRCS-A$ su
password:
SU: so /dev/console
unbusy
unbusy
[-i] <queue name>
Removes edit and order locks from the specified queue in your database.
The -i option allows you to ignore the inverted database trait.
c
If a user is actually working in the file, removing the lock could cause
data loss.
623
Appendix A Command References
utraits
utraits <username> [<option> <value>] [+|- flag]
(Superuser only)
utraits Command Options
destination
realname
editmode
su
keyboard
home
readrate
password
mail
n
The bloblist option is useful for removing iNEWS Workstation user
preferences should they become corrupted.
utraits Command Flags
b
Blacklist
ka
Kill all
bloblist
Remove blob list
log
Log client/server communication
c
Connect
o
Order
cc
Configure colors
s
simplified user interface
cs
Configure shortcut toolbar
td
Technical direct
er
Enter and remove
vb
Video browse
hr
Highlight read
Sets a user’s traits. For instance, to assign keyboard 12 to user Jones, type:
utraits jones keyboard 12
The <username> can be “all”, a pattern, or a user name. You can
enclose the real name in quotation marks to allow for embedded spaces.
Use “<string>*” to indicate wildcards. For instance, “a*” applies to all
users with names starting with the letter A.
624
Console Server Commands
version
version [-<alternate pattern>] <filename> ...
version [+]
Displays the version and platform of the iNEWS software you are using.
Type:
version
A message similar to the following appears and displays product version
information:
(c) 2004
This computer program is protected by copyright law and
international treaties. Unauthorized reproduction or
distribution of this program, or any portion of it, may
result in severe civil and criminal penalities.
U.S. GOVERNMENT USERS RESTRICTED RIGHTS: Use, duplication
or disclosure by the U.S. Government is subject to
restrictions as set forth in subparagraph (c)(1) of FAR
clause 52.227-19, COMMERCIAL COMPUTER SOFTWARE RESTRICTED RIGHTS or, in the case of the Department of
Defense or its subcontractor, is subject to DFARS
227.7202-3, RIGHTS IN COMMERCIAL COMPUTER SOFTWARE OR
COMMERCIAL COMPUTER SOFTWARE DOCUMENTATION.
version: 2.0.0.21 LINUX
You can also use this command to display a particular program’s version
number. Type version followed by the program’s name. For instance, to
find out which version of the dbsort program you are using, type:
version dbsort
A message similar to the following appears:
dbsort: 2.0.0.21 LINUX
625
Appendix A Command References
wholockedit
wholockedit
<queue name>
[all]
Displays who locked a story. For instance, to find out who locked a story in
PEOPLE.SMITH, type:
wholockedit people.smith
To find out who last modified each story in a queue, type wholockedit
followed by the name of the queue and the keyword all.
wiredump
wiredump <device number> <speed> <bits> <file> <count>
or
wiredump <device number> <speed> <bits> -<code[rotate]>
<style>
<bits>
Bits per character (5, 6, 7, or 8) or speed options, as
interpreted by the ccuspeed program.
<file>
File name for collected data
<count>
Number of bytes of data to collect
<code>
b for Baudot, t for TTS, a for ASCII, w for Wire ASCII, or
e for 8-bit ASCII
[rotate]
1-7 to rotate right <x> bits; 8 for one's complement
(010=>101); 9 for inversion (123=>321)
If a problem exists with your wires, you may need to use this command to
collect raw wire data so it can be sent to iNEWS for testing. The
wiredump command can also be used for debugging format changes
made by a wire service. A wire dump can be sent to the screen or to a disk
file.
For instance, if device 35 is a 1200 baud, ASCII, 7-bit wire, type the
following to print the first 200 characters to the screen:
wiredump 35 1200 7 -a c
626
Job List Commands
To dump wire data to a file, use the following format. The file name refers
to the output file into which the wiredump data is placed. It should
include the name of the wire and be preceded by the /tmp directory name.
The count is measured in number of bytes.
For instance, if device 35 is the APTV wire, to capture the first 2000
characters, type:
wiredump 35 1200 /tmp/aptv.raw 2000
A display similar to the following appears:
loadtime = 0:11
NRCS-A$ restart 35
W35: 14:34:09 Hot-to-go
Job List Commands
The following section provides a list of commands that can be used in a job
list, which is created and modified in the database. The command’s format
and description are provided, followed by a list of servers that can utilize
the command in their job lists.
at
at
<hh:mm>
Specifies the time of day when a task will take place. You can combine this
instruction with the keyword on to specify both the day and time for the
task. Applies to action and tx servers.
bpoll
bpoll <queue name> [<polling interval> [<polling
duration>]]
Works like poll, except it reads stories in the primary queue in reverse
direction. If the polling interval and duration are not specified, a single
scan of the primary queue will be done. Applies to timed-interval action
and tx servers.
627
Appendix A Command References
bscan
bscan
<queue name> [priority | all | everyentry]
Works like scan, except it reads stories in the scan queue in reverse
chronological order, reading the newest stories first. This is convenient for
very large queues. Applies to action and tx servers.
The priority option forces the action/txnet server to interrupt the scan
of another queue if the action/txnet server receives a mailbox notification.
The all option forces the action/txnet server to scan the entire queue
instead of the limit of 10 stories when it has more than one queue to scan.
The everyentry option forces the server to process each entry in a
queue, not just modified entries.
distribution
distribution <distribution story queue> [<error queue>]
Specifies the queue containing the distribution story and, optionally, an
error queue for stories whose distribution codes cannot be processed.
Applies to distribution and parallel servers.
dup
dup
<destination queue>
[<distribution code>]
Copies the stories in the scan queue to a queue you specify, optionally
including a distribution code with them. Applies to action and tx servers.
every
every
<dd.hh>
Specifies the interval at which a task is performed. You can set this value in
days and/or hours. Applies to action and tx servers.
extension
extension <file extension>
Applies to tx servers. When transmitting stories using HTML format, each
transmitted story has a filename composed of a hexadecimal representation
of the entry’s qstamp and a filename extension of .html. Use the
extension command to specify a different extension. Do not include the
period in the <file extension> parameter. The defined extension
will also be used in place of html for the published file. See the
publish job list command for more information.
628
Job List Commands
ignore
ignore
[yes | no]
Including ignore yes in a job list that performs validation ensures the
server accepts any values for the fields it is validating. The default is
ignore no. Applies to action and tx servers.
ignore-del
ignore-del
Causes a server to take no action when a story is deleted from its scan
queue. Applies to action and tx servers.
n
local
This option is not reset for each scan/bscan command set. Use
send-del to restore processing of deleted queue entries.
local
<queue name>
Specifies the primary wire queue. Applies to parallel servers.
mailto
mailto <recipient>...
Mails the story as an e-mail text message to each recipient. The list of
recipients is a space-separated list. If the sendform option is on, the
content of fields in the story is included at the start of the e-mail text
message. Only fields present in the story form assigned to the story are
included. Each field is identified by the label text associated with the field
in the story form assigned to the story.
move
move
<destination queue>
[<distribution code>]
Moves stories from the scan queue to a queue you specify, optionally
adding a distribution code to them. It must be the last instruction in a job
list task. Applies to action and tx servers.
number
number
<form field>
<length> <error queue>
Assigns a unique number to each story as the story is processed. Specify
the form field that will contain the number and the number of digits for the
number. Applies to action and tx servers.
629
Appendix A Command References
on
on
<day> ...
Indicates on which days of the week a time-interval task will occur. You
can combine this instruction with the at keyword to indicate both day and
time. Applies to action and tx servers.
open
open <computer> <username> [<format> [<queue name>
[<story name>]]]
Initiates a network connection to a remote system for story transfer. The
username you specify must exist with identical passwords on both the
local and remote systems. Applies to tx servers.
The <computer> can include a port number. The format is
host:port. If no :port is included in the <computer> parameter,
the port defined by the rxnet service is used, if defined; otherwise, the port
defined by the FTP service is used.
The <username> can specify a simple name or a name in the format
name@host. Only the name portion is used to locally look up a
password. The entire username is sent in the FTP USER command. This
may allow connections to be made through proxy servers.
The format, if specified, must be one of the following: 2nsml, nsml,
sep, or html.
The queue name and story name are only used when the format is set to
HTML. The queue name and story name are used to get the Web publishing
template that controls the formatting of the story into an HTML page. If
the queue name is not specified, the template is taken from the
SYSTEM.WEBFORMS queue. The story name can be used to select a
specific template from the queue. If not specified, the first story in the
queue is used.
order
order [yes | no]
Indicates that order changes in the scan queue should be transmitted to the
remote system. For this to work correctly, the destination queue on the
remote system must have its update trait turned on.
630
Job List Commands
The order command applies to tx servers and action servers. For action
servers, the order of the scan queue is propogated to each of the dup,
move, and replace command destination queues. Specifying order
without yes or no is the same as order yes.
poll
poll <queue name> [<polling interval> [<polling
duration>]]
Reads stories in the specified primary queue in a forward direction at
certain intervals for a specified duration. Polling is used in conjunction
with the put or dup commands for rundown mirroring. Stories with
modified times greater than the time of the last scan are processed. If an
interval and duration are not specified, a single scan of the primary queue
will be done. Applies to timed-interval action and tx servers. See
“Mirroring Rundowns” on page 434 and “Polling for Action Servers/Tx
Links” on page 435 for more information.
publish
publish [no|yes]
When placed following a scan or bscan line, the txnet publishing
option, publish no, disables appending information to the
PUBLISHED.HTML file on the remote system when using HTML export.
The default is set to yes. Applies to tx servers.
put
put
[<queue name>]
Sends stories over a Tx link to a specified queue on the remote system.
Applies to tx servers.
The <queue name> parameter is optional. When it is not included, the
story is put into the default destination queue of the user on the remote
system.
quiet
quiet
[no|yes]
Including quiet no in a job list that performs validation sends a
message whenever the server successfully validates a story. The default,
quiet yes, means a message is sent only when a story fails validation.
Applies to action and tx servers.
631
Appendix A Command References
remote
remote
<queue name>
Identifies the secondary wire queue. Applies to parallel wire servers.
remove
remove
Deletes stories from the scan queue. It must be the last instruction in a job
list task. Applies to action and tx servers.
replace
replace
<destination queue name> [<distribution code>]
Works like the dup command, except that it updates stories in the
destination queue only when they are already present in the destination
queue. It does not add new stories to the destination queue. Applies to
action and tx servers.
scan
scan
<queue name>
[priority | all | everyentry]
Specifies the queue monitored by this task. The scan line must come before
any instructions that manipulate stories in the queue, like dup or move.
Ten stories are scanned at a time from each scan queue; adding priority
to a scan line means all new or modified stories in that queue are scanned
at once. The queue identified in the scan command as the priority queue is
always the next queue in the multiple-scan job list, so if it is idle, other
queues are processed. The system checks after every queue to see if new
stories are ready for processing on the queue identified in the scan
command. Applies to the action and tx servers.
The priority option forces the server to interrupt the scan of another
queue if the server receives a mailbox notification. The all option forces
the server to scan the entire queue instead of the limit of 10 stories when
there are multiple queues to scan. The everyentry option forces the
server to process each entry in a queue, not just modified entries.
n
632
Deleted entries are still controlled by the send-del option.
Dialog Commands
send-del
send-del
Instructs the server to process story deletions in the scan queue; this is the
default behavior. Use ignore-del to have the server take no action
when a story is deleted from a scan queue. Applies to action and tx servers.
sendform
sendform
Instructs the Tx link to transmit the full form text of each story, rather than
just the story’s form name. Applies to tx servers.
source
source
<queue name>
Specifies a queue that a distribution or keyword server should check each
time it wakes up. Each task in a job list for such a server must begin with a
source line. Applies to the distribution and keyword servers.
validate
validate
<validation queue>
<error queue>
Activates form field validation for a server. It must include the queue name
containing the validation story and an error queue for stories that cannot be
validated. Applies to action and tx servers.
Dialog Commands
This section describes the dialog commands. Some of these commands are
equivalent to those available to a user during a connect session, while
others are unique to dialogs.
Each command must begin on a new line and can be uppercase or
lowercase. The system does not check dialogs for errors.
Many of these commands take one or more strings as their parameters.
These strings are text and can be entered from the keyboard or, if you need
to include characters not available from your keyboard, use their aliases or
decimal equivalents. This applies to nonprinting characters, such as Escape
and Enter, which are represented by <esc> and <cr> respectively.
633
Appendix A Command References
Depending on which character set is used by the device to which you
connect, you may need to translate certain keyboard characters to
characters understood by the device. You may also need to translate some
of the characters sent by the device to characters usable by your system.
Translating characters is called mapping, and there are three commands
(map, mapin, and mapout) that allow you to do this. While these
commands are also available to users, system administrators will usually
use them in dialogs to set up the translations for users rather than leave it
for users to do after they have connected.
capture
capture
<destination queue name>
Places a copy of all text received from the remote connection during a
session in a story into the queue you specify.
Usually you invoke capture from the cmd> prompt. However, to turn
capture on in a dialog, place the capture command and destination
queue name at the point in the dialog where you want to begin capturing
material.
You must include a destination queue unless you are restarting capture
after having paused it. If you have not paused capture earlier in the
dialog, leaving out the queue name generates an error and terminates the
dialog.
delay
delay
<# of seconds>
Pauses the dialog for a number of seconds.
When the specified time has passed, the dialog resumes. Put the command
where you want the dialog to pause and follow it with the number of
seconds you want the dialog to pause. For instance, to pause the dialog for
five seconds, type delay 5.
Although the dialog is suspended while this command is in effect, you can
use the quit connect command to close the connection.
634
Dialog Commands
diag
diag [on | off]
Normally, a dialog’s diagnostic mode is off and screen output is suppressed
while the dialog is running. However, you can use the diag command to
turn the dialog’s diagnostic mode on so you can see what the dialog is
doing as it executes.
Usually you want the diagnostic mode on only when you are debugging a
dialog, so you can determine exactly where any errors occur. Place a diag
on command in the dialog at the point where you want to start debugging.
To see what happens during just one part of a dialog, bracket that portion
of the dialog with diag on and diag off commands.
echo
echo
[on | off]
Turns local echo on or off.
Turn on local echo in any dialog used to connect to a device or information
service that does not echo back what the user enters. This way, the user can
see what he or she is entering.
To turn on local echo, place echo on in the dialog where you want local
echo turned on. Use this command at or near the beginning of the dialog.
While you can turn local echo off using the echo off command, you are
not required to do so. Local echo is turned off automatically when the
dialog finishes.
escape
escape
<escape character>
To change the escape character (used to bring up the cmd> prompt) from
within a dialog, use the escape command.
For instance, to change the escape character from the default Ctrl+] to
Ctrl+Z, use the escape command. Represent the Ctrl+Z character as
<26> (its decimal value).
n
Do not change the escape character to Ctrl+A, Ctrl+Q, or Ctrl+S. These
characters have other important functions.
635
Appendix A Command References
The escape character is reset to the default (Ctrl+]) when the user closes
the connection.
expect
expect
<delimiter><string1><delimiter><string2><delimiter>...
Instructs the dialog to wait for the device to which the service has
connected to send a string (string1). If that string is not received within
five seconds, expect sends the second string (string2) to the device
and waits for a third string (string3). This continues until an expected
string is received within the five-second limit or expect runs out of
strings.
To use the expect command, follow it with the character—that is,
<delimiter>—you want to use as the delimiter to separate each string in
the list. The delimiter can be any character. Follow this with the first string
you want expect to wait for. Then add a delimiter and the string you
want expect to send if it does not receive the first string. You can add as
many strings as you want.
For instance, some devices may not display a login: prompt unless you
press Enter. To have the dialog send a carriage return to the device if it does
not receive the login: prompt immediately, use the expect command.
If the first character following expect is a comma, this sets the comma as
the delimiter used to separate strings following the command from each
other.
If you do not place a string between two delimiters, this indicates a null
string. If you have the expect command wait for a null string, it
considers any string it receives to be a match. If you have the expect
send a null string, it does not send anything, but instead waits for the next
expected string.
Although the dialog is suspended while this command is in effect, the user
can employ the quit connect command to close the connection.
heol
heol [on|off]
If necessary, you can have the system insert a hard end-of-line character
(HEOL) after each line of captured text.
636
Dialog Commands
Put the heol on command in the dialog at the point where you want this
feature turned on.
To turn off this feature, use heol off.
If you are calling a device that contains information in tables or columns,
have the system insert an HEOL at the end of each captured line. This way,
tables and columns you capture retain their format. Put the heol on
command in the dialog.
map
map
<local character>
<remote character>
Translates a character (local character) entered at the keyboard to some
other character (remote character) before sending it to the device to which
you are connected. Likewise, if the system receives a remote character
from the device, the map command translates it to local character before
sending it to a workstation.
mapin
mapin
<remote character>
<local character>
Translates a specific character (remote character) received from the device
to which you are connected to another character (local character).
This translation affects only characters received from the device to which
you are connected. It has no effect on the character when you enter it.
mapout
mapout
<local character>
<remote character>
Translates a particular character entered at the workstation (local
character) to another character (remote character) before it is sent to the
device to which you are connected.
For instance, some devices use a limited character set that does not
recognize lowercase letters. To connect to such a device, you would want
to map all lowercase characters to their uppercase equivalents. For
instance, to map a to A, use this mapout command:
mapout a A
This has no effect on characters received from the device. Only characters
typed at the workstation are translated.
637
Appendix A Command References
message
message <string>
Sends the string to the screen.
This command informs users that the system is active and functioning
during a dialing session.
pass
pass
<resume character>
Suspends a dialog and yields control to the user.
Whatever the user enters after the pass command is sent directly to the
device to which the user is connected. When the user enters the character
defined in <resume character> parameter, pass resumes the dialog.
To use pass, place it in the dialog where you want to yield control to the
user and follow it with a character you want the user to enter to resume the
dialog. When the user enters this character, pass sends it to the device and
then resumes the dialog, preventing further user input.
For instance, suppose you have a dialog that logs you into an information
service. For security reasons, you want the dialog to pause at the
password prompt, let you enter the password, and then resume. Do this
using the pass command followed by a <cr> so pressing Enter after
entering the password resumes the dialog.
If you use pass without a parameter, it passes everything the user enters
until he or she tries to close the connection with the quit command. Then
the dialog resumes, executes the remaining commands in the dialog, and
closes the connection.
pause
pause
Suspends capturing from within the dialog. If you turned capture on
earlier in the dialog, you can pause capturing using the pause command.
To resume capturing later in the dialog, include a capture command
(without a destination queue) at that point in the dialog.
638
Dialog Commands
stop
stop
Stops capturing from within a dialog.
If you have turned capture on earlier in the dialog, you can turn it off
using the stop command.
timer
timer
<# of seconds>
<string to display>
Counts number of seconds specified in <# of seconds> when it is
activated by the next wait command in the dialog.
When a specified string in the wait command is received, timer stops
counting and wait resumes the dialog. If wait does not receive the
expected string within the time specified in the timer command, timer
displays the text specified in string and closes the connect session.
To use timer, follow it with the number of seconds you want it to count
and the string you want it to display if that period of time elapses. For
instance, you may want to use the timer command so it terminates the
session if the dialog is unable to log in within 60 seconds.
When a pass command is active, an active timer command suspends
counting. When pass command finishes, timer command resumes
counting.
Also, the same timer command applies to any subsequent wait
commands if no other timer commands appear before them. If you do not
want to use the same timer value for another wait command later in the
dialog, insert timer 0 after the first wait command. This cancels the first
timer command and causes subsequent wait commands to wait for their
string forever if no other timer commands follow timer 0.
type
type
<string to send>
Sends a string to the device to which the service has connected.
For instance, if you were creating a dialog that types the user’s name in
response to a login prompt, you may use:
type joel smith
639
Appendix A Command References
Most devices to which you connect expect a carriage return (represented
by a <cr>) after each string you send. When this is the case, you must
include a <cr> at the end of the string.
wait
wait
<string to wait for>
Pauses the dialog until a specified string is received from a device to which
the service has connected, or until a certain amount of time (specified by a
timer command) has elapsed with no response.
To use this command, follow it with the string for which the dialog should
wait. If you use wait without a parameter, the dialog waits until
any character is received.
Unless a timer command has been executed first, the wait command
waits forever until the specified string is received, so type exactly the string
you want it to wait for, and keep in mind that wait is case-sensitive. If the
dialog never receives the string wait is looking for, the dialog hangs, and
you need to use the quit connect command to exit the dialog and return
to your iNEWS Workstation.
640
Appendix B
System Files
This appendix contains samples of system files you are most likely to
reference or change:
•
/etc/dhcpd.conf
•
/etc/hosts
•
/site/config
•
/site/printers/hplaser1
•
/site/system
•
/site/wires/anpa7
•
console.cfg
•
SYSTEM.CLIENT.WINDOWS
•
SYSTEM.CONFIGURE.301-ACTION
•
SYSTEM.MAP
•
SYSTEM.RESOURCE
•
SYSTEM.WIRES.DISTRIBUTION
•
SYSTEM.WIRES.KEYWORDS
•
SYSTEM.WIRES.KEYWORDS-AP
•
SYSTEM.WIRES.KEYWORDS-AP2
Appendix B System Files
/etc/dhcpd.conf
allow bootp;
ignore unknown-clients;
not authoritative;
ddns-update-style none;
subnet 172.24.96.0 netmask 255.255.254.0{
PCU entry starts here...
host pcu10 {
hardware ethernet 00:d0:b7:4b:52:f8;
fixed-address 172.24.96.53;
}
MCSPC entry starts here...
host mcs19 {
hardware ethernet 00:00:f8:20:25:19;
fixed-address 172.24.96.71;
}
}
# line below because of dual nic cards
subnet 10.1.1.0 netmask 255.255.255.0 {}
/etc/hosts
# Do not remove the following line, or various programs
# that require network functionality will fail.
127.0.0.1
localhost.localdomain localhost
642
# iNEWS Servers
123.123.123.95
123.123.123.96
10.1.1.1
10.1.1.2
nrcs-a1 a1 nrcs-a1.local
nrcs-b1 b1 nrcs-b1.local
nrcs-a a nrcs-a.local
nrcs-b b nrcs-b.local
# PCU
10.1.1.10
pcu10
# FTS
123.123.123.54
ftsserver
/site/config
/site/config
;
; iNEWS Starter
;
host
ab a
net
reslist
servers
servers
servers
servers
servers
reslist
reslist
reslist
reslist
reslist
;
host
ab b
net
reslist
servers
servers
servers
servers
reslist
reslist
reslist
reslist
;
host
a a
net
reslist
servers
servers
servers
servers
reslist
reslist
reslist
reslist
reslist
;
config
10
121
141 201
231 233
251 253
271 273
281 283
301 303
311 313
321 323
401:402
501:504
; 20
122
232 234
252 254
272 274
282 284
302 304
312 314
322 324
601:604
211
235
255
275
285
305
315
325
236
256
276
286
306
316
326
;
;
241 243 245 ;
257 259
;
277 279
;
287 289
;
307 309
;
317 319
;
327 329
;
;
;
242
258
278
288
308
318
328
10 ; 20
121:122
141 201 211
231:236 241:245
251:260
271:290
301:310
311:330
401:402
501:504
601:604
244
260
280
290
310
320
330
console connect
Print, Mail, Keyword
Seek & FTS
Action servers
Monitor servers
Monitor servers
Txnet
Rxnet
Rxnet
Web Access
iNEWS sessions
;
;
;
;
;
;
;
;
;
net connect
Seek & FTS
Action servers
Monitor servers
Monitor servers
Txnet
Rxnet
Rxnet
iNEWS sessions
;
;
;
;
;
;
;
;
;
;
console, net connect
Print, Mail, Keyword
Seek & FTS
Action servers
Monitor servers
Txnet
Rxnet
Web Access
iNEWS sessions
iNEWS sessions
643
Appendix B System Files
host
b b
net
reslist
servers
servers
servers
servers
reslist
reslist
reslist
reslist
reslist
10 ; 20
121:122
141 201 211
231:236 241:245
251:260
271:290
301:310
311:330
401:402
501:504
601:604
;
; PCUS
;
pcu
10 pcu10 11:18
; pcu
20 pcu20 21:28
;
; PCU DEVICES
;
wire
11 9600 anpa7 AP
wire
12 9600 anpa7 AX
unused 13:18
;
; unused 21:28
;
; NETWORK RESOURCES
;
resource 121 console - resource 122 net
- ;
; SERVERS
;
server 141 printserver 141
server 201 mailserver 201
server 211 keyword
211
;
; SEEK & FTS SERVERS
;
server 231 seek
231
server 232 seek
231
server 233 seek
231
server 234 seek
231
server 235 seek
231
644
-
;
;
;
;
;
;
;
;
;
;
console, net connect
Print, Mail, Keyword
Seek & FTS
Action servers
Monitor servers
Txnet
Rxnet
Web Access
iNEWS sessions
iNEWS sessions
;
;
;
;
keyword
-
;
;
;
;
;
; slave printing
; mailserver
; keyword server
seek
seek
seek
seek
seek
server
server
server
server
server
/site/config
server 236 seek
server 241 ftsindex
server 242 ftsseek
server 243 ftsseek
server 244 ftsseek
server 245 ftsseek
;
; ACTION SERVERS
;
server 251 action
server 252 action
server 253 action
server 254 action
server 255 action
server 256 action
server 257 action
server 258 action
server 259 action
server 260 action
;
; MONITOR SERVERS (Only
;
server 271 monitor
server 272 monitor
server 273 monitor
server 274 monitor
server 275 monitor
server 276 monitor
server 277 monitor
server 278 monitor
server 279 monitor
server 280 monitor
server 281 monitor
server 282 monitor
server 283 monitor
server 284 monitor
server 285 monitor
server 286 monitor
server 287 monitor
server 288 monitor
server 289 monitor
server 290 monitor
;
; RXNET/TXNET DEVICES
231
241
242
242
242
242
-
;
;
;
;
;
;
seek
Fast
Fast
Fast
Fast
Fast
server
Text Indexing
Text Search
Text Search
Text Search
Text Search
251
252
253
254
255
256
257
258
259
260
-
;
;
;
;
;
;
;
;
;
;
timed-action
timed-action
timed-action
timed-action
timed-action
timed-action
timed-action
timed-action
timed-action
timed-action
1 rundown per monitor server!)
271
272
273
274
275
276
277
278
279
280
281
282
283
284
285
286
287
288
289
290
-
;
;
;
;
;
;
;
;
;
;
;
;
;
;
;
;
;
;
;
;
Morning Show
725 Cut-in
755 Cut-in
825 Cut-in
855 Cut-in
5PM
6PM
10PM
Updates-Afternoon
Updates-Evening
Training
645
Appendix B System Files
;
special 301 0 txnet 301 special 302 0 txnet 302 special 303 0 txnet 303 special 304 0 txnet 304 special 305 0 txnet 305 special 306 0 txnet 306 special 307 0 txnet 307 special 308 0 txnet 308 special 309 0 txnet 309 special 310 0 txnet 310 ;
special 311 0 rxnet
- special 312 0 rxnet
- special 313 0 rxnet
- special 314 0 rxnet
- special 315 0 rxnet
- special 316 0 rxnet
- special 317 0 rxnet
- special 318 0 rxnet
- special 319 0 rxnet
- special 320 0 rxnet
- special 321 0 rxnet
- special 322 0 rxnet
- special 323 0 rxnet
- special 324 0 rxnet
- special 325 0 rxnet
- special 326 0 rxnet
- special 327 0 rxnet
- special 328 0 rxnet
- special 329 0 rxnet
- special 330 0 rxnet
- ;
; WEB ACCESS SESSIONS
;
websession 401:402
;
; INWS SESSIONS
;
inws 501:504 - 0 gnews inws 601:604 - 0 gnews ;
; END OF FILE
646
;
;
;
;
;
;
;
;
;
;
txnet
txnet
txnet
txnet
txnet
txnet
txnet
txnet
txnet
txnet
;
;
;
;
;
;
;
;
;
;
;
;
;
;
;
;
;
;
;
;
rxnet
rxnet
rxnet
rxnet
rxnet
rxnet
rxnet
rxnet
rxnet
rxnet
rxnet
rxnet
rxnet
rxnet
rxnet
rxnet
rxnet
rxnet
rxnet
rxnet
; inws
; inws
/site/printers/hplaser1
/site/printers/hplaser1
; HP LaserJet IVsi Printer profile
;
ejectcode
<ff>
ejectcount
1
idlecount
0
pagelength
66
scriptrhstart 32
scriptrhmax
23
scriptlhmax
25
scriptshift
yes
scripttemplate no
;
expand <esc>(0U<esc>(sp7.0h18vs0b11T <nul>
;Courier
;
font 2 <esc>(s3B
<esc>(s0B
;Bold
font 3 <esc>(s4B
<esc>(s0B
;extra bold
font 4 <esc>&dD
<esc>&d@
;underline
font 5 <esc>&dD<esc>(s3B
<esc>&d@<esc>(s0B ;bold/Under
;
;form 7 <esc>&l0O<esc>(s10H<esc>(s12V <nul> ;landscape,
;form 8 <esc>&l1H
<nul>
;top tray
;form 9 <esc>&l4H
<nul>
;lower tray
/site/system
id=NRCS
net=AB
lowwater=5000 highwater=6250
purgelimit=5
load=5
pausetimeout=0:05
;
; defaults - if parameter not present these values are assumed
;
unless overridden on the command line.
;
; auto_upgrade=yes
lowwater=1250
remotetimeout=0:00
; clockmax=12
maxhits=500
scriptlhmax=40
; excluded_video=none min_passwd_length=5
scriptrhmax=40
; highwater=2500
msgserver=silent
security=or
; lastlogin=yes
pausetimeout=0:30
timechar=:
; load=0
purgelimit=0
timer=verbose
; localtimeout=0:00
readrate=180
wordlength=0
647
Appendix B System Files
/site/wires/anpa7
; %Z% %M%
%I%
Date %E%
%Q%
; anpa7 - suitable for upi7, ap7, and cupi7
bits
start
eos
category
slug
;
;
map
map
map
map
map
map
map
map
map
map
map
map
map
map
map
map
map
map
map
648
7
<soh>
<EOT>
------30
<16>
<25>
<29>
<30>
<35>
<42>
<60>
<61>
<62>
<64>
<91>
<92>
<93>
<94>
<95>
<123>
<124>
<125>
<126>
<SP>
<SP>
<SP>
<SP>
.
..
<23>
<23>
<23>
|N
1/8
1/4
3/8
|B
-1/2
5/8
3/4
7/8
;
;
;
;
;
;
;
;
;
TTS SPACE BAND
EM SPACE
THIN SPACE
EN SPACE
EN LEADER
EM LEADER
HARDEOL
HARDEOL
HARDEOL
console.cfg
console.cfg
log b:log 32764
computer
name
a
label
NRCS
irq
3
hostess
2c0
speed
9600
;
computer
name
b
label
NRCS
irq
3
hostess
2c8
speed
9600
;
computer
name
c
label
NRCS
irq
3
hostess
2d0
speed
9600
;
modem
password
issecret
timeout
6:00
irq
3
hostess
2d8
speed
; A server
; B server
; C server
; remote console
2400
649
Appendix B System Files
SYSTEM.CLIENT.WINDOWS
n
Either IP address or network card information is acceptable; IP address is
preferable.
125.1.100.1
125.1.100.2
125.1.100.3
125.1.100.4
02608c7e519f
02608c7e1790
02608c7e51a8
02608c7e6c01
125.1.100.9
125.1.100.10
125.1.100.11
125.1.100.12
125.1.100.13
125.1.100.14
125.1.100.15
125.1.100.16
125.1.100.17
125.1.100.18
125.1.100.19
125.1.100.20
125.1.100.21
125.1.100.22
650
;02608cdbe7a2 ns001
;02608cd95e7e ns002
;02608c7e178e ns003
;02608c7e67aa ns004
;ns005 michel 87
;ns006 thibault 22
;ns007 ries
04
;ns008 lucas 57
;02608c7e52c6 ns009
;02608c7e5260 ns010
;0020aff431ff ns011
;02608c7e6bfc ns012
;02608c7e5274 ns013
;02608c7e6b58 ns014
;02608c7e532e ns015
;0020aff42efc ns016
;0020aff42dad ns017
;0020aff42dcb ns018
;0020aff432ca ns019
;0020aff42d42 ns020
;0020aff431bf ns021
;0020aff43277 ns022
big table
brock 07
nydam 16
lockett 38
christensen 48
betty 69
aveson 28
robinson 49
tinsley 63
reed 44
landis 61
dorr 51
donnallen 60
douda 54
kennedy 52
control room
becker 30
glass 29
SYSTEM.CONFIGURE.301-ACTION
SYSTEM.CONFIGURE.301-ACTION
scan
system.shredder
remove
scan
dup
dup
dup
scan
dup
scan
dup
scan
dup
scan
dup
scan
dup
scan
dup
scan
dup
scan
dup
scan
dup
system.cables.master
system.cables.groups
system.cables.cable#
system.cables.device_type
phones.airports
phones.*all
phones.business
phones.*all
phones.fire
phones.*all
phones.government.federal
phones.*all
phones.government.local
phones.*all
phones.government.state
phones.*all
phones.hospitals
phones.*all
phones.media
phones.*all
phones.misc
phones.*all
651
Appendix B System Files
SYSTEM.MAP
;
;<rundown queue>
<event dir>
<composite><grp><mon off time>
;<name>
<dev name>
<update> <mct temp> <drv><dir><range>
;
show.6am.rundown
show.6am
monitor
800
cg
cg@casvr
update
ca-cg
C:AMNEWS:500
599
cart
cart@casvr2
update
ca-cart
3
show.cutins.725
show.cutins
900
cg
cg@casvr
update
750
cart
cart@casvr2
update
show.noon.rundown
show.noon
1400
cg
cg@casvr
update
899
cart
cart@casvr2
update
show.6pm.rundown
show.6pm
2100
cg
cg@casvr
599
cart
cart@casvr2
ca-cg
ca-cart
ca-cg
ca-cart
-
update
update
show.11pm.rundown
show.11pm
0300
cg
cg@casvr
update
599
cart
cart@casvr2
update
show.updates.rundown show.updates
0100
cg
cg@casvr
update
850
cart
cart@casvr2
update
show.special.rundown show.special
0200
cg
cg@casvr
update
652
-
ca-cg
ca-cart
ca-cg
ca-cart
ca-cg
ca-cart
ca-cg
monitor
C:AMNEWS:700
3
monitor
C:AMNEWS:800
3
monitor
C:PMNEWS:500
3
monitor
C:PMNEWS:500
3
monitor
C:PMNEWS:800
3
monitor
C:PMNEWS:4000
SYSTEM.MAP
4100
cart
cart@casvr2
update
show.sat-am.rundown show.sat-am
1100
cg
cg@casvr
update
599
cart
cart@casvr2
update
show.sports-sat.rundown show.sports-sat
2200
cg
cg@casvr
update
899
cart
cart@casvr2
update
show.sat-am.cut-in-1 show.sat-am
1100
cg
cg@casvr
update
850
cart
cart@casvr2
update
ca-cart
ca-cg
ca-cart
ca-cg
ca-cart
ca-cg
ca-cart
3
monitor
C:PMNEWS:500
3
monitor
C:PMNEWS:800
3
monitor
C:AMNEWS:800
3
653
Appendix B System Files
SYSTEM.RESOURCE
;Dev Style
Template Effect
cg
bnews
62
cg
th
76
cg
mm
75
cg
pball
9996
cg
lottopb
9993
cg
cashpb
9994
cg
world
50
cg
nation
50
cg
fancash
9995
cg
south
50
cg
recap
52
cg
nitetz
53
cg
tvex
67
cg
uv
68
cg
tji
69
cg
intv1
1
cg
intv
2
cg
intvdate 2
with date
cg
loc
4
cg
locdate
5
cg
date
6
cg
file
7
cg
newsfile 7
cg
ctsy
8
cg
sktch
10
cg
spkng1
11
cg
spkng
12
cg
scenes
13
cg
locskylv 24
cg
locsky
16
cg
intvskylv 17
cg
repsky
18
cg
loclv
19
cg
intvlv
20
cg
intv1lv
28
cg
live
21
cg
replv
22
cg lvsky
23
0
cg
rep
27
cg
sky
141
-
654
# lines
0
1
1
6
12
9
1
1
8
1
1
1
0
0
0
1
2
2
1
2
1
0
0
1
1
1
2
1
1
1
2
1
1
2
1
0
1
1
0
Comment
;breaking news
;today in history
;money matters
;powerball
;lotto/powerball
;cash3/powerball
;the world
;the nation
;fantasy 5 cash 3
;the south
;recap
;11 tonight
;tv exclusive
;unedited video
;this just in
;1 line interview
;2 line interview
;1 line interview
;1 line locator
;locator with date
;date super
;file tape
;newsfile
;courtesy
;sketches by
;speaking one line
;speaking two line
;scenes from
;live skycam locator
;locator skycam
;interview skycam live
;reporter skycam
;live locator
;live interview
;live interview 1 line
;live
;live generic reporter
;live skycam
;reporter not live
;skycam live
SYSTEM.RESOURCE
cg
frsky
254
;
;special for NoonDay
;
cg
locn
1002
locator/noonday
cg
scenesn
1022
cg
innd
1001
cg
lond
1008
cg
inlvnd
1007
noon
;
; SPORTS
cg
nl
950
cg
al
951
cg
nfl
952
cg
cf
953
cg
nba
954
cg
cbb
955
cg
nhl
956
cg
prep
957
cg
scr
960
;; Anchors/Reporters
cg
cg
cg
sa
salv
sasky
104
105
107
-
0
;from skycam
-
1
;1-line
-
-
-
1
2
1
2
;scenes from/noonday
;2 line interview noon
;live locator noon
;live 2 line interview
10
10
10
10
10
10
10
16
;national league
;american league
;nfl
;college football
;nba
;college basketball
;nhl
;high school
;score lower third
0
0
0
; steve aveson
; steve aveson live
; steve aveson skycam
4
655
Appendix B System Files
SYSTEM.WIRES.DISTRIBUTION
AP#medc2##
AP#env####
AP######a#
AP######c#
AP######d#
AP######e#
AP######f#
AP######g#
AP######h#
AP######i#
AP######j#
AP######m#
AP######n#
AP######o#
AP######p#
AP######q#
AP######q#
AP######r#
AP######s#
AP######s#
AP#nbc##t#
AP######t#
AP######u#
AP######v#
AP######v#
AP######w#
AP########
AP########
AP########
NC######u#
NC########
NC########
NC########
AP######q#
AP######s#
656
wires.medsource
wires.environmental
wires.national
wires.features
wires.summaries
wires.features
wires.business
wires.state/regional
wires.summaries
wires.international
wires.state/regional
wires.farm
wires.state/regional
wires.weather
wires.politics
wires.sports.all
wires.sports.scores
wires.advisory.other
wires.sports.all
wires.sports.stories
wires.newschannel
wires.advisory.other
wires.state/regional
wires.advisory.other
wires.daybook
wires.national
wires.unknown
wires.ap
wires.all
wires.advisory.priority
wires.all
wires.newschannel
wires.all
sports.wires
sports.wires
ALWAYS
ALWAYS
URGENT
ALWAYS
URGENT
SYSTEM.WIRES.KEYWORDS
SYSTEM.WIRES.KEYWORDS
* AP
system.wires.keywords-ap
system.wires.keywords-ap2
* UP
*
system.wires.keywords-others
wires.keywords
wires.
wires.keywords
SYSTEM.WIRES.KEYWORDS-AP
destination
atlanta
atlanta
destination
rape
rape
destination
braves
braves
destination
carter
carter
destination
tuscaloosa
tuscaloosa and football
destination
xgr
xgr
destination
medsource
medc2 or medstar
destination
gingrich
gingrich
destination
space
(space AND shuttle) OR (shuttle AND columbia) or (shuttle AND
atlantis)
shuttle AND discovery
destination
drugs
crack AND cocaine
destination
air-safety
crash and plane OR ntsc or n.t.s.c. or faa or f.a.a.
destination
delta
(delta and airlines) OR (hartsfield and airport)
destination
guns
guns or weapons or nra
657
Appendix B System Files
SYSTEM.WIRES.KEYWORDS-AP2
destination 9am-specials
900a and specials
658
Appendix C
Standard Dictionaries
This appendix defines and explains contents of standard dictionaries as
they are installed on your iNEWS newsroom computer system. Reference
this information when modifying dictionary contents. Major sections are:
•
Using Dictionaries to Define Messages and Commands
•
Customizing Dictionaries
•
Utility Messages Dictionary (/site/dict/messages)
•
ccumsgs Dictionary (/site/dict/ccumsgs)
•
Commands Dictionary (/site/dict/ccucmds)
•
Queues Dictionary (/site/dict/queues)
•
Words Dictionary (/site/dict/words)
•
Connect Dictionary (/site/dict/doac)
•
Telex Dictionary (/site/dict/telex)
•
Dial Dictionary (/site/dict/dial)
•
Keyboard Macros Dictionary (/site/dict/keymacros)
•
Printer Messages Dictionary (/site/dict/printmsgs)
•
Case-shifting Dictionary (/site/dict/shift)
•
MCS Dictionary (/site/dict/mcs)
Appendix C Standard Dictionaries
Using Dictionaries to Define Messages and
Commands
Most commands, messages, and many queues your iNEWS newsroom
computer system uses are defined in dictionaries. Your system has a
number of these dictionaries, each defining a particular group of
commands, messages, or words, such as: the names of all commands are
defined in the ccucmds dictionary. Many messages your system uses are
defined in the ccumsgs dictionary.
Dictionaries let you customize your system’s messages, workstation and
commands, as well as the names of many of the queues your system uses
(such as SYSTEM.SEEK). You can change the names of any of your
system’s required queues by editing their definitions in the queues
dictionary and then having your system read the modified dictionary.
n
If you customize your dictionary entries, keep a log of the changes you
make so your changes can be re-entered after future software upgrades.
The following table lists names and locations of dictionary files.
Names and Locations of Dictionary Files
660
File Name & Location
Dictionary File Name
/site/dict/ccucmds
Terminal commands
/site/doct/ccumsgs
Error and Status Messages
/site/dict/ccuvideo
Video Modes
/site/dict/messages
Utility Messages
/site/dict/queues
Required Queues
/site/dict/words
Status and Option Words
/site/dict/doac
Connect Commands and Messages
/site/dict/telex
Telex Commands and Messages
/site/dict/dial
Modem/Dial Messages
Using Dictionaries to Define Messages and Commands
Names and Locations of Dictionary Files
File Name & Location
Dictionary File Name
/site/dict/keymacros
Key Names for Macros
/site/dict/printmsgs
Printer Messages
/site/dict/shift
Case-Shifting Parameters
/site/dict/mcs
MCS Alarms and Words
/site/dict/mctcmds
MCT Commands
/site/dict/mctmsgs
MCT Error and Status Messages
Each line in a dictionary begins with a standard name followed by the
translation for the command, message, or word represented by that
standard name, as shown in the following Dictionary Standard Names and
Translation table..
Dictionary Standard Names and Translation
Standard Name
Translation
cursor left
/cu l
cursor top
/cu t
cursor up
/cu u
Each translation is preceded by a slash (/). In commands, the translation
represents the minimum a user must enter to execute the command. In the
example above, the translation /cu u is the minimum a user must enter to
execute the cursor up command.
The translations may be more than one word long, but the dictionaries have
limited space, so keep each translation as short as possible. As a rule, make
translations just long enough to be unique from any other translation. For
instance, the cursor up command is translated as cu u. This is the
shortest translation for this command that keeps the translation unique.
661
Appendix C Standard Dictionaries
If the purpose of a standard name or its translation is not clear, clarify them
by inserting a comment on the line following the translation. Begin the
comment line with a semicolon (;) to prevent the system from treating it as
part of the translation.
n
iNEWS newsroom computer system uses standard names in each
dictionary to match each translation to the correct command, message, or
word. Do not change any of the standard names in your dictionaries.
Customizing Dictionaries
Your system’s dictionaries are text files stored in the /site/dict
directory. Because they are text files, you can change any dictionary
translation using ed, the line editor, at the console. See Appendix H for
more information.
Changing Default Dictionary Values
As an example of how to modify a dictionary translation, change the enter
directory and enter queue commands to make directory and make queue.
To do this, change the translations for enter directory and enter queue from
e d and e q to ma d and ma q, respectively.
The new translations, like the ones they are replacing, are as short as they
can be and still remain unique. Keep each translation short, because there
is a space limit.
If necessary, hide commands from users by changing the command name.
For instance, to restrict access to the order command, change it to
something like arrange and inform only users that you want to have
access to the command.
662
Customizing Dictionaries
To edit the dictionary file, do the following:
1. Select all servers at the console, so changes you make are made to each
server’s copy of the file. See “Selecting Servers” on page 33 for more
information.
The enter directory and enter queue commands have their
translations stored in /site/dict/ccucmds.
This procedure uses the
ed line editor. See
Appendix H for more
information.
2. Open /site/dict/ccucmds for editing by typing:
ed /site/dict/ccucmds
A message similar to the following appears:
editing /site/dict/ccucmds
1824
3. Move to the line containing the standard name enter directory by
typing:
enter directory
/e d
4. Change e d to ma d by typing s/e d/ma d.
enter directory
/ma d
5. Change the translation for enter queue in the same way.
enter queue
/ma q
6. Type w (lowercase w) to save your changes to disk and type q to quit
edit.
w
1826
q
To change a default dictionary value, do the following:
1. Edit the dictionary file.
See the previous procedure.
2. Type a message like the following:
NRCS-A: broadcast System going down at 1:55 pm. Please log
out.
663
Appendix C Standard Dictionaries
3. Type offline to bring the system offline. This will prevent users
from logging in.
4. At the designated time, type list t to see whether anyone is still
logged in.
If there is someone logged in, a message similar to the following
appears:
G500 terryl
A
5. If anyone is logged in, type logout all to log them out.
6. Type stop all to stop all servers.
7. Become a console superuser. See “The Console Superuser” on page 23
for more information.
8. Type makeccutab -b (-b for build tables).
Use makeccutab to build the command and error message tables in
the PCU program.
Information similar to the following appears::
Translating </site/dict/ccucmds>
Translating </site/dict/ccuvideo>
Translating </site/dict/ccumsgs> and </site/dict/queues>
<atccu> unused space is 205 characters
<directccu> unused space is 205 characters
After modifying a dictionary, run makeccutab and maketab to
have your system read the modified dictionaries and incorporate
changes into its programs.
The makeccutab command builds the command and error message
table for the PCU dictionaries and then displays how much space is
unused in these dictionaries. In the previous example, the unused space
is 205 characters.
9. Type maketab -b to build command and message tables and
translate dictionaries for the iNEWS newsroom computer system.
When the prompt returns, run maketab to translate site dictionaries.
To make it build the table, add -b to this command.
664
Customizing Dictionaries
A display similar to the following appears:
Translating </site/dict/queues>
Translating </site/dict/words>
Translating </site/dict/messages>
<host> unused space is 109 characters
Translating </site/dict/doac>
<snews> unused space is 221 characters
Translating </site/dict/doac>
<nxserver> unused space is 221 characters
The maketab command translates each dictionary and then displays
unused space in these dictionaries.
If you changed the name of a command in a command dictionary, you
must also change the function key definition that references that
command.
10. Restart all devices.
11. At the prompt, exit from superuser using Ctrl+D.
12. Reset your system’s PCUs using their reset switches.
13. When all PCUs have completed their reset, restart them by typing
restart all at the console.
Once you have restarted the system, try using enter directory
and enter queue. The system no longer recognizes these
commands. It recognizes the make directory and make queue
commands.
14. Back up your site files with the sitedump command.
If you do not have one of your site files, a message similar to the following appears when you run the makeccutab or maketab console
command:
Translating </site/dict/ccucmds>
Cannot access translation file </site/dict/ccucmds>.
Do you wish to use the standard English translations and
continue? (n/y)
665
Appendix C Standard Dictionaries
If a set of dictionaries exceeds the amount of space allotted, a message
similar to the following appears:
Table space exceeded by 14 characters
No modifications done!
Restoring Dictionary Defaults
You can restore original dictionary default translations without editing the
dictionary again. Original dictionary files are stored in the /tmp/dict
directory and have a pound symbol (#) prefix, such as #mcs. So, even after
you have made changes to a dictionary, you can restore the standard default
translations by copying the appropriate dictionary file from /site/dict
and running the makeccutab and maketab commands again.
To restore standard translations for enter directory and enter
queue, do the following
1. List files in /site/dict by running the following ls command:
ls /site/dict
666
Utility Messages Dictionary (/site/dict/messages)
A display similar to the following appears:
#ccucmds
pcdgidriver
#ccumsgs
pcflexidriver
#ccuvideo
pcinfdriver
#dial
pclsfdriver
#doac
pcqcbdriver
#keymacros
pcqdeltadriver
#mcs
pcqpbdriver
#mctcmds
pcsvsdriver
#mctmsgs
#messages
#pca72driver
#pcavidapdriver
#pcbcartdriver
#pccypherdriver
#pcdgidriver
ccumsgs
#pcflexidriver
ccuvideo
#pcinfdriver
convertvideo
#pclsfdriver
dial
#pcqcbdriver
doac
#pcqdeltradriver keymacros
#pcqpbdriver
mcs
#pcsvsdriver
mctcmds
#printmsgs
#queues
#shift
#telex
#words
ccucmds
mctmsgs
messages
pca72driver
pcavidapdriver
pcbcartdriver
pccypherdriver
printmsgs
queues
shift
telex
words
2. Type cp followed by the pathname of the file you want to copy, and
the pathname of the file you want to contain the copy. For instance,
cp /tmp/dict/ccucmds /site/dict/ccucmds
After you copy the file to /site/dict, complete the procedure for
changing a translation.
Utility Messages Dictionary (/site/dict/messages)
The /site/dict/messages dictionary holds a number of utility
messages displayed in utility programs used by the iNEWS newsroom
computer system including messages usually displayed when a user is
building a form or creating a keyboard story. A few console messages are
also included in this dictionary.
667
Appendix C Standard Dictionaries
These messages do not contribute to the total size of translations, because
they are sent to workstations only under special circumstances, and—with
some exceptions—the system looks up translations only as they are needed
rather than building them into a program. Some exceptions include the
following messages, which are built into programs via the maketab
program:
n
•
M_COMPUTER
•
M_KEYBAD
•
M_LASTLOG
•
M_NOBULKPR
•
M_ONDEVICE
•
M_PIOFAIL
•
M_WIREFAIL
•
M_WIREIDLE
•
M_WIRERESUME
Some messages defined in dictionary entries on the server that would
typically be displayed in the iNEWS client status bar can now have a
display method designator to determine if the message should be displayed
in the status bar or as a pop-up message. This display method designator is
based on the first character of the message definition. A display designator
of 1 denotes that the message will appear on the status bar. A display
designator of 2 denotes the message displays as a pop-up dialog in
addition to being displayed in the status bar and alerts history. The default
display method will be a ‘1’ if no display designator is specified. Pop-up
dialogs do not steal focus away from the user or interrupt their work.
This section describes these utility messages in the following tables:
668
•
DBServer Program Messages
•
Disconnect Program Messages
•
Category and Keyword Check Program Messages
•
Keyboard Check Program Messages
•
Keyboard Check Program Messages for Macros
•
Grpcheck Messages
Utility Messages Dictionary (/site/dict/messages)
For information on the
display method
designator appearing in
the message definition,
see note on page 668.
For information on the
display method
designator appearing in
the message definition,
see note on page 668.
•
Wire Program Messages
•
Mail Server Messages
•
Validation (Action) Server
•
Seek Server Messages
•
Last Login Messages
•
Messages for Print Server
•
Message for the Sony Barcode Printer
•
dbtraits Messages
DBServer Program Messages
Standard Name
Translation
M_NOSPACE
/2NO SPACE IN SYSTEM
M_LOWSPACE
/1SYSTEM LOW ON SPACE
Disconnect Program Messages
Standard Name
Translation
M_DISCONNECT
/2COMPUTER DISCONNECTED
669
Appendix C Standard Dictionaries
Category and Keyword Check Program Messages
670
Standard Name
Translation
M_NODEST
/No destination found
M_DUPEDEST
/Duplicate destination
M_LINE
/Line
M_KWFMAX
/Too many keyword distribution
files
M_BADQUEUE
/Could not enter the queue
M_NOTQUEUE
/Not a queue
M_PURGEZERO
/Queue is never purged
M_SYSERROR
/System error
M_CATLONG
/Category code word too long
M_CATMAX
/Too many category codes
M_CATFORM
/Illegal category format
M_CATHIDE
/Hidden category
M_KWDLONG
/Keyword too long
M_KWDMAX
/Too many keywords
M_WNOTLAST
/Default keyword list must be last
M_SYNERROR
/Syntax error
M_MISSING
/Missing
M_UNEXPCTD
/Unexpected
M_FILENUM
/Maximum file number bad
M_UPDATEQ
/UPDATE queue
M_INVALIDQ
/Invalid destination queue
Utility Messages Dictionary (/site/dict/messages)
Keyboard Check Program Messages
Standard Name
Translation
M_KEYDUP
/Duplicate key description
M_KEYRANGE
/Invalid key number
M_KEYSEP
/Missing key number separator (~)
M_KEYSTART
/First key description does not begin
with @
M_KEYMIN
/Not enough key descriptions
M_KEYLONG
/Keyboard description contains too
many characters
M_KEYREP
/Warning: a key definition contains
a repeating function
M_KEYFUNKY
/Warning: badly placed @ exists in
key definition line
M_KEYOK
/Keyboard ok
M_KEYBAD
/Keyboard NOT usable
M_COMPUTER
/Computer
Keyboard Check Program Messages for Macros
Standard Name
Translation
M_MACRO
/%s macro #%d:
M_NOLOCATE
/could not locate "%c%d"
M_BADMEMORY
/memory allocation error
671
Appendix C Standard Dictionaries
672
Standard Name
Translation
M_REFERENCE
/circular reference to macro #%d:
M_BADSTACK
/unable to stack keywords
M_MISMATCH
/mismatched "%c%c"
M_TWOTILDES
/Multiple "%c"s found
M_RESWORD
/no "%c%c" found for reserved
word %s
M_TWOTAGS
/multiple macro keys: %s %s
M_NOTILDE
/no "%c" found
M_NOTAG
/no macro key tag
M_UNKNOWN
/unknown macro key identifier: %s
M_IGNORING
/ignoring: %s
M_UNEXPECTED
/unexpected: %s
M_TWODEFS
/duplicate macro definition:
M_LONESTATE
/isolated keyboard state:
M_DISTRIBUTE
/%s does not distribute
M_EMPTY
/empty macro
M_NUMKEYNOSHIFT
/Shifted numeric keypad 0 - 9 keys
cannot be assigned macros
M_STDHELP
/Warning: "Help" key redefined:
M_STDCELLEDIT
/Warning: "Edit Cell" key redefined:
M_STDFINDNEXT
/Warning: "Find Next" key
redefined:
M_STDEXIT
/Warning: "Exit" key redefined:
Utility Messages Dictionary (/site/dict/messages)
Standard Name
Translation
M_STDCLOSE
/Warning: "Window Close" key
redefined:
M_STDDISCARD
/Warning: "Discard Changes" key
redefined:
M_STDREFRESH
/Warning: "Refresh" key redefined:
M_STDTOGGLETEXTFORM
/Warning: "Toggle Story Form" key
redefined:
M_STDSCRIPT
/Warning: "Script Swap" key
redefined:
M_STDPRIORITYQUEUE
/Warning: "GoTo Priority Queue"
key redefined:
M_STDALERTSHISTORY
/Warning: "GoTo Alerts History"
key redefined:
M_STDMESSAGEBAR
/Warning: "Communicate Message
Bar" key redefined:
M_STDMESSAGEHISTORY
/Warning: "Communicate Message
Show History" key redefined:
M_STDMAIL
/Warning: "Communicate
Open/Close Mail" key redefined:
M_BADPAUSE
/Invalid pause interval
Grpcheck Messages
Standard Name
Translation
M_GRPBADALIAS
/Invalid name follows word "alias"
M_GRPBADGRP
/Invalid name follows word "group"
673
Appendix C Standard Dictionaries
674
Standard Name
Translation
M_GRPBADDEV
/Not a workstation device
M_GRPERRSKIP
/Group or alias word missing.
Skipping text
M_GRPEXINPUT
/Ignoring words following group
name
M_GRPAEXINPUT
/Ignoring words following alias
name
M_GRPINT
/Internal groupchecker error
M_GRPDBERR
/Failed to access first story
M_GRPDEVSYN
/Bad workstation device
specification
M_GRPNAMUSR
/User name used as group or alias
name
M_GRPNAMDUP
/Duplicate group or alias name
M_GRPNONAME
/Missing group name
M_GRPALNONAME
/Missing alias name
M_GRPGRPREC
/Recursive group membership
M_GRPINALIAS
/Name already used as group name
M_GRPAINGRP
/Name already used as alias name
M_GRPMEMBAD
/Not a user or workstation
M_GRPNIX
/No groups or aliases found
M_GRPRESERV
/Improper use of reserved word
M_GRPNOSTORY
/Failed to open story
M_GRPNOQ
/Failed to open queue
M_GRPFLODEF
/Cannot open default aliases file
Utility Messages Dictionary (/site/dict/messages)
Standard Name
Translation
M_GRPFLONEW
/Cannot open new aliases file
M_GRPFLSOLD
/Cannot save old aliases file
M_GRPFLLONG
/more than 50,000 alias names
created
M_GRPOK
/GROUPS story OK
M_GRPBAD
/GROUPS story NOT OK
M_GRPSOSO
/GROUPS story accepted, with
errors
M_GRPNOSOUSER
/Lookup of "so" user in passwd file
failed.
M_GRPCHOWNFAILED
/Could not change ownership of
mail alias file.
Wire Program Messages
Standard Name
Translation
M_WIREFAIL
/1HOST-CCU
COMMUNICATION ERROR
M_WIREIDLE
/1wire has been idle for
M_WIRERESUME
/1wire received story, was idle for
675
Appendix C Standard Dictionaries
Mail Server Messages
Standard Name
Translation
M_MAILSYNTAX
/Can't send mail, no address
M_MAILNOREC
/Unable to receive mail from
M_MAILQUEUE
/Can't return mail, bad mail queue
Validation (Action) Server
Seek Server Messages
are also used by
ftsseek.
676
Standard Name
Translation
M_VALID
/Story valid
M_INVALID
/Story invalid
M_VMOVEDTO
/Story invalid - Moved to
Seek Server Messages
Standard Name
Translation
M_BGSNSCHP
/No search path
M_BGSNRESP
/No results path
M_BGSSCHTP
/Invalid Search Type
M_BGSIKWEX
/Invalid keyword expression
M_BGSSPDNE
/Search Path does not exist
M_BGSRQDNE
/Results Queue does not exist
Utility Messages Dictionary (/site/dict/messages)
Standard Name
Translation
M_BGSRQNAQ
/Results Queue not a queue
M_BGSRQNPM
/No write permission for results
queue
M_BGSINVLD
/Invalid Search
M_BGSEOP
/end of path
M_BGSMAXH
/max hits
M_BGSSPI
/Invalid search path
M_BGSRQI
/Invalid results queue
M_BGSRQOE
/Open error on results queue
M_BGSDONE
/Done
M_BGSSTOPPED
/Stopped
M_BGSCANCELLED
/Cancelled
M_BGSSYNTAXERROR
/Syntax Error
M_BGSCOMMERROR
/Communication Error
M_BGSMPAT
/Missing search pattern
Last Login Messages
Standard Name
Translation
M_LASTLOG
/Last Login
M_ONDEVICE
/on device
677
Appendix C Standard Dictionaries
Messages for Print Server
Standard Name
Translation
M_PRINTER_BUSY
/Printer Is OFFLINE
Message for the Sony Barcode Printer
Standard Name
Translation
M_NOBULKPR
/Bulk printing disabled
dbtraits Messages
Standard Name
Translation
M_CHANGE_GROUP
/1Group, form, order, or sortfield
changed.
ccumsgs Dictionary (/site/dict/ccumsgs)
The following table shows entries used for PCUs in the ccumsgs
dictionary, with their default translations.
678
ccumsgs Dictionary (/site/dict/ccumsgs)
PCU Messages
Standard Name
Translation
D_AIRBEND
/End-backwards
D_AIRFEND
/End-forward
D_AIRSTOP
/Stopped
D_AUTHORIZED
/Not allowed
D_BACKT
/Backtime
D_BADARG
/Bad argument
D_BADDEST
/Bad destination
D_BADKBD
/Bad keyboard
D_BADREP
/Must FIND First
D_BUSY
/Busy
D_CANTFIND
/Can't find
D_CMD
/CMD
D_CONTINUE
/Press CMD to continue
D_DEFINED
/Text is defined
D_DIRMODE
/Not in directory
D_DUPED
/2 spaces then DUP'D
D_EMPTY
/5 spaces then EMPTY
D_ERROR
/System error
D_EXISTS
/Already exists
D_GONE
/Gone
D_HOME
/home
D_INSERT
/Insert
679
Appendix C Standard Dictionaries
680
Standard Name
Translation
D_KEY
/Key (must match ccucmd translation)
D_KILLED
/1 space then KILLED
D_LINE
/Line
D_LOCKED
/Locked
D_LOGGEDIN
/Logged in
D_LOGIN
/Login (must match ccucmd translation)
D_MAIL
/mail
D_MAILSTORY
/Story
D_MAXSONS
/Too many
D_MESSAGE
/Message
D_MODE
/Invalid in this mode
D_MOVED
/2 spaces then MOVED
D_NAMETL
/Name too long
D_NEW_PASSWORD
/New password
D_NOARG
/Needs argument
D_NOCMD
/Unrecognized command
D_NODEFINED
/Nothing defined
D_NODELETED
/Nothing deleted
D_NOFINDSTR
/Type word to find
D_NOLOG
/Not logged in
D_NOMSG
/No messages
D_NOREPSTR
/Type new word
D_NOTBATCH
/Queue lacks that capability
D_NOTEMPTY
/Not empty
ccumsgs Dictionary (/site/dict/ccumsgs)
Standard Name
Translation
D_NOTEXIST
/Story moved
D_NOUSER
/No such user
D_OFFLINE
/Offline
D_ONAIR
/On air
D_ORDER
/Order
D_PASSWORD
/Password (must match ccucmd translation)
D_PAUSED
/Paused
D_PERM
/P
D_PRINTED
/PRINTED
D_PURGELOCK
/Queue busy
D_QONLY
/Only in queue
D_QUEMODE
/Not in queue
D_REFRESH
/Refresh
D_REPLACE
/Replace
D_RONLY
/Read-only
D_SORRY
/Sorry
D_SORTED
/Sorted
D_STORY
/Story
D_SYNTAX
/Bad usage
D_TOO_SHORT
/Too short
D_TXED
/TRANSFERRED
D_UNABLEMAIL
/Unable to send mail
D_UNKNOWN
/Unknown command
D_WAIT
/Please stand by
681
Appendix C Standard Dictionaries
Standard Name
Translation
D_WORD
/Word
Commands Dictionary (/site/dict/ccucmds)
The Commands dictionary consists of commands and job list commands
and their translations. Your system’s version of this file may be slightly
different.
Commands may be customized by changing their translation definition.
For instance, the default translation of backtime next is ba n , as shown in
the following commands table. You can change the translation to back n
or back next, or some other translation.
Commands(/site/dict/ccucmds)
682
Standard Name
Translation
air
/ai
air prompter
/ai p
air scrollbox
/ai s
backtime
/ba
backtime begin
/ba b
backtime end
/ba e
backtime next
/ba n
backtime pause
/ba p
blank
/bl
bulletin
/bu
connect
/co
Commands Dictionary (/site/dict/ccucmds)
Standard Name
Translation
cursor bottom
/cu b
cursor down
/cu d
cursor left
/cu l
cursor right
/cu r
cursor top
/cu t
cursor up
/cu u
define character
/def c
define erase
/def e
define paragraph
/def p
define word
/def w
delete character
/del c
delete defined
/del d
delete recover
/del r
destination
/des
display
/di
display norefresh
/di n
display refresh
/di r
display story
/di s
duplicate
/du
enter directory
/e d
enter queue
/e q
find
/fi
683
Appendix C Standard Dictionaries
684
Standard Name
Translation
flash
/fl
get
/ge
get all
/ge a
get old
/ge o
go
/go
help
/he
hold
/ho
insert block
/i b
insert character
/i c
insert mode
/i m
key
/ke
kill
/kill
load keyboard
/loa k
lock
/loc
login
/logi
login exit
/logi e
logout
/logo
logout exit
/logo e
mail
/ma
mail copy
/ma c
mail reply
/ma r
message
/me
Commands Dictionary (/site/dict/ccucmds)
Standard Name
Translation
message clear
/me c
message recall
/me r
monitor
/mon
move
/mov
new
/ne
new bottom
/ne b
new insert
/ne i
new top
/ne t
note clear
/no c
note recall
/no r
note save
/no s
order
/or
pack
/pac
pack all
/pac a
page down
/pag d
page up
/pag u
password
/pas
pause
/pau
print
/pr
publish
/publish
quit
/q
read
/rea
685
Appendix C Standard Dictionaries
686
Standard Name
Translation
read all
/rea a
read old
/rea o
receive
/receive
remove
/rem
replace
/rep
save
/sa
script
/scri
script undo
/scri u
scroll bottom
/scro b
scroll down
/scro d
scroll top
/scro t
scroll up
/scro u
seek
/see
send
/sen
split
/sp
status clear
/st c
tab right
/ta r
template recall
/te r
template save
/te s
time stamp
/ti s
transmit
/tr
unlock
/unl
Commands Dictionary (/site/dict/ccucmds)
Standard Name
Translation
unsplit
/uns
user
/us
video define
/vid d
video step
/vid s
view
/vie
Job List Commands
Standard name
Translation
bscan
/bscan
bpoll
/bpoll
ignore-del
/ignore-del
eof
/eof
all
/all
at
/at
every
/every
everyentry
/everyentry
extension
/extension
ignore
/ignore
ignore-del
/ignore-del
mailto
/mailto
number
/number
on
/on
687
Appendix C Standard Dictionaries
Standard name
Translation
open
/open
order
/order
poll
/poll
priority
/priority
put
/put
quiet
/quiet
scan
/scan
sendform
/sendform
send-del
/send-del
validate
/validate
verify
/verify
Queues Dictionary (/site/dict/queues)
The Queues dictionary contains names for system queues such as
SYSTEM.KEYBOARDS and the Dead queue.
See “Fast Text Search
(FTS) Servers” on
page 471 for
information on the
Queues Disctionary as
defined for FTS server.
688
Queues in this dictionary are used by functions within iNEWS. For
instance, the seek command uses whatever queue translation is
given to Q_SEEK, which is SYSTEM.SEEK by default. Like other
dictionaries, the standard name is in uppercase and must not be
changed. The translation can be in lowercase, but appears in uppercase on the screen. Queue names and their standard translations are
shown in the following Queues Dictionary table. The 8-bit codes
can be defined using 7-bit sequences.
Queues Dictionary (/site/dict/queues)
Queues Dictionary
Standard Name
Translation
Q_ACCT
/system.account
Q_ADDRLIST
/system.teleprinter.addrlist
Q_ADDRDIST
/system.teleprinter.distribution
Q_CATWORDS
/system.wires.distribution
Q_CLIENT_DOS
/system.client.dos
Q_CLIENT_COM
/system.client.com
Q_CLIENT _REMOTE_SEARCH
/system.client.remote-search
Q_CLIENT_COM_VERSIONS
/system.client.com-versions
Q_CLIENT_RS_VERSIONS
/system.client.rs-versions
Q_CLIENT_WIRE_SERVER
/system.client.wire-server
Q_CLIENT_WINDOWS
/system.client.windows
Q_CLIENT_VERSIONS
/system.client.versions
Q_CONFIGURE
/system.configure
Q_DEAD
/dead
Q_DESTINATION
/notes
Q_FLASH
/wires.advisory.priority
Q_FORMS
/system.forms
Q_FTS
/system.fts
Q_GROUPS
/system.groups
Q_HELP
/system.help.terminal
Q_HOME
/notes
689
Appendix C Standard Dictionaries
690
Standard Name
Translation
Q_INDEX
/system.index
Q_KEYBOARDS
/system.keyboards
Q_KEYWORDS
/system.wires.keywords
Q_MAIL
/mail
Q_MAILOUT
/system.mail.out
Q_MAILERROR
/system.mail.error
Q_MESSAGE
/system.message
Q_MOS_MAP
/system.mos-map
Q_MMAP
/system.map
Q_MRESOURCE
/system.resource
Q_NODEST
/system.unknown
Q_PRINTERS
/system.printers
Q_PRINTER2
/system.printers2
Q_REMOTE_SEARCH
/system.remote-search
Q_SEARCHTAPE
/system.searchtape
Q_SEEK
/system.seek
Q_STYLES
/system.styles
Q_SERVICE
/system.service
Q_SCRIPT
/system.dialogs
Q_SPELL
/system.spell
Q_TEMPLATES
/system.templates
Q_TITLE _ENTRY
/system.title-entry
Words Dictionary (/site/dict/words)
Standard Name
Translation
Q_UNKNOWN
/wires.unknown
Q_USERROOT
/people
Q_WEBACC_FORMS
/system.webforms
Q_WEBPUB_FORMS
/system.webforms
Words Dictionary (/site/dict/words)
The Words dictionary contains translations for a variety of miscellaneous
words used by the system. For instance, words regarding priority (such as
flash and silent) or print options (such as story and script) are included.
See “Fast Text Search
(FTS) Servers” on
page 471 for
information on the
Queues Disctionary as
defined for FTS server.
Standard names are in uppercase and must not be changed. Because many
messages in this dictionary are displayed in the upper right corner of
active stories and rundowns, keep them short to avoid overwriting portions of the story or rundown. Translations can be uppercase, lowercase, or
mixed case.
Words Dictionary
Standard Name
Translation
Wire Priorities and Options
W_FLASH
/FLASH
W_BULLETIN
/BULLETIN
W_WIRE_FORM
/wires
W_URGENT
/URGENT
W_SILENT
/SILENT
W_ALWAYS
/A
W_TRANSMIT
/TRANSMIT
691
Appendix C Standard Dictionaries
Standard Name
Translation
Status Types
W_HOLD
/HOLD
W_LOCKED
/LOCKED
W_MAIL
/mail
W_READY
/READY
W_NEW
/NEW
W_WIRE
/WIRE
Special Words for Find
W_AND
/and
W_NOT
/not
W_ANDNOT
/andnot
W_OR
/or
W_NOTREADY
/
W_SLOW
/slow
W_ALL
/all
Print Command Options
692
W_STORY
/story
W_SCRIPT
/script
W_RUNDOWN
/rundown
W_DIRECTORY
/directory
W_ON
/on
Words Dictionary (/site/dict/words)
Standard Name
Translation
W_DAYS
/SunMonTueWedThuFriSat
You can change these translations
only once. If you make a mistake, or
want to change them again, you
must extract the news program from
the release CD first. Call iNews Customer Support for assistance in
extracting the program.
W_MONTHS
/JanFebMarAprMayJunJulAugSepO
ct NovDec
You can change these translations
only once. If you make a mistake, or
want to change them again, you
must extract the news program from
the release CD first. Call iNews
Customer Support for assistance in
extracting the program.
W_PAGE
/page
Words Relating to the Seek Server
W_FAST
/fast
W_ACTIVE
/ACTIVE
W_DONE
/DONE
W_ERROR
W_ABORT
/ABORTED
W_MBSPACE
/¡@
This token applies to multibyte
iNEWS systems only. It must be set
to the multibyte space character of
the code set being used.
W_DELIMITERS
/ <sp> “()-.’/
W_PENDING
/PENDING
W_RESTRICTED
/restricted
693
Appendix C Standard Dictionaries
Standard Name
Translation
W_SLOW
/slow
W_BREAK
/= = = =
Words relating to FTS Server
W_INDEXBASE
/C:/FTS/FTSINDEX
W_BINDFTSI
/ftsserver:6100
W_BINDFTSS
ftsserver:6101
W_AGEWEIGHT
/100
W_HITSWEIGHT
/0
W_LOCWEIGHT
/0
Miscellaneous Options
694
W_DEFAULT_FORM
/default_form
W_WEBACC_FORM
/access_form
W_WEBPUB_FORM
/publish_form
W_LOGTYPES
/D
W_ERROR
/ERROR (only seek)
W_INDXD
/archvd
W_DEST
/destination
W_QUEUE
/queue
W_RESULTS_FORM
/search-results
W_START
/ON
W_OFF
/OFF
W_LOAD
/LOAD
W_UNLOAD
/UNLOAD
W_YES
/yes
Connect Dictionary (/site/dict/doac)
Standard Name
Translation
W_NO
/no
W_GROUP
/group
W_ALIAS
/alias
W_ANYSTR
/-
W_BLANKSTR
/+
W_PAGEBREAK
/pagebreak
(used by various programs and
identifies the word used to replace
the NSML <pb> (pagebreak) tag
when converting to SEP.
W_RESTRICTED
/restricted
(only used by gtraits program and
identifies the name used for the
restricted user group)
n
W_NEAR
/near
W_RUNS
/runs
W_STARTMEDIA
/Primary
W_CUE_REF
/164
Both W_PENDING and W_BREAK may appear in the Words Dictionary
however they are obsolete.
Connect Dictionary (/site/dict/doac)
The Connect dictionary contains messages and commands used by the
Connect feature.
The standard name is in uppercase and must not be changed. The translation can be in lowercase, uppercase, or mixed case.
695
Appendix C Standard Dictionaries
Connect Dictionary
696
Standard Name
Translation
S_SNPROMPT
/cmd>
S_SNCAPON
/Capturing session to
S_SNCAPOFF
/Session saved to
S_SNPAUSE
/Pause capture
S_SNESCAPE
/New escape character
S_SNQUIT
/Quitting
S_SNCAPERR
/Capture error!
S_SNNOQUEUE
/Could not append to queue
S_SNCRERR
/Error creating capture story
S_SNCLOSED
/Connection closed
S_NOSVC
/Unknown service
S_NOCAPTURE
/Session not saved to
S_SNNOTCAP
/Not capturing
S_SNEXPECT
/Failed to get expected string
S_NSCRIPT
/Could not open script story
S_CONNECT
/CONNECT
S_ACCEPT
/ACCEPT
S_REJECT
/REJECT
S_FINISH
/FINISH
S_TERMINAL
/TERMINAL
S_RXNET
/RXNET
Connect Dictionary (/site/dict/doac)
Standard Name
Translation
S_RXDNET
/RXDNET
S_CCAPTURE
/capture
S_CQUIT
/quit
S_CPAUSE
/pause
S_CSTOP
/stop
S_CHELP
/help
S_CESCAPE
/escape
S_CECHO
/echo
S_CHEOL
/heol
S_CTYPE
/type
S_CWAIT
/wait
S_CMESS
/message
S_CEXPECT
/expect
S_CDELAY
/delay
S_CTIMER
/timer
S_CPASS
/pass
S_CDIAG
/diag
S_CMAP
/map
S_CMAPIN
/mapin
S_CMAPOUT
/mapout
S_CAPHLP
/<queue>
Capture to queue, or continue after a
pause
697
Appendix C Standard Dictionaries
698
Standard Name
Translation
S_QUITHLP
/End this connect session
S_PAUSEHLP
/Pause capture, but do not close capture
story
S_STOPHLP
/Stop capturing and close capture story
S_HELPHLP
/Show this list of commands
S_ESCHLP
/<c> Change escape character to
specified character
S_HEOLHLP
/Toggle Hard-End-Of-Line on captured
data
S_ECHOHELP
/Toggle local character echo
S_MAPHLP
/<fromchar> <tochar> map input &
output
S_MAPINHLP
/<fromchar> <tochar> map input
S_MAPOUTHLP
/<fromchar> <tochar> map output
S_NXNONAME
/Computer not named
S_NXNOCONF
/System not configured
S_NXNOPTY
/No ptys available
S_NXNODEV
/No device available
S_KTRANSFER
/transfer
S_KCANCELLED
/cancelled
S_KDISCARDED
/discarded
S_KLOCAL
/L:
S_KREMOTE
/R:
S_KEOF
/[EOF]
Telex Dictionary (/site/dict/telex)
Standard Name
Translation
S_KEOT
/[EOT]
S_KTIMEOUT
/Timed out
S_KUNKNOWN
/Unknown packet type
S_KIOPENERR
/Input file open error
S_KINOTFOUND
/File not found
S_KOOPENERR
/Output file open error
S_KOWRITERR
/Output file write error
S_KOCLOSERR
/Output file close error
Telex Dictionary (/site/dict/telex)
TheTtelex dictionary contains commands and messages used with the telex
feature.
Telex Dictionary
Standard Name
Translation
X_0
/LINE FREE
X_1
/LINE UNAVAILABLE
X_10
/RING INDICATE
X_20
/CONNECTION MADE
X_36
/INCORRECT AB
X_43
/NO CONNECTION
X_50
/CALL CLEARED
X_61
/INVALID COMMAND
699
Appendix C Standard Dictionaries
700
Standard Name
Translation
X_70
/SS ABS
X_71
/SS DER
X_72
/SS MON
X_73
/SS NCH
X_74
/SS NP
X_75
/SS NA
X_76
/SS OCC
X_77
/SS NC
X_81
/SS INF
X_82
/SS CIC
X_83
/SS RDI
X_DISTRIBUTE
/SYSTEM.TELEX.DISTRIBUTION
X_UNKNOWN
/dead
X_CMD
/CMD
X_SENT
/SENT
X_ABORT
/ABORT
X_BUSY
/BUSY
X_NODIAL
/NODIAL
X_NOCNX
/NOCNX
X_MORE
/MORE
X_RETRY
/RETRY
X_FAIL
/FAIL
Dial Dictionary (/site/dict/dial)
Standard Name
Translation
X_MLKUP
/NO LOOKUP ENTRY FOUND
X_MMORE
/SENT OK REMAINING SENDS:
X_MSENT
/SENT OK
X_MRETRY
/NO CONNECTION–RETRIES LEFT:
X_MFAIL
/FAILED–NO MORE RETRIES
Dial Dictionary (/site/dict/dial)
The Dial dictionary contains messages used with modems.
Like other dictionaries, the standard name is in uppercase and must not be
changed. The translation can be in lowercase, uppercase, or mixed case.
Dial Dictionary
Standard Name
Translation
C_USAGE
/Dial: bad usage
C_MDMTO
/Modem timed out
C_NOCONS
/Could not open /dev/console
C_MDMRDY
/Line ready...
C_DSYSERR
/Dial: system error
C_MDMNOT
/Modem not responding
C_MDMNODIAL
/Modem not responding to dial command
C_MDMNOHUP
/Modem did not hang up–Check modem
C_MDMHUP
/Modem is hung up
701
Appendix C Standard Dictionaries
Standard Name
Translation
C_QUITQ
/Do you really want to quit (y/n)?
Keyboard Macros Dictionary (/site/dict/keymacros)
The keyboard macros dictionary contains names of keyboard keys for use
in keyboard macro definitions for iNEWS NRCS.
Like other dictionaries, the standard name is in uppercase and must not be
changed. Translations can be in lowercase, uppercase, or mixed case.
Keyboard Macros Dictionary
702
Standard Name
Translation
K_NULL
/null
K_F1
/f1
K_F2
/f2
K_F3
/f3
K_F4
/f4
K_F5
/f5
K_F6
/f6
K_F7
/f7
K_F8
/f8
K_F9
/f9
K_F10
/f10
K_F11
/f11
K_F12
/f12
Keyboard Macros Dictionary (/site/dict/keymacros)
Standard Name
Translation
K_KP0
/kp0
K_KP1
/kp1
K_KP2
/kp2
K_KP3
/kp3
K_KP4
/kp4
K_KP5
/kp5
K_KP6
/kp6
K_KP7
/kp7
K_KP8
/kp8
K_KP9
/kp9
K_INSERT
/insert
K_HOME
/home
K_PAGEUP
/pageup
K_PAGEDOWN
/pagedown
K_DELETE
/delete
K_END
/end
K_UP
/up
K_DOWN
/down
K_LEFT
/left
K_RIGHT
/right
K_SHIFT
/shift
K_CTRL
/ctrl
703
Appendix C Standard Dictionaries
Standard Name
Translation
K_ALT
/alt
K_TAB
/tab
K_ESC
/esc
K_BACKSPACE
/backspace
K_ENTER
/enter
K_PAUSE
/pause
K_REPEAT
/repeat
K_SPACE
/space
Printer Messages Dictionary (/site/dict/printmsgs)
The Printer Messages dictionary contains error messages generated by the
Sony barcode printer.
The standard name is in uppercase and must not be changed. The
translation can be in lowercase, uppercase, or mixed case.
Printer Messages Dictionary
704
Standard Name
Translation
M_TAPEIDREQ
/Tape ID required
M_INVTAPEID
/Invalid tape ID
M_DUREXCEED
/Duration time exceeded
M_DURTOOSHORT
/Duration time too short
M_INVTIMECODE
/Invalid timecode
M_EOMREQ
/EOM required
Case-shifting Dictionary (/site/dict/shift)
Standard Name
Translation
M_SOMREQ
/SOM required
M_INVCHARS
/Tape ID or title has invalid characters
M_EOMSTMISSING
/EOM Style missing from profile
M_TAPEIDLEN
/Tape ID must be between 3-8 characters long
M_PAGESTRLEN
/Page string too long
M_SOMEXCEEDS
/SOM timecode exceeds EOM timecode
M_UNKERR
/Unknown print error
A_CMDDEL
/*
Case-shifting Dictionary (/site/dict/shift)
The Case-shifting dictionary maps lowercase characters to their uppercase
counterparts and vice versa. iNEWS shifts the case of a character
according to its decimal value in a standard character conversion table.
The dictionary has two parts:
•
The first part, labeled with the keyword tolower, maps decimal values
of uppercase characters to the decimal values of their lowercase
counterparts.
•
The second part, labeled with the keyword toupper, maps decimal
values of lowercase characters to decimal values of their uppercase
counterparts.
In the default dictionary shipped with iNEWS newsroom computer system,
a character at a decimal position in the range on the left of the arrow (->)
shifts to the character at the corresponding decimal position in the range on
705
Appendix C Standard Dictionaries
the right. For instance, the character at decimal position 65 (A) is mapped
to the character at decimal position 97 (a); the character at decimal position
66 (B) shifts to the character at decimal position 98 (b); and so on:
;
tolower
65 - 90 -> 97 - 122
192 - 207 -> 224 - 239
209 - 221 -> 241 - 253
end
toupper
97 - 122 -> 65 - 90
224 - 239 -> 192 - 207
241 - 253 -> 209 - 221
end
; A - Z -> a - z
; a - z -> A - Z
The character-conversion table the system uses depends on the interface
you are using.
•
If you are using the DOS, the character-conversion table is based on
the DEC Multinational Character Set (MCS).
•
If you are using the iNEWS Graphic User Interface (GUI), the
conversion table is based on the ISO standard for multinational
characters.
If character mappings specified in these standard character-conversion
tables are not appropriate for the language you are using, edit the
/site/dict/shift file to remap character conversions. You can map
ranges of values (as shown in the default dictionary file) or you can map
values one by one, if necessary.
When editing the dictionary file, follow these guidelines:
706
•
Ensure all keywords (tolower, toupper, end) in the dictionary file
remain in lowercase.
•
Specify all character-conversions in terms of the characters’ decimal
values in the conversion table.
•
Do not specify a value higher than 255.
MCS Dictionary (/site/dict/mcs)
•
Any characters not mapped in the dictionary file remain the same
when shifted.
•
The system ignores blank lines in the dictionary file and any characters
following a semicolon (;).
After you edit the dictionary file, run the makeshift console command
in maintenance mode during installation to prepare the Case-shifting
dictionary for use by the iNEWS newsroom computer system. For more
information, call Avid Customer Support.
If you map a character to more than one value, the system displays a
warning when you type the makeshift command, but uses the last
character mapping in the file.
MCS Dictionary (/site/dict/mcs)
The MCS dictionarycontains the following:
•
Device Types Used by Monitor Servers and Drivers
•
Special Strings Recognized by the Monitor Server
•
Error Messages for the Monitor Server
•
Error Messages Shared by Monitor Servers and Drivers
•
Driver Errors Sent to MCT Only
•
Driver Errors Sent to MCT and Possibly to Console & Mon User
•
Driver Errors Sent to User Only
•
Status Reported in Device Status Field
The standard name is in uppercase and must not be changed. The
translation can be in lowercase, uppercase, or mixed case.
Device Types Used by Monitor Servers and Drivers
Standard Name
Translation
A_CART
/CART
707
Appendix C Standard Dictionaries
Standard Name
Translation
A_CG
/CG
A_MOS
/MOS
A_SS
/SS
A_USRDEF
/USRDEF
A_CART
/CART
Special Strings Recognized by the Monitor Server
Standard Name
Translation
A_BREAK
/====
A_CHANNELOPEN
/[
A_CHANNELCLOSE
/]
A_CMDDEL
/*
A_COMDEL
/;
A_CURRENT
/<<<<
A_FLDDEL
/
A_LOCALHYPHEN
/-
A_NOUPDT
/noupdate
A_UPDATE
/update
Error Messages for the Monitor Server
708
Standard Name
Translation
A_MBINVL
/Invalid mailbox
MCS Dictionary (/site/dict/mcs)
Standard Name
Translation
A_NOTINMAP
/Queue not in map
A_XMAXSTORY
/Exceeded max # stories, monitor exiting
A_MAPOPENERR
/Map story open error
A_RESOPENERR
/Resource story open error
A_NOSERVER
/Server cannot execute
A_BADCG
/Bad Map line: CG device requires range
A_BADMCT
/Bad Map line: Invalid MCT template
A_BADMAPARG
/Bad Map line: Invalid arg count
A_BADMAPUPDT
/Bad Map line: Expected update arg
A_BADMAPQTME
/Bad Map line: Invalid time value
A_BADMAPDUPE
/Bad Map line: Duplicate device
A_BADMAPDRV
/Bad Map line: Invalid drive specification
A_BADMAPINVCHAN
/Bad Map line: Invalid video channel
assignment policy
A_BADMAPBADMOS
/Bad Map line: Unrecognized MOS parameter
A_BADMAPNOMOS
/Bad Map line: MOS device not assigned to
MOS Server
A_BADMAPBADSVR
/Bad Map line: device-server type mismatch
A_BADMOSITEM
/Invalid MOS item
A_BADDUPENTRY
/Bad Resource line: Duplicate style entry
A_BADCGLINES
/Bad Resource line: Invalid # CG fields
A_BADRESARG
/Bad Resource line: Invalid arg count
A_BADCGTMPL
/Bad Resource line: Invalid CG template
709
Appendix C Standard Dictionaries
710
Standard Name
Translation
A_RESERRORS
/Following errors found in resource story
A_INVLDEV
/Invalid device specification
A_INVLSTYLE
/Invalid style
A_INVLADD
/Invalid address
A_INVLARG
/Missing argument
A_XMAXADD
/Exceeded address range
A_NOFORM
/Cannot access form
A_SRTERR
/Error sorting queue
A_DELERR
/Cannot delete from
A_DIRERR
/Directory open error
A_QUEERR
/Queue open error
A_QUEAPPERR
/Queue append error
A_STRYERR
/Story open error
A_STRYCRT
/Story create error
A_STRYWRT
/Story write error
A_DRVNOTINMAP
/Driver not in Map
A_DRVNCONFIG
/Download failed: driver not configured
A_DRVNOCOMM
/Network connect failed
A_DEVBUSY
/Refused connection request
A_NOSSADDR
/No SS address specified
MCS Dictionary (/site/dict/mcs)
Standard Name
Translation
A_MULSSADDR
/Multiple SS addresses specified
A_MONEXIT
/Monitor exiting
A_QUITTIME
/Quite Time reached
A_MUSTUNLOAD
/Must first unload
A_READY
/OK
Error Messages Shared by Monitor Servers and Drivers
Standard Name
Translation
A_XMAX
/Exceeded max # events
A_NOMEM
/Out of memory
Driver Errors Sent to MCT Only
Standard Name
Translation
A_NOHOST
/Disconnected from host
Driver Errors Sent to MCT and Possibly to Console & Mon User
Standard Name
Translation
A_NODEV
/Device error
A_NODEVCOMM
/Device communication failed
711
Appendix C Standard Dictionaries
Driver Errors Sent to User Only
Standard Name
Translation
A_LOADDONE
/Download complete
A_LOADERR
/Errors in download
A_DRIVEREXIT
/Driver exiting
A_CANOTCUED
/Tape not cued
Status Reported in Device Status Field
712
Standard Name
Translation
A_EVERR
/ERROR
A_CAFRZ
/FREEZE
A_CATREL
/TREL
A_CATHRD
/THREAD
A_CACUING
/CUEING
A_CACUED
/CUED
A_CANOTAPE
/N/L
A_CABIN
/BIN
A_CAPLAY
/PLAY
A_CAPAUSE
/PAUSED
A_CAREW
/REWIND
A_CAEJECT
/EJECT
A_CAINCMPLT
/TRANSFER
Appendix D
PCU Reference
This appendix contains the following main sections:
•
Overview
•
PCUs
Appendix D PCU Reference
Overview
A Peripheral Controller Unit (PCU) is a Personal Computer (PC)
connected between an iNEWS Server and one or more serial devices, such
as printers and wire services. The PCU expands the available serial ports
and relieves the server of routine communication with the devices. The
PCU is an open system. The operating system is Microsoft DOS and a
standard public domain TCP/IP network stack is used.
No server should be connected to more than half the number of PCUs it is
capable of supporting. This ensures that if one server fails, the surviving
server(s) have enough reserve capacity to run the failed server’s PCUs.
Divide your system’s PCUs evenly among your system’s servers. This
yields maximum performance possible from each server. If a server fails,
reconfigure the failed server’s PCUs to the surviving servers until the failed
server is repaired.
PCUs
There are two kinds of PCUs: older models in rack-mount cases and newer
models in standard PC cases. The latter is referred to as a PC-PCU. A PCPCU can be an ordinary PC with special additional hardware to give it
more serial ports. This section describes the rack-mount models.
n
For more information about PC-PCUs, see “Adding a PCU or PC-PCU”
on page 285.
A PCU is essentially a DOS PC. A PCU’s front panel contains one or two
LED displays and reset switches. The reset switches allow you to clear the
PCU’s memory prior to restarting it. LEDs display the PCU’s device
number or current status. This section describes parts of a PCU with which
you need to be familiar to do normal system maintenance work. It also
describes how to reset the PCU, how to connect the PCU to a server, and
how to connect devices to the PCU.
n
714
Avid no longer supports CCUs. If your system has existing CCUs that have
been upgraded to PCUs, such devices must be configured as PCUs.
PCUs
Resetting a PCU
Occasionally, there may be a need to reset a PCU to clear its memory so
that you can load a fresh set of programs. To do this, press the Reset button
and let go. The PCU tests its hardware and boots up to a point where you
can restart it from the console.
A PCU built to resemble a CCU has one or two LED displays with four
digits each. It uses the LED display to indicate whether it is running
normally, has just been reset, or has detected an error. As long as the PCU
is running normally, the LED displays the PCU’s device number.
If the LED goes out, the PCU may have lost power, so make certain the
power switch is in the “on” position and the PCU’s power cord is firmly
attached to the PCU and power supply. PCUs produced in regular PC
housings do not have LED displays.
As the PCU tests itself, it shows a number of status codes on the LED
display. When DOS boots on the PCU, it displays “8000.” If the PCU
passes all its diagnostic tests and receives an IP address from a bootp
server, it displays “0000,” indicating that it has successfully completed the
self test and is ready to be restarted. If the PCU continues to display
“8000,” there is a network or bootp problem.
A PCU displays “8888” after receiving a reset request from the host server.
After it has been restarted and is operational, it displays its device number
(the device number is not divided by 10).
PCU LED Displays
There are standard codes that can appear on the PCU’s LED display. The
8000 codes are typically shown during a normal boot of the PCU, while the
9000 codes represent errors. Contact Avid Customer Support for assistance
if one of your PCUs displays an error code after being restarted. The following PCU LED Code table lists the codes and their meanings.
715
Appendix D PCU Reference
PCU LED Codes
716
Code
Meaning
0000
Network initialization complete
8000
Boot started
8002
Connected to host server for download
of PCU OS
8003
PCU OS download in progress
8004
PCU OS downloaded
8005
Start received
8006
Invoking PCU OS
8100
PCU OS started
8101
PCU OS network initialized
8102
PCU OS fully operational
8888
Reset received
9001
Error, execv failed
9002
Error, file could not be opened
9003
Error, no data downloaded
9004
Error, cannot establish socket
connection
9005
Error, read on socket failed
9006
Error, receive on socket failed
9007
Error, send on socket failed
9010
Memory management—bad free
9011
Memory management—unknown free
9012
Memory management—no space
PCUs
Connecting Devices to a PCU
You use the I/O ports to connect serial devices, such as printers and wires,
to the PCU. These ports are numbered 1 through 8. Use these port
numbers in combination with the PCU’s device number when assigning
device numbers to devices you connect to the PCU. These ports are Data
Terminal Equipment (DTE) RS-232 serial ports. To connect a device to
one of these ports, use a cable built to carry signals the device and PCU
need, in a way they expect.
Locating Ports
The back panel of a PCU built in a CCU III housing contains eight I/O
ports, a host port, a power receptacle, an Ethernet connector, and a power
switch.
The power switch controls power to the PCU and should always be in the
on position. The power receptacle is where the power cord attaches to the
PCU. The host port is used to attach a diagnostic workstation to the PCU,
if necessary.
A PCU in a standard PC case looks similar to this, except that eight serial
I/O ports are on a serial card in one of the PC’s expansion slots.
Connecting a PCU to the System
A PCU has an Ethernet connector. Use this connector to attach the PCU to
the Ethernet network so it can communicate with its server.
717
Appendix D PCU Reference
718
Appendix E
Character Maps
This appendix contains character mapping code tables used by wire
programs. The value set in the “bits” wire profile option determines which
of these tables the wire program uses to “translate” stories it receives from
a wire service. Unless otherwise indicated, the tables contain, in the first
column, decimal numbers sent by the wire service. The other columns
contain characters represented by those numbers, descriptions of the
characters, and mapped values.
Also included in this appendix are examples of character mapping for
Arabic wires.
This section contains the following:
•
ASCII (7-bit) Character Set
•
IBM Character Set
•
dbrestore Character Map (Arabic)
•
Sample Arabic Wire Profile
ASCII (7-bit) Character Set
The following ASCII (7 bit) table is an identity mapping, where the wire
value equals the mapped value, with one exception—the wire value of 124
is mapped to 0. The other 127 values are preserved.
Appendix E Character Maps
ASCII (7 bit).
720
Value
Mapped Alias Description
Mapped Value
000
<nul>
null
000
001
<soh>
start of header
001
002
<stx>
start of text
002
003
<etx>
end of text
003
004
<eot>
end of transmission
004
005
<enq>
enquiry
005
006
<ack>
acknowledgment
006
007
<bel>
bell
007
008
<bs>
back space
008
009
<ht>
horizontal tab
009
010
<lf>
line feed
010
011
<vt>
vertical tab
011
012
<ff>
form feed
012
013
<cr>
carriage return
013
014
<so>
shift out
014
015
<si>
shift in
015
016
<dle>
data link escape
016
017
<dcl>
device control 1
017
018
<dc2>
device control 2
018
019
<dc3>
device control 3
019
020
<dc4>
device control 4
020
021
<nak>
negative acknowledge 021
022
<syn>
synchronous idle
022
ASCII (7-bit) Character Set
Value
Mapped Alias Description
Mapped Value
023
<etb>
end of transmission
023
024
<can>
cancel
024
025
<em>
end of medium
025
026
<sub>
substitute
026
027
<esc>
escape
027
028
<fs>
file separator
028
029
<gs>
group separator
029
030
<rs>
record separator
030
031
<us>
unit separator
031
032
<sp>
space
032
033
!
033
034
“
034
035
#
035
036
$
036
037
%
037
038
&
038
039
'
040
(
040
041
)
041
042
*
042
043
+
043
044
,
045
-
046
.
quote
comma
039
044
045
period
046
721
Appendix E Character Maps
722
Value
Mapped Alias Description
Mapped Value
047
/
047
048
0
048
049
1
049
050
2
050
051
3
051
052
4
052
053
5
053
054
6
054
055
7
055
056
8
056
057
9
057
058
:
059
<sc>
059
060
<
060
061
=
061
062
>
062
063
?
063
064
@
064
065
A
065
066
B
066
067
C
067
068
D
068
069
E
069
070
F
070
colon
058
ASCII (7-bit) Character Set
Value
Mapped Alias Description
Mapped Value
071
G
071
072
H
072
073
I
073
074
J
074
075
K
075
076
L
076
077
M
077
078
N
078
079
O
079
080
P
080
081
Q
081
082
R
082
083
S
083
084
T
084
085
U
085
086
V
086
087
W
087
088
X
088
089
Y
089
090
Z
090
091
[
091
092
\ or<bks>
092
093
]
093
094
^
094
723
Appendix E Character Maps
724
Value
Mapped Alias Description
Mapped Value
095
_
095
096
`
096
097
a
097
098
b
098
099
c
099
100
d
100
101
e
101
102
f
102
103
g
103
104
h
104
105
i
105
106
j
106
107
k
107
108
l
108
109
m
109
110
n
110
111
o
111
112
p
112
113
q
113
114
r
114
115
s
115
116
t
116
117
u
117
118
v
118
underscore
IBM Character Set
Value
Mapped Alias Description
Mapped Value
119
w
119
120
x
120
121
y
121
122
z
122
123
{
123
124
<nul>
0
125
}
125
126
~
126
127
<del>
Delete
127
IBM Character Set
The IBM character set is the same as the ASCII 7-bit character set for the
first 127 characters. For the remaining characters, see the following IBM
Character table.
IBM Character
Value
Wire Value
HEX
Mapped
Alias
Mapped
Value
Mapped
Value HEX
128
80
Ç
190
C7
129
81
ü
252
FC
130
82
é
233
E9
131
83
â
226
E2
132
84
ä
228
E4
133
85
à
224
E0
134
86
å
229
E5
725
Appendix E Character Maps
726
Value
Wire Value
HEX
Mapped
Alias
Mapped
Value
Mapped
Value HEX
135
87
ç
231
E7
136
88
ê
234
EA
137
89
ë
235
EB
138
8A
è
232
E8
139
8B
ï
239
EF
140
8C
î
238
EE
141
8D
ì
236
EC
142
8E
Ä
196
C4
143
8F
Å
197
C5
144
90
É
201
C9
145
91
æ
230
E6
146
92
Æ
198
C6
147
93
ô
244
F4
148
94
ö
246
F6
149
95
ò
242
F2
150
96
û
251
FB
151
97
ù
249
F9
152
98
ÿ
253
FD
153
99
Ö
214
D6
154
9A
Ü
220
DC
155
9B
¢
162
A2
156
9C
£
163
A3
157
9D
¥
165
A5
IBM Character Set
Value
Wire Value
HEX
Mapped
Alias
Mapped
Value
Mapped
Value HEX
158
9E
<nul>
0
0
159
9F
<nul>
0
0
160
A0
á
225
E1
161
A1
í
237
ED
162
A2
ó
243
F3
163
A3
ú
250
FA
164
A4
ñ
241
F1
165
A5
Ñ
209
D1
166
A6
ª
170
AA
167
A7
º
186
BA
168
A8
<nul>
0
0
169
A9
<nul>
0
0
170
AA
<nul>
0
0
171
AB
<nul>
0
0
172
AC
<nul>
0
0
173
AD
<nul>
0
0
174
AE
<nul>
0
0
175
AF
<nul>
0
0
176
B0
<nul>
0
0
177
B1
<nul>
0
0
178
B2
<nul>
0
0
179
B3
<nul>
0
0
180
B4
<nul>
0
0
727
Appendix E Character Maps
728
Value
Wire Value
HEX
Mapped
Alias
Mapped
Value
Mapped
Value HEX
181
B5
<nul>
0
0
182
B6
<nul>
0
0
183
B7
<nul>
0
0
184
B8
<nul>
0
0
185
B9
<nul>
0
0
186
BA
<nul>
0
0
187
BB
<nul>
0
0
188
BC
<nul>
0
0
189
BD
<nul>
0
0
190
BE
<nul>
0
0
191
BF
<nul>
0
0
192
C0
<nul>
0
0
193
C1
<nul>
0
0
194
C2
<nul>
0
0
195
C3
<nul>
0
0
196
C4
<nul>
0
0
197
C5
<nul>
0
0
198
C6
<nul>
0
0
199
C7
<nul>
0
0
200
C8
<nul>
0
0
201
C9
<nul>
0
0
202
CA
<nul>
0
0
203
CB
<nul>
0
0
IBM Character Set
Value
Wire Value
HEX
Mapped
Alias
Mapped
Value
Mapped
Value HEX
204
CC
<nul>
0
0
205
CD
<nul>
0
0
206
CE
<nul>
0
0
207
CF
<nul>
0
0
208
D0
<nul>
0
0
209
D1
<nul>
0
0
210
D2
<nul>
0
0
211
D3
<nul>
0
0
212
D4
<nul>
0
0
213
D5
<nul>
0
0
214
D6
<nul>
0
0
215
D7
<nul>
0
0
216
D8
<nul>
0
0
217
D9
<nul>
0
0
218
DA
<nul>
0
0
219
DB
<nul>
0
0
220
DC
<nul>
0
0
221
DD
<nul>
0
0
222
DE
<nul>
0
0
223
DF
<nul>
0
0
224
E0
<nul>
0
0
225
E1
ß
223
DF
226
E2
<nul>
0
0
729
Appendix E Character Maps
730
Value
Wire Value
HEX
Mapped
Alias
Mapped
Value
Mapped
Value HEX
227
E3
<nul>
0
0
228
E4
<nul>
0
0
229
E5
<nul>
0
0
230
E6
µ
185
B5
231
E7
<nul>
0
0
232
E8
<nul>
0
0
233
E9
<nul>
0
0
234
EA
<nul>
0
0
235
EB
<nul>
0
0
236
EC
<nul>
0
0
237
ED
ø
248
F8
238
EE
<nul>
0
0
239
EF
<nul>
0
0
240
F0
<nul>
0
0
241
F1
±
177
B1
242
F2
<nul>
0
0
243
F3
<nul>
0
0
244
F4
<nul>
0
0
245
F5
<nul>
0
0
246
F6
<nul>
0
0
247
F7
<nul>
0
0
248
F8
°
176
B0
249
F9
<nul>
0
0
IBM Character Set
Value
Wire Value
HEX
Mapped
Alias
Mapped
Value
Mapped
Value HEX
250
FA
<nul>
0
0
251
FB
<nul>
0
0
252
FC
<nul>
0
0
253
FD
²
178
B2
254
FE
<nul>
0
0
255
FF
<nul>
0
0
731
Appendix E Character Maps
dbrestore Character Map (Arabic)
The following is an example of a dbrestore Character map—in this
case, converting characters from ASMO 449+ to Arabic Windows 1256.
#this file maps from ASMO 449+ to MS 1256 code page
130 -> 233
;e acute
131 -> 226
;a circumflex
133 -> 224
;a grave
135 -> 231
;c cidilla
136 -> 234
;e circumflex
137 –> 235
;e umlaut
138 –> 232
;e grave
139 –> 239
;i umlaut
140 –> 238
;i circumflex
147 –> 244
;o circumflex
150 –> 251
;u circumflex
151 –> 249
;u grave
172 –> 161
;arabic comma
174 –.>171
;left double angle quote
175 –> 187
;right double angle quote
187 –.>186
;arabic semi colon
215 – 218 -> 216 – 219
;tah,zah,ain,ghain
224 – 227 -> 220 – 223
;tatweel,feh,qaf,kaf
228 –> 225
;lam
229 – 232 -> 227 – 230
;meem, noon, heh, waw
233 – 234 -> 236 – 237
;alef maksura, yeh
235 – 238 -> 240 – 243 ;fathatan,dammatan,kasratan,fatha
239 – 240 -> 245 – 246
;damma, kasra
241 –> 248
;shadda
242 –>250
;sukun
246 -> 161
;arabic comma
247 => 225 194
;lam alef with madda above
248 => 225 195
;lam alef with hamza above
249 => 225 197
;lam alef with hamza below
250 => 225 199
;lam alef
# that s all
732
Sample Arabic Wire Profile
Sample Arabic Wire Profile
The following is an example of a wire profile for an Arabic wire service,
using the map and reverse wire profile options.
wire
11
300-5
dummy
MIN
-
-
;MINA service
# cat /site/wires/11
; MENA WIRE
;iNEWS 1.2 MS Codepage 1256
form
wire-arabic
bits
5
flags
pblines
start
<212><237><212><237><128><LF><128><LF><128><LF><128><LF>
<128><LF><128><LF>
reverse 0123456789 /,.
end
<228><228><228>
slug
30
accent
<bs>
form wire
flags
addheol
map
map
map
map
; 4 is space
map
map
map
map
map
map
map
map
map
map
map
map
<00>
_<bs>
<01>
<216>
<02>
<CR><LF>
<03>
<213>
<05>
<06>
<07>
<08>
<09>
<10>
<11>
<12>
<13>
<14>
<15>
<16>
<198>
<200>
<203>
<223>
<222>
<207>
<229>
<228>
<221>
<237>
<205>
<230>
733
Appendix E Character Maps
map
map
map
map
map
map
map
map
map
map
;27
map
map
map
;31
map
map
map
;34
map
;36
map
map
map
map
map
map
map
map
map
map
map
map
map
map
map
map
map
map
map
734
is
is
is
is
<17>
<18>
<19>
<20>
<21>
<22>
<23>
<24>
<25>
<26>
figure shift
<28>
<29>
<30>
letter shift
<32>
<33>
<34>
new line
<35>
space
<37>
<38>
<39>
<40>
<41>
<42>
<43>
<44>
<45>
<46>
<47>
<48>
<49>
<50>
<51>
<52>
<53>
<54>
<55>
<212>
<204>
<225><199>
<218>
<209>
<195>
<225>
<202>
<199>
<218>
<227>
<211>
<199><225>
_<bs>
<55>
<CR><LF>
<213>
<236>
<50>
<51>
<223>
<222>
<54>
<229>
<228>
<201>
<236>
<205>
<53>
<212>
<204>
<56>
<47>
<52>
<48>
<57>
Sample Arabic Wire Profile
map
<56>
map
<57>
map
<58>
;59 is figure shift
map
<60>
map
<61>
map
<62>
<49>
<193>
<218>
<227>
<211>
<225>
;63 is letter shift
735
Appendix E Character Maps
736
Appendix F
Environment Variables
Some features in the Avid iNEWS newsroom computer system require the
system administrator to set up environment variables in the Registry of the
workstations. The person responsible for setting up these variables should
have a good understanding of Windows-based operating systems, and the
Registry Editor program. This appendix includes the following sections:
•
Registry Editor
•
Environment Variables (Registry Values)
•
Environmental Variables for Servers
Appendix F Environment Variables
Registry Editor
The Registry Editor is used to create and define environment variables
(Registry values) at each workstation.Environment Variables
To access the Registry Editor:
1. Click the Start button on the Windows Taskbar.
2. Select the Run option.
3. Type regedit in the dialog box that appears.
4. The Registry Editor window appears.
738
Environment Variables (Registry Values)
All iNEWS newsroom computer system environment variables are set up
and stored in the same location on each workstation. After opening the
Registry Editor window, navigate to the following folder (also called a
key).
HKEY_LOCAL_MACHINE\
SYSTEM\
CurrentControlSet\
Control\
Session Manager\
Environment
n
On workstations running the Windows NT-based operating system, there
are two keys with similar names:SessionManager and Session Manager.
The one called Session Manager (with a space between the two words)
must be used
Environment Variables (Registry Values)
Environment variables or registry values are sometimes required to set up
certain iNEWS features at various iNEWS Workstations. Environment
variables are located and defined in the Registry of iNEWS
Workstations—that is, Windows-based PCs running the Client software.
The following variables are covered in this section:
•
CCColor
•
DestinationOrder
•
MailLookup
•
MsgMailAlert
•
PIColor
•
ShowTimingBar
•
SyncToServer
•
Delete_Notify
The following sections explain how to can set up environment variables by
editing the Registry using the Registry Editor.
739
Appendix F Environment Variables
n
Self-importing files, called reg files, can be executed to automatically
import envionment variable information into the Registry. These files with
their exported registry keys, can be used on PCs running Windows NT based operating systems. For more information on how to obtain and use
these reg files, contact Avid Customer Support.
CCColor
An individual workstation can have its closed captioning text color
changed via an environment variable called CCColor. If no environment
variable exists, then the default color of green is used.
To change the closed captioning text color:
1. Open Registry Editor. See “To access the Registry Editor:” on
page 738 for more information.
2. Navigate to the Environment key and open it.
3. Right-click on the right side of the Registry Editor window. A pop-up
menu appears.
740
Environment Variables (Registry Values)
4. Select the DWORD Value option to create and define a new Registry
value of type DWORD in the Registry Editor.
5. Type the name of the new value: CCColor.
6. Press Enter.
7. To set the Value data option:
t
Right-click on the CCColor value.
t
Choose Modify from the pop-up menu.
The Edit DWORD Value dialog box appears
t
Set the Value data using the following hexadecimal format:
0x00RRGGBB,
where RR, GG, BB are two bytes for each color.
n
The leftmost two bytes (00) are not used. Also, If the CCColor has its value
set to zero (0), the closed captioning text will be black because zero
corresponds to the color Black.
t
Click OK to save the setting and close the dialog box.
8. Close the Registry Editor window.
See “RGB Hexadecimal Color Chart” on page 747 for more information
on possible colors used in this environment variable
741
Appendix F Environment Variables
DestinationOrder
Enabling the destination order feature ensures the user’s Home location is
always the top item in the Destination queue list. For instance, when you
duplicate a story to another queue, the user’s Home location will always be
the top item in the list. It also ensures the user’s Destination location is the
second item in the list.
To enable the destination order feature, do the following:
1. Open Registry Editor. See “To access the Registry Editor:” on
page 738 for more information.
2. Navigate to the Environment key, and open it.
3. Right-click on the right side of the Registry Editor window. A pop-up
menu appears.
4. Select the DWORD Value option to create and define a new registry
value of type DWORD in the Registry Editor.
5. Type the name of the new value: DestinationOrder.
6. Press Enter.
7. To set the Value data option:
t
Right-click on the DestinationOrder value.
t
Choose Modify from the pop-up menu.
The Edit DWORD Value dialog appears.
742
Environment Variables (Registry Values)
t
n
Set the Value data. Type 0 (zero) to disable the destination order
feature, or 1 to enable it.
Any number other than 1 turns DestinationOrder off and back to its
default behavior, which is to always display the last visited queue/folder as
the top item in the destination list.
t
Click OK to save the setting and close the dialog box.
8. Close the Registry Editor window.
MailLookup
The iNEWS newsroom computer system provides users with an e-mail
addressee name lookup feature. When used, all groups, aliases, and users
that partially match characters in the To: or CC: fields are displayed in a
Check Name dialog box for user selection. This is the default behavior.
However, system administrators can set an environment variable that
defines which matches are displayed for selection in the Check Name
dialog box. Consequently, this allows system administrators to hide any
groups that exist in the system for reasons other than e-mail purposes.
n
This environment variable must be created and defined in the Registry
Editor at each workstation. Default behavior is used at workstations where
the environment variable is not defined.
To set the environment variable:
1. Open Registry Editor. See “To access the Registry Editor:” on
page 738 for more information.
2. Navigate to the Environment key, and open it.
3. Right-click on the right side of the Registry Editor window. A pop-up
menu appears.
4. Select the DWORD Value option to create and define a new registry
value of type DWORD in the Registry Editor.
5. Type the name of the new value: MailLookup.
6. Press Enter.
7. To set the Value data option:
743
Appendix F Environment Variables
t
Right-click on the MailLookup value.
t
Choose Modify from the pop-up menu.
The Edit DWORD Value dialog appears.
t
Set the Value data, by typing one of the following options:
0 - (zero) show no matches
1 - show only user matches
2 - show only group/alias matches
3 - show groups/aliases and user matches
The default behavior—without the Registry value MailLookup
defined at a workstation—is 3.
t
Click OK to save the setting and close the dialog box.
8. Close the Registry Editor window.
MsgMailAlert
Enabling the Message Mail Alert feature allows you to change the alert
behavior so that the iNEWS Workstation will flash message and/or mail
alerts on the status bar for only 15 seconds, rather than persistently. By
adding the MsgMailAlert variable, you can specify additional settings.
744
Environment Variables (Registry Values)
To set the environment variable:
1. Open Registry Editor. See “To access the Registry Editor:” on
page 738 for more information.
2. Navigate to the Environment key, and open it.
3. Right-click on the right side of the Registry Editor window. A pop-up
menu appears.
4. Select the DWORD Value option to create and define a new registry
value of type DWORD in the Registry Editor.
5. Type the name of the new value: MsgMailAlert.
6. Press Enter.
7. To set the Value data option:
t
Right-click on the MesgMailAlert value.
t
Choose Modify from the pop-up menu.
The Edit DWORD Value dialog appears.
t
Set the Value data, by typing one of the following options:
0 - disable - no alerts whatsoever on status bar
1 - neither persistent - alerts flash for 15 seconds
2 - only message alerts persistent
3 - only mail alerts persistent
4 - both alerts persistent - alerts will not go away until user has
read all correspondence.
745
Appendix F Environment Variables
The default behavior—without the Registry value
MsgMailAlert defined at a workstation—is 1.
8. Click OK to save the setting and close the dialog box.
9. Close the Registry Editor window.
PIColor
An individual iNEWS Workstation can have its presenter instructions text
color changed via an environment variable called PIColor. If no
environment variable exists, then the default color of red is used.
To change presenter instructions text color:
1. Open Registry Editor. See “To access the Registry Editor:” on
page 738 for more information.
2. Navigate to the Environment key, and open it.
3. Right-click on the right side of the Registry Editor window. A pop-up
menu appears.
4. Select the DWORD Value option to create and define a new registry
value of type DWORD in the Registry Editor.
5. Type the name of the new value: PIColor.
6. Press Enter.
7. To set the Value data option:
t
Right-click on the PIColor value.
t
Choose Modify from the pop-up menu.
The Edit DWORD Value dialog box appears.
746
Environment Variables (Registry Values)
t
Set the Value data using the following hexadecimal format:
0x00RRGGBB
where RR, GG, BB are two bytes for each color.
n
The leftmost two bytes (00) are not used. Also, If the PIColor has its value
set to zero (0), the closed captioning text is black because zero corresponds
to the color Black.
t
Click OK to save the setting and close the dialog box.
8. Close the Registry Editor window.
RGB Hexadecimal Color Chart
Avid’s PIColor and CCColor environment variables require RGB
Hexadecimal Color codes. The following are some basic colors, along with
their corresponding hexidecimal code values:
Complete RGB
Hexadecimal Color
Charts, with various
color shades, can be
found on the Internet.
RGB Hexadecimal Color Chart
Color
Hex
Black
000000
Blue
0000FF
Default
747
Appendix F Environment Variables
Color
Hex
Brown
330000
Green
008800
Orange
FF6600
Pink
CC0099
Purple
660099
Red
FF0000
White
FFFFFF
Yellow
FFFF00
Default
(Default color for CCColor)
(Default color for PIColor)
ShowTimingBar
A system administrator can define which key on the keyboard is used to
advance the timing bar during show timing. The default key is the space
bar.
To change the setting to a different key:
1. Open Registry Editor. See “To access the Registry Editor:” on
page 738 for more information.
2. Navigate to the Environment key, and open it.
3. Right-click on the right side of the Registry Editor window. A pop-up
menu appears.
4. Select the DWORD Value option to create and define a new registry
value of type DWORD in the Registry Editor.
5. Type the name of the new value: ShowTimingBar.
6. Press Enter.
7. To set the Value data option:
t
748
Right-click on the ShowTimingBar value.
Environment Variables (Registry Values)
t
Choose Modify from the pop-up menu.
The Edit DWORD Value dialog box appears.
The ShowTimingBar Value data is determined by the Scan
Code of the selected key on the keyboard. For instance, if the
system administrator wants to use the F12 key to advance the
timing bar, the Value data for the ShowTimingBar registry would
be either the Hexadecimal code of 58 or Decimal code of 88. See
the following Scan Codes table for more information.
Scan Codes
Key
Decimal
Hexadecimal
‘ ~ (accent/tilde)
41
29
1 ! (exclamation point)
2
02
2 @ (at symbol)
3
03
3 # (pound sign)
4
04
4 $ (dollar sign)
5
05
5 % (percent)
6
06
6 ^ (carrot)
7
07
7 & (ampersand)
8
08
8 * (asterisk)
9
09
9 ( (open parenthesis)
10
0A
0 ) (close perenthesis)
11
0B
- _ (dash/underscore)
12
0C
749
Appendix F Environment Variables
750
Key
Decimal
Hexadecimal
= + (equal/plus)
13
0D
Backspace
14
0E
Tab
15
0F
Q
16
10
W
17
11
E
18
12
R
19
13
T
20
14
Y
21
15
U
22
16
I
23
17
O
24
18
P
25
19
[ { (open bracket/brace)
26
1A
] } (close bracket/brace)
27
1B
Caps Lock
58
3A
A
30
1E
S
31
1F
D
32
20
F
33
21
G
34
22
H
35
23
J
36
24
K
37
25
L
38
26
; : (semicolon/colon)
39
27
‘ ” (accent/quote)
40
28
\| (backslash/pipe)
43
2B
Left Shift
42
2A
Z
44
2C
X
45
2D
Environment Variables (Registry Values)
Key
Decimal
Hexadecimal
C
46
2E
V
47
2F
B
48
30
N
49
31
M
50
32
, < (comma/less-than)
51
33
. > (period/greater-than)
52
34
/ ? (slash/question mark)
53
35
Right Shift
54
36
CTRL (Control keys)
29
1D
ALT (Alt keys)
56
38
Spacebar
57
39
ESC (Escape key)
1
01
F1
59
3B
F2
60
3C
F3
61
3D
F4
62
3E
F5
63
3F
F6
64
40
F7
65
41
F8
66
42
F9
67
43
F10
68
44
F11
87
57
F12
88
58
INS (Insert key)
82
52
DEL (Delete key)
83
53
Home
71
47
End
79
4F
Page Up
73
49
Page Down
80
51
751
Appendix F Environment Variables
Key
Decimal
Hexadecimal
Up Arrow
72
48
Down Arrow
80
50
Right Arrow
77
4D
Left Arrow
75
4B
NUM (Number Lock key)
69
45
/ (divide on Numeric Keypad) 53
35
- (minus on Numeric Keypad)
74
4A
+ (plus on Numeric Keypad)
78
4E
Print Screen
55
37
SyncToServer
The timing feature of iNEWS syncronizes the clock on the local
workstation with the time set on the server when a user activates show
timing. A user can use the Set Clock option from the Tools drop-down
menu to manually override the clock synchronization. This feature is
turned off by default, but a system administrator can turn it on at any
workstation by creating a new registry value in the workstation.
n
w
752
The syncronized timing feature should be enabled only at those
workstations used to time a show. If the SyncToServer registry value is
not created and defined at a workstation, then the synchronized timing
feature is disabled at that workstation.
This feature is not backwards compatible to iNEWS newsroom
computer system software prior to version 1.2.4. Before enabling the
synchronized timing feature by creating the SyncToServer Registry
value in any workstation, the software for both iNEWS Workstation(s)
and iNEWS Server(s) must be upgraded. iNEWS newsroom computer
system will issue the following message if the server does not support
the sync-to-server feature: Timing synchronization failed. Not
supported on this server.
Environment Variables (Registry Values)
To enable the syncronized timing feature:
1. Open Registry Editor. See “To access the Registry Editor:” on
page 738 for more information.
2. Navigate to the Environment key, and open it.
3. Right-click on the right side of the Registry Editor window. A pop-up
menu appears.
4. Select the DWORD Value option to create and define a new registry
value of type DWORD in the Registry Editor.
5. Type the name of the new value: SyncToServer.
6. Press Enter.
7. To set the Value data option:
t
Right-click on the SyncToServer value.
t
Choose Modify from the pop-up menu.
The Edit DWORD Value dialog box appears.
t
Set the Value data. Type 0 (zero) to disable the synchronized
timing feature, or 1 to enable it.
t
Click OK to save the setting and close the dialog box.
8. Close the Registry Editor window
753
Appendix F Environment Variables
Delete_Notify
When a deleted queue record was received by the rxnet utility program
(from a txnet utility program on another news system) into an update
queue, and the queue had a notify group associated with it, an alert was
sent to the notify group with the queue name and title (slug) of the deleted
entry (story). This is no different than the notification for new or modified
stories entering the queue. This resulted in users wasting time searching for
deleted stories that were no longer in the queue.
Action servers and txnet links behaved the same way as the rxnet utility
program. The utility programs (servers) do not send out notifications when
deleting queue entries.
As a precaution for sites which may want such notification to occur, an
environment variable can be set to restore the former operation. The
environment variable is defined in the workstation’s Registry as
delete_notify. It must be added in the Environment key of the
Registry and should be set to a non-zero value.
To change the setting for delete_notify:
1. Open Registry Editor. See “To access the Registry Editor:” on
page 738 for more information.
2. Navigate to the Environment key, and open it.
3. Right-click on the right side of the Registry Editor window. A pop-up
menu appears.
4. Select the DWORD Value option to create and define a new registry
value of type DWORD in the Registry Editor.
5. Type the name of the new value: delete_notify
6. Press Enter.
7. To set the Value data option:
754
t
Right-click on the delete_notify value.
t
Choose Modify from the pop-up menu.
Environmental Variables for Servers
The Edit DWORD Value dialog box appears.
t
Set the Value data. Set the Environment key of the Registry to a
non-zero value.
t
Click OK to save the setting and close the dialog box.
8. Close the Registry Editor window
Environmental Variables for Servers
You can control some of the behavior of rxnet by putting some enviroment
variable settings in the /site/env/nxserver file.
n
If the /site/env/nxserver file or its parent directory /site/env
do not exist you need to create the directory using the mkdir
/site/env command, before you can edit the file. Contact Avid
Customer Support if you need assistance with this procedure.
The specific variables are:
•
RXDEBUG=<level>
•
RXDEBUGFILE=<filename>
•
RXSITELISTSZ=<size>
•
RXSITEFORMAT=<format>
•
RXSEPFIELDLIST=<filename>
755
Appendix F Environment Variables
756
•
RXSITEIDLE=<seconds>
•
RXOLDNLST=1
Environmental Variables for Servers
RXDEBUG=<level>
An rxdebug level of 2 produces the command traffic to/from rxnet.
RXDEBUGFILE=<filename>
The RXDEBUGFILE file allows you to cause rxnet diagnostics to be put into
<filename>.<process id> instead of the console.
RXSITELISTSZ=<size>
The list size controls the number of stories included in a queue list
when rxnet responds to an FTP list command. The default value for
this is 300.
RXSITEFORMAT=<format>
The format controls