1
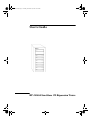
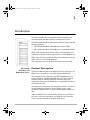
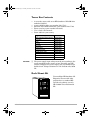
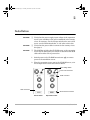
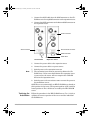
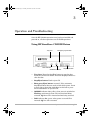
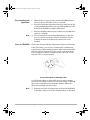
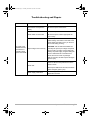
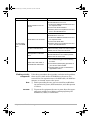
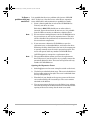
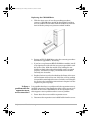
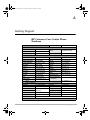
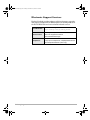
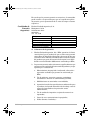
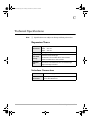
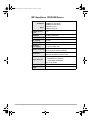
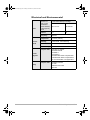
J4148.boo.book Page 1 Tuesday, November 24, 1998 10:24 AM
J4148.boo.book Page 2 Tuesday, November 24, 1998 10:24 AM
J4148.boo.book Page 1 Tuesday, November 24, 1998 10:24 AM
User’s Guide
HP J4148A SureStore CD Expansion Tower
J4148.boo.book Page 2 Tuesday, November 24, 1998 10:24 AM
© Copyright 1998
Hewlett-Packard Company.
All rights reserved. Reproduction, adaptation or
translation without prior written permission is
prohibited, except as allowed under the copyright laws.
Safety Considerations
Prior to the installation and use of this product,
review all safety markings and instructions.
!
Publication number
Instruction Manual Symbol.
If the product is marked with
this symbol, refer to product
manuals to protect the product
from damage.
5967-9867
User’s Manual, First Edition,
December 1998
WARNING
Denotes a hazard that can
cause injury
Applicable Products:
CAUTION
Denotes a hazard that can
damage equipment or data.
J4148A
Trademark Credits
Microsoft®, MS-DOS®, Windows®, Microsoft
Windows NT® are U.S. registered trademarks
of Microsoft Corporation. UNIX® is a registered
trademark of The Open Group. Netscape Navigator is a U.S. trademark of Netscape Communications Corporation.
Warranty
The information contained in this document is
subject to change without notice.
HEWLETT-PACKARD COMPANY MAKES
NO WARRANTY OF ANY KIND WITH
REGARD TO THIS MATERIAL, INCLUDING,
BUT NOT LIMITED TO, THE IMPLIED WARRANTIES OF MERCHANTABILITY AND FITNESS FOR A PARTICULAR PURPOSE.
Hewlett-Packard shall not be liable for errors
contained herein or for incidental or consequential damages in connection with the furnishing,
performance or use of this material.
A copy of the specific warranty terms applicable
to your HP product and replacement parts can
be obtained from your HP Sales and Service
Office or Authorized dealer.
For warranty service information, see appendix
B in this guide.
Hewlett-Packard Company
8000 Foothills Boulevard
Roseville, California
95747-6588
Do not proceed beyond a WARNING or
CAUTION notice until you have understood the
hazard and have taken appropriate
precautions.
Use of control, adjustments, or performance
procedures other than those specified herein
may result in hazardous radiation exposure. To
prevent direct exposure to a laser beam, do not
try to disassemble the CD-ROM drives.
Grounding. This product provides a protective
earthing terminal. There must be an
uninterruptible safety earth ground from the
main power source to the product’s input wiring
terminals, power cord, or supplied power cord
set. Whenever it is likely that the protection
has been impaired, disconnect the power cord
until the ground has been restored.
For more safety information, see appendix D.
Servicing. There are no user-serviceable parts
inside the user-installable modules comprising
the product. Any servicing, adjustment, maintenance, or repair must be performed only by service-trained personnel.
J4148.boo.book Page iii Tuesday, November 24, 1998 10:24 AM
Table of Contents
1. Introduction . . . . . . . . . . . . . . . . . . . . . . . . . . . . . . . . . . . . . . . . . . . . . 1
Product Description . . . . . . . . . . . . . . . . . . . . . . . . . . . . . . . . . . . . . . . . . 1
Tower Box Contents . . . . . . . . . . . . . . . . . . . . . . . . . . . . . . . . . . . . . . . . . 2
Rack Mount Kit . . . . . . . . . . . . . . . . . . . . . . . . . . . . . . . . . . . . . . . . . . . . 2
2. Installation . . . . . . . . . . . . . . . . . . . . . . . . . . . . . . . . . . . . . . . . . . . . . . 3
3. Operation and Troubleshooting . . . . . . . . . . . . . . . . . . . . . . . . . . . . 5
Using HP SureStore CD-ROM Drives . . . . . . . . . . . . . . . . . . . . . . . . . . 5
Troubleshooting and Repair . . . . . . . . . . . . . . . . . . . . . . . . . . . . . . . . . . 7
A. Getting Support. . . . . . . . . . . . . . . . . . . . . . . . . . . . . . . . . . . . . . . . . 13
HP Customer Care Center Phone Numbers . . . . . . . . . . . . . . . . . . . . 13
Electronic Support Services . . . . . . . . . . . . . . . . . . . . . . . . . . . . . . . . . . 14
B. Warranty . . . . . . . . . . . . . . . . . . . . . . . . . . . . . . . . . . . . . . . . . . . . . . . 15
C. Technical Specifications . . . . . . . . . . . . . . . . . . . . . . . . . . . . . . . . . 21
Expansion Tower . . . . . . . . . . . . . . . . . . . . . . . . . . . . . . . . . . . . . . . . . .
Interface Connectors . . . . . . . . . . . . . . . . . . . . . . . . . . . . . . . . . . . . . . .
HP SureStore CD-ROM Drives . . . . . . . . . . . . . . . . . . . . . . . . . . . . . .
Electrical and Environmental . . . . . . . . . . . . . . . . . . . . . . . . . . . . . . . .
21
21
22
23
D. Regulatory and Safety Information . . . . . . . . . . . . . . . . . . . . . . . 25
Safety Statements . . . . . . . . . . . . . . . . . . . . . . . . . . . . . . . . . . . . . . . . . 28
Index. . . . . . . . . . . . . . . . . . . . . . . . . . . . . . . . . . . . . . . . . . . . . . . . . . . . . 35
iii
J4148.boo.book Page iv Tuesday, November 24, 1998 10:24 AM
iv
J4148.boo.book Page 1 Tuesday, November 24, 1998 10:24 AM
1
Introduction
This user’s guide contains information about installing and
maintaining HP J4148A SureStore CD Expansion Tower.
The HP J4148A SureStore CD Expansion Tower works with the
following products:
•
HP J3278A SureStore CD-ROM Server/Tower 7Plus
•
HP J3168A SureStore CD-ROM Server (standalone module)
When used with the Server/Tower 7Plus, the expansion tower
extends the capacity of the storage system to 14 CD-ROM drives.
When used with the standalone server, the expansion tower provides access to seven CD-ROM drives.
The expansion tower can be floor-mounted or rack-mounted.
HP J4148A
SureStore CD
Expansion Tower
Product Description
The HP J4148A SureStore CD Expansion Tower connects to an
HP server or server/tower, using the supplied SCSI cable.
The expansion tower contains seven HP CD-ROM drives in a
single subsystem. The HP CD-ROM drives are daisy-chained
together using an internal SCSI bus interface. The power
required to operate the CD-ROM drives is supplied internally by
the expansion tower.
All components of the tower are completely modular—the drives
are self-configuring modules. In the unlikely event a drive
should fail, replacement is a simple and straightforward procedure.
A drive’s SCSI ID is set automatically, based on its position in
the tower. An active terminator, provided with the expansion
tower, must be installed on the back of the tower.
Introduction 1
J4148.boo.book Page 2 Tuesday, November 24, 1998 10:24 AM
Tower Box Contents
•
•
•
•
•
•
A seven-bay tower with seven HP SureStore CD-ROM drive
modules installed
1-meter SCSI-2 cable (part number 5183-7741)
External active SCSI terminator (part number 5183-7740)
Front cover keys (part number 5183-2615)
User’s Guide (this manual)
Power cable for your country
Region/Country
USA, Canada, Brazil, Mexico
Argentina
Chile
Europe
Denmark
Switzerland
United Kingdom
South Africa, India
Australia, New Zealand
Israel
China
CAUTION!
❏
Part Number
8120-6805
8120-6871
8120-6979
8120-6802
8120-6806
8120-6807
8120-8709
8120-6808
8120-6803
8120-6799
8120-8376
The power supply input voltage must be set according to the
power standards in the country of use. Normally your HP
retailer configures the power supply, but you should always
double check. Voltage selections are 115 and 230 volts, 50/60
Hz.
2 Introduction
CD 32x
CD 32x
CD 32x
CD 32x
CD 32x
CD 32x
CD 32x
CD 32x
CD 32x
CD 32x
CD 32x
CD 32x
CD 32x
CD 32x
Rack Mount Kit
To consolidate HP SureStore CD
Expansion Towers with other
peripherals in a standard HP
19-inch rack cabinet, use only
HP C2982A Tower Rackmount
Kit.
J4148.boo.book Page 3 Tuesday, November 24, 1998 10:24 AM
2
Installation
CAUTION!
❏
Verify that the power supply input voltage of the expansion
tower is set according to the power standards in the country
of use. If necessary, set the voltage switch on the rear of the
tower (see the illustration below) to 115 volts or 230 volts.
CAUTION!
❏
Verify that the power cable is correct for the country of use.
See page 2.
CAUTION!
❏
The SCSI bus of either the CD-ROM server or the expansion
tower may be damaged if you connect or disconnect the SCSI
cable when either unit is powered on.
1.
Switch power to the CD-ROM server/tower off, or remove
power to the standalone server.
2.
Place the expansion tower next to the CD-ROM server, as in
the example of the server/tower shown below.
Input voltage switch
Power cord connector
SCSI connector
SCSI connector
Second SCSI connector
Server/Tower
Expansion Tower
Installation 3
J4148.boo.book Page 4 Tuesday, November 24, 1998 10:24 AM
3.
Connect the SCSI cable from the SCSI connector on the CDROM server to the top SCSI connector on the expansion tower.
4.
Connect the SCSI terminator to the bottom SCSI connector on
the expansion tower.
SCSI connector
Second SCSI connector
SCSI connector
SCSI terminator
SCSI cable
Server/Tower
Note
Expansion Tower
5.
Connect the power cable to the expansion tower.
6.
Connect the power cable to a power source.
7.
Switch power to the expansion tower on.
❏
The expansion tower must be powered up before the CDROM server. If the server boots before the expansion tower
is powered on, the server will not recognize the CD-ROM
drives in the expansion tower.
8.
Switch power to the server/tower on or connect the power to
the standalone server.
SCSI IDs are set automatically on HP CD-ROM drives, based on
their position in the tower. The topmost position is ID 0 and the
lowest position is ID 6. All drives are read by the HP CD-ROM
server.
Verifying the
Installation
4 Installation
Follow the procedure in the HP CD-ROM server User’s Guide to
validate the correct operation of the server and the individual
CD-ROM drives.
J4148.boo.book Page 5 Tuesday, November 24, 1998 10:24 AM
3
Operation and Troubleshooting
Once the HP J4148A expansion tower has been installed and
powered on, all other operations are CD-ROM operations.
Using HP SureStore CD-ROM Drives
Tray door
Emergency Eject button
DISC indicator
ON/BUSY indicator
Stop/Eject button
•
Tray door: Press the Stop/Eject button to open the door.
Insert the CD into the drawer. Press the Stop/Eject button to
close the door.
•
Stop/Eject button: Push to eject CD.
•
Emergency Eject button (recessed): If the automatic
Stop/Eject button does not work, switch off the power. Insert
a paper clip or other thin rigid object in this hole to press
the recessed button to eject the CD.
•
ON/BUSY indicator: On (yellow) when power is switched on.
Flashing continuously when CD is inserted and being
accessed. Off when CD is inserted and not being accessed.
•
DISC indicator: On (green) when power is on and CD is
inserted. Off if no CD is inserted.
Operation and Troubleshooting 5
J4148.boo.book Page 6 Tuesday, November 24, 1998 10:24 AM
Tray Loading and
Operation
Note
Care of CD-ROMs
1.
While the drive is powered up, push the Stop/Eject button.
The tray drawer will slide out in 2–3 seconds.
2.
Place the CD into the depression in the tray, label side up. For
a rack-mounted expansion tower, the label should face away
from the CD-ROM drive’s lights and buttons.
3.
Press the Stop/Eject button again, and the tray will slide shut
within 2–3 seconds.
❏
We recommend you use the Stop/Eject button to close the
tray in a smooth and secure manner. Closing the tray by
pressing the front of the drawer by hand is not recommended.
Check your CDs periodically to determine if they need cleaning.
If the CD is dusty, you can use a commercially available dust
removal spray to blow off dust particles. After removing the dust
particles, you can wipe the CD using a clean, soft cotton cloth.
Use a straight-line motion, wiping from the center out. Do not
wipe the CD in a circular motion.
Correct Procedure for Cleaning a Disc
If a CD becomes dirty or soiled with grease or other contaminants not removable by wiping, you can clean it with a CD-ROM
disc cleaner available at most computer dealers. Follow the
directions packaged with the cleaner.
Note
❏
Keeping your CD in its original case or in the CD-ROM drive
at all times will prevent it from becoming dirty or damaged.
6 Operation and Troubleshooting
J4148.boo.book Page 7 Tuesday, November 24, 1998 10:24 AM
Troubleshooting and Repair
Condition
Probable Cause
Resolution
Power switch is off (on
server/tower and expansion
tower)
Be sure the power switch is on.
Be sure the power cable is connected.
Power cable not connected
Be sure the power cable is appropriate for
your country.
Switch the power switch off. Check the input
power setting—the switch on the back of the
tower. Modify the setting only if you are sure
the current setting is wrong.
No power to the
standalone server,
server/tower or
expansion tower
(power LED is off
Input voltage is set incorrectly
Power loss
CAUTION: Your HP-authorized dealer has
normally set up the input voltage as required
for the country of usage. A lower setting will
destroy the power supply. A higher setting will
cause a malfunction at a load above four
drives, but will not cause any damage.
Wait 10 seconds, and switch power on again
(power cycle).
Your facility may be undergoing a blackout or
brownout. Be sure the power source for the
tower is active.
Switch power off, wait 10 seconds, and switch
power on again (power cycle).
Power supply malfunction
Call HP support for help, as described in
appendixes A and B.
Operation and Troubleshooting 7
J4148.boo.book Page 8 Tuesday, November 24, 1998 10:24 AM
Condition
Probable Cause
Resolution
SCSI terminator is not connected
Be sure the SCSI terminator is connected to
the CD-ROM server. If it is not:
1. Power down both the CD-ROM server and
the expansion tower.
2. Connect the SCSI terminator.
3. Restore power to the expansion tower and
then to the CD-ROM server.
SCSI cable is not connected
Be sure the SCSI cable is connected to the
CD-ROM server. If it is not:
1. Power down both the CD-ROM server and
the expansion tower.
2. Connect the SCSI cable.
3. Restore power to the expansion tower and
then to the CD-ROM server.
No disc in CD-ROM drive
Check the CD-ROM drive to see if it contains
a CD. If necessary, insert a CD. If the condition
persists, see the next row in this chart.
Damaged disc in CD-ROM
drive
Substitute a known-good disc for the one in
the CD-ROM drive. If the condition persists,
see the next row in this chart.
Other tower, SCSI cable, or
CD-ROM drive malfunction
1. There may be a faulty component. Consult
the troubleshooting procedures following
this chart.
2. Consult the troubleshooting procedures in
your server’s User’s Guide.
3. Call HP support for help, as described in
appendixes A and B.
No read activity
from a CD-ROM
drive
Finding a faulty
component
If the above procedures do not produce a solution to the problem,
there may be a fault with a CD-ROM drive, the server, the
server/tower, the expansion tower, the SCSI cable, the SCSI terminator, or network access to the server.
Note
❏
Before proceeding, be sure you have tried the troubleshooting scenarios for power, SCSI connection, and a disc present
in a drive.
CAUTION!
❏
To protect the equipment, be sure to power down the expansion tower and the server before removing/replacing CDROM drives, cables, or terminators.
8 Operation and Troubleshooting
J4148.boo.book Page 9 Tuesday, November 24, 1998 10:24 AM
Is there a
problem with just
one drive?
It is possible that there is a problem with just one CD-ROM
drive. If that is so, then the server, other drives, expansion
tower, SCSI cable, and terminator are probably not faulty.
1.
Insert a known-good disc in each of the CD-ROM drives.
Test only one drive at a time.
Each drive’s DISC LED should turn on when a disc is
inserted. If some do and some do not turn on, it is probable
that the LED not turning on indicates a defective drive.
Note
❏
For server/tower configurations, test the CD-ROM drives in
the server/tower as well as the expansion tower. This test
will be valuable if the problem later is determined to be in
the server/tower components.
2.
If you encounter a defective CD-ROM drive, open the
expansion tower, as described below, and remove the drive.
Removing the drive should cause the rest of the components
to operate normally once the unit is powered up again. The
tower will operate with any number of CD-ROM drives.
Call HP support to arrange for a replacement drive.
Note
❏
The procedures below assume you have the replacement
drive. However, if you do not have it yet, simply remove the
potentially defective drive. The tower will operate with any
number of CD-ROM drives.
Opening the Expansion Tower
1.
Switch off power to the tower (using the switch on the front).
2.
Use the key to unlock the front cover. The cover is locked when
the key index points to the right. The cover is unlocked when
the key index points up.
3.
Place both of your hands on the top two corners of the front
cover and carefully pull it towards you. The cover remains
attached at the bottom.
4.
You can now remove the front cover by lifting it up, making
sure that the flange at the bottom of the cover has cleared the
opening of the tower casing. Set the front cover aside.
Operation and Troubleshooting 9
J4148.boo.book Page 10 Tuesday, November 24, 1998 10:24 AM
Replacing the CD-ROM Drive
Is there a
problem with the
expansion tower
or its connection?
1.
With the front cover off (see the preceding procedure),
remove a CD-ROM drive module by placing both hands on
the two handles on both sides. Pull the module out from the
front of the bay using even pressure on both handles.
2.
Return an HP CD-ROM drive using the warranty procedure
described in appendix B, “Warranty.”
3.
If you have a replacement HP CD-ROM drive module, install
it by aligning the rails with the two grooves provided in each
bay of the tower. Slide the module in by holding the two
handles on both sides and pushing firmly until it is seated
properly. Just before it stops, you should feel the module
inserting into its socket.
4.
Replace the front cover by first hooking the flange of the cover
into the bottom of the tower case. Close the cover by pushing
it towards the main body of the tower. Lock the cover using the
key. Refer to the installation instructions in chapter 2 for the
sequence of power-up steps.
It is possible that there is a problem with the expansion tower or
its SCSI connection. If the installation fails to allow access to all
the discs in the seven CD-ROM drives in the expansion tower,
this suggests a tower problem and not a server problem.
1.
Power down the server and the expansion tower.
2.
Disconnect the expansion tower’s SCSI cable from the server.
10 Operation and Troubleshooting
J4148.boo.book Page 11 Tuesday, November 24, 1998 10:24 AM
3.
Power up the server. Can you see the server on the network?
If the server performs correctly, continue with this procedure.
If the server does not perform correctly, the implication is
that there is a server problem. Leave this section and go to
the next section.
4.
Power down the server.
5.
Remove all drives from the expansion tower. Follow the
procedures in the previous section to open the tower and
remove a drive.
6.
Re-attach the expansion tower’s SCSI cable to the server.
Make sure the SCSI terminator is in place on the back of the
expansion tower.
7.
Power up both the expansion tower and the server.
8.
Now check the server LEDs, according to the server’s User’s
Guide (troubleshooting section).
NORMAL: If the server LEDs are normal, the implication is
that the tower is working correctly. Despite earlier tests, a
CD-ROM drive may be bad.
• Install the CD-ROM drives one by one, by powering
down, installing the drive in the tower, powering up,
inserting a CD, and attempting to access it. If the drive is
not functioning, call HP support.
ABNORMAL: If the server LEDs are not normal, there is a
problem with either the tower or the SCSI cable.
9.
Power down the server and the expansion tower. Install a
different SCSI cable (a known-good spare).
10. Power up both the expansion tower and the server and check
the server LEDs as before.
NORMAL: The SCSI cable was bad. Call HP support for
replacement.
ABNORMAL: There is a problem with the tower or the SCSI
terminator. Call HP support.
Operation and Troubleshooting 11
J4148.boo.book Page 12 Tuesday, November 24, 1998 10:24 AM
Is there a
problem with the
server?
It is possible that there is a problem with the server.
For server/tower configurations, previous tests should have
eliminated the CD-ROM drives in the server/tower as suspects.
For standalone servers, go directly to the “Test the server alone”
procedure below.
Test a server/tower without its drives.
1.
Power down the server/tower.
2.
Remove all drives from the server/tower.
3.
Power up the server/tower and check the server LEDs,
according to the server’s User’s Guide (troubleshooting
section).
NORMAL: If the server LEDs are normal, the implication is
that the tower is working correctly. Despite earlier tests, a
CD-ROM drive may be bad.
• Install the CD-ROM drives one by one, by powering
down, installing the drive in the tower, powering up,
inserting a CD, and attempting to access it. If the drive is
not functioning, call HP support.
ABNORMAL: If the server LEDs are not normal, there is a
problem with either the server or the tower.
Isolate the server from the tower.
The next step is to remove the server module from the tower, so
that it acts like a standalone server.
1.
Power down the server/tower.
2.
Disconnect the server module from the server tower by
disconnecting the internal SCSI cable (the long connector),
leaving the network and power connectors (the short
connectors) intact.
Test the server alone.
1.
Power up the server and check the server LEDs, according to
the server’s User’s Guide (troubleshooting section).
NORMAL: If the server LEDs are normal, there is a problem
with the tower component of the server/tower. Call HP support.
ABNORMAL: If the server LEDs are not normal, there is a
problem with the server. Call HP support.
12 Operation and Troubleshooting
J4148.boo.book Page 13 Tuesday, November 24, 1998 10:24 AM
A
Getting Support
HP Customer Care Center Phone
Numbers
North America
Latin America:
Argentina
787-8080
Brazil
011-829-6612
Chile
800-360999
Europe and Middle East:
Austria
0660 6386
Belgium (Dutch)
02 626 8806
Belgium (French)
02 626 8807
Czech Republic
42 (2) 471 7321
Denmark
3929 4099
Finland
0203 47 288
France
01 43 62 34 34
Germany
0180 52 58 143
Hungary
36 (1) 252 4505
Ireland
01 662 5525
Italy
02 264 10350
Middle east
+41 22/780 71 11
Africa
Asia and Pacific:
Australia
61 3 9272 8000
China
86 010 6564 5959
Hong Kong
800 967729
(toll free)
India
USA & Canada
970-635-1000
Mexico
01 800-472-668446
01 800-HPContigo
Venezuela
800-47-888
Netherlands
Norway
Poland
Portugal
Russia
Spain
Sweden
Switzerland
Turkey
United Kingdom
020 606 8751
22 11 6299
48 22 37 50 65
01 441 7199
7095 923 50 01
902 321 123
08 619 2170
0848 80 11 11
90 1 224 59 25
0171 512 52 02
Europe outside the
+44-171-512-52-02
UK (English)
Malaysia
New Zealand
Philippines
Singapore
Indonesia
62 21 350 3408
Taiwan
Japan
81 3 3335 8333
Thailand
Korea
82 2 3270-0700 or toll free: 080-999-0700
For all other countries, contact your reseller.
+41 22/780 71 11
03 295 2566
09 356 6640
63 2 867 3551
65 272 5300
886 02 717 0055
66 02 661 4011
Getting Support 13
J4148.boo.book Page 14 Tuesday, November 24, 1998 10:24 AM
Electronic Support Services
Hewlett-Packard provides software utilities, firmware upgrades,
and support information for HP SureStore CD-ROM products on
the World Wide Web and various bulletin board services.
14 Getting Support
World Wide Web
HP's Electronic Support Center:
http://www.hp.com/go/cdrom_server
America Online
Go to Keyword hp to reach the HP forum.
Select "HP Support Documents"
Select "Networked Storage"
CompuServe
go hp to reach the HP forum.
To sign up for CompuServe, call (800) 848-8199 and
ask for Representative #51 (USA only).
J4148.boo.book Page 15 Tuesday, November 24, 1998 10:24 AM
B
Warranty
Your Authorized
Dealer
If you encounter difficulty, begin by contacting your HP Authorized Dealer who sold this product to you. Your HP Authorized
Dealer will be familiar with your requirements and can provide
assistance.
Customer
Support
Hewlett-Packard Company has support services available to
help you in case of difficulties with your HP SureStore CD
Expansion Tower. Use the telephone numbers in appendix A,
“Getting Support,” for all post-sales support, including problems
and failures with the product. The support staff will help you
with troubleshooting and isolating the failed components, and
will advise you on warranty service.
Your Warranty
Two Year, Return-to-HP Warranty
The components of your HP SureStore CD Expansion Tower—
the tower and the HP CD-ROM drives—are warranted against
defects in materials and workmanship for a period of two years
from the date of receipt by the end user. During the warranty
period, HP will replace the unit at no charge provided the defective unit is returned. You may return the unit to your HP Authorized Dealer or your local HP Sales and Service Office
representative. Be sure to include a copy of your purchase
receipt.
This warranty does not apply if the HP SureStore CD Expansion
Tower has been damaged by accident or misuse, or as a result of
service or modification by other than an authorized HewlettPackard Service Facility. No other express warranty is given by
Hewlett-Packard. Hewlett-Packard shall not be responsible for
consequential damages.
For your records, please retain your original proof of purchase.
Record the product number and serial number. Your product
number is on a white label on the rear of your tower, for example, “J4148A”. The serial number is on the same label.
Warranty 15
J4148.boo.book Page 16 Tuesday, November 24, 1998 10:24 AM
Warranty Service
To identify the failing component in your product—either the
CD expansion tower or the HP CD-ROM drive—call the HP customer support telephone number for your country, as listed in
appendix A, “Getting Support.” Prepare the following
information:
•
•
•
•
•
HP product number
Serial number
Date of purchase
Your shipping address
Description of the component failure (see chapter 9 first)
Ask for instructions for replacing the defective product.
Service Billing
(Out of Warranty)
When ordering a replacement unit for out-of-warranty service,
you may be charged a repair cost. See your HP Authorized
Dealer or your local HP Sales and Service Office representative.
In the USA only, an alternative is to call HP directly at
(800) 366-8040. You will need to supply your shipping and billing addresses and one of the following:
•
•
For Australia and
New Zealand
Póliza de
Garantía
(México)
Credit card number with expiration date
Purchase order number for customers having an established
account with HP.
For consumer transactions in Australia and New Zealand:
The warranty terms contained herein—except to the extent
lawfully permitted—do not exclude, restrict, or modify, and are
in addition to, the mandatory statutory rights applicable to the
sale of this product to you.
Hewlett-Packard de México, S. A. de C. V. con domicilio en:
Prolongación Reforma No. 470
Col. Lomas de Sta. Fe, 01210
Delegación Alvaro Obregón
Tel. 326 46 00
Garantiza este producto por el término de doce meses en todas
sus partes y mano de obra contra cualquier defecto de fabricación y funcionamiento a partir de la fecha de entrega al consumidor final. En el caso de productos que requieran de enseñanza
o adiestramiento en su manejo o en su instalación, a partir de la
fecha en que hubiese quedado operando normalmente el producto después de su instalación en el domicilio que señale el consumidor.
16 Warranty
J4148.boo.book Page 17 Tuesday, November 24, 1998 10:24 AM
CONDICIONES :
1. Centros de Servicio, Refacciones y Partes:
Para hacer efectiva esta garantía, no podrán exigirse mayores
requisitos que la presentación de esta póliza junto con el producto en el lugar donde fue adquirido o en el centro de servicio
ubicado en el domicilio de la parte superior de esta hoja, mismo
en el que se pueden adquirir refacciones y partes.
2. Cobertura:
La Empresa se compromete a reparar o cambiar el producto, así como las
piezas y componentes defectuosos del mismo, sin ningún cargo para el
consumidor. Los gastos de transportación que se deriven de su cumplimiento serán cubiertos por Hewlett-Packard de México, S. A. de C. V.
3. Tiempo de Reparación:
El tiempo de reparación en ningún caso será mayor a treinta
días contados a partir de la recepción del producto en cualquiera
de los sitios en donde pueda hacerse efectiva la garantía.
4. Limitaciones:
Esta garantía no es válida en los siguientes casos:
1. Cuando el producto ha sido utilizado en condiciones distintas
a las normales.
2. Cuando el producto no ha sido operado de acuerdo con
el instructivo de uso en idioma Español proporcionado.
3. Cuando el producto ha sido alterado o reparado
por personas no autorizadas por Hewlett-Packard de México, S.A. de C. V.
Notas:
El consumidor podrá solicitar que se haga efectiva la garantía
ante la propia casa comercial donde adquirió el producto siempre
y cuando el fabricante o importador no cuente con talleres de
servicio.
Warranty 17
J4148.boo.book Page 18 Tuesday, November 24, 1998 10:24 AM
En caso de que la presente garantía se extraviara, el consumidor
puede recurrir a su proveedor para que se le expida otra póliza
de garantía, previa presentación de la nota de compra o factura
respectiva.
Certificado de
Garantia
(Argentina)
Hewlett-Packard Argentina, S. A.
Montañeses 2150
1428 Buenos Aires
Argentina
Tel. 787 7100
Producto:
Modelo:
No. de serie:
Fecha de entrega:
Vigencia de la garantía:
Extensión de la garantía:
A. Cobertura de la garantía:
1.
Hewlett-Packard Argentina, S.A. (HPA) garantiza al cliente
(usuario final) que el producto al que se refiere esta garantía
estará libre de defectos de fabricación y de mano de obra por
el término antes indicado contando desde la fecha de compra
del producto por parte del usuario final original a un distribuidor o comercializador debidamente autorizado por HPA.
2.
La presente garantía cubre únicamente aquellos defectos que
surgiesen como resultado del uso normal del producto y no por
aquellos que resultasen de:
a.
Mantenimiento inapropiado o inadecuado, alteración o
reparación realizados por personal no autorizado por
HPA;
b.
Uso de software, accesorios, soportes, suministros,
consumibles o interfaz no suministrados por HPA;
c.
Modificaciones no autorizadas o uso indebido;
d. Operación fuera de las especificaciones ambientales para
el producto, incluyendo abuso del ciclo de trabajo o uso de
cargas de conmutadores sin protección contra
sobretensiones;
18 Warranty
e.
Uso de medios de impresión o tarjetas de memoria no
soportados;
f.
Lugar de uso o mantenimiento inapropiados;
g.
Daños durante el traslado; o
J4148.boo.book Page 19 Tuesday, November 24, 1998 10:24 AM
h. Cualquier violación de las condiciones de uso, instalación
y mantenimiento necesarias especificadas en el Manual de
Operaciones.
3.
Si el cliente (usuario final), durante el periodo de garantía,
pusiera en conocimiento de HPA la existencia de los defectos
definidos anteriormente, HPA podrá, según prefiera, reparar
o reemplazar el producto si está averiado. Cualquier producto
de reemplazo será nuevo o como nuevo. En caso que al
momento del reemplazo no hubiese disponible un producto
idéntico al reemplazado (ya sea por discontinuación de su
producción, falta de stock o por cualquier otra causa), HPA se
reserva el derecho de suministrar un producto de prestaciones
o funcionalidad por lo menos iguales a las del producto
reemplazado. Si luego de un plazo razonable, no fuese posible
para HPA reparar o reemplazar el producto, el cliente tendrá
derecho, como única compensación, al reintegro del precio de
compra, contra la devolución del producto a HPA.
B. Limitación de la garantía:
1.
NI HPA, NI NINGUNA ENTIDAD O PERSONA DIRECTA
O INDIRECTAMENTE VINCULADA O RELACIONADA
CON HPA: A) OFRECEN NINGUNA OTRA GARANTIA
DE NINGUNA INDOLE, EXPRESA O IMPLICITA, ORAL
O ESCRITA, RESPECTO AL PRODUCTO AL QUE SE
REFIERE ESTA GARANTIA; O B) FORMULAN NINGUNA GARANTIA IMPLICITA DE COMERCIALIZACIÓN
O ADECUACIÓN DEL PRODUCTO PARA UN PROPOSITO DETERMINADO.
HPA NO OFRECE NINGUNA GARANTÍA DE QUE LA
OPERACIÓN DE SUS PRODUCTOS SERÁ ININTERRUMPIDA O LIBRE DE ERRORES.
C.
Exoneración de responsabilidad:
EXCEPTUANDO LAS OBLIGACIONES EXPUESTAS EN
ESTE CERTIFICADO DE GARANTIA, BAJO NINGUNA CIRCUNSTANCIA HPA SERÁ RESPONSABLE DE CUALQUIER
DAÑO DIRECTO O INDIRECTO (INCLUYENDO SIN LIMITACIÓN, PERDIDA DE DATOS O LUCRO CESANTE) O POR
CUALQUIER DAÑO O PERJUICIO QUE SEA CONSECUENCIA DIRECTA, INDIRECTA O REMOTA DEL USO O MAL
FUNCIONAMIENTO DEL PRODUCTO, CUALQUIERA QUE
SEA EL FUNDAMENTO DEL RECLAMO (CONTRACTUAL,
EXTRACONTRACTUAL O LEGAL).
Warranty 19
J4148.boo.book Page 20 Tuesday, November 24, 1998 10:24 AM
LOS REMEDIOS DESCRITOS EN ESTA GARANTIA SON LOS
UNICOS Y EXCLUSIVOS.
D. Condiciones particulares:
E. Reparaciones:
Comuníquese con el distribuidor o comercializador debidamente
autorizado por HPA que le vendió este producto, o para servicio
mas rápido, llame al Centro de Asistencia Técnica, al numero
787-8080.
Las reparaciones se llevarán a cabo en los centros autorizados de
servicio en Argentina, contra la presentación del producto, este
Certificado de Garantía y la factura original de compra del producto, en el caso de impresoras presentar la HP Card.
20 Warranty
J4148.boo.book Page 21 Tuesday, November 24, 1998 10:24 AM
C
Technical Specifications
Note
❏
Specifications are subject to change without prior notice.
Expansion Tower
Dimensions
Height: 440 mm
Width: 215 mm
Depth: 370 mm
Weight
19.4 kg (42.8 lb)
Front Panel
Security
Front Door Lock, barrel type.
Mechanisms not removable when door is locked.
Media removable when door is locked.
Backplane
PCB
Manages power distribution, SCSI ID setting, and SCSI
interconnect. CD-ROM drives are connected using a
single card-edge connector.
Interface Connectors
CD-ROM Drive
SCSI-2, direct plug-in for HP CD-ROM drive module
External SCSI
Connectors
50-pin high density SCSI-2, with latch and thumb
screw cable attachment
Technical Specifications 21
J4148.boo.book Page 22 Tuesday, November 24, 1998 10:24 AM
HP SureStore CD-ROM Drives
Data Transfer Rate Full CAV
Sustained 2.082MByte/s (14X speed)
4.828MByte/s (32X speed)
Burst 10 MByte/s (synch)
5.0 MByte/s (asynch)
Random Access
Speed
85 ms
Data Buffer
512 KByte (256 blocks)
Eject
Auto Eject; Manual Emergency Eject
Disc Loading
Automatic
Tray Loading
30,000 load cycles
Rear Panel
Power Supply
+5 Vdc at average .71A
+12 Vdc at average .38A
Fast SCSI Bus, 50-pin header-type connection to
Interface Connector tower through HP module carrier only
22 Technical Specifications
Termination
Jumper switch.
Termination disabled by default in tower.
Jumper Switches
SCSI ID configured by the position of the HP
CD-ROM drive in the tower
(upper=ID#0, lower=ID#6)
Parity=On by default
Dimensions
162.00 mm x 41.65 mm x 250.00 mm with carrier
Weight
1.2 kg with carrier
J4148.boo.book Page 23 Tuesday, November 24, 1998 10:24 AM
Electrical and Environmental
Power
Environmental
Must be correctly configured before
power attached,
or damage may
result
At User-Selectable Input Voltage
100–127 Vac
200–240 Vac
Current
2A
1A
Frequency
50/60 Hz
Temperature
41–104°F (5-40°C)
Humidity
0–80% RHG, noncondensing
Acoustics
L NPE 5.5 bels, maximum
Heat discharge 273 BTU/hr
Complies with:
FCC Part 15, Class A
EN 55022 Class-B
EN 50082-1
VCCI Class A
Canadian EMC Class A requirements
Australian EMC Class A requirements
For more information, see appendix D.
Complies with:
EN 60950 / IEC950
UL 1950
NOM-019-SCFI-1994
CSA 950
Electromagnetic
Safety
Technical Specifications 23
J4148.boo.book Page 24 Tuesday, November 24, 1998 10:24 AM
24 Technical Specifications
J4148.boo.book Page 25 Tuesday, November 24, 1998 10:24 AM
D
Regulatory and Safety Information
Regulatory Statements
FCC Statements
General Information. This device complies with Part 15 of the FCC
Rules. Operation is subject to the following two conditions: (1) This
device may not cause interference, and (2) this device must accept any
interference received, including interference that may cause undesired
operation.
Pursuant to Part 15.21 of the FCC Rules, any changes or modifications
to this equipment not expressly approved by the Hewlett-Packard Company may cause interference and void the FCC authorization to operate
this equipment.
The Federal Communications Commission has prepared a booklet titled
Interference Handbook (1986), which may be helpful to you. This booklet (stock number 004-000-004505-7) may be purchased from the Superintendent of Documents, U.S. Government Printing Office, Washington,
D.C. 20402.
FCC Class A. This equipment has been tested and found to comply
with the limits for a Class A digital device, pursuant to Part 15 of the
FCC Rules. These limits are designed to provide reasonable protection
against interference in a commercial environment. This equipment generates, uses and can radiate radio frequency energy and, if not installed
and used in accordance with the instructions, may cause interference to
radio communications.
However, there is no guarantee that interference will not occur in a particular installation. If this equipment does cause interference to radio or
television reception, which can be determined by turning the equipment
off and on, the user is encouraged to try to correct the interference by
one or more of the following measures:
• Reorient or relocate the receiving antenna.
• Increase the separation between the equipment and receiver.
• Connect the equipment into an outlet on a circuit different from that
to which the receiver is connected.
• Consult the dealer or an experienced radio/TV technician for help.
Regulatory and Safety Information 25
J4148.boo.book Page 26 Tuesday, November 24, 1998 10:24 AM
Australia
Canada
This equipment complies with Australian EMC
requirements.
This equipment complies with Canadian EMC Class-A
requirements.
Japan:
VCCI Class A
Taiwan:
Class A
26 Regulatory and Safety Information
J4148.boo.book Page 27 Tuesday, November 24, 1998 10:24 AM
European
Community
Declaration of Conformity. The following Declaration of
Conformity complies with ISO/IEC Guide 22 and EN 45014.
It identifies the product, the manufacturer's name and address,
and the applicable specifications that are recognized in the
European community.
Regulatory and Safety Information 27
J4148.boo.book Page 28 Tuesday, November 24, 1998 10:24 AM
Safety Statements
Follow the safety considerations described on page ii (the page
following the title page) in this User’s Guide.
Chinese Safety
Statement
28 Regulatory and Safety Information
J4148.boo.book Page 29 Tuesday, November 24, 1998 10:24 AM
USA:
Laser Safety
Statement
The HP SureStore CD Expansion Tower contains a laser system
and is classified as a “Class 1 Laser Product” under a U.S.
Department of Health and Human Services (DHHS) Radiation
Performance standard according to the Radiation Control for
Health and Safety Act of 1968.
To ensure proper use of this product, please read this User’s
Guide carefully and retain for future reference. Should the unit
ever require maintenance, contact an authorized service location.
WARNING!
❏
Germany:
Vorsicht
Dieses Gerät ist ein Laser Klasse 1 nach IEC 825. Beachten Sie
die Bedienungsanleitung und verwahren Sie diese für späteren
Gebrauch.
Use of control, adjustments, or performance procedures
other than those specified herein may result in hazardous
radiation exposure. To prevent direct exposure to laser
beam, do not try to disassemble the CD-ROM drives.
Gerät nicht öffnen. Lassen Sie Instandhaltungsarbeiten durch
Vertragswerkstätten durchführen.
VORSICHT!
❏
Führen Sie Einstellungen und Prüfungen entsprechend den
hier beschriebenen Anleitungen durch, um Gefährdungen
durch den Laserstrahl zu vermeiden.
Regulatory and Safety Information 29
J4148.boo.book Page 30 Tuesday, November 24, 1998 10:24 AM
WARNING!
❏
Lifting
Precautions
Mounting
Precautions
HP J4148A SureStore CD Expansion Tower weighs 19.4
kilograms (42.8 pounds). Two people are required to lift the
tower.
When you put the tower into a rack, follow these mounting
precautions:
❏
Use only the HP C2982A CD-ROM Tower Rackmount Kit for
mounting hardware.
❏
The rack or cabinet should be adequately secured to prevent
it from becoming unstable and/or falling over. The tower
should be mounted in a position toward the bottom of the
rack for stability.
❏
Ensure that the expansion tower does not overload the
power circuits, wiring, and over-current protection. To determine the possibility of overloading the supply circuits, add
together the amperage ratings from the labels of all equipment installed on the same circuits and compare the total
with the rating limits for the supply circuits.
❏
Make sure that the power source circuits are properly
grounded, then use the supplied power cable to connect the
server tower to the circuit. See the “Safety Considerations”
statements on page ii (the page following the title page in
this guide).
If your installation requires a different power cord than the
one supplied with the expansion tower, be sure to use a
power cable displaying the mark of the safety agency that
defines the regulations for power cables in your country. The
mark is your assurance that the power cable can be used
safely with the expansion tower.
❏
Do not install the expansion tower in an environment where
the operating ambient temperature might exceed 40°C
(104°F).
❏
Do not block airflow around the back of the unit.
30 Regulatory and Safety Information
J4148.boo.book Page 31 Tuesday, November 24, 1998 10:24 AM
Regulatory and Safety Information 31
J4148.boo.book Page 32 Tuesday, November 24, 1998 10:24 AM
32 Regulatory and Safety Information
J4148.boo.book Page 33 Tuesday, November 24, 1998 10:24 AM
Regulatory and Safety Information 33
J4148.boo.book Page 34 Tuesday, November 24, 1998 10:24 AM
34 Regulatory and Safety Information
J4148.boo.book Page 35 Tuesday, November 24, 1998 10:24 AM
Index
B
lifting procedures 30
bulletin boards 14
M
C
CD-ROM drive
eject button 5
Emergency Eject button 5
loading discs 5
operating 5
tray 5
CDs
cleaning 6
loading 6
maintenance 6
cleaning CDs 6
customer support 13
maintenance of CDs 6
O
ON/BUSY indicator 5
online support services 14
operation 5
P
power supply 23
power voltage 3
product description 1
R
D
regulatory information 25
replacing components 10
DISC indicator 5
drive indicator lights 5
S
E
Eject button 5, 6
Eject hole for emergencies 5
Emergency Eject button 5
safety information 25
specifications 21
support 13
T
troubleshooting 5
I
input voltage switch 3
installation 3
V
L
W
LEDs
DISC 5
ON/BUSY 5
voltage 3
warranty service 16
Index 35
J4148.boo.book Page 36 Tuesday, November 24, 1998 10:24 AM
Index 36
J4148.boo.book Page 37 Tuesday, November 24, 1998 10:24 AM
J4148.boo.book Page 38 Tuesday, November 24, 1998 10:24 AM
Copyright © 1998
Hewlett-Packard Company
Printed in U.S.A. 12/98
Manual Part Number
5967-9867
*5967-9867*