1
XV-N5SL(B).book Page i Thursday, May 9, 2002 11:11 AM
DVD PLAYER
XV-N5SL
TV
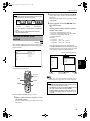
Getting started
6
Basic operations
12
Advanced operations
23
MP3 disc playback
40
JPEG disc playback
43
Changing the initial settings
48
Additional information
57
DVD
TV
DVD
TV1
TV2
TV3
1
2
3
TV4
TV5
4
5
TV7
TV8
TV6
6
TV9
7
8
9
TV-/--
TV0
MUTING
10
0
+10
RETURN
T
2
STANDBY/ON
OPEN/
CLOSE
OP
Introduction
SUBTITLE
TITLE/
GROUP
TV/VIDEO
CANCEL
NU CH
ME
+
ME
NU
VOL-
VOL+
ENTER
CH
OIC
E
CH
-
E
RE
SC
ON
NEXT
PREVIOUS
CLEAR
SELECT
N
STROBE
SLOW-
SLOW+
XV-N5
REPEAT SUB TITLE AUDIO
DIGEST
3D
PHONIC
ANGLE
DVD/SUPER VCD/VCD/CD PLAYER
VFP
ZOOM
AMP VOL
RM-SXV009E
REMOTE CONTROL
VIDEO
INSTRUCTIONS
LET0204-004A
[B]
XV-N5SL(B).book Page 1 Thursday, May 9, 2002 11:11 AM
Warnings, Cautions and Others
CAUTION
• Do not block the ventilation openings or holes.
(If the ventilation openings or holes are blocked by a newspaper
or cloth, etc., the heat may not be able to get out).
• Do not place any naked flame sources, such as lighted candles,
on the apparatus.
• When discarding batteries, environmental problems must be
consid-ered and local rules or laws governing the disposal of
these batteries must be followed strictly.
• Do not expose this apparatus to rain, moisture, dripping or
splashing and that no objects filled with liquids, such as vases,
shall be placed on the apparatus.
IMPORTANT for the U.K.
DO NOT cut off the mains plug from this equipment. If the plug
fitted is not suitable for the power points in your home or the
cable is too short to reach a power point, then obtain an
appropriate safety approved extension lead or consult your
dealer.
BE SURE to replace the fuse only with an identical approved
type, as originally fitted.
If nonetheless the mains plug is cut off ensure to remove the
fuse and dispose of the plug immediately, to avoid a possible
shock hazard by inadvertent connection to the mains supply.
If this product is not supplied fitted with a mains plug then
follow the instructions given below:
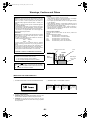
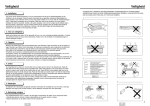
Caution: Proper Ventilation
To avoide risk of electric shock and fire and to protect from
damage.
Locate the apparatus as follows:
Front:
No obstructions and open spacing.
Sides:
No obstructions in 3 cm from the sides.
Top:
No obstructions in 5 cm from the top.
Back:
No obstructions in 15 cm from the back
Bottom:
No obstructions, place on the level surface.
IMPORTANT.
DO NOT make any connection to the terminal which is marked
with the letter E or by the safety earth symbol or coloured
green or green-and-yellow.
The wires in the mains lead on this product are coloured in
accordance with the following code:
Blue :
Neutral
Brown :
Live
As these colours may not correspond with the coloured
markings identifying the terminals in your plug proceed as
follows:
The wire which is coloured blue must be connected to the
terminal which is marked with the letter N or coloured black.
The wire which is coloured brown must be connected to the
terminal which is marked with the letter L or coloured red.
Spacing 15 cm or more
Front
IF IN DOUBT - CONSULT A COMPETENT ELECTRICIAN.
XV-N5SL
CAUTION
To reduce the risk of electrical shocks, fire, etc.:
1. Do not remove screws, covers or cabinet.
2. Do not expose this appliance to rain or moisture.
Wall or
obstructions
Stand height
5 cm or more
Caution ––
switch!
Disconnect the mains plug to shut the power off completely.
The
switch in any position does not disconnect the meins
line. The power can be remote controlled.
Floor
IMPORTANT FOR LASER PRODUCTS
REPRODUCTION OF LABELS
1 CLASSIFICATION LABEL, PLACED ON REAR ENCLOSURE
2 WARNING LABEL, PLACED INSIDE THE UNIT
CAUTION: Invisible laser
radiation when open and
interlock failed or defeated.
AVOID DIRECT EXPOSURE
TO BEAM.
(e)
1. CLASS 1 LASER PRODUCT
2. CAUTION: Visible and invisible laser radiation when open and
interlock failed or defeated. Avoid direct exposure to beam.
3. CAUTION: Do not open the top cover. There are no user
serviceable parts inside the Unit; leave all servicing to qualified
service personnel.
G-1
VARNING: Osynlig laserstrålning när denna del är
öppnad och spärren är
urkopplad. Betrakta ej
strålen.
(s)
ADVARSEL: Usynlig laserstråling ved åbning, når
sikkerhedsafbrydere er ude
af funktion. Undgå udsættelse for stråling
(d)
VARO: Avattaessa ja suojalukitus ohitettaessa olet
alttiina näkymättömälle
lasersäteilylle. Älä katso
säteeseen.
(f)
XV-N5SL(B).book Page 1 Thursday, May 9, 2002 11:11 AM
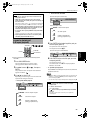
Table of Contents
Introduction
Repeat playback............................................................... 28
Page 2
Supplied accessories..........................................................2
Notes on handling ..............................................................3
Important cautions...................................................................3
Safety precautions ...................................................................3
About discs .........................................................................4
Playable disc types...................................................................4
Non-playable discs...................................................................4
Audio formats...........................................................................4
Disc structure............................................................................5
Video CDs and SVCDs with Playback Control function ........5
Care and handling of discs......................................................5
Getting started
Page 6
Connections ........................................................................6
Before making any connections .............................................6
To connect to a TV ...................................................................6
To connect to a stereo audio amplifier/receiver....................7
To connect to a digital audio device.......................................8
To connect the power cord .....................................................9
To repeat the current selection or all tracks
[Repeat playback] ...............................................................28
To repeat a desired part [A-B repeat playback] ...................29
Changing the language, sound and scene angle.......... 30
To select the subtitle language [SUBTITLE] ........................30
To change the audio language or sound [AUDIO] ..............31
To select a scene angle of DVD VIDEO [ANGLE].................32
Special picture playback and picture/sound effect ...... 33
To display continuous still pictures [STROBE] ....................33
To zoom in or out pictures [ZOOM] .....................................33
To adjust the picture character [VFP] ...................................34
To simulate surround sound [3D PHONIC] ..........................35
Menu bar functions ......................................................... 36
To bring up the menu bar .....................................................36
Basic operation procedure ....................................................36
Menu bar functions for DVD VIDEO .....................................37
Menu bar functions for Audio CD/Video CD/SVCD .............38
MP3 disc playback
Page 40
Using the remote control unit.........................................10
About MP3 discs .............................................................. 40
Operations........................................................................ 40
To install batteries in the remote control unit .....................10
Remote sensor .......................................................................10
To use the remote control unit for TV operation.................11
To control the volume of a JVC amplifier or receiver.........11
Basic operations.....................................................................40
Selecting the desired Group and Track................................41
Direct selection.......................................................................42
Repeat playback .....................................................................42
Basic operations
Page 12
Before operation...............................................................12
Turning on/off the unit...........................................................12
Initial setup before using the unit.........................................13
Basic playback ..................................................................14
Inserting and removing discs................................................14
To start playback ....................................................................15
To stop playback completely ................................................15
To stop playback temporarily ...............................................15
Resuming playback ..........................................................16
To memorize the interrupt position......................................16
To resume playback...............................................................17
Variable speed playback ..................................................18
To advance or reverse playback rapidly
while monitoring.................................................................18
To advance a still picture frame by frame ...........................18
To playback in slow motion ..................................................19
To locate the beginning of the scene or song ...............20
To locate a desired selection using 4 or ¢...................20
To locate a desired selection using
the numeric buttons ...........................................................20
Other convenient functions.............................................21
To check the playback status ................................................21
To move back the playback position during DVD VIDEO
playback [One touch replay function] ...............................22
To change the brightness of the display window ...............22
Advanced operations
Page 23
Playing from a specific position on a disc......................23
To locate a desired scene from the DVD menu ...................23
To locate a desired scene from the menu
of a Video CD/SVCD with PBC ...........................................23
To specify a desired title........................................................24
To locate a desired position in the current title or track
[Time search].......................................................................24
To locate a specific scene from the display [DIGEST] ........25
Changing the playback order ..........................................26
To playback in a specific order [Program play] ...................26
To playback in random order [Random play]......................27
JPEG disc playback
Page 43
About JPEG discs ............................................................ 43
Basic operations .............................................................. 44
To see a desired picture ........................................................44
To zoom in or out the picture [ZOOM] .................................45
To see pictures continuously[slide show mode] .......... 45
Playback features ...................................................................45
Selecting the start point of the slide show ..........................46
Repeat function ......................................................................47
Changing the initial settings
Page 48
Selecting preferences...................................................... 48
About the Preference display................................................48
How to set preferences..........................................................48
LANGUAGE menu .................................................................49
PICTURE menu.......................................................................50
AUDIO menu ..........................................................................51
OTHERS menu .......................................................................53
Limiting playback by children ........................................ 54
To set Parental Lock for the first time
[PARENTAL LOCK]..............................................................54
To change the settings [PARENTAL LOCK] .........................55
To temporarily release the Parental Lock
[PARENTAL LOCK]..............................................................56
Additional information
Page 57
Names of parts and controls .......................................... 57
Front panel .............................................................................57
Display window......................................................................57
Rear panel...............................................................................57
Remote control unit ...............................................................58
Troubleshooting .............................................................. 59
Frequently Asked Questions .......................................... 61
Specifications................................................................... 62
Appendix A: Country/Area code list for
Parental Lock................................................................. 63
Appendix B: Glossary ...................................................... 64
1
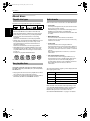
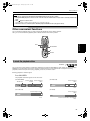
• Remote Control Unit (× 1)
/
M
E E
P S
O LO
C
T
S
V
D
D
5
--
5
V
/
V-
T
N
/O D
Y V
B D
D
N
V
T
TA
2
2
7
7
3
3
V
8
8
V
T
T
V
6
6
0
0
V
T
T
T
9
9
V
+
T
N
E
O
E
ID EL
/V NC
TV A
C
G
N
TI
U
M 10
/
LE UP
TITRO
G
E
L+
O
V
MENU
R
T
X
E
N
T
C
LE
E
S
W
LO
S
LE
TIT
E
B
O
TR
S
B
U
S
T
S
E
IG
D
+
W
LO
S
IO
D
AU
LE
G
N
A
FP
V
M
O
ZO
P
M
A
L
C
V
R
9EOL
00 R
V NT
X CO
-S E
M OT
R EM
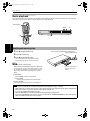
• R6P(SUM-3)/AA(15F) battery (× 2)
V
V
T
T
H
C+
H
C-
EN
V
T
4
4
LE
TIT
B
U
S
LO
V
S
E U
CHOIC EVIO
R
P
R
A
LE
C
ON
SCRE
AT
E
P
E
R
3D NIC
O
PH
2
V
LE
G
N
A
U
1
T
10
TOP MEN
V
1
T
Introduction
XV-N5SL(B).book Page 2 Thursday, May 9, 2002 11:11 AM
Introduction
Supplied accessories
• Audio/video cable (Yellow/White/Red) (× 1)
XV-N5SL(B).book Page 3 Thursday, May 9, 2002 11:11 AM
Introduction
Important cautions
Safety precautions
Installation of the unit
• Select a place which is level, dry and neither too hot
nor too cold (between 5oC and 35oC, 41oF and 95oF).
• Leave sufficient distance between the unit and the TV.
• Do not use the unit in a place subject to vibrations.
Avoid moisture, water and dust
Do not place the unit in moist or dusty places.
Power cord
• Do not handle the power cord with wet hands!
• A small amount of power (2 W) is always consumed
while the power cord is connected to the wall outlet.
• When unplugging the unit from the wall outlet, always
pull the plug, not the power cord.
To prevent malfunction of the unit
• There are no user-serviceable parts inside. If anything
goes wrong, unplug the power cord and consult your
dealer.
• Do not insert any metallic object into the unit.
• Do not use any non-standard shape disc available on
the market, because it may damage the unit.
• Do not use a disc with tape, seals, or paste on it,
because damage to the unit may result.
Note about copyright laws
• Please check the copyright laws in your country before
recording from DVD VIDEO, Audio CD, Video CD,
SVCD, MP3 and JPEG discs. Recording of copyrighted
material may infringe copyright laws.
Avoid high temperatures
Do not expose the unit to direct sunlight or place it near
a heating device.
When you are away
When you are away on travel or otherwise for an
extended period of time, remove the plug from the wall
outlet.
Do not insert foreign objects into the unit
Do not insert wires, hairpins, coins, etc. into the unit.
Do not block the vents
Blocking the vents may damage the unit.
Care of the cabinet
When cleaning the unit, use a soft cloth and follow the
relevant instructions on the use of chemically-coated
cloths. Do not use benzene, thinner or other organic
solvents and disinfectants. These may cause
deformation or discoloring.
If water gets inside the unit
Turn off the power switch and remove the plug from the
wall outlet, then call the store where you made your
purchase. Using the unit in this state may cause a fire or
electrical shock.
Note about the copyguard system
• DVD VIDEO discs are protected by the copyguard
system. When you connect the unit to your VCR (or
integrated TV/Video system), the copyguard system
activates and the picture may not play back correctly.
This product incorporates copyright protection technology that is protected by method claims of certain U.S. patents
and other intellectual property rights owned by Macrovision Corporation and other rights owners. Use of this
copyright protection technology must be authorized by Macrovision Corporation, and is intended for home and
other limited viewing uses only unless otherwise authorized by Macrovision Corporation. Reverse engineering or
disassembly is prohibited.
Manufactured under license from Dolby Laboratories. "Dolby" and the double-D symbol are trademarks of Dolby
Laboratories.
Confidential unpublished works.
Copyright 1992-1997 Dolby Laboratories. All rights reserved.
Manufactured under license from Digital Theater Systems, Inc. US Pat. No. 5,451,942 and other world-wide patents
issued and pending. "DTS," "DTS Digital Surround," are trademarks of Digital Theater Systems, Inc.
Copyright 1996 Digital Theater Systems, Inc. All Rights Reserved.
3
Introduction
Notes on handling
XV-N5SL(B).book Page 4 Thursday, May 9, 2002 11:11 AM
Introduction
About discs
Playable disc types
Audio formats
Playable and non-playable disc types are as follows:
Some audio formats used on discs are described below.
DVD VIDEO
SVCD
Video CD
Audio CD
Introduction
VIDEO
The DVD Logo is a trademark.
• CD-R and CD-RW discs recorded in the Audio CD,
Video CD, SVCD, MP3 or JPEG format can be played
back. However, some discs may not be played back
because of the disc characteristics or recording
conditions.
Note that unfinalized discs cannot be played back.
• DVD-R discs recorded with the DVD VIDEO format can
be played back. However, some discs may not be
played back because of the disc characteristics or
recording conditions.
Note that unfinalized disc cannot be played back.
• DVD VIDEO players and DVD VIDEO discs have their
own Region Code numbers. This unit can play back
only DVD VIDEO discs whose Region Code numbers
include "2."
Examples of playable DVD VIDEO discs:
ALL
2
25
1 2
3 4
123
456
This unit accommodates the PAL system.
Non-playable discs
DVD-ROM, DVD-RAM, DVD-RW, DVD+RW, DVD-AUDIO,
CD-ROM, PHOTO CD, CD-EXTRA, CD-G, CD-TEXT, SACD,
MIX-MODE CD
• Playing back discs listed as "Non-playable discs" above
may generate noise and damage speakers.
• This unit can play back audio signals recorded in CD-G,
CD-EXTRA, CD-TEXT and MIX-MODE CD discs.
• Linear PCM
Uncompressed digital audio, the same format used on
CDs and most studio masters.
DVD VIDEO supports 2 channels at sampling rates of
48/96 kHz and quantization of 16/20/24 bits.
Audio CD/Video CD is limited to 2 channels at 44.1 kHz
at 16 bits.
• MPEG Multichannel
A surround audio format which can handle the
augmentative 7.1-channel format (rare for home use),
as well as 5.1-channel.
• Dolby Digital
A surround audio format configured with six
channels. Because the "LFE (Low-Frequency Effect for
sub-woofer, etc)." channel, one of the six channels, is
an auxiliary channel, this format is called "5.1-channel
system."
Not all Dolby Digital discs contain six (5.1) channel
information.
• DTS (Digital Theater Systems)
A surround audio format configured with six (5.1)
channel which is same as Dolby Digital. Because the
compression ratio is lower than Dolby Digital, it
provides wider dynamic range and better separation.
Not all DTS discs contain six (5.1) channel
information.
The associated indicator lights up in the display window
when playing back a disc.
Indicator
Audio format
LPCM
Linear PCM
MPEG
MPEG Multichannel
DOLBY DIGITAL
Dolby Digital
DTS
DTS (Digital Theater Systems)
Note that with some formats and/or depending on the
unit’s "DIGITAL AUDIO OUTPUT" setting, digital audio
signals may not always transmitted from the unit’s
DIGITAL OUT jacks as are recorded on the disc.
See "DIGITAL AUDIO OUTPUT" on page 51 for details.
4
XV-N5SL(B).book Page 5 Thursday, May 9, 2002 11:11 AM
Introduction
Care and handling of discs
(For DVD VIDEO)
How to handle discs
A DVD VIDEO disc is comprised of "titles" and each title
may be divided into "chapters." For example, if a DVD
VIDEO disc contains some movies, each movie may have
its own title number, and each movie may be divided
into some chapters. In a DVD VIDEO KARAOKE disc, each
song usually has its own title number and does not have
chapters.
Title 1
Title 2
When handling a disc, do not touch the surface of the
disc. Since discs are made of plastic, they are easily
damaged. If a disc gets dirty, dusty, scratched or warped,
the images and sound will not be picked up correctly,
and such a disc may cause the player to malfunction.
Chapter 1 Chapter 2 Chapter 3
Introduction
Disc structure
Chapter 1 Chapter 2
(For Audio CD/Video CD/SVCD)
An Audio CD, Video CD or SVCD is simply comprised of
"tracks."
Track 1
Track 2
Track 3
Track 4
Label side
Do not damage the label side, stick paper to or use any
adhesive on its surface.
Storage
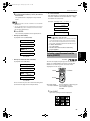
Video CDs and SVCDs with Playback
Control function
What is Playback Control (PBC) function?
The Playback Control function allows you to enjoy menudriven operation and high-resolution still images which
have a resolution four times greater than moving
pictures.
• High-resolution still image display
You can display high-quality images four times
clearer than moving pictures.
• Menu-driven playback
A selection menu is displayed when you start
playing a Video CD or SVCD disc with the Playback
Control feature. The selection menu shows a list of
numbers for selection. Some discs may show
moving pictures or a divided screen.
You can interact with the screen using the menu
display to select and play an entry.
See illustration below about basic feature of menudriven playback (See page 23 for more information
about PBC (Playback Control).)
Press
RETURN.
1
Moving
picture
1 2 3
4
2
1 2
4
Menu
screen
Maintenance of discs
If there are fingerprints or other dirt adhering to a disc,
wipe with a soft dry cloth, moving from the center
outwards.
If a disc is difficult to clean, wipe with a cloth moistened
with water. Never use record cleaners, petrol, alcohol or
any anti-static agents.
CAUTION
The image may be sometimes poor or noisy due to
defects in the disc itself.
Press
RETURN.
Moving
picture
Moving
picture
Still
picture
Still
picture
4
4
Press
RETURN.
Make sure that discs are kept in their cases. If discs are
piled on top of one another without their protective
cases, they can be damaged. Do not put discs in a
location where they may be exposed to direct sunlight,
or in a place where the humidity or temperature is high.
Avoid leaving discs in your car!
Still
picture
5
XV-N5SL(B).book Page 6 Thursday, May 9, 2002 11:11 AM
Getting started
Connections
*Before using the unit, you have to connect the unit to a TV and/or amplifier.
Before making any connections
• Do not connect the AC power cord until all other connections have been made.
• Connect VIDEO OUT of the unit directly to the video input of your TV. Connecting VIDEO OUT of the unit to a TV via a
VCR may cause a monitor problem when playing back a copy-protected disc. You may also have a monitor problem
when connecting the unit to an integrated TV/Video system.
TV
VCR
The unit
Getting started
Connect directly
NOTES
• In the following description, "TV" may be substituted with "monitor" or "projector."
• Terminal names used for other components may be different from those used in the following description.
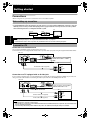
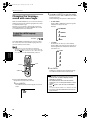
To connect to a TV
Connection to a conventional TV
You can enjoy playback by simply connecting the unit to a TV.
Connect the unit to a TV equipped with stereo audio input and video input jacks using the supplied audio/video cables.
The unit
AUDIO OUT
DIGITAL OUT
VIDEO OUT
AVOUT
PCM / STREAM
COAXIAL
LEFT
OPTICAL
RIGHT
AV COMPU LINK
VIDEO
S-VIDEO
COMP./RGB
In this connection, set the VIDEO
SIGNAL SELECTOR to "COMP./
RGB."
Y/C
VIDEO SIGNAL
SELECTOR
Yellow
Red
TV
VIDEO SIGNAL SELECTOR
White
IN
Yellow
Audio/Video cable (supplied)
VIDEO
LEFT
White
AUDIO
RIGHT
Red
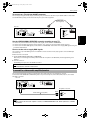
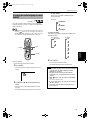
Connection to a TV equipped with an S-video jack
If your TV has an S-video input, you can get better picture quality by connecting it with the S-VIDEO output of the unit
using an S-video cable instead of connecting the video input of the TV to the VIDEO jack of the unit.
The unit
AUDIO OUT
DIGITAL OUT
VIDEO OUT
AVOUT
PCM / STREAM
LEFT
COAXIAL
OPTICAL
RIGHT
AV COMPU LINK
VIDEO
S-VIDEO
COMP./RGB
Y/C
VIDEO SIGNAL
SELECTOR
In this connection, set the VIDEO
SIGNAL SELECTOR to "Y/C."
TV
VIDEO SIGNAL SELECTOR
IN
Red
S-VIDEO
White
S-video cable (not supplied)
White
VIDEO
LEFT
AUDIO
RIGHT
Audio cable (not supplied)
Red
NOTES
• Connect the unit to a PAL TV or multi-scan TV.
• Even if cables are connected to both the VIDEO OUT terminals and S-VIDEO terminal, video signal will only be transmitted from
the port selected by the settings.
• You must change the switch position while the unit power is off. Otherwise, the changed setting is not effective.
6
XV-N5SL(B).book Page 7 Friday, May 10, 2002 7:43 PM
Getting started
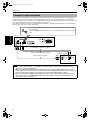
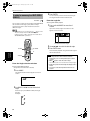
To connect to a TV with the SCART connector
You can enjoy using the unit by simply connecting it to your television set with a 21-pin SCART cable. To hear audio
sound with better quality, connect the audio output to your audio equipment.
SCART cable
(Not supplied)
TV
The unit
IN
AUDIO OUT
DIGITAL OUT
AV
VIDEO OUT
AVOUT
PCM / STREAM
COAXIAL
LEFT
OPTICAL
RIGHT
VIDEO
S-VIDEO
S-VIDEO
AV COMPU LINK
VIDEO
COMP./RGB
IN
Y/C
LEFT
VIDEO SIGNAL
SELECTOR
AUDIO
Set the VIDEO SIGNAL SELECTOR correctly according to your TV.
• If the TV only accommodates the composite video signal, set the switch to "COMP./RGB."
• If the TV accommodates Y/C signals, set the switch to "Y/C" so that you can enjoy better-quality pictures.
• If the TV accommodates RGB signals, set the switch to "COMP./RGB," and set the unit to supply RGB signals using the
procedure shown below.
How to set the unit to supply RGB signals
The unit cannot output the RGB signals from the SCART connector and the S-video (Y/C) signals from the S-VIDEO jack
simultaneously.
¶ When the unit is turned off
1 Set the VIDEO SIGNAL SELECTOR to "COMP./RGB."
2
Note that you must change the switch position while the unit power is off. Otherwise, the changed setting is not
effective.
Turn the unit to on.
The RGB signal outputs from the SCART connector.
NOTE
• Connect the unit to a PAL TV or multi-scan TV.
To connect to a stereo audio amplifier/receiver
You can enjoy high-quality audio by connecting the unit’s audio output to your amplifier or receiver.
Connect the unit’s AUDIO OUT (LEFT/RIGHT) jacks to any line-level inputs (such as AUX, DVD, CD, etc). of an audio
amplifier or receiver.
The unit
AUDIO OUT
DIGITAL OUT
VIDEO OUT
AVOUT
PCM / STREAM
LEFT
COAXIAL
OPTICAL
RIGHT
AV COMPU LINK
VIDEO
S-VIDEO
COMP./RGB
Y/C
VIDEO SIGNAL
SELECTOR
Amplifier or receiver
Red
White
Audio cable (not supplied)
White
IN
LEFT
AUDIO
RIGHT
Red
NOTE
• When using the unit with a stereo amplifier or receiver, set "ANALOG DOWN MIX" in the "AUDIO" preferences to "STEREO"
(see page 52).
7
Getting started
RIGHT
XV-N5SL(B).book Page 8 Thursday, May 9, 2002 11:11 AM
Getting started
To connect to a digital audio device
You can enhance the playback sound quality by connecting either of the unit’s DIGITAL OUT jacks to the digital input of
an amplifier, etc. by using an optical or a coaxal digital cable (optional). The digital audio signal from a disc will be
transferred directly. If you connect the unit to a Dolby Digital or DTS decoder or an amplifier with a built-in decoder using
an optional digital cable, you can enjoy high-quality surround sound.
For a digital connection, connect the unit’s DIGITAL OUT (OPTICAL or COAXIAL) to the digital input of a digital audio
device using an optical or a coaxial digital cable.
When using the DIGITAL OUT (OPTICAL) jack, remove the protection cap. Do not lose
the removed cap.
When the DIGITAL OUT (OPTICAL) jack is not used, replace the protection cap in the
jack.
Getting started
The unit
AUDIO OUT
DIGITAL OUT
VIDEO OUT
AVOUT
PCM / STREAM
COAXIAL
LEFT
RIGHT
OPTICAL
AV COMPU LINK
VIDEO
S-VIDEO
COMP./RGB
Y/C
VIDEO SIGNAL
SELECTOR
Coaxial digital cable (not supplied)
White
Red
Optical digital cable (not supplied)
Digital equipment
Audio cable (not supplied)
White
IN
IN
LEFT
OPTICAL
AUDIO
RIGHT
DIGITAL
COAXIAL
Red
NOTES
• When you make digital connection, we recommend also to make the analog connection, because, depending on discs, no
signal may be output from the DIGITAL OUT.
• When you connect the unit’s DIGITAL OUT to a digital audio device, before using, set "DIGITAL AUDIO OUTPUT" in the
"AUDIO" preferences correctly according to the connected audio device. If "DIGITAL AUDIO OUTPUT" is not set correctly, loud
noise may be generated from speakers, causing damage to them. See "DIGITAL AUDIO OUTPUT" on page 51.
• When you connect the unit’s DIGITAL OUT to a Dolby Digital or DTS decoder (or amplifier with a built-in decoder) to enjoy
surround sound, the unit’s "D. RANGE COMPRESSION" setting in the "AUDIO" preferences is invalid. Make appropriate
surround audio settings on the decoder.
8
XV-N5SL(B).book Page 9 Thursday, May 9, 2002 11:11 AM
Getting started
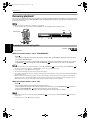
To connect the power cord
When all the audio/video connections have been made, insert the other end to the wall outlet. Make sure that plugs are
inserted firmly. The STANDBY indicator lights in red.
Warning
•
•
•
•
•
Disconnect the power cord if you are not going to use the unit for a long time.
Disconnect the power cord before cleaning the unit.
Disconnect the power cord before moving the unit.
Do not connect or disconnect the power cord with wet hands.
Do not pull the power cord when disconnecting it, as this may damage the cord and cause fire, electric shock, or other
accidents.
Caution
Getting started
• Do not alter, twist or pull the power cord, or put anything heavy on it, which may cause fire, electric shock, or other
accidents.
• If the cord is damaged, consult a dealer and have replacing to the new power cord.
9
XV-N5SL(B).book Page 10 Thursday, May 9, 2002 11:11 AM
Getting started
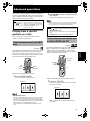
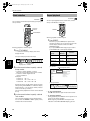
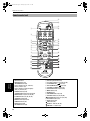
Using the remote control unit
Using the remote control, you can operate not only all the functions of the unit but also basic functions of your TV and
amplifier/receiver.
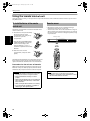
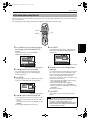
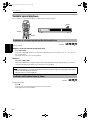
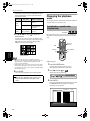
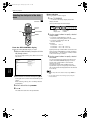
To install batteries in the remote
control unit
The battery compartment is located on the back of the
remote control unit.
the arrow at the top of the
compartment cover, and pull up
the cover to open the
compartment.
• Operate the remote control unit while pointing it
toward the remote sensor on the unit.
• The remote control unit can be used within a range of
about 5 meters from the remote sensor. If you operate
the remote control unit from a diagonal position, range
may be shorter.
Remote sensor
XV-N5
DVD/SUPER VCD/VCD/CD PLAYER
2 Place the two supplied R6P (SUM3)/AA(15F) batteries in the remote
control unit according to the
polarity markings ("+" and "–")
inside the compartment and on the
batteries.
3 Place the cover over the
TV
DVD
STANDBY/ON
OPEN/
CLOSE
compartment, and press down
lightly.
TV
TV1
DVD
TV2
TV3
1
2
3
TV4
TV5
TV6
4
5
6
TV7
TV8
TV9
7
8
9
TV-/--
TV0
MUTING
10
0
+10
RETURN
T
Getting started
1 Press down on the point shown by
Remote sensor
OP
SUBTITLE
TITLE/
GROUP
TV/VIDEO
CANCEL
NU CH
ME
+
ME
NU
VOL-
VOL+
ENTER
The batteries will last about six months with normal use.
If the functions of the remote control become erratic,
replace the batteries. See below for more information.
CH
OIC
E
CH
-
E
RE
SC
ON
NEXT
PREVIOUS
CLEAR
SELECT
SLOW-
SLOW+
REPEAT SUB TITLE AUDIO
DIGEST
3D
PHONIC
Observe the following precautions for the safe use of
batteries. If they are used improperly their life will be
shortened, they may burst or their contents may leak.
• Remove the batteries from the remote control if it is
not going to be used for a long period of time.
• Remove dead batteries and dispose of them
properly.
• Never leave dead batteries lying around, take them
apart, mix them with other refuse, or throw them
into an incinerator.
• Never touch liquid that has leaked out of a battery.
• Do not mix new and old batteries, or batteries of
different types, when replacing them.
10
VFP
PROGRESSSIVE
SCAN
Precautions for the safe use of batteries
Precaution
N
STROBE
ANGLE
ZOOM
AMP VOL
RM-SXV009E
REMOTE CONTROL
NOTE
• If the remote sensor on the unit is exposed to the
sunshine or strong light, you may not be able to control
the unit from the remote control unit.
XV-N5SL(B).book Page 11 Thursday, May 9, 2002 11:11 AM
Getting started
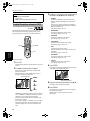
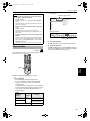
To use the remote control unit for TV
operation
You can operate your TV from the remote control unit.
Setting the remote control signal for
operating your TV
TV
TV
TV1
TV2
2
3
TV5
TV6
4
5
6
TV7
TV8
TV9
7
8
9
TV-/--
TV0
MUTING
10
0
SUBTITLE
TV/VIDEO
CANCEL
ME
NU
VOL+
ENTER
CH
OIC
E
DVD
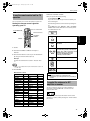
TV/VIDEO CANCEL
Turns the TV on or off.
TV
ON
NEXT
PREVIOUS
SELECT
STROBE
SLOW+
SLOW-
REPEAT SUB TITLE AUDIO
DIGEST
TV
EN
RE
SC
CH
-
CLEAR
Numeric buttons
+10
TITLE/
GROUP
NU CH
ME
+
VOL-
ENTER
The following buttons can be used for operating the
TV.
To use 5/∞ (CH+, CH–), 2/3(VOL–, VOL+), TV/VIDEO CANCEL and numeric buttons for TV control, set the
TV - DVD switch to "TV."
TV3
1
OP
TV - DVD switch
TV STANDBY/ON
.
If your TV turns on or off, you have successfully set
the control signal.
DVD
TV4
RETURN
T
DVD
STANDBY/ON
OPEN/
CLOSE
6 Try to operate the TV by pressing
ANGLE
3D
PHONIC
TV/VIDEO
CANCEL
VFP
ZOOM
Switches the TV input mode between TV
and VIDEO.
AMP VOL
1 Set the TV - DVD switch to "TV."
2 Hold down TV/VIDEO - CANCEL until step 4 is
TV1
1
finished.
~
TV-/--
10
TV0
0
3 Enter the manufacturer code of your TV listed below
Selects the TV channels directly.
* For some TVs, pressing "+10" functions
as the "100+," while "10" functions as the
ENTER button if your TV requires
pressing the ENTER button after
selecting a channel number.
by using the numeric buttons (0 to 9).
Mutes the TV sound.
MUTING
Example:
To enter the manufacturer code "01": Press "0" then
"1."
• When you purchased the unit, the manufacturer code is set
to "JVC" (01).
+10
Changes the TV channels.
CH
+
CH
-
VOL-
4 Press ENTER.
VOL+
Adjusts the TV volume.
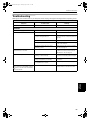
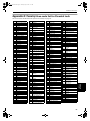
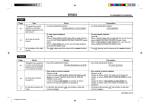
Manufacturer code list
Manufacturer
AIWA
No.
36
Manufacturer
MIVAR
No.
29
BEIJING
22
NEC
20
CCE
02
NOBLEX
22
CHANGHONG
34
NOKIA
31
DAEWOO
17, 37
PANASONIC
04, 11
34, 38, 39
FERGUSON
27
PEONY
FINLUX
30
PHILCO
10, 17, 21
FUNAI
32
PHILIPS
02
GRADIENTE
15, 20
RCA
05
GRUNDIG
19
SAMSUNG
HITACHI
10
12, 33, 34,
35
ITT
28
SANYO
13, 16
JINXING
38
SEARS
13
JVC
01, 23,
24, 25
SHARP
06
SONY
07
KONKA
40
TCL
41
LG (GOLDSTAR)
18
THOMSON
26
MAGNAVOX
02
TOSHIBA
08,14
MITSUBISHI
03
ZENITH
09
NOTE
• If there is more than one code listed for the
manufacturer of your TV, try them one by one until you
succeed.
To control the volume of a JVC
amplifier or receiver
You can control the volume of a JVC’s amplifier or
receiver by using the AMP VOL +/– buttons on the
remote control unit.
AMP VOL
Pressing the + button raises the audio volume of the
amplifier or receiver, while pressing the – button lowers
the volume.
11
Getting started
TV STANDBY/ON
5 Release TV/VIDEO - CANCEL.
XV-N5SL(B).book Page 12 Thursday, May 9, 2002 11:11 AM
Basic operations
In the following description, we assume that the buttons on the remote control unit are mainly used; however, you may
use the corresponding buttons on the front panel if available.
NOTE
TV
Make sure that the TV - DVD switch on the remote control unit is set to "DVD" when using the 5/∞/2/3 and
numeric buttons for controlling the unit.
DVD
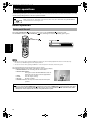
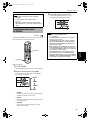
Before operation
Turning on/off the unit
Press DVD STANDBY/ON
on the remote control unit or press STANDBY/ON
on the front panel.
The STANDBY indicator on the STANDBY/ON
button, which lights in red during standby, light in green.
TV
DVD
STANDBY/ON
OPEN/
CLOSE
TV
TV1
DVD
TV2
2
3
TV5
TV6
4
5
TV7
TV8
DVD
STANDBY/ON
TV3
1
TV4
6
TV9
7
8
9
TV-/--
TV0
MUTING
10
0
+10
RETURN
SUBTITLE
TITLE/
GROUP
STANDBY/ON
TV/VIDEO
CANCEL
T
Basic operations
XV-N5
OP
NU CH
ME
+
DVD/SUPER VCD/VCD/CD PLAYER
ME
NU
VOL-
VOL+
ENTER
CH
OIC
E
CH
-
E
RE
SC
ON
NEXT
PREVIOUS
CLEAR
SELECT
STROBE
SLOW+
SLOW-
REPEAT SUB TITLE AUDIO
DIGEST
3D
PHONIC
N
ANGLE
VFP
ZOOM
AMP VOL
RM-SXV009E
REMOTE CONTROL
• You can turn on the unit by pressing the 3 button. In this case, the unit starts playback if the disc is set in the disc tray.
If no disc is set, "NO DISC" appears on the display window.
• You can turn on the unit by pressing the 0 button on the front panel. In this case, the disc tray opens.
The opening display shown at right appears on the TV screen.
The following messages may appear at the bottom of the opening display.
• NOW READING:The unit is reading the disc information.
• REGION CODE ERROR!:
The region code of the DVD VIDEO disc does not
match the unit. The disc cannot be played back.
• OPEN:
The disc tray is opening.
• CLOSE:
The disc tray is closing.
• NO DISC:
No disc is loaded.
• RESUME STOP: The unit stops and memorizes the interrupted
position.
NOW READING
Message area
NOTE
• Even if you press the DVD STANDBY/ON
on the remote control unit or STANDBY/ON
on the front panel to turn off the
unit, the unit is not disconnected from the AC power source as long as it is connected to the wall outlet. This state is called
standby mode. In this state, the unit consumes a very small amount of power.
12
XV-N5SL(B).book Page 13 Thursday, May 9, 2002 11:11 AM
Basic operations
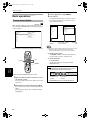
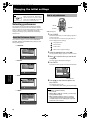
Initial setup before using the unit
We recommend you to set the display language, TV monitor type and digital output before using the unit, by following
the procedure below.
See "Changing the initial settings" beginning on page 48 for details about each setting item.
TV
TV
TV1
TV2
TV3
1
2
3
TV5
TV6
4
5
6
TV7
TV8
TV9
7
8
9
TV-/--
TV0
MUTING
0
RETURN
T
DVD
TV4
10
ENTER
DVD
STANDBY/ON
OPEN/
CLOSE
OP
SUBTITLE
+10
TITLE/
GROUP
TV/VIDEO
CANCEL
NU CH
ME
+
ME
NU
VOL-
VOL+
ENTER
CHOICE
CH
OIC
E
CH
-
E
RE
SC
ON
NEXT
PREVIOUS
CLEAR
SELECT
STROBE
SLOW+
SLOW-
REPEAT SUB TITLE AUDIO
DIGEST
3D
PHONIC
5/∞
N
ANGLE
VFP
ZOOM
AMP VOL
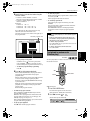
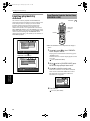
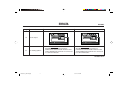
1 Press CHOICE for a few seconds to bring up
the first page of the DVD PLAYER SET UP
display.
The pull-down menu of the "ON SCREEN
LANGUAGE" is already open.
5 Press ENTER.
The third (final) page is shown, in which the pulldown menu of the "DIGITAL AUDIO OUTPUT" is
already open.
DVD PLAYER SET UP
DIGITAL AUDIO OUTPUT
DOLBY DIGITAL/PCM
PCM ONLY
DVD PLAYER SET UP
MENU LANGUAGE
ENGLISH
AUDIO LANGUAGE
ENGLISH
SUBTITLE
ENGLISH
ON SCREEN LANGUAGE
ENGLISH
ANALOG DOWN MIX
DOLBY PROLOGIC
DOLBY
DIGITAL/PCM
D RANGE COMPRESSION
STREAM/PCM
ON
ENGLISH
FRENCH
SELECT
GERMAN
SELECT
ENTER
ENTER
USE 5∞23 TO SELECT, USE ENTER TO CONFIRM
TO EXET, PRESS CHOICE.
ON SCREEN LANGUAGE options
2 Use 5/∞ to select a desired language.
You can select the on-screen language for the
preference displays, etc. from among English,
French and German.
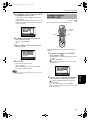
3 Press ENTER.
The second page is shown, in which the pull-down
menu of the "MONITOR TYPE" is already open.
PICTURE
MONITOR TYPE
4:3 L.B.
16:9 NORMAL
STILL MODE
AUTO AUTO
16:9
SCREEN SAVER
4:3
ON LB.
MP3/JPEG
SELECT
ENTER
4:3 PS.
MP3
USE 5∞23 TO SELECT, USE ENTER TO CONFIRM
TO EXET, PRESS CHOICE.
MONITOR TYPE options
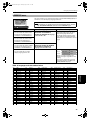
4 Use 5/∞ to select a desired monitor type.
You can select the monitor type according to your TV.
• For a normal (conventional) TV, select "4:3 LB" or
"4:3 PS."
• For a wide-screen TV, select "16:9 AUTO" or "16:9
NORMAL."
See page 50 for details about each mode.
USE 5∞23 TO SELECT, USE ENTER TO CONFIRM
TO EXET, PRESS CHOICE.
DIGITAL AUDIO OUTPUT options
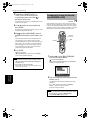
6 Use 5/∞ to select a desired digital output
signal type.
You must set this item correctly when you connect
the unit to an external surround decoder or D/A
convertor (including an amplifier/receiver with
built-in surround decoder or D/A convertor).
(If you do not connect the unit to such a device, you
do not have to set this item.)
• When connecting with a Dolby Digital decoder,
select "DOLBY DIGITAL/PCM."
• When connecting with a DTS or MPEG
Multichannel decoder, select "STREAM/PCM."
• When connecting with other digital device, select
"PCM ONLY."
See page 51 for details.
7 Press ENTER.
The TV screen returns to showing the opening
display.
NOTES
• This setting may not be necessary except when first
turning on the power after purchasing the unit.
• You can also set these items, as well as other
preferences, by pressing CHOICE briefly to bring up the
preference display. See "Changing the initial settings"
on and after page 48 for details.
13
Basic operations
RM-SXV009E
REMOTE CONTROL
XV-N5SL(B).book Page 14 Thursday, May 9, 2002 11:11 AM
Basic operations
Basic playback
This section describes basic operations for playback of DVD VIDEO, Audio CD, Video CD and SVCD discs. For MP3 and
JPEG disc playback, see the separate chapter beginning on pages 40 and 43.
TV
OPEN/CLOSE
TV
TV1
DVD
TV2
TV3
1
2
3
TV4
TV5
TV6
4
5
6
TV7
TV8
TV9
7
8
9
TV-/--
TV0
MUTING
10
0
RETURN
T
DVD
STANDBY/ON
OPEN/
CLOSE
OP
SUBTITLE
7 38
+10
TITLE/
GROUP
0
TV/VIDEO
CANCEL
NU CH
ME
+
ME
NU
VOL-
XV-N5
DVD/SUPER VCD/VCD/CD PLAYER
VOL+
ENTER
CH
OIC
E
CH
-
E
RE
SC
ON
NEXT
PREVIOUS
7
CLEAR
SELECT
STROBE
SLOW+
SLOW-
REPEAT SUB TITLE AUDIO
DIGEST
3D
PHONIC
N
ANGLE
3
8
Disc tray
VFP
ZOOM
AMP VOL
RM-SXV009E
Basic operations
REMOTE CONTROL
Inserting and removing discs
1 Press 0 to open the disc tray.
2 Place a disc in the tray.
3 Press 0 to close the disc tray.
The unit starts playback of the selected item.
With the label side up
The unit reads the disc information and the
opening display appears on the TV screen.
If a menu is shown on the TV screen
When inserting a DVD VIDEO, Video CD or SVCD disc,
a menu display may be automatically shown on the
TV screen. From the menu, you can select a desired
item to be played back by following the procedure
below.
• To insert an 8-cm disc,
place it in the inner
recess.
(for DVD VIDEO)
1 Use 5/∞/2/3 to select a desired item.
2 Press ENTER.
The unit starts playback of the selected item.
(for Video CD/SVCD)
Use the numeric buttons to select a desired item.
NOTES
• Do not load a non-playable disc. For details about playable and non-playable disc types, see page 4.
• When loading a disc on the disc tray, be sure to position the disc inside the recess. Otherwise, the disc may be damaged when
the disc tray is closed, or you may not be able to remove the disc from the unit.
• Do not use any stabilizer when playing back a disc.
• With some DVD VIDEO discs, the unit starts playback automatically after inserting the disc.
• If you insert a DVD VIDEO disc whose region code does not match the unit, "REGION CODE ERROR!" is shown in the opening
display. For details about the region code, see page 4.
14
XV-N5SL(B).book Page 15 Thursday, May 9, 2002 11:11 AM
Basic operations
To start playback
Available :
Press 3.
The unit starts playback from the beginning.
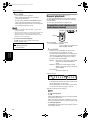
About screen saver function
• A television monitor may have an image burned into it if a
static image is displayed for a long time. To prevent this,
the unit automatically activates the screen saver function if
a static picture, such as an on-screen display or menu, is
displayed for over 5 minutes.
While the screen saver
function is not activated
While the screen saver
function is activated
• Pressing any buttons on the unit or the remote control unit
will release the screen saver function and return to the
previous display.
• You can also turn off the screen saver function (see page 51).
About On-screen guide icons
Basic operations
• When you make an operation, you may see the following icons displayed over the picture for about 3 seconds. These have the
following meanings.
You can set the unit not to display these icons above via the preference settings described on page 53.
Icon
Status
Appears at the beginning of playback mode.
Appears at the beginning of pause mode.
Appears at the beginning of fast forward/backward playback with the current speed. (see page 18).
Appears at the beginning of slow-motion playback with the current speed. (see page 19).
Appears at the beginning of Repeat playback mode. (see page 28).
Appears at the beginning of a scene recorded from multiple angles. (see page 32).
Appears at the beginning of a scene recorded with multiple audio languages. (see page 31).
Appears at the beginning of a scene recorded with multiple subtitle languages. (see page 30).
Appears when the unit does not accept your operation because of disc contents, structure, playback status etc.
Note that some operations may not be performed even if
is not displayed.
NOTES
• When the RESUME function is "ON" or "DISC RESUME" and a resume point is set, pressing 3 starts playback from that point
instead of the beginning. See page 17.
• During playback, the display window shows the title/chapter or track number being played.
• During DVD VIDEO playback, pressing 3 moves the playback position back 10 seconds before the current position. See page 22
for details.
To stop playback completely
Available :
Press 7.
The unit stops playback.
• If you press 0 during playback, the unit stops playback and opens the disc tray.
To stop playback temporarily
Available :
Press 8.
The unit pauses playback. To resume playback, press 3.
15
XV-N5SL(B).book Page 16 Thursday, May 9, 2002 11:11 AM
Basic operations
Resuming playback
The unit can remember the position on a disc where you interrupt playback, and resume playback from that position later.
You can set two resume modes (DISC RESUME and ON) using the preference display. See page 53 for details about how
to set the resume mode.
• The resume mode is initially set to "ON" when you purchased.
• You can deactivate the resume mode by setting "RESUME" on the "OTHERS" preference display to "OFF."
TV
OPEN/CLOSE
TV
TV1
TV2
TV3
1
2
3
TV5
TV6
4
5
TV7
TV8
73
DVD
TV4
XV-N5
8
9
TV0
MUTING
10
0
OP
SUBTITLE
TV/VIDEO
CANCEL
ME
NU
VOL-
VOL+
ENTER
CH
-
E
RE
SC
ON
NEXT
PREVIOUS
7
CLEAR
SLOW-
DVD/SUPER VCD/VCD/CD PLAYER
+10
TITLE/
GROUP
NU CH
ME
+
CH
OIC
E
0
6
TV9
7
TV-/--
RETURN
T
DVD
STANDBY/ON
OPEN/
CLOSE
SELECT
STROBE
Disc tray
N
3
SLOW+
Basic operations
.
To memorize the interrupt position
Available :
¶ During playback
When the resume mode is set to "DISC RESUME"
Press 7 .
The unit stops playback and memorizes the interrupt position. After pressing 7, the display window on the front
panel shows "RESUME STOP."
In this condition, the memory of the interrupt position is not cleared if you press 0 to open the disc tray, or press
STANDBY/ON
(on the front panel) or DVD STANDBY/ON
(on the remote control unit) to turn off the unit.
• The interrupt position is also remembered when you press 0 , STANDBY/ON
(on the front panel) or DVD STANDBY/ON
the remote control unit). In this case, "RESUME STOP" is not shown on the display window.
(on
• To clear the memory, press 7 while the disc stopped.
• The unit remembers interrupt positions for the last 30 discs played.
• If you interrupt the playback of a disc for which an interrupt position has already been stored, the memory will be updated with the
new interrupt position.
• After the unit has stored interrupt positions for 30 discs, remembering a new interrupt position will cause the unit to delete the
oldest stored position. Interrupting playback of a disc for which an interrupt position is already stored may change the order in
which the positions are stored. This may potentially change the order in which positions are deleted.
When the resume mode is set to "ON"
Press 7 .
The unit stops playback and memorizes the interrupt position.
In this condition, the memory of the interrupt position is not cleared if you press STANDBY/ON
panel) or DVD STANDBY/ON
(on the remote control unit) to turn off the unit.
Note that if you press 0 to open the disc tray, the memory of the interrupt position is cleared.
• The interrupt position is also stored by pressing STANDBY/ON
control unit).
• To clear the memory, press 7 while the disc stopped.
16
(on the front panel) or DVD STANDBY/ON
(on the front
(on the remote
XV-N5SL(B).book Page 17 Thursday, May 9, 2002 11:11 AM
Basic operations
To resume playback
Available :
When the resume mode is set to "DISC RESUME"
¶ While stopped, or no disc is inserted
1 Press 0 to insert a disc for which the unit has stored an interrupt position.
After loading the disc, the display window on the front panel shows "RESUME STOP."
(If a disc for which you want to resume playback is already set in the disc tray, go to step 2).
2 Press 3.
Basic operations
The display window shows "RESUME PLAY" and the unit resumes playback from the position where playback was
interrupted.
The unit maintains the memory of the interrupt position for the disc, even if you remove the disc from the disc tray
and replace it again. The unit also maintains the memory of the interrupt position while the disc is in the disc tray.
• To play back a disc from the beginning (instead of the interrupted position)
After loading the disc, press 7 before pressing 3 to start playback.
Pressing 7 while the disc is stopped clears the memory of the interrupted position.
Every time you interrupt playback, the position is remembered as the new "resume" point.
When the resume mode is set to "ON"
¶ While the disc you interrupted playback last time* is still on the disc tray (*by pressing 7 or by turning off the power).
Press 3.
The unit resumes playback from the position where playback was interrupted.
If you press 3 then 7, the unit starts playback after the display window shows "RESUME PLAY."
Note that you cannot resume playback if you interrupted playback last time by opening the disc tray.
• To play back a disc from the beginning (instead of the interrupted position)
Do any of the following:
* Press 7 while stopped, then press 3.
* Turn on the unit by pressing DVD STANDBY/ON
on the remote control unit or STANDBY/ON
panel then press 3.
on the front
NOTES
• If you use the "OTHERS" preference display to change the "RESUME" setting from "DISC RESUME" to "OFF" or "ON," you
cannot resume playback of a disc whose "resuming" position is stored. However, if you again set "RESUME" to "DISC
RESUME," you will then be able to resume playback of the disc.
• If you open the disc tray while RESUME mode is set to ON, the "resume" point will be cleared.
• The resume function does not work with Audio CD, MP3 and JPEG discs.
• In the case of a Video CD/SVCD disc with PBC function, the unit may resume playback from a point slightly earlier or later than
the point where playback was interrupted.
• The unit may not resume playback exactly from the interrupt point.
• For a double-sided DVD VIDEO disc, the unit regards each side as a different disc. Therefore, to resume playback of such a disc,
the disc must be loaded with the same side down.
• When the unit remembers an interrupt point for a disc, it also remembers Audio, Subtitle and Angle settings (regardless of
whether "RESUME" is set to "DISC RESUME" or "ON").
• If you interrupt playback while the menu for a DVD VIDEO, SVCD or Video CD is shown on the TV screen, the unit may not
correctly remember the interrupt position, regardless of whether the "RESUME" mode is set to "ON" or "DISC RESUME."
17
XV-N5SL(B).book Page 18 Thursday, May 9, 2002 11:11 AM
Basic operations
Variable speed playback
You can speed up or slow down playback, or advance the video frame by frame.
TV
TV
TV1
DVD
TV2
TV3
1
2
3
TV4
TV5
TV6
4
5
6
TV7
TV8
TV9
7
8
9
TV-/--
TV0
MUTING
10
RETURN
T
DVD
STANDBY/ON
OPEN/
CLOSE
OP
0
SUBTITLE
4¢
8
+10
TITLE/
GROUP
NU CH
ME
+
TV/VIDEO
CANCEL
ME
NU
VOL-
XV-N5
DVD/SUPER VCD/VCD/CD PLAYER
VOL+
ENTER
4/¢
CH
OIC
E
CH
-
E
RE
SC
ON
NEXT
PREVIOUS
CLEAR
SELECT
STROBE
SLOW+
SLOW-
REPEAT SUB TITLE AUDIO
DIGEST
N
ANGLE
3D
PHONIC
VFP
ZOOM
8
1/¡
AMP VOL
Basic operations
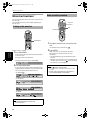
To advance or reverse playback rapidly while monitoring
Available :
¶ During playback
Method 1 (from the remote control unit only)
Press 1 or ¡.
Each press of 1 or ¡ decreases or increases the playback speed. You can select from 2 × , 5 × , 10 × , 20 × and
60 × normal speed.
Pressing 3 returns the unit to normal playback.
Method 2
Hold down 4 or ¢.
Holding down ¢ advances playback rapidly, while holding down 4 reverses playback rapidly, at 5 times the
normal speed. Releasing the button returns the unit to normal playback.
NOTES
• During rapid playback, the sound will be muted except when playing an Audio CD. When using rapid playback with an Audio
CD, the sound will be played discontinuously.
• This function does not work for an MP3 disc.
To advance a still picture frame by frame
Available :
¶ While paused (still)
Press 8.
Each time you press 8, the still picture advances to the next frame.
Pressing 3 returns to normal playback.
18
XV-N5SL(B).book Page 19 Thursday, May 9, 2002 11:11 AM
Basic operations
To playback in slow motion
Available :
You can playback video in slow-motion. You can select from 1/32 × , 1/16 × , 1/8 × , 1/4 × and 1/2 × normal speed.
¶ During playback
Press 8, then use 1/¡.
To play forward slow motion, press ¡, and to play reverse slow motion (for DVD VIDEO discs only), press 1 .
First, the unit plays the slowest speed, and each time you press the button, the playback speed increases.
Pressing 3 returns to normal playback. Pressing 8 pauses slow motion playback.
NOTES
• The sound is muted during slow motion playback.
Basic operations
• Reverse slow motion playback is not possible for a Video CD and SVCD.
19
XV-N5SL(B).book Page 20 Thursday, May 9, 2002 11:11 AM
Basic operations
To locate the beginning of the scene or song
You can locate the desired title or chapter (for DVD VIDEO), or track (for Audio CD/Video CD/SVCD) from which the unit
starts playback.
TV
CLOSE
Numeric
buttons
TV2
1
2
3
TV4
TV3
TV5
TV6
4
5
6
TV7
TV8
TV9
7
8
9
TV-/--
TV0
MUTING
10
RETURN
T
DVD
TV1
OP
0
SUBTITLE
4 ¢
+10
TITLE/
GROUP
NU CH
ME
+
TV/VIDEO
CANCEL
ME
NU
VOL-
XV-N5
DVD/SUPER VCD/VCD/CD PLAYER
VOL+
ENTER
CH
OIC
E
CH
-
E
RE
SC
ON
NEXT
PREVIOUS
CLEAR
SELECT
N
4/¢
STROBE
SLOW+
SLOW-
To locate a desired selection using 4 or ¢
Basic operations
Available :
¶ For DVD VIDEO:
For Audio CD:
For Video CD/SVCD:
During playback
During playback or while stopped
During playback without PBC function
Press 4 or ¢.
With an Audio CD, Video CD or SVCD, pressing the button skips a track. With a DVD VIDEO disc, pressing the button
skips a chapter or title depending on the disc configuration.
The selection number appears in the display window on the front panel.
• To skip forward titles/chapters/tracks, press ¢ as many times as required.
• To skip to the beginning of the current track/title/chapter, press 4 once.
• To skip back titles/chapters/tracks, press 4 as many times as required.
NOTES
• This function may not work with some DVD VIDEO discs.
• This function does not work during Video CD/SVCD playback with PBC function (see pages 5 and 23).
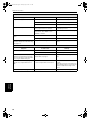
To locate a desired selection using the numeric buttons
Available :
.
¶ For DVD VIDEO/Audio CD: During playback or while stopped
For Video CD/SVCD:
During playback without PBC function or while stopped
Use the numeric buttons to specify the number.
Depending on the disc type and the unit status, what is specified differs.
Unit status
Disc type
What is specified
DVD VIDEO
title or chapter*
Audio CD/ Video CD/SVCD
track
DVD VIDEO
chapter
Audio CD/ Video CD/SVCD
track
While stopped
During playback
* If a disc contains more than one title, a title is specified. If a disc contains only one title, a chapter is specified.
• To select a number between 1 and 10: Press the corresponding button for the number.
• To select a number higher than 10:
Use the +10 button.
Examples:
To select 13:
+10 → 3
To select 34:
+10 → +10 → +10 → 4
To select 40:
+10 → +10 → +10 → 10
The unit starts playback from the beginning of the selection. The selected title, chapter or track number appears in
the display window on the front panel.
20
XV-N5SL(B).book Page 21 Thursday, May 9, 2002 11:11 AM
Basic operations
NOTES
• You can also specify the desired title during DVD VIDEO playback. See page 24 for details.
• During DVD VIDEO playback, if a menu is shown on the TV screen, the numeric buttons may be used for selecting an item in the
menu.
• When
appears on the TV screen:
The title, chapter or track you have selected is not contained in the disc.
• This function does not work during Video CD/SVCD playback with PBC function (see pages 5 and 23).
Other convenient functions
You can check the playback status, as well as change the brightness of the display window.
Also, you can move back the playback position 10 seconds from the current position.
TV
TV
TV2
TV3
1
2
3
TV4
TV5
TV6
4
5
6
TV7
TV8
TV9
7
8
9
TV-/--
TV0
MUTING
10
0
RETURN
T
DVD
OP
SUBTITLE
+10
TITLE/
GROUP
TV/VIDEO
CANCEL
NU CH
ME
+
ME
NU
VOL-
Basic operations
TV1
5/∞
DVD
STANDBY/ON
OPEN/
CLOSE
VOL+
ENTER
CH
OIC
E
CH
-
E
RE
SC
ON
NEXT
PREVIOUS
CLEAR
SELECT
SLOW+
SLOW-
3D
PHONIC
ON SCREEN
STROBE
REPEAT SUB TITLE AUDIO
DIGEST
N
ANGLE
VFP
3
ZOOM
AMP VOL
ANGLE
RM-SXV009E
REMOTE CONTROL
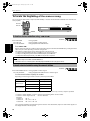
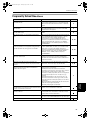
To check the playback status
Available :
You can see the current selection number (the title/chapter number for DVD VIDEO or track number for Audio CD/Video
CD/SVCD), time information (the track or chapter time while stopped, or the elapsed track or chapter time during
playback) and the transport status (stop, playback, pause etc.) on the TV screen.
¶ During playback or while stopped
Press ON SCREEN.
The playback status bar appears on the TV screen.
(for DVD VIDEO)
(for Video CD)
Current chapter
number
Transfer rate
8.5Mbps
Current transport
status
Current transport
status
TITLE 33 CHAP 33
TRACK 33
TOTAL 1:25:58
Current title number Current chapter
time
(for Audio CD)
Current track number
TIME
25:58
Disc elapsed
time
(for SVCD)
Current transport status
TRACK 33
TIME
Current transport
status
25:58
TRACK 33
Current track number
Disc elapsed
time
Current track number
TIME
25:58
Disc elapsed
time
21
XV-N5SL(B).book Page 22 Thursday, May 9, 2002 11:11 AM
Basic operations
The indication on the rightmost end of the status bar shows the unit’s transport status as follows:
Icon
Status
Playback mode.
Stop mode.
Pause mode.
Fast forward/backward playback mode.
Slow motion playback mode.
Note that pressing ON SCREEN again brings up the menu bar under the status bar, from which you can access
various functions.
(Example of the menu bar for DVD VIDEO)
TITLE 33 CHAP 33
8.5Mbps
OFF
CHAP.
1/3
1/5
TOTAL 1:25:58
1/3
See page 36 for details about the menu bar.
Basic operations
NOTE
• To dismiss the status bar:
Press ON SCREEN until the status bar is dismissed.
To move back the playback position during DVD VIDEO playback
[One touch replay function]
Available :
During playback of a DVD VIDEO disc, you can move back the playback position 10 seconds from the current position.
¶ During DVD VIDEO playback
Press 3.
The playback position moves back 10 seconds before the current position.
Note that this function works only within the same title, though it works between chapters.
If you press 3 within 10 seconds from the beginning of a title, playback starts from the beginning of the title.
NOTES
• This function works only with DVD VIDEO discs.
• When
appears on the TV screen:
This function may not work with some DVD VIDEO discs.
To change the brightness of the display window
You can dim the brightness of the display window.
Press 5 or ∞ while holding down ANGLE.
You can select the display window brightness from four levels, or off. If the brightness is set to off, nothing will be
shown on the display.
22
XV-N5SL(B).book Page 23 Thursday, May 9, 2002 11:11 AM
Advanced operations
This chapter describes operations for various advanced
functions of DVD VIDEO, Audio CD, Video CD and SVCD
discs. For MP3 and JPEG disc playback, see the separate
chapters beginning on pages 40 and 43.
2 Use 5/∞/2/3 to select a desired item, then
press ENTER.
The unit starts playback of the selected item.
NOTE
DVD
Make sure that the TV - DVD switch on
the remote control unit is set to "DVD"
when using the 5/∞/2/3, numeric and
TV/VIDEO - CANCEL buttons for
controlling the unit.
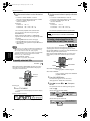
Playing from a specific
position on a disc
You can play a disc from the selected track, title or
chapter, or from the specified time.
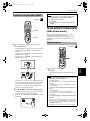
To locate a desired scene from the DVD
menu
Available :
DVD VIDEO discs generally have their own menus which
show the disc contents. These menus contain various
items such as titles of movies, names of songs, or artist
information, and display them on the TV screen. You can
locate a desired scene using the DVD menu.
• With some discs, you can also select items by entering the
corresponding number using the numeric buttons, which
may cause the unit to automatically start playback.
NOTES
• When
appears on the TV screen when you press TOP
MENU or MENU in step 1:
The disc does not have an appropriate menu listing the
titles.
• The MENU button does not work while stopped.
To locate a desired scene from the menu
of a Video CD/SVCD with PBC
Available :
Some Video CD/SVCD discs support the PBC function.
PBC is an abbreviation of "PlayBack Control." A Video
CD/SVCD disc recorded with PBC has its own menus,
such as a list of the songs of the disc. You can locate a
specific scene by using the PBC menu.
TV
STANDBY/ON
TV
TV1
TV
2
3
TV5
TV6
4
5
6
TV7
TV8
TV9
7
8
9
TV-/--
TV0
MUTING
10
0
+10
OP
SUBTITLE
TITLE/
GROUP
NU CH
ME
+
TV/VIDEO
CANCEL
ME
NU
VOL-
VOL+
ENTER
ENTER
CH
OIC
E
EN
RE
SC
ON
NEXT
CH
-
PREVIOUS
TV2
2
3
TV5
TV6
4
5
6
TV7
TV8
TV9
7
8
9
TV-/--
TV0
MUTING
0
RETURN
MENU
5/∞/2/3
TV3
1
10
RETURN
TOP
MENU
DVD
TV4
TV3
1
TV4
RETURN
T
TV2
DVD
T
OPEN/
CLOSE
TOP
MENU
DVD
DVD
STANDBY/ON
OPEN/
CLOSE
TV1
TV
OP
SUBTITLE
TV/VIDEO
CANCEL
ME
NU
VOL-
VOL+
ENTER
CH
OIC
E
CH
-
E
RE
SC
ON
NEXT
PREVIOUS
CLEAR
SELECT
STROBE
SLOW+
SLOW-
SELECT
N
3
VFP
STROBE
DIGEST
SLOW-
Numeric
buttons
+10
TITLE/
GROUP
NU CH
ME
+
REPEAT SUB TITLE AUDIO
CLEAR
Advanced
operations
TV
SLOW+
3D
PHONIC
ANGLE
ZOOM
AMP VOL
¶ Whenever a DVD VIDEO disc is loaded
RM-SXV009E
1 Press TOP MENU or MENU.
The menu appears on the TV screen.
Example:
REMOTE CONTROL
¶ When a Video CD/SVCD disc with PBC is stopped
1 Press 3 or TOP MENU.
A disc menu appears on the TV screen (The PBC
function is activated).
Example:
About DVD VIDEO menu
Normally, a DVD VIDEO disc which contains more than one title
may have a "title" menu which lists the titles. In this case, the
menu appears on the TV screen when you press the TOP MENU
button. Some DVD VIDEO discs may also have a different menu
which appears when the MENU button is pressed.
"PBC" is indicated in the display window on the
front panel.
See the instructions of each DVD VIDEO disc for its particular
menu.
23
XV-N5SL(B).book Page 24 Thursday, May 9, 2002 11:11 AM
Advanced operations
2 Use the numeric buttons to select the desired
2 Use the numeric buttons to specify a title to be
item.
played.
• To select a number between 1 and 10:
Press the corresponding button for the number.
• To select a number higher than 10:
Use the +10 button.
Examples:
To select 13: +10 → 3
To select 34: +10 → +10 → +10 → 4
To select 40: +10 → +10 → +10 → 10
• To select a number between 1 and 10:
Press the corresponding button for the number.
• To select a number higher than 10:
Use the +10 button.
Examples:
To select 13: +10 → 3
To select 34: +10 → +10 → +10 → 4
To select 40: +10 → +10 → +10 → 10
The unit starts playback of the selected item.
You can return to the menu by pressing the
RETURN button.
When something like "NEXT" or "PREVIOUS"
appears on the TV screen, the unit generally works
as follows:
• Pressing ¢ advances to the next page.
• Pressing 4 returns to the previous page.
* The method of the operation may be different on
different discs.
The unit starts playback from the specified title.
NOTE
• This function may not work with some DVD VIDEO
discs.
To locate a desired position in the
current title or track [Time search]
Available :
• To activate the PBC function when a PBC-compatible Video
CD/SVCD disc is being played back without the PBC
function, do any of the following:
* Press TOP MENU or MENU.
* Press 7 to stop playback, then press 3 .
To specify a desired title
You can play a disc from the desired position by
specifying the time from the beginning of the current
title (for DVD VIDEO), or the disc (for Audio CD/Video CD/
SVCD) using the time search function.
Note that some DVD VIDEO discs do not contain time
information, and the time search function cannot be
used.
TV1
TV
TV2
1
2
3
TV4
TV5
TV6
4
5
6
TV7
TV8
TV9
7
8
9
TV0
MUTING
10
0
+10
OP
TITLE/
GROUP
NU CH
ME
+
Numeric
buttons
TV/VIDEO
CANCEL
ME
NU
VOL-
VOL+
ENTER
CH
OIC
E
EN
RE
SC
CH
-
ON
NEXT
PREVIOUS
CLEAR
SELECT
STROBE
SLOW+
SLOW-
TV8
TV9
7
8
9
TV0
OP
Numeric
buttons
MUTING
0
SUBTITLE
+10
TITLE/
GROUP
NU CH
ME
+
TV/VIDEO
CANCEL
ME
NU
VOL-
VOL+
ENTER
CH
OIC
E
ENTER
CH
-
E
RE
SC
ON
NEXT
PREVIOUS
CLEAR
SELECT
ON SCREEN
N
STROBE
¶ For DVD VIDEO/Audio CD:
During playback or while stopped
¶ For Video CD/SVCD:
In any condition except Video CD/SVCD
playback with PBC
TV3
TV-/--
SUBTITLE
6
TV7
DVD
TV1
RETURN
3
TV6
5
RETURN
T
STANDBY/ON
OPEN/
CLOSE
TITLE/
GROUP
DVD
TV3
2
TV5
4
10
While playing back a DVD VIDEO disc with more than
one title, you can specify a desired title to be played
using the numeric buttons.
TV
TV2
1
TV4
TV-/--
2/3
Available :
T
Advanced
operations
• If you want to play a PBC-compatible Video CD/SVCD disc
without activating the PBC function, start playback using
the numeric buttons instead of 3. (See page 20).
¶ During playback
1 Press TITLE/GROUP.
"--" is shown in the title display area of the display
window.
(Display window example)
1 Press ON SCREEN twice.
The menu bar appears on the TV screen.
(See page 36 for details about menu bar.)
2 Use 2/3 to move
to
, then press
ENTER.
The pull-down menu for entering time appears
under the
.
(Screen example for DVD VIDEO)
TITLE 33 CHAP 33
8.5Mbps
OFF
CHAP.
TIME
1/3
TOTAL 1:25:58
1/5
1/3
_:__:__
(Screen example for Audio CD)
Title display area
Current chapter number
TRACK 33
OFF
PROG.
TIME
24
__:__
RND.
TIME
25:58
XV-N5SL(B).book Page 25 Thursday, May 9, 2002 11:11 AM
Advanced operations
3 Use the numeric buttons (0 to 10) to enter the
desired time.
The specified time is displayed in the pull-down
menu.
• To correct a mistake
Use 2 repeatedly to move back to the digit where you
entered a undesired numeral (the leftmost "-" digit),
and reenter the correct time.
(Example : changing "2:35:__" to "2:34:__.")
TIME 2 : 3 5 : _ _
• "10" button works as "0" and "+10" button is not used with
this function.
→
• You can specify the time in hour/minute/second format for
DVD VIDEO discs, and in minute/second format for Audio
CD and Video CD/SVCD discs.
TIME 2 : 3 _ : _ _
→
4 Press ENTER.
Press "4."
TIME 2 : 3 4 : _ _
The unit starts playback from the specified time.
• Example (for DVD VIDEO)
To playback from 2(H):34(M):00(S)
Press 2.
NOTES
• When
appears on the TV screen:
TIME _ : _ _ : _ _
The time you have selected is not contained on the disc,
or the time search function does not work on the disc.
→
Also note that the time search function does not work
during Video CD/SVCD playback with the PBC function.
Press "2."
TIME 2 : _ _ : _ _
TIME 2 : 3 _ : _ _
→
→
Press ENTER.
• Example (for Audio CD/Video CD/SVCD)
To playback from 23(M):40(S)
__:__
→
Press "2."
To locate a specific scene from the
display [DIGEST]
Available :
The unit can display the opening scene of each title or
chapter on a DVD VIDEO or each track of a Video CD/
SVCD. You can select a specific scene from those
displayed on the TV screen.
RETURN
2_:__
T
TIME
• The time search function cannot be used during
program playback.
Press "4."
TIME 2 : 3 4 : _ _
TIME
Press ON SCREEN.
OP
SUBTITLE
TITLE/
GROUP
TV/VIDEO
CANCEL
NU CH
ME
+
ME
NU
VOL-
→
TIME
Press "3."
VOL+
ENTER
ENTER
CH
OIC
E
CH
-
E
RE
SC
ON
NEXT
PREVIOUS
23:__
CLEAR
SELECT
→
Press "4."
23:4_
DIGEST
DIGEST
3D
PHONIC
5/∞/2/3
N
STROBE
SLOW+
SLOW-
REPEAT SUB TITLE AUDIO
TIME
Advanced
operations
→
Press "3."
• To dismiss the menu bar:
ANGLE
VFP
ZOOM
AMP VOL
→
Press ENTER.
You do not have to press "0" to enter the trailing zeros
(for the last two digits in the example above).
RM-SXV009E
REMOTE CONTROL
¶ For DVD VIDEO:
During playback or while stopped
For Video CD/SVCD: In any condition except
Video CD/SVCD playback
with PBC
1 Press DIGEST.
Up to nine opening scenes are displayed.
25
XV-N5SL(B).book Page 26 Thursday, May 9, 2002 11:11 AM
Advanced operations
Depending on the disc type and whether the disc is
being played back or not, the contents shown on
the TV screen differ.
Disc type
Unit status
What is displayed
While stopped
The opening scene of
each title
DVD
VIDEO
During playback
The opening scene of
each chapter in the
current title
Video CD/
SVCD
While stopped or
during playback
The opening scene of
each track
Changing the playback
order
You can play tracks on an Audio CD, Video CD or SVCD in
a specific order or in random order.
To playback in a specific order
[Program play]
Available :
2 Use 5/∞/2/3 to move
to select the
desired scene.
By programming tracks, you can play up to 99 tracks in
any order. You may program the same track more than
once.
If there are more than 9 scenes, the digest screen
will have more than one page. In this case, pressing
¢ advances to the next page, while pressing
4 returns to the previous page.
TV
TV
TV1
2/3
DVD
TV2
TV3
1
2
3
TV4
TV5
TV6
4
5
6
TV7
TV8
TV9
7
8
9
TV-/--
TV0
MUTING
10
0
RETURN
T
DVD
STANDBY/ON
OPEN/
CLOSE
OP
SUBTITLE
Numeric
buttons
+10
TITLE/
GROUP
TV/VIDEO
CANCEL
NU CH
ME
+
ME
NU
VOL-
VOL+
ENTER
CH
OIC
E
ENTER
E
RE
SC
ON
NEXT
PREVIOUS
7
Advanced
operations
CH
-
CLEAR
SELECT
SLOW+
REPEAT SUB TITLE AUDIO
• When the lower right scene is selected, pressing 3
advances to the next page if available. Similarly, when the
upper left scene is selected, pressing 2 returns to the
previous page (if available).
• Depending on discs, it may take some time until all scenes
of the current page appear on the TV screen. If you want to
turn the page, you do not have to wait to press 4 or ¢
until all scenes appear.
3 Press ENTER.
The unit starts playback from the selected scene.
DIGEST
3
STROBE
SLOW-
Selected scene
ON SCREEN
N
ANGLE
3D
PHONIC
VFP
ZOOM
AMP VOL
RM-SXV009E
REMOTE CONTROL
¶ While stopped
1 Press ON SCREEN twice.
The menu bar appears on the TV screen.
(See page 36 for details about menu bar).
2 Use 2/3 to move
to
PROG.
.
(Screen example for Audio CD)
TRACK 33
NOTE
• With some discs, depending on the contents, it may
take some time until all the scenes appear on the
screen.
OFF
PROG.
TIME
25:58
RND.
3 Press ENTER.
The program table appears instead of the menu bar.
The PROGRAM indicator lights in the display
window on the front panel.
Total Program Time
PROGRAM
No.
TrackDisc
1
2
3
4
5
6
7
8
9
10
2
3
7
4
3
5
6
USE NUMERIC KEYS TO PROGRAM TRACKS.
CANCEL DELETES THE LAST STEP. 7 DELETES ALL.
26
00:00:00
XV-N5SL(B).book Page 27 Thursday, May 9, 2002 11:11 AM
Advanced operations
4 Specify tracks in the desired order using the
numeric buttons.
• To select a number between 1 and 10:
Press the corresponding button for the number.
• To select a number higher than 10:
Use the +10 button.
Examples:
To select 13: +10 → 3
To select 34: +10 → +10 → +10 → 4
To select 40: +10 → +10 → +10 → 10
Up to 99 tracks can be programmed. You may
select the same track more than once.
The total program time is shown at the right top of
the program table.
The total program time
No.
1
2
3
4
5
6
7
8
9
10
2
3
7
4
3
5
6
• To exit the program mode
After clearing all programmed tracks, press ON
SCREEN.
The program table is dismissed and the status bar
appears on the TV screen.
The PROGRAM indicator in the display window
disappears and the unit quits program playback
mode.
NOTES
• During program playback, you cannot edit the program
contents.
• During program playback, pressing ¢ skips to the
next selection of the program. Pressing 4 returns to
the beginning of the current selection.
00:25:12
TrackDisc
1
5
4
2
3
4
6
USE NUMERIC KEYS TO PROGRAM TRACKS.
CANCEL DELETES THE LAST STEP. 7 DELETES ALL.
• To dismiss the program table:
Press ON SCREEN. The program table is dismissed and
the status bar is shown.
• To dismiss the menu bar (and the status bar):
Press ON SCREEN.
To playback in random order
[Random play]
Selected track number
• If you specify a wrong track
Use 5/∞ to move
to the wrong track, then
press TV/VIDEO - CANCEL. The track is erased
and the subsequent programmed tracks move up.
Available :
You can play tracks on a disc in random order by using
the random function.
TV
TV
TV1
With a Video CD/SVCD disc, the program table is
automatically dismissed when the program
playback starts.
With an Audio CD disc, the program table remains
on the TV screen during program playback.
However, pressing the ON SCREEN button brings
up the status bar.
When all of the programmed tracks have finished
playback, the unit stops and the program table
appears again.
Note that the program remains.
• To check the program contents
During playback, press 7. Playback stops and the
program table is shown.
When the unit is playing back an Audio CD and the
program table is not shown, you can bring up the
table by carrying out steps 1 to 3.
During Video CD/SVCD playback, you cannot see the
program table during playback.
TV2
TV3
1
2
3
TV5
TV6
4
5
6
TV7
TV8
TV9
7
8
9
TV-/--
TV0
MUTING
0
RETURN
T
DVD
TV4
10
2/3
DVD
STANDBY/ON
OPEN/
CLOSE
• To clear the program while programming
Press 7.
5 Press 3 to start program playback.
Advanced
operations
Total Program Time
PROGRAM
• To clear the program
While stopped and the program table is shown on the
TV screen, press 7.
All the programmed tracks are erased.
OP
SUBTITLE
+10
TITLE/
GROUP
TV/VIDEO
CANCEL
NU CH
ME
+
ME
NU
VOL-
VOL+
ENTER
ENTER
CH
OIC
E
CH
-
E
RE
SC
ON
NEXT
PREVIOUS
CLEAR
SELECT
STROBE
SLOW+
SLOW-
REPEAT SUB TITLE AUDIO
DIGEST
ON SCREEN
N
ANGLE
3D
PHONIC
VFP
ZOOM
AMP VOL
RM-SXV009E
REMOTE CONTROL
¶ While stopped
1 Press ON SCREEN twice.
The menu bar appears on the TV screen.
(See page 36 for details about menu bar)
2 Use 2/3 to move
to
RND.
.
(Screen example for Audio CD)
TRACK 33
OFF
PROG.
TIME
25:58
RND.
• To quit program playback
Press 7. Note that the program remains.
27
XV-N5SL(B).book Page 28 Monday, May 13, 2002 5:46 PM
Advanced operations
3 Press ENTER.
The unit starts random playback.
With a Video CD/SVCD disc, the menu bar is
automatically dismissed.
During random playback, the RANDOM indicator
lights in the display window on the front panel.
After playing all tracks of the disc, the unit stops the
disc and exits the random mode.
Repeat playback
You can repeat playback of the current title or chapter
(for DVD VIDEO), or current or all tracks (for Audio CD/
Video CD/SVCD).
You can also repeat playback of a desired part.
To repeat the current selection or all
tracks [Repeat playback]
• The same track will not be played back more than once
during random play.
Available :
• During random playback, if you bring up the menu bar and
carry out steps 1 to 3 above, the unit cancels random
playback mode and continues playback from the current
selection in the recorded order.
• To stop and quit random playback
Press 7. The unit stops playback and exits the
random playback mode.
NOTE
• To dismiss the menu bar:
Press ON SCREEN.
SLOW-
REPEAT
SLOW+
REPEAT SUB TITLE AUDIO
DIGEST
3D
PHONIC
ANGLE
VFP
ZOOM
AMP VOL
RM-SXV009E
REMOTE CONTROL
¶ For DVD VIDEO:
During playback
For Audio CD/Video CD/SVCD:
In any condition except Video CD/
SVCD playback with PBC
1 Press REPEAT.
Advanced
operations
Each time you press REPEAT, the repeat mode
cycles among All repeat, Repeat 1 and off.
The selected mode is reflected in icons displayed in
the front panel display window, as shown below.
If you press REPEAT while stopped, you need to
press 3 to start repeat playback.
REPEAT:
Repeats the current title for DVD VIDEO
orall tracks for Audio CD/Video CD/
SVCD.
REPEAT 1: Repeats the current chapter for DVD
VIDEO or the current track for Audio CD/
Video CD/SVCD.
No indication:
The repeat mode is off.
(Display window)
Repeat mode indicators
A window which indicates the current repeat mode
will be displayed on the TV screen.
The mode indication on the window is same as the
one on the menu bar (see pages 37 and 38).
(Repeat mode display window example)
CHAP.
• To stop repeat playback
Press 7.
When a DVD VIDEO disc is set, the unit stops playback
and quits the repeat mode.
When an Audio CD, Video CD or SVCD disc is set, the
unit stops playback but does not quit the repeat mode.
• To quit repeat playback
Press REPEAT until the repeat mode indicator goes off
in the display window.
28
XV-N5SL(B).book Page 29 Thursday, May 9, 2002 11:11 AM
Advanced operations
• Audio CD/Video CD/SVCD
NOTES
• You can also select the repeat mode via the menu bar.
See pages 37 and 38.
(Screen example for Audio CD)
TRACK 33
• When the program playback mode is active with an
Audio CD, Video CD or SVCD, the repeat mode changes in
the same manner.
Note that, however, in the "
" mode the unit repeats all
the programmed tracks, instead of all tracks on the disc.
• During playback in the title/chapter/track repeat mode, if
you skip the title/chapter/track using 4/¢, etc., the
destination title/chapter/track is repeated.
PROG.
TIME
25:58
RND.
A-B
Selected repeat mode
TRACK : current track repeat
• If
appears when pressing REPEAT during DVD VIDEO
playback.
ALL :
all track repeat
A-B :
repeats a desired part
(during playback only)
The disc content does not allow title or chapter repeat.
• Repeat playback function cannot be used during Video
CD/SVCD playback with PBC function.
OFF
To repeat a desired part
[A-B repeat playback]
4 Press ENTER at the beginning of the part you
want to repeat (point A).
Available :
9
MUTING
0
+10
OP
SUBTITLE
TITLE/
GROUP
NU CH
ME
+
TV/VIDEO
CANCEL
ME
NU
VOL-
5/∞/2/3
ON SCREEN
VOL+
ENTER
ENTER
CH
OIC
E
CH
-
E
RE
SC
ON
NEXT
PREVIOUS
CLEAR
SELECT
SLOW-
The pull-down menu disappears.
A- .
The repeat icon shows
TV9
8
TV0
RETURN
T
TV8
7
10
N
STROBE
SLOW+
The menu bar appears on the TV screen.
(See page 36 for details about menu bar).
, then press
ENTER.
The pull-down menu for repeat mode selection
appears under the
.
3 Use 5/∞
CHAP.
1/3
1/5
TOTAL 1:25:58
1/3
Repeat icon
5 Press ENTER at the end of the part you want
to repeat (point B).
1 Press ON SCREEN twice.
to
TITLE 33 CHAP 33
8.5Mbps
A-
¶ During playback except Video CD/SVCD playback
with PBC
2 Use 2/3 to move
(Screen example for DVD VIDEO)
Advanced
operations
TV7
TV-/--
to select "A-B."
Depending on the disc type and unit’s status the
repeat mode changes as follows:
A-B .
The repeat icon show
The unit locates "A" and starts repeat playback
between "A" and "B."
• To quit A-B repeat playback
Press ENTER. The A-B repeat mode turns off, while the
playback continues.
• Selecting "OFF" from the pull-down menu for repeat mode
selection, or pressing 4/¢ quits the A-B repeat mode
and continues playback.
• You can also stop and quit A-B repeat mode by pressing 7 .
• During DVD VIDEO playback
TITLE 33 CHAP 33
8.5Mbps
CHAP.
1/3
TOTAL 1:25:58
1/5
1/3
A-B
NOTES
• The A and B points must be set in the same title/
chapter/track.
• To dismiss the menu bar:
Press ON SCREEN.
Selected repeat mode
CHAPTER :current chapter repeat
TITLE :
current title repeat
A-B :
repeats a desired part
(during playback only)
• If
appears when pressing ENTER during DVD VIDEO
playback
The disc content does not allow you to repeat the
selected part.
OFF
29
XV-N5SL(B).book Page 30 Thursday, May 9, 2002 11:11 AM
Advanced operations
Changing the language,
sound and scene angle
With some DVD VIDEO discs, you can choose a desired
subtitle language and/or audio language/sound, as well
as a desired camera angle.
Similarly, you can choose a desired audio channel (or
channel combination) of a Video CD/SVCD disc, as well
as a subtitle channel of an SVCD disc.
2 Use 5/∞ or SUBTITLE to select the subtitle.
Each time you press 5/∞ or SUBTITLE, the subtitle
language changes.
See the following examples for subtitle selection.
• For DVD VIDEO
Pressing 5/∞ or SUBTITLE cycles through the
subtitles recorded on the disc.
Example:
1/3 ENGLISH
2/3 FRENCH
To select the subtitle language
[SUBTITLE]
3/3 SPANISH
Available :
-/3 OFF
Some DVD VIDEO and SVCD discs for movies, guides,
etc. contain more than one subtitle language. You can
choose a desired one from them.
Advanced
operations
• At the beginning of the part where the subtitles are
recorded,
appears on the TV screen (except when the
"ON SCREEN GUIDE" preference is set to "OFF"). See page
53 for details about "ON SCREEN GUIDE" preference.
•
For SVCD
An SVCD disc can have up to four subtitles.
Pressing 5/∞ cycles through those channels as
follows regardless of whether the subtitles are
recorded or not.
-/4 OFF
1/4
TV
STANDBY/ON
OPEN/
CLOSE
TV
DVD
TV1
TV2
1
2
3
TV4
TV5
TV6
4
5
6
TV8
TV9
7
8
TV-/--
OP
9
TV0
10
MUTING
0
SUBTITLE
+10
TITLE/
GROUP
3/4
TV/VIDEO
CANCEL
NU CH
ME
+
ME
NU
VOL-
ENTER
2/4
TV3
TV7
RETURN
T
DVD
VOL+
5/∞
ENTER
CH
OIC
E
CH
-
E
RE
SC
ON
NEXT
PREVIOUS
CLEAR
SELECT
STROBE
SLOW+
SLOW-
REPEAT SUB TITLE AUDIO
SUB TITLE
DIGEST
3D
PHONIC
ANGLE
4/4
N
VFP
ZOOM
AMP VOL
RM-SXV009E
REMOTE CONTROL
¶ During DVD VIDEO/SVCD playback
(except when the status bar is shown)
1 Press SUBTITLE.
The Subtitle selection window appears on the TV
screen.
3 Press ENTER.
Subtitles are displayed in the selected language.
The subtitle selection window is dismissed.
NOTES
• For DVD VIDEO, the selected language may be abbreviated
on the TV screen. See "Table of languages and their
abbreviations" on page 49.
• The Subtitle selection window will automatically
disappear if you do not change the subtitle for several
seconds.
• When
disc):
appears on the TV screen (for DVD VIDEO
You cannot select the subtitle or no subtitle is recorded.
1/3
ENGLISH
30
• You can also select the subtitle via the menu bar. See
pages 37 and 39.
XV-N5SL(B).book Page 31 Thursday, May 9, 2002 11:11 AM
Advanced operations
To change the audio language or sound
[AUDIO]
• For DVD VIDEO
Each time you press 5/∞ or AUDIO, the audio
language changes.
Example:
Available :
1/3 ENGLISH
The audio selection setting allows you to change the
audio language of a movie, or to listen to karaoke with or
without the vocal.
2/3 FRENCH
3/3 SPANISH
• At the beginning of the part where multiple audio tracks are
recorded,
appears on the TV screen (except when the
"ON SCREEN GUIDE" preference is set to "OFF"). See page
53 for details about "ON SCREEN GUIDE" preference.
• For Video CD/SVCD
Each time you press 5/∞ or AUDIO, the playback audio
changes as follows.
(for Video CD)
TV
TV
TV1
ST1
DVD
TV2
TV3
1
2
3
TV4
TV5
TV6
4
5
6
TV7
TV8
TV9
7
8
9
TV-/--
TV0
MUTING
10
0
+10
RETURN
T
(for SVCD)
STANDBY/ON
OPEN/
CLOSE
OP
ST (stereo)
DVD
SUBTITLE
TITLE/
GROUP
ST2
R
L-1
TV/VIDEO
CANCEL
NU CH
ME
+
ME
NU
VOL-
VOL+
ENTER
L
5/∞
ENTER
CH
-
E
RE
SC
ON
NEXT
PREVIOUS
CLEAR
SELECT
SLOW+
REPEAT SUB TITLE AUDIO
3D
PHONIC
R-1
STROBE
SLOW-
DIGEST
N
ANGLE
Advanced
operations
CH
OIC
E
VFP
ZOOM
L-2
AUDIO
AMP VOL
R-2
RM-SXV009E
REMOTE CONTROL
¶ During playback
(except when the status bar is shown)
3 Press ENTER.
You can hear the selected audio.
The audio selection window is dismissed.
1 Press AUDIO.
The audio selection window appears on the TV
screen.
1/3
ENGLISH
NOTES
• For DVD VIDEO, the selected language may be abbreviated
on the TV screen. See "Table of languages and their
abbreviations" on page 49.
• The Audio selection window will automatically
disappear if you do not change the audio for several
seconds.
• When
disc):
appears on the TV screen (for a DVD VIDEO
You cannot select the audio.
2 Use AUDIO or 5/∞ to select the desired
audio.
Each time you press 5/∞ or AUDIO, the audio
changes.
See the following examples for audio selection.
• If only one audio track is recorded, you cannot change
the audio selection.
• You can also select the audio via the menu bar. See
pages 37 and 39.
31
XV-N5SL(B).book Page 32 Thursday, May 9, 2002 11:11 AM
Advanced operations
To select a scene angle of DVD VIDEO
[ANGLE]
Available :
You can enjoy a variety of scene angles if the DVD VIDEO
disc contains "multi-angle" parts, where multiple
cameras were used to shoot the same scene from
different angles.
3 Press ENTER.
You can see the picture from the selected angle.
The angle selection window is dismissed.
From the angle list
¶ During DVD VIDEO playback
1 Press and hold ANGLE for more than 1
second.
Up to nine camera angles recorded on a disc
appear on the TV screen.
• At the beginning of a "multi-angle" part,
appears on the
TV screen (except when the "ON SCREEN GUIDE"
preference is set to "OFF"). See page 53 for details about
"ON SCREEN GUIDE" preference.
TV
TV
TV1
DVD
TV2
TV3
1
2
3
TV4
TV5
TV6
5
6
TV8
TV9
7
8
9
TV-/--
TV0
MUTING
10
0
OP
SUBTITLE
+10
TITLE/
GROUP
TV/VIDEO
CANCEL
NU CH
ME
+
ME
NU
VOL-
VOL+
ENTER
ENTER
CH
OIC
E
CH
-
E
RE
SC
ON
NEXT
PREVIOUS
CLEAR
SELECT
STROBE
SLOW+
SLOW-
Advanced
operations
The selected camera angle
4
TV7
RETURN
T
DVD
STANDBY/ON
OPEN/
CLOSE
REPEAT SUB TITLE AUDIO
DIGEST
ANGLE
3D
PHONIC
ANGLE
5/∞/2/3
N
3
2 Use 5/∞/2/3 to select the desired angle.
3 Press ENTER or 3.
The unit starts playback using the selected angle on
the full-sized screen.
VFP
ZOOM
NOTES
AMP VOL
RM-SXV009E
REMOTE CONTROL
• The Angle selection window will automatically
disappear if you do not change the angle for several
seconds.
• When
appears on the TV screen in step 1:
The current scene is not recorded from multiple angles.
From the Angle selection window
¶ During DVD VIDEO playback
(except when the status bar is shown)
1 Press ANGLE.
The Angle selection window appears on the TV
screen.
1/3
1
2 Use ANGLE or 5/∞ to select the desired
angle.
Each time you press ANGLE or 5/∞, the angle
changes.
Example:
1/3
2/3
3/3
32
• During the operation from the angle list display, audio is
muted.
• You can also select the angle via the menu bar. See
page 38.
XV-N5SL(B).book Page 33 Thursday, May 9, 2002 11:11 AM
Advanced operations
Special picture playback
and picture/sound effect
To zoom in or out pictures [ZOOM]
Available :
You can view continuous still images, or zoom into or out of
the picture. You can also adjust the picture characteristics, as
well as simulate surround sound using a stereo system.
TV1
TV2
1
2
3
TV4
TV5
TV6
4
5
6
TV7
TV8
TV9
7
8
9
TV-/--
TV0
MUTING
10
0
RETURN
T
TV3
OP
SUBTITLE
+10
TITLE/
GROUP
TV/VIDEO
CANCEL
NU CH
ME
+
ME
NU
VOL-
VOL+
ENTER
CH
OIC
E
To display continuous still pictures
[STROBE]
CH
-
E
RE
SC
ON
NEXT
PREVIOUS
CLEAR
SELECT
STROBE
SLOW+
SLOW-
REPEAT SUB TITLE AUDIO
DIGEST
T
OP
NU CH
ME
+
VFP
ZOOM
ZOOM +/–
AMP VOL
RM-SXV009E
ME
NU
VOL-
ANGLE
3D
PHONIC
Available :
5/∞/2/3
N
REMOTE CONTROL
VOL+
ENTER
CH
-
E
RE
SC
ON
NEXT
PREVIOUS
CLEAR
SELECT
STROBE
SLOW+
SLOW-
REPEAT SUB TITLE AUDIO
¶ During playback or while paused
N
8
VFP
PROGRESSSIVE
SCAN
DIGEST
3D
PHONIC
ANGLE
ZOOM
AMP VOL
RM-SXV009E
REMOTE CONTROL
¶ During playback
1 At the point where you want to begin viewing
1 Press ZOOM + or –.
Pressing ZOOM + causes the unit to zoom in on the
image, and pressing ZOOM – causes the unit to
zoom out.
Each time you press ZOOM +, the magnification is
doubled (up to × 1024).
Each time you press ZOOM –, the magnification is
halved (down to × 1/8).
continuous still images, press 8.
The unit pauses playback.
2 Press and hold 8 for more than 1 second.
Nine copies of the same frame (still images) will
appear on the TV screen.
You can advance these frames using the following
step.
3
Press 8 once.
ZOOM x 4
The image in the middle of the top row shows the
next frame of video after the one on the upper left.
Advanced frame
Each press of 8 advances the video by one frames.
Pressing 3 instead of 8 advances each frame at
normal playback speed with a time delay over the
whole nine pictures (while the sound is muted).
• To return to the normal screen
Press and hold 8 for more than 1 second.
At the top left of the screen, the information for the
current magnification appears for 5 seconds. While
zoomed in, an indication of the zoomed image
position also is displayed. The next step can be
used to move the image position.
2 Use 5/∞/2/3 to move the zoomed position.
If no button pressed for 5 seconds, the information
for the current magnification disappears.
To display the information, press ZOOM +/– or 5/∞/
2/3 again.
ZOOM x 4
NOTE
• If you press and hold 8 for more than 1 second during
playback, nine still pictures also appear but they
advance at normal playback speed (while the sound is
muted).
33
Advanced
operations
CH
OIC
E
XV-N5SL(B).book Page 34 Thursday, May 9, 2002 11:11 AM
Advanced operations
3 To define a user setting, select a parameter to
NOTES
be edited using 5/∞ from the following.
• To return to normal playback.
Press ENTER.
• While zoomed, the picture may look coarse.
To adjust the picture character [VFP]
Available :
The VFP (Video Fine Processor) function allows you to
adjust the picture character according to the type of
programming, picture tone or personal preferences.
TV
TV
TV1
TV2
2
3
TV5
TV6
4
5
6
TV8
TV9
7
8
9
TV-/--
TV0
MUTING
10
T
TV3
1
TV7
0
RETURN
ENTER
DVD
TV4
OP
SUBTITLE
+10
TITLE/
GROUP
TV/VIDEO
CANCEL
NU CH
ME
+
ME
NU
VOL-
VOL+
ENTER
CH
OIC
E
CH
-
E
RE
SC
ON
NEXT
PREVIOUS
CLEAR
SELECT
SLOW+
SLOW-
Advanced
operations
DIGEST
5/∞/2/3
N
STROBE
REPEAT SUB TITLE AUDIO
ANGLE
3D
PHONIC
VFP
• BRIGHTNESS
Controls the brightness of the screen.
The setting range is +16 to -16.
• CONTRAST
Controls the contrast of the screen.
The setting range is +16 to -16.
DVD
STANDBY/ON
OPEN/
CLOSE
• GAMMA
Controls the brightness of a shaded portion
without changing the brightness of the entire
picture.
This control is optimum when you adjust the
pictures of software which generates subdued
black in a bright room.
The setting range is +4 to -4.
VFP
ZOOM
• SATURATION
Controls the color depth of the screen.
The setting range is +16 to -16.
• TINT
Controls the tint of the screen.
Use the appearance of a natural skin tone as a
guideline.
The setting range is +16 to -16.
AMP VOL
• SHARPNESS
Controls the sharpness of the screen.
The setting range is +3 to 0.
RM-SXV009E
REMOTE CONTROL
¶ During playback
• Y DELAY
Controls the color gap of the screen.
The setting range is +2 to -2.
1 Press VFP.
The VFP mode selection window appears on the TV
screen.
2 Use 2/3 to select the desired preset.
4 Press ENTER.
A window for setting parameters appears instead
of the VFP mode selection window.
Each time you press the button, the VFP mode
changes as follows.
Set the video type most suitable to the current
program or the room conditions.
SATURATION
Selected preset
+45
NORMAL
Selected parameter
USER 1
GAMMA
+ 4
BRIGHTNESS
+ 4
CONTRAST
+13
SATURATION
+13
TINT
+13
SHARPNESS
+ 4
Y DELAY
+ 2
CINEMA
The higher value enhances the effect.
USER 1
Parameter
USER 2
"NORMAL" is suitable for watching TV in a general
room. "CINEMA" is suitable for watching a movie
software in a room with suppressed light.
They are factory presets and you cannot change
parameters for them.
If you select "USER 1" or "USER 2," you can adjust
parameters that affect the picture character and
store the settings as a user preset. See the next
step.
34
5 Adjust the level of the parameter using 5/∞.
6 Press ENTER.
The parameter is set and the VFP mode selection
window appears again.
Repeat steps 3 to 6 if you want to set other
parameters.
XV-N5SL(B).book Page 35 Thursday, May 9, 2002 11:11 AM
Advanced operations
3 Press 5/∞ to adjust the effect level.
NOTES
You can set the effect level from "1" to "5."
The higher value enhances the effect.
• The number of setting steps varies for different
parameters.
• To dismiss the VFP mode selection window:
Press VFP.
• The window for VFP mode selection and parameter
setting disappears if no operation is made for about 10
seconds.
To simulate surround sound
[3D PHONIC]
ACTION
+45
Effect level
.
NOTES
• To dismiss the 3D PHONIC window:
Available :
Using the 3D PHONIC function, you can get a simulated
surround effect from your stereo system.
OPEN/
CLOSE
TV
TV2
1
2
3
TV4
TV3
TV5
TV6
4
5
6
TV7
TV8
TV9
7
8
9
TV-/--
TV0
MUTING
10
0
+10
RETURN
T
DVD
TV1
OP
SUBTITLE
TITLE/
GROUP
TV/VIDEO
CANCEL
NU CH
ME
+
ME
NU
VOL-
VOL+
ENTER
CH
OIC
E
CLEAR
SELECT
STROBE
REPEAT SUB TITLE AUDIO
ANGLE
3D
PHONIC
• When playing back a DVD VIDEO disc recorded with
Dolby Digital that does not contain the rear signal, you
can change the 3D PHONIC setting, but you will not be
able to achieve a correct 3D effect.
• The 3D PHONIC function does not affect the Dolby
Digital bitstream signal from the DIGITAL OUT jack.
• When the 3D PHONIC function is active, the "ANALOG
DOWN MIX" and "D. RANGE COMPRESSION" settings
in the "AUDIO" setting display are disabled.
SLOW+
SLOW-
DIGEST
5/∞/2/3
EN
RE
SC
ON
NEXT
CH
-
PREVIOUS
3D PHONIC
• The 3D PHONIC function works correctly only when
playing back a DVD VIDEO disc recorded with Dolby
Digital. Pressing the 3D PHONIC button will have no
effect with other content.
DVD
STANDBY/ON
Advanced
operations
TV
Press 3D PHONIC.
• The 3D PHONIC window disappears if no operation is
made for about 10 seconds.
VFP
ZOOM
AMP VOL
RM-SXV009E
REMOTE CONTROL
¶ During playback
1 Press 3D PHONIC.
The 3D PHONIC window appears on the TV screen.
2 Select the desired mode by using 2/3.
Each time you press the button, the 3D PHONIC
mode changes as follows:
ACTION
DRAMA
ACTION
+45
THEATER
Selected effect mode
NONE
• ACTION
Suitable for action movies and sports programs
in which the sound source moves.
• DRAMA
Natural and warm sound. You can enjoy movies
in a relaxed mood.
• THEATER
You can enjoy sound effects like in a major
theater in Hollywood.
35
XV-N5SL(B).book Page 36 Thursday, May 9, 2002 11:11 AM
Advanced operations
Basic operation procedure
Menu bar functions
This section describes the functions you can perform via
the menu bar.
The available menu bar functions differ depending on
the disc type.
TV
TV
TV1
TV2
TV3
1
2
3
TV5
TV6
4
5
6
TV7
TV8
TV9
7
8
9
TV0
10
OP
MUTING
0
RETURN
T
DVD
TV4
TV-/--
To bring up the menu bar
DVD
STANDBY/ON
OPEN/
CLOSE
SUBTITLE
+10
TITLE/
GROUP
TV/VIDEO
CANCEL
NU CH
ME
+
ME
NU
VOL-
ENTER
VOL+
ENTER
CH
OIC
E
CH
-
E
RE
SC
ON
NEXT
PREVIOUS
TV
DVD
CLEAR
SELECT
TV
TV1
TV2
TV3
1
2
3
TV4
TV5
TV6
4
5
6
TV7
TV8
TV9
7
8
9
TV-/--
TV0
10
T
N
STROBE
DVD
SLOW+
SLOW-
OP
2/3
STANDBY/ON
OPEN/
CLOSE
RETURN
Numeric
buttons
DIGEST
3D
PHONIC
MUTING
0
SUBTITLE
REPEAT SUB TITLE AUDIO
ANGLE
VFP
ZOOM
AMP VOL
+10
TITLE/
GROUP
TV/VIDEO
CANCEL
NU CH
ME
+
ME
NU
RM-SXV009E
VOL-
VOL+
REMOTE CONTROL
ENTER
CH
OIC
E
CH
-
E
RE
SC
ON
NEXT
PREVIOUS
CLEAR
SELECT
1 Use 2/3 to select the icon you want to work
SLOW+
SLOW-
REPEAT SUB TITLE AUDIO
DIGEST
ON SCREEN
N
STROBE
ANGLE
3D
PHONIC
with.
VFP
ZOOM
The selected icon is pointed to by
AMP VOL
2 Press ENTER.
¶ When a disc is inserted
Advanced
operations
1 Press ON SCREEN.
A status bar for the type of disc loaded will appear
on the TV screen.
See page 21 about the status bar.
(Example of the status bar for DVD VIDEO)
TITLE 33 CHAP 33
8.5Mbps
TOTAL 1:25:58
2 Press ON SCREEN again.
TITLE 33 CHAP 33
8.5Mbps
CHAP.
1/3
TOTAL 1:25:58
1/5
1/3
(for Audio CD)
PROG.
RND.
PROG.
RND.
PROG.
RND.
TRACK 33
TIME
25:58
TRACK 33
TIME
25:58
TIME
25:58
(for Video CD)
OFF
ST
(for SVCD)
TRACK 33
OFF
ST1
-/4
NOTE
• To dismiss the menu bar (and status bar):
Press ON SCREEN.
36
playback. (You cannot move
to the associated
icon when it is not available.)
• When
appears on the TV screen:
You cannot use the selected function because of disc
contents.
• A mark or text on the menu icon for the function or
mode currently selected is shown in blue.
(for DVD VIDEO)
OFF
With many icons, an appropriate pull-down
window appears, however, there are some
exceptions.
• See the following pages for details about each
function.
• Note that some functions are not available during
NOTES
A menu bar for the type of disc loaded will appear
together with the status bar. The menu bar includes
some icons which indicate their functions.
OFF
.
XV-N5SL(B).book Page 37 Thursday, May 9, 2002 11:11 AM
Advanced operations
Menu bar functions for DVD VIDEO
TITLE 33 CHAP 33
8.5Mbps
OFF
1
2
CHAP.
3
4
1/3
5
TOTAL 1:25:58
1/5
6
1/3
7
Selected Icon
1
Time mode selection
(During playback only)
Selects the time mode shown in
the display window on the front
panel and in the status bar.
2
Repeat mode
(During playback only)
Selects the repeat mode.
Menu icons
The following table shows the menu bar
functions available for DVD VIDEO.
Note that, in the description of the
operation column, we assume the
associated icon is selected.
Operation
Note
Press ENTER to select the time mode from the following. • If a disc has only one title and one
chapter, "TOTAL" and "TIME" show
TOTAL
T.REM
TIME
REM
Return to initial
the same value.
• TOTAL:
Current title elapsed time
• T.REM:
Current title remaining time
• TIME:
Current chapter elapsed time
• REM:
Current chapter remaining time
1 Press ENTER to open the pull-down window.
2 Use 5/∞ to select the repeat mode from the
following.
CHAPTER j TITLE j A-B j OFF
• CHAPTER:Current chapter repeat
• TITLE:
Current title repeat
• A-B:
Repeats a desired part (A-B repeat)
• If you select "OFF" during repeat
playback, the unit continues playback
without repeating.
• For information on subsequent
operations for A-B repeat, see page
29.
Advanced
operations
3 Press ENTER to make the selected repeat
function active.
(See pages 28 and 29 for details about repeat
function.)
1 Press ENTER to open the pull-down window.
2 Use numeric buttons to enter a desired time.
Time search
3 Press ENTER to begin playback from the
Specifies a time from the
specified time.
beginning of the current title as the
3
point from which to begin
playback.
4
CHAP.
Chapter search
(During playback only)
Specifies a desired chapter to be
played back from.
(See page 24 for details about the time search.)
1 Press ENTER to open the pull-down window.
2 Use numeric buttons to enter a desired chapter
number.
• For example, to enter "12," press "1" then "2."
3 Press ENTER to begin playback from the
specified chapter.
• The "10" and "+10" buttons are not
used in this function.
• You can also locate a desired chapter
directly by specifying the chapter
number using the numeric buttons
during playback. See page 20.
• When the chapter number is incorrect:
Overwrite the incorrect number with the correct
number.
5
Audio selection
(During playback only)
Selects the audio language or
sound track.
1 Press ENTER to open the pull-down window.
2 Use 5/∞ to select a desired audio language or
sound track.
Example:
• For DVD VIDEO, the selected
language may be abbreviated on the
TV screen. See "Table of languages
and their abbreviations" on page 49.
1/3 ENGLISH j 2/3 FRENCH j 3/3 SPANISH
3 Press ENTER to begin playback with the selected
audio.
(See page 31 for details about audio selection.)
6
Subtitle selection
(During playback only)
Selects the subtitle language.
1 Press ENTER to open the pull-down window.
2 Use 5/∞ to select a desired subtitle language.
Example:
1/3 ENGLISH j 2/3 FRENCH j 3/3 SPANISH j
-/3 OFF
3 Press ENTER to begin playback with the selected
subtitle.
(See page 30 for details about subtitle selection.)
37
XV-N5SL(B).book Page 38 Thursday, May 9, 2002 11:11 AM
Advanced operations
Selected Icon
Operation
Note
1 Press ENTER to open the pull-down window.
2 Use 5/∞ to select a scene angle.
Example:
7
Angle selection
(during playback only)
1/3 j 2/3 j 3/3
Selects a desired scene angle in a
multi-angle part.
3 Press ENTER to begin playback with the
selected scene angle.
(See page 32 for details about angle selection).
Menu bar functions for Audio CD/Video CD/SVCD
TRACK 33
OFF
2
1
3
PROG.
RND.
4
5
PROG.
RND.
2
1
3
4
5
PROG.
RND.
2
Advanced
operations
1
3
4
5
TIME
Menu icons
6
ST1
6
TIME
-/4
Time mode selection
Selects the time mode shown in
the display window on the front
panel and in the status bar.
2
Repeat mode
Selects the repeat mode.
The following table shows the menu bar
functions available for Audio CD/Video CD/
SVCD.
Note that, in the description of the
operation column, we assume the
associated icon is selected.
25:58
Menu icons
7
Selected Icon
1
25:58
ST
TRACK 33
OFF
25:58
Menu icons
TRACK 33
OFF
TIME
Operation
Note
• When you have selected "REM" and
the disc is stopped, you can change
the track by pressing 4 or ¢.
TIME
REM
TOTAL
T.REM
Return to initial
• TIME:
Current track elapsed time
• While the disc is stopped, "REM"
shows the total time of the current
• REM:
Current track remaining time
track, and "T.REM" shows the total
• TOTAL:
Disc elapsed time
time of the disc.
• T.REM:
Disc remaining time
Press ENTER to select the time mode among the
followings.
1 Press ENTER to open the pull-down window.
2 Use 5/∞ to select the repeat mode from the
following.
OFF j TRACK j ALL j A-B j OFF
• TRACK: Current track repeat
• ALL:
All track repeat
• A-B:
Repeats a desired part (A-B repeat)
• If you select "OFF" during repeat
playback, the unit continues
playback without repeating.
• For information on subsequent
operations for A-B repeat, see page
29.
3 Press ENTER to make the selected repeat
function active.
(See pages 28 and 29 for details about repeat
function.)
3
Time search
(Except during Video CD/SVCD
playback with PBC)
Specifies a time from the
beginning of the current title as
the point from which to begin
playback.
4
PROG.
Program
(While stopped only)
Specifies the playback order of
tracks.
38
1 Press ENTER to open the pull-down window.
2 Use numeric buttons to enter a desired time.
3 Press ENTER to begin playback from the
specified time.
(See page 24 for details about the time search.)
1 Press ENTER to bring up the program table.
2 Specify tracks in the desired order using the
numeric buttons.
3 Press 3 to start program playback.
(See page 26 for details about the program.)
• This function cannot be used during
program playback.
XV-N5SL(B).book Page 39 Thursday, May 9, 2002 11:11 AM
Advanced operations
Selected Icon
5
RND.
Random
(While stopped only)
Operation
Note
1 Press ENTER to activate random playback.
(See page 27 for details about random.)
Activates random playback.
Audio selection
(During Video CD/SVCD playback
only)
Selects the audio channel(s).
7
Subtitle selection
(During SVCD playback only)
Selects the subtitle.
1 Press ENTER to open the pull-down window.
2 Use 5/∞ to select a desired audio channel(s).
3 Press ENTER to playback with the selected
audio channel(s).
(See page 31 for details about audio selection.)
1 Press ENTER to open the pull-down window.
2 Use 5/∞ to select a desired subtitle.
3 Press ENTER to begin playback with the
selected subtitle.
(See page 30 for details about subtitle selection.)
Advanced
operations
6
39
MP3_DISC_PLAYBACK.backup.fm 40 ページ
2002年5月14日 火曜日 午後12時27分
MP3 disc playback
The unit can play back MP3 files on a personally
recorded CD-R/RW disc or commercial CD. We refer to a
disc that contains MP3 file as an "MP3 disc" in this
manual.
Though functions available with MP3 discs are limited,
operations for the available functions are similar to those
for Audio CD discs.
Note that if a disc contains both of MP3 and JPEG files,
you can only play back files of the type selected by the
MP3/JPEG setting in the PICTURE preference display
(see page 51).
• The unit does not support "packet writing" discs.
Some tracks on an MP3 disc are skipped and may not be
played back normally because of the disc configuration or
characteristics determined by the writing (encoding)
software and hardware used for recording. Such
symptoms may occur regardless of whether using a disc
you recorded or using a commercially available disc.The
unit does not support the ID3 tag.
• If the disc is recorded with multiple sessions, the unit
supports up to five sessions.
What is MP3?
• Some discs may not play due to disc characteristics or
recording conditions.
"MP3" stands for "MPEG Audio Layer-3," and is a part
of the MPEG standard. It can store high quality stereo
audio using very little space by only saving the
audible sounds and discarding the sounds your ears
won’t pick up. A CD can store up to around 10 hours of
MP3 audio, which is nearly 10 times as much as an
Audio CD.
• Programmed and random playback functions do not work
with MP3 discs.
• The unit only can play back Tracks with the following file
extensions; ".MP3," ".Mp3," ".mp3" and ".mP3."
• Time required for reading the disc contents may vary for
defferent discs, depending on the numbers of Groups
(folders) and Tracks (files) recorded, etc.
• While an MP3 disc is loaded, you cannot bring up any
preference display. (See page 48.)
NOTE
TV
DVD
Make sure that the TV - DVD switch on
the remote control unit is set to "DVD"
when using the 5/∞/2/3 and numeric
buttons for controlling the unit.
Operations
Basic operations
About MP3 discs
On an MP3 disc, each song is recorded as a file. Files are
sometimes grouped into folders by artists, album,
category, etc. Folders can exist within other folders,
creating hierarchical layers of folders. If you are familiar
with personal computers, the hierarchical file and folder
structure of an MP3 disc will be familiar to you as well.
This unit simplifies the hierarchical structure of a disc
and manages files and folders using "Tracks" and
"Groups," in the following manner.
Available :
TV
TV
DVD
TV1
TV2
1
2
TV3
3
TV4
TV5
TV6
4
5
6
TV7
TV8
TV9
7
8
9
TV-/--
TV0
MUTING
10
0
+10
RETURN
OP
SUBTITLE
TITLE/
GROUP
NU CH
ME
+
Group 1
Track 1
Group 1’
Group 2
up to 99 Groups
per disc
up to 150 Tracks per Group
NOTES for making your own MP3 disc
using a CD-R/CD-RW disc:
• Select "ISO 9660" as the disc format.
• Finalize the disc after completing recording.
• We recommend you record your material at a 44.1 kHz
sampling rate, using the 128 kbps data transfer rate.
40
TV/VIDEO
CANCEL
ME
NU
VOL-
VOL+
ENTER
CH
OIC
E
EN
RE
SC
CH
-
CLEAR
SELECT
STROBE
SLOW+
SLOW-
REPEAT SUB TITLE AUDIO
DIGEST
3D
PHONIC
Basic control
buttons
ON
NEXT
PREVIOUS
• Each file is regarded as a Track.
• A folder which has one or more files (Tracks) is
regarded as a Group.
• A folder which does not directly contain any files is
ignored.
• Files which do not belong to any folder are grouped
into "Group 1."
• The unit recognizes up to 150 Tracks per Group, and up
to 99 Groups per disc. It ignores those exceeding the
maximum numbers and cannot play them back. If
there are files other than MP3 files, they also count
against the 150-file total.
DVD
STANDBY/ON
OPEN/
CLOSE
T
MP3 disc
playback
NOTES
ANGLE
VFP
ZOOM
AMP VOL
The following table shows the basic functions of the
basic control buttons.
Button
ENTER
3
7
8
4/¢
Functions
Starts playback while stopped.
Starts playback while stopped or
paused.
Stops playback.
Pauses playback.
Skips back or forward a Track in the
Group* during playback.
Selects the previous or next Track in the
Group* while stopped.
*You can skip a Track across a Group.
• If you press 3 during playback, or press 7 to stop
playback followed by 3, the unit starts playback from
the beginning of the current track.
• The 5/∞ buttons work the same as the 4/¢
buttons.
XV-N5SL(B).book Page 41 Thursday, May 9, 2002 11:11 AM
MP3 disc playback
2 Move the bar to a desired Group using 5/∞.
NOTES
• The current Group and Track numbers are shown on the
display window in the following manner.
On the right column, Tracks in the selected Group
are shown.
When selecting a Group, Track 1 is initially selected
(highlighted).
English
English
3 Select a desired Track using 4/¢, then
Current Track
number
Current track
elapsed time
• You cannot advance or reverse playback of an MP3 disc
rapidly.
• You cannot see any other time information but the
current track elapsed time.
Selecting the desired Group
and Track
Available :
When loading an MP3 disc, after the disc contents are
read, the MP3 CONTROL display automatically appears
on the TV screen.
MP3 CONTROL
Group : 01 / 10
Track : 01 / 06 (Total 28)
spring
sumer
fall
winter
sea
mountain
camp
picnic
skiing
flower
begonia.mp3
german chamomile.mp3
kiwi fruit.mp3
orchard grass.mp3
petunia.mp3
north pole.mp3
press ENTER or 3.
or
Use the numeric buttons to directly specify a
desired Track number.
• To select a number between 1 and 10:
Press the corresponding button for the number.
• To select a number higher than 10:
Use the +10 button.
Examples:
To select 13: +10 → 3
To select 34: +10 → +10 → +10 → 4
To select 40: +10 → +10 → +10 → 10
The unit starts playback from the selected Track.
In the MP3 CONTROL display and the display window
on the front panel, you can see the current Group and
Track numbers, as well as Track elapsed time.
Current Track elapsed time
MP3 CONTROL
Time : 00:03:08
Group : 01 / 10
Track : 01 / 06 (Total 28)
spring
sumer
fall
winter
sea
mountain
camp
picnic
skiing
flower
begonia.mp3
german chamomile.mp3
kiwi fruit.mp3
orchard grass.mp3
petunia.mp3
north pole.mp3
MP3 disc
playback
Current Group
number
You can specify the desired Group/Track from the display
using the following procedure.
TV
TV
TV2
TV3
1
2
3
TV4
TV5
4
5
TV7
TV8
TV6
6
TV9
7
8
9
TV-/--
TV0
MUTING
10
T
DVD
TV1
0
RETURN
5/∞
DVD
STANDBY/ON
OPEN/
CLOSE
OP
SUBTITLE
ME
NU
VOL+
ENTER
CH
-
E
RE
SC
ON
NEXT
PREVIOUS
4/¢
SELECT
SLOW+
REPEAT SUB TITLE AUDIO
ANGLE
3D
PHONIC
ENTER
• You can also select a desired Track by pressing 3 to move
the black bar to the right (Track) column then using 5/∞.
N
NOTES
STROBE
SLOW-
DIGEST
Selected
Track
TV/VIDEO
CANCEL
VOL-
CLEAR
Track column of the
current Group
+10
TITLE/
GROUP
NU CH
ME
+
CH
OIC
E
Numeric
buttons
Group
column
3
VFP
ZOOM
• If a MP3 file name includes any 2-byte character, the unit
may not show the file name correctly.
• Only MP3 files are shown on the MP3 CONTROL display.
AMP VOL
RM-SXV009E
REMOTE CONTROL
• The order of Groups/Tracks shown in the MP3
CONTROL display may differ from the order shown on
your personal computer when you set the disc on your
computer.
¶ When the MP3 CONTROL display is shown.
1 Make sure that the black (cursor) bar is in the
left (Group) column.
If it is in the right column, press 2 to move it to the
left column.
41
XV-N5SL(B).book Page 42 Thursday, May 9, 2002 11:11 AM
MP3 disc playback
Direct selection
Repeat playback
Available :
Available :
You can select a desired Group directly by specifying the
Group number.
You can repeat playback of the current Track, current
Group or all MP3 files on the disc.
ENTER
TV
CH
OIC
E
DVD
STANDBY/ON
OPEN/
CLOSE
TV
CH
-
CLEAR
TV1
TV2
2
3
TV5
TV6
4
5
6
TV7
TV8
TV9
7
8
9
TV-/--
TV0
10
0
T
OP
SUBTITLE
SELECT
N
STROBE
TV3
1
TV4
RETURN
E
RE
SC
ON
NEXT
PREVIOUS
DVD
MUTING
Numeric
buttons
+10
TITLE/
GROUP
SLOW+
SLOW-
REPEAT SUB TITLE AUDIO
REPEAT
DIGEST
ANGLE
VFP
ZOOM
TV/VIDEO
CANCEL
NU CH
ME
+
VOL-
3D
PHONIC
TITLE/GROUP
ME
NU
AMP VOL
VOL+
ENTER
RM-SXV009E
CH
OIC
E
CH
-
E
RE
SC
ON
NEXT
PREVIOUS
CLEAR
SELECT
SLOW+
REPEAT SUB TITLE AUDIO
ANGLE
3D
PHONIC
REMOTE CONTROL
STROBE
SLOW-
DIGEST
N
VFP
ZOOM
AMP VOL
RM-SXV009E
REMOTE CONTROL
¶ During playback or while stopped
1 Press TITLE/GROUP.
"--" is shown in the Group display area of the
display window.
¶ During playback or while stopped
1 Press REPEAT.
Each time you press REPEAT, the repeat mode
changes as follows. You can see the current mode
via the display window as well as the MP3
CONTROL display.
If you press REPEAT while stopped, you need to
press ENTER or 3 to start repeat playback.
MP3 CONTROL
display
Display
Window
REPEAT TRACK
REPEAT 1
Repeats the current
Track.
REPEAT GROUP
REPEAT
Repeats all Tracks in
the current Group.
REPEAT ALL
REPEAT
Repeats all Tracks on
the disc.
MP3 disc
playback
(Front panel display window example)
Group
Current track
display area number
2 Use the numeric buttons to specify a desired
Group number.
• To select a number between 1 and 10:
Press the corresponding button for the number.
• To select a number higher than 10:
Use the +10 button.
Examples:
To select 13: +10 → 3
To select 34: +10 → +10 → +10 → 4
To select 40: +10 → +10 → +10 → 10
No indication
(TV screen)
MP3 CONTROL
Function
The repeat mode is off.
Selected repeat mode
REPEAT TRACK
Group : 01 / 10
Track : 01 / 06 (Total 28)
spring
sumer
fall
winter
sea
mountain
camp
picnic
skiing
flower
begonia.mp3
german chamomile.mp3
kiwi fruit.mp3
orchard grass.mp3
petunia.mp3
north pole.mp3
(Display window)
Specify the Group number within several seconds
after pressing TITLE/GROUP (i.e. while the display
window shows "--" for the Group number, instead
of the current Group number).
The unit starts playback from Track 1 of the selected
Group.
3 Use the numeric buttons to specify a desired
Track number.
The unit starts playback from the specified Track.
You can also use 4/¢ or 5/∞ to specify a track,
instead of the numeric buttons.
42
Repeat mode indicator
• To stop repeat playback
Press 7. Note that the repeat mode remains active.
• To quit repeat playback
During playback, press REPEAT until no repeat icon is
shown on the display window.
While stopped, press REPEAT until repeat mode
indication on the MP3 CONTROL display goes off.
XV-N5SL(B).book Page 43 Thursday, May 9, 2002 11:11 AM
JPEG disc playback
The unit can play back JPEG files on a personally
recorded CD-R/RW disc. We refer to a disc that contains
JPEG files as a "JPEG disc" in this manual.
Note that if a disc contains both of MP3 and JPEG files,
you can only play back files of the type selected by the
MP3/JPEG setting in the PICTURE preference display
(see page 51).
What is JPEG?
"JPEG" is an abbreviation for the Joint Photographic
Experts Group. "JPEG" is used to refer to an image
file format that utilizes a certain compression
technique.
There are three sub-types of the JPEG format as
follows.
• baseline JPEG: used for digital cameras, the web,
etc.
• progressive JPEG: used for the web
• lossless JPEG: an old type, rarely used now
The unit supports only the baseline JPEG format;
Therefore, it cannot display pictures saved in the
progressive or lossless formats. If a JPEG disc
contains JPEG files of non-baseline type, the unit
recognizes those files as JPEG files, the JPEG
CONTROL display and the display window shows the
information of the contents (filename, file number,
etc.), but you cannot show the still pictures of those
files (the TV screen appears only in black).
NOTE
DVD
On a JPEG disc, each picture is recorded as a file. Files
are sometimes grouped into folders by category, etc.
Folders can exist within other folders, creating
hierarchical layers of folders. If you are familiar with
personal computers, the hierarchical file and folder
structure of a JPEG disc will be familiar to you as well.
This unit simplifies the hierarchical structure of a disc
and manages folders using "Groups," in the following
manner.
• A folder which has one or more files is regarded as a
Group.
• A folder which does not directly contain any files is
ignored.
• Files which do not belong to any folder are grouped
into "Group 1."
• The unit recognizes up to 150 files per Group, and up
to 99 Groups per disc. It ignores those exceeding the
maximum numbers and cannot display them. If there
are files other than JPEG files, they also count against
the 150-file total.
file 1
Group 1’
• Finalize the disc after completing recording.
• We recommend you record your material at a 640 x 480
pixel resolution.
• This unit supports only the baseline JPEG format.
Therefore, it cannot display pictures saved in the
progressive or lossless formats. If a JPEG disc contains
JPEG files of non-baseline type, the unit recognizes
those files as JPEG files. the JPEG CONTROL display
and the display window show the information of the
contents (filename, file number, etc.), but you cannot
show the still pictures of those files (the TV screen
appears only in black).
NOTES
• The unit does not support "packet writing" discs.
• If the disc is recorded with multiple sessions, the unit
supports up to five sessions.
• The unit may not be able to read some discs, or may take a
long time to display a picture on the disc, due to disc
characteristics or recording conditions.
• Programmed and random playback functions do not
work with JPEG discs.
• The screen saver function will be activated if the same
picture is displayed for more than 5 minutes except
during slide show playback (see page 45).
• The unit only can play back files with the following file
extensions; ".jpg," ".jpeg," ".JPG," ".JPEG" and any
other combination of upper case and lower case letters
(such as ".Jpg").
• If a JPEG file name includes any 2-byte character, the
unit may not show the file name correctly.
• If a picture has been saved at greater than 640 x 480
pixel resolution, it may take some time to display the
picture.
About JPEG discs
Group 1
• Select "ISO 9660" as the disc format.
• The unit will not accept any commands (stopping
playback, zooming into or out of an image, etc.) while in
the process of displaying a picture.
• The time required to read the disc contents may vary for
different discs, depending on the numbers of Groups
(folders) and files recorded, etc.
• If you attempt to display a non-baseline JPEG image:
The unit will not be able to display the picture (the TV
screen will be black). Other operations (stopping
display, selecting a file, etc.) will be possible, but may
take a long time.
• While a JPEG disc is loaded, you cannot bring up any
preference display (see page 48).
• This unit does not supports pixel side picture of more
than 2400 pixels. Make sure that the pixel size is the
picture of 2400 pixels or less.
Group 2
up to 99 Groups
per disc
up to 150 files per directory
43
JPEG disc
playback
TV
Make sure that the TV - DVD switch on
the remote control unit is set to "DVD"
when using the 5/∞/2/3, numeric
buttons for controlling the unit.
NOTES for making your own JPEG disc
using a CD-R/CD-RW disc:
XV-N5SL(B).book Page 44 Thursday, May 9, 2002 11:11 AM
JPEG disc playback
3 Select a desired file using 4/¢.
4 Press ENTER.
Basic operations
The selected file (still picture) is shown on the TV.
In the display window, you can see the current
Group and file numbers.
To see a desired picture
Available : JPEG
When loading a JPEG disc, after the disc contents are
read, the JPEG CONTROL display automatically appears
on the TV screen.
JPEG CONTROL
Group : 01 / 10
File : 01 / 06 (Total 28)
spring
sumer
fall
winter
sea
mountain
camp
picnic
skiing
flower
begonia.jpg
german chamomile.jpg
kiwi fruit.jpg
orchard grass.jpg
petunia.jpg
north pole.jpg
JPEG CONTROL
Group : 01 / 10
File : 01 / 06 (Total 28)
spring
sumer
fall
winter
sea
mountain
camp
picnic
skiing
flower
begonia.jpg
german chamomile.jpg
kiwi fruit.jpg
orchard grass.jpg
petunia.jpg
north pole.jpg
Group
column
You can select a desired file for playback via this display.
File column of the
current Group
Selected
file
• You can also select a desired file by pressing 3 to move the
black bar to the right (file) column then using 5/∞.
• To return the black bar to the Group column, press 2.
TV
TV
TV1
DVD
TV2
2
3
TV5
TV6
4
5
TV7
TV8
6
TV9
7
8
9
TV-/--
TV0
MUTING
10
0
OP
SUBTITLE
+10
TITLE/
GROUP
TV/VIDEO
CANCEL
NU CH
ME
+
ME
NU
VOL-
VOL+
ENTER
5/∞
ENTER
CH
OIC
E
CH
-
E
RE
SC
ON
NEXT
PREVIOUS
CLEAR
SELECT
STROBE
REPEAT SUB TITLE AUDIO
DIGEST
N
4/¢
• To dismiss the picture:
Press 7 or MENU.
The TV screen returns to showing the JPEG
CONTROL display.
SLOW+
SLOW-
ANGLE
3D
PHONIC
JPEG disc
playback
• To display another picture:
Use 4/¢ or 5/∞ to select the desired picture.
You can select a picture in another Group.
TV3
1
TV4
RETURN
T
DVD
STANDBY/ON
OPEN/
CLOSE
VFP
ZOOM
AMP VOL
NOTES
• The current Group and file number are also shown on
the display window in the following manner.
RM-SXV009E
REMOTE CONTROL
¶ When the JPEG CONTROL display is shown
1 Make sure that the black (cursor) bar is in the
left (Group) column.
If it is in the right column, press 2 to move it to the
left column.
2 Move the bar to a desired Group using 5/∞.
On the right column, files in the selected Group are
shown.
When selecting a Group, file 1 is initially selected
(highlighted).
44
Current Group
number
Current file
number
• Only JPEG files are shown on the display window.
XV-N5SL(B).book Page 45 Thursday, May 9, 2002 11:11 AM
JPEG disc playback
To zoom in or out the picture [ZOOM]
Available :
JPEG
NOTES
• You can zoom into or out of a picture in slide show
mode if the show is paused (see next column).
• To return to a normal screen:
Press ENTER.
TV
TV
• The image may look coarse when a zoomed image is
displayed.
DVD
TV1
TV2
1
2
3
TV4
TV3
TV5
TV6
4
5
6
TV7
TV8
TV9
7
8
9
TV-/--
TV0
MUTING
10
0
+10
RETURN
T
DVD
STANDBY/ON
OPEN/
CLOSE
OP
SUBTITLE
TITLE/
GROUP
TV/VIDEO
CANCEL
NU CH
ME
+
ME
NU
VOL-
VOL+
ENTER
CH
OIC
E
CH
-
E
RE
SC
ON
NEXT
PREVIOUS
CLEAR
SELECT
STROBE
SLOW+
SLOW-
REPEAT SUB TITLE AUDIO
DIGEST
5/∞/2/3
N
ANGLE
3D
PHONIC
VFP
ZOOM
ZOOM +/–
AMP VOL
To see pictures continuously
[slide show mode]
You can see files (still pictures) one after another
automatically in the slide show mode.
In this mode, each file (still picture) is displayed for
approximately 3 seconds. The next file will then be
displayed.
RM-SXV009E
REMOTE CONTROL
¶ While a JPEG image is displayed on the TV screen
Playback features
1 Press ZOOM + or –.
Available :
TV
Pressing ZOOM + causes the unit to zoom in on the
image, and pressing ZOOM – causes the unit to
zoom out.
Each time you press ZOOM +, the magnification is
doubled (up to × 1024).
Each time you press ZOOM –, the magnification is
halved (down to × 1/8).
STANDBY/ON
OPEN/
CLOSE
TV
TV1
TV3
1
2
3
TV5
TV6
4
5
6
TV7
TV8
TV9
7
8
9
TV-/--
TV0
MUTING
10
0
+10
RETURN
T
DVD
TV2
TV4
OP
JPEG
DVD
SUBTITLE
TITLE/
GROUP
TV/VIDEO
CANCEL
NU CH
ME
+
ME
NU
VOL-
VOL+
ENTER
CH
OIC
E
CH
-
E
RE
SC
ON
NEXT
PREVIOUS
CLEAR
SELECT
3
SLOW+
SLOW-
REPEAT SUB TITLE AUDIO
DIGEST
N
STROBE
ANGLE
3D
PHONIC
VFP
ZOOM
AMP VOL
RM-SXV009E
REMOTE CONTROL
JPEG disc
playback
¶ After inserting a JPEG disc
1 Press 3.
ZOOM x 4
The slide show starts from the beginning of the
disc.
NOTES
• To stop slide show playback (to dismiss the picture) in
the middle of slide show playback:
At the top left of the screen, the information for the
current magnification appears for 5 seconds. While
zoomed in, an indication of the zoomed image
position also is displayed. The next step can be
used to move the image position.
2 Use 5/∞/2/3 to move the zoomed position.
If no button pressed for 5 seconds, the information
for the current magnification disappears.
To display the information, press ZOOM +/– or 5/∞/
2/3 again.
ZOOM x 4
Press 7 or MENU.
The TV screen returns to showing the JPEG CONTROL
display.
Pressing 3 resumes slide show playback from the last
picture displayed.
• To keep showing the current picture while in slide show
mode:
Press 8 or ENTER.
The picture does not change to the next picture.
Pressing 3 resumes the slide show playback from the
next picture.
• If a black screen appears continuously in the slide show
playback:
The file currently displayed may be non-baseline JPEG
file. In this case, select a playable file (a baseline JPEG
file) again (e.g., pressing 7 or MENU to open the JPEG
CONTROL display, etc).
Note that it may take a long time to select another file.
45
XV-N5SL(B).book Page 46 Thursday, May 9, 2002 11:11 AM
JPEG disc playback
Direct selection
Selecting the start point of the slide
show
Available :
TV
TV2
(Front panel display window example)
TV3
1
2
3
TV5
TV6
4
5
6
TV7
TV8
TV9
7
8
9
TV-/--
TV0
MUTING
10
0
SUBTITLE
Numeric
buttons
+10
TITLE/
GROUP
TV/VIDEO
CANCEL
NU CH
ME
+
TITLE/GROUP
ME
NU
VOL-
Group
display area
Current file
number
VOL+
ENTER
CH
OIC
E
CH
-
E
RE
SC
ON
NEXT
PREVIOUS
CLEAR
SELECT
4/¢
SLOW+
REPEAT SUB TITLE AUDIO
DIGEST
N
STROBE
SLOW-
ANGLE
3D
PHONIC
VFP
ZOOM
AMP VOL
RM-SXV009E
REMOTE CONTROL
From the JPEG CONTROL display
¶ While the JPEG CONTROL display is shown
1 Make sure that the black (cursor) bar is in the
left (Group) column.
If it is in the right column, press 2 to move it to the
left column.
JPEG CONTROL
JPEG disc
playback
"--" is shown in the Group display area of the
display window.
DVD
TV4
RETURN
T
JPEG
DVD
TV
TV1
OP
1 Press TITLE/GROUP.
STANDBY/ON
OPEN/
CLOSE
5/∞
¶ During playback or while stopped
Group : 01 / 10
File : 01 / 06 (Total 28)
spring
sumer
fall
winter
sea
mountain
camp
picnic
skiing
flower
begonia.jpg
german chamomile.jpg
kiwi fruit.jpg
orchard grass.jpg
petunia.jpg
north pole.jpg
2 Use the numeric buttons to specify a desired
Group number.
• To select a number between 1 and 10:
Press the corresponding button for the number.
• To select a number higher than 10:
Use the +10 button.
Examples:
To select 13: +10 → 3
To select 34: +10 → +10 → +10 → 4
To select 40: +10 → +10 → +10 → 10
Specify the Group number within several seconds
after pressing TITLE/GROUP (i.e. while the display
window shows "--" for the Group number, instead
of the current Group number).
3 Use the numeric buttons to specify a desired
file number.
You can specify the file number according to the
order in the JPEG CONTROL display. You must
specify a file number within 5 seconds after
carrying out step 2.
The unit starts slide show playback from the
specified file. If you do not specify a file number,
the unit starts slide show playback from the first file
in the Group.
• You can skip a file in the slide show by using 4/¢ or
5/∞.
2 Move the bar to a desired Group using 5/∞.
In the right column, files in the selected Group are
shown.
When selecting a Group, file 1 is initially selected
(highlighted).
3 Select a desired file using 4/¢.
4 Press 3.
The slide show starts from the specified file.
46
• You can select a file in the current group by using the
numeric buttons.
XV-N5SL(B).book Page 47 Thursday, May 9, 2002 11:11 AM
JPEG disc playback
(TV Screen)
NOTES
Selected repeat mode
• To stop slide show playback (to dismiss the picture) in
the middle of slide show playback:
Press 7 or MENU.
The TV screen returns to showing the JPEG CONTROL
display.
Pressing 3 resumes slide show playback from the last
picture you displayed.
• To keep showing the current picture while in slide show
mode
Press 8 or ENTER.
The picture does not change to the next picture.
Pressing 3 resumes the slide show playback from the
next picture.
JPEG CONTROL
REPEAT GROUP
Group : 01 / 10
File : 01 / 06 (Total 28)
spring
sumer
fall
winter
sea
mountain
camp
picnic
skiing
flower
begonia.jpg
german chamomile.jpg
kiwi fruit.jpg
orchard grass.jpg
petunia.jpg
north pole.jpg
(Display window)
• If a