1
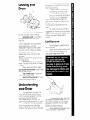
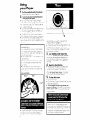
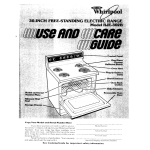
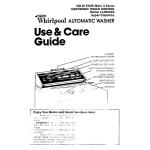
Models
WhirlpOOl
LE6400XK:
LG6401XK
DRYER
Use& Care
Guide
‘I
Copy
your Model
and Serial Numbers
If you ever need to call for service, you
SUIIIneed to give the Model and Serial Numbers Yol,r dryer has these rumbers
on a plate
behind the door
Copy Fe numbers I~I these spaces
Keep this book in the Laundry InformatIon
Center with your Drver Gu/:le sales ~1113
ond warranty
%lode’ “’
here
Before using
your Dryer
Please read this lnooklet to be
sure your dryer IS Installed
and used
properly
It WIII help you get the best
results and longest ilfe your dryer was
deslgned
to give>
You are personally
responsible for making sure that your dryer...
Is Installed by o qualified
Installer.
Is properly
installed
and leveled
In a
well ventilated
room
on a floor that
can support the weight
l Is connected
t,I the right kind of outlet.
electric
supply and grounding
l Is properly
corlnected
to fuel and
exhaust systems
l Is used
only for jobs normally
expected
of home clothes dryers
l Is properly
mantained
l Is out of the weother
l Is not run where
‘here may be exploslve fumes
l Is not used
by children
or anyone
unable to operate
t properly.
l
l
Remove ?he Consumer
Buy
Guide label before using your dryer It
WIII be easier to remove
Wpe out the drum with a damp
cloth to remove =In\i dust
SPECIAL INSTRUCTIONS: See the
Dryer Guide for drying tips, information about permanent
press and
knits, instructions
for drying special
items and for things not to be dried in
your dryer.
See the lnstalla:~o~
lr’structlons
complete
informa+ion
for
FOR YOUR SAFETY
If you smell gas:
1. Open windows
2. Don’t touch
electrical
switches
3. Extinguish any open
flame
4
Immediately
your gas supplier
2
call
FOR YOUR SAFETY
Do not store or use
gasoline or other
flammable
vapors and
liquids in the vicinity of
this or any other
appliance.
I
Please read this manual
Follow the InstructIons
to help
you get the best drying
results
Save the manual
for future use
I
Contents
Before Using Your Dryer
Loading
Your Dryer
Lint Screen
Understanding
Your Dryer
Selecting
Cycles and
Temperature
Settings
Selecting
Drying Times
TUMBLE PRESS” Control
FLUFF AIR
If You Need Service or Help
1 Before Calling
for Service
2. If You Need Service
3 If You Have A Problem
7
8
loading
Dryer
your
/I- -
For best dn/ir-ig results and energy
sort dryer loads carefully
Separate
loads according
to
the type of fabric and weight
For
example
l Dry heavy
fabrics
(denims, towels,
cottons]
separately
from light fabrics
[permanent
press, synthetics).
l Separate
lint givers (towels, sweatshirts, etc ) from IInt takers (synthetics.
blends, permanent
press]
l Keep
dark colors and light colors
separate
l Keep
colorfast
Items away from noncolorfast
fabrics.
Allow room for Items to tumble
freely The load will dry faster with fewer
wrinkles
When drying permanent
press,
dry smaller-than-normal
loads for the
best wrinkle removal.
Use a mesh bag to hold small
items such as baby socks
Read the Dryer Guide for more
hints on sorting and loading
savings,
The cool-down
time ISbuilt in SO
the laundry WI// not be too hot w7en the
dryer stops tumbling
1 When a load of hot laundry
IS
not tumbling,
wrinkles can set in
2 A load of hot laundry can
be too hot to handle comfortably
The other cycle IS PERMANENT
PRESS. This cycle has a longer cooldown time at the end This extra time IS
designed
to give permanent
press fabrics the extra Wrinkle protection
they
need
This Use & Care Guide contains
suggestions
on the way to use your dryer
to get the best results and longest useful
life from your dryer Please read it
carefullv.
lint Screen
The lint screen IS under the lid on
top of the dryer.
C/eon the ht screen before each
iood A screen that’s blocked
by lint
can cause longer drying times
Understanding
your Dryer
Your dryer has five cycles
The
HEAVY, HEAVY, MEDIUM and
Cycles are designed
to tumble
for a certain
length of
depending
on the load. You
the drying temperature
you want
In all these cycles, the heat shuts
off 5 minutes before the dryer stops
tumbling
This helps cool down the load
EXTRA
LIGHT
laundry
time.
select
To remove the screen, open the
lid and pull the screen straight out Roll
the lint off the screen with your fingers
DO NOT rinse the screen or wash
it. Wet lint is hard to remove.
it firmly
When replacing
the screen,
Into place. Close the 110
push
Using
your Dryer
1f
Put the sorted load in the dryer
and close the door tightly.
2.
Turn the Cycle Control
the cycle you want.
Knob to
Jje ,!GHT for small loads of light.+llJ-,t fatrlcs
-he ~lGclT Cycle runs for
*rti +ast time Use LIGHT ulso to damp
Jr,4 .lads for lroriing
l
use MEC for n’3rmul size ioads of light
\I’ 7~edlclrn weight fabrics
[sheets, p11
;tiycoses,
shirts, etc I
l
Lse PEAdY for normal size loads of
hecb J fabrics
jtotieis
jeans. corduroys)
l
Use EX b!EAV’f for large loads or for
I~CIL;~ bulky items (quilts
spreads.
blcnietc etc
l
SUGGESTION:
yc,” carI ;et the Cycle Control Knob
clr#\ where pas!, between
or beiow
‘ni- tX tiEA’&’ and LIGH’ settings
FOI
Ihe fIrsi few loads
l
Set the pointer ir8 the middle of the
loud settlrg
l
:f the !ocd IS drier thap you want
se’ I? to the right [for less time! the
re~‘time
l
If +he load IS not as d+ as you
mnt
se: it to the left [for more time:
the nex+ time
For example:
HEAVY
MED
:Yrq rig time ,jou war:
(See Setting
Drying Times on page 6 ]
l
If laundry IS left in the dryer after I: hoc
s:opped
tumbling,
use the Tumble
Press Control setting (page
61 to help
remove the wrinkles
3.
Set TEMPERATURE SELECTOR.
Turn the TEMPERATURE SELECTOR to
Ihe drying temperature
needed
for
the load See page 5 for suggested
settings
l
4.
Push the Start Button.
Make sure the door IS closed and
Cycle Control IS set If the door IS
opened
durtng the cycle, the dryer will
stop To restart the dryer, close the
iyoor and push the Start Button
l
5.
To stop the dryer:
Open the door
l
3r, turn the Cycle
of the OFF positions.
l
LIGH-I
Control
Knob to one
l
To change
the setting while the
dryer is running, turn the Cycle Control
Knob, either way, so it points
iing you wont
l
Use PERMANENT PRESS for a longer
oersod of cool-down
time Set the
ool-I?er fc.sr+hc r~ ~~jber sf T>inutes of
4
to the set-
IMPORTANT
To help reduce wrinkllng, take the load from the dryer as
soon as tumbling
stops This IS very
important
for permanent
press, knits
ond other synthetic
fcbrlcs
3
4
SELECTING CYCLES AND TEMPERATURE SETTINGS
Zhoose
the correc’
,etti-1
j’. a::cordlng
tc ‘“e
chart
below
CYCLE
TYPE OF LOAD
COTTONS-
LINENS
t i;%
YEA? ieb
srgr
c 1s ~ BeaspreJ
3s
mattress
pads
‘>uli+c
Hi;,,,‘; ~iwl?ly:
? xx cordurc’,c
tiork
:*e”
7ithes
8~’ .s
Sheets pllloyvcoses
fLnt ?’ :Mll/E GHcotter
ucderwta
d#apers
I L;w-ir:[ Gt+TC%
mCh15 x aomp
dry
BatIsles
organdies
tngerte
EX rlE,4VY
HEAVY
MEDIUM
LIGHT
PERMANENT PRESS - SYNTHETIC FIBERS AND
BLENDS
4EWWt~GB’
Vi-‘> Cb
raIncoals,
etc
hf[ J’,PJ&/E’Gci’
.:;ilq’:
sneets slacks
&e~Vf~GM-,~AB
v’s)!
eti
?QLY~ clothes
<hlrts, play
L ,r jerie,
PERMANENT
PRESS
40-50 MIN
jackets
c othes
blouses
RAYONS
BLtNDSHt4lY!&EtG+J( ;TT’c’NS
--shtr?s slacks
shirts etc
I GHwElGHliSYNTHETIC FABRICS (poivester,
ocyl~c, etc ) orld Blends ~ Lingerie. blouses
dresses, etc
: ~L:BR/CS ~ CuriaIns
DE- CATELYCON:
TrjUC-t L_
~:r 3 panels
) Sheers
FOAM RUBBER ARTICLES ~ u IIOWS.bras etc
Drv r othb?s for 8’onlny
set control
30-40
MN
20-30
MIN
dresses
PERMANENT
PRESS
40-50 MIN
KNITS
To Damp
20rcwfes
TEMPERATURE
SELECTOR
PERM T PRESS
HEAVY HlGr
PERM T PRESS
HEAVY HISF
PERM TPRESS
HEA\;
HIGH
PERN T “QESS
HEAVv HIGH
PERM T PRESS
HEAVY HiGH
PERM T PRESS~
HEAVY HIGH
PERM T PRESSHEAVY HlGh
PERM - PRESSHEAVY HIGH
30-40
MIN
KNITS GENTLE-_S!vv
20-30
MIN
KNITS GENTLE LC’:
FLUPC 4 R
(2
PERMANENT
PRESS
20-33 MIN
IP LIGHT setttng
o( PERMANENT
PRESS cycle
for
MIXED LOADS
If You dry a mIxed lead ot ~~ar~ous weights
of fobrlcs,
select the cycle for the lighter
fobrtc
When dryer stops remove
the dry articles
and reset the control
weigh!
Setting
Times
Drying
Modern
c’bers arc desrgned
witrl ar,ing
temr eratures
needed
to
safeI\
handle
rr 3lerri fabrics
Cooldcwr
times hlav- beer1 added
to heat
settings
You rni\Jb’ no+lie slrghtly
longer ur’v’ rjg tlr es
‘ekes -.: dry a load
The +Ime
depends
or
0 ‘be icrrG ot to:
t, r%e sh: ond the
J large :oad of jeans
s/ze SC+r’;e lcud
~111take a lot lc’jger to dry than a
srna,l load of light synthetrcs.
l ,The 3rrount
0’ ,y’osture
,n the load
Towels hold a lcmt of moisture.
synthetics
don t Synthetics
dry foster
0 :e,-rrpe;atufe
c+ ihe r/nse woter
Cold
rinses help save on energy
and wrin
kles, but a cold load WIII take slightly
longer to dry than a worm one
*Amount
of //nt on the Screen
A full
lint screen slows the air flow and can
make drying time longer
l Jemperoture
cround
the dryer The
dryer heats room arr If that arr IS cold,
dryng
time will be longer
l Proper
~nstaiic’~on
and exhoust
sys~
te-ns For the fastest possible
dryng
time, InstallIng
and exhausting
your
dryer properly
IS Important
See rnstallation instructrons
FLUFFAIR
Thus temperature
setting IS useful
for fluffing beddlng.
pillows and clothing, or dusting drapes
It IS also best
to use when damp-drying
heatsensitive items
FLUFF AIR should be used for
such Items as plastic shower curtains
or tablecloths,
rubber-backed
rugs,
some pillows, stuffed toys. etc
l
Turn the TEMPERATURE SELECTOR to
FLUFF AIR
l
Turn the Cycle Control Knob to the
number of minutes you want in the
PERMANENT PRESS Cycle
l
Pusi- the Start Button
TUMBLE PRESS ’
Control
This setting IS useful for removing
wrinkles from packing
in suitcases or
closets. TUMBLE PRESS will help put them
back into their pre-set shape.
l
Set Cycle Control Knob to TUMBLE
l
Set TEMPERATURE SELECTOR to
PERM’T PRESS HEAVY HIGH.
l
Push the Start Button
For best results, TUMBLE PRESS
only CI few items at a time; put them on
hangers or fold them us soon as the
dryer stops.
If You Need
Service or Help,
We Suggest You
Follow These
Three Steps:
1. Before
calling
for service.
...
Problems are sometimes
ccusc
by little things $you can correct
wItho\
tools Check this list before you call
for service
DRYER DOES NOT F’U&
l Is electric
pcwer N;orc plugged
In7
l
Is the dryer door olosed tightly? YOL
dryer has a switch by the door that
shuts off the dryer if the door IS
opened
l
Check csrcui+ breakers
fuse box
or fuses
p +i-le
DR’,‘k? RUNS B JT DOES NOT HEAT
l Is the Cycle
Control Knob poirtlng
to at least 10 minutes or LIGHT?
(The last minutes are cool~dowr
time 1
l Is It c gas drqer?
See if the gas IS
turfled or If noi turn the Cycle Control
Krlob to OFF Turn on the gas and welt
five minutes for the automatic
stiyItc?
tc reset. Ther try starting It cgcln
l IS It an electric
dryer? Check the circult breakers
or fuses In the fuse box
A-, electric
dryer WIII have two fuses If
one ISblown, the dryer may run, but
not heat
DRYING TIME IS LONGER THAN USUAL
l Check
the lint screen
Remove IInt.
Keep the screen clean
l Modern
dryers are designed
with
dn/ing temperatures
needed
to safely
handle
modern
fabrics
Cool-down
times have been added
to heat settings You might notice slightly longer
dwing times
2. If you need
service.
:
” “1.
l
Did you push the Start Button’
If your WHIRLPOOL
appliance
ever
needs service anywhere
in the United
States, help ISjust a phone call away
to your nearest Whirlpool
franchised
TECH-CARE’
service representative.
WhIrlpool
maintains
a nationwide
network of franchised
TECH-CARE service companies
to fulfill your warranty
and provide
after-warranty
service and
maintenance
to keep your WHIRLPOOL
cppllcnce
in peck condition.
You ” find your necres’ ‘ECH-CARE
serdlce company
listec in i/our local
telephone
book Yellow Pages under
Washers
Dryers
Repairing
or Servicing Should you not find a listing, dial
free, the Whirlpool
COOL-LINE. service assistance
telephone
number
(800) 253-1301.
When calling from:
Michigan
(800) 632-2243
Alaska &
Hawaii
(800) 253-l 121
If you move...To
make sure that your
appliance
IS correctly
rnstclled
and to
Insure Its continued
sctrsfcctory
operairon.
please telephone
your
nearest TECH-CARE
service company
for lnstcllct~on
or to get the name of a
quaIlfred
rnstcller
(Instcllatron
cost will,
of course, be paid by you j
Helpful
hinfs...You
con help your
TECH-CARE service representative
give
you faster service if you include
the
model and serial number of your
cppirance
wheri requesting
service
Also, return your sales slip and warranty
to verify your warranty
status.
T&md
PCjrt,Xo 691254 Re. L
LOKPOKATION
Remember...Your
TECH-CARE service
representative
is specially
trained
In the
expert repcrrrng
and servicrng
of your
‘WHIRLPOOL cpplrcnces
He can help
you maintain
the quality
orIgInally
built
Into your WHIRLPOOL appliance
So why
not take the time, now, to look up his
‘elephone
number and jot it down In the
space provided
on the cover
3. If you have
a problem.
:
Call Whirlpool
Corporation
In Benton
Harbor at the COOL-LINE
service
assistance
telephone
number [see Step
2) or write
Mr Stephen E Upton, Vice President
WhIrlpool
Corporctlon
Administrative
Center
2000 U S 33 North
Benton Harbor, Mlchlgcn
49022
If you must call or write, please
provide
your name, address,
telephone
number, type of cppllcnce,
brand, model, serial number, date of
purchase,
the dealer’s
name, and a
complete
description
of the problem
IS needed
In order to
This Information
better respond
to your request for
assistance
Benton
Harbor,
Mlchlydn
Automatic
Washers,
Clothes
Dryers,
Freezers,
Refrlyerator
Freezers,
Ice
Makers.
Lllshwashers,
Bualt 11, Ovens and Surface
Umts,
Ranges,
Microwave
Ovens,
Compactors,
Room
Air Cnnd~t~nn~rn,
Oehumldlflerr,
Central
Heatlnq and Aar Condltmmny
Systems.
Printed
ir
USA