1
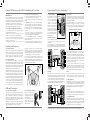
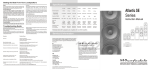
Wharfedale Diamond 75th Anniversary Special D9.1
Specifications
Mounting:
Stand; bookshelf; wall
Bass/Midrange Unit:
5"
Tweeter:
25mm Textile Dome
Recommended Amplifier Power:
20 - 100 Watts
Nominal Impedance:
6 Ohms
Sensitivity (1W/1Metre):
86dB
Frequency Range (-6 dB):
50 Hz - 24 kHz
HF limit (-10dB):
44 kHz
Freq Fb:
50 Hz
Crossover Frequency:
2.2 kHz
Dimensions (H x W x D):
296 x 194 x 278 mm
Diamond 75th Anniversary Special D9.1
User Guide
Wharfedale loudspeakers are compatible with 4 and 8 Ohm amplifiers
Service & Information
Product service enquiries should, in the first instance, be referred to the
supplying dealer. In cases of difficulty or for other product enquiries
please contact the appointed Wharfedale distributor for the country.
United States of America
IAG America, Inc.
8440 154th Avenue NE
Redmond, Washington 98052
Tel: +1 425 861 3909
Fax: +1 425 861 3906
UK (and information about all other territories)
Wharfedale International Ltd.
IAG House, Sovereign Court,
Ermine Business Park, Huntingdon,
Cambs PE29 6XU, England.
Tel: +44 (0)1480 447700
Fax: +44 (0)1480 431767
UK (and information about all other territories)
Room 2310 - 2311 Press Building,
Shennan Road C, Shenzhen,
China
Tel: +86-755-82091200
Fax: +86-755-82091205
The name WHARFEDALE is a registered trademark of Wharfedale International Limited.
Wharfedale has a policy of continuous product development and reserves the right to change
specification without notice.
Loudspeaker Manufacturers since 1932
I
n 1932, when Gilbert Briggs founded the
Wharfedale Wireless Works, his company
was at the leading edge of an exciting new
technology which was dedicated to bringing the
pleasure of music and entertainment to a wide
range of people. As the technology advanced
Wharfedale gave many music lovers their first
taste of High Fidelity, mounting a series of live
sound demonstrations which excited the audio
world and heralded the era of the modern hi-fi
loudspeaker.
Today, 75 years after our inception, Wharfedale
still takes the same uncompromising approach to
the design and manufacture of every loudspeaker
system, using high quality components and stateof-the-art testing to ensure consistently high
performance. And that means that you can
continue to count on the quality of all Wharfedale
products.
COMMEMORATIVE LOUDSPEAKER - LIMITED EDITION
Connecting and Using Your Loudspeakers
Diamond 75th Anniversary Special D9.1 Installation and User Guide
Introduction
For 75 years Wharfedale has been at the forefront of British
loudspeakers. This special Anniversary edition of our most famous
loudspeaker celebrates our long tradition. Constructed from the
finest materials and hand finished by skilled craftsmen, we believe
this loudspeaker is one of the finest in the world at any price.
Please read the instructions carefully before installing your
Diamond 75th Anniversary Special D9.1 loudspeakers.
General Advice and Safety Recommendations
$ Before making connections to your sound system, switch off
the amplifier and all connected sources.
$ When you switch on the system or change sources, set the
volume control to minimum and turn up the level gradually.
$ Do not use your amplifier at full volume. The position of the
Volume Control is NOT a reliable guide as to the maximum
capabilities of your sound system.
$ Playing the system with extreme settings of volume and tone
controls may damage the amplifier and loudspeakers.
$ Do not connect loudspeaker terminals to the mains supply.
$ Ensure that your loudspeakers are correctly wired.
$ Do not subject your loudspeakers to excessive cold, heat or
sunlight.
$ WARNING: To reduce the risk of fire or electrical shock do
not expose this product to rain or moisture. The product must not
be exposed to dripping and splashing and no object filled with
liquids such as a vase of flowers - should be placed on the product.
$ No naked flame sources - such as candles - must be placed on
the product.
$ Do not place heavy objects on top of loudspeaker cabinets. If
you wish to play your loudspeakers with their grilles removed be
careful to protect the drive units from children and pets.
$ Do not use makeshift stands. Always fit a manufacturer's
approved stand using the instructions and the fixings provided.
Your dealer will advise you.
$ Do not attempt to dismantle the loudspeaker. There are no
user serviceable parts inside and you will invalidate the warranty.
Unpacking and Positioning
Carefully remove each loudspeaker from the packing carton. Be
especially careful when removing the polythene bag. DO NOT
attempt to lift the loudspeaker by the polythene bag. Retain the
packing for future use. If you decide to dispose of the packing,
please do so having regard to recycling regulations in your area.
Positioning the Speakers
Your loudspeakers offer great flexibility of positioning. The
loudspeakers should ideally be stand mounted though they may be
placed on a rigid shelf. The loudspeakers also feature a threaded
mount which accepts our specially designed wall bracket. Several
floor stands and alternative wall brackets are available and your
dealer will be pleased to recommend suitable designs.
The loudspeaker drive units are screened so they may safely be
placed close to a TV screen without degrading the colour balance.
Your speakers can be positioned as close as 0.5m - 1m from a side
wall. Ideally there should be at least 200mm between the backs of
the cabinets and the walls. If the loudspeakers are positioned close
to the wall they should be angled inwards slightly and be separated
by a distance of 3 metres. If the loudspeakers are placed further
away from the walls, the inward angle may be increased by up to
40%, although this may restrict the width of the listening position.
As a general rule the bass output will be higher when the
loudspeaker is positioned close to a wall and lower when the
loudspeaker is positioned away from a wall. If they are placed too
close to the walls the bass may boom and become indistinct. Please
experiment with different configurations and play a range of
music before finalising the position of the loudspeakers.
For the best results, place the loudspeakers on rigid stands, well
away from the walls, between two and four metres apart and
equidistant from the listening position. The loudspeakers should
be angled slightly inward, facing the listener. Ideally the tweeters
should be at ear level to a seated listener.
Home Theatre
STANDARD
CONNECTION
Your loudspeakers use a specially STRAPS REMOVED
designed bi-wireable crossover FOR BI-WIRING
panel with four terminal binding
posts. Please follow the drawing
carefully to see the correct
orientation of the loudspeaker
terminals. The upper terminals
connect to the treble unit, the
lower pair to the bass unit. As
supplied, the treble terminal pair
is connected to the bass terminal
pair via removable metal straps.
These should beleft in place for
standard installations.
The 70th Anniversary loudspeakers are ideal for Home Theatre.
To complete the system you should choose the Centre and Effects
speakers with a pertnering subwoofer from our award-winning
Wharfedale Diamond 9 range
A typical Home Theatre system is illustrated. The Front
loudspeakers should be placed on either side of the television
screen, 2 to 4 metres apart. For fuller operating details, consult
your AV processor, subwoofer and effects loudspeaker manuals.
HOME THEATRE SYSTEM WITH REAR MOUNTED D9 DFS SURROUNDS
CENTRE
FRONT
LEFT
>0.7metre
15 -
>200 mm
4
HF+
HF+
AMPLIFIER
HF-
RIGHT SPEAKER
HF-
LEFT SPEAKER
LF+
LF+
LF-
LF-
RIGHT SPEAKER
LEFT SPEAKER
Connecting Speaker Terminals
Cable designed for audio applications will usually offer better
performance than general purpose 'bell' or 'zip' wire. Choose a
cable of suitable diameter - cable that is too thin will limit the
dynamics of the sound and may impair the system's bass response.
Audio cable is polarised, with two cores of different colours, or
often a coloured tracer in the case of twin cable.
Split the twin cores to a depth of about 40mm. Carefully strip the
insulation from each end, leaving about 10mm of bare wire. If the
cable is stranded, lightly twist to gather any loose strands.
Unscrew the terminal. Thread
the bared end of each cable
through the hole in the bottom
of the terminal post.
Ensure that there are no loose
strands which may touch
adjacent terminals. Retighten
the terminal securely.
REAR
RIGHT
Many digital AV Processors require you to specify the size of
speakers in the various channels. These are usually ‘Large’ or
‘Small'. The Rear and Centre channels should be set to 'Small'.
If a sub bass unit is in use set the Front channels to 'Small'. All the
bass will now be routed through the sub bass unit. If no sub bass
unit is in use, set the Front Channel to 'Large'. All the system bass is
now routed through the Front speakers. Set the subwoofer channel
on the processor to ' No' or 'Off'.
If your AV processor has an LFE control, use care as the LFE
channel may contain heavy low frequencies which can overload a
domestic unit. If you hear popping or thumping noises coming
from the Front speakers or the sub bass unit, turn the AV
Processor's volume level down and back off the LFE level.
Phase
Using separate cables to feed the treble and bass units reduces
intermodulation effects and improves headroom and clarity. The
technique is known as Bi-Wiring. Bi-Wiring requires two lengths
of twin core cable between the amplifier and each loudspeaker.
Unscrew each terminal a few turns and remove the metal straps.
Connect the cables between the amplifier and the loudspeakers as
indicated below and re-tighten all the terminals securely.
If the sound lacks definition or the bass is indistinct, the speakers
could be incorrectly wired (out of phase). In this case check the
wiring to the loudspeakers, especially if your speakers are bi-wired.
HF10mm
40mm
REAR
LEFT
Bi-Wiring
HF+
Choosing and Preparing Cables
FRONT
RIGHT
STANDARD CONNCTION
BI-WIRED CONNCTION
Cables and Connections
SUB
WOOFER
Standard Connections
Choose a suitable length of twin
core speaker cable for each channel, and prepare the ends as
described above.
Connect the Red, positive (+) terminal of the Left loudspeaker to
the corresponding Red, positive (+) amplifier terminal; connect the
Black, negative (-) terminals similarly. Repeat for the Right Channel.
2 - 4 metres
0º
Unpacking the Speakers
Crossover Networks
HF+
AMPLIFIER
RIGHT SPEAKER
LEFT SPEAKER
Running In
Care and Maintenance
LF+
LF-
RIGHT SPEAKER
A loudspeaker is only as good as the signal it gets. Your amplifier
should have ample power - a low powered amplifier could run out
of steam and the distortion is unpleasant to listen to and could
damage your speakers. A large amplifier will sound better and
enhance the reliability and performance of your loudspeakers.
Loudspeakers need a 'running in' period. For the first 50 hours or
so exercise care and play your system at reasonable volume levels.
After running in, you will notice a significant sonic improvement.
HF-
LF+
LF-
Ancillary Equipment
LEFT SPEAKER
The cabinets can be occasionally wiped with a damp (not wet)
cloth and buffed with a soft cloth.To clean the grilles, remove them
and brush gently with a soft brush. Never use solvent cleaners,
minor stains are best removed with soap and lukewarm water. Do
not touch the drive units as they can easily be damaged.
For further information on a variety of hi-fi and audio-visual topics, visit our website at www.wharfedale.co.uk