1
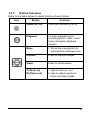
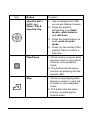
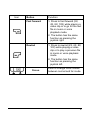
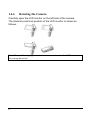
Preface
Congratulations on your purchase of this great digital video
camcorder/ camera, which also is a music player. Please make sure
that you read this manual carefully and keep it in a safe place for
future reference. Thank you for choosing VuPoint Solutions.
About this manual
Every effort has been made to ensure that the contents of this
manual are correct and up-to-date. However, no guarantee is made
regarding the accuracy of the contents, and the manufacturer
reserves the right to make changes without notice.
Copyright
© Copyright 2006.
All rights reserved. No part of this publication may be reproduced,
transmitted, transcribed, stored in a retrieval system or translated
into any language or computer language, in any form or by any
means, electronic, mechanical, magnetic, optical, chemical, manual
or otherwise, without the prior written permission of the
manufacturer.
i
Safety
•
Do no use or store this camera in dusty, dirty, or sandy areas,
as its components may be damaged.
•
Do not store this camera in hot areas. High temperatures can
shorten the life of electronic devices, and damage or melt
certain plastic parts.
•
Do not store this camera in cold areas. When the product
warms up to its normal temperature, moisture can form inside,
which may cause damage to the internal electronic circuits.
•
Do not attempt to open the casing.
•
Do not drop or knock the camera. Rough handling may
damage the internal components.
•
Do not use harsh chemicals, cleaning solvents or strong
detergents to clean this camera. Clean the camera with a
slightly dampened soft cloth.
•
If the product or any of its accessories are not working properly,
please contact VuPoint Solutions at
[email protected]
ii
Table of contents
Preface ................................................................................................... i
About this manual.................................................................................. i
Copyright................................................................................................ i
Safety..................................................................................................... ii
1
Introducing the Camera................................................... 1
1.1
1.2
1.3
1.4
System requirements ................................................................. 1
Features..................................................................................... 1
Package contents....................................................................... 2
About the Camera ..................................................................... 3
1.4.1
1.4.2
1.4.3
1.4.4
1.4.5
1.4.6
2
Front view.............................................................................. 3
Right view.............................................................................. 4
Left view ................................................................................ 5
Bottom view........................................................................... 5
Button functions..................................................................... 6
Rotating the Camera ............................................................. 9
Getting Started ............................................................... 10
2.1
Charging ................................................................................. 10
2.1.1
2.1.2
2.2
2.3
3
Replacing battery ................................................................ 10
Charging.............................................................................. 10
SD card.................................................................................... 11
Turning on/off the Camera..................................................... 12
Using the digital video camcorder................................. 13
3.1
3.2
3.3
3.3.1
3.3.2
3.3.3
3.3.4
3.3.5
3.3.6
Using the LCD display ............................................................ 13
About the LED ........................................................................ 14
Setup menu.............................................................................. 15
Sound effect ........................................................................ 15
USB mode........................................................................... 15
Date and time ...................................................................... 16
Welcome picture.................................................................. 16
Auto power off ..................................................................... 17
LCD brightness.................................................................... 17
3.3.7
3.3.8
3.3.9
3.3.10
3.4
Setting menu ........................................................................... 19
3.4.1
3.4.2
4
Language ............................................................................ 18
TV system ........................................................................... 18
Format................................................................................. 19
Default................................................................................. 19
Video mode ......................................................................... 20
Photo mode......................................................................... 22
Preview mode.................................................................. 29
4.1
4.2
4.3
4.4
4.5
5
Preview mode icons................................................................. 29
Using the self-timer function .................................................. 30
Setting the Flash mode............................................................ 31
White balance.......................................................................... 31
Using the zoom function ......................................................... 31
Shooting your first video................................................ 32
5.1
5.2
5.3
6
DV mode settings..................................................................... 32
Using the zoom function ......................................................... 32
Using the self-timer function .................................................. 32
Taking your first picture................................................ 33
6.1
6.2
6.3
6.4
7
Photo mode settings ................................................................ 33
Using the zoom function ......................................................... 33
Setting the Flash mode............................................................ 33
Using the self-timer function .................................................. 33
Voice recorder mode ...................................................... 34
7.1
7.2
8
Voice recorder buttons ............................................................ 34
Voice recorder icons................................................................ 35
Playback Mode ............................................................... 36
8.1
8.1.1
8.1.2
8.1.3
8.2
Photo ....................................................................................... 36
Viewing photos .................................................................... 36
Photo Play icons.................................................................. 37
Photo playback menu .......................................................... 37
Video........................................................................................ 41
8.2.1
8.2.2
8.2.3
8.2.4
8.3
Voice........................................................................................ 46
8.3.1
8.3.2
8.3.3
8.3.4
8.4
Listening to audio clips ........................................................ 46
Voice playback mode buttons.............................................. 47
Voice Play icons .................................................................. 49
Voice playback menu .......................................................... 49
Music....................................................................................... 50
8.4.1
8.4.2
8.4.3
8.4.4
8.5
Import Music files into the camera ....................................... 51
Play list and Music mode buttons ........................................ 51
Music mode icons................................................................ 54
Music playback mode menu ................................................ 55
Games...................................................................................... 57
8.5.1
8.5.2
8.5.3
8.5.4
9
Viewing videos .................................................................... 41
Video playback mode buttons.............................................. 42
Video play icons .................................................................. 44
Video play menu.................................................................. 45
Sodoku ................................................................................ 57
Tetris ................................................................................... 58
Moving box.......................................................................... 58
Lotto .................................................................................... 59
Installing the Applications ............................................. 60
9.1
Drivers ..................................................................................... 60
9.1.1
10
10.1
10.2
Camera Driver ..................................................................... 60
Connect to a TV.............................................................. 61
View photos and videos on the TV ...................................... 61
Recording TV programs...................................................... 62
11
Remote control................................................................ 63
Appendix.................................................................................... 65
Specifications ...................................................................................... 65
1
Introducing the Camera
Read this section to learn about the features and functions of this
digital video camcorder. This chapter also covers system
requirements, package contents, and the camera views.
System requirements
1.1
This camera requires a host PC with the following specifications:
•
Windows® XP, 2000, ME, 98SE operating system
•
Intel® Pentium III 1 GHz CPU or higher
•
At least 256 MB of RAM or higher
•
Standard USB 1.1 port or higher
•
4x speed CD-ROM drive or higher
•
At least 200 MB of available disk space
A USB 1.1 port will enable you to transfer files to and from the host PC, but
transfer speeds will be much faster with a USB 2.0 port.
1.2
Features
This camera offers a variety of features and functions including:
1
•
Digital Video Camera
•
Digital still camera (with 8 x digital zoom, 5 Mega pixels)
•
Music player
•
Voice recorder
•
TV/VCD/DVD recorder
•
Games
1.3
Package contents
All the following items should be present in the Camera package. If
any of them is missing or appears damaged, please contact your
dealer immediately.
User’s manual
Earphone
Pouch
Software CD
AV cable
Remote control
AC adapter
Quick Start Guide
USB cable
Strap
Battery
2
1.4
About the Camera
Refer to the following diagrams to familiarize yourself with the
buttons and controls of this camera.
1.4.1
Front view
Fast forward button
Stop button
Play/Pause button
Play back button
Rewind button
Power button
Play back button
3
1.4.2
Right view
Joystick ring
Zoom in button
Video record button
Zoom out button
Speaker
Joystick
Picture capture button
Menu button
Charge indicator LED
USB port
AV jack
Earphone jack/TV out
Hand Strap buckle
Focus button
4
1.4.3
Left view
Flash bulb
Lens
Self-timer LED
IR
Microphone
hole
1.4.4
Bottom view
Battery door
5
Tripod screw
1.4.5
Button functions
Refer to the table below for detail function of each button:
Icon
Button
Function
Power on / off
Turns the Camera on or off.
Playback
To enter playback menu
(including photo, video, voice,
music and game playback
modes).
Menu
1. Press the menu button to
enter/exit the settings menu.
Capture
Press to capture images.
Video
Press to shoot videos.
T (Zoom in)/
1. Use to zoom in / out.
W (Zoom out)
2. Use to adjust volume in
music and play modes.
6
Icon
Button
Function
Joystick (left /
right / up /
down / OK) &
Joystick ring
1. Use to navigate the OSD
(on screen display) menus.
2. Press the joystick
left/right/up to set flash
modes, white balance
and self-timer
3. Press the joystick down to
enter voice recorder
mode.
4. Press (in) the center of the
joystick (OK) to confirm a
selection.
Play/Pause
1. Press to play or pause while
playing music or voice clip in
music or voice playback
mode.
2. This button has the same
function as pressing into the
joystick (OK).
Stop
1. Press to stop playing when
playing a music or voice clip
in music or voice playback
mode.
2. The button has the same
function as pressing the
joystick down.
7
Icon
Button
Function
Fast forward
1. Press to fast forward (2X,
4X, 8X, 10X) while playing a
video clip or to go to the next
file in music or voice
playback mode.
2. The button has the same
function as pressing the
joystick right.
Rewind
1. Press to rewind (2X, 4X, 8X,
10X) while playing a video
clip or to play a previous file
in music or voice playback
mode.
2. The button has the same
function as pressing the
joystick left.
Focus
Push to change focus modes
between normal and far mode.
8
1.4.6
Rotating the Camera
Carefully open the LCD monitor on the left side of the camera.
The directions and lock position of the LCD monitor is shown as
follows:
Note: To avoid damaging the LCD monitor, do not rotate the LCD monitor in
the wrong direction!
9
2
Getting Started
Read this section to learn how to start using this digital video
camcorder. This section covers only the basic functions.
2.1
2.1.1
Charging
Replacing battery
This camera is designed to use a rechargeable Lithium Ion battery.
2.1.2
Charging
Use the USB cable in the package to connect the digital video
camcorder to your PC and the battery charging process will start.
10
You can also use the AC adapter to charge your camera. Plug the
AC adapter into the wall outlet and connect the other end to your
camera to charge.
2.2
SD card
An SD card can be inserted into this digital video camcorder to
provide additional storage space.
To install an SD Card:
11
1.
Open the battery door.
2.
Insert an SD card as shown. Make sure the gold contacts
are facing down as shown.
3.
Close the battery door.
2.3
Turning on/off the Camera
There are two ways to turn on/off the camera:
1.
Open or close the LCD monitor.
2.
Press and hold the Power button.
Power button
12
3
Using the digital video camcorder
Read this section to learn how to use the basic setup menu of this
digital video camcorder.
3.1
Using the LCD display
Use the LCD display to compose and review your pictures and
videos stored in memory, and navigate the OSD (On Screen
Display) menu.
Icons displayed on the LCD display also show the current
configuration.
LCD display of video recording
mode
LCD display of preview/capture
mode
13
3.2
About the LED
Camera Status
Power LED
SelfTimer
LED
Charge LED
Blue
Red
Red
Green
Red
Power off
OFF
OFF
OFF
OFF
OFF
Power on/ Stand
by
ON
Flick (1HZ)
OFF
OFF
OFF
Strobe Charging
ON
OFF
OFF
OFF
OFF
Processing
ON
OFF
OFF
OFF
OFF
Battery low
OFF
Flick (1HZ)
OFF
OFF
OFF
USB connection
ON
OFF
OFF
OFF
OFF
Self-timer
ON
OFF
Flick
OFF
OFF
Video recording
ON
OFF
ON
OFF
OFF
Charge
OFF
OFF
ON
OFF
ON
Charge Ok
OFF
OFF
ON
ON
OFF
14
3.3
Setup menu
The setup menu includes a number of settings to configure your
camera.
To access the Setup menu:
1.
Turn the camera on.
2.
Press the Menu button and
press the joystick down to
enter Setup menu.
To exit the Setup menu while configuring the camera, press the
Menu button again to exit the Setup menu.
3.3.1
Sound effect
Use this option to turn on or off the sound effect of the unit.
1.
Press the joystick up or down to highlight the Sound
effect option.
2.
Press the joystick left or right
to select between On or Off.
3.
Press (in) the center of the
joystick to confirm, and press
the Menu button to exit the
menu.
3.3.2
USB mode
Use this option when the camera is connected as a USB device.
Press the joystick up or down to highlight the USB mode option.
3.3.2.1
Mass storage
Press the joystick left or right to select
the Mass storage.
Connect the camera to the PC with the
USB cable. Now the camera will be
presented as a removable disk.
15
While in Mass storage mode, you can copy files from your PC to
the camera, including music files that can be played in music mode.
For music mode operation, please refer to “8.4 Music” for detailed
information.
3.3.2.2
PC Camera
Note: Before connecting the camera as a PC-Camera, please install the driver
on the CD-ROM first. Please refer to “9 Installing the Applications” for
detailed information.
Press the joystick left or right to select
the PC camera.
Connect the camera to the PC with the
USB cable, and then the camera can be
used as a PC camera, use in Netmeeting or any on-line communication
tool.
3.3.3
Date and time
Use this option to set the date and time
1.
Press the joystick up or down to highlight the Date and
time option.
2.
Move the joystick left or right
to change between fields.
3.
Move the joystick up or
down to adjust the number
or the format of the date.
4.
Press in the joystick to
confirm, and press the Menu button to exit the menu.
3.3.4
Welcome picture
Use this option to set a welcome screen when turning the camera
on.
16
1.
Press the joystick up or down to highlight the Welcome
picture option.
2.
Press the joystick left or right to select from Flash,
Picture, and Customized
photo.
3.
3.3.5
•
Select Flash to use the
factory default flash as
the welcome screen.
•
Select Picture to use the
factory default picture as
the welcome screen
•
Select Customized photo to use a photo as the
welcome picture.
Press in the joystick to confirm, and press the Menu
button to exit the menu.
Auto power off
Use this option to set a period of inactivity after which the camera
will switch itself off. This function can save the battery consumption.
1.
Press the joystick up or down to highlight the Auto power
off option.
2.
Press the joystick left or right
to select from Never, 1
minute or 3 minutes.
3.
Press in the joystick to
confirm, and press the Menu
button to exit the menu.
3.3.6
LCD brightness
Use this option to set the brightness of the LCD.
17
1.
Press the joystick up or
down to highlight the LCD
brightness option.
2.
Press the joystick left or
right to select from Darkest,
Darker, Normal, Brighter
or Brightest.
3.
Press in the joystick to confirm, and press the Menu
button to exit the menu.
3.3.7
Language
Use the option to set a language for the
OSD menu of the camera.
1.
Press the joystick up or down
to highlight the Language
option.
2.
Press the joystick left or right
to select from the languages.
3.
Press in the joystick to confirm, and press the Menu
button to exit the menu.
3.3.8
TV system
Use this option to set the camera video
output to match the TV system in your
area.
1.
Press the joystick up or down
to highlight the TV system
option.
2.
Press the joystick left or right to select between NTSC
and PAL.
18
3.
3.3.9
Press in the joystick to confirm, and press the Menu
button to exit the menu.
Format
Use this option to format the data stored
on the memory card or in the internal
memory.
1.
Press the joystick up or down
to highlight the Format option.
2.
Press in the joystick to
confirm and proceed.
Note: When this function is used, all stored data (including photos and
videos) will be erased and cannot be recovered. Make sure you backup all
data before formatting.
3.3.10
Default
Use the option to reset all settings to the
factory default.
1.
Press the joystick up or down
to highlight the Default option.
2.
Press in the joystick to
confirm.
3.4
Setting menu
The setting menu includes both Video and Photo Mode settings.
To access the Setup menu:
1.
Turn the camera on.
2.
Press the Menu button and press the joystick left or
right to choose between Video Mode and Photo Mode.
To leave the Setting menu while configuring the camera, press the
Menu button to exit the Setting menu.
19
3.4.1
Video mode
Read this section to configure the settings in DV mode.
To access the Video mode:
1.
Turn the camera on and
press the Menu button.
2.
Press the joystick left or
right to highlight Video
Mode.
3.
Press the joystick up to
enter the Video mode setting menu.
3.4.1.1
Resolution
Use this option to set the resolution for
each video shoot.
1.
Press the joystick up or
down to highlight the
Resolution option.
2.
Press the joystick left or
right to select from QVGA,
D1 or VGA.
3.
Press in the joystick to confirm, and press the Menu
button to exit the menu.
3.4.1.2
EV adjust
Use this option to change the exposure for your video. Usually this
value would be set to 0.0, but you might want to increase the
exposure to light up a subject with dark
lighting, or decrease the exposure if you
are shooting a video in a very bright
area.
To adjust the EV adjust:
1.
Press the joystick up or down
20
to highlight the EV adjust option.
2.
Press the joystick left or right to select from –2.0, 0.0,
+2.0.
3.
Press in the joystick to confirm, and press the Menu
button to exit the menu.
3.4.1.3
Digital filter
Use this option to convert a video image to different color areas.
To set the Digital filter:
1.
Press the joystick up or
down to highlight the Digital
filter option.
2.
Press the joystick left or
right to select from Normal,
Sepia, Black/White, Red, Pink, Purple, Blue, Green,
Yellow, Solarize or Negative.
3.
Press in the joystick to confirm and press Menu again
to exit the menu.
3.4.1.4
Stabilization
Use this option to counteract camera
shaking and help you to shoot clearer
videos.
To set the Stabilization:
21
1.
Press the joystick up or
down to highlight the
Stabilization option.
2.
Press the joystick left or right to select between on and
off.
3.
Press in the joystick to confirm and press Menu again
to exit the menu.
3.4.1.5
Monitor Video
Use this option to have your camera not to start shooting a video
until the image within the focusing area is moving.
To set the Monitor Video:
1.
Press the joystick up or down
to highlight the Monitor Video
option.
2.
Press the joystick left or right
to select between on and off.
When you select on, the camera will automatically start to shoot a
video when the image within the focusing area is moving.
Press in the joystick to confirm and press the Menu button to exit
the menu.
3.4.2
Photo mode
Read this section to configure the settings
in Capture mode.
To access the Photo mode:
1.
Turn the camera on and press
the Menu button.
2.
Press the joystick left or right to highlight the Photo
Mode.
3.
Press the joystick up to enter the Photo Mode setting
menu.
3.4.2.1
Scene
Use this option to select a proper scene mode to take a picture.
To set a Scene:
22
1.
Press the joystick up or down to highlight the Scene
option.
2.
Press the joystick left or
right to select from Auto,
Portrait, Landscape, Night,
Sport, Night Portrait,
Sunset, Beach Autumn,
Natural, Backlight, Sky or
Party.
3.
Press in the joystick to confirm and press the Menu
button again to exit the menu.
3.4.2.2
Resolution
Use this option to determine the resolution
of the picture that is going to be taken. A larger resolution will
occupy more memory storage space.
To set the Resolution:
1.
Press the joystick up or
down to highlight the
Resolution option.
2.
Press the joystick left or
right to select from VGA, 1.3M, 3.0M, 5.0M, 7.0M or
12.0M.
3.
Press in the joystick to confirm and press the Menu
button again to exit the menu.
3.4.2.3
Image quality
Use this option to set the image quality
for the picture you’re going to capture. A
high quality picture occupies more
memory space.
To set the Image quality:
1.
23
Press the joystick up or down
to highlight the Image quality option.
2.
Press the joystick left or right to select from Basic, Better,
or Best.
3.
Press in the joystick to confirm and press the Menu
button again to exit the menu.
3.4.2.4
Continuous shots
Three pictures will be taken continuously when this function is
activated. Use this function to take continuous pictures with a short
delay between each.
To set Continuous shots mode:
1.
Press the joystick up or
down to highlight the
Continuous shot option.
2.
Press the joystick left or
right to select between off
and on.
3.
Press in the joystick to confirm and press the Menu
button again to exit the menu.
3.4.2.5
Couple shot
Use this option to combine two different images in one photo.
To use the Couple shot:
1.
Press the joystick up or down to highlight the Couple
shot option.
2.
Press the joystick left or right to select between off and
on, and press in the joystick
to confirm.
3.
Use the LCD screen to frame
the first image you want to
shoot, and press the Capture
button. The first image will
24
appear on the left side of the LCD screen.
4.
Use the LCD screen to frame the second image you want
to shot, and press the Capture button. The second image
will appear on the right of the LCD screen.
Now you can combine two different images in one photo.
3.4.2.6
Date stamp
Use this option to set the date stamp to be shown on the images.
To set the Date stamp:
1.
Press the joystick up or down to highlight the Date stamp
option.
2.
Press the joystick left or right
to select from No stamp,
Only date, Only time, or
Date and time.
3.
Press in the joystick to
confirm and press the Menu
button again to exit the menu.
3.4.2.7
Picture frame
Use this option to add a picture frame to your pictures when they
are taken. There are 16 picture frames to choose from.
To set a Picture frame:
25
1.
Press the joystick up or down to highlight the Picture
frame option.
2.
Press the joystick left or right to select between Off and
On.
3.
Highlight the On option and
press in the joystick, and
then you can browse the
frames.
4.
Press the joystick left, right,
up or down to select a frame from the 16 picture frames.
5.
3.4.2.8
Press in the joystick to confirm and exit the menu.
EV adjust
Use this option to change the exposure for your photo. Usually this
value would be set to 0.0, but you might want to increase the
exposure to light up a subject with black lighting, or decrease the
exposure if taking a video in a very bright area.
To adjust the EV adjust:
1.
Press the joystick up or
down to highlight the EV
adjust option.
2.
Press the joystick left or
right to select from –2.0 ~
0.0 ~ +2.0.
3.
Press in the joystick to confirm, and press the Menu
button to exit the menu.
3.4.2.9
ISO
ISO (Sensitivity) settings control the camera's sensitivity to light.
The lower the sensitivity, higher exposure value is needed. When
you increase the sensitivity, the shutter speed will be faster and
exposure value will be reduced. There might be noises on the
images.
To set the ISO:
1.
Press the joystick up or down to highlight the ISO option.
2.
Press the joystick left or
right to select from Auto, 50,
100 or 200. (100 is
equivalent to the ISO 100
film, and so on.)
3.
Press in the joystick to
confirm and press Menu
26
again to exit the menu.
3.4.2.10
Digital filter
Use this option to convert images to different color areas.
To set the Digital filter:
4.
Press the joystick up or
down to highlight the Digital
filter option.
5.
Press the joystick left or
right to select from Normal,
Sepia, Black & white, Red,
Pink, Purple, Blue, Green,
Yellow, Solarize or Negative.
6.
Press in the joystick to confirm and press Menu again
to exit the menu.
3.4.2.11
Metering
This camera provides 3 metering modes (Matrix, Center-weighted
and Spot) to support you with taking
photos in different situations.
To set the Metering mode:
1.
Press the joystick up or
down to highlight the
Metering option.
2.
Press the joystick left or
right to select from Matrix, Center-weighted or Spot.
3.
Press in the joystick to confirm and press Menu again
to exit the menu.
3.4.2.12
Histogram
Use this option to show a graph that displays how light is distributed
in your picture.
To set the Histogram mode:
27
1.
Press the joystick up or
down to highlight the
Histogram option.
2.
Press the joystick left or
right to select between Off
and On.
3.
Press in the joystick to
confirm and press Menu again to exit the menu.
3.4.2.13
Icon
Use this option to turn on or off all of the icons on the LCD.
To set the Icon mode:
1.
Press the joystick up or
down to highlight the Icon
option.
2.
Press the joystick left or
right to select between Off
and On.
3.
Press in the joystick to confirm and press Menu again
to exit the menu.
28
4
Preview mode
Read this section for detailed information on operating the Preview
mode.
4.1
Preview mode icons
Number
29
Icon
Description
1
Video resolution
2
Flash mode
3
White balance
4
Image quality
5
Photo resolution
6
Capture mode icon
7
Pictures remaining
Number
Icon
Description
8
Focus area
9
Present time
10
Battery indicator
11
Zoom bar
Video mode icon
12
4.2
Using the self-timer function
Use the self-timer function to set a delay between the moment you
press the shutter and the moment the picture is captured. A delay of
3 or 10 seconds can be set. This function can be used in both
capture and record mode.
To set the Self-timer:
1.
Turn the camera on.
2.
Press the joystick up to select
from Off, 3 sec, or 10 sec. The
selected timer will be shown on
the center of the LCD screen.
3.
Press the Capture or Video
record button to start counting down.
30
4.3
Setting the Flash mode
When you start to take a picture, press the joystick left to switch
between Flash modes.
See the table below for a detailed description and symbol of each
Flash mode.
Note: This function will be activated only when you are taking a picture.
Icon
Description
Flash is turned off.
Auto flash, fires only when needed.
Force flash, flash is always on.
Slow sync flash
4.4
White balance
Use this option to correct color for different lighting conditions.
Turn on the camera and then press the joystick right to select from
Auto, Daylight, Cloudy, Tungsten, or Fluorescent. (Each press
will just change the mode one at a time.)
4.5
Using the zoom function
This function works in both Capture and Video modes.
To control the zoom function press the T (Zoom in) button which
gets closer to the subject, or W (Zoom out) button which moves
away from the subject.
The zoom bar on the LCD screen indicates the zoom status.
31
5
Shooting your first video
Before shooting your first video, ensure you have read “1
Introducing the Camera”, “2 Getting Started”, and “3 Using the
Camera” carefully.
To shoot a video:
1.
Turn on the camera.
2.
Use the focus area on the LCD
screen to frame the picture.
3.
Press the Video button to shoot
the video.
Video button
The video clip will be saved either on the
SD card or in the internal memory with a unique file name.
5.1
DV mode settings
Please refer to ”3.4.1 Video mode” for detailed information.
5.2
Using the zoom function
Please refer to ”4.5 Using the zoom function” for detailed
information.
5.3
Using the self-timer function
Please refer to “4.2 Using the self-timer function” for detailed
information.
32
6
Taking your first picture
Before shooting your first picture, ensure you have read “1
Introducing the Camera”, “2 Getting Started”, and “3 Using the
Camera” carefully.
To take a picture:
1.
Turn on the camera.
2.
Use the focus area on
the LCD screen to frame
the picture.
3.
Press the Capture button
to capture the picture.
Capture button
The picture will be saved either on the
SD card or in the internal memory with a unique file name.
6.1
Photo mode settings
Please refer to ”3.4.2 Photo mode” for detailed information.
6.2
Using the zoom function
Please refer to ”4.5 Using the zoom function” for detailed
information.
6.3
Setting the Flash mode
Please refer to ”4.3 Setting the Flash mode ” for detailed
information.
6.4
Using the self-timer function
Please refer to “4.2 Using the self-timer function” for detailed
information.
33
7
Voice recorder mode
Read this section and learn how to operate the camera as a voice
recorder. Turn on the camera, and press the joystick down to enter
the Voice record mode.
7.1
Voice recorder buttons
Refer to the table below for button function.
Joystick
Play/Pause
button
Icon
Button
Function
Joystick
Press in the Joystick or the
Play/pause button to start/stop
recording.
Play/Pause
34
7.2
Voice recorder icons
Number
35
Description
1
Indicates the length of a voice recording.
2
Stop: Press in the joystick or Play/pause button to
start/stop recording.
3
Recording time that is remaining.
8
Playback Mode
Read this section for detailed information on using the Playback
mode.
Turn on the camera, and press the Playback button to enter
Playback mode.
8.1
Photo
To enter Photo playback mode:
1.
Press the joystick left or right
in Playback mode and
highlight the Photo option.
2.
Press in the joystick to
confirm.
8.1.1
Viewing photos
After entering the Photo playback mode, the images saved either
on the SD card or in the internal memory, will be shown using
thumbnails.
To view an image:
1.
Press the joystick left or right to show the previous or next
photo.
2.
Press the T or W button to zoom in or out of the photo.
3.
Press the joystick down to record a 20 second voice
memo.
4.
Press the Playback button again to exit the menu.
36
8.1.2
Photo Play icons
Number
Description
1
Indicates the number of the present photo.
2
Indicates the total photo quantity.
8.1.3
Photo playback menu
While viewing the images in Photo playback mode, press the Menu
button to configure the photo playback settings.
Note: This function will be activated only when there is at least one image file
in the SD card or the internal memory.
8.1.3.1
Delete
Use this option to delete images.
37
1.
Press the Menu button.
2.
Press the joystick to highlight
the Delete option.
3.
Press the joystick left or right
to select from Current or All.
4.
8.1.3.2
Press in the joystick to confirm and press the Menu
button again to exit the menu.
Protect
Use this option to protect images from accidentally deleting or to
unprotect images that are protected.
1.
Press the Menu button.
2.
Press the joystick up or
down to highlight the
Protect option.
3.
Press the joystick left or
right to select from Protect
Current, Protect all, Unprotect current or Unprotect
all.
4.
Press in the joystick to confirm and press the Menu
button again to exit the menu.
8.1.3.3
Customize
Use this option to assign the present photo as the Welcome image.
1.
Press the Menu button.
2.
Press the joystick up or
down to highlight the
Customize option.
3.
Press in the joystick to
confirm.
8.1.3.4
Picture frame
Use this option to add a picture frame to the current picture. There
are 16 picture frames to choose from. Press the joystick up or down
to highlight the Frame option to set a picture frame.
Please refer to “ 3.4.2.7
Picture frame” for detailed information.
38
8.1.3.5
Rotate
Use this option to rotate the current picture. Once you have
confirmed the change, the new picture will be saved instead of the
old one.
1.
Press the Menu button.
2.
Press the joystick up or
down to highlight the Rotate
option.
3.
Press the joystick left or
right to select from 90 or 270.
4.
Press in the joystick to
confirm.
8.1.3.6
Crop picture
Use this option to adjust the size of the current picture.
To crop a picture:
1.
Press the Menu button.
2.
Press the joystick up or
down to highlight the Crop
option.
3.
Press in the joystick to start
adjusting.
4.
Press the T (Zoom in) or W (Zoom out) button to
adjust the size of the orange area, and the joystick to
adjust the position of the orange area. Press in the
joystick to confirm.
8.1.3.7
Slide show
Use this option to view all images
without pressing any button.
39
1.
Press the Menu button.
2.
Press the joystick to
highlight the Slide option.
3.
Press the joystick left or right to select from Off, 3
seconds, 5 seconds or 10 seconds.
4.
Press in the joystick to confirm.
8.1.3.8
Voice memo
Use this option to delete the voice
memo of the current picture.
1.
Press the Menu button.
2.
Press the joystick to
highlight the Voice memo
option.
3.
Press in the joystick to confirm.
8.1.3.9
DPOF
Use the DPOF (Digital Print Order Format) function to tag pictures
stored in memory with print information. You can tag the pictures to
print.
DPOF requires an SD card. When all
images to be printed are tagged,
remove the memory card and take it to a
photograph shop for printing, or use it
with a DPOF compatible printer.
To set DPOF parameters:
1.
Press the joystick up or down to highlight the DPOF
option.
2.
Press the joystick left or right to select from Current, All,
Reset current or Reset all.
•
Current: Enables you to tag current image to be
printed.
•
All: Enables you to tag all images to be printed.
40
3.
•
Reset current: Clear the current tag.
•
Reset all: Clear all tags.
Press in the joystick to confirm.
8.1.3.10
Direct print
You can connect the camera to a printer
and print images directly from the
camera. Connect to a printer using the
USB cable exactly the same way, as
you would connect a PC. Select the
Direct print option to connect to a
printer when the menu appears.
8.2
Video
To enter Video playback mode:
1.
Press the joystick left or right in the Playback mode to
highlight the Video option.
2.
Press in the joystick to confirm.
8.2.1
Viewing videos
After entering the Video playback mode,
the videos saved either on the SD card or
in the internal memory, will be shown by
the first frame of the whole video.
To view a video:
41
1.
Press the joystick left or right to
choose a video.
2.
Press in the joystick to start playing, and press it again to
stop.
3.
Press the joystick left or right to play, rewind (2X, 4X, 8X,
10X) or fast forward (2X, 4X, 8X, 10X) when you are
playing a video. Each press will change a playing speed.
8.2.2
Video playback mode buttons
Refer to the table below for detailed functions of each button:
Fast forward button
Stop button
Play/Pause button
Rewind button
Joystick
Zoom in button
Zoom out button
Icon
Button
Function
T (Zoom in)
W (Zoom out)
Use to adjust the volume.
42
Icon
Button
Joystick (up/
down/ left/
down/ in)
Function
Press the joystick up: No
function.
Press the joystick down:
Stop
Press the joystick left:
Rewind (2X, 4X, 8X, 10X).
Press the joystick right: Fast
forward (2X, 4X, 8X, 10X).
Press in the joystick: Play/
pause.
43
Fast forward
Fast forward (2X, 4X, 8X,
10X).
Rewind
Rewind (2X, 4X, 8X, 10X).
Play/pause
Play/ pause
Stop
Stop
8.2.3
Video play icons
Number
Description
1
Play status indicator. Stop, Play, or Pause.
2
Indicates the number of the present video.
3
Indicates the total video quantity.
4
Indicates the length of a video clip
5
Progress bar.
6
Volume indicator.
7
Battery status indicator.
8
Indicates the playing speed.
44
8.2.4
Video play menu
While viewing the video in Video playback mode, press the Menu
button to configure the video playback settings.
Note: This function will be activated only when there is at least one video file
in the SD card or the internal memory.
8.2.4.1
Delete
Use this option to delete videos.
1.
Press the Menu button.
2.
Press the joystick up or down
to highlight the Delete option.
3.
Press the joystick left or right
to select Current or All.
4.
Press in the joystick to confirm and press the Menu
button again to exit the menu.
8.2.4.2
Protect
Use this option to protect videos from accidentally deleting or to
unprotect videos that are protected.
45
1.
Press the joystick up or down to highlight the Protect
option.
2.
Press the joystick left or right
to select Protect Current,
Protect all, Unprotect
current or Unprotect All.
3.
Press in the joystick to
confirm and press the Menu
button again to exit the menu.
8.2.4.3
Continuous play
Use this option to play one video or all videos continuously.
1.
Press the Menu button.
2.
Press the joystick up or down to highlight the
Customize option.
3.
Press the joystick left or
right to select from Off,
Current or All.
4.
Press in the joystick to
confirm and press the Menu
button again to exit the
menu.
8.3
Voice
To enter Voice playback mode:
1.
Press the joystick left or right
in the Playback mode to
highlight the Voice option.
2.
Press in the joystick to
confirm.
8.3.1
Listening to audio clips
After entering the Voice playback mode, the play list will be shown
on the LCD screen.
To play a voice file:
1.
Press the joystick up or down
to scroll through the voice files,
and highlight a file you want to
play.
2.
Press in the joystick and the
selected file will be shown by
whole screen mode.
46
3.
Press in the joystick to play or pause a file.
4.
Press the joystick down to stop playing and press left
(Rewind) or right (Fast forward) to select the previous or
next file.
8.3.2
Voice playback mode buttons
Fast forward button
Stop button
Play/Pause button
Rewind button
Joystick
Zoom in button
Zoom out button
47
Icon
Button
Function
T/W (Zoom in/out)
Use to adjust the volume.
Joystick (up/
down/ left/ down/
in)
Press the joystick up: No
function.
Press the joystick down:
Stop
Press the joystick
left/right: Previous/Next
Press in the joystick: Play
/ pause.
Fast forward
Next
Rewind
Previous
Play/pause
Play / pause
Stop
Stop
48
8.3.3
Voice Play icons
Number
Description
1
Indicates the present playing file.
2
Indicates the recorded date / time.
3
Indicates the length of the present file.
4
Volume indicator.
5
Play status indicator. Stop, Play, or Pause.
6
Playing process bar.
8.3.4
Voice playback menu
When the voice file is in whole screen mode, press the Menu
button to configure the voice play settings.
Note: This function will be activated only when there is at least one voice file
in the SD card or the internal memory.
8.3.4.1
Delete
Use this option to delete voice files.
49
1.
Press the joystick up or down
to highlight the Delete option.
2.
Press the joystick left or right
to select Current or All.
3.
Press in the joystick to
confirm.
8.3.4.2
Protect
Use this option to protect voice files from accidentally deleting or to
unprotect voice files that are protected.
1.
Press the joystick up or
down to highlight the Protect
option.
2.
Press the joystick left or
right to select Protect
Current, Protect all,
Unprotect current or Unprotect All.
3.
Press in the joystick to confirm.
8.4
Music
Read this section and learn how to operate the camera as a Music
player.
To enter Music mode:
1.
Turn on the camera, and press
the Playback button to enter
Playback mode.
2.
Press the joystick left or right to
highlight the Music option.
3.
Press in the joystick (Play/Pause button) to confirm.
50
8.4.1
Import Music files into the camera
Please refer to “3.3.2.1 Mass storage” to learn how to import files
into the camera.
8.4.2
Play list and Music mode buttons
When entering the Music playback mode, a file list will be shown on
the LCD screen.
To play a Music file:
1.
Press the joystick up or down in the play list and
highlight the file you want to play.
2.
Press in the joystick
(Play/Pause button) to start
playing, and press it again
to pause.
3.
Press the joystick down to
stop playing.
4.
Press the joystick left or
right (Rewind or Fast forward button) to move to the
previous / next Music file.
5.
To adjust the volume, press the T (Zoom in) or W
(Zoom out) button
6.
To return to the play list, press the joystick up.
Refer to the table below for detailed functions of each button:
51
Fast forward button
Stop button
Play/Pause button
Rewind button
Joystick
Zoom in button
Zoom out button
Icon
Button
Function
W (Zoom out)
T (Zoom in)
Use to adjust the volume.
52
Icon
Button
Function
Joystick ( up/
down / left/
down/ in)
Press the joystick up: Press to
return to the play list.
Press the joystick down: Stop
Press the joystick left / right:
Previous / next.
Press in the joystick: Play /
pause.
53
Fast forward
Next
Rewind
Previous
Play/pause
Play / pause
Stop
Stop
8.4.3
Music mode icons
Number
Description
1
Shows the album title.
2
Battery indicator.
3
Shows the playing file.
4
Playing time of the present file.
5
Play / pause.
6
Shows present repeat mode.
7
Shows present equalizer mode.
8
Volume indicator.
9
Progress bar
54
8.4.4
Music playback mode menu
In the file list mode, press the Menu button and configure the Music
settings.
Note: This function will be activated only when there is at least one Music file
in the SD card or the internal memory.
8.4.4.1
Delete
Use this option to delete Music files
1.
Press the Menu button.
2.
Press the joystick up or
down to highlight the Delete
option.
3.
Press the joystick left or
right to select from Current and All.
4.
Press in the joystick to confirm.
8.4.4.2
Protect
Use this option to protect Music files from accidentally deleting or to
unprotect Music files that are protected.
1.
Press the joystick up or
down to highlight the Protect
option.
2.
Press the joystick left or
right to select Protect
current, Protect all,
Unprotect current and
Unprotect all.
3.
Press in the joystick to
confirm.
8.4.4.3
Play mode
Use this option to set a repeat mode.
55
To set a play mode:
1.
Press the Menu button.
2.
Press the joystick up or down to highlight the Play mode.
3.
Press the joystick left or right to select from Single repeat,
Continuous, Shuffle, or Circular.
4.
Press in the joystick to confirm.
8.4.4.4
Equalizer
Use this option to set an equalizer.
To set an equalizer:
1.
Press the Menu button.
2.
Press the joystick up or down
to highlight the Equalizer.
3.
Press the joystick left or right
to select from Classical, Popular, Rock, or Jazz.
4.
Press in the joystick to confirm.
8.4.4.5
LCD power off
Use this option to set a time before the LCD automatically powers
off in Music mode.
To set a LCD power off time:
1.
Press the Menu button.
2.
Press the joystick up or down
to highlight the LCD power
off.
3.
Press the joystick left or right
to select from Never, 1 min, 3 min, or 10 min.
4.
Press in the joystick to confirm.
56
8.5
Games
The camera also has many built-in games for entertainment.
To enter the Game mode:
1.
Turn on the camera, and press the Playback button to
enter Playback mode.
2.
Press the joystick left or right to highlight the Game option.
3.
Press in the joystick (Play/Pause button) to confirm.
To select a game:
1.
Press the joystick left or right
to select a game from
Sodoku, Tetris, Moving box
or Lotto.
2.
Press in the joystick to
confirm.
3.
Press the Playback button to exit a game.
8.5.1
Sodoku
The players fill the grids with number from 1 to 9. Make sure that
the number doesn’t appear in the row and column and the number
also shouldn’t appear in the sub 3*3 squares.
57
1.
Press the joystick left or
right to select Sodoku, and
press in the joystick to
confirm.
2.
Press the joystick left or
right to scroll through the
menu and select from NEW,
LOAD, SAVE, CHECK,
SOLUTION, HELP or EXIT.
3.
Press in the joystick to confirm.
4.
8.5.2
Press the Playback button to exit the contents and the
game.
Tetris
The players move and rotate pieces of different shapes in such a
way so as to complete one or more horizontal lines. Once the line is
completed it will disappear. The purpose of Tetris game is not
allowing the pieces to over-fill the board.
1.
Press the joystick left or right to select Tetris, and press
in the joystick to confirm.
2.
Press the joystick left or right to move the piece left / right,
and press the joystick up to
change the shape.
3.
Press the joystick down to
lower down the piece faster.
4.
Press in the joystick again to
pause the game.
5.
Press the Menu button to
view the high score record.
6.
Press the Playback button to exit the contents and the
game.
8.5.3
Moving box
Press the joystick left or right to select
Moving box, and press in the joystick to
confirm.
Move the box to the specified position
and make the ball disappear within the
minimum steps. You will automatically
enter the next round when the previous one is complete.
58
8.5.4
59
Lotto
1.
Press the joystick left or right
to select Lotto, and press in
the joystick to confirm.
2.
In the Setup screen press the
joystick left or right to change
fields, and use the joystick up
or down to adjust the numbers.
3.
Press in the joystick to begin, and press it again to create
a group of lotto numbers.
4.
Press the joystick right to start again, or press the joystick
left to return to the setup screen.
5.
Press the Playback button to exit the contents and the
game.
9
Installing the Applications
9.1
Drivers
After installing the camera driver, you can use the camera as a
“Mass Storage device” on the PC.
9.1.1
Camera Driver
This camera offers a Mass Storage function as a card reader device.
When the driver has been installed and the camera is connected,
the camera memory and any installed mini SD card will appear as a
Mass Storage Device in Windows Explorer. Files can be dragged
and dropped in the same way as on an ordinary disk.
Before connecting the camera to the PC as a PC camera, follow
the following instructions to finish the driver installation.
Please follow the instructions below:
1.
Insert the supplied CD-ROM in the CD-ROM drive.
2.
Use Windows Explorer to execute the Setup.exe file in
the root directory.
3.
The installation is configuring
the window settings.
Note: Please install the XviD on your system, or else you may not be able to
play the recorded videos on the PC.
60
10 Connect to a TV
10.1 View photos and videos on the TV
You can connect the camera to a TV and use the TV screen to
review your images and play back your video clips. In addition, you
can also use this camera to record your favorite TV programs.
Before using the feature, you need to make sure that the output
mode is correct. Please refer to ” 3.3.8 TV system “ on page 17 to
set the TV output mode.
To view photos and videos on the TV, please follow these
instructions:
61
1.
Turn on the camera, and press the Playback button to
enter Playback menu.
2.
Select a photo or video in Photo or Video playback
mode, and press in the joystick to play.
3.
Connect the TV out jack on your camera to the audio /
video input ports on your TV using the AV cable
provided. The LCD screen turns off.
4.
Follow the procedures described in “8.1.1 Viewing
photos” on page 35 or “8.2.1 Viewing videos” on page
40 to play the files in your camera.
10.2 Recording TV programs
You can connect the camera to a TV to record your favorite TV
program.
First, make sure that the AV cable has been connected with the TV
properly.
Note: You can’t hear the voice of the program when you are recording the TV
program. But you can still hear the voice when playing back the recorded
video file.
To record TV programs, please follow the procedure:
1.
Connect the AV jack on your camera to the audio /
video input ports on your TV using the AV cable
provided.
2.
Turn on the camera.
3.
Press the Video button to start recording and press the
button again to stop.
The video clip will be saved either on the SD card or in the internal
memory with a unique file name.
62
11 Remote control
This camera provides IR remote control function.
Refer to the table below for button functions:
Number
Description
1
Use to start/stop video recording.
2
1.
Use to zoom in / out.
2.
Use to adjust volume in Music and Voice play
3
modes.
4
5
63
1.
Use to navigate the OSD menus.
2.
Use to set self-timer.
1.
Use to navigate the OSD menus.
2.
Use to set White balance
6
1.
Use to navigate the OSD menus.
2.
Use to enter voice recorder mode.
3.
Use to record a 20 second voice memo when
viewing photos.
7
Use to enter/exit Settings menu.
8
Use to enter/exit Music mode.
9
Use to enter/exit Game mode.
10
Use to execute an action.
11
1.
Use to navigate the OSD menus.
2.
Use to set Flash mode.
12
Use to enter voice recorder mode.
I. Press the OK button to start / stop recording.
II. Double press the Playback button to leave the
Voice recording mode and return to the preview
mode.
13
1.
Use to enter Playback mode.
2.
Use to return to the main list when in any sub
menu in the Playback mode, and press it again
to return to the preview mode.
14
Use to capture image.
64
Appendix
Specifications
General
CCD Sensor Format
1/ 2.5”
Resolution (Image)
4032x3024 (12MP interpolation)
3072x2304 (7.1MP interpolation)
2592x1944 (5MP)
2048x1536 (3.1MP)
1280x960 (1.3MP)
640x480 (VGA)
Resolution (Video)
320x240 (QVGA)
640x480 (VGA)
720x480 (D1)
Physical Size
122 x 66 x 25 (mm)
Video Clips
30 fps @QVGA, 30 fps @VGA. 30fps@D1
Audio
Microphone, Speaker
DC-in
N/A
Image LCD
2.5” LTPS TFT LCD
Battery
(1050mAH) NP60 Lithium Ion Battery
65
General
Interfaces
USB 2.0 high speed
Internal memory
32MB NAND
Removable memory
card
Removable Secure Digital (SD) memory
Case material
Plastic
AC Adapter
Yes
TV out
Video / Audio output (Stereo)
AV
Video / Audio input (Stereo)
Boot-up time
<= 2 Secs, start from pressing the Power
button/open the LCD plate
Shot to shot time
<= 4 Secs (5M).
Flash
Flash off/Auto Flash/Force flash/Slow sync
flash
Zoom
8X digital zoom
Focus distance
People:60~110cm; Mountain:100cm~infinity
**Manual and Specification subject to change without prior notice
66
VPS07-0202 DV-DA1-VP_ENGLISH