1
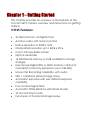
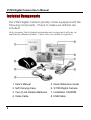
INSTRUCTION MANUAL
3 Mega Pixel Digital Camera
About this Manual
This manual makes using the ViviCam 3765 Camera as
easy as possible. Information in this manual has been
checked for accuracy; however, the information is
subject to change without notice.
Copyright
(c) Copyright 2004 Vivitar Corporation
This document contains proprietary information
protected by copyright. All rights are reserved.
Trademarks
All trademarks and registered trademarks are the
property of their respective owners.
Microsoft® and Windows® are U.S. registered trademarks
of Microsoft Corporation.
Pentium® is a registered trademark of Intel Corporation.
Rev tpiehn 031215
Table of Contents
Chapter 1 – Getting Started .............................................................. 1
Safety Information .................................................................. 2
Included Components .......................................................... 4
Camera Overview.................................................................. 5
Front View................................................................... 5
Back View................................................................... 7
Bottom View............................................................. 10
Inserting a Memory Card .................................................... 11
Installing the Batteries .......................................................... 13
Selecting a Language ......................................................... 15
Setting the Time and Date .................................................. 17
Chapter 2 - Capturing Images ........................................................ 21
Preparing the Camera ........................................................ 21
Selecting the Camera Mode ............................................. 22
Framing the Shot................................................................... 22
Zooming and Shooting ........................................................ 23
Turning off the Camera ....................................................... 23
Chapter 3 - Reviewing Your Images ............................................... 24
Switching to Playback Mode ............................................. 24
Full-Screen Review .................................................. 24
Thumbnail Review ................................................... 25
Chapter 4 - Connecting to a Computer ....................................... 26
Installing Software................................................................. 28
Transferring Images to your Computer ............................. 31
PC/web Camera mode ...................................................... 31
Chapter 5 - Mode / Operation Guide............................................ 33
(Still-Image) Capture Mode................................................ 33
Movie Mode .......................................................................... 34
Preset Modes......................................................................... 35
Landscape ............................................................... 35
Portrait....................................................................... 36
Night Scene.............................................................. 36
Self-Timer................................................................... 36
Macro........................................................................ 37
Playback Mode .................................................................... 37
Setup Mode........................................................................... 38
Delete All .................................................................. 39
Format....................................................................... 39
Quality....................................................................... 40
Buzzer ........................................................................ 41
Date/Time................................................................. 41
Memory Type ........................................................... 42
Language................................................................. 43
Video Out ................................................................. 43
ISO.............................................................................. 44
Welcome Screen..................................................... 44
PC/Web Camera Mode...................................................... 45
Chapter 6 - the LCD Display ............................................................ 46
LCD Icon Descriptions.......................................................... 47
Appendix 1 – Button Function Guide ............................................. 49
Appendix 2 – Troubleshooting Guide ............................................. 50
Chapter 1 – Getting Started
This chapter provides an overview of the features of the
Vivicam 3675 camera overview and instructions on getting
started.
V3765 Features:
•
•
•
•
•
•
•
•
•
•
•
•
•
•
•
3x Optical Zoom, 4x Digital Zoom
Autofocus lens with macro function
Native resolution of 2048 x 1472
Interpolated resolution up to 2496 x 2016
Color LCD viewfinder screen
Optical viewfinder
16 MB Internal memory (14 MB available for image
storage)
Uses Secure Digital (SD) or MMC memory cards (not
included) for memory expansion (up to 256 MB)
Movie Clip Recording capability, with audio
USB 1.1 interface (Mass-storage class)
Automatic exposure with user-defined exposure
capability
Four-mode integral Flash
Automatic White Balance with Preset Modes
10-second Timer mode
Full screen or Thumbnail image review
V3765 Digital Camera User’s Manual
Safety Information
•
•
•
•
•
•
2
Do not look at the sun through the viewfinder. Viewing the sun or
other strong light source through the viewfinder could cause
permanent visual impairment.
Do not disassemble the camera. Touching the internal parts could
result in injury. In the event of a malfunction take the product to
an authorized service center for inspection.
Avoid contact with liquid crystal. Should the LCD display break,
care should be taken to avoid injury due to broken glass. Prevent
the liquid from touching the skin, eyes, or mouth.
Observe proper precautions when handling batteries. The camera
uses only size AA batteries. Batteries may leak or explode if
handled improperly. Remove the batteries from the camera if you
are going to store the camera for an extended period of time.
Ensure the camera is turned off before inserting or removing
batteries. Do not expose batteries to flame or excessive heat.
Discontinue use immediately if you notice any changes in the
battery such as discoloration, deformation or leakage.
Observe caution when operating the flash. Do not use the flash
close to anyone's eyes. This can cause temporary damage to
eyesight. Particular care should be observed when imaging
infants - keep the flash at a distance of at least 1 meter from
infants' eyes.
WARNING: Handling the USB and Video cables on this product
may expose you to lead, a chemical known to the State of
California to cause birth defects or other reproductive harm.
Wash your hands after handling.
Safety Information
FCC STATEMENT
This device complies with Part 15 of the FCC Rules. Operation is
subject to the following two conditions:
1.
This device may not cause harmful interference, and
2.
This device must accept any interference received, including
interference that may cause undesired operation.
Note: This equipment has been tested and found to comply with the
limits for Class B digital devices, pursuant to Part 15 of the FCC rules.
These limits are designed to provide reasonable protection against
harmful interference in a residential installation. This equipment
generates, uses and can radiate radio frequency energy and, if not
installed and used in accordance with the instructions, may cause
harmful interference to radio communications. However, there is no
guarantee that interference will not occur in a particular installation.
If this equipment does cause harmful interference to radio or
television reception, which can be determined by turning the
equipment off and on, the user is encouraged to try to correct the
interference by one or more of the following measures:
1.
Reorient or relocate the receiving antenna
2.
Increase the separation between the equipment and receiver
3.
Connect the equipment into an outlet on a circuit different
from that to which the receiver is connected
4.
Consult the dealer or an experienced radio/TV technician for
help
Use of shielded cable is required to comply with Class B limits in
Subpart B of Part 15 of the FCC rules. Do not make any changes or
modifications to the equipment unless otherwise specified in the
manual. If such changes or modifications should be made, you
could be required to stop operation of the equipment.
3
V3765 Digital Camera User’s Manual
Included Components
The V3765 digital camera typically comes equipped with the
following components. Check to make sure all items are
included.
Note, however, that included accessories and components will vary, as
specified by different retailers. Check with your retailer for specifics.
4
1. User's Manual
5. Quick Reference Guide
2. Soft Carrying Case
6. V3765 Digital Camera
3. Two (2) AA Alkaline Batteries
7. Installation CD-ROM
4. Video Cable
8. USB Cable
Camera Overview
Camera Overview
The front, rear, and bottom views of the camera are shown
on the following pages. Take a moment to review these
illustrations to familiarize your self with the terms used in this
manual.
Front View
1. Shutter Button: Press this button to capture images,
or to select menu options.
2. Integral Flash: The flash allows the camera to
capture images in low light conditions and can
5
V3765 Digital Camera User’s Manual
3.
4.
5.
6.
7.
6
also be used in bright conditions to fill unwanted
shadows.
Self-Timer LED: When the Self-Timer option is
selected this LED blinks for ten seconds after the
Shutter Button is pressed. At the end of the tensecond countdown the camera captures an
image.
Light Sensor: Light measurements are made with
this sensor. The camera detects the ambient light
level and determines whether or not the flash
should fire. Be careful not to block this sensor while
capturing images.
Viewfinder: The viewfinder helps you frame an
image. The actual image, however, is captured
with the lens and not the viewfinder. For macro
shots (close ups) use the LCD display for framing
accuracy.
Lens: The lens focuses light onto the image sensor.
For the optimal image quality, care should be
taken to ensure that the lens remains free of dust,
fingerprints, and scratches.
Microphone: Records audio when you use the
camera for capturing movie clips.
Camera Overview
Rear View
1. Status LED: This LED will flash orange when the
camera is powered-on, or while the camera is
processing an image. When the camera is again
ready to capture an image or accept user
commands, the LED will be solid green.
2. Optical Viewfinder: The optical viewfinder is used
to frame your images. The optical viewfinder is
essential for conditions of extreme brightness or
darkness. The actual image is captured through
the lens and not the viewfinder.
7
V3765 Digital Camera User’s Manual
3.
4.
5.
6.
7.
8.
9.
10.
8
Power Button: Press this button to turn on the
camera. Press it again to turn the camera off.
WB/Delete: In capture mode press this button
to cycle through White Balance presets. In
playback mode use this button to delete images.
Strobe / Copy: In capture mode this button
sets the flash mode. In playback mode, it copies
images from internal camera memory to an
SD/MMC Card (if present.)
Zoom Out Key: In capture mode, press this
key to zoom out. In playback mode if pressed
repeatedly it switches between thumbnail
and full-screen views. If zooming in on an image
during Playback, pressing this key zooms back out
again.
Zoom In Key: In capture mode, press this key
to zoom in on your subject. In Playback mode, use
this key to zoom in on an image.
Shutter Button: Press this button to capture a
digital image. When navigating the camera's
options menus, use it to select menu items.
Power Jack: Use this plug if using an AC Adapter
or an external power source. (Not included)
Video Out Jack: Connect the video cable here
(and the other end to your television set) to use
the camera as a digital video camera or to
playback your images on a TV.
Camera Overview
11.
12.
13.
14.
15.
16.
17.
USB Port: The USB (Universal Serial Bus) port is
used to connect the camera to a computer for
transferring images. The USB port also enables PC
users to use the camera as a PC/web Camera.
Hand Strap Loop: Attach the hand strap to this
loop for ease of carrying.
Mode Dial: Rotate to select the camera mode:
Movie, Preset, Capture, Playback, Setup, or
PC/web Camera.
Down Button: Used to move down through
menus and to cycle to the next during image
Playback.
Up Button: Used to move up through menus
and to cycle to the previous image during image
Playback.
Display Button: Press to cycle through the
various display options: LCD, backlight and status
information; LCD and backlight; LCD off;
histogram.
LCD Display: You may use the LCD display to
preview and frame your images. Always use the
LCD display for framing macro shots. In conditions
of extreme brightness or darkness use the optical
viewfinder. While in the Setup menu, use the LCD
to view messages and configure the camera.
9
V3765 Digital Camera User’s Manual
Bottom View
1. Tripod Socket: Attaches the camera to a
common tripod using the popular ¼-20 thread.
(Tripod not included.) Use a tripod to hold the
camera steady, especially for low light night
images.
2. Battery / Memory Card Cover: Opens to allow
access to the battery chamber and memory card
slot.
3. Memory Card Slot: Holds an optional SD or MMC
memory card to store images. For more
information on memory cards refer to other
sections of this manual including “Memory Type”
4. Battery Chamber: Requires two AA alkaline
batteries. You may also use AA NiMH
rechargeable batteries.
10
Inserting a Memory Card
Inserting a Memory Card
To insert a memory card:
1. Turn off the camera.
2. Open the battery / memory card compartment
by pressing the cover and sliding in the direction
of the arrow as shown.
11
V3765 Digital Camera User’s Manual
3. Insert the memory card with circuitry (pins) first.
The notched corner of the memory card points
towards the camera lens. The manufacturers
label on the memory card will face the front (lens
side) of the camera.
Notch
4. Close the battery / memory card cover.
Note: The maximum usable memory card for the
3765 camera is 256 MB
12
Installing the Batteries
Installing the Batteries
To install or replace the batteries:
1. Turn off the camera.
2. Open the battery compartment on the bottom of
the camera by pressing the cover and sliding in
the direction of the arrow as shown.
13
V3765 Digital Camera User’s Manual
3. Insert batteries into the chamber making sure that
the positive and negative ends are properly
oriented, as indicated by the battery icons in the
compartment.
4. Close the battery cover.
14
Selecting a Language
Selecting a Language
The 3765 camera can display text and messages in
English, French, Spanish, German, Italian, Japanese and
Simplified Chinese.
To select a different language:
1. Rotate the Mode Dial to Setup mode
.
2. Turn the camera on.
15
V3765 Digital Camera User’s Manual
3. Use the Down button
to select Language and
.
then press the Display button
4. Use the Up and Down buttons
language you wish to use.
5. Press the Display button
The Setup Menu returns.
16
/
to select the
to set the language.
Setting the Time and Date
Setting the Time and Date
The time and date are stored with each image you
capture. When you transfer an image to a computer the
time and date associated with that image will be
transferred as well.
To set the date display style:
1. Rotate the Mode Dial to Setup
.
2. Turn on the camera.
17
V3765 Digital Camera User’s Manual
3. Use the Down button
to select Date/Time and
.
then press the Display button
4. Use the Down button
to select Style and then
.
press the Display button
5. Choose the display style for the date.
18
Setting the Time and Date
6. When the settings are correct, press the Display
to save the changes.
button
To set the date and time:
to select Date/Time and
1. Use the Down button
then press the Display button
.
to select the Clock option
2. Use the Down button
and then press the Display button
.
to adjust the
/
3. Use the Up and Down buttons
hour. Press the Strobe/Copy
button to set the
hour and then move on to minutes.
19
V3765 Digital Camera User’s Manual
4. Set the minutes in the same manner. Press the
to set the minutes and
Strobe/Copy button
move on to the next option.
5. Repeat step 3 to set the year, the month, and the
day.
6. When the settings are correct, press the Display
button
to save the changes.
NOTE: If you make a mistake and need to go back, use
the White Balance/Delete button
.
20
Chapter 2 - Capturing Images
This chapter shows you how to capture images with your
3765 camera.
Preparing the Camera
To prepare the camera for capturing images:
Press the Power button to turn the camera on. After a
short pause, the LED will stop flashing, signaling that the
camera is ready to use.
NOTES:
•
•
•
Make sure you have installed two AA batteries.
If you want to store your images on an SD/MMC
memory card, make sure it is inserted before you turn
on the camera. If you want to store images to the
camera's internal memory, either remove the
memory card, or select “Internal” from the Memory
Type menu.
Using the LCD display consumes battery power. To
prolong the life of your batteries it is recommended
that you turn off the LCD display when not in use.
V3765 Digital Camera User’s Manual
Selecting the Camera Mode
There are two modes for capturing images: Capture and
Preset. Capture mode is for basic image capture, while
Preset mode allows you to capture images in one of five
preset schemes: Landscape, Portrait, Night Scene, SelfTimer, and Macro.
Rotate the Mode Dial to the mode you wish to use.
For basic "point and click" image capture, use the
.
Capture mode indicated by the camera icon
To use the self-timer, rotate the Mode Dial to Preset
mode and the use the Up and Down buttons to select
the Self-Timer mode.
Framing the Shot
Hold the camera steady to avoid capturing blurry
images. Use either the Viewfinder or the LCD display to
frame the image. Turning off the LCD display and
capturing images with just the Viewfinder results in longer
battery life. However, in some conditions it may be more
convenient to use the LCD display. Always use the LCD
display for framing macro shots.
22
Zooming and Shooting
Zooming and Shooting
Zoom in on a particular object
or Zoom Out
buttons to
You can use the Zoom In
narrow or widen the camera's field of view. Use either
the LCD display or the optical viewfinder to preview the
effects of the zoom function.
Automatic Image Processing
Pressing the Shutter button halfway down initiates the
camera's internal image processing functions. The
camera adjusts white balance, exposure, and
autofocus. In automatic flash mode, the camera
determines whether or not the flash is required.
Capture the image
When you are satisfied with the preview, completely
(slowly) press the Shutter button. Take care not to press
the Shutter button to rapidly or forcefully; otherwise you
might shake the camera and get a blurry image as a
result.
Turning off the Camera
When you are finished capturing images, press the
power button to turn it off. This conserves battery power.
23
Chapter 3 - Reviewing Your Images
One benefit of digital cameras is that you can
immediately preview the image you just captured.
Switching to Playback Mode
To view the images that you have stored in internal
memory or on an SD/MMC Card, rotate the Mode Dial
and turn the camera on.
to Playback Mode
If the LCD display is not turned on, press the Display
button
. Cycle through the modes by repeatedly
pressing the Display button.
Full-Screen Review
The default Playback method is to show each individual
image, one at a time, sized to fit the full-screen. Press the
to cycle through the
Up and Down buttons
/
images you've captured.
Playback Zoom. You can also use the Zoom buttons
to see more detail of an image. The default zoom
/
setting is 1x where you see the entire image in the LCD
to increase the zoom ratio
display. Press Zoom In
from 1x to 8x in .5x increments. Press the Zoom Out
button
to decrease zoom ratio. Use the Up and
to navigate (traverse) a zoomed
/
Down buttons
image.
Switching to Playback Mode
Thumbnail Review
If you press the Zoom Out button
when the zoom
ratio is at x1 (default), the camera switches to Thumbnail
Review
.
In Thumbnail Review, up to nine images are shown on
the LCD simultaneously. Use the Up and Down buttons
/
to cycle through the thumbnail pages.
To return to Full-Screen Review, select the image you
want to view and press either the Shutter button or the
Zoom Out button. The selected image will then expand
to fill the entire LCD display.
25
Chapter 4 - Connecting to a Computer
The 3765 camera stores images as digital data rather than on
film. Instead of making a trip to a developer and printing from
negatives, you can copy your images to a computer for
storage.
Once transferred, your images can be viewed, edited,
printed, sent via e-mail, placed on a web page, added to a
report, uploaded to a photo-processor, or saved to any
removable media device (such as floppy disk or CD-ROM) for
delivery to a photo finisher.
After successfully transferring images to your computer,
images stored on the memory card or in the camera's
internal memory may be deleted to make room for new
images.
This chapter explains how to connect your digital camera to
a computer to download images to a PC or to use as a PC
Camera.
Do not connect the camera to your computer before
installing the software. This may cause installation problems. It
is best to install the software from the CD-ROM prior to
connecting the camera to your computer.
The 3765 interfaces to your computer in either of two modes:
1) A mass storage device (a removable disk)
2) A PC (web) camera (PC users only)
This section explains how to connect your camera in either of
these two modes. As a mass storage device you will be able
Switching to Playback Mode
to access and view your images (photos), whereas the PC
camera mode is for live video.
Which mode do you use?
•
If you are interested in retrieving your digital images
(images) from your camera you will need to use the
mass-storage mode.
•
If you wish to use your digital camera as a video
camera where live (real-time) video is displayed on
your computer use the PC camera mode.
Mass Storage Device. MSD is a name given to a USB product
(like a digital camera) that works with your computer as if it
was a removable disk. In essence the computer “sees” your
camera as if it were a floppy disk or a CD ROM. The concept
is simple. Think of the memory inside your camera as if it were
a floppy disk (or a Zip disk, or a CD ROM). Think of the camera
as a “reader’.
When you connect an MSD device to a computer it will
appear as a new “drive.” Go to My Computer and observe
the various drives. For example:
•
3-1/2” floppy drive (A:)
•
Local disk (C:)
•
CD ROM (D:)
•
Removable disk (E:) This is the Camera Memory
PC Camera. The 3765 allows you to view live video from your
camera on your computer using optional (third-party) video
software. This mode is supported on Windows PCs only.
27
V3765 Digital Camera User’s Manual
Installing Software
Follow these instructions to install the camera drivers and
software on your system.
Follow these instructions to install the camera drivers and
software on your system. Make sure to install the drivers
before connecting the camera to your computer.
Operating System
MSD
PC Camera
Windows 98, 98SE
Driver required
Driver required
Windows Me, 2000, XP
No Driver
required
Driver required
Mac OSX
No Driver
required
Feature not
supported
Desktop/LX (Linux)
No Driver
required
Feature not
supported
Note that Windows Me, 2000, and XP users do not need
drivers to operate the camera in MSD mode, whereas drivers
are required for PC Camera operation.
Note: Have your Windows CD-ROM ready beforehand, as
you may be prompted to insert it during the installation
process.
28
Installing Software
Step 1: Utility Installation
1. Insert the V3765 CD into your CD-ROM drive. Don't
connect the camera to the PC at this time.
2. The installation program should start automatically.
If not, double click the My Computer icon on your
desktop, open the CD-ROM drive, and then run the
'setup.exe' found on the installation CD-ROM.
3. Follow the on-screen instructions. All the necessary
software is installed automatically. The utility
program that allow the camera to 'talk' to the
computer via the USB cable are also installed.
Step 2: MSD / PC Camera Driver Installation
1. To install the necessary drivers for Mass Storage
Device (MSD) mode (for Windows 98 users) and PC
Camera mode (all Windows users), first set the
correct operational mode for that function. For
example, set the Mode Dial to PC Camera mode to
install those drivers, and to any other mode to install
Mass Storage Device drivers.
2. Connect the small connector of the USB cable to
the camera, as shown:
29
V3765 Digital Camera User’s Manual
3. Connect the large end of the USB cable to an
open USB slot on your computer. To locate USB
slots on your computer, look for the USB icon
.
4. The Windows Add Hardware Wizard will
automatically detect the camera and lead you
through the installation procedures for each
camera mode.
5. You will need to do this once for each mode
(PC/web Camera and MSD mode.)
NOTE: You should reboot your computer before using
camera and software for the first time. Remember to
connect your camera to the PC with the USB cable
before downloading images.
30
Copying Images to your Computer
Copying Images to your Computer
When connected to your computer in MSD mode, the
digital camera behaves exactly like any another disk
drive attached to your computer. This makes copying
the images to your hard drive as easy as copying files
from a floppy disk, zip drive or CD-ROM.
To copy images to your computer:
1. Connect the digital camera to the computer with
the USB cable.
2. Turn on the camera.
3. Open Windows Explorer. The contents of your
computer will be displayed, including all your disk
drives, and, if the camera is connected properly,
an extra disk drive representing the camera's
memory called "Removable Disk."
4. Select the digital camera drive. The camera's
images are listed. Select the images and drag
and drop them onto your computer's hard disk.
PC/Web Camera Mode
Windows PC users can use the 3765 as a PC/Web
Camera, you must put the camera in PC Camera mode
and then connect it to your PC via the USB port.
When connected, the camera may be used in
conjunction with any commercially available video
31
V3765 Digital Camera User’s Manual
capture software to create your own home videos.
Windows XP users can use Windows Movie Maker.
PC Camera mode can also be used with real-time video
conferencing software such as Microsoft NetMeeting™.
NOTE: To use your camera as a PC/web Camera you
must set the camera to PC Camera mode. To use the
camera in MSD mode, you can use any of the modes
other than PC Camera mode.
CAUTION: Do not disconnect the USB cable when the
digital camera is functioning as a PC Camera (i.e. when
an application window shows live camera video, or
when the application is recording video). Unexpected
problems could result.
32
Chapter 5 - Mode / Operation Guide
The 3765 camera has six operational modes.
Select a mode by rotating the Mode Dial to the
desired position. This chapter describes each
mode and associated button functions.
Capture Mode
Capture mode is the most commonly used mode, offering the
most automatic operation. The basic principles of photography
apply to this mode.
Capture mode button functions:
•
•
•
•
Up Button: Increases the exposure value (eV), overriding
the automatic exposure determination, effectively
brightening the image.
Down Button: Decreases the exposure value, (eV),
overriding the automatic exposure determination,
effectively darkening the image.
Display Button: Cycles through the following LCD
display settings: LCD with complete status information,
include histogram, LCD without status information or
histogram, LCD off.
Strobe / Copy: Specifies the strobe (flash) mode.
Pressing the Strobe key cycles through the settings:
Automatic, On (Fill), Auto with Red-Eye Reduction, Off.
V3765 Digital Camera User’s Manual
•
•
•
WB / Delete: Specifies the White Balance setting.
Pressing the WB key cycles through the following settings:
Automatic, Day Light, Shade, Tungsten (incandescent),
and Fluorescent Light.
Zoom Out: Widens the field framed by the camera's
lens from 3x to 1x.
Zoom In: Narrows the field framed by the camera's
lens optically from 1x to 3x in eight steps. After reaching
the extent of the optical zoom you may also zoom digitally
from 1x to 4x in steps of 0.2.
Movie Mode
Movie mode allows you record movie-clips (including audio).
To record a video clip:
1. Turn the Mode Dial to the Movie mode.
2. When the LCD screen comes on, frame your shot.
3. Press the Shutter Button to begin recording. Press the
Shutter Button a second time to stop recording. Note
that the camera will stop recording when memory is full.
You may zoom in and out digitally when recording videos
but you cannot zoom optically. While capturing video you
may use zoom as follows:
Digital zoom: You may change the digital zoom from 1x to
2x in steps of 0.2 while recording.
34
Preset Mode
Optical zoom: You may set the optical zoom from 1x to 3x
prior to recording. Note that you must set the optical zoom
before recording. Once you begin recording the optical
zoom cannot be changed.
/
while recording a
Pressing the Up and Down buttons
video increases and decreases the lens' exposure value,
which brightens or darkens the video.
Preset Mode
The Preset Mode has five pre-defined settings optimized for
capturing specific types of scenes: Landscape, Portrait,
Night Scene, Self-Timer, and Macro. Select the Preset
appropriate to the scene you wish to capture using the Up
/
buttons. Press the Shutter button to make
and Down
a selection. Each of the five Preset-types are described in
the following sections.
Landscape
The landscape preset is optimized for capturing
landscape images where the desired object is far away.
The lens will be adjusted for appropriate focus within the
frame.
35
V3765 Digital Camera User’s Manual
Portrait
The portrait preset is optimized for capturing "head shots"
of people, focusing more on the center of the frame
than on the peripheral areas.
Night Scene
The night scene preset is optimized for capturing images
at night, opening the lens aperture wider and longer to
gather as much ambient light as possible. You should
hold the camera perfectly still when capturing night shot
or place it on a stable surface or tripod to minimize
blurring resulting from the longer exposure.
Self-Timer
Using the self-timer preset the camera captures an
image after a ten second delay. This gives you the ability
to capture hands-free images, such as self-portraits or
group images.
To Capture a Group Image
1. Position the camera on a stable surface or on a
tripod and frame the shot.
2. Rotate the Mode Dial to Preset mode
36
Playback Mode
3. Use the Up and Down buttons to select the SelfTimer Preset.
4. Press the Shutter Button. The 10-second delay
begins immediately. After ten-seconds the
camera captures the image.
With the exception of the Shutter button, all of the
camera's other buttons behave the same as they do in
the other Preset modes.
Macro
The macro preset optimizes the camera for capturing
close up shots of objects at a distance of 12 inches
(30cm) or less from the camera. Close up images
captured using the Macro preset will have sharper focus
than close up images captured using other presets or
Capture mode.
Playback Mode
Playback mode is used to view images stored in memory
(either internal memory or on an SD memory card.) To
view the images, rotate the Mode dial to the Playback
button to turn it on.)
position. (Press the Display
Playback mode button functions:
•
•
Up Button: Move to the previous image.
Down Button: Move to the next image.
37
V3765 Digital Camera User’s Manual
•
•
•
•
•
Display Button: Toggles the image information on/off.
Strobe / Copy: Copies the selected image from onboard memory to the memory card or vice versa.
WB / Delete: Deletes selected image.
Zoom Out: In Playback mode, the Zoom Out button
switches the display to Thumbnail mode.
Zoom In: In Playback mode the Zoom In button
magnifies the displayed image from 1x to 8x in steps of
0.5. Use the Up, Down, WB, and Strobe buttons to
traverse a zoomed image.
Setup Mode
Setup Mode is used to configure the camera. To open the
Setup menu, rotate the Mode dial to the Setup position.
The Setup menu is displayed on the LCD as follows:
38
Setup Mode
Delete All
To delete images from either the camera's internal
memory or from an SD/MMC Card, select Delete All from
the Setup menu.
Format
The format option completely erases and reformats
memory. Although Format requires longer than Delete,
be sure to format your storage device occasionally to
ensure the card continues to function optimally.
39
V3765 Digital Camera User’s Manual
Quality
You can specify the resolution and quality of the images
you capture in the Setup menu.
There are six resolution/quality combinations available:
Megapixel
Count
Resolution
(Horiz. x Vertical)
Quality
5.0 MP
2496 x 2016
Normal
3.0 MP
2048 x 1472
Fine
3.0 MP
2048 x 1472
Normal
2.8 MP
2048 x 1376
Fine
2.8 MP
2048 x 1376
Normal
0.7 MP
1024 x 736
Fine
The higher the resolution and quality, the sharper your
images will be, but at the same time the image file size will
be larger. Therefore you will be able to store fewer images
in memory. 2048 x 1472 is the native resolution of the 3765.
An interpolation method is employed to achieve the
maximum effective resolution of 5.0M (2496 x 2016).
40
Setup Mode
Buzzer
When the buzzer (beeper) is turned on, the camera
generates a beep whenever you press a buttons or
rotate the Mode dial.
To enable beep tones, select the Buzzer option from the
menu. On the subsequent screen, select Yes to confirm
.
and then press the Display button
Date/Time
The 3765 camera marks each image with a time stamp
displaying the hour, minute and day the image was
captured. This is useful for organizing and keeping track
of your image collection.
For more on setting the time and date see page 17.
41
V3765 Digital Camera User’s Manual
Memory Type
You can specify whether you want to store images in the
on-board (internal) memory or on an SD/MMC Card.
To specify the memory to be used:
.
1. Rotate the Mode Dial to Setup
2. Turn on the camera.
3. Use the Down button
to select Memory Type and
then press the Display button
.
4. Use the Up and Down
/
buttons to select either
Internal, to use the camera's on-board memory, or
Memory Card, to use an SD/MMC Card.
42
Setup Mode
5. Press the Display button
to confirm your selection
and return to the main Setup screen.
Language
The 3765 can display menu items in English, French,
Spanish, German, Italian, Japanese and Simplified
Chinese. For more on setting the language, see page 15.
Video Out
When connecting your camera to a TV you may specify
the video standard used by your TV. This enables you to
view images on a TV or record images on a VCR.
Select the Video Out option. Choose either NTSC or PAL,
according to your hardware and region. Press the Display
button
to confirm your choice.
43
V3765 Digital Camera User’s Manual
ISO
You may specify the camera’s ISO light sensitivity. Two ISOs
are available:
ISO 100: For shooting in bright sunlight
ISO 200: For general use in most situations
Opening
You can choose to display the welcome screen when
the camera is turned on.
44
PC Camera Mode
To turn the welcome screen on or off, scroll down to the
, select Yes
Opening option, press the Display button
to confirm.
or No, and press
PC Camera Mode
The 3765 camera can be used with most commercially
available video software as a video camera. Simply
connect it to your PC with the supplied USB cable, turn
the Mode dial to PC Camera and then it turn on.
For more information regarding this mode, see Section 4.
45
Chapter 6 - the LCD Display
The icons on the LCD display indicate the status of camera
settings and functions such as quality, zoom ratio, and
number of images. This chapter describes the LCD display
icons and their meanings.
Preset
Mode
White Balance Mode
Memory Type
Remaining
Images
Quality
Flash
Mode
Zoom
Ratio
Shutter
Speed
Histogram
Date/
Time
F-Stop
Battery
Status
EV
Chapter 6 - the LCD Display
LCD Icon Descriptions
Icon
Name
(None)
Auto Flash The camera determines whether the flash is needed by
detecting the amount of ambient light.
Flash Off
Description
Flash is turned off, regardless of the amount of light available.
Red-Eye
Use the Red-Eye Reduction function to reduce the occurrence
Reduction of "red-eye" (eyes appear red in the images due to flash
reflection off the eyes’ retinas.) This function causes the
camera to pre-flash quickly before the image is captured to
reduce red-eye. The use of flash is automatically determined
by the camera.
Flash On
Flash is always on, regardless of light available.
Capture
Mode
Indicates the camera is in Capture mode (the most common
mode for capturing images.)
Self-Timer Indicates the camera is using the Self-Timer preset. Pressing
the Shutter button will initiate the 10-second countdown timer
before capturing a image.
Playback
Mode
Indicates the camera is in Playback mode. This mode is used
to view images stored in internal or card memory.
Zoom
Indicates the level of zoom currently applied.
In Video Mode, optical zoom must be adjusted before
recording; digital zoom can be adjusted during from 1x to 2x.
In Capture Mode, optical zoom ranges from 1x to 3x and
digital zoom from 1x to 4x. In Playback Mode zoom can be
adjusted from 1x to 8x.
Battery
Indicator
Indicates the level of battery power remaining.
47
V3765 Digital Camera User’s Manual
(None)
White
Balance
Indicates the current White Balance setting. The default setting
is Automatic
Auto WB
The camera automatically determines the White Balance
setting.
Daylight
Use this setting when capturing images in bright daylight, to
reduce the effect of "whitewashed" images.
Shade
Use this setting when capturing images in shade, or any time
your images come out too dark.
Tungsten
Use this setting for capturing images under tungsten or
incandescent light.
Fluorescent
Use this setting for capturing images under fluorescent light.
Histogram This graphically shows the distribution of brightness in an
image. This information can be used to judge the exposure
quality.
48
Appendix 1 – Button Function Guide
Mode
Shutter
Up
Down
Display
Strobe/
Copy
WB/
Delete
Zoom
Out
Zoom
In
Single
Capture
EV+
EV-
LCD + Light
→
LCD Off
Auto
→
On
→
Off
→
Red-Eye
Reduction
Auto
→
Day light
→
Shade
→
Tungsten
→
Fluorescent
Zoom Out
Zoom In
Single
Capture
Select
Landscap
e, Portrait,
Night
Scent,
Self-Timer
or Macro
Select
Landscape,
Portrait,
Night Scent,
Self-Timer
or Macro
LCD + Light
→
LCD Off
Auto
→
On
→
Off
→
Red-Eye
Reduction
Auto
→
Day light
→
Shade
→
Tungsten
→
Fluorescent
Zoom Out
Zoom In
Select Image
Page Up
Page Down
LCD + Light
→
LCD Off
Copy image
to / from
Internal /
External
Delete
Zoom Out
Zoom In
Start / Stop
Recording
EV+
EV-
LCD + Light
→
LCD Off
N/A
Auto
→
Day light
→
Shade
→
Tungsten
→
Fluorescent
Zoom Out
Zoom In
N/A
N/A
N/A
N/A
N/A
N/A
N/A
N/A
Execute
Function
Select
Select
N/A
N/A
N/A
Select
Select
Capture
Preset
Playback
Video
PC
Camera
Setup
N/A = Not Available
Appendix 2 – Troubleshooting Guide
Problem
Possible cause
The camera
The camera is
has no power. turned off.
The batteries are
discharged.
Solution
Press the power button to turn the camera ON.
Replace the batteries with fresh ones. Refer to
Inserting Batteries.
The batteries are
Check the battery orientation. Refer to “Inserting the
inserted incorrectly. Batteries.”
The camera
won’t capture
an image.
The flash
doesn’t work.
If the light is flashing, wait until it is a steady green
Ensure the green
before capturing a image. The camera may be
Camera-Ready
LED indicator is on waiting for the flash to charge.
(not flashing.)
Is the camera
connected to a
computer?
The camera’s buttons are not functional when
connected to a PC. Disconnect the camera to restore
control to the camera buttons.
Is the flash on?
Ensure the flash is set to auto or on. Refer to Setting
the Flash.
The batteries may
be weak.
If the batteries are too weak, the flash will be unable
to recharge. Turn the camera off and wait a few
seconds before turning it back on. If this doesn’t
work, replace the batteries.
The images
are blurry.
Hold the camera steady or put it on a tripod to
The camera or
subject was moving capture images.
when the shot was
captured.
The computer
does not
recognize the
camera.
(Windows 98)
The camera was
connected to PC
computer before
installing USB
driver software.
Connect the camera to the computer with the USB
cable. Select [My computer] > [Control panel] >
[System] > [Device manager]. From [other devices]
delete [Composite USB device] or [unknown device].
Disconnect the camera from the computer, install the
software, and then reconnect the camera.
Appendix 2 – Troubleshooting Guide
When using
Windows ME
or 2000 I get a
message:
"Unsafe
Removal
Device
Detected"
whenever the
USB cable is
unplugged
from the PC
When removing
USB devices, it is
recommended that
users follow the
"Safe Removal of
USB Device"
procedure.
Procedure:
A. Right-click the Unplug or Eject hardware icon at
the bottom-right of your computer screen.
B. Left-click the Unplug or Eject hardware text box
to open the 'Unplug or Eject Hardware' screen.
C. From the 'Unplug or Eject Hardware' screen,
select the device to be disconnected and then
click the Stop button to bring up the 'Stop a
Hardware device' confirmation screen.
D. From the 'Stop a Hardware device' confirmation
screen select the device to be stopped and click
OK to bring up the 'Safe To Remove Hardware'
confirmation.
E. Disconnect the Digital Camera from your PC.
Images lose
formatting data
during image
capture in "PC
Camera"
mode.
If your hard disk's
DMA setting is
turned off images
may lose formatting
data during image
capture. (Windows
98 and ME only.)
Please check to make sure your hard drive's DMA
setting is enabled, as follows:
1.
2.
3.
4.
5.
From the Windows Start menu, select Settings,
then Control Panel.
In the Control Panel double-click System, then
click the Device Manager tab.
Select your hard drive from the list, then click
Properties.
Click the Settings tab.
Make sure the box marked DMA is checked. If
not, check the box to ensure that your hard
drive will protect image attributes during
capture.
51