1
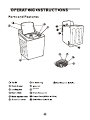
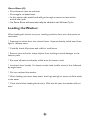
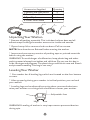
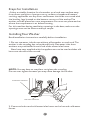
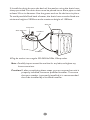
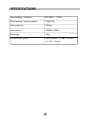
TABLE OF CONTENTS
PAGE
IMPORTANT SAFETY INSTRUCTIONS.............2,3
OPERATING INSTRUCTIONS . ...................................4
Parts and Features. ..........................................................................4
Operating instructions. ...................................................................5
CARE AND CLEANING GUIDE.......................................7
Cleaning and Maintenance....................................... .......................7
Moving & Vacationing .......................................... . . . . . ..........8
TROUBLE SHOOTING..................................................8
INSTALLATION INSTRUCTIONS..................................10
Tools and Materials Required.........................................................10
Unpacking Your Washer..................................................................11
Levelling Your Washer.....................................................................11
Steps for Installation......................................................................12
ELECTRICAL REQUIREMENTS.................................... 14
Power Interruptions.......................................................................14
SPECIFICATIONS............................................Back Cover
1
IMPORTANT SAFETY INSTRUCTIONS
Warning - To reduce the risk of fire, electric shock, or
injury when using your appliance, follow basic
precautions, including the following:
1. Read all instructions before using the appliance.
2.This appliance is not intended for use by persons (including children)
with reduced physical, sensory or mental capabilities, or lack of
experience and knowledge, unless they have been given supervision or
instruction concerning use of the appliance by a person responsible for
their safety. Children should be supervised to ensure that they do not
play with the appliance.
3. Use this appliance only for its intended purpose as described in
this user and care guide.
4. Use only detergents or softeners recommended for use in this
appliance and keep them out of the reach of children.
5. This appliance must be properly installed in accordance with the
installation instructions before it is used.
6. Never unplug your appliance by pulling on the power cord.
Always grasp the plug firmly and pull straight out from the outlet.
7. Replace worn power cords, loose plugs and power outlets
immediately.
8. Unplug your appliance before cleaning or before making any
repairs. Repairs should only be done by authorised technician..
9. Do not operate your appliance when parts are missing or broken.
10. Do not tamper with controls.
11. Do not operate your appliance in the presence of explosive
fumes or toxic flammable vapours.
12. Do not use hot water that exceeds 60 oC in temperature. This
refers to hot water entering the machine. If temperature
cannot be controlled, use WARM wash only.
2
13. Do not use this appliance to wash clothes which are stained,
spotted or washed in gasoline, dry cleaning solvents or any
other explosive or flammable substances that could ignite
and explode.
14. Do not add or mix any flammable or explosive substances to
the wash.
15. Do not try to remove clothes while the washer is in motion.
Wait until it comes to a complete stop.
16. The lid must be closed when the machine is in operation.
17. Do not use this appliance for commercial applications.
18. Do not operate this appliance unless all panels are properly intact.
19. The appliance is not to be used by children without adult supervision.
20. This appliance must be connected to an approved electrical outlet
with 220-240V power source.
21. Do not repair or replace any part of the appliance, this can only be
done by an authorised technician.
22. To reduce the risk of electric shock or fire, do not use extension
cords or adapters to connect the unit to electrical power source.
23. For washing machines having ventilation openings in the base,
the installation instructions shall state that the openings must
not be obstructed by a carpet.
24.Use the hoses provided.
25. If this appliance is supplied from a cord extension set or electrical
portable outlet device, the cord extension set or electrical portable
outlet device must be positioned so that it is not subject to splashing
or ingress of moisture.
3
Agitator
Extra Rinse (5)
• Press button once to activate.
• Press again to deactivate.
• In this option the wash load will go through one extra rinse at the
end of the cycle.
• An Extra Rinse will automatically be added to the Whites Cycle.
Loading the Washer:
When loading the clothes into your washing machine, there are a few points to
remember:
* Separate the white from the colored items. Separate heavily soiled items from
light or delicate items.
* Carefully check all pockets and cuffs for small items.
* Remove pins and other sharp objects from clothing to avoid damages to the
interior parts.
* Pre-treat all stains and heavily soiled areas for better result.
* Load each item loosely. For better results, load smaller items in first, followed
by larger items.
* Do not overload the washer.
* When loading wet items, keep water level high enough so items can float easily
in the water.
* Close the lid after loading the laundry. With the lid open, the washer will not
start.
6
Note: Please only use a low-sudsing or high-efficiency type detergent.
Bleach use and dispenser:
* Bleaching of clothes can help remove stains, heavy soiling and kill
bacteria.
* Bleach should not be used on silk, wool, rayon or drip dry clothes.
* Bleach dispenser is located on the front corner under the lid.
* Fill the dispenser with the manufacturer's recommended dosage
during the first water fill.
* Be careful not to spill undiluted bleach onto the washer cabinet or
your clothes.
Note: Use only liquid bleach in dispenser.
CARE AND CLEANING GUIDE
Warning: Always unplug your washer to avoid electric shock before
cleaning. Ignoring this warning may result in injury. Before using cleaning
products, always read and follow manufacturer warnings to avoid
personal Injury or product damage.
Cleaning and Maintenance
* Use only a damp or sudsy cloth for cleaning the control panel.
* To avoid any kind of damage to cabinet finish, wipe washer cabinet as
needed. If you spill liquid/powdered softener bleach or detergent on the
cabinet, wipe cabinet immediately .
* Do not use any abrasive, harsh chemicals, ammonia, chlorine bleach,
concentrated detergent, solvents or metal scouring pads. These
chemicals may dissolve, damage and/or discolor your washer.
* Leave lid open after washing to allow inside of washer to dry and assist
in preventing unwelcomed bad odours.
7
Moving & Vacationing
* Turn off water supply at the faucet and disconnect hoses. Drain water
from all hoses.
* Disconnect electrical plug.
* Dry inner wash tub. If moving washer disconnect drain hose.
* Turn the leveling legs clockwise all the way in.
* Move and store your washer in upright position only.
* To prevent mold or mildew, leave lid open so moisture inside machine
can evaporate.
* Insert transporting bolts if you are relocating the washer. Ensure
removal prior to usage.
TROUBLE SHOOTING
If washer does not operate:
* Check the unit is plugged in. The plug may have come loose.
* Check if the electrical wall receptacle is of proper voltage.
* Check if the circuit breaker needs to be reset or if the fuse needs
replacing.
* Check if the washer is overloaded :load may need to be re-arranged or
redistributed evenly.
* Check if the lid is open.You may have to close the lid properly.
* The washer pauses in some cycles. This is normal in delicate or handwash cycles which has short period of time.You will not hear washer
operation for a short period of time. When the soak time is over, it will
start automatically.
Problems with water:
* Not enough water coming out: Water faucet may need to be
completely turned on. Hoses may be tangled or kinked. Straighten out
hoses. Check water level selection, it may need to be readjusted.
8
* Water temperature is incorrect: Check your water heater
temperature. Hot water needs to be at a temperature of at least 120 ° F140 ° F(49 ° C-60 ° C).Check to make sure the inlet hoses are properly
connected (E.g. Hot to hot & cold to cold).
* Water leaks: This may be due to incorrectiy installed drain hose or fill
hoses.Your home drain may be clogged .You may need to tighten hoses,
check the plumbing or call a plumber for assistance.
* Water will not drain: This may be due to not installing your drain hose
correctly. Check the position of the drain hose. In order to drain
properly, make sure that top of drain outlet is less than 5 ft. (1.5 m)
above the floor.
Washer is making noise:
* Washer may need to be reinstalled (Check washer installation
section).
* Washer load may need to be re-balanced, as the load may be uneven.
* Coins, loose change, buttons or other heavy objects could create
noise related sounds.
* Squealing sound: Due to overloaded wash tub.
* Vibration Noise: may be caused by not leveling washer properly on the
floor or uneven distribution of clothes in the tub.
Normal Operating Sounds
* The following sounds are normally heard during the
operation of the washer:
* Tumbling sounds: This is normal as the heavy wet clothes in
the washer are continuously being lossed around.
* Air rushing noise: This happens when the washer tub spins at
very high speeds.
* Wash and Rinse cycles going on and off will also make clicking
sounds.
9
Problems with clothes:
* Clothes become excessively creased: this is due to improper sorting,
overloading or washing in excessively hot water repeatedly. Avoid
overloading and resort your load. Wash in cooler water.
* Soap residue: detergent may not be dissolved in water.
* Check water temperature, add detergent as wash tub is being filled
with water. Reduce detergent dosage or pre-dissolve detergent before
adding to wash.
* Spots or stains on your clothes: this is due to incorrect use of fabric
softener. Refer to manufacturers instructions on the container and follow
directions.
* Clothes are grayed or yellowed: this may be due to not using
sufficient detergent for large loads. Add more detergent to the load.
* Clothes are ripped & have holes/excessive wear & tear: this may be
due to sharp objects left in washing. Remove all small loose sharp
objects, fasten belts, zippers, metal snaps etc. Check if you are using
undiluted bleach. Never add undiluted bleach to wash.
LED Display Notes:
Reasons
Trouble Codes
Rinse and spin indicators flash
Unit does not drain, or the speed of draining is too slow.
All progress indicators flash
The washer is out of balance. Please open the lid
and rebalance the load.
All load size (water level ) indicators
flash
The water inlet time exceeds the preset time.
“Small” and “Extra Small” load size
(water level) indicators flash
Water overflow protection.
“Super” and “Large”
load size
(water level) indicators flash
The water level sensor fault - Call service.
Beeps
Top lid not close properly.
INSTALLATION INSTRUCTIONS
Tools and Materials Required
You will need to have following tools to help you
with the installation of your washer:
Pliers, Wrench, Tape Measure, Gloves, Level
10
Accessories Supplied
Quantity
1.Hot & Cold inlet hoses
2.Drain Hose Hook
3.Pipe Clip/brace
2
1
1
1
4.Outer Drain Hose
2
1
3
4
Unpacking Your Washer:
* Remove all packing materials. This includes the foam base and all
adhesive tape holding the washer accessories inside and outside.
* Open the top lid to remove the drum brace. Pull to remove.
NOTE: Save drum brace. Reinstall when moving the washer.
* Inspect and remove any remains of packing, tape or printed materials
before using the washer.
WARNING: To avoid danger of suffocation, keep plastic bag and other
packing material away from babies and children. Do not use this bag in
cribs,carriages and playpens. The plastic bag could block nose and mouth
and prevent breathing. This bag is not a toy.
Leveling Your Washer
* Your washer has 4 leveling legs; which are located on the four bottom
corners.
* After properly placing your washer in its final position, you can level
your washer.
* Leveling legs can be adjusted by turning them counterclockwise to
raise your washer or turning them clockwise to lower your washer.
Adjustable foot
High
Low
WARNING:Leveling of washer is very important to prevent vibration
during spin.
11
Steps for Installation
• Select a suitable location for the washer on a hard even surface away
from direct sunlight or heat source e.g. radiators, baseboard heaters,
cooking appliances etc. Any floor unevenness should be corrected with
the leveling legs located on the bottom corners of the washer. The
washer must be placed at room temperature.You must not place washer
where the temperature is at below freezing.
For this machine having ventilation openings in the base, make sure the
openings must not be obstructed by a carpet.
Installing Your Washer
Read installation instructions carefully before installation.
1. Do not use water inlet hoses without a flat washer on each end. The
washer in the coupling has to be placed firmly. Flat water inlet hose
washers are preinstalled in each end of the water inlet hoses.
New hose-sets supplied with the appliance are to be used and that old
hose-sets should not be reused.
NOTE: You may have to use pliers to tighten the coupling.
Do not over tighten because you may cause damage to the valve.
Cold water inlet hose
Hot water inlet hose
2. Connect the hot and cold water inlet hoses to the hot and cold water
faucet.
12
3. Install the drain hose to the back of the washer using the drain hose
clamp provided. The drain hose must be placed into a drain pipe or sink
at least 3.5cm in diameter. Use the goose neck to fix the hose in place.
To avoid possible flush back of water, the drain hose must be fixed at a
minimum height of 1000mm and a maximum height of 1500mm.
Water Inlet
Goose Neck
Water Supply Hose
Hose Bend
Drain Hose
4.Plug the wash er into a regular 220-24 0Volt/50Hz,10Amp outlet.
Note :Carefully inspect around the machine for any leaks, and tighten any
loose connecti ons.
Caution: If, after completing these steps, you are unsure that unit is
properly installed, contact a qualified installer. To ensure
that your washer is properly installed, it is recommended
that it be installed by a certified installer.
13
ELECTRICAL REQUIREMENTS
Earthing Instructions
This appliance must be grounded. In the event of an electrical
short circuit, grounding reduces the risk of electric shock by
providing an escape wire for the electric current. This appliance
is equipped with a grounding wire with a grounded plug. The
plug must be inserted into an outlet that is properly installed
and grounded.
Improper use of the plug can result in a risk of electric shock.
Consult a qualified electrician or service person if the
grounding instructions are not completely understood or if
doubt exists as to whether the appliance is properly grounded.
Wiring Requirements:
The washer must be plugged into at least 10AMP 220-240 VOLT,
50 HZ GROUNDED OUTLET.
If the supply cord is damaged, it must be replaced by the
manufacturer, its service agent or similarly qualified persons in order
to avoid a hazard.
Note: If a standard two-prong
outlet is encountered, it is the
personal responsibility and
obligation of the consumer
to have it replaced with a
properly grounded
three-prong outlet.
Extension Cords:
We d o n o t re c o m m e n d t h a t yo u u s e a n e x t e n s i o n c o rd .
CAUTION: If this appliance is supplied from a cord extension set or
electrical portable outlet device, the cord extension set or electrical
portable outlet device must be positioned so that it is not subject to
splashing or ingress of moisture.
Power Interruptions
Occasionally there may be power interruptions due to
thunderstorms or other causes. Remove the power cord from AC
outlet when a power outage occurs. When power has been
restored re-plug power cord to AC outlet. If outage is for a
prolonged period, clean washer before using it again.
14
SPECIFICATIONS
Rated voltage·frequency
220-240V~ · 50Hz
Rated washing / spinning capacity
7.5kg/7.5kg
Spin speed max
650rpm
Inlet pressure
0.03MPa-1.0MPa
Net weight
59kg
Dimensions (mm)
686( Depth) x 686(Width)
x 1105( Height)
15