1
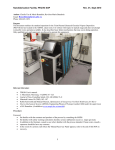
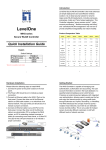
LevelOne DSA-1000 / PRT-1000 Device Server / Thermal Printer User Manual V1.0 Table of Contents 1. 2. 3. 4. Before Your Start .......................................................... Hardware Installation ...................................................... Getting Started ............................................................ Configuration .............................................................. 1 4 5 7 1. Before Your Start Package Contents • DSA-1000 • Power Adapter DC12V 1.5A • Quick Installation Guide x1 x1 x1 It is highly recommended to use all the supplies in the package instead of substituting any components by other suppliers to guarantee best performance. Web Browser : Internet Explorer (8.0 or above), Firefox, Safari A Computer with a network adapter properly installed. 1 X RJ-45 Ethernet cable. Preface With the growth of the Internet age and ever increasing demand for wireless Internet access in public locations ranging from places such as airports, hotels, conventions, stadiums, restaurants or coffee shops, this has revolutionized the Hotspot application and becoming more and more apparent in our daily lives. WHG-1000 WiFi-N Hotspot Access Controller provides the perfect opportunity to generate added revenue for your business and ensuring quality of service for customers within a secured network and prevent unwelcomed users to access the Internet. The hotspot on-demand ticket billing kits containing PRT-1000 Line Thermal Printer and DSA-1000 Network Device Server provides instant ticketing for users and comes with two COM ports for redundancy where two Line Thermal Printers can be attached at the same time. The hotspot on-demand billing kit is designed with ease of use for account generation via DSA-1000 Network Device Server from the built-in On-Demand billing plan from WHG-1000 WiFi-N Hotspot Access Controller and then prints the account ticket via PRT-1000 Line Thermal Printer. The hotspot on-demand ticket billing kits is easy to installation and setup where the Line Thermal Printer connects directly to DSA-1000 Network Device Server with serial port (RS-232) COM1 and COM2 (for redundancy) and standard TCP/IP (RJ45) interface to connect to WHG-1000 WiFi-N Hotspot Access Controller. It is simple to operate with just a few clicks on the DSA-1000 Network Device Server and out comes the ticket from the Line Thermal Printer . . This Quick Installation Guide provides instruction for installing the DSA-1000 for Thermal Printer(PRT-1000) DSA-1000 Network Device Server For PRT-1000 Thermal Printer Quick Installation Guide DSA-1000 Overview 4 DSA-1000 Network Device Server For PRT-1000 Thermal Printer Quick Installation Guide LED and Keypad Description LED Indicate : Power : LED ON indicates power on, and OFF indicates power off. Status : LED ON indicates the device associated with WHG-1000; LED OFF indicates the device unassociated with WHG-1000; LED FLASH indicates the FUNCTION key activated. Lock : LED ON indicates the Keypad locked; LED OFF indicates the Keypad unlocked; LED FLASH indicates input digit number key for unlocking. Link/Act : Link and activity of Ethernet port 100M : Link speed of Ethernet port. Keypad : - / +: Increase (POS) and Decrease(PRE) number for selecting Plan or Function option. Press and Hold two button for more than 5 seconds(until Status LED FLASH) to reset the device to default configurations. Enter : Click to printer On-Demand Account Tickets or Function selected. FUNCTION : Lock Keypad function: Press and Hold button until Lock LED ON. Unlock Keypad function: Press button until Lock LED FLASH, then input key for unlocking. Link Test function : Click button, then select in number 1 and click Enter. Statement Printing : Click button, then select in number 9 and click Enter, the PRT-1000 will print Statement of “Current Balance”; select in number 8 and click Enter, the PRT-1000 will print Statement of “Early Balance”. CANCEL: Stop to print Statement, Clear input key for unlocking or cancel other event... REPEAT: Repeat to print previous Tickets. 5 DSA-1000 Network Device Server For PRT-1000 Thermal Printer Quick Installation Guide How to reset the Network Serial Server back to factory default setting 1) First unplug the Ethernet Cable connected to the network serial server and press the reset button 2)Then press and Hold the “PRE” and “POS” buttons simultaneously for more than 5 seconds(until Status LED FLASH) to reset the device to default configurations. How to Lock and Unlock Keypad for On-Demand Authentication In WHG-1000 web UI: 1) Select a Service Domain’s Authentication Type as On-Demand. 2) Under Service Domain Authentication On-Demand Billing Plan Setup: Enable and save a billing plan. 3) Under Service Domain Authentication On-Demand Thermal Printer Setup: Edit a thermal printer. After enabling it, provide a 4 to 8 –digit Lock Password. Save everything and reboot the WHG-1000. On the DSA-1000 keypad: 4) After WHG-1000 reboots, press the Function button (left-down) for a while until the Lock LED turns solid on. Now the keypad is locked. 5) To Unlock the keypad, press the Function button (left-down) for a while until the Lock LED starts to blink. 6) Select the Lock password digits one by one by pressing the PRE (-) or POS (+) buttons and then pressing Enter button after each digit. After all the keys are input, the Lock LED will turns off, which denotes the keypad is unlocked. The default password for the Network Serial Server is “1111” 6 DSA-1000 Network Device Server For PRT-1000 Thermal Printer Quick Installation Guide 2. Hardware Installation Please follow the steps mentioned below to install the hardware of DSA-1000 with WHG-1000 and PRT-1000 1. Connect DSA-1000 to your WHG-1000 via Ethernet cable. Connect one end of the Ethernet cable to the LAN port of DSA-1000 on the front panel. On your environment, connect the other end of the cable to your network. DSA-1000 also can connect to WAN1/WAN2 port of WHG-1000, but DSA-1000's network subnet must be same with WHG-1000's WAN1/WAN2 2. Connect DSA-1000 to your PRT-1000 via the provided RS-232(DB9 to DB25) cable. Connect one end of the RS-232 cable to COM1 port of DSA-1000 on the front panel. Connect the other end of RS-232 cable to PRT-1000's DB25 Connector for communicating with Thermal Printer. 3. Connect the DC power adapter to the DSA-1000 power socket on the rear panel. Please only use the power adapter supplied with the DSA-1000 package. Using a different power adapter may damage this system 7 DSA-1000 Network Device Server For PRT-1000 Thermal Printer Quick Installation Guide 3. Getting Started Step : 1. Once the hardware installation is done, set the IP segment of the administrator's computer to be in the subnet of 192.168.2.x. Since the DSA-1000's default IP address is 192.168.2.253, make sure no other network devices are assigned an IP address of 192.168.2.253. 2. Launch a web browser to access the web GUI of DSA-1000 by entering “http://192.168.2.253/setting.htm” in the address field. 3. After a successful login, the “Setting Page” will appear on the screen. 4. Set COM1 Settings for communicating with PRT-1000 Thermal Printer.(The default COM1 Setting already matched with PRT-1000) 5. Configure IP Address in the same range of WHG-1000.(The default WHG-1000's LAN IP address is 192.168.2.254) 6. Select desired Server Listening Port, default is 5000. 7. Click Apply button to enable New setting. 8 DSA-1000 Network Device Server For PRT-1000 Thermal Printer Quick Installation Guide 4. Configuration WHG-1000 provides wireless and wired network service with On-Demand authentication for clients in Service Domain. Administrator can select Billing Plan on each PRT-1000 Thermal Printer. If Billing Plan is enabled, the Thermal Printer can generate On-Demand's tickets. The clients are required to get authenticated successfully before access the Internet. Configuration Steps : Step 1 : Create Billing Plans. Click Service Domain -> Authentication -> On-Demand -> Billing Plans Setup, the Billing Plans List page will appear. Here provides 10 sets of independent billing plans. Select desired Billing Plan and click Edit, then setup page will appear. Enable Billing and set desired billing plan for uses used. Below depicts an example for Billing Plan 2 S 9 DSA-1000 Network Device Server For PRT-1000 Thermal Printer Quick Installation Guide Step 2 : Set Virtual AP and Select On-Demand's Authentication for Service Domain Click Service Domain, the Service Domain Setup page will appear. Set VAP0 in Domain1 and select On-Demand in Authentication Type. Below depicts an example for Domain1 with AP0 and On-Demand's authentication. Step 3 : Select Billing Plans for Thermal Printer. Click Service Domain -> Authentication -> On-Demand -> Thermal Printer Setup, the Thermal Printer List page will appear. Select desired Thermal Printer and click Edit, then setup page will appear. Enable Thermal Printer and set related setting with DSA-1000. Then select desired Billing Plan for Thermal Printer. Below depicts an example. 10 DSA-1000 Network Device Server For PRT-1000 Thermal Printer Quick Installation Guide Step 4 : Reboot WHG-1000. Click Reboot button to enable new setting. Step 5 : DSA-1000 Link Test . After reboot, the DSA-1000's Status LED should be ON. Press FUNCTION button, the Status LED should be FLASH. Select in number 1 and press Enter button, the PRT-1000 Thermal Printer should be print “Thermal Printer Link Test !” message Press CANCEL button to stop function event, the Status LED should be ON. Step 6 : Generate On-Demand's Ticket from Thermal Printer. Press POS or PRE button, select desired Billing Plan (e.g Plan 0~2 for this example)and click Enter button to print ticket for your visitor. This ticket contains a unique login Passcode. 11 DSA-1000 Network Device Server For PRT-1000 Thermal Printer Quick Installation Guide Step 7 : User your Ticket to Access Internet. Connect a client device (e.g. Notebook) with wireless interface to scan the configured ESSID of WHG- 1000 (e.g. AP00) and get associated with this ESSID. The client device will obtain an IP address automatically via DHCP from WHG-1000. Open a web browser on a client device, access any URL, and then the Domain1 User Login Page will appear. Enter the Passcode of a printer ticket previously generated via PRT-1000 Thermal Printer . Then Click Login button. Below depicts an example for login with Passcode. Congratulation ! The success page as below will appear after a client has successfully logged into WHG-1000 and has been authenticated by the system. Now, you are connected the network and Internet! 12