1
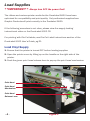
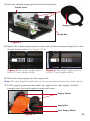
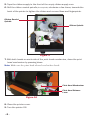
DuraLabel 9000
®
QuickStart Guide
Graphic Products, Inc.
1-800-788-5572
Local: 503-644-5572
www.DuraLabel.com
www.GraphicProducts.com
E-mail: [email protected]
Read Me
First!
**IMPORTANT**
For Upgrading from an existing DuraLabel driver installation!
Upgrade Drivers
In order to upgrade DuraLabel printer drivers the previous driver will need to be
uninstalled. Please follow these steps:
1. Press the “Uninstall Driver” button on the installation screen.
2. Click “Remove printer drivers” and click “Next.”
3. Click “Use advanced printer driver removal options” and click “Next.”
4. Check all existing DuraLabel printers and click “Next.”
5. Check all existing DuraLabel drivers and click “Next.”
6. Check all existing DuraLabel components and click “Next.”
7. Check the files associated with the deleted items you wish to remove and
click “Next.”
8. Check through the list provided and click “Finish.”
9. Click “Restart.”
The Duralabel 9000 printer driver may now be installed. Begin with page 3,
“Connect The Printer” of the QuickStart Guide.
© 2009 Graphic Products, Inc.
Introduction
Thank you for purchasing the DuraLabel 9000 wide-format sign and label printer.
This guide provides steps to help you set up your printer, load supplies, and print
custom signs and labels immediately.
The ribbon and various print media for the DuraLabel 9000 have been optimized
for compatibility and print quality. Only authorized supplies from Graphic
Products will print correctly with the DuraLabel 9000.
For further assistance, please visit www.DuraLabel.com or call our customer
service department. Business hours are M-F 6 a.m. – 5 p.m. Pacific Time.
Graphic Products, Inc.
1-800-788-5572
Contents:
Unpack Printer & Supplies ................................................ pg. 2
Equipment Checklist ....................................................... pg. 2
Connect Printer, Install & Configure Driver ...................... pg. 3
Connect The Printer......................................................... pg. 3
Install Software & Driver ................................................. pg. 3
Configure Driver ............................................................... pg. 3
Load Supplies .................................................................... pg. 4
Load Vinyl Supply............................................................. pg. 4
Load Ribbon Supply ........................................................ pg. 7
Creating & Printing Signs & Labels .................................. pg. 9
Format Document To Print Label ................................... pg. 9
-1-
Unpack Printer & Supplies
Check that all equipment and supplies are present and undamaged before
proceeding.
Equipment Checklist
• DuraLabel 9000 printer unit with cutter built-in
• DuraLabel 9000 CD with printer driver, label templates and symbols
• DuraLabel 9000 User’s Guide
• DuraLabel 9000 QuickStart Guide
• Power cord
• USB cord
• Supply guides (2)
• Ribbon supply core
• Ribbon guides with screws (2)
If any parts are missing, please contact the Graphic Products customer service
department at 1-800-788-5572.
-2-
Connect Printer, Install & Configure Driver
Connect The Printer
1. Connect the printer to a power supply using the provided power adapter.
2. Connect the printer to a computer using either the USB cable.
Note: Please see page 16-19 of User’s Guide if you are using a Serial or Parallel Port.
3. Turn the printer ON using the power switch in the back of the printer.
4. A Found New Hardware dialogue window may appear. If so, select “No, not
this time.”
Install Software & Driver
1. Insert the DuraLabel 9000 CD into the CD-ROM drive.
2. At the prompt, select “Install the software automatically” and click “Next.”
3. Follow the on-screen prompts to install drivers.
Configure Driver
1. Go to “Start >> Control Panel >> Printers and Faxes.”
2. Right-click on the DuraLabel 9000 and choose “Printing Preferences.”
3. Click on “Page Setup.”
4. Set Media Setting to “Continuous.” (only if using continuous supply)
5. Set Media Setting to “Labels With Gaps.” (only if using die-cut labels, see
page 21 of User’s Guide)
6. Set Media Setting to “Labels With Marks.” (only if using labels with black
marks, see page 22 of User’s Guide)
-3-
Load Supplies
**IMPORTANT** Always turn OFF the power first!
The ribbon and various printer media for the DuraLabel 9000 have been
optimized for compatibility and print quality. Only authorized supplies from
Graphic Products will print correctly in the Duralabel 9000.
If the following procedure is not clear, please view the supply loading
instructional video on the DuraLabel 9000 CD.
For printing with Die-Cut labels, see Die-Cut Label Instructions section of the
DuraLabel 9000 User’s Guide, pg.21.
Load Vinyl Supply
1. Ensure that the printer is turned OFF before loading supplies.
2. Open the printer cover by lifting up on the handle on the right side of the
printer.
3. Push the green print head release lever to pop-up the print head mechanism.
Print Head
Print Head
Mechanism
Print Head
Release Lever
-4-
Figure 1
4. Remove outside supply guide from the supply bar.
Printer Cover
Supply Guide
Supply Bar
Figure 2
5. Adjust the inside supply guide to cover the number corresponding to the size
of vinyl being loaded. (see Figure 3 & 4)
Figure 3 The inside supply guide is
set for 6" vinyl supply/media.
Figure 4 The inside supply guide is
set for 8" vinyl supply/media.
6. Place the vinyl supply onto the supply bar.
Note: The vinyl supply should roll over the top and towards the front of the printer.
7. Fit the supply guide onto the label bar, against the vinyl supply, but with
enough room for vinyl supply to rotate with ease.
Supply Guides
Supply Bar
Vinyl Supply/Media
Figure 5
-5-
8. Pull the leading edge of the vinyl supply and thread the vinyl supply under
the media guide bar and through the adjustable media guides.
Supply
Guides
Print Head
Mechanism
Adjustable
Media Guides
Platen
Roller
Supply Bar
Printed
Label
Opening
Media
Guide Bar
Figure 6
9. Pull the vinyl supply over the black platen roller and through the printed label
opening.
Note: Make sure the label supply threads under the green media sensor, located under
the print head mechanism.
10. Move the adjustable media guides to fit the width of the vinyl supply,
securing the vinyl in place.
Adjustable
Label Guides
Media Sensor
Printed Label
Opening
-6-
Figure 7
Load Ribbon Supply
1. Set the ribbon guides based on the size of ribbon loaded.
a. For 4.33" ribbon, move each ribbon guide to the line indicated on the label
on the ribbon spindles and tighten the screws on the top of the ribbon
guide.
b. For 8.66" ribbon, move the ribbon guides against the inside wall of the
printer.
2. Slide an empty ribbon supply core onto the front ribbon rewind spindle,
flushed against the ribbon guide.
3. Slide a roll of ribbon supply onto the ribbon spindle flushed against the ribbon
guide with the leading edge hanging down, towards the back of the printer.
4. Pull the ribbon supply back, then down and thread it underneath the print
head mechanism and above the ribbon sensor (black bar above media sensor).
Media Sensor
Ribbon Sensor
Ribbon Rewind Spindle (front)
Ribbon Spindle (back)
Print Head Mechanism
Figure 8
-7-
5. Tape the ribbon supply to the front of the empty ribbon supply core.
6. Roll the ribbon rewind spindle (front spindle) clockwise a few times, towards the
back of the printer to tighten the ribbon and remove flaws and fingerprints.
Ribbon Rewind
Spindle
Ribbon Spindle
Figure 9
7. With both hands on each side of the print head mechanism, close the print
head mechanism by pressing down.
Note: Make sure the print head release lever latches closed.
Print Head Mechanism
Print Head Release
Lever
Figure 10
8. Close the printer cover.
9. Turn the printer ON.
-8-
Creating & Printing Signs & Labels
Signs and labels can be created using a variety of common software, including
most word processors. The instructions in the following guide are intended for
use with Microsoft Word® and other common word processors. In addition, a
variety of Word templates are included on the DuraLabel 9000 CD.
1. Open Microsoft Word or another word processor.
2. Select the DuraLabel 9000 as the active printer.
Format Document To Print Label
1. Adjust all margins to 0.
2. Adjust paper size and orientation:
▪ If label width is the width of the supply, set page width to the width of the
supply, page height to the height of the label, and orientation to Portrait.
▪ If label height is the width of the supply, set page width to the width of the
label, page height to the width of the supply, and orientation to
Landscape.
3. Insert a text box into the document.
4. Adjust size and position as desired by clicking and dragging box.
5. Click inside the text box to enter label text.
6. Add desired symbols.
Note: The symbols folder is located in the My Documents/DuraLabel 9000 folder.
7. Print label like a normal document.
Note: For optimum printing, see Troubleshooting section of the DuraLabel 9000
User’s Guide pg.50-52.
Please contact us for all your labeling needs. From standardized to custom
labels, we’re ready to provide the labeling supplies you need.
Call 1-800-788-5572 today to get your labeling problems solved.
-9-
1-800-788-5572
P.O. Box 4030
Beaverton, OR 97076
© 2009, Graphic Products, Inc. All Rights Reserved
www.DuraLabel.com
v. 1.0 - 7/7/09