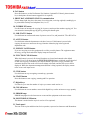
1
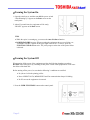
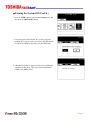
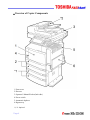
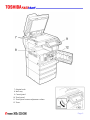
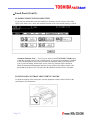
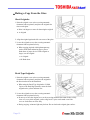
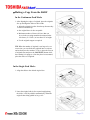
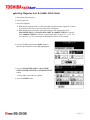
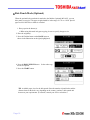
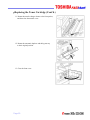
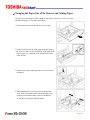
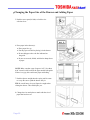
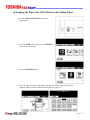
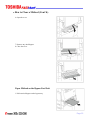
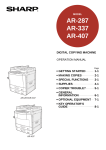
User Guide Set Up & Start Up Basic Copier Operations Key Operator Functions Toshiba America Business Solutions, Inc. © 2004 Training and Dealer Development SET UP & START UP Turning the System On Turning the System Off Overview of Copier Components Overview of Operator Panel Touch Panel Page 1 Turning the System On 1. Open the switch cover, and then turn ON the power switch. “Wait Warming Up” appears on the Basic screen on the touch panel. 2. About 25 seconds later, the equipment will be ready. “READY” appears on the Basic screen. TIPS: y While the copier is warming up, you can use the Auto Job Start function. y POWER FAILURE message: When restarting the equipment due to power failure, etc., “POWER FAILURE” appears at the upper right of the screen. To clear it, press the FUNCTION CLEAR button twice. The job in progress at the time of the power failure is deleted. Turning the System Off When turning off the power of the equipment, perform the following shutdown procedure. DO NOT turn off the power by switching off the power switch of the equipment as it can cause the failure of the hard disk Before turning off the power, be sure that the following 3 conditions are satisfied: y No jobs are left in the printing job list. y None of PRINT DATA, MEMORY RX and Fax communication lamps is blinking. y No PCs access the equipment via network. 1. Press the USER FUNCTIONS button on the control panel. Page 2 Turning the System Off (Cont’d.) 2. Press the USER button to enter the user setting menu, and then press the SHUTDOWN button. 3. “Processing job will be deleted. Are you sure you want to shutdown?” appears on the screen. Press the YES button. To cancel the shutdown operation, press the NO button. 4. “Shutdown in progress” appears on the screen, and then the equipment is shut down. The power switch automatically returns to the OFF position. Page 3 Overview of Copier Components 1. Front cover 2. Drawers 3. Operator’s Manual Pocket (back side) 4. Power switch 5. Automatic duplexer 6. Bypass tray *1, *2: Optional Page 4 7. Original scale 8. Inner tray 9. Control panel 10. Touch panel 11. Touch panel contrast adjustment volume 12. Toner Page 5 Overview of Operator Panel OUCH PANL 1. HELP button When pressing this button, appropriate operation procedures are displayed. 2. USER FUNCTIONS button Press this button to set the paper size of the drawer, the drawer for special use, or to set/register the settings including such as the change of the default setting of the copy, scan and Fax functions. 3. TEMPLATE button Use this button to store and recall the various settings that are frequently used for copy, scan and Fax functions 4. EXTENSION button This is the button to extend functions in the future. It is invalid at present. 5. e-FILING button Use this button to access the saved image data. 6. SCAN button Press this button to use the scanning function. (Optional printer/scanner kit or both printer kit and scanner upgrade kit is required.) 7. COPY button Press this button to use the copy function. Page 6 8. FAX button Press this button to use the Fax/Internet Fax function. (Optional FAX board, printer/scanner kit, or both printer kit and scanner upgrade kit is required.) 9. PRINT DATA/MEMORY RX/FAX communication If these lamps light, they show the status of receiving data, receiving original(s) standing by to be printed and currently used telephone line (1 or 2). 10. INTERRUPT button Use this button to interrupt the copying job in process and to perform another copying job. You can resume the interrupted copying job by pressing this button again. 11. JOB STATUS button Use this button to confirm each status of print or scan or Fax, and journal for TX or RX of Fax. 12. ACCESS button Use this button when the department codes have been set. If this button is pressed after copying, the next user cannot use the copy function without keying in the registered department code. 13. ENERGY SAVER button If you are not going to use the equipment for a while, press this button. The equipment enters the energy saving mode and all the display lamps are turned off. 14. FUNCTION CLEAR button When this button is pressed, all selected functions are cleared and returned to the default settings. Even if you do not press the FUNCTION CLEAR button, within the specified period of time after copying is finished or after the last button is pressed in a copy procedure, the automatic function clear mode will clear all settings to defaults, and the basic screen will be displayed. While the department management function is being operated, the display returns to the access code input screen. 15. STOP button Use this button to stop an ongoing scan and copy operation. 16. START button Press this button to start copying, scanning and Fax operation. 17. Digital keys Use these keys to enter the number of copies you want to make and so on. 18. CLEAR button Use this button to correct numbers entered with digital keys such as an incorrect copy quantity. 19. ERROR lamp ERROR lamp lights in red when an error occurs and the equipment needs some actions. 20. MONITOR/PAUSE button This button is used when the copier is used as a Fax (optional). 21. Touch panel The state of the copier and directions for its operation, expressed as characters and illustrations. Page 7 Touch Panel When the power is turned on, and “READY” is displayed, the BASIC screen of the copy function is shown on the touch panel. On the screen, currently set functions, selected functions and the copier status are shown via messages and illustrations. NOTE: The contents of touch panel screens in this manual show the equipment with all options. (1) Message (2) Reproduction ratio (3) Total copy quantity (4) Currently selected drawer size (5) Remaining paper level (6) Date and time (7) Set functions confirmation button (8) Function setting area (9) Index buttons MESSAGE DISPLAY The following information is shown on the touch panel: Equipment status, operational instructions, cautionary messages, reproduction ratios, total copy quantity, paper size of a selected drawer, amount of paper in a selected drawer and the date and time. Page 8 Touch Panel (Cont’d.) TOUCH-BUTTONS The various function items are touch-button selectable. Press any button lightly with your finger. Index buttons — These buttons are used for switching the menu. The type and the number of the index buttons varies depending on each function of Copy, Scan and Fax. Function setting area — This is an area for selecting and setting each function. SETTINGS (setting functions confirmation) button — This button allows you to confirm the functions that have been set. (An example is shown below.) Icons displayed on the screen (some icons may not appear on the screen): Page 9 Touch Panel (Cont’d.) CLEARING THE FUNCTIONS SELECTED If you press any button that is half-tone shaded, the function selected is cleared. Also, if the copier is left inactive for a while, the automatic function clear works and the setting is cleared. Automatic Function Clear — Even if you do not press the FUNCTION CLEAR button, within the specified period of time (default setting: 45 seconds) after outputting is finished or after the last button is pressed in a procedure, the automatic function clear mode will work to clear all settings, and the basic screen of the copy function will be displayed. While the department management function is being operated, the display returns to the department code input screen. The period for the automatic function clear is selectable. TOUCH PANEL CONTRAST ADJUSTMENT VOLUME To adjust the contrast of the touch panel, turn the adjustment volume on the left side of the control panel. (See illustration.) Page 10 BASIC COPIER OPERATIONS Making a Copy From the Glass Making a Copy From the RADF Magazine Sort & Saddle Stitch Mode (Booklet Mode) Hole Punch Mode Page 11 Making a Copy From the Glass Sheet Originals: 1. Raise the original cover or the reversing automatic document feeder (optional), and place the original face down on the glass. y Raise it 60 degrees or more for detecting the original. y A: Original 2. Align the original against the left rear corner of the glass. 3. Lower the original cover or the reversing automatic document feeder (optional) slowly. y When copying originals with high transparency, such as OHP films and tracing paper, place a blank sheet of paper, the size of the original or larger, over the original. y A: Original y B: Blank sheet Book-Type Originals: 1. Raise the original cover or the reversing automatic document feeder (optional), and place the original in the direction shown in the illustration. y When using the Book-Type Originals to 2-Sided Copies or the Dual-Page function, center the book original on the yellow indicator line. 2. Lower the original cover or the reversing automatic document feeder (optional) slowly. y Do not try to force the original cover or the reversing automatic document feeder to fully close over a very thick original, such as a big book. Copies can be made even if the cover or feeder does not close fully. y During copying, an intense light may leak out. Do not look at the original glass surface. Page 12 Making a Copy From the RADF In the Continuous-Feed Mode: 1. After aligning the edges of originals, place the originals face up and align the slides to their width. y Align the originals in order from the top because they will be fed from the top. y One original sheet is also acceptable. y Maximum number of sheets (all sizes) that can be set in the reversing automatic document feeder: 100 sheets (13.3–20 lb.) or less than 0.6” in height. y Use the original stopper as required. TIP: When the number of originals is too large to be set at one time, you can divide the originals into several sets and set them one after another. To do so, place the first set of originals first and press the CONTINUE button while the scanning is in progress. After they have been scanned, place the next set of originals. In the Single-Feed Mode: 1. Align the slides to the desired original size. 2. Insert the original with its face up and straight along the slides, it will be pulled in automatically. When the original starts being pulled in, let go of it. Page 13 Magazine Sort & Saddle Stitch (Booklet Mode) When the Magazine Sort mode is selected, 1-sided originals can be copied and bound like magazines or booklets. When the saddle-stitch finisher (optional, MJ-1025) is installed, you can select the saddle stitch mode that will automatically fold and staple the center of the document. LD, LT-R, A3, A4-R and B4 are available. (Special paper such as OHP films or labels is excluded. The paper weight should be in the range of 17-28 lb. Bond.) Page 14 Setting Magazine Sort & Saddle Stitch Mode 1. Place paper in the drawer(s). 2. Set the paper size. 3. Place the original(s). y When placing originals in the reversing automatic document feeder (optional), set them by referring to the order of previous pages in the illustrations. y When placing them on the glass, place the first page of the originals first if the MAGAZINE SORT or the MAGAZINE SORT & SADDLE STITCH is selected. If the SADDLE STITCH is selected, set them in the order of pages 12-1, (2-11), 10-3 (4-9), then 8-5, (6-7) by referring to the illustration to the left as an example. 4. Press the Finisher button on the BASIC menu as shown in the illustration on the right (highlighted). 5. Press the MAGAZINE SORT (or MAGAZINE SORT & SADDLE STITCH or SADDLE STITCH) button. y Select other copy modes as required. 6. Press the START button. Page 15 Hole Punch Mode (Optional) When the optional hole punch unit is attached to the finisher (Optional: MJ-1025), you can hole punch your copies. The paper weight should be in the range of 17 lb. to 110 lb. Special paper such as OHP files or labels is excluded. 1. Place paper in the drawer(s). y When using this mode in bypass copying, be sure to specify the paper size. 2. Place the original(s). 3. Press the Finisher button on the BASIC menu as shown in the illustration on the right (highlighted). 4. Press the HOLE PUNCH button. modes as required. Select other copy 5. Press the START button. TIP: Available paper sizes for the hole punch: Since the number of punch holes and the distance between the holes vary depending on the country, purchase a hole punch unit that meets your requirements. (For details, consult your service technician.). Page 16 KEY OPERATOR FUNCTIONS Replacing the Toner Cartridge Changing the Paper Size of the Drawer and Adding Paper How to Clear a Misfeed Counter Reading Service Calls and Supply Orders Replacing the Toner Cartridge When the toner in the cartridge runs out, the REPLACE TONER CARTRIDGE symbol blinks and “Install new toner cartridge” appears. 1. Open the front cover. 2. Press the green lever down. Page 17 Replacing the Toner Cartridge (Cont’d.) 3. Pull out the toner cartridge. 4. Shake the new toner cartridge well to loosen the toner inside. 5. Pull out the seal in the direction of the arrow. 6. Insert the toner cartridge until it clicks. Page 18 Replacing the Toner Cartridge (Cont’d.) 7. Lower the bypass tray. 8. Open the automatic duplexer. 9. Open the transfer cover to take out the transfer charger cleaner from the front pocket. 10. Wipe the transfer charger wire properly with the transfer charger cleaner. y Insert the transfer charger cleaner into the edge of the transfer separation unit. Then take it out again after cleaning. y Press the cleaner against the wall of the next charger and check if the cleaner pad contacts the wire. Page 19 Replacing the Toner Cartridge (Cont’d.) 11. Return the transfer charger cleaner to the front pocket, and then close the transfer cover. 12. Return the automatic duplexer and the bypass tray to their original position. 13. Close the front cover. Page 20 Changing the Paper Size of the Drawer and Adding Paper The paper size of the drawers can be changed. The drawers can also be set for cover sheet, insertion, thick paper 1, Fax and special sheets. 1. Pull out the drawer carefully until it comes to a stop. 2. Push the lower part of the width guide in the direction of the arrow to remove it, then reinstall the width guide at the desired paper size (indicated on the bottom inner surface of the drawer). 3. Push the arrow part (right side) of the size selection lever to unlock it. 4. While pushing the size selection lever in the direction of the arrow, set the side guide to the desired paper size (indicated on the bottom inner surface of the drawer). y Adjust the side guides with both hands. Page 21 Changing the Paper Size of the Drawer and Adding Paper 5. Push the arrow part (left side) to lock the size selection lever. 6. Place paper in the drawer(s). y Place paper face up. y Fan the paper well before placing it in the drawer. y Do not add paper above the line indicated on the guide. y Do not use creased, folded, wrinkled or damp sheets of paper. NOTE: Make sure that a gap of approx. 0.02” (less than 0.04” in total) is left between the paper and the side guide. If there is no gap, this could cause paper misfeeding. 7. Push the drawer straight into the copier until it comes to a stop. Be sure to push the drawer fully in. TIP: Be careful not to let your fingers be caught when closing the drawer. This could injure you. 8. Change the size mark plate to match with the size of paper that has been set. Page 22 Changing the Paper Size of the Drawer and Adding Paper 9. Press the USER FUNCTIONS button on the control panel. 10. Press the USER button, then press the GENERAL button on the touch panel. 11. Press the DRAWER button. 12. Press the drawer button corresponding to the one in which the paper size has been changed, and then press the button indicating the new paper size. Page 23 How to Clear a Misfeed Paper Misfeed in the Drawer Feeding Area 1. Open the bypass tray. 2. Open the automatic duplexer. 3. Open the transfer cover. 4. Rotate the green knob as indicated by the arrow toward the inside and remove any misfed paper. 5. Return the transfer cover, the automatic duplexer and the bypass tray to their original positions. Page 24 How to Clear a Misfeed (Cont’d.) 6. Open the cover. 7. Remove any misfed paper. 8. Close the cover. Paper Misfeed on the Bypass Feed Unit 1. Pull out misfed paper on the bypass tray. Page 25 How to Clear a Misfeed (Cont’d.) Paper Misfeed in the Automatic Duplexer 1. Make sure that the bypass tray is opened, and then open the automatic duplexer. CAUTION: y Be careful not to let your fingers be caught between the equipment and the automatic duplexer. y Do not touch the metal portion of a guide board as it could burn you. 2. Lift the paper guide as indicated by the arrow and remove any misfed paper. 3. Lower the paper guide and return the automatic duplexer to the original position. y Be sure to close both sides of the Automatic Duplexer unit firmly. Paper Misfeed in the Staple Unit 1. Open the front cover of the finisher. 2. Rotate the green knob in the middle clockwise. y When the stapler is up, the window in the upper right of the knob becomes blue. 3. Remove any misfed paper in the paper exit area. 4. Close the front cover. Page 26 How to Clear a Misfeed (Cont’d.) Paper Misfeed in the Fuser Unit 1. Make sure that the bypass tray and the automatic duplexer are opened, and then open the transfer cover. 2. Open the exit cover. y Press it down completely. 3. Remove any misfed paper. 4. Close the exit cover, the transfer cover and the automatic duplexer. Return the bypass tray to the original position. Page 27 Counter Reading Displaying Print Counter This feature allows you to display the total number of the print counter. The print counter contains following counters: y Copy Counter — indicates the number of sheets that has been printed by copy operations. y Fax Counter — indicates the number of sheets that has been printed by fax receptions. y Printer Counter — indicates the number of sheets that has been printed by print operations and E-mail receptions (Internet Fax receptions). y List Counter — indicates the number of sheets that has been printed by system page print operations. 1. Press the USER FUNCTIONS button on the control panel to enter the User Functions menu. 2. Press the COUNTER button, and then press the TOTAL COUNTER button on the touch panel. The TOTAL COUNTER menu is displayed. 3. Press the PRINT COUNTER button. 4. The Print Counter is displayed. Page 28 Counter Reading (Cont’d.) Displaying Scan Counter This feature allows you to display the total number of the scan counter. The scan counter contains following counters: y Copy Counter — indicates the number of originals that has been scanned by copy operations. y Fax Counter — indicates the number of originals that has been scanned by fax and Internet Fax transmissions. y Network Counter — indicates the number of originals that has been scanned by scan operations. 1. Press the USER FUNCTIONS button on the control panel to enter the User Functions menu. 2. Press the COUNTER button, and then press the TOTAL COUNTER button on the touch panel. The TOTAL COUNTER menu is displayed. 3. Press the SCAN COUNTER button. 4. The Scan Counter is displayed. Page 29 Counter Reading (Cont’d.) Displaying Print Counter for Department Code This feature allows you to display the number of the print counter for each department code. NOTE: The department counter is available only when this equipment has been managed with the department code. The print counter contains following counters: y Copy Counter — indicates the number of sheets that has been printed by copy operations. y Fax Counter — indicates the number of sheets that has been printed by polling operations. y Printer Counter — indicates the number of sheets that has been printed by print operations. y List Counter — indicates the number of sheets that has been printed by system page print operations. 1. Press the USER FUNCTIONS button on the control panel to enter the User Functions menu. 2. Press the COUNTER button, and then press the DEPARTMENT COUNTER button on the touch panel. The DEPARTMENT CODE screen is displayed. 3. Enter the department number using the digital keys, and then press the ENTER button. Page 30 Counter Reading (Cont’d.) Displaying Print Counter for Department Code (Cont’d.) 4. Press the PRINT COUNTER button. 5. The Print Counter for the specified department code is displayed. Page 31 Counter Reading (Cont’d.) Displaying Scan Counter for Department Code This feature allows you to display the number of the scan counter for each department code. NOTE: The department counter is available only when this equipment has been managed with the department code. The scan counter contains following counters: y Copy Counter — indicates the number of originals that has been scanned by copy operations. y Fax Counter — indicates the number of originals that has been scanned by fax and Internet Fax transmissions. y Network Counter — indicates the number of originals that has been scanned by scan operations. 1. Press the USER FUNCTIONS button on the control panel to enter the User Functions menu. 2. Press the COUNTER button, and then press the DEPARTMENT COUNTER button on the touch panel. The DEPARTMENT CODE screen is displayed. 3. Enter the department number using the digital keys, and then press the ENTER button. Page 32 Counter Reading (Cont’d.) Displaying Scan Counter for Department Code (Cont’d.) 4. Press the SCAN COUNTER button. 5. The Scan Counter for the specified department code is displayed. Service Calls and Supply Orders* All service calls and supply orders will be placed using the phone number below: ________________________________________________ Please reference the Toshiba serial # on the GOLD Label on the front of the copier/fax system. Toshiba Serial Number ___________________________________________________ * IMPORTANT SUPPLY INFORMATION: PLEASE MAKE SURE THAT THE KEY-OP ORDERS ADDITIONAL SUPPLIES AS SOON AS THE LAST CARTRIDGE IS PLACED IN THE COPIER. Page 33 Notes Page 34