1
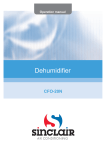
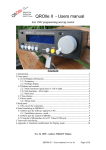
2.1 CH. CD MICRO HI-FI SYSTEM
NX-7CD (CD + MP3 + USB + SD/MMC)
NX-7CD
2.1 CH. CD MICRO HI-FI SYSTEM
WARNING:
TO REDUCE THE RISK OF FIRE OR ELECTRIC SHOCK, DO NOT EXPOSE THIS APPLIANCE TO RAIN OR MOISTURE.
CAUTION:
USE OF CONTROLS OR ADJUSTMENTS OR PERFORMANCE OF PROCEDURES OTHER THAN THOSE SPECIFIED MAY
RESULT IN HAZARDOUS RADIATION EXPOSURE.
The lightning flash with arrowhead symbol, within an equilateral triangle, is intended to alert the
user to the presence of uninsulated “dangerous voltage” within the product’s enclosure that may
be of sufficient magnitude to constitute a risk of electric shock to persons.
The exclamation point within an equilateral triangle is intended to alert the user to the presence of
important operating and maintenance (servicing) instructions in the literature accompanying the
appliance.
CAUTION:
Visible and invisible laser radiation when open and interlock failed or defeated. Avoid direct exposure to beam.
The ventilation should not be impeded by covering the ventilation openings with items, such as newspapers, tablecloths, curtains, etc.
No naked flame sources, such as lighted candles, should be placed on the apparatus.
It shall not be exposed to dripping or splashing and that no objects filled with liquids, such as vases, shall be placed
on the apparatus
.
Do not place the product in closed bookcases or racks without proper ventilation.
CAUTION, danger of explosion if battery is incorrectly replaced. Replace only with the same or equivalent type.
Remark:
In case of malfunction due to electrostatic discharge just reset the product (reconnect of power source may be
required) to resume normal operation.
1
CONTROLS
REMOTE CONTROL
MAIN UNIT
CONNECTION
2
1.
button:
to switch the system on or to standby
mode.
2. FUNCTION button:
to select Tuner, CD, USB/SD or AUX.
3. PLAY (
) button
to start playback or pause during play
mode.
4. STOP button:
to stop playback or to clear a program.
Note:
In USB/SD mode, press and hold down
for a few seconds to changing playback
from USB or SD.
5. SKIP/TUNING (
/
)
buttons:
for CD/MP3 playback:
to select a desired track.
for Tuner:
to tune to a lower or higher radio
frequency.
6.
button:
to open and close CD door.
7. VOLUME (
/
) buttons:
to increase or decrease the volume.
8. Phones Jack:
connects to headphones.
9. SD CARD Slot:
to read SD memory card.
10. USB Port:
connects a USB mass storage class
device.
11. FIND/ST/MO button:
for MP3 playback:
• to search track name, album.
for Tuner:
• to select stereo or mono.
12. FOLDER/PRESET (
/
) buttons:
for MP3 playback:
• to select desired folder.
for Tuner:
• to select a preset radio station.
13. REPEAT button:
to repeat a track/folder/all the tracks.
14. INTRO button:
to play the first 10 seconds of each
track.
15. MUTE button:
interrupts and resumes sound
reproduction.
16. BBS button:
to enhance the bass.
17. TIMER button:
to activate/deactivate the timer function.
18. SLEEP button:
to activate/deactivate or set the sleep
timer.
19. EQ button:
to select the preferred equalizer mode.
(PASS, CLASSIC, ROCK, POP, JAZZ)
20. MEM/CLK SET button:
for CD, MP3 playback:
• to program tracks
for Tuner:
• to program preset radio stations.
for Clock:
• to set the clock function.
21. RDM button:
to activate the random play function.
22. BAND button:
to select waveband: FM or AM.
23. AUX Jack:
connecting other equipment to the
system.
24. SUBWOOFER CABLE Jack:
connecting Main Unit and Subwoofer by
using SUBWOOFER CABLE (13 pins).
25. RCA Jacks:
connects Left and Right speakers.
3
BASIC FUNCTIONS
Checking the Clock Time
During power on. Press and hold down on
MEM/CLK SET for more than 1 second,
the display shows current clock time.
To resume normal display, press MEM/CLK
SET.
Switching the system on
• Press , the system will switch to the last
• Press FUNCTION(Tuner/CD/USB-SD/
AUX), the system will switch to the
Switching the system to standby
• Press
Playable media and files
The system is able to playback following
types of media and files.
Media:
• All pre-recorded audio CDs
• All finalised audio CDR and audio CDRW
discs
• MP3-CDs (CD-ROMs with MP3 tracks)
• USB mass storage class device such as
a USB flash memory device, MP3 Player
etc.
• SD memory card
File Format:
• MP3 only
, the system will switch to
• The volume level, last selected function
and tuner presets will be retained in the
•Press VOLUME
/ to increase or
decrease the volume level. Display shows
the volume level “VOL” and a number
To switch off the volume temporarily
•Press MUTE on remote control. Playback
will continue without sound.
•To restore the volume, press MUTE again
or increase the volume level.
Note:
This System may not playback some USB
mass storage class devices.
This System may not playback some files
even though their formats are listed above.
• Press EQ repeatedly to select the desired
equalizer mode: PASS, CLASSIC, ROCK,
• Press BBS to switch on the bass
Connecting other equipment
Connect the audio OUT terminals of a TV,
VCR, Laser Disc Player, DVD Player or CD
Recorder to the AUX jack by using audio
cords with mini plugs (not supplied).
4
OPERATIONS
3. The total numbers of folder and track
are displayed.
4. Press PLAY (
) to start playback.
To interrupt playback
• Press PLAY (
). The current track
time flashes.
• To resume playback, press PLAY (
)
again.
To stop playback
• Press STOP ( ).
NOTE:
Playing a disc
1. Select CD function.
2. Press
to open the CD door. “OPEN”
is displayed.
3. Insert a disc with the printed side facing
up and press
to close the CD door.
“CD READ” is displayed as the CD
player scans the contents of a disc, and
then the total number of tracks and
playing time are shown.
4. Press PLAY (
) to start playback.
To interrupt playback
• Press PLAY (
). The current track
time flashes.
• To resume playback, press PLAY (
)
again.
To stop playback
• Press STOP ( ).
Connect the USB mass storage class device directly to
the system. Using a USB hub may result in malfunction.
Selecting a different track
• Press
or
repeatedly until the
desired track number appears in the
display.
Playing back from SD memory card
This system is equipped with a SD card slot
for SD memory card.
1. Insert a SD memory card to SD slot.
2. Select USB-CARD function.
3. The total numbers of folder and track
are displayed.
4. Press PLAY (
) to start playback.
To interrupt playback
• Press PLAY (
). The current track
time flashes.
• To resume playback, press PLAY (
)
again.
To stop playback
• Press STOP ( ).
Locating a particular portion
• Press and hold down on
or
the portion you want is reached.
until
Selecting a desired folder/track
To select a desired album
• Press FOLDER/PRESET (
or
) on
remote control repeatedly.
To select a desired track
• Press
or
repeatedly until the
desired track number appear in the
display.
• If playback is stopped, press PLAY (
) to start playback.
Searching for a name of track/folder
To select the track by searching for its
Playing back from the USB mass
storage class device
This system is equipped with a USB port to
connect a USB mass storage class device.
1. Connect a USB mass storage class
device to USB port.
2. Select USB-CARD function.
name. (for MP3-CD only)
1. Press FIND/ST/MO once on the remote
control. An initial letter of a track name
and a track name are displayed.
2. Press
or
repeatedly to select
a initial letter of track name.
5
OPERATIONS
• REPEAT ALL:
to repeat the all of tracks. “REPEAT ALL”
is displayed.
• REPEAT FOLDER (playback MP3):
to repeat all the tracks in the folder.
“REPEAT FOLDER” is displayed.
• To cancel repeat play, press REPEAT
button repeatedly until the repeat indicator
goes off.
3. Press and hold
or
, and then
you can select the track that has same
initial letter selected above by pressing
the
or
.
4. Press PLAY (
) to start playback.
To select the folder by searching for its
name.
1. In SD card and USB mass storage class
device playback mode, pressing FIND/
ST/MO once. In MP3-CD playback
mode, press FIND/ST/MO twice. The
name of folder is displayed.
2. Press
or
to search the folder
which included your desired track.
3. Press PLAY (
) to start playback
the first track into the folder.
Programming the disc tracks
Programming tracks is possible when
playback is stopped. Up to 64 tracks can
be stored in the memory in any order.
Playback Audio CD:
1. Press MEM/CLK SET on remote control
to enter the programming mode.
2. Press
or
repeatedly to select
your desired track number.
3. Press MEM/CLK SET to confirm the
track number to be stored.
4. Repeat step 2-3 to select and store all
desired tracks.
Playback MP3:
1. Press MEM/CLK SET to enter the
programming mode. The folder no. is
flashing.
2. Press
or
repeatedly to select
your desired folder.
3. Press MEM/CLK SET to confirm the
folder and then the track no. is flashing.
4. Press
or
repeatedly to select
your desired track.
5. Press MEM/CLK SET to confirm the
track number to be stored.
6. Repeat step 2-5 to select and store all
desired tracks.
To start playback of your program, press
PLAY (
).
To cancel program, press STOP button
once when playback is stop or twice during
playback.
Text display (for MP3 playback)
• Press and hold down FIND/ST/MO on
remote control for more than 1 second
during playback, the information about the
current track is displayed.
• Press and hold down FIND/ST/MO on
remote control for more than 1 second to
cancel the MP3 information mode.
Different play modes: RANDOM and
REPEAT
You can select and change the various play
modes before or during playback.
RANDOM mode:
• Press RDM on the remote control, all of
tracks are played in random order.
• Press RDM again to cancel random
mode.
REPEAT mode:
Press REPEAT on remote control repeatedly
to activate/deactivate or select repeat play
mode.
• REPEAT:
to repeat the current track. “REPEAT” is
displayed.
6
CLOCK/TIMER
6. Press TIMER on remote control, “VOL
XX” is displayed. Press
or
to
adjust the volume level.
7. Press TIMER on remote control to
confirm the timer.
Press TIMER once on remote control.
Display shows “TIMER” if activated and
disappears if deactivated.
Note:
• When the OFF time is same as the ON
time, display shows “ERROR”and then
returns to timer setting for revising the OFF
time. In this case do not press the timer
button for several seconds to let the timer
setting mode return to normal. Then, you
can re-enter new timer start from step 1.
• If you selected CD mode for the source
of timer ON, a CD/MP3-CD disc must be
loaded into the system. In case you forget
to load a CD/MP3-CD disc into the CD
compartment. The system will also turn
on at the specified time but will change
to Tuner mode automatically.
Clock setting
1. In standby mode, press and hold MEM/
CLK SET, “12HOUR” or “24HOUR” is
displayed and flashing. Press
or
to change the hour mode.
2. Press MEM/CLK SET, the clock digits
for the hours flash. Press
or
to set the hours.
3. Press MEM/CLK SET, the clock digits
for the minutes flash. Press
to set the minutes.
4. PressMEM/CLK SET to confirm the
time.
Timer setting
The timer enables the system to switch on
and off in CD or Tuner mode at the specified
time as an alarm clock. The clock time
needs to be set first before the timer can
beused.
1. Press and hold TIMER on remote
control until “TIMER” and “ON” are
displayed. The clock digits for the hours
flash. Press
or
to set the
hours of ON time
2. Press TIMER on remote control. The
clock digits for the minutes flash. Press
or
to set the minutes of ON
time.
3. Press TIMER on remote control.
“TIMER” and “OFF” are displayed and
the clock digits for the hours flash. Press
or
to set the hours of OFF
time.
4. Press TIMER on remote control. The
clock digits for the minutes flash. Press
or
to set the minutes of OFF
time.
5. Press TIMER on remote control.
“TUNER” or “CD” is displayed. Press
or
to select your desired
source which will be started at the set
time.
Sleep timer setting
The sleep timer enables the system to
switch off by itself after a set period of time.
1. Press SLEEP o n re m o t e c o n t ro l
repeatedly to select a preset time. The
selections from 90 to 10 minutes,
decreasing in 10 minute increments.
2. Once the sleep time is selected,
“SLEEP” and the selected time appear
constant on the display.
3. To deactivate the sleep timer, press
SLEEP repeatedly on remote control
until “SLEEP” and timer goes off.
7
SPECIFICATIONS
RADIO
Supply Voltage
:230V AC/50Hz
Power Consumption:40W
Radio Frequency Range:FM 87.5 - 108.0 MHz
MW 522 - 1620 kHz
Power Output
(Subwoofer
: Typical 15W at 4ohm
Speaker, THD = 10%
(Speaker
: Typical 7.5W at 8ohm
Speaker, THD = 10%
Dimensions (H x W x D):
Main Unit
: 160 x 220 x 80 mm
Subwoofer
: 225 x 130 x 230 mm
Satellite Speaker
: 160 x 193 x 60 mm
Tuning to radio stations
1. Press FUNCTION(Tuner/CD/AUX/
USB-SD) to select Tuner.
2. Press BAND to select the desired
waveband: FM or MW.
3. Press down on
or
and release
it. The frequency display begins change
until a radio station with sufficient signal
strength is found. If a FM station is
received in stereo, is shown.
4. Repeat step 3 if necessary until you find
the desired station.
To tune to a weak station, press
or
briefly and repeatedly until you have
found optimal reception.
Net Weight
Programming radio stations
You can store 30 FM and 10 MW stations
to memories respectively.
1. Tune to your desired station (refer to
“ Tuning to radio station”).
2. Press MEM/CLK SET, preset no. is
flashing.
3. Press FOLDER/PRESET (
or ) to
select your desired preset no.
4. Press MEM/CLK SET again to confirm
the station to be stored.
5. Repeat the above steps to store other
stations.
Tuning to preset radio stations
• Press FOLDER/PRESET (
or ) until
the desired preset station is displayed.
8
: 5.4kg
Imation Asia Pacific Pte Ltd.
23,New Industrial Road,
#03-01 Century Industrial Building,
Singapore, 536209
www.tdk-media.com.sg
AP001239-A
Imation is a registered trademark of Imation Corp.
The TDK Life on Record logo is a trademark of TDK
Corporation and is used under a trademark license
from TDK Corporation.
*NXT is the trademark or registered trademark of New
Transducers Limited in the U.K.