1
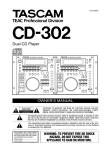
» CD-601MKII CD PLAYER OWNER'S MANUAL D00811701A Important Safety Precautions CAUTION: TO REDUCE THE RISK OF ELECTRIC SHOCK, DO NOT REMOVE COVER (OR BACK). NO USER-SERVICEABLE PARTS INSIDE. REFER SERVICING TO QUALIFIED SERVICE PERSONNEL. The lightning flash with arrowhead symbol, within equilateral triangle, is intended to alert the user to the presence of uninsulated “dangerous voltage” within the product’ s enclosure that may be of sufficient magnitude to constitute a risk of electric shock to persons. The exclamation point within an equilateral triangle is intended to alert the user to the presence of important operating and maintenance (servicing) instructions in the literature accompanying the appliance. This appliance has a serial number located on the rear panel. Please record the model number and serial number and retain them for your records. Model number Serial number WARNING: TO PREVENT FIRE OR SHOCK HAZARD, DO NOT EXPOSE THIS APPLIANCE TO RAIN OR MOISTURE. For U.S.A. For the customers in Europe TO THE USER This equipment has been tested and found to comply with the limits for a Class A digital device, pursuant to Part 15 of the FCC Rules. These limits are designed to provide reasonable protection against harmful interference when the equipment is operated in a commercial environment. This equipment generates, uses, and can radiate radio frequency energy and, if not installed and used in accordance with the instruction manual, may cause harmful interference to radio communications. Operation of this equipment in a residential area is likely to cause harmful interference in which case the user will be required to correct the interference at his own expense. CAUTION Changes or modifications to this equipment not expressly approved by TEAC CORPORATION for compliance could void the user's authority to operate this equipment. CE Marking Information a) Applicable electromagnetic environment: E4 b) Peak inrush current: 2.5 A 2 TASCAM CD-601MKII WARNING This is a Class A product. In a domestic environment, this product may cause radio interference in which case the user may be required to take adequate measures. Pour les utilisateurs en Europe AVERTISSEMENT Il s'agit d'un produit de Classe A. Dans un environnement domestique, cet appareil peut provoquer des interférences radio, dans ce cas l'utilisateur peut être amené à prendre des mesures appropriées. Für Kunden in Europa Warnung Dies ist eine Einrichtung, welche die Funk-Entstörung nach Klasse A besitzt. Diese Einrichtung kann im Wohnbereich Funkstörungen versursachen; in diesem Fall kann vom Betrieber verlang werden, angemessene Maßnahmen durchzuführen und dafür aufzukommen. Important Safety Instructions 1 Read these instructions. • Do not expose this apparatus to drips or splashes. 2 Keep these instructions. • Do not place any objects filled with liquids, such as vases, on the apparatus. 3 Heed all warnings. 4 Follow all instructions. 5 Do not use this apparatus near water. 6 Clean only with dry cloth. 7 Do not block any ventilation openings. Install in accordance with the manufacturer's instructions. 8 Do not install near any heat sources such as radiators, heat registers, stoves, or other apparatus (including amplifiers) that produce heat. • Do not install this apparatus in a confined space such as a book case or similar unit. • The apparatus draws nominal non-operating power from the AC outlet with its POWER switch in the off position. • The apparatus should be located close enough to the AC outlet so that you can easily grasp the power cord plug at any time. • Apparatus with Class I construction shall be connected to an AC outlet with a protective grounding connection. 9 Do not defeat the safety purpose of the polarized or grounding-type plug. A polarized plug has two blades with one wider than the other. A grounding type plug has two blades and a third grounding prong. The wide blade or the third prong are provided for your safety. If the provided plug does not fit into your outlet, consult an electrician for replacement of the obsolete outlet. 10 Protect the power cord from being walked on or pinched particularly at plugs, convenience receptacles, and the point where they exit from the apparatus. 11 Only use attachments/accessories specified by the manufacturer. 12 Use only with the cart, stand, tripod, bracket, or table specified by the manufacturer, or sold with the apparatus. When a cart is used, use caution when moving the cart/ apparatus combination to avoid injury from tip-over. 13 Unplug this apparatus during lightning storms or when unused for long periods of time. 14 Refer all servicing to qualified service personnel. Servicing is required when the apparatus has been damaged in any way, such as power-supply cord or plug is damaged, liquid has been spilled or objects have fallen into the apparatus, the apparatus has been exposed to rain or moisture, does not operate normally, or has been dropped. TASCAM CD-601MKII 3 Safety Information This product has been designed and manufactured according to FDA regulations "title 21, CFR, chapter 1, subchapter J, based on the Radiation Control for Health and Safety Act of 1968", and is classified as a class 1 laser product. There is no hazardous invisible laser radiation during operation because invisible laser radiation emitted inside of this product is completely confined in the protective housings. The label required in this regulation is shown ແ . Rack-mounting the Unit The CD-601MKII can be mounted in a standard 19-inch rack by using the optional RM-601 rack shelf as shown below. NOTE • Leave 1U of space above the unit for ventilation. • Allow at least 10 cm (4 in) at the rear of the unit for ventilation. CAUTION • DO NOT REMOVE THE PROTECTIVE HOUSING USING A SCREWDRIVER. • USE OF CONTROLS OR ADJUSTMENTS OR PERFORMANCE OF PROCEDURES OTHER THAN THOSE SPECIFIED HEREIN MAY RESULT IN HAZARDOUS RADIATION EXPOSURE. • IF THIS PRODUCT DEVELOPS TROUBLE, CONTACT YOUR NEAREST QUALIFIED SERVICE PERSONNEL, AND DO NOT USE THE PRODUCT IN ITS DAMAGED STATE. Optical pickup: Type: Manufacturer: Laser output: Wavelength: 4 TASCAM KSS-213C SONY Corporation Less than 0.4 mW on the objective lens 760 to 800 nm CD-601MKII Contents INTRODUCTION ....................................................... 6 PLAYBACK-RELATED FUNCTIONS ..................... 20 Features ..........................................................................6 Program Playback.........................................................20 Product Configuration .....................................................6 Entering the program mode ......................................20 Precautions on Installation Locations .............................6 Programming ............................................................20 About Backup Memory....................................................7 Swapping programmed tracks ..................................20 Precautions upon Use.....................................................7 Adding program tunes ..............................................20 Handling CDs (compact discs)........................................7 Deleting program tunes ............................................20 NAMES & FUNCTIONS OF PARTS ......................... 8 Clearing a program ...................................................20 Front Panel .....................................................................8 Auto Cue Function ........................................................20 Display Window ............................................................10 Setting the Auto Cue Level .......................................21 Rear Panel .................................................................... 11 Setting Auto Cue Up .................................................21 BASIC OPERATIONS ............................................. 12 Auto Ready Function ....................................................21 Online Playback and Monitor Playback ........................12 Pitch Control Function...................................................21 Preparations..................................................................12 Incremental Play Function ............................................21 Selecting the Playback Mode........................................12 OUTPUT-RELATED SETTINGS ............................. 22 Playing a Specific Tune from the Beginning Setting the Terminals for Online Output ........................22 (SINGLE play) ..........................................................13 Setting the Terminals for Monitor Output ......................22 Playing from an Intermediate Point in a Tune ...............14 Setting Stereo/Monaural ...............................................22 Auto-registering Cue Points ..........................................14 Setting the Output Level ...............................................22 Details of Transport Key Operations .............................15 OTHER FUNCTIONS & SETTINGS ....................... 23 READY key ..............................................................15 Referencing to an External Clock Source .....................23 ON LINE key ............................................................15 Failsafe Function...........................................................23 PLAY/PAUSE key .....................................................15 Displaying the End of Track Warning ............................23 STOP key .................................................................15 Switching the Time Display ...........................................23 Selecting the Playback Point ........................................16 Clearing the Frame Display ..........................................24 Selecting a track .......................................................16 Timer Play Function ......................................................24 Selecting the index ...................................................16 Viewing the Total Motor Time ........................................24 Searching for an Intermediate Point in a Tune .........16 EXTERNAL CONTROL .......................................... 25 MENU OPERATIONS ............................................. 17 Parallel Control .............................................................25 Menu Configuration.......................................................17 Setting fader start/stop .............................................25 Menu Operation Basics.................................................18 Control from the RC-601MKII .......................................26 Saving Menu Settings ...................................................19 Setting operation on the CD player ..........................26 Clearing Menu Settings.................................................19 Control from the RS-232C interface..............................26 Clearing all user banks .............................................19 Setting the baud rate ................................................26 Clearing individual user banks .................................19 SPECIFICATIONS................................................... 27 List of Error Messages ..................................................28 TASCAM CD-601MKII 5 INTRODUCTION Before you start using this product, thoroughly read and understand this manual. After you have finished reading this manual, be sure to keep it in a safe place so that it can be retrieved whenever necessary. Features The CD-601MKII is a professional-use CD player for use in broadcasting stations, post-production, sound production, and other commercial uses. Its features include: z Rack-mountable 3U, half-rack size by using the rack mount tray (sold separately) z Playback of audio discs made using CD-R and CD-RW discs in addition to commercially available audio CDs z Provided with XLR (balance) and RCA (unbalance) analog output terminals, and XLR (AES/EBU) and RCA (S/PDIF) digital output terminals z Two playback modes are provided, online playback for final take, and monitor playback for rehearsals. Each of these playback signals can be output from different output terminals. z Instant start for instantly starting playback z Standby at audio start point of track enabled by auto cue function. z Cueing can be performed at singe-frame accuracy. z Operability can be improved and functions expanded by connecting the RC-601MKII Remote Control Unit (sold separately). z Headphone terminal/level knob for a monitor are provided on the front panel. About Terms Used in This Manual This manual uses the following terms: “Online READY” is used to indicate an “online playback standby state” and “Monitor PAUSE” is used to indicate a “monitor playback standby state.” Product Configuration This product comprises the following items: • CD-601MKII unit x1 • Power cable x1 • Owner’s Manual (this manual) x1 • Warranty x1 When unpacking this product, take care not to damage the product. Store the box and packaging materials so that they can be used for transporting the product at a later date. If you find that any parts are missing or parts have been damaged during transportation, contact us immediately. z Searching of the index is possible. z In addition to regular playback of all tunes, single playback of a single tune and program playback of various tunes in a desired order are also possible. z The Auto Ready Function enables the CD player to automatically stand by at the start of the next track after a track has been played. z The Incremental Play function enables the CD player to automatically stand by at the start of the next track when track playback has been cancelled. z The Failsafe function prevents inadvertent operation during playback of the final take. z Synchronization with an external word clock (44.1 kHz, 48 kHz) is possible. During synchronization with an external 48 kHz clock, the CD playback signal is digitally output at a sampling frequency of 48 kHz. z ±12.5% pitch control function z The Timer Play function automatically starts monitor playback when the power is turned ON. z CD text can be displayed. z Provided with parallel terminal for control such as fader start/stop from external equipment. z Provided with serial (RS-232C) terminal for control from a PC or editing equipment. 6 TASCAM CD-601MKII Precautions on Installation Locations Do not install this product at the following locations. Doing so might cause audio quality to drop or cause the product to malfunction. • Surfaces included 5° or more • Locations subject to lots of vibrations or unstable locations • Next to windows or other locations subject to the direct sunlight • Next to heating apparatus or other locations subject to extremely high temperatures • Locations subject to extremely low temperatures • Locations subject to lots of humidity or poorly ventilated locations • Next to tuners, TVs or video recorder decks Installing this product near such locations may disturb video images or cause noise. INTRODUCTION About Backup Memory The following setup information is stored to backup memory on the CD-601MKII so that the same settings are reproduced when this product is next turned ON. • Playback mode • Time display mode • Auto ready function ON/OFF • Auto cue function ON/OFF • Pitch control function ON/OFF • Pitch control value • Index search function ON/OFF • Settings for each of the menu items (*) (*) : When the “USER” menu is set to “PRE”, the menu item settings return to their defaults each time that the power is turned ON. (→ page 19 “Saving Menu Settings”) Precautions upon Use About the power supply Handling CDs (compact discs) This CD player can play back CD-DA format CDs. Both commercially available audio CDs (120 mm/80 mm) and normally recorded CD-R/CD-RW discs can also be used. z To take a disc out of its storage case, press down on the centre of the case and lift the disc out, holding it carefully by its edges. Correct way of taking a compact disc out of its storage case Correct ways of holding a compact disc z Fingerprints or dust on the recording surface should be carefully wiped off by wiping in a straight motion from the inside to the outside of the disc with a soft cloth. Dirt on discs causes the laser pickup to jump. So, keep discs in a clean state at all times and store them in their storage cases. Connect this CD player to the specified power supply. Do not connect to other power supplies. When connecting or disconnecting the power cable, hold it by its plug. Daily care of the CD player D o n o t w i p e t h e C D p l a y e r ’s b o d y w i t h c h e m i c a l impregnated cloth, or a cloth soaked with benzene, paint thinner or other organic solvent. Doing so might damage the surface of the CD player’s body. Wipe off stubborn dirt on the top cover or panels with a soft cloth moistened with a small amount of diluted neutral detergent. About condensation When the CD player (or a compact disc) is moved from a cold to a warm, heated room (e.g. in winter), or immediately after heating apparatus in the room where the CD player is installed is turned ON, water droplets (condensation) may form inside the CD player. This will not only prevent the CD player from operating normally but also may damage discs or precision components inside the CD player. If condensation forms, leave the CD player turned ON for one or two hours to acclimatize and allow water droplets to evaporate so that the CD player can operate normally. Before moving the CD player or when the CD player is not used, remove the disc. z Never use record sprays, antistatic sprays, benzene, paint thinner, or other organic solvents. Chemical products such as these may damage the surface of the disc. z Do not expose discs to the direct sunlight or high temperature or humidity. Long exposure to high temperatures may cause them to warp or become deformed. z Do not stick paper or write anything with a ballpoint pen on the label surface. z Do not use discs from which cellophane tape or rental CD stickers have been peeled off, or discs with adhesive from stickers still sticking to the disc. Leaving discs such as these in the CD player may prevent the disc from being removed or cause a malfunction. TASCAM CD-601MKII 7 NAMES & FUNCTIONS OF PARTS Front Panel ແ OPEN/CLOSE key (ø) Opens and closes the tray. ໂ PLAY MODE key Select the playback mode from regular playback (playback of all tunes), single playback, and program playback. The current playback mode is displayed in the playback mode display area of the display window. (→ page 12 “Selecting the Playback Mode”) ໃ DISP MODE key Each press of this key switches the time display mode. As the default setting, the time display mode is switched between “track elapsed time” and “track remaining time.” You can select the display modes to be switched between using the menu. (→ page 23 “Switching the Time Display”) ໄ AUTO RDY key Switches the auto ready function (for automatically standing by at the start of the next track after a track has been played) ON/OFF. When this function is ON, “A.READY” is lit in the display window. (→ page 21 “Auto Ready Function”) AUTO CUE key Switches the auto cue function (mainly for searching for the actual track start cue point during a track search) ON/OFF. When this function is ON, “A.CUE” is lit in the display window. (→ page 20 “Auto Cue Function”) 8 TASCAM CD-601MKII ໆ PITCH key Switches the pitch control function ON/OFF. When this function is set to ON, “PITCH” and the setting value (%) are lit in the display window. The +/- keys are used to set the pitch in ±12.5% increments. (→ page 21 “Pitch Control Function”) INDEX key/indicator Switches the index search function ON/OFF. The index search is possible using the TRACK key while the INDEX indicator is lit. (→ page 16 “Selecting the index”) ່ Disc tray This is the tray for placing the disc on. ້ MENU key Switches the menu mode ON/OFF. Various settings can be made using the menu. (→ page 17 “Menu Operations”) ໊ ON LINE key (¥) When this key is pressed in the online READY mode (READY key is lit), online playback is performed. During online playback, this key is lit (green). (→ page 15 “Details of Transport Key Operations”) NAMES & FUNCTIONS OF PARTS ໋ PLAY/PAUSE key (¥/π) When this key is pressed while disc operation is stopped, in the online READY mode or during monitor playback, the CD player enters the monitor PAUSE mode. When it is pressed in the monitor PAUSE mode, monitor playback is started. During monitor playback, this key is lit yellow, and in the monitor PAUSE mode, it blinks. (→ page 15 “Details of Transport Key Operations”) ໌ ENTER key Press this key to apply selections or settings during menu operations. ໍ READY key (π) Pressing this key sets the CD player to the online READY mode. The online READY point differs according to the state of the CD player when this key is pressed. (→ page 15 “Details of Transport Key Operations”) ໎ +/- key This key is used to select items or setting values during menu operations. ໐ TRACK (Â/¯) key This key is used to perform a track search (skip). An index search is performed when the INDEX indicator is lit. The operation after a skip differs according the operation state when this key is pressed, the auto cue settings, and auto cue up setting. (→ page 16 “Selecting the Track”) ໑ SEARCH (∆/˚) key Holding down this key during monitor playback or in the monitor PAUSE mode performs a cue search. (→ page 16 “Searching for an Intermediate Point in a Tune”) ໒ PHONES level knob Adjusts the headphone output level. ໓ PHONES jack This is the standard phone jack for connecting stereo headphones. When connecting a mini plug headphone, use a conversion adapter. ໔ Display window This window displays disc information, CD player operation mode, menus, and various other information. It is also used to set pitch control values. STOP key (ª) Pressing this key stops disc operations. This key is lit while disc operations are stopped. (→ page 15 “Details of Transport Key Operations”) TASCAM CD-601MKII 9 NAMES & FUNCTIONS OF PARTS Display Window ແ Track display area Displays the track No. currently being played back or currently selected track. In the menu mode, displays the menu No. ໂ Index/program display area Displays the index No. currently being played back or currently selected index. During setting of the program, displays the program step No. ໃ Memory bank display area Displays the currently selected memory bank (one of A to E). The memory function is enabled when the Remote Control Unit RC-601MKII (sold separately) is connected. ໄ Memory display area “M” is lit when information such as the disc cue point is saved to internal memory. The memory function is enabled when the Remote Control Unit RC-601MKII (sold separately) is connected. Time display area Displays the time information. In the menu mode, displays the menu items. In the menu item display, alphabet characters are displayed as follows: ່ Auto cue display area Lit when the auto cue function is ON. (→ page 20 “Auto Cue Function”) ້ Pitch control display area When pitch control is ON, “PITCH” is lit and the pitch control value is displayed. (→ page 21 “Pitch Control Function”) Also, in the menu mode, the setting value is displayed. ໊ Clock display area When the CD player is synchronized with an external clock, “EXT CLK” is lit, displaying the sampling frequency. When the operation clock is set to “EXT” and the CD player is not synchronized with an external clock, “EXT CLK” blinks. (→ page 23 “Referencing to an External Clock Source”) ໋ Playback mode/repeat mode display area Displays the playback mode and repeat mode. (→ page 12 “Selecting the Playback Mode”) The repeat function is enabled when the Remote Control Unit RC-601MKII (sold separately) is connected. ໌ Disc/track display area Displays according to the display details while CD text is displayed on the character display area. When disc information is displayed : “DISC” is lit. When track information is displayed : “TRACK” is lit. ໆ Time display mode display area This area is lit as follows according to the time display mode. (→ page 23 “Switching the Time Display”) In the disc remaining time mode : TOTAL and REMAIN are lit. In the disc total time mode : TOTAL is lit. In the track time mode : TOTAL blinks. In the track remaining time mode : REMAIN is lit. Auto ready display area Lit when the auto ready function is ON. (→ page 21 “Auto Ready Function”) 10 TASCAM CD-601MKII ໍ Character display area Displays CD text or menu item details. ໎ Incremental play display area Lights when the incremental play function is ON. (→ page 21 “Incremental Play Function”) NAMES & FUNCTIONS OF PARTS Rear Panel ແ WORD SYNC IN terminal This terminal is for inputting the word clock signal. When the CD player is operated referenced to an external clock (EXT), the word clock that is input to this terminal becomes the reference clock. ໂ WORD SYNC THRU terminal This terminal is for outputting the input word clock signal, allowing it to be sent to other digital equipment as it is. ໃ DIGITAL OUTPUTS - SPDIF terminal This co-axial digital output terminal is for outputting the disc playback signal in IEC60958-3 (S/PDIF) format. In the default setting, the playback signal is output in either of online playback and monitor playback. ໄ DIGITAL OUTPUTS - AES/EBU terminal This digital output terminal is for outputting the disc playback signal in IEC60958-4 (AES/EBU) format. In the default setting, the playback signal is output in either of online playback and monitor playback. ANALOG OUTPUTS - UNBALANCED (L, R) terminals This analog unbalance output terminal (RCA pin) is for outputting the disc playback signal. In the default setting, the playback signal is output in either of online playback and monitor playback. ໆ ANALOG OUTPUTS - BALANCED (L, R) terminals This analog unbalance output terminal is for outputting the disc playback signal. In the default setting, the playback signal is output in either of online playback and monitor playback. CAL knobs These semi-fixed control knobs are for the analog balance output terminals. These knobs allow you to fine-tune the output levels of the L and R channels individually. ່ REMOTE (PARALLEL) terminal This D-Sub 37-pin connector is used for performing fader start and other external controls. (→ page 25 “Parallel Control”) ້ REMOTE (SERIAL) terminal This terminal is for connecting the Remote Control Unit RC-601MKII (sold separately). This terminal is an RS-232C-compliant serial control terminal. So, a PC or other device can be connected to this terminal to control the CD player. (→ page 26 “Control from the RS-232C interface”) ໊ POWER switch Switches the power ON/OFF. ໋ ~ IN connector The power cable (supplied) is connected to this connector. TASCAM CD-601MKII 11 BASIC OPERATIONS Online Playback and Monitor Playback The CD player has two playback modes, online playback and monitor playback. The output destination in each of these playback modes can be set individually. For example, in sites such as broadcasts and events, the monitor playback mode can be used to cue tracks or playback points before the final take, and then the CD player can be set to online standby (READY), and online playback can be performed from that point at the time of the final take. On this CD player, the UNBALANCED analog output terminal and SPDIF digital output terminal are positioned as terminals for monitor output, and the BALANCED analog output terminal and AES/EBU digital output terminal are positioned as terminals for online output. Note, however, that in the default setting both the monitor playback signal and the online playback signal are output in the same way from all analog/digital output terminals. By changing the menu setup, you can set the UNBALANCED analog output terminal and SPDIF digital output terminal for monitor exclusive output, or the BALANCED analog output terminal and the AES/EBU digital output terminal for online exclusive output. (→ page 22 “Setting the Terminals for Online Output”) (→ page 22 “Setting the Terminals for Monitor Output”) [NOTE] • This manual refers to the online playback standby state as “online READY” and the monitor playback standby state as “monitor PAUSE.” Preparations 1 Turn the POWER switch on the rear panel to ON. z When the Remote Control Unit RC-601MKII (sold separately) is used, connect the unit with the CD player turned OFF. 2 Press the OPEN/CLOSE key to open the disc tray. 3 Load the disc in the tray with the label face up. 4 Press the OPEN/CLOSE key to close the disc tray. The total number of tracks on the disc and total playing time will be displayed on the display window. [NOTE] • Instead of pressing the OPEN/CLOSE key, you can also close the disc tray by pressing the PLAY/PAUSE, READY or TRACK keys. 12 TASCAM CD-601MKII Selecting the Playback Mode You can select the playback mode by using the PLAY MODE key. Each press of this key switches the playback mode in the following order: Regular playback (all tunes) → single playback → program playback The current playback mode is displayed in the playback mode display area of the display window. Playback Mode Regular playback Display Window Operation (nothing displayed) Tunes are played back in disc track o r d e r. ( r e g u l a r playback) Single playback SINGLE lit Only the selected track is played back. Program playback PROGRAM lit Tunes are played back in the preset program order. z The selected playback mode is backed up on the CD player. So, the same mode is reproduced when the CD player is next turned ON. BASIC OPERATIONS Playing a Specific Tune from the Beginning (SINGLE play) The following describes the procedure for playing the final take (online playback) after selecting and confirming a desired tune (monitor playback). The following description assumes that the procedure is performed with menu items at their default settings. Display of playback position During playback, the approximate playback position in the track is displayed on the character display area of the display window in the form of a 12-dot bar. The number of square dots in this bar increases the further playback progresses. The following example shows that about 2/3 of the track has been played back. 1 Select the single mode using the PLAY MODE key. Press the PLAY MODE key several times until “SINGLE” is lit in the playback mode display area of the display window. 2 Press the PLAY/PAUSE key to enter the monitor PAUSE mode. The PLAY/PAUSE key starts blinking. 3 Select the tune (track) to play back using the TRACK key. The monitor PAUSE mode is enabled at the start of the selected track. When the time display in the display window is the track remaining mode (REMAIN), all of the square dots light at the beginning of the track, and decrease as playback progresses. 4 To check the playback sound, press the PLAY/PAUSE key to perform monitor playback. z In addition to using an external monitor system, the monitor playback sound can also be checked on headphones connected to the PHONES terminal on the CD player. 5 After checking the monitor playback sound, press the READY key. The disc returns to the tune start point, and the CD player enters the online READY mode. (The READY key is lit.) 6 Press the ON LINE key to start online playback. When the tune ends, playback automatically stops. z To cancel playback, press the STOP key. [NOTE] • In the default setting, the failsafe function is ON, and operation of keys other than STOP, PLAY MODE and DISP MODE is not accepted during online playback. However, the menu system can be used to set the failsafe function OFF. (→ page 23 “Failsafe Function”) TASCAM CD-601MKII 13 BASIC OPERATIONS Playing from an Intermediate Point in a Tune To search for any intermediate point in a tune and play back the final take from that point, select the track at step 3 in procedure on the previous page, and perform the following. 4 Press the PLAY/PAUSE key to perform monitor playback, and proceed to near the desired point. 5 Press the PLAY/PAUSE key near the desired point to set to the monitor PAUSE mode. 6 Search the desired point using the SEARCH key. [NOTE] • One light touch of the SEARCH key in the monitor PAUSE mode moves the point forwards or backwards in single-frame units. Holding down the SEARCH key increases the search speed. (→ page 16 “Searching for an Intermediate Point in a Tune”) Auto-registering Cue Points In the default setting, the position where monitor playback was last started from the monitor PAUSE mode is automatically registered as the cue point. When the READY key is pressed during monitor playback, the CD-601MKII is located to the cue point and enters the online READY mode. By using menu item No. 20 (“CUE_SET”), you can select either of the following two conditions as the condition for auto-registering the cue point. NOR (default setting): The position where monitor playback was last started from the monitor PAUSE mode is automatically registered as the cue point. RDY : The position where monitor playback was started from the monitor PAUSE mode, or the position where the READY key was pressed from the monitor PAUSE mode is auto-registered as the cue point. 7 When the desired point is found, press the PLAY/PAUSE key again to perform monitor playback, and confirm the point. 8 Press the READY key. The disc returns to the point preset in step 6, and the CD player enters the online READY mode. (The READY key is lit.) To adjust the setting point, press the PLAY/PAUSE key to enter the monitor PAUSE mode, and return to step 6. 9 Press the ON LINE key to start playback. When the tune ends, playback stops. z To cancel playback, press the STOP key. 14 TASCAM CD-601MKII z For details on menu operations, see “Menu Operations” (page 17). [NOTE] • When the Remote Control Unit RC-601MKII (sold separately) is used, the above auto-registered cue points can be registered to CUE1 to CUE10. BASIC OPERATIONS Details of Transport Key Operations READY key (π) Pressing this key sets the CD player to the online READY (standby) mode. To perform online playback, the CD player must first be set to the online READY mode. Audio signals are not output from any of the terminals unless the CD player is in the online READY mode. Online READY point The online READY point is as follows according to the state of the CD player when the READY key is pressed. • When the tray is open: Start of track 1 on the disc • In the monitor PAUSE mode: Point when the READY key was pressed • When disc operation is stopped/in the monitor playback mode: Start of track 1 on the disc (when a cue point is not registered), or the position where monitor playback was last started from the monitor PAUSE mode (cue point) • During online playback (only when the failsafe setting is OFF): Point when the READY key was pressed [NOTE] • When the failsafe setting is ON, operation of the TRACK, SEARCH, INDEX, and MENU keys is not accepted in the online READY mode. (→ page 23 “Failsafe Function”) ON LINE key (¥) When this key is pressed in the online READY mode (READY key is lit), online playback is started. During online playback, this key is lit (green). In a mode other than the online READY mode, online playback is not started even if this key is pressed. PLAY/PAUSE key (¥/π) When this key is pressed while disc operation is stopped, in the online READY mode or during monitor playback, the CD player enters the monitor PAUSE mode. When this key is pressed in the monitor PAUSE mode, monitor playback is started. [NOTE] • In the monitor PAUSE mode, “PAUSE” is displayed in the character display area of the display window. In the default setting, the monitor playback signal is output from all analog /digital output terminals. Note, however, that the online playback signal can be set in menus not to be output from the BALANCED analog output terminal and AES/EBU digital output terminal. (→ page 22 “Setting the Terminals for Online Output”) During monitor playback, the PLAY/PAUSE key is lit yellow, and in the monitor PAUSE mode, it blinks. [NOTE] • When this key is pressed while the disc tray is open, the disc tray closes and the CD player then enters the monitor PAUSE mode at the start of track 1. • When this key is pressed while disc operations are stopped, the CD player enters the monitor PAUSE mode at the start of track 1. To cancel online playback, press the STOP key. In the default setting, the online playback signal is output from all analog /digital output terminals. Note, however, that the online playback signal can be set in menus not to be output from the UNBALANCED analog output terminal and SPDIF digital output terminal. (→ page 22 “Setting the Terminals for Monitor Output”) [NOTE] • When the failsafe function is ON, operation of keys other than STOP, PLAY MODE and DISP MODE is not accepted during online playback. (→ page 23 “Failsafe Function”) When failsafe is set to OFF, the CD player enters the monitor PAUSE mode also when this key is pressed during online playback. (→ page 23 “Failsafe Function”) STOP key (ª) When this key is pressed during online playback, in the online READY mode, during monitor playback, or in the monitor PAUSE mode, the disc will stop. This key is lit while disc operations are stopped. Note, however, that when the incremental play function is set to ON, and the STOP key is pressed during online playback and monitor playback, the CD player stands by at the start of the next tune to be played at either the online READY or monitor PAUSE mode according to the auto cue up setting. TASCAM CD-601MKII 15 BASIC OPERATIONS Selecting the playback point Selecting a track Tracks can be selected (skipped) using the TRACK(Â/¯) key. Âkey: Pressing this key when the elapsed time of a track is one second or more, the CD player returns to the start of that track. When the elapsed time is less than one second, the CD player skips to the start of the previous track. ¯ key: The CD player skips to the start of the next track. Pressing this key again makes the CD player skip to the start of the following track. • • • In the program playback mode, the CD player skips to the previous and next tracks according to the program order. When the Âkey is pressed at the start of track 1, the CD player skips to the start of the final track, and when the >>I key is pressed at the final track, the CD player skips to the start of the first track. When the  or ¯ key is pressed while disc operations are stopped, the CD player skips to the start of the first track on the disc. CD player operation after track selection Operation of the CD player after a track is selected by the TRACK key differs according to the operating state of the CD player when this key is pressed, the ON/OFF state of the auto cue function, and the auto cue up setting. (→ page 20 “Auto Cue Function”) When the auto cue function is ON: When the auto cue function is ON, the CD player basically stands by according to the auto cue up setting. When the auto cue function is OFF: The CD player enters the same state as that before the TRACK key is pressed. Note, however, that the CD player enters the monitor playback mode when a track has been selected while disc operations were stopped or while the tray was open. 16 TASCAM CD-601MKII Selecting the index When the INDEX key is pressed to set to the index search mode (INDEX indicator is lit), the index can be selected (skipped) by using the TRACK key. The operation mode after index selection conforms to operation after track selection. The auto cue function also is active. (The CD player stands by at the audio start point of the index.) Searching for an intermediate point in a tune You can search for cues in a tune by holding down the SEARCH (∆/˚) key during monitor playback or in the monitor PAUSE mode. When the failsafe function is OFF, cue searches are also possible in the online READY mode. (→ page 23 “Failsafe Function”) [NOTE] • During a cue search, the playback output level automatically drops by about 12 dB. Holding down the SEARCH key during monitor playback performs a cue search at about ten times the regular speed. Holding down the SEARCH key in the monitor PAUSE mode gradually increases the search speed. MENU OPERATIONS Various settings on the CD player can be made using the menu system. Menu Configuration The menu contains the following items. Menu No. Item Display Details Display Description Reference Item 01 A_CUE Auto cue level Auto cue level setting “Setting the Auto Cue Level” 02 ONLINE Online play output Setting the terminals for online “Setting the Terminals for Online (p. 22) output Output” 03 MONI Monitor output Setting the terminals for monitor “Setting the Terminals for Monitor (p. 22) output Output” 04 CLOCK Clock source Operation clock setting “Referencing to an External Clock (p. 23) Source” 05 PROG Program setting Program setting “Program Playback” (p. 20) 06 INCR_P Incremental play Incremental play ON/OFF “Incremental Play Function” (p. 21) 07 TIMER Timer play Timer play ON/OFF “Timer Play Function” (p. 24) 08 OUTPUT Output stereo mono Output stereo/monaural setting “Setting Stereo/Monaural” (p. 22) 09 OUT_L Output level Output level setting “Setting the Output Level” (p. 22) 10 F_SAFE Fail safe F a i l s a f e f u n c t i o n O N / O F F “Failsafe Function” during online playback/READY 11 EOM End of message time End of track warning display “Displaying the End of Track setting Warning” (p. 23) 12(*) E_CHK End check time End check time setting RC-601MKII Owner’s Manual 13(*) BANK Memory BANK select Memory back selection RC-601MKII Owner’s Manual 14 F_STAR Fader start polarity Setting fader start polarity “Setting fader start/stop” (p. 25) 15 F_STOP Fader stop state Setting the state of the CD “Setting fader start/stop” player at a fader stop (p. 25) 16 CUE_UP Auto CUE up state Setting the CD player standby “Auto Ready Function” mode during an auto cue or an auto ready (p. 21) 17(*) RMT Remote control CD player operation enable/ RC-601MKII Owner’s Manual disable setting when remote control (*) RC-601MKII is used 18 FRAME Frame display Setting the frame display of the “Clearing the Frame Display” time display area of the display window (p. 24) 19 TIME Time display S e t t i n g t h e t i m e d i s p l a y “Switching the Time Display” switching pattern (p. 23) 20 CUESET Cue point set Cue point setting “Auto-registering Cue Points” (p. 14) 21 A_CLR Memory ALL clear Memory all clear “Clearing Menu Settings” (p. 19) 22 USER User setting Calling up user banks to save “Saving Menu Settings” settings to (p. 19) 23 RS232C Com PORT baud rate RS-232C baud rate setting “Setting the baud rate” (p. 26) (none) xxxxH Motor addition time Motor total drive time display display “Viewing the Total Motor Time” (p. 24) * (p. 21) (p. 23) Menu items followed by an asterisk (*) in the above table are valid when the Remote Control Unit RC-601MKII (sold separately) is connected. For details on these menu items, refer to the RC-601MKII Owner’s Manual. TASCAM CD-601MKII 17 MENU OPERATIONS Menu Operation Basics 3 Press the ENTER key to apply the selected menu item. The menu No. stops blinking and stays lit. The MENU, ENTER and +/- keys are used for performing menu operations. z The following steps (4 to 6) are not applied to menu No. 05 (“PROG”), menu No. 21 (“A_CLR”) and the total motor time display. 4 Press the +/- key to select the desired value. The current setting value blinks when it is changed. 5 Press the ENTER key to apply the newly set value. The value stops blinking and stays lit. When the new settings are fixed, the menu mode automatically ends. 1 Press the MENU key. The CD player enters the menu mode, and the menu screen is displayed in the display window. [NOTE] • The alphabet characters of the menu item names are displayed as follows: • When the Remote Control Unit RC-601MKII (sold separately) is connected and menu operations are being performed using the RC-601MKII, all CD player operations including menu operations are not accepted. • Likewise, when menu operations are being performed on the CD player, all RC-601MKII operations including menu operations are not accepted. The following are displayed in each menu screen. Menu No. Menu item name Current setting value Details display 2 Press the +/- key to select the desired menu item. Pressing the + key displays the menu item for the next menu No. Pressing the - key displays the menu item for the previous menu No. z At this state, the menu No. blinks to indicate that the menu item is currently selected. z The menu details display is scrolled immediately after the screen is switched, and then the leading 12 characters are displayed fixed in the display window. Not only item details but also selections are displayed depending on the menu item (e.g. menu No. 19). 18 TASCAM CD-601MKII MENU OPERATIONS Saving Menu Settings Settings made to each of the menu items can be saved to user banks. Five user banks (U1 to U5) are provided, and menu settings when the CD player is turned OFF are stored to the currently selected user bank. You will find it more convenient to save optimum menu settings to individual user banks depending on your specific work requirements. The user bank can be selected by using menu No. 22 (“USER”). Selection: U1 (default setting) to U5, PRE When the CD player is turned ON, the menu settings saved to the currently selected user bank are reproduced. When PRE is selected, all menu settings are returned to their defaults. When a user bank is changed using the above menu item (“USER”) during operations, the menu settings change to those of the newly selected user bank. (The CD player need not be turned OFF then back ON again.) Clearing Menu Settings The menu settings currently saved to a user bank can be cleared to return them to their defaults. User banks can be batch-cleared or cleared individually. Clearing all user banks Set menu No. 22 to “PRE” and use menu No. 21 (“A_CLR”) to clear all user banks. When menu No. 21 (“A_CLR”) is selected, the message “SURE?” will be displayed. Press the ENTER key to clear the user banks. All menu settings currently saved to user banks (U1 to U5) will be cleared and returned to their defaults. [NOTE] • When Remote Control Unit RC-601MKII (sold separately) is used, a memory clear also clears the disc information of memory banks (A to E). Clearing individual user banks 1 Select the user bank to be cleared in menu No. 22. 2 Simultaneously press the + and - keys. TASCAM CD-601MKII 19 PLAYBACK-RELATED FUNCTIONS Program Playback The program playback function can be used to play back a disc in any desired track order. Up to 30 tracks can be programmed. Adding program tunes You can add a program tune by performing the following procedure while the program setup screen is displayed. 1 Press the SEARCH key, and select the location to add a tune. Entering the program mode For example, to add a new tune between the tunes currently preset to program Nos. 2 and 3, select program No. 3. Select the program mode using the PLAY MODE key. Press the PLAY MODE key for the required number of times until “PROGRAM” is displayed in the message display area of the display window. In the program mode, the disc is played backed according to the program made by the method described as follows. 2 Press the + key. 3 Select the track to add to using the TRACK key, and press the ENTER key. 4 When you have finished adding tunes, press the MENU key to exit the menu mode. Programming 1 Press the MENU key to enter the menu mode. Deleting program tunes 2 Press the +/- key, select menu No. 05 (“PROG”), and press the ENTER key. You can delete a program tune by performing the following procedure while the program setup screen is displayed. The display window changes to the program setup screen. 1 Press the SEARCH key, and select the program number that is preset with the tune to delete. 2 Press the - key. This deletes the tune, and the program numbers of the following tunes are rounded up. 3 When you have finished deleting tunes, press the MENU key to exit the menu mode. 3 Select the desired track using the TRACK key, and press the ENTER key. The selected track is set as the 1st tune (program No. 01) of the program, and the next tune (program No. 02) can be set. Clearing a program Opening the disc tray clears the program. [NOTE] • The program settings are not cleared even if the CD player is turned OFF with a disc loaded. Auto Cue Function 4 Repeat step 3 above for the required number of times to make the desired program. 5 When you have finished making the program, press the MENU key to exit the menu mode. Swapping programmed tracks You can swap programmed tracks by performing the following procedure while the program setup screen is displayed. 1 Press the SEARCH key to select the program No. that you want to swap. 2 Select the desired track using the TRACK key, and press the ENTER key. 3 When you have finished swapping the track, press the MENU key to exit the menu mode. 20 TASCAM CD-601MKII When the auto cue function is turned ON, the CD player automatically stands by (in the online READY or monitor PAUSE mode) at the audio start point of the track when the track is selected or when the auto ready function is ON. (→ page 16 “Selecting the Track”) Press the AUTO CUE key to turn the auto cue function ON/ OFF. When the auto cue function is ON, “A.CUE” is lit in the display window. z The auto cue function ON/OFF setting is backed up on the CD player. So, the same setting is reproduced when the CD player is next turned ON. After searching for the audio start point on the track with the auto cue function ON, whether the CD player enters the online READY mode or the monitor PAUSE mode is determined according to the auto cue up setting described below. PLAYBACK-RELATED FUNCTIONS Setting the Auto Cue Level Select from the following auto cue levels using menu No. 01 (“A_CUE”). The point where signals at the auto cue level or above first appear on the selected track are recognized as the audio start point. Selection : -72 dB (default setting), -66 dB, -60 dB, -54 dB, -48 dB Pitch Control Function The pitch control function can be used to control the playback speed within the ±12.5% range. Press the PITCH key to turn the pitch control function ON/ OFF. When the pitch control function is ON, “PITCH” and the current pitch control value are lit in the display window. When the pitch control function is ON, the +/- keys can be used to set the pitch control values in 0.1% increments. Setting Auto Cue Up Select whether the CD player enters the online READY mode or the monitor PAUSE mode when the auto cue function is activated using menu No. 16 (“CUE_UP”). Selection: RDY (online READY, default setting), PUS (monitor PAUSE) z The pitch control function ON/OFF setting and pitch control value are backed up on the CD player. So, the same settings are reproduced when the CD player is next turned ON. [NOTE] • Even when the pitch control function is activated, a digital signal of sampling frequency 44.1 kHz is output at all times from the digital output terminal on the CD player. Note, however, that when the CD player is synchronized to a 48 kHz external word clock signal, a digital signal of sampling frequency 48 kHz is output. [NOTE] • Pressing both the + and - keys simultaneously resets the pitch control value to 0.0%. The CD player also enters the online READY or monitor PAUSE mode according to the auto cue up setting when the auto ready function is activated. Auto Ready Function When the auto ready function is ON, CD player stands by at the start of the next track after a track is played backed. Incremental Play Function When the incremental play function is ON, and the STOP key is pressed during online playback and monitor playback, the CD player stops at the start of the next track, and stands by at either the online READY or monitor PAUSE mode according to the auto cue up setting. Press the AUTO RDY key to turn the auto ready function ON/OFF. When the auto ready function is ON, “A.READY” is lit in the display window. [NOTE] • In the program playback mode, playback skips to the start of the next programmed track. In the single playback mode, playback skips to the start of the current track. z The auto ready function ON/OFF setting is backed up on the CD player. So, the same setting is reproduced when the CD player is next turned ON. Select incremental function ON/OFF using menu No. 06 (“INCR_P”). When the auto ready function is activated, the CD player enters the online READY or monitor PAUSE mode according to the setting of menu No. 16 (“CUE_UP”). (→ above “Setting Auto Cue Up”) Also, the CD player stands by at the following points according to the playback mode: Regular playback Single playback Program playback : Start of next track : Start of current track : Start of next programmed track [NOTE] • When the auto ready function and auto cue function are used together, the CD player stands by at the audio start point of the next track after a track is played. Selection: OFF (default setting), ON [NOTE] • When the MONITOR button on the Remote Control Unit RC-601MKII (sold separately) or the No. 2 pin (MONITOR PLAY IN) of the REMOTE (PARALLEL) terminal is used, playback can skip to the start of the next track and start monitor playback. Also, when the ONLINE button on the Remote Control Unit RC-601MKII (sold separately) or the No. 1 pin (ONLINE PLAY IN) of the REMOTE (PARALLEL) terminal is used, playback can skip to the start of the next track during online playback and start online playback as long as the failsafe function is OFF. TASCAM CD-601MKII 21 OUTPUT-RELATED SETTINGS Setting the Terminals for Online Output The BALANCED analog output terminal and AES/EBU digital output terminal are basically provided as terminals for online output. In the default setting, both of the monitor playback signals and online playback signals are output from these terminals. However, by using menu item No. 02 (“ON LINE”) you can set so that only the online playback signal is output from these output terminals. Setting Stereo/Monaural The playback output signal can be set to monaural. Set monaural using menu No. 8 (“OUTPUT”). Selection: ST (STEREO, default setting), MON (MONO) OFF (default setting): Audio signals are output from the BALANCED analog output terminal and AES/EBU digital output terminal during both online playback and monitor playback. ON: Audio signals are output from the BALANCED analog output terminal and AES/EBU digital output terminal only during online playback. Setting the Terminals for Monitor Output The UNBALANCED analog output terminal and SPDIF digital output terminal are basically provided as terminals for monitor output. In the default setting, both of the monitor playback signals and online playback signals are output from these terminals. However, by using menu item No. 03 (“MONI”) you can set so that only the monitor playback signal is output from these output terminals. OFF (default setting): Audio signals are output from the UNBALANCED analog output terminal and SPDIF digital output terminal during both online playback and monitor playback. ON: Audio signals are output from the UNBALANCED analog output terminal and SPDIF digital output terminal only during monitor playback. [NOTE] • The playback signal is output from the PHONES terminal during both monitor playback and online playback regardless of the above setting. 22 TASCAM CD-601MKII Setting the Output Level You can select the maximum output level of the BALANCED analog output terminal. Set the maximum output level using menu No. 09 (“OUT_L”). Selection: +24 (default setting), +22, +20, +15 (dBu) OTHER FUNCTIONS & SETTINGS Referencing to an External Clock Source The CD player can be operated referenced to an external digital clock. Switching the Time Display 1 Connect the word clock from an external source to the WORD SYNC IN terminal on the rear panel. Each press of the DISP MODE key during playback switches the time information in the display window. As the default setting, the time display mode is switched between “track elapsed time” and “track remaining time.” 2 Set menu No. 04 (“CLOCK”) to “EXT”. “EXT CLK” and the sampling frequency (“44.1k” or “48k”) are lit on the clock display area of the display area. The type of time display that is switches using the DISP MODE key can be selected in menu No. 19 (“TIME”). Selections are displayed at 1 to 4. The default setting is “INT” (referenced to internal clock). 1 (default setting): Track elapsed time ⇔ track remaining time 2 : Track elapsed time ⇔ track remaining time ⇔ disc remaining time 3 : Track elapsed time ⇔ track remaining time ⇔ disc remaining time ⇔ disc total time 4 : Track elapsed time ⇔ track remaining time ⇔ disc remaining time ⇔ disc total time « track time Failsafe Function The failsafe function is a safety function for preventing playback from discontinuation when an operation key is touched inadvertently during a final take. In the default setting, the failsafe function is ON, and operation of keys other than STOP, PLAY MODE and DISP MODE is not accepted during online playback. Also, in the online READY mode, operation of search-related keys such as the TRACK key and numeric keys and the MENU key is not accepted. The current time display mode is displayed as follows at the top of the display window. Track elapsed time Track remaining time Disc remaining time Disc total time Track time When the failsafe function is set to OFF (“OFF”) using menu No. 10 (“F_SAFE”), all keys (excluding the SEARCH key during online playback) are functional. : (no display) : REMAIN is lit. : TOTAL REMAIN is lit. : TOTAL is lit. : TOTAL blinks. z The time display setting is backed up on the CD player. So, the same setting is reproduced when the CD player is next turned ON. [NOTE] Displaying the End of Track Warning The end of track warning (EOM = End of Message) can be displayed in the display window in the online playback and monitor playback modes. (In the default setting, the warning is not displayed.) • While disc operations are stopped, the disc total time is displayed. When the end of track warning is set to be displayed, the countdown to the end of the track is displayed. Set the end of track warning display using menu No. 11 (“EOM”). OFF (default setting): The end of track warning is not displayed. 10, 15, 20, 30, 60, 90: The countdown display starts from the end of the track by the preset number of seconds. TASCAM CD-601MKII 23 OTHER FUNCTIONS & SETTINGS Clearing the Frame Display The frame digit in the time display that is displayed in the display window can be cleared. Select from the following using menu No. 18 (“FRAME”): Viewing the Total Motor Time To view the total time that the CD mechanism motor in the CD player has been used, select the item following menu No. 23 (before menu No. 01) without a menu No. ON (default setting): The frame digit is displayed. OFF: The frame digit is not displayed. AUTO: The frame digit is not displayed only during online playback. The menu example above shows that the total motor time is 234 hours. Timer Play Function When the timer play function is set to ON, monitor playback is started automatically when the CD player is turned ON. Select timer play function ON/OFF using menu No. 07 (“TIMER”). Selection: OFF (default setting), ON 24 TASCAM CD-601MKII EXTERNAL CONTROL Parallel Control Setting fader start/stop The CD player can be controlled on the parallel interface from external equipment using the REMOTE (PARALLEL) terminal (37-pin D-Sub connector) on the rear panel. 19 1 Fader start/stop is possible by connecting the No. 21 pin (FADER START/STOP IN) and No. 36 pin (GND) of the REMOTE (PARALLEL) terminal to the external interface. At a fader start, the CD player enters the online playback mode. To start/stop the CD player from an external fader, set the following menu items. Setting fader start Set the polarity using menu No. 14 (“F_STAR”). 37 20 NOR (NORMAL): Low Active. The CD player starts when the input signal is switched from High to Low. Pin Arrangement Pin No. Signal Name IN/OUT 1 2 3 4 5 6 7 8 9 10 11 12 13 14 15 16 17 18 19 20 21 22 23 24 25 26 27 28 29 30 31 32 33 34 35 36 37 IN IN IN IN IN IN – IN IN IN OUT OUT OUT OUT IN IN OUT IN IN OUT IN OUT IN IN IN IN IN IN IN IN IN IN OUT OUT OUT – – ON LINE PLAY IN MONITOR PLAY IN PAUSE IN READY IN STOP IN TRACK SEARCH REV IN [ |<< ] N.C TRACK SEARCH FWD IN [ >>| ] SEARCH REV IN [ << ] SEARCH FWD IN [ >> ] MONITOR PLAY TALLY READY TALLY PAUSE TALLY STOP TALLY INDEX SERACH REV IN [ <- ] INDEX SEARCH FWD IN [ -> ] ON LINE PLAY TALLY FLASH READY IN FLASH MODE IN EOM OUT FADER START/STOP IN ONLINE PLAY / MONITOR PLAY OUT TEN KEY 0 IN TEN KEY 1 IN TEN KEY 2 IN TEN KEY 3 IN TEN KEY 4 IN TEN KEY 5 IN TEN KEY 6 IN TEN KEY 7 IN TEN KEY 8 IN TEN KEY 9 IN STOP/READY OUT FLASH READY TALLY FLASH MODE TALLY GND +5 V REV (REVERSE): High Active. The CD player starts when the input signal is switched from Low to High. Setting fader stop Set the state of the CD player at stop operation using menu No. 15 (“F_STOP”). STP (STOP): The CD player stops. RDY (READY): The CD player enters the online READY mode. PUS (PAUSE): The CD player enters the monitor PAUSE mode. CUE: The CD player returns to the cue point (point at fader start), and enters the online READY mode. INC (INCREMENT): The CD player enters the online READY mode at the start of the next track. PLY (PLAY): Online playback is continued. Parallel control I/O specifications Input : +5 V pull-up, Low Active, 50 ms or more Output : Open collector, 20 mA max. +5 V (pin No. 37) max. current: 100 mA TASCAM CD-601MKII 25 EXTERNAL CONTROL Control from the RC-601MKII Functions are added to the CD player and the CD player becomes easier to user by using the Remote Control Unit RC-601MKII (sold separately). Control from the RS-232C interface The CD player can be controlled on the serial interface from a PC or other external equipment using the REMOTE (SERIAL) terminal (15-pin D-Sub connector, RS-232Ccompliant) on the rear panel. For details, contact us. Expanded and additional functions by the RC-601MKII • Time chart/index search using the numeric keys • Search using the jog/search dial • End check function that allows you to listen to the end of tracks • 1 tune repeat, all tunes repeat, program repeat, repeat playback between A and B • Max. 10 cue points can be set to a single disc. • Flash start function using 10 cue points • Cue point settings for 500 discs can be stored to memory. • Playback between A and B using MEMO points and confirmation playback of points are possible. • The monitor outputs of up to four CD-601MKII can be connected to RC-601MKII and monitored on headphones. Setting operation on the CD player Operation on the CD player can be selected between enabled and disabled when the RC-601MKII is connected. Set enable/disable using menu No. 17 (“RMT”). R_L (REMOTE + LOCAL, default): Operation of the CD player is possible on both the RC-601MKII and the CD player. R (REMOTE): Operation of the CD player is possible on only the RC-601MKII. 8 15 Pin Arrangement Pin No. 1 2 3 4 5 6 7 8 9 10 11 12 13 14 15 Signal Name SHIELD RX (Reserved) (Reserved) (Reserved) GND (Reserved) (Reserved) TX (Reserved) (Reserved) (Reserved) (Reserved) (Reserved) (Reserved) Shielded (shell ground) Receive data Reserved Reserved Reserved Ground Reserved Reserved Send data Reserved Reserved Reserved Reserved Reserved Reserved When the REMOTE (SERIAL) terminal is used to control the CD player, select the appropriate baud rate from the following using menu No. 23 (“RS232C”). B-0: (default when RC-601MKII is connected) 1,200 bps Operation of the CD player except the OPEN/CLOSE key is disabled. B-2: 2,400 bps B-3: 4,800 bps When the RC-601MKII is not connected, operation of the CD player is enabled regardless of the setting of this item. B-4: 9,600 bps B-5: 19,200 bps B-6: 38,400 bps CD-601MKII IN/OUT – IN – – – – – – OUT – – – – – – Setting the baud rate B-1: 26 TASCAM 1 9 SPECIFICATIONS Rating Analog Output Electrical Characteristics Model: Discs used: Compatible discs: The following characteristics are the balanced and unbalanced analog output specifications. Playback frequency response: 20 Hz to 20 kHz, ±0.5 dB Signal-to-noise ratio: 102 dB or more (20 kHz LPF, A-weighted) Dynamic range: 98 dB or more (20 kHz LPF, A-weighted) [1 kHz max. output level -60 dB] Distortion (THD+N): 0.008% or less (20 kHz LPF) [1 kHz max. output level] Channel Separation: 90 dB or more [1 kHz] Wow flutter: Measured limit value or less CD player Compact discs (12 cm, 8 cm) Audio CD (CD-DA), CD-R, CD-RW, Number of audio channels: 2 channels Number of quantized bits: 16-bit linear/channel Sampling frequency: 44.1 kHz Transmission rate: 4.3218 MB/sec Modulation method: EFM Pickup drive system: Objective lens drive system, optical type 3 beams Objective lens drive system: 2D parallel drive system Light source: Semiconductor laser Wavelength: 780 nm ANALOG OUTPUTS BALANCED (L, R) Connector: Specified output level: Max. output level: XLR 3-31 or equivalent +4 dBu +24 dBu, +22 dBu, +20 dBu, +15 dBu (according to output level setting) Output level calibration variable range: 0 dB to -6 dB or more Output impedance: 150 Ω UNBALANCED (L, R) Connector: RCA Specified output level: -10 dBV Max. output level: +6 dBV Output impedance: 100 Ω PHONES Connector: Stereo phone jack Max. output level: 50 mW + 50 mW (at 32 Ω load) DIGITAL OUTPUTS AES/EBU Connector: Output signal format: Output impedance: Sampling frequency: Audio rise time: Anti-shock time: Within 10 msec 20 seconds General Power requirements: USA/CND: EUR/UK: AUS: Power consumption: External dimensions: 120 V AC, 60 Hz 230 V AC, 50 Hz 240 V AC, 50 Hz 24 W 220 W x 142 H x 382.4 D (mm) (including feet and protrusions) Weight: 6.0 kg Operating temperature: 5 to 35°C Max. tilt of installation surface: 5 degrees Accessories: Power cable, Owner ’s Manual, Warranty z Specifications and external appearance are subject to change without notice in the interest of product improvement. z Note that illustrations in the Owner’s Manual may differ on some products due to product improvements. External Dimensions 220 RCA pin jack IEC60958-3 (S/PDIF) 75 Ω 44.1 kHz, 48 kHz (at word synchronization) 130 142 SPDIF Connector: Output signal format: Output impedance: Sampling frequency: XLR 3-31 or equivalent IEC60958-4 (AES/EBU) 110 Ω 44.1 kHz, 48 kHz (at word synchronization) Other Characteristics Other I/O WORD SYNC IN Connector: BNC Input impedance: 75 Ω (automatic termination) Input level: TTL level Synchronizing frequency range: 44.1 kHz ±0.1% and 48 kHz ±0.1% WORD SYNC THRU Connector: BNC REMOTE (PARALLEL) Connector: 37-pin D-Sub female REMOTE (SERIAL) Connector: 15-pin D-Sub female Electrical characteristics: RS-232C-compliant 11 382.4 361.5 TASCAM CD-601MKII 27 SPECIFICATIONS List of Error Messages If the following error messages are displayed during CD player use, try performing the remedies described in the following table. Indication Description Remedy ERR01 TOC READ Error • The disc is scratched. → Replace the disc. • The disc is dirty. → Clean the disc. ERR02 GFS Error ERR03 Focus Error ERR04 SUBQ Error Replace the disc. ERR05 TRAY LOADING Error Check the disc tray for foreign objects. ERR06 SLED Error ERR07 SYSTEM Error ERR08 MEMORY Error 28 TASCAM CD-601MKII Turn the power OFF then back ON again. » CD-601MKII TEAC CORPORATION Phone: +81-422-52-5082 3-7-3, Nakacho, Musashino-shi, Tokyo 180-8550, Japan www.tascam .com TEAC AMERICA, INC. Phone: +1-323-726-0303 7733 Telegraph Road, Montebello, California 90640 www.tascam.com TEAC CANADA LTD. Phone: +1905-890-8008 Facsimile: +1905-890-9888 5939 Wallace Street, Mississauga, Ontario L4Z 1Z8, Canada www.tascam.com TEAC MEXICO, S.A. De C.V Phone: +52-555-581-5500 Campesinos No. 184, Colonia Granjes Esmeralda, Delegaacion Iztapalapa CP 09810, Mexico DF www.tascam.com TEAC UK LIMITED Phone: +44-845-1302511 Unit 19 & 20, The Courtyards, Hatterslane, Watford, Hertfordshire, WD1 8TE, UK www.tascam.co.u TEAC EUROPE GmbH Phone: +49-611-71580 Bahnstrasse 12, 65205 Wiesbaden-Erbenheim, Germany www.tascam.de TEAC AUSTRALIA PTY.,LTD. A.B.N. 80 005 408 462 Phone: +61-3-9672-2400 Facsimile: +61-3-9672-2249 280 William Street, Port Melbourne, Victoria 3000, Australia www.tascam.com.au TEAC ITALIANA S.p.A. Phone: +39-02-66010500 Via C. Cantu 11, 20092 Cinisello Balsamo, Milano, Italy www.teac.it Printed in Japan