1
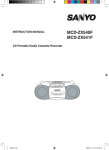
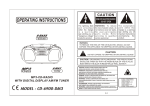
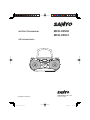
MCD-XP630
MCD-XP631
INSTRUCTION MANUAL
CD Portable Radio
LINE IN
PHONES
SANYO Electric Co., Ltd.
Printed in China
(AU)MR601P63000010
1
630body AU折页.indd
1
2009-6-11
14:54:31
CAUTION - INVISIBLE LASER RADIATION WHEN OPEN AND
INTERLOCKS DEFEATED. AVOID EXPOSURE TO BEAM.
ADVARSEL - USYNLIG LASER STRÅLING VED ÅBNING, NÅR
SIKKERHEDSAFBRYDERE ER UDE AF FUNKTION, UNDGÅ UDS ÆTTELSE
FOR STRÅLING.
VARNING - OSYNLIG LASER STRÅLNING NÄR DENNA DEL ÄR ÖPPNAD
OCH SPÄRR ÄR URKOPPLAD. STRÅLEN ÄR FARLIG.
VORSICHT - UNSICHTBARE LASERSTRAHLUNG TRITT AUS, WENN
DECKEL GEÖFFNET UND WENN SICHERHEITSVERRIEGELUNG
ÜBERBRÜCKT IST. NICHT, DEM STRAHL AUSSETZEN.
VARO - AVATTAESSA JA SUOJALUKITUS OHITETTAESSA OLET ALTTIINA
NÄKYMÄTTÖMÄLLE LASERSÄTEILYLLE. ÄLÄ KATSO SÄTEESEEN.
CAUTION
USE OF CONTROLS OR ADJUSTMENTS OR PERFORMANCE OF PROCEDURES OTHER
THAN THOSE SPECIFIED HEREIN MAY RESULT IN HAZARDOUS RADIATION EXPOSURE.
THIS PRODUCT SHOULD NOT BE ADJUSTED OR REPAIRED BY ANYONE EXCEPT PROPERLY QUALIFIED PERSONNEL.
-
-
Please refer the information on exterior bottom enclosure for electrical and safety information
before installing or operating the apparatus.
The apparatus shall not be exposed to dripping or splashing.
No object filled with liquid, such as vase shall be placed on the apparatus.
Do not use where there are extremes of temperature (below 5 o C or exceeding 35 o C).
Because of the CD players extremely low noise and wide dynamic range, there might be
a tendency to set the volume on the amplifier unnecessarily high. Doing so may produce
an excessively large output from the amplifier which could damage your speakers.
Sudden change in the ambient temperature may cause condensation to form on the
optical lens inside the unit. If this happens, take out the disc, leave the unit for about 1
hour, and then proceed to operate.
Where the MAINS plug or an appliance coupler is used as the disconnect device, the
disconnect device shall remain readily operable.
To be completely disconnect the power input, the mains plug of apparatus shall be disconnected from the mains.
Do not install this equipment in a confined space, such as a book case or built in
cabinet.
The rating label is located on the bottom of the unit.
The mains plug of apparatus should not be obstructed OR should be easily accessed
during intended use.
The ventilation should not be impeded by covering the ventilation openings with items,
such as newspapers, table-cloths, curtains etc.
No naked flame sources, such as lighted candles, should be placed on the apparatus.
Minimum distances around the apparatus for sufficient ventilation.
Attention should be drawn to the environmental aspects of battery disposal.
1
630body AU折页.indd
章节1:1
2009-6-11
14:54:32
4
2
3
6
5
10
8
7
1
9
11
LINE IN
PHONES
12
13
POWER SUPPLY
AC Power
Connect one end of the mains lead to the AC input socket (back of the unit) and the other
end to an AC outlet.
Note:
- The installed batteries are automatically disconnected when the mains lead is connected
to the unit.
- The function switch is mounted on the secondary side. The unit is not disconnected from
mains, even switched off.
Battery power
Installing batteries
Install six “C/R14” batteries (not supplied).
Caution on batteries
To prevent battery electrolyte leakage, which may result in injury and damage to the unit
or other objects, observe the following precautions:
1. All batteries must be installed with the proper polarity (see diagram on the rear of the
unit).
2. Do not mix new with old or used batteries.
3. Only use batteries of the same type and brand.
4. Remove the batteries when they are not to be used for a long period time.
5. When the batteries have become discharged, they must be disposed of in a safe manner
which complies with all applicable laws.
6. Battery shall not be exposed to excessive heat such as sunshine, fire or the like.
GENERAL OPERATION
Adjusting the volume
2
Turn the VOLUME control.
2
630body AU折页.indd
章节1:2
2009-6-11
14:54:33
Headphones
Connect stereo headphones (not supplied) to the PHONES socket for monitoring or for
private listening. The speakers are automatically disconnected when headphones are
connected.
- Excessive sound pressure from earphones and headphones can cause hearing loss.
CD PLAY
5
1
1. Set the function switch to CD.
2. Press the CD compartment lid (OPEN/CLOSE portion) to open it. “- -” appears on the
display.
3. Place the disc with the label facing up on the turntable. (Place only one disc at a time.)
4. Press the CD compartment lid (OPEN / CLOSE portion) to close it.
The total track number appears on the display.
5. Press the i button. Play starts from the first track.
- To start play from the desired track, select the track by using the f or e button,
then press the i button.
Note:
If no disc is loaded or the disc is located with the label facing down, “- -” appears. If these
occur, load the disc correctly or replace the damaged disc.
6. Press the n button to end disc play back.
When the last track has been played, the player stops automatically.
7. To turn the CD player off, set the function switch to OFF.
Note:
- Do not open the CD compartment during CD play. Always press the n button and wait
for the disc to stop rotating before opening the CD compartment.
- This unit can play back the CD-R/RW as well. However, some CD-R/RW can not be
played back depending on the recording conditions.
- This unit cannot playback MP3/WMA CD or Video CD.
Notes on handling compact discs
- Do not expose the disc to direct sunlight, high humidity or high temperature for extended
periods of time.
- Discs should be returned to their cases after use.
- Do not apply paper or write anything on the disc surface.
- Handle the disc by its edge. Do not touch the playing surface (glossy side).
- Fingerprints and dust should be carefully wiped off the playing surface of the disc with a
soft cloth.
Wipe in a straight motion from the center to the outside of the disc.
- Never use chemicals such as record cleaning sprays, antistatic sprays or fluids, benzene
or thinner to clean compact discs.
Temporarily stopping play
5
Press the i button, “a” blinks on the display. To resume play, press the button again.
Skip play
4
8
To skip to track 6 while track 3 is playing, press the e button repeatedly until “06” appears
on the display. To skip back to track 3 while track 6 is playing, press the f button repeatedly
until “03” appears.
3
630body AU折页.indd
章节3:3
2009-6-11
14:54:33
Search (forward/reverse)
4
8
If the e or f button is pressed during play, the player will search at high speed in the
forward or reverse direction while the button is being pressed. When the button is released,
normal play will continue.
Repeat/Random play
9
Press the REPEAT/RANDOM button repeatedly to select the various play mode. Each time
the button is pressed, the mode changes as shown below:
v
v
“RANDOM” appears
(Play all tracks randomly)
Released
(Normal play)
PROGRAMMED PLAY
“REPEAT ALL” appears
(Repeat all tracks)
v
“REPEAT” appears
(Repeat one track)
3
Up to 20 tracks on a disc can be programmed for play in any order.
1. In stop mode press the MEMORY button, the program number “01” appears briefly, then
the track number “00” and “MEMORY” blink on the display.
2. Select a track by using the f or e button.
3. Press the MEMORY button.
4. Repeat steps 2 - 3 to programme additional tracks.
5. Press the i button to start playback. “MEMORY” remains lit.
When all programmed tracks have been played, the player stops automatically.
- The programme contents are retained in memory.
To cancel the programmed play
1. In stop mode press the MEMORY button. The programmed track number and “MEMORY”
blink on the display.
2. Press the n button once. The total track number of the disc appears.
The programmed play is canceled.
Checking the programme
In stop mode press the MEMORY button repeatedly, the programme numbers and programmed track numbers sequentially appear on the display.
Changing a programme
To add a new track to a programme:
1. In stop mode press the MEMORY button repeatedly until the last program number is
displayed briefly, ‘‘00” appears.
2. Select a track as explained above.
3. Press the MEMORY button.
To change a track:
1. In stop mode press the MEMORY button repeatedly until the programme number to be
replaced appears briefly, then the track number blinks on the display.
2. Select a track as explained above.
3. Press the MEMORY button.
4
630body AU折页.indd
章节3:4
2009-6-11
14:54:33
Note:
Programmed details cannot be partially deleted or inserted.
WHAT TO DO IF...
If an abnormal display indication or an operating problem occurs, disconnect the mains
lead and remove all batteries. Wait at least 5 seconds then reconnect the mains lead and
reinstall the batteries.Resume the operation.
LISTENING TO OTHER SOURCES
1
1. Connect the audio cable (not supplied) from the audio output socket of a video/auxiliary
equipment to the LINE IN socket.(Stereo Mini Plug: ø3.5)
2. Set the function switch to LINE IN.
3. Follow the instructions supplied with the other equipment.
LISTENING TO THE RADIO
1
11
1. Select FM or AM with the BAND switch.
2. Tune in a desired station by turning the TUNING control.
3. To turn the radio off, set the function switch to OFF.
To improve reception
FM: Pull out the telescopic aerial and adjust its position.
AM: Rotate the unit.
MAINTENANCE
Cleaning the CD player lens
The lens should never be touched. If dust is on the lens, blow it off using a camera lens
blower. (Consult your dealer.)
Cleaning the unit
Clean the outside of the unit with a clean soft cloth, moistened with lukewarm water. Do
not use benzene, thinners, or alcohol for they may mar the finish of the surfaces.
SPECIFICATIONS
CD player
Channels:
2-Channel stereo
Sampling frequency:
44.1 KHz
Pick-up:
Semiconductor laser
Laser output:
0.6 mW (Continuous wave max.)
Wave length:
790 nm
Wow/Flutter:
Below measurable limits
General
Output power:
1 W/ch (DC max.)
1 W/ch (AC max.)
Speakers:
7.7 cm x 2, 8 ohms
Terminals:
PHONES: 32 ohms
Power source:
AC: 230V - 240V, 50Hz
DC: 9V, 6 “C/R14” batteries
Dimensions:
282 (W) x 137 (H) x 210 (D) mm
Weight:
Approx. 1.12 kg (not including batteries)
Radio
Reception frequency:
FM: 87.5 - 108 MHz
AM: 526.5 - 1606.5 KHz
Specifications subject to change without notice.
5
630body AU折页.indd
章节2:5
2009-6-11
14:54:33