1
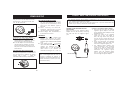
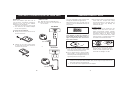
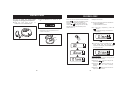
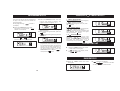
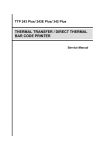
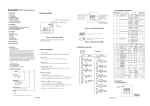
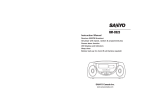
SAFETY TIPS
CDP-244
CDP-244CRB
Instruction Manual
Personal CD Player
CD MOBILE
EN
OP
SANYO Canada Inc.
www.sanyocanada.com
Thank you for purchasing the SANYO
CDP-244/CDP-244CRB.
The CDP-244 comes with headphones and
an AC adapter.
The CDP-244CRB comes with headphones,
an AC adapter, car cassette adapter and
cigarette lighter adapter.
CONDENSATION
If cold water is poured into a glass, water
droplets form on the outside of the glass.
This is called condensation. Condensation
may occur on internal operating parts of the
laser pickup.
CAUTIONS FOR SAFETY
Do not take the unit apart. The laser beam
used in the unit could harm your eyes.
Ê Do not insert pins or other objects inside
the unit. This unit is equipped with a
safety device which automatically turns
the laser beam off when the disc
compartment is opened. If a pin or other
metal object should get inside the unit,
however, this safety device may be
deactivated.
Ë Do not drop the unit or subject it to
strong shocks. Doing so could result in
damage.
Ê When the unit is brought from the
CONDENSATION OCCURS:
outdoors into a warm room, or if it is in a
cold room which is heated quickly.
Ë In the summer, if the unit is moved
suddenly from an air-conditioned room or
car to a hot or humid location.
SHOULD CONDENSATION OCCUR:
The unit may not operate properly if
condensation occurs. Wait for 1 to 2 hours
(to allow the internal parts to adjust to the
surrounding temperature) before using the
unit.
Do not place the unit in the following
locations:
Ê Locations where the temperature is
high. The cabinet may warp or the unit
may otherwise be damaged if it is placed
in direct sunlight, near heaters (where
the temperature is 140LF/60LC or
greater) or in cars with the windows
closed. (In the summer, the temperature
may get as high as 212LF/110LC or
more.) Use the unit within a temperature
range of 41LF/5LC to 95LF/35LC.
Ë In humid or dusty locations.
Ì In locations exposed to heavy
vibrations.
Í On unstable or tilted surfaces.
1
CONTROLS
SAFETY TIPS
LASER SAFETY
THIS SET EMPLOYS AN OPTICAL LASER BEAM SYSTEM IN THE CD MECHANISM,
DESIGNED WITH BUILT-IN SAFEGUARDS. DO NOT ATTEMPT TO DISASSEMBLE.
EXPOSURE TO THIS INVISIBLE LASER LIGHT BEAM MAY BE HARMFUL TO THE HUMAN
EYE. THIS IS A CLASS-1 LASER PRODUCT. USE OF CONTROLS, ADJUSTMENTS OR
PROCEDURES OTHER THAN THOSE SPECIFIED HEREIN, MAY RESULT IN HAZARDOUS
LASER LIGHT BEAM EXPOSURE. THIS COMPACT DISC PLAYER SHOULD NOT BE
ADJUSTED OR REPAIRED BY ANYONE EXCEPT QUALIFIED SERVICE PERSONNEL. THE
LASER MECHANISM IN THE SET CORRESPONDS TO THE STYLUS (NEEDLE) OF A
RECORD PLAYER. ALTHOUGH THIS PRODUCT USES A LASER PICK-UP LENS, IT IS
COMPLETELY SAFE WHEN OPERATED ACCORDING TO DIRECTIONS.
1.
2.
3.
4.
5.
6.
CD lid
PLAY/PAUSE
button
STOP
button
PROGRAM button
ANTI-S (anti-skip) button
P-MODE (Program, Repeat, Intro scan,
Random play) button
7. Display screen
8. SEARCH (forward)
button
9. SEARCH (backward)
button
10. PHONES jack
11. OPEN latch
12. VOLUME control
13. LINE OUT jack
14. BATTERY compartment
15. DC IN 4.5V jack
16. BASS X BOOST (BassXpander) switch
SAFETY INSTRUCTIONS
CAUTION
RISK OF ELECTRIC SHOCK
DO NOT OPEN
The lightning flash
and arrow head
within the triangle is a
warning sign alerting
you of "dangerous
voltage" inside the
product.
CAUTION: TO REDUCE THE
RISK OF ELECTRIC SHOCK, DO
NOT REMOVE COVER (OR
BACK). NO USER SERVICEABLE
PA R T S I N S I D E . R E F E R
SERVICING TO QUALIFIED
SERVICE PERSONNEL.
9
8 7
6 5 4
3
2
1
16
The exclamation point
within the triangle is a
warning sign alerting
you of important
i n s t r u c t i o n s
accompanying the
product.
WARNING: TO PREVENT FIRE OR SHOCK HAZARD, DO NOT EXPOSE THIS APPLIANCE
TO RAIN OR MOISTURE.
Do not apply oil or petroleum products or solvents to any part of this set.
CAUTION:
Invisible laser radiation when open and interlocks defeated. Avoid exposure to beam.
2
13
EN
OP
12
10
11
14
3
15
CAR KIT ADAPTER (FOR CDP-244CR ONLY)
POWER SUPPLY
Plug one end of the AC adapter into the
DC 4.5V jack, then plug the other end
into an AC wall outlet.
NOTE ON ALKALINE BATTERIES
Ê When replacing the alkaline batteries,
use two new batteries of the same
type. Do not mix a used battery with a
new one or mix different types of
batteries.
Ë When inserting the batteries,
mistakenly inserting even one with
improper polarity will cause leakage.
Ì Never charge, heat, disassemble, or
throw batteries into a fire.
i The supplied cigarette lighter adapter is designed for use with vehicles that have a
i
12V, negative ground electrical system.
Most vehicles have this type of electrical system, but if you are unsure about the
system in your vehicle, contact the vehicle dealer.
CIGARETTE LIGHTER ADAPTER (FOR
CDP-244CRB)
Plug one end of the cigarette lighter
adapter into the [DC IN 4.5V], then plug
the other end into the cigarette lighter
jack.
Caution on the cigarette lighter adapter.
i Use this unit only with the supplied
cigarette lighter adapter. Use with
other cigarette lighter adapters could
damage the unit.
i When the inside of the cigarette
lighter jack is dirty with ashes or
dust, the plug section may become
hot due to poor contact. Be sure to
clean the cigarette lighter jack before
use.
i After use, disconnect the cigarette
lighter adapter plugs from both this
unit and the cigarette lighter jack.
i The cigarette lighter adapter may
cause interference with reception
from the car radio or another radio
inside the vehicle. If this is the case,
disconnect the cigarette lighter
adapter from the cigarette lighter
jack, or use the radio at a distance
from the cigarette lighter adapter.
REMEMBER
Ê If the symbol "
" flashes in the
display, your batteries are weak.
Replace them or use the AC adapter or
cigarette lighter adapter (CDP-244CRB
only).
Ë If the display is blank
no numbers
show when PLAY/PAUSE button
is
pushed, the batteries are dead.
Replace them, or use AC adapter.
(Also check if you inserted the
batteries according to the + and - as
Precautions on using the AC Adapter.
Ê Do not touch the AC adapter with wet
hands. Doing so is dangerous, as this
could result in an electrical shock.
Ë If the AC adapter is connected when
the batteries are installed, the power
supply automatically switches to the
AC power source and the batteries are
disconnected.
ALKALINE BATTERY INSTALLATION
Insert two AA batteries (not supplied) into
the battery compartment on the bottom of
the unit. Be sure to observe the proper
polarity (the"+" and" - " signs) as
indicated inside the battery compartment.
IMPORTANT NOTE:
Spent or discharged batteries must be
recycled or disposed of properly in
compliance with all applicable laws. For
detailed information, contact your local
solid waste authority.
4
DC IN 4.5V
5
CAR CASSETTE ADAPTER (FOR CDP-244CR ONLY)
USING IN A CAR
Ê Plug the cord into LINE OUT jack.
Ë Insert the pack into the tape slot of
the car stereo.
BEFORE USE
Check the cassette tape insert slot of
your car stereo. If necessary, change the
direction of the cord on the cassette
shaped pack of the adapter.
i There may be some car stereo types
with which this car cassette adapter
will not work properly.
Car Stereo
To change the cord direction
Ê Gently pull the cord out of the slot on
the back as shown.
HANDLING COMPACT DISCS
Ì Do not apply paper or write anything on
This unit is designed to play compact discs
bearing the identification logo (below).
Discs that do not carry this logo may not
conform to the CD standards and may not
play properly.
either side of a compact disc. Sharp
writing instruments, or the inks used in
some felt-tip pens, may damage the
surface of the disc.
COMPACT
CLEANING DISCS
Ê Fingerprints should be wiped from the
surface of the disc with a soft cloth.
Unlike conventional records, compact
discs have no grooves to collect dust and
microscopic debris, so gently wiping
them with a cloth should remove most
particles. Wipe in a straight motion from
the inside to the outside of the disc.
DIGITAL AUDIO
Dirty. scratched or warped discs may
cause skipping or noise. Pay attention to
the following: Handle the disc only by the
edges. To keep the disc clean, do not touch
the surface of the disc.
EN
OP
YES
LINE OUT
Ë
NO
Change the cord exit location (back
or either side of the pack). Push the
cord back into the slot.
or
Car Stereo
Ë Never use chemicals such as record
Ê Discs should be returned to their cases
cleaning sprays, anti-static sprays or
thinner to clean compact discs. Such
chemicals can damage the disc.
after use to avoid serious scratches that
could cause the laser pickup to skip.
Ë Do not expose discs to direct sunlight,
high humidity, or high temperatures for
extended periods. Prolonged exposure to
high temperatures can warp a disc.
i The unit will not play a disc that has been inserted upside down or discs that do not
EN
OP
conform to the Compact Disc standard. Also, the unit might not play discs that are
scratched, soiled or carry fingerprints.
i 3" (8-cm) CDs can be played without an adapter.
LINE OUT
6
7
PLAYING A DISC
Ë Slide the OPEN latch to release the CD
Be sure to reduce the volume before
plugging in or unplugging the headphones.
Ê Plug
the cord from a pair
headphones into the PHONES jack.
PLAYING A DISC
lid.
of
OPEN
Î Adjust the volume.
Close the lid and press the PLAY/PAUSE
button(
). The disc will begin to spin,
after a few seconds the display will
indicate
and the total number of
tracks and total playing time on the disc,
playing will begin automatically from
track number 1.
Ï Set the following functions as desired.
i BASS X BOOST
i Digital ANTI-S function
Ð To stop play temporarily, press the
Ì Hold the disc with the label side up
button.
and press it onto the spindle until it
"clicks" into place.
i The elapsed playing time flashes in
the display.
EN
OP
i Press the
button again to resume.
Ñ To stop play, press the STOP button
.
Total tracks and total playing time
appears in the display. Press STOP again
to turn power off.
TRACK SEARCH
Press the SEARCH buttons during play to
skip to the desired track.
Ê Press the
button to skip to the
next track on the disc.
Ë Press the
button to start at the
beginning of the track currently
playing.
Ì Press the
button twice or more to
skip to previous tracks.
8
9
BASSXPANDER
PLAYING A DISC
FORWARD/BACKWARD SEARCH
Press and hold the
or
buttons
during play to scan the disc at high speed.
When the desired section of the disc is
found, release the button. Normal play will
resume.
.................Forward
i When the data buffer is filling, the
disc will turn at normal speed. After
the data buffer has been filled the
disc will turn slower and then stop
(conserving battery life). The data
stored in memory continues to be
decoded. After the buffer has been
emptied the disc will begin to turn
again.
i Press the Anti-S button to turn antiskip protection off.
.................Reverse
Ê If you press and hold the
button
while playing, it will scan the track
forward at high speed.
Ë If you press and hold the
button
while playing, it will scan the track
backward at high speed.
ANTI-SKIP PROTECTION
BASS X PANDER
Use this function to increase the bass
output.
OFF BASS X ON
BOOST
AUTO POWER ON / OFF FUNCTION
AUTO POWER ON FUNCTION
AUTO POWER OFF FUNCTION
The power turns on automatically when
the
button is pressed.
The power turns off automatically 30
seconds after all tracks on a disc have
been played or the
button is pressed.
RECORDING
FROM THE AUX
OUT JACK
PROGRAMMED
PLAY
The ultimate anti-skip protection keeps
the music playing under virtually any
conditions. It does this by using a new
quick-focus laser, rapid-access
mechanism and fast-read circuitry.
i When the Anti-S button is pressed
during play, the
indicator appears
in the display. Digital data equivalent
to 300 seconds is stored in a "read
ahead" memory buffer before it is
decoded and played. The
mark
changes to a
mark, indicating the
buffer is full.
i When the unit is subjected to a shock
during play the data stored in
memory continues to be decoded and
played. This gives the pickup time to
stabilize and continue reading new
data. As the data is read from
memory the indicator changes to
.
NOTE: Keep the anti-skip function off when
using the unit in a stable location
where it will not be subjected to
shocks. The battery power
consumption is reduced when skip
protection function is turned off
NOTE: When ANTI-S is switched on or off,
the sound will be interrupted for 1
to 2 seconds. This is normal (the
interrupted time is used for the
memory to switch on or off).
10
The output from the CD player can be
recorded.
l Connect a patch cable (not supplied)
from the AUX OUT jack on the CD
player to the LINE INPUT jacks on a
cassette recorder.
The sound from the CD can be heard
through the speakers.
l Connect a patch cable (not supplied )
from the AUX OUT jack on the CD
player to the AUX or CD INPUT jacks on
a stereo system.
TO AUX OUT JACK
EN
OP
11
SINGLE/ALL/A
PROGRAMMED PLAY
Ì Press the PROGRAM button. The first
track is now stored in memory. The
program number changes to " 02 ".
The tracks on the disc can be programmed
for play in any order. (Up to 22 tracks can
be programmed.)
During programming, " PROG " flashes in
the display.
Ê Press the PROGRAM button once
during play or in stop mode, " PROG "
flashes in the display.
Í Repeat steps 2 and 3 to program
additional tracks.
Î After programming is finished, press the
button.
i " PROG " stops flashing and programmed
play begins.
Ë Press the
or
buttons to select
the first track to be programmed.
i The player stops automatically after all
programmed tracks have been played.
The programmed tracks are stored in
memory until the disc compartment is
opened or power is turned off. To play
the same program again, press the
PROGRAM button to display" PROG ",
then press the
button.
B TRACKS REPEAT
1. SINGLE TRACK REPEAT
Press the P-MODE button once during play,
"
1 " appears in the display.
This plays the song over until you press
the
button.
2. ALL TRACKS REPEAT
Press the P-MODE button twice during play ,
"
ALL " appears in the display .
All songs will keep playing in sequence and
when finished, they will start over again
until you press the
button.
3. A
B TRACKS REPEAT
Press the P-MODE button three times
during play , "
" appears in the
A
display . Press PLAY/PAUSE, "B" appears
and plays the tracks from A to B
continuously until you press the
button.
A
INTROSCAN PLAY
Ê
Ë
Press the P-MODE button four times
in stop mode or during play.
" INTRO "appears in the display. Press
the
or
button.
RANDOM PLAY
Ê Press the P-MODE button five times
during play.
12
" appears in the display.
Ë "
Press
or
, all tracks on the disc
will be played once in random order.
13
TROUBLE SHOOTING GUIDE
CLEANING
CLEANING THE PICKUP LENS
Dust on the pickup lens can lead to erratic
operation and interruption of the sound
during play.
CLEANING THE CABINET
Use a soft cloth moistened with plain
lukewarm water and wrung dry.
Never use benzol, benzene or other strong
chemical cleaners, since these could
damage the finish. It is important that no
liquid reaches the inside of the unit.
i To clean the pickup lens, open the disc
compartment. Blow the dust off the
lens using a camera lens blower
(available at most camera stores). Do
not touch the surface of the lens.
SYMPTOM
CD Player will not turn
on.
Disc will not play.
CAUSE
SOLUTION
Dead or weak batteries. Replace both batteries.
The AC adapter is not
Check the AC adapter connection at
connected properly.
AC outlet and side of set.
Disc inserted incorrectly. Re-insert disc with label side facing up.
Defective or wrong type Try another audio compact disc (DVD
compact disc.
or data disc won't work).
CD lid not closed.
Close lid securely
Moisture has formed
inside the CD player.
No sound from
headphones.
Sound is skipping.
Sound is distorted.
Tracks do not change
or set does not play
normally.
Buttons do not work.
14
Take out the CD and leave the CD lid
open for about an hour to dry the
moisture condensation.
Headphone plug not
inserted properly.
Headphone plugged into
the AUX out jack.
Volume control set
to minimum.
Weak batteries.
Re-insert headphone plug into the
headphone jack.
Plug headphone into the headphone jack
(not the line out jack).
Increase the volume.
Weak batteries.
Replace both batteries or use the
AC adapter.
Replace batteries or use the
AC adapter.
Defective compact disc. Try another compact disc.
The compact disc or
Clean or replace the compact disc or
lens is dirty.
clean the lens using a camera
brush/blower.
Too much movement
Reduce movement of CD player.
of the CD player.
ANTI-S is off.
Turn on the ANTI-S.
Decrease the volume control level.
Music is too loud.
BASS X BOOST is on
and music is too loud.
Batteries are too weak
and the battery symbol
will show in display.
Lower volume or slide BASS X BOOST
switch to off.
Replace both batteries. Battery life with
new alkaline batteries is about 4-8 hours
of playing time.
Electronic or static error Remove batteries and AC adapter.
caused circuitry to lock. Wait a few seconds and re-insert.
Make sure batteries are fresh or adapter
has power.
15
SPECIFICATIONS
Frequency
Response
CD
PLAYER
SECTION
20 Hz -20 kHz
Frequency Response
20Hz-20kHz
Wow and Flutter
Sampling Frequency
Below measurable limits
44.1 kHz
D/A Converter
Error Correction Method
Pickup
1-bit
CIRC
Optical 3-beam semiconductor laser
(780 nm wavelength)
General
GENERAL
Maximum output (stereo headphones)
Dimensions (Approx.) millimeter (W x H x D)
Weight (Approx.)
20mW+20mW (32 )
143.5mm x 27mm x143.5mm
220 g
POWER SUPPLY
DC (batteries)
3V: Using two "AA" batteries
AC adapter
Input: 120V / 60Hz
Output: 4.5V/600mA
Because products are subject to continuous improvement, we reserve the right to modify
product designs and specifications without notice and without incurring any obligation.
THE SANYO COMFORT WARRANTY AUDIO PRODUCTS
You, the original retail purchaser, are responsible for
any costs of TRANSPORTING the product to and
from SANYO Canada Inc. or an authorized Sanyo
Service Depot. You also are responsible for the cost
of any MAINTENANCE necessary in respect of the
product.
WARRANTY APPLICATION
New, unused Sanyo Audio products purchased
through a Sanyo authorized dealer in Canada are
warranted against manufacturing defects in
materials and workmanship for ONE YEAR from the
date of purchase by the original retail purchaser.
This warranty only applies in favour of the original
retail purchaser of the warranted product.
WARRANTY BECOMES VOID
This warranty becomes void if the product's serial
numbers are altered or removed or if any repair to
the product is made other than by SANYO Canada
Inc. or by an authorized Sanyo Service Depot.
SANYO CANADA INC.'S RESPONSIBILITY
During the warranty period, SANYO Canada Inc.
will repair, or at our option, replace an Audio
product which shows evidence of a manufacturing
defect in materials or workmanship.
LIMITATIONS
Ê SANYO Canada Inc. Reserves the right to
change or improve the design of the model of
the product warranted hereunder without
incurring any obligation to make any
modifications to or to install any improvement
in or on the product.
Ë In no event shall SANYO Canada Inc. or any of
its Authorized Dealers be liable for special or
consequential damage arising from the use of
this product.
Replacement PARTS are warranted for the
remaining portion of the warranty period.
WHAT IS NOT COVERED
Ê Audio products purchased outside Canada.
Ë Audio products purchased in a used
condition.
Ì Problems due to product set-up and installation.
¹ Adjustments that are outlined in the
Operating Manual
º Accessory items including antenna, batteries
and cassette tapes.
Ï Damage in or due to transportation.
Ð Damage due to improper maintenance,
improper wiring, accident, abuse, misuse or
negligence.
½ Damage caused by lightning and power
surges.
¾ The cost of removal and reinstallation of an
Audio product designed for automobile use.
STATUTORY WARRANTIES
The above provisions do not preclude the operation
of any applicable provincial statute which in certain
circumstances may not allow some of the
limitations and exclusions described in this
Warranty. Where any terms of this Warranty are
prohibited by such a statute, they shall be deemed
null and void but the remainder of this warranty shall
remain in effect.
HOW TO OBTAIN WARRANTY SERVICE
Please contact the Sanyo Authorized Dealer from
whom the product was purchased, or contact us
directly at:
ORIGINAL RETAIL PURCHASER'S
RESPONSIBILITY
You, the original retail purchaser, must present
your original, dated bill-of-sale together with this
warranty to SANYO Canada Inc. or to an authorized
Sanyo Service Depot when you make a claim under
this Warranty.
SANYO Canada Inc.
1-300 Applewood Cres.
Concord, Ont. L4K 5C7
(905) 760-9944
1-800-263-2244
IB01796-CD23F-45B-sanyo-E
sony 3009
16
Jul.13,02
B40599-CD23F-45J7-Audio tech-E
17