1
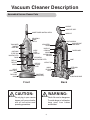
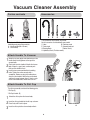
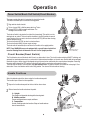
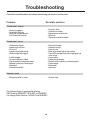
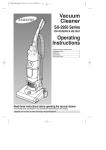
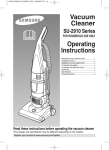
Vacuum
Cleaner
SU-8500 Series
FOR HOUSEHOLD USE ONLY
Operating
Instructions
IMPORTANT SAFETY INSTRUCTIONS .......................2
VACUUM CLEANER DISCRIPTION ...........................3
VACUUM CLEANER ASSEMBLY...............................4
CARTON CONTENTS .................................4
ACCESSORIES .........................................4
ATTACH HANDLE TO VACUUM.....................4
ATTACH HANDLE TO DIRT CUP ...................4
ATTACH VACUUM HOSE AND TOOLS ...........5
OPERATION ..........................................................6
POWER SWITCH/BRUSH ROLL SWITCH
(CIRCUIT BREAKER)..................................6
HANDLE POSITIONS..................................6
POWERFOOT HEIGHT ADJUSTMENT ...........7
EDGE CLEANING ......................................7
CLEANING TOOLS.....................................7
POWER CORD ARRANGEMENT ..................8
CORD CLIP ..............................................8
TRANSPORTING CLEANER .........................8
CARRYING CLEANER ................................8
MAINTENANCE .....................................................9
DIRT CUP CHECK OR FILTER CLOGGED INDICATOR ..9
CLEANING DIRT CUP.................................9
CLEANING THE CARTRIDGE FILTER TANK ....9
CLEANING THE HEPA MEDIA POST-MOTOR FILTER ..9
CHECK ROTATING FLOOR BRUSH AND DRIVE BELT 10
REPLACE DRIVE BELT .............................10
CLEARING CLOGS ..................................11
POWERED HAND TOOL(TURBINE BRUSH)..12
BRUSHBAR REPLACEMENT......................12
BELT REPLACEMENT...............................12
TROUBLE SHOOTING ...........................................13
❈ The design and specification may be different depending on the models.
Important Safety Instructions
Thank you for purchasing a Samsung vacuum cleaner. When using an electrical appliance, basic precautions
should always be followed, including the following:
PLEASE READ ALL WARNINGS AND INSTRUCTIONS BEFORE USING THIS VACUUM CLEANER.
WARNING: To reduce the risk of fire, electric shock, or injury:
• Do not leave vacuum cleaner unattended when it is plugged in.
• Unplug from outlet when not in use and before servicing.
• Do not use outdoors or on wet surfaces.
• Do not allow children to operate vacuum cleaner or use as a toy.
• Close attention is necessary when used by or near children.
• Use only as described in this manual. Use only manufacturer’s recommended attachments.
• Do not use with damaged cord or plug.
• If vacuum cleaner is not working as it should, or has been dropped, damaged, left outdoors or dropped into water,
return it to a service center.
• Do not pull or carry by cord, use cord as a handle, close a door on cord, or pull the cord around sharp edges or
corners. Keep cord away from heated surface.
• Do not unplug by pulling on the cord. To unplug, grasp the plug, not the cord.
• Do not handle vacuum cleaner or plug with wet hands.
• Do not put any object into openings. Do not use with any opening blocked; keep openings free of dust, lint, hair and
anything that may reduce air flow.
• Keep hair, loose clothing, fingers and all parts of body away from openings and moving parts.
• Do not pick up anything that is burning or smoking, such as cigarettes, matches or hot ashes.
• Do not use without dirt cup or filters in place. Empty dirt cup and clean filter frequently when picking up very fine
materials such as powder.
• Turn off all controls before unplugging vacuum cleaner.
• Use extra care when cleaning on stairs.
• Do not use to pick up flammable or combustible materials such as gasoline or fine wood fine wood sandings or use
in areas where they may be present.
• Store your vacuum cleaner indoors, in a cool and dry area.
• Avoid picking up hard, sharp objects with the cleaner. They may damage the cleaner.
• Always turn off this appliance before connecting or disconnecting the hose, removing the bottom plate for
maintenance.
• Use only on dry, indoor surfaces, never change the plug in any way.
• Do not modify the polarized plug to fit a non-polarized outlet or extension cord.
• Do not touch the brush roller when it is rotating.
• Keep suction away from your face when using nozzles and pipe.
• Do not pull the power cord around sharp corners and do not allow it to be trapped.
• Unplug before connecting turbine nozzle.(only using turbine-brush model)
• This appliance is not intended for use by young persons or infirm persons without supervision unless they have
been adequately supervised by a responsible person to ensure that they can use the appliance safely.
• Young children should be supervised to ensure that they do not play with the appliance.
• The plug must be removed from the socket-outlet before cleaning or maintaining the appliance.
• If the supply cord is damaged, it must be replaced by the manufacturer or its service agent or a similarly qualified
person in order to avoid a hazard.
SAVE THESE INSTRUCTIONS
This vacuum cleaner is intended for household use only.
2
Vacuum Cleaner Description
Assembled Vacuum Cleaner Parts
HANDLE
COMFORT GRIP
ON/OFF POWER CONTROL SWITCH
BRUSH ROLL
ON/OFF
SWITCH
UPHOLSTERY
BRUSH
TOOL COVER
POWERED
HAND TOOL
CHECK
FILTER
INDICATOR
CARTRIDGE
FILTER TANK
LOUVERS/FILTER
FRAME
CORD CLIP
DUSTING BRUSH
QUICK RELEASE
CORD WRAP
HOSE CLIP
CARRYING
HANDLE
SUCTION INLET
FOR HOSE
POWER CORD
HEPA MEDIA
POST-MOTOR FILTER
DIRT CUP
DIRT CUP
HANDLE
DIRT CUP
RELEASE
LEVER
HOSE
CREVICE TOOL
EXTENSION
WAND
HANDLE
RELEASE
PEDAL
HEIGHT
ADJUSTMENT
KNOB
POWERFOOT
(BRUSH ROLL)
FURNITURE
GUARD
HOSE WAND BASE
Front
Back
CAUTION:
WARNING:
Do not plug in your vacuum
cleaner until you are familiar
with all instructions and
operating procedures.
Plastic film can be dangerous.
To avoid danger of suffocation,
keep away from babies
and children.
3
Vacuum Cleaner Assembly
Carton contents
Accessories
C
A
B
Empty carton. Find the parts shown above
before disposing of packing materials.
A. Handle section(with 4 screws)
B. Cleaner body
D
E
F
G
H
The accessories are packed on the cleaner.
Not all accessories are included with every model.
C. Hose
D. Extension wand
E. Crevice tool
F. Powered hand tool
G. Dusting Brush
(Turbine Brush)
H. Upholstery Brush (Furniture nozzle)
Attach Handle To Vacuum
the vacuum upright and slide the base of the
handle firmly into the grooves at the top of the
1 Stand
vacuum body.
Check to be sure the handle is fitted to the cleaner
If there is a gap in front, continue to push
2 body.
firmly until the handle is flush.
the two screws provided into the existing
holes. Tighten the screws securely with a
3 Insert
screwdriver. Before securing the handle, please
check that the handle is fitted to the vacuum body
and there’s no gap between them. If there is a gap
or the screw is loosened, cleaner won’t turn on.
Attach Handle To Dirt Cup
The dirt cup assembly consists of the following parts;
* Dirt Cup (A)
* Dirt Cup Handle (B)
1 Unlock the dirt cup from the cleaner body.
the dirt cup handle into the dirt cup as shown.
Press firmly until it locks in place.
2 Insert
3 Insert the dirt cup into the cleaner body and lock.
B
4
A
Vacuum Cleaner Assembly
Attach Vacuum Hose and Tools
the cord around hooks
for storage. The top hook
1 Wrap
rotates right or left for easy
the hose with two screws
from the assembly packet. Tighten
2 Attach
securely them with a screw driver.
cord release.
the extend wand into the
storage clip. Insert the crevice tool
4 Slide
into the nook.
in the Dusting brush and
insert upholstery brush into the
5 Snap
storage clip as shown.
5
the hose into the hose clip as
shown.
3 Snap
NOTE: The powerfoot will not operate
effectively unless the Hose is firmly
attached to the base.
Operation
Power Switch/Brush Roll Switch(Circuit Breaker)
The power control slide switch is located on the front of the handle.
This switch also allows you to control the cleaning power.
OFF
OFF
1 Plug cord into electrical outlet.
turn cleaner ON(I), slide the power switch up. To turn
2 Tocleaner
OFF(O), slide the power switch down. The
headlight turns on when in use.
The brush roll switch is located on the side of the cleaner body. This switch turns the
rotating brush on and off. The brush switch should be in the ON(I) position for normal
carpet cleaning. You may want to turn the brsuh switch OFF(O) for bare floor cleaning
or other delicate surfaces.
Turn brush roll switch OFF(O) to clean hard surface floors.
Turn brush roll switch ON(I) to clean carpet and rugs.
The brush rolls will automatically turn off when the handle is in the upright position.
NOTE: Your SAMSUNG vacuum is equipped with a special internal switch that
turns the Rotating Brush off whenever the unit is in the Upright position.
BRUSH ROLL SWITCH
(CIRCUIT BREAKER)
Circuit Breaker(Reset Switch)
The Circuit breaker turns off the brush rolls if there is an obstruction in them. The circuit breaker combining ON/OFF switching and
extremely fast overload performance in a rocker switch. Under overload conditions, an internal neon (filament bulb for low voltages)
illuminates to give a cleaner signal of the tripped status of the mechanism and thereby the cause of power interruption. Returning
the rocker switch through the OFF position and back ON will reset the mechanism and restore the supply.
The brush rolls will not turn, but the suction motor will continue to run. To reset the breaker, turn cleaner off and unplug it. Clear
obstruction. Press circuit breaker switch to the ON(I) position. Turn cleaner ON and continue cleaning.
Handle Positions
Select the desired angle of the cleaner using the handle release pedal.
The handle of your cleaner has three positions.
1 Step on the handle release pedal on the back of the cleaner base.
the handle and release the pedal.
2 Raise orA.lower
Upright:
For storage and elevated cleaning with cleaning tools.
B. Medium position:
For general operation on carpet and floors.
C. Low position:
Use for reaching under low furniture. Step on handle release
lever to lower handle.
6
A
B
C
Operation
Powerfoot Height Adjustment
The powerfoot on your SAMSUNG vacuum can be adjusted to clean several floor
surfaces.
NOTE : For optimal cleaning performance, adjust to the lowest practical
setting. If your cleaner is difficult to push, adjust to the next higher setting.
1 Place Handle in Upright Position.
Adjustment Knob to desired setting.
2 Turn Height
Lowest Setting - For bare floors.
Medium Settings - For short and medium pile carpets.
Highest Setting - For plush pile carpet.
NOTE : You may also adjust the setting while in the Medium position.
Edge Cleaning
The Edge Cleaning Feature helps the cleaner to clean edges of rugs and floors effectively, allowing suction to reach against walls and
near furniture.
Cleaning Tools
Attachment tools can be used to clean furniture, drapes, stairs, or in corners. Place the vacuum on the floor with the handle in the upright
position while using attachment tools. Do not place the vacuum on top of furniture or steps as the brushroller may cause damage.
Unhook hose (with cleaning tools attached) from the rear of the vacuum
1cleaner.
desired tool on end of narrow wand. Press firmly and twist to connect the
tool to the wand.
2 Place
A. Dusting Brush:
Use for carved furniture, table tops, books, lamps, lighting fixtures,
venetian blinds, base boards, shutters and registers.
B. Crevice tool:
Use in corners, on stairs, baseboards, and behind furniture.
A
B
7
Operation
C. Extension Wand:
Use with desired attachments and narrow wand for a longer
reach.
C
D. Powered hand tool (Turbine-Brush):
Use for upholstered furniture, carpeted stairs and hard-to-reach places.
D
E. Upholstery Brush:
Use for upholstered furniture, draperies, mattresses, clothing, automobile
interiors, and carpeted stairs.
E
Power Cord Arrangement
When you are done using your SAMSUNG vacuum, return it to the Upright position and store
the Power Cord.
1
2
3
4
Turn vacuum cleaner OFF(O).
Unplug Power Cord by grasping the polarized plug (Not the cord) and disconnect from outlet.
Loop Power Cord around Cord Wraps on side of vacuum cleaner.
Clip molded plug to Power Cord to secure.
Cord Clip
CORD CLIP
For easier handling while Vacuuming, hook the
power cord onto the power cord clip.
Transporting Cleaner
To move your cleaner from room to room, put handle in upright position,
tilt cleaner back on rear wheels and push forward.
Carrying Cleaner
Do not lift cleaner using dirt cup handle.(A)
The cleaner can be moved by using the carrying handle located on the back of the cleaner.
A
8
Maintenance
Dirt-Cup check or Filter clogged Indicator
The Dirt-Cup check Indicator on the front of the vacuum shows a red or green display. When
the Dirt-Cup display is green, the Dirt-Cup is not yet full or the filter is not clogged. When the
indicator turns to red, the Dirt-Cup needs to be emptied or the filter needs to be cleaned.
If the display is still red after emptying the dust container, turn the cleaner off to
see if the hose, tube, or nozzle is clogged .
Cleaning the Dirt cup
1 Unplug the Cleaner from electrical outlet.
Dirt cup can be reached by removing the Dirt cup, reaching underneath
the Upper Tank and turning the rim of the Filter Frame to unlock. Pull straight
2 The
down to remove. Brush the dirt off the Louvers and Dirt cup.
foam Upper Tank Filter may be removed and hand washed in cold water
with mild detergent. Rinse well then air dry throughly before replacing.
3 The
Cleaning the Cartridge Filter Tank
1 Unplug the Cleaner from electrical outlet.
Cartridge Filter Tank assembly can be reached by
pulling it from the cleaner.
2 The
the cover from the Cartridge Filter Tank, and
the foam may be removed and hand-washed in cold
3 Remove
water with mild detergent, then air dried.
WARNING:
Do not operate cleaner
with damp or wet filters
or without all filters in
place.
4 Reposition Filters when completely dry.
Cartridge Filter Tank
Cleaning the HEPA Media Post-Motor Filter
1 Unplug the Cleaner from electrical outlet.
HEPA Media Post-Motor Filter assists in the filtration process to return clean
air to the room. It is located behind the door on the side of the cleaner. If the filter
2 The
becomes dirty, open the door, remove the filter and clean. To remove this filter,
3
HEPA Media Post-Motor Filter
open the door on the side of the cleaner, grasp filter and pull it straight out.
WARNING:
Reposition the HEPA Media Post-Motor Filter, then lock the door.
To reduce the risk of injury
from moving parts, turn off
vacuum cleaner and
disconnect Power Plug
from electrical outlet.
9
Maintenance
Check Rotating Floor Brush and Drive Belt
You should check your vacuum cleaner’s Rotating Floor Brush and Drive Belt regularly for
wear or damage. You should also clean the brush and brush ends of strings, hair, and carpet
fibers. These can wrap around the brush and hamper its ability to effectively clean your
carpet. Also remove any debris that has accumulated under the brush cover.
1 Unplug cleaner from electrical outlet.
2 Place handle in Low position.
3 Remove the four screws as shown with a screwdriver.
4 Turn over the cleaner.
5 Remove the eight screws, and turn over the cleaner again.
6 Lift the cover-Brush off.
7 Remove the three screws on the case-drum.
8 Grasp Rotating Floor Brush at both ends and lift.
strings, hair and other debris from Rotating Floor Brush, paying particular
attention to brush ends.
9 Clean
strings, hair and other debris from Motor Pulley and Drive Belt areas.
10Clean
Check Drive Belt carefully for wear, cuts or stressed areas.
11Check
12 Air Passageway for obstructions. Remove debris from this area.
Replace Drive Belt
1 Unplug cleaner from electrical outlet.
Rotating Floor Brush removed from vacuum cleaner(Step1-7 of
Check Rotating Floor and Drive Belt) grasp old Drive Belt and remove from
2 With
Motor pully. Discard old Drive Belt.
new Drive Belt over motor pulley and stretch other end over rotating
Floor Brush in the space between the bristles.
3 Place
4 Place ends of rotating Floor Brush down into slots on sides as shown.
rotating Floor Brush by hand several times in direction of motor pulley,
if properly installed, Drive Belt will center itself.
5 Turn
Brush cover and eight screws. Tighten screws securely. Snap
end of Brush cover into place.
6 Reposition
10
Maintenance
Clearing Clogs
Low suction or poor pickup may be due to a clog in the vacuum cleaner. If you notice a change in the
sound of the motor or a reduction in the spinning action, check for clogs.
1 Unplug cleaner from electrical outlet.
2 Empty Dirt Cup.
3 Check Case filter for build up or clogs.
4 Remove the Case filter and check the suction inlet for a clog.
Grasp the Quick Reach Handle and lift Hose Wand to separate from the
opening. Check for a clog in the Base, the Wand or the Hose.
5 suction
Remove the screw attaching the Hose Wand Base to the vacuum.
the Hose Wand Base and unclog with long, narrow object.
6 Straighten
the vacuum cleaner off and unplug it. Remove the brush cover, check the air
passageway for obstructions. Remove debris from this area. Reposition brush
7 Turn
cover and eight screws. Tighten screws securely, snap end of brush cover into
place.
11
Maintenance
Powered hand tool(Turbine Brush)
*Brushbar Replacement
the tool from the hose, and turn upside down. Slide the switch to unlock position
and remove bottom plate.
1 Remove
2 Unscrew the one screw and remove belt guard.
3 Remove brushbar including end plates and discard.
belt to ensure that it is in good condition. If broken or cracked, please replace.
(See below for details.)
4 Inspect
5 With the curved ends facing down, slide end plates of brushbar into slots on the tool.
bottom plate, insert the four tabs on edge of bottom plate into slots on front of
Pivot bottom plate down and snap closed.
6 Totool.replace
*Belt replacement
1 Grasp turbine and pull firmly to remove.
2 Remove a screw, and lift the cover belt off.
3 Remove belt from turbine pulley. Replace with new belt.
flat sides of turbine retainers pointing down, slide retainers into grooves in tool
housing and snap into place.
4 With
5 Replace brushbar and bottom plate.
*Cleaning Brushbar
• Cut off pet hairs or threads surrounding brush by using scissors.
12
Troubleshooting
Check this list of possible problems and solutions before bringing your vacuum to a service center.
Problem
Possible solution
CLEANER WON’T TURN ON
• Plug unit in firmly.
• Check fuse or breaker.
• Replace fuse or reset breaker.
• Slide to on.
• Tighten the screw of the handle.
• Not firmly plugged in.
• No voltage in wall plug.
• Blown fuse or tripped breaker.
• On/Off switch not turned on.
CLEANER WON’T PICK UP
• Reset circuit breaker.
• Replace brush rolls.
• Empty dirt cup.
• Move nozzle control knob to lower settings.
• Clear HEPA cartridge filter by either tapping the side
of the dirt cup.
• Clean pre-filter.
• Position dirt cup properly.
• Ensure that filter assembly is positioned properly.
• Clear blockage.
• Replace belt.
• Insert hose.
• Circuit breaker tripped.
• Agitator brush rolls worn.
• Dirt cup full.
• Incorrect carpet height setting.
• HEPA cartridge filter clogged.
• Pre-filter clogged.
• Dirt cup not properly installed.
• Filter assembly not assembled properly.
• Blockage in hose(or air flow passage).
• Broken belt.
• Hose not inserted fully.
ABNORMAL SOUND
• Strange sound like air rushes
• Check for clogs.
This Vacuum cleaner is approved the following.
EMC Directive: 89/336/EEC, 92/31/EEC and 93/68/EEC
Low Voltage Safety Directive: 73/23/EEC and 93/68/EEC
13
DJ68-00237A REV(0.0)