1
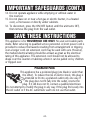
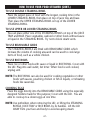
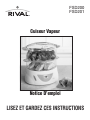
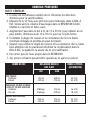
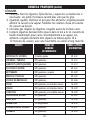
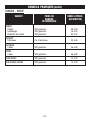
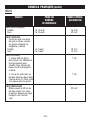
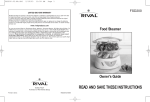
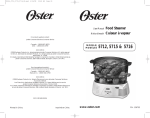
FSD200
FSD201
Food Steamer
Owner’s Guide
READ AND SAVE THESE INSTRUCTIONS
IMPORTANT SAFEGUARDS
When using electrical appliances, basic safety precautions should
always be followed, including the following:
1. Read all instructions.
2. Do not touch hot surfaces. Use potholders when removing cover or
handling hot containers to avoid burns.
3. Close supervision is necessary when any appliance is used by or near
children.
4. To protect against electrical shock, do not immerse cord, plug or
base unit in water or other liquids.
5. Unplug from outlet when not in use and before cleaning. Allow to
cool before putting on or taking off parts, and allow to cool before
cleaning the appliance.
6. Do not operate any appliance with a damaged cord or plug, or after
the appliance malfunctions or has been damaged in any manner.
Return appliance to an authorized service center for examination,
repair or adjustment.
7. Lift and open cover carefully to avoid scalding and allow water to
drip into the Food Steamer.
8. Extreme caution must be used when moving any appliance
containing hot food, water or other liquids. Avoid reaching over the
Food Steamer when in use.
9. The use of accessory attachments not recommended by the
appliance manufacturer may cause injuries.
10. Do not use outdoors.
11. Do not use appliance for other than its intended use.
12. Do not let cord hang over edge of table or counter, or touch
hot surfaces.
13. To protect against burns caused from accidental spillage of hot liquid,
locate unit on a level and firm surface away from traffic areas where
bumping could disturb it.
-E2-
IMPORTANT SAFEGUARDS (CONT.)
14. Do not operate appliance while emptying or without water in
the reservoir.
15. Do not place on or near a hot gas or electric burner, in a heated
oven, a microwave or directly under cabinets.
16. To disconnect, press the ON/OFF button until the unit turns OFF,
then remove the plug from the wall outlet.
SAVE THESE INSTRUCTIONS
This appliance is for HOUSEHOLD USE ONLY. No user-serviceable parts
inside. Refer servicing to qualified service personnel. A short power cord is
provided to reduce the hazards resulting from entanglement or tripping
over a longer cord. An extension cord may be used with care. However,
the marked electrical rating should be at least as great as the electrical
rating of this appliance. The extension cord should not be allowed to
drape over the counter or tabletop where it can be pulled on by children
or tripped over.
POLARIZED PLUG
This appliance has a polarized plug (one blade is wider than
the other). To reduce the risk of electric shock, this plug is
intended to fit into a polarized outlet only one way. If
the plug does not fit fully into the outlet, reverse the
plug. If it still does not fit, contact a qualified electrician.
Do not attempt to modify the plug in any way. If the plug fits loosely into
the AC outlet or if the AC outlet feels warm do not use that outlet.
-E3-
KNOW YOUR FOOD STEAMER
LID
RICE BOWL
REMOVABLE GRID
UPPER STEAMING BOWL
REMOVABLE GRID
LOWER STEAMING BOWL
JUICE TRAY
DIGITAL CONTROL PANEL
WATER RESERVOIR
BASE
BASE COVER
REMOVABLE RING
WATER LEVEL INDICATOR
HEATING ELEMENT
On / Off
-E4-
READ CAREFULLY BEFORE USING YOUR FOOD STEAMER
BEFORE THE FIRST USE:
• Check the voltage rating on the base, make sure it corresponds to the
main voltage in your home.
• Remove any labels or stickers from appliance.
• Thoroughly wash LID, RICE BOWL, both STEAMING BOWLS, JUICE
TRAY, and REMOVABLE RING in warm, soapy water before first use
then rinse and dry carefully.
• Wipe the inside of the BASE with a damp cloth.
INSTANT STEAM FUNCTION:
There is a removable HEATING ELEMENT RING included. If you place this
ring on top of the HEATING ELEMENT before cooking, the instant steam
function will produce steam in 35 seconds.
NOTE: There is a small cut on the REMOVABLE RING, which should be
facing downward when you place it over the HEATING ELEMENT.
-E5-
1.
2.
3.
4.
5.
6.
7.
HOW TO USE YOUR FOOD STEAMER
Place unit on a flat sturdy surface with adequate room (i.e. do not
place under cabinets). The Food Steamer unit and components are
not for use in ovens (i.e. microwave, convection and/or conventional)
or on a stovetop.
Put the REMOVABLE RING around the HEATING ELEMENT, with the
cut facing downward.
Fill WATER RESERVOIR with cold tap water only. Do not put any other
liquids or add any salt, pepper, etc. in the WATER RESERVOIR.
Overfilling will prevent “FAST STEAM” from working and increase
cooking times.
Make sure the water should not exceed the MAX fill level as indicated
by the WATER LEVEL INDICATOR. To fill the WATER RESERVOIR, pour
cold water directly into it.
Place the JUICE TRAY on the base.
Place the STEAMING BOWLS on top of the JUICE TRAY, plug in the
cord and set the timer for the desired cooking time, up to 60
minutes. When the time is up a bell will sound, the INDICATOR
LIGHT will go out and the unit will automatically shut off.
When cooking in the RICE BOWL, add the rice and water directly into
the bowl and then fill the WATER RESERVOIR to the appropriate level.
Place the RICE BOWL in the LOWER STEAMING BOWL.
-E6-
HOW TO USE YOUR FOOD STEAMER (CONT.)
TO USE DOUBLE STEAMING BOWL
Place the largest piece of food with the longest cooking time in the
LOWER STEAMING BOWL then place on top of juice tray and base.
Then place the UPPER STEAMING BOWL on top of the LOWER
STEAMING BOWL.
TO USE UPPER OR LOWER STEAMING BOWL
You can place either one of the STEAMING BOWLS on top of the JUICE
TRAY and BASE. Place vegetables, seafood or other foods without sauce
or liquid in the STEAMING BOWL. Try not to block steam vents.
TO USE REMOVABLE GRIDS
The STEAMING BOWLS are fitted with REMOVABLE GRIDS which
increase the volume of cooking area and can be used to cook large
items of food, such as a whole chicken.
TO USE RICE BOWL
Place rice or other foods with sauce or liquid in RICE BOWL. Cover with
the LID. Plug into wall outlet; Set timer. When food is well cooked,
unplug unit.
NOTE: The RICE BOWL can also be used for cooking vegetables or other
foods with sauces, poaching chicken or fish in liquids, or reheating
foods like casseroles.
COOKING EGGS
Place the eggs directly into the REMOVABLE GRIDS using the especially
designed holders made for this purpose; Cover with the LID. You are
able to cook up to a dozen eggs at one time.
NOTE: Use potholders when removing the LID, or lifting the STEAMING
BOWLS, JUICE TRAY or RICE BOWL by its handles. Lift the LID
AWAY from your face and body to avoid escaping steam.
-E7-
DIGITAL TIMER SETTING
LCD DISPLAY
POWER INDICATOR LIGHT
On / Off
COUNT DOWN BUTTON
ON/OFF BUTTON
COUNT UP BUTTON
• When plugging in the Food Steamer, the time “00” will flash on
the display.
• The cooking time can be set by pressing the COUNT UP/DOWN
BUTTON and it will display in 1 minute intervals. In the adjusting
status, the digits will keep flashing until the operation has started.
• After setting your desired time, press the ON/OFF BUTTON to start
operation. Then it will start counting down 1 minute at a time.
• To stop the unit from operating, press the ON/OFF BUTTON and the
time “00” will flash on the display.
• To adjust the time when operating, press the COUNT UP/DOWN
BUTTON to set. Then the digits begin to flash until the adjustment
has finished and without pressing any button in 5 seconds, the time
display will stop flashing and continue to count down from the time
which had been set.
• After finishing to count down, the time “00” will flash again on the
display and it will stop operating and a bell will sound.
• If not enough water is in the RESERVOIR when operating, the time
operation will automatically stop with a continuous tone and the time
“00” will flash on the display. It cannot operate again unless the water
reservoir is refilled.
-E8-
HOW TO CLEAN YOUR FOOD STEAMER
Unplug cord from the outlet before cleaning. Allow the steamer to
cool. Never immerse the base, cord and/or plug in water.
• Empty the JUICE TRAY and WATER RESERVOIR of their contents.
• Wash the LID, STEAMING BOWLS, RICE BOWL, JUICE TRAY and
REMOVABLE RING in hot, soapy water. Rinse thoroughly and dry all
parts. Or wash on top rack of dishwasher.
• Pour hot, soapy water into the WATER RESERVOIR. Use a nonabrasive cleaner or mesh scouring pad to clean the interior. Rinse
with clean, hot water.
• The LOWER STEAMING BOWL and RICE BOWL can nest inside the
UPPER STEAMING BOWL with the LID on top of all three to save
storage space.
• After a period of uses, the HEATING ELEMENT surface may discolor or
start to become coated with build up. When cleaning the heating
element follow these steps:
1.
2.
3.
4.
5.
6.
7.
8.
Do not cover the BASE with any steamer parts
Pour 3 cups of clear vinegar into the WATER RESERVOIR
Fill the rest with water, up to the MAX fill line
Plug unit in and set the timer for approximately 20 minutes
When timer has stopped, unplug the cord from the outlet
DO NOT allow solution to boil over or spill onto exterior surfaces
Allow unit to cool completely before emptying contents
Rinse with cold water and use a non-abrasive scouring pad to scrub
the heating element
NOTE: DO NOT use bleach, abrasive pads/cleaners to clean ANY part of
The FOOD STEAMER.
-E9-
TIPS AND HINTS
RICE AND GRAINS
1. There are many types of rice. Follow specific directions for
variety used.
2. Accurate measuring of rice and water when combined in RICE BOWL.
Pour specified amount of water in WATER RESERVOIR. Cover and
steam.
3. For softer rice, increase water mixed with rice by 1-2 tablespoons. For
firmer rice decrease water mixed with rice by the same amount.
4. Check doneness and consistency of rice at minimum time specified
for each type, stirring rice at the same time.
5. When checking or stirring rice, be careful not to drip the
condensation into the RICE BOWL which would reduce the quality
and flavor of the rice.
6. Use only clean water in the WATER RESERVOIR.
7. Rice may be seasoned with salt, pepper or butter after steaming.
TYPE OF RICE
BROWN
Regular
Parboiled
LONG GRAIN/WILD RICE MIX
Regular
Quick Cooking
INSTANT
WHITE
Regular
Parboiled
COMBINED TO
RICE BOWL
APPROXIMATE
TIME (MINUTES)
RICE
WATER
⁄ Cup
1 Cup
1 Cup
1 1⁄2 Cup
42-45
45-50
Mix
Mix
1 1⁄2 Cup
1 3⁄4 Cup
16-58
18-20
1 Cup
1 Cup
1 1⁄2 Cup
1 2⁄3 Cup
45-50
50-55
1
2
-E10-
TIPS AND HINTS (CONT.)
VEGETABLES
1. Clean the vegetables thoroughly. Cut off stems; trim; peel or chop if
necessary. Smaller pieces steam faster than larger ones.
2. Quantity, quality, freshness and size temperature of frozen foods, may
affect steam timing. Adjust water amounts and cooking times as
desired.
3. Frozen vegetables should not be thawed before steaming.
4. Some frozen vegetables should be placed in the rice bowl and
covered with a piece of aluminum foil during steaming. The frozen
foods should be separated or stirred after 10-12 minutes using a long
handle fork or spoon.
VARIETY
WEIGHT/OR
NUMBER
PIECES
APPROXIMATE
TIME (MINUTES)
ARTICHOKES, WHOLE
4 Whole Tops Trimmed
ASPARAGUS, SPEARS
1 Pound
30-32
12-14
BEANS (GREEN/WAX)
1
2
⁄ Pound
12-14
OATMEAL
1 Pound
20-22
BEETS
1 Pound, Cut
25-28
BROCCOLI, SPEARS
1 Pound
20-22
BRUSSELS SPROUTS
1 Pound
24-26
CABBAGE
1 Pound, Thinly Sliced
16-18
CELERY
1
2
⁄ Pound, Thinly Sliced
18-20
CARROTS
1 Pound, Thinly Sliced
18-20
CAULIFLOWER, WHOLE
1 Pound, Thinly Sliced
20-22
CORN ON COB
1 Pound
14-16
EGGPLANT
3 1⁄2 Pounds
16-18
MUSHROOMS, WHOLE
1 Pound
10-12
OKRA
1 Pound
18-20
-E11-
TIPS AND HINTS (CONT.)
VEGETABLES (CONT.)
VARIETY
WEIGHT/OR
NUMBER
PIECES
APPROXIMATE
TIME (MINUTES)
PEAS
1 Pound, Shelled
PEPPERS, WHOLE
Up to Four Medium (Not Stuffed)
12-13
POTATOES(RED/RUTABAGA)
1 Pound - About 6
30-32
SPINACH
1
2
⁄ Pound
14-16
SQUASH
Summer Yellow and Zucchini 1 Pound, Sliced
Winter Acorn/Butternut
1 Pound
12-13
12-14
22-24
TURNIPS
1 Pound, Sliced
20-22
ALL FROZEN VEGETABLES
10 Ounces
28-50
FISH AND SEAFOOD
1. The steaming times listed in the chart are for fresh, or frozen and
fully thawed seafood and fish. Before steaming, clean and prepare
fresh seafood and fish.
2. Most fish and seafood cook very quickly. Steam in small portions or
in amounts as specified.
3. Clams, oysters and mussels may open at different times. Check
the shells to avoid overcooking.
4. You may steam fish fillets in the RICE BOWL. Serve steamed
seafood and fish plain or use Seasoned butter or margarine,
lemon or favorite sauces.
5. Adjust steaming times accordingly.
-E12-
TIPS AND HINTS (CONT.)
FISH AND SEAFOOD (CONT.)
VARIETY
WEIGHT/OR
NUMBER
PIECES
APPROXIMATE
TIME (MINUTES)
CLAMS IN SHELL
1 Pound
10-12
CRAB
King Crab
Soft Shell
1
⁄2 Pound, Chunks
8 - 12 Pieces
20-22
8-10
LOBSTER
Tails
Split
Whole, Live
2-4
1 - 1 1⁄4 Pound
1 - 1 1⁄4 Pound
16-18
18-20
18-20
MUSSELS (FRESH IN SHELL)
1 Pound
14-16
OYSTERS (FRESH IN SHELL)
3 Pound
18-20
SCALLOPS
Bay (Shucked)
Sea (Shucked)
1 Pound
3 Pound
14-16
18-20
1 Pound
1 Pound
10-12
16-18
⁄ - 3⁄4 Pound
⁄ - 3⁄4 Pound
1 Pound
1
⁄4 Pound
10-12
10-12
10-12
16-18
SHRIMP
Medium (In Shell)
Large Jumbo (In Shell)
FISH
Whole
Dressed
Fillets
Steaks
1
2
1
2
-E13-
TIPS AND HINTS (CONT.)
MEATS/BEEFS
VARIETY
WEIGHT/OR
NUMBER
PIECES
APPROXIMATE
TIME (MINUTES)
BEEF
Chuck
Hamburger
Meatballs
1 Pound
1 Pound
1 Pound
28-30
16-18
22-24
CHICKEN
Pieces
2-4 Pieces
24-26
LAMB
Cubes
1 Pound
26-28
PORK
Cubes
1 Pound
26-28
HOTDOGS
1 Pound
14-18
PRE-COOKED SAUSAGE
1 Pound
14-18
-E14-
TIPS AND HINTS (CONT.)
EGGS
VARIETY
IN THE SHELL
Soft Cooked
Hard Cooked
WEIGHT/OR
NUMBER
PIECES
1 - 12 Eggs
1 - 12 Eggs
“EGGS IN A CUP”
Crack Raw Egg into Custard
Cup, Season with Salt,
Pepper and Butter or
Margarine, if Desired.
Soft Cooked
1 - 4 Eggs
Hard Cooked
1 - 4 Eggs
APPROXIMATE
TIME (MINUTES)
16-18
20-22
10-12
12-14
POACHED
Step One: Pour 2 Cups
Water in Rice Bowl.
Steam to Heat Water.
Use margarine, if Desired
7-8
Step Two: Crack Egg in
Bowl, Slide into Hot Water
in Rice Bowl. Steam Until
Poached.
7-8
SCRAMBLED
Beat Together 6 Eggs and
2 Tablespoons of Milk in
Rice Bowl. Season with Salt
and Pepper. Stir Eggs Half
Way Through Cooking
20-22
-E15-
SERVICE INSTRUCTIONS
1. Do NOT attempt to repair or adjust any electrical or mechanical functions on this unit. Doing so will void the Warranty.
2. If you need to exchange the unit, please return it in its original carton, with a sales receipt, to the store where you
purchased it. If you are returning the unit more than 30 days after the date of purchase, please see the enclosed Warranty.
3. If you have any questions or comments regarding this unit’s operation or believe any repair is necessary, please write to our
Consumer Service Department or visit our website at www.rivalproducts.com
RIVAL
c/o THE HOLMES GROUP, INC.
CONSUMER SERVICE DEPARTMENT
13052 JURUPA AVENUE
FONTANA, CA 92337
ONE (1) YEAR LIMITED WARRANTY
SAVE THIS WARRANTY INFORMATION
A. This Warranty applies only to the original purchaser of this product.
B. This Warranty applies ONLY to repair or replacement of any supplied or manufactured parts of this product that,
upon inspection by The Holmes Group, Inc. authorized personnel, is shown to have failed in normal use due to
defects in material or workmanship. The Holmes Group will determine whether to repair or replace the unit. This
Warranty does not apply to installation expenses.
C. Operating this unit under conditions other than those recommended or at voltages other than the voltage
indicated on the unit, or attempting to service or modify the unit, will render this WARRANTY VOID.
D. Unless otherwise proscribed by law, The Holmes Group shall not be liable for any personal injury, property or any
incidental or consequential damage of any kind resulting from malfunctions, defects, misuse, improper
installation or alteration of this product.
E. All parts of this product are guaranteed for a period of 1 year as follows:
1. Within the first 30 days from date of purchase, the store from which you purchased your product should
replace this product if it is defective in material or workmanship (provided the store has in-stock
replacement.) * If you intend to assert any claim in connection with the product, please follow the
instructions in paragraph F.
2. Within the first twelve months from date of purchase, The Holmes Group will repair or replace the product if
it is defective in material or workmanship, subject to the conditions in paragraph G.
F. If you have any other problem or claim in connection with this product, please write to our Consumer Service
Department.
G. IMPORTANT RETURN INSTRUCTIONS. Your Warranty depends on your following these instructions if you are
returning the unit to The Holmes Group, Inc.:
1. Carefully pack the item in its original carton or other suitable box to avoid damage in shipping.
2. Before packing your unit for return, be sure to enclose:
a) Your name, full address with zip code and telephone number,
b) A dated sales receipt or PROOF OF PURCHASE,
c) A check for return prepaid shipping and handling, and
d) The model number of the unit and the problem you are having. (Enclose in an envelope and tape directly to
the unit before the box is sealed.)
3. The Holmes Group recommends you ship the package U.P.S ground service for tracking purposes.
4. All shipping charges must be prepaid by you.
5. Mark the outside of your package:
RIVAL
c/o THE HOLMES GROUP, INC.
13052 JURUPA AVENUE
FONTANA, CA 92337
This Warranty gives you specific legal rights, and you may have other rights which vary from state to state. The provisions of
this Warranty are in addition to, and not a modification of, or subtraction from, the statutory warranties and other rights and
remedies contained in any applicable legislation. To the extent that any provision of this Warranty is inconsistent with any
applicable law, such provision shall be deemed voided or amended, as necessary, to comply with such law.
Printed in China
FSD200/201/9100410000102
FSD200/20105EFM1
FSD200
FSD201
Cuiseur Vapeur
Notice D’emploi
LISEZ ET GARDEZ CES INSTRUCTIONS
CONSIGNES IMPORTANTES
L’emploi de tout appareil électroménager exige certaines précautions
fondamentales, y compris les suivantes:
1. Lisez attentivement toutes les instructions.
2. Ne touchez pas aux surfaces chaudes. Utilisez des poignées pour
retirer le couvercle, manier les récipients chauds et éviter les brûlures.
3. Redoublez de vigilance lorsque l’appareil est utilisé par des enfants
ou bien en leur présence.
4. Pour vous protéger des chocs électriques, n’immergez jamais le
cordon, la fiche ou la base de l’appareil, quel que soit le liquide.
5. Débranchez l’appareil entre utilisations et avant le nettoyage. Laissezle refroidir avant de mettre et d’ôter toute pièce ou de le nettoyer.
6. Ne vous servez pas d’un appareil dont le cordon ou la fiche est
abîmé, qui a mal fonctionné ou qui a été endommagé de quelque
façon que ce soit. Portez-le au centre de réparation le plus proche
pour le faire vérifier, réparer ou régler, s’il y a lieu.
7. Levez le couvercle avec soin afin que la vapeur ne vous brûle pas et
laissez égoutter l’eau dans le cuiseur vapeur.
8. Prenez toutes les précautions d’usage pour déplacer un appareil qui
contient des aliments chauds, de l’eau ou tout autre liquide chaud.
Évitez de vous pencher ou d’étendre le bras au-dessus du cuiseur
pendant son fonctionnement.
9. L’emploi d’accessoires qui ne sont pas conseillés par le fabricant de
l’appareil peut se révéler dangereux.
10. N’employez pas cet appareil à l’air libre.
11. N’utilisez l’appareil qu’aux fins auxquelles il est destiné.
12. Ne laissez pas pendre le cordon au bord de la table ou du plan de
travail et veillez à ce qu’il ne touche pas à une surface chaude.
13. Pour vous protéger des brûlures que pourrait causer un renversement
de liquide chaud, posez l’appareil sur une surface plane et solide,
dans un endroit où il ne puisse pas être accidentellement cogné.
-F2-
CONSIGNES IMPORTANTES (suite)
14. Ne faites pas fonctionner l’appareil quand vous le videz ou bien
quand son réservoir est vide.
15. Ne le placez pas sur ou près d’un foyer à gaz ou électrique chaud,
dans un four chaud, dans un four à micro-ondes ou bien sous vos
armoires de cuisine.
16. Pour le débrancher, appuyez sur le bouton MARCHE-ARRÊT jusqu’à
ce que l’appareil s’éteigne, puis tirez la fiche hors de la prise.
CONSERVEZ CES INSTRUCTIONS
Cet appareil n’est destiné qu’à l’EMPLOI DOMESTIQUE. Ne contient
pas de pièces réparables. Confiez toujours les réparations à un personnel
qualifié. Cet appareil est pourvu d’un cordon électrique court qui ne
devrait ni s’emmêler ni faire trébucher, comme ça pourrait être le cas
avec un cordon plus long. L’emploi d’une rallonge est permis à
condition que sa tension assignée soit au moins égale à celle de
l’appareil. Cette rallonge ne doit pas pendre du plan de travail ou du
plateau de table, pour éviter que les enfants ne risquent de la tirer ou
qu’elle risque de faire trébucher.
FICHE POLARISÉE
Cet appareil est équipé d’une fiche polarisée (ayant une broche
plus large que l’autre). Par mesure de sécurité, elle ne peut
être insérée dans les prises de courant polarisées que
d’une façon. Si la fiche ne rentre pas bien dans la prise,
inversez-la. Si vous ne réussissez toujours pas, faites changer
la prise par un électricien. Ne tentez pas de neutraliser le dispositif de
sécurité. Si la fiche rentre dans la prise mais qu’il y a du jeu ou bien si la prise
de courant alternatif vous semble chaude, utilisez une autre prise de courant.
-F3-
FAMILIARISEZ-VOUS AVEC LE CUISEUR VAPEUR
COUVERCLE
BOL À RIZ
GRILLE AMOVIBLE
BOL VAPEUR SUPÉRIEUR
GRILLE AMOVIBLE
BOL VAPEUR INFÉRIEUR
RAMASSE-GOUTTES
PANNEAU NUMÉRIQUE
RÉSERVOIR À EAU
BASE
CARROSSERIE DE LA BASE
BAGUE AMOVIBLE
INDICATEUR DE
NIVEAU D’EAU
ÉLÉMENT CHAUFFANT
On / Off
-F4-
À LIRE ATTENTIVEMENT AVANT D’UTILISER LE CUISEUR VAPEUR
AVANT LA TOUTE PREMIÈRE UTILISATION:
• Assurez-vous que la tension qui est indiquée sur la base soit bien
identique à la tension de votre domicile.
• Retirez toutes étiquettes et vignettes apposées sur l’appareil.
• Avant la toute première utilisation, lavez soigneusement le
COUVERCLE, le BOL À RIZ, les deux BOLS VAPEUR, le RAMASSEGOUTTES ainsi que la BAGUE AMOVIBLE à l’eau savonneuse chaude;
rincez-les puis asséchez-les à fond.
• Essuyez l’intérieur de la BASE avec un linge humide.
FONCTION VAPEUR RAPIDE:
Une bague amovible est fournie. Quand vous placez cette bague sur
l’élément chauffant avant de débuter la cuisson, la fonction vapeur rapide
provoque la production de vapeur sous 35 secondes.
REMARQUE: La BAGUE AMOVIBLE comprend une petite entaille qui
doit être orientée vers le bas lorsque vous posez la bague
sur l’ÉLÉMENT CHAUFFANT.
-F5-
1.
2.
3.
4.
5.
6.
7.
MODE D’EMPLOI DU CUISEUR VAPEUR
Posez l’appareil sur une surface plane assurant un espace adéquat (ne
le placez pas sous les armoires de cuisine, par exemple). Le cuiseur
vapeur et ses composantes ne doivent être utilisés dans absolument
aucun four (à micro-ondes, à chaleur tournante ou ordinaire) et ne
conviennent pas non plus sur la cuisinière.
Placez la BAGUE AMOVIBLE autour de l’ÉLÉMENT CHAUFFANT,
l’entaille étant dessous.
Remplissez le RÉSERVOIR À EAU d’eau froide du robinet
(uniquement). Ne versez aucun liquide autre que de l’eau dans le
RÉSERVOIR À EAU et ne mettez pas de sel, de poivre, ou d’autres
condiments. Remplir le réservoir à l’excès empêchera la «vapeur
rapide» et prolongera même la durée de cuisson nécessaire.
Assurez-vous que le niveau de l’eau ne dépasse pas le repère MAX de
l’INDICATEUR DE NIVEAU D’EAU. Pour remplir le RÉSERVOIR, videz
l’eau directement dedans.
Placez le RAMASSE-GOUTTES sur la base.
Posez alors les BOLS VAPEUR sur le RAMASSE-GOUTTES, branchez le
cordon et réglez la minuterie à la durée de cuison désirée – le
maximum est de 60 minutes. Une fois la durée écoulée, un timbre
retentira, le VOYANT LUMINEUX s’éteindra et l’appareil s’arrêtera
automatiquement.
Pour faire cuire du riz dans le BOL À RIZ, mettez le riz ainsi que l’eau
directement dans le bol puis versez le volume d’eau approprié dans
le RÉSERVOIR À EAU. Placez alors le BOL À RIZ dans le BOL VAPEUR
INFÉRIEUR.
-F6-
MODE D’EMPLOI DU CUISEUR VAPEUR (suite)
UTILISATION DES DEUX BOLS VAPEUR
Posez l’aliment le plus volumineux ou qui requiert la cuisson la plus
longue dans le BOL VAPEUR INFÉRIEUR puis posez celui-ci sur le
ramasse-gouttes et la base. Placez ensuite le BOL VAPEUR SUPÉRIEUR
sur le BOL VAPEUR INFÉRIEUR.
UTILISATION DU BOL VAPEUR SUPÉRIEUR OU INFÉRIEUR
Vous pouvez placer l’un ou l’autre des BOLS VAPEUR sur le RAMASSEGOUTTES et la BASE. Déposez légumes, fruits de mer ou denrées sans
sauce ou liquide dans le BOL VAPEUR, sans boucher les orifices.
UTILISATION DES GRILLES AMOVIBLES
Les BOLS VAPEUR incorporent une GRILLE AMOVIBLE qui, lorsque
enlevée, augmente le volume de cuisson utilisable, permettant de faire
cuire des morceaux plus volumineux, un poulet entier, par exemple.
UTILISATION DU BOL À RIZ
Déposez le riz ou les aliments avec sauce ou liquide dans le BOL À RIZ.
Mettez le COUVERCLE. Branchez le cordon sur la prise de courant.
Réglez la minuterie. Débranchez quand la cuisson est à point.
REMARQUE: Le BOL À RIZ sert à cuire légumes, ou autres, dans liquide
ou sauce, à pocher le poulet ou le poisson ainsi qu’à
réchauffer les restes, les casseroles en particulier.
CUISSON DES ŒUFS
Placez les œufs directement sur les GRILLES AMOVIBLES, des alvéoles
sont prévus à cet effet. Mettez le COUVERCLE. Vous pouvez ainsi faire
cuire jusqu’à une douzaine d’œufs d’un coup.
REMARQUE: Utilisez des poignées marmiton pour ôter le COUVERCLE,
sortir les BOLS VAPEUR, le RAMASSE-GOUTTES ou le BOL
À RIZ par leurs poignées. Orientez en outre la vapeur loin
de votre visage ou peau quand vous levez le COUVERCLE.
-F7-
RÉGLAGE DE LA MINUTERIE NUMÉRIQUE
AFFICHEUR À CRISTAUX LIQUIDES
VOYANT DE MISE
SOUS TENSION
On / Off
TOUCHE DE
COMPTE RÉGRESSIF
TOUCHE MARCHE-ARRÊT
TOUCHE DE COMPTE PROGRESSIF
• Au branchement du cuiseur, la durée «00» clignote à l’afficheur.
• La durée de cuisson se règle avec les TOUCHES DE COMPTAGE
PROGRESSIF OU RÉGRESSIF à raison d’une minute par coup. Les
chiffres clignotent durant le réglage et ceci, jusqu’à ce que le
fonctionnement débute.
• Une fois la durée de cuisson réglée, appuyez sur la touche MARCHEARRÊT pour que la cuisson débute. Le décompte (1 minute à la fois)
commencera.
• Pour arrêter le fonctionnement, appuyez sur la touche MARCHEARRÊT et la durée «00» clignotera à l’afficheur.
• Pour modifier la durée en cours de fonctionnement, appuyez
simplement sur la touche voulue pour AUGMENTER (touche de
compte progressif) ou DIMINUER (touche de compte régressif) la
durée. Les chiffres clignoteront jusqu’à ce que la modification soit
terminée et, sans presser de touche, la durée cessera de clignoter sous
5 secondes et le décompte reprendra.
• En fin de décompte, la durée «00» clignotera de nouveau à
l’afficheur, cessera et un timbre retentira.
• S’il n’y a pas assez d’eau dans le RÉSERVOIR, le décompte cessera
automatiquement, un timbre retentira et «00» clignotera à l’afficheur.
L’appareil ne pourra fonctionner qu’une fois le réservoir rempli.
-F8-
NETTOYAGE DU CUISEUR VAPEUR
Débranchez le cordon à la prise avant le nettoyage. Laissez refroidir
le cuiseur. N’immergez ni la base, ni le cordon, ni la fiche.
• Videz le RAMASSE-GOUTTES et le RÉSERVOIR À EAU.
• Lavez le COUVERCLE, les BOLS VAPEUR, le BOL À RIZ, le RAMASSEGOUTTES et la BAGUE AMOVIBLE à l’eau savonneuse chaude. Rincez
et asséchez-les. Ces pièces sont également lavables en machine, à
condition de les placer dans le panier supérieur du lave-vaisselle.
• Versez de l’eau savonneuse chaude dans le RÉSERVOIR À EAU. Utilisez
un produit non abrasif ou un tampon à récurer synthétique pour
nettoyer l’intérieur. Rincez à l’eau chaude propre.
• Le BOL VAPEUR INFÉRIEUR et le BOL À RIZ s’emboîtent dans le BOL
VAPEUR SUPÉRIEUR et le COUVERCLE protège le tout, réduisant ainsi
le volume de rangement.
• Avec le temps, la surface de l’ÉLÉMENT CHAUFFANT peut se
décolorer ou s’entartrer. Agissez comme suit pour nettoyer l’élément.
1.
2.
3.
4.
5.
6.
Ne placez aucune pièce sur la BASE.
Versez 750 mL/3 tasses de vinaigre blanc dans le RÉSERVOIR À EAU.
Versez alors le volume d’eau requis pour que le niveau soit à MAX.
Branchez l’appareil et réglez la minuterie à environ 20 minutes.
Quand la minuterie s’arrête, débranchez l’appareil à la prise.
Ne laissez PAS bouillir ou déborder la solution sur les surfaces
extérieures.
7. Attendez que l’appareil ait totalement refroidi pour vider le réservoir.
8. Rincez le réservoir à l’eau froide et servez-vous d’un tampon à récurer
non abrasif pour frotter l’élément chauffant.
REMARQUE: N’employez EN AUCUN CAS d’eau de Javel, de tampons
ou de nettoyants abrasifs pour nettoyer les pièces, quelles
qu’elles soient, du CUISEUR VAPEUR.
-F9-
CONSEILS PRATIQUES
RIZ ET CÉRÉALES
1. Il existe de nombreuses variétés de riz. Observez les directives
données pour la variété utilisée.
2. Mesurez le riz et l’eau avec précision puis mettez-les dans le BOL À
RIZ. Versez alors le volume d’eau requis dans le RÉSERVOIR À EAU.
Mettez le couvercle et faites cuire.
3. Augmentez l’eau dans le bol à riz de 15 à 30 mL pour obtenir un riz
plus tendre, diminuez-la de 15 à 30 mL pour un riz plus ferme.
4. Constatez le degré de cuisson et la consistance du riz à la durée
minimale indiquée et profitez-en pour le brasser.
5. Quand vous vérifiez le degré de cuisson et la consistance du riz, faites
bien attention de ne pas laisser retomber la condensation dans le
BOL À RIZ, la qualité et la saveur du riz en souffriraient.
6. Ne versez que de l’eau propre dans le RÉSERVOIR.
7. Sel, poivre et beurre peuvent être ajoutés au riz après sa cuisson.
GENRE DE RIZ
MÉLANGÉS DANS LE
BOL À RIZ
DURÉE APPROX.
(EN MINUTES)
RIZ
EAU
RIZ CARGO
Ordinaire
Précuit
125 mL
250 mL
250 mL
375 mL
42 à 45
45 à 50
MÉLANGE DE RIZ À GRAIN
LONG ET DE RIZ SAUVAGE
Ordinaire
Vite cuit
Mélange
Mélange
375 mL
450 mL
16 à 58
18 à 20
BLANC INSTANTANÉ
Ordinaire
Précuit
250 mL
250 mL
375 mL
450 mL
45 à 50
50 à 55
-F10-
CONSEILS PRATIQUES (suite)
LÉGUMES
1. Nettoyez bien les légumes. Épluchez-les, coupez-les ou hachez-les si
nécessaire. Les petits morceaux cuisent plus vite que les gros.
2. Quantité, qualité, fraîcheur et grosseur des aliments congelés peuvent
affecter la cuisson à la vapeur. Modifiez les volumes d’eau et la durée
de cuisson au besoin.
3. Ne faites pas dégeler les légumes congelés avant de les faire cuire.
4. Certains légumes devraient être placés dans le bol à riz et couverts de
feuille d’aluminium pour cuire convenablement à la vapeur. Les
aliments congelés devraient être séparés ou brassés après 10 à
12 minutes de cuisson, avec une fourchette ou cuiller à long manche.
VARIÉTÉ
POIDS OU
NOMBRE
DE MORCEAUX
DURÉE APPROX.
(EN MINUTES)
ARTICHAUTS, ENTIERS
4, feuilles parées
30 à 32
ASPERGES, TURIONS
500 grammes
12 à 14
HARICOTS (VERTS/JAUNES)
250 grammes
12 à 14
FLOCONS D’AVOINE
500 grammes
20 à 22
BETTERAVES
500 grammes, coupées
25 à 28
BROCOLI, POUSSES
500 grammes
20 à 22
CHOUX DE BRUXELLES
500 grammes
24 à 26
CHOU
500 grammes, en tranches minces
16 à 18
CÉLERI
250 grammes, en tranches minces
18 à 20
CAROTTES
500 grammes, en rondelles minces
18 à 20
CHOU-FLEUR, ENTIER
500 grammes
20 à 22
MAÏS, ÉPIS
500 grammes
14 à 16
AUBERGINE
1,5 kilogramme
16 à 18
CHAMPIGNONS, ENTIERS
500 grammes
10 à 12
GOMBOS
500 grammes
18 à 20
-F11-
CONSEILS PRATIQUES (suite)
LÉGUMES (suite)
VARIÉTÉ
POIDS OU
NOMBRE
DE MORCEAUX
DURÉE APPROX.
(EN MINUTES)
PETITS POIS
500 grammes, écossés
12 à 13
POIVRONS, ENTIERS
jusqu’à 4 moyens (non farcis)
12 à 13
POMMES DE TERRE
(ROUGES) ET RUTABAGAS
500 grammes – environ 6
30 à 32
ÉPINARDS
250 grammes
14 à 16
COURGES ET COURGETTES
Courges d’été ou courgettes
Courge poivrée ou musquée
250 grammes, en rondelles
500 grammes
12 à 14
22 à 24
NAVETS
500 grammes, en rondelles
20 à 22
LÉGUMES CONGELÉS
280 grammes
28 à 50
POISSON ET FRUITS DE MER
1. Les durées de cuisson du tableau sont pour le poisson et les fruits de
mer frais ou bien congelés et totalement dégelés. Nettoyez et
préparez le poisson et les fruits de mer frais avant de les faire cuire.
2. Poisson et fruits de mer cuisent généralement très vite. Faites-les cuire
à la vapeur par petites quantités ou selon les quantités indiquées.
3. Les myes, huîtres et moules ne s’ouvrent pas toutes en même temps.
Vérifiez régulièrement leurs coquilles afin d’éviter la surcuisson.
4. Les darnes de poissons peuvent cuire dans le BOL À RIZ. Servez les
fruits de mer et le poisson cuits à la vapeur nature ou bien avec
beurre ou margarine assaisonné(e), citron et sauces favorites.
5. Modifiez les durées de cuisson au besoin.
-F12-
CONSEILS PRATIQUES (suite)
POISSON ET FRUITS DE MER (suite)
VARIÉTÉ
POIDS OU
NOMBRE
DE MORCEAUX
DURÉE APPROX.
(EN MINUTES)
MYES EN COQUILLES
500 grammes
10 à 12
CRABE
Crabe royal
À carapace molle
250 grammes, en tronçons
8 à 12 morceaux
20 à 22
8 à 10
HOMARD
Queues
Coupé en deux
Entiers, vivants
2à4
450 à 500 grammes
450 à 500 grammes
16 à 18
18 à 20
18 à 20
MOULES (FRAÎCHES)
500 grammes
14 à 16
HUÎTRES (FRAÎCHES)
1,5 kilogramme
18 à 20
PÉTONCLES
De baie (écaillés)
De mer (écaillés)
500 grammes
1,5 kilogramme
14 à 16
18 à 20
CREVETTES
Moyennes (en carapace)
Très grosses (en carapace)
500 grammes
500 grammes
10 à 12
16 à 18
POISSON
Entier
Habillé, paré
Filets
Darnes
250 à 375 grammes
250 à 375 grammes
500 grammes
125 grammes
10 à 12
10 à 12
10 à 12
16 à 18
-F13-
CONSEILS PRATIQUES (suite)
VIANDE – BŒUF
VARIÉTÉ
POIDS OU
NOMBRE
DE MORCEAUX
DURÉE APPROX.
(EN MINUTES)
BŒUF
Palette
Hamburger
Boulettes de viande
500 grammes
500 grammes
500 grammes
28 à 30
16 à 18
22 à 24
POULET
Morceaux
2 à 4 morceaux
24 à 26
AGNEAU
Cubes
500 grammes
26 à 28
PORC
Cubes
500 grammes
26 à 28
HOT-DOGS
500 grammes
14 à 18
SAUCISSES CUITES
500 grammes
14 à 18
-F14-
CONSEILS PRATIQUES (suite)
ŒUFS
VARIÉTÉ
POIDS OU
NOMBRE
DE MORCEAUX
DURÉE APPROX.
(EN MINUTES)
ŒUFS EN COQUILLE
Mollets
Durs
1 à 12 œufs
1 à 12 œufs
16 à 18
20 à 22
ŒUFS MOULÉS
Cassez les œufs crus dans
des pots à crème; ajoutez
sel, poivre et beurre ou
margarine, si désiré.
Mollets
Durs
1 à 4 œufs
1 à 4 œufs
10 à 12
12 à 14
ŒUFS POCHÉS
1. Versez 500 mL d’eau
dans le bol à riz. Débutez le
fonctionnement pour
chauffer l’eau. Ajoutez du
beurre ou de la margarine
si désiré.
7à8
2. Cassez les œufs dans un
bol puis faites-les glisser dans
l’eau du bol à riz. Faites cuire
à la vapeur selon les goûts.
7à8
ŒUFS BROUILLÉS
Battez 6 œufs et 30 mL de
lait dans le bol à riz. Salez
et poivrez. Remuez les œufs
lorsqu’ils sont à moitié
cuits.
20 à 22
-F15-
INSTRUCTIONS DE SERVICE
1. N’essayez PAS de réparer ou d’ajuster une fonction mécanique ou électrique de l’appareil, ceci annulerait la garantie.
2. Si l’appareil doit être remplacé, veuillez le retourner au magasin où vous l’avez acheté, dans son emballage
d’origine et de concert avec le reçu de caisse. Si ce retour a lieu plus de 30 jours après la date de l’achat,
veuillez consulter la garantie ci-incluse.
3. Si vous avez toute question ou observation relative au fonctionnement, ou si vous croyez que l’appareil a
besoin d’être réparé, veuillez écrire à notre service à la clientèle ou bien visiter www.rivalproducts.com
RIVAL
c/o THE HOLMES GROUP, INC.
CONSUMER SERVICE DEPARTMENT
13052 JURUPA AVENUE
FONTANA, CA 92337, ÉTATS-UNIS
GARANTIE LIMITÉE DE UN (1) AN
GARDEZ CES RENSEIGNEMENTS DE GARANTIE
A. Cette garantie n’est offerte qu’à l’acheteur au détail initial du produit.
B. Cette garantie est LIMITÉE à la réparation ou au remplacement de toute pièce usinée du produit dont la
défectuosité a été constatée par le personnel autorisé de The Holmes Group, Inc., s’il est démontré que la panne
attribuable à des vices de matériau ou de fabrication découle d’un usage normal. The Holmes Group se réserve le
droit de choisir entre réparer ou remplacer l’appareil. La présente garantie ne saurait couvrir les frais d’installation.
C. L’emploi de cet appareil dans des conditions autres que les conditions stipulées ou à une tension autre que la
tension indiquée sur l’appareil et la réparation ou la modification de l’appareil ANNULENT LA GARANTIE.
D. À moins que la loi ne l’interdise, The Holmes Group n’assumera aucune responsabilité en ce qui concerne les
blessures corporelles, les dommages matériels ou tous dommages accessoires ou indirects résultant
d’anomalies, de défauts, de mésusage, d’une installation fautive ou de l’altération du produit.
E. Toutes les pièces de ce produit porte une garantie de un (1) an, comme suit:
1. Au cours des 30 premiers jours à compter de la date de l’achat, le magasin qui l’a vendu devrait (si l’article est
en stock) remplacer tout article défectueux qui présente des vices de fabrication ou de matières premières.
* Si vous désirez faire valoir vos droits en ce qui concerne le produit, observez les instructions du paragraphe F.
2. Durant les 12 premiers mois à partir de la date de l’achat, The Holmes Group réparera ou remplacera le produit
défectueux (vices de fabrication ou de matières premières), sous réserve des conditions du paragraphe G.
F. Pour tout autre problème ou réclamation en ce qui concerne ce produit, veuillez écrire au service à la clientèle.
G. INSTRUCTIONS IMPORTANTES DE RETOUR. Si vous renvoyez l’article à The Holmes Group, Inc. dans le cadre
de la présente garantie, il est primordial qe vous observiez les instructions suivantes:
1. Emballez soigneusement l’article dans sa boîte d’emballage originale ou bien dans une boîte apte à empêcher
l’endommagement du produit durant le transport.
2. Avant de faire le colis dans lequel vous envoyez l’article, n’oubliez pas d’inclure:
a) votre nom, votre adresse postale complète, code postal inclus, et votre numéro de téléphone;
b) le reçu de caisse daté ou bien la PREUVE D’ACHAT;
c) un chèque couvrant les frais d’expédition et de manutention; et enfin
d) le numéro de modèle de l’appareil et la nature du problème. (Placez le tout dans une enveloppe que
vous fixerez à l’appareil à l’aide de ruban adhésif, avant de fermer le colis.)
3. The Holmes Group conseille d’envoyer le colis par UPS afin qu’il puisse être pisté.
4. Tous les frais d’expédition doivent être prépayés (ils vous incombent).
5. Indiquez clairement l’adresse suivante sur le colis:
RIVAL
c/o THE HOLMES GROUP, INC.
13052 JURUPA AVENUE
FONTANA, CA 92337, ÉTATS-UNIS
Cette garantie vous confère des droits juridiques précis et vous pouvez avoir d’autres droits, ces droits variant
d’un État ou d’une province à l’autre. Les stipulations de cette garantie s’ajoutent aux garanties légales, aux
droits et aux voies de droit prévus par toute législation en vigueur, sans les modifier ou les réduire. Au cas où
toute mesure de cette garantie serait interdite par la législation pertinente, une telle mesure serait considérée
annulée ou modifiée, tel que nécessaire, pour se conformer à la législation pertinente.
Imprimé en Chine
FSD200/201/9100410000102
FSD200/20105EFM1