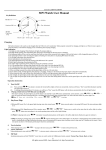
1
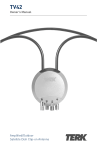
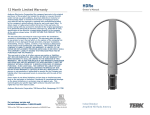
TROUBLESHOOTING
SPECIFICATIONS
Your ANT2050X antenna comes with a switchable amplifier which is
designed to operate over a wide range of signal strengths. The default
setting is the DX (distance setting) which is set at the factory and
allows maximum amplifier gain. Normally there will be no need to
change this setting to the LOC (Local) position, however if the
television picture is snowy, or has diagonal lines that appear to move,
or has poor reception on some UHF channels, even though the
signal is known to be adequate in the area for the affected station.
These conditions can sometimes be the result of too much signal at
the amplifier input and can often be remedied by switching to the
LOC setting.
In cases where there is a desire to experiment with the picture
quality, the switch should be changed from the preset DX setting to
the LOC setting.
To change the switch setting, remove the rubber plug and move the
switch with your finger to the desired setting (see diagram K).
K.
Switch to Desired
Position with
Finger
Removable
Rubber Cover
Return the
Rubber Cover
When Finished
Preset
Position
Some or Most Channels Are Poorly Received: Loosen the 2 bolts
on the “L” shaped pipe where it meets the straight pipe. Next, slightly rotate the antenna’s upper assembly, then check TV picture. Repeat
process until the best picture is achieved, then retighten the 2 bolts
on the “L” pipe. In extreme cases, the upper assembly of the antenna
can be removed from the “L” pipe and rotated 180 degrees before
replacing assembly in “L” pipe. Then the above rotating procedure is
repeated as described above. Another option is to move the
ANT2050X to a different place, such as another side of the house or
to a higher location. Obstructions such as trees, other houses and
mountain sides between the antenna and TV transmitters normally
impair reception. Generally, best results occur when the antenna is
mounted at the highest available point.
Picture Has Ghosting (Shadows or Double-images): Check to
make sure that none of the coaxial cables have any sharp bends or
kinks in them (a common cause of ghosting). If ghosting persists,
check entire system connections for tightness. Also, make sure antenna is not positioned near the house's electric supply lines on the roof
or in the attic. It is recommended that the antenna be repositioned in
cases where the problem persists. When ghosting cannot be eliminated, consult with a TV or electronics repair shop.
Dish Diameter: 11.6"
Dipole Length: 35.9"
Height: Adjustable
Included Accessories: 2 - 7 ft. RG-6 weather resistant cables,
2 - Diplexers
Frequency Range: 54-800 MHz
Current: Less than 50mA
Voltage: 10-21 VDC
Gain: 12 dB
IP3: +28 dBm
Loss DBS: Max: 1.1 dB at 975 MHz Typical: 0.7 dB
DBS Attenuation: Max: 62 dB at 975 MHz Typical: 38 dB
Noise Figure: Typical 3.0 dB
Other: Integral High Pass Interference Filter
Box Dimensions: 23 7/8" x 15 7/8" x 3 1/8"
Unit Weight: 6.5 lbs.
ONE YEAR LIMITED WARRANTY
Thomson Consumer Electronics will replace this antenna if found to
be defective in materials or workmanship. Return it postage prepaid
to the address below for prompt, no change replacement with a current equivalent antenna.
This replacement is TCE’s sole obligation under this warranty. TCE
will not be responsible for any incidental or consequential damages,
or for any loss arising in connection with the use or inability to use
this product.
This warranty gives you specific legal rights, and you may also have
other rights which vary from State to State.
© 1999 Thomson Consumer Electronics, Inc.
Product Exchange Center
11721 Alameda Ave.
Socorro, Texas, 79927
Omni-Directional
DBS Off-Air Antenna
Direct
Broadcast
Satellite
CAUTION
WARNING!
USE EXTREME CAUTION WHEN INSTALLING AN
OUTDOOR ANTENNA CLOSE TO OVERHEAD WIRES.
IF THE ANTENNA STARTS TO FALL, LET IT GO! IF
ANY PART OF THE ANTENNA MAKES CONTACT
WITH OVERHEAD POWER LINES, TOUCHING THE
ANTENNA, MAST, CABLE OR GUY WIRES CAN CAUSE
ELECTROCUTION AND DEATH. CALL THE POWER
COMPANY TO REMOVE THE ANTENNA. DO NOT
ATTEMPT TO REMOVE IT YOURSELF.
IMPORTANT SAFETY PRECAUTIONS:
Please read and follow these important safety precautions:
• Be sure to select an antenna site well away from any
overhead wires.
• Do not try to guess which overhead wires carry high voltage.
• Always check with the power company whenever
overhead wires are involved.
• If you notice anything making contact with the overhead wires,
call the power company to have the item removed properly.
• Do not run the downlead cable over power wires.
• If there is any doubt of clearing overhead wires, only a
qualified professional should remove an old antenna.
• Never install the antenna outdoors in windy conditions.
• Make sure the antenna downlead cable is connected to
suitable lightning arresters if antenna is not mounted on
the DBS Antenna.
• Make sure the antenna installation is secure.
LIGHTNING PROTECTION:
When ANT2050X is not mounted on the pole of the DBS
antenna, a copper ground wire (not included) should be
installed from the “To TV” F connector on antenna to a
grounding block (not included). This grounding block
should be as close as possible to where the down lead
enters the house.
ANT2050X
TROUBLESHOOTING
SPECIFICATIONS
Your ANT2050X antenna comes with a switchable amplifier which is
designed to operate over a wide range of signal strengths. The default
setting is the DX (distance setting) which is set at the factory and
allows maximum amplifier gain. Normally there will be no need to
change this setting to the LOC (Local) position, however if the
television picture is snowy, or has diagonal lines that appear to move,
or has poor reception on some UHF channels, even though the
signal is known to be adequate in the area for the affected station.
These conditions can sometimes be the result of too much signal at
the amplifier input and can often be remedied by switching to the
LOC setting.
In cases where there is a desire to experiment with the picture
quality, the switch should be changed from the preset DX setting to
the LOC setting.
To change the switch setting, remove the rubber plug and move the
switch with your finger to the desired setting (see diagram K).
K.
Switch to Desired
Position with
Finger
Removable
Rubber Cover
Return the
Rubber Cover
When Finished
Preset
Position
Some or Most Channels Are Poorly Received: Loosen the 2 bolts
on the “L” shaped pipe where it meets the straight pipe. Next, slightly rotate the antenna’s upper assembly, then check TV picture. Repeat
process until the best picture is achieved, then retighten the 2 bolts
on the “L” pipe. In extreme cases, the upper assembly of the antenna
can be removed from the “L” pipe and rotated 180 degrees before
replacing assembly in “L” pipe. Then the above rotating procedure is
repeated as described above. Another option is to move the
ANT2050X to a different place, such as another side of the house or
to a higher location. Obstructions such as trees, other houses and
mountain sides between the antenna and TV transmitters normally
impair reception. Generally, best results occur when the antenna is
mounted at the highest available point.
Picture Has Ghosting (Shadows or Double-images): Check to
make sure that none of the coaxial cables have any sharp bends or
kinks in them (a common cause of ghosting). If ghosting persists,
check entire system connections for tightness. Also, make sure antenna is not positioned near the house's electric supply lines on the roof
or in the attic. It is recommended that the antenna be repositioned in
cases where the problem persists. When ghosting cannot be eliminated, consult with a TV or electronics repair shop.
Dish Diameter: 11.6"
Dipole Length: 35.9"
Height: Adjustable
Included Accessories: 2 - 7 ft. RG-6 weather resistant cables,
2 - Diplexers
Frequency Range: 54-800 MHz
Current: Less than 50mA
Voltage: 10-21 VDC
Gain: 12 dB
IP3: +28 dBm
Loss DBS: Max: 1.1 dB at 975 MHz Typical: 0.7 dB
DBS Attenuation: Max: 62 dB at 975 MHz Typical: 38 dB
Noise Figure: Typical 3.0 dB
Other: Integral High Pass Interference Filter
Box Dimensions: 23 7/8" x 15 7/8" x 3 1/8"
Unit Weight: 6.5 lbs.
ONE YEAR LIMITED WARRANTY
Thomson Consumer Electronics will replace this antenna if found to
be defective in materials or workmanship. Return it postage prepaid
to the address below for prompt, no change replacement with a current equivalent antenna.
This replacement is TCE’s sole obligation under this warranty. TCE
will not be responsible for any incidental or consequential damages,
or for any loss arising in connection with the use or inability to use
this product.
This warranty gives you specific legal rights, and you may also have
other rights which vary from State to State.
© 1999 Thomson Consumer Electronics, Inc.
Product Exchange Center
11721 Alameda Ave.
Socorro, Texas, 79927
INSTALLATION CONTINUED
INSTALLATION CONTINUED
the straight pipe with 5 holes (as shown in diagram B). Now place
assembled pipes into small end of double mounting clamp and
loosely secure clamp with wrench (as shown in diagram C).
5. Mount pipe and mounting clamp assembly on “Support Column”
of DBS system antenna (as shown in diagram D).
6. Mount dish, antenna, and spreader bracket assembly on pipe
and mounting clamp assembly (as shown in diagram E). Note
that antenna assembly can be rotated to clear any obstruction
or for fine tuning. The ANT2050X overall height can be adjusted
by resetting the 5 hole pipe using its other pre-drilled hole
(as showin in diagram F).
Output to the TV’s S-Video Input (as shown in diagram I).
RCA patch cords and S-Video cables are supplied in most DBS
installation kits.
I.
From Roof
or Outside
75 Ohm "F"
Jack Input
Satellite
Cable
DBS
Receive
r
DBS
Video/Au
dio
In
Out
Televisio
n Back
Separating
Diplexer
Video/A
udio
In
75 Ohm
"F
Jack In
put
UHF/VHF Cable
E.
F.
Keep
Horizontal
FOR OPTIMAL PERFORMANCE
• Mount the antenna a minimum of 8 feet
high (the higher, the better).
7. IMPORTANT: Make sure that dish assembly is fully horizontal
and that no part of the dish itself covers the front surface of the
DBS antenna (as shown in diagram G).
8. Connect 7-foot coaxial cable(s) from LNB of DBS antenna to
“from DBS dish” connector(s) of the antenna. Next, connect the
cable(s) going into house to “to TV” connector(s) of the antenna
G.
H.
TM
X
House
LNB
(as shown in diagram H).
9. An external “separating” diplexer is used to separate the antenna’s
VHF/UHF signal from the satellite signal before the coaxial cable
is connected to the DBS receiver (as shown in diagram I). Connect
the VHF/UHF cable from the external “separating” diplexer
DIRECTLY to the TV’s 75 ohm “F” jack for best results! (It is
NOT recommended to connect the VHF/UHF cable DIRECTLY to
the DBS receiver since it will likely degrade VHF/UHF picture
quality.) The satellite signal cable from the external “separating”
diplexer should be connected DIRECTLY to the DBS receiver 75
ohm “F” jack. The DBS connection to the TV can be done with
RCA type patch cords, which connect the DBS receiver’s
Video/Audio Output to the TV’s Video/Audio Input. The best
connection, however, is made using the DBS receiver’s S-Video
In the attic
• The ANT2050X is an omnidirectional
antenna; however as with any antenna,
it performs best in locations where
there is a clear path, or a “line of sight”,
to the approximate location of the TV
transmitters in your area.
Note: Even with the advanced design of
this antenna, large obstructions such as
canyon walls, mountain sides, and
other man-made or natural geographic
objects can impair performance. Therefore, it is best to minimize
any obstructions that block the “line of sight” by mounting the
DBS antenna on the roof or on the highest possible point.
• When the DBS antenna is
mounted less than 8 feet high,
the antenna can be mounted
on the side of the house, chimney, or in the attic to achieve
the required height. Wood
screws or the included mortar
“anchors” can be used with the
antenna dish mounting clamp
(as shown in diagram J) to
mount the antenna on the side
of the house, the chimney, or
in the attic.
J.
"L" Pipe