1
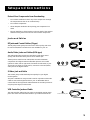
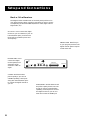
Digital Receiver User's Guide
0
01
1101
00101
0101001
110010110
0101110100
101110100101
0100101010110
011010110011011
1001101011100010
101100101011010101
Safety Information
WARNING
To reduce risk of fire or
shock hazard, do not
expose this receiver to
rain or moisture.
Cautions
WARNING
RISK OF ELECTRIC SHOCK
DO NOT OPEN
TO REDUCE THE RISK OF ELECTRIC SHOCK, DO NOT REMOVE
COVER (OR BACK). NO USER SERVICEABLE PARTS INSIDE.
REFER SERVICING TO QUALIFIED SERVICE PERSONNEL.
This symbol indicates
“dangerous voltage” inside the
product that presents a risk of
electric shock or personal injury.
This symbol indicates
important instructions
accompanying the product.
Do not stack electronic components or other objects on top of the
receiver. The slots on top of the receiver must be left uncovered to allow
proper airflow to the unit. Blocking the airflow to the unit could impair
performance or damage your receiver and other components.
Do not stack the receiver on top of a “hot component” such as an audio
power amplifier.
Refer to the accompanying Important Safeguards pamphlet for additional
information concerning the safe use of this product.
Note to Cable TV Installer:
This reminder is provided to call your attention to Article 820-40 of the
National Electrical Code (Section 54 of the Canadian Electrical Code, Part 1)
which provides guidelines for proper grounding and, in particular, specifies
that the cable ground shall be connected to the grounding system of the
building as close to the point of cable entry as practical.
Note to Antenna Installer:
This reminder is provided to call your attention to Article 810 and in
particular article 810-15 of the National Electrical Code (Section 54 of the
Canadian Electrical Code, Part 1) which covers proper installation and
grounding of television receiving equipment as well as to article 820-40 of
the National Electrical Code (Section 54 of the Canadian Electrical Code, Part
1) which specifies that the satellite dish cable ground shall be connected to
the grounding system of the building as close to the point of cable entry as
practical.
IMPORTANT NOTICE:
This device incorporates an anticopy process technology that is protected by
U.S. patents and other intellectual property rights. The anticopy process is
licensed for non-commercial, home use only. Reverse engineering or
disassembly is prohibited.
Care and Cleaning:
Use a soft cloth or dusting attachment of your vacuum cleaner to dust your
receiver. Remove dust from the ventilation holes on the top and bottom.
Plastic surfaces are easily scratched and can be marred by alcohol and various
solvents. Avoid excessive use of oil-based furniture polishes since the
materials used in the cabinet will accumulate more dust. A non-abrasive,
anti-static cleaner/polisher is recommended.
StarSight-Licensed: The manufacture and sale of the television schedule
feature of this product was licensed under one or more of the following
patents of StarSight Telecast, Inc.; U.S. Patent Nos. 4,706,121; 4,977,455;
5,151,789; 5,335,277: and 5,353,121.
Table of Contents
Setup and Connections ........................................ 3
Step 1: Unpack the Digital Receiver ............................................... 4
Step 2: Place Batteries in the Remote Control .............................. 4
Step 3: Connecting Your Receiver to Your TV and VCR ................ 4
Basic Connection ....................................................................... 7
Advanced Connection .............................................................. 8
A/V Receiver Connection .......................................................... 9
Step 4: Connecting the VCR Controller ........................................ 10
Attaching the VCR Controllers ............................................... 10
Step 5: Plug in and Turn on the System ....................................... 11
Step 6: Find the Video Input on Your TV ..................................... 11
Step 7: Set the VCR Code .............................................................. 12
Using the Remote ............................................... 15
Remote Control Buttons ............................................................... 16
The Point and Select Method ....................................................... 17
Programming the Remote Control .............................................. 17
The Menu System ............................................... 21
The Main Menu ............................................................................. 22
Exiting a Menu Screen ............................................................ 22
Main Menu Items .................................................................... 23
What is a Program Guide? ............................................................ 24
Getting Around in the Guides ............................................... 25
Tuning to a Channel from the Guide ................................... 26
Getting Information on a Program .............................................. 26
Exiting the Program Guide ..................................................... 28
Customizing the Program Guide ........................................... 28
Pay-Per-View Programs ................................................................. 30
Reviewing Past and Scheduled Purchases ............................. 32
Locking and Unlocking the System .............................................. 33
Setting the Spending Limit .................................................... 34
Profiles ........................................................................................... 35
Especially for Parents .............................................................. 35
Creating and Editing a Profile ............................................... 36
Setting the Rating Limits ........................................................ 37
Choosing Your Profile ............................................................. 39
Timers ............................................................................................. 40
The Mailbox ................................................................................... 41
The Set-Up & Test Menu ............................................................... 42
System Test .............................................................................. 42
Audio Choice ........................................................................... 42
Picture Format ......................................................................... 43
Index .............................................................................................. 45
1
Setup and Connections
Getting Started
1
In Setup and Connections, you’ll learn:
• about the jacks and cables
➣
This manual is designed to get you started quickly. It first
introduces you to your digital receiver system, then shows you
how to use the on-screen guides and menus.
2
Using the Remote
3
The Menu System
➣
• things to know before connecting the components
• different ways to connect the receiver to your TV
Using the Remote defines the buttons of the remote and how
to program it.
Setup and Connections
The Menu System details the items and features associated
with the different guides and menus.
3
Setup and Connections
Step 1: Unpack the Digital Receiver
Make sure to locate the remote control.
Step 2: Place Batteries in the
Remote Control
Follow these steps whenever you need to install or change the batteries
in your digital receiver remote.
1.
Remove the cover from the battery compartment.
2.
Insert batteries in the battery compartment, matching the +
and – end of each battery.
3.
Replace the cover.
Step 3: Connecting Your Receiver to
Your TV and VCR
The following sections provide cable and connection information to help
you decide what connection is best for you. Depending on what
components you have, another connection may provide better picture
and audio quality.
Things to Know Before Connecting
Components
Protect Your Components from Power Surges
•
Connect all components before plugging any power cords into the
wall outlet.
•
Always turn off the digital receiver, TV and other components
before you connect or disconnect any cables.
Position Cables Correctly to Avoid Audio Hum or
Interference
4
•
Insert all cable plugs firmly into their jacks.
•
Place the audio/video cables to the sides of the TV’s back panel
instead of straight down the middle after you connect your
components.
•
Try not to coil any twin-lead cables and keep them away from the
audio/video cables as much as possible.
•
Make sure all antennas and cables are properly grounded. Refer to
the Safety Tips sheet packed with your unit.
To receive signals, your digital receiver
must be connected to a digital antenna.
This antenna must be installed by a
certified, professional installer. Do not
attempt to install the digital antenna
yourself.
Setup and Connections
Protect Your Components from Overheating
•
Do not block ventilation holes in any of the components. Arrange
the components so that air can circulate freely.
•
Do not stack components.
•
Allow adequate ventilation when placing your components in a
stand.
•
Place an amplifier or digital receiver on the top shelf of the stand so
heated air rising from it will not flow around other components.
Jacks and Cables
RF Jacks and Coaxial Cables (F-type)
The RF jacks provide good picture and mono sound quality, and are to
be used if audio/video connections are not available for your TV.
RF Jack
Audio/Video Jacks and Cables (RCA-type)
The audio/video jacks provide very good picture and stereo sound
quality, and should be used if your TV has no S-Video jack.
Theses jacks are used for most audio/video connections between
components. The digital receiver audio/video jacks are color coded
(yellow for video, red for right audio, and white for left audio). If your
TV has only one input for audio (mono), connect it to the left (white)
audio jack on the digital receiver.
Audio/Video Jacks
S-Video Jack and Cable
The S-Video jack provides the best picture quality for your digital
receiver system.
This jack is available on many TVs and is used in conjunction with audio
cables to connect the digital receiver to your TV. Remember also to
connect the left and right audio cables because the S-Video jack carries
only the picture signal, not the sound.
S-Video Jack
VCR Controller Jack and Cable
The VCR controller cable plugs into a jack on the digital receiver’s back
panel. The other end of the cable affixes to your VCR’s remote sensor.
VCR Controller Jack
5
Setup and Connections
Back of the Receiver
The diagram below describes each of the back panel jacks found on
your digital receiver. When connecting A/V cables, be sure to connect
corresponding OUTPUTS and INPUTS (Video to Video, Right Audio to
Right Audio, etc.).
OUT TO TV Use to connect the digital
receiver to your TV. However, if your TV
has audio/video jacks, you should use
those jacks to get better picture and
sound quality.
SMART CARD Identifies you
to your program providers. The
digital receiver system requires
a valid smart card.
IN FROM ANT Use to
connect the digital
receiver system to an
alternative off-air
antenna or cable TV
signal.
OUT
TO
TV
IN
FROM
AUX
S-VIDEO Provides the best
picture quality. If your TV has
S-VIDEO capability, use this jack
along with the audio/video jacks
to connect the digital receiver to
your TV.
6
MMDS INPUT
VIDEO
CH 4
CH 3
S-VIDEO
OUT
OUT
SMART CARD
R AUDIO L
OUT
REMOTE
OUT
AUDIO/VIDEO Provide better sound
and picture quality than the OUT TO
TV jack. If your TV has audio/video
capability, use these jacks to connect
the digital receiver to your TV. You
must also connect the VIDEO jack.
PHONE JACK
Setup and Connections
Basic Connection
How to View Your Components
To watch the digital receiver in this connection, tune the TV to CH 3 or
4. You may change the output channel.
To record programming, tune the receiver to the desired channel and
set your VCR to record on channel 3 or 4.
CAUTION
Do not stack electronic components or
other objects on top of the digital
receiver. See Safety Information, inside
front cover.
To view VCR recordings, tune the TV to the VCR output channel (usually
CH 3 or 4) and set your VCR to play. If your VCR is a brand other than
RCA, GE, or ProScan, you may need to program the remote to control
the VCR. See the next section, Programming the Remote.
DIGITAL
RECEIVER
DIGITAL
ANTENNA
VCR
IN FROM ANT
OUT TO TV
CH3
CH4
TV
IN
7
Setup and Connections
Advanced Connection
How to View Your Components
To watch the digital receiver in this connection, tune the TV to the video
input channel. (To find your TV’s video input channel, follow Step 4).
Then tune the receiver to the desired channel.
To record programming, tune the receiver to the desired channel. Then
set your VCR to record on channel 3 or 4.
CAUTION
Do not stack electronic components or
other objects on top of the digital
receiver. See Safety Information, inside
front cover.
To view VCR recordings, tune the TV to the VCR output channel (usually
channel 3 or 4) and set your VCR to play. If your VCR is a brand other
than RCA, GE, or ProScan, you may need to program the remote to
control the VCR. See the next section, Programming the Remote.
DIGITAL
RECEIVER
VCR
IN FROM ANT
OUT TO TV
CH3
CH4
TV
IN
8
DIGITAL
ANTENNA
Setup and Connections
A/V Receiver Connection
How to Listen to Programming
To listen to programming using optional audio equipment, connect an
A/V receiver to the digital receiver. Use RCA-type audio cables to connect
the digital receiver’s left and right audio out jacks to the A/V receiver’s
left and right audio in jacks.
This connection provides stereo sound output to your stereo equipment.
Sound quality may vary depending on the type of equipment you use.
CAUTION
Do not stack electronic components or
other objects on top of the digital
receiver. See Safety Information, inside
front cover.
To listen to digital receiver audio, tune the digital receiver to a program.
Turn the A/V receiver on and tune to the A/V receiver’s audio input.
DIGITAL
ANTENNA
DIGITAL
RECEIVER
OUT
TO
TV
MMDS INPUT
VIDEO
CH 4
CH 3
IN
FROM
AUX
S-VIDEO
OUT
SMART CARD
R AUDIO L
OUT
OUT
PHONE JACK
REMOTE
OUT
A/V RECEVER
R
L
AUDIO INPUT
VCR
IN FROM ANT
OUT TO TV
CH3
CH4
TV
IN
9
Setup and Connections
Step 4: Connecting the VCR
Controller
The VCR Controller enables the digital receiver to control your VCR so
that you can record a program from the program guide.
After you have affixed the ends of the controller to the VCR , you will
use the on-screen menu system to test the connected devices.
Attaching the VCR Controllers
Some components label the infrared remote sensor, and others do not. If
your component is labeled, affix the VCR controller directly over the
sensor. For components that do not label the remote sensor, you need to
use to use the component’s remote control to locate the sensor.
1.
Hold the VCR’s remote control (not the remote that came with your
digital receiver) so that it is touching the front of the VCR.
2.
Slowly move the remote over the front of the VCR while pressing the
remote power button on and off. (Be sure to press and release the
power button each time you move the remote. Holding the button
may not work.)
VCR
10
Setup and Connections
STEP 5: Plug in and Turn on the
System
Plug the end into the wall outlet, matching the wide blade of the plug
with the wide slot in the outlet. Be sure to insert the plug completely.
To turn on the system, press the LOOK button on the remote or the
POWER button on the front panel. If your TV brand is RCA, GE, or
ProScan, press the TV button on the remote to turn on the TV. If your TV
brand is not RCA, GE, or ProScan, see the next section, Using the
Remote, for details on how to use the remote to control your TV.
Step 6: Find the Video Input on
Your TV
•
Note: You do not need to complete this step if you used the basic
connection.
If you used the advanced connection, you must tune your TV to the
Video Input Channel to see the digital receiver menu screens. Since
there are so many brands and models of TVs, there are just as many
ways to access a TV’s Line Input Channel. Below are some things you can
try.
•
If your TV brand is RCA, GE, or ProScan, press TV on the remote that
came with your digital receiver. Then press the INPUT button on the
remote.
•
If your TV brand is not RCA, GE, or ProScan, consult your TV Owner’s
Manual.
If you cannot find your TV Owner’s Manual, you will have to investigate.
You might access the TV’s Video Input Channel by:
•
pressing a button on the remote
•
finding it through the TV’s menu system
•
tuning directly to it by pressing a specific channel number
•
going through all channels in the list by pressing the channel up or
down buttons on the TV.
The video channel variations table at the right lists some of the
different ways manufacturers label the Video Input Channel.
Video Channel Variations
Button/switch
on the TV
Button on the
TV Remote
Channel #
VIDEO
SIGNAL
VID 1
VID 2
S-VID
S-VIDEO
VID 1
LINE
VID
VIDEO
S-VID
INPUT
SOURCE
AUX
00
90
91
92
VID 1
VID 2
11
Setup and Connections
Step 7: Set the VCR Code
To complete this step, make sure you have connected the VCR controller
as described in step 4. To control your VCR, you will then need to tell the
digital receiver which VCR brand you are using. This is done by selecting
Set VCR Code from the Set-up & Test menu.
1.
Make sure your TV is tuned to the channel that displays the digital
receiver picture, i.e. channel 3,4 or the Video Input channel.
2.
Press the LOOK button on the remote control. The receiver should
turn on.
3.
Press the MENU•SELECT button. The Main menu should appear on
the TV screen.
Press MENU•SELECT to bring up the Main menu.
4.
Press the down arrow on the remote until the menu item Set-up &
Test is highlighted on the menu screen, then press MENU•SELECT.
6.
Press the down arrow on the remote control until the menu item
Set VCR Code is highlighted, then press MENU•SELECT.
7.
Use the arrows or digit keys to input the correct code for your VCR
brand. The VCR Codes are located on the following page.
Use the arrows to enter a VCR code.
12
Read the section Using the Remote
Control for more information about
programming the remote to control TVs
and VCRs.
Setup and Connections
2.
Follow the on-screen instructions to ensure that you are using the
correct code. If the VCR automatically stops tape play, then you
know that the receiver and the VCR are communicating.
Note: Some older VCR brands may not be
capable of being controlled by the digital
receiver.
Follow the on-screen instructions to complete the set-up.
VCR Codes
Aiwa ........................................................................................... 015
Akai .................................................... 003, 017, 022, 023, 063, 066
Audio Dynamics ................................................................. 014, 016
Broksonic .................................................................................... 010
Candle ........................................ 007, 009, 013, 044, 045, 046, 052
Cannon ............................................................................... 008, 053
Capehart ..................................................................................... 001
Citizen ........................................ 007, 009, 013, 044, 045, 046, 052
Colortyme ................................................................................... 014
Craig ................................................................................... 007, 012
Curtis-Mathes ..... 000, 007, 008, 014, 015, 044, 046, 053, 064, 067
Daewoo .............................................................. 013, 045, 052, 076
DBX ..................................................................................... 014, 016
Dynatech .................................................................................... 015
Electrohome ............................................................................... 027
Emerson .............................. 008, 009, 010, 013, 015,020, 023, 027,
.................... 034, 041, 042, 047, 049, 057, 062, 065, 067, 068, 070
Fisher .......................................... 002, 012, 018, 019, 043, 048, 058
Funai ........................................................................................... 015
GE ............................................................... 000, 007, 008, 032, 053
Goldstar .............................................................. 009, 014, 046, 060
Harman Kardon ......................................................................... 014
Hitachi ................................................................ 005, 015, 035, 036
Instant Replay ............................................................................ 008
JCL ............................................................................................... 008
JC Penney ........... 002, 005, 007, 008, 014, 016, 030, 035, 051, 053
JVC .............................................................. 002, 014, 016, 030, 046
Kenwood ............................................ 002, 014, 016, 030, 044, 046
KLH ............................................................................................. 073
Lloyd ........................................................................................... 015
Logik ........................................................................................... 031
Magnavox .......................................................... 008, 029, 053, 056
Marantz ...................... 002, 008, 014, 016, 029, 030, 044, 046, 061
Marta .......................................................................................... 009
MEI .............................................................................................. 008
Memorex ............................................................ 008, 009, 012, 015
MGA ................................................................................... 004, 027
Midland ...................................................................................... 032
Minolta ............................................................................... 005, 035
Mitsubishi ................................................... 004, 005, 027, 035, 040
Montgomery Ward .................................................................... 006
MTC .................................................................................... 007, 015
Multitech ............................................................ 007, 015, 031, 032
NEC ............................. 002, 014, 016, 030, 044, 046, 059, 061, 064
Panasonic ........................................................... 008, 053, 075, 077
Pentax ......................................................................... 005, 035, 044
Pentex Research + ...................................................................... 046
Philco .................................................................. 008, 029, 053, 056
Philips ................................................................................. 008, 029
Pioneer ............................................................... 005, 016, 033, 050
Portland ...................................................................... 044, 045, 052
ProScan ....................................................................................... 000
Quartz ........................................................................................ 002
Quasar ................................................................................ 008, 053
RCA ............................. 000, 005, 007, 008, 028, 035, 037, 054, 069
Radio Shack/ Realistic ....................... 002, 006, 008, 009, 012, 015,
............................................................................ 019, 027, 043, 053
Samsung ..................................................... 007, 013, 022, 032, 042
Sansui ......................................................................................... 016
Sanyo .................................................................................. 002, 012
Scott ............................................................ 004, 013, 041, 049, 068
Sears ........................... 002, 005, 009, 012, 018, 019, 035, 043, 048
Sharp .......................................................... 006, 024, 027, 039, 045
Shintom .............................................................. 017, 026, 031, 055
Sony ............................................................................ 017, 026, 038
Sylvania ...................................................... 008, 015, 029, 053, 056
Symphonic .................................................................................. 015
Tandy .................................................................................. 002, 015
Tashiko ........................................................................................ 009
Tatung ........................................................................................ 030
Teac ............................................................................. 015, 030, 069
Technics ...................................................................................... 008
Teknika ............................................................... 008, 009, 015, 021
Toshiba ....................................................... 005, 013, 019, 048, 049
Totevision ........................................................................... 007, 009
TMK ............................................................................................ 067
Unitech ....................................................................................... 007
Vector Research ......................................................... 014, 016, 044
Victor .......................................................................................... 016
Video Concepts .......................................................... 014, 016, 044
Videosonic .................................................................................. 007
Wards .. 005, 006, 007, 008, 009, 012, 013, 015, 025, 027, 031, 035
Yamaha ....................................................... 002, 014, 016, 030, 046
Zenith ................................................................. 011, 017, 026, 072
13
Using the Remote
How to use your Universal Remote
The universal remote can be programmed to control most
brands of remote controllable TVs. If you have an RCA,
GE, or ProScan TV or VCR, you probably don’t need to
program it at all.
1
Setup and Connections
➣
This section defines the buttons on the remote and
describes how to program it.
Using the Remote
3
The Menu System
➣
2
15
Using the Remote
Remote Control Buttons
LOOK Turns on the digital receiver and tells the remote to control the
digital receiver system functions.
POWER
POWER Turns the device you are controlling on or off.
VCR
VCR Tells the remote to control the VCR.
TV
LOOK
INPUT
TV Tells the remote to control the TV.
SELECT•MENU
INPUT In TV mode, press the INPUT button one or more times to toggle
through the available video inputs connected to the TV. In VCR or LOOK
mode, performs the antenna switch function.
GUIDE
PPV
INFO
LAST CH
SELECT•MENU Brings up the Main menu. If you are already in the
menu system, press SELECT•MENU to select a highlighted choice.
GUIDE Brings up the on-screen program guide. Press the GUIDE button
several times to toggle through the different types of guides.
ARROWS Use the navigation arrows to move the on-screen highlight
up, down, left, or right. Using the arrows to highlight a menu item is
also called “pointing.”
PPV (Pay-Per-View) In LOOK mode, pressing PPV tunes the digital
receiver to the preview channel. Press PPV a second time to display the
five-line pay-per-view guide.
1
2
3
4
5
6
7
8
9
INFO Brings up the on-screen channel marker and provides program
details.
CHAN
0
VOL
LAST CH Moves you back and forth between your last two selected
channels.
CLEAR
DIGIT KEYS (0 - 9) Use the digit keys to tune directly to a channel. If
you are in the menu system, use the digit keys to enter numbers for the
time, date, channel and passwords.
CHAN UP/DOWN Use to scan up and down through the channels in the
current channel list. If you are in the program guide or menu system, use
the CHAN UP/DOWN buttons to page up and down a screen at a time.
VOL UP/DOWN Adjusts the audio volume.
CLEAR Removes the on -screen displays and returns to normal viewing.
AUDIO 2 Use to toggle through the available languages or audio types
for a program.
MUTE Reduces the TV’s volume to its minimum level. Press again to
restore the volume.
TRANSPORT Buttons (REVERSE, PLAY, FORWARD, RECORD, STOP,
PAUSE) Use when controlling a VCR. The RECORD button is used to
schedule a timer recording when using a program guide.
PROFILE In Look mode, pressing PROFILE toggles between the Main
Profile and four individual User’s Profiles.
16
REW
RECORD
STOP
AUDIO 2
MUTE
PLAY
FF
PAUSE
PROFILE
Using the Remote
The Point and Select Method
Point and Select is the two-step method you use to navigate through the
menu system and program guides. Once you know how to point and
select, you can explore the digital receiver system menus.
1. Point
You point by pressing the arrow keys on the remote or front panel.
Pressing the arrow keys moves the on-screen highlight to different
items in the program guide and the menu screens. Pressing an
arrow once moves the highlight one space in the direction of the
arrow.
SELECT•MENU
For example, to point down (that is, to move the highlight toward
the bottom of the screen), press the down arrow. To point right,
press the right arrow.
2. Select
Once you have pointed to an item on the screen, select it by
pressing the MENU button on the remote or front panel. Selecting
an item tells the menu system to go ahead and make the change
you have indicated.
For example, the instructions in the User’s Manual might tell you to
Point to the on-screen Movies button and press MENU.
Programming the Remote Control
The remote can be programmed to control most brands of remote
controllable TVs and VCRs. The remote is programmed to control most
RCA, GE and ProScan TVs and VCRs. The remote needs to be
programmed to control other manufacturers’ brands.
Modes of Operation
Because this universal remote can control the digital receiver, the TV and
a VCR, it uses operational modes triggered by the component buttons.
For example if you want the remote to control the TV, you would press
the TV button to put the remote into TV mode before you could control
the TV.
Testing the Remote
To determine whether the remote needs to be programmed, turn on the
TV, point the remote at the TV, and press the TV button. Then press
POWER or CH ^ (channel up) or CH v (channel down) to see if the TV
responds to the remote commands. If not, the remote needs to be
programmed.
Don’t worry about getting stuck inside a
menu. Pressing the CLEAR button on the
remote takes you out of the menu system
and back to the program you were
watching.
17
Using the Remote
Programming the Remote to Control the TV
1.
Turn on the TV.
2.
Look up the brand and code number(s) for the TV on the code list
below.
3.
Press and hold the TV button.
4.
While still holding down the TV button, enter the code from the TV
code list.
5.
Release the button, and then press the POWER button to see if the
component responds to the remote commands. If it doesn’t, try
pressing the TV button and then POWER again.
6.
If you get no response, repeat these steps using the next code listed
for your brand until the TV responds to the remote commands.
This remote may not operate all models
of the brands that are shown. Use the
codes shown in this manual, or on the
sheet packed with your remote.
TV Codes
Akai ............................................................................................ 002
Anam National ........................................................................... 038
AOC .................................................................... 011, 019, 027, 088
Candle ........................................................................ 011, 027, 033
Citizen ................................................................ 011, 027, 033, 064
Colortyme ................................................................... 011, 027, 084
Concerto ............................................................................. 011, 027
Contec/Cony ............................................... 036, 037, 040, 042, 064
Craig ........................................................................................... 064
Curtis Mathes ............................................. 000, 011, 015, 027, 037
CXC ............................................................................................. 064
Daewoo ...................................................................... 011, 019, 027
Daytron .............................................................................. 011, 027
Electrohome ................................ 006, 011, 014,027, 038, 061, 068
Emerson ............. 011, 026, 027, 028, 029, 030, 031, 032, 037, 042,
............................................ 053, 064, 065, 067, 075, 076, 078, 079
Envision .............................................................................. 011, 027
Fisher .................................................................. 017, 021, 039, 041
Funai ........................................................................................... 064
GE ............... 000, 008, 009, 011, 012, 027, 038, 068, 086, 089, 091
Goldstar ............................... 003, 004, 006, 011, 019, 027,037, 050
Hallmark ............................................................................. 011, 027
Hitachi ........................ 009, 011, 027, 036, 037, 040, 047, 063, 080
Infinity ........................................................................................ 013
JBL ............................................................................................... 013
Jensen ................................................................................. 011, 027
JVC ...................................... 012, 024, 036, 037, 040, 048, 051, 074
Kawasho ..................................................................... 002, 011, 027
Kenwood ............................................................ 006, 011, 014, 027
Kloss Novabeam ................................................................. 035, 043
KTV ............................................................................................. 078
Loewe ......................................................................................... 013
Luxman ............................................................................... 011, 027
LXI ............................................................... 013, 018, 021, 023, 054
Magnavox ................................. 006, 007, 010, 011, 013, 016, 027,
.................................................... 033, 035, 043, 049, 066, 087, 089
Marants ...................................................................................... 013
Marantz .............................................................. 011, 013, 027, 069
MGA ................... 006, 011, 014, 019, 022, 027, 041, 056, 061, 068
Mitsubishi ... 006, 011, 014, 019, 022, 027, 041, 055, 056, 061, 068
MTC ............................................................................ 011, 019, 027
Multivision ................................................................................. 081
NAD .................................................................................... 018, 023
18
NEC ..................................................... 011, 014, 019, 027, 038, 084
Panasonic ........................................................... 012, 013, 038, 086
Penney ................ 000, 008, 011, 019, 027, 040, 068, 077, 086, 088
Philco ......................... 006, 007, 010, 011, 013, 016, 019, 027, 033,
............................................................ 035, 037, 038, 043, 087, 089
Philips ................................ 002, 006, 007, 010, 011, 013, 016, 033,
........................................................... 035, 037, 038, 043, 066, 073
Pioneer ....................................................... 011, 027, 045, 062, 093
Portland .............................................................. 011, 019, 027, 037
ProScan ....................................................................................... 000
Proton ................................................................. 011, 027, 037, 072
Quasar ........................................................................ 012, 038, 092
Radio Shack ........................ 000, 021, 025, 036, 037, 059, 064, 078
RCA .................................... 000, 006, 011, 012, 019, 027, 034, 038,
.................................................................... 044, 046, 072, 088, 100
Realistic ...................................................................................... 021
Sampo ................................................................................. 011, 027
Samsung ..................... 006, 011, 014, 015, 019, 027, 036, 037, 077
Sanyo .................................................. 017, 021, 039, 056, 057, 058
Scott ............................................................................ 028, 037, 064
Sears .................................. 000, 006, 011, 014, 017, 018, 021, 023,
.................................................... 027, 039, 040, 041, 051, 071, 083
Sharp .......................... 011, 020, 025, 027, 037, 052, 053, 059, 060
Sony ............................................................................................ 002
Soundesign ................................................................. 011, 027, 033
Sylvania ..................................... 006, 007, 010, 011, 013, 016, 027,
.................................................... 033, 035, 043, 049, 066, 087, 089
Symphonic .......................................................................... 064, 076
Tatung ........................................................................................ 038
Technics ...................................................................................... 012
Techwood ........................................................................... 011, 027
Teknika ............................... 011, 019, 027, 033, 036, 037, 040, 066
Telecaption ................................................................................. 090
TMK .................................................................................... 011, 027
Toshiba ....................................... 018, 021, 023, 040, 071, 077, 085
Universal ............................................................................. 008, 009
Victor .......................................................................................... 051
Vidtech ............................................................................... 019, 027
Wards ................. 000, 005, 006, 007, 008, 009, 010, 011, 013, 019,
............................. 025, 027, 028, 035, 043, 059, 066 076, 082, 089
Yamaha ............................................................... 006, 014, 019, 027
Zenith ......................................................................................... 001
Using the Remote
Programming the Remote to Control the VCR
1.
Turn on the VCR.
2.
Look up the brand and code number(s) for the VCR on the code list
below.
3.
Press and hold the VCR button.
4.
While still holding down the VCR button, enter the code from the
VCR code list.
5.
Release the button, and then press POWER button to see if the VCR
responds to the remote commands. If it doesn’t, try pressing the
VCR button and then POWER again.
6.
If you get no response, repeat these steps using the next code listed
for your brand until the VCR responds to the remote commands.
This remote may not operate all models
of the brands that are shown. Use the
codes shown in this manual, or on the
sheet packed with your remote.
VCR Codes
Aiwa ........................................................................................... 015
Akai .................................................... 003, 017, 022, 023, 063, 066
Audio Dynamics ................................................................. 014, 016
Broksonic .................................................................................... 010
Candle ........................................ 007, 009, 013, 044, 045, 046, 052
Cannon ............................................................................... 008, 053
Capehart ..................................................................................... 001
Citizen ........................................ 007, 009, 013, 044, 045, 046, 052
Colortyme ................................................................................... 014
Craig ................................................................................... 007, 012
Curtis-Mathes ..... 000, 007, 008, 014, 015, 044, 046, 053, 064, 067
Daewoo .............................................................. 013, 045, 052, 076
DBX ..................................................................................... 014, 016
Dynatech .................................................................................... 015
Electrohome ............................................................................... 027
Emerson .............................. 008, 009, 010, 013, 015,020, 023, 027,
.................... 034, 041, 042, 047, 049, 057, 062, 065, 067, 068, 070
Fisher .......................................... 002, 012, 018, 019, 043, 048, 058
Funai ........................................................................................... 015
GE ............................................................... 000, 007, 008, 032, 053
Goldstar .............................................................. 009, 014, 046, 060
Harman Kardon ......................................................................... 014
Hitachi ................................................................ 005, 015, 035, 036
Instant Replay ............................................................................ 008
JCL ............................................................................................... 008
JC Penney ........... 002, 005, 007, 008, 014, 016, 030, 035, 051, 053
JVC .............................................................. 002, 014, 016, 030, 046
Kenwood ............................................ 002, 014, 016, 030, 044, 046
KLH ............................................................................................. 073
Lloyd ........................................................................................... 015
Logik ........................................................................................... 031
Magnavox .......................................................... 008, 029, 053, 056
Marantz ...................... 002, 008, 014, 016, 029, 030, 044, 046, 061
Marta .......................................................................................... 009
MEI .............................................................................................. 008
Memorex ............................................................ 008, 009, 012, 015
MGA ................................................................................... 004, 027
Midland ...................................................................................... 032
Minolta ............................................................................... 005, 035
Mitsubishi ................................................... 004, 005, 027, 035, 040
Montgomery Ward .................................................................... 006
MTC .................................................................................... 007, 015
Multitech ............................................................ 007, 015, 031, 032
NEC ............................. 002, 014, 016, 030, 044, 046, 059, 061, 064
Panasonic ........................................................... 008, 053, 075, 077
Pentax ......................................................................... 005, 035, 044
Pentex Research + ...................................................................... 046
Philco .................................................................. 008, 029, 053, 056
Philips ................................................................................. 008, 029
Pioneer ............................................................... 005, 016, 033, 050
Portland ...................................................................... 044, 045, 052
ProScan ....................................................................................... 000
Quartz ........................................................................................ 002
Quasar ................................................................................ 008, 053
RCA ............................. 000, 005, 007, 008, 028, 035, 037, 054, 069
Radio Shack/ Realistic ....................... 002, 006, 008, 009, 012, 015,
........................................................................... 019, 027, 043, 053
Samsung ..................................................... 007, 013, 022, 032, 042
Sansui ......................................................................................... 016
Sanyo .................................................................................. 002, 012
Scott ............................................................ 004, 013, 041, 049, 068
Sears ........................... 002, 005, 009, 012, 018, 019, 035, 043, 048
Sharp .......................................................... 006, 024, 027, 039, 045
Shintom .............................................................. 017, 026, 031, 055
Sony ............................................................................ 017, 026, 038
Sylvania ...................................................... 008, 015, 029, 053, 056
Symphonic .................................................................................. 015
Tandy .................................................................................. 002, 015
Tashiko ........................................................................................ 009
Tatung ........................................................................................ 030
Teac ............................................................................. 015, 030, 069
Technics ...................................................................................... 008
Teknika ............................................................... 008, 009, 015, 021
Toshiba ....................................................... 005, 013, 019, 048, 049
Totevision ........................................................................... 007, 009
TMK ............................................................................................ 067
Unitech ....................................................................................... 007
Vector Research ......................................................... 014, 016, 044
Victor .......................................................................................... 016
Video Concepts .......................................................... 014, 016, 044
Videosonic .................................................................................. 007
Wards .. 005, 006, 007, 008, 009, 012, 013, 015, 025, 027, 031, 035
Yamaha ....................................................... 002, 014, 016, 030, 046
Zenith ................................................................. 011, 017, 026, 072
19
The Menu System
What’s a Menu?
1
2
Using the Remote
3
The Menu System
➣
Don’t Forget Point and Select
As with all of the on-screen displays, you use Point and Select
to navigate.
Setup and Connections
➣
The digital receiver menu system is a list of choices, just like a
menu in a restaurant. And, just as a restaurant menu is
divided into sections such as appetizers, entrees, and desserts,
the on-screen menus are also separated into sections to help
you find the information you need.
21
The Menu System
The Main Menu
The Main menu is the gateway to all other menus in the digital receiver.
To view the Main menu , press the LOOK button on the remote control,
then SELECT•MENU. If you are already in another menu, first press
CLEAR, then SELECT•MENU.
Press SELECT•MENU to see the Main menu.
When you point to and select an item on the Main menu, you go to
another screen or to another menu. For example, if you point to and
select Profiles, you will go to the Profiles menu.
Exiting a Menu Screen
There is an Exit button at the top left corner of most screens.
There are two ways to exit a menu:
22
•
Point to Exit and press SELECT•MENU.
•
Press the CLEAR button on the remote control. The on-screen
display clears from the screen and you return to TV viewing.
The Menu System
Main Menu Items
Brief descriptions follow each of the Main menu items. Detailed
information about each menu is included in this section of the manual.
Program Guide
Shows the Program Guide, a listing of all available programming.
PPV
Shows available pay-per-view programming and special events.
Locks
Allows you to set the Main Profile’s password and spending limits.
Profiles
Allows you to set ratings and spending limits for individual profiles, and
to create favorite channel lists.
Timers
Allows you to schedule your digital receiver to record a specific channel
at a specific time on your VCR, or to automatically tune to a specific
channel at a specific time.
Press SELECT•MENU to see the Main menu.
Purchase List
Allows you to review upcoming purchases and to review past purchases.
Mailbox
Use to read mail messages from your program providers.
Set-up & Test
Allows you to set the preferred audio track and picture size, set-up your
VCR, and run the system test.
23
The Menu System
What is a Program Guide?
At first glance, the Program Guide looks much like the TV program
guide you see in a newspaper — a grid showing what programs are on
during each half-hour of the day, for each channel. But you also can use
the Program Guide to get more information about a program and to
tune digital receiver to a specific channel.
Using the Program Guide is easy — just point and select. Point to items
on the screen by pressing the arrows on the remote control or front
panel of the digital receiver. Then press SELECT•MENU to tune to that
program.
Using the GUIDE button
Whether you are in another menu or watching TV, pressing the GUIDE
button on the remote control takes you to the Program Guide. Each
additional press of the GUIDE button takes you to a different format of
the Program Guide.
•
Press GUIDE once to see the half-screen Program Guide. This format
displays a three-line guide and the current channel.
Press the GUIDE button once to see the three-line guide.
•
Press GUIDE again to see the full-screen Program Guide.
Press the GUIDE button twice to see the seven-line guide.
24
Bringing Up the Program
Guide
You can get to the Program Guide by
pressing the GUIDE button on the remote
control, or by selecting Program Guide or
PPV from the Main menu.
The Menu System
•
Press GUIDE a third time to see the Info Guide. When you point to a
program in the Info Guide, you are presented with a description for
that program.
Press the GUIDE button three times to see the five-line
information guide.
Getting Around in the Guides
This section describes how to change channels and move around the
program guide.
Point to Channels with the number keys (0-9)
You can point quickly to any channel in the program guide by entering
the channel number with the number keys (0-9). For example, to point
to channel 228, press the numbers 2-2-8 on the remote. To point to
channel 530, press 5-3-0.
Scrolling Channel By Channel
The programs that you see on the TV screen make up one section—or
page—of the total program guide. You can scroll to other sections using
the arrows: point to other times with the left and right arrows; point to
other channels with the up and down arrows.
Scrolling Page By Page
If you want to scroll up or down through the program guide faster, press
the Channel Up/Down buttons on the remote control. The highlight
scrolls a page at a time.
25
The Menu System
Tuning to a Channel from the Guide
To tune directly to a program listed in the Program Guide, point to the
program and press SELECT•MENU.
If you select a program that is not currently on, a screen will appear that
describes that program. You can select Watch this Channel or Record
Program. To return to the Program Guide from that screen, press the onscreen Exit button.
If you select a pay-per-view program, a second screen will allow you to
buy the program, get more information on it, or return to the Program
Guide. (For more information on purchasing a pay-per-view program,
refer to page 30.)
Getting Information on a
Program
To get more information about a program, use the INFO button on the
remote control.
Getting Information from the Program Guide
Point to a program using the arrow keys on the remote control and
press the INFO button. You will then see the Program Details menu, a
full-screen program description with several possible menu options.
Press INFO in the guide to see more choices.
Then, you can select:
•
Watch this Program to tune to the listed program.
•
Watch this Channel to tune to the future program’s channel.
•
Record this Program to set up a timer to record the program.
The Program Details menu may also includes the Alternate Times on-
26
The Menu System
screen button if this information is available. Select this button to see
when the program may be broadcast again.
The guide may provide a schedule of alternate times.
Getting Information from TV Viewing
To obtain information on the program you are currently watching, press
the INFO button on the remote control.
•
Press the INFO button once to show the Information Banner, which
includes the current time, the program’s title, its start time, its end
time, the channel you’re on, and the program that will air next.
•
Press INFO again to show the Description Banner, which includes a
brief summary of the program you’re watching.
Press the INFO button twice to see the Information
Banner and Description Banner.
•
Both the Information Banner and the Description Banner
automatically leave the screen after a few seconds. To clear the
screen quickly, press CLEAR.
27
The Menu System
Exiting the Program Guide
There are two ways to exit the Program Guide:
•
Point to a channel and press SELECT•MENU.
•
Press CLEAR on the remote control.
The Program Guide disappears, and you are returned to regular
program viewing. If you have selected a pay-per-view program, a display
screen allows you to purchase the selected program.
Customizing the Program Guide
There are five on-screen buttons at the bottom of the five and seven line
Program Guide that let you to change what programs the Guide
displays.
The PPV, Sports, Movies, Sort, and Future buttons are sorting buttons.
These buttons allow you to personalize the Program Guide so that it
shows only specific types of programming, such as movies or sports.
Sorting buttons appear at the bottom of the guide.
PPV
Point to and select the PPV on-screen button to display a Program Guide
that lists only pay-per-view programs.
Sports
Point to and select the Sports on-screen button to display a Program
Guide that lists only sports programs.
Movies
Point to and select the Movies on-screen button to display a Program
Guide that lists only movies.
28
The Menu System
Sort
The Sort on-screen button allows you to further customize the Program
Guide. Point to and select Sort to display the Sorting menu. This menu
displays a list of topics on the left side of the screen, and a list of related
themes on the right side of the screen.
Select Topics on the left; Themes on the right.
Use the up and down arrows on the remote control to go through the
list of topics. Point to a topic and press the right arrow. Your on-screen
highlight moves to the list of themes.
Use the up and down arrows to go through this list of themes. Point to a
theme and press SELECT•MENU to select it with a check mark. Press
SELECT•MENU again to deselect it (the check mark goes away). You can
select as many themes as you want.
Use the left arrow to return to the Topic on-screen button, and press
SELECT•MENU to display a Program Guide that lists programs that match
your choice of topic and themes.
Using combinations of topics and themes, you can create personalized
lists of programs. For example, you can create a Program Guide that only
lists baseball and ice skating programs.
29
The Menu System
Future
The Future on-screen button is a short-cut to viewing future times in the
Program Guide. Point to and select Future to display the Future Times
menu.
The Future button can sort the guide by time of day.
The Future Times menu will sort the Program Guide by respective times,
such as “Tomorrow Morning,” or “Monday Night.” Simply point to and
select the Future on-screen button, point to the desired time period with
the up and down arrows, and press SELECT•MENU to display the
Program Guide listing programs in that time period.
Pay-Per-View Programs
Pay-per-view programs are featured in the PPV Program Guide and can
be purchased — like a movie ticket — on a program-by-program basis.
Once you purchase a program, tune to the program’s channel at its start
time to watch it.
PPV Previews
Press the PPV button on the remote once to view the pay-per-view
promotional channel.
The PPV promotional channel features previews and
information.
30
The Menu System
Press the PPV button again to view the PPV five-line Info Guide.
The PPV Program Guide lists programs and times.
Purchasing and Viewing Pay-Per-View Programs
To purchase a pay-per-view movie or program, you can:
1.
Find a pay-per-view program while scanning through the channel
list with the CHAN arrows on the remote.
2.
Select a pay-per-view program from the PPV Program Guide.
When you select a pay-per-view program, an on-screen message asks
you to press SELECT on the remote control if you want to purchase the
program. Press SELECT to purchase the program. If you do not wish to
purchase it, enter a new channel number, or press GUIDE or CLEAR to
clear this on-screen message.
When you press INFO, the Purchase Program menu is displayed.
Press SELECT•MENU to purchase a program.
If you choose to purchase a program that
exceeds your spending limit, the system
will ask you to enter the four-digit PIN
that you set up in the Profiles menu.
To purchase the program, point to and select Purchase Program. You are
then asked to confirm your purchase.
31
The Menu System
You must confirm your purchase.
Select Yes to confirm the purchase of the program. Select No to cancel
the order.
Before you purchase a program you can also select Alternate Times from
the Purchase Program menu to find out if the program is available at
other times.
Reviewing Past and Scheduled Purchases
The Purchases menu lets you review upcoming and past pay-per-view
purchases. This lets you know how much you have spent or how much
more you are scheduled to spend on pay-per-view programs.
To display the Purchases menu, select the Purchase List on-screen button
from the Main menu.
Canceling a Purchase
If you order a pay-per-view program by
mistake or choose to cancel an upcoming
purchase for any other reason, you may
do so by contacting your Customer
Service Center.
Select Purchases from the Main menu to review
upcoming and past purchases.
If you want to review upcoming purchases, point to and select an entry
to display the program description.
32
The Menu System
Locking and Unlocking the System
The locking feature lets you manage your family’s access to certain
programs. The User Profile settings for channel lists, rating limits, and
the spending limit go into effect when you lock the system.
Changing any ratings, channel lists, or the per-program spending limit is
impossible without knowing the Main Profile PIN (Personal
Identification Number). A PIN is a password for a Profile that locks and
unlocks the digital receiver system.
To lock or unlock the system:
1)
In the Main menu, point to and select Locks .
2)
Set System Lock is highlighted. Press the right arrow button to
highlight Lock System or Unlock System, then select it.
Locking the system locks the profile limits.
3)
Use the arrows or digit keys to enter a four-digit system password.
Be sure to remember your password.
4)
When you create a password the first time you must enter it a
second time to confirm it.
When the system is unlocked, the spending, rating, and channel limits
you have set are no longer in effect.
33
The Menu System
Important Note: Overriding Profile Limits
When you attempt to view a program that is blocked by one or more
limits, a screen will appear that asks you to enter the four-digit Main
Profile PIN. Enter the Main Profile PIN to override the system lock. Once
you enter the Main Profile PIN, all limits will remain unlocked until you
turn off the digital receiver. When you turn the receiver on again, it will
be locked and the Main Profile will be in effect.
Setting the Spending Limit
The Locks menu also determines how much you can spend on pay-perview programs by setting a per-program spending limit. This spending
limit is the same for all User Profiles.
34
1)
From the Main menu, point to Locks and press SELECT•MENU.
2)
Point to and select Set Spending Limit.
3)
Use the arrows or digit keys to enter the spending limit.
4)
Press SELECT•MENU to confirm the spending amount.
If You Forget Your Main
Profile PIN…
If you forget your Main Profile PIN, don’t
worry! Just contact your Customer
Service Center.
The Menu System
Profiles
Not everybody likes to watch the same things. Within your own family
you might not want everybody to be able to watch the same things.
The Profiles menu allows up to four individual members of your
household to control their own viewing choices by setting up a
customized channel list that can be protected with a PIN (Personal
Identification Number).
Especially for Parents
The Profiles feature also contains a Main Profile that is automatically
activated each time the digital receiver is turned on. Setting up the Main
Profile lets you as a parent decide which channels and the type of shows
that can be viewed by your children.
Remember, the Main Profile PIN lets you lock the Profiles menu so that
no one can change any of the rating limits, spending limits, or channel
lists without knowing this four-digit PIN. The Main Profile PIN ensures
that only the programming of your choice can be viewed through the
digital receiver.
Getting to the Profiles Menu
The Profile menu lets you set up a Main Profile and four individual User
Profiles. To get to the Profiles menu, point to Profiles in the Main menu
and press SELECT•MENU.
Profiles let you decide which channels can be viewed.
35
The Menu System
Creating and Editing a Profile
The five Profiles are designed to give you easy access to customized
Program Guides. You can edit these profiles to show only certain
channels or programming within certain rating limits.
The Main Profile is selected by default when you turn on your digital
receiver.
To create or edit a Profile:
1.
From the Main menu, point to and select Profiles.
2.
Point to Set Profiles, and press SELECT•MENU. The highlight moves
to the right area of the screen.
Point to a Profile to edit rating limits and channel lists.
2.
Point to an individual user or the Main Profile, and press
SELECT•MENU.
Setting the User Name
Point to and select Edit Name to enter or change the user’s name. The
highlight moves to the first letter of the user’s name.
You can personalize each profile.
36
The Menu System
Use the up and down arrows to go through the alphabet. When the
correct letter is displayed, press the right arrow on the remote control.
Each name can be up to six characters. Press SELECT•MENU to confirm
the name.
Setting the User PIN
A PIN locks a User Profile. When a PIN is assigned, the user must enter it
before he or she can view programs using that Profile.
You do not need to set a User PIN if you do not want to lock a User
Profile.
Point to and select Profile PIN to password-protect the User Profile. Once
this is done, the user will have to enter his or her PIN to view the Profile.
You can password protect each profile.
There are two ways to enter a PIN:
1.
Use the number keys on the remote control to enter the four-digit
PIN.
2.
Use the up and down arrows to go through numbers (0-9). Press the
right arrow on the remote control to move to the next digit.
After you set your PIN, you will need to re-enter it to verify that it is
correct.
Setting the Rating Limits
The rating limit is another way in which the digital receiver allows you
to determine what kinds of programs you want available to your family.
This feature lets you set the maximum viewing limits for rated programs.
37
The Menu System
MPAA Ratings
MPAA Ratings limit lets you set the maximum viewing limits for rated
movies only. This includes movies on premium channels and pay-per-view
movies, but excludes movies on regular television broadcasts.
1.
Point to MPAA Ratings Limit and press SELECT•MENU. The highlight
moves to the rating list on the right side of the screen.
The MPAA ratings feature blocks movies rated above the
set limit.
2.
Set the rating limit using the up and down arrows to move the
rating selector to the highest rating you want the user to view. Press
SELECT•MENU to confirm.
TV Ratings
TV Ratings limit lets you set the maximum viewing limits for rated
television broadcasts only.
38
The Menu System
Editing the Channel List
Once you have set a user name, you have the option of creating a
customized list of channels for that user. Editing your own channel list is
a way to give you fast access to your favorite channels.
Point to Channel List and press SELECT•MENU.
You can use the Profiles to make favorite channel lists.
The first time you see this menu, all of the channels are selected (check
marked). To create a customized channel list, scroll through the list and
deselect those channels that you do not want to appear in the Program
Guide.
To add or delete channels in your channel list:
1.
Use the arrow keys to point to a channel, and press SELECT•MENU
to remove (or replace) the checkmark.
2.
Use the left arrow to return to the Channel List button. Point to
another item or press CLEAR to exit the screen.
The Add All Chan choice adds all available channels to your list (all
channels will be check marked). The Remove All Chan choice deletes all
channels from your list.
Choosing Your Profile
Each time you turn on the digital receiver, the Main Profile is selected by
default.
1.
To find another Profile, press the PROFILE button on the remote
control. Each press on the PROFILE button brings up, in turn, one of
the five Profiles: the Main Profile and the four User Profiles.
2.
When your Profile appears, enter your four-digit User PIN to
activate it.
Once you enter a PIN, the rating limit, channel list, and spending limits
will be those that have been set for the selected Profile.
If the Profile is not password protected, you can simply press
SELECT•MENU to activate it.
39
The Menu System
Timers
The Timers menu lets you preset your digital receiver to automatically
tune to a particular channel at a predetermined time. If you have a VCR
controller connected to the digital receiver and your VCR, you may also
record a program at a predetermined time. Select Timers from the Main
menu to bring up the Timers menu.
Set Timers to record a program.
Setting a Timer
Select a Timer (1-8) and use the arrow buttons to complete the onscreen sentence. If you set the Timer to Record, your VCR will record the
program when it airs. (The VCR Controller must be affixed to the VCR
remote sensor and connected to the Remote Out jack on the back of the
receiver.) If you set the Timer to Watch, the receiver will automatically
tune to the program when it airs. You can switch between Record and
Watch by pressing SELECT•MENU.
You can cancel or edit a Timer from the Timer menu. Select the Timer
you want to edit or cancel. Use the arrow keys to edit the Timer and
select OK, or select Clear to cancel the Timer.
One-Step Recording
Select a program in the Program Guide and press the REC button on the
remote control. The program information (channel, day and time) is
stored in the first available Timer.
Before You Record
1.
Make sure there is a tape in your VCR.
2.
Make sure the VCR controller is connected and the digital receiver
knows your VCR model. This is done in the Set-up & Test menu. See
page 10-13.
40
The Menu System
The Mailbox
The mailbox shows you messages that are sent—or “mailed”—from your
program provider. For example, you may receive a message calling your
attention to a new service.
How to tell when you have mail
The power light on the front panel of the receiver flashes.
Checking your mail
Select Mailbox in the Main menu.
1. Point to a message and press SELECT•MENU. The message is
opened for you to read.
If the system is locked, you must enter
the Main Profile PIN to access mail
messages.
Mail provides the latest information from program
providers.
2. Press SELECT•MENU again to close the letter.
After you read a message and want to erase it, point to Erase
Message and press SELECT•MENU. When you exit the display
screen, messages not erased are saved in memory.
41
The Menu System
The Set-Up & Test Menu
The Set-up & Test menu is designed to ensure that you get the optimal
performance from your digital receiver. It lets you adjust the receiver to
your TV and VCR, choose an alternate audio track and run a diagnostic
test.
System Test
The System Test offers four separate tests: signal, tuning, phone
connection, and access card.
To test the system:
1.
Point to Set-up & Test in the Main menu and press SELECT•MENU.
2.
Point to System Test and press SELECT•MENU.
The System Test helps diagnose any problems.
A screen appears, telling you whether the system passed each test. If the
system fails a test, run the system test several times before concluding
that there is a problem. Occasional disruptions in the phone line or
broadcast signal can give temporary false test results.
Audio Choice
Some television programs are broadcast with alternate language
options.
The Audio Choice on-screen button in the Set-up & Test menu allows
you to select different audio tracks (when available) to listen to with
broadcast programs.
To select an alternate audio track:
42
1.
Point to Audio Choice and press SELECT•MENU.
2.
Point to the preferred language and press SELECT•MENU.
The Menu System
A check mark next to the language choice means you have selected it as
your preferred option. The digital receiver will then set the audio
program to reflect this choice. For example, if you select French, the
digital receiver will then automatically set the audio track to French
whenever French audio is available.
Picture Format
Some television sets and home theater systems have screens that are
slightly wider than standard televisions. (This wider screen is sometimes
called a cinema screen). A normal TV has an aspect ratio of 4x3, while a
cinema screen has an aspect ratio of 16x9.
The Picture Size menu lets you to choose between a standard screen
(4x3 ratio) and the wider cinema screen (16x9 ratio). You should only
use the 16x9 option if you have a cinema screen TV. Using this option
with a standard screen TV may crop or distort the picture.
To choose a picture size:
1.
Point to Picture Format in the Set-up & Test menu and press
SELECT•MENU.
2.
Point to the type of TV screen you have and press SELECT•MENU.
When 16x9 is selected, 16x9 video will be displayed if it is available. If
not, 4x3 video will still be shown.
43
The Menu System
Setting the VCR Code
In order to let the digital receiver control your VCR, you need to connect
the VCR Controller. (For instructions on how to make the connection, see
page 10.) You will then need to tell the digital receiver which VCR brand
you are using. This is done by selecting Set VCR Code from the Set-up &
Test menu.
1.
Use the arrows or digit keys to input the correct code for your VCR
brand. The VCR Codes are located on page 13.
2.
Follow the on-screen instructions to ensure that you are using the
correct code. If the VCR automatically stops tape play, then you
know that the Receiver and the VCR are communicating.
Some older VCR brands may not be capable of being controlled by the
digital receiver.
44
Index
A
L
antenna (digital) 4
ARROW buttons 16
AUDIO 2 button 16
Audio choice 42
Language preference 42
LAST CH button 16
Locking
the system 23, 33
LOOK button 16
B
Back panel 6
Batteries 4
Buttons
remote 16
C
CHAN UP/DOWN buttons 16
Channel limits 33
Channel lists 39
CLEAR button 16
Codes
remote 18, 19
VCR controller 13
Connections 4
advanced 8
audio/video quality 5
basic 7
jacks and cables 5, 6
VCR controller 10, 12, 44
D
DIGIT KEYS 16
Digital antenna 4
Digital receiver
back panel 6
connecting 4, 7, 8, 10, 12
E
Exiting
menus 22
program guides 28
F
Future sorting button 30
G
GUIDE button 16, 24
Guides. See Program guides
I
INFO button 16
INPUT button 16
Input channel 22
Iput channel 11
M
Mailbox 23, 41
Main menu 22
Menu system 21
exiting 22
navigation 17, 21
Menus
Locks 23, 33
Mailbox 23, 41
PPV 23
Profiles 23, 36
Program Guide 23
Purchase List 23
Set-up & Test 23, 42
Timers 23, 40
Messages
deleting 41
reading 41
Movies sorting button 28
MPAA ratings 38
MUTE button 16
P
Passwords 33
Pay-per-view 30
review 32
Picture format 43
PIN 33, 34
Point and select 17, 21
POWER button 16
PPV button 16, 28
PROFILE button 16
Profiles 35
channel lists 39
choosing 39
editing 36
menu 23
overriding limits 34
ratings limits 37, 38
Program guides 23, 24
exiting 28
sorting 28
Program information 26, 27
Programming the remote 17
to control your TV 18
to control your VCR 19
Purchase list 23
past 32
R
Ratings limit 33, 37, 38
RECORD button 16
Recording 10, 12
with Timers 40
Remote control 4
batteries 4
buttons 16
codes 18, 19
programming 17, 18, 19
using 15
S
SELECT•MENU button 16
Set-Up & Test 23, 42
Setting the VCR type 12, 44
Sort buttons
Future 30
Movies 28
PPV 28
Sort 29
Sports 28
Spending limit 33
Sports sorting button 28
System
lock 33
menus 21
T
Timer/Record feature 23, 40
Tuning to a channel 26
TV button 16
TV codes 18
TV ratings 38
U
User name 36
User PIN 37
V
VCR
codes 13, 19
connecting 6, 10
controller 6, 10
setting the 12, 44
VCR button 16
Video input channel 11
VOL UP/DOWN button 16
INDUSTRY CANADA REGULATIONS
NOTICE:
The Industry Canada label identifies certified equipment. This certification means that the equipment
meets certain telecommunications network protective, operational and safety requirements. Industry
Canada does not guarantee the equipment will operate to the user’s satisfaction.
Before installing this equipment, users should ensure that it is permissible to be connected to the
facilities of the local telecommunications company. The equipment must also be installed using an
acceptable method of connection. The customer should be aware that compliance with the above
conditions may not prevent degradation of service in some situations.
Repairs to certified equipment should be made by an authorized Canadian maintenance facility
designated by the supplier. Any repairs or alterations made by the user to this equipment, or
equipment malfunctions, may give the telecommunications company cause to request the user to
disconnect the equipment.
Users should ensure for their own protection that the electrical ground connections of the power
utility, telephone lines and internal metallic water pipe system, if present, are connected together.
This precaution may be particularly important in rural areas.
CAUTION:
Users should not attempt to make such connection themselves, but should contact the appropriate
electric inspection authority, or electrician, as appropriate.
NOTICE:
The Ringer Equivalence Number (REN) assigned to each terminal device provides an indication of the
maximum number of terminals allowed to be connected to a telephone interface. The termination on
an interface may consist of any combination.of devices subject only to the requirement that the sum
of the Ringer Equivaledce Numbers of all the devices does not exceed 5.
RADIO INTERFERENCE:
This Class B digital apparatus meets all requirements of the Canadian Interference-Causing Equipment
Regulations.
PRODUCT SERVICE:
If trouble is experienced with this equipment, please consult the instruction manual for product
service.
The following materials were used
in printing this publication:
©1998 Thomson Consumer Electronics, Inc.
Trademark(s)® Registered
Marca(s) Registrada(s)
Printed in USA
TOCOM 15377550
100%
RECYCLED PAPER
MINIMUM 40% POST CONSUMER