1
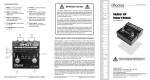
www.radialeng.com
™
Radial Cabbone
Part # R800 7060 00
Owner’s Manual
Radial Engineering
1638 Kebet Way, Port Coquitlam BC V3C 5W9
tel: 604-942-1001 • fax: 604-942-1010
email: [email protected] • web: www.radialeng.com
Radial Engineering is a division of C•TEC (JP CableTek Electronics Ltd.)
True to the Music
Radial Cabbone Owner’s Manual
TABLE OF CONTENTS
PAGE
Introduction ......................................................................1
Feature set ......................................................................2
Quick start .......................................................................3
Getting to know your Cabbone ........................................5
Slingshot remote control ..................................................8
Built in safety features .....................................................10
Warranty ..........................................................................Back Cover
INTRODUCTION
Congratulations on the purchase of the Radial Cabbone. This clever
device has been designed to allow you to toggle between two different
speaker cabinets from one guitar amplifier head. This opens the door
to greater flexibility on stage and creative new sounds in the studio.
The Cabbone also introduces a remote control system we call Slingshot™ that is designed to enhance the Cabbone’s performance when
utilized as part of a guitar switching system.
As with all Radial Tonebone products, the Cabbone combines the very
finest components with an innovative circuit design to ensure the tone
of your instrument and amplifier is maintained while noise and distortion is minimized. We believe that our relentless attention to detail sets
Radial apart from others and keeps our products working for years
without service.
Please take the time to read through this manual before operating your
Cabbone. This will allow you to take advantage of all of the features
that have been included and ensure the safe operation of your amplifier system. Furthermore, it is a good idea to occasionally visit www.
tonebone.com for the latest updates and to peruse the question &
answer section. This is where we post new questions that arise after
products are released and is a great resource for new ideas. If, after
consulting the FAQ, you have a question that is not answered, please
feel free to send us an email at [email protected] and we will do our
very best to get back to you promptly.
Now sit back, read, and then be prepared to change the way you have
been playing guitar forever!
Radial Engineering
1
Cabbone Owner’s Manual
True to the Music
FEATURE SET
6. From amp input jack
Used to receive the speaker output
signal from the amp head. Maximum input 120 watts.
1. Power supply input
15VDC supply is included with the
Cabbone.
2. Slingshot remote output Can
be used to send a channel change
command to the guitar amplifier or
to another Cabbone for large multiamp stage set-ups.
7. Speaker-1 output jack
Used to connect to your
main speaker cabinet.
8. ALT-Z input jack
Designed for amps
that are equipped with multi-tap
transformers with various speaker
impedance options to properly
match amp and speaker loads.
3. Remote output assign
Allows you to configure the output
switching to match your amplifier’s
footswitch configuration for latching
or momentary operation and tip or
ring positive with dual function ¼”
TRS switch types.
9. Speaker-2 output jack
Used to connect to your second
speaker cabinet.
4. Slingshot remote input
Used to receive a status change
command from a remote footswitch, another Slingshot equipped
pedal, or a MIDI controller.
10. LED indicators
Large, easy to see LED indicators
for instant visual monitoring of
speaker cabinet status.
5. FT SW assign
Allows the Cabbone to receive
speaker status change commands
from the on-board footswitch, or
from an external device. When set
to external, the Cabbone’s footswitch is defeated.
Radial Engineering
11. Footswitch
On
board footswitch is used to select between speaker cabinet one or two.
2
Cabbone Owner’s Manual
True to the Music
QUICK START
Note:
This section is designed for guitar technicians that are familiar
with speaker cabinet loads and remote switching. We do highly
recommend that all users take a few moments to peruse the rest
of this manual so all features and functions are understood. This
is important as we have no way of controlling how the Cabbone is
used. It is therefore your responsibility to follow these instructions
and consult your amplifier manuals to ensure compatibility.
Basic connections
Before starting, ensure your amplifier is turned off, all volume controls are set to zero, and the Cabbone power supply is disconnected.
Assuming both of your speaker cabinets have the same impedance,
make sure you set your amp’s impedance to match. We recommend
using 16-gauge or larger speaker cables for all connections.
Connect your amp’s speaker output to the Cabbone’s ‘FROM AMP’
input jack. The Cabbone’s maximum input is 120 watts. Connect the
Cabbone’s SPEAKER-1 output jack to your first speaker cabinet and
SPEAKER-2 output to your second speaker cabinet. You can now connect the Cabbone’s power supply. This will turn the Cabbone on and
one of the LED indicators will illuminate.
Basic speaker cabinet switching set up
Now, turn your amp on and bring up the volume slowly. Driving your
amp at a low level during setup will minimize any harmful occurrences
should an improper connection be made. At this point you should have
sound coming through speaker-1. Make sure the Cabbone remote
selector switch is set to INTERNAL so that the on-board footswitch
will work. Depress the footswitch on the Cabbone. This will switch the
sound to speaker-2.
If you are using two speaker cabinets with different loads (different
impedance rated in ohms), set the amp’s impedance to match the load
of the lowest speaker cabinet impedance you intend to use.
Radial Engineering
3
Cabbone Owner’s Manual
True to the Music
Using Slingshot output & input remote control
The Slingshot output lets you send a status change command out to
a device such as an amplifier’s footswitch channel selector. The Cabbone’s Slingshot remote input lets you receive a status change command from any footswitch to change between the Cabbone’s speaker
outputs. To accept a remote footswitch, simply switch the Slingshot
remote from INTERNAL to EXTERNAL. The Cabbone is designed to
receive a latching contact closure as is common with most guitar amps.
Slingshot set up to change amp channels at the same time speaker
cabinets are switched. External foot switch is optional.
To send a status change command from the Cabbone to your amp to
change its channel, simply connect the Slingshot output to the amp’s
footswitch ¼” input jack. If the amp uses a dual function ¼” TRS jack
to control channel change and reverb/chorus on/off, you may have to
employ a ¼” TRS cable from the Cabbone or have an adaptor made to
break out each function. Consult your dealer or a qualified technician
for help on this. Once connected, if the amp channel does not toggle,
try changing the setting from LATCHING to PULSE or vice versa. With
TRS set-ups, try reversing the polarity from TIP to RING or vice versa.
It is unlikely that you can damage the amp while setting up. By ensuring the volume levels are set low, you will reduce power generation and
transients from harming your system. If you are not sure about your
system or set-up, have your Tonebone dealer assist you.
Safety features that are built in
Once you are satisfied that the Cabbone is working with your amp,
you are now set to play. It is important to note that when the Cabbone
switches between the two speaker cabinets, the Cabbone will momentarily activate both speakers at the same time in a controlled ramped
overlap. This ensures safe operation of the amplifier by maintaining a
constant speaker load.
Furthermore, Cabbone is equipped with a feature called SafeMode™.
Should ever the power be disconnected, the Cabbone will immediately
go into SafeMode™ whereby a default setting will connect the amp to
speaker output-1.
Radial Engineering
4
Cabbone Owner’s Manual
True to the Music
GETTING TO KNOW YOUR CABBONE
ALT-Z
input
Speaker-2
output
From amp
input
Speaker-1
output
Slingshot
Input
PSU input
Slingshot
output
The Cabbone is a speaker cabinet switching device, it connects between your guitar amplifier head and two speaker cabinets.
Power supply input
There is no power-on switch on the Cabbone. Power automatically
turns on when the Cabbone’s 15VDC supply is connected. This is
a special high power 15VDC supply with positive center pin that is
compatible with all other Tonebone power supplies. You will not harm
the Cabbone if the power is left on. Before making any connections,
make sure your amplifier is turned off and the volume controls are set
to zero.
From amp input jack
The Cabbone’s main ¼” input jack is used to receive the signal from
your amplifier head. The Cabbone’s maximum input is 120 watts.
Always use a 16-gauge or larger (14 ~ 12 AWG) cable for best signal
transfer. Before connecting, make sure your speaker cabinets and amplifier loads are matched. If your amp has a single impedance selector/output and your speakers are different ohm loads, we suggest that
you set your amplifier to match the lowest speaker cabinet impedance.
For more details on impedance matching and loads, please consult the
sections on pages 7 & 8, or go on line at www.tonebone.com for the
latest updates.
To speaker-1 output jack
This ¼” output jack is used to connect to your first speaker cabinet. If
you are using a combo, we recommend that this be connected to the
speaker in your combo amp, as this is the most logical setup. If you
are using an amp head and two cabinets, connect the top cabinet to
speaker-1 output.
Radial Engineering
5
Cabbone Owner’s Manual
True to the Music
LED indicator
Footswitch
To speaker-2 output jack
This ¼” output jack is used to connect to your second speaker cabinet.
Most players tend to stack one cabinet on top of the other and this
would generally be connected to the bottom cabinet.
Foot switch assign (FT- SW ASSIGN)
The foot switch assign is used to alternate between the Cabbone’s foot
switch and an external foot switch. When set to external, the speaker
selection is triggered by the Slingshot remote input. See pages 8, 9, &
10 for more information.
Foot switch
The on-board foot switch is used to toggle between speaker cabinet 1
and speaker cabinet 2. The footswitch assign switch needs to be set
to INTERNAL for it to work. When this switch is depressed, it sends a
change command to a timer IC chip that in turn, sends on-off commands to the two internal relays. These actually do the speaker connections and are rated for 120 watts RMS. During the transition, both
speakers are momentarily on, creating a ramped overlap. This ensures the amp is always seeing a load. Now, depress the foot switch. If
you do not have sound going to speaker-2, check your cables. If you
have no sound, try connecting your amp directly to speaker-2 to make
sure it is working correctly.
LED indicators
Two large, easy-to-see LED indicators are set above the footswitch to
provide instant visual monitoring of speaker cabinet set-up. These will
toggle when the footswitch is activated.
Radial Engineering
6
Cabbone Owner’s Manual
True to the Music
ALT-Z (alternate impedance) input jack
The second ¼” input jack on the Cabbone is used with amps that are
equipped with multi-tap transformers and multiple outputs for various
speaker impedance requirements. For instance, you may have one
speaker that is 4-Ohms and another that is 8-Ohms. Many amps feature separate speaker outputs to accommodate these loads.
Start by connecting the 4-Ohm cabinet. Connect the amp’s 4-Ohm
speaker output to the Cabbone’s FROM AMP input and then connect
the SPEAKER 1 output to the 4-Ohm speaker cabinet. Now connect
the 8-Ohm cabinet. Connect the amp’s 8-Ohm output to the Cabbone’s
ALT-Z input and then the SPEAKER 2 output to the 8-Ohm speaker
cabinet. The ALT-Z input is a “switching” jack that automatically reroutes the input signal when connected.
Using unmatched loads
It is important to note that most amplifiers are designed to work best at
their rated impedance. This does not, however, mean that you cannot
use alternate loads. Before connecting the Cabbone, make sure you
read the amplifier manufacturer’s specifications to ensure the speaker
connections meet the amps accepted working range.
Transistor or solid-state amps generally work differently than tube
amplifiers. With solid-state amps, lowering the load generally makes
the amp sound louder. Most solid-state amps are designed to see an
8-Ohm or 4-Ohm load. Never go below the amplifier’s rated minimum
impedance. With tube amps, lowering the load tends to drive the tubes
harder which means they will not last as long. On the other hand, a
higher speaker impedance will generally make tube amps sound less
full and punchy. Therefore unless your amp is set up with two different
speaker outlets with independent impedance options, you will have to
make decisions on where to compromise to make your system work.
Alternatively, you can change your speaker cabinet and/or wiring to
match the load. To be safe, we always recommend setting your amp’s
impedance selector switch to match the lowest speaker cabinet impedance in your setup.
For more information on wiring speaker cabinets, please visit our www.
tonebone.com web page. There you will find more information on
parallel and series wiring which could be helpful when designing your
guitar amplifier system.
Radial Engineering
7
Cabbone Owner’s Manual
True to the Music
Using unmatched loads
Amp type & rated imp.
Solid-state amp with
8-Ohm outlet.
Tube amp with 8-Ohm
outlet.
Higher speaker imp.
Connecting a 16-Ohm
cabinet will reduce the
power and lower the
volume.
Lower speaker imp.
Connecting a 4-Ohm
cabinet will increase
the volume. Check amp
specs. for min. load.
Connecting a 16-Ohm
cabinet will make amp
sound less punchy and
warm. You get longer
tube life.
Connecting a 4-Ohm
cabinet will make amp
sound more punchy and
warm. You get shorter
tube life.
THE SLINGSHOT REMOTE CONTROL
One of the most innovative features built into the Cabbone is the Slingshot remote control. This clever feature allows you to remotely toggle
the Cabbone’s output from your pedal board or send a status change
command to another device such as a guitar amplifier to change channels or to an effect device to change presets.
At first glance, the Slingshot may appear to be a ‘cool extra bonus’ that
was added to the Cabbone. In fact, when developing the Cabbone,
we found that the Slingshot plays an indispensable role in making a
guitar amp setup really work effectively. For example, on small stages,
you may find that switching speakers using the on-board footswitch
works well with the Cabbone stationed next to your amp. But on larger
stages, you may prefer to perform this function from your pedal board.
The problem is running cables to and from your amp can be cumbersome. The Slingshot input gives you a simple solution by allowing you
to remotely switch the Cabbone using a simple footswitch.
As you push your system demands further, you may wish to use the
Slingshot output to switch guitar amplifier channels at the same time as
your speakers. This would allow you to have independent EQ and level
control for each speaker cabinet. Guitar amp channel-1 and speaker-1
could work together and amp channel-2 and speaker-2 could also be
mated. To further extend this, you may want to one day incorporate
a MIDI controller to change multi-effects processor presets and amp
channels simultaneously. The Slingshot leaves the door open for this
type of expansion.
Slingshot input
This ¼” jack is used to receive a status change command from a remote footswitch, another Slingshot equipped pedal or a MIDI controller.
The Slingshot feature employs the same basic latching contact closure
as used on traditional guitar amplifiers for their channel switching. This
means that the Slingshot is easy to interface with most gear.
Radial Engineering
8
Cabbone Owner’s Manual
True to the Music
Foot switch assign - internal or external
Works with the Slingshot remote input. To allow an external device to
toggle the Cabbone’s speaker selector switch, the footswitch assign
switch needs to be set to EXTERNAL. Once set, the on-board footswitch will be deactivated.
Slingshot output
One of the most powerful features built into the Cabbone is the Slingshot output / thru-put. From this ¼” jack you can send a status change
command to various other devices such as switching your amp’s channels at the same time as you change speakers. Another application
may be to toggle a multi-effects processor from one preset to another.
To send a status change command from the Cabbone to your amp and
change its channel, simply connect the Slingshot output to the amp’s
footswitch ¼” input jack.
Slingshot assign switch – latching or pulse
This switch lets you configure the Cabbone’s output switch configuration to match your amplifier’s switching footswitch for latching or
momentary operation. Most older tube amps employ a latching type
of switch while newer amplifiers tend to use electronic switching that
require a pulse or momentary contact closure to make them work.
Once connected, if when switching, the amp channel or effect device
does not toggle, try changing the setting from LATCHING to PULSE or
vice versa. Although it is unlikely that you can damage your amp while
setting up, by ensuring the volume levels are set low, you will reduce
the opportunity for loud transients from harming your system. If you
are not sure about your system or set-up, have your Tonebone dealer
assist you.
Slingshot assign switch – positive or negative
If your amp uses a dual function ¼” TRS jack to control the channel
selector and reverb on/off, you may have to employ a ¼” TRS cable
from the Cabbone or have an adaptor made to break out each function.
Consult your dealer or a qualified technician for help on this. To adapt
to various systems, the Cabbone is equipped with a switch that lets
you assign the switch to the TIP or the RING on a ¼” TRS connector. If
the Cabbone does not affect a change, try reversing the polarity.
Footswitch with ¼” mono jack
Radial Engineering
TRS style footswitch and cable
9
Cabbone Owner’s Manual
True to the Music
BUILT-IN SAFETY FEATURES
Once you are satisfied that the Cabbone is working with your amp,
you are now set to play. It is important to note that when the Cabbone
switches between the two speaker cabinets, the Cabbone will momentarily activate both speakers at the same time. This ramped overlap
applies a constant load on the amplifier and ensures its safe operation.
Cabbone is also equipped with a feature called SafeMode™. In the
unlikely event that the power is disconnected from the Cabbone, the
Cabbone will immediately go into SafeMode whereby a default setting
will connect the amp to speaker output-1. This ensures a speaker
will always be connected to the amp. If ever you are playing and
the sound suddenly goes off, stop playing immediately and check to
locate the problem by 1st checking cables as this is the usual culprit.
If all cables seem ok, then check the speakers by connecting the amp
directly. If the amp is working when connected directly to the speaker,
the Cabbone or one of the speaker cables could require servicing.
CABBONE BLOCK DIAGRAM
Radial Engineering
10
Cabbone Owner’s Manual
www.radialeng.com
RADIAL LIMITED ONE YEAR WARRANTY
Radial Engineering - a division of JP CableTek Electronics Ltd. (“Radial”)
warrants this product to be free from defects in material and workmanship to
the original owner and will remedy any such defects free of charge according
to the terms of this warranty. Radial will repair or replace at its option any
defective component(s) of this product, excluding the finish, wear and tear
on components under normal use, and the tube and footswitch (which are
warranted for 90 days), for a period of one (1) year from the original date
of purchase. In the event that a particular product is no longer available,
Radial reserves the right to replace the product with a similar product of
equal or greater value. To make a request or claim under this limited warranty,
the product must be returned prepaid in the original shipping container (or
equivalent) to Radial or to an authorized Radial repair centre and you must
assume the risk of loss or damage. A copy of the original invoice showing
date of purchase and the dealer name must accompany any request for work
to be performed under this limited warranty. This limited warranty shall not
apply if the product has been damaged due to abuse, misuse, misapplication, accident or as a result of service or modification by any other than an
authorized Radial repair centre.
THERE ARE NO EXPRESSED WARRANTIES OTHER THAN THOSE
ON THE FACE HEREOF AND DESCRIBED ABOVE. NO WARRANTIES
WHETHER EXPRESSED OR IMPLIED, INCLUDING BUT NOT LIMITED TO,
ANY IMPLIED WARRANTIES OR MERCHANTABILITY OR FITNESS FOR
A PARTICULAR PURPOSE SHALL EXTEND BEYOND THE RESPECTIVE
WARRANTY PERIOD DESCRIBED ABOVE OF ONE YEAR.
RADIAL SHALL NOT BE RESPONSIBLE OR LIABLE FOR ANY SPECIAL OR
INCIDENTAL OR CONSEQUENTIAL DAMAGES OF LOSS ARISING FROM
THE USE OF THIS PRODUCT. THIS WARRANTY GIVES YOU SPECIFIC
LEGAL RIGHTS, AND YOU MAY ALSO HAVE OTHER RIGHTS, WHICH MAY
VARY, FROM STATE/PROVINCE TO STATE/PROVINCE.
Radial Engineering
1638 Kebet Way, Port Coquitlam, BC V3C 5W9
tel: 604-942-1001 •
fax: 604-942-1010
email: [email protected]
web: www.radialeng.com
Radial Engineering is a division of JP CableTek Electronics Ltd.
Radial Cabbone Owner’s Manual - Part # R800 9670 00 • V1.0 05-0704
Specifications and appearence are subject to change without notice.