1
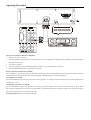
MECHANICAL DECK
PT-669D
Precautions
Thank you for purchasing this product. Taking time to read these
operating instructions carefully before use will acquaint you fully
Do not remove the case and bottom panel
with all its features and help ensure optimum performance.
In order to simplify the explanation illustrations may
Any inspections or adjustments inside the unit may lead
sometimes differ from the originals.
to malfunctions and electric shocks. Do not touch any of
the inside parts.
RISK OF ELECTRIC SHOCK
DO NOT OPEN
CAUTION: TO REDUCE THE RISK OF ELECTRIC SHOCK,
DO NOT REMOVE COVER(OR BACK)
NO USER-SERVICEABLE PARTS INSIDE.
REFER SERVICING TO QUALIFIED SERVICE PERSONNEL.
Do not block the ventilation holes
Do not block the ventilation holes on the top of the unit
by placing records or other objects over them. This will
The lighting flash with arrowhead symbol, within an
increase the inside temperature may lead to a failure or
malfunction.
equilateral, is intended to alert the user to the presence of
uninsulated “dangerous voltage” within the product’s
enclosure that may be of sufficient magnitude to
constitute a risk of electric shock to persons.
Installation precautions
Do not install the unit in any of the following locations
since this may result in deterioration in performance of
The exclamation point within an equilateral triangle is
intended to alert the user to the presence of important
malfunction:
*
Locations exposed to direct sunlight or near objects radiating
*
Locations exposed to moisture or humidity.
*
Locations with poor ventilation exposed to dust and dirt.
*
Locations which are unstable and not perfectly flat or which are
heat such as heating appliances.
operating and maintenance (servicing) instructions in the
literature accompanying the appliance.
WARMING: To prevent fire or shock hazard, do not expose this
appliance to rain or moisture
susceptible to vibration.
Do not wipe with thinners
Power plug
Wipe the panels and case from time to time with a soft
When disconnecting the power cord from the power
cloth. Using any kind of thinner, alcohol or volatile
outlet, always take hold of the plug, and not the wire,
liquid will mar the surface, cause blotching on the
and pull free. Never connect or disconnect the power
exterior and erase the markings and should therefore
plug with wet hands since you may receive an electric
be avoided. Do not use insecticide sprays in the
shock.
vicinity.
Remember to disconnect the power plug from the power
outlet when you do not intend to use the unit for a
Dripping warning: The product shall not be exposed to dripping
prolonged period of time.
or splashing and that no objects filled with liquids, such as vases,
shall be placed on the product.
Panel Information
2
3
4
2
DECK B
COUNTER
ON/STANDBY
DECK A PLAYBACK
PLAY CrO2
POWER
DUBBING
REC CrO2
HI.SP.DUBBING
REC/PLAYBACK BECK B
REC LEVEL
MIN
6
1.
1
10
9
8
MAX
5
7
6
(play): Press to play the tape.
ON/STANDBY SWITCH
Press button to switch “ON” the unit and press again to switch
(rewind): Press to rewind the tape
“OFF” unit into “STANDBY MODE”. If the unit is left unattended
(fast forward):
for long period, remove the plug from the power socket.
Press to fast forward the tape.
2.
CASSETTE HOLDER
3.
PEAK LEVEL INDICATOR
(stop/eject)
Press to stop the tape. Pressing this button after the tape
These indicate the recording level during recording and output
stops opens the cassette holder.
level during playback. The LED indication varies with the signal
(pause):
strength during recording and playback.
Press to temporarily stop the tape in the record or playback
mode. Press it again to release the pause mode and restart
* HIGH SPEED
This lights when in the high- speed dubbing.
* DYNAMIC NR
When you need the Dynamic noise reduction, push the level
the tape.
7.
REC CrO2 SWITCH
For recording with CrO2 tape.
switch to the left.
8.
* PLAY CrO2/ METAL
When you need dubbing, press this switch and the relative light
This lights when the CrO2/metal function is operated.
* REC CrO2
This lights when CrO2 function is operated.
4.
TAPE COUNTER AND RESET BUTTON (DECK B)
HIGH SPEED DUBBING SWITCH
will be lit.
9.
DUBBING SWITCH
Press the DUBBING switch to get set for further record functions
meanwhile relative light will be indicated.
When recording or playing, you can use the tape counter to count
10. PLAY CrO2/METAL SWITCH
the tape length.
Set these switches to NORM when using normal tape, to CrO2
5.
when using chrome tape, and to METAL when using metal tape.
REC LEVEL SWITCH
Adjust the record level.
6.
●
CASSETTE OPERATION BUTTONS
REC
This lights when deck B is in the recording the record-pause
mode.
Operating Procedures
R ISK OF EL ECT RIC SH OC K
D O N OT OP EN
LINE
( IN)R EC
PLAY( OUT)
INTEGRATED CIRCUIT
AC 220V ~230V 50Hz
REMOTE SYSTEM
TO AMP
AUDIO
IN
FM
75 Ω
REC
AM
PLAY
TAPE
EQ
CD
LOGIC TAPE
EQ
LOOP
REC
PLAY
AUX
CD
IN
Playback a recorded tape (DECK A or DECK B)
1.
Switch on the power of the unit.
2.
Press the Stop/Eject button and insert a recorded cassette tape. For CrO2/metal tape, further press the CrO2/metal switch and the light at
the indicator will be lit up.
3.
Press the PLAY button.
4.
Adjust the Amplifier Volume and Graphid Equalizer controls for your desired sound level and taste.
5.
Press the STOP/EJECT button to stop playback at any time.
Fast forward and rewind (Deck A or Deck B)
For fast winding or rewinding the tape, press the FFWD or REW button. Press the STOP/EJECT button when the desired location has been
reached. When the end of the tape has been reached, the FFWD or REW button will be released automatically.
Pause (DECK A or Deck B)
Press the PAUSE button to momentarily stop tape travel during playback or recording. Re-press the button for pause release and playback or
recording tape re-start.
Full automatic stop (Deck A or Deck B)
Press the STOP/EJECT button to stop playback (or recording) at any time. When the end of the tape has been reached, any of the PLAY,
REC, REW or FFED buttons, if pressed, will be automatically released and the head block completely separates from the tape and capstan.
This protects tape and prevents pinch roller wearing out.
Recording (Deck B): When recording use the Deck B.
Operating Procedures
Manually level control recording
This unit has record level volume to adjust the record level. Usually, the volume has a center click. When it reaches the center click position,
the tape can be recorded normally. If the sound source signal is too strong, a red spot will be appeared in the record level indicator. You can
adjust the record level volume to left position and vice versa. In normal state, the sound source level is between the red and green spots
(that’s 0dB).
1.
Press the STOP/EJECT button and insert a cassette.
2.
When CrO2 tape is used for recording, press the REC CrO2 switch.
3.
Press the record button. The level meter at the peak level indicator will shift and the REC light will be lit up indicating t hat recording is
underway.
4.
Press the STOP/EJECT button to stop recording at any time.
Pause
Press the PAUSE button to momentarily stop tape travel during recording. Re-press the button to pause release and recording restart.
Dubbing operation (Deck A—
Deck B)
This unit enables you to dub a recorded tape to another tape by using the built-in double deck mechanisms. It is performed only one way
from the Deck A to Deck B.
Preparation
1.
Insert a cassette for playback in DECK A.
2.
Select tape DIRECTION button (FFWD or REW) for the desired location of the tape to the beginning.
3.
Insert a cassette into DECK B.
4.
Select the dubbing speed by the dubbing High speed switch.
5.
There are two dubbing speeds: High speed and Normal speed. High speed doubles Normal speed.
6.
For high speed dubbing, press High speed switch, the light in the indicator will be lit up and the high speed dubbing is then activated.
7.
Normal speed dubbing requires no pressing of the High speed switch, and no light will be shown at the indicator at all.
8.
Press the PAUSE button of DECK A.
9.
Then, press the PLAY button of DECK A.
10. Press the RECORD button of DECK B.
11. Press the PAUSE button again of DECK A to release the pause mode. The unit will start the synchronized dubbing operation.
12. To stop dubbing operation, press the STOP/EJECT button of DECK B.
Note: Do not change dubbing speed during dubbing operation.
Specifications
Type
Stereo double cassette deck
Motors
DC servo motor x 2
Track system
4-track 2-channel
Fast Forward/Rewind time
Approx. 100 Sec. with
Tape speed
4.8 cm/sec
Input terminals
C-60 cassette
LINE IN x 2
Min. input level: 80mV
Input impedance: 50kΩ
Frequency response (-20dB recording)
Chrome tape
40-15,000Hz (±3dB)
Normal tape
40-14,000 Hz (±3dB)
(0dB recording)
Output terminals
LINE OUT x 2
Output: 600mV (0dB)
Output impedance: 5kΩ
Power requirement
AC 220V ~50Hz
Chrome tape
40-8,000 Hz (±3dB)
For U.K
240V ~50Hz
Normal tape
40-8,000 Hz (±3dB)
For U.S.A. & Canada
110V ~60Hz
S/N ratio
58dB
Power consumption
10W
Wow and flutter
<0.2% (DN 45500)
Dimensions
420mm x 130mm x 220mm
Crosstalk
40dB (1KHz)
Harmonic distortion
Less than 1%
Weight
4Kg (8.5lbs)
(at 1KHz, OVU 3 rd
ACCESSORIES
Pin plug cord…2
H.D, Normal tape)
Channel separation
40dB (1KHz)
Head
Deck A for Auto playback)
Deck B for recording/playback,
2-gap ferrite head for erasure.)
Design and specifications are subject to change without notice.
(W x H x D)
MADE IN CHINA