1
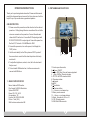
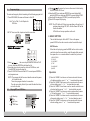
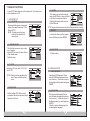
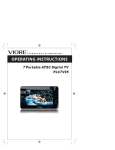
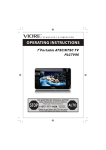
7 inch headrest monitor TFT-LCD color monitor
Adjustable headrest monitor
PLD7HB
PLD7HB
SD
SD
_
ME NU
_
_
MO DE
MO DE
_
ME NU
_
_
PL D7 HB
US B
AV / DVD
USB
AV / DVD
HTTP://WWW.PYLEAUDIO.COM
OPERATING INSTRUCTIONS
2.PART NAMES AND FUNCTIONS
Thank you for purchasing headrest monitor. Please read this manual
carefully before operating and reserve it for future reference. It will be
helpful to you if you encounter any operational problem.
1
PLD7HB
USE INSTRUCTION
1. Please connect the power line and the video line for the unit and
power box.. Putting through the nine core cables of the unit to the
nine core connector on the power box. Connect the audio and
video with AV IN on the box. Connect the DVD output signal with
14
15
MODE
_
16
USB
SD
MENU
AV / DVD
+
DVD OUT1/DVD OUT2 for output signal. Connect the power line,
Red for ACC, Yellow for +12v AND Black for GND.
2. Connect the power wire, turn on the power, it will display the
“DVD” picture.
3. It will be auto identify for the PAL system and NTSC system. If
the connection is correct it will be show the picture with clearly
13 11
6
12
10 9 8 7
5 4
3
and colorful.
4. To adjust the brightness, contrast, color, tint for the best result
that you need.
5. This set is with USB transfer line, it will be convenience for
connect with USB driver.
1. MAINLY SPECIFICATION
Name: Headrest DVD monitor
Pixel format:1440X234 Resolution
System: PAL/NTSC
Power: DC+12V / ±10%
Consumption: 7W
Function: AV+DVD+SD+USB
Picture: 7 inch (16:9)
With function remote control 6M
1
1. Press to open the monitor,
2. Power: ON/OFF
3.
Play: DVD Stop, Press will resume playback
4.
Stop: ON Play, Press to stop play.
5. AV/ DVD:AV/DVD selection button
6. IR receiver window
7. Forward
8. REV
9. Next button
10. Previous button
11. +:Volume + or sub manual up
12.Manu: press to manual
13.-:Volume- or sub manual down
14.Mode: Selection for 16:9 or 4:3
15. SD:SD carder reader
16. SUB:Mini USB connector
2
2
3. REMOTE CONTROL UNIT
34 AV/DVD
AV/DVD function selection
35 MENU
36 +
UP
Display effect adjust
37 DOWN
Precautions before using remote control unit
36
37
AV/DVD
1. Please pull out the PVC when the remote control unit is first using.
2. Don't drop or step on remote control unit or subject it to shocks.
3. Note that it may not be possible to operate the main unit if there
are obstacles between it and the remote sensor.
4. Using the remote control unit within the specified operating range.
34
35
Remote control unit operating range
1.Horizontal: ±30 degree
2.Vertical: ±30 degree
3. Distance: 5M
Replacing the battery
3
4
4. CONNECTING THE PLAYER TO OTHER COMPONENTS
CONNECTTING TO THE POWER BOX
USB
U SB
USB Connector
PLD7HB
MINI USB Connector
US B
SD
USB
SD
AV / DVD
+
MENU
MODE
_
MENU
_
AV / DVD
_
_
MODE
1.Be sure the dish in eject, connector the USB, it will be play the USB
2. It will display “READ USB”, then play the file.
3.The menu and the method same as the way of MP3 and JPEG.
4.Pull out the USB when you want to stop playing.
NOTE:
Be sure the DVD is in ejected, then connect the USB, it will be work.
Be sure the format of the file in USB is fit with the unit, otherwise must
formatting the USB before connect with USB
PLD7HB
CONNECTTING WITH SD CARD
SD
SD CARD
MODE
_
SD
MENU
+
▼
US B
AV / DVD
SD
_
ME NU
_
_
MO DE
US B
AV / DVD
1.Plug the SD card to the SD card slot, it will be read the file of SD
card.
2. It will display “READ CARD” on the screen, then will show the file
of SD card.
3.The menu and the method same as the way of MP3 and JPEG.
4.Pull out the SD card when you want to stop the playing.
USB CONNECTING TO THE USB
Use the USB line, (mini USB connector and USB port 1.1), Please
reference the following drawing as below:
5
NOTE:
It unit just work with SD card.
Be sure the DVD is in ejected, then the SD card will be work.
Be sure the direction of SD card is in correct when plug in the SD card.
6
G
5.BASIC OPERATIONS
A Using OSD
1. Press OSD to show the play and disc
information in the LCD when the main unit
is in play mode.
2. Press OSD again to disable the
information display.
B
"OSD" Key
1. Press AUDIO to select the audio
language when the main unit is in play
mode for DVD disc.
2 .Press AUDIO to select the audio channel
whe the main unit is in play mode for VCD, CD disc.;
"AUDIO" Key
C
Selecting a sub-title
"SUBTITLE" Key
Selecting an angle
1.Press ANGLE to select the play angle when
the main unit is in play mode for DVD disc,
there is no function for other disc.
2. It will be no working if the dish not have this function.
E
"ANGLE" Key
Stopping the playing
"STOP" Key
1.Press STOP to pause the playing, the unit
" PLAY" Key
can memorize the play point.
2 . Press PLAY to continues play from the
pausing point
3 . Press STOP to stop the disc.
NOTE: The unit can not play to continues playing for some disc.
AV/DVD
F
MENU
-
+
Pausing the disc
1 .Press PLAY/PAUSE to pause the
playing when playing.
2 .Press PLAY/PAUSE to continues
playing.
" PLAY/PAUSE" Key
AV/DVD
MENU
-
"FMD" Key
AV/DVD
MENU
+
1.Press STEP/SLOW in the remote control unit
"STEP/SLOW" Key
to slow playing. Change the playing speed to
1/2、1/3、1/4、1/5、1/6 and 1/7 for every
pressing STEP/SLOW.
2 . Press STEP/SLOW to skip frame when the
unit is in pause mode.
Note: The sound is mute when the main unit is
in fast or slow playing except CD and MP3 disc. Press PLAY to
resume normal playing.
I
Repeat playing the disc
MENU
-
+
1 . A-B play mode: Press A-B, the LCD will show
Repeat A-. Press A-B again, the main unit will
repeat the play from A to B.. Press A-B again,
" Repeat " Key
the unit will resume normal playing.
"A-B" Key
"SHIFT" Key
2 . Repeat playing the title, chapter or track.:
Press REPEAT to select the title, chapter
or track when the unit is in play mode. DVD:
title, chapter; VCD or CD: track.
NOTE:
Please press SHIFT to select the FUNCTION mode of remote control
unit first
AV/DVD
J
Searching the disc
Press SEARCH
Using cursor key and ENTER to select the
proper playing item. Input digit to select
playing time, title, chapter or track.
Press ENTER to confirm the playing item
Press SEARCH to resume the play mode.
K
Zoom playing
Press ZOOM every times,
The picture will change to
2X 3X 4X 1/2X 1/3X, 1/4X and normal.
"ZOOM" Key
+
8
MENU
"SEARCH" Key
AV/DVD
7
-
Slow playing the disc
AV/DVD
Press SUBTITLE to select the sub-title
when the main unit is in play mode.
D
1.Press FMD to fast the playing.
"REV" Key
2.Change the playing speed to X2 X4 X8 X20, and
normal for every pressing to back the normal speed.
3.Press REV to backward playing, change the playing
speed to X2 X4 X8 X20, and normal for every pressing
to back the normal speed.
H
Selecting an audio
Scanning forward and backwward
MENU
-
+
-
+
L
Program playing
The main unit may play the list according to the following program list:
1. Press PROGRAM, the menu will shown in the LCD
Hint: T is for Title, C is for Chapter for
DVD disc.
NOTE: There is no title, chapter or track for some disc.
Using
the cursor key to move the cursor to the directory,
fild, MP3 icon or JPEG icon.
Selecting MP3 icon and press ENTER if you want to play Mp3,
selecting JPEG icon and press ENTER if you want to play JPEG.
Selecting a file and press ENTER if you want to play the file.
Press A-B to repeat A-B playing.
NOTE: The LCD will be off if there is no operation on the unit over 3
minutes when playing CD, MP3. And the Power LED will be
flash in the status.
LCD will be on for any operation on the unit.
6.BASIC SETTING
The unit with two inputs: AV and DVD. Turn on the power,
press AV/DVD on the unit or remote control to select the input.
AV/DVD mode
When the unit is playing, press the MENU on the unit or remote
control to enter the menu setting, select the mode that you want,
then press the + or on remote control to select that you want.
3 Using
the cursor key to move the cursor to PLAY
in=con, and press ENTER to start play the list.
4 Using the cursor key to move the cursor to CLEAR icon, and
Press ENTER to clear the play list.
5 Press PLAY/PAUSE or select the EXIT icon and press ENTER to
exit program menu.
NOTE: The program list will be cancel whe the main unit is power
off or eject the disc.
There is no program function for some disc.
The unit can not play the list if you select the item that does
not exit in the disc.
M
Playing MP3 and JPEG disc
1.
2.
3.
4.
Directory
File
Mp3 icon
JPEG icon
9
1).BRIGHTNESS
2).COLOR
3).CONTRAST
4).TINT
5).LANGUAGE
6).MODE
Operation
1).Press the "MENU " one time on unit or remote control to menu
of brightness setting, press " + " or " - " to select what you want.
2).Press the " MENU " two times on unit or remote control to menu
of color setting, press " + " or "- " to select what you want.
3).Press the " MENU " three times on unit or remote control to menu
of contrast setting, press " + " or " - " to select what you want.
4).Press the " MENU " four times on unit or remote control to menu
of Tint setting, press " + " or " -" to select what you want.
5).Press the " MENU " five times on unit or remote control to menu
of languate setting, press " + " or " -" to select what you want.
6).Press the " MENU " six times on unit or remote control to menu
of mode setting, press " + " or " -" to select what you want.
10
7.MAIN UNIT SETTINGS
Press SETUP when the main unit is in play mode. The set up menu
will be displayed in LCD.
1、SYSTEM SETUP
1).TV SYSETM
Please select the proper video signal
system if you want to see on a TV set.
Default: NTSC
NOTE: The picture may be a grey
picture if the system is not
correctly set.
5).RATING
This setting can control the unit play
parent lock DVD disc. Level is divided
in to 2 level: normal and children.
Selecting Normal the lock is cancel.
Default: Normal
OTE: The parent lock level can not be set if the parent lock is locked.
6).DEFAULT
To restore the factory setting, please
select this item and press ENTER.
2).SCREEN SAVER
This function can save in stop, no disc
over 1 minutes.
Select OFF to turn on the saver, Select
ON to disable saver.
Default is saver.
8).EXIT SETUP
Exit the setting.
3).TV TYPE
Selecting a TV scale, with 16:9, 4:3 LB
and 4:3 PS.
NOTE: Picture scale is depending the
disc. Please select the correct
scale.
2.LANGUAGE SETUP
1).OSD LANGUAGE
Selecting a OSD language: Please
enter the OSD language select menu,
use cursor key to move the cursor to
the language what you want and press
ENTER.
4).PASSWORD
2).AUDIO LANG
Default setting: 0000. When unlock,
new parent lock can be input and select
the parent lock level..
11
SYSTEM SETUP
Selecting a audio language Please
enter the audio language select menu,
use cursor key to move the cursor to
the language what you want and press
ENTER.
If the disc not have the language, it is
not showing this language.
12
3).SUBTITLE LANG
Selecting a sub-title language:
Please enter the sub-tile language
select menu, user cursor key
to move the cursor to the language
what you want and press ENTER
9 . The discs listed on the below can be played on this player without
any adapter.
4). MENU LANG
Selecting a menu language:
Please enter the menu language
select menu, use cursor key to
move the cursor to the language
what you want and press ENTER.
5).EXIT SETUP
Exit the language setting
NOTE: The language will be the
disc default language if the
language you want is not visible.
Default language: English
8. CAUTIONS ON USING THIS PLAYER
1.Be sure the anode and cathode is correct connection.
2. To reduce the risk of fire or electric shock, do not expose this
appliance to rain or moisture.
3.Do not open the cabinet, refer servicing to qualified personnel only.
4.Installation should be very fasten. Preventing the fallen unit hurt
people when moving on or a sudden brake.
5.DC 12V should best be connected to the power adapter to prevent
from the over-voltage drop the may influence the normal work of
monitor.
6.A few high lights or dark spots may occur on the LCD screen. It is
a very common phenomenon to the active matrix display technology,
and never necessary means any defects or faults.
7.Do not using the disc that is scratched seriously, otherwise will
damage the DVD.
13
14