1
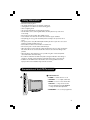
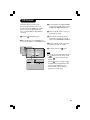
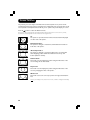
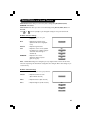
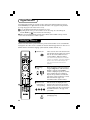
LCD TV
32PF5520D
Introduction
ANALAOGUE
DIGITAL
MENUS
Thank you for purchasing this television set.
This handbook has been designed to help you install and operate your TV set.
We would strongly recommend that you read it thoroughly.
Safety information. . . . . . . . . . . . . . . . . . . . . . . . . . . . . . . . . . . . . . . . . . . . . . . . . . . . . . . . . . . . . . . . . . . 3
Presentation of the LCD television . . . . . . . . . . . . . . . . . . . . . . . . . . . . . . . . . . . . . . . . . . . . . . . . . . 3
Remote control . . . . . . . . . . . . . . . . . . . . . . . . . . . . . . . . . . . . . . . . . . . . . .. . . . . . . . . . . . . . . . . . . . . . . 4
Remote control buttons. . . . . . . . . . . . . . . . . . . . . . . . . . . . . . . . . . . .. . . . . . . . . . . . . . . . . . . . . . . . . 5
Digital or Analogue channels ? . . . . . . . . . . . . . . . . . . . . . . . . . . . . . . . . . . . . . . . . . . . . . . . . . . . . . . . 6
Mode selector . . . . . . . . . . . . . . . . . . . . . . . . . . . . . . . . . . . . . . . . . . . . . . . . . . . . . . . . . . . . . . . . . . . . . . 7
Installing your television set. . . . . . . . . . . . . . . . . . . . . . . . . . . . . . . . . . . . . . . . .. . . . .. ... . .. . . . . . . . 7
Switching on for the first time . . . . . . . . . . . . . . . . . . . . . . . . . . . . . . . . . . . . . . . . . . . . . . . . . . . . . . 8
Understanding the information on the banner . . . . . . . . . . . . . . . . . . . . . . . . . . . . . . . . . . . . . . . .9
Rearrange services . . . . . . . . . . . . . . . . . . . . . . . . . . . . . . . . . . . . . . . . . . . . . . . . . . . . . . . . . . . . . . . . . . 9
View or Listen to new TV services . . . . . . . . . . . . . . . . . . . . . . . . . . . . . . . . . . . . . . . . . . . . . . . . . . .10
Add new services . . . . . . . . . . . . . . . . . . . . . . . . . . . . . . . . . . . . . . . . . . . . . . . . . . . . . . . . . . . . . . . . . . . 10
Reinstall all services . . . . . . . . . . . . . . . . . . . . . . . . . . . . . . . . . . . . . . . . . . . . . . . . . . . . . . . . . . . . . . . . . 10
Test reception . . . . . . . . . . . . . . . . . . . . . . . . . . . . . . . . . . . . . . . . . . . . . . . . . . . . . . . . . . . . . . . . . . . . . . . 11
Language and location preferences . . . . . . . . . . . . . . . . . . . . . . . . . . . . . . . . . . . . . . . . . . . . . . . . . . .11
Access restrictions . . . . . . . . . . . . . . . . . . . . . . . . . . . . . . . . . . . . . . . . . . . . . . . . . . . . . . . . . . . . . . . . . . 12
Setting up your favourite list . . . . . . . . . . . . . . . . . . . . . . . . . . . . . . . . . . . . . . . . . . . . . . . . . . . . . . . . . 13
Information menu . . . . . . . . . . . . . . . . . . . . . . . . . . . . . . . . . . . . . . . . . . . . . . . . . . . . . . . . . . . . . . . . . . . 13
Downloading new software . . . . . . . . . . . . . . . . . . . . . . . . . . . . . . . . . . . . . . . . . . . . . . . . . . . . . . . . . .14
Using the Options menu . . . . . . . . . . . . . . . . . . . . . . . . . . . . . . . . . . . . . . . . . . . . . . . . . . . . . . . . . . . . .14
TV guide . . . . . . . . . . . . . . . . . . . . . . . . . . . . . . . . . . . . . . . . . . . . . . . . . . . . . . . . . . . . . . . . . . . . . . . . . . . . 15
Recording function . . . . . . . . . . . . . . . . . . . . . . . . . . . . . . . . . . . . . . . . . . . . . . . . . . . . . . . . . . . . . . . . . . 16
Selecting the menu language. . . . . . . . . . . . . . . . . . . . . . . . . . . . . . . . . . . . . . . . . . . . . . . . . . . . . . . . . .17
Automatic tuning of analogue programmes . . . . . . . . . . . . . . . . . . . . . . . . . . . . . . . . . . . . . . . . . . .17
Manual tuning of analogue programmes . . . . . . . . . . . . . . . . . . . . . . . . . . . . . . . . . . . . . . . . . . . . . . 18
Sorting of analogue programmes . . . . . . . . . . . . . . . . . . . . . . . . . . . . . . . . . . . . . . . . . . . . . . . . . . . . .18
Naming of channel. . . . . . . . . . . . . . . . . . . . . . . . . . . . . . . . . . . . . . . . . . . . . . . . . . . . . . . . . . . . . . . . . . . 19
Editing of channel. . . . . . . . . . . . . . . . . . . . . . . . . . . . . . . . . . . . . . . . . . . . . . . . . . . . . . . . . . . . . . . . . . . . 19
Picture settings . . . . . . . . . . . . . . . . . . . . . . . . . . . . . . . . . . . . . . . . . . . . . . . . . . . . . . . . . . . . . . . . . . . . . 20
Sound settings . . . . . . . . . . . . . . . . . . . . . . . . . . . . . . . . . . . . . . . . . . . . . . . . . . . . . . . . . . . . . . . . . . . . . . .20
Feature settings . . . . . . . . . . . . . . . . . . . . . . . . . . . . . . . . . . . . . . . . . . . . . . . . . . . . . . . . . . . . . . . . . . . . . 20
Timer feature. . . . . . . . . . . . . . . . . . . . . . . . . . . . . . . . . . . . . . . . . . . . . . . . . . . . . . . . . . . . . . . . . . . . . . . . 21
Childlock feature. . . . . . . . . . . . . . . . . . . . . . . . . . . . . . . . . . . . . . . . . . . . . . . . . . . . . . . . . . . . . . . . . . . . 22
Active control feature. . . . . . . . . . . . . . . . . . . . . . . . . . . . . . . . . . . . . . . . . . . . . . . . . . . . . . . . . . . . . . . . 22
PIP feature. . . . . . . . . . . . . . . . . . . . . . . . . . . . . . . . . . . . . . . . . . . . . . . . . . . . . . . . . . . . . . . . . . . . . . . . . . . 23
Screen formats. . . . . . . . . . . . . . . . . . . . . . . . . . . . . . . . . . . . . . . . . . . . . . . . . . . . . . . . . . . . . . . . . . . . . . 24
Smart Picture and sound feature . . . . . . . . . . . . . . . . . . . . . . . . . . . . . . . . . . . . . . . . . . . . . . . . . . . . . 25
Digital teletext . . . . . . . . . . . . . . . . . . . . . . . . . . . . . . . . . . . . . . . . . . . . . . . . . . . . . . . . . . . . . . . . . . . . . . 26
Analogue Teletext . . . . . . . . . . . . . . . . . . . . . . . . . . . . . . . . . . . . . . . . . . . . . . . . . . . . . . . . . . . . . . . . . . . 26
Using the LCD TV as a PC monitor . . . . . . . . . . . . . . . . . . . . . . . . . . . . . . . . . . . . . . . . . . . . . . . . . . 28
Using the HD (high definition) mode . . . . . . . . . . . . . . . . . . . . . . . . . . . . . . . . . . . . . . . . . . . . . . . . 29
Before calling service . . . . . . . . . . . . . . . . . . . . . . . . . . . . . . . . . . . . . . . . . . . . . . . . . . . . . . . . . . . . . . . . 30
Centre Frequencies Table (in KHz) . . . . . . . . . . . . . . . . . . . . . . . . . . . . . . . . . . . . . . . . . . . . . . . . . . 31
Digital TV reception trouble shooting guide . . . . . . . . . . . . . . . . . . . . . . . . . . . . . . . . . . . . . . . . . . 32
Recycling
The materials used in your set are either reusable or can be recycled.
To minimise environmental waste, specialist companies collect used appliances
and dismantle them after retrieving any materials that can be used again (ask
your dealer for further details).
2
Safety Information
•
–
–
–
–
•
•
•
•
•
•
•
•
•
•
•
Disconnect mains plug when :
the red light below the TV screen is flashing continuously.
cleaning the TV screen. Never use abrasive cleaning agents.
there is a lightning storm.
the set is left unattended for a prolonged period of time.
No naked flame sources, such as lighted candles, should be placed on top of the TV or
in the vicinity.
Do not place your TV set under direct sunlight or heat.
Leave at least 5 cm around each side of TV set to allow for proper ventilation.
Avoid placing your set (e.g. near the window) where it is likely to be exposed to rain or
water.
No objects (such as vases) filled with liquids should be placed on top the TV so as to avoid
dripping or splashing of liquids on the set.
Do not shift or move the set around when it is switched on.
Do not touch, push or rub the surface with hard object.
When the surface becomes dusty, wipe gently with absorbent cotton or other soft materials
like chamois. Do not use acetone, toluene and acohol as it causes chemical damage to the
polarizer.
Wipe off saliva or water droplets as soon as possible. Long time contact with polarizar
causes deformations and colour fading.
Be careful of condensation at sudden temperature change. Condensation does damage to
polarizar or electrical contact parts. After condensation fades, smear or spot will occur.
Installation of the LCD TV on the wall should be carried out by qualified servicemen.
Improper and incorrect installation may render the set unsafe,
Presentation of the LCD Television
& LCD TV buttons
• POWER : to switch the TV on or off.
• VOLUME – / + : to adjust sound level.
• MENU : to access or close menus. The
PROGRAM – / + keys can be used to
select an adjustment and the VOLUME
– /+ keys to make that adjustment.
• PROGRAM – / + : to select programmes.
3
Presentation of the LCD Television
Rear of set :
The main connections are made at the bottom
and rear of the television. For more details on
connections, see page 16.
CI
D
DATA
SPDIF
é Power socket
“ HDMI/PC-D*: HDMI input for connecting
a HD (high definition) equipment or
computer (equipped with DVI output
connected with a DVI to HDMI cable).
‘ PC-VGA/CVI-2* : VGA and audio input
for connecting a HD (high definition)
equipment or computer with VGA output.
You also can use aComponent Video to
VGA adaptor to connect to a component
video output OUT digital equipment.
( PC AUDIO IN : Audio input for
connecting computer/equipment with
audio output.
§ AV* : AUDIO and VIDEO IN sockets.
è AUDIO OUT and VIDEO OUT
sockets.
! CVI-1* : for connecting equipment with
Component Video and Audio output.
ç TV aerial socket.
0 Common interface slot : for connecting
a CAM (conditional access module) and a
smartcard.
1 SPDIF output : for connecting equipment
with “DIGITAL IN” input (amplifier with
coaxial digital input).
2 L Headphone jack.
3 REAR/SVHS*: allow for connections for
items such as cameras or gaming stations.
* Press the AV key on the remote control to
display the Source List menu and select TV or
connected peripheral equipment.
Remote control
Insert the two R6-type batteries
(supplied) making sure that they are
the right way round.
The batteries supplied with this appliance do
not contain mercury or nickel cadmium. If you
have access to a recycling facility, please use
this facility (if in doubt, consult your dealer).
When the batteries are replaced, use the
same type.
4
The remote control buttons
1
2
3
4
5
6
7
8
9
10
11
Standby
To set the TV to standby mode. To switch the TV
set on again, press P –/+ or 0 to 9 keys or AV button.
Select *
Press this key to switch between TV, DVD or AUX functions.
DVD/VCR / Teletext Colour buttons
– In DVD/AUX mode, function as DVD/VCR buttons
(refer to page 6).
– In TV teletext mode, function as teletext buttons
(refer to page 26-27).
TV menu
To display or exit from the analogue menus.
Cursor
These 4 keys are used to move within the menu or to
directly access the screen formats.
Analogue or Digital mode
To switch the television between analogue and digital mode.
Volume
To adjust the sound level.
Numerical keys
For direct access to programmes. For a 2 (3) digit programme
number, the second (third) digit must be entered before the dash
disappears.
Sound mode
To switch from Stero to Mono or to choose between different
languages (Dual I, Dual II,..). Note : When the sound mode is
switched to Mono, the indication is displayed in red.
Unused button (no function).
Screen format/Teletext
When in TV mode, functions as screen format feature
(refer to page 24) and when in Teletext mode, use for
teletext function (refer to pages 26-27).
AV / Teletext
– In TV mode, displays Source list to select TV channel or
12 other
External sources (refer to Quick Guide).
13
1
2
3
4
5
6
7
8
9
10
11
12
13
14
Surround sound
To activate/deactivate the Virtual Dolby Surround* effect. In stereo,
you can obtain Dolby Surround Pro Logic sound quality. In mono, a
stereo spatial effect is simulated.
* Manufactured under licence from Dolby Laboratories. “Dolby” “Pro Logic” and the
double-D symbol are trademarks of Dolby Laboratories.
Mode *
The remote control allows you to control the main functions of SOME Philips DVDs
or Auxillary devices. Note : Not available to DVD-R device.
Press the SELECT button to select the required mode : DVD or AUX functions.
The remote control indicator lights up to display the selected mode. It switches off
automatically after 20 seconds if left idle. The remote control automaticallt returns
to TV mode
5
The remote control buttons
14
15
Options menu (refer to page 14).
16
OK button
Confirms selection. Also access program list in Analogue
or Digital mode.
17
18
19
20
TV guide (refer to page 15).
21
22
Teletext (refer to pages 26 - 27)
23
24
25
26
27
Digital menu
To display or exit from the digital menus (when TV is in
digital mode).
14
Programme selection
To access the next or previous programme (or page in
digital menus).
15
Mute
To disable or enable the sound.
16
Previous programme
To access the previously viewed programme. In Digital
mode, it also used as an edit or back space button.
17
18
PIP on/off
Displays PIP screen on TV. Press button repeatedly to
changes size of the window (refer to page 23).
Pixel + (depending on model/version)
Switches the Pixel + demonstration mode on or off.
Active control
Optimises the picture quality depending on the quality of
the incoming signal and ambient light conditions.
19
Unused button (no function).
26
Screen information
In Digital mode, press once to display the information
banner, 2nd time to get more information on the
programme and a 3rd time to remove it (refer to page 9).
In Analogue mode, this displays/removes the
programme information (number, name, sound mode).
Hold down for 5 seconds to permanently display the
analogue programme number on the screen.
Picture and sound settings
Accesses a series of picture and sound settings.
The position Personal coresponds to the settings stored
in the menus.
27
20
21
22
23
24
25
Digital or Analogue channels
To receive TV channels, your television is equipped with 2 tuners. One is for digital channels, the other
is for analogue channels. Use the
(A/D) key of the remote control to switch the TV between
keys to select channels.
analogue and digital mode.Then use the P(age) +/– or
6
Mode selector
Press the
(SELECT) button to select the required mode : DVD or AUX.
The remote control indicator lights up to display the selected mode. It switches
off automatically after 20 seconds if left idle. The remote control automatically
returns to TV mode.
The following keys are opertaional depending on the equipment :
standby
navigation and adjustments
fast rewind
fast forward
digit keys
recording
pause
programme selection
stop
play
tv menu
audio selection
OSD menu
cancel
Installing your television set
& Positioning the television set
Place your TV on a solid stable surface. To
avoid danger, do not expose the TV to water
or a heat source (e.g. lamp, candle, radiator).
Do not obstruct the ventilation grid at the
rear of the set. Leave at least 5 cm around each
side of TV set to allow for proper ventilation.
é Connecting the aerials
• Use the aerial connection lead supplied and
connect the ¬ socket situated at the bottom
of the TV to your aerial socket.
• Connect the power lead to the television and
the mains plug into the wall socket (220-240V/
50 Hz).
“ Switching on
To switch on the set, press the POWER key. A
green indicator comes on and the screen lights
up. Go straight to the chapter “Switching on
for the first time on page 8. If the television
remains in standby mode, press the P(age) +
key on the remote control.
The indicator will flash when you use the remote
control.
7
Switch on for the first time
The first time the TV set is switched on, a
congratulation message will appear on screen.
The language of which changes every 5 seconds.
If the menu is not displayed, press and hold
down the MENU button on the side of the TV
set for 5 seconds to display the menu.
& Press the OK button on the remote control,
the moment your prefered language is
visible on the screen.The Setup menu is
displayed
é The language, corresponding country
and time zone is now preselected
according to the opening screen. However,
you can still change your preferences
before you start a service scan.
8
“ With the cursor keys, select language,
country or Time zone and check if the
adjustment is according to your preferences.
If necessary, use the cursor keys to make
your adjustment and press OK to exit.
CAUTION : if you select a wrong country, the
channel numbering will not be according to the
standard for your country.
‘ Select service scan from the menu and
press OK to start the installation. The
service scan menu is displayed. All the
digital and analogue programmes are
searched for and stored automatically.
When the search is complete, the menu will
indicate the number of digital services and
analogues programmes found.
( Press the OK key twice to start watching
TV. The television then displays the current
programme.The installation is now
complete.
NOTE : If at some point of time you
decide to reset to the factory default
settings, press and hold down the MENU
button on the side of the TV set for 5
seconds. A congratulation message
will appear on screen. Repeat steps
1 - 5 as if this was the first time you
have turned on the TV.
Understanding the information in the banner
When you select a digital programme, an
information banner is displayed for a few
seconds at the top of the screen.
button of the remote
You can also use the
control to display this banner. A second press
displays more information about the programme
(when available).
Symbols description :
i more information about this programme is
available : press the
button to display or
remove it.
Banner description
4 other audio languages are availables and can
be selected in the options menu.
i no function (not applicable).
s the selected Favourite list is displayed in the
one of the colour (red, green, yellow or
blue) of the activated list.
Note : A white colour s will appear if the
programme is stored in one or more of the
favourite list which is currently not activated.
The banner contains information on the preset
number, channel name, programme duration,
transmission clock, programme title and the
time remaining of the current programme.
Rearrange services
This menu allows you to change the order of
the stored digital channels and radio stations.
& From the digital mode, press the
button
to display the setup menu.
é Use the œ button to select installation and
pressÉ twice to select the Service lists
menu.
“ Use the o or œ button to select
Rearrange services and press Ébutton.
‘ Use the o or œ button to select the
channel you want to exchange.
( Press OK button to activate. If you want to
uninstall the selected channel, press the red
button.
§ Use the o or œ button to select the new
channel number you want to exchange it
with.
è Press OK button to confirm. The exchange
is done.
! Repeat the operations ‘ to è until all
the channels are in the required order.
ç Press the
button to exit the menu.
9
View or Listen to new services
This menu allows you to check the availability
of new TV channels or new radio stations that
have been launched by the broadcaster after
the initial installation.
& From the digital mode, press the
button
to display the setup menu.
é Use the œ button to select installation and
pressÉ button twice to select the Service
lists menu.
“ Use the o or œ button to select View new
TV channels or Listen to new Radio
station.
‘ If new services are availables, press É
button to enter into the list and use the o
or œ button to move through the list.
( Press the
button to exit the menu.
Add new services
This menu allows you to search for new TV channels é Use the œ button to select installation and
pressÉbutton.
or radio stations that have been launched by the
“ Pressœ button to select Service setup and
broadcaster after the initial installation.
press É button.
‘ Press É button to select Add new
services and press OK button to activate
the installation. The search begins and only
new channels will be stored and added to the
channel list menu. The percentage of the
installation that has been completed and the
number of channels found is displayed.
( When the search is complete, select store
and press OK button to accept the new
services.
& From the digital mode, press the
button
button to exit the menu.
§ Press the
to display the setup menu.
Reinstall all services
This menu allows you to reinstall all the digital
TV channels and radio stations.
& From the digital mode, press the
to display the setup menu.
button
é Use the œ button to select installation and
pressÉbutton.
“ Pressœ button to select Service setup and
press É button.
‘ Pressœ button to select Reinstall all
services and press É button.
( Press OK button to start the installation.
A search is then made for all digital services
which are then stored automatically. When
the search is completed, the menu will
indicate the number of digital services found.
§ When the search is complete, press OK
button to store the services.
è Press the
10
button to exit the menu.
Test reception
This menu allows you to check the strengh of
the signal you are receiving through your aerial.
& From the digital mode, press the
button to display the setup menu.
é Use the œ button to select installation
and pressÉ button to display the installation
menu.
“ Use œ button to select Test reception and
press Ébutton. You obtain an indication of
the actual programme frequency, the network
name, the signal quality and strength.
‘ You now have to enter the frequency of the
digital channel you want to test.
Your TV magazine can provide the list of digital
channel numbers. Use the table on page 30 to
get the frequency.
( If the signal quality and strength is poor, a
message appears at the bottom of the menu
prompting you to enter the frequency
between the lower and the higher limit. If
after keying the frequency, the reception is
still poor, you can try improving, renewing,
adjusting or updating the aerial. It is however
advisable to contact a specialised aerial
installer in order to achieve best results.
Language and location preferences
This menu allows you to select your preferred
language for audio, subtitle, teletext and menu
and make changes to the location (country
and time zone).
Make your adjustment and press
p button to exit.
OK
button or
Language default settings
• Audio : to select the audio sound language.
•
Subtitle/Teletext : No function (not applicable).
& From the digital mode, press the
button
• Subtitling mode : No function (not applicable).
to display the setup menu.
• Subtitles for hearing impaired : No function
é Use the œ button to select preferences and
(not applicable).
press É button.
• System : to select the menu language.
Location settings
• Country : to select the country where you
are located.
• Time zone : to select the time zone where
you are located.
Digital Audio Output settings
To select AC3 (if the amplifier supports the
Dolby Digital format) or PCM (if it doesn’t
support Dolby Digital format).
NOTE : If you select AC3 sound, you must have
your TV conected to a Home Theatre System or
amplifier. In this mode, no sound will be heard
“ Use œ button to select Languages, Location
or Digital Audio Output and press Ébutton. from the TV speakers directly.
‘ Use the o or œ button to select a setting and ( Press the
button to leave the menu.
press É button to enter into the sub-menu.
11
Access restrictions
This menu allows you to setup the access
restrictions of the digital channels.
& From the digital mode, press the
button to display the setup menu.
é Use the œ button to select Access
restriction and press É.
• Maturity rating : select your preferred rating
to lock the channel.
Maturity rating will only block certain programmes
if the broadcaster provides data with the programme.
• TV channels : select the TV channel you want
to lock and press OK .
• Radio station : select the radio station you
want to lock and press OK .
• Change pin code : press É button to enter
in the menu. Follow the on-screen instruction
to change your access code.
The default pin code is 1234. If you have forgotten
your personal code, you can reset to the default pin
code (1234) by enter the universal code 0711.
( Press the
“ Press the É button to enter into the
Set pin code protection menu.
‘ Use the ÑorÉ button to set to On and
press OK button to exit.You can then access
the other adjustments : Warning : the moment
you use any kind of access restriction, you need to
fill in the pin code when you schedule a program
for recording.
12
button to leave the menu.
The TV is equipped with a Common Interface (CI)
slot (refer to Quick User Guide). A CI module can
enable additional services, for example Pay TV. The
Access Restrictions menu will show the CI Access
Restrictions when a CI module is installed. The CI
module is responsible for the messages and texts
on screen. In case of failure or strange behaviour,
you must call your CI service provider.
Setting up your favourite list
This menu enables you to create a favourite
list with your prefered TV channels and radio
stations. For example, each member of your
family can create his/her own favourite list.
& From the digital mode, press the
button to display the setup menu.
Setup
11:46
Favourites
List 1
Preferences
List 2
Information
List 3
Access restrictions
List 4
Installation
‘ Use the o or œ button to select a setting and
press É button to enter into the sub-menu.
• Name : use the ÑorÉbutton to move
around the name display area (16 characters)
and the – P(age) + buttons to select the
characters. When the name has been entered,
press OK button to exit.
• Select TV channels : use the o orœ button
to select your favourite TV channels and confirm
with OK button. PressÑbutton to exit.
• Select radio stations : use the oorœ button
to select your favourite radio station and
confirm with button. PressÑbutton to exit.
• Add all services : press OK button if you want
to add all the service into your favourite list.
Make changes to your lists of favourite services
Close
• Remove all services : press OK button if you
want to remove all the service from your
favourite list.
é Press É button to enter into the
favourites list menu. You have the choice
button to leave the menu.
( Press the
to create 4 different favourite lists.
“ Use the o or œ button to select your
favourite list : List 1, List 2, List 3 or List 4 § Your favourite list can be selected using the
options menu (see next page).
and press π button.
Information
This menu provides information about the
“ You can activate the menu to automatically
software version and the installation of new
accept any software update of your digital TV.
software.
Normally the product will detect if an update
& From the digital mode, press the
button
is available while it is in standby mode. Next
to display the setup menu.
time the television is turned on a banner will
appear at the bottom of the screen indicating
é Use the œ button to select information and
press É button twice.
new software is available. Selecting OK button
Setup
activates the software download. The software
11:46
download menu will give a description of the
software together with the date and time of
System software
Favourites
the download. This may update certain menus,
Preferences
functions or add new features, but the general
Information
way in which the TV operate will not change.
Once accepted the download will take place at
Access restrictions
the designated time and date.
Installation
Note : The TV must be put into standby when
the download is due in order for it to take
place.
Provides information on problem reports and ...
Close
The software version is displayed.
‘ Press the
button to exit the menu.
13
Downloading new software
Whenever a new software is available, it is advisable to always accept and download the software.
In case new software is available, you will see a message when you switch on the TV.
Using the Options menu
This menu gives you direct access to the:
favourite list, the language selection and some
other selections.
& From the digital mode, press the white
OPTIONS button to display the options
menu.
é Use the o or œ button to select a setting and
press É button to enter the sub-menu.
Options
Favourites
Subtitle language
Audio language
None
List 1
List 2
List 3
List 4
Mode
Selects the active favourite list
Exit
14
• Favourites : use the o or œ button to
select your favourite list and confirm with
OK button.
The “none” option deactivate any favourite list.
To create your own favourite list, see page 13.
• Subtitle language : No function (not
applicable).
• Audio language : to temporarily change
the audio sound language. To permanently
change the audio language, use the Preferences
menu (refer to page 11).
• Mode : you can choose to only have radio
stations, TV channels or services without
audio or video.
Remark : for the UK only, the TV list will contain
both radio stations and TV channels.
• Banner duration : to select the duration
for which the banner is visible.
“ Press the white OPTIONS button to exit
the menu.
TV guide
The TV guide is an Electronic Service Guide
that allows you to look up digital programmes
as you would in a newspaper or TV magazine.
You can navigate through the list of digital
programmes and obtain detailed information
on the programmes. You can also program the
TV to provide a digital channel to be recorded.
& From the digital mode, press the
button to display the TV guide :
1
17:15-17:25
BBC ONE
See It Saw
Preset/service
17:24
Now/Next
Today
Now
Next
1
BBC ONE
See It Saw
Microsoap
2
BBC TWO
Snooker
Ice Skating
3
ITV Channel 3
Trisha
This morning
4
Channel 4
-
-
5
ITV 2
Gmtv2
This afternoon
6
BBC CHOICE
Oakie Doke Bodger & Badger
Record
Record list
Top
Close
A list of all the digital programmes in the
currently selected favourite list is displayed.
é Use the œ button to enter into the
Preset/service list or press Ébutton
to access Today list..
“ Use the Ñ or É button to select a
pro gramme.
Options
‘ The TV guide features are displayed at the
bottom of the screen. Use the coloured
buttons red, green, yellow, blue or white to
activate them :
• Record (red button) : this feature enables
you to record a digital channel even the TV
is in standby mode.You will still have to
program your video recorder.
If you wish to continue watching another
digital channel after setting a timer, you can
do so by changing channels in the normal
way.
Important : In digital mode, if you change the
channel when recording starts, the TV will record
the last channel you have selected.
• Record list (green button) : this menu gives
the list of recording schedules.You can
check, modify, delete or add a new schedule
by using the cursor or coloured buttons as
indicated on the screen.
• Top (yellow button) : to go directly to the
top of the list.
• Close (blue button) : to exit from the TV
guide.
• Options (white † button) : with this
menu, you can select your favourite list,
mode or themes. Themes are areas of
interest, you can for example decide to
display only : drama, news, movie, ...
( Press the
button if you want to display
more information about the selected
programme (if available).
§ Press the
button to exit the menu.
15
Recording function
This feature enables you to record a digital
channel while the TV is in standby mode. You
will still have to program your video recorder.
If you wish to continue watching another
digital channel after setting a timer, you can
do so by changing channels in the normal way.
IMPORTANT : In digital mode, if you change the
channel when recording starts, the TV will record the
last channel you have selected.
The video recorder must be connected to EXT2.
Please note that it is NOT possible to record one
digital channel and watch another digital channel at
the same time. You can however record a digital
channel and watch an analogue channel on your
TV or vice versa.
& From the digital mode, press the
button to display the TV guide.
é Use the œ button to enter into the
Preset/service list or press É button to
access Today list.
“ Press the RED button to call the Record
menu.
11:46
2
BBC 2
Name
Service
See it saw
2 BBC 2
Enter your pin code if locked
Day & Month
16/02
Start time
12:15
End time
12:30
Audio language
Store
Cancel
English
Close
‘ Use the o or œ buttons to select a setting
and press É button to enter into the submenu. Make your adjustment and press OK
or Ñbutton to exit.
• Name : the selected programme will be
displayed here.
16
• Service : you can change the number of
the programme you want to record. Press
OK button to confirm.
Note : it is only possible to change to a number
that is in the currently selected favourite list.
• Enter your pin code if locked : enter
your secret code only if you have activated
the access restriction feature (refer to page 11).
Press the OK button to confirm.
• Day & Month : enter the date by using the
or – P(age) + buttons. Press OK
button to exit
• Start time : enter the start time.
• End time : enter the end time.
• Audio language : select your language and
confirm with OK button.
• Subtitle language : No function (not
applicable).
• Subtitles for hearing impaired : No function
(not applicable).
• Occurrence : select Once, Daily or Weekly
and confirm with OK button.
( Press the RED button to store your
recording. The TV guide reappears.
You can press the GREEN button to display
the list of recordings you have set.
§ If you have finished watching television, you
must leave it in standby in order for the
recording program to be activated.
IMPORTANT : never switch off the TV with the
Power button when a recording has been
programmed, but use the standby key on the
remote control.
è If you wish to continue watching another
digital channel after setting a timer, you can
do so by changing channels in the normal way.
! If you are watching another digital channel
when the timer is due to start, the timer
alarm will sound and present you with the
option of switching channels or continuing to
watch the current channel.
ç You can also watch analogue channels while
recording digital channels. Press the
button to switch the TV to analogue mode.
Selecting the menu language
Before you proceed to do the Automatic
Installation of TV Programmes, select
the menu Language of your choice.
(TV menu) button. The TV
& Press the
Menu is displayed on the screen.
é Use the o or œ button on the remote
control to select the Install.
TV
Auto
“ Press the É button to access the Install
menu (Language is highlighted).
É
É
Sort
Name
Channel Edit
É
É
‘ Select your language using the ÑorÉ
button.
É
( To exit the menu, press the
button.
Automatic tuning of analogue programmes
Auto Store function allows you to automatically
search for all the available analogue programmes.
é Use the œ button to select Install and
press the É button to access Install menu.
& From the analogue mode, press the
(TV menu) key to display the main menu.
“ Use the œ button to select Auto Store and
press the É button to start automatic tuning
of channels. When the automatic tuning is
completed, the Install menu is displayed.
Note : To interrupt or stop automatic tuning,
press
button.
TV
Auto
É
Sort
Name
Channel Edit
É
‘ To exit the menu, press the
button.
É
É
17
Manual tuning of analogue programmes
Manual Sore function allows you to store the
programmes one at a time.
& Press the
(TV menu) button.
é Use the œ button to select Install and
press the É button to access Install
menu.
“ Use the œ button to select Manual Store
and press the É button to access Manual
Store menu.
TV
Install
Language É
É
Store É
É
Name É
Channel Edit É
•
•
•
•
•
Colour System
Sound System
Search
Programme
Fine Tune
Manual
Colour System
Sound System
Search
Channel
Fine Tune
Store
– Colour System
Use the Ñor É button to select Auto
(automatic detection), PAL, NTSC 3.58,
NTSC 4.43 or SECAM.
– Sound System
Use the Ñor É button to select Auto
(automatic detection), BG, I, DK or M.
– Search
Press É button to start manual search.
Searching stops once a transmitting channel
is found. If you know the frequency of the
required channel, you can key in directly
the frequency using the Digit (0 to 9)
buttons.
– Program No
Enter the required number using the ÑorÉ
or Digit (0 to 9) buttons.
–
Fine Tune
If the reception is not satisfactory, adjust using
the ÑorÉ button.
–
Store
Press the É button to store channel.
É
É
É
É
É
‘ Use the o or œ button to select a setting :
( To exit the menu, press the
button.
Sorting of analogue programmes
Sorting function allows you to change the
channel number to another channel number
for a particular TV station.
& Press the
(TV menu) button.
é Use the œ button to select Install and
press the É button to access Install menu.
TV
Install
Auto
É
É
Sort
Name
Channel Edit
18
É
É
É
•
•
•
•
•
•
0
1
2
3
4
5
“ Use the œ button to select Sort.
‘ Press the É button to access Sort mode.
( Use the o or œ button to select the
programme you want to change channel
number.
§ Press the É button to enter sorting mode
(The arrow now points to the left).
è Use the o or œ button to select the new
channel you want to be exchanged.
! Press the Ñ button to activate sorting
mode (The arrow now points to the right
and the sorting is completed).
ç To exit the menu, press the
button.
Naming of channel
Name feature allows you to enter a name
for any channel you select.
& Press the
(TV menu) button.
é Use the œ button to select Install and
press the É button to access Install
menu.
TV
Auto Store
Manual Store
Sort
Name
Channel Edit
É
É
É
2
EL
É
“ Use the œ button to select Name.
‘ Press the É button to access name mode.
( Use the o or œ button to select the
programme you want to name.
§ Press the É button to enter name mode
è Use the o or œ button to key in first
character. Use the É button to move to
next character slot (You can key up to a
maximum of 5 characters.
! To store name, press the É button
repeatedly until you exit name mode. The
name is now indicated at the top left hand
corner of the screen.
ç To exit the menu, press
button.
Editing of channel
Channel Edit feature allows you to edit or
skip programmes which have bad or weak
TV signal or programmes that you do not
watch often.
& Press the
(TV menu) button.
é Use the œ button to select Install and
press the É button to access Install
menu.
“ Use the œ button to select Channel Edit.
‘ Press the É button to access Channel
Edit menu.
( Use the Ñ or É or Digit (0 - 9) button to
select the channel you want to skip.
§ Press the œ button to select Skipped and
use the Ñ or É button to select On
option to activate skipping of channel.
è To exit the menu, press the
button.
TV
É
Auto
É
É
Channel Edit
• Channel
• Skipped
Restoring skipped channels
To restore skipped channels :
– Repeat steps & to ‘ and select the channel
you want to restore by the o or œ button.
– Press Ñ or É button to select Off option
to restore the skipped channel.
19
Picture settings
& Press the
(TV menu) button (Picture is
highlighted).
é Use theÉ button to access Picture menu.
TV Menu
Picture
Brightness
39
É
É
Hue
ColourTemp.
É
“ Use the o or œ button to select a setting
and the Ñor É button to adjust.
‘ To exit the menu, press
button.
Description of the picture settings
• Brightness : this changes the picture brilliance.
• Colour : this changes the intensity of the colour.
• Contrast : this changes the difference between
the light and dark tones
• Sharpness : this changes the picture definition.
• Colour Temp. : this changes the colour
rendering : Cold (bluer), Normal (balanced) or
Warm (redder).
Sound settings
& Press the
(TV menu) button.
é Use the œ button to select Sound.
“ Use theÉ button to access Sound menu.
‘ Use the o or œ button to select a setting
and the Ñor É button to adjust.
TV Menu
Picture
Sound
Features
Install
Sound
Equalizer
É
A
AVL
Dolby Virtual
( To exit the menu, press
20
É
É
• 120 Hz
• 500 Hz
• 1500 Hz
• 5 KHz
• 10 KHz
button.
Description of the sound settings
• Equalizer : to adjust the sound tone (from
bass : 120 Hz to treble 10 kHz.
• Balance : this balances the sound on the left
and right speakers.
• Delta Volume : this is used to compensate any
volume discrepancies between the different
programmes or EXT sockets. This setting is
available for programmes 0 to 40 and the EXT
sockets.
• AVL (Automatic Volume Leveller) : this is the
used to limit increases in sound, especially on
programme change or advertising slots.
• Dolby Virtual : to activate/deactivate the
surround sound effect. You can also access these
settings with the
key.
• Store : this is used to store the sound settings.
Features Settings
The Features menu comprises the following
features, namely, Timer, Child Lock, Contrast+,
NR (Noise Reduction) and PIP (Picture-inPicture).
& Press the
(TV menu) button.
é Use the œ button to select Features
and press the É button to access
Features menu.
“ Use the o or œ button to select a setting
and the Ñor É button to adjust.
Description of the sound settings
Timer : allows you to set the timer to switch
to another programme at a specified time
(refer to page 21).
Child Lock : allows you to lock programmes
(refer to page 22).
Contrast+ : automatic adjustment of the picture
contrast which permanently sets the darkest part
of the picture to black.
NR : attenuates picture noise (snow) in difficult
reception conditions.
TV
Features
Timer
Child Lock
Contrast+
NR
PIP
ime
Time
PIP : to adjust the size and position of the PIP
screen ((refer to page 23).
Time
É
• Channel
• Activate
‘ To exit the menu, press
button.
Timer Feature
The Timer feature allows you to set the timer to
switch to another programme at a specified time
when you are watching another programme or
from standby mode. For the timer to function, the
set must not be switched off. Once the set is
switched off, the timer is disabled.
& Press the
(TV menu) button.
“ Press the É button to access the Timer
menu. Use the Digit (0 - 9) / o / œ / Ñand
É buttons to select a setting and do the
necessary adjustments.
Time : time automatically followsthe time
from the Digital Broadcast.
Note : Ensure the Location and Time Zone
of the Digital TV is correctly set(refer to page 8.
Start Time : enter the start time.
TV Menu
Picture
Sound
Feature
Insta
Stop Time : enter the standby time.
Child
•
NR
•
PIP É • Activate
Timer
ime
Start Time
Stop Time
Channel
Activate
Display
É
É
É
É
É
é Use the œ button to select Features and
press the É button to access Features
menu.
Channel : enter the channel number that
you want to switch to by the Timer.
Activate: the settings include :
– Once for one time activation,
– Daily for each day,
– Off to deactivate Timer.
Display : to activate / deactivate the current
time display on screen.
button.
‘ To exit the menu, press
( Press 2 button to put the TV set in standby
mode. It will automatically come on at the
time set. If you leave the TV set on, it will just
change programme at the time entered (and
will go to standby mode at the Stop Time).
21
Child Lock Feature
The Child Lock feature allows you to lock
programmes to prevent your children from
watching programmes you deem undesirable.
& Press the
(TV menu) button.
é Use the œ button to select Features and
press the É button to access Features menu.
“ Use the œ button to select Child Lock and
press the É button to access the Child Lock
mode.
TV Menu
Sound
Features
Install
T
Child Lock É
Contrast+ É
NR É
PIP É
Access Code
----
Child
Lock
Change Code
Clear All
Lock All
5
F
É
É
É
‘ Use the Digit (0 - 9) to key in access code
0711. A message “Incorrect will appear.
Enter access code 0711 again.
( It will prompt you to change to Change Code.
Use the Digit (0 - 9) to key in your own
four-digit code. Key in the new code again to
confirm. Once the new code is confirmed, the
Child Lock menu will appear.
§ Use the Digit (0 - 9) / o / œ / Ñand É
buttons to select a setting and do the
necessary adjustments.
è To exit the menu, press the
button.
Description of the settings
• Lock Channel : allows you to lock individual
programme. A keylock symbol F will appear
besides the locked programme number.
• Change Code: allows you to change to a new
four-digit code of your choice.
• Clear All: allows you to unlock all locked
programmes.
• Lock All: allows you to lock all programmes.
Active Control Feature
This Active Control feature allows you to
automatically adjust the picture setting for optimal
picture quality continuously under any signal
conditions.
Active Control Off
OR
Active Control On
OR
Active Control On With Sensor
22
& To activate Active Control feature, press the
(Active Control) button repeatedly to
select Active Control On or the Active
Control ON With Sensor option.
Note : If Active Control ON With
Sensor option is selected, the sensor will
sense and adjust picture setting according to
the lighting conditions of the room. Select
Active Control Off option to deactivate
Active Control feature.
é To exit the menu, press
button.
PIP Feature
This feature allows you to call up a PIP
(Picture-in-Picture) window on the screen.
For PIP to function, the HDMI input of the TV
must be connected to digital output of AV
device, e.g. PC / DVD-R (See Quick Guide for
connection)
& Press the
(TV menu) button.
é Use the œ button to select Features and
press the É button to access Features menu.
TV Menu
Picture
Sound
Feature
Insta
“ Use the œ button repeatedly until PIP is
selected and press theÉ button to access
the PIP menu (PIP Size highlighted).
‘ Press the ÑorÉ button to select your
desired PIP size options.
( If you want to move the PIP window
horizontally or vertically, press the œ
button to select Horizontal or Vertical.
§ Press the ÑorÉ button to move PIP
window horizontally or vertically.
è To exit the menu, press
T
T
Child Lock
•
•
Time
PIP
PIP Size
Horizontal
Vertical
Off
É
É
button.
Note
You can also access the PIP window directly via
(PIP) button on the remote control.
the
button to display the PIP
• Press the
window.
• Press the
button repeatedly to toggle
through the various PIP window sizes and
select your desired PIP wndow size.
• Use the ÑorÉ button to change the
programme on the PIP screen.
23
Screen Formats
The pictures you receive may be transmitted in 16:9 format (wide screen) or 4:3 format
(conventional screen). 4:3 pictures sometimes have a black band at the top and bottom of the
screen (letterbox format).This function allows you to optimise the picture display on screen.
button to select the different modes:
Press the
This TV set is also equipped with automatic switching which will select the correct-screen format,
provided the specific signals are transmitted with the programmes.
4:3
The picture is reproduced in 4:3 format and a black band is displayed
on either side of the picture.
Movie Expand 14:9
The picture is enlarged to 14:9 format, a thin black band remains on
both sides of the picture.
Movie Expand 16:9
The picture is enlarged to 16:9 format.This mode is recommended
when displaying pictures which have black bands at the top and
bottom (letterbox format).
Subtitle Zoom
This mode is used to display 4:3 pictures using the full surface of the
screen leaving the sub-titles visible.
Superzoom
This mode is used to display 4:3 pictures using the full surface of the
screen by enlarging the sides of the picture.
Widescreen
This mode restores the correct proportions of images transmitted in
16:9.
Note: If you display a 4:3 picture in this mode, it will be enlarged horizontally.
24
Smart Picture and Sound Feature
Smart Picture feature offers you a choice of 5 picture settings, namely, Rich, Natural, Soft,
DVD/VCD and Personal.
Smart Sound feature offers you a choice of 4 sound settings namely, Theatre, Music, Voice and
Personal.
Press
or
button repeatedly to cycle through the settings to select your desired mode.
Defintion of Picture Settings
Personal
: Picture settings are set to your
preference.
Rich
: Emphasize very vibrant colours.
(Suitable for AV mode in brightly-lit
room)
Natural
: Emphasize original colours.
Soft
: Emphasize “ warm” colours. (Suitable
for dimly-lit room condition and gives
cinema-like effect when light is
switched off).
DVD/VCD
: Emphasize “soft” colours.
(Suitable for playing computer
games, sur•ng, etc.)
Personal
OR
Rich
OR
Natural
OR
Soft
OR
DVD/VCD
Note : The Personal setting is the setting that you set up using the Picture menu in the main menu.
This is the only setting in the Smart Picture settings that can be changed. All the other settings are preset at the factory
Defintion of Sound Settings
Personal
: Sound settings are set to your preference.
Theatre
: Emphasize sensation to action.
(Bass and Treble boosted)
Music
: Emphasize low tone. (Bass boosted)
Voice
: Emphasize high tone. (Treble boosted)
Personal
Rich
NaturalSoft
DVD/VCD
Personal
OR
Theatre
OR
Music
OR
Voice
25
Digital Teletext
Some digital channels, which you select like any other channel, offer dedicated teletext services (for
instance BBCTEXT). Some digital channels also offer information on the programme being broadcast
(a message may appear at the bottom of the screen).
& To use the digital teletext, follow the instructions on screen.
é Depending on the service, you can be asked to use the cursor keys, the coloured keys, the
Teletext On/Off key (
) and sometimes the numerical keys.
“ When you have finished watching teletext, select a different channel with P -/+ keys or follow
the on screen instructions to return to picture.
Analogue Teletext
Teletext is an information system broadcast by certain channels which can be consulted like a
newspaper. It also offers access to subtitles for viewers with hearing problems or who are not
familiar with the transmission language (cable networks, satellite channels, etc.).
& Teletext call
This is used to call or exit teletext mode.
The summary appears with a list of items
that can be accessed. Each item has a
corresponding 3- digit page number.
If the channel selected does not broadcast
teletext, the indication 100 will be displayed
and the screen will remain blank (in this
case, exit teletext and select another
channel).
é Selecting a
page
Enter the number of the page required
using the DIgit 0 to 9 or P -/+ buttons.
Example : page 120, enter 120. The
number is displayed top left, the counter
turns and then the page is displayed.
Repeat this operation to view another
page. If the counter continues to search,
this means that the page is not
transmitted. Select another number.
“ Direct access
to the items or
corresponding
Coloured areas are displayed at the
bottom of the screen. The 4 coloured
buttons are used to access the items or
corresponding pages. The coloured areas
flash when the item or the page is not
yet available.
‘ Contents page
This returns you to the contents page
(usually page 100).
“
é
é
‘
26
&
Analogue Teletext
!
( Stop sub-page
acquisition
Certain pages contain sub-pages
which are automatically displayed
successively. This button is used to
stop or resume sub-page acquisition
The indication
appears at the
top left of the screen.
§ Double page
page teletext
To activate or deactivate the double
teletext display mode.The active
page is displayed on the left and
the following page is displayed on
the right. Press f you want to hold
a page (i.e. the contents page).The
active page is then displayed on the
right.To return to normal mode,
press .
è Hidden information
To display or hide the concealed
(games information solutions).
! Enlarge a page
This allows you to display the top
or bottom part of the page and
then return to normal size.
!
§
(
è
o œ
27
Using the LCD TV as a PC monitor
NOTE
• When using the LCD TV as a PC monitor, slight diagonal interference lines may be observed
when it is operated under electromagnetic interference environment but will not affect the
performance of this product.
• For better performance, good quality DVI cable with good noise isolation filter is recommended.
Choosing PC-VGA mode
& Press the AV button on the remote control
to display the Source List.
é Use the o or œ button to select PC-VGA
and then press the É button to switch
the TV to PC-VGA mode.
To return to TV mode, press the AV button,
select TV and confirm with É button.
Choosing PC-D mode
& Press the AV button on the remote control
to display the Source List.
é Use the o or œ buttons to select PC-D
and then press the É button to switch
the TV to PC-D mode.
To return to TV mode, press the AV button,
select TV and confirm with É button.
Using the PC menus
& Press the TV MENU button to display the
PC menu.
é Use the o / œ / Ñ/ É buttons to select,
adjust or activate the PC menu items
namely : Picture, Audio Selection,
Features, Reset to Factory.
Picture menu
– Brightness / Contrast : to adjust the
brightness and contrast.
– Horizontal / Vertical* : to adjust the
horizontal and vertical placing of the image.
– Adjust Colour : to adjust the colours (cold,
normal or warm).
Audio Selection
To choose the sound reproduced on the TV (PC
or TV).
Features
• Phase/Clock*: eliminates the horizontal
(Phase) and vertical (Clock) interfering lines.
• Format : to choose between full screen or
native format of the PC screens.
• PIP : to adjust the size and position of the PIP
screen.
• Auto Adjust*: position is set automatically.
* These adjustments are not available in PC-D
mode.
Reset To Factory Setting
To return to the factory settings (default
settings).
Here is the list of the different display resolutions available on your TV :
Digital PC (DVI-I)
Analogue PC (YPbPr)
28
640 x 350 p
800 x 600 p
1152 x 864 p
640 x 480 p
832 x 624 p
1280 x 960 p
720 x 400 p
1024 x 768 p
1280 x 1024 p
640 x 350 p
720 x 400 p
832 x 624 p
640 x 480 p
800 x 600 p
1024 x 768 p
Using the HD (High Definition) mode
HD Mode
Using the HD menus
The HD (High Definition) mode allows you to
enjoy clearer and sharper pictures through the
CVI-1, CVI-2 or HDMI input if you are using a
HD receiver/ equipment that can transmit high
definition programming.
& Press the TV MENU button to access the
HD menu.
é Use the o / œ / Ñ/ É buttons to select,
adjust or activate the menu items (the
settings are automatically saved) namely :
Picture, Sound and Features.
You must connect the HD equipment (see
Quick Use Guide).
Choosing HD mode
& Press the AV button on the remote control
to display the Source List.
é Depending on the connections, use the
o œ buttons to select CVI-1 (SD/HD)*,
CVI-2 (SD/HD)* or HDMI and press the
É button to switch the TV to the selected
mode.
“ To return to TV mode, press the AV button,
select TV and confirm with É button.
Picture / Sound menus
The HD Picture/Sound settings are the same as
the TV Picture/Sound settings and function
exactly the same way as in the TV Picture/Sound
menus.
Features menu
• PIP : to adjust the size and position of the PIP
screen.
• Horizontal : to adjust the horizontal placing
of the image.
• Vertical : to adjust the vertical placing of the
image.
* SD - Standard Definition
* HD - High Definition
Here is the list of the different display resolutions available on your TV :
Digital HD (DVI-I)
EDTV 480 p
HDTV 720 p
HDTV 1080 i
480 i
480 p
720 p
576 i
576 p
1080 i
EDTV 576 p
Analogue PC (YPbPr)
29
Before calling service
Below is a list of frequently occurred symptoms. Before you call service, make these simple checks.
Some of these symptoms can easily be rectified if you know what to do.
Symptom
What you shoul do
No power
• Check the TV’s AC power cord is plugged into the mains socket. If
there is still no power, disconnect plug. Wait for 60 seconds and
re-insert plug. Switch on the TV again.
Poor reception
• The proximity of mountains or high buildings may be responsible for
ghost pictures, echoing or shadows. In this case, try manually adjusting
your picture: see Fine Tune (p. 18) or modify the orientation of the
outside aerial. If you are using an indoor aerial, reception may be
difficult in certain conditions.You can improve reception by rotating
the aerial. If the reception remains poor, you will need to use an
external aerial
No picture
• Check the antenna connection at the rear of the TV.
• Try another programme to con•rm whether it is a particular TV
station problem or otherwise.
Good picture but
no sound
• Try increasing the volume.
• Check that the sound is not muted. If it is muted, press the Mute
button on the remote control to restore sound.
Good sound but poor • Try increasing the contrast and brightness setting.
colour or no picture
Snowish picture and
noise
• Check antenna connection at the rear of the TV.
Horizontal dotted
line
• Possible electrical interference e.g. hairdryer, vacuum cleaner, etc.
Switch off appliances.
Double images or
“Ghost” images
• Possible poor positioning of antenna. Using a highly directional
antenna may improve reception.
TV not responding
to remote control
handset
• Aim remote control handset directly at remote control sensor lens
on the TV.
• If still not responding, check whether plastic insulation sheet is
removed and the battery is placed correctly (words should be facing
you) .
• Try changing the battery.
• If the set receives no signal for 15 mins, it automatically goes into
standby mode.
Incorrect Display
position (PC mode)
• Adjust the image position using the Horizontal Position and/or
Vertical Position in the PC Mains Controls menu.
No Video Input
(PC Mode)
30
• Make sure the monitor cable is properly connected to the PC input
(VGA/DVI) at the bottom of the TV.
• Check whether the monitor cable has bent pins.
Before calling service
Vertical flicker
appears (PC Mode)
• Try eliminating the vertical bars by using the Clock Adjustment of
Video Noise in the Main PC Menu.
Horizontal flicker
appears (PC Mode)
• Try eliminating the horizontal bars by using the Phase. Adjustment of
Video Noise in the Main PC Menu.
Screen too bright or
dark (PC Mode)
• Try adjusting the contrast and brightness in the Main Menu.
PC and PIP modes
do not work?
• Check that you have confiured the computer on a compatible
display resolution.
Standby
• If th set receives no signal for 15 minutes, it automatically goes into
standby mode. To save power, your set is fitted with components
that give it a very low power consumption when in standby mode
(less than 1 W).
Cleaning the set
• Only use a clean, soft and lint-free cloth to clean the screen and the
casing of your set. Do not use alcohol-based or solvent-based products.
Still no results?
• Disconnect the mains plug of the TV for 30 seconds then reconnect
it. If your TV set breaks down, never attempt to repair it yourself:
contact your dealer’s after-sales service.
Centre Frequencies Table (in KHz)
Digital Frequency
Channel
Nominal Centre
Frequency KHz
21 . . . . . . . . . . . . . . . . .474 000
22 . . . . . . . . . . . . . . . . .482 000
23 . . . . . . . . . . . . . . . . .490 000
24 . . . . . . . . . . . . . . . . .498 000
25 . . . . . . . . . . . . . . . . .506 000
26 . . . . . . . . . . . . . . . . .514 000
27 . . . . . . . . . . . . . . . . .522 000
28 . . . . . . . . . . . . . . . . .530 000
29 . . . . . . . . . . . . . . . . .538 000
30 . . . . . . . . . . . . . . . . .546 000
31 . . . . . . . . . . . . . . . . .554 000
32 . . . . . . . . . . . . . . . . .562 000
33 . . . . . . . . . . . . . . . . .570 000
34 . . . . . . . . . . . . . . . . .578 000
35 . . . . . . . . . . . . . . . . .586 000
36 . . . . . . . . . . . . . . . . .594 000
37 . . . . . . . . . . . . . . . . .602 000
38 . . . . . . . . . . . . . . . . .610 000
39 . . . . . . . . . . . . . . . . .618 000
40 . . . . . . . . . . . . . . . . .626 000
41 . . . . . . . . . . . . . . . . .634 000
42 . . . . . . . . . . . . . . . . .642 000
43 . . . . . . . . . . . . . . . . .650 000
44 . . . . . . . . . . . . . . . . .658 000
45 . . . . . . . . . . . . . . . . .666 000
Digital Frequency
Channel
Nominal Centre
Frequency KHz
46 . . . . . . . . . . . . . . . . .674 000
47 . . . . . . . . . . . . . . . . .682 000
48 . . . . . . . . . . . . . . . . .690 000
49 . . . . . . . . . . . . . . . . .698 000
50 . . . . . . . . . . . . . . . . .706 000
51 . . . . . . . . . . . . . . . . .714 000
52 . . . . . . . . . . . . . . . . .722 000
53 . . . . . . . . . . . . . . . . .730 000
54 . . . . . . . . . . . . . . . . .738 000
55 . . . . . . . . . . . . . . . . .746 000
56 . . . . . . . . . . . . . . . . .754 000
57 . . . . . . . . . . . . . . . . .762 000
58 . . . . . . . . . . . . . . . . .770 000
59 . . . . . . . . . . . . . . . . .778 000
60 . . . . . . . . . . . . . . . . .786 000
61 . . . . . . . . . . . . . . . . .794 000
62 . . . . . . . . . . . . . . . . .802 000
63 . . . . . . . . . . . . . . . . .810 000
64 . . . . . . . . . . . . . . . . .818 000
65 . . . . . . . . . . . . . . . . .826 000
66 . . . . . . . . . . . . . . . . .834 000
67 . . . . . . . . . . . . . . . . .842 000
68 . . . . . . . . . . . . . . . . .850 000
69 . . . . . . . . . . . . . . . . .858 000
31
Digital TV Reception Trouble Shooting Guide
After a channel scan, some channels or no channels are found
• Your TV antenna may not be properly connected to your digital receiver
1. Did you connect your antenna as illustrated on Page 7?
2. Is the antenna wall socket in good condition? For optimum and reliable contact
performance, the antenna wall connector should be an ‘F’ (screw) type connector.
3. Are you using a quality antenna fly lead between antenna wall socket and iDTV?
The use of RG6 or RG59 Quad Shield 75 ohm coaxial cable fly leads with metal ‘F’
connectors provides a secure, reliable connection that also greatly reduces impulse
noise pickup. Low cost antenna fly leads with right-angled plastic molded connectors
are a common cause of poor reception and impulse noise pickup.
• Digital TV or some channels (services) may not have yet commenced in
your area.
Consult with your retailer who has local knowledge on DTV broadcasting
• The signal received may be too poor to allow the digital receiver to find some
or all available channels or
• Your old antenna may not be designed to receive all DTV channels or
• Antenna reception performance has deteriorated due to weathering, corrosion
of antenna connections / cabling and broken elements.
Please contact your local TV antenna installer.
Generally, a quality suburban antenna installation consists of: (1) separate VHF (Ch’s 6-12)
and UHF (Ch’s 27-69) antenna’s (rule of thumb; larger antenna’s with more elements
capture more signal). If you live within 5-10Km of DTV transmission towers, a combined
VHF/UHF antenna should be adequate. Outside this area, separate VHF and UHF antennas
provide superior reception performance.; (2) a shielded diplexer that combines the
separate VHF and UHF antenna signals intoone signal. Depending on DTV signal conditions,
some installations may instead require a VHF/UHF masthead amplifier. (3) RG6 Quad Shield
75 ohm coaxial cabling (4) ‘F’ connectors. These guidelines equally apply to regional
installations except for the antenna, which, in most cases will be UHF only, since most DTV
broadcasting is usually located in the UHF bands.
To avoid personal injury and property damage, qualified antenna installers must perform antenna
installations, repairs and inspections.
• I am a home unit dweller
The existing Master Antenna TV (MATV) system may have been originally designed for
analog PAL TV only, and may require a substantial upgrade or replacement to also carry
DTV signals. Please consult your Body Corporate.
• Received signal is ‘too weak’ (i.e.; poor quality) to generate a stable picture
Please check antenna & cabling or contact your local TV antenna installer.
32
Digital TV Reception Trouble Shooting Guide
Some channels display “No Signal” or “Loss of Signal”
Picture regularly breaks up on some channels
• The received signal may be too weak to allow the digital TV receiver to reliably ‘lock’ to
the desired signal and generate a stable picture.
Please check antenna & cabling or contact your local TV antenna installer.
• ‘Impulse Noise’ interference from household appliances such as lights, refrigerators,
washing machines, electric stoves etc may cause pictures to break up and audio to mute
or distort momentarily
In the first instance, replace antenna fly-lead with a quality RG6 or RG59 Quad Shield 75 ohm
coaxial cable fly lead. If problem persists, check / improve antenna & cabling or contact your local TV
antenna installer.
• A masthead amplifier may be ‘over-boosting’ the antenna signal, which is overloading
the DTV tuner, resulting in poor reception on some or all channels.
Please contact your local TV antenna installer.
Picture very
infrequently
breaks upbreaks
on someup
or all
Picture
very
infrequently
onchannels
some or all channels
• Electrical atmospheric interference caused by local or distant lighting storms or heavy
rain with wind in ‘leafy’ locations may cause pictures to break up and audio to mute or
distort momentarily.
• Impulse noise interference from an infrequently used electrical appliance, or a passing
vehicle or lawn mower with a ‘noisy’ ignition system.
For further DTV reception trouble shooting information please visit the Digital Broadcasting Australia (DBA)
website: www.dba.org.au
33
Specifications are subject to change without notice.
Trademarks are the property of Koninklijke Philips Electronics N.V. or their respective owners.
2005 © Koninklijke Philips Electronics N.V. All rights reserved.
www.philips.com
3139 125 33781