1
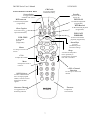
2005 HF Series User’s Manual
112505.0959
32HF7543 - 37HF7543 – 42HF7543 - User’s Manual
1
2005 HF Series User’s Manual
112505.0959
SAFETY INFORMATION
•
•
•
•
•
•
Disconnect mains plug when:
Ø the red light below the TV screen is flashing continuously.
Ø a bright white line is displayed across the screen.
Ø cleaning the TV screen. Never use abrasive cleaning agents. Use a slightly
damp chamois leather or soft cloth.
Ø there is a lightning storm.
Ø the set is left unattended for a prolonged period of time.
No open flame sources, such as lighted candles, should be placed on or near the TV.
Do not place your TV set under direct sunlight or heat.
Leave at least 1/4” around each side of TV set for sufficient ventilation to avoid overheating.
Avoid placing set where it is likely to be exposed to rain or water (e.g. near the
window).
No objects filled with liquids should be placed on top the TV in order to avoid
dripping or splashing of liquids into the set.
USEFUL TIPS
• Do not leave the television off (in standby mode) for a prolonged period of time.
• Do not re-position the television while it is switched on. Non-uniformity in screen
color may result.
• Never attempt to repair a defective TV yourself. Always consult skilled service
personnel.
2
2005 HF Series User’s Manual
112505.0959
Before Calling Service
A list of common symptoms is presented as follows. Before you call for service, perform
these simple checks. Some of these symptoms can be readily corrected. Note: Please
become familiar with the commercial features as described in TV Installation / Setup,
because the effects of several of these features, if they are not thoroughly understood,
might appear as faulty operation.
Symptom
TV does not respond to commands (volume,
channel, power), or cannot be turned on if it is off,
or cannot be turned off if it is on.
Possible Corrective Action
Check commercial TV setup (TV installation /
setup) menu settings, including power forced on,
front keypad lockout, channel ring, volume
maximum features.
• TV automatically turns off after when no RF
signal is present.
• Check Energy Saving Programmability setting
(see ESP) in TV installation / setup.
Verify that the TV’s AC power cord is plugged into
the mains socket. If there is still no power,
disconnect plug. Wait for 60 seconds and re-insert
plug. Switch on the TV again.
• Check antenna connection at rear of the TV.
• Possible TV station problem. Try another
channel.
• Try increasing the volume.
• Check that the sound is not muted. If it is
muted, press the Mute button on the remote
control to restore sound.
• Check the MAX VOLUME settings in the
setup menu
Check picture adjustments (brightness, contrast,
color, tint).
• Check antenna, cable, and/or set-top box
connections and antenna / cable.
• Possible electrical interference from appliances
or other sources.
Check antenna, cable and/or set-top box.
• Check batteries.
• Aim remote control handset directly at remote
control sensor lens on the TV.
The first time a digital channel is tuned, the tuning
time will be slow as information embedded in the
signal is processed. After that digital channel
tuning will be faster.
TV turns off by itself
No power
No picture
Picture ok, no sound.
Sound ok, but poor color or no picture
Snowy / noisy picture
Double images / “ghost” images
Television does not respond to remote control.
Channel Change to digital channels is slow
Note: These televisions are shipped in commercial mode with the processing of PSIP Virtual Channel
Table (VCT) disabled. To enable PSIP VCT processing, see the Hotel Mode Menu section.
3
2005 HF Series User’s Manual
112505.0959
Basic Television Connection
Antenna Connection
• Connect the antenna or RF cable signal
to the 75-ohm RF ‘F’ connector socket
located on the TV’s rear jack panel.
Mains Connection
• Verify that the mains voltage and
frequency are correct. Please refer to the
product labeling and documentation.
Note: The power button on the front panel
does not disconnect the television from the
AC mains; it toggles the TV’s power mode
between on and standby. To completely
remove AC mains power, you must unplug
the AC mains plug.
Switching on the Set
• Press the power button on the TV’s front
panel or on the remote control to switch on
the set.
Note 1: If the TV is in commercial mode, it
might not respond to the front panel or the
remote control, depending upon the TV’s
mode and setup configuration. Please refer
to the section TV Installation and TV
Setup Menu in this documentation for
more information.
Note 2: See Mains Connection, above.
4
2005 HF Series User’s Manual
112505.0959
Use And Care of Remote Control
To load the supplied batteries into the remote
control:
Remove the battery compartment lid
from the back of the remote control.
Insert the correct type of batteries into
the compartment.
Ensure that the (+) and (-) ends of the
batteries are placed in the correct positions.
Re-attach the battery compartment lid.
Note: Always remove the batteries from the
remote control if it is not to be used for a long
period. This can help prevent damage to the
remote from possible battery leakage.
REMOTE CONTROLS
The following remote controls are applicable to the Philips’ HF-series television
products. These can be used for guest control functions and setup and configuration
purposes.
RC2888/01
Guest Remote
RC2573GR
Setup Remote
(Optional)
5
2005 HF Series User’s Manual
112505.0959
A Guest Remote may be used to access a limited menu and to perform the basic
control functions of the television. Remote control RC2573GR is an optional remote
control specifically for configuring Institutional TV / Business Display Solutions features
and SmartCard settings. Refer to the documentation for the RC2573GR for detailed
information. Remote controls are optional accessories for all HF-series products and must
be purchased separately.
When the RC2573GR in is setup mode and RECALL is pressed, information
similar to below will appear on the TV screen. This information describes the TV chassis
firmware version, diagnostic codes, setup information, and other service and technical
data regarding the television configuration.
Line 1 shows the SmartPort Processor part number. Line 2 shows the software
version number. Line 5 shows the model number of the set (no distinction is made on
screen size). Lines 3, 4, 6 are blank. Line 7 shows the communication mode (always SPSPI for these models) and the status of the SmartPort, either online or offline. Line 8
shows the source or channel that has been selected and if a signal is detected on that
source (Tuned or Not Tuned). Below is an example screen:
01
02
03
04
05
06
07
08
3104 337 01381
IJ5U1-1.0
MODEL xxHF7543 / 37
COMMUNICATION SP-SPI ONLINE
TV 3 TUNED
6
2005 HF Series User’s Manual
112505.0959
CH Guide
GUEST REMOTE CONTROL KEYS
Source Select
To activate Channel
Guide functionality
To toggle between
available video sources
Standby
Press to s witch
the TV off.
DVD PAUSE
DVD PLAY
To Pause DVD playback
(if applicable)
To Start DVD playback
(if applicable)
DVD Rewind
To Rewind DVD playback
(if applicable)
Close Caption
To activate Close
Caption functionality
DVD FAST
FORWARD
DVD STOP
To Fast Forward DVD
playback (if applicable)
To Stop DVD
playback
(if applicable)
Smart Keys
To select
predefined picture
and sound settings.
Menu
To call up or exit the
menus.
Sleep
Activates the sleep timer.
Press repeatedly to
increment the countdown
time with 15 minutes.
+ Vol To adjust the volume.
Mute
Interrupt the sound or
restore it.
+ CH – Channel
Selection
To move up or down a TV
channel.
0/9 Digit keys
To select a TV channel.
For a two digit program
number, enter the second
digit before the dash
appears.
Alternate Channel
Formats
To toggle between
alternating channels
To adjust TV
screen formats
7
2005 HF Series User’s Manual
112505.0959
TV Setup Main Menu
SETUP
ENGLISH
>
>
>
>
>
>
LANGUAGE
COMMUNICATION
CHANNEL INSTALL
SWITCH ON / OSD
SECURITY
CONTROL
CLOSED CAPTION
•
•
•
•
To enter, press “M” on the RC2573GR setup remote control.
To scroll through the menu, press
(cursor up / down) on the remote
control. A highlight indicates that the respective menu item’s setting is selected for
modification.
To modify the setting of the selected menu item press
(cursor left /
right).
To exit, press “M” on the RC2573GR setup remote control.
TV Setup Menu and Sub-Menus
LANGUAGE
(English / Espanol / Francais)
When you first enter the TV SETUP menu, LANGUAGE is highlighted. You can scroll
to the LANGUAGE item. Select the desired language with cursor left or cursor right.
COMMUNICATION
COMMUNICATION
COMMERCIAL MODE
YES/NO
COMMERCIAL MODE
COMMERCIAL MODE is no rmally YES during typical operation in BDS Television
applications. When Commercial Mode is NO, the television’s Hotel Mode Menu may be
accessed. The user sends the sequence 3 1 9 7 5 3 MUTE to invoke the hotel mode submenu.
8
2005 HF Series User’s Manual
112505.0959
The specific steps for entering Hotel Mode Menu, setting Hotel Mode to No, making
changes to the consumer set and then reversing the process are as follows:
1. Using RC2573GR setup remote, enter setup menu
2. Go to “Communication” item and right arrow to select
3. Set “Commercial Mode” to No
4. Exit setup menu (press “M” twice)
5. Press sequence 3,1,9,7,5,3, mute to enter “Hotel Mode Menu”
6. Set Hotel Mode to No
7. Scroll down to Store, press right arrow to go to “Store” on the right side of screen.
Press “F” button to get “Store Completed”
8. Remove AC power from set for at least 5 seconds
9. Power on set. Set is now in consumer mode and changes can be made to the noncommercial settings.
10. When finished with consumer settings, press sequence 3,1,9,7,5,3, mute to enter
“Hotel Mode Menu”
11. Set Hotel Mode to yes, scroll down and ensure PSIP** is set to desired setting. Scroll
down to Store, press right arrow to go to “Store” on the right side of screen. Press
“F” button to get “Store Completed”
12. Remove AC power from set for at least 5 seconds and the n restore AC power to set.
Set is now back in Hotel mode
13. Wait about 10 seconds (you will hear a click around that time), then press power
button on setup remote (in setup mode)
14. Wait a few seconds and press “M” to invoke menu.
15. Go to “Communication” item and right arrow to select
16. Set “Commercial Mode” to Yes
17. Exit setup menu (press “M” twice)
18. Press power button on setup remote to turn set off and then turn back on to ensure
settings are saved.
19. Set should now work as a commercial set
** ATSC digital terrestrial broadcast channels send information along with the television signal that is
known as PSIP information. PSIP information contains data such as the channel numbers that will
normally be seen by the viewer of the channel. These channels are virtual channels meaning the channel
numbers displayed may not represent the channel numbers where the signals are physically located. In
normal viewing of ATSC signals by consumers, these virtual channels are used when tuning. However, in
some commercial applications there is a desire not to use virtual channels and instead use the physical
channel numbers when tuning.
The Hotel Mode Menu allows the selection of “PSIP” to either Yes or No. Setting PSIP to Yes means that
the PSIP Virtual Channel Tables will be processed and used when tuning digital signals. Setting PSIP to
No means PSIP Virtual Channel Tables will not be processed and digital channels will be tuned using the
RF channel location and MPEG program number as defined in PAT/PMT.
9
2005 HF Series User’s Manual
112505.0959
CHANNEL INSTALL
(>)
The CHANNEL INSTALL menu allows the user to configure the channels that can be
accessed. When installing the channels, different inputs can be mapped to TV channels to
allow seamless integration into the channel map. The two sections below explain how to
install analog channels and AV inputs, and how to install digital channels.
Installing Analog channels
When selected, CHANNEL INSTALL menu appears as follows. Configure the inputs
and channels as described.
CHANNEL INSTALL
CHANNEL
SOURCE
RING
LABEL
AUTO INSTALL TV
•
•
•
•
•
TV 1– 125
ANALOG/DIGITAL / AV 1 / AV 2 /HDMI 1/HDMI 2/SIDE AV
SAVED
(
)
>
>
CHANNEL:
Select the channel you wish to configure.
SOURCE:
Select the input source that you wish to associate with the specified CHANNEL. This
feature enables you to “map” (re-assign) a numeric channel number to a video input,
rather than to its normal RF TV channel (i.e. ANALOG). In other words, TV channel
2 could be used to select the AV 1 video input instead of RF (ANALOG) channel 2.
Special instructions for mapping digital channels are included below.
RING:
Specify whether the current channel or input is to be SAVED to or DELETED from
the cha nnel ring (i.e., list of channels available for selection by means of a standard
guest remote control).
LABEL:
Input a maximum of 8 characters for the channel’s label. Cursor to the right to start
the first character. Cursor left or right to navigate between character positions within
the label field. Cursor up or down to select characters from the list: A to Z, 0 to 9, -, .,
/, :, =, ?, ;, <, >, @ or space. To edit, re- input the character at its position. To exit,
press “M” to navigate out of the label editing field.
AUTO INSTALL TV:
When AUTO INSTALL TV is selected, the TV performs an automatic search for the
presence of viable RF analog signals at its tuner input. Channels 1 through 125 will
be checked. When a viable signal is detected on a given channel, that channel is
added to the channel ring. Any command from a remote control terminates the AUTO
PROGRAM session.
10
2005 HF Series User’s Manual
112505.0959
Installing Digital Channels
CHANNEL INSTALL
TV 1 – 125
DIGITAL
DELETED / SAVED
0 – 999
0 – 999
(
) >
>
CHANNEL
SOURCE
RING
MAJOR
MINOR
LABEL
AUTO INSTALL TV
•
•
•
•
•
•
CHANNEL:
Select the channel or input you wish to configure.
SOURCE:
When DIGITAL is selected two additional entries are added to the menu to allow for
mapping the digital channels.
RING:
Specify whether the current channel or input is to be SAVED to or DELETED from
the channel ring (i.e., list of channels available for selection by means of a standard
guest remote control).
MAJOR:
This item indicates the Major cha nnel of two-part ATSC channel number if PSIP is
YES in the Hotel Mode Menu. This item indicates the RF channel number if PSIP is
set to NO.
MINOR:
This item indicates the Minor channel of two-part ATSC channel number if PSIP is
YES in the Hotel Mode Menu. This item indicates the Program number as defined by
PMT if PSIP is set to NO.
LABEL:
Input a maximum of 8 characters for the channel’s label. Cursor to the Right to start
the first character. Cursor left or right to navigate between character positions within
the label field. Cursor up or down to select characters from the list: A to Z, 0 to 9, -, .,
/, :, =, ?, ;, <, >, @ or space. To edit, re- input the character at its position. To exit,
press “M” to navigate out of the label editing field.
11
2005 HF Series User’s Manual
112505.0959
SWITCH ON / OSD
SWITCH ON / OSD
>
TV 2
30
WIDESCREEN
STANDBY
YES
ALL
NO
WELCOME MESSAGE
SWITCH ON CHANNEL
SWITCH ON VOLUME
SWITCH ON PIC FMT
POWER ON
VOLUME INDICATOR
CHANNEL DISPLAY
3 DIGIT ENTRY
•
•
•
•
•
•
•
WELCOME MESSAGE:
A welcome message (two lines, 20 characters) can appear on-screen when the set is
powered on. The message remains on-screen until the TV receives a command from
the remote or front panel or times out in 25 seconds. When the WELCOME
MESSAGE setup menu item is highlighted, cursor right or left to invoke the
MESSAGE sub- menu. Cursor up or down to select the desired MESSAGE sub- menu
item. Press MENU to return to the SETUP main menu.
SWITCH ON CHANNEL: TV 1-TV 125/HDMI 1/HDMI 2/SIDE AV/AV 1/AV 2/
/ STANDARD)
Specify the channel / input to which the TV will be tuned when it is powered on.
If STANDARD, the channel at power-on will be that to which the TV was tuned at
last power-down. If specified (e.g., 2, AV1, etc.), then that will always be the channel
/ input at power-on, until SWITCH ON CHANNEL is changed.
SWITCH ON VOLUME:
(STANDARD / 0 - 99)
Specify the volume setting that takes effect when the TV is powered on.
If STANDARD, the volume at power-on will be the volume at which the TV was
prior to last power-down.
If specified as 0 - 99, that will always be the volume at power-on, until SWITCH ON
VOLUME is changed.
POWER ON:
(STANDBY / FORCED ON)
STANDBY:
The TV will be in standby mode when AC mains power is first
applied after having been disconnected.
FORCED ON: The TV will turn ON whenever AC mains power is applied. This
feature allows the TV’s power status to be controlled, for example, from an AC mains
breaker. In addition, the set cannot be put into standby with a guest remote or using
the front panel power key.
VOLUME INDICATOR:
(NO / YES)
When VOLUME INDICATOR is set to YES, an OSD graphic appears that provides
visual verification (e.g. “VOLUME 15”) during volume adjustment, by means of
either the remote control, or the front panel (if it is not locked out).
CHANNEL DISPLAY:
(NONE / NUMBER / LABEL / ALL)
Specifies which of the respective channel properties are displayed by the TV’s OSD
when a channel or input is first selected.
3 DIGIT ENTRY:
(NO / YES)
o YES: The TV, upon receiving a remote control digit command, “expects” to
receive up to two more successive remote control digit commands (e.g. 123,
012, etc.) before tuning the intended channel. The television will display, in
12
2005 HF Series User’s Manual
•
112505.0959
the upper left- hand corner of the screen, each digit as it is received, followed
by a hyphen ‘-’, indicating that the TV is “waiting” for the next digit (see
Note).
o NO: The TV, upon receiving a remote control digit command, “expects” to
receive one more successive remote control digit command before tuning the
intended channel (see Note).
Note: Successive digit commands must occur within two seconds, or the TV will
interpret the previously received digit(s) as constituting the intended channel and tune
accordingly.
SWITCH ON PIC FMT:
(AUTO / 4:3 / ZOOM 14:9 / ZOOM 16:9 /
SUBTITLE ZOOM / WIDESCREEN / SUPERZOOM)
Set the default screen format of the television at Power On.
The pictures you receive may be transmitted in 16:9 format (wide screen) or 4:3
format (conventional screen). 16:9 pictures sometimes have a black band at the top
and bottom of the screen (letterbox format). This function allows you to optimize the
picture display on screen.
13
2005 HF Series User’s Manual
112505.0959
Using the different formats
Select the preferred format from the SWITCH ON PIC FMT menu item in the setup
screen, or (if applicable) use the Format button on the Remote Control to select the
different modes: 4:3, Zoom 14:9, Zoom 16:9, Subtitle zoom, Super Zoom, and
Widescreen.
4:3
The picture is reproduced in 4:3 format and a black band is displayed on either
side of the picture.
Zoom 14:9
The picture is enlarged to 14:9 format, a thin black band remains on both sides of
the picture.
Zoom 16:9
The picture is enlarged to 16:9 format. This mode is recommended when
displaying pictures that have black bands at the top and bottom (letterbox
format).
Subtitle Zoom
This mode is used to display 4:3 pictures using the full surface of the screen
leaving the subtitles visible.
Super Zoom
This mode is used to display 4:3 pictures using the full surface of the screen by
enlarging the sides of the picture
Widescreen
This mode restores the correct proportions of pictures transmitted in 16:9 using
the full screen display.
14
2005 HF Series User’s Manual
112505.0959
SECURITY
SECURITY
STANDARD
NO
SECURITY
KEYBOARD LOCK
•
•
SECURITY
Special feature for commercial use only.
KEYBOARD LOCK
NO:
The TV’s keyboard is operational.
YES:
The TV’s keyboard is disabled.
(STANDARD / HIGH)
(NO / YES)
CONTROL
CONTROL
OFF
YES
YES
YES
99
ESP
SOURCE MENU ITEM
PIC FMT MENU ITEM
CHANNEL GUIDE
MAX VOLUME
•
•
•
•
•
ESP
(OFF / 1 HR / 2 HR / ... / 99 HR)
Energy Saving Programmability. This feature enables the TV to automatically
power-down after a specified period of time, if during any such period it receives no
commands from the front panel or remote control. This is an energy-saving feature
that assumes that the TV, after the specified period of inactivity, is no longer being
viewed.
SOURCE MENU ITEM
(NO / YES)
This feature provides the option to display or delete the source option from the guest
menu.
PIC FMT MENU ITEM
(NO / YES)
This feature provides the option to display or delete the picture format option from
the guest menu.
CHANNEL GUIDE
(NO / YES)
The channel guide feature provides an on-screen summary listing of the RF (tuner)
channels that are currently in the channel ring (see CHANNEL INSTALL ->
CHANNEL RING) and have been assigned labels (see CHANNEL INSTALL ->
LABEL).
MAX VOLUME
(0 - 99)
Specify the highest volume setting possible by means of either the remote control, or
the front panel (if it is not locked out).
Note: The MAX VOLUME setting is effective whether the volume command is
issued from the front panel (if it is not locked out), a standard guest- mode remote
control, or an RC2573GR setup remote in setup mode.
15
2005 HF Series User’s Manual
112505.0959
CLOSED CAPTION
CLOSED CAPTION
SAVE CC
CC
DIGITAL CC MODE
ANALOG CC MODE
EXIT
YES/NO
CC OFF / CC ON / CC ON MUTE
CS1 / CS2 / CS3 / CS4 / CS5 / CS6
CC1 / CC2 / CC3 / CC4/ TXT1 / TXT2 / TXT3 / TXT4
>
•
SAVE CC
If yes, saves the state of the closed caption settings chosen in the guest menu when
the TV is put into standby or powered off. If no, the settings are restored to their
default condition when the TV is put into standby or powered off.
•
CC
Allows Closed captions to be enabled, disabled, or enabled only while the volume is
muted.
•
DIGITAL CC MODE
The settings displayed represent the Closed Caption services available on digital
channels.
•
ANALOG CC MODE
The settings displayed represent the Closed Caption services available on analog
channels.
16
2005 HF Series User’s Manual
112505.0959
32HF7543 Rear and Side Jack Panel Connections
17
2005 HF Series User’s Manual
112505.0959
37/42HF7543 Rear Jack Panel Connections
37/42HF7543 Bottom Jack Panel Connections
18