1
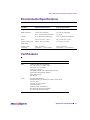
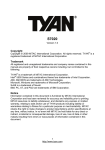
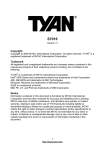
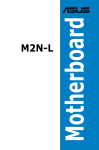
Hardware Installation Guide
TM
Alteon Web Switch
10/100/1000 Mbps Web Switches
Part Number: 212779, Revision A, December 2001
50 Great Oaks Boulevard
San Jose, California 95119
408-360-5500 Main
408-360-5501 Fax
www.nortelnetworks.com
Alteon Web Switch Hardware Installation Guide
Copyright 2001 Nortel Networks, Inc., 50 Great Oaks Boulevard, San Jose, California 95119, USA. All
rights reserved. Part Number: 212779, Revision A.
This document is protected by copyright and distributed under licenses restricting its use, copying,
distribution, and decompilation. No part of this document may be reproduced in any form by any means
without prior written authorization of Nortel Networks, Inc. Documentation is provided “as is” without
warranty of any kind, either express or implied, including any kind of implied or express warranty of noninfringement or the implied warranties of merchantability or fitness for a particular purpose.
U.S. Government End Users: This document is provided with a “commercial item” as defined by FAR
2.101 (Oct 1995) and contains “commercial technical data” and “commercial software documentation” as
those terms are used in FAR 12.211-12.212 (Oct 1995). Government End Users are authorized to use this
documentation only in accordance with those rights and restrictions set forth herein, consistent with FAR
12.211- 12.212 (Oct 1995), DFARS 227.7202 (JUN 1995) and DFARS 252.227-7015 (Nov 1995).
Nortel Networks, Inc. reserves the right to change any products described herein at any time, and without
notice. Nortel Networks, Inc. assumes no responsibility or liability arising from the use of products
described herein, except as expressly agreed to in writing by Nortel Networks, Inc. The use and purchase of
this product does not convey a license under any patent rights, trademark rights, or any other intellectual
property rights of Nortel Networks, Inc.
Alteon 180, Alteon 180-PLUS, Alteon 180e, and Alteon 184 are trademarks of Nortel Networks, Inc. in the
United States and other countries.
Regulatory Compliance
FCC Class A Notice: This device complies with Part 15 of the FCC Rules. Operation is subject to the
following two conditions: 1. This device may not cause harmful interference. 2. This device must accept
any interference received, including interference that may cause undesired operation.
Note: This equipment has been tested and found to comply with the limits for a Class A digital device,
pursuant to Part 15 of the FCC Rules. These limits are designed to provide reasonable protection against
harmful interference when the equipment is operated in a commercial environment. This equipment
generates, uses and can radiate radio frequency energy and, if not installed and used in accordance with the
instruction manual, may cause harmful interference to radio communications. Operation of this equipment
in a residential area is likely to cause harmful interference in which case the user will be required to correct
the interference at his own expense.
Do not make mechanical or electrical modifications to the equipment.
VCCI Class A Notice: This is a Class A product based on the standard of the Voluntary Control Council
for Interference from Information Technology Equipment (VCCI). If this equipment is used in a domestic
environment, radio disturbance may occur, in which case, the user may be required to take corrective
actions.
2
212779-A, December 2001
Alteon Web Switch Hardware Installation Guide
Japanese VCCI Class A Statement:
CE Notice: The CE mark on this equipment indicates that this equipment meets or exceeds the following
EMC technical standards: EN50024, EN55022, EN50204, EN61000-3-2, EN61000-3-3, EN61000-4-2,
EN61000-4-3, EN61000-4-4, and EN61000-4-5, EN61000-4-6, EN61000-4-11.
The equipment also meets or exceeds the following safety technical standards: IEC60950 (CB certified
with all member deviations), EN60950, and EN60825-1.
Safety Information
Caution—This Product Contains a Lithium Battery. Batteries are not customer replaceable parts. They
may explode if mishandled. Do not dispose of the battery in fire. Do not disassemble or recharge.
Caution—This product is designed to work with single-phase power systems having a grounded neutral
conductor. To reduce the risk of electric shock, do not plug this product into any other type of power
system. Contact your facilities manager or a qualified electrician if you are not sure what type of power is
supplied to your building.
Caution—Not all power cords have the same ratings. Household extension cords do not have overload
protection and are not meant for use with computer systems. Do not use household extension cords with
this product.
Caution—This product is shipped with a grounding type (three-wire) power cord. To reduce the risk of
electric shock, always plug the cord into a grounded power outlet.
Caution—This product uses a 3A/250V fast-acting fuse. For continued protection against the risk of fire,
replace only with the same type and rating fuse.
Attention—Utiliser un fusible de rechange de meme type.
3
212779-A, December 2001
Alteon Web Switch Hardware Installation Guide
Nordic Lithium Battery Cautions
(Norge) ADVARSEL—Litiumbatteri - Eksplosjonsfare. Ved utskifting benyttes kun batteri som anbefalt
av apparatfabrikanten. Brukt batteri returneres apparatleverandøren.
(Sverige) VARNING—Explosionsfara vid felaktigt batteribyte. Använd samma batterityp eller en
ekvivalent typ som rekommenderas av apparattillverkaren. Kassera använt batteri enligt fabrikantens
instruktion.
(Danmark) ADVARSEL! Litiumbatteri - Eksplosionsfare ved fejlagtig håndtering. Udskiftning må kun
ske med batteri af samme fabrikat og type. Levér det brugte batteri tilbage til leverandøren.
(Suomi) VAROITUS—Paristo voi räjähtää, jos se on virheellisesti asennettu. Vaihda paristo ainoastaan
laitevalmistajan suosittelemaan tyyppiin. Hävitä käytetty paristo valmistajan ohjeiden mukaisesti.
Taiwan EMC Statement
4
212779-A, December 2001
Contents
Preface 7
Who Should Use This Book 7
How This Book Is Organized 7
Contacting Us 8
Warranty 8
Chapter 1: The Alteon Web Switch 9
Physical Description 10
Front Panels 10
Alteon 180 Series Web Switches 10
Alteon AD series Web Switches 11
Ports 12
Rear Panel 14
AC Power 14
DC Power 14
Chapter 2: Installing the Switch Hardware 15
Included Items 15
Preparing for Installation 15
Installing the Switch 17
Rack-Mounting the Web Switch 17
Table-Mounting the Web Switch 18
Connecting Power 19
AC Power 19
DC Power 19
Connecting Cables to Network Ports 20
Gigabit Ethernet via the Fiber Optic SC Connector 21
10/100 Mbps Ethernet via the RJ-45 Connector 21
Automatic Selection of Redundant Connections 22
5
050009C, October 2001
Alteon Web Switch Hardware Installation Guide
Chapter 3: Using the Console Port 23
Connecting a Serial Cable 23
Establishing a Console Connection 25
Upgrading Software 26
Software Already Installed 26
TFTP Download Through CLI 26
Serial Upgrade 26
Troubleshooting 27
Link LED Does Not Light 27
Symptom 27
Cause 27
Temperature Sensor Error Message 27
Actions 27
Switch Will Not Boot 28
Symptoms 28
Cause 28
Actions 28
Switch Will Not Accept TFTP Software Upgrade 28
Symptoms 28
Cause 28
Actions 28
Appendix A: Specifications 29
Supported Standards 29
Port Specifications 29
Physical Characteristics 30
Power Requirements 30
AC Power 30
DC Power 30
Environmental Specifications 31
Certifications 31
6
n
Contents
050009C, October 2001
Preface
This manual describes the features and installation process of AD3, AD4, and the Alteon 180
series of Gigabit Ethernet switch hardware.
For full documentation on configuring and using the Web switch’s many software features
(such as Server Load Balancing and Application Redirection), see the Web OS switch software
manuals.
Who Should Use This Book
This manual is intended for network installers and system administrators engaged in configuring and maintaining a Gigabit Ethernet network. It assumes that you are familiar with the
Ethernet concepts of the installation—Web switch.
How This Book Is Organized
Chapter 1, “The Alteon Web Switch,” provides a brief overview of the Alteon 180 series
(180e, 184) and Alteon AD series (AD3 and AD4) Web switch hardware, including a description of switch features, ports, and LEDs.
Chapter 2, “Installing the Switch Hardware,” describes how to install the Alteon Web
switch, and how to connect network cables.
Chapter 3, “Using the Console Port,” describes how to connect a terminal for viewing system messages, and provides suggestions for troubleshooting.
Appendix A, “Specifications,” describes the physical specifications and characteristics of the
Alteon Web switches.
7
212779A, December 2001
Alteon Web Switch Hardware Installation Guide
Contacting Us
For complete product support and sales information, visit the Nortel Networks website at the
following URL:
http://www.nortelnetworks.com
See the contact information on this site for regional support and sales phone numbers and
e-mail addresses.
n
In North America, dial toll-free 1-800-4NORTEL.
n
Outside North America, call 987-288-3700.
Warranty
Nortel Networks provides a limited warranty on all its switches for a period of one year from
the date of shipment. Free technical support and free replacement of hardware is provided for
the first 90 days after shipment. Nortel Networks provides a limited warranty on all its switch
software for a period of 90 days from date of shipment. You may choose to purchase additional
service and support from Nortel Networks. Please contact your local sales representative for
more information.
8
n
212779A, December 2001
CHAPTER 1
The Alteon Web Switch
An Alteon Web switch attaches to the network backbone and interconnects servers using
10 Mbps, 100 Mbps, and 1,000 Mbps Ethernet connections. This flexibility off loads server-toserver traffic from the backbone, frees backbone bandwidth, and accelerates client-server
performance.
This chapter describes the operational and physical features of the Alteon Web switch
hardware.
9
212779-A, December 2001
Alteon Web Switch Hardware Installation Guide
Physical Description
The following sections describe the Alteon Web switch hardware.
Front Panels
Alteon 180 Series Web Switches
Figure 1 and Figure 2 illustrate the Alteon 180 series switches. Figure 3 and Figure 4
illustrate the Alteon AD3 and Alteon AD4 Web switches. The switch ports are described in
“Ports” on page 12.
C
A
2
3
4
5
6
7
8
Data
Link
RX
1
TX
Data
Link
Active
1000
Base-SX
Alteon
180e
9
Data
Link
Active
TX
RX
TX
RX
TX
RX
TX
RX
TX
RX
TX
RX
TX
RX
TX
Power
RX
Console
004
B
D
E
Figure 1 Alteon 180e Front Panel
C
A
Alteon
184
Data
Link
Active
1
2
3
4
5
6
7
8
A
Data
Link
Active
TX
RX
TX
RX
TX
RX
TX
RX
TX
RX
TX
RX
TX
RX
TX
RX
Power
Console
004
B
D
E
Figure 2 Alteon 184 Front Panel
10
n
Chapter 1: The Alteon Web Switch
212779-A, December 2001
Alteon Web Switch Hardware Installation Guide
Alteon AD series Web Switches
A
C
ACEdirector
3
4
5
6
7
8
Data
Link
RX
2
TX
1
1000
Base-SX
3
Data
Link
Status
Power
9
Console
057
B
D
E
Figure 3 Alteon AD3 Front Panel
A
C
A
057
B
D
E
Figure 4 Alteon AD4 Front Panel
Chapter 1: The Alteon Web Switch
212779-A, December 2001
n
11
Alteon Web Switch Hardware Installation Guide
Ports
Table 1 shows the port densities for each Alteon Web switch model.
Table 1 Ports of the Alteon 180 and Alteon AD Series
Alteon 180e
Alteon 184
Alteon AD3
Alteon AD4
700107
700116
700106
700117
10/100Base-T
Fast Ethernet Ports
8
9
8
9
1000Base-SX
Gigabit Ethernet Ports
9
9
1
1
Model Number
Port Count
The front panel of the Alteon Web switch has the following features:
A
Port 1 through Port 8: RJ-45 network ports
NOTE – The Alteon 180 series provides dual-media ports: RJ-45 and SC jacks. The Alteon AD
series only provides RJ-45 jacks.
The RJ-45 jack is for connecting 10/100 Mbps Ethernet segments to the port, and the SC
jack is for connecting Gigabit Ethernet fiber optic segments. The ports are auto-negotiating and support half- or full-duplex operation. In the Alteon 180 series, only one of the
two jacks can be active at any given time. Selection conditions are described in “Automatic Selection of Redundant Connections” on page 22.
B
12
n
Three LEDs for each network jack
Chapter 1: The Alteon Web Switch
212779-A, December 2001
Alteon Web Switch Hardware Installation Guide
The table below describes the lights and conditions represented by the state of the LEDs.
Table 3 Front Panel Port LEDs
LED
State
Description
Data
Blinking
Off
Data detected on the port.
No data detected on the port.
Link
On
Off
Blinking
Good link.
No link; could be a result of a bad cable or bad connector.
Port has been disabled by software.
Active
On
The jack indicated (either the RJ-45 or the SC) is selected
for this port’s use.
The jack is not selected.
Off
All three Flashing in
port LEDs sequence
C
This pertains only to the Alteon AD series.
When no connection is detected on the port, the port LEDs
will light in sequence from the bottom LED to the top.
Port 9: Dedicated uplink port
o The Alteon 180e and Alteon AD3 have one SC-style Gigabit Ethernet fiber optic
connector.
o The Alteon 184, 185, and Alteon AD4 have a dual-media network port for either
Gigabit Ethernet fiber optic segments, or 10/100 Mbps Fast Ethernet segments.
D
A green Power LED that lights to indicate that the Alteon Web Switch is on and receiving
proper power.
E
A female DB-9 serial connector labeled Console for the console (DCE) connector
Chapter 1: The Alteon Web Switch
212779-A, December 2001
n
13
Alteon Web Switch Hardware Installation Guide
Rear Panel
AC Power
C
B
RPS700114 - 12V 40A
F3A
250V
CAUTION: FOR CONTINUED PROTECTION
AGAINST RISK OF FIRE, REPLACE ONLY WITH SAME
TYPE AND RATING FUSE. ATTENTION: UTILISER
UN FUSIBLE DE RECHANGE DE MEME TYPE.
100-240V 50/60 Hz 3A
USE ONLY WITH 250V FUSE
A
D
009
Figure 5 Alteon Web Switch Rear Panel—AC Powered Models
The rear panel of the AC-powered Alteon series Web switches has the following components:
A
A power switch
B
A fuse housing
C
An AC power connector
D
Air vents and exhaust fans
DC Power
B
A
+
F3A
125V
CAUTION: FOR CONTINUED PROTECTION
AGAINST RISK OF FIRE, REPLACE ONLY WITH SAME
TYPE AND RATING FUSE. ATTENTION: UTILISER
UN FUSIBLE DE RECHANGE DE MEME TYPE.
–
C
009
Figure 6 Alteon Web Switch Rear Panel—DC Powered Models
The rear panel of the DC-powered Alteon Web switches has the following components:
14
n
A
A wire terminal block for connecting –48VDC to –60VDC power
B
A fuse housing
C
Air vents and exhaust fan
Chapter 1: The Alteon Web Switch
212779-A, December 2001
CHAPTER 2
Installing the Switch Hardware
This chapter describes how to install the Alteon Web switch in a rack or on a table.
Included Items
Your Web switch is shipped with the following items:
n
Two mounting brackets (for rack mounting)
n
Six Phillips screws for installing the mounting brackets
n
Four rubber feet (for tabletop placement of the switch)
n
AC power cord (only for AC-powered models)
n
A console cable
NOTE – The console cable is not intended for permanent installation and should be disconnected from the console port after configuring the switch.
Preparing for Installation
Switch installation involves the following tasks:
1.
Choosing a suitable location to install the switch.
2.
Unpacking the switch from the box.
3.
Turning the power switch to the OFF (O) position.
4.
Mounting the switch.
5.
Connecting the power inlet of the Web switch to the appropriate power source.
6.
Connecting network cables to the switch.
15
212779-A, December 2001
Alteon Web Switch Hardware Installation Guide
7.
Powering on the switch.
NOTE – The DC powered switch requires insulated copper conductor wire of #12 to #22 AWG.
The required wire size is related to the length of the wire. For information, refer to the standard
NEC 1999.
!
CAUTION—Observe the following precautions when selecting a site and installing the switch:
Make sure the equipment is properly grounded electrically, and that power connections are
safe, particularly when using power strips.
If installing the DC powered switch, the switch chassis must be placed in a location of
restricted access—the DC power connectors are open.
Avoid overloading your electrical supply circuits. Electrical ratings are printed on the nameplates of all your equipment. Be sure that your supply circuits and wiring can support the rated
power draw of whatever equipment is used.
The ambient temperature of an operating Alteon Web switch must not exceed 40oC. When
installing the switch in a closed or multi-unit rack assembly, please consider that the operating
ambient temperature of the switch may be higher than the ambient temperature of the room.
Take appropriate steps to ensure that the switch does not overheat.
For proper air circulation, the vents on the front, back, and sides of the switch should not be
blocked or obstructed by cables, panels, rack frames, or other materials.
Do not place or rack-mount the switch in any way which would exceed the maximum weight
bearing capacity of the surface or rack, or which would cause potentially hazardous uneven
mechanical loading.
16
n
Chapter 2: Installing the Switch Hardware
212779-A, December 2001
Alteon Web Switch Hardware Installation Guide
Installing the Switch
Always observe the precautions outlined in the manuals for this and all other equipment you
are installing.
Determine whether the unit will be mounted into an equipment rack, or placed free-standing on
a shelf or tabletop. The following sections detail each type of installation.
Rack-Mounting the Web Switch
The following instructions are for both the AC and DC powered Alteon switches. There are
additional precautions for installing switches equipped with “DC Power” on page 19.
NOTE – Do not use the rubber feet for a rack installation.
1.
Connect the two mounting brackets to the switch using the supplied screws as shown in
Figure 7.
010
Figure 7 Position Mounting Brackets for Rack Mount
Chapter 2: Installing the Switch Hardware
212779-A, December 2001
n
17
Alteon Web Switch Hardware Installation Guide
2.
Then, install the switch as shown in the figure below using the appropriate screws for
your rack-mount system (four 10-32, 12-24, M5X.8-6H, or M6X1-6H type screws).
1
2
3
4
011
5
6
7
8
9
Figure 8 Rack-Mounted Alteon Web Switch
Table-Mounting the Web Switch
18
n
1.
Attach the four rubber feet to the bottom of the switch.
2.
Place the switch onto a level tabletop or equipment shelf.
Chapter 2: Installing the Switch Hardware
212779-A, December 2001
Alteon Web Switch Hardware Installation Guide
Connecting Power
The following instructions are for AC powered and DC powered Alteon switches.
AC Power
1.
Connect the power cord to the Web switch. Verify that the power switch is in the off
position.
2.
Plug the switch cord into a properly fused AC outlet.
3.
Power On (|) the switch.
CAUTION—The switch uses a 3A/250V fast-acting fuse. For continued protection against risk
of fire, replace only with the same type and rating fuse. French: Attention–Utiliser un fusible
de rechange de meme type.
!
DC Power
The wire terminal block on the back of the chassis is for connecting the lead wires for standard
DC power.
Follow the instructions below to connect the switch to a -48 to -60 VDC SELV source only, in
compliance with National Electrical Code (NEC) articles 110-26 and 110-27.
1.
Be sure that DC power is turned off at the source.
2.
Connect your DC earth-ground lead to the switch
terminal.
The switch must be connected to a protective earthing terminal in accordance to National Electrical Code (NEC) article 250-160.
Use copper conductor wire of #12 to #22 AWG. Strip 1 cm of the insulation from one end of
the ground wire. Loosen the cap of the module’s earth-ground terminal (marked
), and
insert the bare end of the wire into the terminal’s wire slot.
Make sure that the bare wire makes contact with the metal terminal post. Finally, tighten the
terminal cap to secure the wire into place.
3.
Connect the other end of the DC earth-ground lead to the earth-ground terminal on your
DC power source.
4.
Connect each remaining DC power lead to the appropriate wire terminal on the switch.
Be sure to use copper conductor wire of #12 to #22 AWG when connecting to the terminals.
Chapter 2: Installing the Switch Hardware
212779-A, December 2001
n
19
Alteon Web Switch Hardware Installation Guide
5.
Connect the other end of each DC power lead to the appropriate wire terminal of your
DC power source.
Connect the DC “+” (common) switch terminal to the source DC “+” common power terminal.
Connect the DC “–” (-48) switch terminal to -48 VDC source relative to common.
CAUTION—Be certain that the DC power leads are correctly connected. Improper power connection can damage the switch’s internal fuse.
!
CAUTION—The fuse can be accessed by unscrewing the fuse cover on the rear panel. Replace
only with a fast-acting, 3A, 125VDC-rated fuse for continued protection against risk of fire.
The fuse must be rated for DC power.
!
6.
Install the terminal block safety cover.
7.
Turn DC power on at the source.
Connecting Cables to Network Ports
Each network port on Alteon 180 series Web switch has two connector jacks: one RJ-45 jack
for connecting 10/100 Mbps Ethernet segments to the port, and one SC jack for connecting
1000 Basic SX Gigabit Ethernet fiber optic segments.
Each network port on Alteon AD series Web switch has only one connector jack: RJ-45, for
connecting 10/100 Mbps Ethernet segments to the port.
All ports support full-duplex operation. The 10/100 Mbps ports auto-negotiate, and also support half-duplex operation. On Alteon 180 Web switches, only one of the two jacks can be
active at any given time for any port, according to conditions described in “Automatic Selection of Redundant Connections” on page 22.
The port LEDs light to indicate various port connection conditions. See Table 3 on page 13 for
details.
20
n
Chapter 2: Installing the Switch Hardware
212779-A, December 2001
Alteon Web Switch Hardware Installation Guide
Gigabit Ethernet via the Fiber Optic SC Connector
The figure below illustrates an SC-type connector used for Gigabit Ethernet fiber optic connections on the Alteon Web switches:
003
Figure 9 Fiber Optic Connector for Alteon Web Switches
The following table lists the cable characteristics for connecting to 1000Base-SX ports.
Table 4 1000Base-SX Link Characteristics
Description
62.5 Micron
50 Micron
Shortwave (850 nm multimode fiber)
Operating Range
2 to 260 meters
2 to 550 meters
(in compliance with IEEE 802.3z)
10/100 Mbps Ethernet via the RJ-45 Connector
Use a straight-through cable on the 10/100 Mbps ports if the device attached to the port is a
computer. If the device is a switch, hub, or router, use a crossover cable. See the figure below
for cabling details. You can use a straight-through cable with a switch, hub, or router if it has
an uplink enable/disable switch that you can set.
Straight-through cable
Crossover cable
Switch
10/100 Mbps Port
Computer
Port
Switch
10/100 Mbps Port
Hub, Switch,
or Router Port
pin 1
pin 1
pin 1
pin 3
pin 2
pin 2
pin 2
pin 6
pin 3
pin 3
pin 3
pin 1
pin 6
pin 6
pin 6
pin 2
Figure 10 Pin Assignments for 10/100 Mbps Port Cables
Chapter 2: Installing the Switch Hardware
212779-A, December 2001
n
21
Alteon Web Switch Hardware Installation Guide
Automatic Selection of Redundant Connections
NOTE – This feature is supported only on the Alteon 180 Series Web switches.
The Alteon 180 series’ unique dual-media configuration supports automatic bring-up and failover between the 10/100 Mbps and 1000 Mbps port-pairs. Order of precedence follows these
rules:
n
If both the 10/100 Mbps and 1000 Mbps ports are inactive:
o If the user activates the Gigabit Ethernet port first (by plugging a live cable into the
SC-jack), the port immediately becomes active.
o If the user activates the 10/100 Mbps port first, it remains inactive for a user-selectable
timeout (default 1.5 seconds). If the Gigabit Ethernet port is activated prior to the timeout, it becomes the active port. Otherwise, the 10/100 Mbps port becomes active.
n
If the active Gigabit Ethernet link fails, the 10/100 Mbps port will become the active port,
with minimally required software intervention.
n
If the 10/100 Mbps link is active and the Gigabit Ethernet link becomes viable (either
because of a newly created connection or because of a repaired link), the 10/100 Mbps
link will remain active until one of the following conditions occurs:
o The 10/100 Mbps link fails or is removed by the user.
o The user forces the Gigabit Ethernet to become the active link from any management
interface.
22
n
Chapter 2: Installing the Switch Hardware
212779-A, December 2001
CHAPTER 3
Using the Console Port
Alteon Web switches have a console port for configuring the switch. This chapter explains how
to connect a terminal to the console port.
For instructions on using the console to view and configure switch settings, see the Web OS
switch software manuals.
Connecting a Serial Cable
To establish a console (DCE) connection, the following are required:
n
An ASCII terminal or a computer running ASCII terminal emulation software set to the
parameters shown in the table below:
Table 5 Console Configuration Parameters
Parameter
Value
Baud Rate
Data Bits
Parity
Stop Bits
9600
8
None
1
23
212779-A, December 2001
Alteon Web Switch Hardware Installation Guide
n
Console Cable
The console port accepts a straight-through serial cable with a male DB9 connector.
Table 6 Pinouts for DB9 Serial Connector
DB9 Serial Connector
1
2
6
3
7
4
8
5
9
Pin
Description
1
2
3
4
5
6
7
8
9
DCD
RxD
TxD
DTR
Ground
DSR
RTS
CTS
Not used
The following figures show the pin assignments for the console to use to configure serial
cables to terminal connectors with 9-pin or 25-pin connectors.
Switch
Console Port
9-pin Connector
1
2
3
4
5
6
7
8
PC Serial Port
9-pin Connector
1
2*
3*
4
5*
6
7
8
DCD
RxD
TxD
DTR
Ground
DSR
RTS
CTS
* Only the pins for RxD, TxD, and Ground are required.
Figure 11 9-pin to 9-pin Connector Pin Assignments
24
n
Chapter 3: Using the Console Port
212779-A, December 2001
Alteon Web Switch Hardware Installation Guide
Switch
Console Port
9-pin Connector
3
2
7
8
6
5
1
4
PC Serial Port
25-pin Connector
2*
3*
4
5
6
7*
8
20
TxD
RxD
RTS
CTS
DSR
Ground
DCD
DTR
* Only the pins for RxD, TxD, and Ground are required.
Figure 12 9-pin to 25-pin Connector Pin Assignments
NOTE – Console cables are not intended for permanent installation and should be disconnected
from the console port after configuring the switch.
Establishing a Console Connection
Following are the instructions to connect a console.
1.
Connect the terminal to the Console port of the switch using the serial cable that is
included with your switch.
2.
Power on the terminal.
3.
To establish the connection, press <Enter> on your terminal.
4.
Enter the password when prompted.
The default administrator password is admin. Once your password is verified, the Main menu
is displayed. For instructions on using the menus to configure the switch, see the Web OS
switch software manuals.
Chapter 3: Using the Console Port
212779-A, December 2001
n
25
Alteon Web Switch Hardware Installation Guide
Upgrading Software
Software Already Installed
The Alteon Web switch is provided with the software installed and configured with the factory
default settings. For more information, refer to the Web OS software manuals.
TFTP Download Through CLI
Following are outlines of TFTP downloading Web OS software. For details, refer to the
Web OS software manuals.
1.
Back up the current Web OS configuration to a file.
2.
Perform a TFTP download of the Web OS software code onto the selected switch software image.
3.
Reboot the switch with the selected switch software image.
Serial Upgrade
NOTE – Serial upgrade is performed through the Console port of the Web switch.
A serial upgrade will erase the current configuration and reconfigure the switch to its factory
default settings. It is recommended that you save the current configuration before attempting a
serial upgrade.
26
n
1.
Back up the current Web OS configuration to a file.
2.
Perform a serial download of the Web OS image.
3.
Reboot the Web switch.
Chapter 3: Using the Console Port
212779-A, December 2001
Alteon Web Switch Hardware Installation Guide
Troubleshooting
This section contains information about possible problems that may occur or error messages
that might display if the switch is not properly installed or configured.
Link LED Does Not Light
Symptom
The green Link LED does not light. When you check the Link state using the console terminal
(see the Web OS switch software manuals), the status is reported as down.
Cause
n
Port configuration mismatch. If the switch port is configured with a specific speed or
duplex mode (for example, 100 Mbps, full duplex) check to see that the other device is set
to the same configuration. If the switch port is configured to auto-negotiate, verify that the
other device is also set to auto-negotiate. Refer to the appropriate Web OS switch software
manuals for more information about setting speed and mode.
n
Cable problem. Make sure you are using the correct type of cable to connect the switch to
other devices. Refer to Figure 10 on page 21 for information about crossover cables for
connecting switches, hubs, or routers to Alteon Web switches.
Temperature Sensor Error Message
The following message is displayed on the console if the temperature of an Alteon Web switch
exceeds the threshold. Immediate attention is required.
Temperature at sensor xxx exceeds threshold
Current temperature is xx oC
Threshold is xxoC
Actions
n
Make sure that the air circulation vents on the front, back, and sides of the switch are free
from obstruction by cables, panels, rack frames, or other materials.
n
Make sure that all four cooling fans inside the switch are running. The fans are located
behind the ventilation grill at the rear of the switch. The exhaust from all four fans should
be blowing outward with roughly equal air pressure (it is normal for the exhausts to have
different temperatures). You can also use a flashlight to check whether the fan blades are
moving. If any fan stops during switch operation, contact Customer Support.
Chapter 3: Using the Console Port
212779-A, December 2001
n
27
Alteon Web Switch Hardware Installation Guide
n
Units in a closed or multi-unit rack assembly may have an operating ambient temperature
higher than the ambient temperature of the room. The ambient temperature of an operating
switch must not exceed 40oC. If the operating ambient temperature cannot be lowered
before this maximum is reached, turn off the switch and let it cool.
n
It may be necessary to cool the room to a lower temperature or provide a fan for greater air
circulation. Resolve the room’s cooling and circulation problems before turning the switch
back on.
Switch Will Not Boot
Symptoms
All the Alteon switch LEDs stay on, and the command prompt does not appear on the console.
Cause
The operating system may have been damaged.
Actions
Perform a serial upgrade of the Web switch software. See “Serial Upgrade” on page 26.
Switch Will Not Accept TFTP Software Upgrade
Symptoms
The unit is unable to contact the TFTP server and download files.
Cause
There may be due a problem with the TFTP server, or the Web switch software may be damaged.
Actions
If the software was damaged, perform a serial upgrade of the switch software. See “Serial
Upgrade” on page 26.
28
n
Chapter 3: Using the Console Port
212779-A, December 2001
APPENDIX A
Specifications
Supported Standards
n
Spanning Tree Protocol (IEEE 802.1d)
n
Logical Link Control (IEEE 802.2)
n
10Base-T/100Base-TX (IEEE 802.3, 802.3u)
n
1000Base-SX (IEEE 802.3z)
n
Flow Control (IEEE 802.3x)
n
Link Negotiation (IEEE 802.3z)
n
Frame Tagging (IEEE 802.1Q) on all ports when VLANs are enabled
n
SNMP support: RFC 1213 MIB-II, RFC 1493 Bridge MIB, RFC 1398 Ethernet-like MIB,
RFC 1757 RMON1 (groups 1-4), and RFC 1573 Interface Extensions MIB compliant.
Alteon Enterprise MIB supporting the configuration and monitoring of all Alteon-specific
features.
Port Specifications
Port
Connector
Media
Maximum Distance
10Base-T
RJ-45
UTP Cat. 3, 4, or 5
100 meters (325 feet)
100Base-TX
RJ-45
UTP Cat. 5
100 meters (325 feet)
1000Base-SX
SC full-duplex
Shortwave (850 nm):
62.5 micron MM fiber
50 micron MM fiber
2 to 275 meters (6.5 to 902 feet)
2 to 550 meters (6.5 to 1804 feet)
RS-232C (serial)
25 meters (82 feet)
Console (DCE)
Female DB-9
29
212779A, December 2001
Alteon Web Switch Hardware Installation Guide
Physical Characteristics
Characteristic
Measurement
Width
43.18 cm (17.00 inches)
(Standard 19" EIA rack mountable)
Height
8.81 cm (3.47 inches)
Depth
45.72 cm (18.00 inches)
Weight
8 kg (18 lb.)
Power Requirements
AC Power
Specification
Measurement
Auto-ranging power supply
100-240VAC @ 50-60 Hz, 3A
Maximum power consumption
90 Watts
DC Power
30
n
Specification
Measurement
Auto-ranging power supply
-48 to -60VDC, 3A
Maximum power consumption
80 Watts
Appendix A: Specifications
212779A, December 2001
Alteon Web Switch Hardware Installation Guide
Environmental Specifications
Condition
Operating Specification
Storage Specification
Temperature
0° to 40° C (+32° to +104° F)
–40° to +85° C (–40° to +185° F)
Relative humidity
5 to 85% non-condensing
(40° C, 16 hour dwells at extremes)
5 to 95% non-condensing
10° C/hour
Altitude
up to 3,050 meters (10,000 feet)
up to 10,750 meters (35,000 feet)
Shock
10g, 1/2 sine wave, 11 msec
60g, 1/2 sine wave, 11 msec
Vibration, peak to peak
displacement
0.005 in. max (5 to 32 Hz)
0.1 in. max (5 to 17 Hz)
Vibration, peak
acceleration
0.25g (5 to 500 Hz)
(Sweep Rate = 1 octave/minute)
0.25g (5 to 500 Hz)
(Sweep Rate = 1 octave/minute)
Certifications
Category
Compliance
EMC
CISPR 22/CISPR 24 (International)
FCC, CFR 47 Part 15, Class A (USA)
CSA CSO3 Class A (Canada)
VCCI Class A (Japan)
EN 55022/EN 55024 (with required subtest) (Europe)
AS/NZ 3548 (Australia/New Zealand)
CNS 13438 (Taiwan)
MIC (Korea)
Safety
IEC 60950 (International)
National Deviation per CB Member Countries to IEC 60950
UL 1950, (USA)
CSA 22.2, No. 950 (Canada)
EN 60950 (Europe)
NOM-D19-SCFI - 1998 (Mexico)
IEC 60950 with deviations (Argentina)
IEC 60950 with deviations (Chile)
Appendix A: Specifications
212779A, December 2001
n
31
Alteon Web Switch Hardware Installation Guide
32
n
Appendix A: Specifications
212779A, December 2001