1
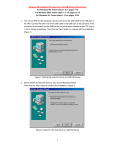
rheAction Professional V4.0N - User Guide 1 2 3 4 5 Index Installation Notes .................................................................................................1 1.1 rheAction System Requirements......................................................................1 What’s new..........................................................................................................2 2.1 Changelog.....................................................................................................2 2.2 Some screenshots..........................................................................................4 Installing rheAction ..............................................................................................7 3.1 Installation procedure ....................................................................................7 3.2 Registering the Gold version ......................................................................... 10 3.3 Installing rheavendors USB Programmer V1 ................................................... 10 3.3.1 Using Windows XP (before SP2): ............................................................ 10 3.3.2 Using Windows XP with SP2 ................................................................... 11 3.3.3 Using Windows 2000 ............................................................................. 15 3.4 Installing rheavendors USB Programmer V2 ................................................... 16 3.4.1 Using Windows XP with SP2 ................................................................... 16 3.4.2 Using Windows Vista ............................................................................. 20 3.4.3 Troubleshooting USB programmer V2 ..................................................... 23 User Guide......................................................................................................... 26 4.1 Update Master firmware ............................................................................... 26 4.2 Download a configuration file to the VMC ...................................................... 26 4.3 Performing Data Audit.................................................................................. 27 4.4 Performing Extended Data Audit ................................................................... 29 Appendix A: How to find out Windows version ...................................................... 32 1 Installation Notes Before installing this new release, we recommend to remove any previously installed version of rheAction and older versions of the USB programmer V2 driver. For using rheavendors USB programmer (V1 or V2), first of all, you have to install rheAction. Then you should install USB drivers according to the procedure described in this document (if you are using USB programmer V2, its drivers are automatically installed at the end of the rheAction setup), and you can eventually use rheAction with your rheavendors USB programmer. Resuming, the basic steps are the following ones: Install rheAction (a reboot is usually required) Install the rheavendors USB programmer drivers (if you’re using an USB interface); this step is not required if using the parallel programmer Start rheAction and change the programmer settings according to the programmer you’ve just installed. A wizard panel will help you in this task A detailed installation guide is described in chapter 3. 1.1 rheAction System Requirements Software requirements when using USB programmer V2 - Supported operating systems: MS Windows 2000, MS Windows XP Home/Professional, MS Windows Server 2003 Standard/Enterprise, MS Windows Vista (Basic, Premium or Ultimate). rheAction User guide Page 1 of 32 Software requirements when using USB programmer V1 or parallel programmer - Supported operating systems: MS Windows 98, MS Windows ME, MS Windows 2000, MS Windows XP Home/Professional, MS Windows Server 2003 Standard/Enterprise. Hardware requirements - 50Mb of Hard Disk, 256Mb of RAM. Depending on your type of programmer you need also: a parallel port, a serial port, or an USB port. Suggested video resolution: 1024x768 or higher. Note for Windows Vista users: rheAction has been tested on Windows Vista Ultimate, and it’s compatible with the USB programmer V2 and with the parallel programmer. 2 What’s new Current release supports key programming through the following programmers: Parallel programmer (KIT0000022); rheavendors USB programmer V1 (KIT0000027 – the programmer has a white cover). Some rheAction functionalities (new machine configuration data and extended data audit) won’t be available with this programmer, so if you want to take full advantage of new rheAction features we suggest to order the rheavendors USB programmer V1; rheavendors USB programmer V2 (KIT0000033 – the programmer has a black cover) 2.1 Changelog Version V4.0N Starting with version 4.0M rheAction will come in 2 versions: Gold and Silver. The difference is that the former has got the possibility to configure luxury VMC and requires a mail activation of the software (registration requests should be sent to [email protected] with the HW-ID number, XXXX-XXXX); Support for new VMC models: Cino XS Grande and Caffè Europa 2T; Added a parameter to fine tune the write operations with the USB programmer V2; Possibility to write up to 8 configuration files on the same rhea key (this feature is supported only by Cino XS Grande Version V4.0A Mail activation of the software; Editable message file (in XML format) for each language (supported by new LuceX2); Support for luxury VMCs: o Multiple ignitions of a product in the same selection (for preparing “double cappuccino” or similar drinks); o VMC settings file in XML format; o Editable message file (in XML format) for each language; o GUI composer: a tool for customizing the Graphical User Interface of VMCs equipped with a screen / graphic display. Version V3.5D Added Dutch Language. Fixed communication problem with the USB programmer V1 rheAction User guide Page 2 of 32 Version V3.5B Automatic driver installation process at the end of the rheAction installation; Signed driver of the USB programmer V2 (WHQL Certified for Windows 2000, XP, 2003 Server, Vista); Support for a new VMC model: LuceX2; Improvement of communication protocol of the USB programmer V2 in order to let it work properly in older computers (to avoid timeout errors); Fixed communication problem with the parallel programmer: the issue occurred with some PC brands; Software directory reorganization; Updated user manual. Version V3.4A Support for localization (multiple languages). The following languages are supported: English, German, French, Spanish, Italian; Data Audit in EVA-DTS format through rheavendors memory cards (master software should be updated); Extended event logging (extended data audit) through rheavendors memory cards (master software should be updated); with this data audit the VMC will record on the memory card all the events (turn on/off, selections, offs, washing, …) that occurs during the operation of the machine, together with their timestamps; Improvements of the “Autodetect USB port” functionality. Version V3.3E Support for other machines: Sagoma Lena, Horeca, XM Inox and Generic model (with 30 selections); Improved usability for model selection panel; Copy/Switch selection utility: this functionality give you the ability to copy an existing selection configuration to another one (for instance you can copy selection #2 to selection #11 or switch them); Flash Memory card checking utility: a tool that shows what is currently stored on a flash card (Master, Slave, Machine Data, Data Audit info). Selection names configurator: through rheAction now you’ve the chance to choose a custom display name of each selection (master software should be updated in order to support this functionality); New format for dat files (machine configuration files): in order to store new data the dat file has been extended (and it cannot be opened with an older rheAction version). Backward compatibility is ensured: old dat files will be opened and converted automatically to the new format. Version V3.2B Programmer selection panel and driver installation wizard; New Look and Feel and general improvements; Restored support for rheavendors USB programmer V1 (old type of rheavendors’ card - Blue Memory card - are programmable only with USB programmer V1 or with the parallel programmer). Version V3.1A rheAction User guide Page 3 of 32 Fixed the speed issue with the parallel programmer when using with the following Operating Systems: Windows XP, Windows 2000, Windows Server 2003. Version V3.0B Support for the new rheavendors USB programmer V2 (supporting USB 2.0 High Speed standard). This programmer works even with old USB hosts V1.1 or V1.0; Sensitive tooltip helps across the different panels; Energy saving timetables configuration; Discounts timetables configuration; Support for two new machines: Barista and XXOC; Support for new rheavendors’ payment systems. 2.2 Some screenshots rheAction User guide Page 4 of 32 rheAction User guide Page 5 of 32 rheAction User guide Page 6 of 32 3 Installing rheAction Since version 3.0A, rheAction there two installation kits: Installation kit for: Windows XP (Home and Professional), Windows 2000, Windows Server 2003, Windows Vista. This kit has the following naming convention: “rheaction[version]full.zip”, i.e. “rheaction3.5Bfull.zip” for instance. Installation kit for: Windows 98, Windows ME. This kit has the following naming convention: “rheaction[version]_W98_WME.zip”, i.e. “rheaction3.5B_W98_WME.zip” for instance. In order a kit, you should launch the executable named ”setup.exe” located in the extraction folder of the zip file. Note for Windows XP users: an upgrade to Windows XP Service Pack 2 (SP2) is suggested, but not mandatory for using rheAction. The Service Pack could be obtained through the Windows Update website (www.windowsupdate.com). Version 3.5A will be the last one supporting Windows 98 and Windows Millennium. 3.1 Installation procedure Usually rheAction is shipped with one of the following ways: If you have downloaded a single .exe from our website (for example “rheAction3.5B.exe”), you can start installation procedure by clicking on the .exe file and, when prompted, type the correct password; If you have received an USB pen drive containing the installation click, click on the setup.exe file, in order to start the setup rheAction User guide Page 7 of 32 When the first dialog appears, you can confirm the installation directories by clicking “next button”. The “rheaction User license agreement” will appear; read it carefully and then select “I accept the License Agreement(s)” if you want to continue the setup. Confirm with the “Nect” button. At this point the setup will show a panel confirming the you’re going to install the rheAction software. Confirm with “Next” button again. Now you should see the progress bar showing the present installation progress. Aftea a while, if the installation procedure ended without errors, you’ll see panel confirming that the setup succeeded (“the installer has finished updating your system”). Click the “Next” button. Then you’ll see that two dialogs will appear: one for the “USB programmer V2” driver installation one for rebooting the system If you want to install the “USB programmer V2” driver (or if you want to update the driver, since the last version of the driver has been updated on August 2007) please click on the “Next” button of the first dialog, leaving the second dialog in background for a moment. If you don’t want to install this driver, please click on the “Cancel” button and proceed with the system reboot. At the first launch of the rheAction, please choose the proper programmer type and click on the “Autodect USB port” (if you are using an USB programmer). rheAction User guide Page 8 of 32 If you’ve chosen to install the “USB programmer V2” driver, pressing “Next” button, you’ll see a dialog telling you that Windows is installing the driver. This installation could lasts a few minutes. At the end of the driver installation the following panel should appear. Then you can reboot the system, connect the programmer, launch rheAction and perform an autodetect of the USB port. rheAction User guide Page 9 of 32 3.2 Registering the Gold version The new rheAction (Gold version) requires a customer registration (mandatory for the usage of the software and required only for the first installation on a PC). At the first launch of the rheAction, if it has not been activated before, rheAction will display a small form, in which is written the Hardware-ID corresponding to the computer on which rheAction has been installed. When this form is prompted for the first time, the customer should take note of the Hardware-ID (“1D4E-B437” in the screenshot above) and quit the program by clicking on “Enter serial”. In order to receive the activation code, any customer that uses rheAction should send by email to [email protected] the following information: Name Surname Company Valid email address (belonging to the company domain, if possible) Hardware-ID (is the number indicated in the small form, with the following format: XXXX-XXXX) If the customer want to be informed by email when a new rheAction version is released Rheavendors will reply to the provided email address, sending the assigned “Registration name” and the “Serial number” for the activation, that will enable the customer to activate the rheAction on the computer with the provided Hardware-ID. 3.3 Installing rheavendors USB Programmer V1 Note: We suggest to connect always the rheavendors USB programmer V1 to the same physical USB port which will be used for further uses. In this way you don’t need to reinstall the device driver for a different USB port. 3.3.1 Using Windows XP (before SP2): 1. Launch the executable “HidComInst.exe” located in the “DriverUSB1” subfolder of “X\Program Files\rheavendors\” directory. Confirm to continue drivers installation even if these drivers aren’t MS XP certificated; 2. Connect your USB programmer; 3. Go to the Control Panel, System, choose “Hardware” tab and select “Device Manager…”; rheAction User guide Page 10 of 32 4. Under “Human Interface Device” select “HID” and right click. Select “Properties” from the popup menu; 5. Then select the “Driver” tab and click on “Update Driver…”; 6. Select the option: “Search for a suitable driver…” and click “Next”; 7. In the following windows select only the “Specify a location” box and click “Next”; 8. Now browse to select the file “hidcom.inf” located in the subdirectory called “DriverUSB1”, in the “X\Program Files\rheavendors\” directory; click “OK” and wait the installation to finish; 9. Restart computer if asked; 10. Launch rheAction; 11. In the panel named “Programming Options” select “USB Programmer V1” and then “AutoDetect USB Port”; 12. Confirm “Yes” twice. 3.3.2 Using Windows XP with SP2 1. Launch the executable “HidComInst.exe” located in the “DriverUSB1” subfolder of “X\Program Files\rheavendors\” directory. Confirm to continue drivers installation even if these drivers aren’t MS XP certificated; 2. Connect your USB programmer. Just after the connection some messages should appear on the bottom-right side of the screen (the last one indicates that the hardware is correctly installed); 3. Go to the Control Panel, click on “System” icon, choose “Hardware” tab and select “Device Manager…”; 4. Under “Human Interface Device” select “HID” and right click. Select “Update Driver…” from the popup menu; rheAction User guide Page 11 of 32 5. Select the “No, not this time” option; 6. Select the option: “Install from a list of specific location (Advanced)” and click “Next”; rheAction User guide Page 12 of 32 7. In the following windows select only the “Don’t search. I will choose the driver to install” box and click “Next”; 8. In the following dialog select “rheavendors USB programmer -> COM device”, click “Next” and wait the installation to finish; rheAction User guide Page 13 of 32 9. Confirm to continue drivers installation even if these drivers aren’t MS XP certificated. Then click on “Finish”; 10. Check the COM port number assigned to the USB programmer; rheAction User guide Page 14 of 32 11. Launch rheAction; 12. In the panel named “Programming Options” select “USB Programmer V1” and then select the COM port number seen previously (alternatively click on “AutoDetect USB Port”); 3.3.3 Using Windows 2000 1. Connect your USB programmer; 2. Go to the Control Panel, click on “System” icon, choose “Hardware” tab and select “Device Manager…”; 3. Under “Human Interface Device” select “HID” and right click. Select “Properties” from the popup menu; 4. Then select the “Driver” tab and click on “Update Driver…”; 5. Select the option: “Search for a suitable driver…” and click “Next”; 6. In the following windows select only the “Specify a location” box and click “Next”; 7. Now browse to select the file “hidcom.inf” located in the subdirectory called “DriverUSB1”, in the “X\Program Files\rheavendors\” directory; click “OK” and wait the installation to finish; 8. Restart computer if asked; 9. Launch rheAction; 10. In the panel named “Programming Options” select “USB Programmer V1” and then “AutoDetect USB Port”; 11. Confirm “Yes” twice. rheAction User guide Page 15 of 32 3.4 Installing rheavendors USB Programmer V2 Since rheAction 3.5B, the driver for the “rheavendors USB programmer V2” is automatically installed at the end of the rheAction setup (check out the installation procedure chapter). Anyway you can even install this driver manually, as described in the following chapters. We recommend to remove any previous version of the drivers from the control panel: locate the entry “rheavendors USB2 Serial Converter Drivers” and click on “Change/Remove”. 3.4.1 Using Windows XP with SP2 1. Connect your USB programmer V2; 2. Choose “No, not this time” in the following dialog: 3. Choose “Install from a list or specific location (Advanced)”; rheAction User guide Page 16 of 32 4. In the following windows select “Include this location in the search” and click “Browse”. Now browse to select the subdirectory called “DriverUSB2B”, in the “X\Program Files\rheavendors\rheAction” directory; then click “Next”; 5. Click to “Finish”; rheAction User guide Page 17 of 32 6. Repeat the steps 2÷5 for a second time. At the first launch of the rheAction, after selecting “USB Programmer V2” in the “Programming Options” panel, we suggest to use the Autodetect USB Port functionality, in order to locate the correct COM port number that has been assigned to your USB programmer. Alternatively you can discover the COM port number following these steps: 1. Open the “Control Panel” and select “System”; 2. Select the “Hardware” tab and click on the “Device Manager” button; 3. Expand the “Ports (COM & LPT)” node; 4. Locate the “USB Serial Port” and see the assigned COM port (in this case COM 9). rheAction User guide Page 18 of 32 rheAction User guide Page 19 of 32 3.4.2 Using Windows Vista 1. Connect your USB programmer V2; 2. Choose “Locate and install driver software” in the following dialog: 3. Press “Continue” button when Windows shows a dialog titled: “User Account Control - Windows need your permission to continue” 4. Choose “Yes, always search online (recommended)” in the following dialog: rheAction User guide Page 20 of 32 5. Choose “Browse my computer for driver software (advanced)” in the following dialog: 6. In the following dialog press the “Browse” button and locate the “X\Program Files\rheavendors\rheAction\DriverUSB2B” folder: rheAction User guide Page 21 of 32 7. If the driver installation is completed correctly, you should see the following dialog. Press “Close” button to continue installation. 8. Repeat the steps 2÷8 for a second time. At the first launch of the rheAction, after selecting “USB Programmer V2” in the “Programming Options” panel, we suggest to use the Autodetect USB Port functionality, in rheAction User guide Page 22 of 32 order to locate the correct COM port number that has been assigned to your USB programmer. Alternatively you can discover the COM port number following these steps: 1. Open the “Control Panel” and select “Hardware and Sound”; 2. Select the “View hardware and devices” link within the “Device Manager” group; 3. Expand the “Ports (COM & LPT)” node; 4. Locate the “USB Serial Port” and see the assigned COM port (in this case COM 3). 3.4.3 Troubleshooting USB programmer V2 “Programming failed after 10 consecutive writes” exception If you receive this exception after a write attempt, you could try to raise the value of the parameters “Delay” (for instance to 20msec) among the “Programmer Option”, in the main panel. “No USB Device found” exception It could happen (especially in some notebooks) that COM number assigned automatically by the OS cannot be usable, cause it has an indirect conflict with other peripherals; in this case you will receive the message “No USB Device found” when trying to use the “AutoDetect” function. In order to change manually the COM port number assigned to the programmer you should follow there steps: 1. Open the “Control Panel” and select “Hardware and Sound”; 2. Select the “View hardware and devices” link within the “Device Manager” group; 3. Expand the “Ports (COM & LPT)” node; 4. Locate the “USB Serial Port” and right click on it; 5. Select “Properties” rheAction User guide Page 23 of 32 6. In the shown panel navigate to the “Port Settings” tab and click on “Advanced…” 7. In the next panel click in the “Com Port Number” combo and select another COM port, starting from the lowest ones (COM1, COM2, …). You could make a test even with the COMs that appears in use because sometimes they’re erroneously set to busy by other drivers/applications. rheAction User guide Page 24 of 32 rheAction User guide Page 25 of 32 4 User Guide 4.1 Update Master firmware When you need to update the firmware of the VMC, you’ll receive a proper .mhx file from rheavendors customer care. Keep in mind that each VMC model has got a specific firmware (for example: XS_Italy_E3.mhx) so you shouldn’t program a VMC with a firmware that is not intended for your specific model. Here’s the steps you need to do in order to update the VMC firmware: 1. Launch rheAction and click on the “Update Master Software” checkbox 2. Select the .mhx file for your specific VMC model that you want to update 3. Once you have selected the right file, click on the “Load” button 4. Now you have to insert the “rheavendors flash card” in the programmer your are using and press the “Write” button 5. Wait for the end of the programming process and extract the flash card from the programmer 6. Turn off the VMC you want to program with the new firmware and insert the flash card in the proper connector located in the CPU board 7. Turn on the machine and wait for the apparition of the following string in the VMC display: “Programming Master” 8. Wait for programming end (the flashing of the display will stop, and it will be displayed an “ok”), turn off the VMC and remove the flash card 4.2 Download a configuration file to the VMC A configuration file (a file with a filename like XXXX.dat) is a file containing the VMC settings like: timing of each selection, container configuration, payment system settings, etc. This chapter describers the steps in order to transfer a configuration file to the VMC. 1. Launch rheAction and click on the “Update Configuration Data” checkbox 2. In the next windows, select the “Load configuration from file” option 3. Browse to select the configuration file (like “xle-5 std_I.dat”) you want to transfer to the VMC 4. Once you have selected the right file, click on the “Finish” button 5. The program will come back to the main panel; now you have to insert the “rheavendors flash card” in the programmer your are using and press the “Write” button rheAction User guide Page 26 of 32 6. Wait for the end of the programming process and extract the flash card from the programmer 7. Turn off the VMC you want to program with the new configuration file and insert the flash card in the proper connector located in the CPU board 8. Turn on the machine and wait for the apparition of the following string in the VMC display: “Programming EAROM data…” 9. Wait for programming end, turn off the VMC and remove the flash card 4.3 Performing Data Audit Data Audit is done using a rheavendors flash card that can collect data from different VMC (up to 255 per key). The purpose of this functionality is to give to the operator a mean to record sales information. There 2 main formats for the Data Audit: rheavendors format EVA-DTS format Keep in mind that only the latest VMC models (from Sagoma Lean and new Luce21) can collect data in EVA-DTS format. The following screenshot shows the two available options: you can find the rheavendors data audit format on the left and EVA-DTS format on the right. rheAction User guide Page 27 of 32 Here’s the detailed steps to perform a data audit: 1. Launch rheAction and click on the “Data Audit” button 2. Insert a rheavendors flash card in your programmer and click “Config Memory Card for DAQ”. Please note that you should choose the proper button (on the left or on the right, according to your preferred data audit format) 3. Remove the flash card from the programmer and insert it in proper connector of the CPU board of the VMC, when it’s turned off 4. Turn on the VMC and wait for a message in the display that shows that the data audit information have been saved to the card. 5. At this point you can collect data from other VMC, using the same key 6. When you have finished your acquisition session, insert the card in your programmer and click on the proper “rhea Memory Card” button. At this point rheAction will ask you to specify the filename for the data audit file. Two types of files will be saved. For the “rheavendors format” the following files will be generated: o a “.daq” file, containing a raw dump of the data audit information, in binary format o a “.csv” file (semicolon separated) containing an header row and a row for each acquisition For the “EVA-DTS format” the following files will be generated: o a “.eva” file, containing all the EVA-DTS records belonging to all the acquisitions o a “.txt” file for each acquisition, containing the “EVA-DTS” record Note about Excel 2000 users: we’ve seen that opening a csv file with a double click on the file could cause a bad alignment of the data audit fields. Thus, with this version of Excel, we suggest to open Excel first, and then click on “File”, “Open” and select the csv file manually. rheAction User guide Page 28 of 32 4.4 Performing Extended Data Audit Extended Data Audit is done using a rheavendors flash card that is used to record all relevant events occurring during the operation of a rheavendors VMC. This kind of data audit has been recently introduced by rheavendors on latest VMC models (from Sagoma Lean on). The collected data can be analyzed with a brand new software: “rheAction Data Analyzer” (this software is not included in the rheAction license and must be purchased separately); with this data audit the VMC will record on the memory card all the events (turn on/off, selections, offs, washing, …) that occurs during the operation of the machine, together with their timestamps. This kind of Data Audit enables some analysis that are not possible with the standard Data Audit (rheavendors format or EVA-DTS format). Just as an example you can analyze the daily distribution of each selection’s sales, as shown in the following screeshot of the “rheAction Data Analyzer” (RDA from now on): In brief, RDA is a powerful software that: Collects in a single database all the different acquisition sessions belonging to different VMCs Provides a wide series of reports, graphs and queries that enable the operator to obtain a detailed picture of what’s going on on his VMCs rheAction User guide Page 29 of 32 Here’s the steps in order to collect data in Extended data audit format: 1. Launch rheAction and click on the “Extended Data Audit” button 2. Insert a rheavendors flash card in your programmer and click “Config Memory Card for Ext. DAQ”. 3. Remove the flash card from the programmer and insert it in proper connector of the CPU board of the VMC, when it’s turned off 4. Turn on the VMC and leave the rheavendors flash card inside the VMC during its normal operation. If we consider a VMC that serves 100 selections per day (average value), using rheavendors flash card, it will be able to store data for 150 days (considering a VMC with 200 selections per day, it will be able to store data for 75 days…) 5. When you acquisition session is over, remove the flash card from the VMC, plug it in your programmer and read it pressing the “Read Memory card” button (within the “extended data audit” menu) 6. After the read, rheAction will save a “.exd” file that contains all the data belonging to this acquisition session 7. Using “rheAction Data Analyzer” you will be able to import the acquisition session (.exd file) in your database and analyze the collected data rheAction User guide Page 30 of 32 rheAction User guide Page 31 of 32 5 Appendix A: How to find out Windows version In order to find out your operating system version you could use this procedure: 1. Click on “Start” and than “Run…” 2. Type “winver” within the textbox: 3. Look at the message box to find out your operating system version and service pack number: rheAction User guide Page 32 of 32


![[XX OC] Manual de instalación y manutención](http://vs1.manualzilla.com/store/data/006222191_1-4f1409e282aefa3d271872dd749bc27d-150x150.png)