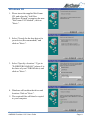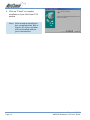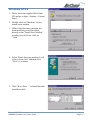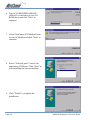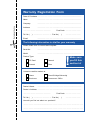
1
Contents
Features of your Roadster V.92 modem ....................................................................... 4
Installing your Modem ................................................................................................... 5
Speakerphone ............................................................................................................... 6
Installing your Drivers .................................................................................................... 7
Windows XP ....................................................................................................... 7
Windows 2000 ................................................................................................... 8
Windows Me ..................................................................................................... 10
Windows 98 ...................................................................................................... 11
Windows NT4.0 ................................................................................................ 13
Installing your Software ............................................................................................... 15
Facsimile and Voice Mail Utility ........................................................................ 15
Using your Roadster V.92 Modem with FaxTalk ......................................................... 16
Configuring voice/fax mailboxes ...................................................................... 16
General settings .............................................................................................. 16
Logging incoming calls ................................................................................... 17
Automatically detecting fax calls ...................................................................... 17
Discarding messages ..................................................................................... 17
Password protecting a mailbox ....................................................................... 18
Greeting settings .............................................................................................. 18
Recording a greeting ....................................................................................... 18
Selecting a greeting ......................................................................................... 18
Playing a greeting ............................................................................................ 19
Deleting a greeting ........................................................................................... 19
Greeting settings .............................................................................................. 19
Recording a greeting ....................................................................................... 19
Selecting a greeting ......................................................................................... 20
Playing a greeting ............................................................................................ 20
Deleting a greeting ........................................................................................... 20
Using the Speakerphone feature ................................................................................ 21
Receiving calls ................................................................................................. 21
Placing calls ..................................................................................................... 21
Using the phonebook ...................................................................................... 22
Using the redial list .......................................................................................... 22
Muting a conversion ......................................................................................... 22
Adjusting the speakerphone volume ............................................................... 22
Adjusting the microphone sensitivity ............................................................... 22
Troubleshooting .......................................................................................................... 23
Testing Your Modem ........................................................................................ 23
Updating Your Modem's Firmware .................................................................. 24
AT Commands ................................................................................................. 25
Frequently Asked V.92 Questions .................................................................... 26
Registering your Modem ............................................................................................. 28
Contact Information .......................................................................................... 28
www.netcomm.com.au
Page 2
Rev.1 - YML658
AM5698 Roadster V.92 User Guide
Warranty Information ...................................................................................................
Limitations of Warranty ....................................................................................
Regulatory Information ................................................................................................
Austel Requirements (Australia Only) .............................................................
Telecom New Zealand Warnings ....................................................................
Mandatory European Statement ......................................................................
Network Compatibility Statement ....................................................................
FCC Class B Certification ................................................................................
CE Mark Warning .............................................................................................
Rev.1 - YML658
AM5698 Roadster V.92 User Guide
31
31
32
32
33
34
34
35
35
www.netcomm.com.au
Page 3
Features of your Roadster V.92 modem
Connect to the Internet faster
The Roadster V.92 cuts the time it takes to connect by 40% or more.
Upload faster
The Roadster V.92 can upload at speeds of up to 48,000 bps.
Download faster
The Roadster V.92 uses new V.44 compression, which allows you greater throughput
for viewing HTML pages on the Internet.
Supporting the following Standards
56 Kbps (download)48 Kbps (send)with Auto-negotiation of V..92 and V.90 .
Data -V.92,V.90,V.34 ,V.32 bis,V.32 , V.22 bis,V.22 A/B,V.22 ,V.23 ,V.21
Bell 103/212 A
Error Correction V.42 ,MNP 2-4
Data Compression V.44 ,V.42 bis,MNP 5
Fax Send/Receive 14,400 bps (Class 1 )
Video support V.80 for H.324 (videophone) compatibility
Supports Digital Line Protection, Voice Capable (TAM), Speakerphone, Distinctive
Ring (duet) and Caller Id.
■ Flash ROM Upgradeable
■ Hayes AT and extended AT command set compatibility
■
■
■
■
■
■
■
■
Note: To achieve a 56Kbps V.92 connection and utilise the other V.92
features - such as Caller ID & Distinctive Ring, - these features
must be enabled on your phone line and your ISP must support and
enable the V.92 Standard. If a V.92 connection is not available, this
product will revert to a 56K V.90 mode.
www.netcomm.com.au
Page 4
Rev.1 - YML658
AM5698 Roadster V.92 User Guide
Installing your Modem
Before beginning, please turn your computer off.
■ Connect the serial port on the back of the modem (marked SERIAL) to a COM port
on your PC using the serial cable.
■ Connect the power pack to a power point and connect the other end to the modem
power socket (marked POWER).
■ Connect the telephone cord to the line socket on the back of the modem (marked
LINE) and the other end to a phone socket.
■ Turn on your modem. Refer to the Multiple Operational Features following to
prepare for speakerphone functionality.
■ Turn on your computer and refer to the appropriate operating system in Installing
your Drivers to continue.
Rev.1 - YML658
AM5698 Roadster V.92 User Guide
www.netcomm.com.au
Page 5
Speakerphone
There are three ways to use your speakerphone modem:
1. Use the inbuilt speakerphone functions, such as microphone an speaker.
2. Plug in a headset and boom microphone for easy hands free communication.
3 Use your computer's external speaker, sound card and sound card cable to enhance
video conferencing.
Note: The Headset is available as an
optional extra.
www.netcomm.com.au
Page 6
Rev.1 - YML658
AM5698 Roadster V.92 User Guide
Installing your Drivers
Windows XP
1. Please insert the supplied NetComm
CD, and when the "Found New
Hardware Wizard" recognizes the new
"NetComm V.92 Modem", select
"Install from a list or specific location
(Advanced)" and then click "Next>".
2. Select "Search for the best driver in
these locations" and choose "Include
this location in the search:". Type in
"D:\DRIVERS\AM5698" (where d:\ is
the letter of your CD ROM drive) and
click on "Next>".
3. The Wizard will search for the correct
driver. The drivers that Windows XP
uses are not digitally signed by
Microsoft and the message to the
right will be displayed. Click
"Continue Anyway".
4. Windows XP will now copy the
required files.
5. Once all files have been copied click
"Finish".
Note: After modem installation
has completed the Wave
Device for Voice modem
will be installed without
your intervention.
Rev.1 - YML658
AM5698 Roadster V.92 User Guide
www.netcomm.com.au
Page 7
Windows 2000
1. Please insert the supplied NetComm
CD, and when the "Found New
Hardware Wizard" starts. Click on
"Next>".
2. Select "Search for a suitable driver for
my device (recommended)" and click
on "Next>".
3. Select "Specify a location" and click
on Next>".
4. Enter the driver location
"D:\DRIVERS\AM5698" (where D:\ is
the drive letter of your CD ROM
drive) and click on "OK".
www.netcomm.com.au
Page 8
Rev.1 - YML658
AM5698 Roadster V.92 User Guide
5. Windows will locate the correct driver.
Click on "Next>" to continue.
6. Windows 2000 will now copy the
driver files.
7. Once the files have been copied click
"Finish" to complete installation of
the NetComm V.92 Modem.
Note: After modem installation
has completed the Wave
Device for Voice modem
will be installed without
your intervention.
Rev.1 - YML658
AM5698 Roadster V.92 User Guide
www.netcomm.com.au
Page 9
Windows Me
1. Please insert the supplied NetComm
CD, and when the "Add New
Hardware Wizard" recognizes the new
"NetComm V.92 Modem", select
"Specify the location of the driver
(Advanced)" and then click "Next>".
2. Select "Search for the best driver in
these locations" and choose "Specify
a location:". Type in
"D:\DRIVERS\AM5698" (where d:\ is
the letter of your CD ROM drive) and
click on "Next>".
3. Windows will confirm the driver and
location. Click on "Next>" to
continue.
4. Click on "Finish" to complete
installation of the NetComm V.92
modem.
Note: After modem installation
has completed the Wave
Device for Voice modem
will be installed without
your intervention.
www.netcomm.com.au
Page 10
Rev.1 - YML658
AM5698 Roadster V.92 User Guide
Windows 98
1. Please insert the supplied NetComm
CD, and when the "Add New
Hardware Wizard" recognizes the new
"NetComm V.92 Modem", click on
"Next>".
2. Select "Search for the best driver for
your device (Recommended)" and
click on "Next>".
3. Select "Specify a location:". Type in
"D:\DRIVERS\AM5698\" (where d:\ is
the letter of your CD ROM drive) and
click on "Next>".
4. Windows will confirm the driver and
location. Click on "Next>".
5. The required files will then be copied
to your computer.
Rev.1 - YML658
AM5698 Roadster V.92 User Guide
www.netcomm.com.au
Page 11
6. Click on "Finish" to complete
installation of your NetComm V.92
modem.
Note: After modem installation
has completed the Wave
Device for Voice modem
will be installed without
your intervention.
www.netcomm.com.au
Page 12
Rev.1 - YML658
AM5698 Roadster V.92 User Guide
Windows NT4.0
1. Please insert the supplied NetComm
CD and go to Start - Settings - Control
Panel.
2. Double-click on "Modems" icon to
install a new modem.
3. If this is the first time a modem has
been installed you will be taken
directly to the "Install New Modem"
window (step 4). If not, click on
"Add."
4. Select "Don't detect my modem; I will
select it from a list" and then click
"Next" to continue.
5. Click "Have Disk…" to install from the
installation disk.
Rev.1 - YML658
AM5698 Roadster V.92 User Guide
www.netcomm.com.au
Page 13
6. Type in "D:\DRIVERS\AM5698"
(where D:\ is the letter of your CD
ROM drive) and click "Next" to
continue.
7. Select "NetComm V.92 Modem" from
the list of Models and click "Next" to
continue.
8. Select "Selected ports" choose the
appropriate COM port. Click "Next" to
start installing the selected modem.
9. Click "Finish" to complete the
installation.
www.netcomm.com.au
Page 14
Rev.1 - YML658
AM5698 Roadster V.92 User Guide
Installing your Software
Facsimile and Voice Mail Utility
1. Insert the NetComm CD into your CDROM drive. Go to the Start Menu and
click on Run.
2. Browse the CD for the location or
type in
"D:\Software\Faxtalk\setup.exe"
where D: is the letter of your CD-ROM
drive.
2. Select a language and click “OK” to
continue.
3. Follow the instructions on screen to
install the FaxTalk Communicator
software.
4. You will be prompted to select your
Modem. Select the "Don't query the
modem, I will select it from a list." Box
and click on "Next".
5. Select the "NetComm V.92 Desktop
Modem" from the list and click on
"Next".
6. Continue with the installation and
restart your computer when prompted.
Rev.1 - YML658
AM5698 Roadster V.92 User Guide
www.netcomm.com.au
Page 15
Using your Roadster V.92 Modem with FaxTalk
Configuring voice/fax mailboxes
Voice/fax mailboxes are the basic type of mailbox used by FaxTalk Communicator. These
mailboxes can receive both voice messages and faxes. You can also configure a Voice/
fax mailbox to act as an announce only or fax only mailbox.
To change the settings of a Voice/fax mailbox, select the desired mailbox and click
Properties. A Voice/fax mailbox contains three configuration tabs.
General settings
The General tab contains the mailbox settings such as mailbox name, maximum message
length, and remote access password.
Voice /Fax Mailbox General Configuration Screen
Setting the maximum message length You can control the length of time a caller has to
leave a message. Each mailbox can be set to a specific message length of between 1
and 999 seconds. To change the maximum message length:
1. Click the up or down arrows on the Maximum Message Length setting to change
the value. You can also type a new value directly into the field.
2. Click OK to save the change.
www.netcomm.com.au
Page 16
Rev.1 - YML658
AM5698 Roadster V.92 User Guide
Logging incoming calls
You can elect to have all incoming calls logged to a mailbox regardless of whether the
caller left a message. If Caller ID information is available, The Caller ID name and
number will also be logged with the call.
To log all incoming calls:
1. Check the Log all calls where the caller did not leave a message option.
2. Click OK to save the change.
Automatically detecting fax calls
You can enable a mailbox to automatically detect incoming fax calls while playing the
greeting. If a fax call is detected during the greeting and the Auto Detect Fax Calls for
this Mailbox option is enabled, the software will automatically begin receiving the fax.
To automatically detect fax calls:
1. Check the Auto Detect Fax Calls for this Mailbox option.
2. Click OK to save the change.
Discarding messages
You can have a mailbox automatically delete received messages that are under certain
length. To automatically delete messages under a certain length:
1. Enable the Discard Messages Under X seconds option.
2. Click the up or down arrows on the Discard Messages Under X seconds setting to
select the maximum length of messages to delete. A setting of 3 seconds will delete
all messages under 3 seconds in length.
3. Click OK to save the change.
Rev.1 - YML658
AM5698 Roadster V.92 User Guide
www.netcomm.com.au
Page 17
Password protecting a mailbox
You can password protect individual Voice / Fax mailboxes for privacy. You have the
option of requiring a password for local access, local and remote access, or just remote
access.
To set a mailbox password:
1. Enter a numeric password in the password field. If you want password protection
only when accessing the mailbox remotely, check the Prompt for password with
remote access only option.
2. Click OK to save the change.
Greeting settings
The Greeting tab includes options for recording, selecting, saving, and playing
greetings. You can also select the default action a mailbox should perform after playing
a greeting.
Recording a greeting
You can record a custom greeting to be played when a voice call Depending on your
modem's capabilities, you can record your greeting the telephone handset, modem
microphone, or multimedia microphone.
To record a greeting:
1. Click New to create a new greeting
2. In the Greeting Recorder, select the recording device in the From you will be using
to record the greeting.
3. Click the Record button to begin recording. Click the Stop button you are finished.
4. Once you have recorded the greeting, click Save and save the to a file.
Selecting a greeting
You may want to record and use different voice greetings depending needs. For
instance, you could record a standard greeting, a greeting customers know you are
closed during lunch hour, and another you will be away for an extended period. You
can easily change greeting for any mailbox.
To select a greeting for a mailbox, select the desired greeting from Greeting list and click
OK.
www.netcomm.com.au
Page 18
Rev.1 - YML658
AM5698 Roadster V.92 User Guide
Playing a greeting
To play and review a greeting:
1. Select the desired greeting from the Greeting list.
2. In the Greeting Recorder, select the playback device from the 3. Click the Play
button to begin playback. If you are playing to multimedia device you can use the
playback slider to move backward in the greeting.
Deleting a greeting
To delete a greeting:
1. Select the desired greeting from the Greeting list and click the button. You will be
asked to confirm that you wish to delete selected greeting.
2. Click OK to delete the greeting.
Greeting settings
The Greeting tab includes options for recording, selecting, saving, and playing
greetings.
Greeting Configuration Screen
Recording a greeting
You can record a custom greeting to be played when a caller accesses the mailbox. A
Data greeting should inform the caller that this is a data mailbox. Depending on your
modem's capabilities, you can record your greeting from the telephone handset, modem
microphone, or multimedia microphone.
Rev.1 - YML658
AM5698 Roadster V.92 User Guide
www.netcomm.com.au
Page 19
To record a greeting:
1. Click New to create a new greeting
2. In the Greeting Recorder, select the recording device in the From list that you will be
using the record the greeting.
3. Click the Record button to begin recording. Click the Stop button when you are
finished.
4. Once you have recorded the greeting, click Save and save the greeting to a file.
Selecting a greeting
To select a greeting for a mailbox, select the desired greeting Greeting list and click OK.
Playing a greeting
To play and review a greeting:
1. Select the desired greeting from the Greeting list.
2. In the Greeting Recorder, select the playback device from 3. Click the Play button to
begin playback. If you are playing multimedia device you can use the playback
slider to move backward in the greeting.
Deleting a greeting
To delete a greeting:
1. Select the desired greeting from the Greeting list and click button. You will be asked
to confirm that you wish to delete selected greeting.
2. Click OK to delete the greeting.
www.netcomm.com.au
Page 20
Rev.1 - YML658
AM5698 Roadster V.92 User Guide
Using the Speakerphone feature
With the FaxTalk Communicator speakerphone you can place and receive voice calls
and use your computer and Roadster V.92 modem as a "smart" telephone. FaxTalk
Communicator's speakerphone capabilities offer mute, hold with optional music, last 20
number redial, and support for call waiting services. Speakerphone capabilities are a
feature of the Roadster V.92 modem. FaxTalk cannot "add" speakerphone capabilities to
a modem that does not have hardware support for speakerphone.
FaxTalk Communicator with speakerphone
Receiving calls
To answer an incoming call on FaxTalk Communicator's speakerphone, click Speaker.
The speakerphone answers the call and connects you to the calling party. When you're
finished with the call, click Hangup.
Placing calls
You can place outgoing calls with FaxTalk Communicator using a variety of methods:
■ If the number you wish to call is entered in the phonebook, click the Phonebook tab
and either double-click on the entry or highlight the entry and click Dial.
■ If you previously added a number to a Speed Dial button, click the Speed Dial tab
and click on the appropriate button.
■ Click Speaker to take the phone off-hook and enter the numbers individually
■ Select a previously dialed number from the Redial list, and click Dial.
Rev.1 - YML658
AM5698 Roadster V.92 User Guide
www.netcomm.com.au
Page 21
Using the phonebook
The Phonebook tab displays all entries in the FaxTalk Phonebook. You can dial a
phonebook entry by either double clicking on the entry or highlighting the entry in the
Name column and clicking Dial. When a phonebook entry is highlighted, the number to
be dialed is displayed in the Redial field.
Using the redial list
FaxTalk Communicator includes a recent dialed numbers list that contains the last 20
numbers dialed. To redial a number in the redial list, select the number from the
dropdown list and click Dial.
Muting a conversion
To mute a call so that the caller cannot hear conversations occurring locally, click
Mute. When Mute is active a green light appears on the Mute button. Click on Mute
again to resume a normal conversation.
Adjusting the speakerphone volume
The Speaker volume control allows you to adjust the volume of the caller while on the
speakerphone. If you want to increase the volume of the caller's voice, slide the volume
control to the right. To decrease the caller's volume, slide the volume control to the left.
Adjusting the microphone sensitivity
The Microphone sensitivity control allows you to adjust the sensitivity of the
microphone when used with the speakerphone. If you want to increase the sensitivity
of the speakerphone microphone, slide the volume control to the right. To decrease the
sensitivity of the speakerphone microphone, slide the volume control to the left.
www.netcomm.com.au
Page 22
Rev.1 - YML658
AM5698 Roadster V.92 User Guide
Troubleshooting
Testing Your Modem
Windows XP
1. To test and verify that the modem is working properly, please go to Start / Settings /
Control Panel.
2. If "Category view" is selected (by default) select "Switch to Classic View".
3. Double click on the "Phone and Modem options" icon.
4. Select the "Modem" tab and select your new modem. Click on the "Properties"
button.
5. Select the "Diagnostics" tab and click on the "Query Modem" button.
6. If your modem is responding to AT commands and functioning correctly, it means
that your modem is working properly. Click "OK" to end this procedure. If any error
is reported during this procedure please restart your PC and repeat the test
procedure.
Windows 98/ME
1. Please go to Start / Settings / Control Panel and double-click on the "Modems"
icon.
2. To test the modem by clicking on the "Diagnostics" tab. Then select the COM Port
where Topic Modem is setting and click on the "More Info…" button to start the
test.
3. If your modem is responding to AT commands and functioning correctly, it means
that your modem is working properly. Click "OK" to end this procedure. If any error
is reported during this procedure please restart your PC and repeat the test
procedure.
Windows 2000
1. Please go to Start / Settings / Control Panel and double-click on the "Phone and
Modem Options" icon.
2. Click "Modems" tab, select "Roadster V.92 Modem" and click on the "Properties"
button.
3. Click "Diagnostics" tab and then click on the "Query Modem" button.
4. If your modem is responding to AT commands and functioning correctly, it means
that your modem is working properly. Click "OK". If any error is reported during
this procedure please restart your PC and repeat the test procedure.
Rev.1 - YML658
AM5698 Roadster V.92 User Guide
www.netcomm.com.au
Page 23
Updating Your Modem's Firmware
Your NetComm Roadster V.92 modem comes with the latest firmware, however, as new
releases become available, you may wish to update to update your firmware.
To update your Modem’s Firmware, go to the NetComm web site at
www.netcomm.com.au and refer to the support section. Search for your Modem and
select the latest firmware version to download.
Follow the instructions included with the file to correctly install your modem’s
firmware.
www.netcomm.com.au
Page 24
Rev.1 - YML658
AM5698 Roadster V.92 User Guide
AT Commands
Note: Not all of the commands and registers are accessible to the user. The
following are listed for quick reference only. A full copy of the AT
command set can be found in Adobe Acrobat format at “D:\Manuals\
where D:\ is the letter of your CD-ROM drive.
Where the following table shows an n, the n represents a numerical value. For example
Mn can represent M1, M2 or M3, etc.
Command
Description
T
,
A
D
En
Hn
Ln
On
Vn
Wn
X3
X4
Z
&F
&Kn
\Nn
%Cn
S0=n
Dial using Tone (DTMF) method.
(comma) Pauses before continuing the dial string.
Enter answer mode, go off hook and attempt to answer call.
Enter originate mode, go off hook, and attempt to dial.
Character Echo: 0 = Do not echo, 1 = echo characters.
Hook-state: 0 = Hang up, 1 = Go off hook (loop line)
Set speaker volume: where n is 0 or 1=low, 2=medium, 3=high
Go to on-line state from command state: 0 = no retrain, 1 = retrain.
Display result codes: 0 = as numbers, 1 = as words
Negotiation progress messages: 0= None, 1 = Return (display)
Provide basic codes, connection speed and BUSY detection.
Provides basic codes, connection speeds, DIALTONE, and BUSY.
Reset.
Recall factory configuration.
Flow control: 3= RTS/CTS, 4=XON/XOFF
Error correction mode: 0 = normal (off) speed buffered mode.
Data compression: 0 = Disabled.
Set auto answer. Range n = 0-255 (Rings)
Rev.1 - YML658
AM5698 Roadster V.92 User Guide
www.netcomm.com.au
Page 25
Frequently Asked V.92 Questions
What is V.92?
V.92 is a new standard for dial-up communications that offers several important
improvements over the existing V.90 standard. These improvements are intended to
make communications faster, easier and more enjoyable. V.92 and its companion
compression standard V.44, have been officially adopted by the ITU, the International
Telecommunications Union.
What makes a V.92 modem faster than V.90?
There are three features that allow the V.92 modem to give you faster speeds.The first is
the V.92's improved "automatic negotiation" or "handshake" which is the way modems
determine compatibility and decide what standards to use to communicate. With a
typical V.90 modem this can take as long as 30 seconds. With QuickConnect, the entire
process can take as little as half that time.The V.92 Modem also includes V.44, a new
international data compression standard. V.44 was designed specifically for the
Internet, and can double the effective speed of your Internet page loading. Finally, the
V.92 standard increases the upload speed by as much as 30%., from 33,600 bps (the
maximum upload speed using V.90) to 48,000 bps.
How does V.44 increase the speed of my web browsing?
V.44 is the latest compression standard approved by the ITU. Compression increases
the effective speed of your connection by analysing the data and encoding it so that it
can be sent more efficiently. The old standard (V.42bis) was created about 10 years ago,
so it wasn't designed with the Internet in mind. V.44 was, and it is therefore much more
efficient at compressing web pages - up to 100% more efficient in some cases.
Do I need a special service or new ISP?
No. But you may not be able to take advantage of all these features right away. While
your current ISP will almost certainly support V.92 and V.44 at some point, it may take a
while before the equipment manufacturers that your ISP or online service uses sends
them an upgrade, or until they implement the upgrade. However, V.92 and V.44 are true
international standards, so over time you can be assured of nearly universal support.
In the meantime you can use the V.90 protocol, which is also in your V.92 modem, until
your ISP switches over.
www.netcomm.com.au
Page 26
Rev.1 - YML658
AM5698 Roadster V.92 User Guide
Does V.92 "QuickConnect" work on all calls?
This feature of the V.92 standard allows the modem to "learn" and "remember" the
variables associated with calling a specific telephone number and connecting to a
specific modem associated with that number. This feature will be most effective when
you repetitively call the same number - such as that for your on-line service or internet
service provider. The modem will then be able to use its stored profile and deliver the
advantage of a quicker connection.
Does V.44 work equally well on all file transfers? Which are most
improved; least improved?
V.44 compression is optimized for the types of files associated with internet use
including web pages, graphics and documents such as .PDF files. As with all
compression the amount of improved performance varies both with the actual format
and with the content of individual pages. For reference, web searches show the most
visible improvement, especially searches on web stores or areas that have high
amounts of text and numerous small images. The next most improvement is in standard
web browsing. Email and downloading of ASCII type text files show noticeable but
more modest improvement
Will a V.92 modem work automatically with earlier modems? V.90,
K56flex, X2? With 33.6k, 14.4k, 9600 and 2400 modems?
A V.92 modem will automatically negotiate and connect at the best achievable-shared
speed down to 2,400 bps. The negotiation and the related connection time may take
longer if the connection does need to be negotiated down to a very low speed as the
higher speeds are attempted first. However the connection between a 56K V.92 and a
56K V.90 will take approximately the same time as between two current V.90 modems.
How do V.92 modem speeds compare to ISDN, ADSL and Cable speeds?
First, remember that V.92 is asymmetric in nature, the same as ADSL. It offers download
speeds from the web which are higher than it's upload speeds. This means that it is
inherently different from ISDN and has been optimized, like ADSL, for Internet access.
In fact it is optimized primarily with V.44 compression rather than with purely higher
transmission speed as found in ADSL and Cable. Because of this it is not possibly to
directly compare the different devices except in terms of the Internet experience itself,
including Web browsing. Given optimum V.92/V.44 performance of approximately
300,000 bps, this still means that that it will operate at less than half the speed of most
broadband services (which range from 600,00 bps to 1,500,000 bps).
Rev.1 - YML658
AM5698 Roadster V.92 User Guide
www.netcomm.com.au
Page 27
Registering your Modem
To ensure that the conditions of your warranty are complied with, please go to the
NetComm web site for quick and easy registration of your Roadster V.92 at
www.netcomm.com.au
Alternatively, you can complete the following Warranty Registration Form and mail it to
NetComm Limited, PO Box 1200, Lane Cove NSW 2066.
Contact Information
If you have any technical difficulties with the modem, please do not hesitate to contact
NetComm’s Customer Support Department.
Email:
[email protected]
Fax:
(02) 9424-2010
Web:
www.netcomm.com.au
www.netcomm.com.au
Page 28
Rev.1 - YML658
AM5698 Roadster V.92 User Guide
Warranty Registration Form
Cut along the line
Date of Purchase …….......………………...........……….................................
Name
…….......………………...........……….................................
Company
…….......………………...........……….................................
Address
…….......………………...........……….................................
…………………….........……...........
Tel No (
Post Code .....………...……….
) ..............………....……. Fax No (
E-mail
)
.....………...……….
…….......………………...........……….................................
The following information is vital for your warranty
Please make sure it’s correct and complete.
Serial No
…….......………………...........……….................................
Model
…….......………………...........……….................................
!
Make sure
you fill this
section in!
Product Type:
PC Card
External
Internal
Other
I intend to use this modem at:
Home
School/College/University
Business
Government Office
Dealer’s Name
…….......………………...........……….................................
Dealer’s Address …….......………………...........……….................................
…………………….........……...........
Tel No (
Post Code .....………...……….
) ..............………....……. Fax No (
)
.....………...……….
How did you find out about our products?
…………………….............................………………………………………....…………
…………………….............................………………………………………....…………
Warranty Information
The warranty is granted on the following
conditions:
1. This warranty extends to the original
purchaser (you) and is not transferable;
2. This warranty shall not apply to software
programs, batteries power supplies,
cables or other accessories supplied in or
with the product;
3. The customer complies with all of the
terms of any relevant agreement with
NetComm and any other reasonable
requirements of NetComm including
producing such evidence of purchase as
NetComm may require;
4. The cost of transporting product to and
from NetComm's nominated premises is
your responsibility; and,
5.
NetComm does not have any liability or
responsibility under this warranty where
any cost, loss, injury or damage of any
kind, whether direct, indirect,
consequential, incidental or otherwise
arises out of events beyond NetComm's
reasonable control. This includes but is
not limited to: acts of God, war, riot,
embargoes, acts of civil or military
authorities, fire, floods, electricity
outages, lightning, power surges, or
shortages of materials or labour.
4. Your modem has been used for any other
purposes than that for which it is sold, or
in any way other than in strict
accordance with the user manual
supplied;
5. Your modem has been repaired or
modified or attempted to be repaired or
modified, other than by a qualified person
at a service centre authorised by
NetComm; and,
6. The serial number has been defaced or
altered in any way or if the serial number
plate has been removed.
Limitations of Warranty
The Trade Practices Act 1974 and
corresponding State and Territory Fair Trading
Acts or legalisation of another Government
("the relevant acts") in certain circumstances
imply mandatory conditions and warranties
which cannot be excluded. This warranty is
in addition to and not in replacement for such
conditions and warranties. To the extent
permitted by the Relevant Acts, in relation to
your product and any other materials provided
with the product ("the Goods") the liability of
NetComm under the Relevant Acts is limited to,
at the option of NetComm to:
■
Replacement of the Goods; or
■
Repair of the Goods; or
■
Payment of the cost of replacing the
Goods; or
■
Payment of the cost of having the Goods
repaired.
The warranty is automatically voided if:
1. You, or someone else uses the product,
or attempts to use it, other than as
specified by NetComm;
2. The fault or defect in your product is the
result of a voltage surge subjected to the
modem either by power supply or
communication line, whether caused by
thunderstorm activity or any other
cause(s);
3. The fault is the result of accidental
damage or damage in transit, including but
not limited to liquid spillage;
All NetComm ACN 002 490 486 products have
a standard 12 months warranty from date of
purchase. However some products have an
extended warranty option (refer to
packaging). To be eligible for the extended
warranty you must supply the requested
warranty information to NetComm within 30
days of the original purchase by registering
on-line via the NetComm web site at
www.netcomm.com.au.
NetComm reserves the right to request proof
of purchase upon any warranty claim.
Rev.1 - YML658
AM5698 Roadster V.92 User Guide
www.netcomm.com.au
Page 31
Regulatory Information
Austel Requirements
(Australia Only)
The software supplied with this modem has
default settings compliant with the
requirements of Austel Technical Standard
TS-ØØ2.
Adjustment of these settings outside the
required limits will void the Austel permit
associated with the modem.
Dial Retry Attempts
With the service tone detection enabled (eg.
Busy Tone) the unit must not be configured to
make more than 1Ø dial attempts to the same
telephone number.
telecommunications line connection (Telecom
cable) must be removed before opening the
case of the PC. NOTE Adjustment of these
settings outside the required limits will void the
Austel permit associated with the modem.
Connection of a non-approved modem to the
telecommunications network is an offence
under Section 253 of the Telecommunications
Act 1991 and may attract a maximum fine of
$12,ØØØ.
With the service tone detection disabled (eg.
Busy Tone - ATXØ) the unit must not be
configured to make more than 3 dial attempts
to the same telephone number.
With dial tone detection disabled (eg. ATXØ)
the unit should be configured to dial not less
than two seconds after line seizure and not
more than 5 seconds after line seizure.
In all of the above cases no further attempts
shall be made to connect to the telephone
number, until a further period of at least 3Ø
minutes has elapsed (this does not apply if
the redial sequence is manually restarted).
Call Answering
The modem shall answer an incoming call by
seizing the line in not less than 2 seconds
from the start of the application of ring signal
from the PSTN. (eg. ATSØ=2 or issue ATA
after the 2nd ring.)
Internal Modems Internal modems are
designed to operate only within a PC with a
screw down lid.
Also, telecommunications network voltages
exist on the card inside the PC. Therefore the
www.netcomm.com.au
Page 32
Rev.1 - YML658
AM5698 Roadster V.92 User Guide
Telecom New Zealand
Warnings
The grant of a Telepermit for any item of
terminal equipment indicates only that Telecom
has accepted that the item complies with
minimum conditions for connection to its
network. It indicates no endorsement of the
product by Telecom, nor does it provide any
sort of warranty. Above all, it provides no
assurance that any item will work correctly in
all respects with another item of Telepermitted
equipment of a different make or model, nor
does it imply that any product is compatible
with all of Telecom's network services.
This equipment is not capable, under all
operating conditions, of correct operation at
the higher speeds for which it is designed.
Telecom will accept no responsibility should
difficulties arise in such circumstances.
This equipment shall not be set up to make
automatic calls to the Telecom `111`
Emergency Service.
This equipment may not provide for the
effective hand-over of a call to another
device connected to the same line.
IMPORTANT NOTICE
Under power failure conditions, this telephone
may not operate. Please ensure that a
separate telephone, not dependent on local
power, is available for emergency use.
Some parameters required for compliance
with Telecom's Telepermit requirements are
dependent on the equipment (PC) associated
with this device. The associated equipment
shall be set to operate within the following
limits for compliance with Telecom's
Specification:-
b. The equipment shall go on-hook for a
period of not less than 30 seconds
between the end of one attempt and the
beginning of the next attempt. Some
parameters required for compliance with
Telecom's Telepermit requirements are
dependent on the equipment (PC)
associated with this device.
In order to operate within the limits for
compliance with Telecom's Specifications, the
associated equipment shall be set to ensure
that automatic calls to different numbers are
spaced such that there is no less than 5
seconds between the end of one call attempt
and the beginning of another.
Some parameters required for compliance
with Telecom's Telepermit requirements are
dependent on the equipment (PC) associated
with this device. In order to operate within the
limits for compliance with Telecom's
Specifications, the associated equipment shall
be set to ensure that calls are answered
between 3 and 30 seconds of receipt of
ringing.
All persons using this device for recording
telephone conversations shall comply with
New Zealand law. This requires that at least
one party to the conversation is to be aware
that it is being recorded. In addition, the
Principles enumerated in the Privacy Act 1993
shall be complied with in respect to the nature
of the personal information collected, the
purpose for collection, how it is used and
what is disclosed to any other party.
Not all telephones will respond to incoming
ringing when connected to the extension
socket.
a. There shall be no more that 10 call
attempts to the same number within any
30 minute period for any single manual call
initiation, and
Rev.1 - YML658
AM5698 Roadster V.92 User Guide
www.netcomm.com.au
Page 33
Mandatory European
Statement
Network Compatibility
Statement
The equipment has been approved in
accordance with Council Decision 98/482/EC
for Pan-European single terminal connection
to the public switched telephone network
(PSTN). However, due to differences
between the individual PSTN's provided in
different countries, the Approval does not, of
itself, give an unconditional assurance of
successful operation on every PSTN network
termination point.
This product is designed to work with, and is
compatible with the following networks. It has
been tested to and found to conform with the
additional requirements contained in EG 201
121.
In the event of problems, you should contact
your equipment supplier in the first instance.
Germany - ATAAB AN005, AN006, AN007,
AN009, AN010, and DE03, DE04, DE05, DE08,
DE09, DE12, DE14, DE17
Greece - ATAAB AN005, AN006 and GR01,
GR02, GR03, GR04
Portugal - ATAAB AN001, AN005, AN006,
AN007, AN011 and P03, P04, P08, P10
Spain - ATAAB AN005, AN007, AN012, and
ES01
Switzerland - ATAAB AN002
All other countries - ATAAB AN003, AN004
Specific switch settings or software setup
are required for each network, please refer to
the relevant sections of the user guide for
more details. The hookflash (time break
register recall) function is subject to separate
national type approval. It has not been tested
for conformity to national type regulations,
and no guarantee of successful operation of
that specific function on specific national
networks can be given.
www.netcomm.com.au
Page 34
Rev.1 - YML658
AM5698 Roadster V.92 User Guide
FCC Class B Certification
This equipment has been tested and found to
comply with the regulations for a Class B
digital device, pursuant to Part 15 of the FCC
Rules. These limits are designed to provide
reasonable protection against harmful
interference when the equipment is operated
in a commercial environment. This equipment
generates, uses, and can radiate radio
frequency energy and, if not installed and
used in accordance with this user's guide,
may cause harmful interference to radio
communications. Operation of this equipment
in a residential area is likely to cause harmful
interference, in which case the user will be
required to correct the interference at his
own expense.
CE Mark Warning
This is a Class B product. In a domestic
environment, this product may cause radio
interference, in which case the user may be
required to take adequate measures.
Rev.1 - YML658
AM5698 Roadster V.92 User Guide
www.netcomm.com.au
Page 35