1
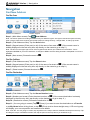
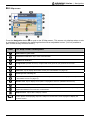
User Manual F-Series with SmartS ™ 2006 en English - Australia/ Canada/ United States Global support information ENGLISH For 24/7 help and support with Navman products, visit our Technical Support website at: http://support.navman.com Here you will find a detailed section covering all frequently asked questions (FAQs) with search options and a direct email facility if you cannot find the solution to your question. 24 hours a day, 7 days a week, over 90% of our customers immediately find the answers they need at: http://support.navman.com If you would like to speak to one of our Technical Support Team, please call the number(s) below: Australia : +61 2 9879 9000 Monday to Friday: 8.30am - 5.00pm Eastern Standard Time. North America: +1-866-9NAVMAN (866-962-8626) Monday to Friday: 9.00am - 6.00pm Eastern Time. © 2006 Brunswick New Technologies Asia Pte Limited. Navman is a registered trademark of Brunswick New Technologies Asia Pte Limited and is used under licence by Navman New Zealand. Navman is part of the Brunswick Corporation, headquarters Chicago, IL. All rights reserved. The software contains proprietary information of Navman; it is provided under a licence agreement containing restrictions on use and disclosure and is also protected by copyright law. Reverse engineering of the software is prohibited. No part of this publication may be reproduced, stored in a retrieval system, or transmitted in any form or by any means, electronic, mechanical, photocopying, recording or otherwise, without the prior written permission of Navman. Back-On-Track, Drive-Away, NavPix, Smart5 and Turn-by-Turn are either registered trademarks or trademarks of Brunswick New Technologies Asia Pte Limited and are used under licence by Navman New Zealand. All rights reserved. Location Identifiers © 2005 International Air Transport Association. All other trademarks and registrations are the property of their respective owners. Published in New Zealand. Disclaimer Due to continued product development this information may change without notice. Navman does not warrant that this document is error-free. The screenshots and other presentations shown in this manual may differ from the actual screens and presentations generated by the actual product. All such differences are minor and the actual product will deliver the described functionality as presented in this User Manual in all material respects. Compliance WARNING This product, its packaging and its components contain chemicals known to the State of California to cause cancer, birth defects or reproductive harm. This Notice is being provided in accordance with California’s Proposition 65. The manufacturer is not responsible for any radio or tv interference caused by unauthorized modifications to this equipment. Such modifications could void the user’s authority to operate the equipment. This device complies with part 15 of the FCC Rules. Operation is subject to the following two conditions: (1) This device may not cause harmful interference, and (2) this device must accept any interference received, including interference that may cause undesired operation. F-Series | Important safety information Important safety information PLEASE READ CAREFULLY BEFORE INSTALLING PRODUCT IN VEHICLE This is the safety alert symbol. It is used to alert you to potential personal injury hazards. Obey all safety messages that follow this symbol to avoid possible injury or death. WARNING indicates a potentially hazardous situation which, if not avoided, could result in death or serious injury. CAUTION indicates a potentially hazardous situation which, if not avoided, may result in minor or moderate injury. CAUTION used without the safety alert symbol indicates a potentially hazardous situation which, if not avoided, may result in property damage. Removing original equipment, adding accessories or modifying your vehicle could affect the vehicle’s safety or make it illegal to operate in some jurisdictions. Follow all product instructions and all instructions in your vehicle owner’s manual regarding accessories or modifications. Consult your country’s and/or state’s laws regarding operation of a vehicle with any accessories or modifications. It is your sole responsibility to place, secure and use the Navman in a manner that will not cause accidents, personal injury or property damage. Always observe safe driving practices. Mount the Navman in a position that is secure and does not obstruct the driver’s view. Do not mount the Navman in a way that may interfere with the safe operation of the vehicle, the deployment of air bags or other safety equipment. Do not operate the Navman while driving. Before you use your Navman for the first time, familiarize yourself with your device and its operation. On main roads, the distance to an exit calculated by the Navman may be further than the distance shown on road signs. Road signs show the distance to the start of an exit while your Navman shows the distance to the next intersection, i.e., the end of the exit ramp or road. To prepare to exit a road, always follow distance information on road signs. The use of information regarding safety or speed camera locations may be subject to local laws in the country of use. You are responsible for checking that you can legally use the information in your country or in the country where the information will be used. Do not handle the Navman while it is hot. Let the product cool, out of direct sunlight. Do not expose the Navman to direct sunlight in an unattended vehicle for prolonged periods. Overheating may damage the unit. To discourage theft, do not leave the Navman, mounting bracket or any cables in plain view in an unattended vehicle. 3 F-Series | Important safety information AC Adapter-specific safety information To charge your Navman from the mains power, use the AC adapter/AC power pack supplied by Navman as an accessory (may be sold separately). Using other AC adapters with your Navman could result in serious injury or property damage. Never use the adapter if the plug or cord are damaged. Do not expose the adapter to moisture or water. Do not use the adapter in a high moisture environment. Exposure to water may cause electrical sparks or fires. Never touch the adapter when your hands or feet are wet. Allow adequate ventilation around the adapter when using it to operate your Navman or charge the Navman internal battery. Do not cover the adapter with paper or other objects that will reduce ventilation. Do not use the adapter while it is inside a carrying case or other container. Ensure that the adapter is connected to a power source with the correct fitting and voltage requirements. The voltage requirements can be found on the AC adapter casing and/or packaging. Do not attempt to service the adapter as this could result in personal injury. Replace the adapter if it is damaged or exposed to excess moisture. Internal battery-specific safety information The Navman contains a non-replaceable internal lithium-ion polymer battery. The battery may burst or explode if mishandled, releasing hazardous chemicals. To reduce the risk of fire or burns, do not disassemble, crush or puncture the battery. Recycle or dispose of the battery safely and properly according to local laws and regulations. Do not dispose of the battery in fire or water. Only use the correct AC adapter (sold separately) or in-vehicle adapter supplied by Navman to charge the Navman internal battery. Only use the Navman internal battery with the Navman unit. Failure to adhere to these warnings and cautions may lead to death, serious injury or property damage. Navman disclaims all liability for installation or use of the Navman that causes or contributes to death, injury or property damage or that violates any law. 4 F-Series | Contents Contents Important safety information...................................................................................................................3 Getting started .......................................................................................................................................6 Welcome...........................................................................................................................................6 Battery ..........................................................................................................................................6 Components .....................................................................................................................................7 Starting your Navman .......................................................................................................................8 Main Menu ........................................................................................................................................9 Free Driving ......................................................................................................................................9 Navigation............................................................................................................................................10 Find New Address...........................................................................................................................10 Find the Area ..............................................................................................................................10 Find the Address ........................................................................................................................10 Find the Destination....................................................................................................................10 Find Address by Zip Code ..........................................................................................................11 Find Recent Address ......................................................................................................................11 Find My Home ................................................................................................................................11 Find a Favorite (saved address).....................................................................................................11 Find Places of Interest (POI)...........................................................................................................12 Nearest POI................................................................................................................................12 ALL POI......................................................................................................................................12 Back-On-Track (automatic rerouting) ..............................................................................................12 Viewing your Route.........................................................................................................................12 3D Map screen .......................................................................................................................13 Next Turn screen ....................................................................................................................14 Turn-by-Turn screen ...............................................................................................................15 Route Summary screen ..........................................................................................................16 Information screen......................................................................................................................17 Actions screen ............................................................................................................................18 GPS Status.................................................................................................................................19 Preferences .........................................................................................................................................20 Localize ..........................................................................................................................................20 Navigation.......................................................................................................................................20 Maps...............................................................................................................................................21 System............................................................................................................................................21 Demos ............................................................................................................................................22 Traffic..............................................................................................................................................22 Support ................................................................................................................................................23 Troubleshooting ..............................................................................................................................23 Address Search Rules ....................................................................................................................23 5 F-Series | Getting started Getting started Welcome We hope you enjoy your new Navman GPS transferable navigation system. This user manual will help you Drive-Away™ with your Navman, straight out of the box. Your Navman uses information received from the GPS (Global Positioning System) satellites to calculate your current position. This process is called getting a GPS ‘Fix’. Your Navman can then display your current position on maps, providing street-level detail for door-to-door navigation – including Places of Interest (POI) such as accommodation, restaurants, petrol stations, railway stations, airports and more. If your Navman has not been used recently, or if you are turning it on for the first time, it may take an extended time to get a GPS fix. Battery For best performance, always plug the in-car power adapter into your Navman to continually trickle charge the battery. From a full charge, the battery life should last approximately 3 hours. 6 F-Series | Getting started Components Item Component Gas button. Press to display a list of Gas stations nearest to your current position. Parking button. Press to display a list of parking areas nearest to your current position. Main Menu button. Press to display the Main Menu screen. Navigation button. Press (repeatedly) to cycle through the 3D Map, Next Turn, Turn-by-Turn, and Route Summary screens. External antenna connection. Connect external antenna here if required. Speaker. Power button. Press to turn the power ON or OFF. Reset button. Press to restart your Navman. Hot shoe plate. Connector for Navman Traffic or Power modules (available as optional accessories). Slot for accessory memory card. Card must be inserted with label facing the front of the Navman. (In some regions with large map data requirements, an accessory map memory card is provided.) Mini USB socket. Use for power adapter (included), or for USB cable to computer (included with optional Connectivity Pack accessory). Volume controls. 7 F-Series | Getting started Starting your Navman Normal start: A warning message will display. After accepting the warning message, the Main Menu screen will display (if no route is planned) or a navigation map will display if a route is planned. If for any reason your Navman does not start up correctly, press the Reset Button on the bottom of the device. First-time start: You will be guided through some steps to set up your Navman. This guided start occurs only the very first time you start your Navman, or after a complete reset to factory default settings. Step 1: Press the Power button to turn on your Navman. Screen: Language Screen: Maps Screen: Voice Step 2: (Language screen) Choose a language £. Step 3: (Warning screen) Read the warning message £. If you tap Decline, your Navman will turn OFF. It will not operate if the warning message is declined. If you accidentally decline the warning message, simply start again from Step 1. Step 4: (Welcome screen) Read the welcome message ¥. a) b) If the Maps screen displays, continue to step 5. If the Voice screen displays, continue to step 6. Step 5: (Maps screen) Choose maps £. In some regions with large map data requirements you might need to limit the number of active maps to ensure optimum performance. Your Navman will alert you to reduce the number of maps selected if the file size is too large. Step 6: (Voice screen) Female or Male ¥. Step 7: (Units screen) Kilometers or Miles ¥. Step 8: (Time screen) Choose an option choose a setting £. (Repeat for each option and then tap ¥ to continue to step 9.) You can set Format (12 or 24 h), Daylight Saving (ON or OFF) and Time Zone. Step 9: (Tutorial screen) Tap £ (to view tutorial) or (to skip tutorial) ¥. a) If you choose £, a Tutorial will begin. At the end continue to step 10. b) If you choose , continue to step 10. Step 10: Read the settings message £. The Main Menu screen will then display. 8 F-Series | Getting started Main Menu Press the Main Menu Button Item to access the Main Menu screen at any time Menu description Tap this button to drive straight to your My Home address. If you have not yet saved a My Home address you can save your current position as My Home (this option requires a GPS fix), or find a new My Home address. Tap this button to find a New Address. You can save the address as a Favorite or drive there straight away. Tap this button to find Places of Interest (POI). POI include airports, car parks, banks, etc. You can select any POI and save it as a Favorite or as My Home , or drive there straight away. Tap this button to find Favorites (saved addresses). You can change the name of a Favorite, save it as My Home, or drive there straight away. Tap this button to find a Recent Address that you have navigated to. You can select any Recent Address and save it as a Favorite or drive there straight away. Tap this button to change Preferences or to view Tutorials and Demonstrations. Free Driving Screen: Free Driving Screen: Seeking GPS After turning on your Navman, press the Navigation button to view the navigation screens. If you have not selected an address to go to, you will see the Free Driving screen. This 3D moving map screen shows your current position. If a GPS fix has not been obtained within 40 seconds from turning on your Navman, an animated icon will be displayed to show that your Navman is seeking GPS signals. All other navigation screens only display when a route is planned. To plan a route, you must find and confirm a destination address. 9 F-Series | Navigation Navigation Find New Address Find the Area Screen: Find Address Screen: Keypad Step 1: (Main Menu screen) Tap Screen: Area New Address. Note: The search options for finding an address vary for different regions. All regions include the option to find by Area or Street, while some regions also include options to change Country, change State, or find by Zip Code. Step 2: (Find Address screen) Tap the Area button. Step 3: (Keypad screen) Enter part (or all) of the name of an area ¦. (If the correct name is already displayed in the text entry box, tap directly on the name to go to step 5.) Note: The arrow in the upper-right corner of the keypad screen allows you to delete incorrect letters. Text is highlighted GREEN as you enter characters, it changes to RED if the word being entered is misspelled or not in the database. Step 4: (Area screen) Choose the area £. Find the Address Step 5: (Find Address screen) Tap the Street button. Step 6: (Keypad screen) Enter part (or all) of the name of a street ¦. (If the correct name is already displayed in the text entry box, tap directly on the name to go to step 8.) Step 7: (Street screen) Choose the street £. Find the Destination Screen: Find Address Screen: You are going to: Screen: 3D Map Step 8: (Find Address screen) Tap the House Number button. Step 9: (Number pad screen) Enter the street number ¦. (If the correct destination is already displayed in the text entry box, tap directly on the destination to go to step 11.) Step 10: (Destination screen) Choose the destination £. Step 11: (You are going to screen) Tap (Save) if you want to save the destination as a Favorite or as My Home before driving there, or tap ¡ (Drive) to drive there straight away. A 3D moving map will display your current position and nearest route details. Note: From the ‘You are going to’ screen, tap anywhere on the map to select a destination directly from the map. Tap and drag the map to view different areas, then tap the point on the map where you would like to go. 10 F-Series | Navigation Find Address by Zip Code Some regions allow you to find addresses by zip code. This can reduce the number of address search steps, as zip codes more specifically identify a location straight away. All other steps are as for finding by area. Find Recent Address Step 1: (Main Menu screen) Tap Recent Address. Step 2: (Recent Address screen) Choose the address £. Step 3: (You are going to screen) Tap (Save) if you want to save the address as a Favorite or as My Home, or tap ¡ (Drive) to drive there straight away. A 3D moving map will display your current position and nearest route details. Find My Home Step 1: (Main Menu screen) Tap and nearest route details. My Home. A 3D moving map will display your current position Note: If you have not yet saved a My Home address you can save your current location as My Home (this option requires a GPS fix), or find a new My Home address. Finding a new Home address follows the steps described for finding a New Address. Find a Favorite (saved address) Step 1: (Main Menu screen) Tap Favorites. Step 2: (Favorites screen) Choose the Favorite £. Step 3: (You Are Going To screen) Tap (Edit) if you want to change the name of the Favorite or save it as My Home, or tap ¡ (Drive) to drive there straight away. A 3D moving map will display your current position and nearest route details. 11 F-Series | Navigation Find Places of Interest (POI) Nearest POI Step 1: (Main Menu screen) Tap Places of Interest. Step 2: (Find Places of Interest (POI) screen) Tap Nearest POI to find POI nearest to your current location. Step 3: (POI Type screen) Choose the POI type £. Step 4: (POI screen) Choose the POI £. Step 5: (You are going to screen) Tap (Save) if you want to save the POI as a Favorite or as My Home, or tap ¡ (Drive) to drive there straight away. A 3D moving map will display your current position and nearest route details. Note: Icons for all active POI appear on-screen along your route as you get close to them. You can change active POI at any time from the preferences menu. ALL POI Step 1: (Main Menu screen) Tap Places of Interest. Step 2: (Places of Interest (POI) screen) Tap All POI to find POI in any location. Note: Search options for finding an address vary for different regions. All regions include the option to find by Area, while some regions also include change Country, change State, or find by Post Code. Step 3: (Find POI screen) Tap the Area button. Step 4: (Keypad screen) Enter part (or all) of the name of an area ¦. (If the correct name is already displayed in the text entry box, tap directly on the name to go to step 6, you do not need to go to the area list.) Note: The arrow in the upper right corner of the keypad screen allows you to delete incorrect letters. Text is highlighted GREEN as you enter characters, it changes to RED if the word being entered is misspelled or not in the database. Step 5: (Area screen) Choose the area £. Step 6: (Find POI screen) Tap the Find POI button. Step 7: Follow steps 3 to 5 from finding Nearest POI. Back-On-Track (automatic rerouting) You will be redirected if you make a wrong turn. The ? symbol will display in the upper left corner of the navigation screen while the route recalculates. Viewing your Route Once a route has been calculated, the 3D Map screen will display. You will be directed to your destination by vocal and visual instructions. You can view your route in several ways by pressing to cycle through the map screens. 12 F-Series | Navigation 3D Map screen Press the Navigation button to cycle to the 3D Map screen. This screen only displays when a route is calculated. It is oriented to the travelling direction with an adjustable horizon. (It is not possible to plan a route directly from this screen.) Item 3D Map screen description Next street on your route. Direction of next turn. Tap to hear next instruction. Distance to next turn. Progress bar (toward next turn). Progress bar turns green as you get close to next turn. Navigation icon. Shows your current position. GPS icon. Tap to display GPS status screen (see "GPS Status" on page 19). Street you are currently on. Information icon. Tap to change the information you would like to have displayed here (see "Information screen" on page 17). Zoom+ icon. Tap to display zoom options. Tap again to zoom in. (Disables Auto Zoom.) Zoom- icon. Tap to zoom out. (Disables Auto Zoom.) Auto zoom icon. Tap to enable Auto Zoom. This automatically adjusts the zoom depending on speed and distance from next turn or intersection. Map tilt icons. Tap to tilt the map up or down. N Tap anywhere on the map to display the Actions screen (see "Actions screen" on page 18). If the zoom options are displaying, tap on the map once to hide icons, then tap again to display the Actions screen. 13 F-Series | Navigation Next Turn screen Press the Navigation button to cycle to the Next Turn screen. A route must be calculated for this screen to be able to display. Item Next Turn screen description Next street on your route. Direction of next turn. Tap to hear next instruction. Distance to next turn. Progress bar (toward next turn). Progress bar turns green as you get close to next turn. Turn after next turn. Navigation icon. Shows your current position. GPS icon. Tap to display GPS status screen (see "GPS Status" on page 19). Street you are currently on. Information icon. Tap to change the information you would like to have displayed here (see "Information screen" on page 17). N Tap anywhere on the map to display the Actions screen (see "Actions screen" on page 18). 14 F-Series | Navigation Turn-by-Turn screen Press the Navigation to cycle to the Turn-by-Turn screen. A route must be calculated for this screen to be able to display. Item Turn-by-Turn screen description Next turn on your route. Direction of next turn. Tap to hear next instruction. List of next turns. GPS icon. Tap to display GPS status screen (see "GPS Status" on page 19). Street you are currently on. Information icon. Tap to change the information you would like to have displayed here (see "Information screen" on page 17). Scroll bar. Use to scroll the list of next turns. N Tap anywhere on the screen to display the Actions screen (see "Actions screen" on page 18). 15 F-Series | Navigation Route Summary screen Press the Navigation button to cycle to the Route Summary screen. A route must be calculated for this screen to be able to display. Item Route Summary screen description Destination address. Navigation icon. Shows your current position. GPS icon. Tap to display GPS status screen (see "GPS Status" on page 19). Progress toward destination. Information icon. Tap to change the information you would like to have displayed here (see "Information screen" on page 17). N Tap anywhere on the map to display the Actions screen (see "Actions screen" on page 18). 16 F-Series | Navigation Information screen Tap the information icon at the bottom-right corner of any navigation screen to display the Information screen. Item Route Information screen description Tap this button to display the remaining distance to go. Tap this button to display the estimated time of arrival. Tap this button to display the current time. Tap this button to display the current speed. Tap this button to display the current heading. Tap this button to display the current battery status. Back arrow. Tap to return to the navigation screen. 17 F-Series | Navigation Actions screen Tap anywhere on a navigation screen to display the Actions screen. Item Actions screen description Tap this button to pause route. If you pause your route, the Free-Driving screen will display with a 'Continue' icon in the top-left corner of the screen. Tap the Continue icon to resume route navigation. Tap this button to cancel route. If you cancel your route, the Free-Driving screen will display. The other navigation screens are not available when there is no route planned. Tap this button to mute or un-mute sound. Tap this button to save current position and add to Favorite. Tap this button to adjust screen brightness. Tap this button to change display mode (Day/Night). Day and Night modes offer different map colours for safer driving. Back arrow. Tap to return to the navigation screen. 18 F-Series | Navigation GPS Status From any navigation screen, tap the GPS icon to display the GPS Status screen. This screen provides a visual representation of the GPS information being received. Item GPS Status screen description Latitude and Longitude. North pointing compass. Signal status (see visual key below). Number of satellites in communication. Back arrow. Tap to return to the navigation screen. Current time. Information icon. Tap to change the information you would like to have displayed here (see "Information screen" on page 17). Visual Key Gray bars: No signal at all. Yellow bars: Valid signal, but not enough information to fix your position. Green bars: Valid signal providing a position fix (when all bars are green, a strong signal is being received). Note: Your Navman will get a GPS fix more quickly if your vehicle is stationary than if it is moving. 19 F-Series | Preferences Preferences Localize Language Preferences Localize Language choose language £. Time Preferences Localize Time Format 12 h or 24 h £. Preferences Localize Time Daylight saving OFF or ON £. Preferences Localize Time Zone choose nearest city £. Units for speed and distance Preferences Localize Units Kilometers or Miles £. Voice for announcements Preferences Localize Voice Female or Male £. Navigation Driving Mode Preferences Navigation Driving Mode Fastest time or Shortest distance £. Fastest time will favor the use of Freeways and main roads. Shortest distance will use all grades of roads. Road Types Preferences Navigation Road Types Toll Roads Use, Avoid, or Warn £. Preferences Navigation Road Types Unsealed Roads Use, Avoid, or Warn £. Preferences Navigation Road Types Ferries Use, Avoid, or Warn £. These settings determine what action your Navman will take for different road types on your route. Safety Alerts Preferences Navigation Safety Alerts Audio or Visual (or both) £. You can also set the speed at which alerts show or sound. Custom POI Alerts Preferences Navigation Custom POI Alerts Custom POI Enable, Audio, Visual £. You can also set the distance at which alerts show or sound. 20 F-Series | Preferences Maps Manage maps Preferences Maps Manage Maps (if required, choose country) choose maps £. In some regions with very large map data requirements you may need to limit the number of maps in active use. Limiting the number of active maps ensures optimum performance. Your Navman will alert you to reduce the number of maps selected if the file size is too large. Enable Places of Interest Preferences Maps Enable POI choose POI to display £. Enabled POI are displayed on navigation map screens as you get close to the POI along your route. Display Mode (Day/Night) Preferences Maps Display Mode Day, Night, or Auto £. Day and Night modes offer different map colours for safer driving. If you set the Day/Night mode to Auto, your Navman will automatically swap between Day and Night mode depending on the time of day at your current location. System Adjust Screen Brightness Preferences System Brightness adjust brightness £. GPS Mode Preferences System GPS Mode Normal GPS, WAAS or EGNOS £. WAAS and EGNOS are special augmented satellite tracking systems that can offer better tracking. Reset Options Preferences System Reset Delete Preferences £. Preferences System Reset Delete Favorites £. Preferences System Reset Delete Recent Addresses £. Preferences System Reset Factory Reset £. Restores ALL settings to factory defaults. Preferences System Reset GPS Reset £. About Preferences System About read information. About provides information about your Navman and our copyright notice. 21 F-Series | Preferences Demos Tutorial Preferences Tutorial and Demos Tutorial £. The Tutorial steps you through some basic information about operating your Navman. Route Demonstration Preferences Tutorial/Demos Route Demo Demonstration, Repeat £. Route Demonstration allows you to preview a route, or to plan and view a route without a GPS fix (e.g. when you are in a building). Selecting Repeat will place the demonstration you have chosen on a continuous loop. Start Location If your Navman is receiving a GPS signal, it will calculate your trip from your current location. Otherwise, it will calculate your trip using your My Home address as the starting point. Note: If you have not yet saved a My Home address you can save your current location as My Home (this option requires a GPS fix), or find a new My Home address. Finding a new Home address follows the steps described for finding a New Address. Select the destination in one of the following ways: a) (Main Menu screen) Tap the My Home button. b) (Main Menu screen) Tap Favorites choose the address £. c) (Main Menu screen) Tap Recent Address choose the address £. d) (Main Menu screen) Tap New Address (see page 10 for instructions on finding a new address) To disable Route Demonstration: Preferences Tutorial/Demos Route Demo Demonstration £. SmartST Demo Preferences Tutorial and Demos Smart5 Demo £. The Smart5 demo will run automatically to show you the features of this software. To disable the demonstration, tap anywhere on the screen £. Traffic Using a Navman Traffic module (available as an optional extra), your Navman can plug straight in and receive Traffic event messages. You can choose what action your Navman will take in response to different types of Traffic event messages, e.g. re-route to avoid trouble spots, warn about the event, or ignore the event message. 22 F-Series | Support Support Troubleshooting When I turn on my Navman using battery, the screen does not activate. Possible cause: There might be insufficient battery charge. Solution: Connect your Navman to a power source and then turn it on. The screen is hard to read. Possible cause: The brightness setting might be too low. Solution: Increase the brightness setting (see "Actions screen" on page 18). I can’t find the street I am looking for. Possible cause: A wrong abbreviation might have been used. Solution: Follow the Address search rules below when entering addresses. Only enter the first few characters of the street name, and then use the Street screen to find the street. The GPS is not working. Possible cause: The GPS antenna might not have a clear view of the sky (e.g. you might be surrounded by tall buildings). Solution: Ensure the GPS antenna has a clear view of the sky. Possible cause: Some heated or heat reflecting windscreens can block GPS signals. Solution: If your windscreen is blocking GPS signals, you will need to purchase an external antenna. Possible cause: You might have travelled a significant distance since last using your Navman. Solution: Press the Reset button on the bottom of your Navman. Possible cause: Unknown. Solution: Press the Reset button on the bottom of your Navman. Note: Heavy weather conditions, e.g. snowing, can also block GPS signals. See your GPS FAQ guide for more information about GPS. Address Search Rules Street Names with Dates (Europe) If a street name contains a date or a number, search by the first number, e.g. if searching for “Avenue du 14 Avril 1914”, search by “14”. If a highway or motorway designation contains a number, search by the first character, e.g. if searching for “A-6”, search by “A”, or if searching for “Strada Provinciale 168”, search by “168”. Streets Named After People (excluding Italy) If a street name is a person's name (including at least a first and last name), search by the first name, e.g. if searching for “Rue Albert Mathieu”, search by “Albert”. Streets Named After People (Italy) If a street name is a person's name (including at least a first and last name), search by the last name, e.g. if searching for “Via Placido Giovanella”, search by “Giovanella”. Post Codes / Zip Codes In some countries, you can search for your destination by Post Code or Zip Code. If you are in the United Kingdom, and you know the Post Code of your destination, you can search for it from the Find Address screen by tapping Post Code, then entering a Post Code of up to eight characters. Post codes in the Netherlands When searching by post code in the Netherlands, type the post code without the last two letters, e.g. if searching for “3514 BN”, search by “3514”. 23 MN000699C-G