1
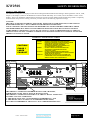
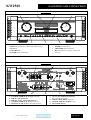
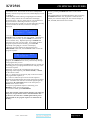
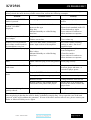
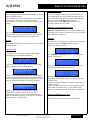
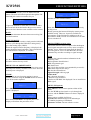
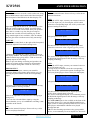
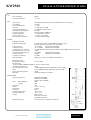
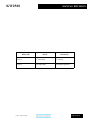
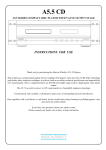
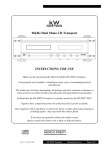
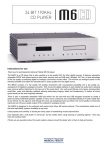
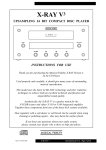
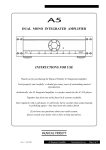
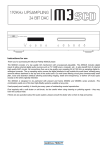
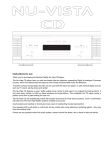
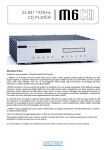
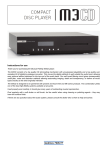
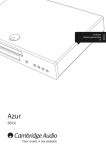
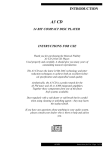
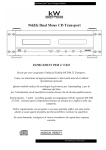
KW250S
INSTRUCTIONS FOR USE
Thank you for purchasing the Musical Fidelity KW250S
This model uses the very latest DAB/FM radio text receiver, top quality CD transport, ultra low jitter 24 Bit
DAC technology and further jitter reduction techniques to achieve both an excellent technical specification
and unparalleled DAB/FM/CD sound quality. This is complimented with a top quality 6922 tube line level
preamplifier stage and two monobloc power amps capable of driving over 250W.
The KW250S is a perfect answer to most hi-fi requirements in a single, beautifully engineered package.
Used properly and carefully, it should give many years of outstanding musical reproduction.
Dust regularly with a soft duster or soft brush, but be careful when using cleaning or polishing agents - they
may harm the surface finish.
If you have any questions about your audio system,
Please consult your dealer who is there to help and advise.
KW250S
CONTENTS
PAGE
3
Safety information :
-
Mains plug (U.K. only)
Modification warning
4, 5
Safety information :
-
Laser product labelling
Laser type
Radio-frequency interference
6
General advice :
-
Installation precautions
User information
7
General advice :
-
Introduction
Installation
Aerial
Audio connection
Notes on using compact discs
Cleaning
8
Facilities and connections :
-
Illustrations - front and rear panels
9
Remote control :
-
Operation and illustration
10
CD basic operation
-
Loading, playback, and track selection
11, 12
CD special features
-
Repeat, shuffle, scan, programming
13
CD problems?
-
Basic CD player fault finding
14, 15
DAB button functions
-
Band, auto tune, manual tune, presets, info.
menu
16
FM function buttons
-
Auto tune, band, manual tune, presets,
mono/stereo, info. menu
17
Tuner problems?
-
Basic tuner fault finding
18
Amplifier connections
-
Input connections, output connections
19, 20
Amplifier operation
-
Phono, CD, Tuner, AUX1, AUX2, recording
21
Amplifier problems?
-
Basic Amplifier fault finding
22
CD, DAC and tuner specifications
23
Pre & Power amplifier specifications
24
Manual history
Issue 2: 19th June 2006
Page 2 of 24
KW250S
SAFETY INFORMATION
IMPORTANT! (U.K. only)
This unit is supplied in the U.K. with mains lead fitted with a moulded 13 amp plug. If, for any reason, you need to cut off the
plug, please remove the fuse holder and dispose of the plug safely, out of reach of children. It must not be plugged into a mains
outlet.
The wires in the mains lead supplied with this appliance are coloured in accordance with the following code:
Green and yellow..............Earth
Blue................................Neutral
Brown.................................Live
WARNING - This appliance MUST be earthed
As the colours of the wires of the mains lead of this appliance may not correspond with the
coloured markings identifying the terminals in your plug, proceed as follows:
The wire which is coloured green-and-yellow must be connected to the terminal in the plug which is marked with the letter E or
coloured green or green-and-yellow, or by the earth symbol :
The wire which is coloured brown must be connected to the terminal which is marked with the letter L or coloured red.
The wire which is coloured blue must be connected to the terminal which is marked with the letter N or coloured black.
If connecting to a BS1363 plug, a 13 amp fuse must be used.
WARNING:
ANY MODIFICATIONS TO THIS PRODUCT NOT EXPRESSLY APPROVED
BY MUSICAL FIDELITY WHO IS THE PARTY RESPONSIBLE FOR
STANDARDS COMPLIANCE COULD VOID THE USER'S AUTHORITY TO
OPERATE THIS EQUIPMENT.
Issue 2: 19th June 2006
Page 3 of 24
KW250S
SAFETY INFORMATION
CLASS 1 LASER PRODUCT
The KW250S incorporates a CD player which has been designed and manufactured according to FDA regulations "title 21, CFR,
chapter 1, sub-chapter J, based on the Radiation Control for Health and Safety Act of 1968", and is classified as a Class 1 laser
product. There is no hazardous radiation during normal use because invisible radiation emitted inside this product is completely
confined within the protective housing. However you must observe the following important warnings:
CAUTION!
THIS CD PLAYER USES INVISIBLE LASER LIGHT. WHEN THE PLAYER OPERATES, LASER LIGHT IS
RADIATED INTERNALLY. DO NOT REMOVE THE PROTECTIVE HOUSINGS.
USE OF CONTROLS OR ADJUSTMENTS OR PERFORMANCE OF PROCEDURES OTHER THAN THOSE
SPECIFIED HEREIN MAY RESULT IN HAZARDOUS RADIATION EXPOSURE CAUSING EYE INJURY.
IF THIS PRODUCT DEVELOPS A FAULT, PLEASE CONTACT YOUR AUTHORISED MUSICAL FIDELITY
SERVICE AGENT. DO NOT ATTEMPT TO SERVICE IT YOUR-SELF AND DO NOT CONTINUE TO USE THIS
PRODUCT IN A FAULTY STATE.
INTERNAL LASER WARNING LABELS
CAUTION
CAUTION!
CLASS 1
LASER
PRODUCT
- INVISIBLE LASER RADIATION WHEN OPEN AND
INTERLOCKS DEFEATED. AVOID EXPOSURE TO BEAM.
VORSICH! - UNSICHTBARE LASERSTRAHLUNG TRITT AUS,
WENN DECKEL GEÖFFNET UND WENN
SICHERHEITSVERRIEGELUNG ÖBERBRÖCT IST.
NICHT DEM STRAHL AUSSETZEN!
VARNING
- OSYNLIG LASERSTRALNING NÄR DENNA DEL
AR ÖPPNAD OCH SPÄRR ÄR URKOPPLAD.
STRALEN AL FARLIG.
ADVARSEL - USYNLIG LASERSTRAKING VED ABNING, NAR
SIKKERHEDSAFBRYDEREER UDE AF FUNCTION UNDGA
UDSÆTTELSE FOR STRALING.
VAROITUSI - SUOJAKOTELOA EI SAA AVATA LAITE SISÄLTÄÄ
LASERDIODIN, JOKA LAHETTÄÄ (NAKYMATONTA)
SILMILLE VAARALLISTA LASERSATEILYA.
REAR PANEL :
THIS PRODUCT COMPLIES WITH DHHS RULES 21 CFR, CHAPTER 1,
SUBCHAPTER J, PART 1040 AT DATE OF MANUFACTURE.
THIS PRODUCT COMPLIES WITH PART 15 OF THE FCC RULES. OPERATION
IS SUBJECT TO TWO CONDITIONS:
1. THIS DEVICE MAY NOT CAUSE HARMFUL INTERFERENCE, AND
2. THIS DEVICE MUST ACCEPT ANY INTERFERENCE RECEIVED,
INCLUDING INTERFERENCE THAT MAY CAUSE UNDESIRED OPERATION.
Issue 2: 19th June 2006
Page 4 of 24
KW250S
SAFETY INFORMATION
LASER INFORMATION:
Optical pick-up :
Manufacturer : Sharp
Pick-up type : GH6C005B
Wavelength : 780nm
RADIO - FREQUENCY INTERFERENCE (RFI)
This equipment uses and can radiate radio frequency energy, and if not installed and operated in accordance with the instructions,
may cause interference to radio communications.
However, it is designed to radiate minimal levels of RFI, and accordingly been testing to North American standards (FCC
regulations - limits for a class B digital device pursuant to part 15 of the rules). These requirements are intended to provide
reasonable protection against excessive interference in a residential installation.
Conversely, the product has also been checked to ensure that its own operation is not adversely affected by normal background
levels of RFI received externally.
However, if interference is experienced, for instance to radio or TV broadcasts, the user is recommended to try one or more of the
following measures:
•
Identify the source of interference by turning off power to the CD player or other equipment individually, and checking
whether the problem disappears.
•
Re-orientate or relocate the receiving aerial.
•
Move the CD player away from the receiver.
•
Connect the CD player to a mains outlet on a different circuit from the receiver.
•
Consult a dealer or experienced TV/radio technician for help.
If a problem persists, please contact Musical Fidelity's service department.
Issue 2: 19th June 2006
Page 5 of 24
KW250S
GENERAL INSTALLATION
INSTALLATION PRECAUTIONS and USER INFORMATION
Your new KW250S is designed and built to provide trouble-free performance, but as with all electronic devices it is necessary to
observe a few precautions:
Heed all warnings shown on the back of the product.
Only connect the KW250S to a mains outlet having the same voltage as marked at the back of the unit.
Always ensure that when disconnecting and reconnecting your audio equipment the mains supply is switched off.
Position the mains lead and signal interconnects where they are not likely to be walked on or trapped by items placed on
them.
Do not use near water, or place water-filled containers on the KW250S, for example, a flower vase or potted plants. If
water does spill inside, immediately pull out the mains plug from the wall socket and inform your dealer, who should then
check the unit before further use. Entry of liquid into the KW250S is dangerous, and may cause electric shock or fire
hazard.
Do not place the unit near direct heat sources such as radiators, direct sunlight or other equipment.
Do not remove any covers or try to gain access to the inside. There are no internal adjustments or fuses you can replace
yourself. Refer all service work to an authorised Musical Fidelity agent.
Note: Unauthorised opening of the equipment will invalidate any warranty claim.
Dust regularly with a soft cloth or soft brush but be careful when using cleaning or polishing agents - they may harm the
surface finish.
The electronics in modern hi-fi equipment is complex and may, therefore, be adversely affected or damaged by lightning. For
protection of your audio system during electrical storms, remove the mains plugs and disconnect any aerial lead.
If after-sales service is required, to help your dealer identify the KW250S please quote the serial number located on the rear panel
of the unit.
Issue 2: 19th June 2006
Page 6 of 24
KW250S
INTRODUCTION
Congratulations on the purchase of your new KW250S
integrated CD/DAB/FM/PRE and dual mono power amp.
The KW250S is one of the most comprehensive fully
integrated Hi-Fi designs ever made, and, encloses the best
elements out of all our separates into one convenient box.
The CD player has extremely low jitter, vanishingly low
distortion, exemplary linearity and ultra low noise. The tuner
is designed to bring DAB into the realms of hi-fidelity sound
reproduction to complement the very latest technology
DAB/FM receiver circuit. Great attention has been paid to
internal layout, isolating each circuit section to prevent
possible interaction.
The CD, DAB and FM digital data streams are first upsampled to 192kHz, which moves noise, jitter and distortion
artefacts well above the audio band. They are then passed
through a new, low noise, low distortion 24-bit dualdifferential digital-to-analogue converter, which allows
simpler filtering of the analogue output. This in turn gives an
improved audio response without the need for sharp filters that
degrade sound quality. The result is a CD player and
DAB/FM tuner which has a smoother response than
previously possible with none of the “hardness” of other units.
The preamplifier sections are our finely tuned and tweaked
tube input line level preamplifier for smooth tube sound
coupled with low noise and virtually no distortion. This also
includes our top quality low noise phono stage which caters
for both MM and MC cartridge users.
The power amplifier consists of two mono block amplifier
modules with completely separate supplies for the absolute
best in separation and imaging. Rated for 250W nominal they
are enough to drive even the most demanding loudspeakers
with ease. Low distortion and very quiet they will deliver all
music types exactly as the artist originally intended!
The resultant performance achieved by this unit is among the
best in the world. It has excellent signal to noise ratio, low
distortion, wide bandwidth, huge dynamic range,
extraordinary resolution and fine detail.
INSTALLATION
Position the KW250S on a stable, horizontal surface where
there is no risk of it being knocked, or subjected to vibration
such as from loudspeakers.
Protect your KW250S from humidity - if the unit is moved
from a cold place to a warm room, or in generally humid
conditions, moisture can form on the pickup lens inside the
player, preventing the laser beam from reading the disc. If this
happens, remove the CD, close the disc drawer, and leave the
unit switched on for an hour or so to allow sufficient time for
the moisture to evaporate.
Issue 2: 19th June 2006
GENERAL INSTALLATION
AERIAL (ANTENNA)
For ease of installation, a tri-band aerial is supplied with the
unit. This covers the FM, DAB II, III and L-bands and picks
up sufficient signal for most domestic purposes. However, if
FM stereo background noise is obtrusive, radio text is
corrupted or DAB cut-out is experienced, or unit is to be used
in a fringe area, a rooftop DAB and FM aerial may be
required. Please contact an approved aerial contractor with
good local knowledge.
The tri-band aerial is plugged into the tri-band antenna F
connector at the rear of the unit, and should be securely
fastened by tightening the nut.
AUDIO CONNECTIONS
Outputs: Connect your loudspeakers to the terminals on the
back panel marked as LEFT and RIGHT SPEAKER
outputs.
Preamp outputs phono sockets are controlled by the volume
and source controls. This allows connection of a second
amplifier for bi-amping or increased drive.
Tape outputs of nominal line level and are constant volume
for recording to tape, CD-R/RW, or any other recordable
format.
If desired, the unit can also be attached to an external DAC
of your choice. The unit outputs COAX and OPTICAL digital
signal stream at 48kHz.
NOTE: The digital output works for CD, DAB and FM.
Inputs: The KW250S has three line level inputs and a Phono
MM/MC input. PHONO MM/MC, AUX1 and AUX2 are
available at the back for other signal sources.
A Portable Device Input (PDI) 3.5mm stereo jack is provided
at the front which is shared with the AUX1 rear inputs. This
allows easy connection of a portable player.
Two digital inputs AUX 1 (optical and coax.), AUX 2 (coax
only), cater for digital sources that would benefit from the
KW250S‘s up to date DAC circuits. Use these inputs for
better quality from mini disc, DAT or MP3, for enhanced
sound quality.
NOTES ON USING COMPACT DISCS
Always hold discs by the edges and make sure they remain
clean - do not touch the surface. Keep discs away from direct
sunlight and heat sources, such as radiators. Clean discs with
a cloth before playing them, but do not use solvents such as
benzene, thinners, or antistatic spray intended for analogue
records.
After playing, always return the disc to its case for storage.
CLEANING
Before cleaning the unit, switch off power at the mains
switch and remove the mains plug from the wall socket.
Clean the cabinet and remote control unit using a moist cloth.
We do not advise using solvents, white spirit or thinners as
they could damage the surface finish.
Page 7 of 24
KW250S
FACILITIES AND CONNECTION
FRONT PANEL
1
5
2
3
6
7
4
8
6.
7.
8.
9.
1. DAB/FM Tuning knob
2. DISPLAY (incorporates remote control IR receiver)
3. CD drawer
4. VOLUME knob
5. POWER mains on/off switch
9
CD function buttons
TUNER function buttons
AMPLIFIER function buttons
PDI (Portable Device Input), 3.5mm jack
connector
REAR PANEL
10
14
10.
11.
12.
13.
14.
11
15
LOUDSPEAKER OUPUTS Right hand side
PRE & TAPE OUTPUTS
PHONO, AUX 1, AUX 2/PDI INPUTS
LOUDSPEAKER OUPUTS Left hand side
DIGITAL OUTPUTS RCA coaxial and optical
Issue 2: 19th June 2006
12
16
13
17
18
15. AUX 1, AUX 2 DIGITAL INPUTS
RCA coaxial and optical
16. PHONO GROUNDING 4mm post
17. DAB/FM AERIAL SOCKET F-type
18. IEC MAINS INLET
Page 8 of 24
KW250S
REMOTE CONTROL
The remote control shown below enables functions to be operated from a convenient distance.
Equivalent buttons on the remote control have the same functions as those on the front panel of the unit. Other functions are only
available by remote control.
As the handset uses an invisible infra-red light beam, the front edge must be pointed directly towards the receiver window at the
front of the player, without visual obstruction between them.
If the range of the remote control greatly decreases, replace the batteries with new ones. Do not mix old and new batteries - two
are required, size AAA, LR03 or SUM-4.
Please dispose of used batteries in accordance to local regulations.
Tuner Buttons:
INFO – To access broadcast information
BAND – Selects DAB or FM
MENU – to choose options
STORE – Stores station as preset
AUTO TUNE – finds previous/next
broadcast
SELECT – To choose preset/DAB
station
MONO/STEREO – Option for weaker
FM stations
PRESET ↑ ↓ selects preset
TUNE ↑ ↓ steps up/down band
Amplifier Buttons:
PHONO – Selects Phono input
CD – Selects internal CD
TUNER – Selects internal tuner
AUX 1 – Select source AUX 1
AUX 2 – Select source AUX 2/PDI
MUTE – Mutes unit until pressed
again
VOLUME UP/DOWN – sets
volume level
CD Buttons:
TIME – Displays Track Time/Time
remaining
DISPLAY – Dims display
0-9 Buttons – Used to select track
numbers
CLEAR – Clears selected pre
programmed track
CHECK – Check pre programmed
tracks
A/B Sets repeat start/end to repeat
section of track
PROGRAM – Programs selection and
order of tracks
SHUFFLE – Plays back tracks in
random order
INTRO – Player plays first 10 seconds
of each track
TRACK – Next/previous track
REPEAT – Repeats whole disk or
selected tracks
PAUSE/PLAY – Stop/start CD
playback
SEARCH – Fast forward/backward
through track
STOP – Stop playing/Eject CD
Issue 2: 19th June 2006
Page 9 of 24
KW250S
CD BASIC OPERATION
LOADING AND PLAYING COMPACT DISCS
Select CD function by pressing CD button under AMPLIFIER
heading to the right of the front panel, the CD button on the
remote does the same.
NO DISC
To load a disc, press the OPEN/CLOSE button to open the
transport drawer.
When the drawer is fully extended, insert the disc with the
label facing upwards and then press either the OPEN/CLOSE
or PLAY/PAUSE button to close the transport drawer again.
If OPEN/CLOSE has been pressed, the disc drawer closes
and the unit scans the contents of the disc. After a short
delay, the display window then shows the total number of
tracks available on the CD, and total playing time. In the
following example there are 7 tracks, lasting a total of 41
minutes 56 seconds :
STOP
7
41:56
If mains power to the unit is switched on with a disc already
loaded, it will automatically search for the disc.
The display then indicates STOP, and shows the number of
tracks available on the CD and total playing time, as in the
above example.
DISC PLAY
If PLAY/PAUSE is pressed, the unit will begin playing from
track 1, confirmed by the word PLAY appearing on the left of
the display, with 1 in the centre and elapsed time on the right.
PLAY
1
0:01
When all tracks on the CD have been played, the display
shows STOP and total number of tracks on the disc.
PAUSE
Pressing the PLAY/PAUSE button on the front panel whilst a
disc is playing pauses playback of the disc. PAUSE appears
in the display window instead of PLAY. The disc will
continue spinning, but the track does not advance and the
CD's output is muted.
PAUSE
1
pressing PAUSE will not resume play. Note that if the disc is
already playing, pressing the PLAY button
reverts play to the beginning of the current track.
STOP
Playback can be stopped at any time by pressing the STOP
button once. On the remote control, press either end of the
button, not the middle part.
STOP
7
Pressing the STOP button a second time on front panel or
remote opens the transport drawer.
If a disc is loaded but not playing, pressing STOP once will
also eject the drawer.
TRACK SELECTION
To change track, the track skip buttons PREVIOUS and
NEXT on the front panel can be pressed to jump
forwards or backwards one track in either direction.
Corresponding TRACK buttons on the remote control are
marked |<< and >>| .
If the unit has stopped playing, a specific track can be
accessed directly by pressing either PREVIOUS or NEXT to
obtain the required track number, then pressing
PLAY/PAUSE.
TRACK SELECTION (Remote control)
Simply press the PLAY button to start a CD playing from the
first track.
Alternatively, a specific track can be selected directly by
pressing one of the ten track number buttons grouped in the
centre-section of the remote control. The chosen track then
plays after a short delay of about 5 seconds. To play a track
number with two digits, press the second digit button on the
remote control within this delay period, example for track 17:
Press 1:
PLAY
1
Press 7 within about 5 seconds:
PLAY
17
0:03
After a small pause, machine plays selected track:
Pressing PLAY/PAUSE again resumes playback from the
same place.
PAUSE (Remote control)
On the remote control, PLAY and PAUSE buttons have
separate functions at each end of the same button. Pressing
PLAY will only control disc play, and
Issue 2: 19th June 2006
PLAY
17
0:01
If a track number is chosen which is not available on the disc,
for example pressing button number 9 if the CD has only 7
tracks, an INVALID TRACK message is briefly displayed
(along with elapsed time of last track played).
Page 10 of 24
KW250S
CD SPECIAL FEATURES
REPEAT PLAYBACK
The REPEAT button on the remote control allows the
repeated playback of either one track or all tracks on the disc.
By pressing the REPEAT button once, only the current track
is repeated, and the display shows
PLAY
1
repeat track
0:12
If the REPEAT button is pressed a second time, “repeat
disc” is displayed instead, and the entire disc is then played
repeatedly.
PLAY
1
repeat disk
0:24
Pressing REPEAT a third time cancels repeat mode.
A-B REPEAT PLAYBACK
“A-B repeat” provides the option of playing just a certain
section of the disc over and over again.
Find the beginning of the required section either by listening,
or using the display time as a guide.
When the desired starting point is reached, press button A / B
on the remote control.
The display will show
PLAY
1
repeat a-
0:34
When the disc has reached the end of the required section,
press the A / B button again, to display
PLAY
1
repeat a-b
1:55
and the unit continuously plays the selected part of the disc in
this case, the segment of track 1 from 34 seconds to 1 minute
55 seconds.
To cancel A-B repeat mode, press A / B on the remote
control.
SHUFFLE PLAYBACK
The SHUFFLE feature allows tracks on the discs to be played
in random sequence rather than the normal consecutive order.
PLAY
1
shuffle disc
function, continuing to the end of the disc in normal order
starting from wherever it was left by the previous random
selection.
From stop mode, pressing PLAY/PAUSE also begins shuffle
play.
If REPEAT is then pressed whilst in shuffle mode, a repeat
shuffle function is obtained
PLAY
7
0:39
repeat shuffle
Pressing >>| selects the next track in random order.
SCAN INTRODUCTION
The scan-introduction function allows play back of just the
start of each track on the disc, for instance to locate a
preferred track by ear.
Press INTRO on the remote control, and if the player has
stopped, the display will show
STOP
74
scan intro
The first ten seconds (approximately) of each track on the CD
can then be played in sequence by pressing either
PLAY/PAUSE on the front panel, or PLAY on the remote
control.
Press INTRO again to cancel introduction search mode. If
INTRO mode is cancelled while the KW250S is still playing,
the remainder of the entire disc will be played.
PROGRAMMED PLAY
The built-in program memory allows you to store up to 25
track numbers and then play them back in the held order.
Each track is stored as a “step” in the program.
With the CD loaded and the player stopped, first press
PROGRAM on the remote control. The following is then
displayed :
STOP
74
program 1
On the remote control, press the numeric button of the track
number corresponding to the first track you wish to store
(number 3 for example).
That track number will now appear in the display:
0:34
Tracks are also played in a different order each time the disc
is restarted, or another disc loaded.
This function is obtained by pressing SHUFFLE on the
remote control with the unit either stopped or playing. If the
KW250S is already playing, play will continue in random
order until all tracks on the disc have been played.
Shuffle play is cancelled by pressing the SHUFFLE button a
second time. The unit resumes normal play
track 0
STOP
74
program 1
track 3
Press PROGRAM again on the remote control - the next
program step is selected, (prog 2) and the track number
reverts to 0 ready for a new entry.
STOP
74
program 1
track 0
DISPLAY
Issue 2: 19th June 2006
Page 11 of 24
KW250S
CD SPECIAL FEATURES
Continue entering track numbers in the same way up to
a maximum of 25. If more than 25 tracks are attempted the
memory will not accept any extra ones, and the display reverts
to “prog 1”.
Remember that when entering a single-digit track number,
there is a delay of about two seconds before the display
accepts the entry - this is to allow time for a second button to
be pressed when a double-digit number is required.
If an incorrect entry is made, say track 99 when there are only
7 tracks available on the disc, a brief error message is
displayed
KW250S display brightness can be controlled in three
levels by pressing the DISPLAY button on the remote
control.
The original setting is maximum brightness, but by pressing
the DISPLAY button once, brightness is reduced, and a
further press turns the display off. This controls display in
CD, TUNER, and external source modes.
INVALID TRACK
program 2
track 9
If at any time you wish to add a track to the list, press the
CLEAR button to obtain the next step number. Alternatively,
to delete a previous entry, press CLEAR a second time to
remove the last entry. Repeated pressing of CLEAR will
then erase each step in reverse order. So to delete an entire
program sequence from the memory, press CLEAR
repeatedly until “prog 1” is shown in the display.
When the last track number has been entered, press
PROGRAM a final time, then the PLAY button to start the
program sequence.
PLAY
1
play program
0:41
If you wish to check the selection before playing back your
program, the CHECK button can be pressed to step through
each program entry in turn.
If during this check sequence the PLAY button is pressed, the
remaining part of your programmed selection will play to the
end of the sequence.
Otherwise, to play all the programmed tracks from the
beginning of the sequence, press PLAY/PAUSE, or PLAY
on the remote control.
The >>| button may be pressed to jump to the next track in
the programmed sequence, or
|<< button to obtain the previous track in the sequence.
When all programmed tracks have been played, the CD player
stops. The same track selection can then be played again by
pressing the PLAY/PAUSE button on the front panel, or
PLAY on the remote control.
To repeat a programmed sequence continually, press
REPEAT whilst playing the program.
To cancel this mode, press PROGRAM.
Note: The program contents will be cleared if you switch off
the power, or open the disc drawer and load another disc.
If, however, the same disc is loaded again with the power
still switched on, the program sequence is retained in the
memory.
Issue 2: 19th June 2006
Page 12 of 24
KW250S
CD PROBLEMS?
Basic problem-solving with a CD player is similar to troubleshooting other electrical or electronic equipment.
Always check the most obvious possible causes first, such as the following examples:
Problem
Probable Cause
Remedy
No power when POWER
button is pressed
Power plug is not inserted
Plug in securely fully into rear
socket
No playback when disc is
loaded, “NO DISC”
displayed
Disc is loaded with label side down
Incorrect disc type
Dirty disc
Moisture/humidity or cold affecting
laser lens
Re-load with label side up
Please load a standard audio CD
Clean disk and try again
Leave unit on for an hour to
allow moisture to evaporate.
No audio output, or too low
level output
Output muted
Volume set too low
Check mute is not on
Turn volume up
Sound is severely distorted,
and volume control needs to
be turned down very low
Line level audio lead is connected to
phono input sockets of the amplifier
Re-connect lead to auxiliary
sockets or other “line level”
amplifier input
Mis-tracking (sound jumping) Player is receiving vibration or shock
Disc is dirty
Moisture/humidity or cold affecting
laser lens
Change position of player away
from loudspeakers
Clean disc surface
Leave unit on for an hour to
allow moisture to evaporate.
Hum
Audio connector plug is not fully pushed Insert plug securely
in
Interference noise heard from
radio tuner
Player is positioned too near the tuner
Keep a reasonable distance
between player and tuner, or
switch off player power
Remote control does not
work
Player’s POWER switch is set to off
Set switch to on
Battery(ies) fitted the wrong way round
Insert batteries correctly
Batteries are flat
Change batteries for a new set
Remote control is not pointed directly
towards the front panel of the player
Ensure there is no obstruction
between the remote control and
player front
Batteries are running out
Change batteries – for a new set
Remote control range has
greatly reduced
Remember - the most vulnerable part of a CD playing system is the disc itself. The most likely cause of a
disc not playing is that the disc itself is faulty, scratched or simply dirty. Never open the case of the unit
yourself, as this will invalidate the guarantee. If none of the above actions affect a cure, please contact your
dealer or Musical Fidelity service agent.
Issue 2: 19th June 2006
Page 13 of 24
KW250S
DAB FUNCTION BUTTONS
DAB TUNER BUTTONS
TUNE UP/DOWN
Press TUNER under AMPLIFIER heading to select the
internal DAB/FM tuner.
Note: Whenever the power is turned ON, the station
you were previously receiving will be selected
automatically. The name of the station appears in the
display.
To select a station, simply turn the left-hand knob to
cycle through the list of receivable broadcasts in your
area. When the required station is displayed, push the
knob or press the SELECT button to listen
See the section on the PRESET buttons to store
favourite stations for easy recall
BBCWorld Service
BBC National DAB
All settings, and stored stations, will be retained in
memory while the unit is turned off. On selection, the
last band (DAB/FM) and station is remembered.
PRESET UP and PRESET DOWN
PRESET UP/DOWN buttons are used to select one of
ten DAB preset memory locations. Press select when the
desired preset is displayed.
STORE
BAND
This button alternates the tuner between receiving DAB
and FM stations
It is possible to store favourite stations in preset memory
locations using the STORE button as follows:
Tune to the station required:
BBCWorld Service
BBC National DAB
AUTO-TUNE
To update your tuner with locally available DAB
stations Press the AUTO TUNE button.
AUTO TUNE
QUICK SCAN
The tuner will search through all the ensembles and
pick out all the locally available stations.
™™™™™™™™™™™™™™™™ 0
Searching...
When a station is found, the name is briefly displayed
and the station tally at the top right increments. Note: if
there are stations already stored, the tally does not start
from 0, but from the number of stations previously
™™™™™™™™™™™™™™™™ 1
BBC Radio 1
stored. In this manner, the station list is updated.
Once all the locally available bands have been
scanned, the unit reverts to the first station found by
name (in alphabetical order), or the previous broadcast
being listened to, if applicable.
Issue 2: 19th June 2006
Press PRESET UP/DOWN buttons until the desired
preset. is displayed.
BBCWorld Service
<Empty preset
1>
Press and hold the STORE to accept this preset. The
display will indicate the preset is saved,
BBCWorld Service
Preset
1
saved
then reverts to the selected station
Note: this will overwrite any station stored previously
on this preset.
Briefly pressing the button will display current preset
without storing.
There are 10 presets available for programmes on the
DAB band (in addition to the 10 provided for FM).
Presets are remembered even if the unit is switched off.
MONO/STEREO(remote only)
This button has no function when in DAB mode
Page 14 of 24
KW250S
DAB FUNCTION BUTTONS
INFO
Displays the current broadcast information in the
following order:
- DAB programme text
- Music Type
- Network name
- Date and time (as transmitted by network)
- Transmission mode and bit rate
- Ensemble and frequency
- Signal Strength
- Returns to top of this list
MENU (DAB options)
Press MENU to access menu options whilst in DAB
mode.
Use the TUNE up/down buttons to cycle through the
options, and the SELECT button to choose displayed
option.
Menu options available for DAB are:
Manual Tune: Allows manual search of ensembles and
DAB frequencies
Canadian L band: Enables Canadian L-Band
European L Band: Enables European L band
Service Base: Factory use only
Customer Version: Software version reference
System reset: RESETS all presets and performs a new
scan of DAB band
Issue 2: 19th June 2006
Page 15 of 24
KW250S
FM FUNCTION BUTTONS
AUTO-TUNE
To auto search stations, press the AUTO TUNE
button. The tuner will search upwards through the FM
band and pick out the next station for you.
PS:
Preset
1
FM
saved
and then revert to selected station.
105.80MHz
FM
PS:
If pressed and held for more than a second, the tuner
will scan back down the band to the previous station
(the scan-down function is not available on the remote).
BAND
This button alternates the tuner between receiving FM
and DAB stations
TUNE UP/DOWN
To manually tune to a station, simply turn the left-hand
knob to cycle through the FM band. Turning slowly
gives fine-tuning steps (50kHz).
When the required station frequency is displayed, the
station should be heard, and after a few seconds radio
text information is displayed, if available.
PS:
FM
Radio 1
Note: this will overwrite any station stored previously
on this preset.
Briefly pressing the button will display current preset
without storing. There are 10 presets available for
programmes on the FM band (in addition to the 10
provided for DAB). Presets are remembered even if the
unit is switched off.
MONO/STEREO (remote only)
This button enforces mono reception when inadequate
aerial signal strength results in noisy stereo reception.
MONO ‘forces’ mono at all times until the button is
pressed again for AUTO. In AUTO mode, the tuner
automatically switches according to signal strength.
FM
Radio 1
See the section on the PRESET buttons to store
favourite stations for easy recall
PRESET UP and PRESET DOWN
PRESET UP/DOWN buttons are used to select one of
ten FM preset memory locations. Press select when the
desired preset is displayed.
STORE
It is possible to store favourite stations in preset
memory locations using the STORE button as follows:
Tune to the station required:
PS:
INFO
Displays the current broadcast information in the
following order:
PI: Programme identification*
PTY: Programme type*
RT: Radio text*
CT: Clock date and time (as transmitted by network)*
MS: Music/Speech (info only)*
DI: Decoder information*
Signal Strength with bar graph
Audio mode
AF: Alternate frequency*
- Returns to top of this list
* Relies on FM RDS. Not displayed if no or insufficient
RDS signal.
FM
Radio 1
Press PRESET UP/DOWN buttons until the desired
preset is displayed.
PS:
Preset
1
FM
empty
Press and hold STORE to accept this preset. The
display will indicate the preset has saved
Issue 2: 19th June 2006
MENU (FM options)
Press MENU to access menu options whilst in FM
mode.
Use the TUNE up/down knob to cycle through the
options, and the SELECT button to choose displayed
option.
Menu options available for FM are:
System reset: RESETS all presets and tuning to
87.50MHz (beginning of FM Band)
Customer Version: Current software version
Page 16 of 24
KW250S
TUNER PROBLEMS?
Basic problem-solving with a tuner is similar to troubleshooting other electrical or electronic equipment. Always check
the most obvious possible causes first, such as the following examples:
Problem
Probable Cause
Remedy
No power when POWER button is
pressed
Mains power plug is not inserted
fully into rear socket
Plug in securely.
No audio output
Mute function is still selected on the
pre-amp or amplifier
Tape monitor function on the preamp or amplifier has been selected
accidentally
Speakers not connected, or
incorrectly wired
Cancel mute function on the pre-amp
or amplifier.
Cancel tape monitor function on the
pre-amp or amplifier.
Check speaker cables
Excessive background noise (hiss or
crackle on FM)
Audio cuts out on DAB
Position of aerial incorrect.
Aerial signal strength insufficient.
Reposition aerial.
Consider a rooftop DAB/FM aerial see
P.6 Aerial (Antenna)
Tuner does not display FM RDS
station name and/or text
Tuned station does not transmit the
RDS feature
RDS information feature therefore
unavailable.
Signal insufficient to receive RDS
Try repositioning the whip aerial if
used. Improve the aerial.
Remote control does not work
Tuner’s POWER switch is set to off
One or more batteries fitted the
wrong way round
Batteries are flat
Remote control is not pointed directly
towards the front panel of the tuner
Set switch to on
Insert batteries correctly
Change batteries – do not mix old and
new ones
Ensure there is no obstruction between
the remote control and player tuner
Remote control range has greatly
reduced
Batteries are running out
Change batteries for a new set
If none of these actions affect a cure, please contact your dealer, or an authorised Musical Fidelity service agent.
Remember; never open the case of the KW250S yourself, as this will invalidate the guarantee.
Issue 2: 19th June 2006
Page 17 of 24
KW250S
All input, output and power connections should be
made with the mains power switched OFF.
INPUT CONNECTIONS
Phono: The KW250S has a pair of RCA type phono
input sockets intended for use with moving magnet
(MM) or moving coil (MC) pickups. Some
turntable/pickup arm combinations are fitted with an
extra wire for chassis earth. This should be connected
to the earth terminal on the back panel.
Line level inputs: The unit also has two stereo pairs of
RCA “line level” input sockets controlled by the
internal volume setting.
They both have the same input sensitivity, and are
therefore suitable for use with any source component
having a line output of 300mV nominal. The two
sockets on the rear panel are marked, AUX1,
AUX2/PDI, corresponding with function selector
buttons on the front panel. The AUX2/PDI input
sockets on the back share the same input as the PDI
input jack at the front.
Do not connect devices to both sides of the AUX2
input simultaneously. Please see note P.20
Digital inputs: Digital sources are catered for on the
AUX1, AUX 2 inputs. Unit automatically switches
AUX1 input to digital source type (coax/optical) on
insertion of a lead with digital signal present.
AMPLIFIER CONNECTIONS
The KW250S’s PRE OUT RCA sockets would
therefore be connected to the input of the external
“woofer” amplifier in this example.
If you are in doubt about bi-amplification, please
contact your dealer for advice.
TAPE OUT: The KW250S has a single tape output
with facilities for recording material to a suitable linelevel recorder such as tape, CD-R/RW, minidisk etc.
The tape deck's line inputs are connected to the units’
TAPE OUT sockets to record the material being
listened to. The line outs should be connected to the
unused of the AUX inputs
OUTPUT CONNECTIONS
Speakers: Connect your loudspeakers to the terminals
on the back panel marked as LEFT and RIGHT
SPEAKER outputs. Make sure both speakers are
connected with the same polarity.
PRE-: The KW250S has its pre-amplifier output
available from RCA sockets on the back panel marked
PRE-OUT, and is controlled by the volume
adjustment.
This is to allow “bi-amplification” using suitable
external amplifiers and crossover networks to power
the speaker drive components separately, giving
noticeable improvement in clarity, imaging and bass
weight. In this arrangement, typically the KW250S
speaker outputs may be used to drive the speaker’s
“tweeter” (high audio frequencies), and an external
higher power stereo amplifier(s) could drive the
“woofer” (low frequencies).
Issue 2: 19th June 2006
Page 18 of 24
KW250S
AMPLIFIER OPERATION
STARTING . . . .
Once all connections are made, switch on the unit, using
the POWER button to the bottom left of the front panel,
the front panel of the KW250S- the blue display will
KW250S
v1.0
light indicating that the unit is on. The feet glow red to
indicate speaker outputs are muted, for about fifteen
seconds, so no sound will be heard from your speakers.
Once the 15 seconds is up, the feet glow orange to
indicate unit is usable, but still warming up. At this
stage sound output is now available. After 30 minutes,
the feet glow blue to indicate unit is fully warmed up.
VOLUME
The volume control knob, to the right of the front panel,
should be adjusted for normal listening levels.
KW250S
TUNER
Selects the internal tuner. Please refer to p.14 for advice
and tuner functions.
AUX 1
To use the AUX1 input, connect your external source to
the AUX1 input (see p.8). Pressing the AUX1 button
selects the corresponding input. On AUX1 you have the
option of analogue line level,
AUX1 ANALOG
or digital optical/coax inputs.
AUX1 OPTICAL
The unit switches automatically to digital inputs and
selects the correct one when a digital signal is present.
v1.0
AUX1 COAXIAL
Whilst being adjusted, the volume setting is shown in
the display window. The settings range from 0 to 100 in
1dB resolution steps giving about +19db out from the
preamp outputs at 100 setting.
Note: to prevent damage to hearing and speakers, the
switch-on volume setting is limited to 50 maximum.
Please readjust setting after switch on if necessary
PHONO INPUT
To use the phono input, connect your turntable
cartridge outputs to the phono input sockets (see p.8).
Pressing the phono button selects the corresponding
input.
For sources with digital outputs, we recommend you use
the KW250S digital inputs to take advantage of the upsampling technology.
AUX 2
To use the AUX2 input, connect your external source to
the AUX2 input (see p.8).
Pressing the AUX2 button selects the corresponding
input. On AUX 2, you have the option of analogue line
level (rear phono plugs or front 3.5mm jack PDI input),
AUX2 ANALOG
PHONO MM
or digital coax input.
Pressing a second time alternates the input for moving
magnet (MM) or moving coil (MC)
PHONO MC
Choose the input that best describes the cartridge type
being used.
You can also select the Phono input by using the
remote handset, (see p. 9) but MM/MC switching is not
available on the remote.
CD
Selects the internal CD player. Please refer to p.10 for
advice and player functions.
Issue 2: 19th June 2006
AUX2 COAXIAL
The unit switches automatically to digital input for
AUX2 when a digital signal is present.
For sources with digital outputs, we recommend you use
the KW250S digital inputs to take advantage of the upsampling technology.
The AUX 2/PDI input is also available at the front of the
unit in the form of a 3½ mm jack PDI (Portable Device
Input) socket to enable personal/portable devices such as
MP3 players and minidisk walkman to be played
thorough the unit.
TIP: For best listening experience using your portable
device, we recommend you set its outputs for “line level”
Page 19 of 24
KW250S
available. Please refer to your portable device’s manual,
for more details
Note: Please note the sockets PDI at the front and
AUX2/PDI at the back are electrically connected
together:
AMPLIFIER OPERATION
use, as opposed to “headphones”, if the option is
If the front PDI socket is used, please ensure you
disconnect any devices and wires connected to the rear
AUX2/PDI connectors.
If the rear AUX2/PDI connectors are used, please
ensure you disconnect any devices and wires
connected to the front PDI socket
Failure to do so could result in equipment failure.
RECORDING
To record, to any format of your choice, simply select
the required source with the input selector button on the
front panel or remote control. This source will now be
routed to the KW250S TAPE OUT for recording by
tape deck, cd recorder DAT, minidisk, or computer
soundcard input. You will also be able to hear the
selected source through the loudspeakers.
Note - adjustment of the volume control has no effect on
the recording level.
Issue 2: 19th June 2006
Page 20 of 24
KW250S
AMPLIFIER PROBLEMS?
Basic problem-solving with an amplifier is similar to troubleshooting other electrical or electronic equipment. Always
check the most obvious possible causes first, such as the following examples:
Problem
Probable Cause
Remedy
No power when POWER button is
pressed
Mains power plug is not fully inserted
into rear socket
Plug in securely
No sound
Mute function is still active
Wrong connections between input
sources and the unit
Speakers not connected, or
incorrectly wired
Devices connected to both AUX2 rear
connector and PDI front panel input
simultaneously
Press the MUTE button on the
remote control to cancel
Check audio input lead connections
Check speaker cables
Sound is not precise, lacking in bass
and stereo image
Speakers are connected out of phase,
i.e., connections to one speaker (+
and -) are reversed
Ensure speakers are connected
correctly
Hum
Audio connector plug not fully
pushed in
Insert plug securely
Remote control does not work
Amplifier’s POWER switch is set to
off
One or more batteries fitted the wrong
way round
Batteries are flat
Remote control is not pointed directly
towards the front panel of the
amplifier
Set switch to on
Insert batteries correctly
Change batteries for a new set
Ensure there is no obstruction
between the remote control and
amplifier front
Remote control range has greatly
reduced
Batteries are running out
Change batteries for a new set.
Remove one of the devices
If none of these actions affect a cure, please contact your dealer, or an authorised Musical Fidelity service agent.
Remember; never open the case of the KW250S yourself, as this will invalidate the guarantee.
Issue 2: 19th June 2006
Page 21 of 24
KW250S
CD, DAC & TUNER SPECIFICATIONS
CD:
Disc mechanism
Total correlated jitter
Philips
< 135 pS
DAC circuits
Up sampling
Total correlated jitter
Linearity
Output digital 0dB level
Analogue output impedance
Frequency response
Channel separation
Signal / noise ratio
Total harmonic distortion
24 bit Delta-Sigma (Bit stream) dual differential 8x over sampling
192 kHz
< 135 pS
< 0.1dB down to -96dB
2.15VRMS at 1 kHz nominal
47 Ohms
10Hz to 20 kHz -0.2dB max
> 105dB 20Hz to 20 kHz
> 113dB “A” weighted
< 0.003% 10Hz to 20 kHz
DAC:
TUNER:
DAB Specifications
Supported DAB modes:
VHF sensitivity
L-Band sensitivity
L-band after error correction
Band III after error correction
Adjacent Channel Selectivity
Far-off selectivity
Acquisition sensitivity
Input Impedance
FM Specifications
RF Frequency Range
RF Sensitivity
(S+N)/N=26dB, [email protected]
RF Limiting Sensitivity
(S+N)/N Ultimate s/n ratio
THD
Stereo Channel Separation
RDS data
WHIP AERIAL:
Operating Frequency
Gain
FM & Band III
L-Band
Impedance
S.W.R.
Polarization
Connector
Operating temperature
Storage temperature
Length
Mechanical Fixing
Issue 2: 19th June 2006
I, II, III, and IV VHF 174 240 MHz RF frequency range
L-Band (standard and Canada) 1452 1492 MHz
-96 -97 dBm
(Measured to EN50248)
-95 -96.5 dBm
(Measured to EN50248)
-15 dBm Maximum Input Signal for Pseudo channel BER with real value 0.02
0 dBm
32 33 dBm
(Measured to EN50248)
48 dBm
(Measured to EN5024845)
101 dBm
50Ω F type connector (to VHF/L-Band diplexer)
87.5-108 MHz
5 µV Dev. F.mod=1 KHz
0.5 µV
63 dB (90MHz@200mV/22.5KHz Dev. Fmod=1 KHz)
0.5% (90MHz@200mV/75KHz Dev. Fmod=1 KHz)
30 dB
CENELEC EN50067 compliant
FM Band 88-108MHz
Band III 174-240MHz
L-Band 1452-1492MHz
2dBi
5dBi
75Ω
<2.0:1 at res. freq.
Vertical
F-type
-20 to +65°C
-30 to +75°C
Sleeve 36mm
Retracted 153±10mm
Extended 646±10mm
180° swivel joint on plug with locking nut
Page 22 of 24
KW250S
Output:
AMPLIFIER SPECIFICATIONS
Power
Voltage, RMS
Voltage, Peak-to-peak
Current peak-to-peak
Damping factor
Output devices per channel
Pre-out impedance
250 Watts per channel into 8 Ohms (24dBW),
400 Watts per channel into 4 Ohms
45 Volts 20Hz to 20 kHz
127.3 Volts
75 Amps
140
4
50 Ohms
THD + noise, 20Hz to 20 kHz
Signal / noise ratio
Input sensitivity for 250 Watts
Input impedance
Overload margin
Channel separation
Frequency response
< 0.01%
> 100dB ‘A’-weighted
330mV
220k Ohms
26dB
> 70dB typical
20Hz to 20 kHz, +0, -0.2dB
Line inputs:
Phono input:
RIAA/IEC combined response (see graph)
20.0
15.0
10.0
PHONO RESPONSE
5.0
dB
0.0
RIAA
-5.0
PHONO
-10.0
RIAA/IEC
-15.0
-20.0
20.0
31.5
50.0
80.0
125
200
315
500
1000 1600 2500 4000 6300 10000 16000
Frequency (Hz)
Signal / noise ratio
Input sensitivity
Input impedance
Overload margin
> 96dB ‘A’-weighted
2.5mV (moving magnet)
47k Ohms
24dB
Aerial input
Digital inputs
1 F-type (female) with securing thread, DAB/FM
1 optical (TOSLINK)
2 S/PDIF (RCA connector),
1 optical (Toslink), 44.1/48 kHz
1 S/PDIF (RCA connector), 48 kHz
2 pairs line level RCA connectors,
1 front panel 3.5mm jack socket (sharing AUX2 input)
1 pair phono (MM/MC) RCA connectors,
1 pair RCA [preamp] controlled by the volume,
1 pair RCA [tape record] fixed line level output.
1 pair 4mm banana plug/binding posts per channel.
Connections:
Digital outputs
Line level inputs:
Line level outputs:
Speaker outputs:
Power requirement:
100 / 115 / 230Volts AC 50 / 60Hz (factory pre-set),
700 Watts maximum into 8 Ohms, 80 Watts idle
Weight:
29.5 kg, 65 lbs
37.0 kg, 81.5 lbs
unit only, unboxed
in shipping carton
Dimensions:
485 mm, 19.1 inches wide
170 mm, 6.7 inches high including feet
470 mm, 18. 5 inches deep including terminals
Standard accessories:
Telescopic tri-band aerial with F-plug connector,
IEC type mains lead (16-Amp type),
Remote control (A5, universal type),
2 batteries size LR03 or AAA, manganese alkaline type
Musical Fidelity reserves the right to make improvements which may
result in specification or feature changes without notice.
Issue 2: 19th June 2006
Page 23 of 24
KW250S
MANUAL REVISION
RELEASE
DATE
CHANGES
Issue 1
1st June 2006
[1st release]
Issue 2
19th June 2006
Presentation updated.
Issue 2: 19th June 2006
Page 24 of 24