1
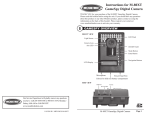
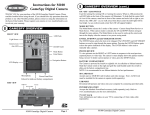
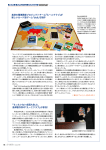
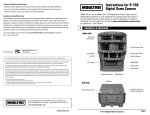
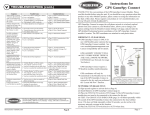
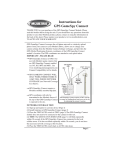
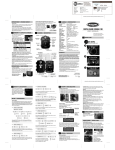
Instructions for L20
GameSpy Digital Camera
THANK YOU for your purchase of the Game Spy L20 Camera. Please read this
booklet before using the unit. If you should have any questions about this product
or any other Moultrie product, please contact us using the information on the back
page. Please register your product at www.moultriefeeders.com TO ACTIVATE
YOUR WARRANTY.
BACK VIEW
Auto
Date
Photo
Quality
Delete All
Up, Enter, and Down Buttons
USB PORT
Download still pictures and video onto your computer by connecting the provided
cable. Refer to the Advanced Information section of this manual for details.
ON/OFF Switch
BATTERY COMPARTMENT
The Camera is powered by four (4) C size alkaline batteries.
Multi-shot
reset
ON/OFF
FUNCTION SWITCH
The Function Switch selects one of the seven functions of the camera: Auto, Date,
Time, Photo Quality, Photo Delay, Multi-shot, and Delete All. When a function is
selected, the ENTER button will activate a setting adjustment and the UP and
DOWN buttons will step through the options. Refer to the FUNCTION SWITCH
DETAILS section of this manual for more information. The software version of the
camera is displayed when the Function Switch is rotated all the way in the
clockwise direction.
SD MEMORY CARD SLOT
The SD Memory Card Slot accepts up to a 4GB SD Card for photo storage. If there
is no SD Card in the slot then the LCD screen will display “NO CARD”.
Photo
Delay
ENTER
ON / OFF SWITCH
Used for turning On and turning Off the camera.
Function Switch
Time
LCD Display
GAMESPY OVERVIEW (continued)
Battery Compartment
Four Alakaline C Cells
USB Port
BATTERY LEVEL INDICATOR
When the batteries get to a low level, the LCD screen will display the Low Battery
Indicator Icon. When the batteries get to a critical level, the camera will not
function, but the Low Battery Indicator Icon will still be visible on the LCD Screen.
The batteries will last approximately 90 days (based on 5 daytime and 5 nighttime
pictures per day).
SD Card Slot
SIDE VIEW
Lock
Opening
RESET
The reset button will cause the camera to reset to default values.
FUNCTION SWITCH DETAILS
Open the back panel of the Camera and remove the battery compartment
cover. Install four (4) C size alkaline batteries with polarities as indicated in
the Battery Compartment. Re-install the Battery Compartment Cover.
Thread the provided Mounting Strap through the Eyelets on the back of the
camera and secure to a tree or pole approximately 36" from the ground as
shown.
AUTO MODE
The camera’s LCD screen will display the number of photos taken follow by the
pictures remaining when the FUNCTION SWITCH is set to AUTO. This is the
camera’s normal state for taking pictures. During this mode, the camera will
sleep and use a minimal amount of battery life. When the PIR motion sensor
detects an animal, it will wake up the camera and immediately take a picture.
When in AUTO MODE, press the ENTER button and the camera will
immediately take a picture.
DATE
The camera’s current date setting will be displayed by the LCD when the
FUNCTION SWITCH is set to DATE. Press the ENTER button and the Month
digits of the date will flash. Use the UP and DOWN buttons to adjust the
Month. Press the ENTER button to advance to the Day digits and repeat the
process. Press the ENTER button to set Year. Press the ENTER button to
confirm the new settings.
Turn Camera on by sliding ON/OFF switch to the ON position.
Rotate the FUNCTION SWITCH to DATE and set the date by pressing the
ENTER button and UP/DOWN buttons to adjust selected field. Rotate the
FUNCTION SWITCH to TIME and set the date by pressing the ENTER
button and UP/DOWN buttons to adjust selected field.
Rotate the FUNCTION SWITCH to AUTO. Your Camera will now
automatically take pictures whenever an animal is detected in range -based
on the default settings below
Function
Photo Quality
Photo Delay after each photo is taken
Setting
High
1 minute
Multi Shot Count
1-Shot
TIME
The camera’s current time setting will be displayed by the LCD when the
FUNCTION SWITCH is set to TIME. Press the ENTER button and the Hour
digits of the Time will flash. Use the UP and DOWN buttons to adjust the
hour. Press the ENTER button to advance to the Minute digits and repeat the
process. Press the ENTER button to set AM or PM. Press the ENTER button
again to confirm the new settings.
Pressing and holding the Up or Down Buttons will cause the digits to increase or
decrease at double speed.
MFH-DGS-L20
FUNCTION SWITCH DETAILS (cont.)
PHOTO QUALITY
The camera’s current PHOTO QUALITY setting will be displayed by the LCD
when the FUNCTION SWITCH is set to PHOTO QUALITY. Use the Up and
Down buttons to select the desired setting. Press the ENTER button to confirm
the new setting.
The Photo Quality settings are:
- Low: 1280 x 960 (1.3MP)
- High: 1600 x 1200 (2.0MP)
PHOTO DELAY
The camera’s current PHOTO DELAY setting will be displayed by the LCD
when the FUNCTION SWITCH is set to PHOTO DELAY. The camera will
wait a specified number of minutes between each picture. Use the UP and
DOWN buttons to select the desired setting. Press the ENTER button to
confirm the new setting.
The Photo Delay settings are:
- 1min
- 5min
- 10 min
- 30 min
- 60 min
ADVANCED INFORMATION
1 VIEWING PICTURES - USB
1. Plug provided USB cable into the USB port on your Windows
XP/Vista/Windows 7 or Macintosh computer.
2. Plug other end of USB cable into the camera’s USB port.
3. To access JPG pictures and AVI movie files, navigate to “My Computer” and
double click the “DCIM\100-MDGC” folder.
4. To exit USB mode, follow computer’s instructions for properly
disconnecting a removable drive and then unplug the USB cable from the
computer and the camera.
2
INFORMATION ON PICTURE
Date
MULTI-SHOT
The camera’s current MULTI-SHOT setting will be displayed by the LCD when
the FUNCTION SWITCH is set to MULTI-SHOT. The camera will
automatically take the specified number of photos, with a 5 second delay
between photos. Use the UP and DOWN buttons to select the desired setting.
Press the ENTER button to confirm the setting.
The Multi-Shot settings are:
- 1-Shot
- 2-Shots
DELETE ALL
The camera’s current DELETE ALL setting will be displayed by the LCD when
the FUNCTION SWITCH is set to DELETE ALL. This function will clear all
contents on the SD Card. Use the UP and DOWN buttons to select the desired
setting. Press the ENTER button to confirm the Delete All function.
Page 5
Page 6
Time
Resolution
Resolutions
LOW
HIGH
Approximate photos stored 1GB SD card
LOW
HIGH
SD Memory Card
Optical Field of View
Batteries
Xenon Flash Range
Approximate Detection Range
1280 x 960
(1.3MP)
1600 x 1200
(2.0MP)
3800
1500
4 GB Max
(not included)
60 degrees
4 Alkaline C-cell
(not included)
Up to 20 feet
30 +/-5 feet
06082010R4/ MFH-DGS-L20
Page 7