1
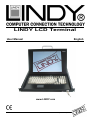
LINDY LCD Terminal
User Manual
English
LINDY No. 21520 - 21525
www.LINDY.com
© LINDY ELECTRONICS LIMITED & LINDY-ELEKTRONIK GMBH - FIRST EDITION (AUG 2003)
Safety Information
• In order to avoid the risk of fire or electric shock, DO NOT expose this
device to liquid or a high humidity environment
• Operate the LCD only at temperatures between +5°C and +45°C
• No user serviceable parts. Refer servicing to qualified personnel
• Carefully read all notes and instructions before using this product
• This device should be securely mounted in 19” rack enclosure
• Do not use liquid cleaning products or products containing abrasives,
clean only with a soft damp cloth
• Ensure there is sufficient ventilation to prevent overheating
• Never obstruct or block the ventilation slots or other openings, and do
not position the device in any location where there is insufficient
ventilation
Features
•
•
•
•
•
•
•
•
•
•
•
15“ 1024 x 768 TFT LCD Screen
VGA, SVGA, and XGA video support
Built-in 5 language OSD for display adjustment
Backlight lifetime of 50,000 hours
PS/2 touch pad
105 key keyboard
100-240V AC external power supply
Dimensions: Width 448/482mm x Height 440mm x Depth 510mm.
Weight approx. 14Kg, 15Kg with packaging
Rack mountable to a depth of between 52cm - 90 cm
Environmental Specification:
o Temperature: 0 ~ 50° C (Operating) -20~60° C (Storage)
o Relative Humidity: 10~90%, Non-Condensing
© LINDY ELECTRONICS LIMITED & LINDY-ELEKTRONIK GMBH - FIRST EDITION (AUG 2003)
User Manual KVM LCD Terminal
KVM LCD Terminal INSTALLATION
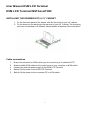
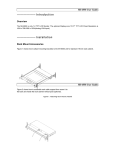
INSTALLING THE DRAWER INTO A 19” CABINET
1. Fix the front side panel of the drawer onto the front side of your 19” cabinet
2. Fix the screws in the back onto the rear side of your 19” Cabinet. The mounting
rails may be adjusted to fit different cabinet depths of between 52cm and 90cm
Cable connections
1.
2.
3.
4.
5.
Ensure the computer or KVM switch you are connecting to is switched OFF!
Attach suitable KVM cables to the control ports of your computer or KVM switch
Connect the external power supply to the KVM LCD Terminal
Switch ON the power to the KVM LCD Terminal
Switch ON the power to the connected PC or KVM switch
1
1 .L C D M o n ito r In s ta lla tio n
1-1 Installation:
(1) The following process offers users the best way to set up your LCD
Monitor into a whole PC system with correct and safe installation.
(2) Turn off the power switch of the PC and disconnect from the mains
input supply.
(3) Connect one end of 15-pin XGA Signal Cable to the signal input
port on the LCD Monitor and the other end to the signal output port
of PC
(4) Connect the DC 12V power output jack to the 12V DC input socket
of the LCD monitor. Connect the power cord to the adapter and the
other end into a suitable AC power outlet socket.
(5) Now connect the PC power cord to the AC power outlet socket.
(6) Check all the connections are correct, then, Turn on the LCD
monitor power switch..
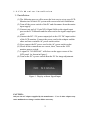
(7) A signal of “NO SIGNAL” will show on the upper corner of the
LCD panel. As shown in figure 1.
(8) Turn on the PC’s power switch Run the PC for image adjustment.
Figure 1. Display without Signal Input
CAUTION:
Only use the AC adapter supplied by the manufacture . User of other adaptor may
cause malfunction or danger and invalidate warranty.
2
2 .F u n c tio n K e y s a n d o p e ra tio n :
2.1 Function Keys Definition and description:
(1) Menu Key: Use this key to select and execute the magnitude and
function process.
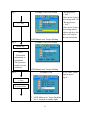
The Sequence flows of Manu Key pressing:
(a) Mode Selection:
(+ Key)
Press Manu key Display 1st press 2nd press 3rd press 4th press 5th press
OSD
*OSD shows up. Colour Picture Function
Manu
Mics
Exit
.
5th press 4th press 3rd press 2nd press 1st press
(- key)
(b) Adjusting-and Executing for the desired Selection:
st
(1 selection: Colour Adjustment)
(+ Key)
Press Manu key
1st press 2nd press 3rd press 4th press 5th press
* “Colour icon”
flashed.
Contrast Brightness
Red
Green
Blue
Exit
* “Contrast”
marked.
5th press
4th press 3rd press 2nd press 1st press
- key
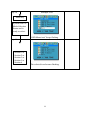
(c) Magnitude Adjustment:
Press Manu key
Magnitude Scale shows
up
Adjusting item
Magnitude varied by pressing:
+ Key: Value increases to until 255.
Contrast
- Key: Value decreases to until 0.
Mode Exit: Always selects Exit + Manu key pressing to go out from any one
of modes to another.
(d) When the system back to Mode Selection that it is ready for
another mode selection.
(e) As for actually uses of OSD’s Function adjustment and
execution, Please refers the item 2-2: “Quick OSD Adjustment
& Execution Operation”
3
(2)
(3)
+ Key:
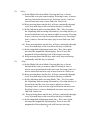
(a) In the Mode-Selection Mode: Pressing this key to locate
forward the icon you want to adjust. Pressing it once, it moves
one step forward to the next icon. Pressing it twice, it moves
forward one more step to next 2nd icon. And so on.
(b) Keep pressing down on this key, it flows continually through
every icon and stops at the icon when the key is released.
(c) In the Adjusting-and-executing Mode: The + Key, becomes
the Adjusting-and-executing selection key. Pressing this key to
locate forward the icon you want to adjust or execute. Pressing
it once, it moves one step forward to the next icon. Pressing it
twice, it moves forward one more step to next 2nd icon. And
so on.
(d) Keep pressing down on this key, it flows continually through
every icon and stops at the icon when the key is released.
(e) In the magnitude adjustment mode, the + Key, once again,
becomes the magnitude Adjusting key. Press it once the
magnitude of the adjusting scale will increase one step.
(f) Keep pressing down on this key, and it will keep increasing
continually until the key is released.
- Key:
(a) In the Mode-Selection Mode: Pressing this key to locate
backward the icon you want to adjust. Pressing it once, it
moves one step backward to the next icon. Pressing it twice, it
moves backward one more step to next 2nd icon. And so on.
(b) Keep pressing down on this key, it flows continually through
every icon and stops at the icon when the key is released.
(c) In the Adjusting-and-executing Mode: The - Key, becomes
the Adjusting-and-executing selection key. Pressing this key to
locate backward the icon you want to adjust or execute.
Pressing it once, it moves one step backward to the next icon.
Pressing it twice, it moves backward one more step to next
2nd icon. And so on.
(d) Keep pressing down on this key, it flows continually through
every icon and stops at the icon when the key is released.
(e) In the magnitude adjustment mode, the - Key, once again,
becomes the magnitude Adjusting key. Press it once the
magnitude of the adjusting scale will increase one step.
4
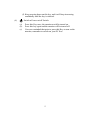
(f) Keep pressing down on this key, and it will keep increasing
continually until the key is released.
(4)
Switch
(a)
(b)
(c)
Power on/off Switch.
Press this Key once; the monitor would be turned on.
Press this key again and the monitor will be turned off.
Users are reminded that prior to press this Key to turn on the
monitor, remember to switch on your PC first
5
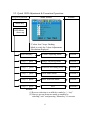
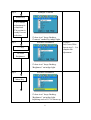
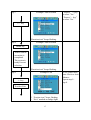
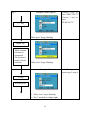
2-2. Quick OSD Adjustment & Execution Operation:
Key to be pressed
Step 1
Menu Display
OSD Display
Remark
Menu Key
OSD Menu
shows up.
1."Colour Icon” keeps flashing.
2.Mode is ready for Colour Adjustment.
3. Resolution displayed
Press/Display:
Colour Adjusting Mode
Section 1
+ key: 1st press
Image Adjusting Mode
Section 2
+ key: 2nd press
Function Executing Mode
Section 3
+ key: 3rd press
OSD Manu Mode
Section 4
+ key: 4th press
Mics Selection Mode
Section 5
+ key: 5th press
Exit
Section 6
Remark:
(1) Reverse selection is available to make by “- key”.
(2) Always get out from one mode to another by
selecting “exit” and pressing “Manu key” to execute.
6
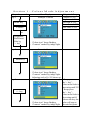
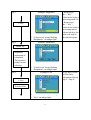
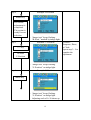
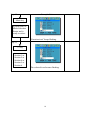
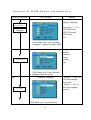
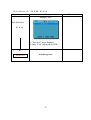
S e c tio n 1 : C o lo u r M o d e A d ju s tm e n t
Key to be pressed
Menu Display
Magnitude Range
Step 1
Example: Contrast
Contrast: 0~255
Brightness: 0~216
Red Gain: 0~255
Menu Key
Green Gain: 0~255
Blue Gain: 0~255
Contrast
or
Brightness/
Red/Green/
Blue by
“+ key”
Step 2
1. “Colour icon” keeps flashing.
2. “Contrast” marked by indigo light.
Example: Contrast
Menu Key
Step 3
+/- key
1. “Colour icon” keeps flashing.
2. “Contrast” marked by indigo light.
3. Adjusting scale of 0~255 shows up.
Example: Contrast
* Keeps press
the “+ key”:
Value in the Scale is
increasing until 255
* Keeps press
the “- key”:
Value in the Scale is
decreasing until 0
Release the key, the
1. “Colour icon” keeps flashing.
value will stop at
2. “Contrast” marked by indigo light. the satisfied point.
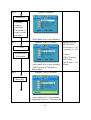
Step 4
Example: Contrast
Menu Key
The Contrast
adjustment is
completed.
The system is
ready for next
selection
Step 5
+/- key
To select
Brightness
1. “Colour icon” keeps flashing.
2. “Contrast” marked by indigo light.
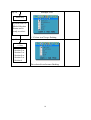
Example: Brightness
If selects:
Red, Green, Blue.
Repeat step 3~ 5 to
complete the
adjustment.
1. “Colour icon” keeps flashing.
2. “Brightness” on indigo light.
Step 6
Example: Brightness
Manu Key
1. “Colour icon” keeps flashing.
2. “Brightness” on indigo light.
3. Adjusting scale of 0~216 shows up
8
Step 7
Example: Brightness
+/- key
1. “Colour icon” keeps flashing.
2. “Brightness” on indigo light.
Example: Brightness
Step 8
* Keeps press
the “+ key”:
Value in the Scale is
increasing until 216
* Keeps press
the “- key”:
Value in the Scale is
decreasing until 0
Release the key, the
value will stop at
the satisfied point.
Manu key
Brightness
adjustment is
completed.
The system is
ready for next
selection
1. “Colour icon” keeps flashing.
2. “Brightness” on indigo light.
Example: Exit
Step 9
+/- key
To select Exit
1. “Colour icon” keeps flashing.
2. “Exit” on indigo light.
9
As for Red, Green,
or Blue Gain
adjustment: Repeat
step 5~ Step 8.
Step 10
Example: Exit
Manu key
System backs to
Mode Selection
Status and is
ready to select:
1. “Colour icon” keeps flashing.
Step 11
+/- key
Section 2 or
Section 3 or
Section 4 or
Section 5 or
Section 6
The selected icon become flashing.
10
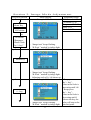
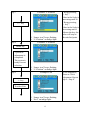
S e c tio n 2 : Im a g e M o d e A d ju s tm e n t
Key to be pressed
Menu Display
Magnitude Range
Step 1
Example: H-Position
H-Position: 0~146
V-Position: 0~20
Sharpness: 1/2/3/4/5
Menu Key
Phase: 0~31
Clock: 0~127
H-Position
or
V-Position/
Sharpness/
Phase/Clock
by “+ key”
Step 2
3. “Image icon” keeps flashing.
4. “H-Posit.” marked by indigo light.
Example: H-Position
Menu Key
Step 3
+/- key
4. “Image icon” keeps flashing.
5. “H-Posit.” marked by indigo light.
6. Adjusting scale of 0~146 shows up.
Example: H-Position
* Keeps press
the “+ key”:
Value in the Scale is
increasing until 146
* Keeps press
the “- key”:
Value in the Scale is
decreasing until 0
Release the key, the
3. “Image icon” keeps flashing.
value will stop at the
4. “H-Posit.” marked by indigo light. satisfied point.
11
Step 4
Example: H-Position
Menu Key
H-Position
adjustment is
completed.
The system is
ready for next
selection
3. “Image icon” keeps flashing.
4. “H-Posit.” marked by indigo light.
Example: V-Position
Step 5
+/- key
To select
V-Position
3. “Image icon” keeps flashing.
4. “V-Position” on indigo light.
Step 6
Example: V-Position
Manu Key
4. “Image icon” keeps flashing.
5. “V-Position” on indigo light.
6. Adjusting scale of 0~20 shows up
12
If selects:
Sharpness, Phase,
or Clock:
Repeat step 3~ 5 to
complete the
adjustment.
Step 7
Example: V-Position
+/- key
3. “Image icon” keeps flashing.
4. “V-Position” on indigo light.
Example: V-Position
Step 8
* Keeps pressing
“+ key”:
Value in the Scale is
increasing until 20
* Keeps pressing
“- key”:
Value in the Scale is
decreasing until 0
Release the key, the
value will stop at
the satisfied point.
Manu key
V-position
adjustment is
completed.
The system is
ready for next
selection
3. “Image icon” keeps flashing.
4. “V-Position” on indigo light.
Example: Exit
Step 9
+/- key
To select Exit
3. “Image icon” keeps flashing.
4. “Exit” on indigo light.
13
As for Sharpness,
Phase or Clock
adjustment: Repeat
step 5~ Step 8.
Step 10
Example: Exit
Manu key
System backs to
Mode Selection
Status and is
ready to select:
1. “Image icon” keeps flashing.
Step 11
+/- key
Section 1 or
Section 3 or
Section 4 or
Section 5 or
Section 6
The selected icon become flashing.
14
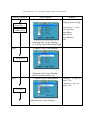
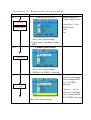
S e c tio n 3 : F u n c tio n E x e c u tio n
Key to be pressed
Step 1
Menu Display
Example: Auto Configuration
Remark
Manu pressed and
Display: Auto Config.
Menu Key
Selected by +/- key:
Auto Position.
Auto Phase.
Auto Clock.
Auto Balance.
Exit
Auto config
5. “Function icon” keeps flashing.
6. “A. Config” marked by indigo light.
Step 2
Example: Auto Configuration
Menu Key
7. “Function icon” keeps flashing..
8. Yes/No execution shows up.
Step 3
Example: Auto Configuration
+/- key
“Function icon” keeps flashing.
15
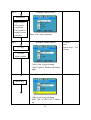
* Presses “+ key” to
select “Yes.”
* Presses “- key” to
select “No.”
Step 4
Example: Auto Configuration
Menu Key
Auto Config.
is completed.
The system is
ready for next
selection
5. “Function icon” keeps flashing.
Step 5
Example: Auto-Position
+/- key
To select
Auto-Position
Step 6
1. “Function icon” keeps flashing.
2. “Auto position” Marked on Indigo
light.
Example: Auto-Position
Manu Key
7. “Function icon” keeps flashing.
8. Yes/No execution shows up.
16
If selects:
Auto Phase, Auto
Clock or Auto
Balance:
Repeat step 3~ 5 to
execute.
Step 7
Example: Auto-Position
* Presses “+ key”
to select “Yes.”
* Presses “- key”
to select “No.”
+/- key
“Function icon” keeps flashing.
Example: Auto-Position
Step 8
Manu key
Auto-Position
execution is
completed.
The system is
ready for next
selection
“Function icon” keeps flashing.
Example: Exit
Step 9
+/- key
To select Exit
5. “Fuction icon” keeps flashing.
6. “Exit” marked on indigo light.
17
As for Auto Phase,
Auto Clock or Auto
Balance:
Repeat step 5~
step 8.
Step 10
Example: Exit
Manu key
System backs to
Mode Selection
Status and is
ready to select:
“Function icon” keeps flashing.
Step 11
+/- key
Section 1 or
Section 2 or
Section 4 or
Section 5 or
Section 6
The selected icon become flashing.
18
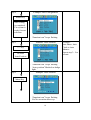
S e c tio n 4 : O S D M a n u A d ju s tm e n t
Key to be pressed
Step 1
Menu Display
Example: Language
Remark
Manu pressed and
Display: Language
Menu Key
Selected by +/- key:
OSD H-Position.
OSD V-Position.
OSD Timer.
Exit
Language
7. “OSD Manu icon” keeps flashing.
8. “Language” marked by indigo light
Step 2
Example: Language
Menu Key
Language Table:
English.
Germany.
France.
Spanish
Italy
9. “OSD Manu icon” keeps flashing..
10. Language table shows up.
Step 3
Example: Language
+/- key
“OSD Manu icon” keeps flashing.
19
* Presses “+ key” to
select the language
downward
* Presses “- key” to
select the language
upward.
Step 4
Example: Language
Menu Key
Language
setting is
completed.
The system is
ready for next
selection
6. “OSD Manu icon” keeps flashing.
Step 5
Example: OSD H-Position
+/- key
To select OSD
H-Position
Step 6
3. “OSD Manu icon” keeps flashing.
4. “OSD H-position” Marked on
Indigo light.
Example: OSD H-Position
Manu Key
9. “OSD Manu icon” keeps flashing.
10. Adjusting Scale of 0~120 shows up.
20
Adjusting Range:
OSD Position:
H-Position: 0~120
V-position: 0~ 120
If selects:
OSD V-Position.
OSD Timer.
Repeat step 3~ 5 to
execute.
Step 7
Example: OSD H-Position
+/- key
* Keeps presses
“+ key”:
Value in the Scale is
increasing until 120
* Keeps presses
“- key”:
Value in the Scale is
decreasing until 0
Release the key, the
value will stop at
the satisfied point.
“OSD Manu icon” keeps flashing.
Example: OSD H-Position
Step 8
Manu key
OSD
H-Position
adjustment is
completed.
The system is
ready for next
selection.
“OSD Manu icon” keeps flashing.
Example: Exit
Step 9
+/- key
To select Exit
7. “OSD Manu icon” keeps flashing.
8. “Exit” marked on indigo light.
21
As for OSD Timer.
Repeat step 5~
step 8.
Step 10
Example: Exit
Manu key
System backs to
Mode Selection
Status and is
ready to select:
“OSD Manu icon” keeps flashing.
Step 11
Section 1 or
Section 2 or
Section 3 or
Section 5 or
Section 6
The selected icon become flashing.
22
S e c tio n 5 : F u n c tio n E x e c u tio n
Key to be pressed
Menu Display
Remark
Step 1
Example: Input Source
Manu pressed and
Display: Input Source.
Menu Key
Selected by +/- key:
Mode Option.
Reset.
Exit
Input Source
9. “Misc icon” keeps flashing.
10. “Input Source” marked by indigo
light.
Example: Input Source
Step 2
Menu Key
11. “Misc icon” keeps flashing..
12. “DSUB/AV/S-VIDEO” shows up
Step 3
Example: Input Source
+/- key
Presses “+ key” to
select one of the Input
Source among DSUB,
AV or S-VIDEO
rightward.
* Presses “- key” to
select one of the Input
Source among DSUB,
AV, S-VIDEO leftward
“Misc icon” keeps flashing.
Step 4
Example: Input Source
Menu Key
Input Source
Selection is
completed.
The system is
ready for next
selection.
“Misc icon” keeps flashing.
Step 5
Example: Mode Option
+/- key
To select
Mode Option
5. “Misc icon” keeps flashing.
6. “Mode Option” Marked on Indigo
light.
Step 6
Example: Mode Option
Manu Key
11. “Misc icon” keeps flashing.
12. MAC 768-75/VESA768-75 shows
up.
24
If selects:
Reset.
Repeat step 3~ 5 to
execute.
Step 7
Example: Mode Option
* Presses “+ key” to
select “MAC768-75.”
* Presses “- key” to
select
“VESA768-75”
+/- key
“Misc icon” keeps flashing.
Example: Mode Option
Step 8
Manu key
Mode Option
selection is
completed.
The system is
ready for next
selection
Step 9
“Misc icon” keeps flashing.
Example: Exit
+/- key
To select Exit
9. “Misc icon” keeps flashing.
10. “Exit” marked on indigo light.
25
As for Reset
Repeat step 5~step 8.
Step 10
Example: Exit
Manu key
System backs to
Mode Selection
Status and is
ready to select:
“Misc icon” keeps flashing.
Step 11
+/- key
Section 1 or
Section 2 or
Section 3 or
Section 4 or
Section 6
The selected icon become flashing.
26
S e c tio n 6 : O S D E x it
Key to be pressed
Menu Display
Example: Exit
Mode Selection:
E x it
11. “Exit icon” keeps flashing.
12. Only “Exit” displayed on OSD.
Step
Menu Key
OSD Disappeared
27
Remark
3 .S p e c ific a tio n a n d A p p e n d ix :
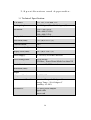
3-1 Technical Specification:
LCD Panel:
15.0” TFT, 0.297mm, TTL
Viewing Angle
-60~60 degree (H), -55~45 degree (V)
Resolution:
Display Colors:
1024 x 768 (XGA)
800 x 600 (SVGA)
640 x 480 (VGA)
16.7 M (8 bits/color)
Pixel Pitch (mm):
0.297 (H) x 0.297 (V)
Contrast Ration:
350:1
Brightness (cd/m2):
250nit
Display Area (mm):
304.1 (H) x 228.1 (V)
Power Supply:
AC 90~264, 50~60Hz Universal
Power management:
VESA-DPMS
30W Max.; Power Down Mode: less than 3W
Power on/off, OSD control
User’s Control:
Dimension (mm):
Weight
Safety certifications
UL, FCC, CE
Environmental Condition: Operation Temp.: 0~50 degree C
Storage Temp.: -20~60 degree C
Humidity: 10~90%
Accessories:
12V/48W power adapter
Signal cable
Power card
28
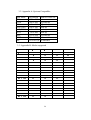
3-2. Appendix A: Systems Compatible:
Input Mode
XGA
SVGA
VGA
DOS (Text)
DOS (EGA)
TEXT
MAC
NTSC
PAL
Resolution
1024 x 768
800 x 600
640 x 480
640 x 480
640 x 350
720 x 400
832 x 624
720 x 240(I)
720 x 288 (I)
Zoom to 1024x768
1:1
HQ scale up
HQ scale up
Scale up
Scale up
Scale up
HQ scale up
De-interlace
De-interlace
3-3: Appendix B: Modes supported
, - . / 0
1
2 3 4
! " #$ %
3 .
5 6
7 8
9 :
; <
7 8
@ A
B C
D E
@ F
B G
D E
H A
@ G
D E
I J K
L
M K N
O P
Q R
S T
U V V
W
X V V
O X
Q R
S T
O U
Q Y
S T
Z Q
X V
S T
Z R
R X
S T
Q Y V
W
O V V
Z [
Q V
S T
X O V
W
O U V
Z Q
Q R
S T
Z Q
Q Y
S T
Z R
X X
S T
Z [
X V
S T
Z [
X V
S T
Y O
R X
Z [
Q V
X O V
X O V
W
W
O V V
Z R V
29
& ' ( ) * +
= > ?
Radio Frequency Energy Certifications
Shielded cables must be used with this equipment to maintain compliance with radio frequency
energy emission regulations and ensure a suitably high level of immunity to electromagnetic
disturbances.
European EMC Directive 89/336/EEC
CE statement
This equipment complies with the requirement for
CE mentioned in the European Directive and
Standards EN55022 and EN55024.
FCC Compliance Statement (United States)
This equipment has been tested and found to comply
with part 15 of FCC rules.
Operation is subject to the following two conditions:
(1) This device may not cause harmful
interference.
(2) This device must accept any interference
received. Including interference that may
cause undesired operation.
Canadian Department of Communications RFI
statement
This equipment does not exceed the class B limits for
radio noise emissions from digital apparatus set out in
the radio interference regulations of the Canadian
Department of Communications.
Le présent appareil numérique n’émet pas de
bruits radioélectriques dépassant les limites
applicables aux appareils numériques de la
classe A prescrites dans le règlement sur le
brouillage radioélectriques publié par le ministère
des Communications du Canada
© LINDY ELECTRONICS LIMITED & LINDY-ELEKTRONIK GMBH - FIRST EDITION (AUG 2003)