1
Owner’s Manual
This product has been manufactured according to strict specifications and voltage requirements
that are applicable in the country in which it is intended that this product should be used. If you
have purchased this product via the internet, through mail order, and/or via a telephone sale, you
must verify that this product is intended to be used in the country in which you reside.
WARNING: Use of this product in any country other than that for which it is intended could be
dangerous and could invalidate the manufacturer's or distributor's warranty.
Please also retain your receipt as proof of purchase otherwise your product may be disqualified
from the manufacturer's or distributor's warranty.
Owner’s Manual
IMPORTANT NOTICE TO CONSUMERS
E
4015-2 Yanokuchi, Inagi-city, Tokyo 206-0812 Japan
2008 KORG INC.
E
2009 AH Printed in Japan
IMPORTANT SAFETY INSTRUCTIONS
•
•
•
•
•
•
•
•
•
•
•
•
•
•
•
•
•
•
•
•
•
•
Read these instructions.
Keep these instructions.
Heed all warnings.
Follow all instructions.
Do not use this apparatus near water.
Mains powered apparatus shall not be exposed to dripping or
splashing and that no objects filled with liquids, such as vases,
shall be placed on the apparatus.
Clean only with dry cloth.
Do not block any ventilation openings. Install in accordance with
the manufacturer’s instructions.
Do not install near any heat sources such as radiators, heat
registers, stoves, or other apparatus (including amplifiers) that
produce heat.
Do not defeat the safety purpose of the polarized or groundingtype plug. A polarized plug has two blades with one wider than
the other. A grounding type plug has two blades and a third
grounding prong. The wide blade or the third prong are provided
for your safety. If the provided plug does not fit into your outlet,
consult an electrician for replacement of the obsolete outlet. (for
USA and Canada)
Protect the power cord from being walked on or pinched
particularly at plugs, convenience receptacles, and the point
where they exit from the apparatus.
Only use attachments/accessories specified by the
manufacturer.
Unplug this apparatus during lightning storms or when unused
for long periods of time.
Turning off the power switch does not completely isolate this
product from the power line so remove the plug from the socket
if not using it for extended periods of time.
Install this product near the wall socket and keep the power plug
easily accessible.
WARNING—This apparatus shall be connected to a mains
socket outlet with a protective earthing connection.
Refer all servicing to qualified service personnel. Servicing is
required when the apparatus has been damaged in any way,
such as power-supply cord or plug is damaged, liquid has been
spilled or objects have fallen into the apparatus, the apparatus
has been exposed to rain or moisture, does not operate
normally, or has been dropped.
Do not install this equipment on the far position from wall outlet
and/or convenience receptacle.
Do not install this equipment in a confined space such as a box
for the conveyance or similar unit.
Battery shall not be exposed to excessive heat such as
sunshine, fire or the like.
Excessive sound pressure from earphones and headphones can
cause hearing loss.
Use only with the cart, stand, tripod, bracket, or table specified
by the manufacturer, or sold with the apparatus. When a cart is
used, use caution when moving the cart/apparatus combination
to avoid injury from tip-over.
The lightning flash with arrowhead symbol
within an equilateral triangle, is intended to
alert the user to the presence of uninsulated
“dangerous voltage” within the product’s
enclosure that may be of sufficient magnitude
to constitute a risk of electric shock to persons.
The exclamation point within an equilateral
triangle is intended to alert the user to the
presence of important operating and
maintenance (servicing) instructions in the
literature accompanying the product.
CAUTION
Danger of explosion if battery is incorrectly replaced.
Replace only with the same or equivalent type.
THE FCC REGULATION WARNING (for USA)
This equipment has been tested and found to comply with the limits
for a Class B digital device, pursuant to Part 15 of the FCC Rules.
These limits are designed to provide reasonable protection against
harmful interference in a residential installation. This equipment
generates, uses, and can radiate radio frequency energy and, if not
installed and used in accordance with the instructions, may cause
harmful interference to radio communications. However, there is no
guarantee that interference will not occur in a particular installation.
If this equipment does cause harmful interference to radio or
television reception, which can be determined by turning the
equipment off and on, the user is encouraged to try to correct the
interference by one or more of the following measures:
• Reorient or relocate the receiving antenna.
• Increase the separation between the equipment and receiver.
• Connect the equipment into an outlet on a circuit different
from that to which the receiver is connected.
• Consult the dealer or an experienced radio/TV technician for
help.
Unauthorized changes or modification to this system can void the
user’s authority to operate this equipment.
Notice regarding disposal (EU only)
When this “crossed-out wheeled bin” symbol is displayed on
the product, owner’s manual, battery, or battery package, it
signifies that when you wish to dispose of this product,
manual, package or battery you must do so in an approved
manner. Do not discard this product, manual, package or
battery along with ordinary household waste. Disposing in
the correct manner will prevent harm to human health and
potential damage to the environment. Since the correct method of
disposal will depend on the applicable laws and regulations in your
locality, please contact your local administrative body for details. If
the battery contains heavy metals in excess of the regulated
amount, a chemical symbol is displayed below the “crossed-out
wheeled bin” symbol on the battery or battery package.
* All product names and company names are the trademarks or registered trademarks of their respective owners.
Page 2
Contents
Introduction ................................. 4
Features .............................................4
Connection example .........................4
Parts of the MR-2000S ......................5
Front panel .................................................5
Rear panel ..................................................7
Screens and operations ...................8
Home screen and
menu list (MENU) screen .................8
Selecting parameters
and setting values ....................8
Basic operation ........................... 9
1. Power and usage ..........................9
2. Connecting
your monitor equipment ..........9
3. Turning the power on/off ..............9
Turning the power on ..................................9
Turning the power off ..................................9
4. Playing back the demo project ..10
Playing back .............................................10
Pausing .....................................................10
Stopping playback ....................................10
Searching for a desired
location during playback .................10
5. The home screen ........................11
6. Recording ....................................12
Selecting the input source ........................13
Selecting the recording format ..................13
Adjusting the input level ............................14
Starting and stopping recording ................15
Record operation lock (REC Lock) ...........15
7. Other
playback/editing operations ..16
9. Using marks within a project .... 21
Adding a mark .......................................... 21
Viewing the mark list ................................ 22
Using marks to move ............................... 22
Editing marks ........................................... 22
Other functions .......................... 25
Play mode ....................................... 25
Play list (PLAY LIST) ...................... 25
Creating a play list ................................... 25
Viewing a play list .................................... 26
Editing a play list ...................................... 26
Record mode .................................. 28
Project recording format
(New Project Type) ........................ 28
Settings when WAV (BWF) is selected .... 28
Settings when
DFF, DSF, or WSD are selected ... 28
Recording time for
each format (per 1 Gbyte) .............. 28
System setting (SYSTEM) .............. 29
LCD Contrast ........................................... 29
Synchronization
clock setting (Clock Source) .......... 29
Analog reference
level setting (Reference Level) ...... 29
Mark mode setting (Mark Mode) .............. 30
Device information (Device Info) .............. 30
DSD output fillter settings (DSD Filter) .... 30
Project name setting (Project Name) ....... 31
Resetting the
system setting (Factory Reset) ...... 31
Formatting the hard disk (HDD Format) ... 31
Updating the software (SoftwareUpdate) . 32
Using the MR-2000S
with your computer ............... 33
Selecting the project/file to play ................16
Selecting a project/file to edit ....................17
USB mode ................................................ 33
Hard disk structure and files .................... 33
Using the AudioGate software ................. 35
8. Other general operations ...........17
Appendix .................................... 36
Changing the counter mode
in the home screen .........................17
Changing the meter peak hold ..................17
Setting the date and time ..........................18
Editing the project/file name .....................19
Protecting a project ...................................20
Deleting a project/file ................................20
Viewing details about the project/file ........21
Troubleshooting ............................. 36
USB .......................................................... 36
Various messages .......................... 37
Specifications ................................. 38
Main sections ........................................... 38
Main specifications ................................... 38
Included items: ......................................... 39
Demo Project ........................................... 39
Index ........................................... 40
3
Introduction
Thank you for purchasing the Korg MR-2000S 1-bit studio recorder. In order to take full advantage of your
new equipment, please read this manual carefully and use the product as directed. When you've read the
manual, keep it safe for future reference.
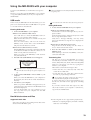
Features
The MR-2000S is an ultra-high-quality recorder that can record and play back in DVD audio format (24bit/192 kHz), SACD (Super Audio CD) quality format (1-bit/2.8 MHz), and in the even higher-quality 1bit/5.6 MHz format. In addition, the recorder can also play back in MP3 format which is used in computers
and many portable digital audio devices.
To allow extended recording times, the MR-2000S contains a high-capacity hard disk.
The recorded data can be copied to your computer via USB, and data files can be copied from your computer to the MR-2000S for listening.
The MR-2000S includes Korg’s "AudioGate" format conversion software, so you can use a computer to convert audio files to different file formats.
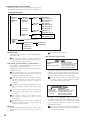
Connection example
from mic pre-out
or line input, etc
WORD
CLOCK
LINE IN
XLR
Computer
Mixer, Monitor, etc.
RCA
IN
S/P DIF
OUT IN
LINE OUT
OUT
XLR
RCA
USB
PHONES
Power cable
Headphone
4
to the AC outlet
Power supply connection
You must use the
included power cable.
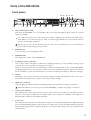
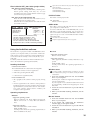
Parts of the MR-2000S
Front panel
14 15
19
1.
1
2
3
4
5
6 7
8
9
16 17 18
10
11 12 13
19
Power button, power LED
This turns the MR-2000S on or off (standby). The power LED will light-up green when on, and red
when off (standby).
If you disconnect the power cable, the power will be completely off and the power LED will go
dark. When you re-connect the power cable, it will take approximately one second for the unit to
return to off (standby) condition.
When you turn this off, the shutdown process will occur automatically; do not disconnect the
power cable until the display has gone dark.
2.
PHONES jack
You can connect a set of headphones here.
3.
PHONES knob
This adjusts the volume of the PHONES jack.
4.
Sampling frequency indicator
One of these LEDs will light to indicate the sampling frequency of the currently playing project
(→p.10)/ file or the currently-recording project (→p.28).
However if the synchronization clock setting is external (S/P DIF, Word Clock), and the MR-2000S's
sampling frequency does not match the external clock, the sampling frequency LED of the external
device will blink (→p.29). If synchronization is not achieved during recording, no indicator will light.
5.
Display
The display shows the level meters and counter during recording and playback, and can also show
information about the project (→p.10) or file, and parameter settings.
6.
HDD access indicator
This will light-up when the internal hard disk is being accessed during recording or playback.
While this indicator is lit, do not power-off the MR-2000S, or subject it to impact or vibration.
7.
Clock source indicator
This indicates the current synchronization clock (→p.29). However, the indicator will blink if synchronization is not achieved. When the recording format is set to DSD, this will blink if 44.1 kHz is not
detected, and it will be lit if 44.1 kHz is detected.
8.
Level meter
This indicates the L/R audio levels during recording (or record-ready) and playback. Adjust the input
level so that the PEAK segment of the meter does not light. You can clear the PEAK indication by holding down the display button. The meter gradations also indicate the reference level; the specified value
will remain lit.
5
9.
Display button
When the home screen is shown in the display, pressing this button will switch the content shown in
the counter display area (→p.17).
10. Dial
Use this dial to select projects (→p.10) or files, to select parameters in various screens, and to specify
values. In record-ready mode, this dial adjusts the level.
11. Stop button
This button stops recording or playback
12. Playback/Pause button, Play LED
This button starts recording or playback. During recording or playback, you can press this button to
pause (temporarily halt). This LED will light-up during playback, and will blink while paused. While
you're selecting a project (→p.10) or file, this LED will blink rapidly.
13. Record button, Record LED
This button puts the MR-2000S in record-ready mode; recording will begin when you then press the
play/pause button (record LED lit).
You can press this button during playback or recording to store a Mark (→p.21).
You can also stop recording by pressing this button in record-ready mode or record-pause mode.
14. Menu button, Menu LED
This button accesses the menu list screen, where you can choose the information and parameters
shown in the display. At this time the Menu LED will light. The menu screen and home screen will
alternate each time you press this button.
When playing or stopped in the home screen, you can press and hold this button to access a project
select screen or play list screen, depending on the playback mode (→p.25).
15. Enter button
Use this button to select various parameters, to confirm a value, to execute various operations, and to
enter the next screen in the menu list.
From the home screen, you can press and hold this button to move from the home screen to an editing
screen for the selected project/file. From the "LIBRARY LIST," "MARK LIST," or "PLAY LIST" screens
of the menu, you can press and hold this button to move to an editing screen for the selected item.
16. Exit button
Use this button to cancel execution, or to return from an editing screen in the menu list back to the previous screen.
17. Rewind button
Use this button to rewind, or to move between marks.
18. Fast-forward button
Use this button to fast-forward, or to move between marks.
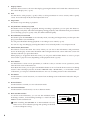
19. Rack attachment holes
As shown in the illustration, you can use the included screws,
insulating washers, and insulating bushings to install the MR2000S in an EIA standard rack.
When installing the MR-2000S in an EIA standard rack case,
make sure to allow sufficient spacing and openings at the back
to ensure adequate cooling.
6
MR-2000S
EIA
standard rack
Front panel side
Screw
Insulating washer
Insulating bushing
Rear panel
1
1.
2
3
4
5
6
7
8
9
10
AC connector
Connect the power supply cable (included) here.
2.
USB connector
This lets you use a USB cable to connect the MR-2000S to your computer.
3.
WORD CLOCK OUT jack
This jack outputs the same synchronization word clock as the project (→p.10) or file.
When operating in 1-bit format, this will output 44.1 kHz.
4.
WORD CLOCK IN jack
This jack allows the input of an external synchronization word clock in a range of 44.1 kHz – 192 kHz.
When operating in 1-bit format and using an external word clock for synchronization, 44.1 kHz
must be input in order to operate correctly.
5.
S/P DIF OUT jack (COAXIAL)
This is an S/P DIF digital signal (IEC60958) output jack.
If the format of the project (→p.10) or file is WAV, this will output the same audio as the LINE OUT
jacks, at that sampling frequency and bit depth.
For MP3, the bit depth is fixed at 16 bits; for 1-bit, no signal will be output.
6.
S/P DIF IN jack (COAXIAL)
This is an S/P DIF digital signal (IEC60958) input jack.
7.
Balanced output jacks (XLR)
These are balanced outputs that allow XLR connectors to be used. They output the same audio as the
RCA jacks.
8.
Unbalanced output jacks (RCA)
These are unbalanced outputs that allow RCA connectors to be used. They output the same audio as
the XLR jacks.
9.
Balanced input jacks (XLR)
These are balanced inputs that allow XLR connectors to be used.
10. Unbalanced input jacks (RCA)
These are unbalanced inputs that allow RCA connectors to be used.
7
Screens and operations
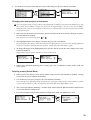
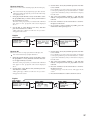
Home screen and menu list (MENU) screen
When you power-on the MR-2000S, the display will show the level meter screen.
While the display is showing the home screen, pressing the menu button will show the menu list (MENU)
screen which lets you proceed to various screens related to settings as well as informational screens.
You'll use the dial and enter button from this screen to select your choices.
When the display shows the menu list (MENU) screen, pressing the menu button will take you back to the
home screen. Using this method, pressing the menu button will alternate between the menu list (MENU)
screen and the home screen.
Home screen
Menu list screen
Various setting screens
By pressing and holding the menu button during playback, you can access a library select screen or the
play list screen, depending on the playback mode (→p.25). When you've finished adjusting your settings, press the exit button to return to the previous screen.
By pressing and holding the enter button from the home screen, you can access the editing screen for
the selected program/file. If you're in a menu list such as "LIBRARY LIST," "MARK LIST," or "PLAY
LIST," pressing and holding the enter button will take you to the list editing screen.
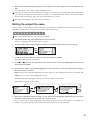
Selecting parameters and setting values
On the MR-2000S, you can select parameters and set values by turning the dial and pressing the enter button. The item you've selected by turning the dial is indicated on the screen by the movement of the " " or
" " selection icon.
The " " selection icon indicates that an additional setting screen will appear when you press the enter button.
To select parameters and set values, you will turn the dial to move this selection icon or modify the value,
and then press the enter button to confirm. When you need to perform this sequence of operations on the
MR-2000S, we'll simply tell you to "select and confirm" the item you're setting.
Depending on the parameter, selecting and confirming an item may cause an additional setting screen to
appear, or it may cause a check mark to appear in a check box.
If you've adjusted a setting in an additional setting screen, you can press the exit button to return to the
previous screen.
Selection icon
8
Recording mode screen
Basic operation
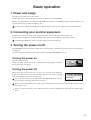
1. Power and usage
Plug the power cable into an AC outlet.
Connect the power cable to the AC connector on the back of the MR-2000S.
When you connect the power cable, the MR-2000S will enter the Off (Standby) status in approximately one
second, and the power LED will light-up red.
You must use only the included power cable. Using any other power cable may cause malfunctions.
2. Connecting your monitor equipment
Connect your monitor system to the output jacks. You can use either the XLR or RCA jacks.
Connect stereo headphones to the headphone jack. Use the phones knob to adjust the volume.
Connecting headphones will not cut the sound from the output jacks.
3. Turning the power on/off
The MR-2000S contains an internal hard drive, and should be considered a precision device comparable to
a computer.
You must observe the following procedure when turning the MR-2000S on or off.
Turning the power on
Press the power button.
The power LED will turn green, the opening screen will appear, and then
the home screen will appear.
Turning the power off
Hold down the power button for at least two seconds. The shutdown
screen will appear, the power will automatically turn off several seconds
later, and then the power LED will turn red.
If you disconnect the power cable before the MR-2000S turns off, you
may lose data or damage the internal circuitry.
Before you disconnect the power cable, make sure that the power LED is lit red and the screen has gone
blank (power off).
When you disconnect the power cable, the power will be completely off and the power LED will go
dark.
9
4. Playing back the demo project
The MR-2000S contains a high-quality demo project that was recorded in DFF (DSDIFF) format. Here's
how to play back this project.
When the MR-2000S is shipped from the factory, the clock source (→p.29) is set to Internal.
What is a project?
When you record on the MR-2000S, two files are created; an audio file and a project file (containing
protection data and markers, etc.). These two files are collectively called a "project," and they can be
used on the MR-2000S as if they were a single audio file. (→p.33 "Hard disk structure and files")
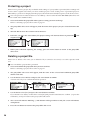
Playing back
Project Name
When you've turned on the power, make sure that the demo project name
is shown in the upper part of the level meter screen, and press the play/
pause button.
The demo project recorded on the MR-2000S will play back.
If something other than the demo project is shown, select the demo file as described in "Selecting the
project/file to play" (p.16).
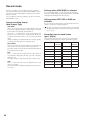
Quick-Play Function
After the Playback/Pause button is pressed, the MR-2000S restores the data and starts playback.
Therefore, a time lag occurs from when the button is pressed until when the playback begins.
To start the playback in exact timing with other devices, use the Quick-Play function.
Pressing the Playback/Pause button with the Stop button pressed during stopping will temporarily
stop the status indication of the recorder in the home screen and the Play LED will blink.
After that, pressing the Playback/Pause button will immediately start playback from the beginning
of the project/file.
Paused indication
Stopped indication
While
holding
Pausing
During playback, press the play/pause button to pause at that location (the Play LED will blink). Press the
play/pause button once again to resume playback from that location.
Stopping playback
During playback, press the stop button.
If you then press the play/pause button, playback will start from the beginning of the selected project/file.
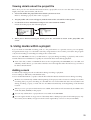
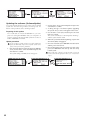
Searching for a desired location during playback
If you hold down the rewind button during playback, the Playback Location Indicator will move toward
the beginning of the project/file, and playback will resume from the location where you released the button. If you hold down the fast-forward button, the Playback Location Indicator will move toward the end
of the project/file, and playback will resume from that location when you release the button.
If you hold down the rewind or fast-forward button while stopped or paused, the location will continue
moving while you hold down the button, and will stop/pause at that location when you release the button.
If you assign marks to a project, you'll be able to move quickly to a specified point (→p.21).
10
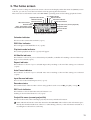
5. The home screen
When you turn on the power, the home screen is shown in the display. When the menu list (MENU) screen
is shown, you can also access the level meter screen by pressing the menu button.
This screen shows information such as the MR-2000S's operating status and recording/playback format.
All / Shuffle indicator
Playback mode indicator
REC Lock indicator
Repeat indicator
DSD filter indicator
Calendar indicator
Auto Pause indicator
Input Source indicator
Recorder status
Project/file name (current project/file)
Order / total number in folder
Record/edit calendar indicator
Project/file format
Protect indicator
Counter
Project/file playback location indicator
Calendar indicator
This shows the current date and time (→p.18).
DSD filter indicator
This will appear if the DSD filter is on (→p.30).
Playback mode indicator
The current playback mode icon (→p.25) will appear.
All/Shuffle indicator
This indicator is shown if you've selected Play All, Shuffle, or Shuffle All. Nothing is shown if these settings are not selected (→p.25).
Repeat indicator
This indicator is shown if you've selected Repeat Play. Nothing is shown if this setting is not selected
(→p.25).
Auto Pause indicator
This indicator is shown if you've selected Auto Pause. Nothing is shown if this setting is not selected
(→p.25).
Input Source indicator
The icon shows the selected input source (→p.13).
Recorder status
The current status of the recorder is shown using symbols such as record (●), play (®), or stop (■).
REC Lock indicator
This indicator is shown if the Record Lock function is on.
Nothing is shown if this function is off (→p.15).
Project/file name (current project/file)
This shows the name of the selected project/file, the artist, and title information.
Artist and title information cannot be entered on the MR-2000S. This will show the information specified by the included AudioGate software or other editing software, or the information entered on a
recording device that allows such entry.
11
Order / total number in folder
This shows the order of the projects/files within the specified folder, as well as the total number of
projects/files in that folder.
Project/file format
This shows the format of the selected project/file (→p.28).
Record/edit calendar indicator
This shows the date and time at which the selected project/file was recorded or most recently edited
(→p.18).
Protect indicator
A lock symbol is shown if the selected project is protected. Nothing is shown if the protect setting is off
(→p.20).
Counter
The counter shows either the current location (as elapsed time since the beginning of the recording), or
the remaining amount of time that can be recorded (→p.17).
Project/file playback location indicator
This is a graphical indication of the approximate position of the current counter value compared to the
overall length of the current project/file.
6. Recording
If you set the MR-2000S's date and time (→p.17), the correct date and time will automatically be
assigned to each project and date folder. However if you leave the power cable disconnected, the internal clock will stop operating after approximately one week. If you've left the power cable disconnected
for an extended period of time, you should set the date and time again after reconnecting the power
cable.
For convenient management of projects, the MR-2000S automatically creates a date folder for each day that
you record. Each time you record, a folder called a "project" will be created, containing an audio file and
another file containing the settings for that audio file. A name will be automatically assigned to the project
folder (→p.34).
MR PROJECT (Folder)
2008-07-25 (Folder)
2008-08-19 (Folder)
2008-08-20 (Folder)
Automatically created
each day you record
WAV-0002 (Project folder)
WAV-0001 (Project folder)
DFF-0002 (Project folder)
DFF-0001 (Project folder)
You are free to edit this name after recording (→p.19).
On the MR-2000S, each of these project folders is handled in the same way as an audio file.
12
Selecting the input source
Here's how to select the input source that you want to use. The audio signal from the input jack that you
specify here will be the audio that is input during record-ready mode or while recording.
With the factory settings, the clock source (→p.29) is set to Internal.
An error will occur if you attempt to record in 1-bit format while S/P DIF is selected.
1. Press the menu button, use the dial to select "SYSTEM" from the menu list, and press the enter button to confirm.
The SYSTEM setting screen will appear.
2. In the SYSTEM setting screen, use the dial to select "Input Source" and then press the enter button
to confirm.
The Input Source setting screen will appear.
Selection icon
System setting screen
3. Use the dial to select the desired input source, and press the enter button to confirm.
There will be a check mark in the check box for the input jack you've selected and confirmed.
XLR: Balanced analog input
RCA: Unbalanced analog input
S/P DIF: Digital input
If you select S/P DIF, the clock source (→p.29) will switch to S/P DIF in record-ready mode and
during recording regardless of the setting that you specify here, and the clock source indicator will
also switch to S/P DIF. However, the clock source that you specified will be preserved, and will
return to that specified setting when the MR-2000S is stopped or playing.
Input source screen
4.
When you've finished setting the recording mode, press the exit button to return to the menu list
screen, and then press the menu button to return to the home screen.
Selecting the recording format
Here's how to select the recording format. Each time you record, a new project will be created in the recording format that you've selected.
The default setting is DFF, 5.6 MHz.
1. Press the menu button, use the dial to select "REC MODE" from the menu list, and press the enter
button to confirm.
Mode (REC MODE) setting screen will appear.
Recording mode screen
13
2. Use the dial to select the Project Type, and press the enter button to confirm.
A check mark will appear in the check box for the project type you selected and confirmed.
You can choose from WAV (BWF), DFF, DSF, and WSD. For details on each type, please refer to "Project
recording format (New Project Type)" (p.28).
If you've selected DFF, WSD, DSF
If you've selected WAV
or
3. If you checked WAV (BWF), use the dial to select the desired Wav Format: fs/bit setting (bit depth
and sampling frequency), and press the enter button confirm.
If you check DFF, DSF, or WSD, use the dial to select the sampling frequency in the 1-bit DSD Format:
Fs setting, and press the enter button to confirm.
4. When you've finished setting, press the exit button to return to the menu list screen, and then press
the menu button once again to return to the home screen.
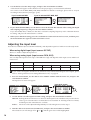
Adjusting the input level
Press the record button (the record LED will blink), and adjust the input level while in record-ready mode.
When using digital input (input source: S/P DIF)
There's no need to adjust the input level.
When using analog input (input source: RCA, XLR)
You can adjust the input level in steps of 0.25 dB. The range will depend on the input source and the reference level.
Input source
Reference level
Setting range (dB)
RCA
XLR
No setting
– 12 dB
– 14 dB
– 16 dB
– 18 dB
– 20 dB
– 60...21
– 60...19
– 60...21
– 60...23
– 60...25
– 60...27
If you want to change the nominal level (reference level) of the balanced inputs and outputs, please
refer to "Analog reference level setting (Reference Level)" on page 29.
1. Press the menu button, use the dial to select "INPUT LEVEL" from the menu list, and press the
enter button to confirm.
The Input Level screen will appear.
Input level screen
2. Use the dial to select the input level link setting, and press the enter button to confirm.
LR Link: Turning the dial will increase or decrease both input levels simultaneously. Use the dial to
select a gain value that does not make the level exceed the "0" marking in the level meter,
and then press the enter button to confirm.
Indivi.: The level can be adjusted independently for left and right. Proceed to step 3.
3. Turn the dial to select InL Gain (or InR Gain), and press the enter button to confirm.
The selection icon will change from " " to " ", and the gain value will be highlighted.
14
4. Use the dial to select the desired gain value, and press the enter button to confirm.
The selection icon will change from " " to " ". Perform these steps for the left and right channels.
Adjust the level so that the signal does not exceed the "0" marking.
When you've finished setting the input volume, press the exit button to return to the menu list screen,
and then press the menu button once again to return to the home screen.
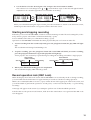
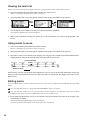
Starting and stopping recording
Each time you record on the MR-2000S, a folder is created containing an audio file and a settings file, collectively called a "project." The folder is named automatically (→p.34).
You can edit this name after you've finished recording (→p.19).
Operations on the MR-2000S will handle the entire project folder just as if it were an audio file.
1. To start recording from the record-ready mode, press the play/pause button (the play LED will lightup).
The record LED will change from blinking to lit.
2. To pause recording, press the play/pause button (the record LED will blink); to resume recording,
press the play/pause button once again (the play LED will light-up).
A new project is not created if you pause during recording; the recording will still be a single project.
Stop and then
resume recording
Start recording
Project 1
Stop recording
Pause and then
resume recording
Start recording
Project 2
Stop recording
Project 1
3. When you're finished recording, press the stop button.
The record LED and play LED will both go dark.
Record operation lock (REC Lock)
When the display shows the home screen and the MR-2000S is in record-ready mode or during recording,
you can hold down the enter button for approximately 2 seconds to lock the recording operations.
When lock is enabled, the REC Lock icon (→p.11) will be shown in the upper part of the home screen, and
you will be unable to perform the operations "record-pause," "cancel record-ready mode," or "pause during
recording."
A message will appear in the screen if you attempt to perform one of these disabled operations.
To defeat the record operation lock function, hold down the enter button once again until the REC Lock
icon disappears.
15
7. Other playback/editing operations
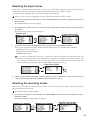
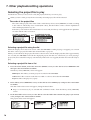
Selecting the project/file to play
Use the dial to select (or choose from a list) the project/file that you want to play.
When you turn on the power, the most recently selected project/file will be selected.
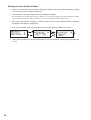
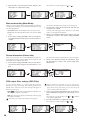
The order of the project/files
The order of the projects/files in the folder on the library select screen (LIBRARY) is listed according
to the order in which they were created (FAT order), but the folders can be sorted in alphabetical
order and displayed that way also.
Each time you hold down the menu button for 2 seconds, the library will toggle between alphabetical order and the order of creation.
In alphabetical order
In order of creation
Hold
down
Selecting a project/file using the dial
When the display shows the home screen while the MR-2000S is either playing or stopped, you can turn
the dial to select a project/file within the selected folder or play list.
When you turn the dial, the project/file name at that location will be displayed; then after approximately
two seconds, the MR-2000S will load the displayed project/file that was selected. If you were playing a
project/file, the loaded file will play automatically. If the unit was stopped, then the file will load ready to
play.
Selecting a project/file from a list
1. Press the menu button, and in the menu list (MENU) screen, use the dial to select "LIBRARY" and
then press the enter button to confirm.
The library select (LIBRARY) screen will appear.
MR Project: This library contains projects recorded on the MR-2000S.
Audio: This folder contains audio files recorded on a device other than the MR-2000S.
Play List: This is the play list (→p.25).
2. In the library select (LIBRARY) screen, use the dial to select "MR Project," and press the enter button
to confirm.
The date folder select screen will appear, listing the date folders.
Step 3 is not necessary if you selected and confirmed "Audio" from the library select (LIBRARY)
screen.
3. In the date folder select screen, use the dial to select the folder that contains the project you want to
select, and press the enter button to confirm.
The project select screen will appear.
16
4. In the project select screen, use the dial to select a project, and press the enter button to confirm.
The home screen showing the newly selected project name will appear.
When the display shows the home screen, you can use a shortcut to access the selection screen for the
selected project/file (step 4); simply hold down the menu button for about 2 seconds.
Selecting a project/file to edit
Editing the selected project/file
When the display shows the home screen, hold down the enter button for about 2 seconds to access the
project/file edit screen.
Editing a different project/file
1. Perform steps 1–3 in "Selecting a project/file from a list" on page 16.
2.
In the project/file select screen, use the dial to select the project/file that you want to edit, and hold
down the enter button for about 2 seconds.
The edit screen for the selected project/file will appear.
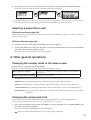
8. Other general operations
Changing the counter mode in the home screen
From the home screen, press the display button.
Each time you press the button, the counter mode will change as follows.
While playing or stopped
No indication → REMAIN → TOTAL ∏ TOTAL REMAIN → REC REMAIN →
No indication → ...
While record-ready or recording
No indication ↔ REC REMAIN
No indication: The absolute time will be displayed, with the beginning of the current project/file as 0.
REMAIN: The remaining playback time of the current project/file will be displayed.
TOTAL: The elapsed time of all projects/files in the current folder or play list will be displayed.
TOTAL REMAIN: The remaining playback time of the current folder or play list will be displayed.
REC REMAIN: The remaining time that can be recorded in the format of the current project will be
displayed.
Changing the meter peak hold
The peak value of the meter and the hold time for the PEAK indication can be set independently.
You can specify a hold time of 0, 0.5, 1, 2, 3, 4, or 10 seconds, or ∞ (stay lit).
1. Press the menu button; in the menu list (MENU) screen use the dial to select "PEAK HOLD" and
press the enter button to confirm.
The peak hold setting (PEAK HOLD) screen will appear.
If the level meter's PEAK indication is lit, it will go dark at this time.
17
Alternatively, you can press the menu button, and use the dial to select "PEAK HOLD" in the menu list
(MENU) screen, and then press the enter button to confirm.
2. Turn the dial to select "Meter," and press the enter button to confirm.
The selection icon will change from " " to " ," and the hold time will be highlighted.
3. Use the dial to select the desired hold time, and press the enter button to confirm.
The selection icon will change from " " to " ."
4. Use the dial to select "Peak LED," and press the enter button to confirm.
The selection icon will change from " " to " ."
5. Use the dial to select the desired hold time, and press the enter button to confirm.
The selection icon will change from " " to " ."
6. When you've finished making settings, press the exit button to return to the home screen.
Setting the date and time
Here's how to set the internal clock.
1. Press the menu button; in the menu list (MENU) screen use the dial to select "SYSTEM" and press
the enter button to confirm.
The system setting (SYSTEM) screen will appear.
2. Use the dial to select the date and time indication in the top line, and press the enter button to confirm.
The date and time setting (Calendar) screen will appear.
3. Use the dial to select "Year," and press the enter button to confirm.
The selection icon will change from " " to " ."
4. Use the dial to specify the correct year, and press the enter button to confirm.
The selection icon will change from " " to " ."
5. In the same way, select, set, and confirm the "Month," "Day," "Hour," "Minute," and "Sec."
18
6. When you've finished making settings, use the dial to select "Set" and press the enter button to confirm.
You will return to the system setting (SYSTEM) screen.
If the power cable is left disconnected, the internal clock will stop operating after approximately one
week. If you've left the power cable disconnected for an extended period of time, you'll need to make
the date and time settings again after reconnecting the power cable.
The time will continue to stay while you’re setting it.
Editing the project/file name
You can specify a name of up to sixteen characters, using uppercase alphabetical characters A–Z, lowercase
alphabetical characters a–z, numerals 0–9, and the following symbols.
! # $%& ' ( ) + , - ; = [ ] ^ _ ` { } ~
You can't edit the name of a project that's protected.
1. Select and confirm the project/file that you want to rename.
Refer to "Selecting a project/file to edit" on page 17.
2. The project/file edit screen will appear, with the selected project/file name shown at the top.
Hold
down
3. Use the dial to select "Rename" and press the enter button to confirm.
The name editing screen will appear.
√] or [®
®] to move to the position of the character you want to edit (highlighted), and use the
4. Use [√
enter button to confirm.
5. The character will be selected and highlighted. Use the dial to select the desired character, and press
the enter button to confirm.
[DEL]: Deletes the currently highlighted character and moves the subsequent characters toward the left.
[INS]: Inserts a space at the highlighted location.
[A/a]: Switches between uppercase letters, lowercase letters, and symbols.
Repeat these steps to edit the name.
6. When you've finished making settings, use the dial to select (highlight) [OK]. Then press the enter
button to confirm and return to the file edit selection screen.
If you use the dial to select (highlight) [CANCEL] and then press the enter button or exit button to
return to the project/file edit select screen, the rename operation will be cancelled.
19
Protecting a project
Here's how to protect a project. If you edit the mark settings of a project that is protected, these settings will
revert to their original state when you select another project or turn off the power. A protected project is
indicated by a protect icon displayed in the project/file information field (the top line) of the home screen.
You can't protect an audio file that was recorded by a device other than the MR-2000S (these files will
be located in the AUDIO folder).
1. Select and confirm the project/file whose protect setting you want to change.
Refer to "Selecting a project/file to edit" on page 17.
2. The project/file edit screen will appear, with the name of the project you just selected shown at the
top.
3. Turn the dial to move the selection icon to "Protect."
4. Each time you press the enter button, the project setting will alternate between protected (
un-protected (
).
) and
5. When you've finished adjusting the settings, press the menu button to return to the project/file
edit screen.
Deleting a project/file
Here's how to delete a file. Once you’ve deleted a file, it cannot be recovered, so use this operation with
care.
You can't delete a project that's protected.
1. Select and confirm the project/file that you want to delete.
Refer to "Selecting a project/file to edit" on page 17.
2. The project/file edit screen will appear, with the name of the selected and confirmed project/file
shown at the time.
3. Use the dial to select "Delete" and press the enter button to confirm.
A screen will ask you to confirm the Delete operation.
4. Use the dial to select [Yes] and press the enter button to confirm.
If you decide not to delete, use the dial to select [No] and press the enter button to confirm. (or press the
exit button), and you'll return to the project/file edit screen.
5. The screen will indicate "Working...", and deletion will begin. When it ends, the screen will indicate
"Completed."
6. Press the exit button to return to the project/file edit screen.
20
Viewing details about the project/file
Here's how you can view detailed information about a project/file. You can view the audio format, song
length, artist, title, date and time, and file size.
1. Select and confirm the project/file whose details you want to view.
Refer to "Selecting a project/file to edit" on page 17.
2. The project/file edit screen will appear, with the name of the selected file in the top line.
3. Use the dial to select "Information" and press the enter button to confirm.
Details about the project/file will be displayed.
4. When you've finished viewing the details, press the exit button to return to the project/file edit
screen.
9. Using marks within a project
If you've made an extended recording, such as a live performance or a practice session, you can quickly
navigate between songs or to a desired location by using markers to move while you listen to the program
or by fast-forwarding or rewinding according to the counter time.
However, the MR-2000S also lets you add marks to a project during recording or playback, and use the
rewind and fast-forward buttons to rapidly move between these marks during playback.
Even if the file (a WAV or DSDIFF file that can be recognized by the MR-2000S) was recorded and
edited by another device, you can still use marks to move through the audio file. However, you will not
be able to edit the marks.
Adding a mark
To add a mark, simply press the record button during recording or playback.
You can add up to 100 marks, and edit them later.
You can set the Mark Mode (→p.30) so that the file will be divided at marked locations during recording.
Markers are automatically added at the beginning of the project, and at locations at which you resume
recording after you pause recording. If a divided file was created when the data size exceeded 1 GB
during recording (→p.35), a mark will also be added automatically at the beginning of the divided
location.
When you save a project in which marks were added, the mark data will automatically be added to the
audio file (WAV, DSDIFF) in the project.
You can only add marks to a project that was recorded on the MR-2000S.
You can register marks in any position of the WAV, DEF or WSD project, but for the DSF project, only
the 11.6 ms (Fs=2.8 MHz) or larger size mark can be registered by a unit of 5.8 ms (Fs=5.6 MHz).
21
Viewing the mark list
Here's how to view the list showing the marks in a project in the order of their time location.
1. Select and confirm the project/file whose marks you want to view.
Refer to "Selecting a project/file to edit" on page 17.
2. The project/file edit screen will appear, with the name of the selected file in the top line.
Hold
down
3. Use the dial to select "Mark List" and press the enter button to confirm.
The mark list (Mark List) screen will appear.
4. When you've finished viewing the marks, press the exit button to return to the project/file edit
screen.
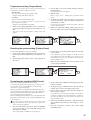
Using marks to move
1. Select and confirm a project/file that contains marks.
Refer to "Selecting a project/file to edit" on page 17.
2. The project/file edit screen will appear, with the name of the selected file in the top line.
3. Regardless of the screen shown in the display, you can press the rewind or fast-forward button during playback to move to the time location of the previous or next mark.
Press once
Current position
(time) Press once
Press once
Press once
Press once
Project
Mark
Mark
Mark
Mark
Mark
Order of times
Alternatively, you can use the dial in the Mark List screen to select the desired destination mark, and
then press the enter button to move there. When the move is completed, the display will return to the
home screen.
Editing marks
You can edit the time locations of the marks shown on the mark list (Mark List) and delete the unwanted
marks.
You can only edit marks of a project that the MR-2000S is able to recognize.
You can edit the marks even of a project whose Protect setting is on, but they will revert to their
unedited state when you select a different project or turn off the power.
1. In the mark list (Mark List) screen, use the dial to select the mark that you want to edit, and press the
enter button to confirm.
The mark edit select (Mark Edit) screen will appear.
To return to the mark list (Mark List) screen, press the exit button.
22
2. Use the dial to select the item that you want to edit, and press the enter button to confirm.
Changing the time locations of the marks
You can register marks in any position of the WAV, DFF or WSD project, but for the DSF project, only
the 11.6 ms (Fs=2.8 MHz) or larger size mark can be registered by a unit of 5.8 ms (Fs=5.6 MHz).
When the time locations are changed, each location is automatically set to the nearest position within
its specified region.
1. When you use the dial to select the time, the time location of the mark will be changed, and press
the enter button to confirm.
The selection icon will change from " " to " ".
2. The highlighted place will change each time you press the enter button.
By pressing the enter button when the last place is highlighted, you can exit from changing the time
location; to continue changing the time location, simply press the enter button again.
3. To change the digits of the highlighted place, turn the dial to specify the value and press the enter
button to confirm it.
Repeat these steps to specify the time location for the mark.
4. When you've finished adjusting these settings, press the exit button to return to the mark edit
select screen.
Deleting a mark (Delete Mark)
1. When you use the dial to select "Delete Mark" and press the enter button to confirm, a dialog
screen will ask you to confirm the deletion.
2. Use the dial to select [Yes] and press the enter button to confirm.
If you decide not to delete the mark, use the dial to select [No] and press the enter button to confirm
(or press the exit button), and you'll return to the mark edit select (Mark Edit) screen.
3. The screen will indicate "Working..." and the mark will be deleted. When deletion is finished, the
screen will indicate "Completed."
4. Press the exit button (or the enter button) to return to the mark list (Mark List) screen.
23
Deleting all marks (Delete All Mark)
1. When you use the dial to select "Delete All Mark" and press the enter button to confirm, a dialog
screen will ask you to confirm the deletion.
2. Use the dial to select [Yes] and press the enter button to confirm.
If you decide not to delete the marks, use the dial to select [No] and press the enter button to confirm
(or press the exit button), and you'll return to the mark edit select (Mark Edit) screen.
3. The screen will indicate "Working..." and the marks will be deleted. When deletion is finished,
the display will indicate "Completed."
4. Press the exit button (or the enter button) to return to the mark list (Mark List) screen.
5. Verify that all marks have been deleted, and press the exit button to return to the project/file edit
screen.
24
Other functions
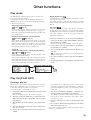
Play mode
The MR-2000S provides three play modes, as well as auto
pause and repeat play settings.
To select these modes, use "PLAY MODE" in the menu list
(MENU) screen. The icon for the selected settings will appear
in the home screen (p.11).
Single (play only one project/file):
(folder) /
(play list)
In this mode, only the single project/file you select will
play. (See "Selecting the project/file to play" on page 16)
When the selected file has finished playing, playback will
stop automatically.
Repeat (Repeat play):
Turn this "On" if you want playback to repeat; the icon will
appear in the home screen.
This setting is valid for all play modes. Playback according
to the selected mode will continue until you press the stop
button.
Auto Pause:
When this Auto Pause setting is "On," the icon will appear
in the home screen, and when each song finishes playing,
the MR-2000S will load the data of the next song and then
pause. This setting is valid for all of the play modes (All,
Shuffle All, and Repeat).
All (play all songs in folder / play the play list):
ALL (folder) /
ALL (play list)
In this mode, the projects/files in the folder (or play list)
that contains the selected project/file will be played in the
order in which it appears in the library select screen list.
When all projects/files in the folder (or play list) have finished playing, playback will stop automatically.
1. Press the menu button to access the menu list (MENU)
screen, use the dial to select "PLAY MODE," and press
the enter button to confirm.
The play mode select (PLAY MODE) screen will appear.
Shuffle All
(shuffle play within folder / shuffle play the play list):
3. If you want playback to repeat, turn the "Repeat" setting "On."
(folder) /
(play list)
If you select this option, the project/file playback order
will be shuffled (randomized).
When playback ends, the order will automatically be shuffled, and then playback will continue. If you press the stop
button and then press the play button, playback will continue from the beginning of the same project/file.
2. Use the dial to select the desired play mode, and press
the enter button to confirm.
"If "Auto Pause" is turned "On," the repeat playback setting will be ignored.
4. Press the exit button to return to the menu list (MENU)
screen.
5. Press the play button to start playback with the selected
mode.
Play list (PLAY LIST)
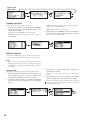
Creating a play list
Here's how to create a play list. By selecting "Play List" in the
library select (LIBRARY) screen, you can play projects/files
in the order of the play list that you create here.
You can store up to one hundred play lists.
If you decide not to add the project/file, use the dial to
select [No] and then press the enter button to confirm (or
press the exit button to cancel); you will return to the file
edit screen.
1. Select and confirm the project/file that you want to add
to the play list.
Refer to "Selecting a project/file to edit" on page 17.
6. The screen will indicate "Working...", and when processing is finished it will indicate "Completed."
The added project/file will be added to the end of the
play list. If you want to change the order, refer to "Editing a play list" (p.26).
2. The name of the project/file that you selected and confirmed will appear in the project/file edit screen displayed above.
3. Turn the dial to move the selection icon to "Add to Play
List."
4. Press the enter button; a message will ask "Add to Play
List: Are you sure?"
5. Use the dial to select [Yes] and press the enter button to
confirm.
7. Press the exit button to return to the project/file edit
screen.
8. If you want to add another project/file, press the menu
button and repeat steps 1–7.
You can also use this procedure to add a project/file to a play
list that you created earlier.
25
Project / file
edit screen
or
Viewing a play list
Here's how to view the contents of a play list.
1. Press the menu button, then in the menu list (MENU)
screen, use the dial to select "LIBRARY" and press the
enter button to confirm.
The library select (LIBRARY) screen will appear.
MR Project: This library contains projects recorded on
the MR-2000S.
Audio: This folder contains audio files recorded on a
device other than the MR-2000S.
Play List: This is the play list (→p.25).
2. In the library select (LIBRARY) screen, use the dial to
select "Play List," and press the enter button to confirm.
The play list screen will appear.
Editing a play list
In the play list (PLAY LIST) screen (see above), select the file
you want to edit and then select the item you want to edit.
Play
Here's how to select a project/file from the list, and start
playback. In the play list screen, press the play button to
start playback of the project/file indicated by the selection button.
Change Order
Here's how to change the order of a project/file in the list.
1. In the play list (PLAY LIST) screen, use the dial to select
the project/file whose order you want to change, and
hold down the enter button for about 2 seconds.
2. The name of the project/file you selected and confirmed
will appear in the project/file edit screen displayed
above.
26
3. Use the dial to select "Change Order," and press the
enter button to confirm.
The Move icon will appear in the play list (PLAY LIST)
screen.
4. Turn the dial to move the project/file to the desired
position, and then press the enter button to confirm.
The play list (PLAY LIST) screen will show the new order.
If you press the exit button before you confirm, you will return
to the play list edit screen.
Remove from List
Here's how to remove the selected project/file from the play
list.
This will not delete the project/file itself. If you later decide to
add the project/file to the play list, you can use the Add to Play
List operation to do so.
1. In the play list (PLAY LIST) screen, use the dial to select
the project/file that you want to delete, and hold down
the enter button for a time.
The name of the project/file you selected and confirmed
will appear in the project/file edit screen displayed
above.
2. Use the dial to select "Remove from List," and then
press the enter button to confirm.
A dialog message of "Remove from List. Are you sure?"
will appear in the screen.
3. Use the dial to select [Yes] and then press the enter button to confirm.
If you decide not to remove the project/file, use the dial
to select [No] and then press the enter button to confirm
(or press the exit button), and you will return to the play
list edit screen.
4. The screen will indicate "Working...", and will then
indicate "Completed" when the project/file has been
removed.
5. Press the exit button (or the enter button) to return to
the play list edit screen.
6. If you want to remove another project/file, press the
menu button and repeat steps 1–5.
Playlist
edit screen
or
Remove All
Here's how to remove all projects/files from the play list.
This will not delete the projects/files themselves.
1. In the play list (PLAY LIST) screen, use the dial to select
the project/file a volonte, and hold down the enter button for approximately 2 seconds.
The name of the project/file you selected and confirmed
will appear in the project/file edit screen displayed
above.
2. Use the dial to select "Remove All," and then press the
enter button to confirm.
A dialog message of "Remove from List. Are you sure?"
will appear in the screen.
3. Use the dial to select [Yes] and then press the enter button to confirm.
If you decide not to remove the project/file, use the dial
to select [No] and then press the enter button to confirm
(or press the exit button), and you will return to the play
list edit screen.
4. The screen will indicate "Working...", and will then
indicate "Completed" when the project/file has been
removed.
5. Press the exit button (or the enter button) to return to
the play list screen
A dialog message of "No File in List" will appear in the
screen.
6. Press the menu button to return to the home screen.
Playlist
edit screen
or
27
Record mode
Here you can adjust various settings related to recording.
Press the menu button, and in the menu list (MENU) screen,
use the dial to select "REC MODE" and then press the enter
button to confirm.
You can adjust the following settings from the record mode
(REC MODE) screen.
Project recording format
(New Project Type)
WAV (BWF)
This is an uncompressed linear PCM multi-bit audio file
format. The sampling frequency and bit-depth are selected
by the PCM Format settings described below.
The name is an abbreviation of Wave File Format (file
extension .wav). This format is compatible with the Broadcast Wave Format (file extension .wav) used for broadcast
audio.
A higher sampling rate and bit depth allows higher-quality
recording, but will require more hard disk space.
DFF (DSDIFF)
This is a 1-bit audio file format widely used in professional
audio devices for SACD (Super Audio CD) production.
The name stands for Direct Stream Digital Interchange File
Format (file extension .dff).
DSF
This is a 1-bit audio file format used in some "VAIO (A
Sound Reality deployment model)" personal computers
made by Sony.
The name stands for DSD Stream File (file extension .dsf).
WSD
This is a 1-bit audio file format as defined by the "1-bit
Audio Consortium."
The name stands for Wideband Single-bit Data (file extension .wsd).
28
Settings when WAV (BWF) is selected
If you select WAV (BWF), you can also select the sampling
frequency and bit depth. At sampling frequencies of 88.2 kHz
and higher, the bit depth will always be 24.
Settings when DFF, DSF, or WSD are
selected
If you've selected a 1-bit format, use the 1bit DSD Format: Fs
setting to specify the sampling frequency.
In order to synchronize with a digital audio device other than
the MR-2000S, both devices must be synchronized to the same
clock (→p.29).
Recording time for each format
(per 1 Gbyte)
The following table shows the approximate recording time
available in each format per 1 Gbyte of hard disk capacity.
WAV Format
Recordable time
1bit Format
Recordable time
44.1kHz/16bit
90 minutes
DFF 2.8MHz
22 minutes
44.1kHz/24bit
60 minutes
DFF 5.6MHz
11 minutes
48kHz/16bit
85 minutes
DSF 2.8MHz
22 minutes
48kHz/24bit
55 minutes
DSF 5.6MHz
11 minutes
88.2kHz/24bit
30 minutes
WSD 2.8MHz
22 minutes
96kHz/24biit
25 minutes
WSD 5.6MHz
11 minutes
176.4kHz/24bit
15 minutes
192kHz/24bit
13 minutes
System setting (SYSTEM)
Here you can adjust various system settings for the MR2000S itself.
Press the menu button to access the menu list (MENU)
screen, use the dial to select "SYSTEM," press the enter button
to confirm, and then adjust the settings as described here.
LCD Contrast
Here you can set the LCD contrast. Higher settings will make
the black portions of the display darker. Adjust the value for
best visibility.
To automatically revert the LCD contrast to the factory
default, press and hold the exit button for approximately 3 seconds while on the home screen, and the display will revert to
LCD contrast “8”.
The selection icon will change from " " to " ", and the
value will be highlighted.
2. Turn the dial, and the contrast will change along with
the value.
3. When you've adjusted the contrast for best visibility,
press the enter button to complete the setting.
The selection icon will change from " " to " ".
1. In the system setting (SYSTEM) screen, use the dial to
select "LCD Contrast," and then press the enter button
to confirm.
Synchronization clock setting (Clock Source)
Here you can make synchronization clock settings. The synchronization clock source is shown at all times by the clock
source indicator. If the clock source indicator is blinking during recording, this indicates that synchronization is not
achieved, or that an external clock of 44.1 kHz cannot be
detected when using DSD format.
INTERNAL: Operating with the internal clock
S/P DIF: Synchronize to the clock supplied to the S/P DIF
IN jack
WORD: Synchronize to the clock supplied to the WORD
CLOCK IN jack
If you choose "WORD" as the clock source when using 1-bit
format, you must input 44.1 kHz. The MR-2000S will not
operate correctly if anything other than 44.1 kHz is being
input.
If the input source (→p.13) is set to "S/P DIF," the clock
source will temporarily be changed to "S/P DIF" while in
record-ready mode and during recording, and this will be
shown by the clock source indicator. When recording ends, the
clock source will automatically return to its original setting.
1. In the system setting (SYSTEM) screen, use the dial to
select "Clock Source" and press the enter button to confirm.
The synchronization clock (Clock) setting screen will
appear.
2. Use the dial to select the desired clock source, and press
the enter button to confirm.
A check mark will appear in the check box for the clock
source you selected and confirmed.
3. When you've finished making settings, press the exit
button to return to the system setting (SYSTEM) screen.
Analog reference level setting (Reference Level)
Here you can specify the analog reference level in units of dB
below the digital clipping point.
You can set this in a range of five steps: – 12 dB, – 14 dB, – 16
dB, – 18 dB, and – 20 dB. To remind you of the setting, the
corresponding segment of the level meter will light to indicate the specified level.
This setting is ignored for the headphone jack and the unbalanced (RCA) jacks.
1.
In the system setting (SYSTEM) screen, use the dial to
select "REF.LEVEL" and press the enter button to confirm.
The selection icon will change from " " to " ," and the
value will be highlighted.
29
2. Turn the dial to select the desired value, and press the
enter button to complete the setting.
The selection icon will change from " " to " ."
Mark mode setting (Mark Mode)
Here you can specify the mark mode that will be used during
recording. This setting does not affect the marks that you register during playback.
New Mark: Marks will be added in the conventional way
Divide: The file will be divided where each mark is added
(→p.35)
1. In the system setting (SYSTEM) screen, use the dial to
select "Mark Mode" and then press the enter button to
confirm.
The mark mode (Mark List) setting screen will appear.
2. Use the dial to select the desired mode, and press the
enter button to confirm.
A check mark will appear in the check box for the mark
mode you selected and confirmed.
3. When you've finished adjusting the settings, press the
exit button to return to the system setting (SYSTEM)
screen.
Device information (Device Info)
Here you can view the version of the MR-2000S's system software, the total capacity of the hard disk, the free capacity, and
the number of recorded projects/files.
1. In the system setting (SYSTEM) screen, use the dial to
select "Device Info" and press the enter button to confirm.
The information (Device Information) screen will appear.
2. When you've finished viewing the information, press
the enter button to return to the system setting (SYSTEM) screen.
DSD output fillter settings (DSD Filter)
If you turn this setting on, a 1-bit project/file will pass
through the signal processing filter during playback. By
default, this is "ON". The icon for the settings will appear in
the home screen (p.11).
ON (
) :Playback will pass through the DSD filter (-3.0
dB at the pass frequency of 50 kHz).
OFF:The 1-bit signal will play back directly without going
through the DSD filter.
This setting can be made only while the unit is stopped.
30
Noise or extraneous sound may occur if you connect your
MR-2000S to a device that does not support wideband audio
input. Before turning this setting off, you must check the
owner's manual of the connected device.
1. In the system setting (SYSTEM) screen, use the dial to
select "DSD Filter" and press the enter button to confirm.
The selection icon will change from " " to " ", and the
value will be highlighted.
2. Press the enter button to complete the setting.
The selection icon will change from " " to " ".
Project name setting (Project Name)
Here's how to assign the name for the project folder that is
automatically created each time you record.
Default Name:
The name will be "file type (p.34)_0001--9999."
Examples: DFF_0001, WAV_0001, etc.
UserName:
The name will be UserName0001--9999.
You can use up to eight characters to specify this "UserName" portion as desired.
Examples: UserName0001, Select0002
1. In the system setting (SYSTEM) screen, use the dial to
select "Project Name" and press the enter button to confirm.
The project name (Project Name) setting screen will
appear.
2. Use the dial to select "User Name Setting," and press
the enter button.
The name edit screen will appear.
3. Edit the name.
Refer to steps 4–6 in
(p.19).
"Editing the project/file name"
4. To make the edited name the name for the project
folder, use the dial to select "User Name" and press the
enter button to confirm.
If you want to return this to the file type name, select and
confirm "Default Name."
5. When you've finished making settings, press the exit
button to return to the system setting (SYSTEM) screen.
Resetting the system setting (Factory Reset)
To return the MR-2000S to the factory settings.
1. In the system setting (SYSTEM) screen, use the dial to
select "Factory Reset" and press the enter button to confirm.
2. The message "Factory Reset. Are you sure?" appears in
the screen.
3. Use the dial to select [Yes] and then press the enter button to confirm.
If you decide not reset the settings, use the dial to select
[No] and then press the enter button to confirm (or press
the exit button to exit); you will return to the system setting (SYSTEM) screen.
4. When the reset is finished, the screen will return to the
system setting (SYSTEM).
Formatting the hard disk (HDD Format)
Here's how to format the MR-2000S's hard disk.
You should only perform this operation if you want to erase
all of the data saved on the hard disk, or if the message
"Drive Error." appears frequently.
When the hard disk is formatted, MR_PROJ other than the
system setting in the hard disk, the project / file and the LST0001.m3u in the AUDIO folder will completely be deleted
(p.33 "Hard disk structure and files").
Before formatting the hard disk, be sure to check the data and
back-up the necessary data (p.33 "Using the MR-2000S with
your computer").
If a power failure or similar accident occurs during formatting, the MR-2000S may become inoperable. If this occurs,
please contact Korg distributor.
1. Press the menu button, and in the menu list (MENU)
screen, use the dial to select "SYSTEM" and press the
enter button to confirm.
The system setting (SYSTEM) screen will appear.
2. Use the dial to select "HDD Format" and press the enter
button to confirm.
3. A dialog message of "HDD Format: All data will be
cleared. Are you sure?" will appear in the screen.
4. Use the dial to select [Yes], and continue holding it for
three seconds or longer.
If you decide not to format the hard disk, use the dial to
select [No] and then press the enter button to confirm (or
press the exit button); you will return to the system setting (SYSTEM) screen.
5. The screen will indicate "Working...", and when formatting is finished the indication will change to "Completed."
6. Press the exit button to return to the system setting
(SYSTEM) screen.
31
3 seconds
or longer.
Updating the software (SoftwareUpdate)
You can download the latest version of the software update
system files from the Korg website (www.korg.com). For
details on the procedure, refer to the Korg website.
Preparing for the update
Use a USB cable to connect the MR-2000S to your computer (see "Using the MR-2000S with your computer" on
page 33), and copy the downloaded system file to the root
folder of MR-2000S's hard disk.
Update procedure
If a power failure or similar accident occurs while updating the
system, the MR-2000S may become inoperable. If this occurs,
please contact your local Korg distributor.
1. Press the menu button, and in the menu list (MENU)
screen, use the dial to select "SYSTEM" and press the
enter button to confirm.
The system setting (SYSTEM) screen will appear.
32
2. Use the dial to select "SoftwareUpdate" and press the
enter button to confirm.
3. A dialog message of "Software Update: Upgrading
the system. Are you sure?" will appear in the screen.
4. Use the dial to select [Yes] and then press the enter
button to confirm.
The screen will indicate "SoftwareUpdate: Working..."
and the system will be loaded.
5. When the system has finished updating, "System will
shut down. [OK]" will apppear.
6. Press the enter button; the MR-2000S will shut down
and the power will turn off.
7. Press and hold down the power button to turn on the
power; the MR-2000S will start up with the newly
loaded system.
If the update fails, a message will appear. Make a note of the
contents, and take the appropriate action (p.37 "Various messages").
Using the MR-2000S with your computer
You can use the MR-2000S as a USB 2.0 mass storage class
device.
This lets you copy files from the MR-2000S to your computer,
or copy files (WAV, DSDIFF, etc.) from your computer into
the MR-2000S
There are limitations on the audio files that the MR-2000S can
recognize (p.33).
USB mode
In this mode, the MR-2000S will be detected by your computer as an external hard disk. The MR-2000S won't operate
as a recorder while it is in USB mode.
Don't disconnect the USB cable while a file is being transferred.
Exiting USB mode
1. To disconnect the MR-2000S from your computer:
Entering USB mode
1. Connect the MR-2000S to your computer.
Windows users (Windows 2000 or later)
Use a USB cable to connect the MR-2000S's USB connector to your computer's USB connector.
Make sure that the connector is oriented correctly, and
insert it all the way.
Press the menu button, and from the menu list
(MENU) screen, use the dial to select "USB MODE."
and press the enter button to confirm.
Macintosh users (Mac OS X 10.3.9 or later)
With the MR-2000S powered-off, connect the USB cable
to the Macintosh. Make sure that the connector is oriented correctly, and insert it all the way.
When you power-on the MR-2000S, it will automatically enter USB mode.
2. The USB mode (USB MODE) screen will appear.
While this screen is displayed, you must not disconnect
the USB cable or turn the power of your computer on or
off.
3. A drive named "MR-2000S" will be added to your
computer.
When you connect the MR-2000S to your computer for
the first time, the device driver will be installed automatically.
4. Save data on your computer.
When you open the "MR-2000S" that appeared on your
computer in step 3, the contents of the MR-2000S's hard
disk will be displayed.
Copy the desired data onto your computer. You can
also copy data from your computer into the MR2000S's hard disk.
Windows users (Windows 2000 or later)
Left-click the icon shown in the right side of your computer's taskbar.
In the menu that appears, left-click "Safely remove USB
mass storage device (drive name)."
Verify that a message indicating "You may safely
remove the USB mass storage device" is displayed. In
Windows
Macintosh users (Mac OS X 10.3.9 or later)
Drag the drive from the desktop into the "Trash," or
choose "Trash" from the "File" menu.
2. Press the enter button to return to the menu list
(MENU) screen
After returning to the menu list (MENU) screen, disconnect the USB cable.
Transferring files
The files you record on the MR-2000S are saved in
automatically-created date folders for each recording
format (WAV, DFF, DSF, WSD) within the MR_PROJ
folder. You can back-up your files by copying these
folders to your computer.
These folders contain the following two files.
• Audio data files (.wav/.dff/.dsf/.wsd): These files
contain the recorded audio
• Project data files (.prj): These files contain information such as project settings and marks
Do not change the names of these two files. Doing so
may make them unplayable on the MR-2000S.
To restore data that you previously backed-up, copy
the files into the folder for the appropriate recording
format.
If you want to transfer audio data (.mp3/.wav/.dff/
.dsf/.wsd) created on your computer or other device,
copy it into the AUDIO folder.
Hard disk structure and files
Supported audio files
Stereo files are used for all recording formats that can be
selected on the MR-2000S (p.28).
The following files are also supported for playback only.
• MP3 files of sampling frequency 44.1 kHz or 48 kHz,
at bit rates of 32–320 kbps.
33
Supported folders and file names
FAT32 file system format. Long file names are supported,
double-byte characters (e.g., Japanese) are not supported.
Folder/file structure
MR-2000S
MR_PROJ
(folder)
MRpm.sys
(file)
2008-07-04
(date folder)
DFF_0001
(folder)
2008-07-12
(date folder)
DFF_0001.prj
(project settings file)
DFF_0001_001.dff
(audio data file)
DFF_0002
(folder)
DFF_0002.prj
DFF_0002_001.dff
DFF_0002_002.dff
DFF_0002_003.dff
2008-08-01
(date folder)
PROJECTS
(folder)
PLAYLIST
(folder)
AUDIO
(folder)
WAV_0001
(folder)
AGProject1
(folder)
WAV_0001.prj
WAV_0001_001.wav
WAV_0002.prj
WAV_0002_001.wav
LST_0001.m3u (playlist file)
Euro2008 (folder)
Dance001.wav
orakesta.dff
Dance002.wav
Pianoman.dsf
zoozyeee.wav
MR_PROJ folder
This folder contains folders recorded on the MR-2000S,
organized by date.
Don't use your computer to delete or rename the
MR_PROJ folder. If you do so, the MR-2000S will no
longer recognize the files you created.
Date folders (year-month-date: e.g., 2008-07-04, etc.)
A maximum of approximately 400 project folders can
be created here, organized by date.
The MR-2000S is only able to edit recorded files that are
inside these folders.
Up to 400 date folders can be recognized. If there are
more than 400 project folders, they can be recognized by
connecting a computer in USB mode.
Up to 400 project folders can be recognized within a
date folder. If there are more than 400 project folders,
they can be recognized by connecting a computer in
USB mode.
The maximum number of project folders that can be created will be limited by the space remaining on the hard
disk.
Don't use your computer to delete or rename folders.
This may make it impossible to recognize the projects
you created.
Audio data you created on your computer or other
device will not be recognized if you place it in these
project folders.
The PROJECTS folder contains projects created by the
included "AudioGate" software, or projects that were
backed up to an external device.
MRpm.sys
This file contains settings used by the system. There
must be one and only one such file. Do not move or
delete it.
34
Never delete or rename this file.
DFF_0001 folder (project folder)
WAV _ 0 0 0 1
Format identification
symbol
WAV, DFF, DSF, WSD
Recording number
A number from 0001 to 9999
assigned automatically to
each recording in a format
folder, in sequential order
This folder is created for each project you record. The
numerical portion of the folder name will be incremented, starting with 0001. The first three alphabetical
characters will depend on the recording format.
If you choose User Name as the project name setting,
the "DFF_" portion can be freely changed, so the file
name will have the following structure.
USERNAME0001
Folder name
Specify up to
eight characters
as desired
Recording number
A number from 0001 to 9999
assigned automatically to
each recording in a format
folder, in sequential order
Operations on the MR-2000S apply to the project
recorded in this project folder. Renaming the project
will rename the project folder, and the name of the
project setting file within the folder will also be
renamed automatically.
If you use your computer to rename a project folder, you
must also use the same name for the project setting file
(***.prj) within that folder.
Files inside the DFF_0001 folder (project folder)
DFF_0001.prj (project settings file)
This is a file specific to the MR-2000S, containing information (protect setting, mark data, etc.) for each
recorded project. Only one file with this extension (.prj)
can exist in each project folder.
DFF_0001_001.dff (audio data file: dff)
These are stereo audio data files. The extension (.wav)
will depend on the recording format.
When the file is recorded, the file name and the extension will be as follows.
D F F _ 0 0 0 1 _ 0 0 1 . d f f Recording format
Project name
(This will not be
updated even if
you rename.)
extension
WAV(BWF)--DSDIFF-------DSF------------WSD------------
.wav
.dff
.dsf
.wsd
The file is divided (into a maximum of ninety
nine files), with this area being "1" if the
file size is 1 GB or less, and "1", "2" ... etc.
if the size is greater than 1 GB. Even if the
file size is less than 1 GB, the file will be divided
if you pause or store a "Divide" mark during recording.
If you choose User Name as the project name setting, the name
will be as follows.
Files in the USERNAME0001 folder
USERNEME0001.prj
USERNEME0001-001dff
PLAYLIST folder
This folder contains play list files.
LST_0001.m3u
This file contains a play list.
AUDIO folder
This folder is used to hold audio data that was created on
your computer or another device.
You cannot edit these files on the MR-2000S, but you can
add them to a play list and play them. You can create up to
four levels within a folder, but the MR-2000S is able to recognize only up to a total of four hundred folders and files
within this folder.
You must not rename this folder.
Only the supported audio files can be recognized.
Using the AudioGate software
The audio files of a project recorded on the MR-2000S can be
copied to your computer. Then you can use the "AudioGate"
audio format conversion application on the included CD to
convert the audio file format; as well as edit, divide, or join
audio files.
For details, install the software from the included CD and
refer to the AudioGate operating manual (PDF).
Installing AudioGate
Contents of the Install CD
The included Install CD contains the following items.
• "AudioGate" format conversion application
• AudioGate operating manual (PDF)
• Software license agreement (PDF)
Please read before use
• All copyrights to this software are the property of Korg
Inc..
• A license agreement for the software of this product is
included separately. You must read this software license
agreement before you install the software. Your installation of this software will be taken to indicate your
acceptance of this agreement.
Operating requirements
Windows
Supported operating systems
Microsoft Windows XP Home Edition/Professional
Edition Service Pack 1 or later, Microsoft Windows
Vista
Supported computers
CPU: Intel Pentium III /1 GHz or better
RAM: 256 MB or more
A USB port that meets the operating requirements of
Microsoft Windows XP/Vista
Mac OS X
Supported operating system
Mac OS X 10.3.9 or later
Supported computers
CPU: Apple G4/800 MHz or better, Intel Mac is supported
RAM: 256 MB or more
A USB port that meets the operating requirements of
Mac OS X
Windows users
In order to install or uninstall software in Windows, you must
have Administrator privileges. For details, consult your system
administrator.
1. Insert the included Install CD into the CD-ROM
drive of your computer.
Normally, the "AudioGate Application Installer" will
start up automatically.
If your computer is set so that the installer will not start
up automatically, double-click "KorgSetup.exe" in the
Install CD.
2. Follow the on-screen instructions to proceed with the
installation.
3. When you've finished installing AudioGate, exit the
installer.
Mac OS X users
1. Insert the included Install CD into the CD-ROM
drive of your computer.
2. In the Install CD, double-click the AudioGate
installer (.pkg) to start up the installer.
3. Follow the on-screen instructions to proceed with the
installation.
4. When you've finished installing AudioGate, exit the
installer
35
Appendix
Troubleshooting
Power does not turn on
• Is the power cable correctly connected?
• Is the power LED lit green?
→ If the power LED is lit red, the MR-2000S is in
standby mode. Press the power button to turn it on
(→p.9).
Nothing appears in the display
• Is the contrast adjusted correctly? (→p.29)
No sound
• Is the MR-2000S and the connected equipment powered-on? (→p.4)
Sampling frequency indicator blinks
• The sampling frequency of your playback or recording
device does not match the S/P DIF or word clock.
→ Match the sampling frequency. If you're using 1-bit
format, you must input 44.1 kHz.
Clock source indicator blinks
• The clock source is not set to "S/P DIF" or "WORD."
→ Set the clock source setting to match the input jack
you're using.
Can't record
• Does the input source match the input device? (→p.13)
• Are the amp or headphone connections incorrect?
• Are the input level lowered?
• Is the headphone volume set to "0"?
• Is there sufficient hard disk space remaining?
Can't hear the audio input
→ Set the counter display to "REC REMAIN" and check
the remaining time available for recording. (→p.17)
• Are the recording settings correct?
• Does the input source match the input device? (→p.13)
• Is the recording level raised?
• Make sure that audio is being input.
→ Verify that the level meters are moving.
Playback will not start immediately after selecting a song
The recording is interrupted
• Could the MR-2000S have been bumped while recording?
• Could the MR-2000S have been in a location subject to
continuous vibration (such as near a motor or a bass
amp) while recording?
• When you select a project/file located in a folder other
than the current project/file, the MR-2000S is designed
to calculate the total playback time of files in the folder,
and therefore may take some time before playback can
start.
To avoid this situation, we recommend that you store
the desired songs in a play list, or use your computer to
move the desired songs into the same folder.
USB
Your computer does not detect the MR-2000S
• Is the USB cable connected correctly? (→p.33)
→ Re-connect the cable.
Can't release the MR-2000S from your computer
• The procedure will depend on the operating system of
your computer. (→p.33)
36
When you connect the MR-2000S, you are asked
to install software or a device driver
• Does the MR-2000S support the version of the operating
system your computer is running? (→p.35)
Various messages
The message dialog box will disappear when you
press the enter button or the exit button.
Execution message
Completed
• The operation has been successfully completed.
Working...
• The operation is being carried out. Please wait until this
message disappears.
Error messages
Check Sum Error.
• The software update has failed.
→ Try the operation once again from the beginning. If
this message appears again, please contact your local
Korg distributor.
Disk too busy.
• Repeated actions of recording, writing, and deleting
will gradually decrease the amount of contiguous free
space on the hard disk, causing files to be saved in a
fragmented state during recording. This message will
appear when access to the drive has slowed down due
to such problems.
→ Back up your important files, format the hard disk,
and then restore your files back onto the hard disk.
Alternatively, delete unneeded files to increase the
amount of free space, and then connect the MR2000S to your computer in USB mode and optimize
the drive. It is effective to use software of a type that
optimizes the free space.
Play List Full.
• A maximum of 100 projects/files can be stored in a play
list.
Please enter name.
• There is no project name (the name consists only of
spaces).
→ Please enter a valid project name (one or more alpha-
betical character, numeral, or symbol).
Protected Project.
• The operation cannot be executed because the project is
protected.
→ Turn off the project protect setting.
Project Name Error. Delete illegal folder.
• An identically named project/file already exists.
→ Rename the project/file. Alternatively, use USB
mode to delete the project/file and the directory of
the same name.
Recorder Info: Canot record at 1-bit via S/P DIF.
• If the input source is S/P DIF, you can't record in 1-bit
format.
S/P DIF. Error: No Audio.
• An audio signal was detected when receiving S/P DIF.
→ Transmit an S/P DIF audio signal.
S/P DIF. Error: Non PCM.
• When receiving S/P DIF, a non-linear PCM audio signal
was detected.
→ Transmit a non-linear PCM audio S/P DIF signal.
Drive Error.
S/P DIF. Error: Parity.
• An error occurred while accessing the drive.
• A parity error occurred while receiving S/P DIF.
→ Use USB mode to connect the MR-2000S to your
computer and execute the Check Drive command.
If this error message appears even after you've executed Check Drive, format the drive.
Drive Full.
• There is insufficient remaining capacity on the drive.
→ Delete unneeded projects/files.
Failed to write System File.
• The system update has failed.
→ It is possible that the MR-2000S has malfunctioned.
Please contact your local Korg distributor.
Memory Full.
• You attempted to register more than 100 marks. No further marks can be registered.
→ Delete unneeded marks before registering other
marks.
Not supported file.
• This file format is not supported.
→ Check the audio file formats that are supported.
Operation is forbidden while recorder is runnning.
• This operation cannot be performed at this time.
→ Make sure that the external device is correctly con-
nected to the MR-2000S.
Make sure that the coaxial digital cable is not faulty.
S/P DIF Error: Unlock.
• Lock was lost when synchronized to S/P DIF.
→ Make sure that the external device is correctly con-
nected to the MR-2000S.
Make sure that the coaxial digital cable is not faulty.
S/P DIF Info: Sample Rate Changed.
• The sampling frequency was changed when synchronized to S/P DIF.
System File Error.
• The system file required for "SoftwareUpdate" does not
exist, or the length of the file does not match.
→ Check the system file and re-save it.
Warning: Rec Time Limit.
• The maximum continuous recording time is 6 hours. No
further continuous recording is possible.
Warning: Bad fragmentation. Should be optimized.
• This message will appear when you enter record-ready
mode if there is a possibility that the "Disk too busy."
error might occur during recording because of insufficient contiguous free space on the hard disk.
37
Normally, a minimum of ten minutes of contiguous free
space will be allocated if there is ten minutes or more
free capacity; if there is less than ten minutes of free
capacity, as much as exists will be allocated.
It is not necessarily the case that the "Disk too busy."
error will always occur if this warning appears, but we
recommend that you take the following actions.
→ Back up your important files, format the hard disk,
and then restore your files back onto the hard disk.
Alternatively, delete unneeded files to increase the
amount of free space, and then connect the MR2000S to your computer in USB mode and optimize
the drive. It is effective to use software of a type that
optimizes the free space.
Confirmation messages
Info: # # # # #
• This will appear if there is information to be conveyed
to the user.
→ Press the enter button or the exit button to continue
operations.
Warning: # # # # #
• This will appear when there is a warning for the user.
→ Press the enter button or exit button, and remove the
cause of the error.
Serious error messages
Word Error: Unlock.
Fatal: # # # # #
• Lock was lost when synchronized to S/P DIF.
• This will appear if the MR-2000S itself has a problem or
malfunction.
→ Make sure that the external device is correctly con-
nected to the MR-2000S.
Make sure that the coaxial digital cable is not faulty.
→ If this type of message appears, make a note of the
text in "# # # # #" and contact your local Korg distributor.
Word Info: Sample Rate Changed.
• The sampling frequency was changed when synchronized to S/P DIF.
Specifications
Operating conditions:+5 to +35 degrees Celsius or
41 to 95 degrees Fahrenheit
Main sections
: Maximum continuous recording 6 hours
Recorder section
Number of tracks : 2 tracks
: 2 tracks simultaneous playback/
2 tracks simultaneous recording
Recording formats: PCM audio format
BWF (extension .wav)
44.1 kHz @ 16/24 bit,
48 kHz @ 16/24 bit
88.2 kHz @ 24 bit, 96 kHz @ 24 bit
176.4 kHz @ 24 bit, 192 kHz @ 24 bit
Recording
38
Number
of projects
: Recognizes a maximum of
four hundred projects of each format
Mark points
: 100 points per project*No mark names
USB functionality : Connect to computer via USB 2.0,
usable as FAT32 USB external drive
Project editing
: Rename, Delete, Protect
General
Display
: 160 x 104 pixel, LCD with backlight
: 1-bit audio format
2.8 MHz @ 1-bit, 5.6 MHz @ 1-bit
DSDIFF format (extension .dff),
DSF (extension .dsf),
WSD (extension .wsd)
Level meter
: – 54 dB...+ 3 dB, L and R each provide
23-step LED + peak LED
Power supply
: AC100... 240 V
: Maximum approximately
120 hours at 44.1 kHz/16 bit –
approximately 14.5 hours at 5.6 MHz/
1- bit (for 80 Gbyte hard disk)
Dimensions/Weight:
482mm (W) x 220mm (D) x 45mm (H)
16.6" (W) x8.7" (D) x 1.8" (H)
2.8kg/6.2 lbs (Including protrusions)
Power consumption: 7 W
Main specifications
Frequency response:10 Hz ... 20 kHz ± 1 dB
@ Fs 44.1 kHz / 48 kHz
10 Hz ... 40 kHz ± 1 dB
@ Fs 88.2 kHz/96 kHz/
176.4 kHz/ 192 kHz
10 Hz ... 100 kHz (1-bit)
S/N
: 103 dB (typical) @ IHF-A
THD+N
: 0.005% (typical), 20 Hz ... 20 kHz
A/D conversion
: 2.8224 MHz/5.6448 MHz(1-bit),
24bit (PCM)
D/A conversion
: 2.8224 MHz/5.6448 MHz(1-bit),
24bit (PCM)
Nominal level
: + 4 dBu (REC LEVEL=0dB)
Maximum level
: + 24 dBu
: RCA (Unbalanced)
Input impedance : 50kΩ
Nominal level ( – 12 dBFS – 12 dB-SACD)
: – 6 dBV (REC LEVEL = 0 dB)
: + 10 dBV
LINE OUT L/R
XLR
: XLR-3-32 type (balanced)
Load impedance : 600 Ω or greater
Nominal level
Load impedance : 47 kΩ or greater/
Nominal level (– 12 dBFS – 12 dB-SACD)
: – 6 dBV
Connector
: 1/4" stereo phone jack
Load impedance : 16 Ω or greater
Maximum level
: 170 mW + 170 mW @ 32 Ω
S/P DIF IN/OUT (coaxial)
RCA
Connector
: RCA (Unbalanced)
PHONES
: XLR-3-31 type (balanced)
Input impedance : 22 kΩ
Maximum level
Connector
: + 6dBV
XLR
Connector
RCA
Maximum level (0 dBFS 0 dB-SACD)
LINE IN L/R
Connector
Maximum level (0dBFS 0dB-SACD)
: – 16 dBu (Nominal level= –12dBFS)
– 18 dBu (Nominal level= –14dBFS)
– 20 dBu (Nominal level= –16dBFS)
– 22 dBu (Nominal level= –18dBFS)
– 24 dBu (Nominal level= –20dBFS)
: + 4dBu
Connector
: RCA pin
Format
: IEC60958
WORD CLOCK IN/OUT
Connector
: BNC receptacle, 75 Ω
USB
Connector
: Type B
Format
: USB 2.0 compliant,
USB mass storage class
Supported operating systems:
Windows 2000, or later Mac OS X
10.3.9 or later
Included items:
AC power cable,
owner's manual (this document)
Install CD ("AudioGate" audio file
conversion application)
Demo Project
All Most Blues
The Wind and the Wheat performed by Phil Keaggy
copyright Phil Keaggy 2006
www.philkeaggy.com
* Appearance and specifications are subject to change without notice
39
Index
A
All 25
All/Shuffle indicator 11
Audio 16
Audio file 33
Audio folder 35
AudioGate 35
Auto pause 25
Auto pause indicator 11
C
Calendar 18
Calendar indicator 11
Clock 18
Clock source 29
Counter 12
Counter mode 17
Current project/file 11
D
Default name 31
Delete
all mark 24
mark 23
Delete project 20
Demo project 10, 39
Detail project 21
Details 21
Device information 30
DFF (DSDIFF) 28
DSD filter 30
DSD filter indicator 11
DSF 28
E
Edit calendar 12
F
Factory reset 31
Fast-forward 10
Feature 4
File name 34
Format 31
H
Hard disk structure 33
HDD format 31
Home screen 11
40
I
Input level 14
Input source 13
Input source indicator 11
L
LCD contrast 29
Location indicator 12
M
Mac OS X 35
Mark
add 21
delete 23
location 23
move 22
view 22
Mark mode 30
Message 37
MR project 16
O
Oorder of the project 16
Order number 12
Output fillter 30
P
Peak hold 17
Play list 25
Play list folder 35
Play mode 25
Playback mode indicator 11
Project 10
Project name setting 31
Project Type 28
Project/file format 12
Protect 20
Protect indicator 12
Q
Quick play 10
R
Rack case 6
REC lock 15
REC lock indicator 11
REC REMAIN 17
Record calendar 12
Record mode 28
Recorder status 11
Recording 12
Recording format 13, 28
Recording time 28
Reference level 29
Rename 19
Repeat 25
Repeat indicator 11
Reset 31
Rewind 10
S
Selecting the project 16
Shuffle 25
Single 25
Specification 38
Synchronization 29
System 29
T
TOTAL 17
Total number 12
TOTAL REMAIN 17
Troubleshooting 36
U
Update 32
USB mode 33
User name 31
W
WAV (BWF) 28
Windows 35
WSD 28
41
Owner’s Manual
This product has been manufactured according to strict specifications and voltage requirements
that are applicable in the country in which it is intended that this product should be used. If you
have purchased this product via the internet, through mail order, and/or via a telephone sale, you
must verify that this product is intended to be used in the country in which you reside.
WARNING: Use of this product in any country other than that for which it is intended could be
dangerous and could invalidate the manufacturer's or distributor's warranty.
Please also retain your receipt as proof of purchase otherwise your product may be disqualified
from the manufacturer's or distributor's warranty.
Owner’s Manual
IMPORTANT NOTICE TO CONSUMERS
E
4015-2 Yanokuchi, Inagi-city, Tokyo 206-0812 Japan
2008 KORG INC.
E
2009 AH Printed in Japan