1
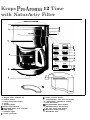
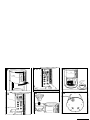
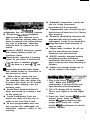
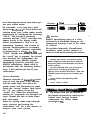
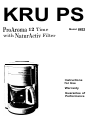
KRU PS
ProAroma 12 Time
with NaturActiv Filter
Model #453
Instructions
for Use
Warranty
Guarantee of
Performance
IMPORTANT SAFEGUARDS
When using electrical appliances, basic safety precautions should
always be followed to reduce the risk of fire, electric shock, and/or
injury to persons, including the following:
0 Read all instructions and information in this instruction book
and any ohter literature included in this carton referring to this
product before operating or using this appliance.
0 Do not touch hot surfaces. Use handles or knobs.
0 To protect against electric shock, do not immerse cord, plugs,
or appliance in water or other liquid.
0 Close supervision is necessary when any appliance is used by
or near children.
0 Unplug from outlet when not in use and before cleaning. Allow
to cool before putting on or taking off parts, and before
cleaning the appliance.
0 Do not operate any appliance with a damaged cord or plug or
after the appliance malfunctions, or has been damaged in any
manner. Return appliance to an authorized KRUPS Service
Center for examination, repair, or adjustment (see Guarantee
of Performance).
0 The use of an accessory not evaluated for use with this
appliance may cause injuries.
0 Do not use outdoors.
0 Do not let cord hang over edge of table or counter, or touch
hot surfaces.
0 Do not place on or near a hot gas or electric burner, or in a
heated oven.
0 To disconnect, turn appliance to “OFF”, then remove plug
from wall outlet.
0 Do not use appliance for other than intended use.
0 Snap lid securely onto glass carafe before serving beverages.
0 Appliance with Glass Carafe:
A.
The carafe is designed for use with these appliances. lt
must never be used on a range top.
B.
Do not set a hot carafe on a wet or cold surface. Thermal
shock may result from sudden changes in temperature.
C.
Do not use a cracked carafe or a carafe having a loose or
weakened handle.
D.
Do not clean carafe with cleansers, steel wool pads, or
other abrasive material, which will reduce the strength of
the glass.
SAVE THESE INSTRUCTIONS
SPECIAL CORD SET INSTRUCTIONS
Regarding your Cord Set:
A. A short power-supply cord is provided to reduce risks resulting
from becoming entangled in or tripping over a longer cord.
6. Longer extension cords may be used if care is exercised in their use.
C. If a long extension cord is used, (1) the marked electrical rating of
the extension cord should be at least as great as the electrical
rating of the appliance, (21 if the appliance is of the grounded type,
the extension cord should be a grounding-type 3-wire cord, and (3)
the longer cord should be arranged so that it will not drape over
the counter top or table top where it can be pulled on by children
or tripped over.
D. This appliance has a polarized plug (one blade is wider than the
other). To reduce the risk of electric shock, this plug is intended to
fit into a polarized outlet only one way. lf the plug does not fii fully
into the outlet, reverse the plug. lf it still does not fit, contact a
qualified electrician. Do not attempt to modify the plug in any
way.
CAUTION:
This appliance is for household use. Any servicing other than
cleaning and user maintenance should be performed by an
authorized KRUPS Service Center.
Do not immerse base in water or any other liquid.
To reduce the risk of fire or electric shock, do not remove the base.
No user service able parts inside. Repair should be done by
authorized service personnel only.
0 Check voltage to be sure that the voltage indicated on the name
plate agrees with your voltage.
0 Never use warm or hot water to fill the water container! Use
cold water only!
0 Never refill the water chamber while this KRUPS coffee maker is
in operation, in the “on” position. Turn the KRUPS coffee maker
off and let cool down for 10 minutes before refilling with water.
0 Before turning your KRUPS coffee maker on, please make sure
that:
1.
the filter is properly inserted into the swivel filter;
2.
the swivel filter is properly closed;
3.
the lid for the glass carafe is properly attached to the
glass carafe;
4.
the glass carafe sits flat on the inside circle of the
heating plate.
0 Keep your hands and the cord away from hot parts of the
appliance during operation .
0 Never clean with scouring powders or hard implements.
Krups ProAroma 12 Time
with NaturActiv Filter
a
-g
-h
i
b
\
i
!!!!a
d
-_:
F_
time
m
Ln
0
1
h
min.
d-P
on/off
auto1
! q
s
a: hinged water chamber lid
b: release button
c: swing away filter holder
d: carafe
e: warming plate
f: hidden cord storage
g: magnified water level indicator
h: LED display
i: indicator light
j: carafe prewarm
k: aroma selector button
I: programmable auto shut off button
m: temperature adjustment button
n: time set button
o: programmable timer button
p: ON/OFF button, set minutes
q: set auto on/set hour button
r: NaturActiv Filter housing
s: NaturActiv filter
I
\
/
r8
19
I i -
>
n Adjustable temperature control lets
you set coffee keep-warm
temperature in 6 increments.
Your new KRUPS “ProAroma 12 Time”
coffeemaker has the following features:
n Exclusive “NaurActiv” vegetable
based cocoa filter removes up to
82% of unwanted chlorine taste from
water for smooth rich coffee without
any hint of bitterness. Important
minerals such as calcium are left
behind.
W Exclusive KRUPS deep-brew system
with special filtering action for
maximum flavor.
w Electronically controlled 3 brewing
cycles let you select a full-flavored
1-3 cup brew, a medium strength
4-12 cup brew or a strong 412 cup
brew.
w Swing away two-part filter holder
with release button is convenient to
use and easy to clean.
n “Stop’n Serve” feature lets you
serve a cup or two while brewing.
The automatic filter seal allows you
to remove the carafe for 20 seconds
without coffee dripping onto the
warming plate.
n Aroma Savor System lid locks in
flavor and aroma by creating a seal
on the carafe lid.
n Carafe Pre-Warming Cycle prewarms the carafe so every cup of
coffee is hot, from first to last.
n 24 hour programmable timer lets
you program the coffeemaker for
convenient “wake-up” coffee in the
morning.
n Programmable auto shut-off lets you
select shut-off time from 1 to 5 hours
after brewing.
n Electronic decalcifying detection will
automatically alert you when the
coffeemaker needs to be decalcified.
w Magnified water level indicator is
easy to read.
n Hinged water container lid will not
get lost and will protect water
container from dust and dirt.
n KRUPS specially designed heating
and tubing system minimizes
calcification and leaves no residual
water in the system when brewing is
finished.
n Hidden cord storage allows you to
set the desired cord length.
1. Plug in the Krups “ProAroma 12
Time”. Make sure that the
coffeemaker is turned off (the red
light should not be illuminated).
2. The LCD display will be flashing.
This is your signal to set the digital
clock.
3. Press the “time” button s InI on the
selector panel. Press the “auto”
button * (q) and advance to the
proper hour. Press the “on/off”
button 9 (~1 and advance to set the
precise minutes.
7
The AM or PM indicator will be
illuminated and should you pass the
time you wish to set, just hold in the
“auto” button G (q) until desired
time is reached.
4. To lock in the time, simply press the
“time” button fi (n) again (Note:
the time will automatically set in
after 4 seconds). The flashing dots in
the LCD display will confirm that the
time has been properly set.
ingcoffee
Before making your first pot of
delicious coffee, we recommend
operating the coffee maker once or
twice with water only, without ground
coffee or a paper filter to remove any
possible dust.
Be sure that the water container is
empty. Remove literature, etc. if
inserted in the water container.
The lid of the glass carafe must be
properly positioned during the brewing
process. Position the lid over the carafe
and snap the rectangular piece onto
the handle. The lid is then locked in
place.
Make sure that the swing away filter (c)
is properly closed during the brewing
process. When closing the swivel filter
you will feel a noticeable resistance
between the swivel filter and the base.
Push in firmly until you hear the filter
“click” into place.
Caution: If the swivel filter is not
completely closed, the “Stop’n Serve”
trigger will not function properly,
8
which may cause hot water or hot
coffee to overflow.
The “Stop’n Serve” mechanism is
opened as long as the glass carafe is
inserted into the machine and sits
properly on the warming plate and the
swivel filter is properly closed.
ng the Water Chamber
W Open the hinged lid (see figure 3).
W Pour in the desired quantity of water
(see figure 5).
n The water level indicator shows you
how much water you are filling into
the container (see figure 61.
The amount of freshly brewed coffee
delivered after the brewing process will
always be slightly less than the amount
put into the water container. This is
due to the minimal absorption of the
water by the ground coffee. Therefore,
put in a little more water to begin with
so that you will have the number of
cups you desire.
Replace the carafe on the warming
plate with the glass carafe lid in
position.
Inserting/Changing the
“NaturActiv’
Fikr
j
To insert or change the “NaturActiv”
filter, remove the plastic filter housing
(r) from inside the water chamber.
n Remove the bottom portion of the
housing (see figure 1).
’
Remove and discard the old filter.
I Insert a new filter by dropping it into
the bottom housing piece. Snap back
into filter housing (see figure 21.
I Replace housing unit back into the
water chamber (see figure 41.
Each filter will last approximately 40
cycles.
Note: Replacement filters can be
purchased by calling KRUPS Consumer
Service Department I-800-526-5377.
n Close the swivel filter and make sure
that it is completely closed
(see figure 10).
A
Attention!
Make sure that the filter paper does not
tip over when closing the swivel filter,
or else the water might run between
the filter paper and the filter holder
producing a very weak cup of coffee.
Am
n To open the swing away filter holder,
move the release button (b) to the
right to swing the filter out
(see figure 7).
H Insert a paper filter (we recommend
KRUPS size 4) with the seam
pointing towards the handle of the
filter holder (see figure 8).
Instead of filter paper you can also use
the KRUPS goldtone filter (model
#053). (When ordering filter paper or
the goldtone filter from KRUPS be sure
to indicate that they are for model
#453).
n Put ground coffee into the paper
filter (see figure 9).
We suggest using one level KRUPS
measuring spoon of ground coffee for
each cup of robust brewed coffee.
or EMton
The “aroma” button provides you
complete control over brewing
strength and brewing cycles, to suit
you personal taste.
Press the “aroma” button G (k). The
current aroma setting will appear in the
LCD display. Press the “aroma” button
(k) again to display the next aroma
selection, and so on.
There are three selections from which
to choose:
Display
aroma
[p,oJ
for 4-12 cups of
coffee; delivers
a medium and
more mellow
flavor
After using your KRUPS coffee maker
several times you can adjust the
measure to suit your own taste.
9
Display
aroma
aroma
for 4-12 cups of
coffee; delivers
a stronger,
more
stimulating
coffee, with a
powerful
aroma
for 1-3 cups of
coffee; full
flavor and
aroma
Approximately 4 seconds after you
have made your aroma selection, the
time will reappear in the display
window. Please note that the lastselected aroma setting will remain in
memory until manually changed to a
different selection.
U To begin the brewing process, press
the “ON/OFF” button * (~1. The
indicator light will illuminate,
indicating the brewing process has
begun (see figure 11).
;_
:.
This feature allows you to pre-warm
the carafe before the brewing process
begins. Follow the steps in “Filling the
Water Chamber” and “Putting in the
Ground Coffee”.
To start the process, select the coffee
strength you desire using the “aroma”
button ZTr (k). Within 6 seconds, press
10
the carafe pre-warm button f (il. The
display will say “on”. Press the 5
button (p). The indicator light will flash,
indicating that you have chosen to prewarm the carafe. Pre-heating takes
approximately 5 minutes, after which
the brewing process will automatically
begin. Once the carafe is pre-heated,
the indicator light will stop flashing,
but remain solid red.
A Note!
Once you press the carafe pre-warm
button, the function is stored in
memory. The next time you make
coffee, the carafe will automatically be
pre-warmed.
The function can be cancelled by
pressing the carafe pre-warm button
during the pre-warm stage. The light
will then remain solid red. Carafe prewarming is automatically cancelled in
the event of a power shortage or
removal of plug.
When the brewing cycle is complete,
the last drop to leave the filter seals the
opening within the lid of the carafe.
When pouring, the stream of coffee
forms a seal on the carafe lid so the
remaining coffee is in an airtight
container. This reduces evaporation
and heat loss, and protects the aroma
and freshness of the coffee.
The “Stop’n Serve” feature~is~l&UPS’
answer to the impatient coffee
drinker’s clamor for “a quick cup of
coffee!” This device automatically
stops the flow of brewed coffee
through the filter cone if the glass
carafe is removed from the warming
plate during the brewing cycle. You
have about 20 seconds between the
removal of the carafe and its being
reinserted to allow the serving of one
or two cups of coffee.
The “Stop’n Serve” device closes off
the filter cone so effectively that there
is virtually no coffee-drip onto the
warming plate (one drop, at most!).
Once the carafe is replaced, the
brewing cycle and the flow of the
coffee into the carafe are resumed.
A Caution
If the coffee does drip onto the
warming plate after removal of the
carafe, it is usually an indication that
the small seal in the filter holder is
missing or defective. It is also possible
that too much ground coffee has been
placed into the paper filter. This causes
the water that jets into the filter cone to
overflow between the paper filter and
the sides of the filter cone.
This overflow carries coffee grounds
with it that interfere with the snap-shot
action of the filter holder, thus allowing
brewed coffee to continue to drip
through.
If this blockage and subsequent
dripping do occur, replace the glass
carafe immediately and allow the full
brewing cycle to run its course. Do not
swing out the swivel filter until the
brewing cycle is completed.
This feature enables you to enjoy
freshly brewed coffee at any preselected time within a 24-hour period.
To use this feature, you must first set
the digital clock (see Setting the Time):
1. Press the “prog” button= (01. The
display will change from the current
clock setting to “Wake-Up” setting.
The R symbol will appear in the
display and the display will not flash.
2. Immediately select the time in which
you would like the brewing process
to commence (see diagram below).
1 3 1
Press the
“prog” button
Set the
hour
progr.
Display
I
!&
mm.
Set the
minutes
onioff
3. Once you have set the “Wake-Up“
time, either press the “prog” key or
wait approximately 4 seconds. The
current clock time will reappear and
the display colon will flash.
11
To activate “Wake-Up” setting press
e button (q). A green light will
indicate the “Wake-Up” program has
been set. The “Wake-Up” time is
now stored in memory. If you wish
to check the “Wake-Up” time that
has been programmed, simply press
the “prog.” button and the time will
be displayed.
Preparing “Wake-Up”
coffee
The ProAroma 12 Time has a “keepwarm” feature that maintains coffee
temperature in 6 increments. To set the
“keep-warm” temperature, press the
“temp” button G (m). The currently
entered temperature number will
appear in the display. By pressing the
“temp.” button, you are able to to
select the desired level of temperature
(I-6).
To enjoy delicious “Wake-Up” coffee
that is freshly brewed and hot, first set
the “Wake-Up” time (see Setting the
“Wake-Up” Time).
Put in ground coffee.
Fill the water chamber to the desired
number of cups.
Place the carafe back on the warming
plate.
n Press the “auto” button i (q).
The indicator light will turn green
and the P symbol will appear in the
display (see figure 13).
Enter the desired aroma setting, if you
have not previously done so.
At the pre-programmed time, the
indicator light will change from green
to red, indicating the brewing process
has begun.
the coffee will
1
i after brewing,
brewing
) temperature
’ after brewing,
temperature at
I
/ be increased
After approximately 4 seconds, the
current clock time will reappear in the
display. Please note that the
temperature level can be altered at any
time.
12
.
cknitlg
The ProAroma 12 Time also lets you
select how long you would like the
coffee kept warm, from 1 to 5 hours,
before automatically turning itself off.
To set the warming period, press the
“auto off” button T(I). The currently
entered period will appear (ie; 2h) in
the display window.
By continuously pressing the “auto
off” button, the warming period will be
increased by one hour until the
maximum period of 5 hours is reached.
jp.
cb I er’od
Upon making your selection, the clock
time will reappear in the display
window after approximately 4 seconds.
The automatic shut-off can be adjusted
at any time.
Note:
The ProAroma 12 Time may be
manually shut off at any time by using
the “on/off” button.
Always unplug this appliance before
cleaning.
n Clean the filter holder, the carafe and
carafe lid in a solution of hot water
and mild liquid soap (see figure 14).
These parts can also be placed in the
upper level of your dishwasher for safe
effective cleaning.
Never use scouring agents.
Do not place metal objects, such as
flatware, silverware, coins, steel wool,
etc. inside the carafe at any time. Glass
may break or fracture as a result of
impact.
Never immerse the appliance itself in
the water or any other liquid. To clean,
simply wipe off with a soft, damp cloth.
Never use a cloth to clean the inside of
the water chamber, as this might leave
fuzzy deposits in the chamber. Just
rinse with cold water, periodically.
Although your KRUPS coffee maker
has the most advanced water heating
and pumping system, it will
periodically need cleaning with a
decalcifying agent.
This is due to the calcium (limestone)
found in drinking water.
In some areas where the water is hard,
you will need to decalcify more
frequently than in areas with soft
water.
13
It will also depend upon how often you
use your coffee maker.
An automatic sensor has been built
into your ProAroma 12 Time which will
indicate when your coffee maker needs
decalcifying by displaying the message
“CALC”. This sensor is extremely
sensitive and the “CALC” message may
appear briefly in the display under
certain circumstances. This is of no
importance, however, and should be
ignored. Decalcification is necessary
only when “CALC” appears repeatedly
or permanently in the display.The
“CALC” display will remain visible until
the “on/off” key is pressed. You should
now decalcify the coffeemaker. We
recommend using KRUPS original
decalcifying agent for cleaning your
KRUPS coffeemaker. When used in
accordance with the following instructions, it will prolong the life of your
coffeemaker.
How to decalcify
Dissolve contents of decalcifier in two
cups of cold tap water. Pour solution
into the water tank, then place the
empty carafe and filterbasket in place.
Press the “aroma” button. Now select
the “l-3” cup setting. Press the
“on/off” key. Allow the decalcifying
solution to completely run through one
cycle. Repeat this two or three times
with cold liquid.
Rinse by cycling clean water through
twice, pausing and turning the
coffeemaker “off” for a few minutes in
between each rinse session.
14
Display
aroma
I
min.
on/on
A Caution
KRUPS decalcifying agent is a citric
acid which is harmless. However, we
recommend keeping it out of the reach
of children.
Do not take internally. If swallowed
accidently, drink several glasses of
water or milk and consult your doctor.
For best results . . .
. . . always use fresh, cold water (warm
water might be stale and have mineral
deposits which would Impair the flavor
of the coffee).
. . . we recommend that you grind your
own beans. Freshly ground beans
deliver more aroma and flavor. Use one
KRUPS measuring spoon of beans per
cup.
. . . serve coffee immediately after
brewing.
. . . never reheat coffee.
n The power cord can be tailored to
the length required by utilising the
hidden cord storage located
underneath the coffee maker
(see figure 15).
Your KRUPS # 453 is covered by the
following warranty (glass carafes are
excluded from warranty):
If from date of purchase within one
year this KRUPS product fails to
function because of defects in
materials or workmanship, KRUPS
North America, will at its option, repair
or replace the unit without charge,
provided the owner has a proof of date
of purchase.
This warranty will be void if
malfunction was caused by damage to
the product by accident, misuse, use
on frequency or voltage other than
marked on the product and/or
described in the instructions, abuse
including tampering, damage in transit,
or use for commercial purposes. This
warranty gives you specific legal rights,
and you may also have other rights
which vary from state to state.
15
GUARANTEE OF PERFORMANCE
This fine KRUPS product is manufactured according to a rigid
code of quality standards, and, with minimum care, should
give years of satisfying service. However, should the need arise
for repairs or for replacement parts within or after the warranty
period, please call our CONSUMER SERVICE DEPARTMENT:
(800) 526-5377
24-hours a day, 7 days a week
You will be provided with specific instruction on how to get
your product repaired.
The department will also be able to answer any general
product questions you may have.
Before calling the Consumer Service Department, please have
the type number of your Krups appliance available. You must
have this information before calling our Consumer Service
Department so that we may better answer your questions. The
type number can be located by looking on the bottom of your
appliance.
This product is Type #453.
Any general correspondance can be addressed to:
Krups North America, Inc.
PO. Box 3900
Peoria, IL 61612