1
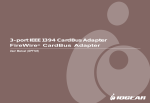
Wireless-G PC Card
GWP512 Quick Start Guide
Read this guide thoroughly and follow the installation and operation procedures
carefully to prevent any damage to the unit and/or any of the devices it connects to.
GWP512 package contains:
1 802.11g Wireless-G PC Card
1 Installation & Manual CD
1 Quick Start Guide
1 Warranty/Registration Card
®
Copyright © 2004 IOGEAR
All brand names and trademarks are the registered
property of their respective owners
®
PKG-M0109/QS
1. Welcome
®
Thank you for choosing IOGEAR to serve your wireless needs. In no time you will be sharing files or surfing the
®
Internet wirelessly. We hope you will have as much fun using your IOGEAR Wireless-G PC Card, as we had
designing it.
®
Rest assured, your IOGEAR Wireless-G PC Card is built rock-solid to ensure maximum up-time for you to stay
up-and-running. If for any reason you have a problem, we stand behind our products with an industry-leading 3
®
year factory warranty, so you can have peace-of-mind with your current and future IOGEAR purchases.
We want you to be happy with your purchase, so we have made every effort to ensure product quality, reliability,
and ease-of-use.
Note:
®
Your order has been carefully packaged and inspected, and we hope you are pleased with the IOGEAR product
you purchased. Please inspect the contents of the package to ensure that you have received all items and that
nothing has been damaged. If you discover a problem, please contact your dealer immediately for assistance.
Contact Information:
949-453-8782
23 Hubble
Irvine, CA 92618
USA
www.iogear.com
[email protected]
2. System Requirements & Features
System Requirements:
®
• Pentium class notebook computers with at least one available Cardbus slot
®
®
• Microsoft Windows 98SE, ME, 2000, XP
• CD-ROM drive
Features:
• 54 Mbps wireless connection speed - up to five times faster than previous 802.11b technology
• Sleek, compact antenna is designed for maximum agility
• Includes Funk software Odyssey client to support strong WLAN security protocols, such
as EAP-TTLS, EAP-PEAP, EAP-TLS, and LEAP.
• Ultra-easy installation in just a few simple steps
-1-
3. Hardware Diagram
When the adapter card is not associated with any wireless network devices, the Power/Tx LED will stay solid green;
Rx LED will be off. When both LEDs are blinking green, the adapter card is scanning/connecting to an wireless
network. When the adapter card is associated, Power/Tx LED indicates transmitting activity; Rx LED indicates
receiving activity.
Rx LED
Power/Tx LED
-2-
4. Installation
Driver Installation
If you have connected the notebook adapter to your computer, please remove it first.
Step. 1
Insert the Driver and Utility CD into CD Drive.
Step. 2
A series of introduction screens will show up. It runs on Macromedia Flash. (If your computer doesn’t have the Flash
player installed, please visit www.macromedia.com to download the plug-in.)
Step. 3
Next, a Read Me screen will be brought up. Please read it through carefully, then click Next.
Step. 4
Click the button of “I accept the terms in the license agreement”. Click Next.
-3-
Step. 5
A Main Installation Menu will show.
Step. 6
Click the button of IOGEAR GWP512 Driver Installation. When it is completed, an information window will pop up.
Please click OK, then it will return to main menu.
You can install the Utility Software by following instructions in section 6
Installing the Network Adapter Driver
Note: The following procedures are operated in Windows 2000.The steps and screen shots are
similar for the other supported OS (such as Win 98SE, ME and XP).
Step. 1
Now, please insert your card into your laptop.
When Windows 2000 recognizes the adapter, the Found New Hardware Wizard dialog box appears. Click Next.
-4-
Step. 2
Select the Search for a suitable driver for my device and click Next.
Step.3
Select the Specify a location checkbox. Click Next.
Step. 4
Click Browse button, browse to the IOGEAR GWP512\Driver\Win2k directory and click OK.
Note: Windows 98SE users, please specify to IOGEAR GWP512\Driver\Win98 directory,
Windows ME users, please specify to IOGEAR GWP512\Driver\WinME directory,
Windows XP users, please specify to IOGEAR GWP512\Driver\WinXP directory.
-5-
Step. 5
The wizard will display the location of driver. Click on the Next button.
Step.6
The Microsoft Digital Signature Not Found dialog box could appear at this point in the installation. A Microsoft
digital signature is not required for the driver installation. Click Yes to continue. In Windows XP, please click Continue
Anyway.
Note: Windows98SE users, you will be asked to provide the Windows98 source files CD, please
insert the CD and follow on-screen description to continue the driver installation.
Step. 7
After a while, the wizard will report that the hardware installation is complete. Click Finish.
-6-
Step. 8
After all the necessary drivers are installed, you can find that a PCMCIA adapter icon
the Power LED on the adapter showing steady green.
on the system tray and
Note: Windows 98SE & ME users, you will be asked to restart your computer. Please click Yes to
reboot your computer.
5. Verify the Driver Installation
Note: The following procedures are operated in Windows 2000. The steps and screens are similar for the other
supported O.S. If you want to check whether the driver's installation is successful, please follow the
following steps.
Step. 1
Right-click mouse button on the My Computer icon on your Windows desktop, and highlight Properties from the
pop-up menu.
Step. 2
The System Properties screen will be pop-up. Under Hardware tab, click Device Manager….
-7-
Step. 3
After clicking Device Manager…, the following screen will be shown. Click on the + symbol in front of Network
adapters and see if an item labeled IOGEAR GWP512 Network Adapter is visible. If you don't see the item below
the network adapter icon but a"?" or "!" symbol is displayed, it means that the driver installation was unsuccessful.
Highlight IOGEAR GWP512 Network Adapter, right-click mouse button and select Properties.
Step.4
Click the General tab, if the Device Status field reports that This device is working properly, it
means that the driver has been installed successfully.
6. Installations of Configuration Utility and Odyssey for
Marvell Utility
This Network Adapter Configuration Utility and Odyssey for Marvell Utility are contained in the utility CD we provide.
The Odyssey for Marvell Utility will be installed after the completion of Configuration Utility. The installation procedure
is the same for all support O.S except the screenshots. The following procedure is operated in Windows 2000.
Step. 1
From the Main Installation Menu, select the button of GWP512 Configuration Utility -- Odyssey from Marvell.
-8-
Step. 2
The InstallShield Wizard is preparing to install the configuration utility. Click Next.
Step. 3
In the Destination Folder screen you are asked to confirm the Destination Folder for the application
software. If you would like, you may change the destination folder to another location as the
directory. Click Next.
Step. 4
Select a program folder and click Next.
-9-
Step. 5
The InstallShield Wizard is installing utility.
Step. 6
Click Finish to compete the Utility installation.
Step. 7
The InstallShield Wizard continues to install the Odyssey Client for Marvell helps the user to configure WPA function.
The Odyssey Client Installation Wizard window appears. Click Next. If the user doesn't want to install the Odyssey for
Marvell Utility, he can click Cancel to terminate the installation.
-10-
Step. 8
Click the button of I accept the terms in the license agreement. Click Next.
Step. 9
Enter User Name and Organization in the Customer Information window. Click Next.
Step.10
Click the button of Complete. Click Next.
-11-
Step. 11
Click Install to install the program.
Step. 12
The InstallShield Wizard starts copy files to PC.
Step. 13
When installation is complete, the Wizard Completed window appears. Click Finish.
-12-
Step. 14
The Configuration Wizard window appears. Click Next. Then Click Finish to complete the configuration Wizard.
Step. 15
The Odyssey Client for Marvell icon resides on the system tray automatically. If the network adapter
is plugged into a slot and connects with a wireless network, the Configuration Utility launches
automatically and has an icon shows green in the system tray. If it doesn't launch, and you cannot
get wireless connection, please see below to launch the Configuration Utility.
Odyssey for Marvell
7. Configuration Utility
Configuration Utility Icon
(Please refer to User Manual for further details)
7.1 Using the configuration utility IOGEAR provides in Windows 98/ME/2000/XP
Step. 1
The user can open the Configuration Utility from Windows Start -> Programs -> IOGEAR GWP512 -> IOGEAR
GWP512 Configuration Utility.
After you launch the utility, the utility icon will reside on the Windows system tray and provides at-a-glance
feedback about the device's status by changing appearance. Right-click mouse button on the icon and select
Restore from the shortcut menu. The configuration main window will be shown on screen.
-13-
Step. 2
The user can now use any of the management functions available in the Configuration Utility.
7.2 Using the zero configuration utility Windows XP provides
(Please refer to User's Manual for more details on the configuration utility)
Once you have the network adapter properly installed, you will see the network connection icon shown below.
Step. 1
Right-click mouse button on the network connection icon resides on the system tray, and click View available
Wireless Networks.
Step. 2
The following Connect to Wireless Network dialog box will be displayed. You can click Connect to start the wireless
connection or click Advanced button to do further configurations.
-14-
8. Radio and TV Interference
This equipment has been tested and found to comply with the limits for a Class B digital device, pursuant to Part
15 of the FCC Rules. These limits are designed to provide reasonable protection against harmful interference in
a residential installation. This equipment generates, uses and can radiate radio frequency energy and if not
installed and used in accordance with the instructions, may cause harmful interference to radio communications.
However, there is no guarantee that interference will not occur in a particular installation
IN NO EVENT SHALL THE DIRECT VENDOR'S LIABILITY EXCEED THE PRICE PAID FOR THE PRODUCT
FROM DIRECT, INDIRECT, SPECIAL, INCIDENTAL, OR CONSEQUENTIAL DAMAGES RESULTING FROM
THE USE OF THE PRODUCT, DISK OR ITS DOCUMENTATION.
The direct vendor makes no warranty or representation, expressed, implied, or statutory with respect to the
contents or use of this documentation, and especially disclaims its quality, performance, merchantability, or
fitness for any particular purpose.
The direct vendor also reserves the right to revise or update the device or documentation without obligation to
notify any individual or entity of such revisions, or update. For further inquiries, please contact your direct
vendor.
9. Limited Warranty
IN NO EVENT SHALL THE DIRECT VENDOR'S LIABILITY FOR DIRECT, INDIRECT, SPECIAL, INCIDENTAL OR
CONSEQUENTIAL DAMAGES RESULTING FROM THE USE OF THIS PRODUCT, DISK, OR ITS
DOCUMENTATION EXCEED THE PRICE PAID FOR THE PRODUCT.
The direct vendor makes no warranty or representation, expressed, implied, or statutory with respect to the contents
or use of this documentation, and especially disclaims its quality, performance, merchantability, or fitness for any
particular purpose.
The direct vendor also reserves the right to revise or update the device or documentation without obligation to notify
any individual or entity of such revisions, or updates. For further inquiries please contact your direct vendor.
-15-