1
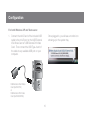
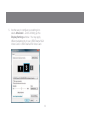
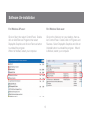
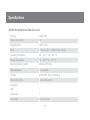
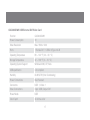
Installation Guide
USB 2.0 External VGA Video Card (GUC2015V)
USB 2.0 External DVI Video Card (GUC2020DW6)
1
GUC2015V/GUC2020DW6
PART NO. M1110
©2009 IOGEAR. All Rights Reserved. Part No. M1110
IOGEAR, the IOGEAR logo, MiniView®, VSE are trademarks or registered trademarks of IOGEAR, Inc. Microsoft and
Windows are registered trademarks of Microsoft Corporation. IBM is a registered trademark of International Business
Machines, Inc. Macintosh, G3/G4 and iMac are registered trademarks of Apple Computer, Inc. IOGEAR makes no warranty
of any kind with regards to the information presented in this document. All information furnished here is for informational
purposes only and is subject to change without notice. IOGEAR, Inc. assumes no responsibility for any inaccuracies or
errors that may appear in this document.
2
Table of Contents
Package Contents
4
Overview
5
System Requirements
6
Software Installation
7
- For Windows XP user:
7
- For Windows Vista user:
8
- For Mac OS X 10.4 and above user:
9
Configuration
10
Software Un-installation 15
Specifications
16
Federal Communications Commission (FCC) Statement
18
CE Statement
20
Limited Warranty
21
Contact
22
3
Package Contents
GUC2015V:
––
––
––
––
––
1 x USB 2.0 External VGA Video Card
1 x USB 2.0 Cable
1 x Installation CD
1 x User Manual
1 x Warranty/Registration Card
GUC2020DW6:
––
––
––
––
––
1 x USB 2.0 External DVI Video Card
1 x USB 2.0 Cable
1 x Installation CD
1 x User Manual
1 x Warranty/Registration Card
4
Overview
• Easily connect up to six monitors using a USB 2.0 Cable
• Enjoy resolutions of up to 1280 x 1024 at 32 bit color with GUC2015V USB External VGA Video Card;
or 1600 x 1200 with GUC2020DW6 USB External DVI Video Card..
• Allows for effortless multitasking
• Bus Powered - No external power supply needed
• Supports usage through powered KVMP's or USB hubs
5
System Requirements
Minimum system requirements:
• Computer with 1.2GHz or higher processor speed. Intel Pentium/Celeron family, or AMD K6/Athlon/
Duron family, or compatible processor recommended.
• 256MB or RAM or higher (512MB recommended)
• Available USB 2.0 port
• 30MB of available disk space
• Super VGA (800 x 600) or higher resolution video adapter and monitor CD-ROM or DVD-ROM
• Windows XP/Vista 32 and 64-bit OS
• Mac OS X 10.4 or higher with Intel based CPU
The USB VGA Video Card or USB DVI Video Card support all analogue CRT and LCD monitors or displays
with a VGA connector. Monitors or displays that equipped with DVI-A or DVI-I can also be connected
using a suitable VGA to DVI adapter.
6
Software Installation
For Windows XP user:
1. Insert the included CD to the CD-ROM/
DVD-ROM of your computer. The installation
process will automatically load. Select the
preferred language for the installation and click
on I Accept to continue.
2. Restart your system after the installation
completes.
7
For Windows Vista user:
2. Select the preferred language for installation and
click on I Accept to continue.
1. Insert the included CD to the CD-ROM/
DVD-ROM of your computer. The installation
process will automatically load.
Click on Run setup.exe to continue.
3. Restart your
system after
installation
completes
8
For Mac OS X 10.4 and above user:
2. Execute the Displaylink-OSX01.1.3b1.dmg to
begin the installation for Mac OS.
1. Insert the included CD to the CD-ROM/DVDROM of your computer. Browse through the
content on the CD and find a folder named
Mac driver.
9
Configuration
For both Windows XP and Vista users:
Once plugged in, you will see a monitor icon
showing up in the system tray.
1. Connect the mini-B end of the included USB
cable to the mini-B port on the USB External
VGA Video Card or USB External DVI Video
Card. Then connect the USB Type-A end of
the cable to any available USB port on your
computer.
USB External VGA Video
Card (GUC2015V)
or
USB External DVI Video
Card (GUC2020DW6)
10
2. For GUC2015V, USB External VGA Video
Card, connect the male end of the VGA cable
(not included) to the VGA port on the USB
External Video Card. Then connect the other
male end of the VGA cable (not included) to
the VGA port on your monitor/display.
USB cable
(included)
Primary
VGA monitor
For GUC2020DW6, USB External DVI Video
Card, connect the male end of the DVI cable
(not included) to the DVI port on the USB
External DVI Video Card. Then connect the
other male end of the DVI cable (not included) to
the DVI port on your monitor/display.
USB cable
(included)
GUC2015V
Secondary
Primary
VGA monitor
DVI monitor
VGA cable
(not included)
GUC2020DW6
Secondary
DVI monitor
DVI cable
(not included)
11
3. Click on the monitor icon to bring up the
configuration menu. When connecting
the USB External VGA Video Card or USB
External DVI Video Card to your computer, it is
configured to function as the Extended Mode
by default, and you can also change to Mirror
mode as you prefer.
Note:
When in Extended Mode, you will see the
wallpaper displaying on the monitor/display that is
connected to the USB External VGA Video Card
or USB External DVI Video Card.
12
When in Mirror Mode, you will see a clone
desktop displaying on the monitor/display that is
connected to the USB External VGA Video Card or
USB External DVI Video Card.
4. You can also adjust the screen resolution using
this menu. The supported resolution of your
monitor/display will show up on the right side
of the menu and you can select any preferred
setting as you wish. When resetting your
resolution, you will see your monitor/display
flickers or turns into black for few seconds,
then it will resume back to normal.
13
5. Another way to configure your setting is to
select Advanced… and it will bring up the
Display Settings window. You may apply
different adjustments to your USB External VGA
Video Card or USB External DVI Video Card.
14
Software Un-installation
For Windows XP user:
For Windows Vista user:
Click on Start, then select Control Panel. Double
click on Add/Remove Programs then select
Displaylink Graphics and click on Remove button
to uninstall the program.
When it is finished, restart your computer. Click on the Vista icon on your desktop, then select Control Panel. Double click on Programs and
Features. Select Displaylink Graphics and click on
Uninstall button to uninstall the program. When it
is finished, restart your computer. 15
Specifications
GUC2015V USB External VGA Video Card
Function
GUC2015V
Power Consumption
5V
Video Resolution
1280 x 1024
Ports
1 Female VGA / 1 USB 2.0 Type mini-B
Operating Temperature
68 ~ 122 ° F ( 20 ~ 50 ° C)
Storage Temperature
32 ~ 158 ° F ( 0 ~ 70 ° C)
Operating System Support
Windows XP, Vista
USB specificaton
2.0 compliant
Humidity
20-80% RH, (Non Condensing)
Power Connections
Optional Power Port
Connectors
USB
1
Video Ouput
1
Color Depth
32-bit true color
16
GUC2020DW6 USB External DVI Video Card
Function
GUC2020DW6
Power Consumption
5V
Video Resolution
Max. 1600 x 1200
Ports
1 Female DVI / 1 USB 2.0 Type mini-B
Operating Temperature
68 ~ 122 ° F ( 20 ~ 50 ° C)
Storage Temperature
32 ~ 158 ° F ( 0 ~ 70 ° C)
Operating System Support
Windows 2000, XP, Vista
USB specificaton
2.0 compliant
Humidity
20-80% RH, (Non Condensing)
Power Connections
Bus Powered
Connectors
USB: 1, Video: 1
Video Connections
Input: USB, Output: DVI
Power Mode
USB
Color Depth
32-bit true color
17
Federal Communications Commission (FCC) Statement
15.21
You are cautioned that changes or modifications not expressly approved by the part responsible for
compliance could void the user’s authority to operate the equipment.
15.105(b)
his equipment has been tested and found to comply with the limits for a Class B digital device, pursuant
to part 15 of the FCC rules. These limits are designed to provide reasonable protection against harmful
interference in a residential installation. This equipment generates, uses and can radiate radio frequency
energy and, if not installed and used in accordance with the instructions, may cause harmful interference
to radio communications. However, there is no guarantee that interference will not occur in a particular
installation. If this equipment does cause harmful interference to radio or television reception, which can
be determined by turning the equipment off and on, the user is encouraged to try to correct the
interference by one or more of the following measures:
- Reorient or relocate the receiving antenna.
- Increase the separation between the equipment and receiver.
- Connect the equipment into an outlet on a circuit different from that to which the receiver is connected.
- Consult the dealer or an experienced radio/TV technician for help.
18
THIS DEVICE COMPLIES WITH PART 15 OF THE FCC RULES. OPERATION IS SUBJECT TO THE FOLLOWING TWO CONDITIONS:
1. this device may not cause interference and
2. this device must accept any interference, including interference that may cause undesired operation of the device.
FCC RF Radiation Exposure Statement:
This equipment complies with FCC radiation exposure limits set forth for an uncontrolled environment. End
users must follow the specific operating instructions for satisfying RF exposure compliance. This transmitter must not be co-located or operating in conjunction with any other antenna or transmitter.
19
CE Statement
This device has been tested and found to comply with the requirements set up in the council directive on
the approximation of the law of member states relating to EMC Directive 89/336/EEC, Low Voltage
Directive 73/23/EEC and R&TTE Directive 99/5/EC.
The product has been approved for LVD and covered the following countries:
Belgium, Denmark, France, Germany, Italy, Portugal, U.K., Spain, Sweden
20
Limited Warranty
IN NO EVENT SHALL THE DIRECT VENDOR’S LIABILITY FOR DIRECT, INDIRECT, SPECIAL,
INCIDENTAL OR CONSEQUENTIAL DAMAGES RESULTING FROM THE USE OF THE PRODUCT,
DISK, OR ITS DOCUMENTATION EXCEED THE PRICE PAID FOR THE PRODUCT.
The direct vendor makes no warranty or representation, expressed, implied, or statutory with respect to
the contents or use of this documentation, and especially disclaims its quality, performance,
merchantability, or fitness for any particular purpose.The direct vendor also reserves the right to revise
or update the device or documentation without obligation to notify any individual or entity of such
revisions, or updates. For further inquiries please contact IOGEAR.
21
Contact
IOGEAR
23 Hubble
Irvine, CA 92618
P 949.453.8782
F 949.453.8785
Visit us at: www.iogear.com
22
23
About Us
FUN
IOGEAR offers connectivity solutions that are innovative, fun, and stylish,
helping people enjoy daily life using our high technology products.
GREEN
IOGEAR is an environmentally conscious company that emphasizes the
importance of conserving natural resources. The use of our technology solutions
helps reduce electronic waste.
HEALTH
IOGEAR supports healthy and fit lifestyles. By integrating products with
the latest scientific developments, IOGEAR’s solutions enhance the life of
end-users.
24
© 2009 IOGEAR®