1
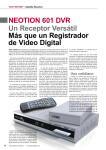
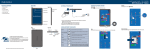
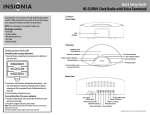
Quick Setup Guide
NS-DP8CH Infocast™ Internet Media Display
Congratulations on your purchase of a high-quality
Insignia product. Your Infocast™ Internet Media
Display features state-of-the-art technology and is
designed for reliable and trouble-free performance.
Features
Insignia button
Package contents
Infocast™ Internett
Media Displayy
AC power
adapter
Power button
MS Pro Duo adapter
USB
ports
Power port
Headphone jack
SD/SDHC, MMC, MS, xD
card slot
Setting Up
Using the Infocast™ Internet Media Display for the first time
Connect the AC power adapter to the back of
your Infocast™ Internet Media Display, then plug
the adapter into a power outlet.
The first time you plug in your Infocast™ Internet Media Display, it turns on automatically. After it’s plugged
in, you will need to manually turn it on or off. To turn it on or off, press the power button on the back of the
device.
Getting started
Cleaning
cloth
Follow the on-screen instructions by touching the
series of stars. This helps your Infocast™ Internet
Media Display learn precisely where your finger is
touching the screen.
User Guide
View introductory video
An introductory video will play. This will give
you additional information about your device
and teach you tips like using your fingernail for
best results.
Connect to a network
Quick Setup Guide
CF card slot
The Infocast™ Internet Media Display turns on
automatically and the Setup Wizard opens.
When you are finished with the introductory video,
you will need to connect to a network. Select an
Access Point from the list that is displayed on your
Infocast™ Internet Media Display screen.
Configuring the network connection
1
Tap your network name (Access Point) to select it, then tap NEXT to
confirm.
Or, if you don't see your network, tap OTHER, type the name of your
network with the on-screen keyboard, then tap NEXT.
2 If your network requires authentication (a password or encryption key),
select the type of authentication, tap NEXT, enter the authorization
key using your on-screen keyboard, then tap the ENTER key.
3 Tap Automatic (recommended) or Manual to select your IP mode
(how your network identifies the Infocast™ Internet Media Display),
then tap NEXT. A confirmation screen opens.
4 Review your settings, then tap NEXT.
Your Infocast™ Internet Media Display begins connecting to your
network. When the network is connected, a success message will be
displayed.
5 Click DONE. The SET TIME ZONE screen opens.
NOTE: TIME/DATE will only open if the device cannot get time from the
internet.
For more information or for troubleshooting, see your User Guide or visit
www.insigniaproducts.com for details.
Setting the time zone
If the time and date can’t be set
automatically from the Internet, the
SET TIME/DATE screen opens.
• Repeatedly tap a yellow dot on the
map closest to where you live until
the yellow dot is selected with a
circle, then tap the “x” at the top
right hand corner of the screen.
Activating your Infocast™ Internet Media Display
(optional)
NOTE: To get the most from your Infocast™ Internet Media Display, including
access to apps, photos, music and other content from the Internet, we highly
recommend activating your device.
1 At a computer, open a Web browser and go to
www.insigniaproducts.com/chumby. If you don’t have Internet access
right now, tap LATER on your device and do this activation at another
time.
2 On the site, click the LOG IN/CREATE NEW ACCOUNT button to create
an account.
3 You will be sent an email and will need to confirm that you created the
account.
Features
4 Go to www.insigniaproducts.com/chumby and click the “Activate your
tabs
new Device” button. Follow the instructions on the screen
5 When you see the Congratulations screen on your Infocast™ Internet
Media Display, you have successfully activated your device. If you do not
see this screen, visit the help section on
www.insigniaproducts.com/chumby.
Screen
settings
Home
Network Alarm/Date/Time
settings
settings
Audio
Night
settings
mode
Playing a channel
To play the Featured Channel:
1
2
3
In the Home screen or in the Main menu, tap APPS, then tap CHANNELS.
The Featured Channel (along with any other channels you’ve defined)
appears in the main menu.
Tap a channel to select it.
Tap PLAY. The channel loads the apps, then plays the channel content.
Each app plays for a set period of time.
You can change that interval time by customizing the app’s display time
in your chumby.com account page or by tapping the
icon (effects) in
the app shuttle.
Setting the time and date
Infocast™ Internet Media Display overview
•
Home screen - Tap one of the Features with your finger to open it.
Tap the up or down arrows to
change the hours, minutes, seconds,
month, day, and year values, then
tap the ”x” at the top right hand
corner of the screen. The Activate
Infocast screen appears.
Main menu - Tap a tab or icon to view options or make selections.
Features options
6-month limited warranty
See your User Guide or visit www.insigniaproducts.com for details.
Need additional help?
See your User Guide! This comprehensive guide includes everything
from basic how-to steps to more advanced features.
www.insigniaproducts.com
For customer service, call1-800-467-4289
Distributed by Best Buy Purchasing, LLC
7601 Penn Avenue South, Richfield, MN USA 55423-3645
© 2010 BBY Solutions, Inc. All rights reserved. INSIGNIA is a trademark
of BBY Solutions, Inc. Registered in some countries. All other products
and brand names are trademarks of their respective owners.
ENGLISH 10-0480
Apps
Friends
Photos
Music
Videos