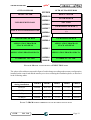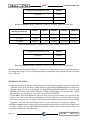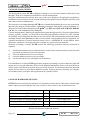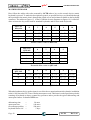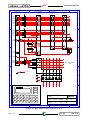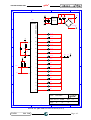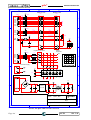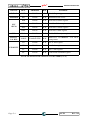
1
GCTR
Grifo ®
C
To
Rom
USER MANUAL
Via dell' Artigiano, 8/6
® 40016 San Giorgio di Piano
grifo
(Bologna) ITALY
E-mail: [email protected]
http://www.grifo.it
http://www.grifo.com
Tel. +39 051 892.052 (a. r.) FAX: +39 051 893.661
Edition 5.40
Rel. 06 February 2002
GCTR
®
®
, GPC , grifo , are registered trademarks of grifo®
ITALIAN TECHNOLOGY
GCTR
Grifo ®
C
To
Rom
USER MANUAL
GCTR is a complete and poweful software package that allows to develop
C application programs taking advantage of its fast, comfortable and
efficent development environment and debuggin environment.
It is available for each of the grifo® cards based on microprocessors of
family Intel 86.
GCTR can save in FLASH EPROM the code developed in its environments,
this makes easier the final update and installation phase, that can be done
even on the field.
A wide set of library functions allow to manage immediatly several
operator interfaces normally present in most of automation applications.
Via dell' Artigiano, 8/6
® 40016 San Giorgio di Piano
grifo
(Bologna) ITALY
E-mail: [email protected]
http://www.grifo.it
http://www.grifo.com
Tel. +39 051 892.052 (a. r.) FAX: +39 051 893.661
Edition 5.40
Rel. 06 February 2002
GCTR
®
®
, GPC , grifo , are registered trademarks of grifo®
ITALIAN TECHNOLOGY
DOCUMENTATION COPYRIGHT BY grifo® , ALL RIGHTS RESERVED
No part of this document may be reproduced, transmitted, transcribed, stored in a
retrieval system, or translated into any language or computer language, in any form or
by any means, either electronic, mechanical, magnetic, optical, chemical, manual, or
otherwise, without the prior written consent of grifo®.
IMPORTANT
Although all the information contained herein have been carefully verified, grifo®
assumes no responsability for errors that might appear in this document, or for damage
to things or persons resulting from technical errors, omission and improper use of this
manual and of the related software and hardware.
grifo® reserves the right to change the contents and form of this document, as well as the
features and specification of its products at any time, without prior notice, to obtain
always the best product.
For specific informations on the components mounted on the card, please refer to the
Data Book of the builder or second sources.
SYMBOLS DESCRIPTION
In the manual could appear the following symbols:
Attention: Generic danger
Attention: High voltage
Trade Marks
, GPC®, grifo® : are trade marks of grifo®.
Other Product and Company names listed, are trade marks of their respective companies.
ITALIAN TECHNOLOGY
grifo®
GENERAL INDEX
INTRODUCTION ........................................................................................................................ 1
SOFTWARE VERSION............................................................................................................... 1
GENERAL INFORMATION ...................................................................................................... 2
MINIMUM REQUIREMENTS .................................................................................................. 4
CONTROL CARD ................................................................................................................... 4
PERSONAL COMPUTERS ................................................................................................... 4
SERIAL COMMUNICATION CABLE ................................................................................ 5
WORKING SOFTWARE ....................................................................................................... 6
SOFTWARE TO DEVELOP THE APPLICATION PROGRAM ................................. 6
SOFTWARE AND FIRMWARE FOR THE CONTROL CARD .................................. 7
GCTR USER MANUAL ......................................................................................................... 7
EPROM PROGRAMMER ..................................................................................................... 7
USE OF GCTR ............................................................................................................................. 8
INSTALLATION ..................................................................................................................... 8
DIRECTORY C:\TC_GCTR ............................................................................................. 9
DIRECTORY C:\TD_GCTR ............................................................................................. 9
DIRECTORY C:\GCTRXXX............................................................................................ 9
USE ......................................................................................................................................... 11
EPROM PROGRAMMING ................................................................................................. 12
FLASH EPROM PROGRAMMING (FLASH WRITER) ................................................ 12
BOARD CONFIGURATION .......................................................................................... 13
FLASH EPROM AREAS ................................................................................................. 13
FLASH WRITER EXECUTION .................................................................................... 14
CHANGES TO INSTALLED APPLICATION: DEVELOPMENT, EXECUTION ....... 15
HOW TO START ....................................................................................................................... 17
DESCRIPTION OF GCTR ....................................................................................................... 20
START-UP CODE .................................................................................................................. 20
ADDRESSING OF HARDWARE STRUCTURES IN I/O ................................................ 20
LOCATOR ............................................................................................................................. 21
FLOATING POINT .............................................................................................................. 21
HARDWARE BREAKPOINT ............................................................................................. 21
MEMORY ORGANIZATION ............................................................................................. 22
MEMORY USE NOTES .................................................................................................. 24
RESERVED MEMORY................................................................................................... 25
CONSOLE MANAGEMENT .............................................................................................. 26
CONSOLE HARDWARE DEVICES ............................................................................. 26
CONSOLE PREDEFINED SYMBOLS ......................................................................... 27
MATRIX KEYBOARD .................................................................................................... 28
CONSOLE COMMANDS ............................................................................................... 29
GCTR
Rel. 5.40
Page I
grifo®
ITALIAN TECHNOLOGY
CURSOR LEFT ................................................................................................................ 29
CURSOR RIGHT ............................................................................................................. 29
CURSOR DOWN ............................................................................................................. 30
CURSOR UP ..................................................................................................................... 30
HOME ............................................................................................................................... 30
CARRIAGE RETURN .................................................................................................... 30
CARRIAGE RETURN+LINE FEED ............................................................................. 30
ALPHANUMERIC CURSOR PLACEMENT .............................................................. 31
BACKSPACE .................................................................................................................... 31
CLEAR PAGE .................................................................................................................. 31
CLEAR LINE ................................................................................................................... 31
CLEAR END OF LINE.................................................................................................... 31
CLEAR END OF PAGE .................................................................................................. 32
CURSOR OFF .................................................................................................................. 32
STATIC CURSOR ON ..................................................................................................... 32
BLINKING CURSOR ON ............................................................................................... 32
LEDS ACTIVATION ........................................................................................................ 33
LEDS ACTIVATION WITH MASK .............................................................................. 33
LIBRARIES ........................................................................................................................... 34
EXTERNAL WATCH DOG ................................................................................................. 34
USER CONFIGURATIONS ................................................................................................. 35
DIFFERENCES AMONGST BORLAND C++, TURBO C OR C++ AND GCTR ......... 35
DEMO PROGRAMS ............................................................................................................ 36
VERSIONS OF GCTR ............................................................................................................... 38
BIBLIOGRAPHY ....................................................................................................................... 39
APPENDIX A: ELECTRIC DIAGRAMS ............................................................................. A-1
APPENDIX B: LIBRARY FUNCTIONS CHANGED ......................................................... B-1
CALLOC .............................................................................................................................. B-1
CLREOL .............................................................................................................................. B-1
CLRSCR ............................................................................................................................... B-2
CPRINTF ............................................................................................................................. B-2
CPUTS .................................................................................................................................. B-3
CSCANF ............................................................................................................................... B-3
DELAY.................................................................................................................................. B-4
_DISABLE ............................................................................................................................ B-4
DELLINE ............................................................................................................................. B-5
_DOS_GETDATE ................................................................................................................ B-5
_DOS_GETTIME ................................................................................................................ B-6
_DOS_GETVECT ............................................................................................................... B-6
_DOS_SETDATE ................................................................................................................. B-7
_DOS_SETTIME ................................................................................................................. B-7
_DOS_SETVECT ................................................................................................................ B-8
_ENABLE ............................................................................................................................. B-8
_EXIT ................................................................................................................................... B-9
FAR_FREE......................................................................................................................... B-10
Page II
GCTR
Rel. 5.40
ITALIAN TECHNOLOGY
grifo®
FAR_MALLOC ................................................................................................................. B-10
FREE .................................................................................................................................. B-11
GETCH , GETCHE ........................................................................................................... B-11
GETDATE .......................................................................................................................... B-12
GETTIME .......................................................................................................................... B-12
GOTOXY ........................................................................................................................... B-13
KBHIT ................................................................................................................................ B-13
LEDBLINKSTATUS ......................................................................................................... B-14
LEDSTATUS ...................................................................................................................... B-14
MALLOC ........................................................................................................................... B-16
PUTCH ............................................................................................................................... B-16
QTPLED ............................................................................................................................. B-17
SERIN ................................................................................................................................. B-17
SEROUT ............................................................................................................................. B-18
SERSTATUS ...................................................................................................................... B-18
SETIN ................................................................................................................................. B-19
SETOUT ............................................................................................................................. B-19
SETSERIAL ....................................................................................................................... B-20
SETDATE ........................................................................................................................... B-21
SETTIME ........................................................................................................................... B-21
SLEEP ................................................................................................................................ B-22
_STRDATE......................................................................................................................... B-22
_STRTIME ......................................................................................................................... B-23
WHEREX ........................................................................................................................... B-23
WHEREY ........................................................................................................................... B-24
APPENDIX C: I/O ADDRESSES ........................................................................................... C-1
APPENDIX D: ALPHABETICAL INDEX ............................................................................ D-1
GCTR
Rel. 5.40
Page III
grifo®
ITALIAN TECHNOLOGY
FIGURES INDEX
FIGURE 1: SERIAL CONNECTION BETWEEN DEVELOPMENT PC AND CONTROL CARD ............................. 5
FIGURE 2: SERIAL CONNECTION BETWEEN CONSOLE PC AND CONTROL CARD ..................................... 5
FIGURE 3: SERIAL CONNECTORS AND CONNECTION ACCESSORIES ........................................................ 6
FIGURE 4: RUN AND DEBUG MODE SELECTION JUMPERS TABLE ................................................... 16
FIGURE 5: MEMORY CONFIGURATION IN DEVELOPMENT MODE ................................................ 22
FIGURE 6: MEMORY CONFIGURATION IN EXECUTION MODE ....................................................... 23
FIGURE 7: SRAM MEMORY ADDRESSES VALUES SET DURING INSTALLATION ..................................... 23
FIGURE 8: SRAM MEMORY ADDRESSES VALUES OF CONTROL CARD CONFIGURATION ........................ 24
FIGURE 9: ROM MEMORY ADDRESSES VALUES SET DURING INSTALLATION ....................................... 24
FIGURE 10: ROM MEMORY ADDRESSES VAMUES OF CONTROL CARD CONFIGURATION ....................... 24
FIGURE 11: CONSOLE HARDWARE DEVICES ...................................................................................... 26
FIGURE 12: CONSOLE DEVICES CONNECTIONS ................................................................................. 27
FIGURE 13: KEY CODES OF KDX X24 ............................................................................................. 28
FIGURE 14: KEY CODES OF QTP 16P ............................................................................................ 28
FIGURE 15: KEY CODES OF QTP 24P ............................................................................................ 28
FIGURE A1: IAC 01 ELECTRIC DIAGRAM ...................................................................................... A-1
FIGURE A2: QTP 24P ELECTRIC DIAGRAM (1 OF 2) ..................................................................... A-2
FIGURE A3: QTP 24P ELECTRIC DIAGRAM (2 OF 2) ..................................................................... A-3
FIGURE A4: QTP 16P ELECTRIC DIAGRAM ................................................................................... A-4
FIGURE A5: KDX X24 ELECTRIC DIAGRAM ................................................................................... A-5
FIGURE C1: I/O REGISTERS ADDRESSES ON GPC® 884 ................................................................. C-1
FIGURE C2: I/O REGISTERS ADDRESSES ON GPC® 188F (1 OF 2) ................................................. C-2
FIGURE C3: I/O REGISTERS ADDRESSES ON GPC® 188F (2 OF 2) ................................................. C-3
FIGURE C4: I/O REGISTERS ADDRESSES ON GPC® 188D (1 OF 2) ................................................. C-4
FIGURE C5: I/O REGISTERS ADDRESSES ON GPC® 188D (2 OF 2) ................................................. C-5
FIGURE C6: I/O REGISTERS ADDRESSES ON GPC® 883 ................................................................. C-6
Page IV
GCTR
Rel. 5.40
ITALIAN TECHNOLOGY
grifo®
INTRODUCTION
The use of these devices has turned - IN EXCLUSIVE WAY - to specialized personnel.
The purpose of this handbook is to give the necessary information to the cognizant and sure use of
the products. They are the result of a continual and systematic elaboration of data and technical tests
saved and validated from the manufacturer, related to the inside modes of certainty and quality of
the information.
The reported data are destined- IN EXCLUSIVE WAY- to specialized users, that can interact with
the devices in safety conditions for the persons, for the machine and for the enviroment, impersonating
an elementary diagnostic of breakdowns and of malfunction conditions by performing simple
functional verify operations , in the height respect of the actual safety and health norms.
To be on good terms with the products, is necessary guarantee legibility and conservation of the
manual, also for future references. In case of deterioration or more easily for technical updates,
consult the AUTHORIZED TECHNICAL ASSISTANCE directly.
To prevent problems during card utilization, it is a good practice to read carefully all the informations
of this manual. After this reading, the user can use the general index and the alphabetical index,
respectly at the begining and at the end of the manual, to find information in a faster and more easy
way.
grifo® gives no warrany that this software may fulfil the user needs, the production does not stop or
be without errors or all the eventual errors can be corrected. grifo® is not responsible for problems
caused by hardware changes of the computers and the operating system that may happen in the
meantime.
All the trademarks in this manual are property of the respective owners.
SOFTWARE VERSION
The present handbook is reported to the GCTR release 3.5 and later. The validity of the bring
informations is subordinate to the number of the software release. The user must always verify the
correct correspondence among the two denotations. Software release number is printed on the disk
labels and is written in the source of some programs, examples, etc.
This manual also contains information about other programs that are part of GCTR package: each
of these programs has its own release number that will be specified when the explanation will require
it.
In case of need for the technical assistance it is essential that the user provides the release number
or numbers of the program/s used in addtion to a clear and exhaustive description of the problem.
For information about GCTR releases that can be ordered and the description of the changes made,
please refer to chapter “GCTR VERSIONS”.
GCTR
Rel. 5.40
Page 1
grifo®
ITALIAN TECHNOLOGY
GENERAL INFORMATION
This manual gives all the software and hardware information to allow the user to take the maximum
advantage of GCTR (Grifo® C To Rom) feautres.
This manual uses the following conventions:
Application program:
is the program developed by the user; it manages the software part of
the system to build.
Control card:
is the grifo® card used to develop the application program with GCTR
as software development environment.
GCTR is a complete and powerful software development package that allows to develop C
application programs taking advantage of its comfortable development and debugging environments.
It is available for all the grifo® cards based on family Intel 86 microprocessors.
GCTR allows to work in a very advanced environment that needs no deep knowledge of the
hardware used and has been designed with the goal to simplify and fasten the phases of development,
test and installation of the system to make.
The package is made of several subsets indipendent and not that satisfy the needs of modern
programmers, accoding to their working experiences. In detail, the package includes a compiler and
linker, a debugger, a programmer, general utility programs and examples ready for use, in
addition to the code needed to rom the application program.
C is one of the most appreciated programming languages and, thanks to its modularity, compactness,
flexibility and efficence, is very easy to find great amounts of code already written and often ready
for use. This language allows to manage directly the on board hardware, take advantage of several
kinds of data structures, manage interrupts easily, use powerful control instructions and exploit all
the advantages of a high level programming language.
GCTR uses Borland C compiler, certainly one of the most diffused so certainly well-known by the
programmers. This latter is provided only of its essential files; the user has the task to get the complete
package to be able to take advantage of all of its tools, library functions, on line and on paper
documentation, etc.
Borland C/C++ is development environment for DOS and/or WINDOWS programs, so even if its
compiler and linker can be used to develop embedded code, its debugger and libraries require the
presence of an operating system. GCTR provides the missing parts to the programmers who want
to use Borland C/C++ to develop programs for and embedded hardware that does not have an
operating system.
Both GCTR and any program developed using GCTR are not subject to any royalty: the user can
develop an unlimited number of application programs also in different versions without having to
inform grifo® about them.
- Complete development environment on ROM for family I86 CPU's and compatible.
- Programmation in Borland C/C++.
- On board debugging through Borland Turbo Debugger.
- Source level remote debugging.
- Short download time of application program to debug (about 6 Kbyte/second).
- Start-up code for ROM storage, to execute the application program after a reset or a power
on.
- Large memory model is used to have maximum room available for code, data, stack and heap.
- Floating point completely available.
Page 2
GCTR
Rel. 5.40
ITALIAN TECHNOLOGY
grifo®
- Library storable into ROM that provides the most frequently used functions (malloc, free,
interrupt, delay, etc.) in the automation field.
- Possibility to use high level console functions (cprintf, cputs, getch, kbhit, etc.) to manage
a set of operator panels like QTP xxx, QTP xxxP, serial terminals or, more simply,
alphanumeric display and matrix keyboards.
- Flexible locator for 80x86 microprocessors, preset to generate binary files.
- Ready to operate also matched with application programs that manage interrupts, without
limits for the response procedures.
- Code can be stored into EPROM or FLASH EPROM.
- Possibility to use only part of available SRAM for data, stack and heap and to keep the
remaining for storing parameters, data logher, etc.
- Possibility to use only part of available ROM for code and to keep the remaining for storing
messages, tables, etc.
- Use of Borland standard linker and compiler.
- Hardware debugging.
- Complete management of target board watch dog circuit. The user can mantain always
connected the watch dog circuit, when required, even during download and debug phases.
- GCTR is a non intrusive development environment, in fact it does not use interrupts for its
own and performs no action in autonomy. One serial line on the debugged board is used
during the debugging phase.
- GCTR is deterministic: execution times of its functions are constants so it can also be used
in real time applications.
- Included there is a specific installation program to perform automatically the package
configurations.
- No royalties or further costs.
- Provided on floppy disks, pre-programmer memory device and with user manual on CD.
Considering the natural evolution of software packages, please always refer to the eventual
READ.ME file in the work disk or directory. This file reports all the additions, changes and
improvements made to all the software package not yet reported in the manual: if this file is present
it must be examined, printed and added to this manual.
GCTR
Rel. 5.40
Page 3
grifo®
ITALIAN TECHNOLOGY
MINIMUM REQUIREMENTS
Here follows a brief description of all the material (hardware and software) needed to work with
GCTR.
CONTROL CARD
It is a control card belonging to grifo® industrial cards listing based on a family I86 microprocessor
like: GPC® 188F, GPC® 188D, GPC® 884, GPC® 883, etc.
Indipendently from the requirements of the application to build, the control card must be provided
with:
- at least 64KByte of SRAM
- an asynchronous RS 232 serial line
- an
EPROM
or a
TDE B xxx
Ver. ?.?
zzM
where:
xxx
?.?
yyy
zz
=
=
=
=
FLASH EPROM
FWR xxx
Ver. ?.?
yyyK zzM
with one of the following labels:
control board code
program version
size of FLASH EPROM (128K or 256K Byte)
control board clock frequence (20M, 26M or 40M)
The above repoted list is minimum work structure, in fact the same system can be expanded
increasing its potentialities. The control card configuration must be chosen according to the specific
needs of the application that must be developed.
Should the control card and GCTR be purchased in the same order, the EPROM or FLASH EPROM
memory device is provided already installed on the control card. On the label of such device all the
information about board code, version of code stored, its size and clock frequence are specified in
a form like the one above described.
PERSONAL COMPUTERS
GCTR software package needs a personal computer, from now called development PC, with at least
the following features:
Personal Computer:
RAM:
Operating system:
Monitor:
Mass storage:
One Serial port:
Mouse:
Page 4
IBM compatible (with CPU ≥ 386).
At least 8M Bytes.
WINDOWS 3.11, 95, 98, ME..
Colour.
Floppy disk drive 3" 1/2.
Hard Disk with at least 4M Byte of free space.
COM 1 or 2 in RS 232, compliant to V24 standard (capable to manage
115.2 KBaud)
Microsoft compatible with its own driver installed.
GCTR
Rel. 5.40
grifo®
ITALIAN TECHNOLOGY
Another personal computer, from now called console PC, is suggested to be able to use directly the
demo program provided with GCTR and to create a “traditional” user interface.
The console PC just needs to have are a keyboard, a monitor, an RS 232 serial line and a serial
communication program to perform the tasks of a simple terminal the shows on the monitor data
received from the serial port and sends there all the keys pressed on the keyboard.
SERIAL COMMUNICATION CABLE
COM?
9 pins DB
COM?
25 pins DB
RxD
2
3
2
10
TxA
TxD
3
2
5
9
RxA
GND
5
7
6
2
GND
CN?A
6 pins plug
CN?
16 pins low p.
Control card
Development P.C.
During the debugging phase, and for the eventual programmin of FLASH EPROM on the control
card, it is essential to perform a connection between one of the development PC serial ports and the
serial line A of the control card. This connection needs only the transmission, reception and ground
signals (RxD, TxD and GND) and must be compliant to the V24 normatives of C.C.I.T.T.
A second communication cable may be required between console PC and serial line B of control card
if the user wants to use the GCTR console.
This cable is like the previous described, as reported here:
COM?
9 pins DB
COM?
25 pins DB
RxD
2
3
2
6
TxB
TxD
3
2
5
5
RxB
GND
5
7
6
2
GND
CN?B
6 pins plug
CN?
16 pins low p.
Control card
Console P.C.
FIGURE 1: SERIAL CONNECTION BETWEEN DEVELOPMENT PC AND CONTROL CARD
FIGURE 2: SERIAL CONNECTION BETWEEN CONSOLE PC AND CONTROL CARD
The indication COM? stands for one of PC serial lines, while the indications CN? 16 pins low p.
and CN? 6 pins plug stand for grifo® control card standard connectors, described in the control card
technical manual. The table in the following figure shows connectors names and accessories codes
(cables, cards, etc.) that grifo® can offer to easy and fasten the connection phase. So the user can
decide whether to make them in autonomy or purchase them directly from grifo®.
GCTR
Rel. 5.40
Page 5
grifo®
ITALIAN TECHNOLOGY
CONTROL
CARD NAME
CONNECTOR
GPC® 188F
CN1
FLT 16+16; NCS 01; CCR 25+25 or CCR 25+9
GPC ® 188D
CN1
FLT 16+16; NCS 01; CCR 25+25 or CCR 25+9
GPC ® 883
CN3A, CN3B
CCR.PLUG25F or CCR.PLUG9F
GPC ® 884
CN3A, CN3B
CCR.PLUG25F or CCR.PLUG9F
CODE OF ACCESSORIES FOR SERIAL
CONNECTION
FIGURE 3: SERIAL CONNECTORS AND CONNECTION ACCESSORIES
WORKING SOFTWARE
In addition to the previously described hardware, GCTR needs a software for working to develop
and set up the application program. Such software is made by a set of programs and files provided
through the distribution disks and can be divided in two main groups as follows:
SOFTWARE TO DEVELOP THE APPLICATION PROGRAM
GCTR is basec on Borland C compiler, linker and debugger. These software tools are normally used
to generate executable files for standard personal computers with MS DOS or WINDOWS operating
system installed. To avoid the potential problems that may arise between different versions of the
previously mentioned software packages, GCTR provides also the essential parts of compilation,
linker and debug packages already installed and configured, ready to use.
This simplifies the use of GCTR; it is however essential that the user gets the complete Borland
packages to use them regularly, to read their documentation and to be able to use the generic utility
tools provided with Borland software package.
Summarizing, the software essential to develop the application program is:
- Software package Borland TURBO C or Borland TURBO C++ or Borland C++ with its own
documentation
- Software package Borland TURBO DEBUGGER with its own documentation
Version and type of these software packages are not important for the above described reasons.
It is suggested, but not essential, to use a generic communication programcapable to manage a classic
terminal emulation, with possibility to set through PC the console physical communication protocol.
Remarkable for this use are the following famous and diffused programs: CROSS TALK, PROCOMM,
BITCOMM, TERMINAL, HYPERTERMINAL, etc. or GET51 available on grifo® CD or website.
Page 6
GCTR
Rel. 5.40
ITALIAN TECHNOLOGY
grifo®
SOFTWARE AND FIRMWARE FOR THE CONTROL CARD
GCTR is based on a set of programs and files charged to make the C application program storable
in a ROM, despite the compiler has been designed to generate executable codes for system provided
with an operating system. This task is performed by libraries, startup code, remote debugging,
support programs, utilities, etc. that change according to the features of the control card used and are
made and provided by grifo®. For further information about software and firmware for control cards,
please refer to the paragraph called “DIRECTORY C:\GCTRxxx”.
GCTR USER MANUAL
The present manual, that reports all the technical information regarding GCTR operating system.
In detail it is possible to find hardware connections, commands syntax, libraries description,
procedures and support programs, memory organization, etc.
EPROM PROGRAMMER
There is the need for an EPROM programmer to burn the files generated on the development PC and
to complete the application. In fact the code already developed, debugged and tested in all its parts,
must be stored permanently in a EPROM to install on the control card.
Please remark that the EPROM programmer is needed only if the GCTR used is not on FLASH
EPROM because in this latter case the burning on the FLASH itself is performed in autonomy by the
control card through the development PC and a specific programming firmware (FWR xxx) included
in GCTR.
GCTR
Rel. 5.40
Page 7
grifo®
ITALIAN TECHNOLOGY
USE OF GCTR
To use correctly GCTR it is essential to perform the operations, both sequential and not, described
in the following paragraphs. To verify the correct working of the software package and to obtain a
system ready for use in short time, please follow the information reportedin the next chapter whose
title is “HOW TO START”.
INSTALLATION
Please consider the GCTR is a software package designed to perform all the operation of the
application program creation, of course except debugging, on the development PC, not on the control
card, for this reason it is convenient for the user to choose a powerful, fast and secure PC to make
the installation.
Here follows the list of operations that the user must perform to install correctly the GCTR software
package. It is essential to follow the ordere here specified:
1-
Install on the development PC, if not already present, the software package Borland TURBO
C or TURBO C++ or C++, following the indication given by the package itself.
This step is optional, but recommended toeasy the successive operations of writing and
syntactic checking of the application programs to develop.
2 - Assure that at least 4 MBytes of free space are available on the development PC's hard disk.
3Insert the disk 1 “GCTR xxx” in the floppy disk drive of the development PC and run the
installation program INSTALL.EXE by double-clicking on its icon.
4 - Read the informative window showed by the installation program, click on the “Next” button
to continue.
5 - At this point the installation programs checks the hardware and software requirements of the
development PC and, if they are enough, installation continues, otherwise the program awarns
about the lacks inviting to remove them.
6Wait for the end of the serch for a Borland development environment (I.D.E.) on the
development PC hard disk. After the serch the possible development environment found is
shown, orhterwise, in case no C Borland compiler has been installed, the standard editor
EDIT.COM is shown. Should the user not appreciate the development environment presented
by GCTR, it can be modified by specifing the path of the preferred programs in the specific
displayed window, or by editing the file GCTR.IDE as described in the paragraph “USER
CONFIGURATIONS”, even at the end of the installation.
7 - Select the serial port to use on the development PC (COM1 or COM2).
8 - Select the size of the two memory areas (CODE AREA SIZE and DATA AREA SIZE) that
are to be dedicated to GCTR, taking care that such sizes are respectively lower than or equal
to the amount of EPROM/FLASH EPROM and SRAM installed on the control card.
9This far the installation program starts to copy the work files to the hard disk. During this phase
a specific windwo shows the name of the file currently being copied and a progress bar
indicating the percentage of work already done. Insert the other “GCTR xxx” disks when
prompted and press a key to continue.
10 - Wait for the end of the copy phase, which will be indicated by a window informing about the
succesful installation; then click on “Next” button to continue.
Page 8
GCTR
Rel. 5.40
grifo®
ITALIAN TECHNOLOGY
11 - Compile the options of the GET188 installation window, taking care to select again the
development PC serial port (COM1 or COM2), the communication baudrate (115200), the
messages language (italian or english), the type of monitor used and user and firm name.
After completing click on “Install” button to continue.
12 - Read the update notes not yet reported on this manual that are shown in a specific window
during this phase. Please remark that such update notes are stored in the file READ.ME and
that they can be read and printed also in a second moment.
13 - Verify that on the development PC's hard disk the directories C:\TC_GCTR, C:\TD_GCTR
and C:\GCTRxxx have been created correctly and that they contain the files described in the
following paragraphs.
14 - At this point installation is completed.
To complete the explanation, here follows a short description of all the files installed on the
development PC; use information are reported in the next chapter.
DIRECTORY C:\TC_GCTR
This directory contains 9 files and/or programs that allow to compile and link the C source of the
application program and to obtain the executable file. Documentation about these files can be found
in Borland C++, TURBO C, TURBO C++ manuals.
DIRECTORY C:\TD_GCTR
This directory contains 15 files and/or programs that allow to debug the application program under
development; please remark that the debugger in the GCTR software package is a very powerful
symbolic source level debugger capable to manage directly the control board hardware, breakpoint,
trace, data structures visualization, etc. in a simple and intuitive mode with a multiple windows
representation, pull-down menus, shortcuts, etc. Also for this program, documentation can be found
in Borland TURBO DEBUGGER manuals.
DIRECTORY C:\GCTRXXX
After the installation this directory contains 80 files and/or programs that allow to use the whole
GCTR software package. The user must alwats work in this directory because the files present allow
to access the other directories so that all the operation like editing, compilation, linking, debugging,
EPROM image preparation, etc. can be performed.
In detail these files are:
STDEB.OBJ ->
STBIN.OBJ ->
GCTR
These are the startup code used during the linking of the application program
for the debug phase and binary image generation; such codes provides to set
and to initialize opportunely the hardware being used so that the C main
function of application program, may take control of the card. The files
change according to the memory configuration chosen at point 8 of installation.
Rel. 5.40
Page 9
grifo®
ITALIAN TECHNOLOGY
LCTR_T.LIB ->
This is a library file for the cotrol card used during the linking of the
application program that allows the executable generated for an operating
system to be ROMmed and executed on the control card.
CL.LIB ->
This is the Borland standard library file for the Large memory model; some
of its functions have been modified to be used on the control card, also this
file is used during the linking phase. For further information please refer to
the next chapters.
EMU, MATL.LIB -> These are the library files that contain the C mathematic procedures in the
version with emulated math coprocessor, essential to perform floating point
operations and to use the wide range of mathematical functions.
*.H ->
These are the header files where the declarations of Borland functions are
stored; they can be included in the main function of the application program
according to the rules of Borland documentation.
LOC.EXE ->
This program allows to transform the .EXE executable file obtained after
compiling and liking in the corresponding binary image to be used for
burning EPROM or FLASH EPROM for the control card.
EXETOBIN.LOC -> This file contains the transformation parameters for LOC.EXE that specify
the memory configuration of the control card. Of course this file changes
according to the memory configuration of control card input by the user at
point 8 of installation.
CTODEB.* ->
These files are support programs that provides to run sequentially the
Borland I.D.E. or the text editor, the compiler, the linker and the debugger
for the specified application program.
CTOBIN.* ->
These files are support programs that provides to run sequentially the
compiler, the linker and the locator for the specified application program.
FLASHWR.* ->
These files are support programs that allow to program the FLASH EPROM
on the control card.
GCTR.IDE ->
This is a text file containg the path of the I.D.E. program or the text editor
that must be used during the development of the application program.
CTODEB runs the program indicated here.
TDxxx.IMG ->
This is the binary image of the program executable on the control card that
is charged to communicate with the TURBO DEBUGGER and so it
manages the whole set-up phase of the application program. This file
changes according to the memory configuration chosen at point 8 of
installation.
GET188.EXE ->
This is the intelligent terminal emulation program used by FLASHWR to
program the FLASH EPROM.
G188HELP.HLP -> On line help file for GET188.
GET188IN ->
Installation program for GET188.
GHEX2.COM ->
This is an utility program that allows to transform a binary file into the
equivalent file in Intel HEX format.
INSTALL.LOG ->
This is a text file containing the list of the installed files.
UNINSTALL.EXE -> This is the uninstallation program for GCTR and can be used to delete the
files installed on the development PC.
*.C ->
This is a set of demo programs directly usable on the control card with
GCTR.
READ.ME ->
This files contains the latest updates not yet reported in this manual.
Page 10
GCTR
Rel. 5.40
ITALIAN TECHNOLOGY
grifo®
USE
Here follows the description of how to use GCTR software package; please remark that the use
procedure has been simplified making it usable by all the user who are programmers capable to use
C.
The following steps must be performed to obtain an application program written in C, completely
debugged, to be installed on the control card and must be executed in the reported order. To give a
complete description both the use modalities under MS-DOS and the modalities under WINDOWS
are shown when they happen to be different:
123-
4-
5-
Enter in directory C:\GCTRxxx on the development PC's hard disk.
Check the user configurations and modify them according with used editor and Borland C
I.D.E. settings as described in "USER CONFIGURATIONS" paragraph.
Run the support program CTODEB:
typing C:\GCTRxxx>CTODEB <filename>.C<ENTER>
under MS-DOS
dragging the icon <filename>.C onto the icon of CTODEB
under WINDOWS
this runs the Borland I.D.E. or the editor specified during the installation phase with file
<filename>.C as target. In this environment the user must develop the C program according
to the rules of the programming language, being careful not to modify the name of the C source
file being used; after writing the application program (or the part of it that must be tested) it
is convenitent, if the user is running an I.D.E., to check the syntax correctness giving the
compilation command. It is now possible to exit from the I.D.E. or the text editor, the source
is automatically compiled and linked with the specific programs in the directory C:\TC_GCTR.
It is essential to check for absence of errors in this phase, if errors are present the execution of
CTODEB must be terminated and point 3 must be repeated since the beginning to correct the
errors. If compiling and linking complete succesfully, the debugger that finds in directory
C:\TD_GCTR is automatically run. Now the correct working of the application program must
be verified taking advantage of the great potenitalities of Borland TURBO DEBUGGER
testing it directly on the hardware of control card connected to eventual external electronic and
to the development PC.
After terminating the test the user can exit form the debugger and return the control to the
development PC operating sytstem, because CTODEB terminates when the debugger is
terminated. During the execution of this phase the files <filename>.OBJ, <filename>.MAP,
<filename>.EXE, <filename>.C, <filenale>.BAK are created or modified but only the file
<filename>.C is intresting for the user.
If the correct working verify shows no problem or error the user can continue to point 3,
otherwise must repeat point 3 until the complete verify of all the program parts. Of course the
errors found using the debugger must be solved by the user through changes to the source of
the application program.
After the debugging phase the application program must be saved on the control card. This
operation is completely automatic and is performed running the support program CTOBIN:
typing C:\GCTRxxx>CTOBIN <filename>.C<ENTER>
under MS-DOS
dragging the icon <filename>.C onto the icon of CTOBIN
under WINDOWS
where <filename>.C is the name of the C source file used at point 3. Also in this point user will
have to check for the absence of errors and, at the end, the file <filename>.IMG will have been
generated; this file contains the binary image of the code to use for programming (burning)
EPROM or FLASH EPROM for the control card. A file called <filename>.ABM is also created
in this step.
GCTR
Rel. 5.40
Page 11
grifo®
6-
7-
ITALIAN TECHNOLOGY
The user must burn EPROM or FLASH EPROM with the file <filename>.IMG. For a detailed
description of the execution of these operations, please refer to the paragraphs “EPROM
PROGRAMMING” and “FLASH EPROM PROGRAMMING”.
Now, if the GCTR on EPROM is used, the user must turn off the control card, uninstall the
EPROM labelled “TDE B xxx ...” and replace it with the one burned at point 6; if the GCTR
on FLASH EPROM is used the user must turn off the control card, set it to RUN mode (please
see paragraph “CHANGES TO AN ALREADY INSTALLED APPLICATION”).
Once the control card is supplied, application program starts automatically.
The user must keep the work files of the application program (sources, includes, macros, etc.) in the
directory C:\GCTRxxx; eventually, to simplify the icons dragging when working under WINDOWS,
it is possibleto copy the support link files CTODEB and CTOBIN on desktop and to use these copies.
EPROM PROGRAMMING
The modalities of use of an EPROM programmer are not subject for this manual, so in this paragraph
only GCTR related information are provided.
The file <filename>.IMG generated by the CTOBIN support program is a binary file whose size is
the same as the size of the selected EPROM during the GCTR installation phase; this file must be
burned from address 00000H.
If the EPROM programmer being used requires the Intel HEX format the binary file must be
transformed into the equivalent Intel HEX file through the program GHEX2.COM. The syntax to use
GHEX2 is:
C:\GCTRxxx>GHEX2 <filename>.IMG<ENTER>
it must be type at MS-DOS prompt or in the Start|Execute window of WINDOWS and it generates
the file <filename>.HEX featuring extended Intel HEX format.
Should the application program need external data to store in EPROM (configuration data, messages,
tables, etc.) they must be stored after the last byte of the previously saved code. As the binary file
generated by GCTR fills the whole EPROM content, the user has to locate the address of code end
as described in the paragraph “RESERVED MEMORY”.
FLASH EPROM PROGRAMMING (FLASH WRITER)
One of the GCTR remarkable features is the possibility to manage in autonomy the FLASH EPROM
installed on the control card. This feature makes really easier the development of an application, in
fact it an external EPROM programmer is not needed any more, it is replaced simply by the
development PC connected to the control card through a serial port. The updating, verify and
maintenance phases of the software under development may comfortably performed even on the
field, for example using a portable PC.
FLASH EPROM management through GCTR is a supported operation that allows the user to modify
the content of certain FLASH areas using a specific program, starting from some files stored on any
of the development PC's drives. These are high level operations and are provided with help messages
that support the user across all the phases.
Page 12
GCTR
Rel. 5.40
ITALIAN TECHNOLOGY
grifo®
Please remark that to guarantee the integrity of data stored in FLASH EPROM and to assure
everytime the presence of program FLASH WRITER, this latter is always written in the last sector
of the component and it can be written only by grifo®. The user can obtain other FLASH EPROMs
for working or to install on a production system by ordering them to grifo® using the code FWR xxx
or FWR www.512K, as described in chapter "GCTR VERSIONS".
BOARD CONFIGURATION
To manage correctly FLASH WRITER, the user must perform the following hardware configurations:
1234-
Connect the serial line A of the control card to the serial line of the development PC chosen
during installation using the communication cable described in figure 1.
Install the FLASH EPROM labelled “FWR xxx ...” on the specific socket of the control card.
Install at least 128KBytes of SRAM on the specific sockets of the control card.
Configure the jumpers of the control card according to its hardware configuration and select
the DEBUG mode following the indications on the technical manual or figure 4 in this manual.
NOTE: For GPC® 188F and GPC® 188D do not connect jumpers J16 and J17.
FLASH EPROM AREAS
Referring to figures 5 and 6, only the areas marked with (*) can be modified through the program
FLASH WRITER. Here follows a short description of these areas.
1-
2-
3-
FLASH WRITER area: it corresponds to the last 16K Bytes of the FLASH and it contains the
code of the FLASH management program. The control card always executes this portion of
code after a reset or a power on, its first action is to detect whether RUN or DEBUG mode are
set and, in consequence, run the program stored in FLASH (RUN mode) or the FLASH
WRITER (DEBUG mode). This area cannot be modified by the user in any way in order to
avoid wrong situations which would prejudice the control card correct working.
Not used area: it may be present in FLASH EPROMs whose sector size is greater than the
16KBytes required by the FLASH WRITER area. Size of this area is variable (for example 0K
Bytes for 128Kx8 FLASH and 48KBytes for 512Kx8 FLASH), however it corresponds to an
area not usable for any operation.
User area: it corresponds the remaining free space on the FLASH except for the two previous
areas (for example 112K Bytes for 128Kx8 FLASH, 448K Bytes for 512Kx8 FLASH) and it
can contain code and/or data like the application program, configuration data, messages,
tables, etc. In RUM mode the control card always starts by executing the code stored at the
beginning of this area.
In the user area can be stored one or more binary files located on development PC mass memory
devices (floppy disk, hard disk, etc.) that have been generated by GCTR or other software
packages. These files can be written to FLASH EPROM starting from an user specified address
until the last file is writtern or the user area is full. User area cannot be written twice with
different data (in such case a FLASH EPROM malfunctioning error is visualized), so user area
must first be deleted.
GCTR
Rel. 5.40
Page 13
grifo®
ITALIAN TECHNOLOGY
The application program developed with GCTR must be aloways stored at the beginning of
the user area to be executed in RUN mode.
For further information about previously described memory areas please refer to the paragraphs
“MEMORY ORGANIZATION”.
FLASH WRITER EXECUTION
To execute correctly the FLASH EPROM management program, the following steps must be
performed; when needed the differences between MS-DOS and WINDOWS are specified:
1-
23456-
7-
Run GET188 on the development PC connected to the control card:
typing C:\GCTRxxx>GET188 /T<ENTER>
under MS-DOS
double clicking on the icon FLASHWR
under WINDOWS
and wait for the presentation window to disappear.
Prepare the control card as described in the previous paragraph “BOARD CONFIGURATION”
then reset or turn off and on the control card to run FLASH WRITER.
FLASH WRITER starts showing its version number, size of FLASH, start address of free user
area and the first help screen.
Read carefully the help screens selecting them with the keys “N” and “P” then continue the
execution pressing “ENTER”.
Select the operation desired by pressing the corresponding numeric key (“0”÷“3”) as indicated
in the menu.
If the write to user area operation is selected (key “0”), the user must insert the name of the file
to write in this area. This file must be in binary format (.IMG, .BIN, etc.) and located in the
current directory of the current drive. The program checks for the existance of the specified file;
if it exists the program continues otherwise request a new file name.
If the file exists, the user must type the segment address from wich the programming of the
selected file content must start; the program will prompt automatically the first free address of
FLASH that can be confirmed or changed by inserting a new hexadecimal upper case address.
FLASH WRITER verifies that the address inserted is included in the user area and, in case it
is, it continues, otherwise requires a new address.
If the address is valid the program checks whether the selected file can be completely written
into the user area starting from the specified address and, if it is possible, the program
continues, otherwise prompts for a confirm to the programming and truncation of the final part
that exceeds the user area. If the user confirms the program continues, otherwise the operation
is aborted.
The next writing phase is shown by a specific status message that shows the address currently
under programming; during this phase the user has just to wait for its completion and verify
its result.
The file name requested by the program is in the format <drive>:<name>.<extension> and
the drives supported are all the ones of development PC. Should the file to select not to be
located in the current directory, the right directory must be selected through the option
“File|Change Dir...” of GET188.
If the user selects to delete the user area (key “1”) the confirmation request appears and in case
of user confirmation the whole user area of the FLASH is deleted, otherwise the operation is
aborted.
Page 14
GCTR
Rel. 5.40
ITALIAN TECHNOLOGY
grifo®
In case of confirmation the user has just to wait for the completion of the operation, whose
progress is indicated by a serie of dots printed on the monitor, then verify its result.
This operation is normally used to delete the previous content of the FLASH EPROM and so
making possible a successive programmation with new files; data elimination is definitive so
it must be selected and confirmed extemly carefully.
8 - If the help screen representation is selected (key “2”), the help screens are shown to the user
as described in step 4.
9If exit operation is selected (key “3”), the FLASH WRITER shows a proper message that
informs about the stopped execution and about next possible operations.
10 - During the execution of most of the phases it is possible to stop the operation by pressing the
“ESC” key that terminates the FLASH WRITER. This key has the same effect of exit
operation.
11 - During every phase of the program possible malfunctioning are verified (file system access
error, FLASH deletion error, FLASH write error, etc.) and in case one of them occours and
informative message appears immediatly.
12 - Exit from GET188 on the development PC pressing at the same time the keys <ALT>+<X>
to return the control to the operating system.
CHANGES TO INSTALLED APPLICATION: DEVELOPMENT, EXECUTION
A very common feature requested to any system is the possibility to intervent easily on the
application programs to update them, modify them or verify their working when they are operational.
GCTR responds to this request by providing the possibility to perform these operations of updating,
modifing and verifing in a simple and efficent way, always using the only development PC. The
technique provided is the possibility to stop the already installed application program execution
(EXECUTION mode) and to return to the verify and modification condition described in the
paragraph “USE OF GCTR” (DEVELOPMENT mode). Both EXECUTION and DEVELOPMENT
mode have already been widely described in the previous paragraphs, so in this paragraph only the
passage from one mode to the other is described, in two different versions for GCTR in EPROM and
in FLASH EPROM.
GCTR in EPROM
EXECUTION mode is selected by installing on the control card the EPROM containing the
application program obtained following the indications in the paragraph “EPROM
PROGRAMMING”.
DEVELOPMENT mode is selected by installing on the control card the EPROM labelled
“TDEB xxx ...” and connecting serial port A of control card to development PC.
GCTR in FLASH EPROM
EXECUTION mode is selected by setting the control card in DEBUG mode, erasing the user
area of FLASH EPROM then storing the application program at the beginning of the user area
and setting back the control card to RUN mode.
DEVELOPMENT mode is selected by setting the control card in DEBUG mode, erasing the
user area of FLASH EPROM then storing the TURBO DEBUGGER (file TDxxx.IMG) at the
beginning of the usera area and setting back the control card to RUN mode.
GCTR
Rel. 5.40
Page 15
grifo®
ITALIAN TECHNOLOGY
The operations of user area deletion and programming must be performed using the FLASH
WRITER following the indications given in the paragraph “FLASH EPROM
PROGRAMMING”. Both in EXECUTION and DEVELOPMENT modes when the program
to save at the beginning of the user area is selected the storing with truncation of the file must
be confirmed.
The operative mode selection (RUN/DEBUG) is made positioning a specific jumper, as
described in the following table:
CONTROL
CARD
RUN DEBUG JUMPER
GPC® 188F
J18
GPC® 188D
J18
GPC ® 883
J1
GPC® 884
J1
FIGURE 4: RUN AND DEBUG MODE SELECTION JUMPERS TABLE
Where:
jumper not connected ->
jumper connected
->
selects RUN mode
selects DEBUG mode
NOTE: Whenever the status of the RUN/DEBUG mode selection jumper is changed the
control board must be reset or turned off and then on, because FLASH WRITER checks for
its status only at startup.
Certainly the switching between these two operative modes is more comfortable in case of GCTR
on FLASH EPROM, in fact in this case the only physical intervent on the control card is the different
connection of a comfortable jumper.
GCTR on FLASH EPROM is suggestable in the phase of application set-up or however for small
productions, while GCTR on EPROM is certainly a better choice to produce a great number of
systems with a stable application program.
Page 16
GCTR
Rel. 5.40
ITALIAN TECHNOLOGY
grifo®
HOW TO START
This chapter describes the operations to perfom in order to begin to use GCTR.
In detail here is reported the correct sequence of operation with pratical use examples. For further
information, please refer to the previous chpaters, where each operation here explained is described
with many more details. Examples reported in this paragraph are reported to a GCTR in FLASH
EPROM for GPC® 884 with 128K FLASH EPROM (“FWR xxx ...”) and 128 K SRAM.
12-
3-
4-
5-
6-
7-
Read all the documentation included in the software package.
In stall a Borland C programming package.
Example: install Borland C++ Ver. 3.1 following the information and the possibilities of its
installation program.
Install GCTR selecting: the development environment (I.D.E.), the development PC serial port
and the configuration for the memories installed on the control card.
Example: confirm the choice of Borland I.D.E. BC.EXE; select COM1 in the serial port
request window; set the size for CODE AREA SIZE to 128K Bytes; set the size
for DATA AREA SIZE to 128K Bytes; after the copy reselct COM1 in the
GET188 installation window and insert the user personal data.
Install the EPROM “TDE B xxx ...” or FLASH EPROM “FWR xxx ...” on the specific socket
of control card and set it to DEVELOPMENT mode.
Example: install FLASH EPROM “FWR 884 ...” on socket IC5; connect jumper J1; run
FLASHWR on the development PC; supply the control card; cancel the user area
with FLASH WRITER on the FLASH EPROM then program it with file
TD884.IMG at the beginning of user area (E000H) confirming the truncation; exit
from GET188 pressing <ALT> and <X> at the same time; disconnect jumper J1
and turn off and on the control card.
Connect serial line A of control card to the development PC's selected serial port taking care
to respect the RS 232 standard in the connection of signals GND, TxD and RxD. For further
information about this connection please refer to figure 1 or to control card and PC technical
manuals.
Example: build a connection cable that connects respectively pins 2, 3 and 5 of a DB 9 female
connector to pins 2, 5 and 6 of a 6 pins male plug connector; connect this cable to
CN3A of GPC® 884 and to connector COM1 of development PC.
Connect serial line B of control card to the console PC's one of its serial ports taking care
to respect the RS 232 standard in the connection of signals GND, TxD and RxD. For further
information about this connection please refer to figure 2 or to control card and PC technical
manuals.
Example: build a connection cable that connects respectively pins 2, 3 and 5 of a DB 9 female
connector to pins 2, 5 and 6 of a 6 pins male plug connector; connect this cable to
CN3A of GPC® 884 and to connector COM1 of development PC.
Run on the console PC a serial communication program and configure the logic communication
protocol to 19200 Baud, 8 bit per character, 1 stop bit, no parity on the serial port connected
to serial line B of control card.
Example: run the communication program GET51 (available on the site and/or the CD of
grifo®); set the above mentioned parameter in the window “Option|Serial port”
and activata the communication with the command “Option|Terminal”.
GCTR
Rel. 5.40
Page 17
grifo®
8-
9-
10 -
11 -
12 -
13 -
14 -
ITALIAN TECHNOLOGY
Run on the development PC the support program for the debugger with program TEST.C as
target file:
typing C:\GCTRxxx>CTODEB TEST.C<ENTER>
under MS-DOS
dragging the icon of file TEST.C on the icon CTODEB
under WINDOWS
verify that the selected I.D.E. program is run and that it opens file TEST.C.
This latter is the classical program that prints to the console the prime numbers lower than 100,
its purpose is merely didactical and demonstrative.
Example: Run the support program for debugger as above noted.
If Borland I.D.E. is used, continue reading from here, otherwise jump to step 12.
Configure Borland I.D.E. selecting the signalation of all warnings and the use of large model.
Example: Select the option “All” in the window “Display Warnings” visualized with the
command “Option|Compiler|Messages”; select the option “Large” in the window
“Model” visualized through the command “Options|Compiler|Code generation”;
save these settings with the command “Options|Save” and confirming with "OK".
Examine he program TEST.C without changing it using the editor commands then run the
compilation using the specific command of Borland I.D.E.
Example: scroll the program source with arrow keys; verify the potentialities of edit and
search menus commands without changing the program; compile the program
selection the option “Compile|Compile”.
Correct the error signaled during the compilation: at row 48 the source contains a typing error,
that is an “s” has been omitted so the string“flag[i]” should have been “flags[i]”. After having
added the missing letter compilation must be repeated and if there are no errors compilation
must be repeated.
Example: move to row 48, where the compiler has found an error, and add the missing “s”;
repeat the compilation described at step 9.
After having verified and corrected the syntax of TEST.C exit from I.D.E., check for errors
absence during the next phases of compiling and linking, wait for TURBO DEBUGGER to run
and confirm the program transmission through the serial line, as requested by the specific popup window.
Example: perform the above described operations confirming by keyboard pressing <ENTER>
or by mouse clicking on key “Yes” when the message “Program out of date, send
over link?” appears.
Wait for the transmission phase to end and the source of TEST.C to appear on the monitor,
select the execution command “Run|Run”. Doing so, on the console PC's monitor the list of
the prime numbers included in the range 1 to 100 will appear, it is possible to verify the
correctness and completeness of the list.
The user should immediatly note the absence of prime number 1: program TEST.C has a
functional error that must be located.
Example: perform the above described operations.
Stop the program execution by pressing <CTRL>+<BREAK>, close the CPU window that
appears with <ALT>+<F3>, reload the program with the command “Run|Program Reset”,
place the cursor at the end of the prime numbers determination cycle (row 61) then give
command “Run|Go To Cursor”. The program is executed up to the numbers representation
cycle, now the boolean vector flags[] already contains the status matched to the first 100
numbers. The command “Data|Add watch”, specifing the variable “flags”, pops up a window
that shows its content; it is easy to verify that the vector has the correct value for index 1so the
absence found at step 13 is due to an error during representation. Executing the code step by
step by command “Run|Trace Into” it is immediate to see that the starting index is wrong, in
fact the first prime number printed has index 2.
Page 18
GCTR
Rel. 5.40
ITALIAN TECHNOLOGY
15 -
16 -
17 -
18 -
19 -
grifo®
Example:
Example perform the above described operations.
To correct the starting index exit from TURBO DEBUGGER with command “File|Quit” and
repeat step 8, correct row 63 with “i=1” and repeat steps 10 and 12. Now also prime number
1 will be printed to the console PC so the program has been completely tested and verified.
Example: perform the above described operations.
The program, completely tested, obtained in the previous step now can be stored to EPROM
or FLASH EPROM on the control card to make it run automatically at power on, even without
the development PC connected. To do this, first run on the development PC the support
program that generates a binary image of the executable:
typing C:\GCTRxxx>CTOBIN TEST.C<ENTER>
under MS-DOS
dragging the icon of file TEST.C on the icon CTOBIN
under WINDOWS
to create the file TEST.IMG in the work directory.
Example: run the support program as above indicated
Now the control card must be set in EXECUTION mode:
in case of GCTR on EPROM, file TEST.IMG must be used to burn an empty EPROM whose
size is equal to the size indicated at step 3 through an EPROM programmer connected to the
development PC;
in case of GCTR on FLASH EPROM control card must be turned off, set to DEBUG mode,
the program GET188 must be run on the development PC:
typing C:\GCTRxxx>GET188 /T<ENTER>
under MS-DOS
double clicking on the icon FLASHWR
under WINDOWS
turn on control card, wait for program FLASH WRITER to start, confirm the execution
pressing <ENTER>, select the user area deletion (pressing <1>) and confirm the operation
pressing <Y>, wait for the end of the deletion and press a key to return to FWR main menu,
here select the write user area option (pressing <0>), type the name of the file to store in the
area C:TEST.IMG<ENTER>, cofirm the programming address pressing <ENTER>, confirm
programming with truncation pressing <Y>, wait for the end of programming and press a key
to return to the main menu, select the option to exit form FWR pressing <3>, exit from GET188
pressing <Alt>+<X>.
In both cases after the programming operation has been completed the development PC is not
needed any more and can also be disconnected from the control card.
Example: perform the above described operations considering that for GPC® 884 the
DEBUG mode is set connecting jumper J1 and that when programming the address
to confirm is E000.
Turn off the control card and set it to EXECUTION mode which:
in case of GCTR on EPROM, means to replace the EPROM on the control card with the one
obtained at step 17;
in case of GCTR on FLASH EPROM means to set the control card in RUN mode,
disconnecting the specific jumper.
Example: turn off GPC® 884 and disconnect jumper J1.
Turn on the control card and check that the application program starts automatically, that is
check that on the console PC all the prime numbers between 1 and 100 are represented.
So the creation of the first application program is terminated.
Example: perform the above instructions.
GCTR
Rel. 5.40
Page 19
grifo®
ITALIAN TECHNOLOGY
DESCRIPTION OF GCTR
Here follow some general information about GCTR that the user must use during the development
of the application program to take the best advantage of the control card features.
Of course the different features of different hardware are shown separately.
START-UP CODE
By start-up code we mean that piece of code always executed by the control card immediatly after
a reset or a power on that is charged to set up all the conditions needed for the next phases. The main
operations performed by start-up code are listed below:
123-
Sets the control card for selected memory size
Sets the I/O configuration
Disables the circuiteries that can influence the program execution like internal watch dog,
interrupts, DMA, etc.
4 - Retrigger ther external watch dog circuit
5 - Initializes an opportune stack for working
6 - Resets the global variables area
7 - Initializes the floating point emulator
8 - Copies the initialized data area from EPROM or FLASH EPROM to SRAM
9 - Installs an handler for interrupt 21H to intercept and refer eventual unexpected system callls
10 - Jumps to the firsr instruction of main in C application program
GCTR start-up code is essential for any Capplication program and can't be replaced with Borland
standard start-up code because this latter is based on an execution under MS-DOS or WINDOWS
operating system. Such code must be used also during the development phase of the application
program infact TURBO DEBUGGER can execute it even if the control card hasn't been reset or
turned off and on.
The start-up code specific for the selected memory configuration is provided already compiled in the
files STDEB.OBJ, STBIN.OBJ and are automatically linked to the application program through
CTODEB and CTOBIN.
ADDRESSING OF HARDWARE STRUCTURES IN I/O
The start-up code which is always executed before the main function of C application program is also
charged to set and initialize the microprocessor register used to manage I/O (RELOC, PACS).
A setting common for all the control cards is to set the I/O internal microprocessor addresses starting
from FF00H and to set the I/O addresses of on-board peripherals starting from the values reported
in APPENDIX C of this manual.
These addresses, especially the peripherals addresses, must be used directly by the user in the C
application program and are also used by the ROMed libraries provided with GCTR; so they can't
be changed for any reason.
Page 20
GCTR
Rel. 5.40
ITALIAN TECHNOLOGY
grifo®
LOCATOR
The GCTR locator allows to locate code and data anywhere in the control card conventional memory
space. It works on standard executable files (.EXE) and on .MAP files generated by the Borland C/
C++ creating a binary file that can be burned on EPROM or used to program a FLASH EPROM. It
may also create a file in Intel OMF absolut format if needed, such file is used by most of the emulators.
Allocation commands are in an human readable format; they indicate the files that the locator must
use, the ROM addresses, the SRAM addresses of the segments and the memory areas available. Such
commands must not be provided by the user infact they are already written in the file EXETOBIN.LOC
during the GCTR installation.
Locator performs cross verifies during allocation. It checks for ROM overflows, code overlappings,
SRAM and ROM overlappings, missing correspondances between .EXE and .MAP files, the
complete program allocation, etc. After it has worked locator prints the amount of ROM used, both
as percentage and as number of bytes currently used.
Locator generates an absolute .MAP file, with extension .ABM, that reports the addresses of all
public functions and data structures; it has the same format of .MAP file generated by Borland linker
with addresses changed.
FLOATING POINT
GCTR provides fast and precise floating point support with typical C mathematic and trigonometric
functions. For grifo® control cards not provided with mathematic coprocessor, Borland C/C++
mathematic management means a floating point software emulation.
Mathematic errors are managed by a specific ROMed function that exits from application program
execution and retuns an unique error code, to provide the user information about what happened.
There is an example program, called DEMOFP.C, specific to show the use modalities of all the
functions available.
HARDWARE BREAKPOINT
In the application program DEVELOPMENT and debug mode, the user can employ two breakpoints
that provide tha possibility to take the control of the control card execution even when the the
application program has jumped into an infinite loop or other not predicted situations.
The first breakpoint is the classic one, activable through development PC keyboard by pressing
<CTRL>+<BREAK>, it is a software interrupt matched to the reception interrupt of serial line A on
the control card.
The second is a real hardware breakpoint matched to Not Maskable Interrupt (/NMI) of control card.
This interrupt can be activated by pressing simply a button that connects /NMI signal (available on
the control card connectors) to the ground. Differently from the first breakpoint, this one can't be
disactivated by software, it is always active so it is always usable. Another difference between these
two breakpoints is that the first one stops the application program execution, while the second one
exits from program execution so this must be reloaded for eventual next debug phases. Of course no
breakpoint is available and/or actived during EXECUTION mode of application program.
GCTR
Rel. 5.40
Page 21
grifo®
ITALIAN TECHNOLOGY
MEMORY ORGANIZATION
Basically, all C programs use three fundamental memory areas: code area, data area, stack and heap
area, while the control card features two kind of memories: ROM (EPROM or FLASH EPROM)
which is read-only and SRAM, readable and writeable. GCTR charges to organize all the memory
installed on the control card to make it available to the application program in the way the user has
chosen. During installa phase, in fact, GCTR ask for the size of code area (in EPROM or FLASH
EPROM) and data+stack+heap area (in SRAM) and self-configures automatically with the selections
input by the user; for this reason it is not essential to worry about the hardware configuration during
the work but it is enough to respect the indications provided in this paragraph, limitating to use only
the allowed areas.
The grifo® control cards based on microprocessors of family I86, it is possible to set size and
addresses of memory devices by software through programming a set of microprocessor internal
registers and the eventual on board MMU circuitery. GCTR sets these registers (UMCS, MPCS,
MMCS, LMCS, MMU) in the start-up code which is also configured during the installation. Control
card always runs star-up code after a reset or a power on so the correct memory configuration is
always guaranteed in the operating phase. If the memory needs of an application program change it
is enough to reinstall GCTR and recompile the application program without any further modification.
The following figures show the possible memory configurations supported by GCTR:
GCTR ON FLASH EPROM
GCTR ON EPROM
FFFFFH
RESET VECTOR
RESET VECTOR
ADDR.10
FLASH WRITER
ADDR.9
NOT USED
USER RESERVED ROM
ADDR.8
USER RESERVED ROM (*)
ADDR.7
TURBO DEBUGGER CODE
TURBO DEBUGGER CODE (*)
ADDR.6
ADDR.5
USER RESERVED RAM
APPLICATION PROGRAM
STACK AND HEAP
double
APPLICATION PROGRAM DATA
USER RESERVED RAM
ADDR.4
ADDR.3
ADDR.2
APPLICATION PROGRAM CODE
APPLICATION PROGRAM CODE
ADDR.1
TURBO DEBUGGER DATA
INTERRUPT VECTOR
APPLICATION PROGRAM
STACK AND HEAP
double
APPLICATION PROGRAM DATA
ADDR.0
TURBO DEBUGGER DATA
INTERRUPT VECTOR
00000H
FIGURE 5: MEMORY CONFIGURATION IN DEVELOPMENT MODE
Page 22
GCTR
Rel. 5.40
grifo®
ITALIAN TECHNOLOGY
GCTR ON FLASH EPROM
GCTR ON EPROM
FFFFFH
RESET VECTOR
RESET VECTOR
ADDR.10
FLASH WRITER
ADDR.9
NOT USED
USER RESERVED ROM
ADDR.8
USER RESERVED ROM (*)
ADDR.7
APPLICATION PROGRAM CODE
ADDR.6
APPLICATION PROGRAM CODE
(*)
ADDR.5
USER RESERVED RAM
USER RESERVED RAM
ADDR.4
APPLICATION PROGRAM
STACK AND HEAP
APPLICATION PROGRAM
STACK AND HEAP
ADDR.3
APPLICATION PROGRAM DATA
INTERRUPT VECTOR
APPLICATION PROGRAM DATA
ADDR.0
INTERRUPT VECTOR
00000H
FIGURE 6: MEMORY CONFIGURATION IN EXECUTION MODE
The values of the addresses reported in figures 5 and 6 change according to the memory configuration
installed on the control card and the memory area sizes set during the installation phase, as described
in the following tables.
Size of DATA area set
during installation
ADDR.0
ADDR.1
ADDR.2
ADDR.3
ADDR.4
64 Kbyte
00400H
00FC0H
?????H
?????H
10000H
128 Kbyte
00400H
00FC0H
?????H
?????H
20000H
256 Kbyte
00400H
00FC0H
?????H
?????H
40000H
512 Kbyte
00400H
00FC0H
?????H
?????H
80000H
FIGURE 7: SRAM MEMORY ADDRESSES VALUES SET DURING INSTALLATION
GCTR
Rel. 5.40
Page 23
grifo®
ITALIAN TECHNOLOGY
Configuration SRAM on card
ADDR.5
128 Kbyte
10000H
256 Kbyte
20000H
512 Kbyte
80000H
FIGURE 8: SRAM MEMORY ADDRESSES VAMUES OF CONTROL CARD CONFIGURATION
Size of CODE area set
during installation
ADDR.6
ADDR.7
ADDR.8
ADDR.9
ADDR.10
128 KByte
E0000H
?????H
FC000H
FC000H
FFFF0H
256 Kbyte
C0000H
?????H
F8000H
FC000H
FFFF0H
512 Kbyte
80000H
?????H
F0000H
FC000H
FFFF0H
FIGURE 9: ROM MEMORY ADDRESSES VALUES SET DURING INSTALLATION
Configuration ROM on card
ADDR.6
128 Kbyte
E0000H
256 Kbyte
C0000H
512 Kbyte
80000H
FIGURE 10: ROM MEMORY ADDRESSES VALUES OF CONTROL CARD CONFIGURATION
Wherever there is an undefined address (?????H) an exact value cannot be specified because the area
size change according to the size of the application program under development and can be decided
only by the user.
MEMORY USE NOTES
- Information about both data area and code area size of application program can be found in the files
<filename>.MAP and <filename>.ABM which are generated by GCTR during its normal work.
- The user area, referred to by paragraph “FLASH EPROM PROGRAMMING“, is the FLASH
EPROM area delimited between the addresses ADDR.6 and ADDR.8, as denoted by the *, which
indicates the areas that the user can modify using FLASH WRITER.
- For GCTR on FLASH EPROM the choice to have an area not used whose size depends on the
memory size is due to the physical orgranization of the FLASH used. In fact this latter is divided
into 8 sectors of equal size, for safety reasons it has been decided to protect the last sector making
it unusable. This safety decision reduces the user area of an amount of memory acceptable.
- GCTR uses large memory model to provide the maximum dimension for all the areas of application
program. Anyhow please remind that the DGROUP segment can't exceed the 64K iclusive, as
described in Borland C documentation.
Page 24
GCTR
Rel. 5.40
ITALIAN TECHNOLOGY
grifo®
- As described on figure 5 the TURBO DEBUGGER doubles the data area of application program
saved on RAM, for an internal use. Summarizing on control card must be installed the following
SRAM size: 0FC0H + application code + application data + application data + stack and heap +
possible reserved memory.
- In DEVELOPMENT mode GCTR uses really much more RAM than those required in EXECUTION
mode, in fact in the first condition TURBO DEBUGGER saves on RAM even other different areas
of application program under development. For simplicity, security and cost reduction reasons it
is possible to use a control card with the highest SRAM configuration during program generation
(DEVELOPMENT mode) and after in production (EXECUTION mode) it is possible to use the
only necessary configuration.
RESERVED MEMORY
One of the most common requirements during the development of industrial automation application
programs is the availability of reserved memory areas, completely manageable by the user, where
DMA transfers can be performed, data acquired from the field or parameters tables and/or messages
can be stored, etc.
GCTR allows to have reserved memory areas both in SRAM and in ROM by simply installing on
the control card enough memory for the application program plus the reserved space and installing
GCTR specifing data and code area sizes enough for the application program only. Doing so, all the
memory amount installed on the control card but not declared is automatically reserved. More in
detail, GCTR never accesses in autonomy SRAM in the range ADDR.4÷ADDR.5 and ROM in the
range ADDR.7÷ADDR.10 in case EPROM is used ir in the range ADDR.7÷ADDR.8 in case FLASH
EPROM is used.
For example, if the user needs 256 KBytes of SRAM to save data transferred through DMA and
50÷100 KBytes of SRAM for data+stack and heap area of application program, then control card will
have to be configured with 512 KBytes of SRAM and GCTR will have to be installed specifing 256
KBytes for data area. Doing so, GCTR and the application program will nevere access addresses
greather than or equal to ADDR.4 = 40000H and, starting from this address, the user will
comfortably manage the DMA transfers.
If the user needs to save 10 Kbytes of messages in four different languages (totalizing 40 KBytes)
in ROM and the application program size is 50 KBytes, then the control card will have to be
configured with 128 KBytes of EPROM or FLASH EPROM, GCTR will have to be installed with
128 KBytes of code area and messages wil be storable starting from F0000H. This address has been
chosen 14 KBytes after ADDR.7 = EC800H to let the application program grow in size without
having to move the messages.
To get information about size of code and data areas used by the application programs developed
with GCTR, to sum to size of reserved areas, to install correctly the package and select the right
quantity of memory installed on the control card, the user can examine the file .ABM generated by
the support program CTOBIN. This file in fact contains the list of all application program segments
specifing their size in bytes.
Should the available configurations not to be able to satisfy the application program requirements,
please contact grifo® directly.
GCTR
Rel. 5.40
Page 25
grifo®
ITALIAN TECHNOLOGY
CONSOLE MANAGEMENT
The development system GCTR is charged to manage a set of operator interfaces that can be used
through C high level instructions dedicated to console management.
Operator interfacement has always been one of the worst problems of application programs,so
availability of tools ready-to-use to easy the solution of this problem surely simplifies the user work
and reduces the development time.
The console device managed through GCTR may be matched to hardware devices to use as operation
interface, like printers, serial terminals, alphanumeric displays, status LEDs, matrix keyboards, etc.
These devices can both be manufactured by grifo® (e.g. QTP xxx, QTP xxxP, KDx x24, DEB 01,
IAC 01, etc.) and manufactured by third parts.
Console management is made by the application program thorugh specific C high level instructions
(cputs(), cprintf(), cscanf(), etc.) that call as many functions included in library CL.LIB; currently
are available several functions that allow to activate status LEDs with attributes and to print and/or
read both numeric and alphanumeric data, even formatted, on all hardware devices supported. For
a detailed description of console functions please refer to “APPENDIX B” of this manual, where
definitions, parameters description and use example are reported for each function.
Normally to manage correctly GCTR console the following operations must be performed in
sequence:
a)
b)
c)
d)
initialize the hardware device used to be able to connect the eventual console system connected
(operation essential only for serial systems);
select the hardware device to use as input;
select the hardware device to use as output;
use the selected devices with high level instructions;
It is immediate to see that a GCTR application program can manage even more than one input and
output devices, provided that they all have been initialized and that the device to be used has been
selected, also if a different device has been previously selected. The distinction between input and
output devices allows to use different hardware system for these purposes, allowing, for example,
to read data from a serial port and to print them on a parallel printer.
CONSOLE HARDWARE DEVICES
GCTR libraries are designed to manage a set of hardware console devices that can be used for input
and/or output operations and that use some resources of the control card, as indicated below:
Hardware console device
I/O
Resources of control card used
Serial terminals, QTP xxx, P.C., etc
I/O
Serial line A
Serial terminals, QTP xxx, P.C., etc
I/O
Serial line B
External display and keyboard (KDx x24)
I/O
16 I/O digital lines
Display, keyboard and LEDs (QTP xxP)
I/O
16 I/O digital lines
Parallel printer (IAC 01, DEB 01)
O
16 I/O digital lines
FIGURE 11: CONSOLE HARDWARE DEVICES
Page 26
GCTR
Rel. 5.40
grifo®
ITALIAN TECHNOLOGY
The devices that use 16 digital I/O lines are provided with a standard connector and can be connected
directly to the control card, following the indications of figure 12, the connector also provides power
supply. Should the interfaces manufactured by grifo® not fulfil the user needs it is possible to build
own operator interfaces following the indications in “APPENDIX A” where the electric diagrams
of some interfaces are reported.
CONTROL CARD
CONNECTOR
CONNECSION CABLE
GPC ® 188F
CN2
FLAT 20+20
GPC® 188D
CN2
FLAT 20+20
GPC® 883
CN5
FLAT 20+20
GPC® 884
CN5
FLAT 26+20
FIGURE 12: CONSOLE DEVICES CONNECTIONS
For further information about console devices nominated in this paragraph and their possible
configurations and potentialities, please refer to the specific documentation available on grifo®
website or CD.
CONSOLE PREDEFINED SYMBOLS
GCTR provides an header file called GCLIBD.H that includes the definition of a set of symbols that
must be used for high level management of console device:
QTP16P
QTP24P
KDxx24
SER0
SER1
PRINTER
LCD20x2
LCD20x4
LCD40x2
VFD20x2
->
->
->
->
->
->
->
->
->
->
Identifies the hardware console device QTP 16P
Identifies the hardware console device QTP 24P
Identifies the hardware console device KDx x24
Identifies the hardware console device serial port B
Identifies the hardware console device serial port A
Identifies the hardware console device parallel printer
Identifies a 20 characters by 2 rows LCD display
Identifies a 20 characters by 4 rows LCD display
Identifies a 40 characters by 2 rows LCD display
Identifies a 20 characters by 2 rows fluorescent display
(*)
(*)
(*)
(#)
(#)
(#)
(#)
In the same file are present, in addition to these symbols, the prototypes of all the library functions
for console management available to the user; these latter are widely described in “APPENDIX B”.
Please remark that the symbols can be used directly as parameters for the library functions and that
symbols marked with (*) must be ORed with symbols marked with (#) to define completely the
console device used. No other symbols combination is allowed, they may cause a console libraries
malfunction.
For further information about the use of predefined symbols please refer to the specific demonstration
program called DEMOCONS.C which can manage all the console devices supported by GCTR.
GCTR
Rel. 5.40
Page 27
grifo®
ITALIAN TECHNOLOGY
MATRIX KEYBOARD
Here follow the tables with codes returned by GCTR when a key on the console device martix
keyboard is pressed. To make the description as generic as possible the keys are identified through
their position in the matrix, that is through the signals of row and column available on the keyboard
connector. The tables on figures 13, 14 and 15 and the electric diagrams on figures A2, A4 and A5
allow to know the key codes both for standard keyboards and for user-made keyboards.
PIN CN2
KDx x24
8
7
6
5
9
10
4
F = 70
E = 69
D = 68
C = 67
J = 74
N = 78
3
CR = 13
9 = 57
6 = 54
3 = 51
I = 73
M = 77
2
0 = 48
8 = 56
5 = 53
2 = 50
H = 72
L = 76
1
A = 65
7 = 55
4 = 52
1 = 49
G = 71
K = 75
FIGURE 13: KEY CODES OF KDX X24
PIN CN3
QTP 16P
8
7
6
5
4
D = 68
C = 67
B = 66
A = 65
3
# = 35
9 = 57
6 = 54
3 = 51
2
0 = 48
8 = 56
5 = 53
2 = 50
1
* = 42
7 = 55
4 = 52
1 = 49
FIGURE 14: KEY CODES OF QTP 16P
PIN CN3
QTP 24P
6
5
4
3
2
1
10
7 = 55
CR = 13
6 = 54
L = 76
H = 72
D = 68
9
ESC = 27
0 = 48
4 = 52
K = 75
G = 71
C = 67
8
5 = 53
9 = 57
3 = 51
J = 74
F = 70
B = 66
7
1 = 49
8 = 56
2 = 50
I = 73
E = 69
A = 65
FIGURE 15: KEY CODES OF QTP 24P
When the hardware device used as input is one of the above mentioned matrix keyboards, in addition
to the 16 I/O lines also CPU Timer 2 and its interrupt are used. This latter is used to perform a periodic
scanning of keyboard to detect eventual key pressures and to provide the typical debouncing and
autorepeat features. In detail GCTR sets:
debouncing time
autorepeat time
first autorepeat delay
keyboard buffer size
Page 28
=
=
=
=
20 msec
100 msec
500 msec
5 keys
GCTR
Rel. 5.40
ITALIAN TECHNOLOGY
grifo®
The autorepeat management starts to save a key code in the buffer once every 100 msec, if that key
has been pressed for more than 500 msec, and stoos saving when the key is released. The code of every
key pressed is saved in the buffer, which is a FIFO, here it is ready to be read by the library functions;
pressing more than 3 keys without any read from the buffer means the loss of these extra characters
because there is no physical space where to store them.
CONSOLE COMMANDS
This paragraphs shows all the command sequences that can be used to take advantage of the main
console device hardware features. GCTR shows on the display all the characters having a code
included in the range 32÷255 (20÷FF Hex); if it is sent a code not included in this range and this
latter is not a command, the code is ignored. The charactes is printed in the current cursor position,
this latter will move one position to the right; if the cursor is in the last position (bottom right corner)
it will be moved to Home position (top left corner).
For each command a double description is reported: a mnemonic description, based on ASCII
characters, and the numeric desription, both in decimail and hexadecimal form. These commands are
compliant to ADDS View-Point standard, so all the command sequences start wtih character ESC,
corresponding to decimal code 27 (0x1B). Of course, the effect of each command depends on the kind
of hardware console peripheral used, so, for example, all the listed commands will be managed
correctly by QTP xx or QTP xxP but will not be managed by a printer or a serial terminal that is not
ADDS View-Point compliant.
Please remark that for some of the commands listed here below there are library functions which
perform exactly the same action: for further information refer to APPENDIX C of this manual.
CURSOR LEFT
Code:
21
Hex code:
0x15
Mnemonic:
NACK
The cursor is shifted of one position to the left without modifying the display contents. If the cursor
is in Home position, it will be placed in the last position of the last row of the display.
CURSOR RIGHT
Code:
6
Hex code:
0x06
Mnemonic:
ACK
The cursor is shifted of one position to the right. If the cursor is placed in the last position of the last
row, il will be moved to the Home position.
GCTR
Rel. 5.40
Page 29
grifo®
ITALIAN TECHNOLOGY
CURSOR DOWN
Code:
10
Hex code:
0x0A
Mnemonic:
LF
The cursor will be moved to the line below but it will remain in the same column. If the cursor is in
the last display line, it will be moved to the first display line.
CURSOR UP
Code:
26
Hex code:
0x1A
Mnemonic:
SUB
The cursor will be moved to the line above but it will remain in the same column. If the cursor is in
the first display line, it will be moved to the last display line.
HOME
Code:
1
Hex code:
0x01
Mnemonic:
SOH
The cursor is moved to Home position i.e first line, first column of the display, or on the other hand
the up, left corner
CARRIAGE RETURN
Code:
13
Hex code:
0x0D
Mnemonic:
CR
The cursor is moved to the beginning of the line where it was located.
CARRIAGE RETURN+LINE FEED
Code:
29
Hex code:
0x1D
Mnemonic:
GS
The cursor is moved to the beginning of line above the one where it was located. If the cursor is at
the last display line, it will be moved to the beginning of the first line i.e Home position.
Page 30
GCTR
Rel. 5.40
ITALIAN TECHNOLOGY
grifo®
ALPHANUMERIC CURSOR PLACEMENT
Code:
27 89 r c
Hex code:
0x1B 59 r c
Mnemonic:
ESC Y ASCII(r) ASCII(c)
The cursor is moved to the absolute position indicated by "r" and "c".
These codes are the row and column values of the position, plus a constant offset of 32 (20 Hex).
If, for example, the user wants to place the cursor at Home position (line 0, column 0), the following
byte sequence must be sent:
27 89 32 32.
If row and/or column values are not compatible to the installed display, the command is ignored.
BACKSPACE
Code:
8
Hex code:
0x08
Mnemonic:
BS
This command moves the cursor one character position to the left and it erase the contents of the
reached cell.
If the cursor is in Home position, it will be erased the last character of the last row of the display.
CLEAR PAGE
Code:
12
Hex code:
0x0C
Mnemonic:
FF
This command clears all data on the display and it moves the cursor to Home position.
CLEAR LINE
Code:
25
Hex code:
0x19
Mnemonic:
EM
This command erases all characters displayed on the current line and it moves the cursor to the first
column of the said line.
CLEAR END OF LINE
Code:
27 75
Hex code:
0x1B 0x4B
Mnemonic:
ESC K
This command erases all characters displayed from the current cursor position to the end of line
inclusive. The cursor mantains the previous position.
If, for example, the cursor is at the beginning of a display line, the complete line will be erased.
GCTR
Rel. 5.40
Page 31
grifo®
ITALIAN TECHNOLOGY
CLEAR END OF PAGE
Code:
27 107
Hex code:
0x1B 0x6B
Mnemonic:
ESC k
This command erases all characters displayed from the current cursor position to the end of display
inclusive. The cursor mantains the previous position.
If, for example, the cursor is at Home position, the complete display will be erased.
CURSOR OFF
Code:
27 80
Hex code:
0x1B 0x50
Mnemonic:
ESC P
The cursor is not active and it is not more visible.
STATIC CURSOR ON
Code:
27 79
Hex code:
0x1B 0x4F
Mnemonic:
ESC O
The cursor is activated so it is visible. Now it is a not blinking line placed under the char.
NOTE: This command is not available when fluorescent display 20x4 is used.
BLINKING CURSOR ON
Code:
27 77
Hex code:
0x1B 0x4D
Mnemonic:
ESC M
The cursor is activated so it is visible. Now it is a blinking line placed under the char.
Page 32
GCTR
Rel. 5.40
grifo®
ITALIAN TECHNOLOGY
LEDS ACTIVATION
Code:
27 50 n.LED Attr.
Hex code:
0x1B 0x32 n.LED Attr.
Mnemonic:
ESC 2 ASCII(n.LED) ASCII(Attr.)
The LED shown in “n.LED” is setted with the attribute specified in “Attr.”. The LEDs numbers are
included in 0÷15 range as shwon in figure B1.
The available attributes are as follows:
0
(00 Hex) ->
255 (FF Hex) ->
85 (55Hex) ->
Not enabled LED
Enabled LED
Blinking LED
For example if you wish to enable LED n.5 with blinking attribute, the following sequence has to be
sent:
27 50 5 85
If the parameters LED number or attribute are not valid, the command is ignored.
LEDS ACTIVATION WITH MASK
Code:
Hex code:
Menomonic:
27 52 mask1 mask2 mask3
0x1B 0x34 mask1 mask2 mask3
ESC 4 ASCII(mask1) ASCII(mask2) ASCII(mask3)
All the LEDs available on the console system (like QTP 24, QTP 24P, QTP 22, QTP G28, etc.) are
contemprarily managed as indicated in "mask1", "mask2" and "mask3" with the following
corrispondence:
mask1 (bit 0 …7)
mask2 (bit 0 …7)
mask3
->
->
->
LED 0 … LED 7
LED 8 … LED 15
(No function, manteined for compatibility)
If a bit is placed at 0 logic state, the correpondent LED is turned off (disabled), viceversa it will be
turned on (enabled) if the correspondent bit is at 1 state.
If there are some LEDs having the blinking attribute, this latter will be disabled.
LEDs numbers range from 0 to 15 and are assigned like in figure B1.
NOTE:
GCTR
The "mask3" must be always sent even if it has no meaning, for a correct management
of all the terminal's LEDs.
Rel. 5.40
Page 33
grifo®
ITALIAN TECHNOLOGY
LIBRARIES
Libriaries cand be used when programming with GCTR like with any other C compiler. The package
delivers four library files:
LCTR_T.LIB
CL.LIB
MATHL.LIB
EMU.LIB
to make the code ROMable;
which is the Borland TURBO C++ standard library with console functions, timing
functions and date and time management functions modified;
allows to use the wide set of Borland C mathematic functions;
to perform floating point operations with a math coprocessor software emulation
when this latter is not available on the control card.
Suffix or prefix L present in many library names indicate the memory model used by GCTR. This
latter is Large model because it is the best choice to take the maximum advantage of the memory
configuration on the control card.
The user can freely intervent on the libraries but only changing them in fact the support programs
CTODEB and CTOBIN, that perform link phase, can't use other files different from those above
listed. Hovewer new library functions can be added to standard library CL.LIB without restrictions.
The modification and/or addition madalities are the typical ones of the used Borland package,
managed by dedicated program TLIB. When the source code of the library functions that must be
modified or added is available it can be alternatively used the include tecnique: the source files will
be simply "inserted" inside the application program used with CTODEB and CTOBIN.
Using the library functions means to include its specific header files (*.H) where function protoypes
and eventual data structures are declared. The complete set of .H files it stored in the work directory
of GCTR during the installation and the user should include only the ones needed.
In “APPENDIX B” of this manual the list of library functions ROMed and/or modified is present;
in the list also function's needed header file name is specified. The library functions provided replace
the standard functions with the same name so can be used directly in the applications program
developed by the user.
The source file of libraries is not included in GCTR package but can be requested directly to grifo®
if this is essential. Several demonstration program that use library functions are proveded, to make
them immediatly usable.
Remarkable is the possibility to manage directly the console redirected to the serial port of control
card, in fact this feature provides the user a minimun interface like the one usually available for
Borland C++ on PC without any effort. To take full advantage of this feature the user will have to
configure the console PC as previously described.
EXTERNAL WATCH DOG
GCTR performs autonomously the periodic retrigger of external watch dog circuit available on each
control card. In this way the customer that develop an application that use external watch dog can
restfully connect this circuit and he has not to perform retrigger when GCTR is executed (start up
code, TURBO DEBUGGER, library function with a long execution time). Naturally when the
application program developed by the user is executed , the periodic retrigger of watch dog circuit
must be performed by the same program, to avoid circuit intervention and consequent card reset.
To spare unwanted retrigger, if watch dog circuit intervenes when application program is executed,
you must always:
Page 34
GCTR
Rel. 5.40
ITALIAN TECHNOLOGY
-
grifo®
restart communication with TURBO DEBUGGER through a keyboard breakpoint
<CTRL>+<BREAK>;
exit from TURBO DEBUGGER on development P.C.;
reset or resupply power to control card;
restart normal application program development.
-
USER CONFIGURATIONS
As described in the previous paragraph, GCTR features a range of configurations that allow the user
to define the development package functionalities. For completeness in this paragraph all these
configurations are described, defining for each one meaning and setting modalities.
- EDITOR:
this is the editor by which the user writes and/or modifies the source of
application program when uses CTODEB.It is suggestable to use the editor integrated in Borland
C I.D.E. because it provides features like color coding, syntax check, an on line help about C, etc.
The choice of the editor is made during the installation phase or modifing the ASCII file
GCTR.IDE where the editor complete pathname is stored.
- Borland C I.D.E.:
if the Borlanc C I.D.E. has been selected as editor of GCTR and
the user wants to take advantage of its application program syntax check feature (command
Compile), I.D.E. itself must be configured for the memory model and warning level desired. This
means to select manually the Large memory model in the compilers options and to activate all
alarm messages (All) in messages options. These configurations must be performed through the
specific I.D.E. modalities, as described in its own documentation, and saved to make them
permanent (refer to example at step 9 of "HOW TO START" chapter).
- CODE AREA SIZE: this is the size of memory area used by GCTR to store the application
program code. It can set only during installation phase.
- DATA AREA SIZE:
this is the size of memory area used by GCTR to store data, stack
and heap of application program. It can set only during installation phase.
- Development PC serial port:
this is the development PC serial line connected to the control
card used to debug and store to FLASH EPROM the application program. It can set only during
installation phase.
DIFFERENCES AMONGST BORLAND C++, TURBO C OR C++ AND GCTR
The differences are due to the fact that the first three have been developed for PC hardware platforms
where also an operating system exists while the control card where the last one works does not have
this structure.
1-
The standard start-up code must be replaced with a specific one capable to work from EPROM
or FLASH EPROM even when the operating system is absent (for further information please
refer to the paragraph “START UP CODE”).
GCTR
Rel. 5.40
Page 35
grifo®
2-
3-
4-
5-
6-
7-
8-
ITALIAN TECHNOLOGY
Some library functions related to date and time cannot be used. In detail the functions to set
and get the current date and time have been changed to manage the hardware real time clock
(RTC) on the control card while the functions based on “system ticks” cannot be modified and
so used.
Library functions related to PC hardware peripherals (files on hard disk or floppy disk, mass
memories, monitor, graphic, printer, serial communicatio, etc.) cannot be used on the control
card.
The library functions related to the console cannot be used on their original form because they
use operating system calls, so they have been modified to redirect their data flow on one of the
hardware devices supported, as described in the paragraph “CONSOLE MANAGEMENT”.
An application program developed with GCTR enters an infinite loop when it terminates
because the control cannot be returned to an operating system that does not exist on the control
card. The termination conditions of an application program are the classical ones like an error
during execution, the reaching of main function end, a call to INT 21H, the function “exit()”,
etc.
Timing of generated code are constant. The absence of MS-DOS or WINDOWS operating
systems and their interrupts warrants unchangeable execution times of generated code,
consequently the possibility to fix in advance and to measure with certainty program
performances.
The program generated by linker must be transformed in its memory utilization before being
executed. This transformation is called allocation and is performed by a specific program
described in the paragraph “LOCATOR”.
In DEVELOPMENT mode of application program the serial line A on the control card is
always used by TURBO DEBUGGER and so is not available for the application program.
Developing PC programs the debug is performed using monitor and keyboard which are not
completely dedicated and so can continue to perform console tasks.
Further differences can be easily encountered during the debug phase and opportunely manged while
for further information about the changes to the libraries please refer to the paragraph about libraries
and to “APPENDIX B”.
DEMO PROGRAMS
GCTR is delivered with a set of examples that show the employ modalities of the development
package and allow to take adventage of the control board resources in the least time possible. Here
follows the list of these demo programs with a short description:
C:\GCTRxxx\DEMOCONS.C
Demo for the management of all console hardware devices through library functions.
C:\GCTRxxx\DEMOFP.C
Demo for the management of the main mathematical functions on floating point variables.
C:\GCTRxxx\DEMORIT.C
Demo for the management of the time delays functions.
Page 36
GCTR
Rel. 5.40
ITALIAN TECHNOLOGY
grifo®
C:\GCTRxxx\DEMORTC.C
Demo for the library functions that manage date and time through real time clock.
C:\GCTRxxx\IRQxxx.C
Demo for the management of interrupt generated by hardware peripherals of GPC® xxx control card.
C:\GCTRxxx\PRxxx.C
Demo for the management of all hardware sections of GPC® xxx control card.
C:\GCTRxxx\TEST.C
Program to learn the GCTR use modalities, used in the chapter “HOW TO START”.
C:\GCTRxxx\DEB01\*.C
Demo programs for DEB 01 didactic board management, connected to GPC® xxx control card, in
all its sections.
Of course all these programs are provided in source form, are well documented and are structured
to be used directly by the user. This latter will be able whether to use part of these examples (for
examples the functions) without any change orto examine the source text and modify it according
to the needs.
GCTR
Rel. 5.40
Page 37
grifo®
ITALIAN TECHNOLOGY
VERSIONS OF GCTR
The following basic versions of the sofware package are available:
GCTR xxx
Development environment for control card GPC® xxx in EPROM.
FGCTR xxx
Development environment for control card GPC® xxx in FLASH EPROM size 128K Byte.
FGCTR xxx.512K
Development environment for control card GPC® xxx in FLASH EPROM size 512K Byte.
FWR xxx
FLASH EPROM size 128 KByte for control card GPC® xxx, with FLASH WRITER programmed
in the first sector.
FWR xxx.512K
FLASH EPROM size 512 KByte for control card GPC® xxx, with FLASH WRITER programmed
in the first sector.
The five above reported signatures fit for the card with basic clock frequence (20 MHz for GPC®
188F/D and 26 MHz for GPC® 884, GPC® 884); if the user wants to user GCTR with higher clock
frequencies, specific versions identified with suffix .xxM must be ordered (for example .40M for
GPC® 884 at 40 MHz). Please remark that the above reported signatures can be used directly to make
orders.
Like every software and firmware, also GCTR is continuously changed and improved to satisy
completely the new requirements of the users and correct the eventual problems. Here follows a brief
description of the changes made to the development package according to the version number:
Ver. 1.0
Ver. 1.1
Ver. 2.0
Ver. 3.1
->
->
->
->
Ver. 3.2
Ver. 3.3
->
->
Ver. 3.4
->
Ver. 3.5
->
First version.
Added installation program.
Added complete management for floating point.
Added FLASH EPROM management; employed large memory model; added
management of GPC® 884.
Improved start-up code setting.
Added selection of control card memory amount; added hardware breakpoint
management.
Improved library functions; added serial port selection on development PC;
increased warning leved; added utilization from WINDOWS 3.1, 95, 98, ME.
Added external watch dog retrigger; improved demo programs; added management
of GPC® 883.
Any eventual improvement or addition the user thinks may be intresting can be suggested contacting
grifo® directly.
Page 38
GCTR
Rel. 5.40
ITALIAN TECHNOLOGY
grifo®
BIBLIOGRAPHY
Here follows a list of manuals and technical notes to which user can refer to obtain further information
that simplify the use of GCTR:
Title
The C programming language
BORLAND C++ - User Guide
BORLAND C++ - Programming Guide
TURBO DEBUGGER - User Guide
BORLAND C++ - Libraries
Author/s
Brian W. Kernighan and Dennis M. Ritchie
Borland
Borland
Borland
Borland
To get all the updated versions of such manuals, example application programs, special writing, etc.
please refer to the specific internet sites.
GCTR
Rel. 5.40
Page 39
grifo®
Page 40
ITALIAN TECHNOLOGY
GCTR
Rel. 5.40
grifo®
ITALIAN TECHNOLOGY
APPENDIX A: ELECTRIC DIAGRAMS
This appendix shows some of the console hardware managed by GCTR electric diagrams. Each of
the se interfaces can be produced in autonomy or can be ordered directly from grifo®.
A
B
C
D
1
1
CN2
20 pin Low-Profile Male
2
P1.0
P0.0
P0.1
P0.2
P0.3
P0.4
P0.5
P0.6
P0.7
P1.5
P1.7
P1.4
P1.6
P1.1
P1.2
P1.3
+5V
GND
CN1
25 pin D-Type Female
15
2
1
4
3
6
5
8
7
12
10
11
9
16
20
13
14
19
18
17
3
RR1
4,7 KW 9+1
+5V
C4 2,2 nF C6 2,2 nF C8 2,2 nF C10 2,2 nF
1
2
3
4
5
6
7
8
9
10
11
12
13
14
15
16
17
18
19
20
21
22
23
24
25
/STROBE
D1
D2
D3
D4
D5
D6
D7
D8
/ACK
BUSY
PE
SELECT
/AUTOLF
/FAULT
/RESET
MODE
2
3
22 mF 6,3V
C2
100 nF
+
C5
C3
C7
2,2 nF
2,2 nF
C11
C9
C1
2,2 nF
2,2 nF
2,2 nF
4
4
5
5
Title:
grifo®
IAC 01
Date: 13-11-98
Page :
A
B
1
C
Rel. 1.1
of
1
D
FIGURE A1: IAC 01 ELECTRIC DIAGRAM
GCTR
Rel. 5.40
Page A-1
grifo®
A
B
I/O 20 pins
+5V
CN5
RR1
1
C
LCD 20x2
VFD FUTABA
CN2
PA.7
PA.6
PA.5
PA.4
PA.3
PA.2
PA.1
PA.0
ITALIAN TECHNOLOGY
7
8
5
6
3
4
1
2
D7
D6
D5
D4
D3
D2
D1
D0
LCD 20x4
CN4
CN6
1
3
5
7
9
11
13
15
14
13
12
11
10
9
8
7
14
13
12
11
10
9
8
7
SD
Col.1
Col.2
Col.3
Col.4
Col.5
Col.6
1
+5V
PC.2
PC.1
PC.0
PC.3
PC.4
2
RR2
13
16
15
14
11
18
17
/BUSY
20
TEST
16
E
R/W
RS
E
R/W
RS
6
5
4
6
5
4
CLK
Contrast
3
3
+5V
J1
+5V
GND
/SEL
/WR
18
17
+
8
2
1
14
10
12
16
16
15
N.C.
N.C.
3
PC.4
+
15
+VLED
C10
2
4
6
19
20
R7
R5
R6
11
3
CN3
+5V
PC.5
PC.6
PC.7
2
C12
C13
C9
RV1
2
1
R8
12
9
10
10
7
R9
Enter 6
L
H
D
9
R10
RR2
Esc
0
4
K
G
C
5
9
3
J
F
B
1
8
2
I
E
A
QTP 24 keyboard
4x6
8
R11
7
J2
6
5
4
3
2
1
8
6
10
4
12
2
Metal Panel
+5V
4
4
14
C3
IC3
7407
7
9
5
11
3
13
1
Col.6 Col.5 Col.4 Col3 Col.2 Col.1
LD1
LD2
LD3
5
LD5
LD6
LD7
LD8
A
B
C
D
LD9
LD10
LD11
LD12
E
F
G
H
LD13
LD14
LD15
LD16
I
5
LD4
QTP 24
J
K
A
L
1
2
3
4
5
6
7
8
ESC
9
0
ENTER
grifo®
Title: QTP 24P
B
Date: 2 2 - 0 7 - 1 9 9 8
Rel. 1.2
Page :
2
of
1
C
FIGURE A2: QTP 24P ELECTRIC DIAGRAM (1 OF 2)
Page A-2
GCTR
Rel. 5.40
grifo®
ITALIAN TECHNOLOGY
A
B
C
CN1
+5V
IC1
1
+
IC2
C5
+
C11
+ C7 +
3
C8
SWITCHING
PD1
1
REGOLATOR
M5480
17
18
19
20
21
22
23
24
8¸24Vac
4
LD16
LD15
25
2
2
+5V
14
R1
LD14
26
LD13
27
13
C4
C2
LD12
28
LD11
2
+5V
1
3
3
D4
LD10
D3
3
+5V
LD9
4
R4
R3
LD8
5
CLK
15
LD7
6
LD6
7
SD
16
LD5
8
4
4
LD4
9
LD3
10
LD2
11
LD1
12
5
5
Title:
Date: 2 2 - 0 7 - 1 9 9 8
Page :
A
B
grifo®
QTP 24P
2
of
Rel.
1.1
2
C
FIGURE A3: QTP 24P ELECTRIC DIAGRAM (2 OF 2)
GCTR
Rel. 5.40
Page A-3
grifo®
A
B
Standard I/O 20 pin connector
1
PA.7
PA.6
PA.5
PA.4
PA.3
PA.2
PA.1
PA.0
C
DISPLAY 4x20
DISPLAY 2x20
+5V
CN1
CN4
7
8
5
6
3
4
1
2
ITALIAN TECHNOLOGY
CN2
RR1
D7
D6
D5
D4
D3
D2
D1
D0
14
13
12
11
10
9
8
7
14
13
12
11
10
9
8
7
1
D3
D2
D1
D0
+5V
RR2
13
16
15
14
PC.2
PC.1
PC.0
PC.3
E
R/W
RS
E
R/W
RS
6
5
4
+5V
2
6
5
4
Contrast
3
3
RV1
J1
18
17
+5V
GND
C2
2
1
2
1
16
16
2
+5V
C1
R1
15
R3
15
R2
Keyboard connector
+5V
3
RR2
11
12
9
10
PC.4
PC.5
PC.6
PC.7
R7
4
R6
19
20
N.C.
N.C.
D
C
B
A
#
9
6
3
0
8
5
2
*
7
4
1
3
R5
3
R4
2
DC Power supply
1
Matrix
Keyboard
4x4
8
7
6
5
CN3
2
2
4
6
8
1
3
5
9
D0
D1
D2.
D3
2
5
8
0
3
6
9
#
A
B
C
D
1
2
3
4
5
3
6
7
8
1 2 3 4 5 6 7 8
A
+5V
1
4
7
*
10
12
11
13
14
B
C5
SN7407
7
CN5
4
4
3
PD1
+5V
~
A
-
+
~
C3
C4
+
4
SWITCHING
C9
C6
L1
C8
+
REGOLATOR
C7
+
TZ1
OPTIONAL
5
B
5
AC Power supply
Title:
QTP 16P
Date:
22-07-98
Page :
A
B
1
of
grifo®
Rel.
1.2
1
C
FIGURE A4: QTP 16P ELECTRIC DIAGRAM
Page A-4
GCTR
Rel. 5.40
grifo®
ITALIAN TECHNOLOGY
A
B
I/O 20 pins
CN5
RR1
PA.7
PA.6
PA.5
PA.4
PA.3
PA.2
PA.1
PA.0
7
8
5
6
3
4
1
2
D7
D6
D5
D4
D3
D2
D1
D0
LCD 20x4
LCD 20x2
VFD FUTABA
+5V
CN3
1
C
CN6
1
3
5
7
9
11
13
15
CN4
14
13
12
11
10
9
8
7
14
13
12
11
10
9
8
7
1
D7
D6
D5
D4
D3
D2
D1
D0
+5V
2
PC.2
PC.1
PC.0
PC.3
PC.4
RR2
13
16
15
14
11
+5V
+5V
GND
/SEL
18
/WR
/BUSY
17
20
TEST
16
3
8
2
1
18
17
+
C5
C4
C1
3
N.C.
N.C.
19
20
+
E
R/W
RS
E
R/W
RS
6
5
4
6
5
4
2
14
10
12
Contrast
3
CN1
16
GND
+5V
16
2
4
6
R1
+VLED
R5
15
3
15
R2
PC.5
PC.6
PC.7
R4
CN2
+5V
12
9
10
2
1
R3
C2
J1
RV1
2
1
R6
4
RR2
R7
F
E
D
C
J
N
CR
9
6
3
I
M
0
8
5
2
H
L
A
7
4
1
G
K
3
R9
External Keyboard
4x6
2
R8
1
4
5
LCD20x2 LCD20x4 Futaba VFD
R1= 0W
N.M.
N.M.
R2= N.M.
N.M.
N.M.
R3= 18W
12W
N.M.
R4= 18W
12W
N.M.
R5= N.M.
N.M.
N.M.
R6= 470W
R7= 470W
R8= 470W
R9= 470W
RR1= 22KW 9+1 SIP
RR2= 22KW 9+1 SIP
RV1= 10KW trimmer
C1= 100nF
C2= 22mF 6,3V Tantalium
C3= 100nF
C4= 100nF
C5= 22mF 6,3V Tantalium
CN1= 2 pins mini male connector
CN2= 10 pins male strip
CN3= 20 pins male low profile c connector
CN4= LCD L214 (20x4)
CN5= Futaba VFD20x2
CN6= LCD L2012 (20x2)
IC1= 7407
J1= 2 pins female jumper
+5V
8
7
6
5
9
10
2
4
6
8
10
12
14
C3
IC1
7407
7
1
3
5
9
D0
D1
D2
D3
11
13
D4
D5
5
Title:
B
grifo®
KDL/F-2/424
Date: 2 2 - 0 7 - 1 9 9 8
Page :
A
4
of
1
Rel.
1.2
1
C
FIGURE A5: KDX X24 ELECTRIC DIAGRAM
GCTR
Rel. 5.40
Page A-5
grifo®
Page A-6
ITALIAN TECHNOLOGY
GCTR
Rel. 5.40
ITALIAN TECHNOLOGY
grifo®
APPENDIX B: LIBRARY FUNCTIONS CHANGED
CALLOC
Definition:
#include <ALLOC.H>
void* calloc(unsigned int items, unsigned int size);
Library:
LCTR_T.LIB
Description:
Function calloc allocates a memory area and resets it. The amount of memory allocated by a call to
this function corresponds to items*size bytes, must be lower than 64K Bytes and is allocated in the
heap area.
Example:
struct zoo*park1;
park1=calloc(105,sizeof(struct zoo));
Parameters returned:
Function calloc returns a pointer to the memory allocated if it works successfully or a NULL pointer
in case of error. The pointer returned is NULL also when available memory is insuffucent to fulfil
completely the request.
CLREOL
Definition:
#include <CONIO.H>
void clreol(void);
Library:
CL.LIB
Description:
Function clreol deletes all the characters from current cursor position to the end of the line without
moving the cursor position. If a serial line has been selected as output console device it will receive
the ADDS View-Point codes for this action.
Example:
integer i;
cputs("Insert number of pieces=").
clreol();
cscanf("%d",&i);
Parameters returned:
Function clreol returns nothing.
GCTR
Rel. 5.40
Page B-1
grifo®
ITALIAN TECHNOLOGY
CLRSCR
Definition:
#include <CONIO.H>
void clrscr(void);
Library:
CL.LIB
Description:
Funtion clrscr deletes all the characters on the screen and locates the cursor to Home position (the
top left corner). If a serial line has been selected as output console device it will receive the ADDS
View-Point codes for this action.
Example:
clrscr();
cputs("Help screen: select item with arrow keys").
cputs("
:
:
: ");
Parameters returned:
Funtion clrscr returns nothing.
CPRINTF
Definition:
#include <CONIO.H>
int cprintf(const char *format [,argument,......]);
Library:
CL.LIB
Description:
Function cprintf manages the formatted representation (feature of the famous function printf) to the
selected output console hardware device; the device must be selected and/or initialized previously.
All formats can be used to create the constant format and for further information please refer to C
programming manual.
Example:
integer i;
float d[100];
cprintf("Index= %d Value= %f \r\n",i,d[i]);
Parameters returned:
Function cprintf resturn the number of charactes printed.
Page B-2
GCTR
Rel. 5.40
ITALIAN TECHNOLOGY
grifo®
CPUTS
Definition:
#include <CONIO.H>
int cputs(const char *str);
Library:
CL.LIB
Description:
Function cputs manages a string representation to the selected output console hardware device; the
device must be selected and/or initialized previously. String str must be terminated with null
character and the function does not represent CR or LF characters.
Example:
cputs("Produzione arrestata");
Parameters returned:
Function cputs resturns the represented character code.
CSCANF
Definition:
#include <CONIO.H>
int cscanf(const char *format [,address,......]);
Library:
CL.LIB
Description:
Function scanf manages the formatted input (feature of the famous function scanf) from selected
input console hardware device: the device must be selected and/or initialized previously. All formats
can be used to create the constant format and for further information please refer to C programming
manual.
Example:
integer i;
float d;
cscanf("%d %f",&i,&d);
Parameters returned:
Function cscanf returns the number of values correctly acquired.
GCTR
Rel. 5.40
Page B-3
grifo®
ITALIAN TECHNOLOGY
DELAY
Definition:
#include <DOS.H>
void delay(unsigned int milliseconds);
Library:
CL.LIB
Description:
Function delay performs a calibrated delay whose lasting is determined by parameter milliseconds
and is expressed in milliseconds.
Example:
outp(PA,0x01);
delay(50);
outp(PA,0x00);
// Activates output for 50 msec
Parameters returned:
Function delay returns nothing.
_DISABLE
Definition:
#include <DOS.H>
void _disable(void);
Library:
LCTR_T.LIB
Description:
Function _disable disables the microprocessor interrupt management bit, which finds in the flags
register.
Example:
_disable();
Parameters returned:
Function _disable returns nothing.
Page B-4
GCTR
Rel. 5.40
ITALIAN TECHNOLOGY
grifo®
DELLINE
Definition:
#include <CONIO.H>
void delline(void);
Library:
CL.LIB
Description:
Function delline deleters the line where the cursor finds, then the cursor is located at the beginning
of the line. If a serial line has been selected as output console device it will receive the ADDS ViewPoint codes for this action.
Example:
integer i;
delline();
cputs("Input number of pieces=").
cscanf("%d",&i);
Parameters returned:
Function delline returns nothing.
_DOS_GETDATE
Definition:
#include <DOS.H>
void _dos_getdate(struct dosdate_t *datep);
Library:
CL.LIB
Description:
Function _dos_getdate fetches current date from Real Time Clock on the control card and stores it
to the structured variable datep. This latter must be a pointer to the type dosdate_t, declared in the
header DOS.H, that contains four variables: day (unsigned char), month (unsigned char), year
(unsigned int) and dayofweek (unsigned char).
Example:
struct dosdate_t dd;
_dos_getdate(&dd);
cprintf("Current date: %2d/%2d/%2d", dd.day, dd.month, dd.year);
Parameters returned:
Function _dos_getdate returns nothing.
GCTR
Rel. 5.40
Page B-5
grifo®
ITALIAN TECHNOLOGY
_DOS_GETTIME
Definition:
#include <DOS.H>
void _dos_gettime(struct dostime_t *timep);
Library:
CL.LIB
Description:
Function e _dos_gettime fetches current time form Real Time Clock of control card and stores it in
the structured varable timep. This latter must be a pointer to a variable of type dostime_t, declared
in header file DOS.H, that contains four variables hour, minute, second, hsecond (all usigned char).
Control card RTC does not manage hundreds of seconds (structure member hsecond), so its value
is always zero.
Example:
struct dostime_t tt;
_dos_getdate(&tt);
cprintf("Current time: %2d:%2d:%2d", tt.hour, tt.minute, tt.second);
Parameters returned:
Function _dos_gettime returns nothing.
_DOS_GETVECT
Definition:
#include <DOS.H>
void interrupt (*_dos_getvect(unsigned int intnum)) ();
Library:
LCTR_T.LIB
Description:
Function _dos_getvect fetches the address of response routine of interrupt specified by intnum from
the memory area reserved to interrupt vectors in a safe way (disabling interrupts themselves). Intel86
microprocessors family can manage 256 different interrupts, numbered from 0x00 to 0xFF, whose
vectores are stored sequentially in the first kilobyte of memory from 0x0000 to 0x0400.
Example:
void interrupt(*oldfunc) (__CPPARGS);
oldfunc=_dos_getvect(5);
Parameters returned:
The far address (one world for segment and one word for offset) of the specified interrupt response
procedure is returned by this function.
Page B-6
GCTR
Rel. 5.40
grifo®
ITALIAN TECHNOLOGY
_DOS_SETDATE
Definition:
#include <DOS.H>
unsigned char _dos_setdate(struct dosdate_t *datep);
Library:
CL.LIB
Description:
Function _dos_setdate sets on Real Time Clock of control card the date stored in the structured
variable datep. This latter must be a pointer to the type dosdate_t, declared in the header DOS.H, that
contains four variables: day (unsigned char), month (unsigned char), year (unsigned int) and
dayofweek (unsigned char).
Example:
struct dosdate_t dd;
dd.day=1;
dd.month=1;
dd.year=0;
_dos_setdate(&dd);
// Sets RTC to beginning of century
Parameters returned:
Function _dos_setdate always returns 0 to indicate that setting has been succesful.
_DOS_SETTIME
Definition:
#include <DOS.H>
unsigned char _dos_settime(struct dostime_t *timep);
Library:
CL.LIB
Description:
Function _dos_settime sets on Real Time Clock of control card the time stored in the structured
variable timep. This latter must be a pointer to a variable of type dostime_t, declared in header file
DOS.H, that contains four variables hour, minute, second, hsecond (all usigned char). Control card
RTC does not manage hundreds of seconds (structure member hsecond), so it is not evalued by the
function.
Example:
struct dostime_t tt;
tt.hour=tt.minute=tt.second=1;
_dos_setdate(&tt);
// Sets RTC to beginning of day
Parameters returned:
Function _dos_settime always returns 0 to indicate that setting has been succesful.
GCTR
Rel. 5.40
Page B-7
grifo®
ITALIAN TECHNOLOGY
_DOS_SETVECT
Definition:
#include <DOS.H>
void _dos_setvect(unsigned int intnum, void interrupt far(*isr) ());
Library:
LCTR_T.LIB
Description:
Function _dos_setvect sets the address for the response procedure to interrupt specified by intnum
into the memory area reserved to interrupt vectors in a safe way (disabling interrupts themselves).
Intel86 microprocessors family can manage 256 different interrupts, numbered from 0x00 to 0xFF,
whose vectores are stored sequentially in the first kilobyte of memory from 0x0000 to 0x0400.
Example:
_dos_setvect(5,intris);
void interrupt intris(void)
{
}
Parameters returned:
Function _dos_setvect returns nothing.
_ENABLE
Definition:
#include <DOS.H>
void _enable(void);
Library:
LCTR_T.LIB
Description:
Function _enable enables the microprocessor interrupt management bit, which finds in the flags
register.
Example:
_enable();
Parameters returned:
Function _enable returns nothing.
Page B-8
GCTR
Rel. 5.40
ITALIAN TECHNOLOGY
grifo®
_EXIT
Definition:
#include <STDLIB.H>
void _exit(int value);
Library:
LCTR_T.LIB
Description:
Function _exit is different from the common C exit() function because it does not to MS-DOS or
WINDOWS operating system but simply it stores the exit code to variable _exit_status, enables
interrupts and enters an infinite loop. Function exit can be used with profit during debug phase, in
fact setting a breakpoint on it and getting the exit code it is always possible to determine the cause
of program execution termination even it has not been explicitally called form application program.
To perform this check with TURBO DEBUGGER a breakpoint must be set on the label _exit then
execute single steps (F8) when this is reached up to the infinite loop of _abort procedure; at this point
it is possible to inspect the value stored in variable _exit_status.
Here follows the correspondance between exit cuses and respective numeric exit codes:
Normal return from main
NULL pointer assignment
Stack overflow
Call to INT 21H of operating system
Floating point emulator not initialized
Division by 0
Divisione overflow
->
->
->
->
->
->
->
0x80
0x81
0x82
0x83
0x90
0x91
0x92
Example:
exit(0);
Parameters returned:
Function _exit returns nothing and function itself does not return to the caller.
GCTR
Rel. 5.40
Page B-9
grifo®
ITALIAN TECHNOLOGY
FAR_FREE
Definition:
#include <ALLOC.H>
void far_free(void far *block);
Library:
LCTR_T.LIB
Description:
Function far_free frees the memory previously allocated by function far_malloc. It is equivalent to
function free in large memory model and releases memory only if the variable block has a valid value.
Example:
int huge *array;
array=far_malloc(50000L * sizeof(int));
:
:
far_free(array);
Parameters returned:
Function far_free returns nothing.
FAR_MALLOC
Definition:
#include <ALLOC.H>
void far *far_malloc(unsigned long nbytes);
Library:
LCTR_T.LIB
Description:
Function far_malloc allocates and so keeps reserved a memory block of size nbytes Bytes in heap
memory area. This function can allocate all the memory available and is particularly intresting to
manage large arrays.
As this function returns a far pointer, far_malloc does not have the 64 KBytes limit characteristic of
function malloc which works with small model.
Example:
float matrix far *array;
array=far_malloc(80000L * sizeof(float));
Parameters returned:
Function far_malloc returns a far pointer to memory succesfully allocated or a NULL pointer in case
of errors. The pointer returned is NULL also if free available memory is insuffucent to fulfil the
request.
Page B-10
GCTR
Rel. 5.40
ITALIAN TECHNOLOGY
grifo®
FREE
Definition:
#include <ALLOC.H>
void free(void *block);
Library:
LCTR_T.LIB
Description:
Function free releases memory previously allocated with function malloc. If the memory indicated
by block has never been allocated or is released twice, unpredictable results may happen.
Example:
char *buffer;
buffer=malloc(10000);
:
:
free(buffer);
Parameters returned:
Function free returns nothing.
GETCH , GETCHE
Definition:
#include <CONIO.H>
int getch(void);
int getche(void);
Library:
CL.LIB
Description:
Functions getch and getche manage the acquisition of character from the selected input console
hardware device; the device will have to be previoulsy selected and/or initialized. Acquisition
suspends the execution of calling program and, in case of getche, echo of input character to output
console device is made.
Example:
unsigned char scelta;
if getch()=='S'
scelta=getche();
Parameters returned:
Functions getch and getche return the first available character from input console.
GCTR
Rel. 5.40
Page B-11
grifo®
ITALIAN TECHNOLOGY
GETDATE
Definition:
#include <DOS.H>
void getdate(struct date *datep);
Library:
CL.LIB
Description:
Function getdate fetches current date from Real Time Clock on the control card and stores it to the
structured variable datep. This latter must be a pointer to the type date, declared in the header file
DOS.H, that contains three variables: da_day (char), da_month (char), da_year (int).
Example:
struct date d;
getdate(&d);
cprintf("Current date: %2d/%2d/%2d", d.da_day, d.da_mon, d.da_year);
Parameters returned:
Function getdate returns nothing.
GETTIME
Definition:
#include <DOS.H>
void gettime(struct time *timep);
Library:
CL.LIB
Description:
Function gettime fetches current time form Real Time Clock of control card and stores it in the
structured varable timep. This latter must be a pointer to a variable of type time, declared in header
file DOS.H, that contains four variables ti_hour, ti_min, ti_sec, ti_hsec (all char). Control card RTC
does not manage hundreds of seconds (structure member ti_hsec), so its value is always zero.
Example:
struct time t;
gettime(&t);
cprintf("Current time: %2d:%2d:%2d", t.ti_hour, t.ti_min, t.ti_sec);
Parameters returned:
Function gettime returns nothing.
Page B-12
GCTR
Rel. 5.40
grifo®
ITALIAN TECHNOLOGY
GOTOXY
Definition:
#include <CONIO.H>
void gotoxy(int x, int y);
Library:
CL.LIB
Description:
Function gotoxy moves the cursor to the position specified by the input parameters x and y, which
correspond to row or column of console. If a serial line has been selected as output console device
it will receive the ADDS View-Point codes for this action. If the indicated coordinates are not suitable
for the selected console the function will do nothing.
Example:
int npz;
gotoxy(2,5);
cprintf("Number of pieces produced=%d",npz).
Parameters returned:
Function gotoxy returns nothing.
KBHIT
Definition:
#include <CONIO.H>
int kbhit(void);
Library:
CL.LIB
Description:
Function kbhit manages checks whether a character is available for selected input console hardware
device; the device will have to be selected and/or initialized previously. The function checks for a
character available without suspending the program execution.
Example:
while (!kbhit());
// Wait for a key
Parameters returned:
Function kbhit returns a value different from 0 if a character is available and viceversa.
GCTR
Rel. 5.40
Page B-13
grifo®
ITALIAN TECHNOLOGY
LEDBLINKSTATUS
Definition:
#include <GCLIBD.H>
unsigned int ledblinkstatus(void);
Library:
CL.LIB
Description:
Function ledblinkstatus returns the bliking status of LEDs that the console hardware device
connected may eventually have (QTP 24 and QTP 24P); the device will have to be selected and/or
initialized previously.
Example:
unsigned int blink;
blink=ledblinkstatus();
Parameters returned:
Function ledblinkstatus returns a 16 bit word whose least significant bit (bit 0) corresponds to LED0
and most significant bit (bit 15) corresponds to LED15, as indicated in figure B1. If a bit in the word
returned is set (1) the correspoding LED is blinking and viceversa.
LEDSTATUS
Definition:
#include <GCLIBD.H>
unsigned int ledstatus(void);
Library:
CL.LIB
Description:
Function ledstatus returns the activation status of LEDs that the console hardware device connected
may eventually have (QTP 24 and QTP 24P); the device will have to be selected and/or initialized
previously.
Example:
unsigned int led;
led=ledstatus();
Parameters returned:
Function ledblinkstatus returns a 16 bit word whose least significant bit (bit 0) corresponds to LED0
and most significant bit (bit 15) corresponds to LED15, as indicated in figure B1. If a bit in the word
returned is set (1) the correspoding LED is on or blinking and viceversa.
Page B-14
GCTR
Rel. 5.40
grifo®
ITALIAN TECHNOLOGY
LED5
LED6
LED7
LED4
LED8
LED1
LED2
LED3
grifo®
LED13
LED14
LED9
LED15
LED10
LED16
LED11
LED12
FIGURE B1: LEDS NUMERATION ON QTP 24 AND QTP 24P
GCTR
Rel. 5.40
Page B-15
grifo®
ITALIAN TECHNOLOGY
MALLOC
Definition:
#include <ALLOC.H>
void *malloc(unsigned int nbytes);
Library:
LCTR_T.LIB
Description:
Function malloc allocates and so keeps reserved a memory block of size nbytes Bytes in heap
memory area. This function can allocate all the memory available up to 64 KBytes.
Example:
unsigned char *tmp;
tmp=malloc(8000);
Parameters returned:
Function malloc returns a far pointer to memory succesfully allocated or a NULL pointer in case of
errors. The pointer returned is NULL also if free available memory is insuffucent to fulfil completely
the request.
PUTCH
Definition:
#include <CONIO.H>
int putch(int ch);
Library:
CL.LIB
Description:
Function putch manages a single characther representation to the selected output console hardware
device; the device must be selected and/or initialized previously.
Example:
putch('\r');
Parameters returned:
Function putch returns the represented character.
Page B-16
GCTR
Rel. 5.40
grifo®
ITALIAN TECHNOLOGY
QTPLED
Definition:
#include <GCLIBD.H>
void qtpled(unsigned char nled, unsighed char attr);
Library:
CL.LIB
Description:
Function qtpled gives the LED indicated in nled the attribute specified by attr on the connected
console hardware device (QTP 24 and QTP 24P); the device must be selected and/or initialized
previously. LEDs numbers are included in the range 0÷15, as shown in figure B1, while the attributes
can be:
0
(00 Hex) -> LED Off
255 (FF Hex) -> LED On
85 (55 Hex) -> LED blinking
If parameters are not valid, the function does nothing.
Example:
qtpled(5, 85);
// Sets LED5 blinking
Parameters returned:
Function qtpled returns nothing.
SERIN
Definition:
#include <GCLIBD.H>
unsigned char serIn(unsigned char nser);
Library:
CL.LIB
Description:
Function serIn manages a character reception from serial line nser; serial line must be initialized
previously. The function can use one of the control card serial lines according to the parameter nser:
0 -> serial B and 1 -> serial A. It waits for character reception suspending the program.
Example:
unsigned char rx[10];
for (i=0; i<5; i++)
rx[i]=serIn(0);
// Cycle to receive 5 chr from serial B
Parameters returned:
Function serIn resturns the character code received.
GCTR
Rel. 5.40
Page B-17
grifo®
ITALIAN TECHNOLOGY
SEROUT
Definition:
#include <GCLIBD.H>
void serOut(unsigned char nser, unsigned char c);
Library:
CL.LIB
Description:
Function serOut manages the single characther c transmission to serial line indicated by nser; the
serial line must be initialized previously. The function can use one of the control card serial lines
according to the parameter nser: 0 -> serial B and 1 -> serial A.
Example:
unsigned char tx[10];
for (i=0; i<5; i++)
serOut(0, tx[i]);
// Cycle to send 5 chr on serial B
Parameters returned:
Function serOut returns nothing.
SERSTATUS
Definition:
#include <GCLIBD.H>
unsigned char serStatus(unsigned char nser);
Library:
CL.LIB
Description:
Function serStatus checks for a character reception from serial line nser; the serial line must be
initialized previously. The function can use one of the control card serial lines according to the
parameter nser: 0 -> serial B and 1 -> serial A and does not suspend program execution.
Example:
unsigned char rx;
if (serStatus(0))
rx=serin(0);
// If character received from serial B
// fetch it
Parameters returned:
Function serStatus returns a value different from 0 if a character has been received and viceversa.
Page B-18
GCTR
Rel. 5.40
grifo®
ITALIAN TECHNOLOGY
SETIN
Definition:
#include <GCLIBD.H>
unsigned int setIn(unsigned int device);
Library:
CL.LIB
Description:
Function setIn allows to select the input console hardware device and prepares it for the future
operations performed by other console functions. The input parameter device specifies the console
connected to control card and must be defined as described in paragraph “CONSOLE PREDEFINED
SYMBOLS”.
Example:
unsigned int devin;
devin=QTP16P | LCD20x4;
setIn(devin);
// Set as console QTP 16P with display LCD 20x4
Parameters returned:
Function setIn returns 0 in case of invalid device and viceversa.
SETOUT
Definition:
#include <GCLIBD.H>
unsigned int setOut(unsigned int device);
Library:
CL.LIB
Description:
Function setOut allows to select the output console hardware device and prepares it for the future
operations performed by other console functions. The input parameter device specifies the console
connected to control card and must be defined as described in paragraph “CONSOLE PREDEFINED
SYMBOLS”.
Example:
unsigned int devout;
devout=SER0;
setOut(devout);
// Set as console serial B
Parameters returned:
Function setOut returns 0 in case of invalid device and viceversa.
GCTR
Rel. 5.40
Page B-19
grifo®
ITALIAN TECHNOLOGY
SETSERIAL
Definition:
#include <GCLIBD.H>
void setSerial(unsigned char nser, unsigned long baud, unsigned char bitxchr, unsigned char parity,
unsigned char stopbit);
Library:
CL.LIB
Description:
Function setSerial manages initialization of serial line indicated by nser, to prepare it to work with
successiveconsole functions. The five input parameters are:
nser
serial port to initialize
baud
bitxchr
parity
baud rate
bit per character
parity bit management
stop bit
number of stop bit
0 -> serial B
1 -> serial A
50÷115200
5÷8
0 -> no parity
1 -> odd parity
2 -> even parity
1 or 2
According to the control card used the values acceptable for the above parameters may vary; the user
must find the valid ones on the control card technical manual and use them to call the function
correctly. Hardware and/or software handshakes management is never enabled by this function.
Example:
setSerial(0, 19200, 8, 0, 1);
serOut(0, 65);
// Initializes serial B
Parameters returned:
Function setSerial returns nothing.
Page B-20
GCTR
Rel. 5.40
grifo®
ITALIAN TECHNOLOGY
SETDATE
Definition:
#include <DOS.H>
void setdate(struct date *datep);
Library:
CL.LIB
Description:
Function setdate sets current date of Real Time Clock on the control card from structured variable
datep. This latter must be a pointer to the type date, declared in the header file DOS.H, that contains
three variables: da_day (char), da_month (char), da_year (int).
Example:
struct date d;
d.da_day=1;
d.da_mon=1;
d.da_year=0;
setdate(&d);
// Sets RTC to beginning of century
Parameters returned:
Function setdate returns nothing.
SETTIME
Definition:
#include <DOS.H>
void settime(struct time *timep);
Library:
CL.LIB
Description:
Function settime sets current time of Real Time Clock on the control card from structured variable
timep. This latter must be a pointer to a variable of type time, declared in header file DOS.H, that
contains four variables ti_hour, ti_min, ti_sec, ti_hsec (all char). Control card RTC does not manage
hundreds of seconds (structure member ti_hsec), so it can be ignored.
Example:
struct time t;
t.ti_hour= t.ti_min= t.ti_sec= 1;
settime(&t);
// Sets RTC to beginning of the day
Parameters returned:
Function settime returns nothing.
GCTR
Rel. 5.40
Page B-21
grifo®
ITALIAN TECHNOLOGY
SLEEP
Definition:
#include <DOS.H>
void sleep(unsigned int seconds);
Library:
CL.LIB
Description:
Function sleep performs a calibrated delay whose duration is specified in seconds by the input
parameter seconds.
Example:
outp(PA,0x02);
sleep(5);
outp(PA,0x00);
// Activates output for 5 sec
Parameters returned:
Functione sleep returns nothing.
_STRDATE
Definition:
#include <TIME.H>
char *_strdate(char *buf);
Library:
CL.LIB
Description:
Function _strdate converts current date from Real Time Clock on the control card into a string that
stores in the buffer buf. The string generated is terminated by the classic null character and features
the American notation MM/DD/YY where MM, DD and YY are two figures numbers for month, day
and year. So the buffer buf must be at least 9 characters long.
Example:
char datebuf[9];
_strdate(datebuf);
cprintf("Date: %s",datebuf);
Parameters returned:
Function _strdate returns buf, that is the address from where the string has been stored.
Page B-22
GCTR
Rel. 5.40
grifo®
ITALIAN TECHNOLOGY
_STRTIME
Definition:
#include <TIME.H>
char *_strtime(char *buf);
Library:
CL.LIB
Description:
Function _strtime converts current time from Real Time Clock on the control card into a string that
stores in the buffer buf. The string generated is terminated by the classic null character and features
the notation HH:MM:SS where HH, MM and SS are two figures numbers for hours, minutes and
seconds. So the buffer buf must be at least 9 characters long.
Example:
char timebuf[9];
_strtime(timebuf);
cprintf("Time: %s",timebuf);
Parameters returned:
Function _strtime returns buf, that is the address from where the string has been stored.
WHEREX
Definition:
#include <CONIO.H>
int wherex(void);
Library:
CL.LIB
Description:
Function wherex returns current orizontal position x (column) of cursor on console display.
Example:
int col, row;
col=wherex();
row=wherey();
gotoxy(col+5,row);
// Move cursor 5 chars forward
Parameters returned:
Function wherex returns the column where the cursor finds, the range of this value changes according
to which console is selected.
GCTR
Rel. 5.40
Page B-23
grifo®
ITALIAN TECHNOLOGY
WHEREY
Definition:
#include <CONIO.H>
int wherey(void);
Library:
CL.LIB
Description:
Function wherey returns current vertical position y (row) of cursor on console display.
Example:
int col, row;
col=wherex();
row=wherey();
gotoxy(col,row+3);
// Move cursor 3 chars down
Parameters returned:
Function wherey returns the row where the cursor finds, the range of this value changes according
to which console is selected.
Page B-24
GCTR
Rel. 5.40
grifo®
ITALIAN TECHNOLOGY
APPENDIX C: I/O ADDRESSES
DEVICE
REG.
ADDRESS
R/W
ABACO®
I/O BUS
IOBUS
F000H÷F0FFH
R/W
RUN/DEB.
RUNDEB
F100H
R
SEC1
F100H
R/W
Data register for seconds units
SEC10
F101H
R/W
Data register for seconds decines
MIN1
F102H
R/W
Data register for minutes units
MIN10
F103H
R/W
Data register for minutes decines
HOU1
F104H
R/W
Data register for hours units
HOU10
F105H
R/W
Data register for hours decines and
AM/PM
DAY1
F106H
R/W
Data register for day units
DAY10
F107H
R/W
Data register for day decines
MON1
F108H
R/W
Data register for month units
MON10
F109H
R/W
Data register for month decines
YEA1
F10AH
R/W
Data register for year units
YEA10
F10BH
R/W
Data register for year decines
WEE
F10CH
R/W
Data register for week day
REGD
F10DH
R/W
Control register D
REGE
F10EH
R/W
Control register E
REGF
F10FH
R/W
Control register F
RWD
F600H
R/W
Register for watch dog retrigger
Real
Time
Clock
W. DOG
PURPOSE
ABACO ® I/O BUS addresses
Register for configuration jumper
acquisition
FIGURE C1: I/O REGISTERS ADDRESSES ON GPC® 884
GCTR
Rel. 5.40
Page C-1
grifo®
DEVICE
REG.
ADDRESS
W.DOG
RWD
F000H
R/W Watch Dog retrigger
EEPROM
RE2
F000H
R/W EEPROM serial access
MMU
MMU
F000H
R/W MMU memory paging
LD3,4
LED
F000H
R/W Activity LEDs management register
BT1
BAT
F000H
RSB
F080H
R/W Serial line B status register
RDB
F081H
R/W Serial line B data register
RSA
F082H
R/W Serial line A status register
RDA
F083H
R/W Serial line A data register
DMA
F100H
R/W Disable DMA request register
IRL0÷7
F180H÷F18EH
(even)
R/W Sequencer instruction register low 0÷7
IRH0÷7
F181H÷F18FH
(odd)
R/W Sequencer instruction register high 0÷7
CNTL
F190H
R/W Configuration register low
CNTH
F191H
R/W Configuration register high
INTENL
F192H
R/W Interrupt abilitation register low
INTENH
F193H
R/W Interrupt abilitation register high
INTSTL
F194H
R
Interrupt status register low
INTSTH
F195H
R
Interrupt status register high
TMRL
F196H
R/W Timer register low
TMRH
F197H
R/W Timer register high
FIFOL
F198H
R
Conversions to FIFO register low
FIFOH
F199H
R
Conversions to FIFO register high
LIMSTL
F19AH
R
Limits status register low
LIMSTH
F19BH
R
Limits status register high
SCC
85C30
DMA
A/D
LM12458
R/W
ITALIAN TECHNOLOGY
R
PURPOSE
Battery status acquisition register
FIGURE C2: I/O REGISTERS ADDRESSES ON GPC® 188F (1 OF 2)
Page C-2
GCTR
Rel. 5.40
grifo®
ITALIAN TECHNOLOGY
DEVICE
REG.
ADDRESS
R/W
PURPOSE
PA
F200H
R/W Port A data register
PB
F201H
R/W Port B data register
PC
F202H
R/W Port C data register
RC
F203H
R/W Control and command register
S1
F280H
R/W Units of seconds data register
S10
F281H
R/W Decines of seconds data register
MI1
F282H
R/W Units of minutes data register
MI10
F283H
R/W Decines of minutes data register
H1
F284H
R/W Units of hours data register
H10
F285H
R/W Decines of hours data register; AM/PM
D1
F286H
R/W Units of day data register
D10
F287H
R/W Decines of day data register
MO1
F288H
R/W Units of month data register
MO10
F289H
R/W Decines of month data register
Y1
F28AH
R/W Units of year data register
Y10
F28BH
R/W Decines of year data register
W
F28CH
R/W Day of week data register
REGD
F28DH
R/W D control and status register
REGE
F28EH
R/W E control and status register
REGF
F28FH
R/W F control and status register
WRITE
PROTECT
WRP
F300H
W
SRAM write protection register
DIP
SWITCH
DSW1
F300H
R
Dip Switch acquisition register
PPI 82C55
RTC
62421
FIGURE C3: I/O REGISTERS ADDRESSES ON GPC® 188F (2 OF 2)
GCTR
Rel. 5.40
Page C-3
grifo®
ITALIAN TECHNOLOGY
DEVICE
REG.
ADDRESS
R/W
W.DOG
RWD
F000H
R
EEPROM
RE2
F000H
R/W
EEPROM serial access
RSB
F080H
R/W
Serial line B status register
RDB
F081H
R/W
Serial line B data register
RSA
F082H
R/W
Serial line A status register
RDA
F083H
R/W
Serial line A data register
DMA
DMA
F100H
R/W
Disable DMA request register
ABACO®
I/O BUS
IOBUS
F180H÷F1FFH
R/W
Addresses for ABACO
management.
PA
F200H
R/W
Port A data register
PB
F201H
R/W
Port B data register
PC
F202H
R/W
Port C data register
RC
F203H
R/W
Control and command register
SCC
85C30
PURPOSE
Watch Dog retrigger
®
I/O BUS
PPI 82C55
FIGURE C4: I/O REGISTERS ADDRESSES ON GPC® 188D (1 OF 2)
Page C-4
GCTR
Rel. 5.40
grifo®
ITALIAN TECHNOLOGY
DEVICE
REG.
ADDRESS
R/W
S1
F280H
R/W
Units of seconds data register
S10
F281H
R/W
Decines of seconds data register
MI1
F282H
R/W
Units of minutes data register
MI10
F283H
R/W
Decines of minutes data register
H1
F284H
R/W
Units of hours data register
H10
F285H
R/W
Decines of hours data register;
AM/PM
D1
F286H
R/W
Units of day data register
D10
F287H
R/W
Decines of day data register
MO1
F288H
R/W
Units of month data register
MO10
F289H
R/W
Decines of month data register
Y1
F28AH
R/W
Units of year data register
Y10
F28BH
R/W
Decines of year data register
W
F28CH
R/W
Day of week data register
REGD
F28DH
R/W
D control and status register
REGE
F28EH
R/W
E control and status register
REGF
F28FH
R/W
F control and status register
WR PROT
WRP
F300H
W
SRAM write protection register
DIP
SWITCH
DSW1
F300H
R
Dip Switch acquisition register
LED
F340H
W
Register to manage activity LEDs
RTC
72421
LEDS
PURPOSE
FIGURE C5: I/O REGISTERS ADDRESSES ON GPC® 188D (2 OF 2)
GCTR
Rel. 5.40
Page C-5
grifo®
DEVICE
REG.
ABACO®
I/O BUS
I/O BUS
RUN / DEB.
RUNDEB
F100H
SEC1
F100H
R/W Decines of seconds data register
SEC10
F101H
R/W Units of minutes data register
MIN1
F102H
R/W Decines of minutes data register
MIN10
F103H
R/W Units of hours data register
HOU1
F104H
R/W Decines of hours data register; AM/PM
HOU10
F105H
R/W Units of day data register
DAY1
F106H
R/W Decines of day data register
DAY10
F107H
R/W Units of month data register
MON1
F108H
R/W Decines of month data register
MON10
F109H
R/W Units of year data register
YEA1
F10AH
R/W Decines of year data register
YEA10
F10BH
R/W Day of week data register
WEE
F10CH
R/W D control and status register
REGD
F10DH
R/W E control and status register
REGE
F10EH
R/W F control and status register
REGF
F10FH
R/W Registro di controllo F
DASCTRL
F500H
W
A/D converter control register
DASL
F500H
R
A/D converter low data register
DASH
F501H
R
A/D converter high data register
PA
F540H
R/W Port A data register
PB
F541H
R/W Port B data register
PC
F542H
R/W Port C data register
RC
F543H
R/W Control and command register
W. DOG
RWD
F580H
R/W Watch Dog retrigger register
DIP SWITCH
DSW1
F5C0H
RTC 62421
A/D MAX197
ADDRESS
R/W
ITALIAN TECHNOLOGY
F000H÷F0FFH R/W
R
PURPOSE
Addresses for ABACO® I/O BUS
management.
Units of seconds data register
PPI 82C55
UART CAN
SJA 1000
CAN
R
Dip switch acquisition register
Registers to manage UART CAN SJA
1000 in BasicCAN or PeliCAN
F600H÷F67FH R/W modalities (registers are the same
reported in the component data sheet,
plus an offset of F600H)
FIGURE C6: I/O REGISTERS ADDRESSES ON GPC® 883
Page C-6
GCTR
Rel. 5.40
ITALIAN TECHNOLOGY
grifo®
APPENDIX D: ALPHABETICAL INDEX
SYMBOLS
.ABM
.BAK
.BIN
.EXE
.HEX
.IMG
.MAP
.OBJ
/NMI
11, 21, 24, 25
11
14
11, 21
12
11, 12, 14
11, 21, 24
11
21
A
ADDRESSING OF HARDWARE STRUCTURES IN I/O
ADDS VIEW-POINT 29, B-1, B-2, B-5, B-13
AUTOREPEAT 28
20
B
BAUDRATE 9
BIBLIOGRAPHY 38
BOARD CONFIGURATION 13
BORLAND 6, 8, 11, 17, 18, 20, 34, 35
BREAKPOINT 21
C
CHANGES TO AN ALREADY INSTALLED APPLICATION 15
CODE AREA 8, 17, 22, 35
CONNECTION CABLE 17
CONSOLE 26, A-1, B-2, B-3, B-11, B-13, B-16, B-19, B-23, B-24
CONSOLE COMMANDS 29
ALPHANUMERIC CURSOR PLACEMENT 31
BACKSPACE 31
BLINKING CURSOR ON 32
CARRIAGE RETURN 30
CARRIAGE RETURN+LINE FEED 30
CLEAR END OF LINE 31
CLEAR END OF PAGE 32
CLEAR LINE 31
CLEAR PAGE 31
CURSOR DOWN 30
CURSOR LEFT 29
CURSOR OFF 32
CURSOR RIGHT 29
CURSOR UP 30
GCTR
Rel. 5.40
Page D-1
grifo®
ITALIAN TECHNOLOGY
HOME 30
LEDS ACTIVATION 33
LEDS ACTIVATION WITH MASK 33
STATIC CURSOR ON 32
CONSOLE HARDWARE DEVICES 26
CONSOLE PC 5
CONSOLE PREDEFINED SYMBOLS 27
KDXX24 27
LCD20X2 27
LCD20X4 27
LCD40X2 27
PRINTER 27
QTP16P 27
QTP24P 27
SER0 27
SER1 27
VFD20X2 27
CONTROL CARD 4
CTOBIN 11, 25
CTODEB 11, 18, 35
D
DATA AREA 8, 17, 22, 35
DATE 36
DEBOUNCING 28
DEBUG 21
DEBUGGER 9, 11, 15, 25
DESCRIPTION OF GCTR 20
DEMO PROGRAMS 36
DEMOCONS.C 27
DEMOFP.C 21
DEVELOPMENT PC 4, 8
DIFFERENCES AMONGST BORLAND C++, TURBO C OR C++ AND GCTR
DIRECTORY C:\GCTRXXX 9
DIRECTORY C:\TC_GCTR 9
DIRECTORY C:\TD_GCTR 9
DMA 20, 25
DOWNLOAD TIME 2
35
E
EMULATORS 21
EPROM 4, 7, 15, 16, 17, 22
EPROM PROGRAMMER 7
EPROM PROGRAMMING 12
EXETOBIN 21
Page D-2
GCTR
Rel. 5.40
ITALIAN TECHNOLOGY
grifo®
F
FLASH EPROM 4, 7, 12, 13, 15, 16, 17, 22
FLASH EPROM AREAS 13
FLASH EPROM PROGRAMMING (FLASH WRITER)
FLASH WRITER 13, 16, 24
FLASH WRITER AREA 13
FLASH WRITER EXECUTION 14
FLOATING POINT 21
FWR 4, 7, 13, 17, 37
12
G
GCLIBD.H 27
GCTR.IDE 35
GENERAL INFORMATION 2
GET188 14, 17
GET51 6, 17
GHEX2 12
GPC® 188D 4, 13, 16, 27, C-4
GPC® 188F 4, 13, 16, 27, C-2
GPC® 883 4, 16, 27, C-6
GPC® 884 4, 16, 27, C-1
H
HARDWARE BREAKPOINT 21
HEAP 22
HOW TO START 17
I
I.D.E. 8, 11, 17, 18, 35
INSTALLATION 8
INTERRUPTS 20, B-4, B-6, B-8
INTRODUCTION 1
I/O ADDRESSES 20, A-1
K
KDX 26, 27, A-5
KEYBOARD 28
L
LIBRARY 10, 26, 34, 36, B-1
LIBRARY FUNCTIONS B-1
_DISABLE B-4
_DOS_GETDATE B-5
_DOS_GETTIME B-6
_DOS_GETVECT B-6
GCTR
Rel. 5.40
Page D-3
grifo®
ITALIAN TECHNOLOGY
_DOS_SETDATE B-7
_DOS_SETTIME B-7
_DOS_SETVECT B-8
_ENABLE
_EXIT B-9
_STRDATE B-22
_STRTIME B-23
CALLOC B-1
CLREOL B-1
CLRSCR B-2
CPRINTF B-2
CPUTS B-3
CSCANF B-3
DELAY B-4
DELLINE B-5
FAR_FREE B-10
FAR_MALLOC B-10
FREE B-11
GETCH , GETCHE B-11
GETDATE B-12
GETTIME B-12
GOTOXY B-13
KBHIT B-13
LEDBLINKSTATUS B-14
LEDSTATUS B-14
MALLOC B-16
PUTCH B-16
QTPLED B-17
SERIN B-17
SEROUT B-18
SERSTATUS B-18
SETDATE B-21
SETIN B-19
SETOUT B-19
SETSERIAL B-20
SETTIME B-21
SLEEP B-22
WHEREX B-23
WHEREY B-24
LMCS 22
LOCATOR 21
M
MATRIX KEYBOARD 28, A-2
MEMORY MANAGEMENT B-1, B-10, B-11, B-16
MEMORY ORGANIZATION 22
MEMORY USE NOTES 24
MINIMUM REQUIREMENTS 4
Page D-4
GCTR
Rel. 5.40
grifo®
ITALIAN TECHNOLOGY
MMCS 22
MMU 22
MPCS 22
N
NOT USED AREA 13
O
OMF
21
P
PACS 20
PERSONAL COMPUTERS
PRINTER 26, A-1
4
Q
QTP
26, 27, 29, A-2, B-14
R
RELOC 20
RESERVED MEMORY 25
RS 232 4, 5
RTC 36, B-5, B-6, B-7, B-12, B-21, B-22, B-23
RUN/DEBUG 16
S
SERIAL COMMUNICATION CABLE 5
SERIAL PORT 27, B-17, B-18, B-20
SOFTWARE AND FIRMWARE FOR THE CONTROL CARD 7
SOFTWARE TO DEVELOP THE APPLICATION PROGRAM 6
SOFTWARE VERSION 1
SRAM 4
STACK 22
START-UP CODE 9, 20, 35
T
TDEB 4, 12, 15, 17
TDXXX.IMG 15
TERMINAL 29
TEST.C 18
TIME 36
TURBO 6, 8, 34
GCTR
Rel. 5.40
Page D-5
grifo®
ITALIAN TECHNOLOGY
U
UMCS 22
USE 11
USE OF GCTR 8
USER AREA 13, 15
USER AREA DELETION 15
USER CONFIGURATION 35
USER MANUAL 7
V
VERSIONS OF GCTR 38
W
WATCH DOG 20, 34
WORKING SOFTWARE 6
Page D-6
GCTR
Rel. 5.40