1
ZyWALL 35
Internet Security Appliance
Quick Start Guide
Version 3.62
April 2004
ZyWALL 35 Internet Security Appliance
Introducing the ZyWALL
The ZyWALL 35 is the ideal secure gateway for all data passing between the Internet and the LAN. By
integrating NAT, firewall, content filtering, certificates and VPN capability, ZyXEL’s ZyWALL 35 is a
complete security solution that protects your Intranet and efficiently manages data traffic on your network.
The ZyWALL increases network security by adding up to four De-Militarized Zone (DMZ) ports for use
with publicly accessible servers. Dual WAN ports and dial backup enhance reliability. The
PCMCIA/CardBus slot allows you to add a 802.11b/g-compliant wireless LAN. The embedded web
configurator is easy to operate and totally independent of the operating system platform you use.
You should have an Internet account already set up and have been given most of the following information.
Internet Account Information
Your device’s WAN IP Address (if given): __________________
Your device’s WAN Default Gateway (if given): __________________
Your device’s WAN Net Mask (if given): __________________
DNS Server IP Address (if given): Primary _______________, Secondary _______________, Third _______________
Encapsulation: (choose one below)
Ethernet
Service Type: _______________________
Login Server IP Address: ______________
PPTP
User Name: ____________
Password: ____________
User Name: ____________
Password: ____________
Your WAN IP Address: ____________
PPTP Server IP Address: ___________
Connection ID (if required): ____________
PPPoE
(PPPoE) Service Name: ____________
User Name: ____________
Password: ____________
Procedure to View a Product’s Certification(s)
1. Go to www.zyxel.com.
2. Select your product from the drop-down list box on the ZyXEL home page to go to that product's page.
3. Select the certification you wish to view from this page.
1
ZyWALL 35 Internet Security Appliance
1 Hardware Connections
1.1 Front Panel and Connectors
Refer to section 1.3 on how to setup your ZyWALL.
LABEL
DESCRIPTION
RESET
You only need to use this button if you’ve forgotten the ZyWALL’s password. It returns
the ZyWALL to the factory defaults (password is 1234, LAN IP address 192.168.1.1,
terminal emulation settings as described below etc.; see your User’s Guide for details).
WAN 10/100
1/2
These ports are auto-negotiating (can connect at 10 or 100Mbps) and auto-crossover
(automatically adjust to straight-through or crossover Ethernet cable).
LAN/DMZ
10/100
1-4
These ports are auto-negotiating (can connect at 10 or 100Mbps) and auto-crossover
(automatically adjust to straight-through or crossover Ethernet cable).
1.2 Rear Panel and Connectors
LABEL
DESCRIPTION
DIAL BACKUP
Only connect this port if you want to set up a backup WAN connection; see your User’s
Guide for details.
CONSOLE
Only connect this port if you want to configure the ZyWALL using the SMT (System
Management Terminal) via console port; see your User’s Guide for details.
Your computer should have a terminal emulation communications program (such as
HyperTerminal) set to VT100 terminal emulation, no parity, 8 data bits, 1 stop bit, no flow
control and 9600 bps port speed.
2
ZyWALL 35 Internet Security Appliance
LABEL
EXTENSION
CARD SLOT
DESCRIPTION
Do not insert or remove a card with the ZyWALL turned on.
Turn off the ZyWALL before inserting or removing an 802.11b/g-compliant wireless LAN
PCMCIA or CardBus card (to avoid damage).
Do not force, bend or twist the wireless LAN card.
POWER
12VDC
Connect the included power adaptor (use only this adaptor) to this power socket.
1.3 Setting Up Your ZyWALL
1.
Connect your cable/DSL modem(s) to WAN1 port and/or WAN2 port with the Ethernet cable(s) that
came with your modem(s).
2.
Connect computers or hubs to LAN ports with Ethernet cables.
If you configure these ports as DMZ ports in the LAN or DMZ screen through the Web configurator,
connect publicly accessible servers (Web, FTP, etc.) to these ports to make them visible to the outside
world.
3
ZyWALL 35 Internet Security Appliance
3.
Slide the 64-pin connector end of the PCMCIA or CardBus wireless LAN card into the extension card
slot if you want to add a 802.11b/g-compliant wireless LAN.
4
ZyWALL 35 Internet Security Appliance
4.
If you want to set up a backup WAN connection, connect the 9-pin female end of your modem or
Terminal Adaptor (TA) cable to DIAL BACKUP port and the other end to your modem or TA.
5.
If you want to configure the ZyWALL using the SMT (System Management Terminal) via CONSOLE
port, connect the 9-pin male end of the console cable to the console port of the ZyWALL and the other
end to a serial port (COM1, COM2 or other COM port) on your computer.
6.
After you’ve made the connections, connect the included power adaptor to the power socket and
connect the power adaptor to a power supply (outlet).
The PWR LED turns on green when you connect the power. The SYS LED blinks for about 30 seconds
while performing system testing and then stays on if the testing is successful. The ACT, CARD, WAN
and LAN/DMZ LEDs turn on if the corresponding connections are properly made. Please see section
1.4 for detailed LED descriptions.
5
ZyWALL 35 Internet Security Appliance
1.4 Front Panel LEDs
LED
COLOR
PWR
SYS
ACT
CARD
WAN
10/100
DESCRIPTION
Off
The ZyWALL is turned off.
Green
On
The ZyWALL is turned on.
Red
On
The power to the ZyWALL is too low.
Green
Off
The ZyWALL is not ready or has failed.
On
The ZyWALL is ready and running.
Flashing
The ZyWALL is restarting.
Off
The backup port is not connected.
Flashing
The backup port is sending or receiving packets.
Off
The wireless LAN is not ready, or has failed.
On
The wireless LAN is ready.
Flashing
The wireless LAN is sending or receiving packets.
Off
The WAN connection is not ready, or has failed.
On
The ZyWALL has a successful 10Mbps WAN connection.
Flashing
The 10M WAN is sending or receiving packets.
On
The ZyWALL has a successful 100Mbps WAN connection.
Flashing
The 100M WAN is sending or receiving packets.
Off
The LAN/DMZ is not connected.
On
The ZyWALL has a successful 10Mbps Ethernet connection.
Flashing
The 10M LAN is sending or receiving packets.
On
The ZyWALL has a successful 100Mbps Ethernet connection.
Flashing
The 100M LAN is sending or receiving packets.
Green
Green
Green
Orange
LAN/DMZ
10/100
STATUS
Green
Orange
6
ZyWALL 35 Internet Security Appliance
2 Setting Up Your Computer’s IP Address
Skip this section if your computer is already set up to accept a dynamic IP
address. This is the default for most new computers.
The ZyWALL is already set up to assign your computer an IP address. Use this section to set up your
computer to receive an IP address or assign it a static IP address in the 192.168.1.2 to 192.168.1.254 range
with a subnet mask of 255.255.255.0. This is necessary to ensure that your computer can communicate with
your ZyWALL.
Your computer must have an Ethernet card and TCP/IP installed. TCP/IP should already be installed on
computers using Windows NT/2000/XP, Macintosh OS 7 and later operating systems.
Windows 2000/NT/XP
1.
In Windows XP, click Start, Control Panel. In Windows 2000/NT, click Start, Settings, Control Panel.
2.
In Windows XP, click Network Connections.
In Windows 2000/NT, click Network and Dial-up Connections.
3.
Right-click Local Area Connection and then click Properties.
4.
Select Internet Protocol (TCP/IP) (under the General tab in Windows XP) and click Properties.
5.
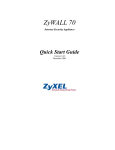
The Internet Protocol TCP/IP Properties screen opens (the
General tab in Windows XP).
- To have your computer assigned a dynamic IP address, click
Obtain an IP address automatically.
-To configure a static IP address, click Use the following IP
Address and fill in the IP address (choose one
from192.168.1.2 to 192.168.1.254), Subnet mask
(255.255.255.0), and Default gateway (192.168.1.1) fields.
7
ZyWALL 35 Internet Security Appliance
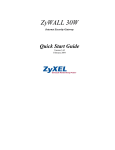
6.
Click Advanced. Remove any previously installed gateways in
the IP Settings tab and click OK to go back to the Internet
Protocol TCP/IP Properties screen.
7.
Click Obtain DNS server address automatically if you do
not know your DNS server IP address(es).
If you know your DNS server IP address(es), click Use the
following DNS server addresses, and type them in the
Preferred DNS server and Alternate DNS server fields.
If you have more than two DNS servers, click Advanced, the
DNS tab and then configure them using Add.
8.
Click OK to close the Internet Protocol (TCP/IP) Properties
window.
9.
Click OK to close the Local Area Connection Properties
window.
Checking Your Computer’s IP Address
1.
In the computer, click Start, (All) Programs, Accessories and then Command Prompt.
2.
In the Command Prompt window, type "ipconfig" and then press ENTER. Your computer’s IP address must be in
the correct range (192.168.1.2 to 192.168.1.254) with subnet mask 255.255.255.0 in order to communicate with
the ZyWALL.
Refer to your User’s Guide for detailed IP address configuration for other Windows and Macintosh computer
operating systems.
3 Configuring Your ZyWALL
Choose one of these methods to access and configure the ZyWALL. This Quick
Start Guide shows you how to use the web configurator wizards only. See your
User’s Guide for background information on all ZyWALL features and SMT
configuration. Click the web configurator online help for screen-specific web help.
Web Configurator
SMT (System Management Terminal). Access the SMT via:
o
Console port using terminal emulation software
o
LAN, WLAN, DMZ or WAN using Telnet
8
ZyWALL 35 Internet Security Appliance
3.1 Accessing Your ZyWALL Via Web Configurator
1.
Launch your web browser. Enter “192.168.1.1” as the web site address.
Web site address.
2.
The default password (“1234”) is already in the password field (in non-readable format). Click Login to
proceed to a screen asking you to change your password. Click Reset to revert to the default password
in the password field.
Default password.
3.
It is highly recommended you change the default password! Enter a new password, retype it to confirm
and click Apply; alternatively click Ignore if you do not want to change the password now.
Change default password.
9
ZyWALL 35 Internet Security Appliance
4.
Click Apply in the Replace Certificate screen to create a certificate using your ZyWALL’s MAC
address that will be specific to this device.
5.
You should now see the web configurator HOME screen.
Click Internet Access and VPN Wizard to begin setup wizards screens to help you configure your
ZyWALL for the first time.
Click a link in the navigation panel to configure that ZyWALL feature.
Click MAINTENANCE in the navigation panel to upload firmware and back up, restore or upload
a configuration file.
Click Renew to renew the WAN IP address.
Click Show Statistics to see ZyWALL performance statistics.
Click Show DHCP Table to see current DHCP (Dynamic Host Configuration Protocol) client
information.
Click VPN Status to display the active VPN (Virtual Private Network) connections.
Click LOGOUT when you have finished a ZyWALL management session.
10
ZyWALL 35 Internet Security Appliance
The ZyWALL automatically logs you out if it is left idle for five minutes. If this
happens to you, simply log back in. This idle timeout timer is one of the many
ZyWALL features that you may edit using the web configurator.
Wizards
Navigation panel
LOGOUT
11
ZyWALL 35 Internet Security Appliance
3.2 Using the Wizard to Configure for Internet Access
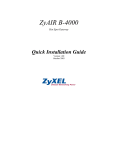
1.
Click Internet Access in the HOME screen to help you configure your WAN1 on the ZyWALL to
access the Internet. The first wizard screen has three variations depending on what encapsulation type
you use. Use the information in Internet Account Information to fill in fields.
Choose Ethernet when the WAN port is used
as a regular Ethernet. Choose from Standard
or a RoadRunner version. You’ll need a user
name, password and login server IP address
for some Roadrunner versions.
Click Next to continue.
Internet Connection with Ethernet
Point-to-Point Protocol over Ethernet (PPPoE)
also functions as a dial-up connection.
Therefore you’ll also need a username and
password and possibly the PPPoE service
name.
Your ISP will give you all needed information.
Click Next to continue.
Internet Connection with PPPoE
12
ZyWALL 35 Internet Security Appliance
Choose PPTP if your service provider uses a
DSL terminator with PPTP login. The ZyWALL
must have a static IP address in this case.
You’ll also need a login name, associated
password, the DSL terminator IP address and
possibly a connection ID.
Click Next to continue.
Internet Connection with PPTP
2.
Fill in the fields and click Finish to save and complete the wizard setup.
WAN IP Address Assignment
Select Get automatically from ISP if your ISP
did not assign you a fixed IP address. Select
Use fixed IP address if the ISP assigned a
fixed IP address and then enter your IP
address and subnet mask in the next two
fields. Enter the gateway IP address in this field
(if provided) when you select Use Fixed IP
Address.
System DNS Servers
Select From ISP if your ISP dynamically
assigns DNS server information (and the
ZyWALL's WAN IP address).
Select User-Defined if you have the IP
address of a DNS server. Enter the DNS
server's IP address in the field to the right.
Select None if you do not want to configure
DNS servers. If you do not configure a DNS
server, you must know the IP address of a
machine in order to access it.
WAN MAC Address
Select Factory Default to use the factory assigned default MAC address. Alternatively, select Spoof this Computer's MAC
address - IP Address and enter the IP address of the computer on the LAN whose MAC address you are cloning.
13
ZyWALL 35 Internet Security Appliance
3.3 Test Your Internet Connection
Launch your web browser and navigate to www.zyxel.com. You don’t need a dial-up program such as Dial
Up Networking. Refer to the User’s Guide for more detailed information on the complete range of ZyWALL
features.
3.4 Using the Wizard to Configure a VPN Policy
Refer to your User’s Guide for more background information about VPN.
1.
Click VPN Wizard in the HOME screen to help you edit a VPN rule that use a pre-shared key and
configure IKE settings to establish a VPN tunnel. Click Next to continue.
Enter the WAN IP address of your ZyWALL.
The ZyWALL uses its current WAN IP
address (static or dynamic) in setting up the
VPN tunnel if you leave this field as 0.0.0.0.
Select IP Address and then enter an IP
address to identify the remote IPSec router by
its IP address.
Otherwise, select Domain Name and enter
the domain name.
If the remote secure gateway has a dynamic
WAN IP address and does not use DDNS,
enter 0.0.0.0 as the secure gateway’s
address. In this case only the remote secure
gateway can initiate SAs.
2.
Fill in the fields and click Next to continue. Use this screen to configure the IP addresses of the devices
that can use the VPN tunnel. Local network refers to the devices behind the ZyWALL and remote
network refers to the devices behind the remote IPSec router.
Select Single for a single IP address. Select
Range IP for a specific range of IP
addresses. Select Subnet to specify IP
addresses on a network by their subnet
mask.
Local Network
If the Local Network field is configured to
Single, enter a (static) IP address on the
LAN behind your ZyWALL. If the Local
Network field is configured to Range IP,
enter the beginning and end (static) IP
address, in a range of computers on the LAN
behind your ZyWALL. If the Local Network
field is configured to Subnet, enter a (static)
IP address and subnet mask on the LAN
behind your ZyWALL.
14
ZyWALL 35 Internet Security Appliance
Remote Network
If the Remote Network field is configured to Single, enter a (static) IP address on the network behind the remote IPSec
router. If the Remote Network field is configured to Range IP, enter the beginning and end (static) IP address, in a range of
computers on the network behind the remote IPSec router. If the Remote Network field is configured to Subnet, enter a
(static) IP address and subnet mask on the network behind the remote IPSec router.
3.
Use the third wizard screen to configure IKE (Internet Key Exchange) tunnel settings.
Negotiation Mode
Select Main Mode or Aggressive Mode.
Multiple SAs connecting through a secure
gateway must have the same negotiation
mode.
Encryption Algorithm
Select the method of data encryption using a
private (secret) key.
The DES encryption algorithm uses a 56-bit
key. Triple DES (3DES) is a variation on
DES that uses a 168-bit key. As a result,
3DES is more secure than DES. It also
requires more processing power, resulting in
increased latency and decreased throughput.
This implementation of AES uses a 128-bit
key. AES is faster than 3DES.
Authentication Algorithm
MD5 (Message Digest 5) and SHA1 (Secure Hash Algorithm) are hash algorithms used to authenticate packet data. Select
MD5 for minimal security and SHA-1 for maximum security.
Key Group
Choose a key group for phase 1 IKE setup. DH1 (default) refers to Diffie-Hellman Group 1 a 768 bit random number. DH2
refers to Diffie-Hellman Group 2 a 1024 bit (1Kb) random number.
SA Life Time (Seconds)
Define the length of time before an IKE SA automatically renegotiates in this field. The minimum value is 180 seconds.
Pre-Shared Key
Type from 8 to 31 case-sensitive ASCII characters or from 16 to 62 hexadecimal ("0-9", "A-F") characters. You must
precede a hexadecimal key with a "0x” (zero x), which is not counted as part of the 16 to 62 character range for the key.
Click Next to continue.
15
ZyWALL 35 Internet Security Appliance
4.
Use the forth wizard screen to configure IPSec settings and click Next to continue.
Choose Tunnel mode or Transport mode.
Choose which protocol to use (ESP or AH)
for the IKE key exchange.
Choose an encryption algorithm or select
NULL to set up a tunnel without encryption.
Choose an authentication algorithm.
Set the IPSec SA lifetime. This field allows
you to determine how long the IPSec SA
should stay up before it times out.
Choose whether to enable Perfect Forward
Secrecy (PFS) using Diffie-Hellman publickey cryptography. Select None (the default)
to disable PFS. DH1 refers to Diffie-Hellman
Group 1 a 768 bit random number. DH2
refers to Diffie-Hellman Group 2 a 1024 bit
(1Kb) random number (more secure, yet
slower).
5.
This read-only screen shows a summary of the VPN rule’s settings. Check whether what you have
configured is correct.
Click Finish to save and complete the wizard
setup. Otherwise, click Back to return to the
previous screen.
16
ZyWALL 35 Internet Security Appliance
4 Troubleshooting
PROBLEM
CORRECTIVE ACTION
None of the
LEDs turn on
when you turn
on the ZyWALL.
Make sure that you have the power adaptor connected to the ZyWALL and plugged in to an
appropriate power source. Check all cable connections.
Cannot access
the ZyWALL
from the LAN.
Check the cable connection between the ZyWALL and your computer or hub. Refer to the section on
front panel for details.
Cannot ping any
computer on the
LAN.
If the 10/100M LAN/DMZ LEDs are off, check the cable connections between the ZyWALL and your
LAN computers.
Cannot get a
WAN IP address
from the ISP.
The WAN IP is provided after the ISP verifies the MAC address, host name or user ID.
If the LEDs still do not turn on, you may have a hardware problem. In this case, you should contact
your local vendor.
Ping the ZyWALL from a LAN computer. Make sure your computer’s Ethernet card is installed and
functioning properly.
Verify that the IP address and subnet mask of the ZyWALL and the LAN computers are in the same
IP address range.
Find out the verification method used by your ISP and configure the corresponding fields.
If the ISP checks the WAN MAC address, you should clone the MAC address from a LAN computer.
Click WAN and then the WAN1 or WAN2 tab, select Spoof WAN MAC Address and enter the IP
address of the computer on the LAN whose MAC address you are cloning.
If the ISP checks the host name, enter your computer’s name in the System Name field in the
MAINTENANCE General screen (refer to the Maintenance part in the User’s Guide).
If the ISP checks the user ID, click WAN and then the WAN1 or WAN2 tab. Check your service type,
user name, and password.
Cannot access
the Internet.
Check the ZyWALL’s connection to the cable/DSL device.
Click WAN to verify your settings.
17