1
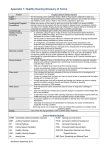
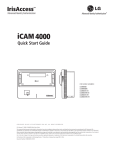
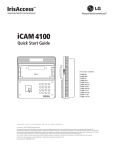
Training 3
Information Technology Department
Government Of Sindh
IRIS Access
Configuration & Installation
Biometric Identification Electronic System
ADP: 1488
Year: 2009-2010
Prepared By:
IRIS Access System Configuration and Installation
Training 3
TABLE OS CONTENTS
IRIS Access 4000....……….……………………………………...3
The IRIS Aceess 4000 EAC System ……………………………5
Inutive User Interface………………………………….…………6
iCam4000 IRIS Camera..................................................................7
Inside iCam 4000…..………………………..….............................8
Use of Iris Access………….………………………………….…..10
Prepared Iris Server Pc……. ..…….……………………..……....11
Preparing for Installation.……………………………………….16
Installing the EAC Software…………………………………….17
Iris Server………………………………………………………...23
Iris Manager……………………………………………………...25
Iris Enroll 4000……………………………………………………27
Identifying User………………………………………………… 31
Iris Monitor…...…………………………………………………..35
Iris DBA Admin…………………………………………………..51
Technical Support ………………………………………………..56
IRIS Access System Configuration and Installation
Training 3
1. IrisAccess® 4000
Iris ID’s IrisAccess® 4000 sets the standard for performance and versatility for iris recognition.Whether
you are looking for a single biometric identification solution or a multi-factor solutionthat works with
many leading cards, card readers and or pin input devices for verification, theIrisAccess platform will
meet your needs.
Iris ID Systems has been the key developer and driver of the commercialization of iris recognition
technology for over 10 years. IrisAccess®, now in its third generation with even more features and
flexibility is the world’s leading deployed iris recognition platform. Iris ID’s biometric solutions enabling
non-contact and highly accurate identification by the iris of the eye, deliver security, convenience,
privacy and productivity to millions around the world.
The IrisAccess® 4000 solution is versatile and flexible allowing easy integration and expansion into a
range of applications. An intuitive user interface, with visual and audible prompts enables users to be
enrolled and identified more easily and more quickly at an affordable price. A powered, auto-tilt
capability further increases both speed and convenience by adjusting for height with a simple touch or if
a card is presented when multi–factor authentication is chosen.
IRIS Access System Configuration and Installation
Training 3
The security of the IrisAccess® platform is also superior since no biometric templates are stored on the
iCAMs. Experts also concede that the countermeasures built into the IrisAccess® suite set the standard
for the industry. A new iData software suite for access control and a tool kit for building identity
dependent applications support several different encryption alternatives is FIPS201 compliant and
include PKI support.
Every iris pattern is unique and stable for life barring direct trauma. Since there are more readily
measurable characteristics in the iris, iris recognition is the most accurate, fastest, and scalable option
for small and large scale biometric deployments. Finger, hand, voice, vein and facial characteristics often
vary and change over time.
IRIS Access System Configuration and Installation
Training 3
2. The IrisAccess™ 4000 EAC System
• IP (Ethernet) based system
• Consists of Computers, Iris Cameras, and Control Units.
• Can operate in conjunction with 3rd party access control systems.
IRIS Access System Configuration and Installation
Training 3
3. Intuitive User Interface
• iCAM activates when user approaches or when card is presented.
• Picture capture range is 10-14 inches (26-36cm) away.
• Self or auto/set height adjustment.
• Placing dot over the bridge of nose easily helps alignment.
• Orange (dot) turns to green (dot) when user is at correct distance.
• Visual indication is amplified with friendly audio prompts.
• Right and left irides are acquired.
• A face picture can also be captured.
IRIS Access System Configuration and Installation
Training 3
4. iCAM4000 (IrisCamera)
IRIS Access System Configuration and Installation
Training 3
5. Inside iCAM 4000
• Power and Network are required connections
• Wiegand In and Smartcard are optional
• Reset button to reload default IP address and iCAMlogin
• Tamper switch on unit rear and front panel
IRIS Access System Configuration and Installation
Training 3
Installation and Dimension
Illustration of mounting prep depth requirements with flush mount to wall.
Recess mount kit available for iCAM4000 - Order iCAM-RM Mount kit.
IRIS Access System Configuration and Installation
Training 3
6. Use of IrisAccess
System Configuration and Setup
IRIS Access System Configuration and Installation
Training 3
7. Prepare the IrisServer PC
In order to configure the iCAM iris cameras, the IrisServer computer must be
given the static IP Address of 192.168.5.1
If a different static IP Address is required for the IrisServer computer, this can be
changed after all of the iCAM’s have been configured.
IRIS Access System Configuration and Installation
Training 3
Configuring the iCAM IP Address
With the iCAM connected and powered on, enter in the URL for the iCAM in the
computer’s web browser address bar. http://192.168.5.100
At the log in screen enter the
Username: iCAM4000 and thepassword: iris4000. Click Login
IRIS Access System Configuration and Installation
Training 3
Steps for ChangingiCAM IP Address
At the menu select “Network Settings”
Enter the desired IP information then click OK to save and change the address
values.
IRIS Access System Configuration and Installation
Training 3
Steps for Changing iCAM IP Address (cont’d)
The IP Address is changed within seconds.
After each iCAM configuration the arp cache on the computermust be deleted.
Click on Start (in the Windows task bar)
Select Run
Type cmd
Press Enter
At the command prompt type: arp –d
Close the command prompt window.
Connect the next iCAM to be configured on the network andperform the
configuration to the next iCAM.
To avoid confusion you may want to remove the configurediCAMs until all are
completed.
IRIS Access System Configuration and Installation
Training 3
8. Preparing for Installation
Software Disk Insert – Starting point for all installations. Identifies the
documentation needed for installation and otherdocuments to refer to as
needed.
Hardware Guides – Steps for hardware installation and unit setupintegration
with other hardware.
Software Installation Guide – Step by step procedure forinstallation of the EAC
software.
Other documents such as the IrisAccess® 4000 and 3000Hardware Manuals,
User’s Manual, Upgrade docs etc.Areavailable on the software CD.
Technical support web site knowledgebase is available 24/7
IRIS Access System Configuration and Installation
Training 3
9. Installing the EAC Software
If the IP Address of the IrisServer computer is to be different from192.168.5.1
please changes the address at this time.
Install the IrisAccess® EAC Software on the IrisServer computer.
Follow the IrisAccess® EAC Software Installation Guide for software installation
and configuration.– CD Key is printed on the CD case label
If required the EAC software can be installed on additional computers to serve as
additional IrisEnroll, IrisManager, and IrisMonitor stations
IRIS Access System Configuration and Installation
Training 3
Configuring the ICU
Configuration of the ICU requires a serial connection between the IrisServer
computer and the ICU.
The ICU Serial Configuration Cable is included with each ICU. This has a 9 pin
female serial connector on one end and a 6 pin Wieland connector on the other.
The serial cable is only required when programming the IP Address and the
Security ID’s on the ICU.
IRIS Access System Configuration and Installation
Training 3
Configuring the ICU (cont’d)
The ICU is configured using the IrisICUAdmin utility.
When configuring the ICU with iCAMs use the IrisICUAdmin4000 program only.
Connect the ICU, but do notpower on the unit.
Double click on the IrisICUAdmin4000 icon. Select “New Installation” from the
menu.
Enter the Server IP Address (the address entered here will be the only computer
which will be allowed to communicate with the ICU) This must be the computer
which will have the IrisServer program running.
IRIS Access System Configuration and Installation
Training 3
IRIS Access System Configuration and Installation
Training 3
Enter the SIDs for all four channels.
Be sure to record what has been entered for SIDs. They will need to be entered in
IrisManager later and must match exactly.
Select the COM port of the IrisServer to which the Configuration cable is
connected.
Click Start, then Start and turn on the ICU.
During boot‐up the ICU will look for the serial connection and will automatically
start to download the configuration from the computer.
Connection and transfer should be complete within 80 seconds.
After the transfer is complete the serial cable may be removed .The rest of the
ICU configuration will use the network.
Before proceeding, connect the DCU or WIB to CH1 of the ICU main board. If
IRIS Access System Configuration and Installation
Training 3
using the DCU be sure that the DIP switches are in the down position. If using a
WIB the DIP switches may be left in the up position.
Continue the setup by entering the password for the ICU. The default password is
iris4000.
The ICU will connect over the network. Click Next to download the software into
the ICU.
After the configuration files have been downloaded from the ICU c lick on
configuration to modify the setting
The IP Address of the iCAM is entered into each channel of the ICU.
In this case channel 1 of this ICU will control the iCAM with the IP Address of
192.168.5.20
Repeat the IP Address entry for each channel of the ICU. If the channel is not
IRIS Access System Configuration and Installation
Training 3
being used you may disable it by un‐checking the Channel check mark.
Click next for the remaining configuration, and click Yes to reboot the ICU.
The remaining ICU’s maybe configured at this time by following the same
procedure.
Each ICU must have a unique IP Address and SIDs.
Do not connect more than one un‐configured ICU to the network at the same
time. This will cause an IP Address conflict on the network.
10.IrisServer
Starting IrisServer
IRIS Access System Configuration and Installation
Training 3
IrisServer Main Window
IrisServer should always be left running in the background (minimized).
Only one IrisServer per network.
Displays real‐time database and remote unit connection status.
Helpful for troubleshooting iCAM / ICU connection problems
IRIS Access System Configuration and Installation
Training 3
11.IrisManager
Configuring IrisManager
This part of the setup is also covered in the EAC Software QuickInstallation Guide.
Open the IrisManager program by double clicking the desktopicon.
The system configuration is performed in IrisManager / Creationmenu.
A default configuration is created for IrisEnroll, IrisManager, andIrisMonitor. The system is
configured to be able to run all programs from the IrisServer computer using the loopback
IPAddress (127.0.0.1)
Since we are using only the IrisServer computer for IrisEnroll, IrisManager, and IrisMonitor we
do not need to modify the default settings. If we did want to change settings we could click on
the New… button to add computers or Modify… to change existing settings.
When the applications are started for the first time, the loopbackIP address (127.0.0.1) may
need to be entered.
IrisEnroll4000 may require the SID to be entered:111111111111111.
IRIS Access System Configuration and Installation
Training 3
Name: Short descriptive name for the iCAM
ICU IP Address: The IP Address of the ICU which is controlling the iCAM.
Security ID: The Unique SID entered for the ICU channel during ICU configuration.
Description: Optional field for other information. Putting the iCAM IP Address here will assist in
troubleshooting.
IRIS Access System Configuration and Installation
Training 3
Channel ID: Channel of ICU which is controlling the iCAM.
Use Type: no effect
Model: Selects the icon type shown for this remote unit.
Complete the entries for each ICU and ICU channel that will make up the system.
IRIS Access System Configuration and Installation
Training 3
12.IrisEnroll4000
• Enrollment
• Identification
• Verification
• Card
• Live
IRIS Access System Configuration and Installation
Training 3
• Options
IRIS Access System Configuration and Installation
Training 3
IRIS Access System Configuration and Installation
Training 3
13.Identifying a User
IRIS Access System Configuration and Installation
Training 3
IRIS Access System Configuration and Installation
Training 3
IRIS Access System Configuration and Installation
Training 3
IRIS Access System Configuration and Installation
Training 3
14.IrisMonitor
IRIS Access System Configuration and Installation
Training 3
IRIS Access System Configuration and Installation
Training 3
IrisManager
IRIS Access System Configuration and Installation
Training 3
IRIS Access System Configuration and Installation
Training 3
IRIS Access System Configuration and Installation
Training 3
IRIS Access System Configuration and Installation
Training 3
IRIS Access System Configuration and Installation
Training 3
IRIS Access System Configuration and Installation
Training 3
IRIS Access System Configuration and Installation
Training 3
IRIS Access System Configuration and Installation
Training 3
IRIS Access System Configuration and Installation
Training 3
IRIS Access System Configuration and Installation
Training 3
IRIS Access System Configuration and Installation
Training 3
IRIS Access System Configuration and Installation
Training 3
IRIS Access System Configuration and Installation
Training 3
IRIS Access System Configuration and Installation
Training 3
15.Iris DBAdmin
IRIS Access System Configuration and Installation
Training 3
IRIS Access System Configuration and Installation
Training 3
IRIS Access System Configuration and Installation
Training 3
IRIS Access System Configuration and Installation
Training 3
16.Technical Support
Iris ID support web site: www.irisid.com, click on Support
&Service. Knowledgebase answers available 24 x 7 x 365.
IRIS Access System Configuration and Installation